Category: Silhouette Studio Tutorials

  • How to Convert Studio3 to SVG for Free

    Need to convert Studio3 to SVG file? No worries, you can use a free online converter by Ideas R Us to convert a .studio3 file to .svg.
    How to Convert Studio3 to SVG for Free - cuttingforbusiness.com.

    What is a .Studio3 File?

    A .studio3 file is a file format used by Silhouette Studio. Silhouette Studio is the design program for users to create designs to be cut on a Silhouette Portrait or Silhouette Cameo machine.

    How to Open a .Studio3 File?

    .Studio3 files can only be opened with Silhouette Studio.

    What About .Studio Files?

    Before .studio3 files, Silhouette Studio files were saved as .studio files. .Studio is not used anymore.

    Why Would You Need to Convert .Studio3 to .SVG?

    Since .Studio3 files can only be used in Silhouette Studio, you would need to convert your .studio3 file to use in other programs like Adobe Illustrator.

    You would also want to convert your .studio3 to .svg if you wanted to sell a design made in Silhouette Studio. .Studio3 files are proprietary and cannot be sold. I’ve written an article about selling SVG files.

    How to Use the Ideas R Us Studio3 to SVG Converter

    1. Visit the Ideas R Us Software website. I know in 2023 that it looks a little outdated, but it still works well.
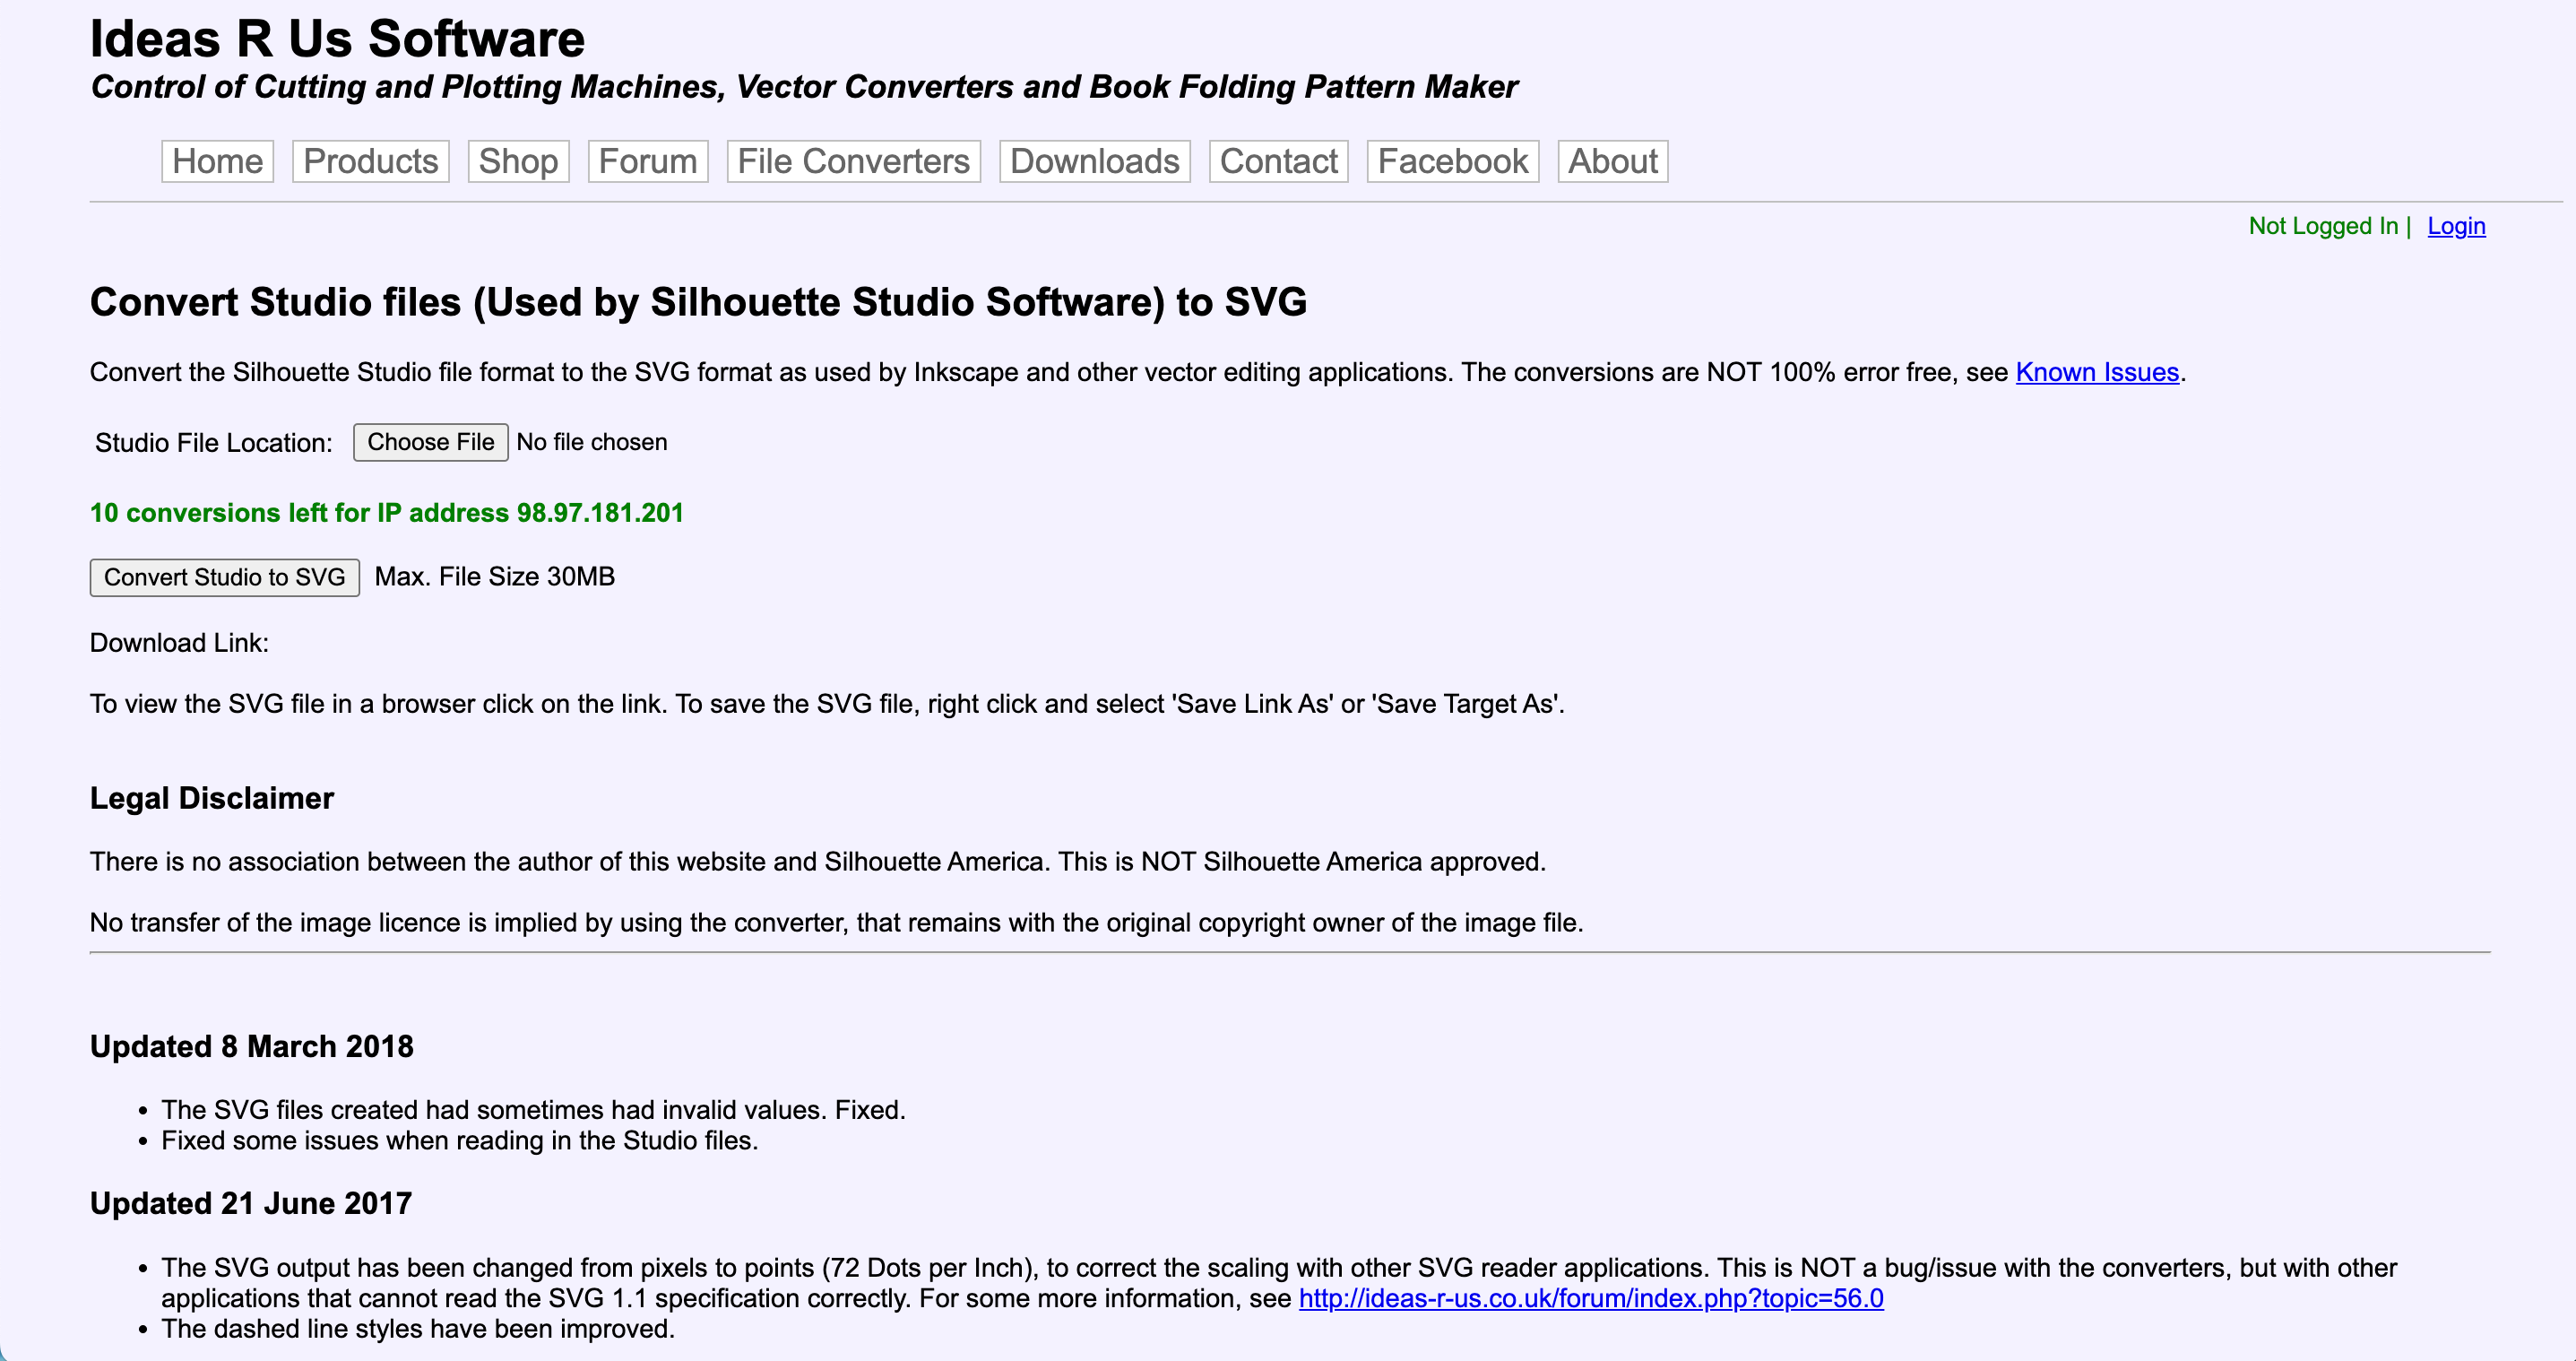
    Ideas R Us Studio to SVG Converter Screenshot - cuttingforbusiness.com.

    2. Click the ‘Choose File’ button and select your file.
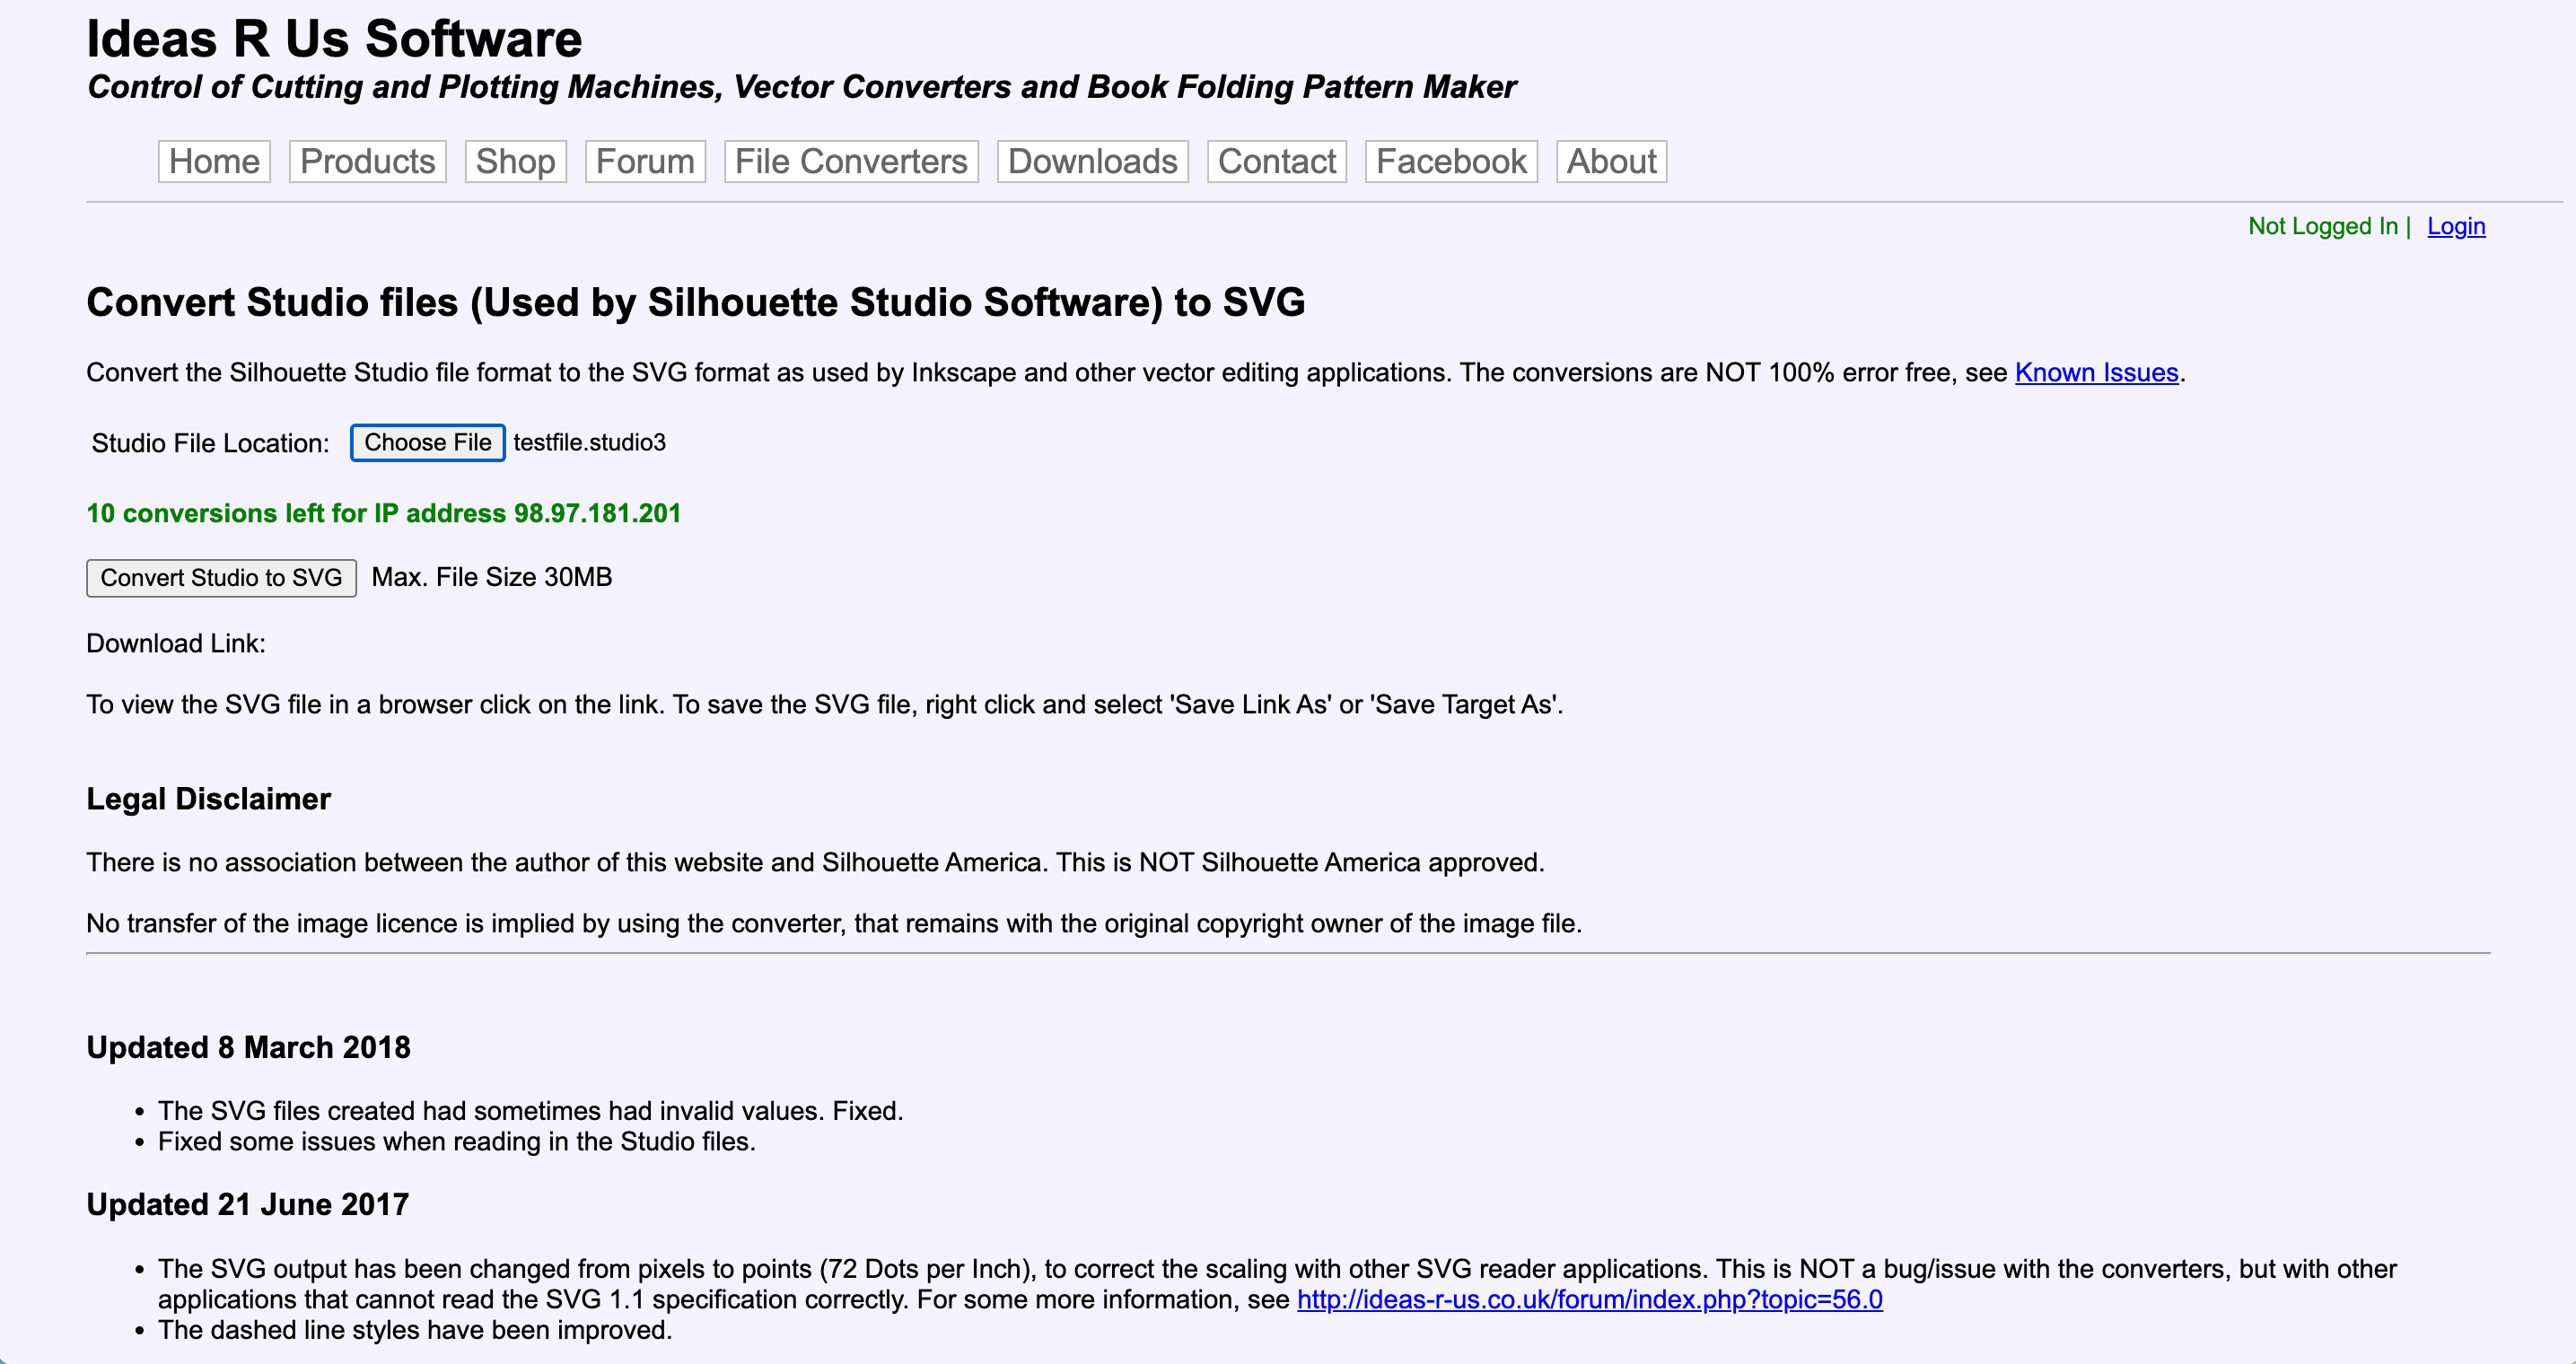
    Ideas R Us Studio to SVG Converter Screenshot - cuttingforbusiness.com.

    3. Click the ‘Convert Studio to SVG’ button. A download link will appear beneath the button after it processes.
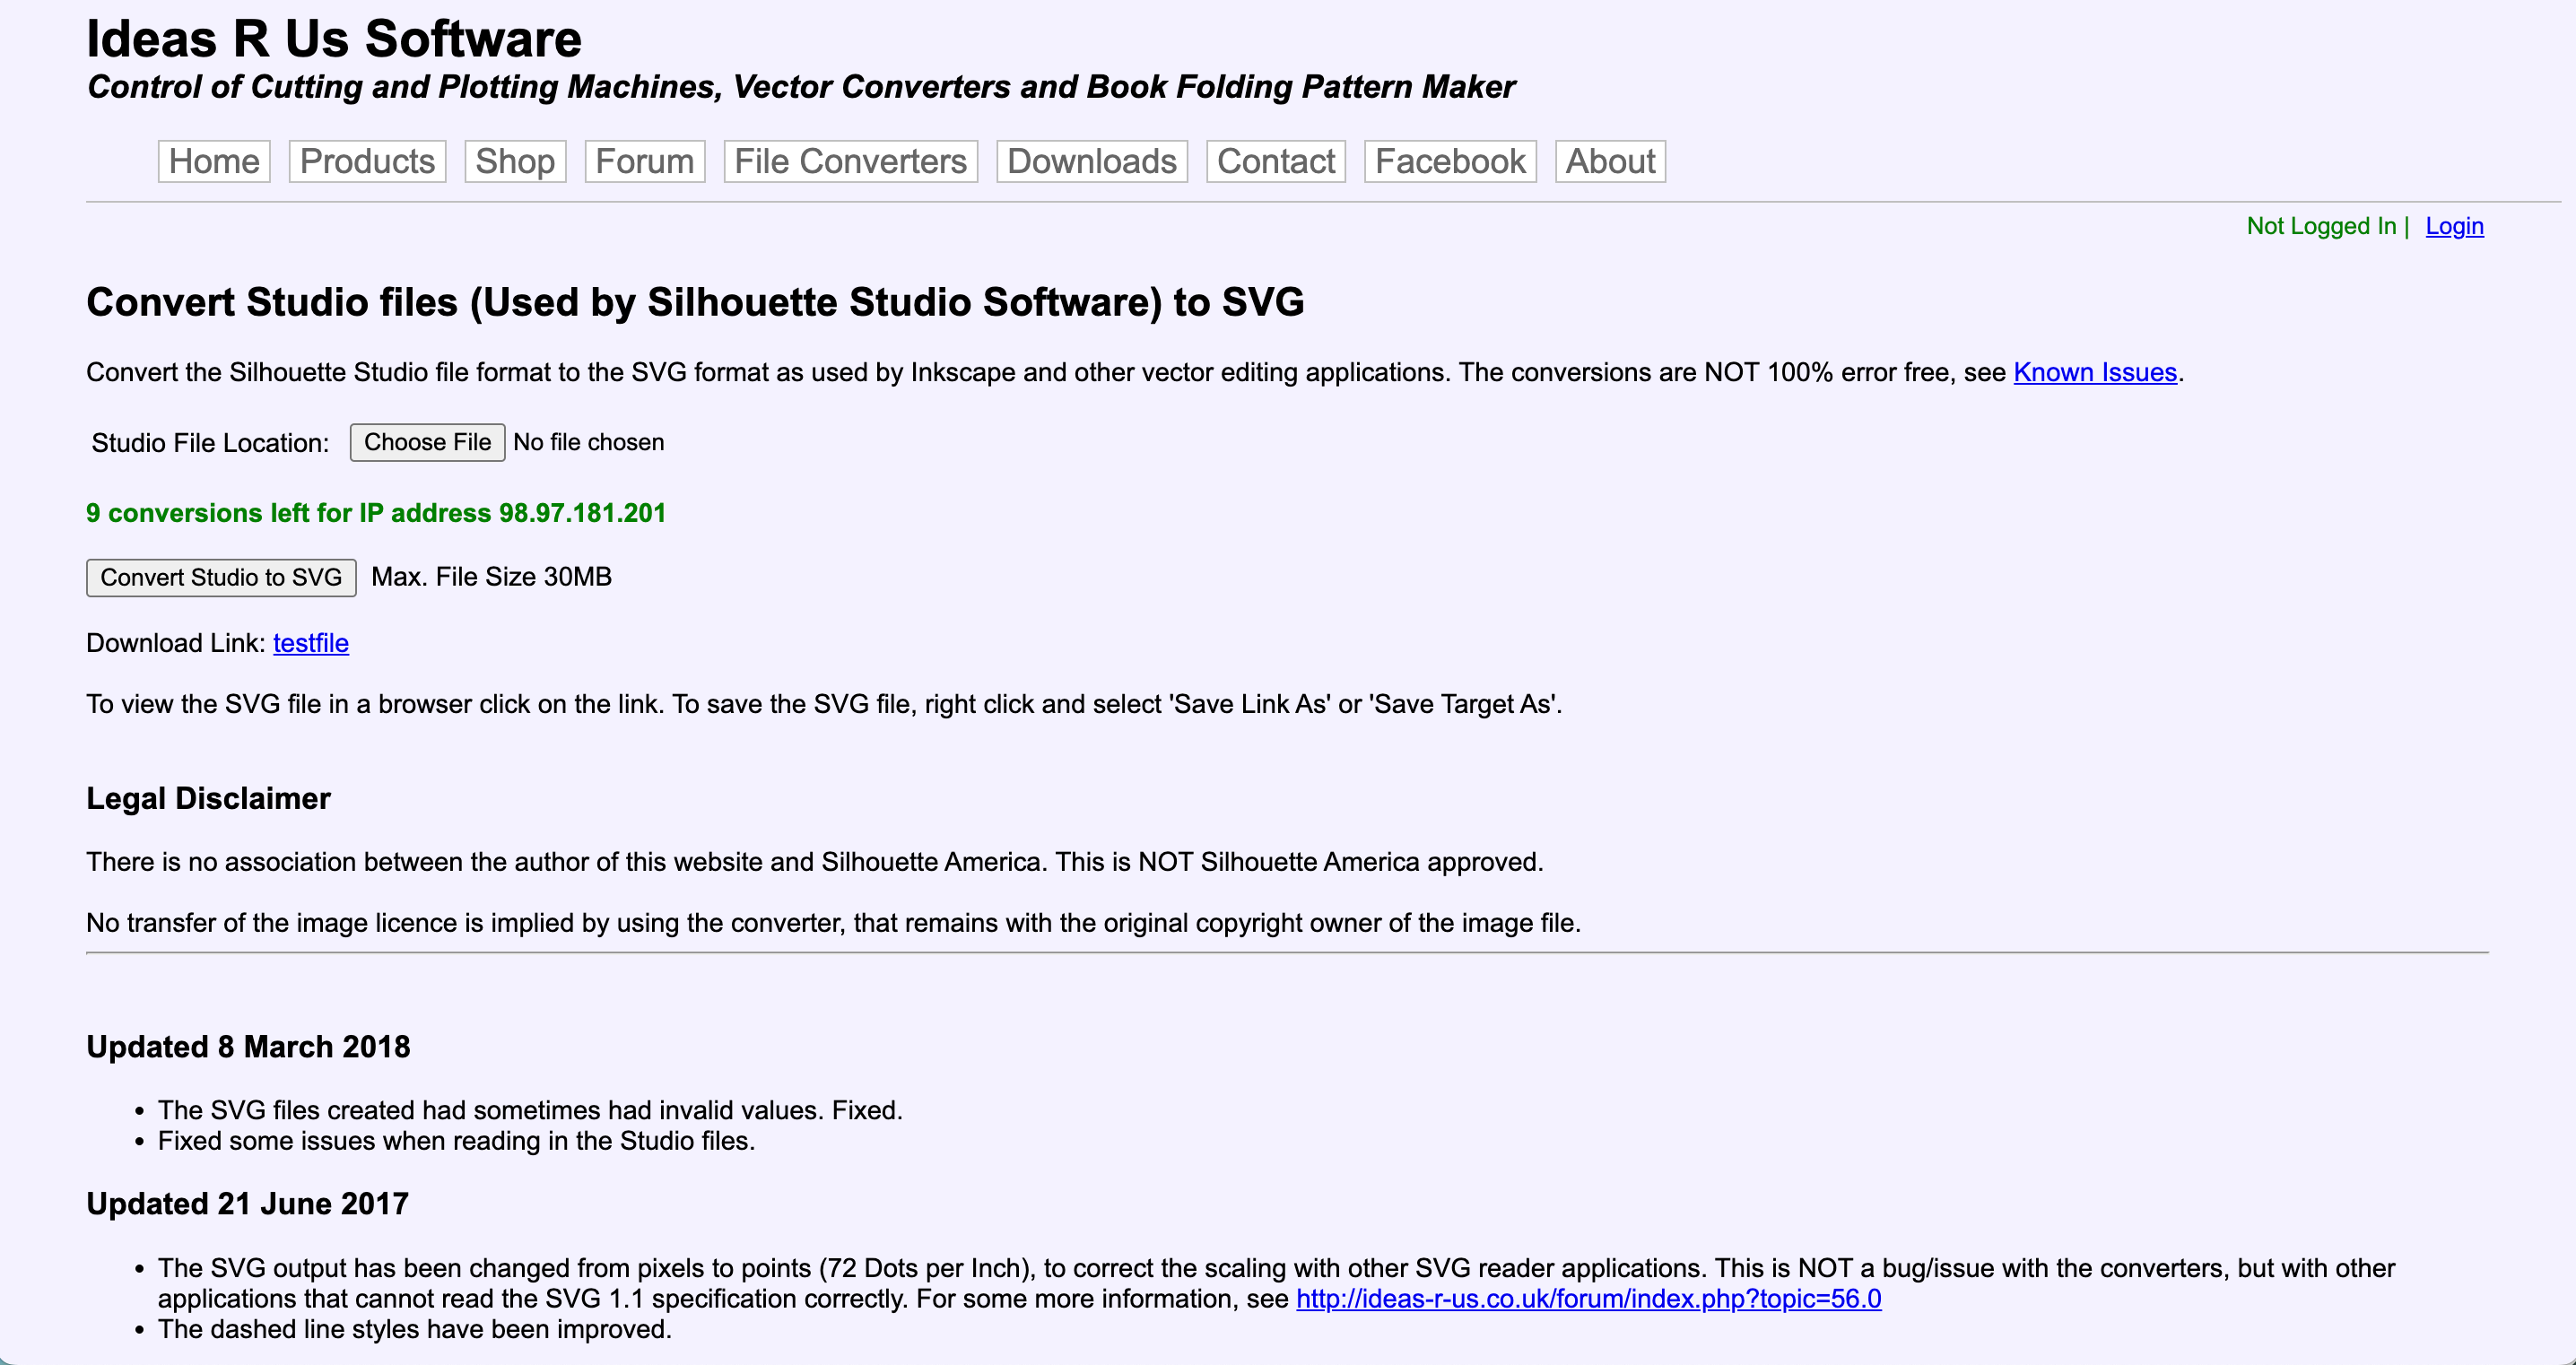
    Ideas R Us Studio to SVG Converter Screenshot - cuttingforbusiness.com.

    4. Click the link to download the converted file. The file will appear in a browser window. You will right click it, then select ‘Save As’ to download your file.
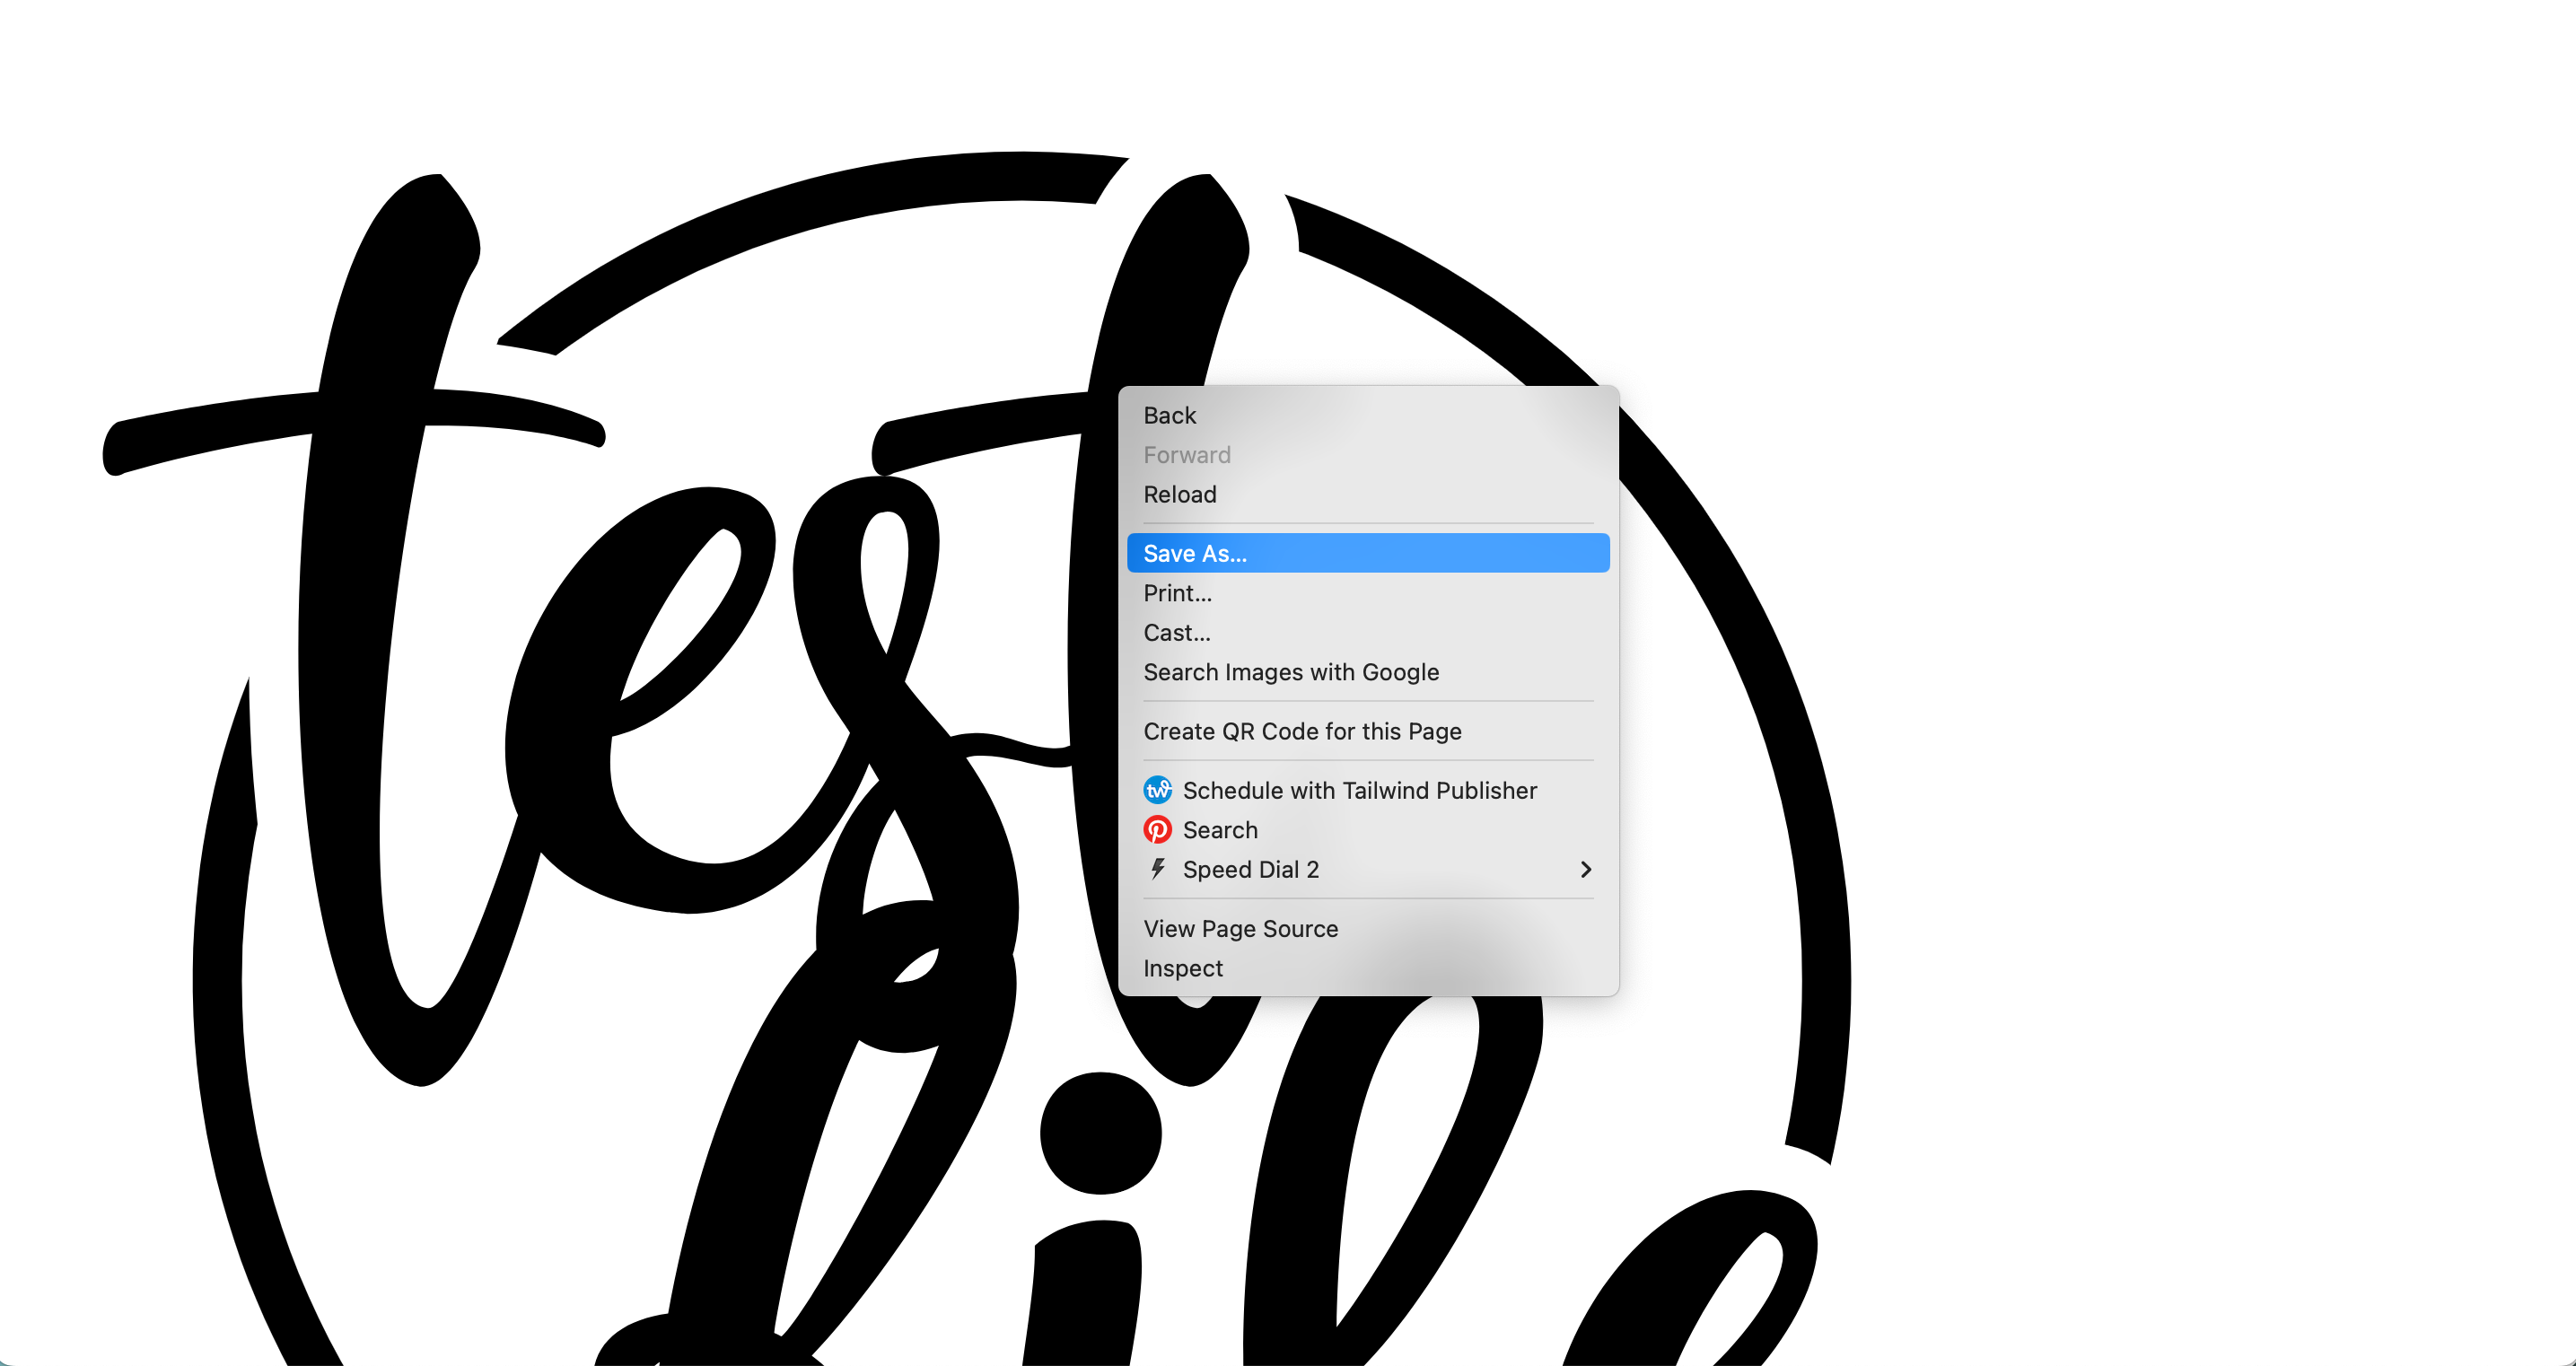
    Ideas R Us Studio to SVG Converter Screenshot - cuttingforbusiness.com.

    How Much Does the Ideas R Us Studio to SVG Converter Cost

    The Ideas R Us Studio to SVG Converter is free. The free option allows 10 conversions per day. Conversion credits are available a la carte if you need more than 10 conversions per day.

    My Experience with the Ideas R Us Studio to SVG Converter

    I tried several files and had mixed results. On simple files (those with just text or simple line designs) the converter worked fast and well.

    For a few layered designs, it didn’t work as well. Ideas R Us does have a list of known issues.

    Save as an SVG in Silhouette Studio

    You can prevent the need to convert files by saving your design as an SVG right in Silhouette Studio. Pick up a copy of Silhouette Studio Business Edition. It allows you to save as an SVG.

    Inkscape Alternative

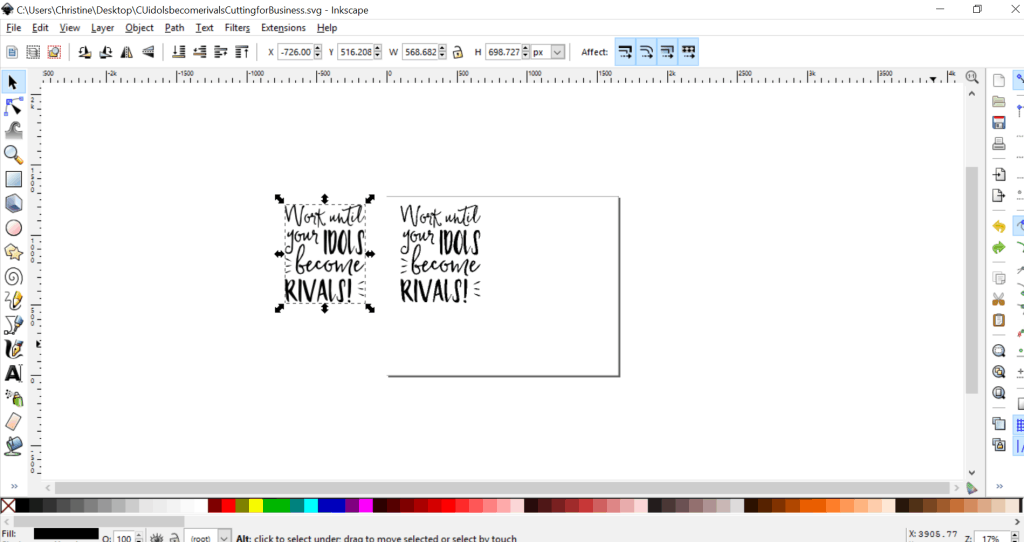
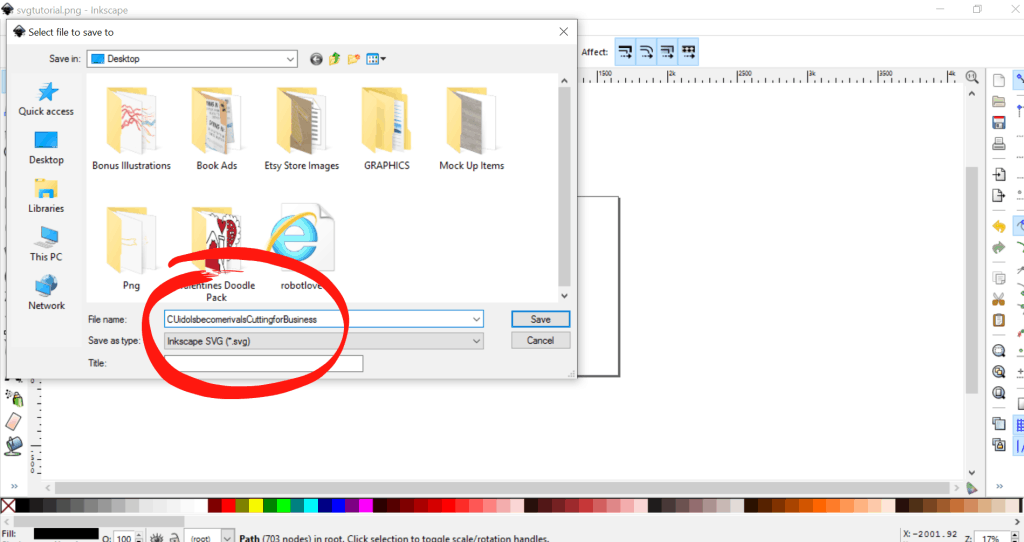
    If you need complex .studio3 files saved as an SVG, use my Inkscape tutorial.
  • How to save as .png, .jpg, or .pdf in Silhouette Studio (Mac Version)

    This article has been recently updated to account for changes after the release of Silhouette Studio Version 4.

    Silhouette America recently rolled out an update to Silhouette Studio that allows users to save in more formats.

    Save as .JPEG and .PDF with Silhouette Studio Business Edition

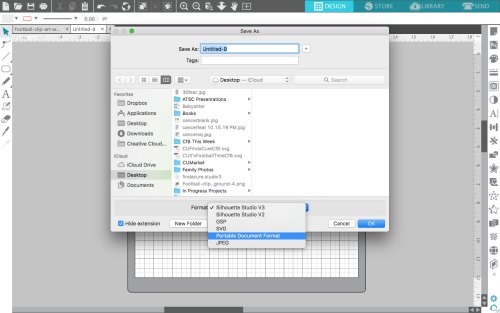
    To Save as .JPEG or .PDF in Silhouette Studio, go to ‘File’, ‘Save As’, ‘Save to Hard Drive’, then select either .JPEG or .PDF under ‘Format’ as shown below. You’ll need Silhouette Studio Business Edition – buy it here.

    How to save as .png, .jpg, or .pdf in Silhouette Studio (Mac Version) - by cuttingforbusiness.com

    Save as .PNG

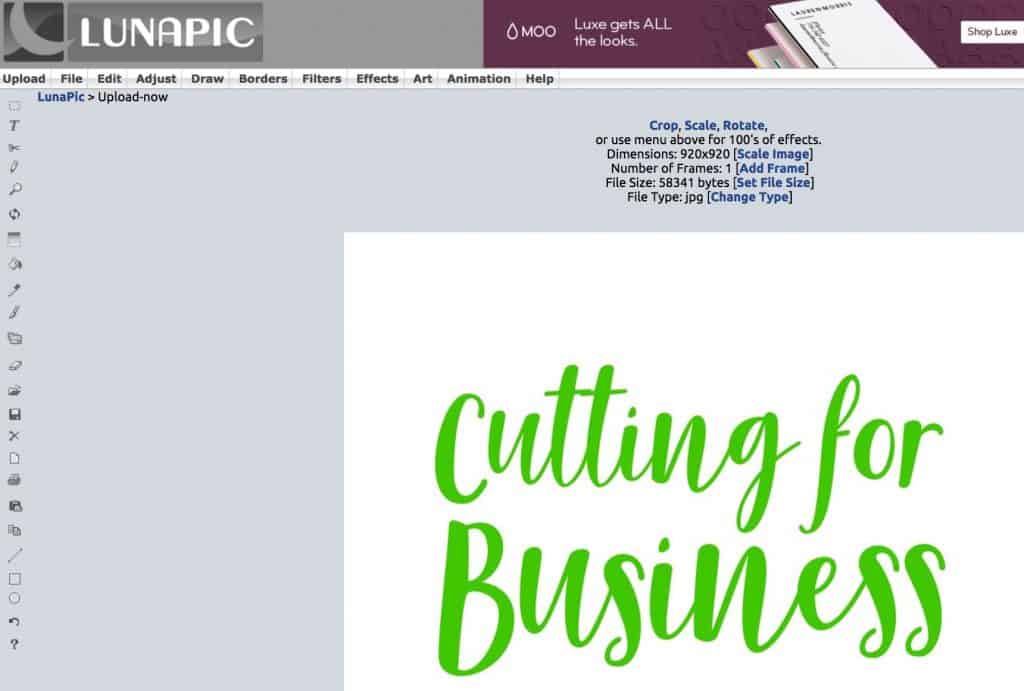
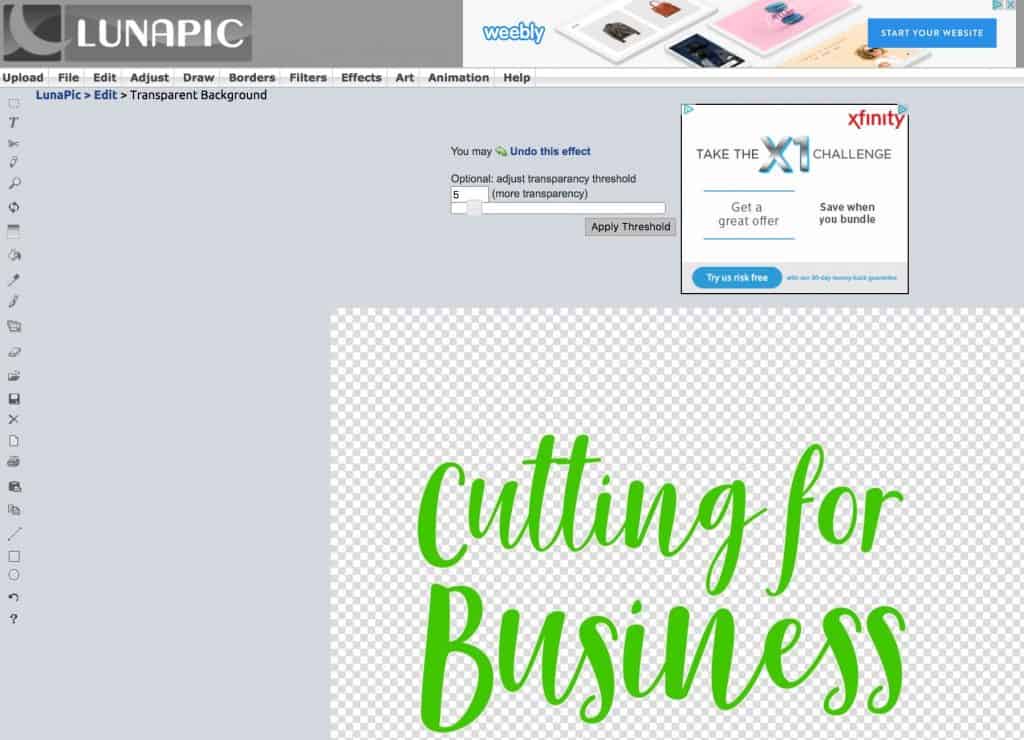
    Do you need to save as a .PNG with a transparent background? The easiest way to do this is to first save as a .JPEG, then remove the white background using Lunapic.com. Here’s how:

    1. Visit Lunapic.com and upload your .JPEG image using the ‘Browse’ button.How to save as .png, .jpg, or .pdf in Silhouette Studio (Mac Version) - by cuttingforbusiness.com
    2. Navigate to ‘Edit’, ‘Transparent Background’. Simply click on the white background and let Lunapic magically remove it for you! When the background is checkered instead of white, save it using the button near the bottom.How to save as .png, .jpg, or .pdf in Silhouette Studio (Mac Version) - by cuttingforbusiness.com

    That’s it! It’s just that fast and easy!

    Don’t have Business Edition?

    If you don’t have Silhouette Studio Business Edition, you can take a screenshot of your design. On a MAC computer, hold down ‘Command’ + ‘Shift’ + ‘4’. If you need a transparent background, you can do so using the above instructions for lunapic.com. On Windows 10, use the snipping tool. Hold down ‘ALT’ + ‘M’ to launch it. Again, if you need, you can use lunapic.com to create a PNG with a transparent background.

    Save this post to Pinterest:

    How to save as .png, .jpg, or .pdf in Silhouette Studio (Mac Version) by cuttingforbusiness.com courtesy of happyhootparties.etsy.com

  • How to Create Your Own Designs in Silhouette Studio

    Yesterday we talked about designing with fonts. Today, we are going to talk about creating your own designs in Silhouette Studio.

    Why create your own designs?

    Shops are likely to sell more when their products are unique and different from other shops. This is shown clearly by looking at big box retailers. You usually don’t see retailers selling inhouse brands that are the same as other retailers. Unfortunately, when you buy designs online you usually aren’t buying an exclusive design and your competition could be selling the same exact design!

    How can you create your own designs?

    First, stop tracing stuff! If you didn’t create the file you are tracing – you cannot use it in your business without a license or permission. There a number of ways you can create your own designs, including: drawing on a piece of paper and scanning it into your computer, drawing with a Wacom tablet and pen or Livescribe pen (or any other similar device), or using the drawing tools available in Silhouette Studio. But what if you can’t draw? First, don’t feel bad and know that you aren’t alone – I don’t draw well, either.

    My favorite secret to creating in Silhouette Studio:

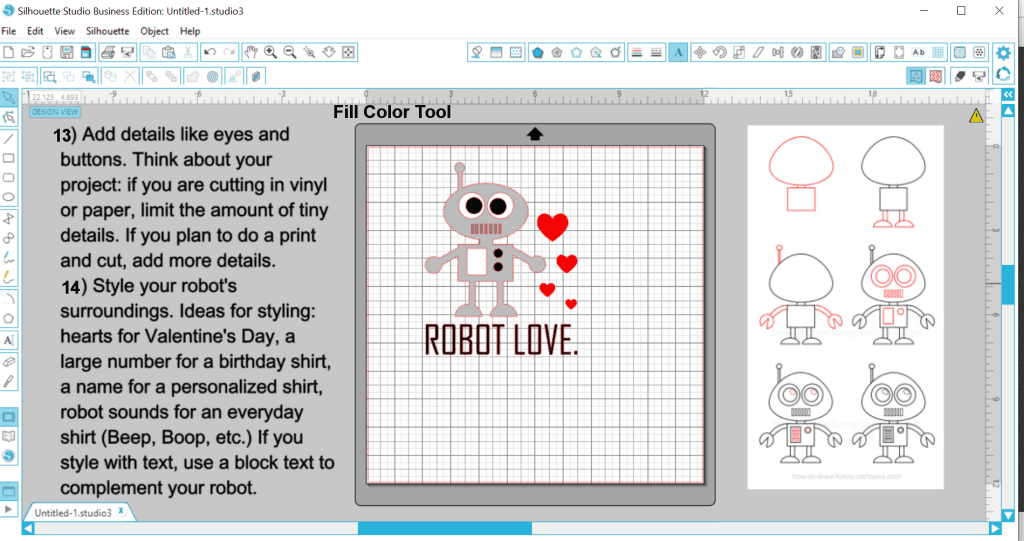
    Think of whatever you want to draw and break it into basic shapes. For a non-art inclined crafter, this can be difficult – if not impossible for me to think of any object in basic shapes. What’s a crafter to do? Use Google! I usually search for whatever I want to design and the words “how to draw _______ step by step”. For example, if I want to design a robot shirt I would search “how to draw a robot step by step”. Several tutorials pop up and I can choose my favorite one. This is important: the actual tutorial you choose is not too important – it’s the step breakdown that you need.

    Since we are already talking robots, grab your computer and let’s draw a robot together.

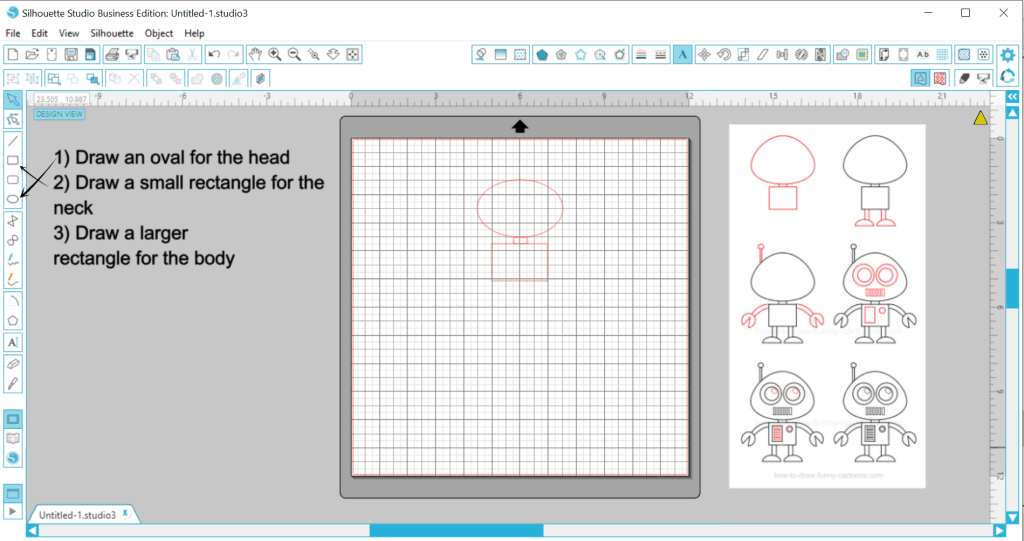
    How Create a Robot in Silhouette Studio Step by Step

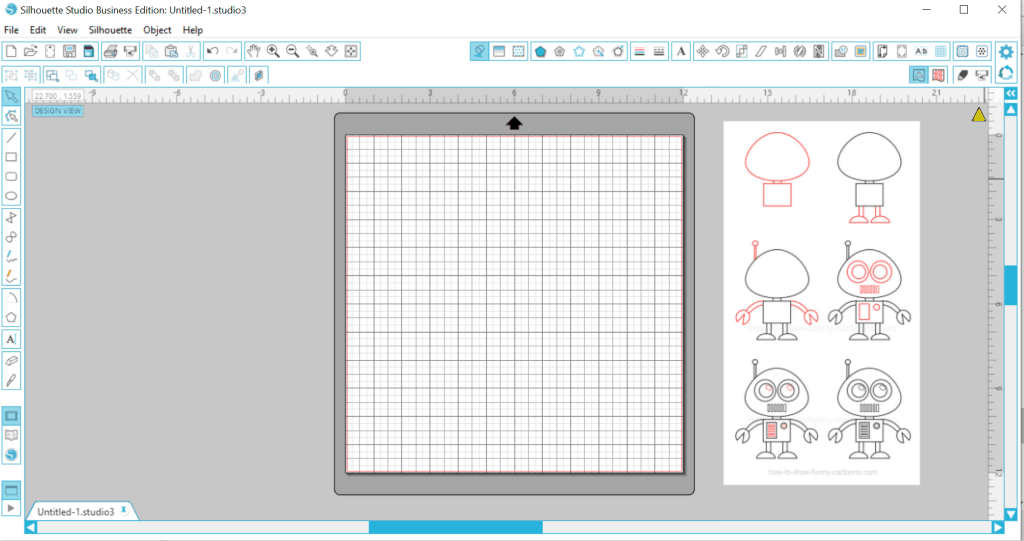
    To start, open your step by step tutorial you found online in Silhouette Studio. I used a tutorial found here.

    How to Create Your Own Designs in Silhouette Studio - Silhouette Cameo Curio - by cuttingforbusiness.com

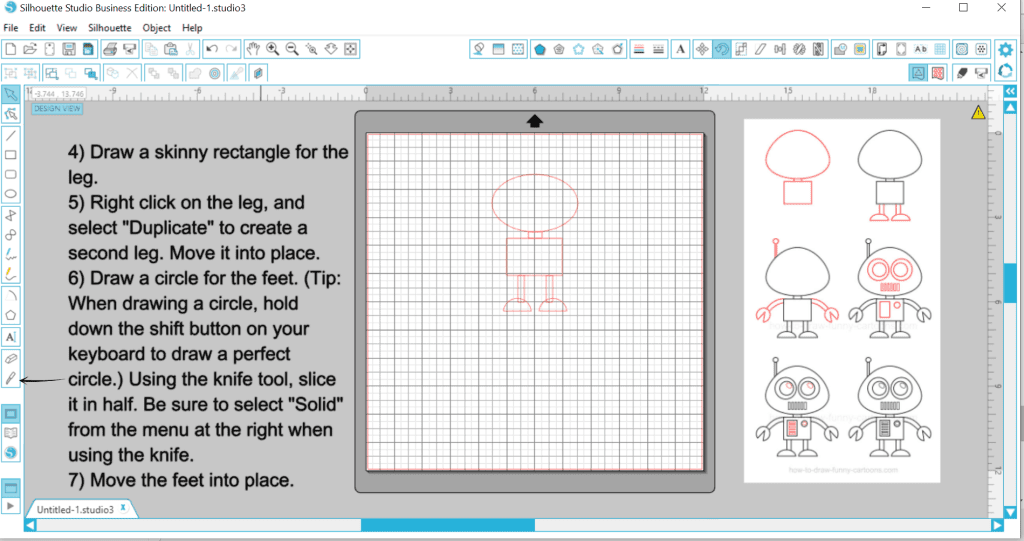
    How to Create Your Own Designs in Silhouette Studio - Silhouette Cameo Curio - by cuttingforbusiness.com

    How to Create Your Own Designs in Silhouette Studio - Silhouette Cameo Curio - by cuttingforbusiness.com

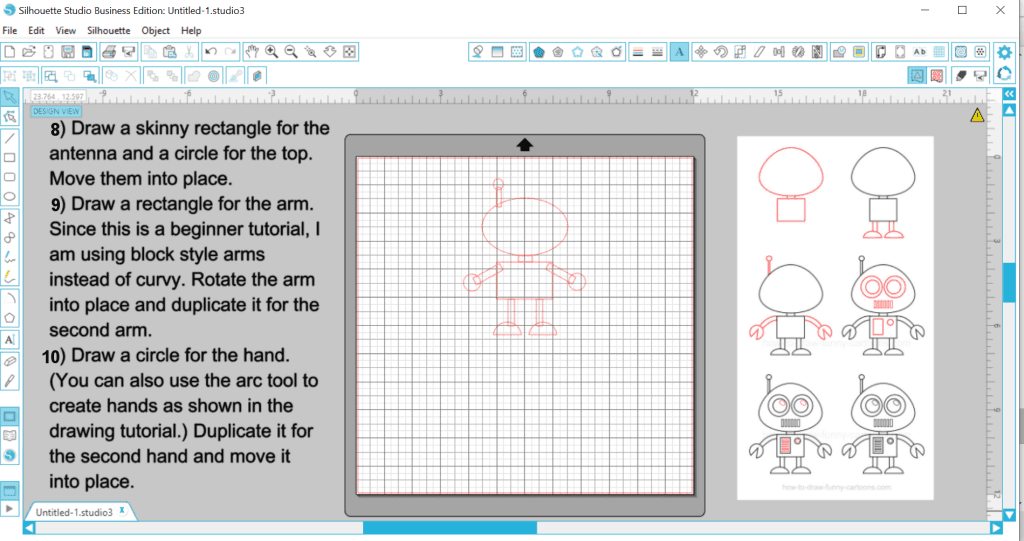
    How to Create Your Own Designs in Silhouette Studio - Silhouette Cameo Curio - by cuttingforbusiness.com

    How to Create Your Own Designs in Silhouette Studio - Silhouette Cameo Curio - by cuttingforbusiness.com

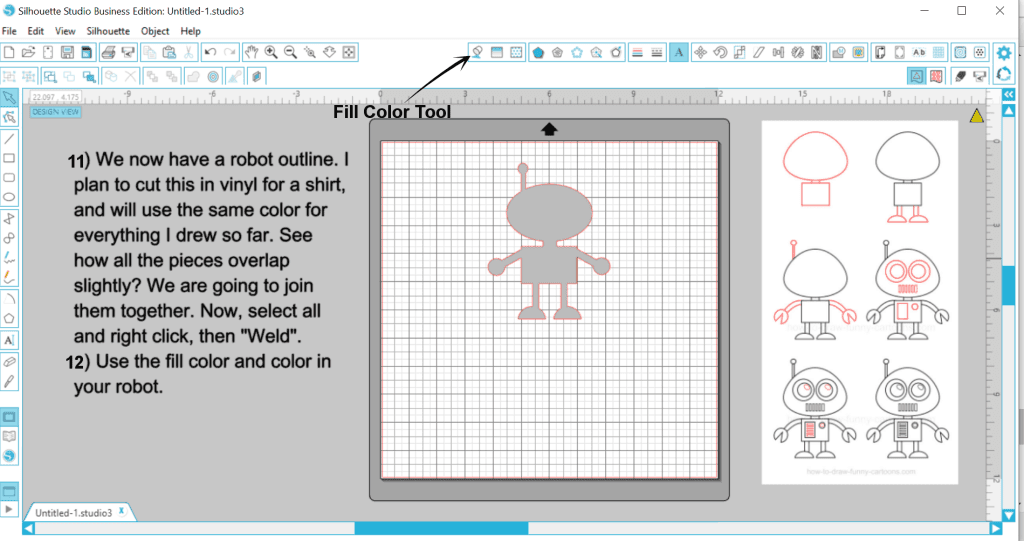
    How to Create Your Own Designs in Silhouette Studio - Silhouette Cameo Curio - by cuttingforbusiness.com

    That’s it! Remember, you are now able to draw just about anything. Search “how to draw _______ step by step” for a step breakdown. As you draw your design, change and modify the design to fit your needs and style.

    I hope that next time someone asks you where you got your design you can proudly say, “I drew it!” If you thought it was helpful, please share this post on social media by hovering over the image below.

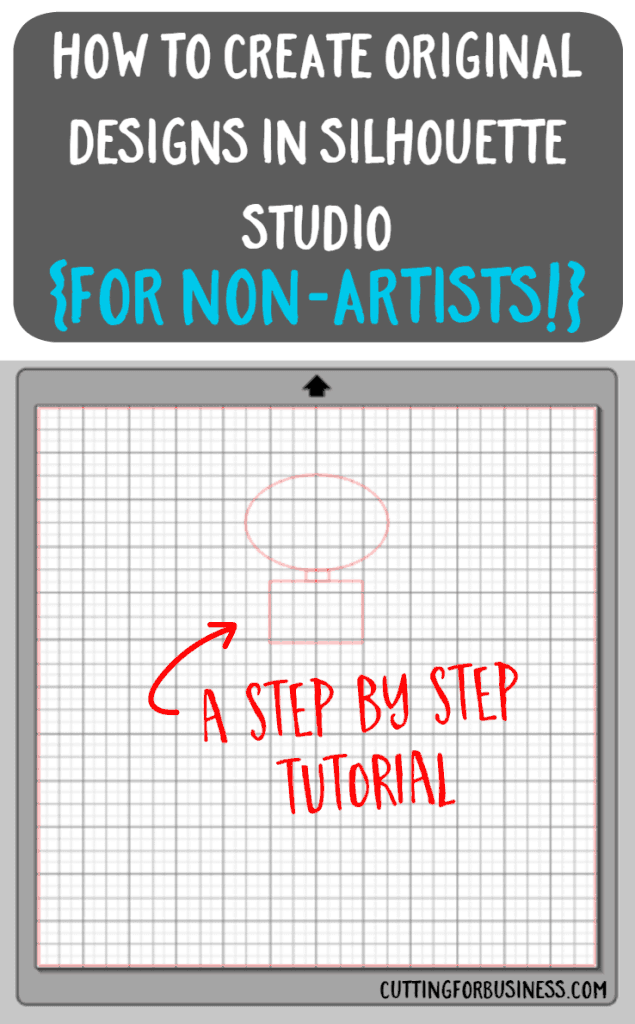
    How to Create Your Own Designs in Silhouette Studio - a tutorial by cuttingforbusiness.com

  • How to Save as .png, .jpg, or .pdf from Silhouette Studio

    This article has been recently updated to account for changes after the release of Silhouette Studio Version 4.

    Silhouette America recently rolled out an update to Silhouette Studio that allows users to save in more formats.

    Save as .JPEG and .PDF from Business Edition

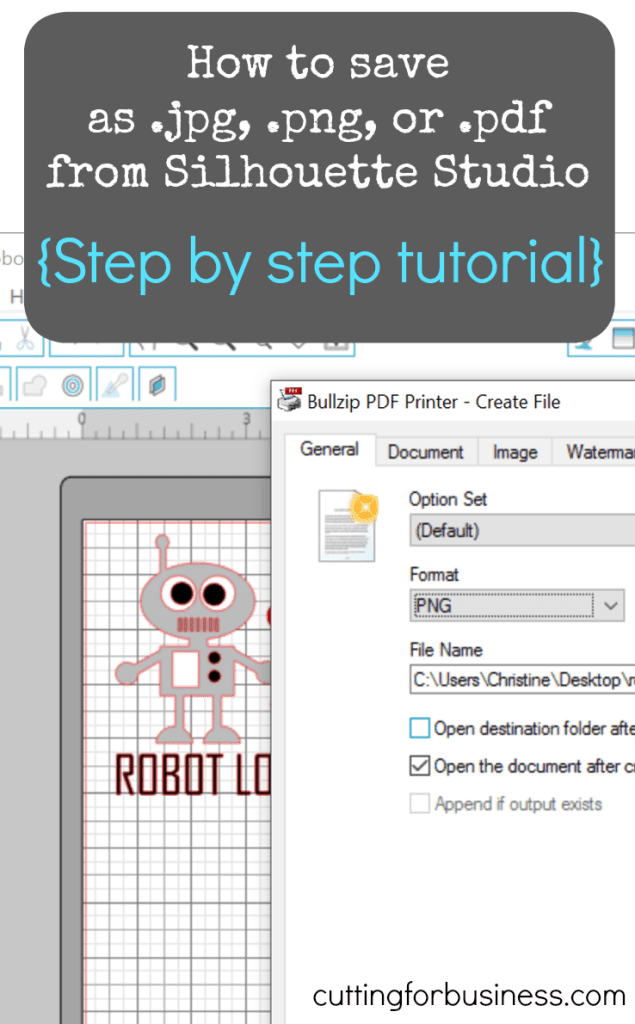
    To Save as .JPEG or .PDF in Silhouette Studio, go to ‘File’, ‘Save As’, ‘Save to Hard Drive’, then select either .JPEG or .PDF under ‘Format’ as shown below. You’ll need Silhouette Studio Business Edition – buy it here.

    How to save as .png, .jpg, or .pdf in Silhouette Studio (Mac Version) - by cuttingforbusiness.com

    Save as .PNG

    Do you need to save as a .PNG with a transparent background? The easiest way to do this is to first save as a .JPEG, then remove the white background using Lunapic.com. Here’s how:

    1. Visit Lunapic.com and upload your .JPEG image using the ‘Browse’ button.How to save as .png, .jpg, or .pdf in Silhouette Studio (Mac Version) - by cuttingforbusiness.com
    2. Navigate to ‘Edit’, ‘Transparent Background’. Simply click on the white background and let Lunapic magically remove it for you! When the background is checkered instead of white, save it using the button near the bottom.How to save as .png, .jpg, or .pdf in Silhouette Studio (Mac Version) - by cuttingforbusiness.com

    That’s it! It’s just that fast and easy!

    Don’t have Business Edition?

    If you don’t have Silhouette Studio Business Edition, you can take a screenshot of your design. On a MAC computer, hold down ‘Command’ + ‘Shift’ + ‘4’. If you need a transparent background, you can do so using the above instructions for lunapic.com. On Windows 10, use the snipping tool. Hold down ‘ALT’ + ‘M’ to launch it. Again, if you need, you can use lunapic.com to create a PNG with a transparent background.

    Share this image on your favorite social media network by hovering over it with your mouse or tapping it on your device:

    How to Save as .png, .jpg, or .pdf from Silhouette Studio for your Silhouette Cameo - by cuttingforbusiness.com

  • How to Convert .studio or .studio3 to .svg from Silhouette Studio

    Update: The tutorial below gives you more control over your SVG. If you would simply like to convert a simple .studio3 file to SVG automatically, head to this post. Also, if you are working in Silhouette Studio, saving as an SVG has been added to Business Edition!


    So far this week I’ve covered designing with text, creating your own designs, and saving as a .jpg, .png, or .pdf from Silhouette Studio. Today, let’s wrap up our discussion on designing with a quick tutorial on saving as an SVG from Silhouette Studio.

    What is an SVG?

    An SVG is a file format that stands for scalable vector graphic. Fancy words that just mean that the image can be resized without losing the quality (no grainy or blurry images). You can open SVG in any vector program, Silhouette Studio Designer Edition, or Cricut Design Space.

    Tutorial to save as SVG in Silhouette Studio

    1. First, prep your design in Silhouette Studio.
      • Color your image black and white. This tutorial works best when you have a high contrast image (black) and a solid background (white).
      • Group all pieces of your image together.
      • Turn off the grid on your virtual mat. Sometimes the grid lines will show if you don’t turn them off.
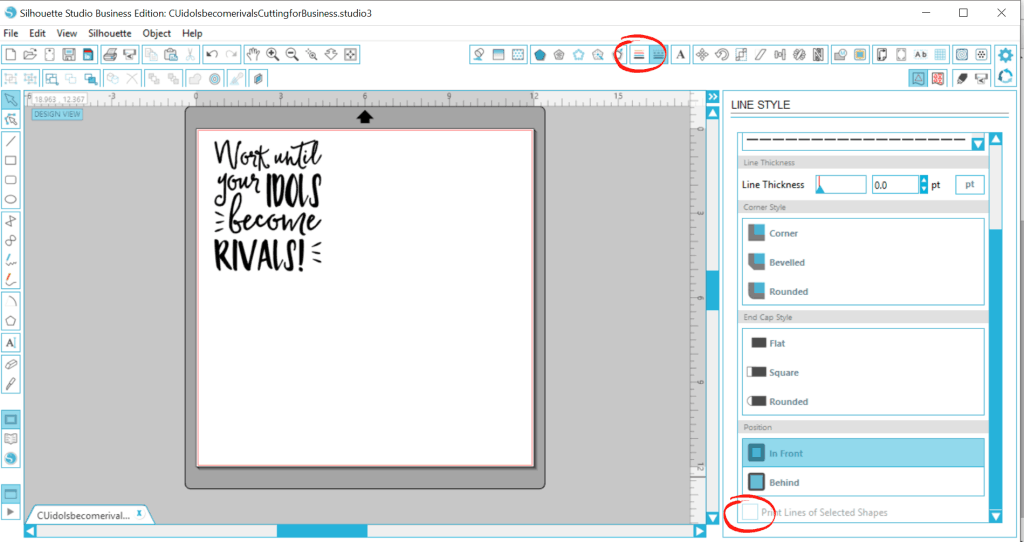
      • Color your lines black and make sure that the “Print Lines of Selected Shapes” is unchecked as shown in the image below: How to Convert .studio or .studio3 to .svg from Silhouette Studio
    2. Now, you’ll need to use a PDF Printer to virtually print your design to your computer in .png format. I covered gave a step by step tutorial to do this yesterday.
    3. Download and install Inkscape (it’s free).
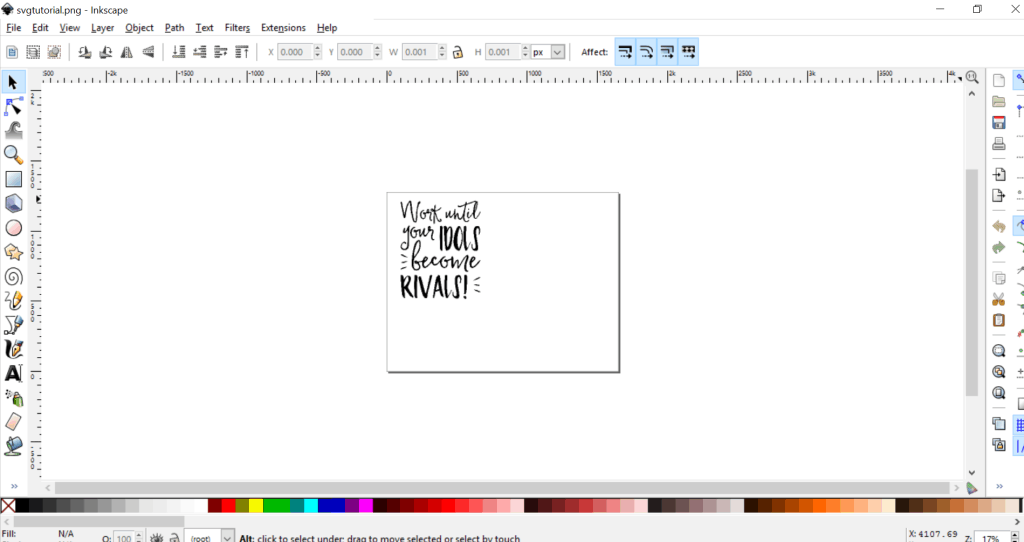
    4. Open your image in Inkscape. If you get a window to select the .png input, choose “Embed” and click “OK”.How to Convert .studio or .studio3 to .svg from Silhouette Studio by cuttingforbusiness.com
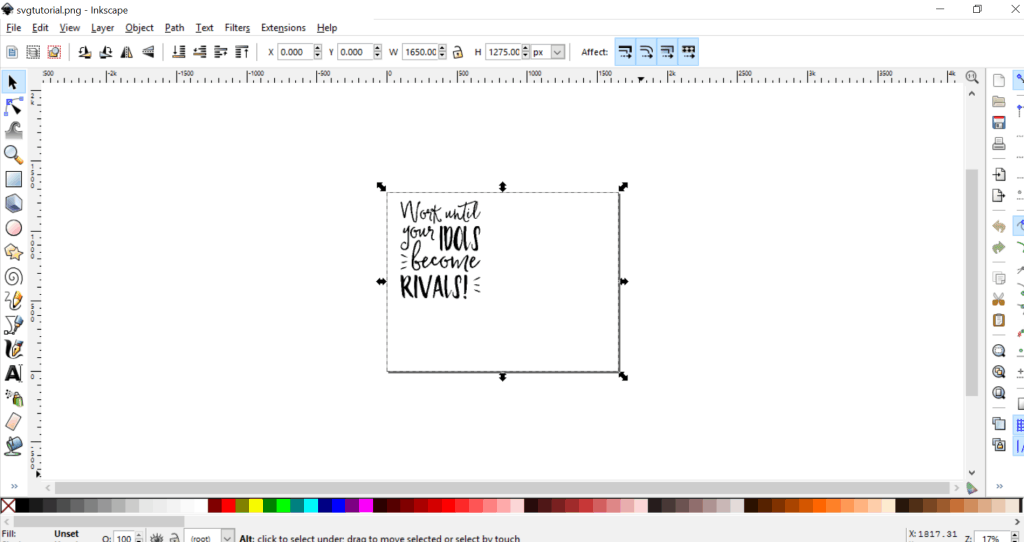
    5. Press “Control + A” to select all. You’ll notice that arrows appear around your project. How to Convert .studio or .studio3 to .svg from Silhouette Studio by cuttingforbusiness.com
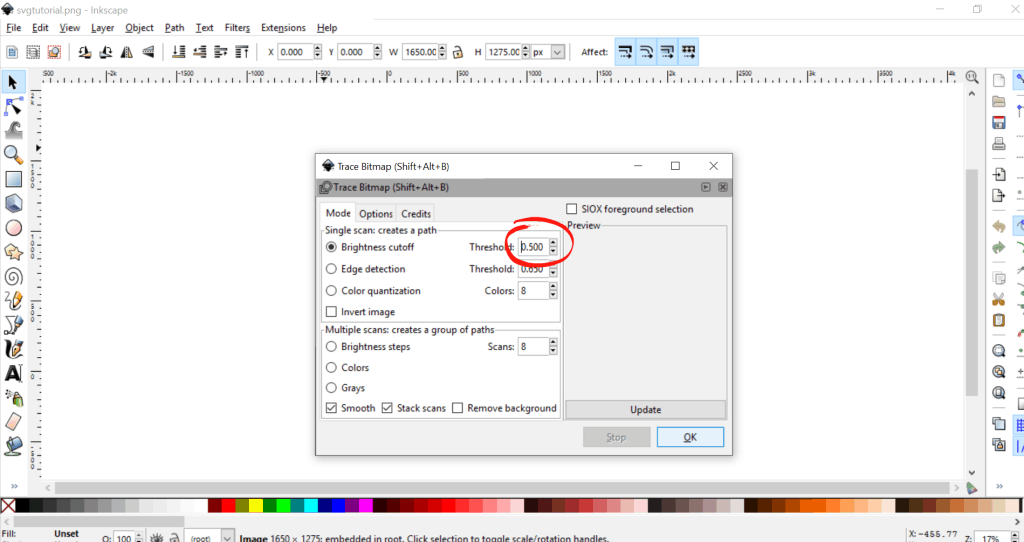
    6. From the menu at the top of Inkscape, go to “Path”, then “Trace Bitmap”. A pop up window will appear and you’ll will want to change the “Brightness cutoff” to .5 or higher. Then, click “Ok”. Close the “Trace Bitmap” box.How to Convert .studio or .studio3 to .svg from Silhouette Studio by cuttingforbusiness.com
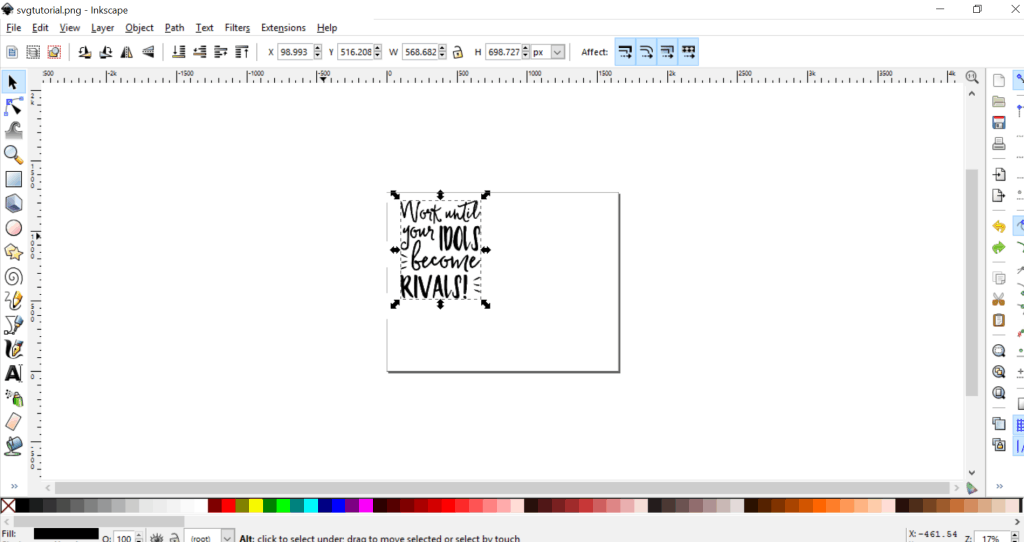
    7. Inkscape just worked it’s magic! It might not look different but you’ve now got two copies of your design. You’ll notice that the black arrows have moved and are now tightly around your design. How to Convert .studio or .studio3 to .svg from Silhouette Studio by cuttingforbusiness.com
    8. Drag the top copy of the design over to reveal both designs. Delete the one in the back by selecting it and pressing your keyboard delete button. Drag your design back onto the project mat.How to Convert .studio or .studio3 to .svg from Silhouette Studio by cuttingforbusiness.com
    9. Go to “File”, “Save As” to save your file. Be sure that “Inkscape SVG” is selected, name your file, and click “Save”. How to Convert .studio or .studio3 to .svg from Silhouette Studio by cuttingforbusiness.com

    That’s it, you are ready to go with your new SVG!

    How to Convert .studio or .studio3 to .svg from Silhouette Studio by cuttingforbusiness.com