Category: Silhouette Studio Tutorials

  • Design Tutorial: 5 Types of Faux Leather Earring Cut Files in Silhouette Studio

    I’m sure you know, but it seems like faux leather earrings cut with a Silhouette or Cricut are taking the internet by storm. I love the trend and if you don’t design many of your own cut files, these are a great place to start because they are created with simple shapes.

    I’ve said it so many times on the blog before: One way to make your business stand out during trends is to create your own cut files. Of course, doing so insures that your products look different from other small businesses. Let’s get designing!

    Design Tutorial: 5 Type of Faux Leather Earrings in Silhouette Studio

    (Note: The following tutorials use Business Edition, version 4.1.206.)

    Design 1: Teardrop

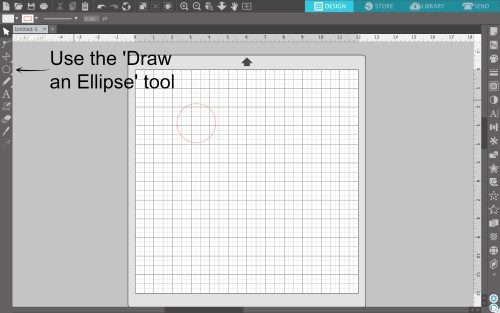
    1. Once in Silhouette Studio, draw a circle using the ‘Draw an Ellipse’ tool. DIY Design Tutorial: 5 Types of Faux Leather Earrings in Silhouette Studio for Cameo, Portrait, or Curio - By cuttingforbusiness.com
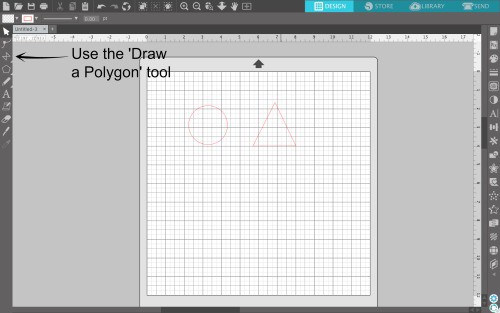
    2. Draw a triangle using the ‘Draw a Polygon’ tool. DIY Design Tutorial: 5 Types of Faux Leather Earrings in Silhouette Studio for Cameo, Portrait, or Curio - By cuttingforbusiness.com
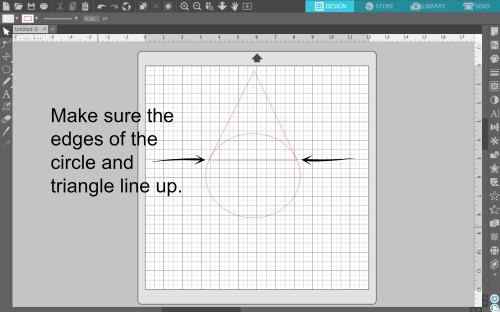
    3. Drag the circle onto the bottom of the triangle. Resize the circle if needed to make sure that it lines up with the bottom corners of the triangle. DIY Design Tutorial: 5 Types of Faux Leather Earrings in Silhouette Studio for Cameo, Portrait, or Curio - By cuttingforbusiness.com
    4. Select both the triangle and the circle and right click, then select ‘Weld”. DIY Design Tutorial: 5 Types of Faux Leather Earrings in Silhouette Studio for Cameo, Portrait, or Curio - By cuttingforbusiness.com
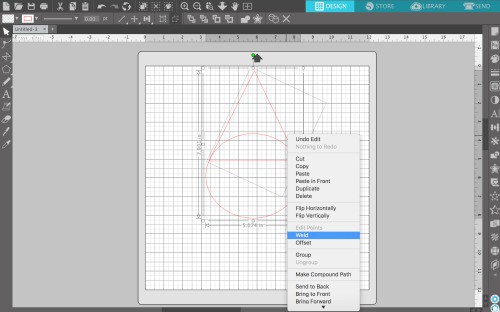
    5. Draw another small circle. This time, hold down the ‘Shift’ key to keep it round (instead of oval). Drag this circle where you want to attach the earring hardware. DIY Design Tutorial: 5 Types of Faux Leather Earrings in Silhouette Studio for Cameo, Portrait, or Curio - By cuttingforbusiness.com
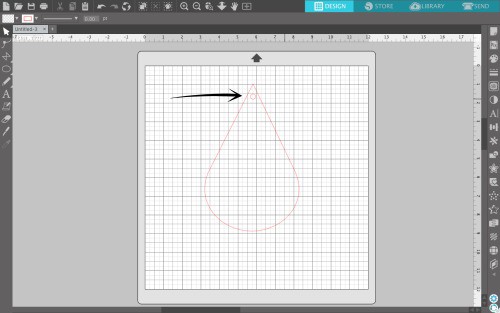
    6. Finally, ‘Select All’ (Command/Control + A on your keyboard). Then, right click and ‘Group’, then right click and ‘Duplicate’. You’ve got two earring designs ready to resize then cut.

    Design 2: Hollow Teardrops

    Now that you’ve mastered the simple teardrop, let’s make it hollow. This is perfect for layered style earrings!

    1. Using the above tutorial, let’s go back to step 4. After welding your triangle and circle, you’ll end up with something like this: DIY Design Tutorial: 5 Types of Faux Leather Earrings in Silhouette Studio for Cameo, Portrait, or Curio - By cuttingforbusiness.com
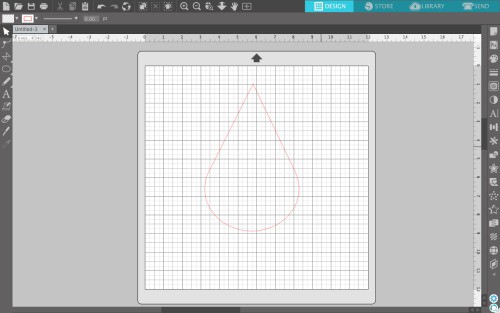
    2. Now, you’ll use the ‘Offset Panel’ (‘Panels’, ‘Offset’) to do an internal offset. Experiment with the offset amount to get the result you want. Click the ‘Apply’ button when you are satisfied. DIY Design Tutorial: 5 Types of Faux Leather Earrings in Silhouette Studio for Cameo, Portrait, or Curio - By cuttingforbusiness.com
    3. After you add a small circle for the earring hardware, this hollow teardrop is ready to cut.

    Design 3: Striped Hollow Teardrops

    Enjoying designing? After you create the hollow teardrop above, add some rectangles across it to make stripes.

    1. From the last step in the tutorial above, select both teardrops, then navigate to ‘Object’, ‘Modify’, and ‘Subtract’. The inner teardrop will be subtracted from the outer teardrop leaving only an outline. DIY Design Tutorial: 5 Types of Faux Leather Earrings in Silhouette Studio for Cameo, Portrait, or Curio - By cuttingforbusiness.com
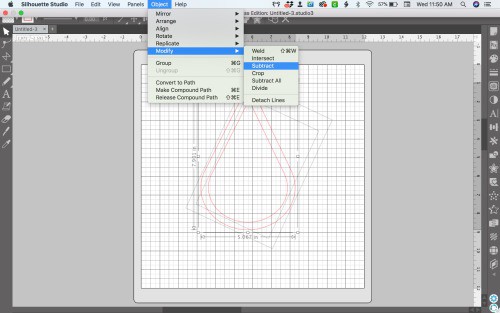
    2. Draw a skinny rectangle and duplicate it a few times. DIY Design Tutorial: 5 Types of Faux Leather Earrings in Silhouette Studio for Cameo, Portrait, or Curio - By cuttingforbusiness.com
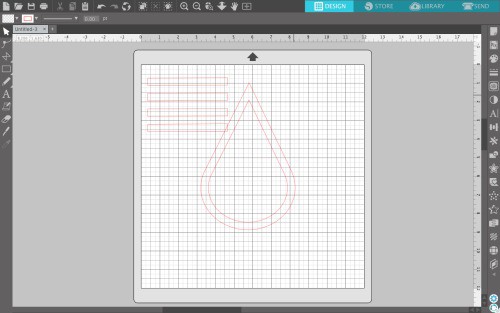
    3. Drag your rectangles across your teardrop outline – spacing them evenly. DIY Design Tutorial: 5 Types of Faux Leather Earrings in Silhouette Studio for Cameo, Portrait, or Curio - By cuttingforbusiness.com
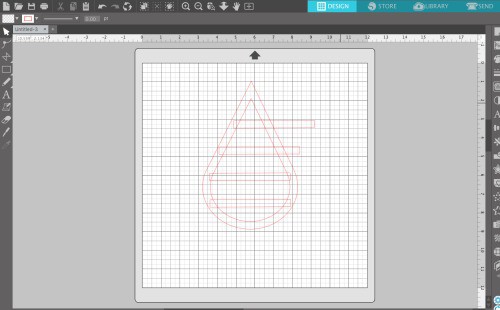
    4. Use the knife tool to cut off the excess of the rectangles, then delete the excess. DIY Design Tutorial: 5 Types of Faux Leather Earrings in Silhouette Studio for Cameo, Portrait, or Curio - By cuttingforbusiness.com
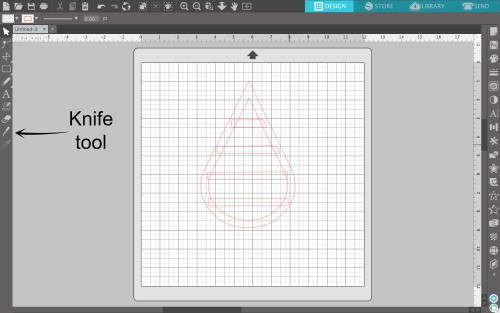
    5. ‘Select all’ the pieces, then right click to ‘Weld’ them together. DIY Design Tutorial: 5 Types of Faux Leather Earrings in Silhouette Studio for Cameo, Portrait, or Curio - By cuttingforbusiness.com
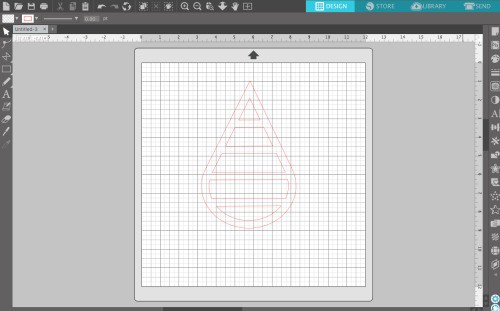
    6. After you add a hole for the earring wire to attach to and resize, this file is ready to cut.

    Design 4: Diagonal Striped Square

    Tired of the teardrop shape? Try out a square.

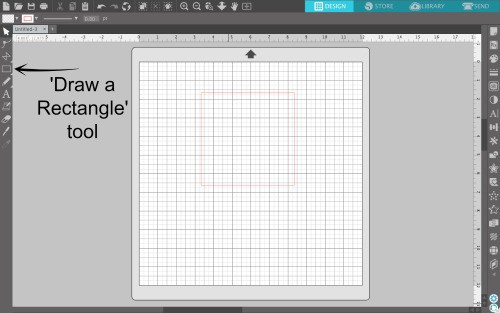
    1. Draw a box using the ‘Draw a Rectangle’ tool. Hold down the ‘Shift’ key to make it square. DIY Design Tutorial: 5 Types of Faux Leather Earrings in Silhouette Studio for Cameo, Portrait, or Curio - By cuttingforbusiness.com
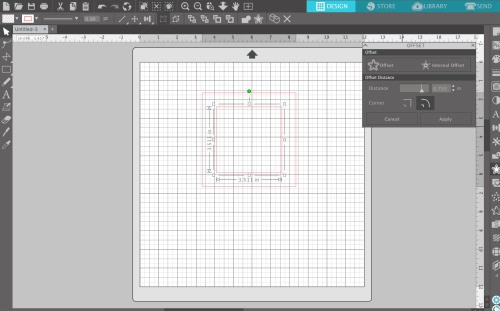
    2. Use the offset function as we did in Design 2 above to create a second box inside the first. DIY Design Tutorial: 5 Types of Faux Leather Earrings in Silhouette Studio for Cameo, Portrait, or Curio - By cuttingforbusiness.com
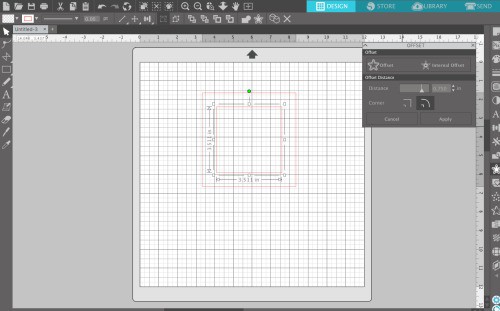
    3. Navigate to ‘Object’, ‘Modify’, and ‘Subtract’. The inner box will be subtracted from the outer box leaving only an outline. DIY Design Tutorial: 5 Types of Faux Leather Earrings in Silhouette Studio for Cameo, Portrait, or Curio - By cuttingforbusiness.com
    4. Draw several rectangles and duplicate them. DIY Design Tutorial: 5 Types of Faux Leather Earrings in Silhouette Studio for Cameo, Portrait, or Curio - By cuttingforbusiness.com
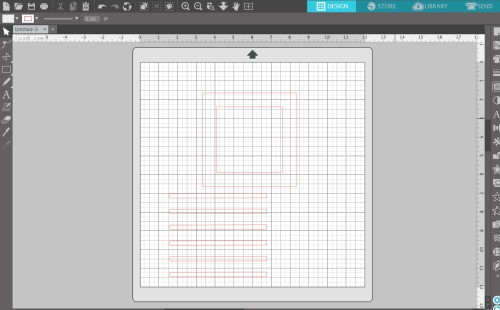
    5. Draw them across your square design – spaced evenly. DIY Design Tutorial: 5 Types of Faux Leather Earrings in Silhouette Studio for Cameo, Portrait, or Curio - By cuttingforbusiness.com
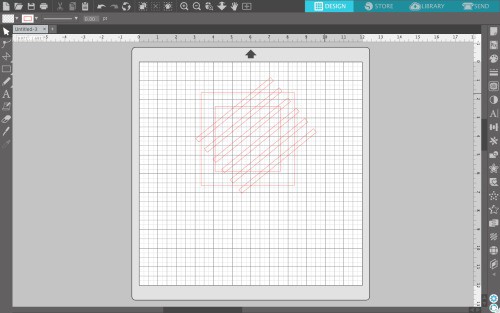
    6. Use the knife tool to cut away the excess diagonal lines. DIY Design Tutorial: 5 Types of Faux Leather Earrings in Silhouette Studio for Cameo, Portrait, or Curio - By cuttingforbusiness.com
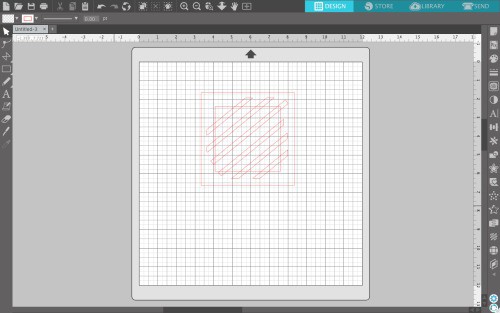
    7. ‘Select all’ the pieces, then right click to ‘Weld’ them together. DIY Design Tutorial: 5 Types of Faux Leather Earrings in Silhouette Studio for Cameo, Portrait, or Curio - By cuttingforbusiness.com
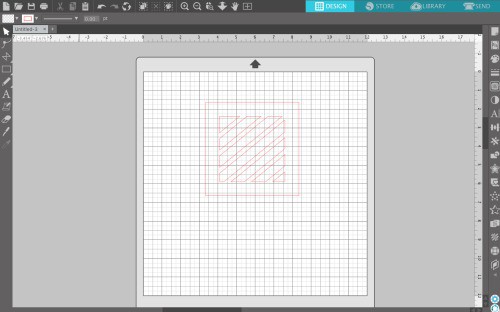
    8. After you add a hole for the earring wire to attach to and resize, this file is ready to cut.

    Design 5: Rectangle Cut Out

    One more before you go!

    1. Prefer something a little different? Start with a skinny rectangle. DIY Design Tutorial: 5 Types of Faux Leather Earrings in Silhouette Studio for Cameo, Portrait, or Curio - By cuttingforbusiness.com
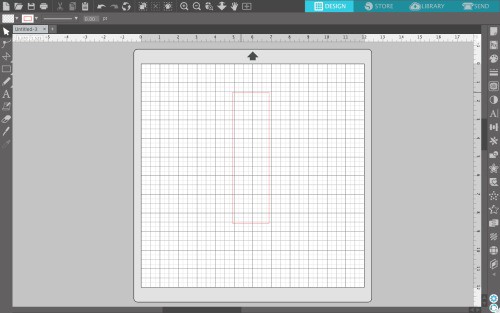
    2. Add any shape to the bottom center (circle, heart, leaf, and so on). Then subtract it from the rectangle. DIY Design Tutorial: 5 Types of Faux Leather Earrings in Silhouette Studio for Cameo, Portrait, or Curio - By cuttingforbusiness.com
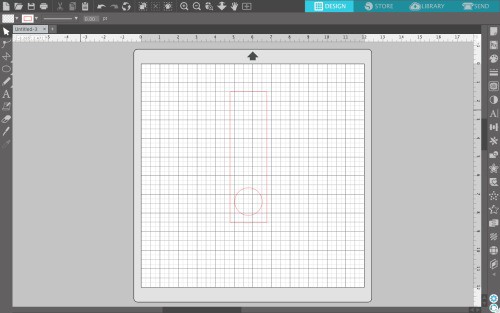
    3. After you add a hole for the earring wire to attach to and resize, this file is also ready to cut.

    As you can see, there’s no need to buy cut files to create earrings in Silhouette Studio. All you need is a few minutes.

    Don’t forget: I’ve got free earring card templates to mount your earrings on after you create them in this post.

    Need help with the actual earring assembly? Hop over to this tutorial by Lycia.

    Love design tutorials? I can only keep them coming if you save the image below to Pinterest.
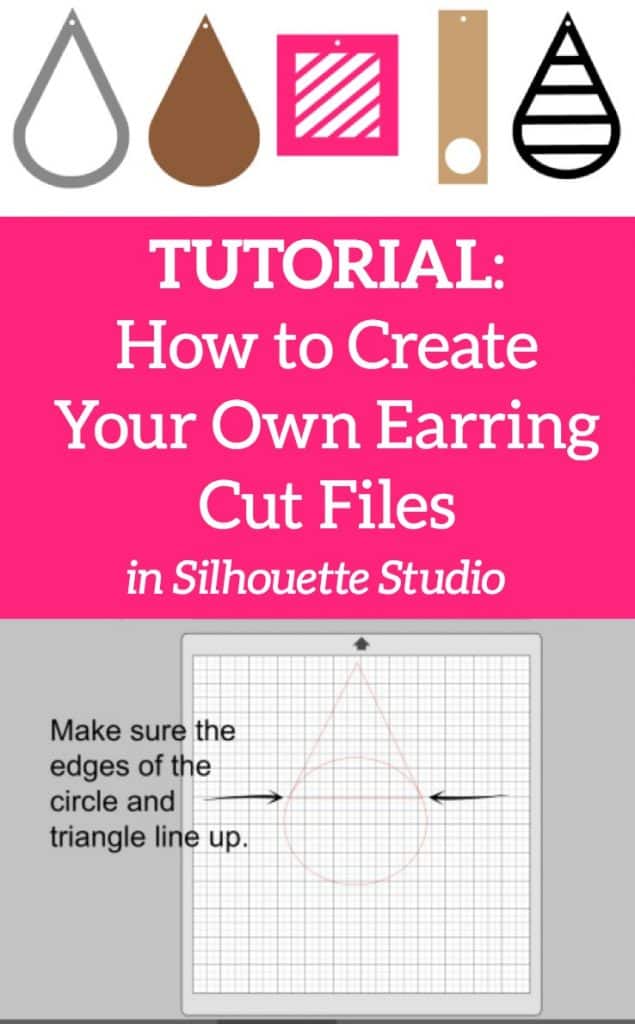
    DIY Design Tutorial: 5 Types of Faux Leather Earring Cut Files in Silhouette Studio for Cameo, Portrait, or Curio - By cuttingforbusiness.com

  • Tutorial: How to Create Faux Zentangle Cut Files in Silhouette Studio

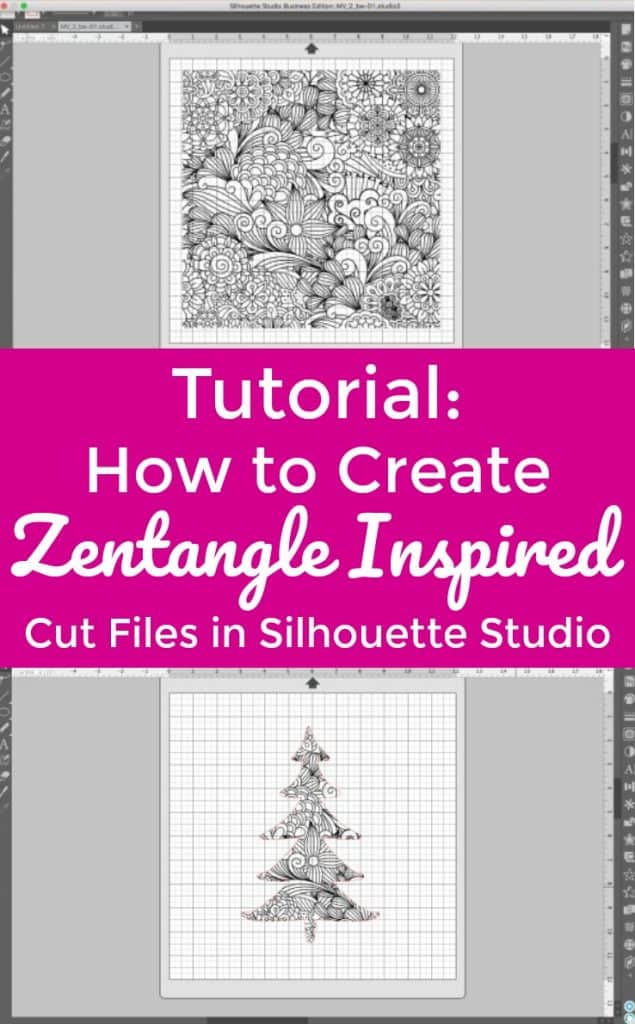
    Hey small business owners, I know that December is absolutely the busiest time of year for you. Take a quick break with a fun tutorial today: How to create faux Zentangle cut files!

    What is Zentangle?

    Before we get started, what exactly is Zentangle? Zentangle is an art form that involves creating pictures using repetitive, doodled patterns. The creators of Zentangle, Maria Thomas and Rick Roberts, offer a step by step system to follow to create the designs. They offer live classes and instructor certification programs. You can find more information about official Zentangle at this link.

    So, the easiest way to create a true Zentangle pattern to use with your Silhouette is to draw one on paper or your iPad Pro and Apple Pencil; then open and cut it on your Silhouette (or Cricut).  But, you can also make Zentangle inspired cut files.

    How to Create Zentangle Inspired Cut Files in Silhouette Studio

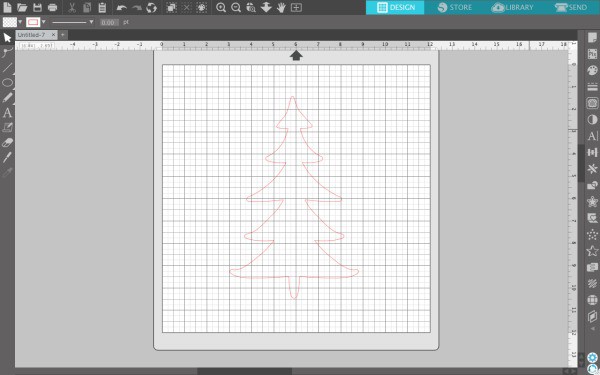
    1. Draw the outline of a shape in Silhouette Studio. If you cannot draw a shape, feel free to trace a piece of commercial use clipart or use a dingbat font. (This tutorial uses a dingbat font from the Amastery Extras font.) Tutorial: How to Create Faux Zentangle Cut Files in Silhouette Studio for Cameo, Curio, Portrait, Mint - by cuttingforbusiness.com
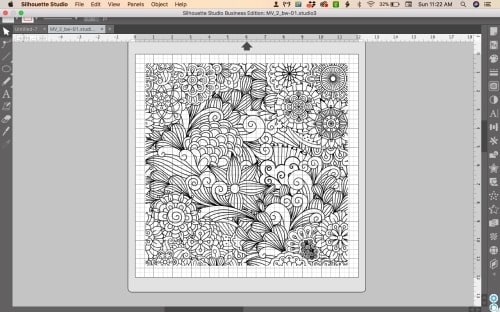
    2. Purchase a Zentangle inspired pattern from Etsy or Creative Market and open it in Silhouette Studio ‘File’, then ‘Open’. (I’m using this one.) I purchased a file in .eps format. This format is similar to .svg and is ready to cut. If you purchase a pattern in .jpg or .png format, you will need to trace it before being able to cut it. Your pattern should open now: Tutorial: How to Create Faux Zentangle Cut Files in Silhouette Studio for Cameo, Curio, Portrait, Mint - by cuttingforbusiness.com
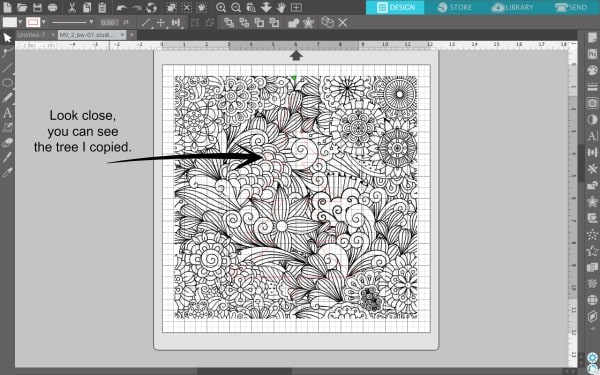
    3. Copy and paste the shape from your first mat onto your Zentangle inspired pattern. (On Mac, ‘Command + C’, and ‘Command + V’. On Windows, ‘Control + C’, and ‘Control + V’.) Resize your pattern and shape as needed.Tutorial: How to Create Faux Zentangle Cut Files in Silhouette Studio for Cameo, Curio, Portrait, Mint - by cuttingforbusiness.com
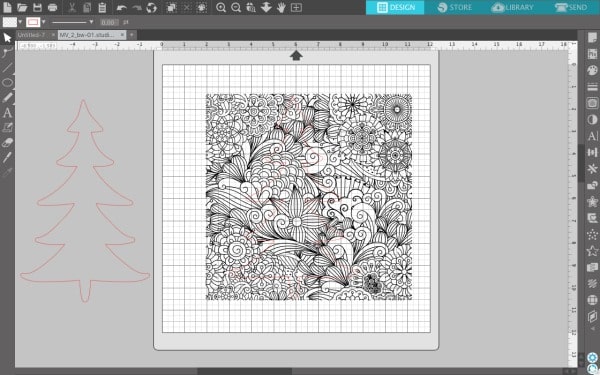
    4. Make a copy of your shape and set it off to the side. Tutorial: How to Create Faux Zentangle Cut Files in Silhouette Studio for Cameo, Curio, Portrait, Mint - by cuttingforbusiness.com
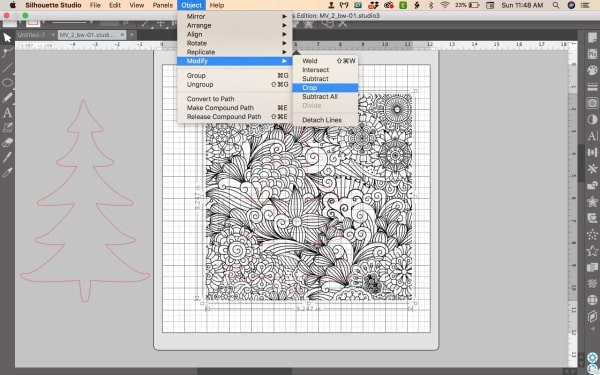
    5. Select your pattern and your shape. (Hold down the ‘Shift’ key to select both at the same time.) Then, navigate to ‘Object’, ‘Modify’, ‘Crop’. Tutorial: How to Create Faux Zentangle Cut Files in Silhouette Studio for Cameo, Curio, Portrait, Mint - by cuttingforbusiness.com
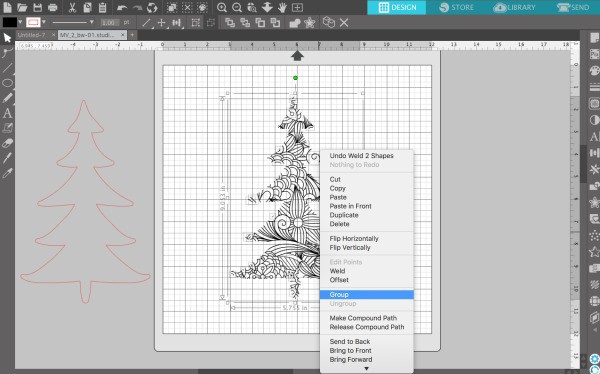
    6. Your shape should now be cut out and and filled with the Zentangle inspired pattern. Right click and select ‘Group’ to group all the pieces together.Tutorial: How to Create Faux Zentangle Cut Files in Silhouette Studio for Cameo, Curio, Portrait, Mint - by cuttingforbusiness.com
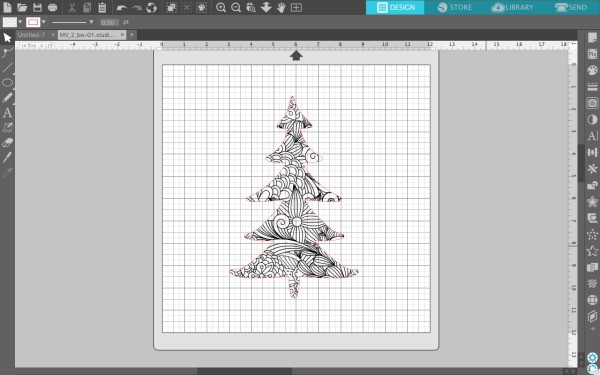
    7. Drag the shape you copied onto your Zentangle inspired pattern and ‘Group’ it together. This step gives you a finished edge around the Zentangle. Tutorial: How to Create Faux Zentangle Cut Files in Silhouette Studio for Cameo, Curio, Portrait, Mint - by cuttingforbusiness.com
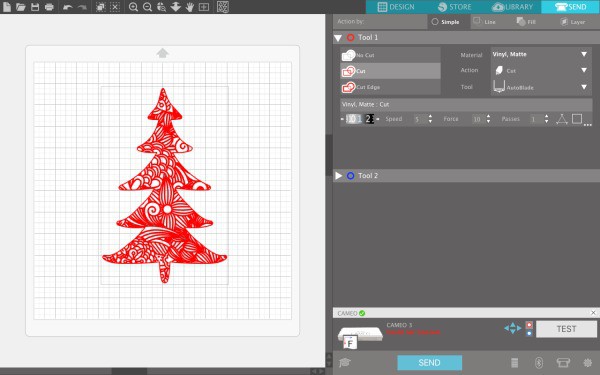
    8. Add additional text or design elements if desired. Your Zentangle inspired cut file is ready to cut:Tutorial: How to Create Faux Zentangle Cut Files in Silhouette Studio for Cameo, Curio, Portrait, Mint - by cuttingforbusiness.com

    Love this tutorial? Share it with fellow crafters on Pinterest:

    Tutorial: How to Create Faux Zentangle Cut Files in Silhouette Studio for Cameo, Curio, Portrait, Mint - by cuttingforbusiness.com

  • Design with Me: Two Color Repeating Text Designs

    I’ve said it many, many times: If you want your business to stand out from others online – you should create your own designs. Why? When no one else has the same designs as you, you put your business ahead. Creating your own designs is not hard at all, so today I’m going to walk you through an easy way to create a dramatic text design.

    This tutorial uses Silhouette Studio Business Edition, but you can do the same thing in any graphics program.

    How to Create Two Color Text Block Designs

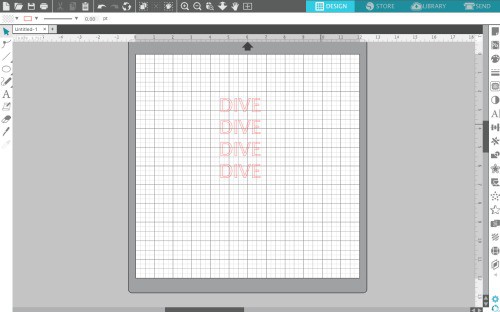
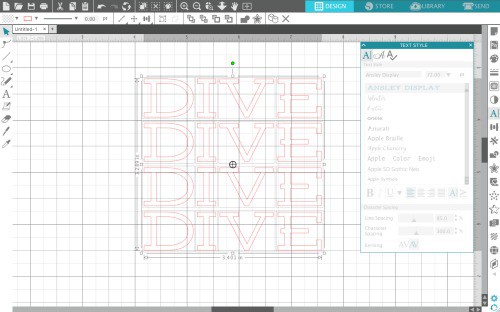
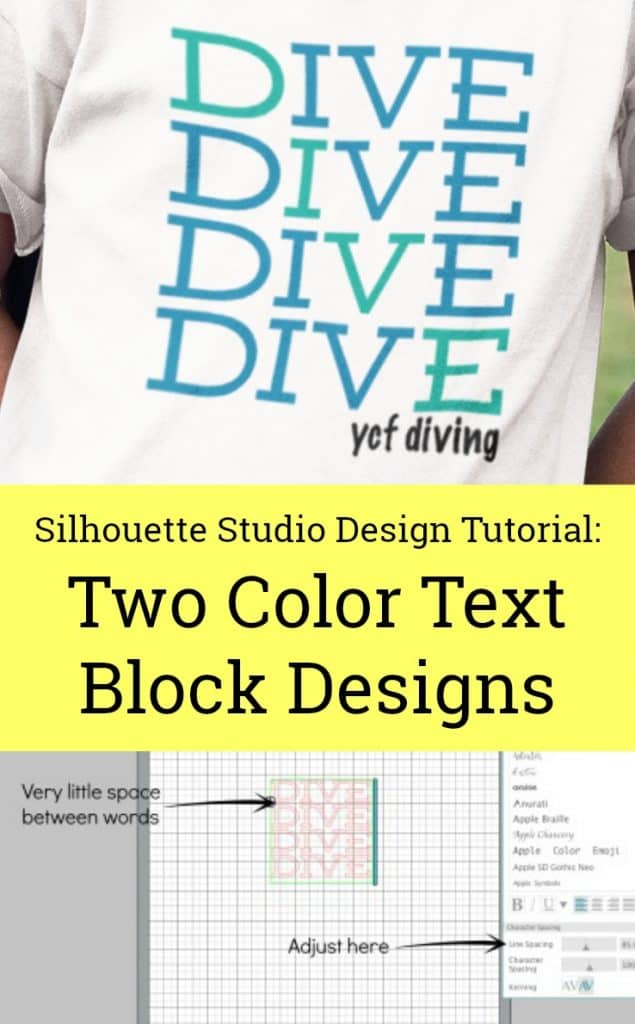
    1. Choose a word that is 3, 4, or 5 letters long and type it as shown in the image below. If your word has 3 letters, type it 3 times; if your word has 4 letters, type it 4 times; if your word has 5 letters, type it 5 times, and so on. (You can use this for any length word, but it looks better with shorter words.)Design with Me: Two Color Repeating Text Designs for Silhouette Cameo, Curio, Mint, Cricut Explore, Maker - by cuttingforbusiness.com
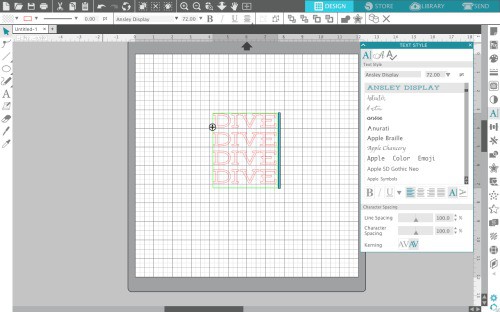
    2. Choose a block, bold, or chunky font style. For my design, I used Ansley which you can grab here for free with commercial use.Design with Me: Two Color Repeating Text Designs for Silhouette Cameo, Curio, Mint, Cricut Explore, Maker - by cuttingforbusiness.com
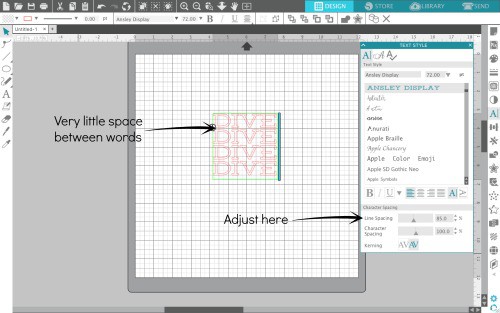
    3. Depending on your font, you may need to change the line spacing. You can do this from ‘Panels’, ‘Text Style’. You’ll want to make your text close enough together to create a square or rectangle. Design with Me: Two Color Repeating Text Designs for Silhouette Cameo, Curio, Mint, Cricut Explore, Maker - by cuttingforbusiness.com
    4. To prepare for cutting, you’ll want to ungroup the letters so they are single. Select the text, right click, and select ‘Ungroup’. All letters are now independent of each other. Design with Me: Two Color Repeating Text Designs for Silhouette Cameo, Curio, Mint, Cricut Explore, Maker - by cuttingforbusiness.com
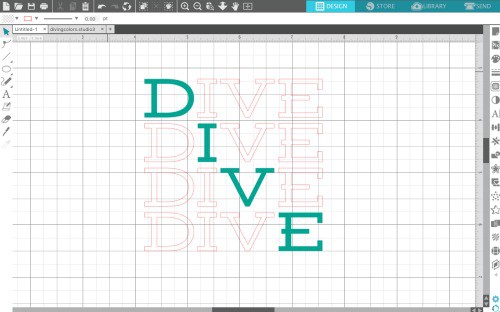
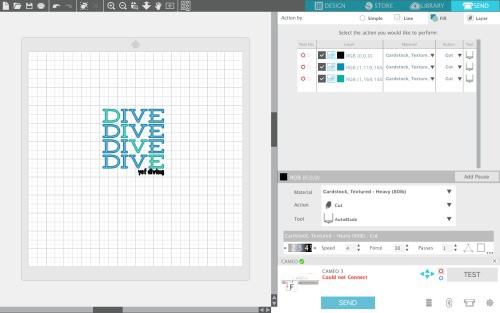
    5. Now, you’ll need to regroup some of the letters. First, select the letter in the top left hand corner and each letter in your word diagonally (hold the shift key to select multiple letters). Then, right click and choose ‘Group’. Last, fill your diagonal word with a color. Design with Me: Two Color Repeating Text Designs for Silhouette Cameo, Curio, Mint, Cricut Explore, Maker - by cuttingforbusiness.com
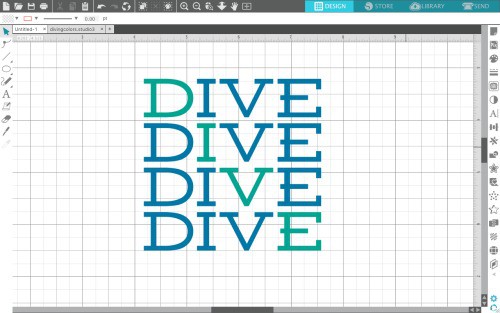
    6. Repeat step 5 for all the remaining letters. When finished, your design should look similar to this: Design with Me: Two Color Repeating Text Designs for Silhouette Cameo, Curio, Mint, Cricut Explore, Maker - by cuttingforbusiness.com
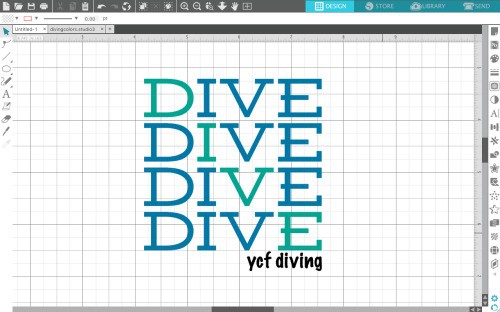
    7. Add additional text as desired. Design with Me: Two Color Repeating Text Designs for Silhouette Cameo, Curio, Mint, Cricut Explore, Maker - by cuttingforbusiness.com
    8. That’s it! When cutting your design, try cutting by fill color. Design with Me: Two Color Repeating Text Designs for Silhouette Cameo, Curio, Mint, Cricut Explore, Maker - by cuttingforbusiness.com

    Looking for more designing tutorials? Try here, here, here, or even here.

    Here’s my finished shirt – don’t forget to save the tutorial to Pinterest:

    Design with Me: Two Color Repeating Text Designs for Silhouette Cameo, Curio, Mint, Cricut Explore, Maker - by cuttingforbusiness.com

  • Tutorial: How to Make Cut Files with Dingbat Fonts

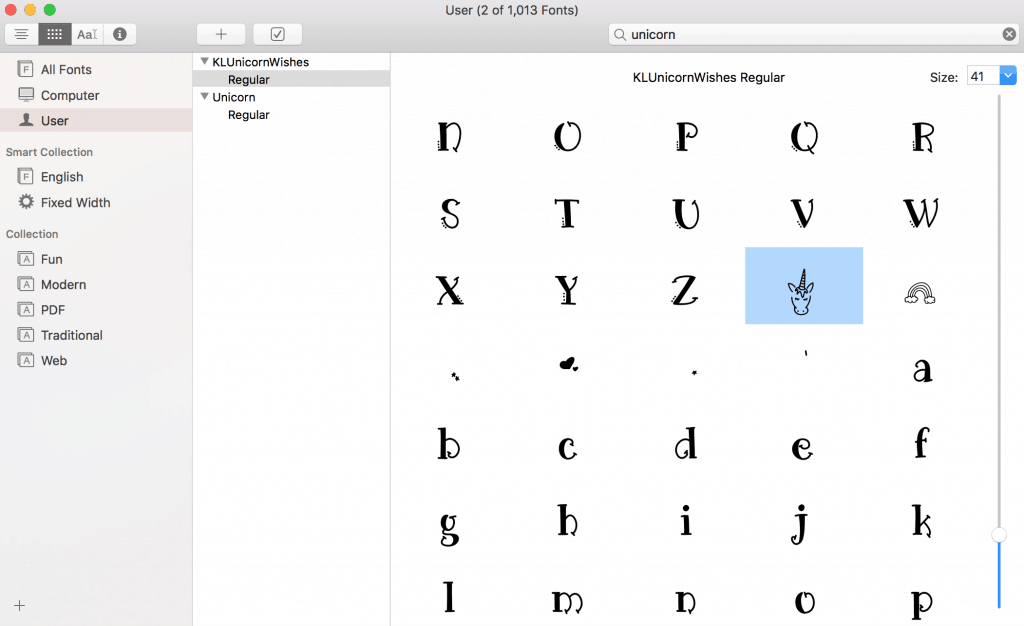
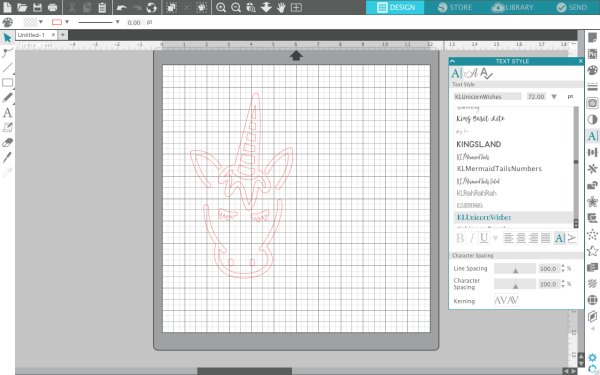
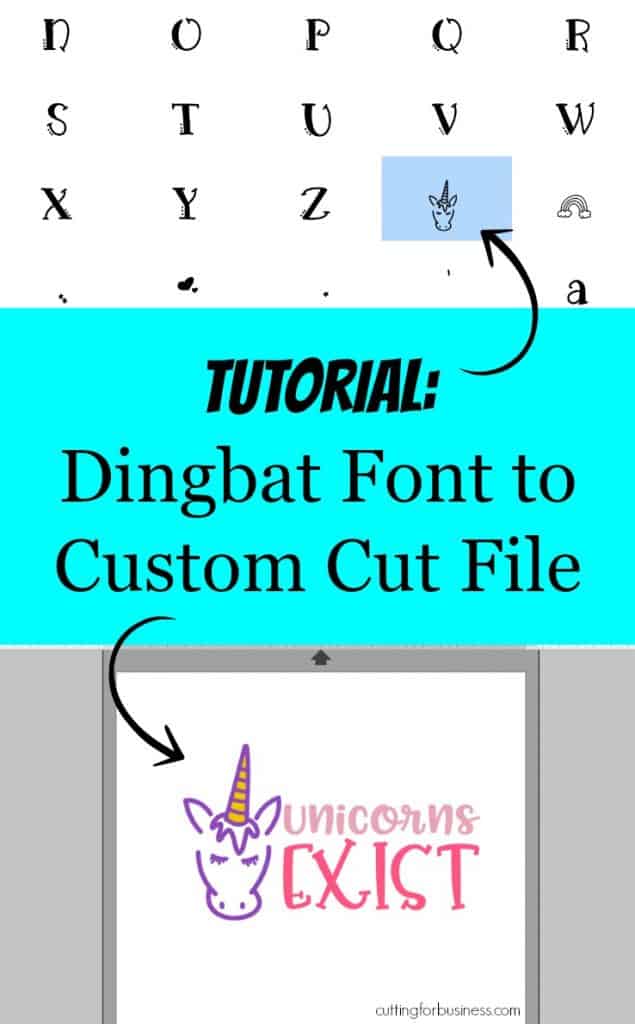
    A few days ago I downloaded The Best Sellers Font Bundle Vol IV by Font Bundles and it had several fonts with dingbats in it. (If you don’t know: A dingbat is a symbol or image included with a font. Also, some fonts are made entirely of dingbats.) Personally, I love dingbats! Why? You can use dingbat fonts to create custom cut files to use in your Silhouette or Cricut small business.

    How to Use Dingbats to Create Custom Cut Files

    Tutorial: How to Make Cut Files for Silhouette Cameo or Cricut Explore with Dingbat Fonts - by cuttingforbusiness.com

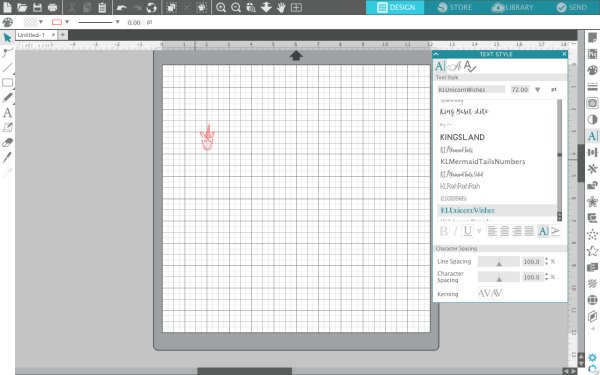
    • Copy and paste it into Silhouette Studio (or Cricut Design Space):

    Tutorial: How to Make Cut Files for Silhouette Cameo or Cricut Explore with Dingbat Fonts - by cuttingforbusiness.com

    • Resize the dingbat as needed.

    Tutorial: How to Make Cut Files for Silhouette Cameo or Cricut Explore with Dingbat Fonts - by cuttingforbusiness.com

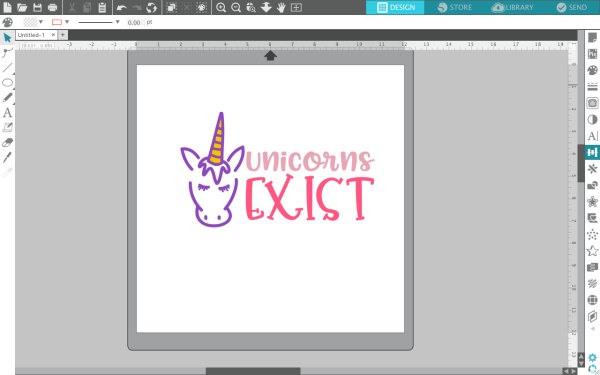
    Now, the file is ready to cut as is – or you can add other images or text:

    Tutorial: How to Make Cut Files for Silhouette Cameo or Cricut Explore with Dingbat Fonts - by cuttingforbusiness.com

    Wondering about the fonts I used? You can find them all in The Best Sellers Font Bundle Vol IV for a limited time only. Not up for purchasing the whole bundle? You can buy them a la carte: the unicorn head is Unicorn Wishes, the “unicorns” text is Pinsetter Littles, and the word “exist” is Pinsetter Tails.

    Note: If you are using a dingbat in a product or design for sale – be sure that you have a commercial use license with the font. Learn more in this post.

    Save this image to Pinterest, then download the Unicorns Exist cut file below.

    Tutorial: How to Make Cut Files for Silhouette Cameo or Cricut Explore with Dingbat Fonts - by cuttingforbusiness.com

    Download the commercial use Unicorns Exist SVG at this link.

  • Design Tutorial: Text Cut Out Designs in Silhouette Studio

    It’s about time for another design tutorial, don’t you think? Today, we are going to look at creating cut out text designs in Silhouette Studio. Cut out designs are easy enough for a beginning Silhouette user to create and look great on a number of products, so let’s go!

    Here’s a few examples of cut out designs that I’ve shared on the blog before – and they’ve all been popular:

    Cut Out Designs in Silhouette Studio Tutorial

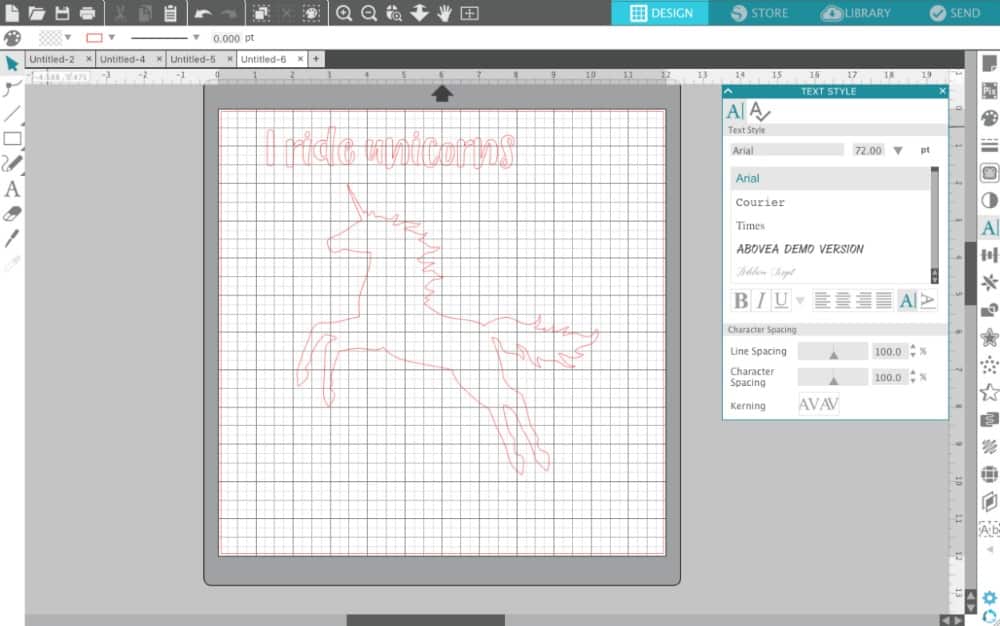
    1. Start by finding a commercial use clipart design that you can trace. For this tutorial, I chose a free, commercial use unicorn image. When looking for images, find ones that have enough space for text and that are easily recognizable when cut in one color.
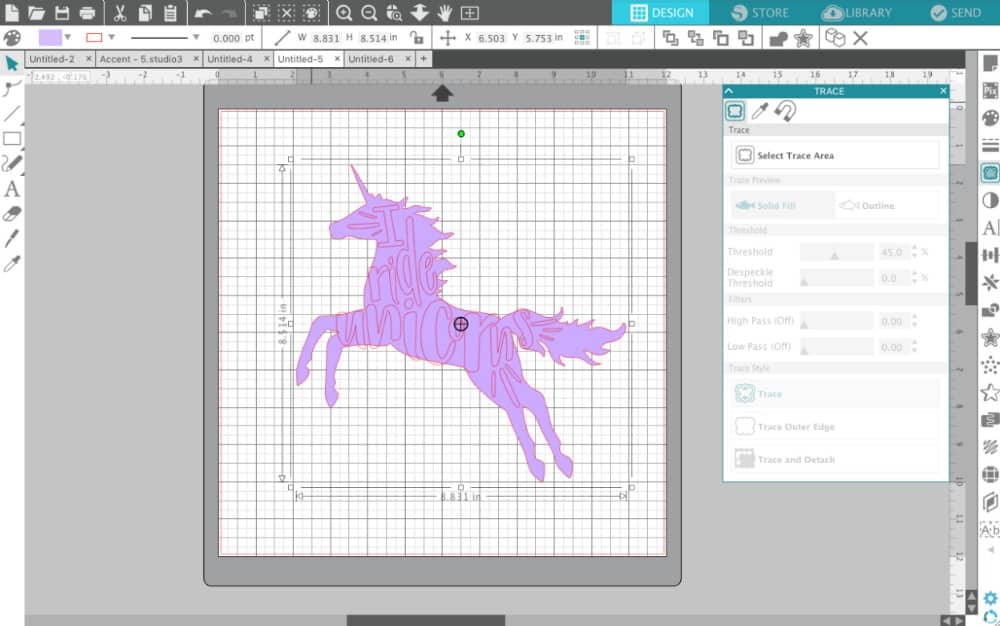
    2. Trace the unicorn design. In Silhouette Studio version 4, you’d use the “Trace” panel. Delete the original image once you’ve got the trace. Design Tutorial: Text Cut Out Designs in Silhouette Studio - by cuttingforbusiness.com
    3. Choose a font and type out the text to put in your design. For this tutorial, I chose Camica font and the words “I ride unicorns”. Design Tutorial: Text Cut Out Designs in Silhouette Studio - by cuttingforbusiness.com
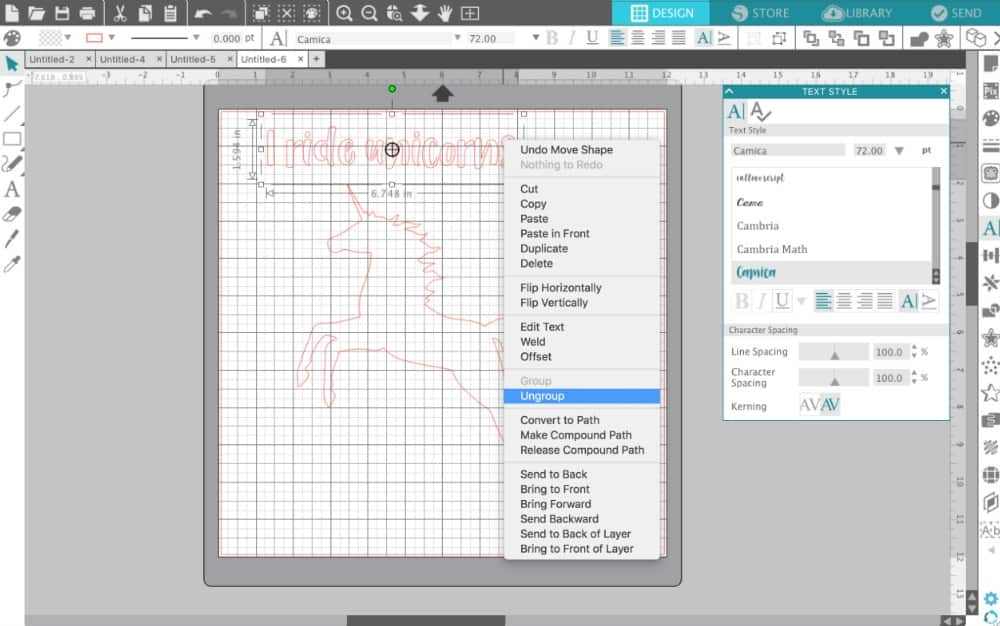
    4. Right click the text and select “Ungroup”. This will leave you with each letter separated from the rest. Design Tutorial: Text Cut Out Designs in Silhouette Studio - by cuttingforbusiness.com
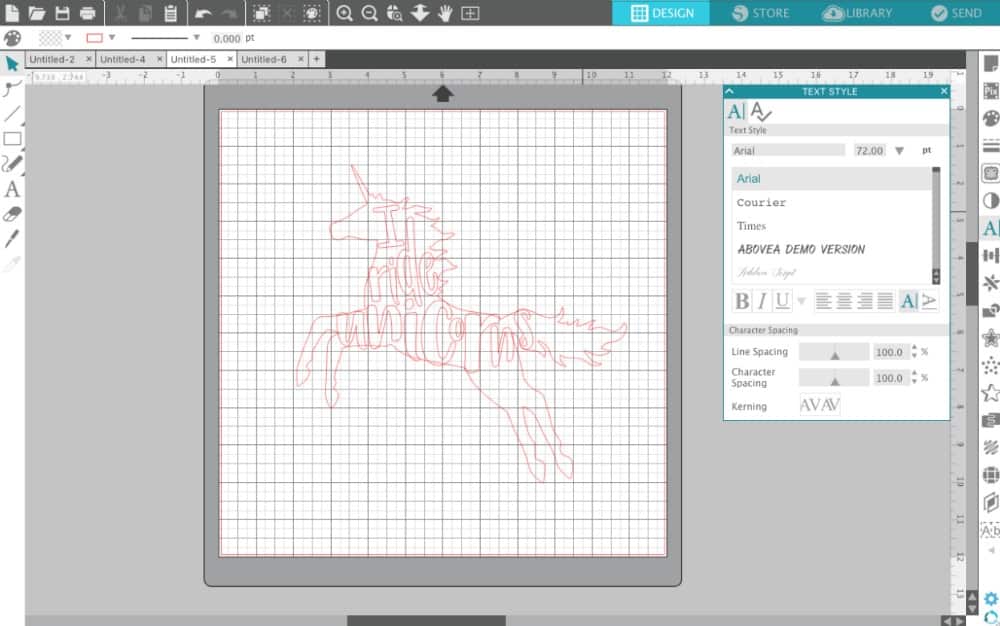
    5. Now, drag each letter to where you want it. The goal will be to cover most of the shape with the text. I like to let my letters overlap the shape a bit, but that is your choice. Design Tutorial: Text Cut Out Designs in Silhouette Studio - by cuttingforbusiness.com

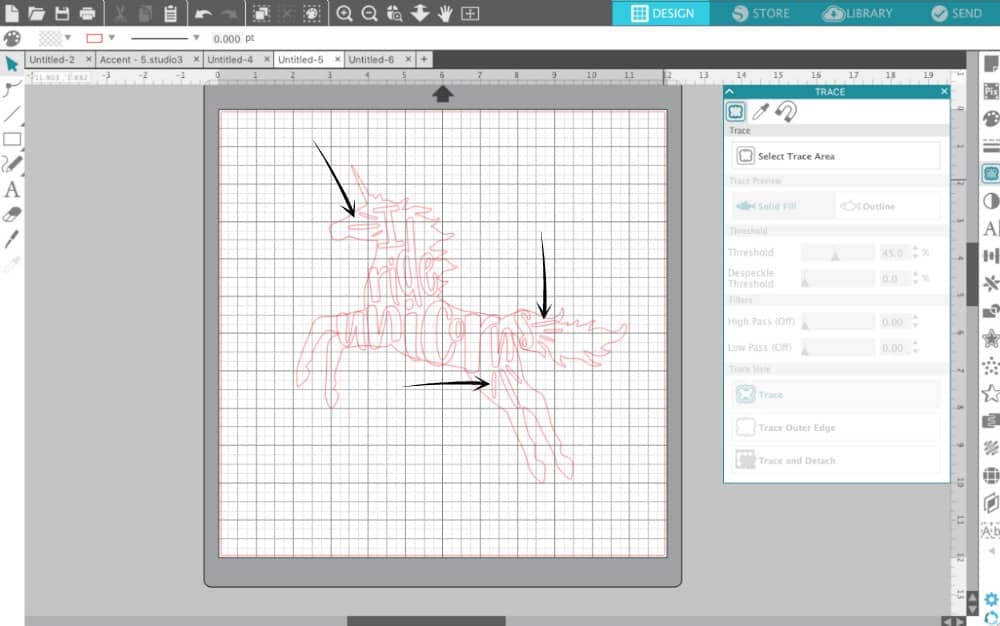
    6. After your letters are arranged, select all the letters and group them together. In Silhouette Studio version 4, you’d right click and select “Group”.
    7. Now, we have to deal with the empty space in the design. To fill it in a little more, I just add some flourishes, dashes, and so on. I first drew one shape using the Smooth Drawing Tool (pencil icon, left side), then copy and pasted it and resized it to make more. Design Tutorial: Text Cut Out Designs in Silhouette Studio - by cuttingforbusiness.com
    8. Now, I like to turn my picture a solid color. Choose any color and fill in your traced image. Design Tutorial: Text Cut Out Designs in Silhouette Studio - by cuttingforbusiness.com
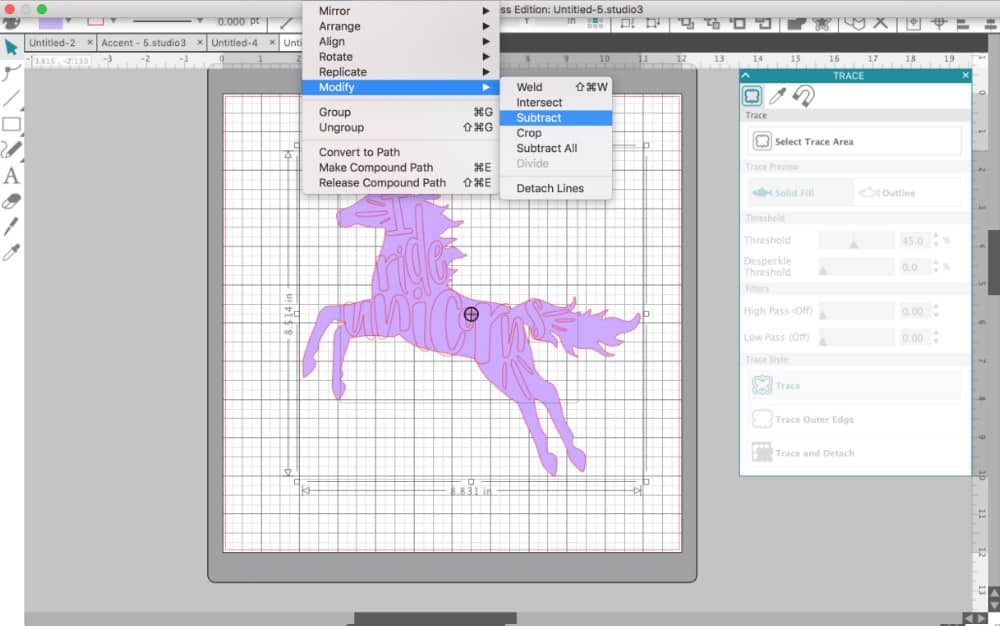
    9. Last, select the text and subtract it from the image. In Silhouette Studio 4, you’d select, “Object”, “Modify”, “Subtract”. Design Tutorial: Text Cut Out Designs in Silhouette Studio - by cuttingforbusiness.com
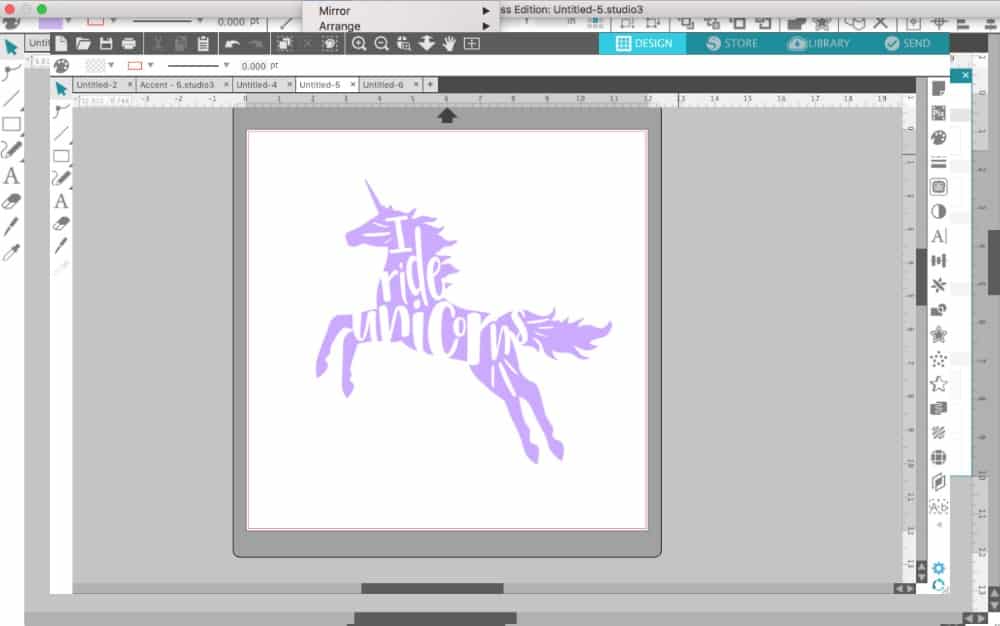
    10. That’s it! Here’s what the finished design looks like: Design Tutorial: Text Cut Out Designs in Silhouette Studio - by cuttingforbusiness.com
      Or, here’s the design in holographic heat transfer material:Design Tutorial: Text Cut Out Designs in Silhouette Studio - by cuttingforbusiness.com

    Now, get out there and try it yourself! Remember, unique designs pay off!

    Download the file I created in this tutorial – free with commercial use license included at this link in .studio3 format.

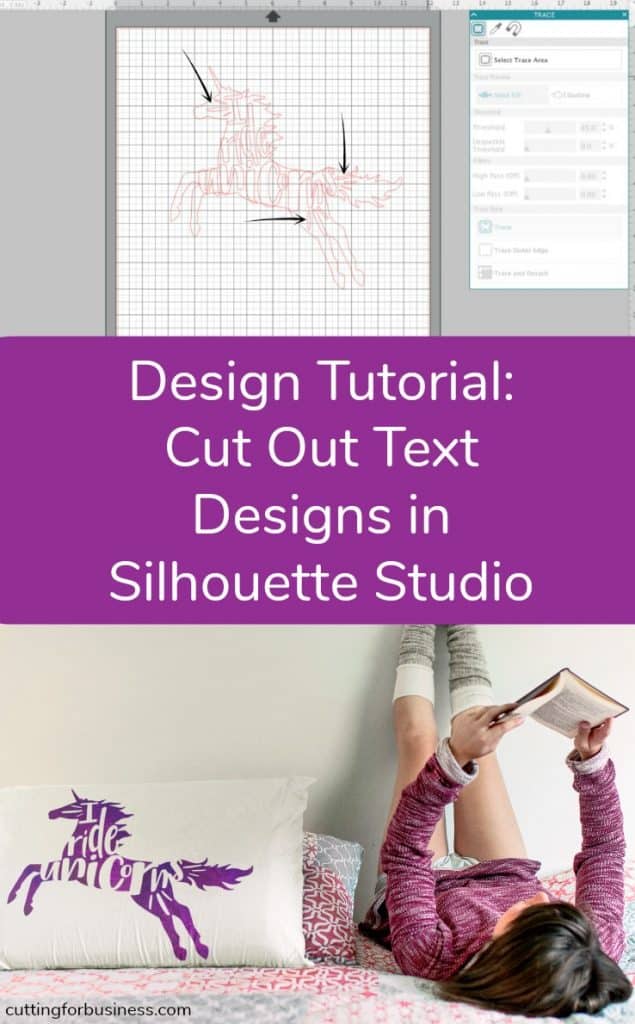
    No time to design right now? Save this post to Pinterest and come back to it later:

    Design Tutorial: Text Cut Out Designs in Silhouette Studio - by cuttingforbusiness.com

  • Design Tutorial: Working with Text in Silhouette Studio

    I’ve said it many times before, and I’ll say it again: I think that craft businesses that create their own designs have an advantage over shops who purchase all of their designs premade. Why? It’s no secret that unique designs make you stand out.

    Today, we are going to look at creating text based designs. Honestly, there is no reason that you would ever need to buy a text based design from a designer. Why? Even the most uncreative Silhouette and Cricut owners can create text based designs!

    Here’s how I create text based designs (tutorial shown in Silhouette Studio – version 4 beta release):

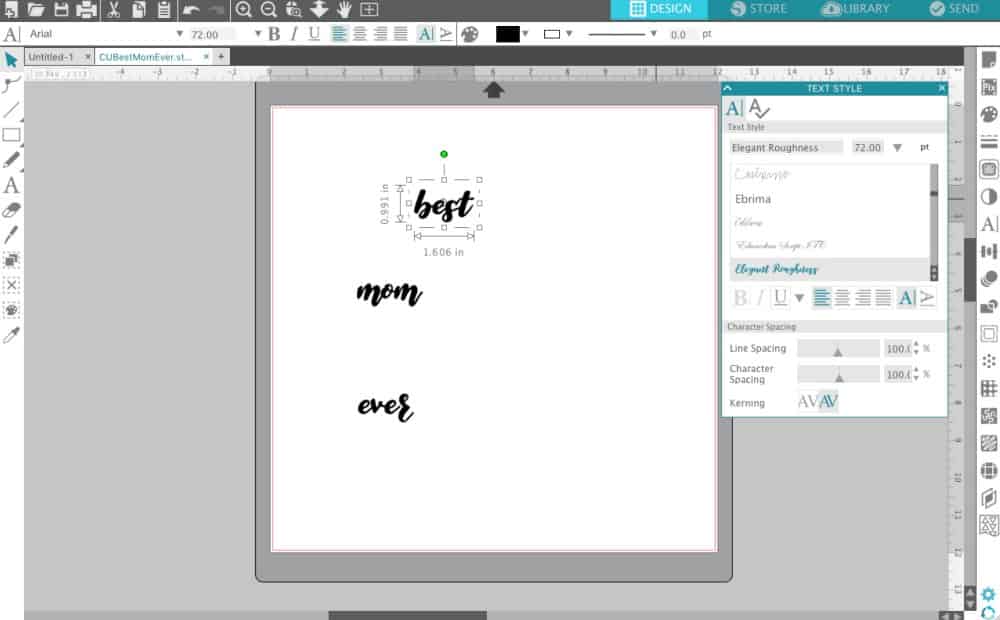
    1. Start by writing out the text to include in your design. You’ll notice that I typed each word in a separate text box. This is the key to be able to arrange the words in a pleasant looking way. Design Tutorial: Working with Text in Silhouette Studio or Design Space by cuttingforbusiness.com
    2. Next, choose a font and change all the words to your desired font. The font I used in this tutorial is Elegant Roughness – and it is free for a limited time! I also fill my words with color to make the design easier to see.Design Tutorial: Working with Text in Silhouette Studio or Design Space by cuttingforbusiness.com
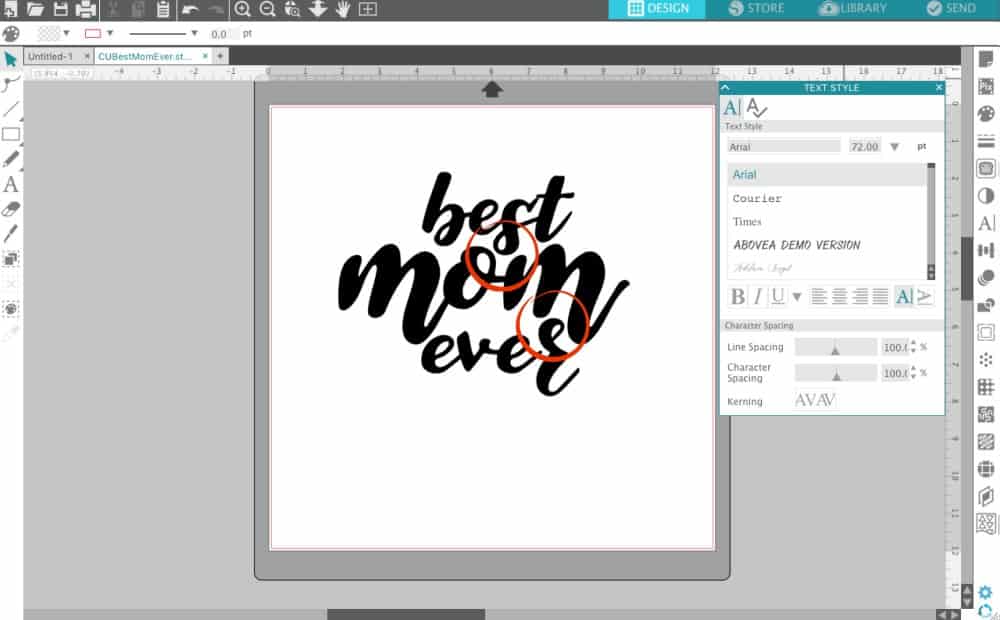
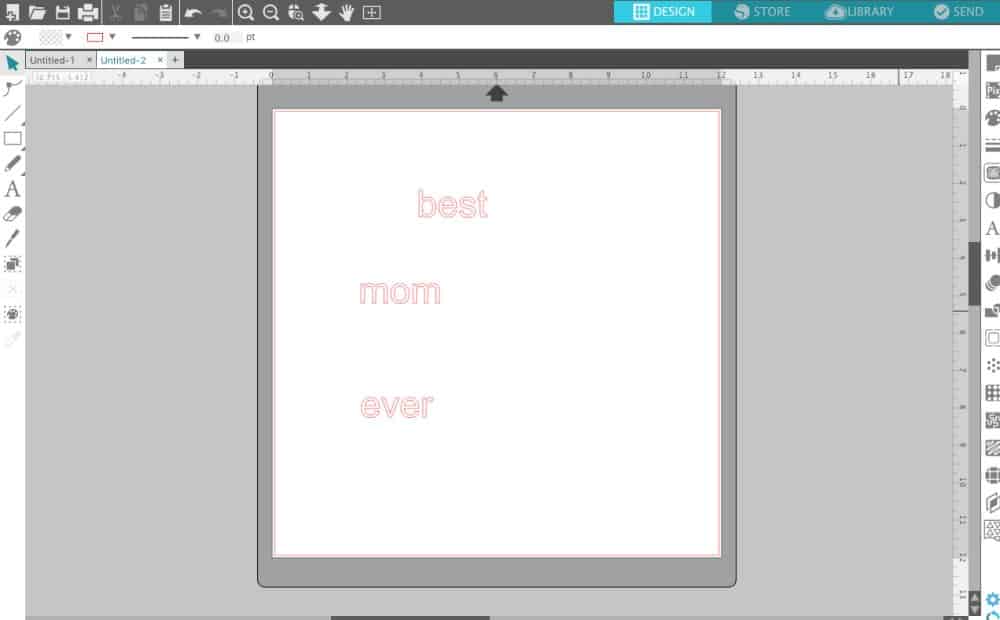
    3. Now, you will arrange the words however you’d like them. All I’ve done is drag the words around and resized some of them. When I arrange them, I look for nooks and crannies where letters will “fit” into each other. I circled the nooks – the “s” fits nicely into the nook above with “om” and the “r” fits nicely into the nook in the “m”.Design Tutorial: Working with Text in Silhouette Studio or Design Space by cuttingforbusiness.com
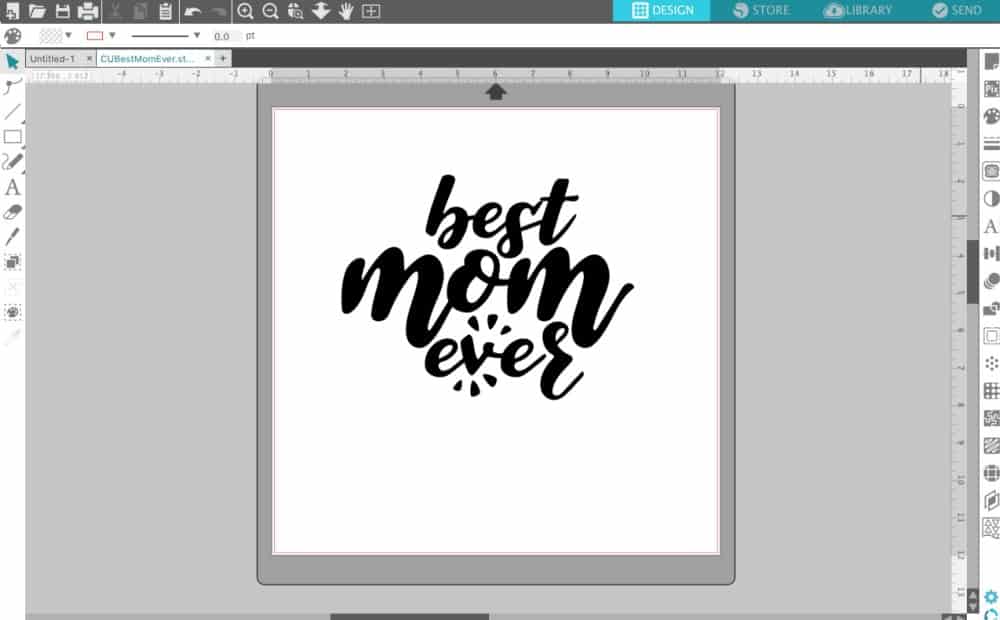
    4. The design looks good but I don’t like the big space below “mom” and above “ever”. I draw a few teardrop shapes using the smooth freehand tool and place them to fill the space. To balance the design and add emphasis on “ever” I add the same teardrops below “ever”. If you don’t like the teardrops, you could substitute with lines or a heart.Design Tutorial: Working with Text in Silhouette Studio or Design Space by cuttingforbusiness.com
    5. Now, you’ll just want to finish up the design by welding the letters if needed.

    Additional Posts to Help You with Text Designs:

    Now, get out there and start playing with text in Silhouette Studio or Design Space – it’s not as hard as you’d think!

    Download the file I created in this tutorial – free with commercial use license included at this link.

    Share this post on Pinterest:

    Design Tutorial: Working with Text in Silhouette Studio or Design Space by cuttingforbusiness.com

  • 2 Ways to Thicken Fonts in Silhouette Studio

    If you know anything about me beyond the Cutting for Business blog, you know that I am a softie for good fonts. Unfortunately, some of my favorite fonts are not good for cutting designs. This is usually because they are too thin to cut and weed well. Today, let’s look at two ways to thicken fonts and make them easier to cut in Silhouette Studio.

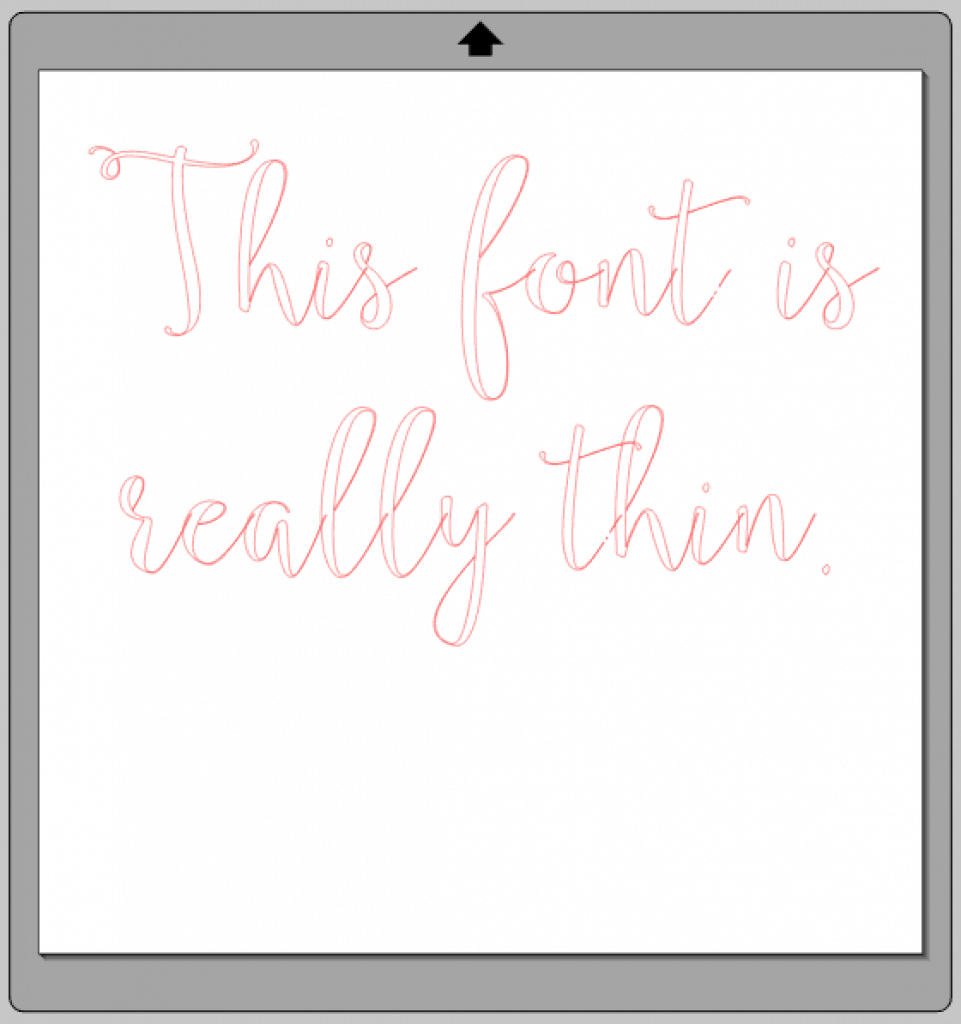
    Here’s an example of a font that needs thickened to cut better in Silhouette Studio. If you are curious, this font is called Annabella and you can download it here.

    2 Ways to Thicken Fonts in Silhouette Studio for cutting on Cameo or Curio - by cuttingforbusiness.com

    How to Thicken Fonts in Silhouette Studio Using Offsetting

    One way to thicken fonts is to use an offset. Here’s how:

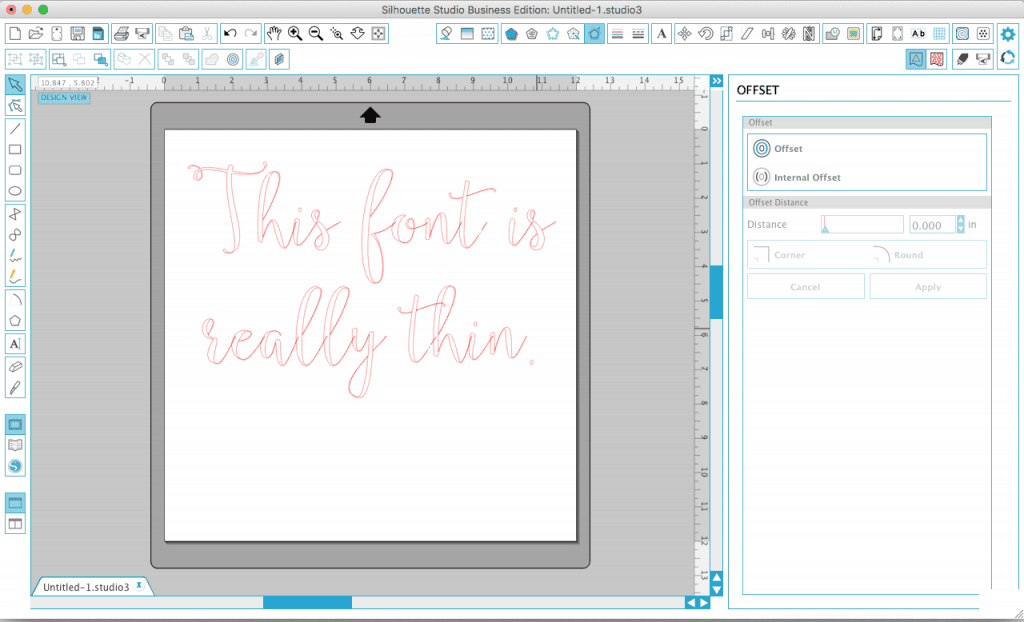
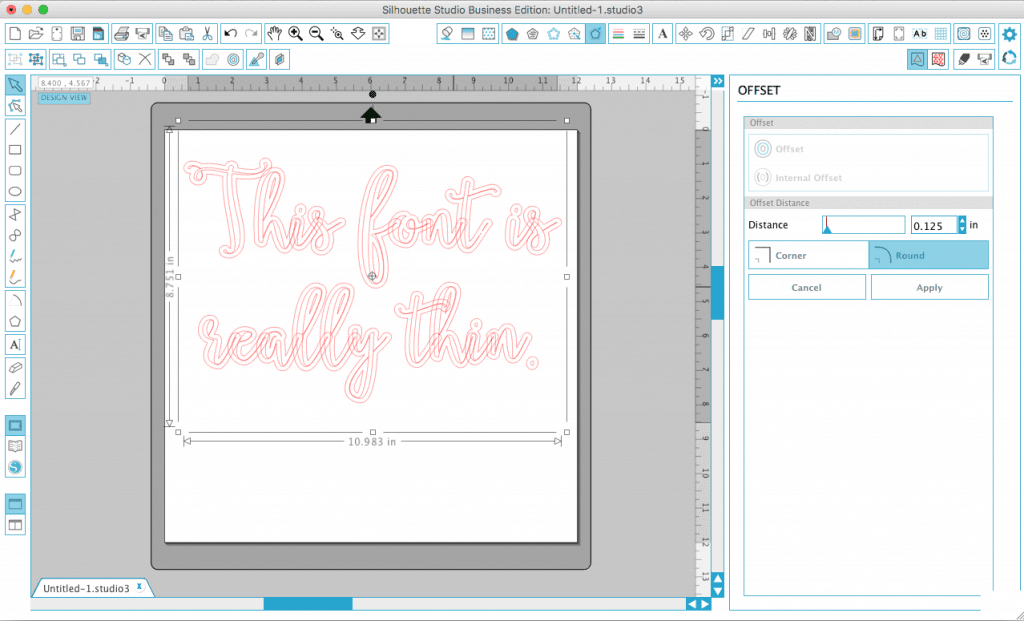
    1. Within Silhouette Studio, navigate to the offset window.2 Ways to Thicken Fonts in Silhouette Studio for cutting on Cameo or Curio - by cuttingforbusiness.com
    2. Select your design and click “Offset”. 2 Ways to Thicken Fonts in Silhouette Studio for cutting on Cameo or Curio - by cuttingforbusiness.com
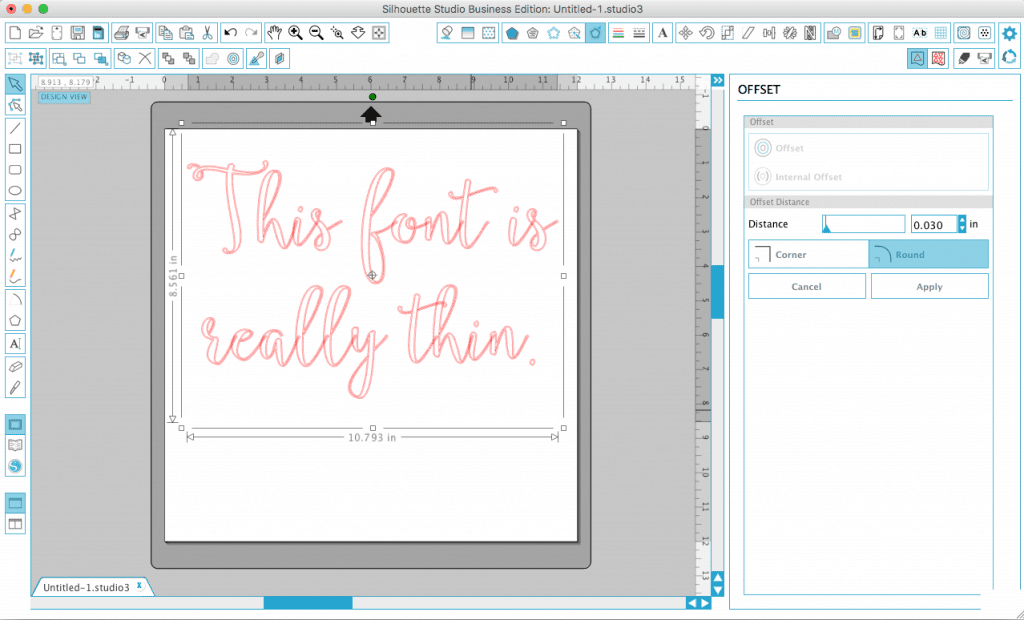
    3. Now, use the slider next to “Distance” to thicken the font. I usually offset by between .01 and .05, depending how thin the font is. Click “Apply” to confirm the change.2 Ways to Thicken Fonts in Silhouette Studio for cutting on Cameo or Curio - by cuttingforbusiness.com
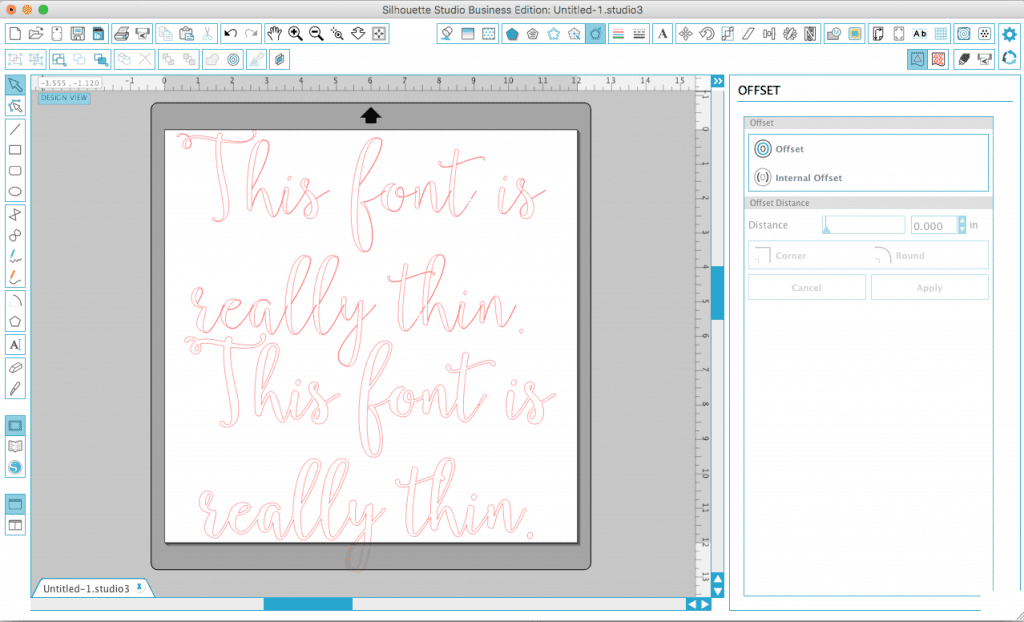
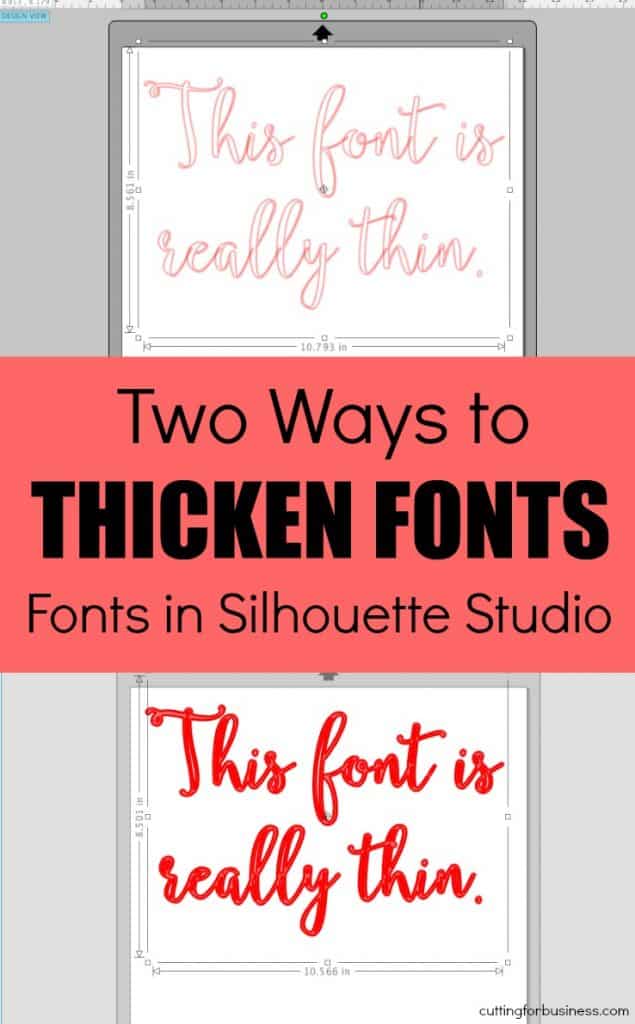
    4. You’ll now drag your newly offset design away from the original text and delete it. You’ll notice your new design is thickened up and will cut better on your Silhouette. (In the photo below, the top is the original and the bottom is the offset design.)2 Ways to Thicken Fonts in Silhouette Studio for cutting on Cameo or Curio - by cuttingforbusiness.com

    Offsetting is great and commonly used, but I think there is an easier way!

    How to Thicken Fonts in Silhouette Studio Using Line Styles

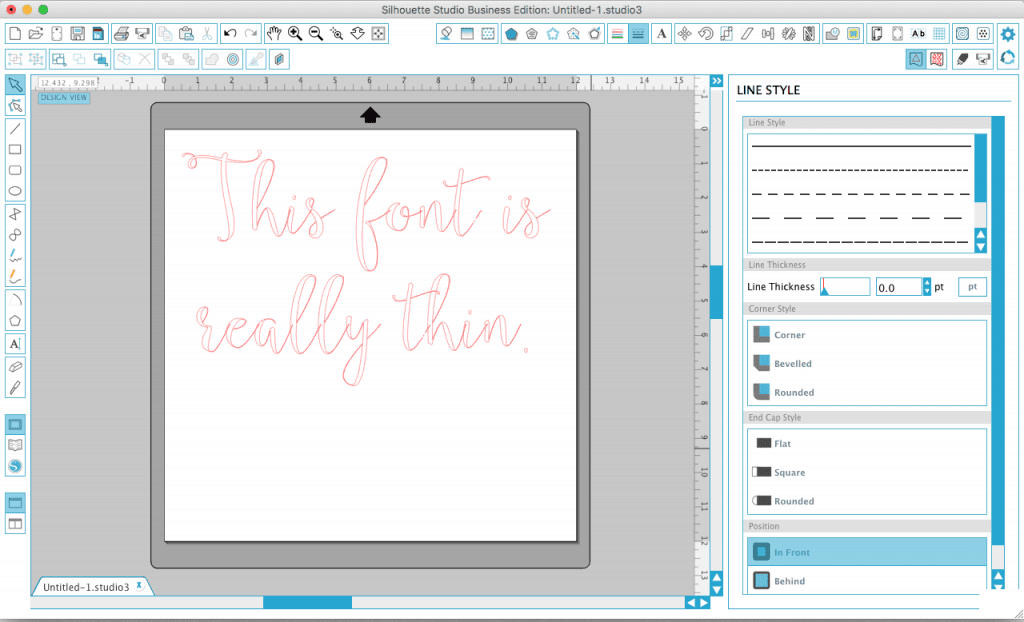
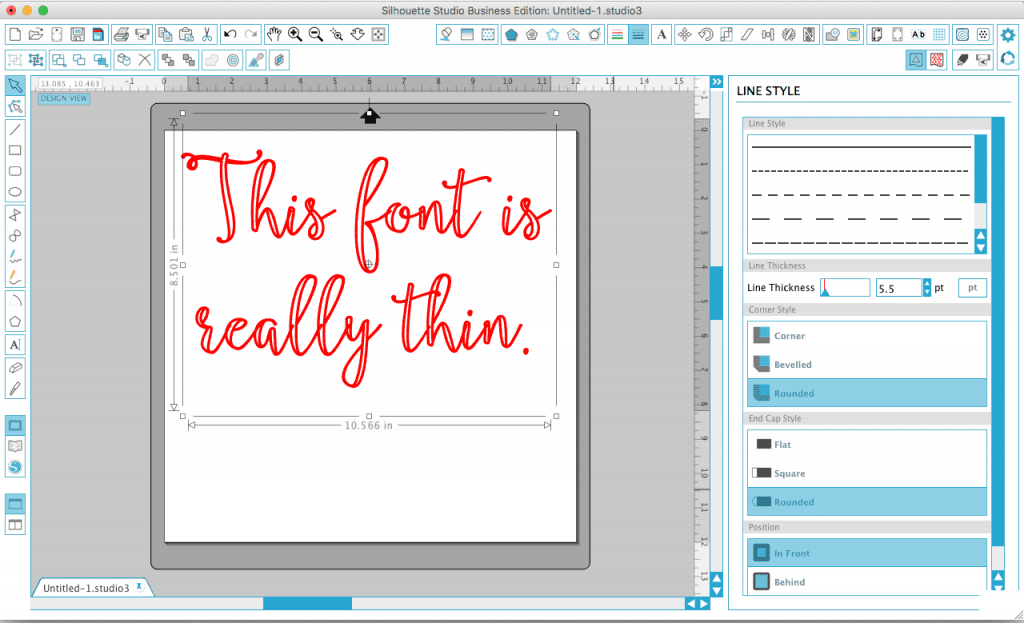
    1. Starting with the same original design, you’ll navigate to the “Lines Styles” menu. 2 Ways to Thicken Fonts in Silhouette Studio for cutting on Cameo or Curio - by cuttingforbusiness.com
    2. This time, all you need to do to thicken your font is change the line thickness. 2 Ways to Thicken Fonts in Silhouette Studio for cutting on Cameo or Curio - by cuttingforbusiness.com
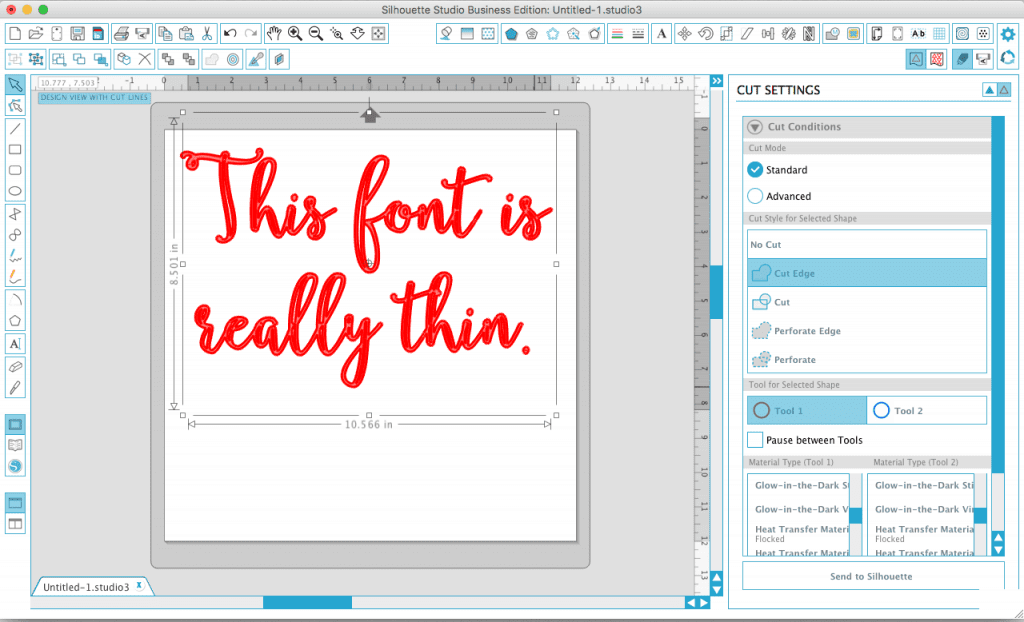
    3. When you are ready to cut, first fill the font with a color. Then you’ll choose the “Cut Edge” setting. 2 Ways to Thicken Fonts in Silhouette Studio for cutting on Cameo or Curio - by cuttingforbusiness.com

    There you go – two ways to thicken fonts to make them easier to cut with your Silhouette. Remember, when you know how to work the software better; your small business will save time and do better.

    Save this post to Pinterest:

    2 Ways to Thicken Fonts in Silhouette Studio for cutting on Cameo or Curio - by cuttingforbusiness.com

  • Tutorial: How to Use iPad Pro as a Drawing Tablet in Silhouette Studio

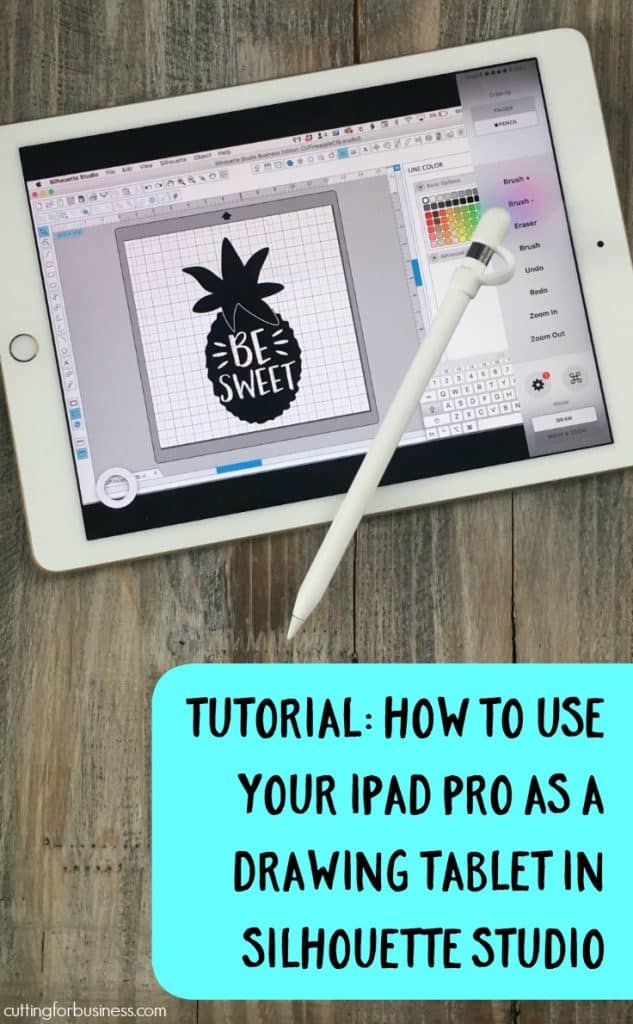
    Do you draw? Do you use Silhouette Studio? Do you have a Mac computer? Do you have an iPad Pro and an Apple Pencil? If you answered yes to all these – then this tutorial is for you! You can take all these things and combine them together to use your iPad Pro as a drawing tablet in Silhouette Studio!

    How to Use Your iPad Pro as a Drawing Tablet with Silhouette Studio

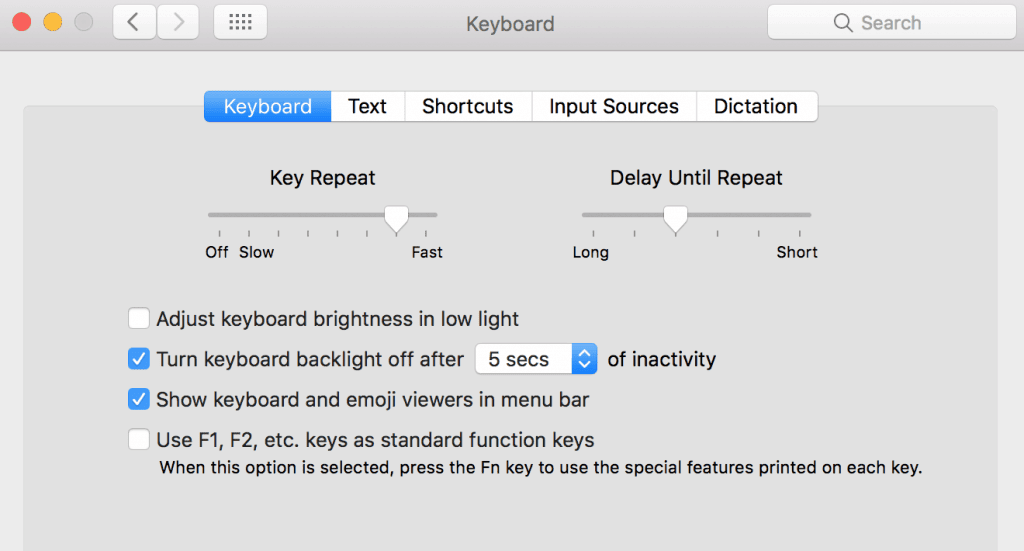
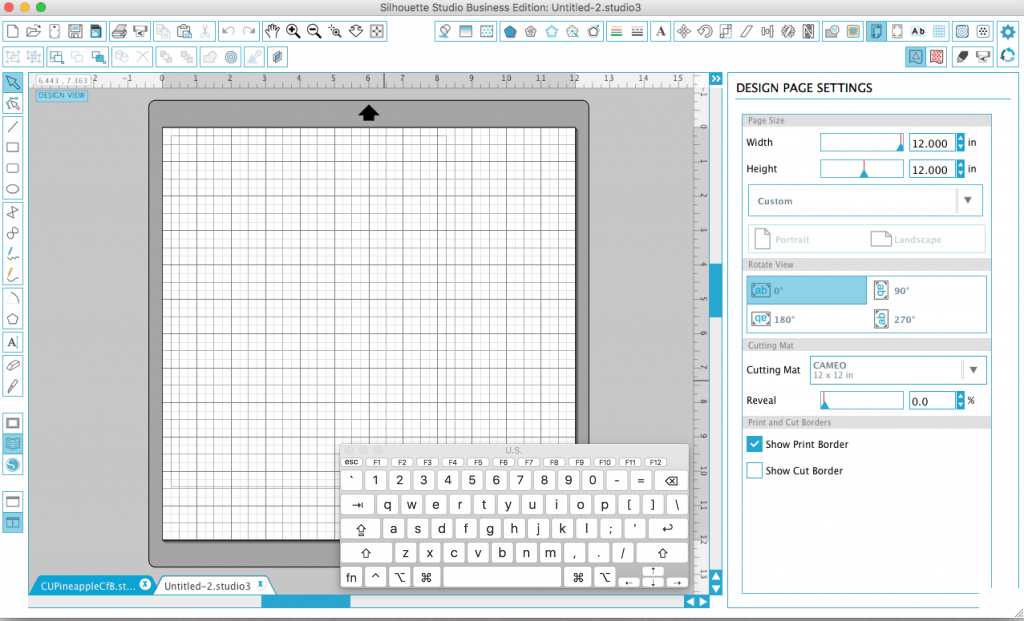
    1. Enable the onscreen keyboard. Here’s how: Go to “System Preferences” then “Keyboard”. Check the box, “Show keyboard and emoji viewers in menu bar”. Tutorial: How to Use iPad Pro as a Drawing Tablet in Silhouette Studio - Great for Silhouette Cameo, Curio, Mint Owners who like to draw! By cuttingforbusiness.com.
    2. From the menu bar on your Mac, click the keyboard icon and select “Show Keyboard Viewer”. You’ll now have a mini keyboard on your screen. Tutorial: How to Use iPad Pro as a Drawing Tablet in Silhouette Studio - Great for Silhouette Cameo, Curio, Mint Owners who like to draw! By cuttingforbusiness.com.
    3. Open Silhouette Studio on your Mac.
    4. Install Astropad on your Mac and your iPad Pro.
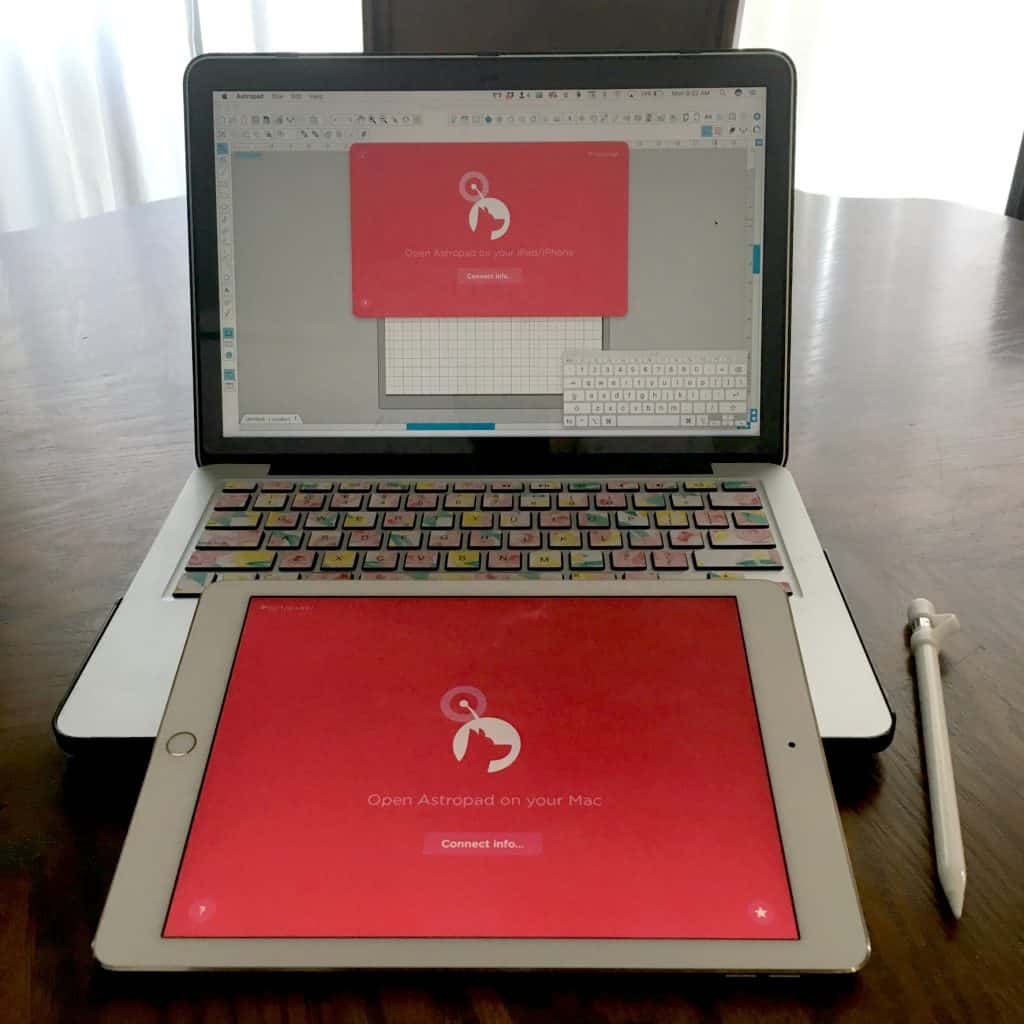
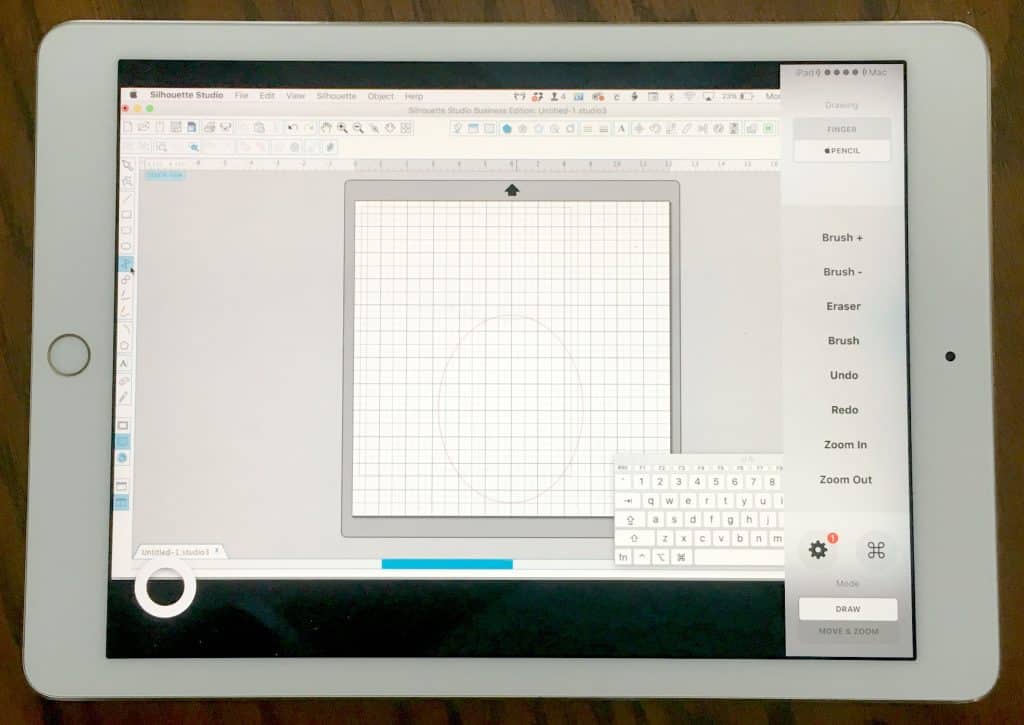
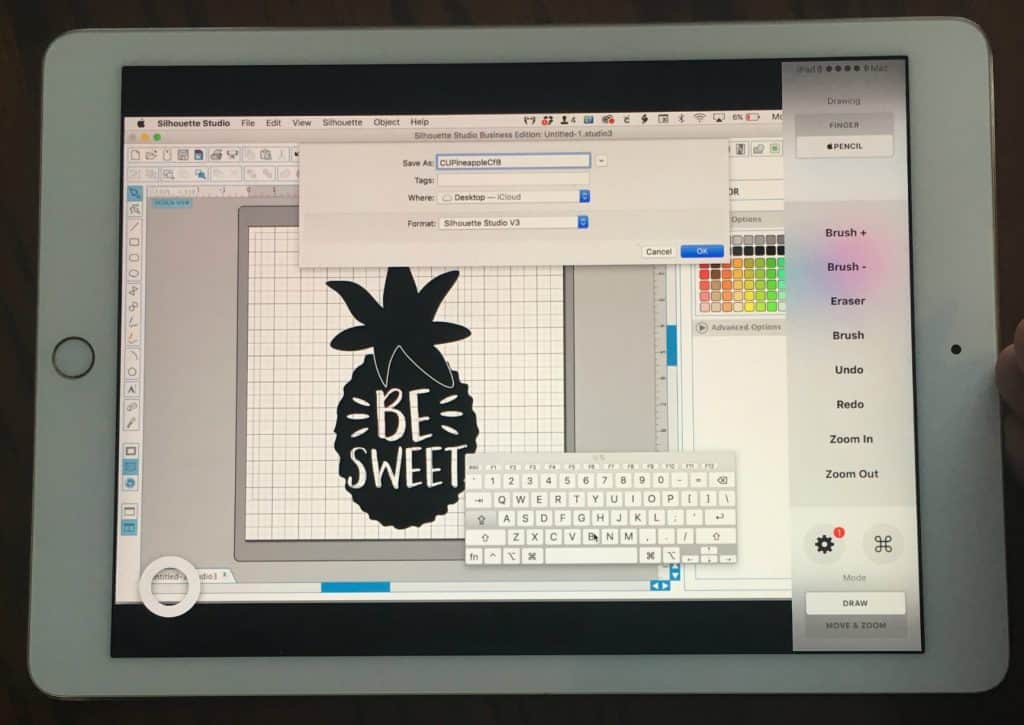
    5. Open Astropad on both your Mac and your iPad Pro. You’ll need to make sure that both your Mac and iPad Pro are on the same wifi network. Tutorial: How to Use iPad Pro as a Drawing Tablet in Silhouette Studio - Great for Silhouette Cameo, Curio, Mint Owners who like to draw! By cuttingforbusiness.com.Astropad will connect and you’ll see Silhouette Studio displayed on your iPad. Tutorial: How to Use iPad Pro as a Drawing Tablet in Silhouette Studio - Great for Silhouette Cameo, Curio, Mint Owners who like to draw! By cuttingforbusiness.com.
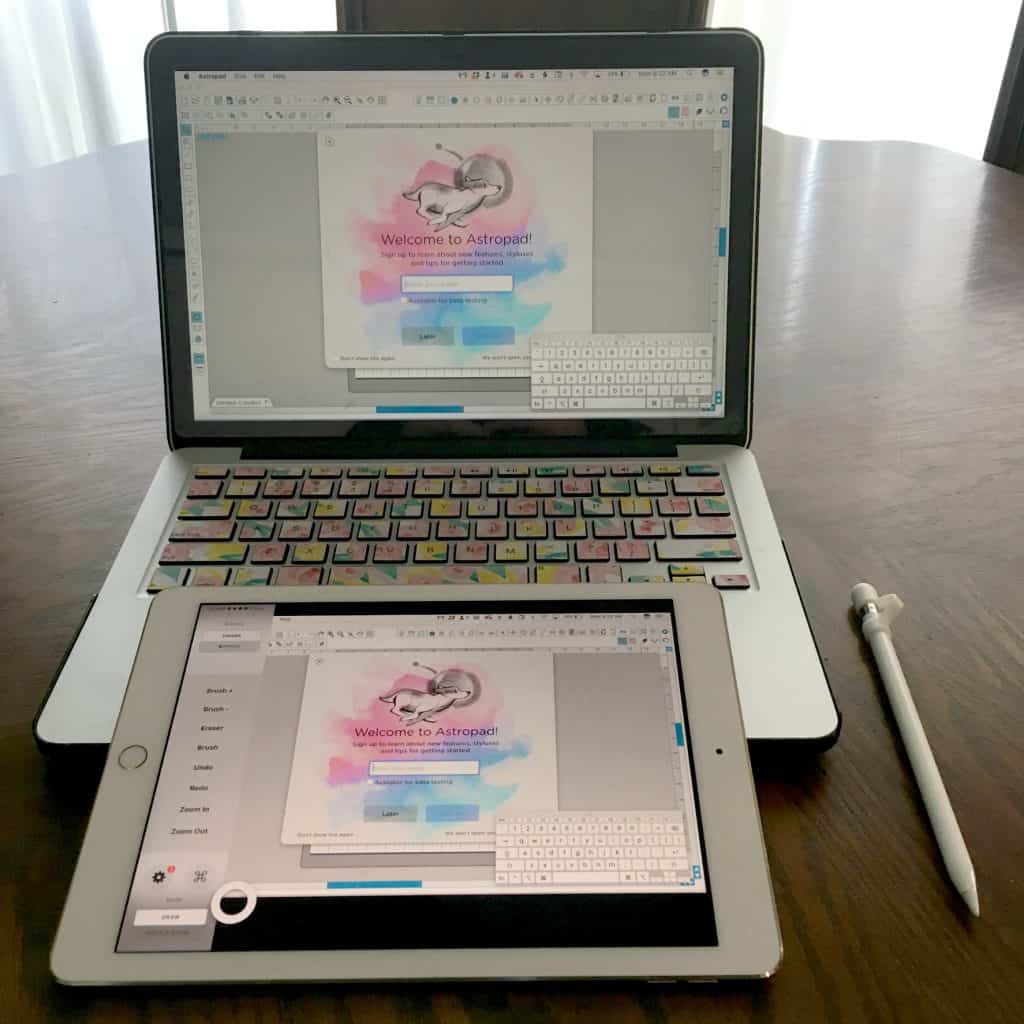
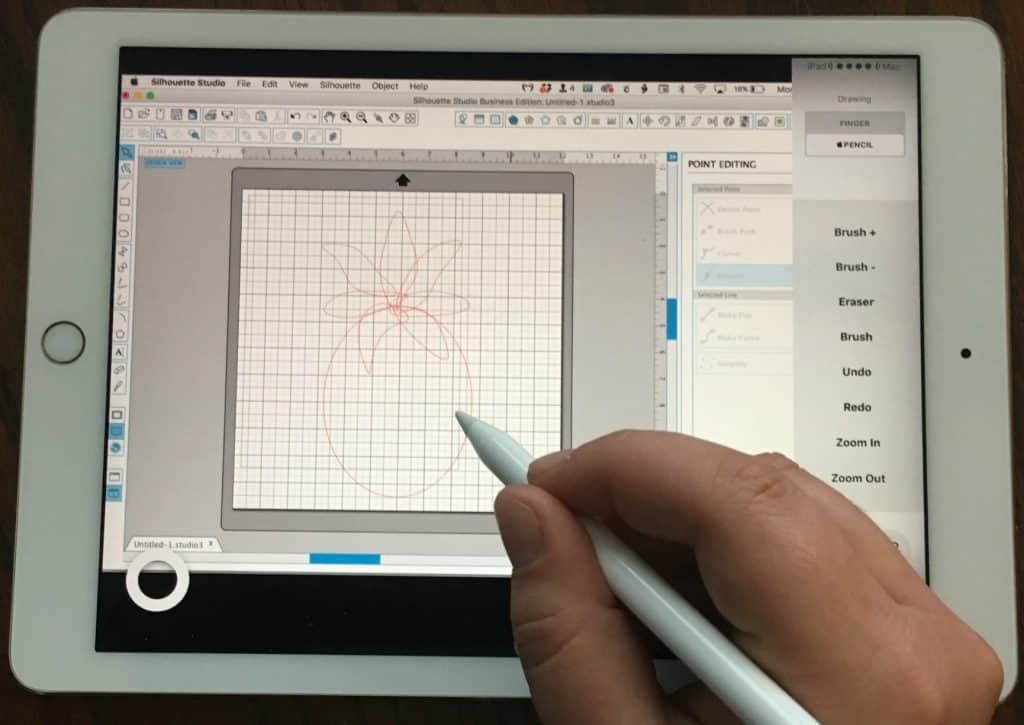
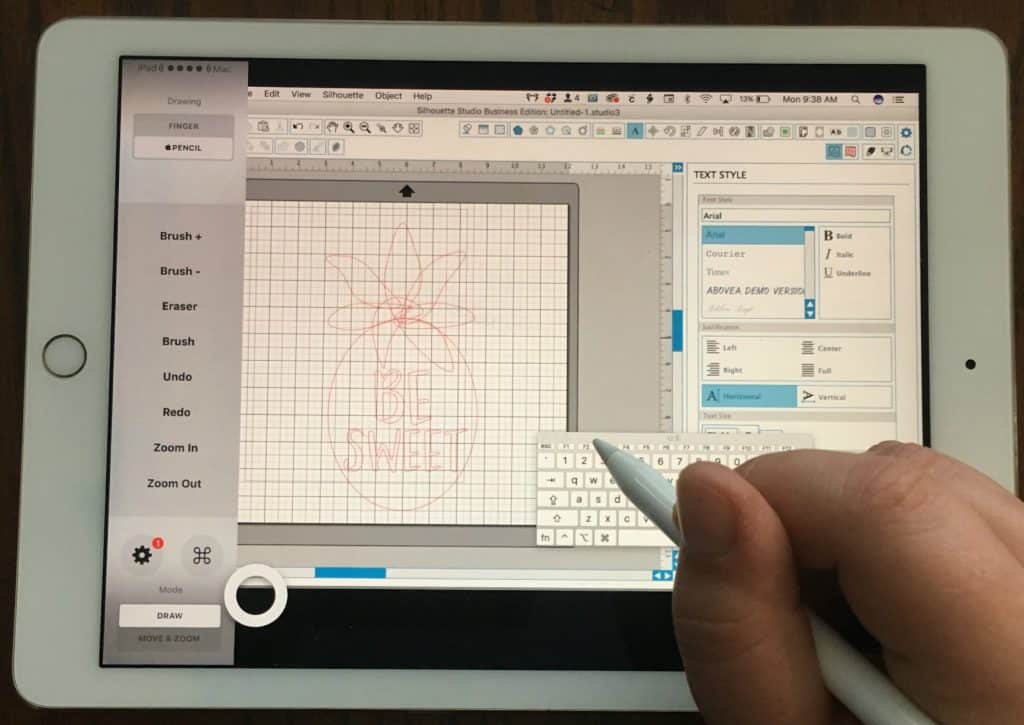
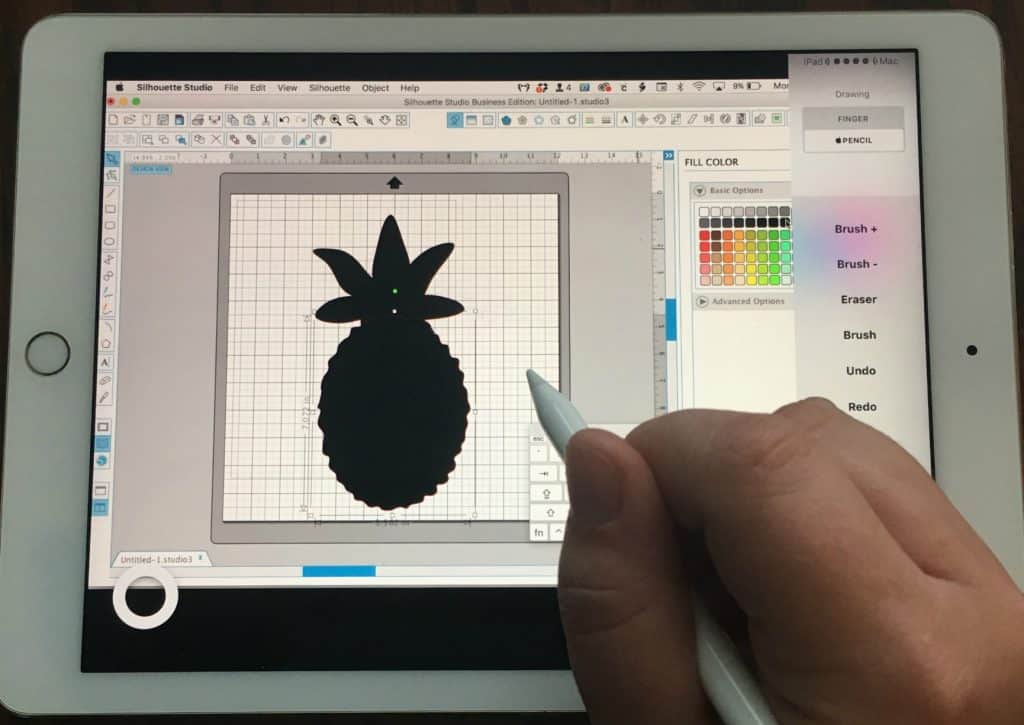
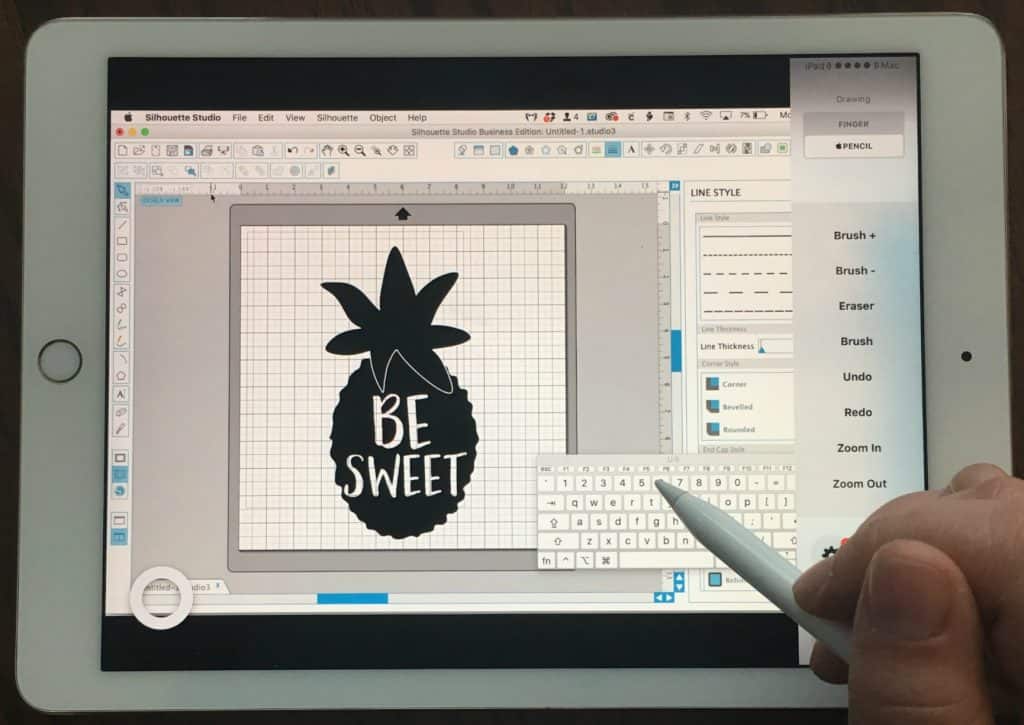
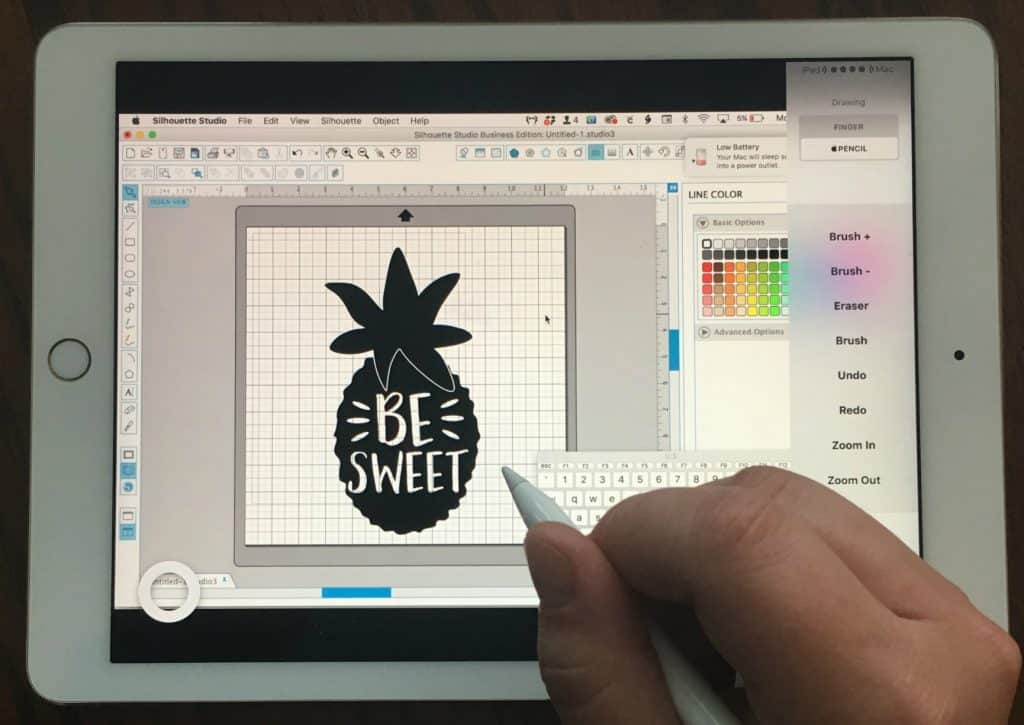
    6. Close the welcome screen, and you can start drawing – right in Silhouette Studio! You’ll use all the same tools and all the functions you know in Silhouette Studio, but they will be right on your iPad Pro. These next photos show me designing a pineapple cut file. (As a side note – I’m not a great artist – but I’ll show you my process.) Tutorial: How to Use iPad Pro as a Drawing Tablet in Silhouette Studio - Great for Silhouette Cameo, Curio, Mint Owners who like to draw! By cuttingforbusiness.com.
      Tutorial: How to Use iPad Pro as a Drawing Tablet in Silhouette Studio - Great for Silhouette Cameo, Curio, Mint Owners who like to draw! By cuttingforbusiness.com.
      Tutorial: How to Use iPad Pro as a Drawing Tablet in Silhouette Studio - Great for Silhouette Cameo, Curio, Mint Owners who like to draw! By cuttingforbusiness.com.
      Tutorial: How to Use iPad Pro as a Drawing Tablet in Silhouette Studio - Great for Silhouette Cameo, Curio, Mint Owners who like to draw! By cuttingforbusiness.com.
      Tutorial: How to Use iPad Pro as a Drawing Tablet in Silhouette Studio - Great for Silhouette Cameo, Curio, Mint Owners who like to draw! By cuttingforbusiness.com.
      Tutorial: How to Use iPad Pro as a Drawing Tablet in Silhouette Studio - Great for Silhouette Cameo, Curio, Mint Owners who like to draw! By cuttingforbusiness.com.
      Tutorial: How to Use iPad Pro as a Drawing Tablet in Silhouette Studio - Great for Silhouette Cameo, Curio, Mint Owners who like to draw! By cuttingforbusiness.com.

    Pretty neat, huh!? A few notes before you run off to try it yourself:

    1. I use Astropad Standard which costs a one time fee of $29. While this is expensive for an app, this is cheaper than a drawing pad and it works great. Astropad also works on iPhones and other iPads, but you wouldn’t be able to use the Apple Pencil unless you have an iPad Pro.
    2. Astropad says that they are working on adding in program keyboards for 2017. Until this happens, you’ll need to turn on the Mac keyboard viewer to type anything.
    3. You should be able to do this with Cricut Design Space as well as many other programs.
    4. Special thanks to Beau Lindsly Studio for originally introducing me to Astropad.
    5. If you don’t have a cap to keep up with your Apple Pencil top, grab one here.

    Save this post to Pinterest:

    Tutorial: How to Use iPad Pro as a Drawing Tablet in Silhouette Studio - Great for Silhouette Cameo, Curio, Mint Owners who like to draw! By cuttingforbusiness.com.

  • Tutorial: How to Create Semi Custom Designs Using Kits

    One of my resolutions for 2017 on the blog is to write more posts about designing in both Silhouette Studio and Cricut Design Space. If you aren’t much of a designer – these posts are for you!

    Lately, I’ve been seeing a shift by designers who create cut files for Silhouette or Cricut designs. Instead of selling a completed design that is ready to cut; a number of designers are offering kits to “assemble” your own cut file. If you remember, I recently created a red truck Valentine design using a kit (click here to view it).

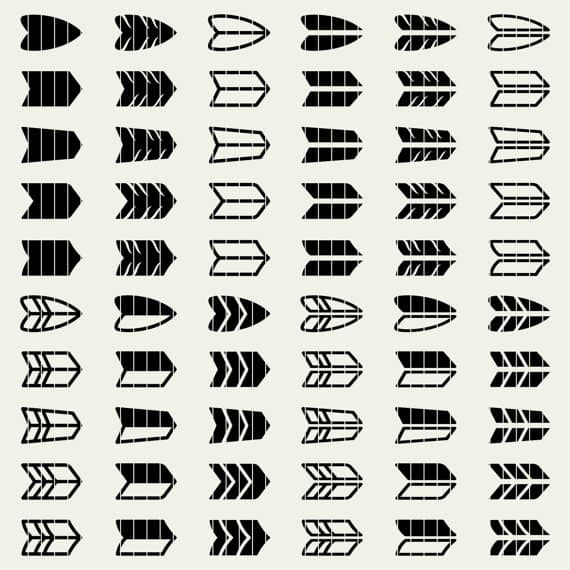
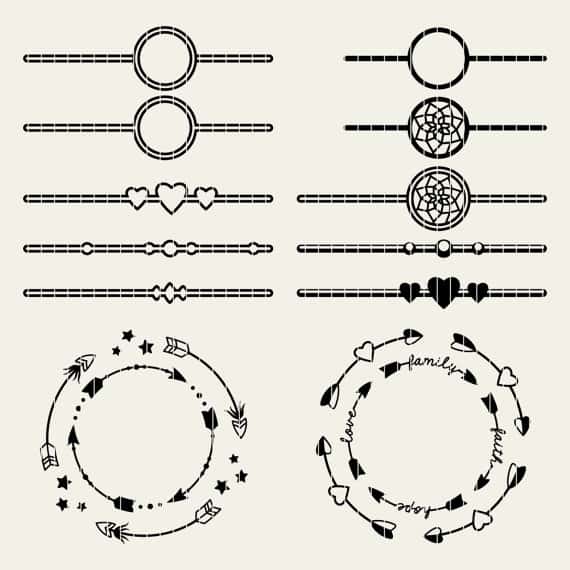
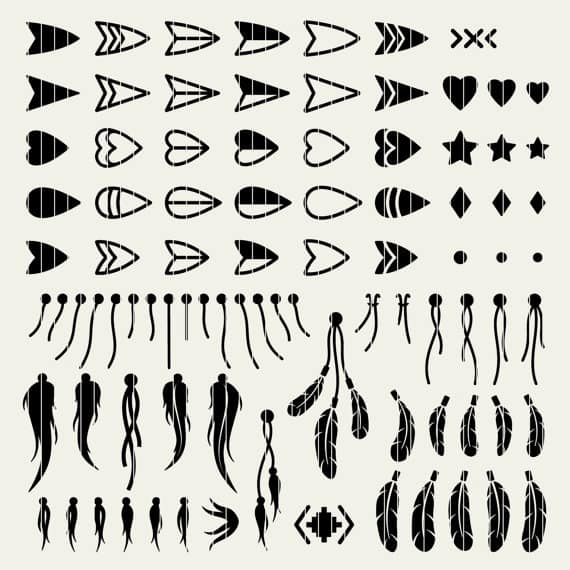
    Kits are a great alternative for crafters who want a more custom cut file, but lack design skills (like me!). Today, I’m showing you how these kits work. The concept is easy: drag pieces of designs together to create a cut file. Since arrows are trendy right now, Olga from Clean Cut Creative donated her popular The Ultimate Arrow Toolkit to me to use as a demo.

    How to Create Semi Custom Designs in Silhouette Studio

    1. After purchasing a kit, decide on which design elements to use in your design. You’ll notice that this kit has arrow backs, arrow shafts, and arrow points. You combine them to create a full arrow. Here’s a peek into the different parts in The Ultimate Arrow ToolkitTutorial: How to Create Semi Custom Designs for Silhouette Studio or Cricut Design Space - by cuttingforbusiness.com
      Tutorial: How to Create Semi Custom Designs for Silhouette Studio or Cricut Design Space - by cuttingforbusiness.com
      Tutorial: How to Create Semi Custom Designs for Silhouette Studio or Cricut Design Space - by cuttingforbusiness.com
      Tutorial: How to Create Semi Custom Designs for Silhouette Studio or Cricut Design Space - by cuttingforbusiness.com
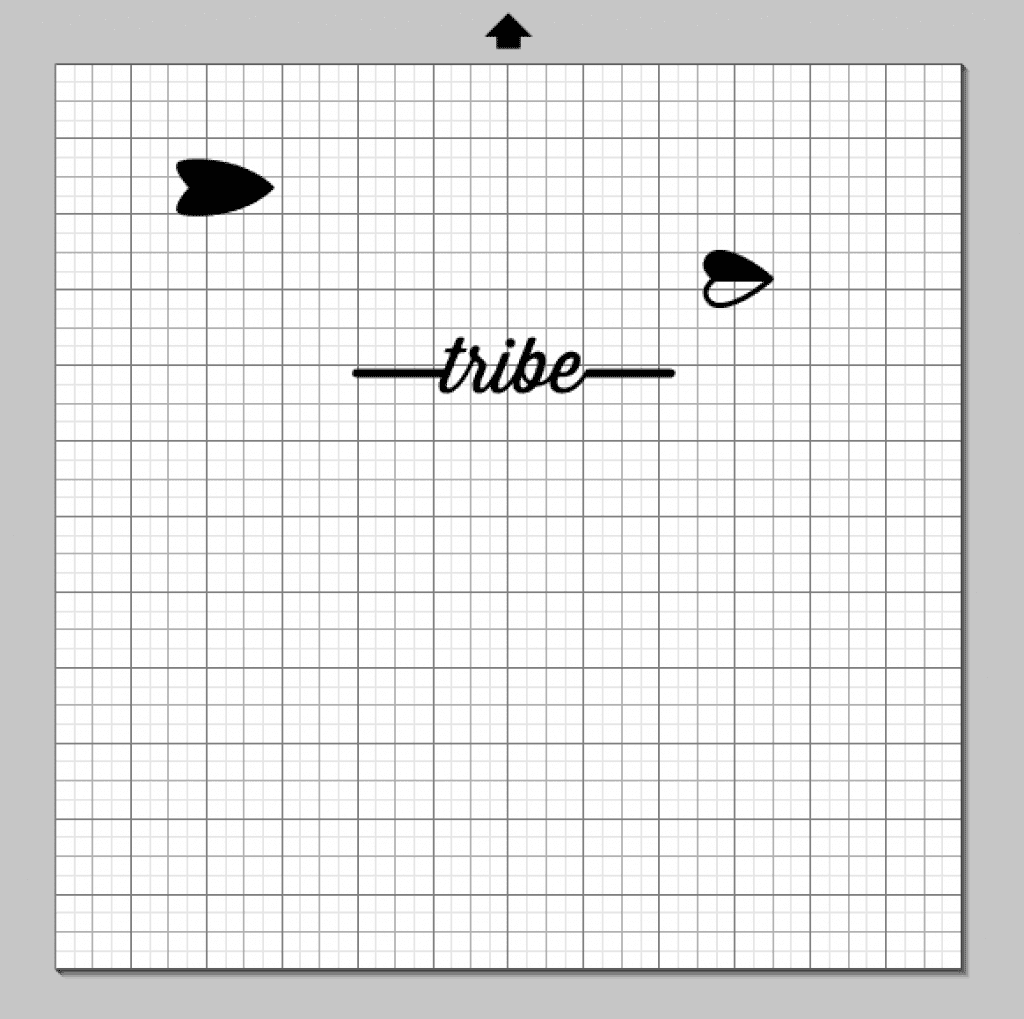
    2. After selecting your design elements, open them all onto the same mat in Silhouette Studio or Cricut Design Space. Depending how your chosen kit is organized for download, you may need to ungroup the elements to use them. After your chosen elements are on the mat, your screen should look similar to this: Tutorial: How to Create Semi Custom Designs for Silhouette Studio or Cricut Design Space - by cuttingforbusiness.com
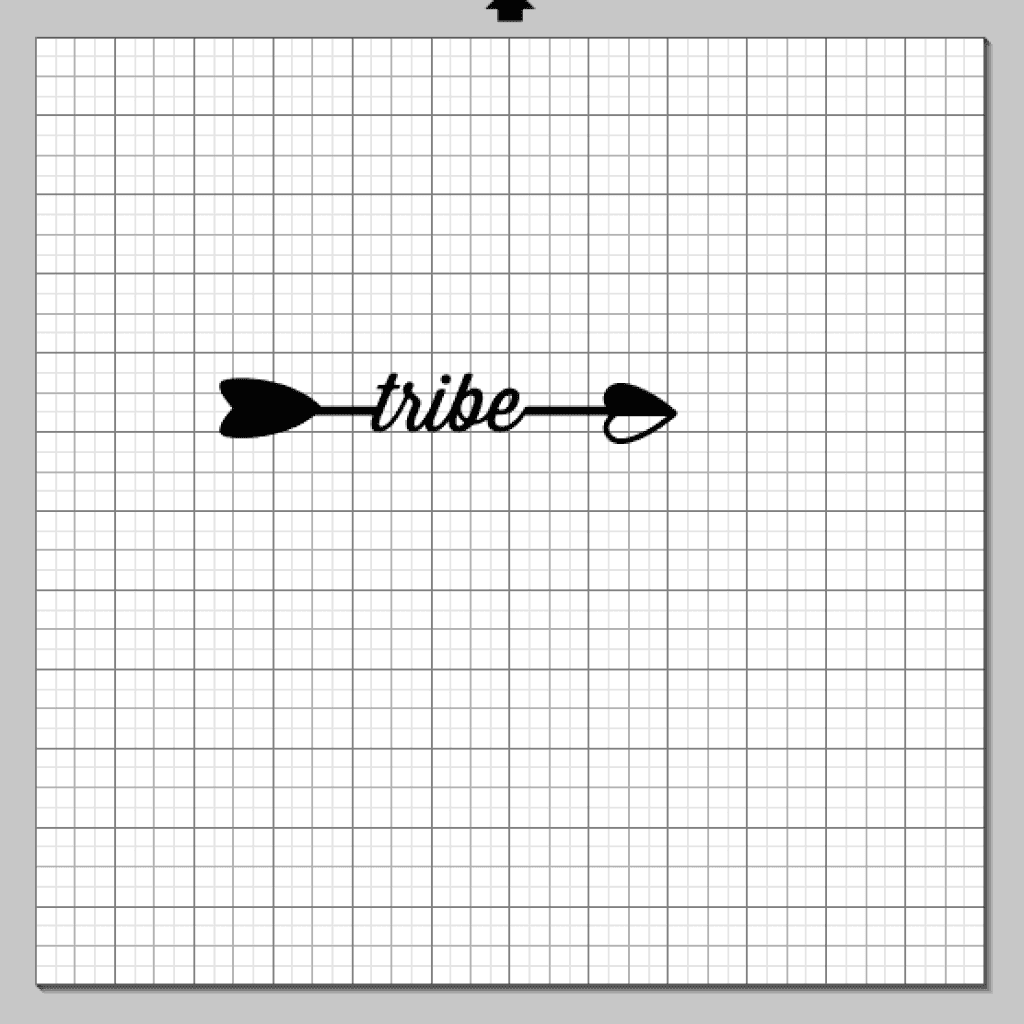
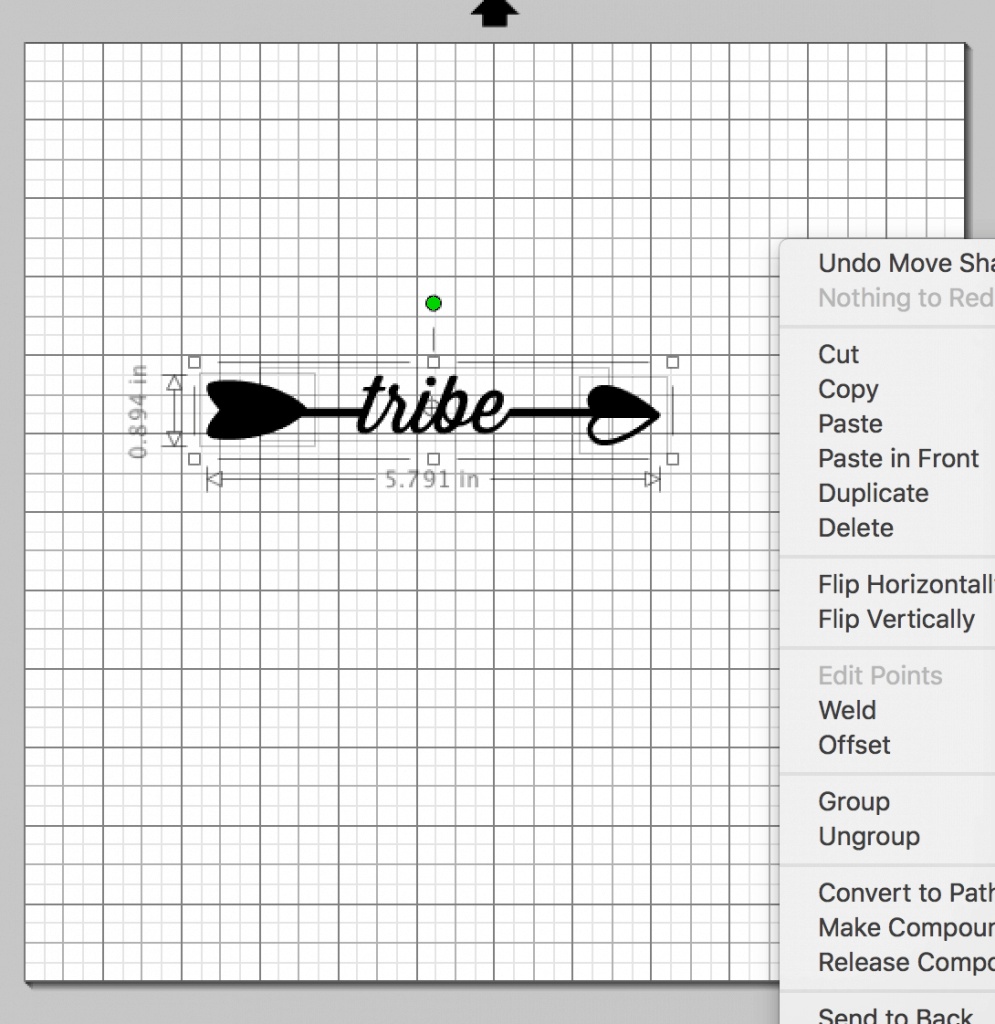
    3. Now, drag your elements into place or align them using the align command. Tutorial: How to Create Semi Custom Designs for Silhouette Studio or Cricut Design Space - by cuttingforbusiness.com
    4. Last, select all parts the of the design and weld them together. Tutorial: How to Create Semi Custom Designs for Silhouette Studio or Cricut Design Space - by cuttingforbusiness.com
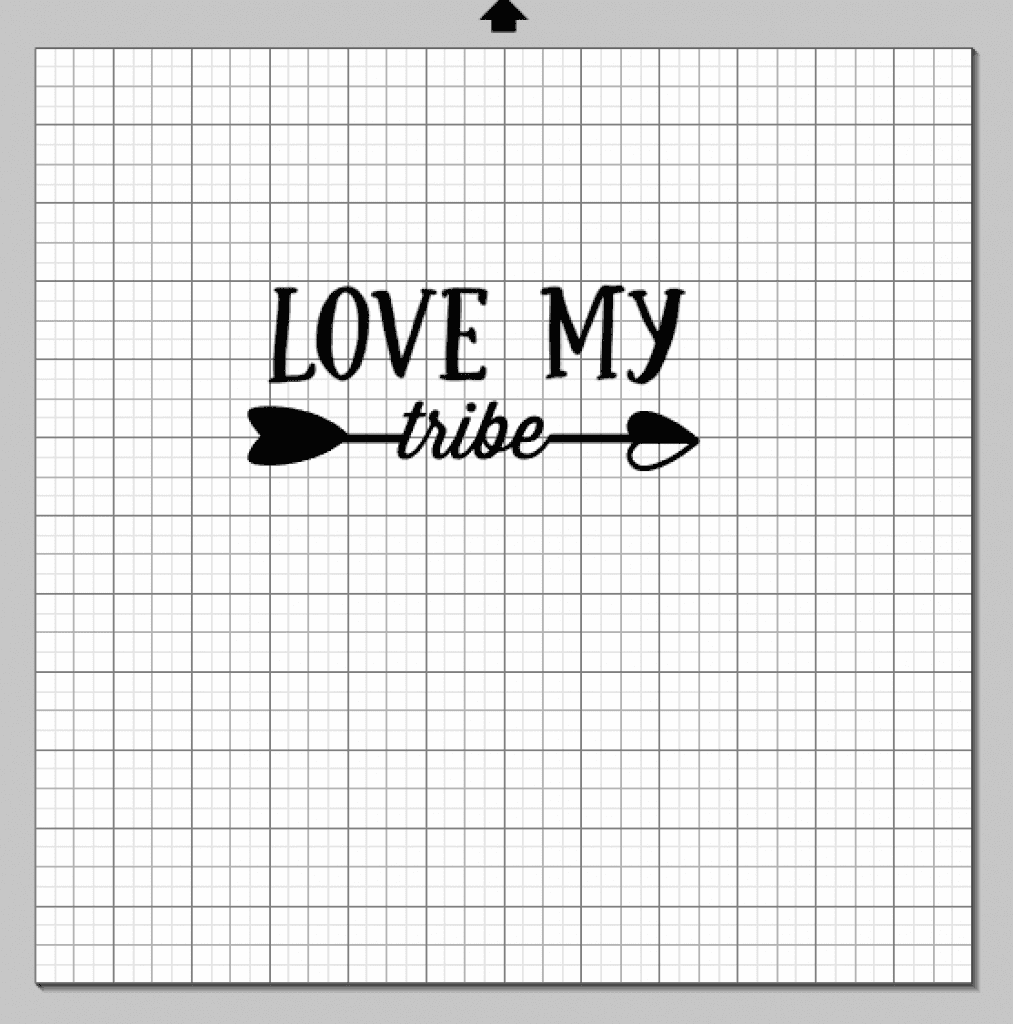
    5. You can use the design as is, or add additional text or design elements. Tutorial: How to Create Semi Custom Designs for Silhouette Studio or Cricut Design Space - by cuttingforbusiness.com

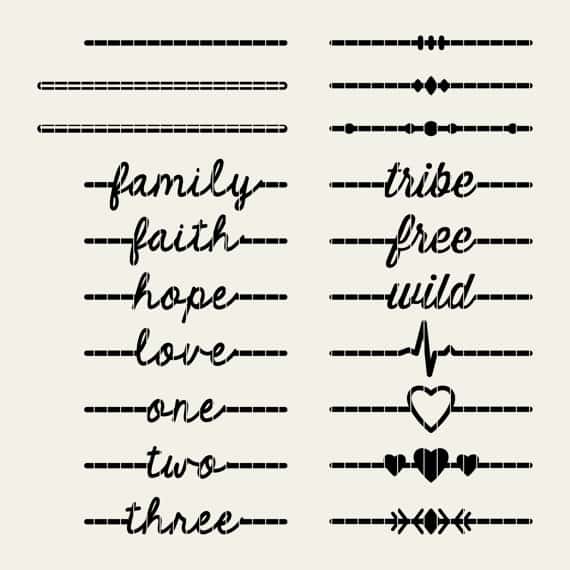
    That’s it! Using kits you can create your own, semi custom design files! And, did I mention that The Ultimate Arrow Toolkit is only $6?! If you are wondering about the font Olga used in “family”, “faith”, and so on – it is KG The Fighter which was slighly offset and available for commercial use for $5.

    Searching for more kits? Try search terms like “design elements”, “elements”, or “graphic packs”.

    Save this tutorial to Pinterest:

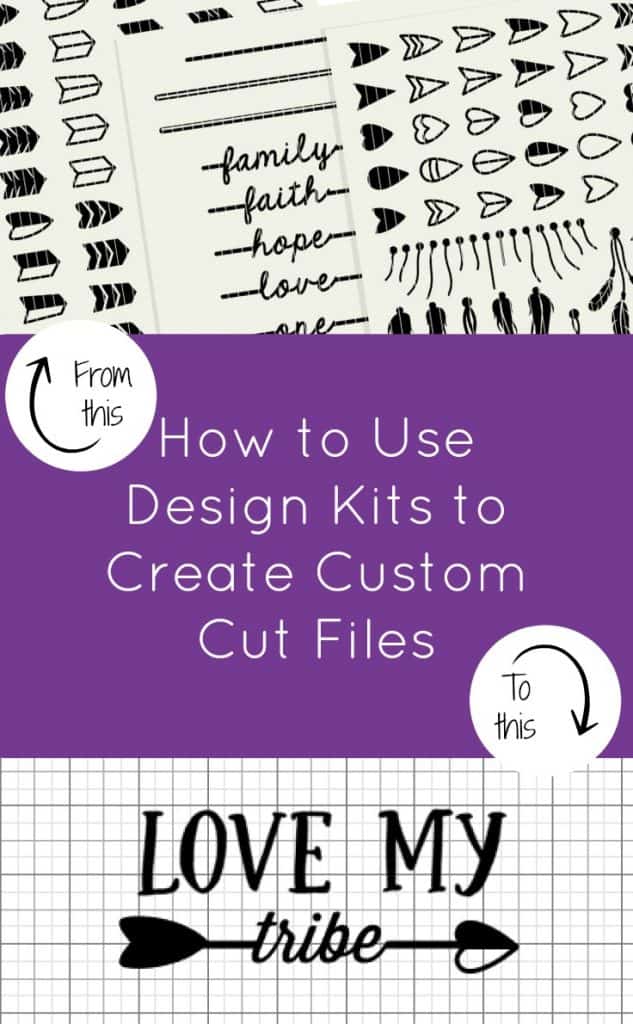
    Tutorial: How to Use Design Kits to Create Semi Custom Cut Files for Silhouette Studio or Cricut - by cuttingforbusiness.com

  • Two Ways to Use PNG files in Silhouette Studio

    I share a lot of freebies on the Cutting for Business Facebook page – and one of the things that I regularly share are PNG files. I get asked all the time – “What can I do with this file in Silhouette Studio?” Today, I’ll share 2 ways to use a PNG file.

    Note: During this tutorial, I’m using a free bundle from Creative Market. You can pick it up this week at this link.

    What is a PNG file?

    PNG stands for Portable Network Graphics and is a format for pictures. It was originally created to replace GIF images because you can compress the file without losing quality.

    Two Ways to Use PNG Files in Silhouette Studio

    Print and Cut Images.

    1. You can open a PNG file in Silhouette Studio by going to “File, then “Open”. Resize your graphic as needed. Two Ways to Use PNG files in Silhouette Studio by cuttingforbusiness.com
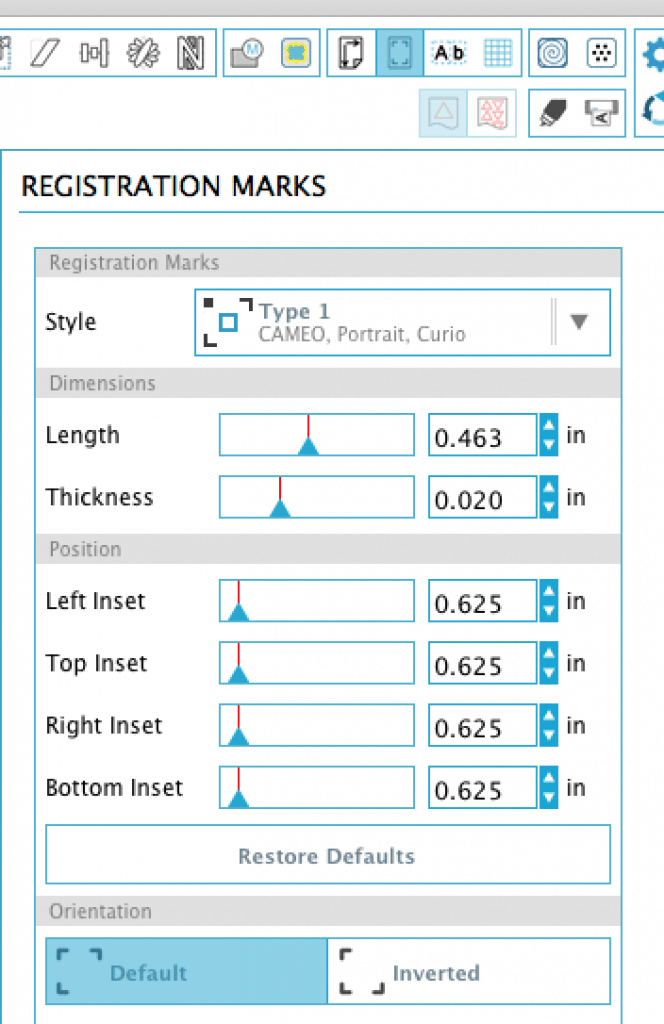
    2. Turn on registration marks by going to the “Registration Marks” icon in the top panel. Then selecting “Type 1”. Two Ways to Use PNG files in Silhouette Studio by cuttingforbusiness.com
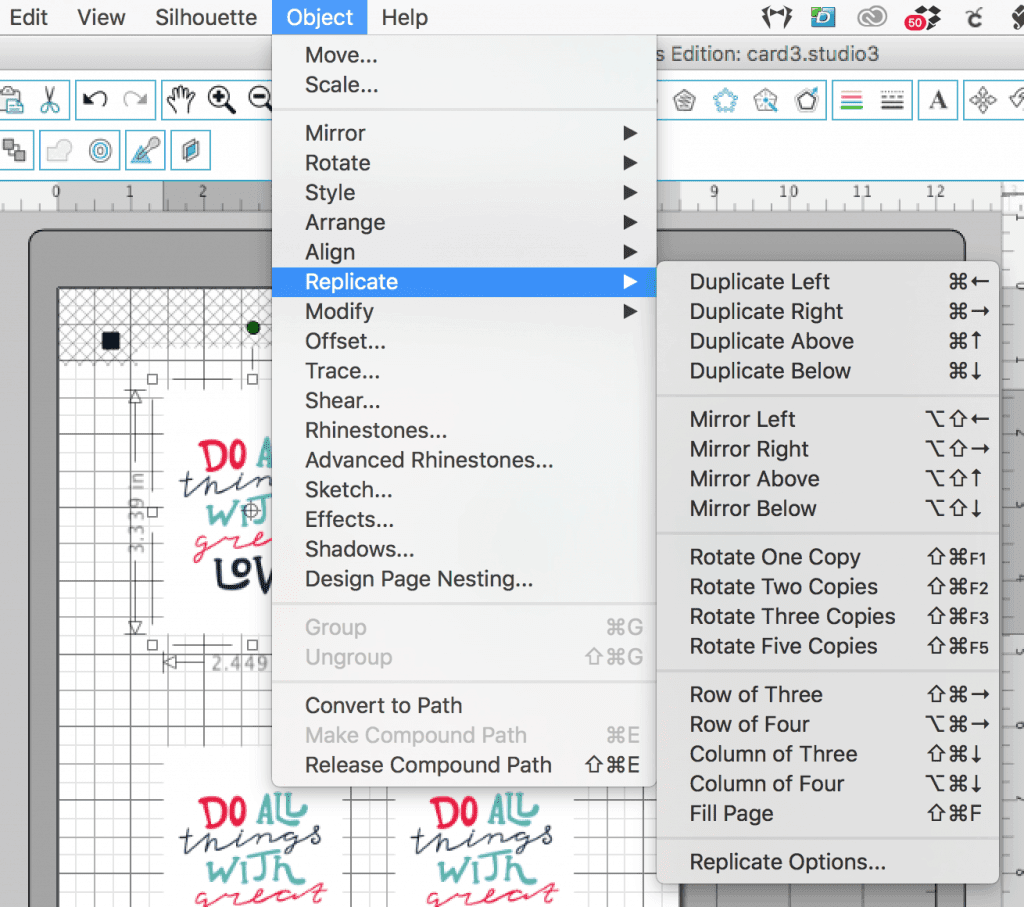
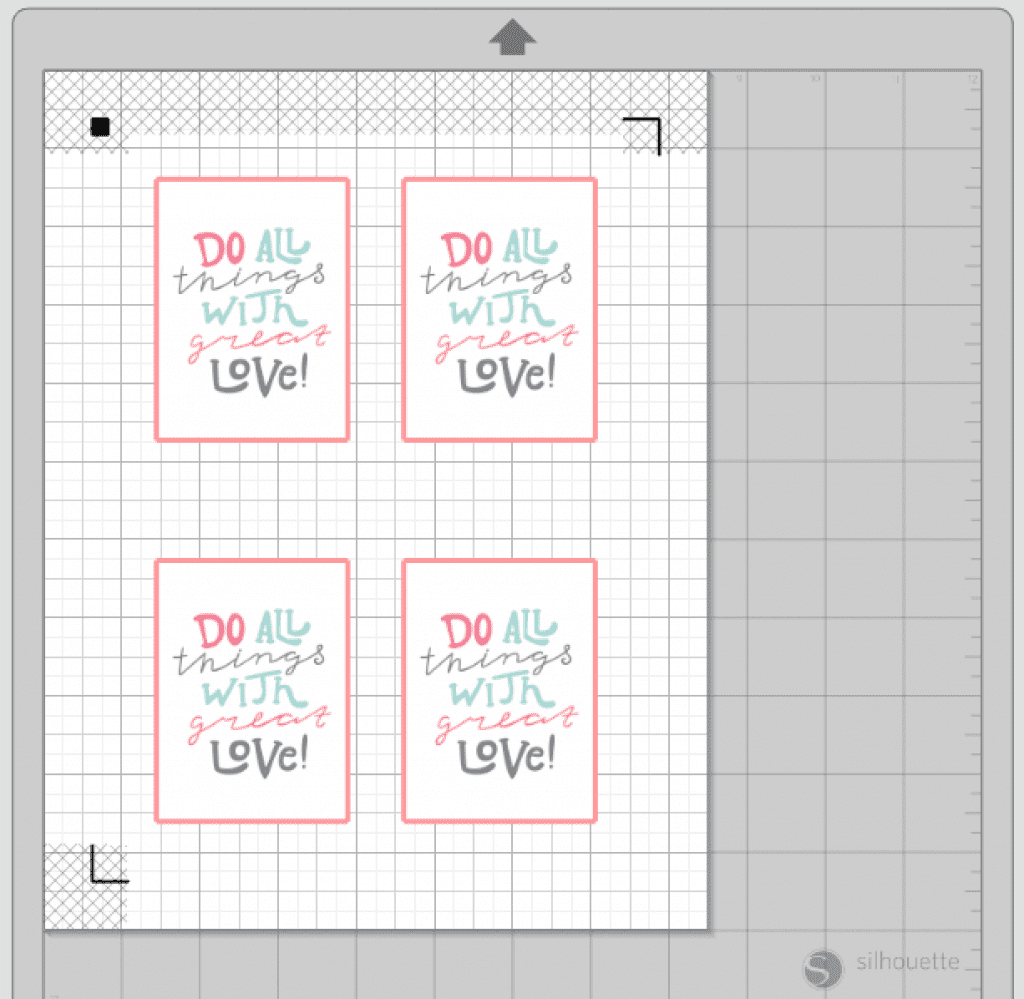
    3. Duplicate the graphic as many times as you need by going to “Object”, then “Replicate”. Two Ways to Use PNG files in Silhouette Studio by cuttingforbusiness.com
    4. Your files are ready are ready to print and cut. Two Ways to Use PNG files in Silhouette Studio by cuttingforbusiness.com

    Cut Files

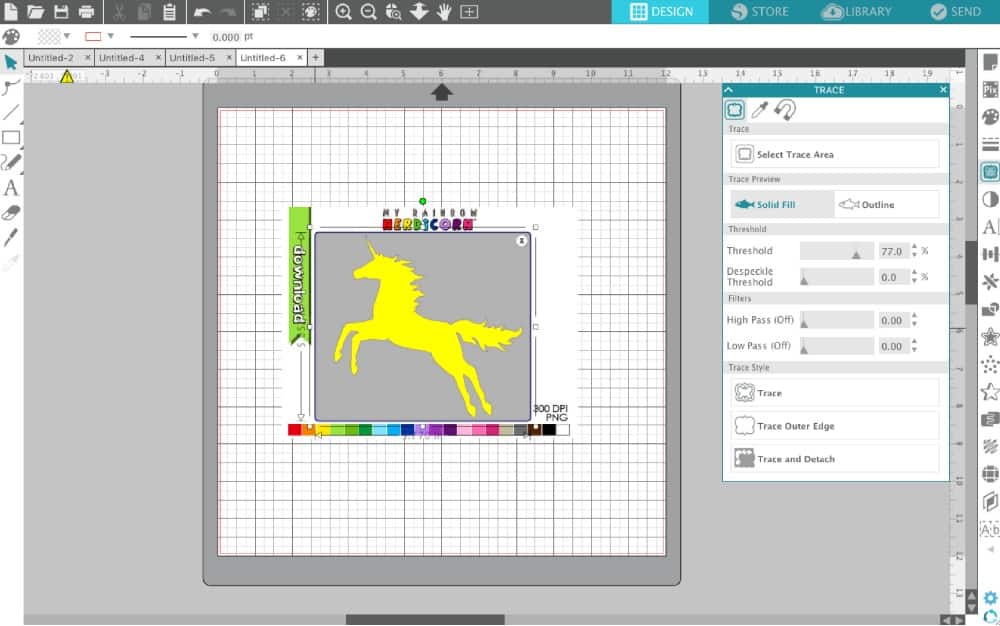
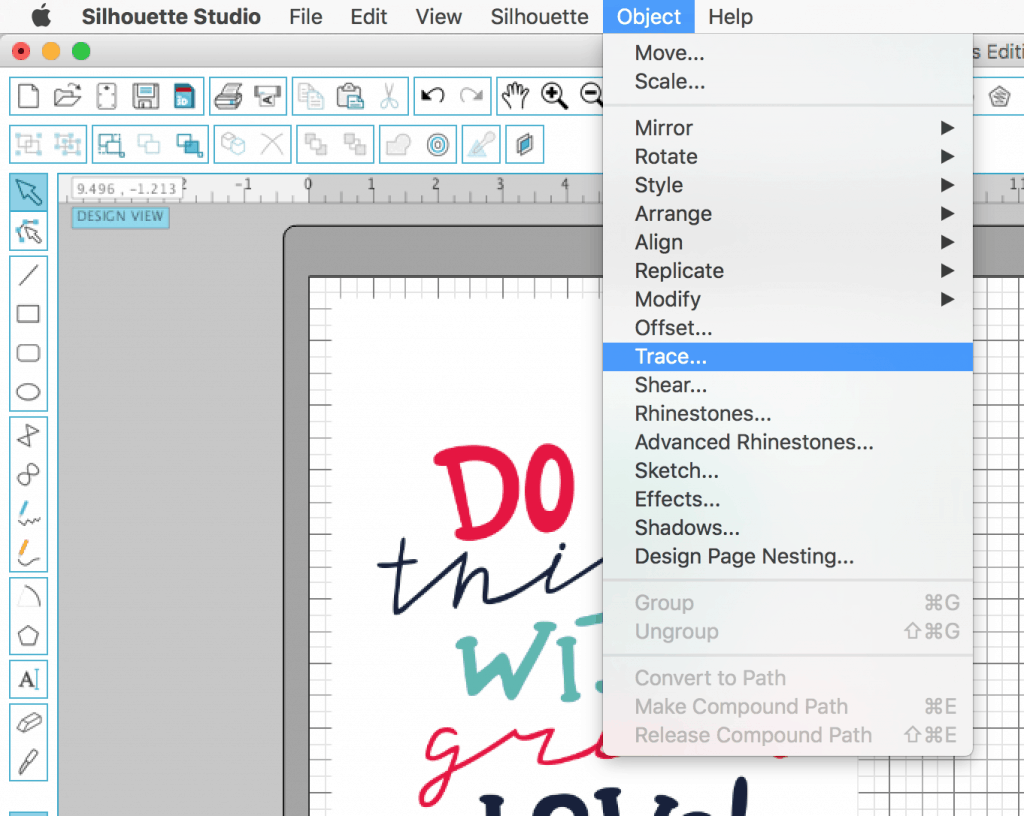
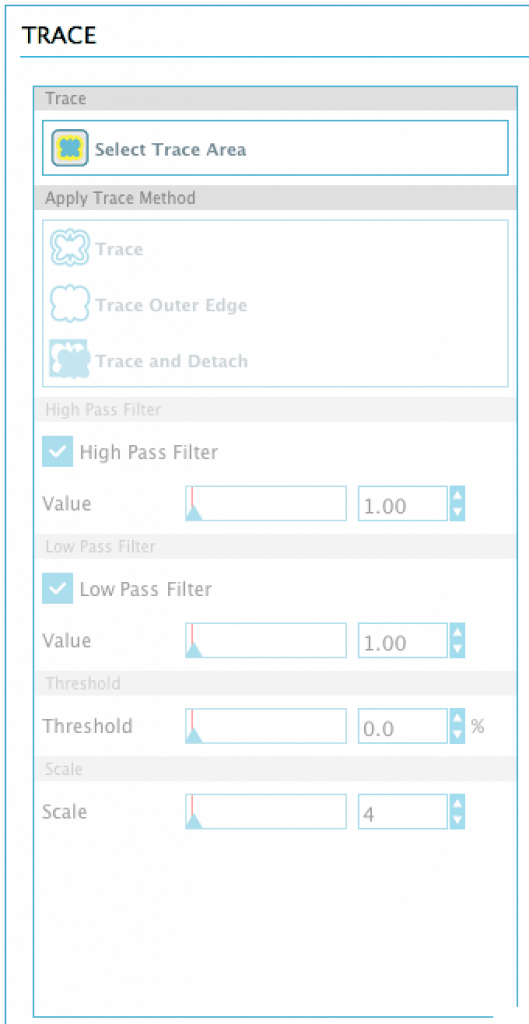
    1.  After opening the PNG file in Silhouette Studio, go to “Object”, then “Trace”. Two Ways to Use PNG files in Silhouette Studio by cuttingforbusiness.com
    2. On the right hand side, click “Select Trace Area”. Two Ways to Use PNG files in Silhouette Studio by cuttingforbusiness.com
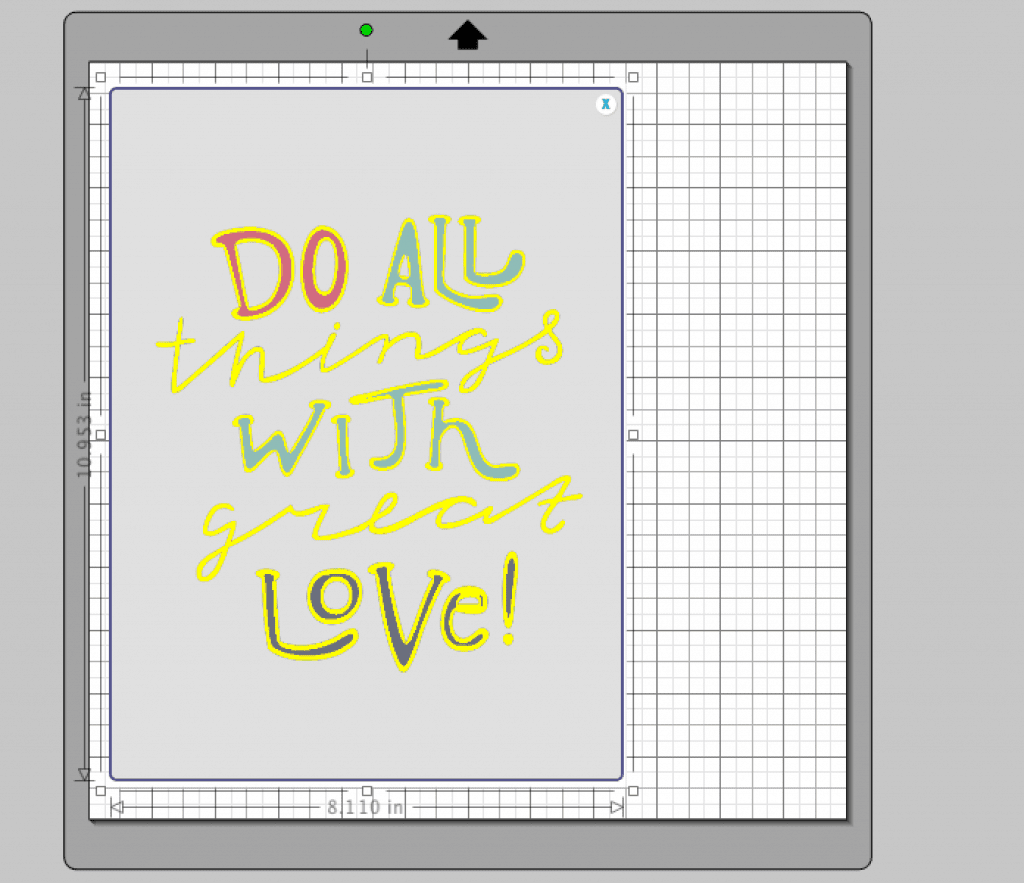
    3. Draw a tracing box around the design. Two Ways to Use PNG files in Silhouette Studio by cuttingforbusiness.com
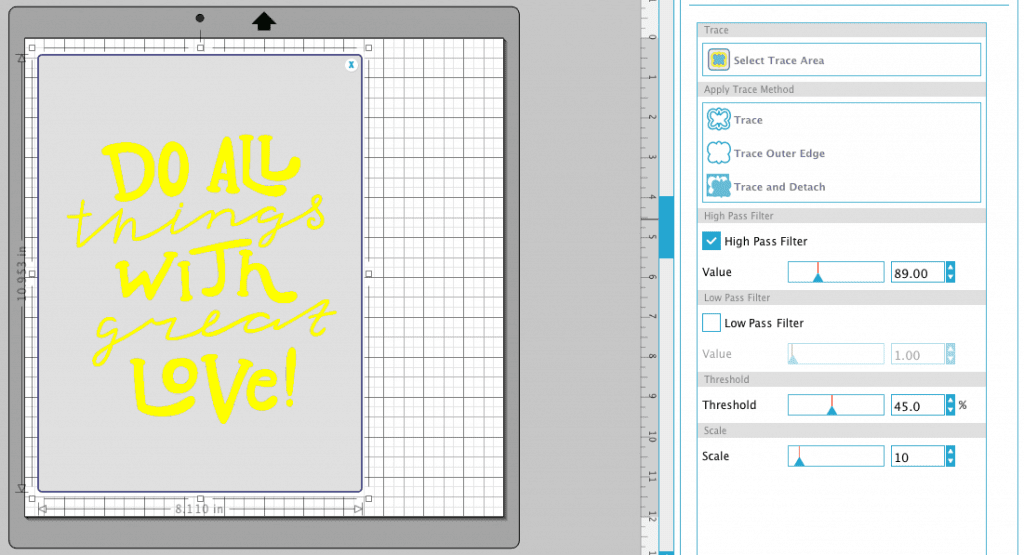
    4. On the right hand side, adjust the “High Pass Filter” until the entire design turns yellow. Then click “Trace”.Two Ways to Use PNG files in Silhouette Studio by cuttingforbusiness.com
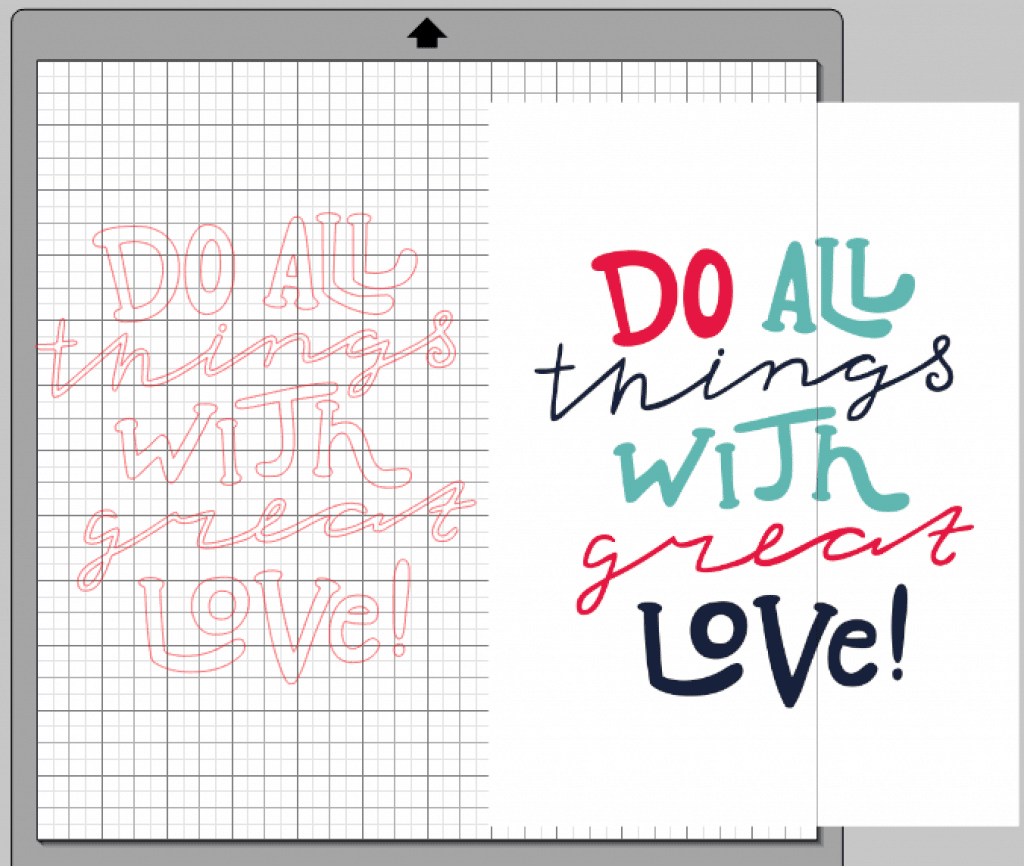
    5. Move over the original design file and – voila! – you’ve got the same design ready to be cut out in paper, vinyl, or another material. Two Ways to Use PNG files in Silhouette Studio by cuttingforbusiness.com

    Now, be sure that you follow Cutting for Business on Facebook so I can share a lot of freebies with you!

    Save this post to Pinterest:

    Two Ways to Use PNG files in Silhouette Studio by cuttingforbusiness.com