Author: christine

  • XTool P2 vs Glowforge – Which One is Better?

    Earlier in the year my Glowforge started having problems. It started barely being able to cut through materials – including Proofgrade materials.

    Unfortunately, my Glowforge is pretty old – I ordered it in late 2018. And, it’s got thousands of hours on it. It is well beyond the warranty. I am not willing to send the machine to Glowforge for several hundred dollars to replace the laser tube.

    Since I have been very happy with my xTool M1, I decided to try out the xTool P2 – which is a direct competitor to Glowforge. Now that I have had the xTool P2 for several months, I’m sharing my opinions on the xTool P2 vs Glowforge all week long.
    xTool P2 vs Glowforge - Which One is Better - cuttingforbusiness.com

    xTool P2 vs Glowforge: What Are The Differences?
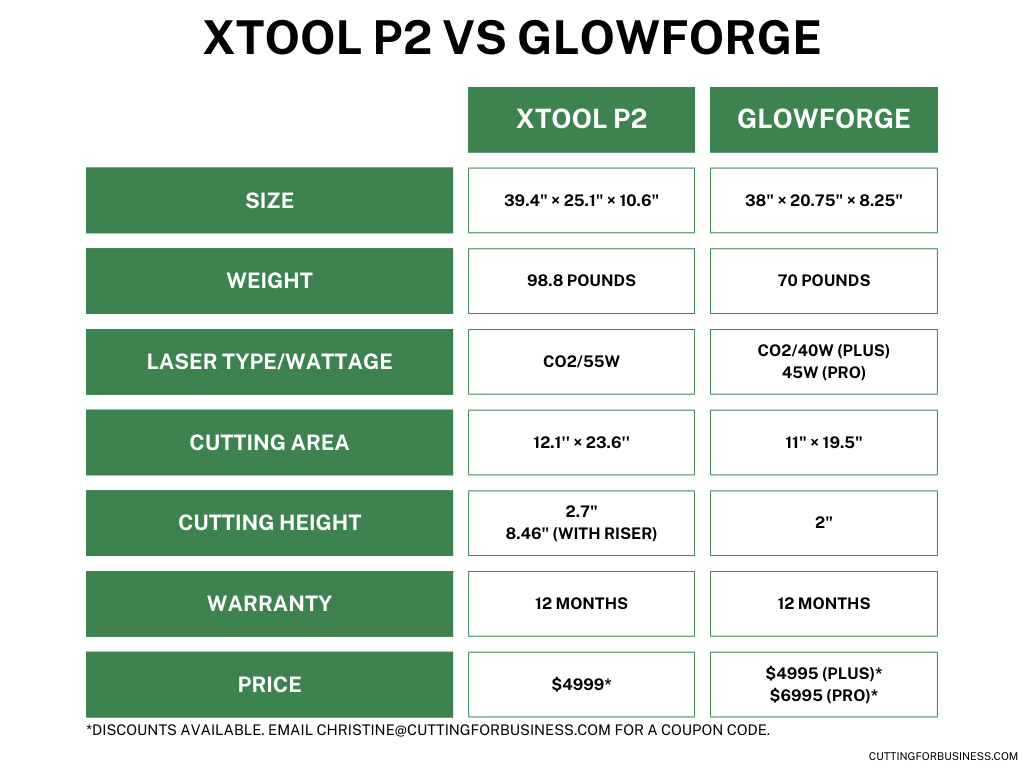
    XTool P2 vs. Glowforge Comparison Chart - cuttingforbusiness.com.

    I created a comparison chart of the xTool P2 and Glowforge features. But, I’m also going to expand on some of the key differences and similarities below.

    xTool P2 vs Glowforge: Size

    The size differences between the two machines are negligible. The xTool P2 is slightly larger.

    xTool P2 vs Glowforge: Weight

    The xTool P2 weighs nearly 30 pounds more than the Glowforge. Honestly, the weight difference is also negligible because neither machine can be safely carried or moved by a single person. And, if your table or workspace will support a 70 pound machine, it should also support a 98 pound machine.

    xTool P2 vs Glowforge: Laser Type

    Both the xTool P2 and the Glowforge are CO2 lasers. The xTool P2 is a 55W machine; the Glowforge is available as either a 40W or a 45W.

    The higher the watts, the faster the machine cuts. Faster cuts lead to increased productivity. (Yay for more work done in less time!)

    xTool P2 vs Glowforge: Cutting Area

    The cutting area of the xTool P2 is slightly larger than the Glowforge.

    While not included on the chart, xTool P2 has a conveyor belt that automatically feeds materials up to 19.6″ and 118” inches long. The Glowforge Pro has a passthrough slot where users can manually feed materials up to 20″ wide, 1/4″ thick, and infinitely long.

    xTool P2 vs Glowforge: Cutting Height

    The xTool P2 and the Glowforge have similar cutting heights (this means the height of the material in the machine). The cutting height of the xTool P2 is 2.7″ and the Glowforge 2″. However, the xTool P2 has a riser base that can extend the cutting height to 8.46″. Glowforge does not.

    Now, before the critics come in: Yes, you can cut off the bottom of the Glowforge and increase the cutting height. However, for the average user – this isn’t practical. And, it voids your warranty.

    xTool P2 vs Glowforge: Warranty

    The warranty is the same on both machines: 12 months.

    xTool P2 vs Glowforge: Miscellaneous Features

    While not listed on the chart, the xTool P2 also features some advanced safety features: an automatic lock, in machine water tank, and an emergency stop button.

    The xTool P2 has a rotary attachment (perfect for cups!), and the ability to engrave curved surfaces. Glowforge has neither of these features.

    xTool P2 vs Glowforge: Software

    The xTool P2 runs on software installed on your computer, while the Glowforge uses a cloud. Using a cloud means that usage can slow down during peak periods – or Glowforge can prevent use at all.

    xTool P2 vs Glowforge: Price

    Finally, the xTools P2 costs $4999 versus the Glowforge at $4995 (Plus) or $6995 (Pro). Discounts available: Save on xTool or Glowforge.

    Ready to see the xTool P2 in action? See more xTool P2 articles and tutorials.

  • What is Threads?

    Have you heard about Threads? Maybe you are already on the Threads app? Let’s take a look at it today.

    What is Threads? Why You Should Join - cuttingforbusiness.com.

    What is Threads?

    Several months ago, the Threads app was released by Meta – the parent company of Instagram, Facebook, and WhatsApp. Threads is a newer social media platform, and is in direct competition to Twitter.

    Like Twitter, Threads has a focus on text conversations. Threads users can post text updates as long as 500 characters, photos, and videos up to 5 minutes long. And, there is an estimated user base of 141 million as of December 2023 (source).

    I’ve been on Threads since it first launched, but I’ve been seeing more crafters and makers joining.

    Why Am I Posting About Threads Right Now?

    My Threads feed is often pretty quiet. I assume that of those 141 million users – most are not actively using the platform.

    So, why am I posting about it now? In the last week, there has been a huge push in women supporting women. I’m seeing women led businesses reaching out to each other to join together and grow their accounts.

    Much of this is due to some changes to the Instagram algorithm. Many creators and business owners are struggling to be seen on Instagram – and taking their efforts over to Threads.

    I see now as the perfect time to jump in the conversation over on Threads.

    Should You Join Threads?

    In a nutshell, Threads is just another social media network. Whether you want to spend the time on another social media network is up to you.

    However, I do recommend you go over and create an account so that you can reserve your business username. For example, I wouldn’t be happy if someone was using cuttingforbusiness on Threads. So, I made sure I owned it. You should do the same.

    How Do You Sign Up for Threads?

    Signing up for Threads is easy, visit threads.net or download the Threads app.

    Want to follow me? Cutting for Business on Threads. Better yet: After you join, tag me and I’ll come reply and follow you. ❤️

    What’s Different About Threads?

    1. No ads. Threads currently doesn’t have any ads – yet. Mark Zuckerberg has been open about eventually monetizing Threads.
    2. No hashtags. Unlike other social media networks, hashtags don’t work on Threads. You can add them to your post, but they aren’t clickable links. Hashtag functionality (called tags) has now been added.
    3. Limited editing. Read what you post before you post it. You can only edit your post within the first few minutes of posting it. After that, you’ll have to delete and repost it.
    4. Choose commenters. When you post on Threads, you can choose who can comment on your post: Everyone, only those tagged, profiles you follow. Why do I love this? If you set the replies to only “profiles you follow”, you can eliminate potential spam.
    5. No trending page/section. Threads doesn’t have a section that tells you what is popular on the network at the moment.

    Tell me in the comments: What do you think of Threads?

  • Silhouette Studio Tutorial: String of Christmas Lights SVG

    Design with Me is a new regular feature on Cutting for Business! Each Friday, I’ll bring you a new Silhouette Studio tutorial featuring how to design an SVG.

    ‘Tis the season! Do you decorate the outside of your house? I’m sad to say that we don’t decorate the outside of our house. Unfortunately, our home sits so far off the road – our lights wouldn’t be seen.

    So, let’s draw some Christmas lights.

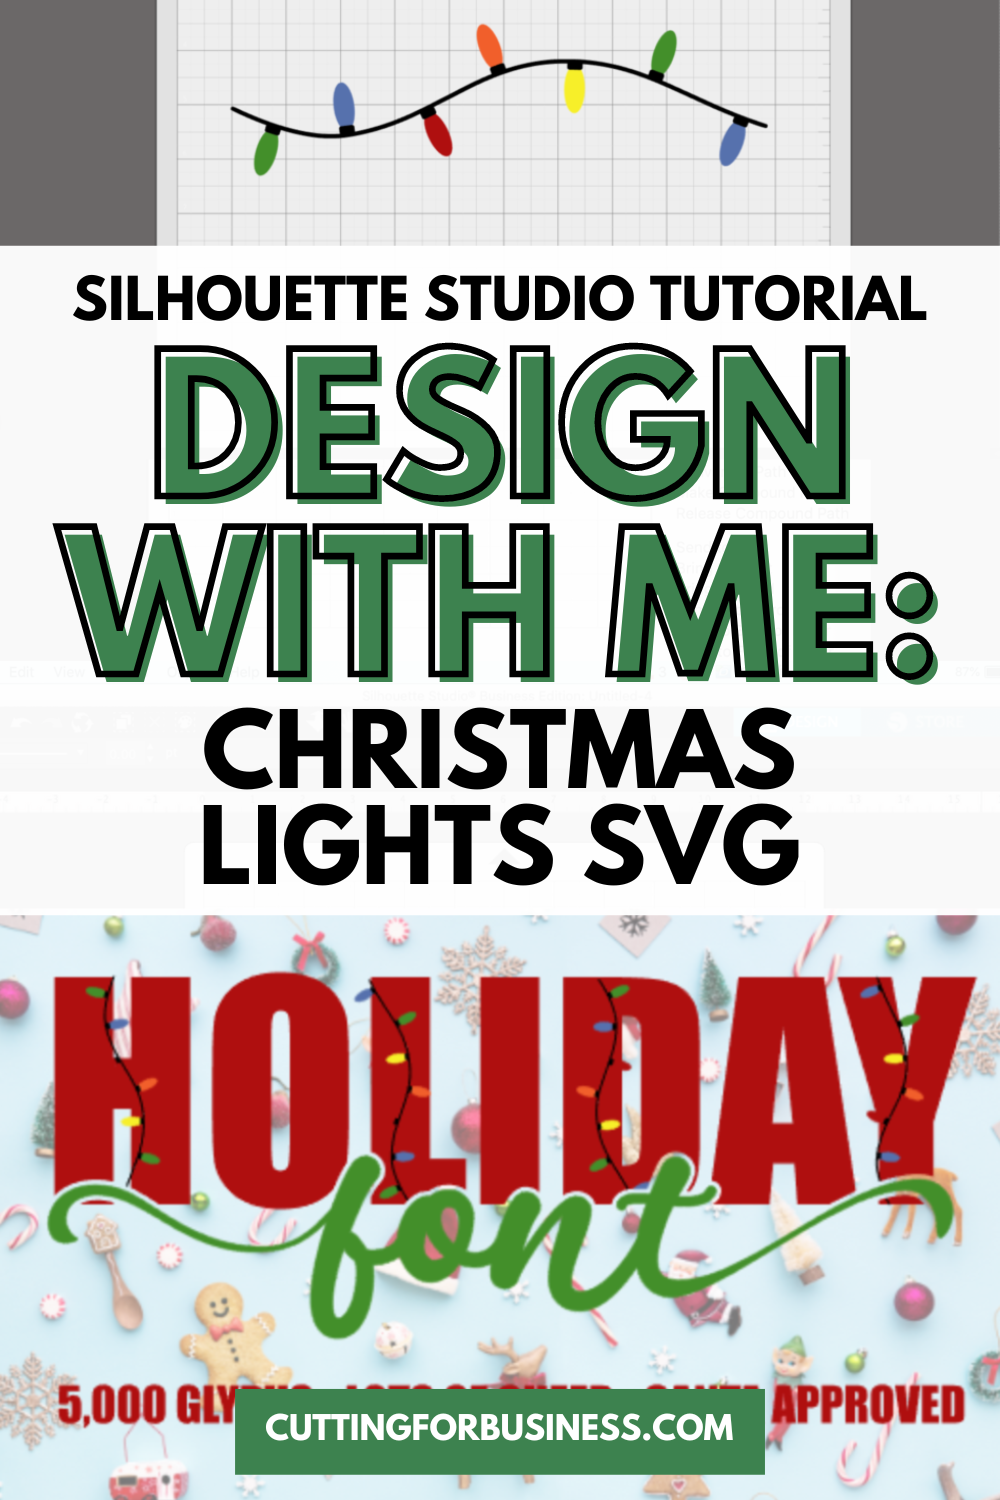
    Silhouette Studio Tutorial: String of Christmas Lights SVG - cuttingforbusiness.com

    Silhouette Studio Tutorial: String of Christmas Lights SVG

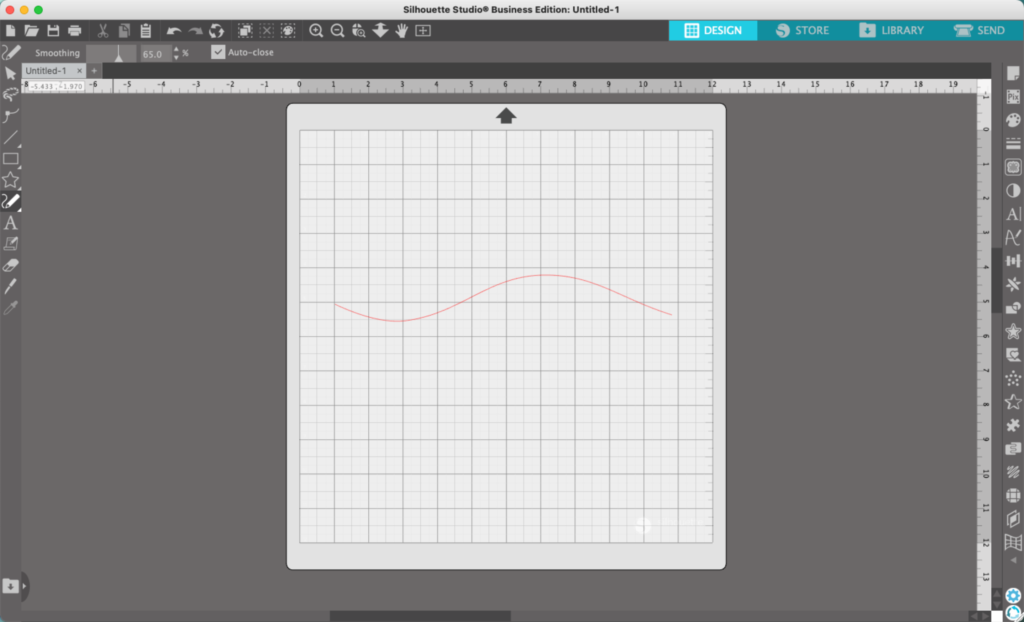
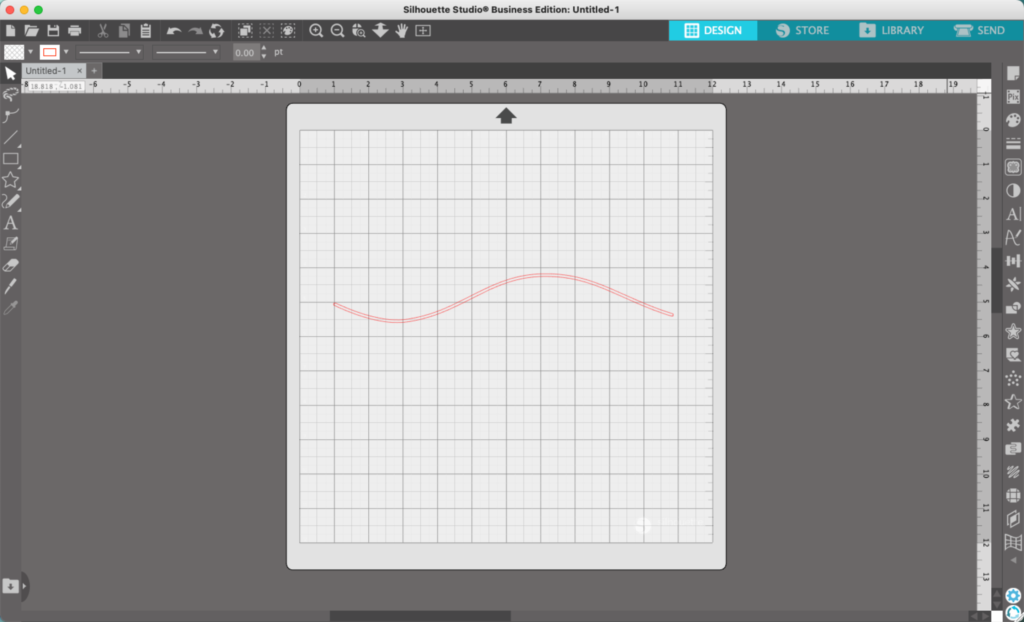
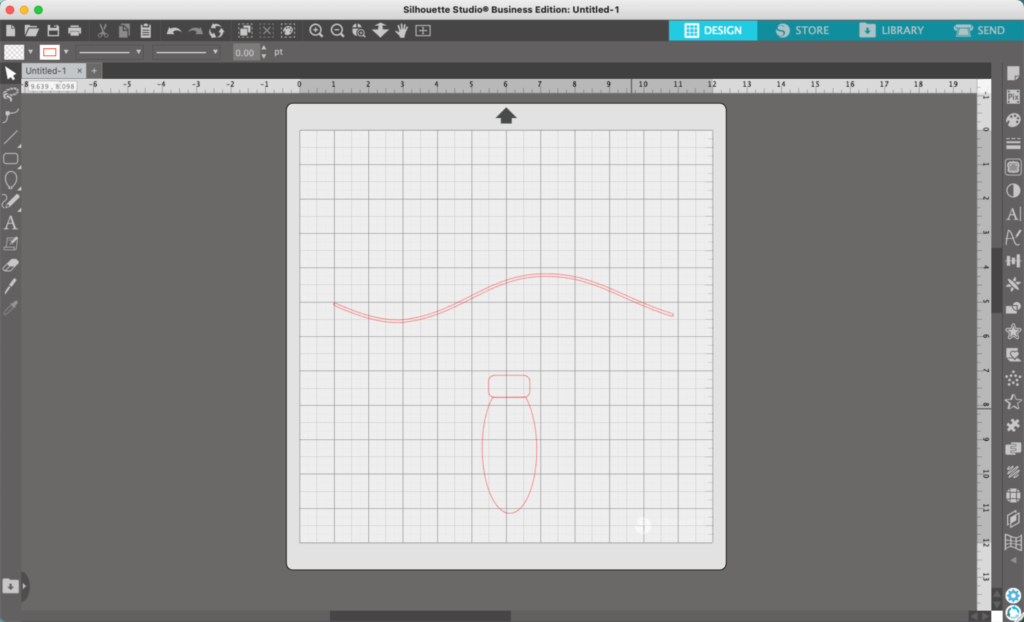
    1. In Silhouette Studio, draw a wavy line using the ‘Draw Smooth Freehand’ tool. If your line isn’t smooth, you can change the amount of smoothing in the toolbar. I keep mine set around 60% to 70%.
    Silhouette Studio Screenshot - cuttingforbusiness.com

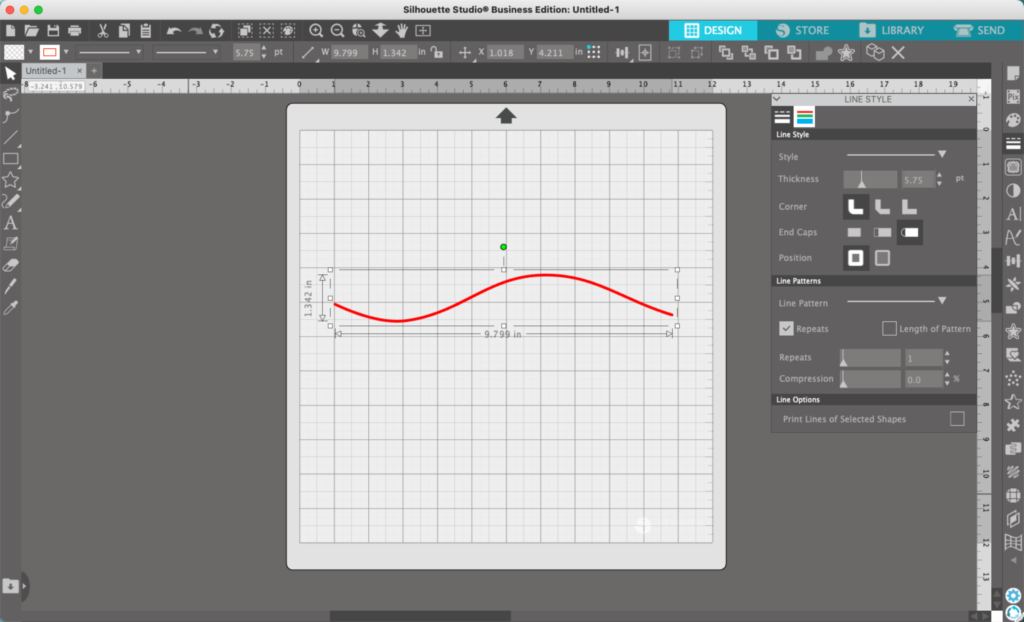
    2. Navigate to ‘Panels’, ‘Line Style’. Thicken your line.

    Silhouette Studio Screenshot - cuttingforbusiness.com

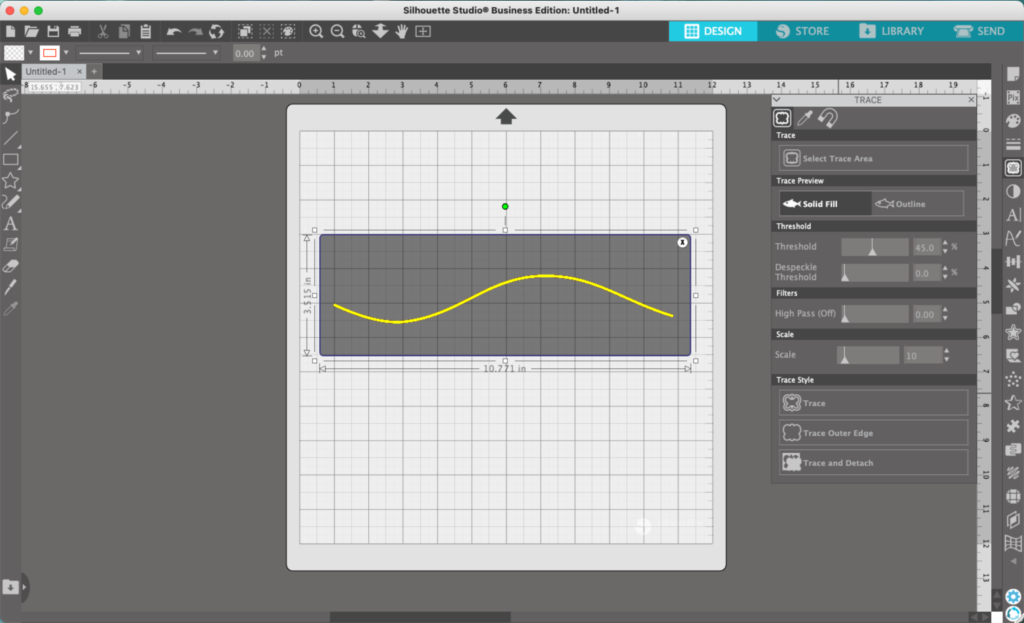
    3. From ‘Panels’, navigate to ‘Trace’. Trace your thickened line and delete the original.

    Silhouette Studio Screenshot - cuttingforbusiness.com
    Silhouette Studio Screenshot - cuttingforbusiness.com

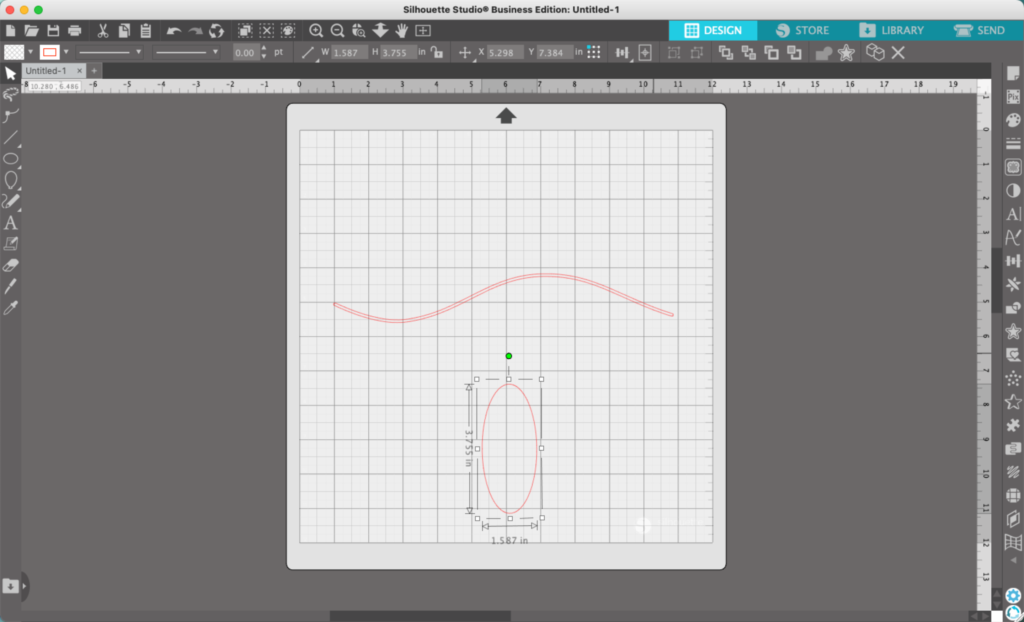
    3. Use the ‘Draw an Ellipse’ tool to draw an oval, or choose from Flexishapes. In Flexishapes, the teardrop and the balloon will both probably work.

    Silhouette Studio Screenshot - cuttingforbusiness.com

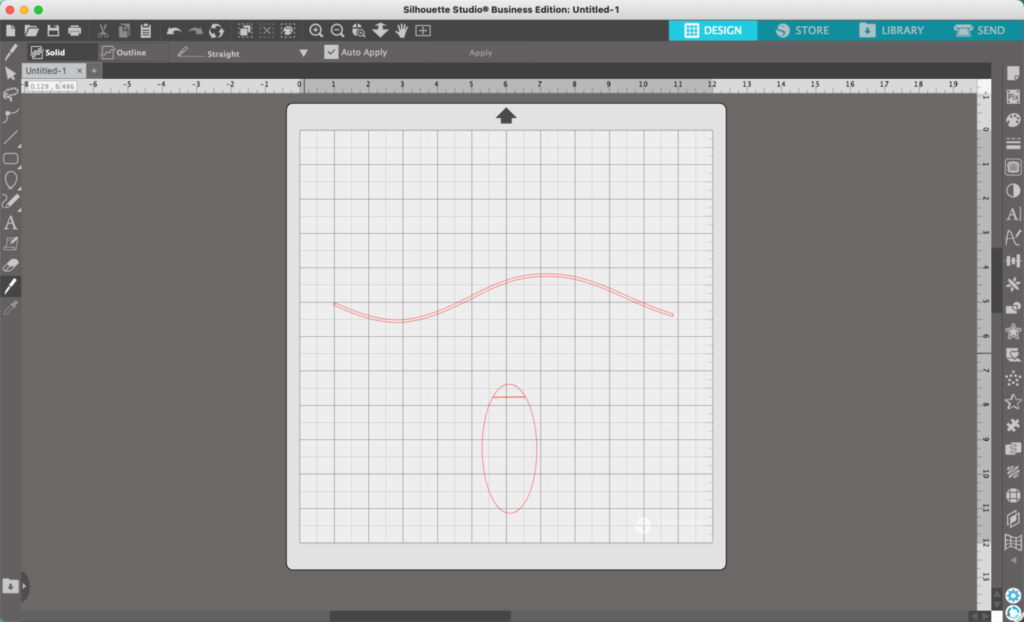
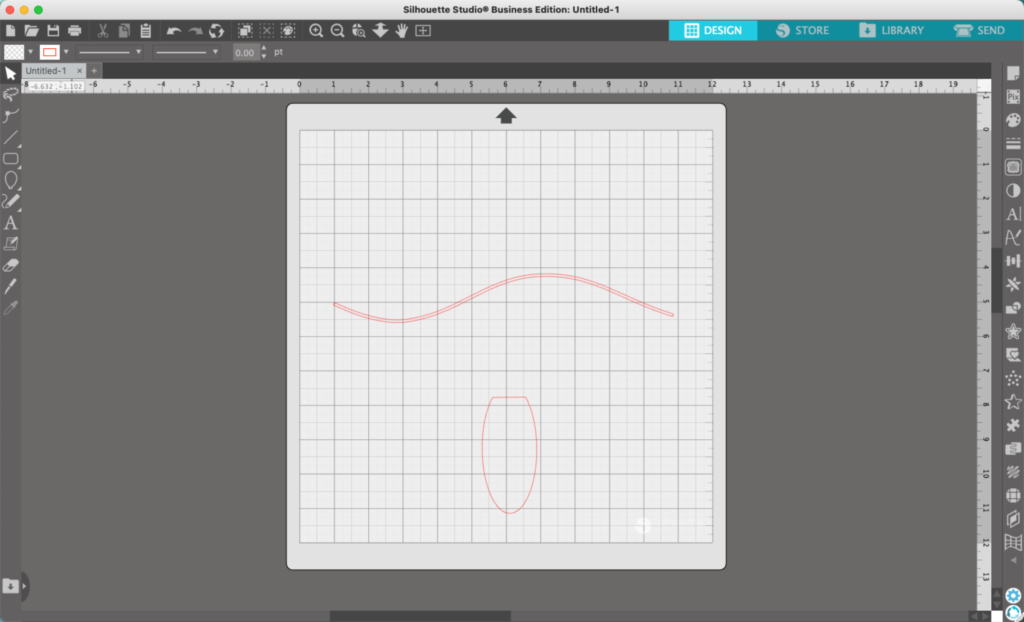
    4. Use the knife tool to slice off a section of the oval. Then, delete it.

    Silhouette Studio Screenshot - cuttingforbusiness.com
    Silhouette Studio Screenshot - cuttingforbusiness.com

    5. Draw a rectangle using the ‘Rounded Rectangle’ tool to use as the lightbulb base.

    Silhouette Studio Screenshot - cuttingforbusiness.com

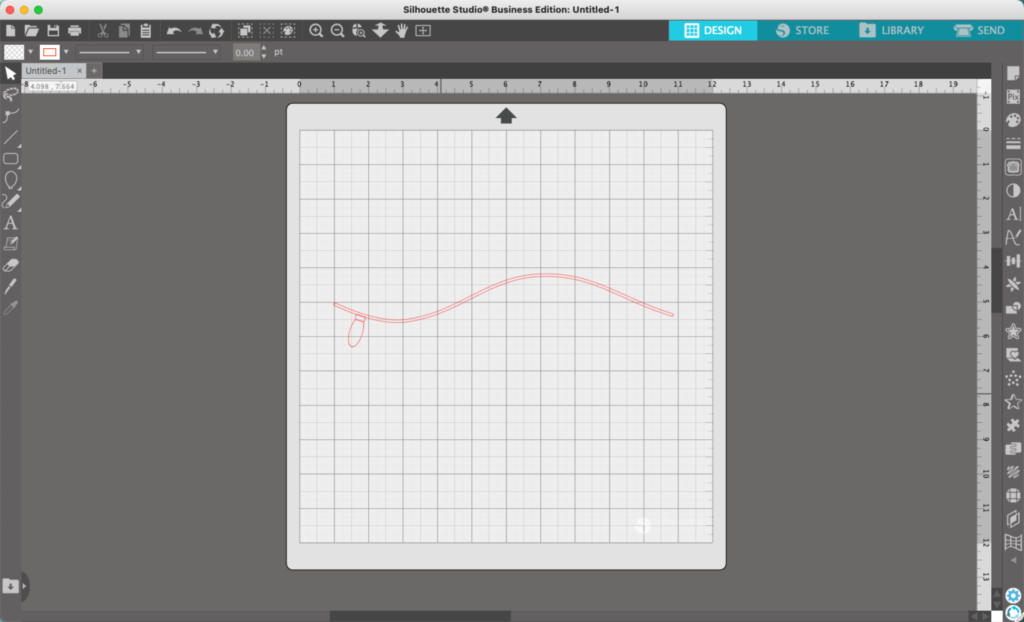
    6. Select both parts of the light and move it into place on your string

    Silhouette Studio Screenshot - cuttingforbusiness.com

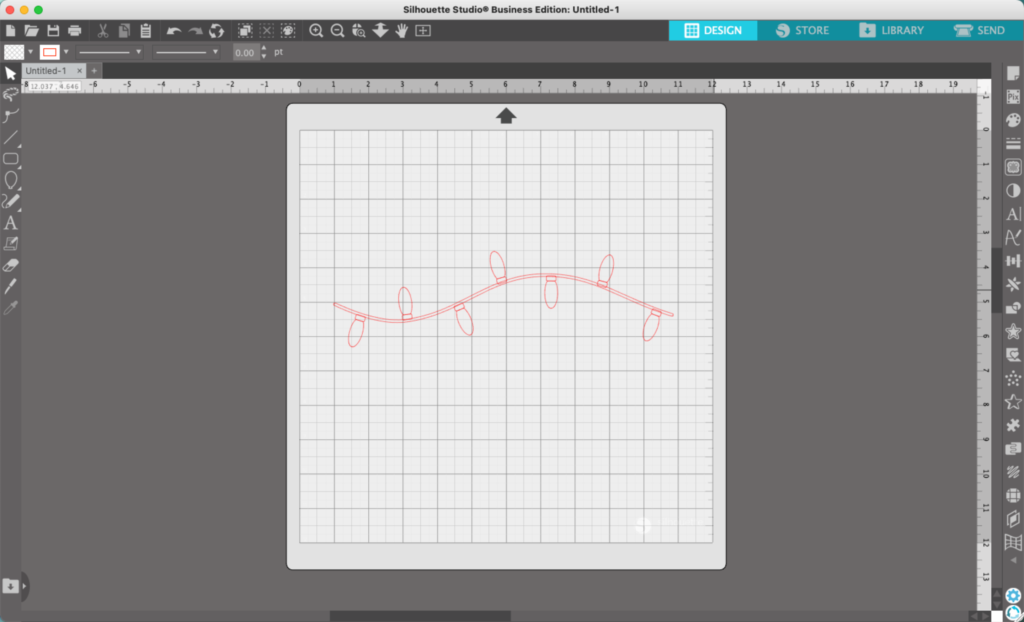
    7. Duplicate the bulb and place several copies along the string.

    Silhouette Studio Screenshot - cuttingforbusiness.com

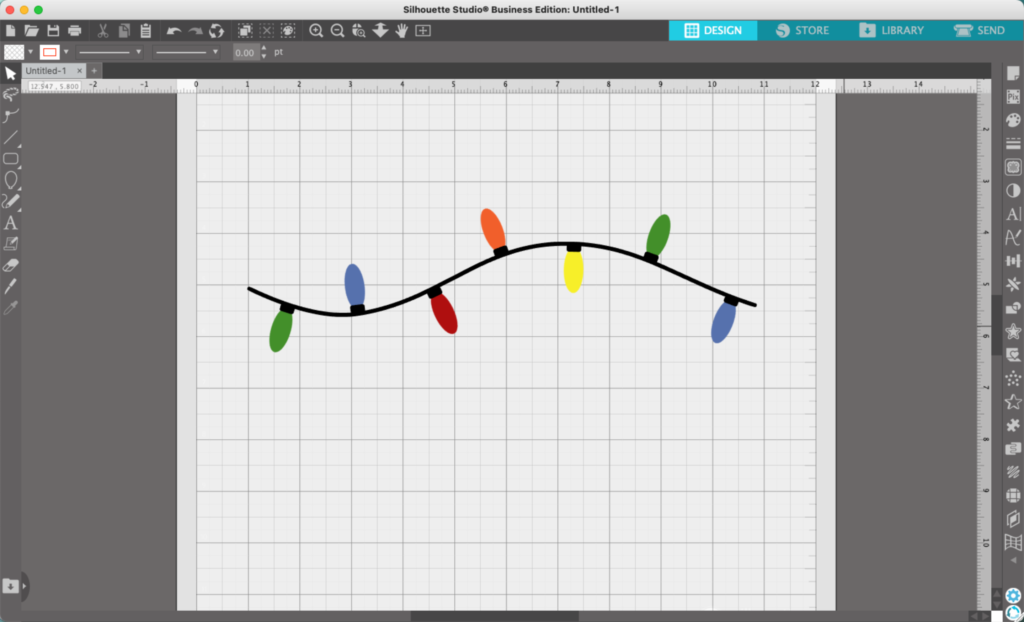
    8. Add color to the design. You’ll likely want to weld the bulb bases to the string, unless you are cutting the design in paper – then you might not.

    Silhouette Studio Screenshot - cuttingforbusiness.com

    I used the lights in a sample font intro page:

    Holiday Font Intro Sample - cuttingforbusiness.com.

    That’s it! Your string of Christmas lights is ready to go!

    Don’t Forget to Save!

    To save your new SVG creation, head to ‘File’, ‘Save As’, ‘Save to Hard Drive’, name the file, then select ‘SVG’ from the dropdown menu.

    Want More SVG Tutorials?

    View more Design with Me SVG tutorials.
  • Silhouette Studio Tutorial: Santa’s Footprints SVG

    Design with Me is a new regular feature on Cutting for Business! Each Friday, I’ll bring you a new Silhouette Studio tutorial featuring how to design an SVG.

    When I write tutorials, I try to include a mix of in depth tutorials – and quick ones where you can sit down and in 15 minutes you can have an SVG ready to cut.

    Today’s Santa’s footprints tutorials is a quick one!

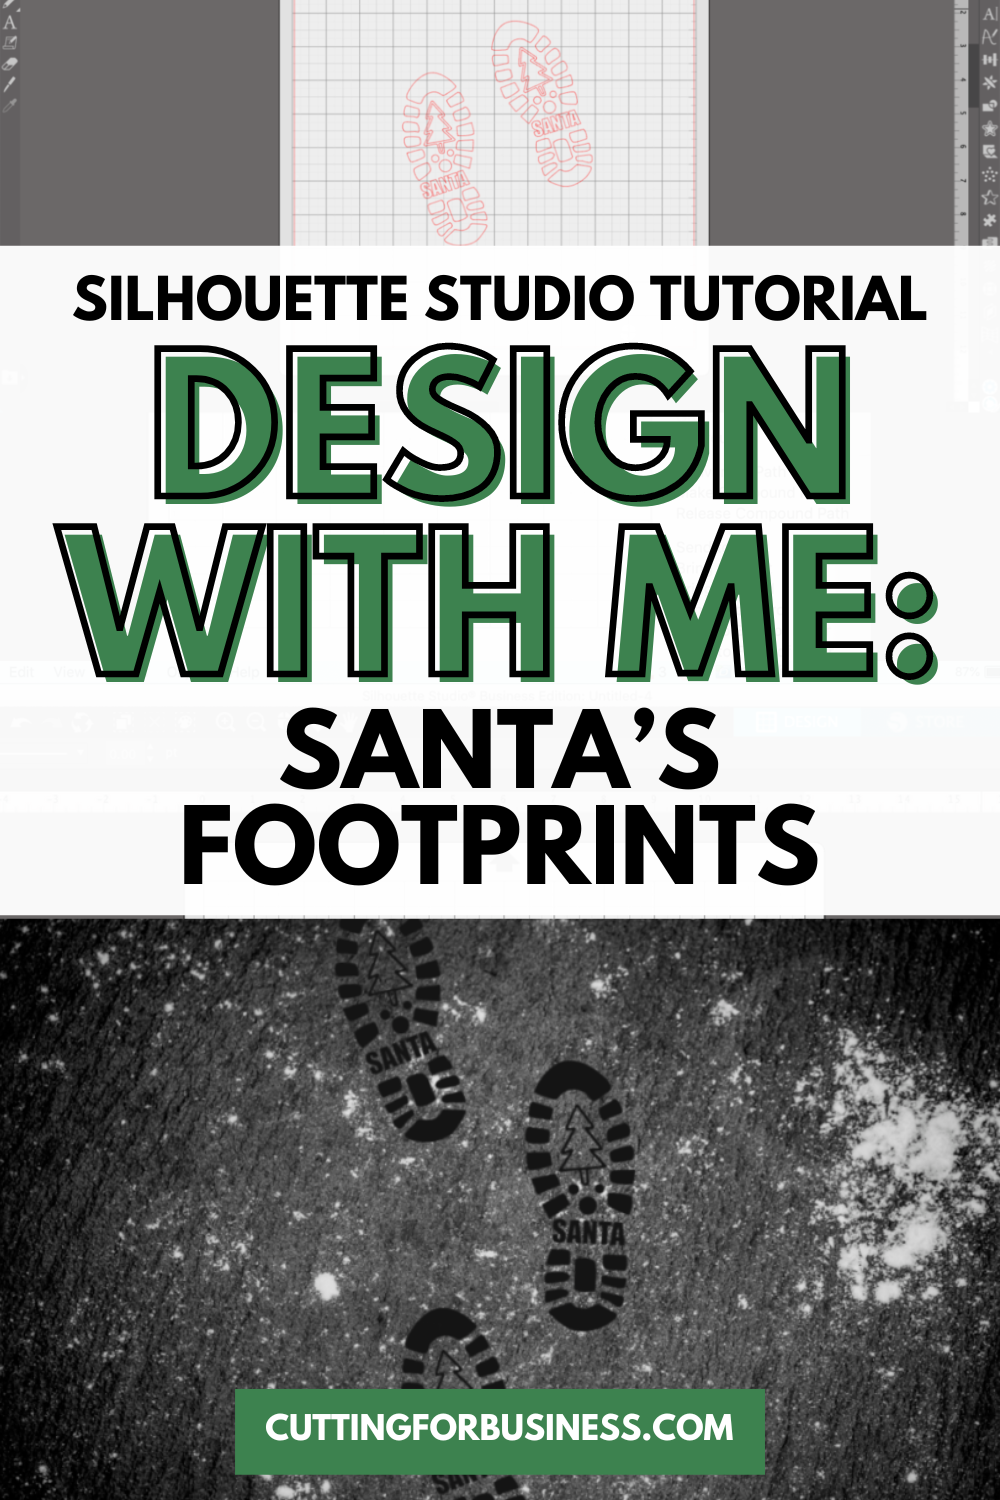
    Silhouette Studio Tutorial: Santa's Footprints SVG - cuttingforbusiness.com.

    Silhouette Studio Tutorial: Santa’s Footprints

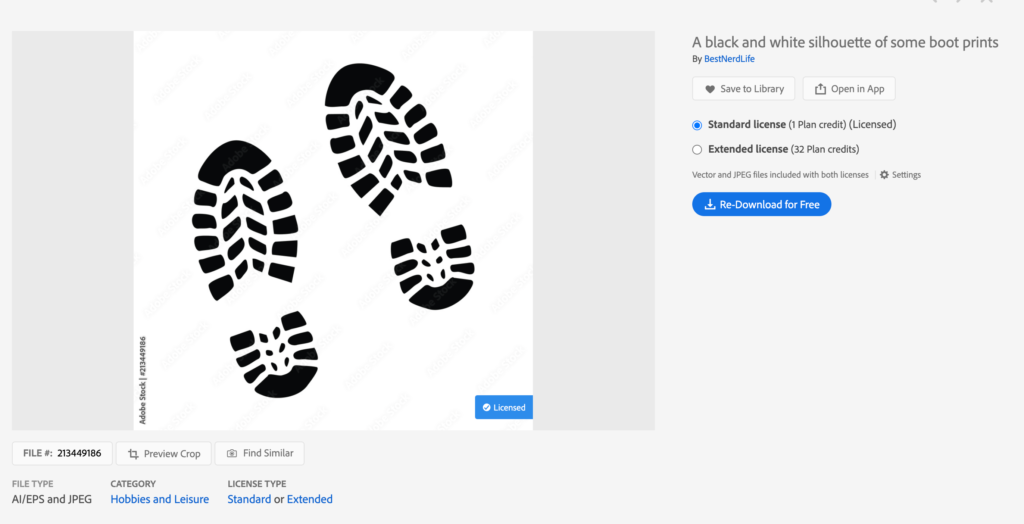
    1. Grab a boot sole clip art from your favorite source. Double check the license to make sure it has commercial use. I grabbed mine from Adobe Stock.
    Adobe Stock Screenshot - cuttingforbusiness.com.

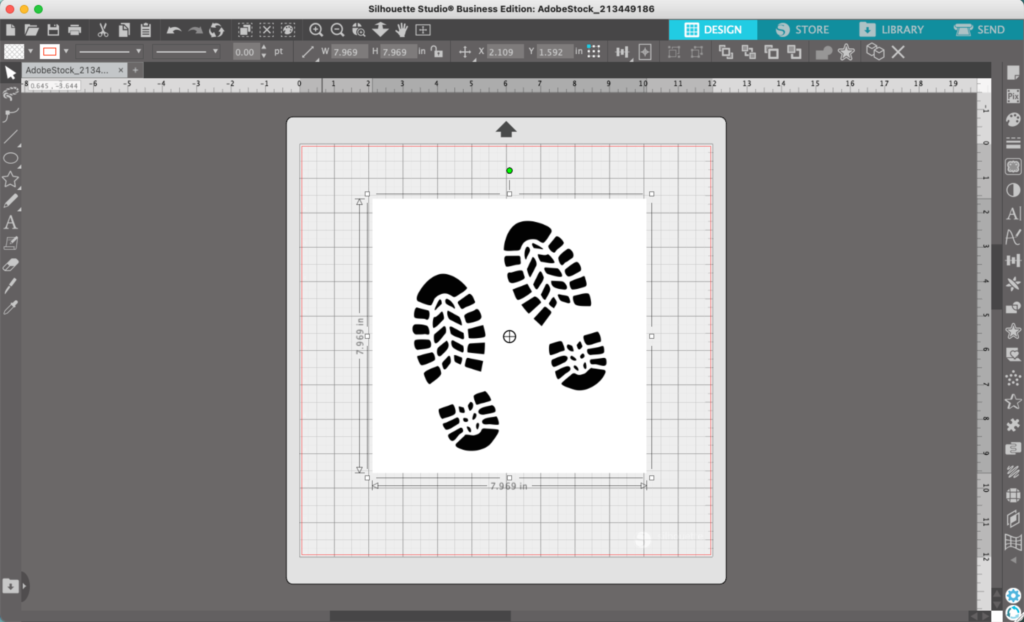
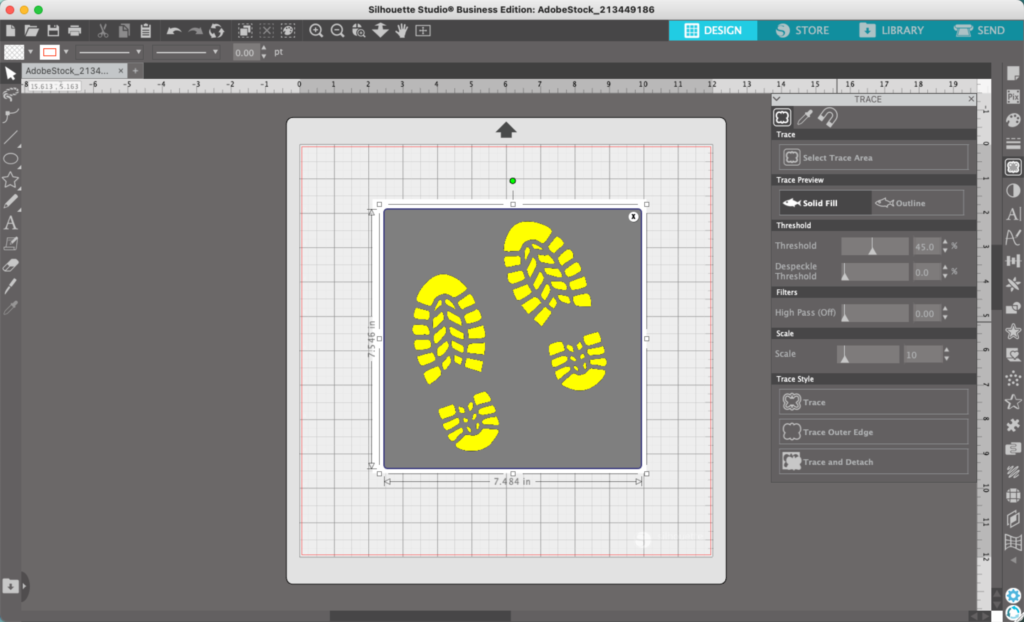
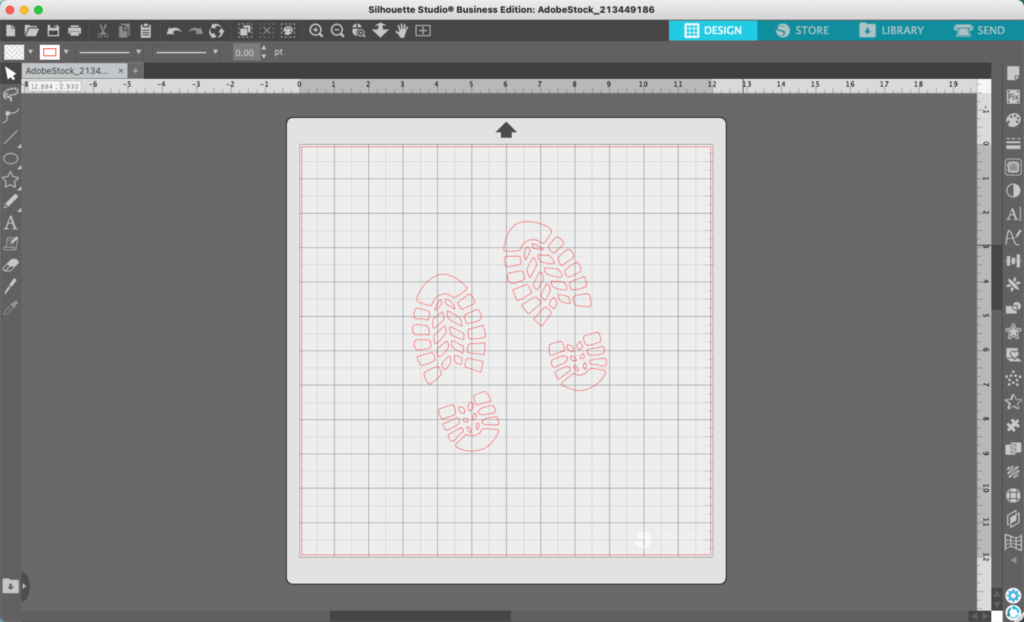
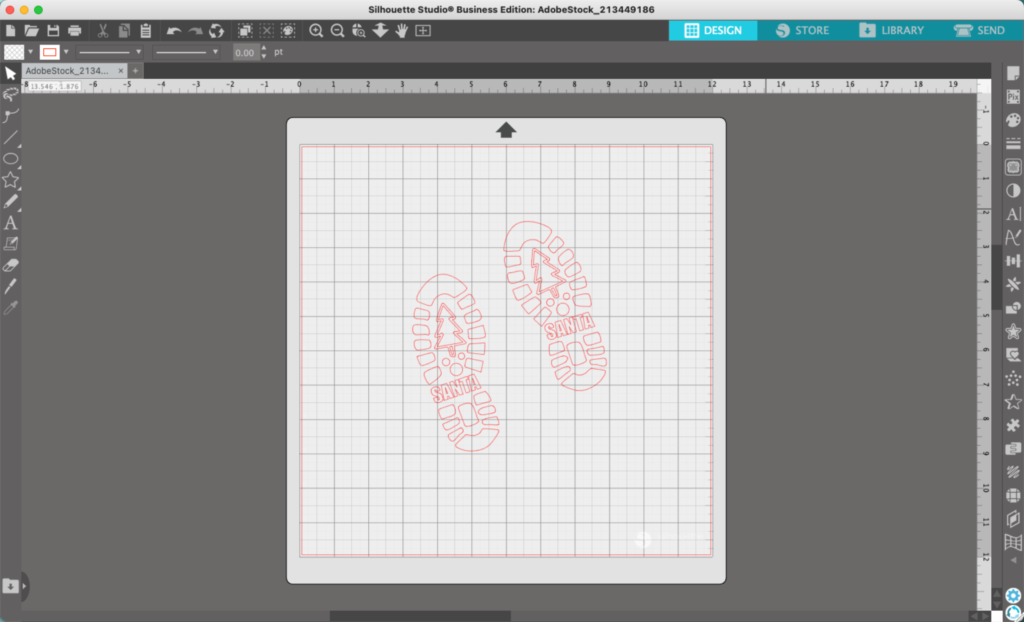
    2. Open the image in Silhouette Studio, then navigate to ‘Panels’, ‘Trace’. Trace the image and delete the original.

    Silhouette Studio Screenshot - cuttingforbusiness.com.
    Silhouette Studio Screenshot - cuttingforbusiness.com.
    Silhouette Studio Screenshot - cuttingforbusiness.com.

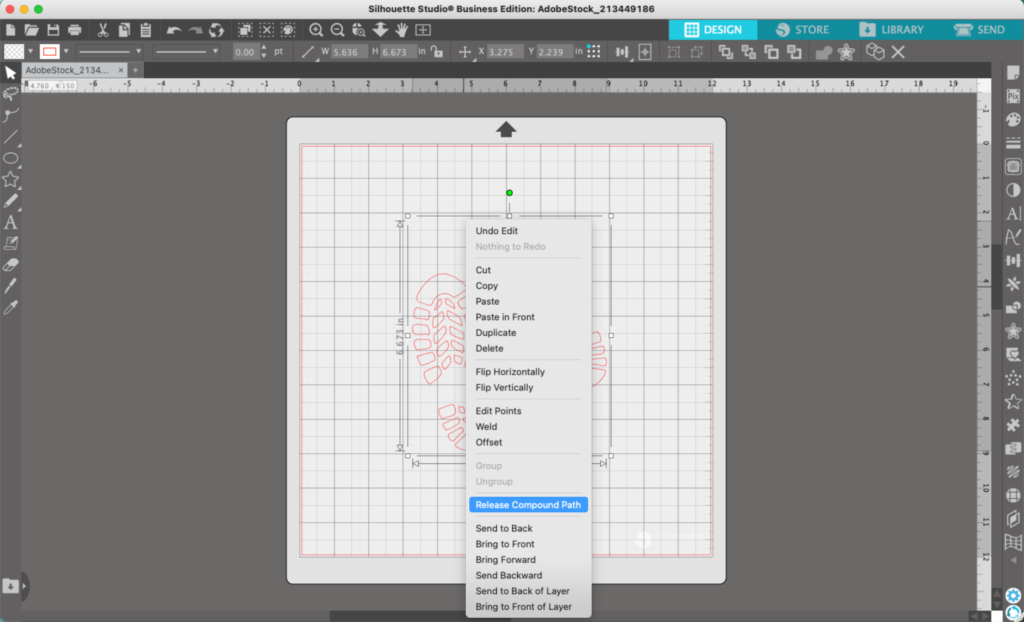
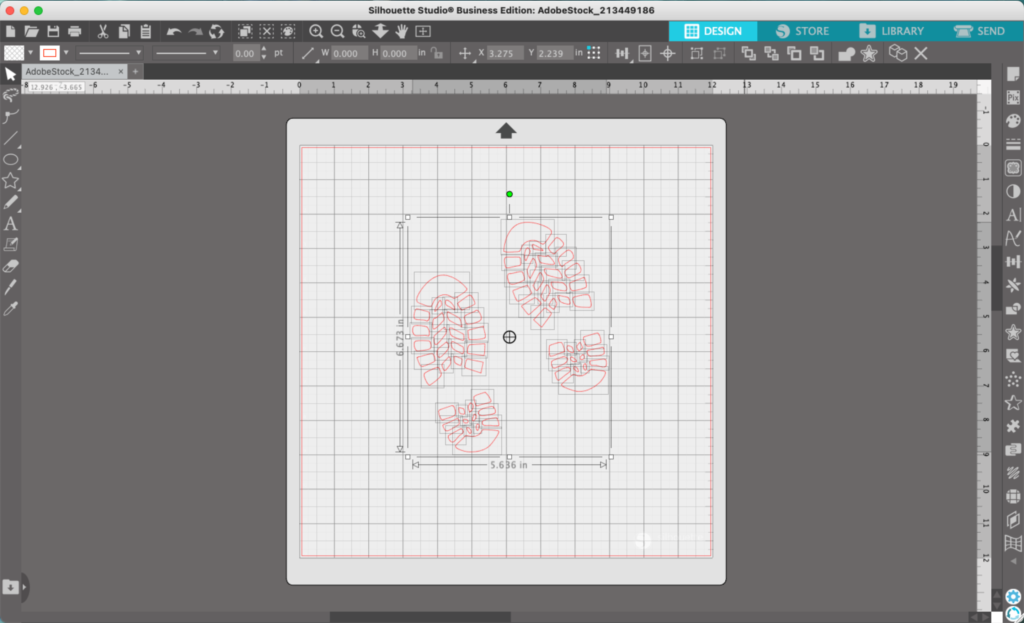
    3. Right click the boot soles and select ‘Release Compound Path’. This allows you to manipulate each piece of the boot sole independently.

    Silhouette Studio Screenshot - cuttingforbusiness.com.
    Silhouette Studio Screenshot - cuttingforbusiness.com.

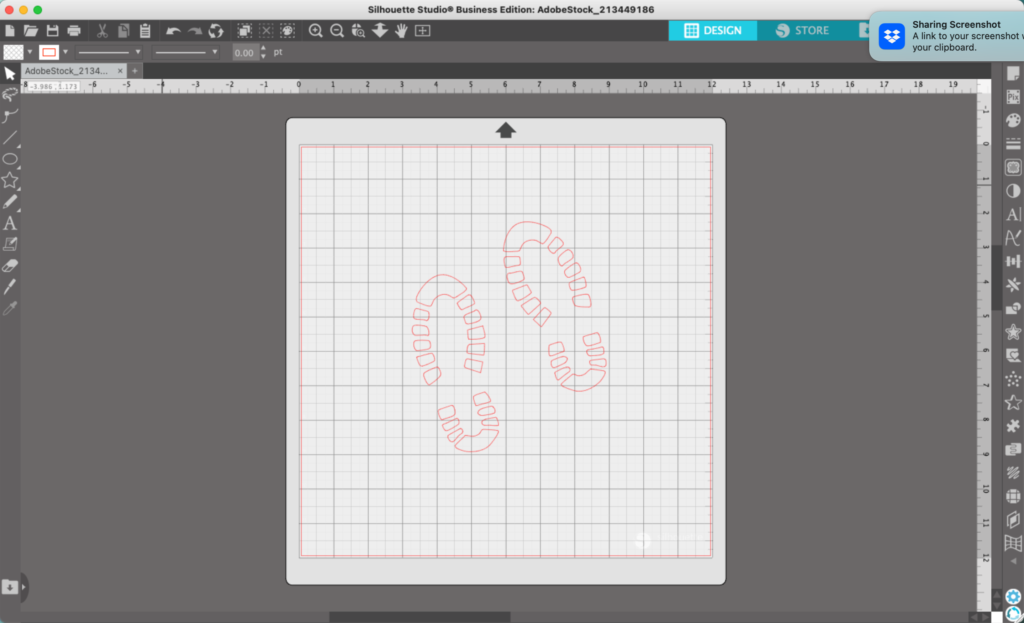
    4. Delete all the interior pieces of the boot soles.

    Silhouette Studio Screenshot - cuttingforbusiness.com.

    5. Use your favorite Christmas dingbat font and fill the interior of the boot sole with Christmas-y things. For this tutorial, I used the Country Trees font for the tree.

    Silhouette Studio Screenshot - cuttingforbusiness.com.

    That’s it! Your Santa’s footprints are done!

    In a hurry? You can design one sole, then duplicate it and mirror it for a second sole. Don’t forget to reverse your text if you have any in your design.

    My finished design looks like this when used with some flour on the floor:

    Silhouette Studio Tutorial: Santa's Footprints SVG - Finished Design - cuttingforbusiness.com.

    Don’t Forget to Save!

    To save your new SVG creation, head to ‘File’, ‘Save As’, ‘Save to Hard Drive’, name the file, then select ‘SVG’ from the dropdown menu.

    Want More SVG Tutorials?

    View more Design with Me SVG tutorials.
  • Silhouette Studio Tutorial: Repeating Word Designs

    Design with Me is a new regular feature on Cutting for Business! Each Friday, I’ll bring you a new Silhouette Studio tutorial featuring how to design an SVG.

    Want to know a secret? I like designs that I can create quickly and easily. Honestly, I don’t want to sit for hours working on a design. While I’ve said it before, I’ll say it again: If it takes more than 20 minutes to design – it probably isn’t for me.

    Today, let’s take a look at a 5 minute design project: How to create a repeating word design. This one is Christmas themed – but you can use any word or theme that you want.

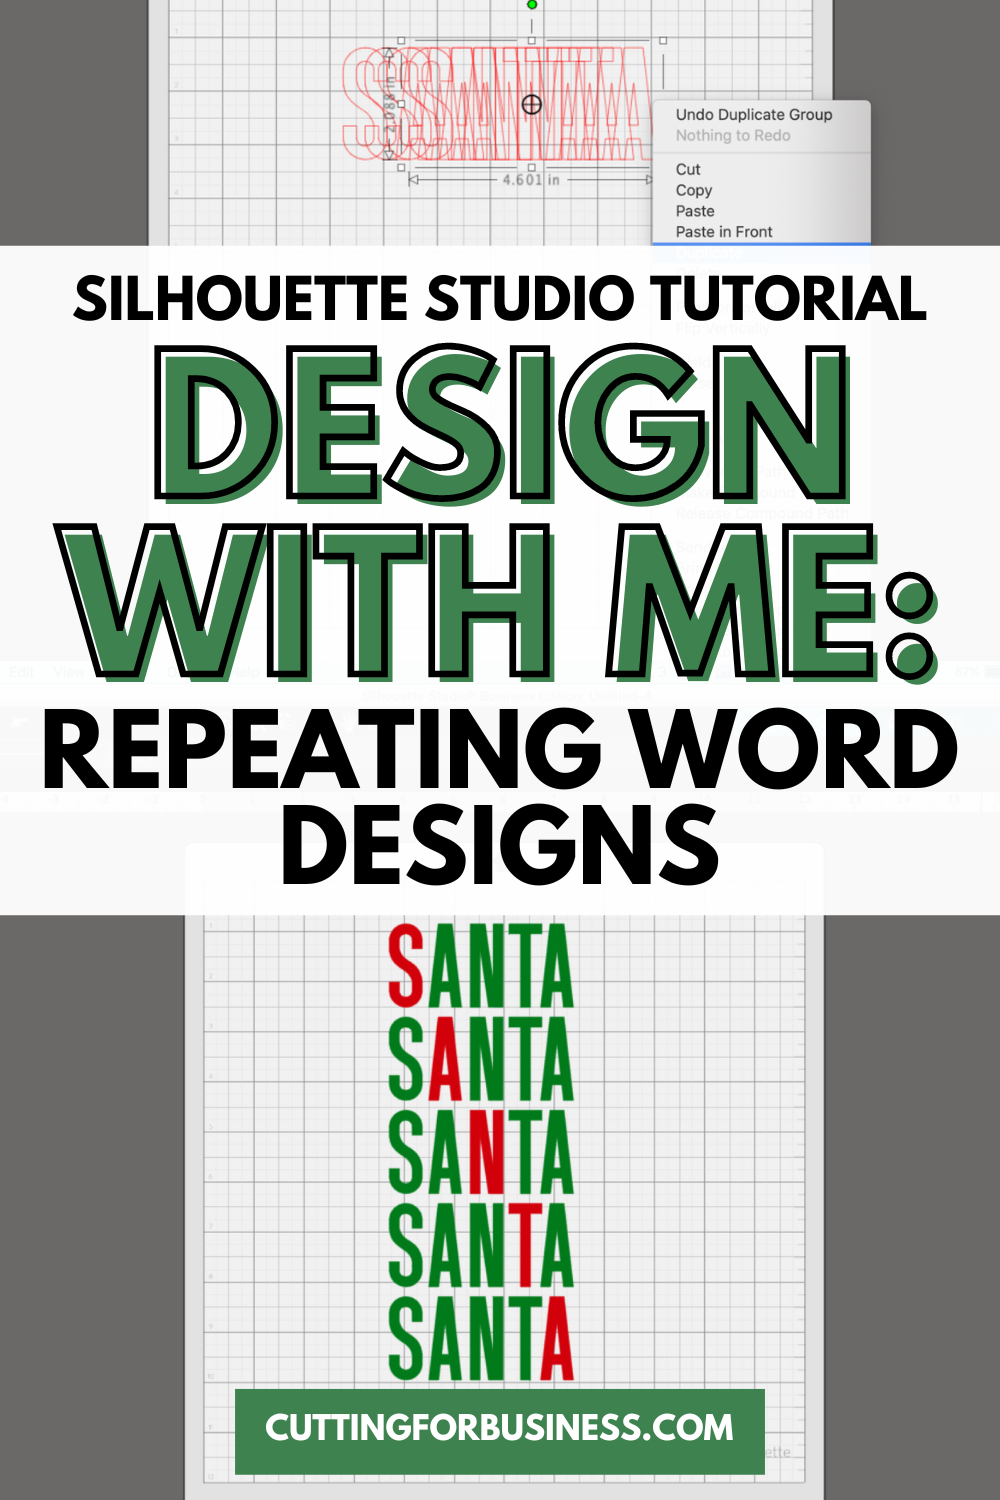
    Silhouette Studio Tutorial: Repeating Word Designs - cuttingforbusiness.com

    Silhouette Studio Tutorial: Repeating Word Design

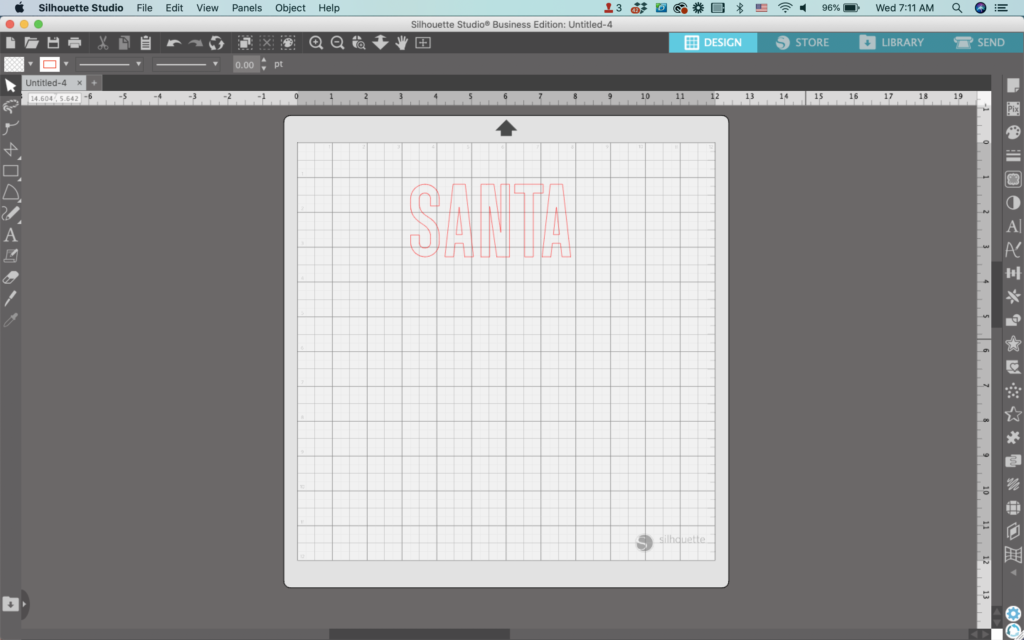
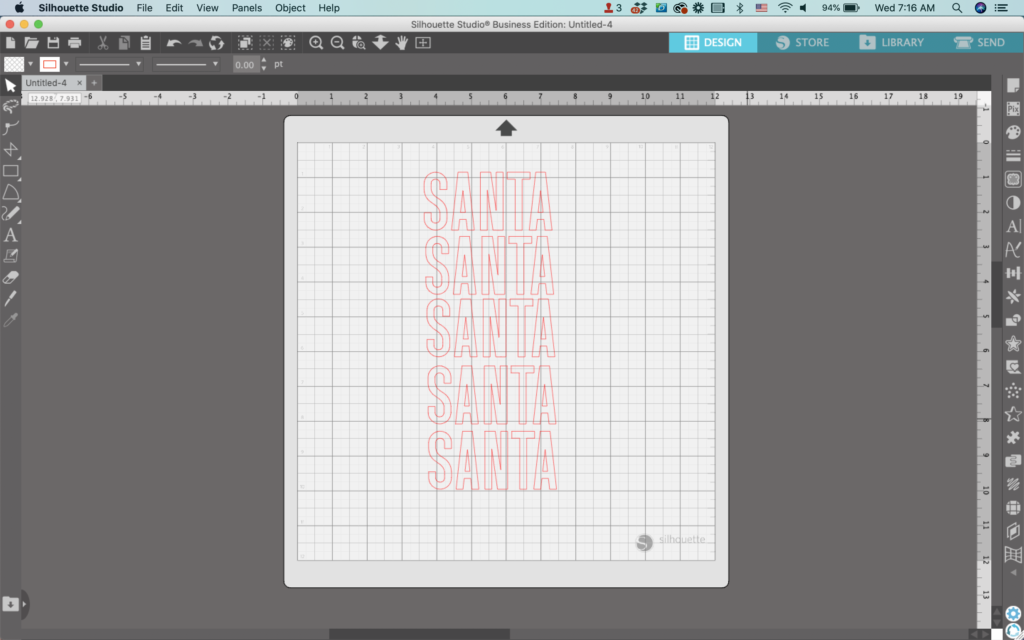
    1. Type your word in Silhouette Studio in an easy to read printed font. In this tutorial, I’m using the Singo font. It’s best to use a 3, 4, or 5 letter word.
    Silhouette Studio Screenshot - cuttingforbusiness.com.

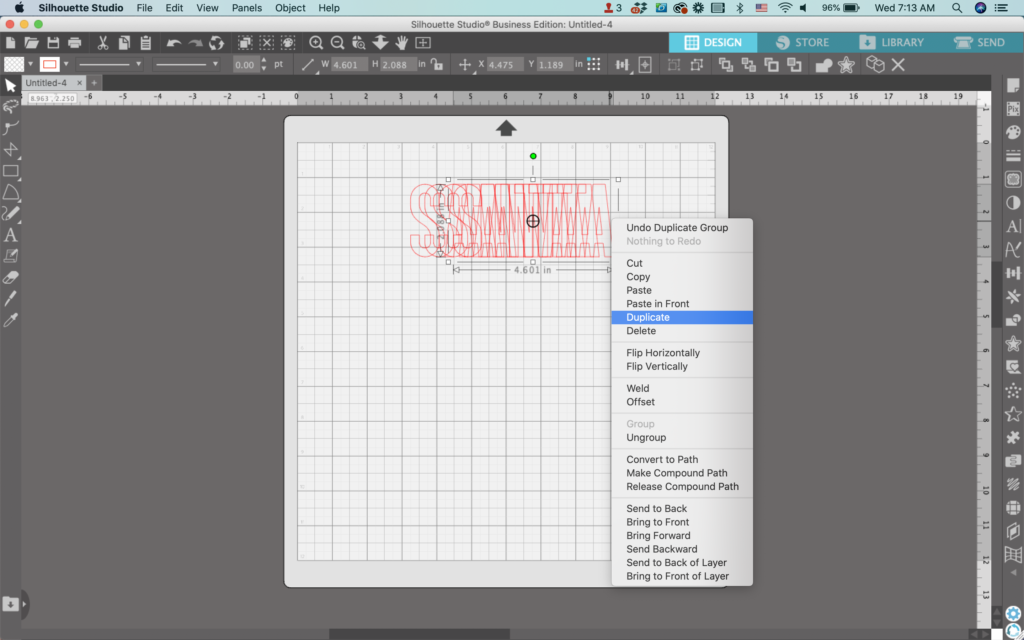
    2. Right click the word and duplicate it the same number of times as letters in the word. For example, the word ‘Santa’ has 5 letters in it, so I duplicated it 5 times. If your word has 4 letters, duplicate it 4 times.

    Silhouette Studio Screenshot - cuttingforbusiness.com.

    3. Drag the words so they are stacked on top of one another.

    Silhouette Studio Screenshot - cuttingforbusiness.com.

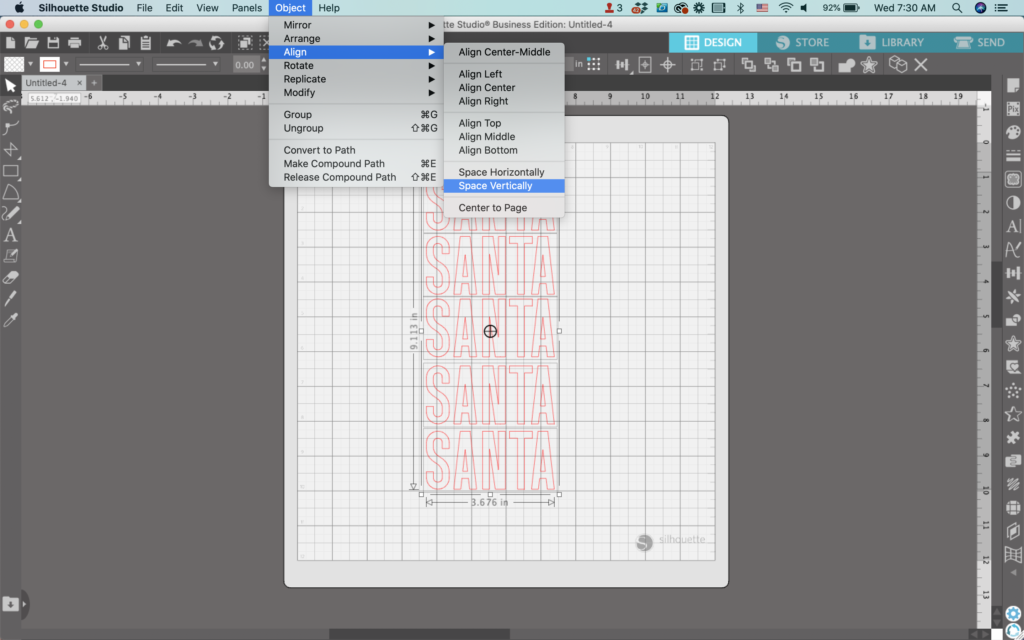
    4. Fine tune the alignment of the words. I like to use ‘Align Center’ and ‘Space Vertically’ to help me.

    Silhouette Studio Screenshot - cuttingforbusiness.com.

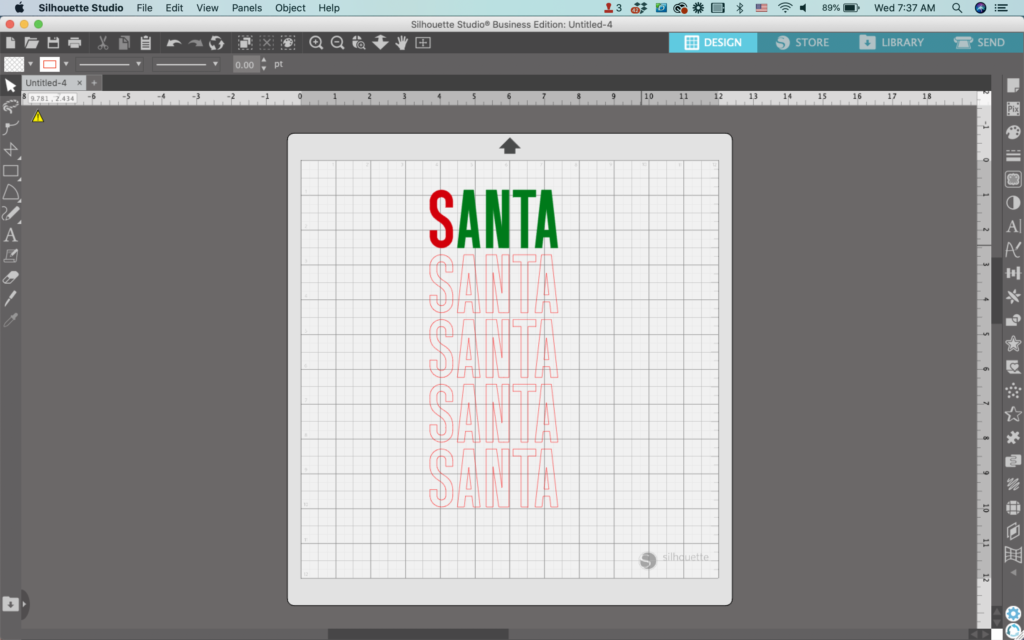
    5. Start with the top word and right click, then ungroup it. Add a fill color to the first letter. Then, fill in the rest of the letters in a different color.

    Silhouette Studio Screenshot - cuttingforbusiness.com.

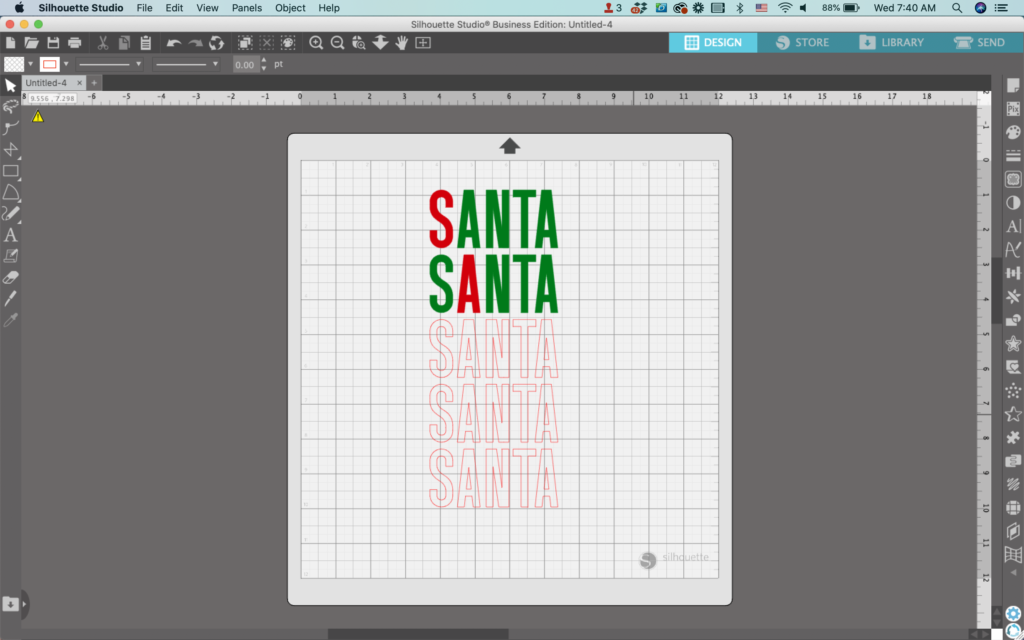
    6. Repeat step 5 for the second word. This time color the second letter a different color from the rest.

    Silhouette Studio Screenshot - cuttingforbusiness.com.

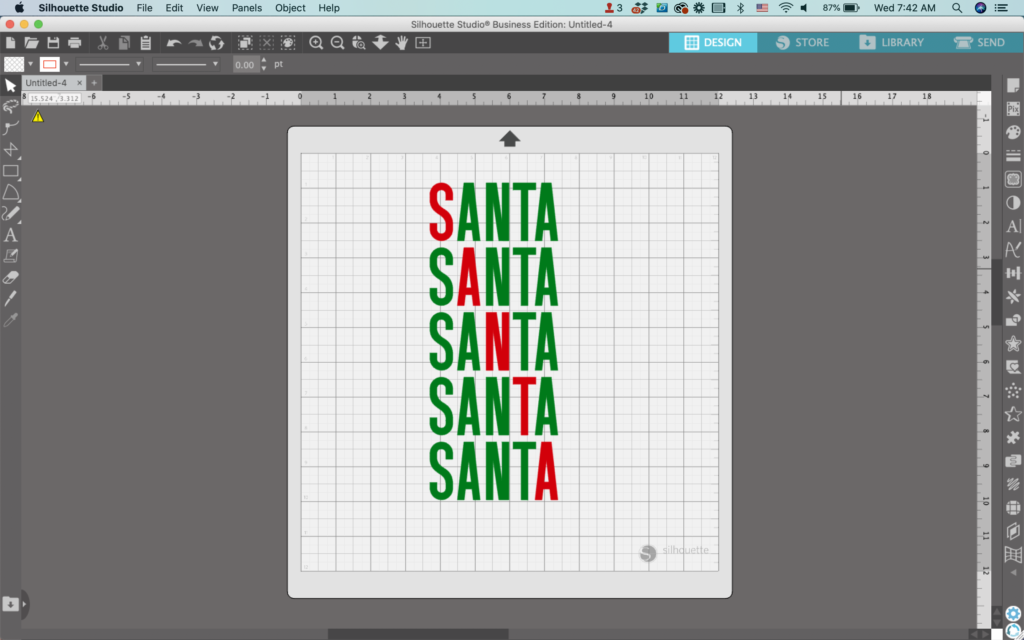
    7. Continue ungrouping words and filling in the letters until you’ve done all the words.

    Silhouette Studio Screenshot - cuttingforbusiness.com.

    8. If desired, add additional details to finish your design. I used the Watershed font to finish off the design.

    Santa Claus Design - cuttingforbusiness.com

    That’s it! Your repeating word design is ready to go!

    Download my Joy, Joy, Joy SVG or Merry, Merry, Merry Christmas SVG.

    3, 4, and 5 Letter Christmas Words

    I mentioned above that this design works best with 3, 4, and 5 letter words. Here are a list of words to get you started:

    • Joy
    • Elf
    • Noel
    • Snow
    • Tree
    • Yule
    • Merry
    • Frost

    Need more ideas? Ask ChatGPT for a “list of short Christmas words”.

    Don’t Forget to Save!

    To save your new SVG creation, head to ‘File’, ‘Save As’, ‘Save to Hard Drive’, name the file, then select ‘SVG’ from the dropdown menu.

    Want More SVG Tutorials?

    View more Design with Me SVG tutorials.
  • Silhouette Studio Tutorial: Classic Snowman Faces

    Design with Me is a new regular feature on Cutting for Business! Each Friday, I’ll bring you a new Silhouette Studio tutorial featuring how to design an SVG.

    My favorite cold weather activity when I was a kid was building snowmen. Of course, I rolled the snow into a ball, added rocks for eyes and a mouth, and topped it off with a carrot nose.

    Today, let’s take a look at how to make a classic snowman face in Silhouette Studio.

    Silhouette Studio Tutorial: Snowman Faces - cuttingforbusiness.com.

    Silhouette Studio Tutorial: Classic Snow Man Faces

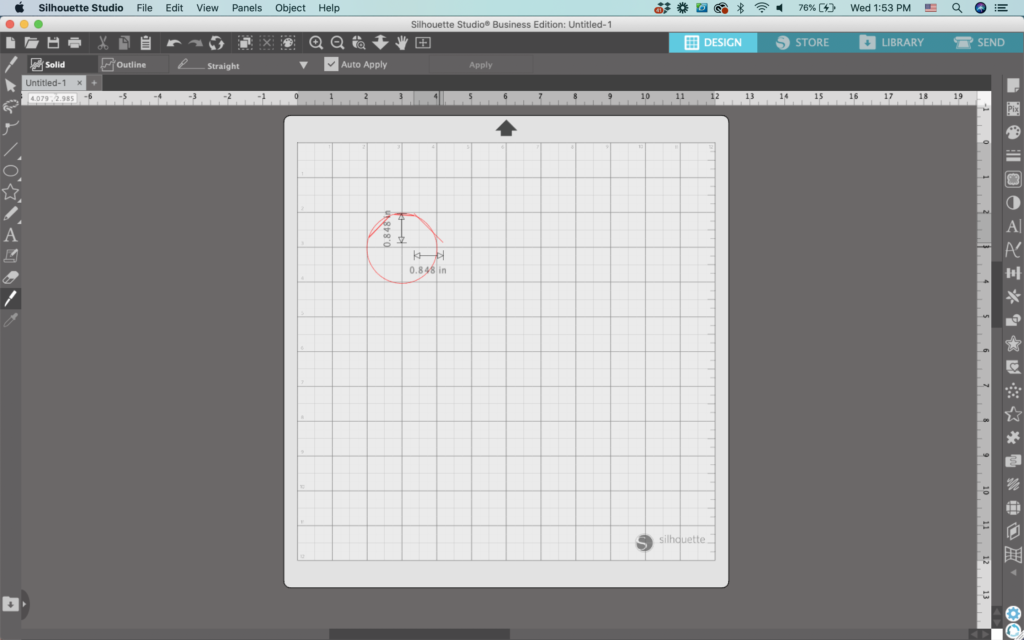
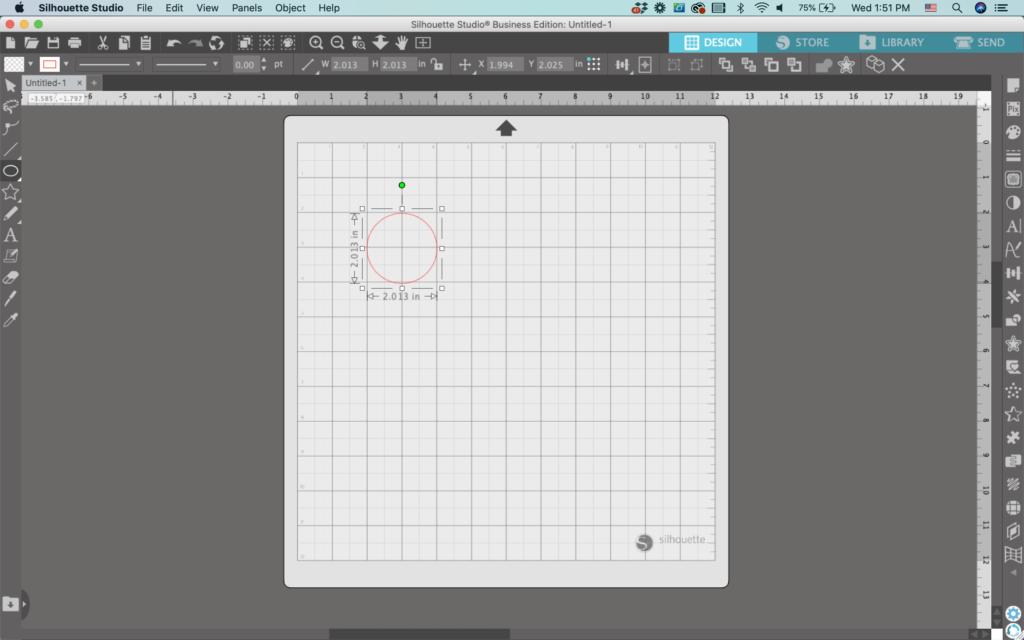
    1. In Silhouette Studio, draw a circle. Hold down the SHIFT key to make it a perfect circle.
    Silhouette Studio Screenshot - cuttingforbusiness.com

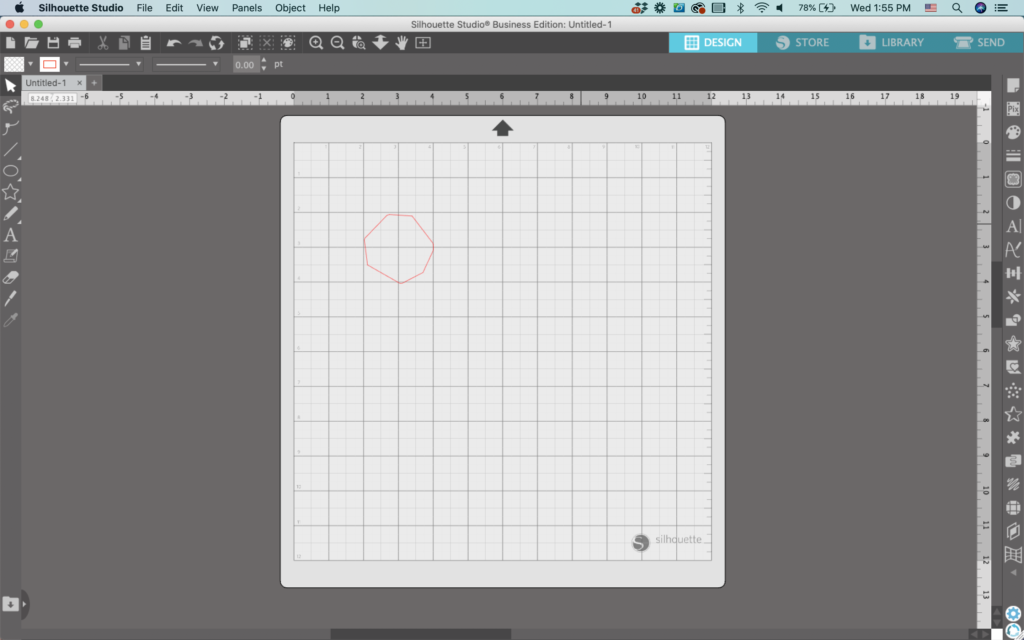
    2. Use the knife tool to slice off a sliver on every side of circle. Be sure that the knife setting is set to ‘Solid’ instead of ‘Outline’.

    Silhouette Studio Screenshot - cuttingforbusiness.com

    3. Delete all the ‘small slivers’. This will leave you with a shape that resembles a rock.

    Silhouette Studio Screenshot - cuttingforbusiness.com

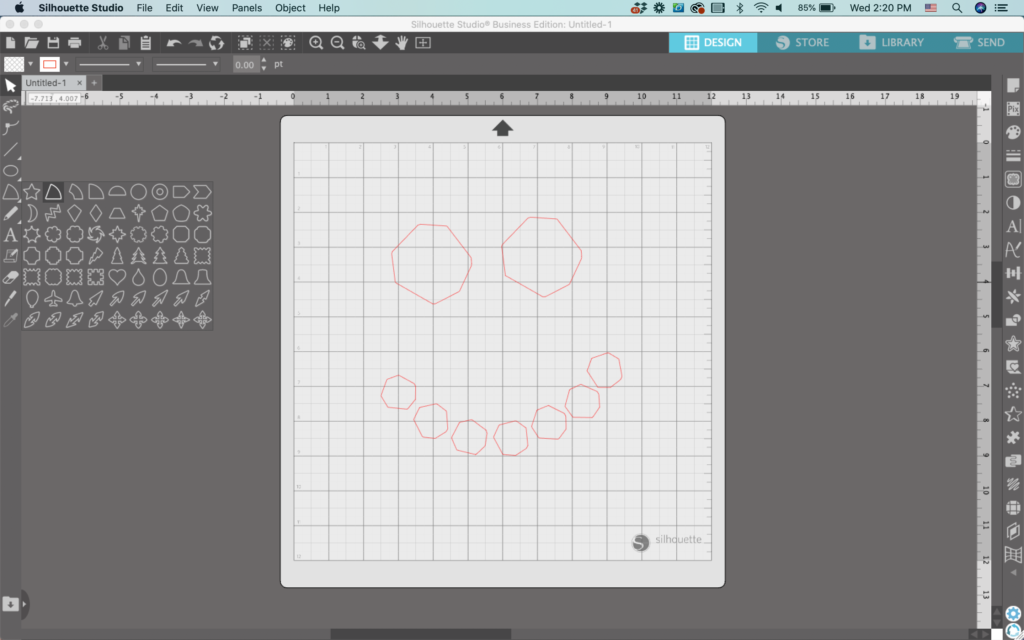
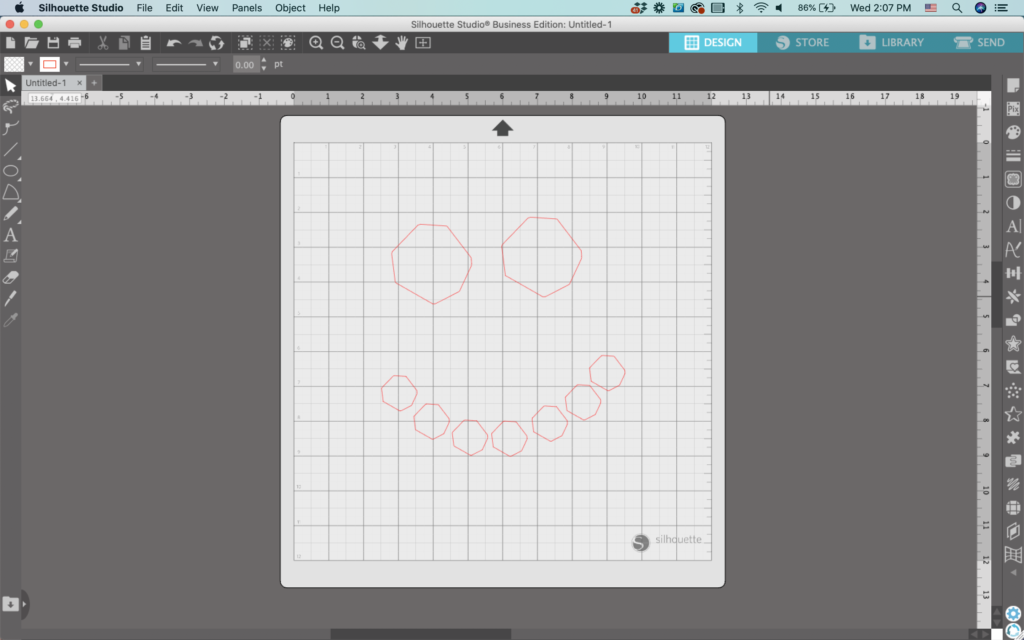
    4. Either copy and paste or right click and ‘Duplicate’ the rock shape several times. Resize as needed and move them into place to form two eyes and a mouth.

    Silhouette Studio Screenshot - cuttingforbusiness.com

    5. Rotate each rock piece slightly to make them look less uniform. You could also slightly resize them if you want.

    Silhouette Studio Screenshot - cuttingforbusiness.com

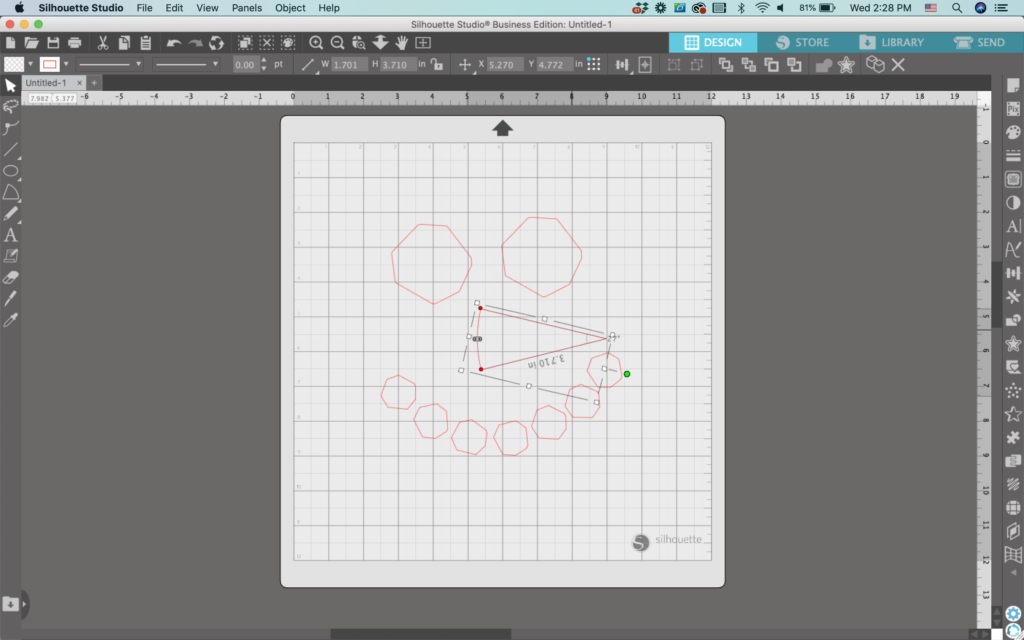
    6. Using Flexishapes, create a nose. I think the second shape in the first row makes the perfect carrot shape.

    Silhouette Studio Screenshot - cuttingforbusiness.com
    Silhouette Studio Screenshot - cuttingforbusiness.com

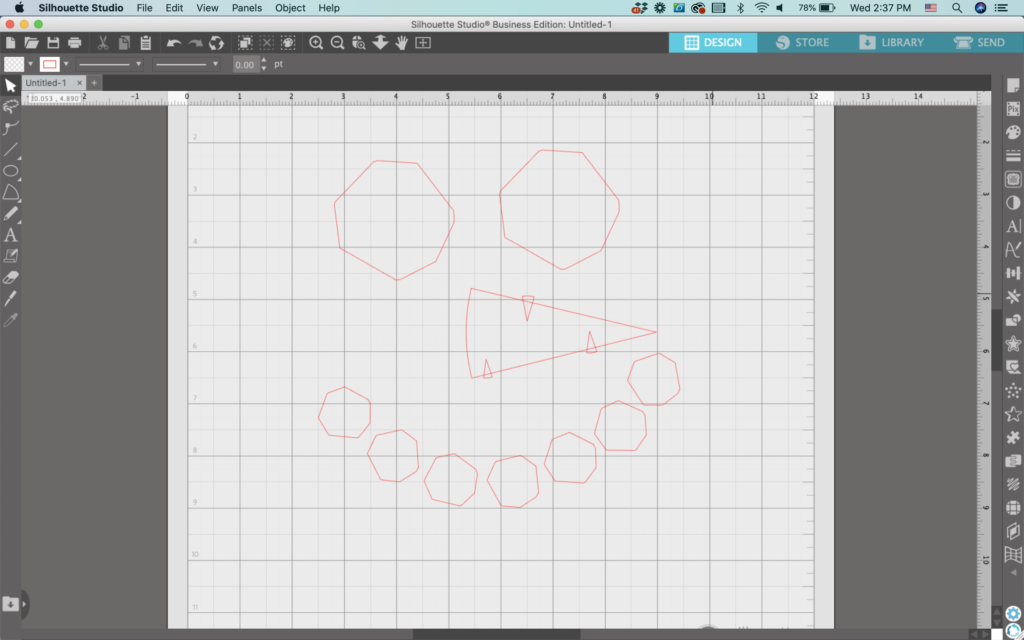
    7. To make the carrot look more like a carrot, use the same Flexishape tool to create some smaller shapes. Move them into place around the sides of the carrot.

    Silhouette Studio Screenshot - cuttingforbusiness.com

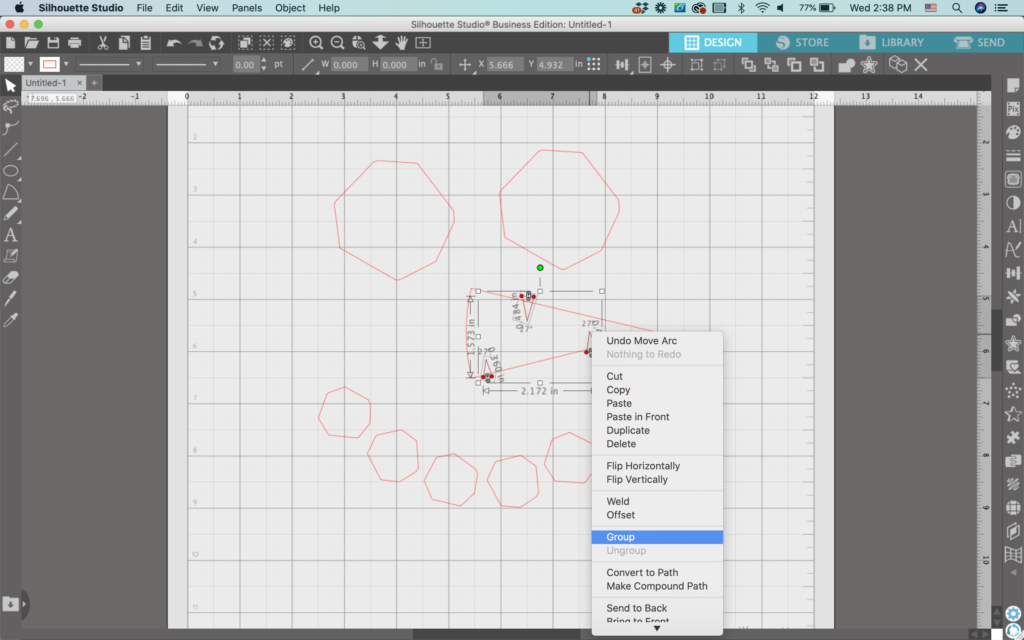
    8. Select all the tiny shapes you made and right click, then ‘Group’ them together.

    Silhouette Studio Screenshot - cuttingforbusiness.com

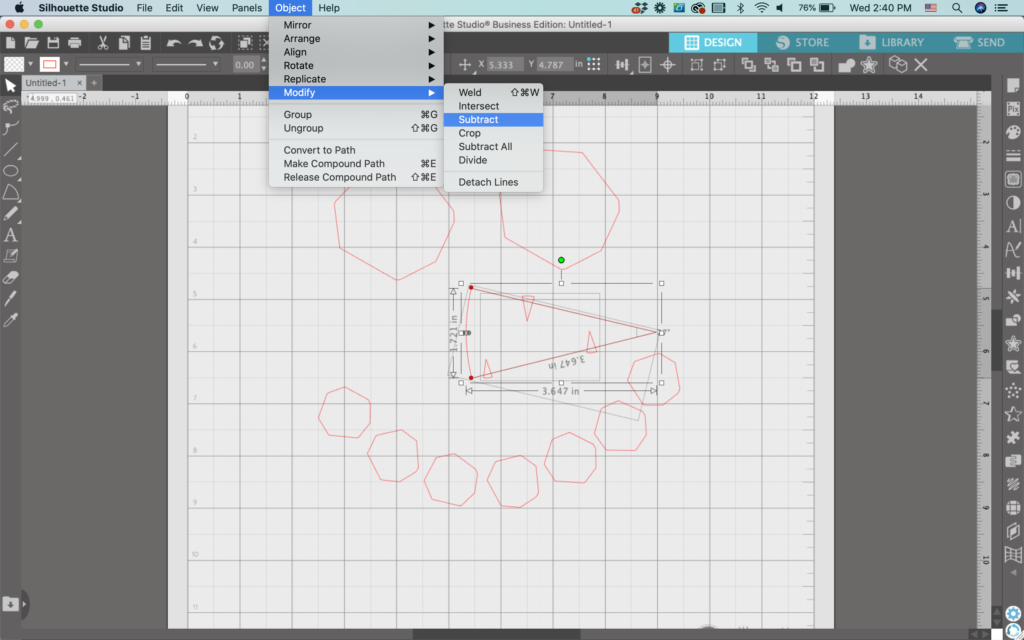
    9. Select both the carrot nose and the group of small triangles and navigate to ‘Object’, then ‘Subtract’ to subtract them from the larger shape.

    Silhouette Studio Screenshot - cuttingforbusiness.com

    10. Add color to your design. My completed design looks like this:

    That’s it! Your snowman face is ready to go!

    Don’t Forget to Save!

    To save your new SVG creation, head to ‘File’, ‘Save As’, ‘Save to Hard Drive’, name the file, then select ‘SVG’ from the dropdown menu.

    Want More SVG Tutorials?

    View more Design with Me SVG tutorials.
  • Silhouette Studio Tutorial: How to Design Snowflakes

    Design with Me is a new regular feature on Cutting for Business! Each Friday, I’ll bring you a new Silhouette Studio tutorial featuring how to design an SVG.

    Let’s talk snow. Whether you love it or hate it, snow is coming for much of the country.

    Today, let’s create one-of-a-kind snowflakes.

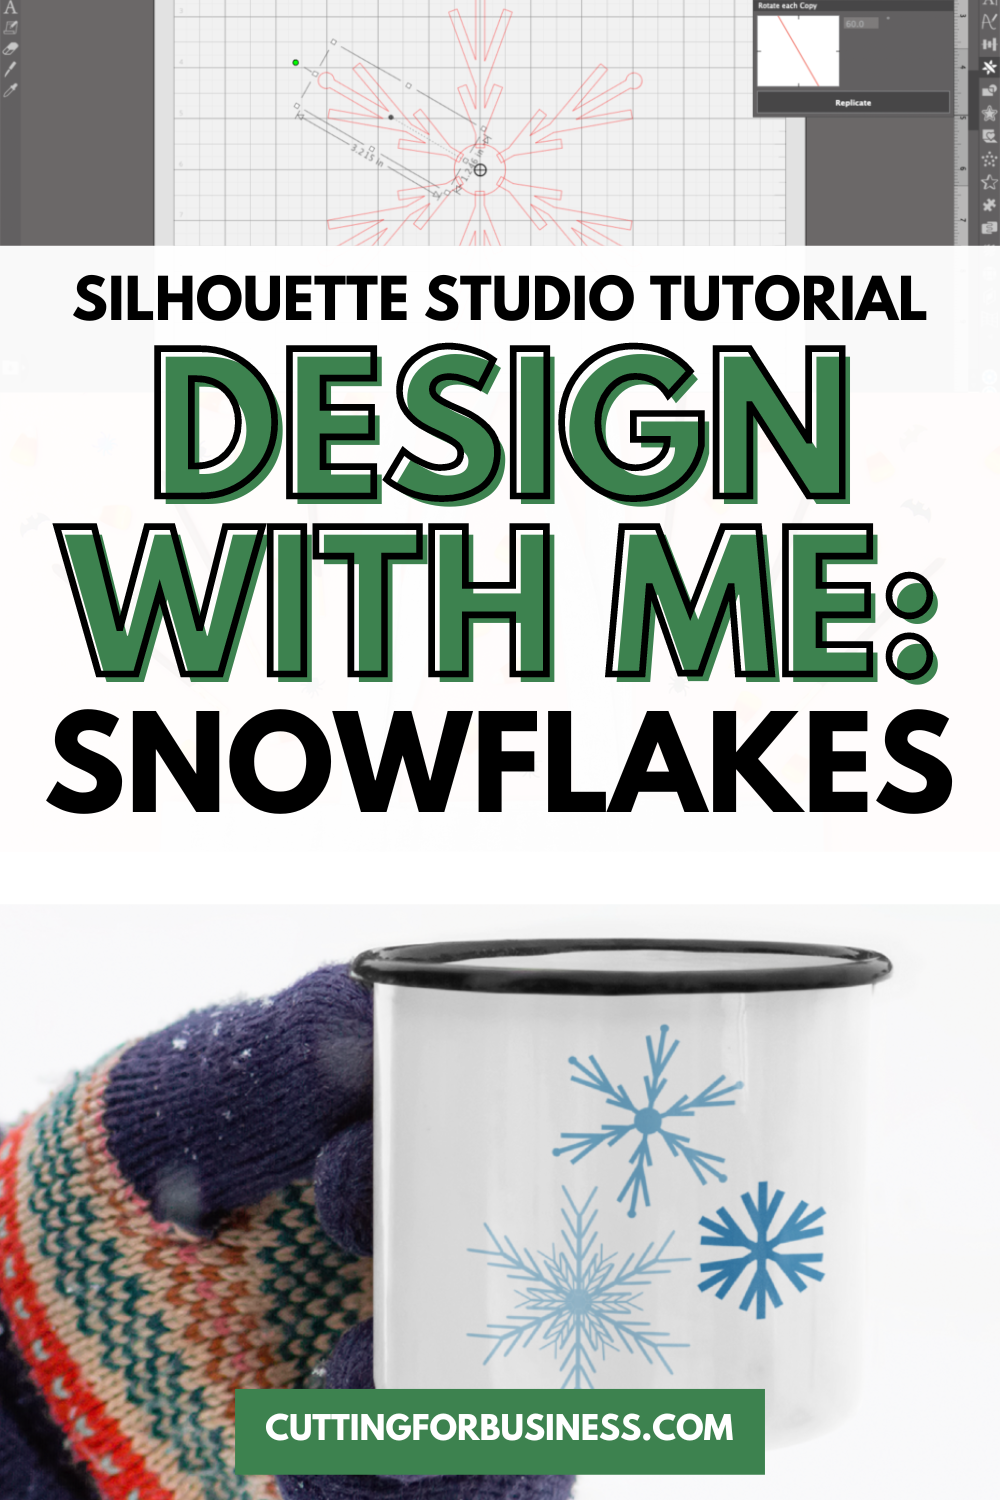
    Silhouette Studio Tutorial: How to Design Snow Flakes - cuttingforbusiness.com.

    Silhouette Studio Tutorial: Snowflakes

    Before we dive in to the tutorial, make sure that your design mat is set to a square. In this tutorial, I’m using a 12″ by 12″ square. If you need to check your settings, head to ‘Panels’, ‘Page Setup’.

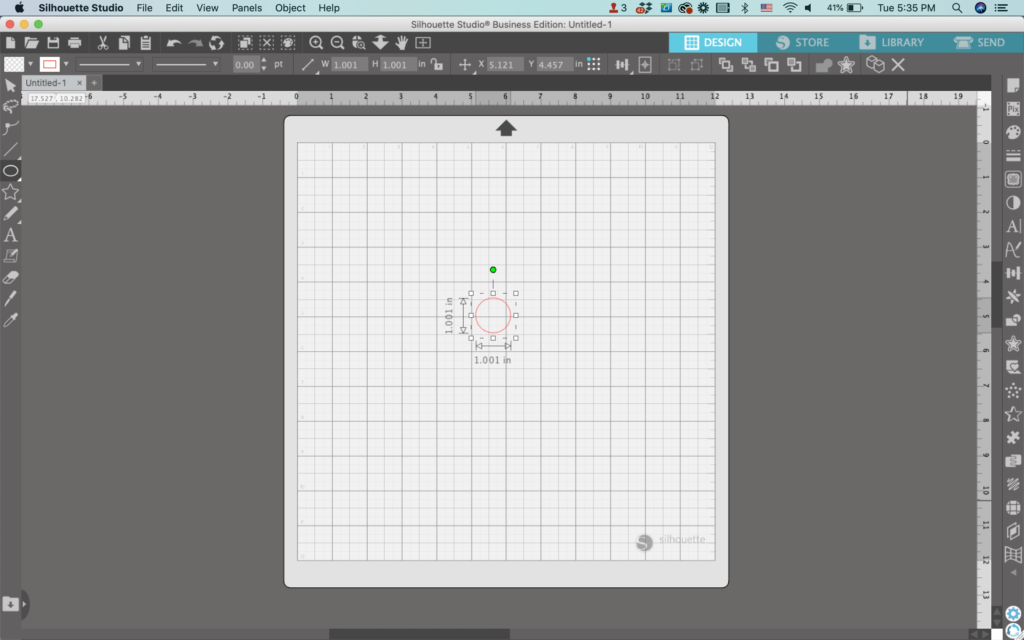
    1. In Silhouette Studio, draw a circle. Be sure to hold down the SHIFT key to make it perfectly round.
    Silhouette Studio Screenshot - cuttingforbusiness.com.

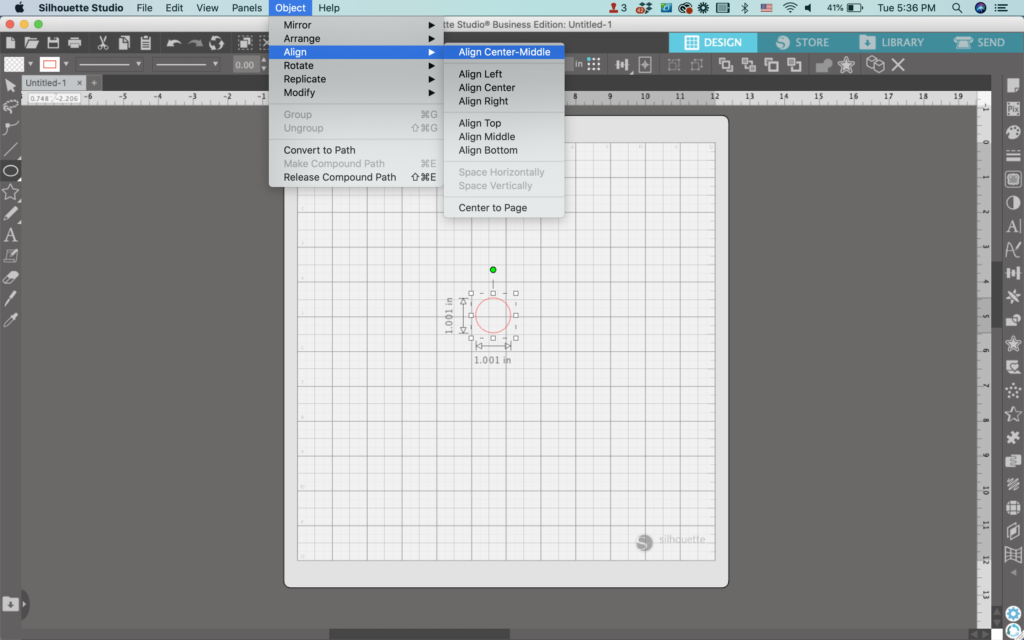
    2. With the circle selected, navigate to ‘Align’, then ‘Align Center-Middle’. This will move your circle to the middle of the page. (This is why it’s important to have a square design mat for this tutorial.)

    Silhouette Studio Screenshot - cuttingforbusiness.com.

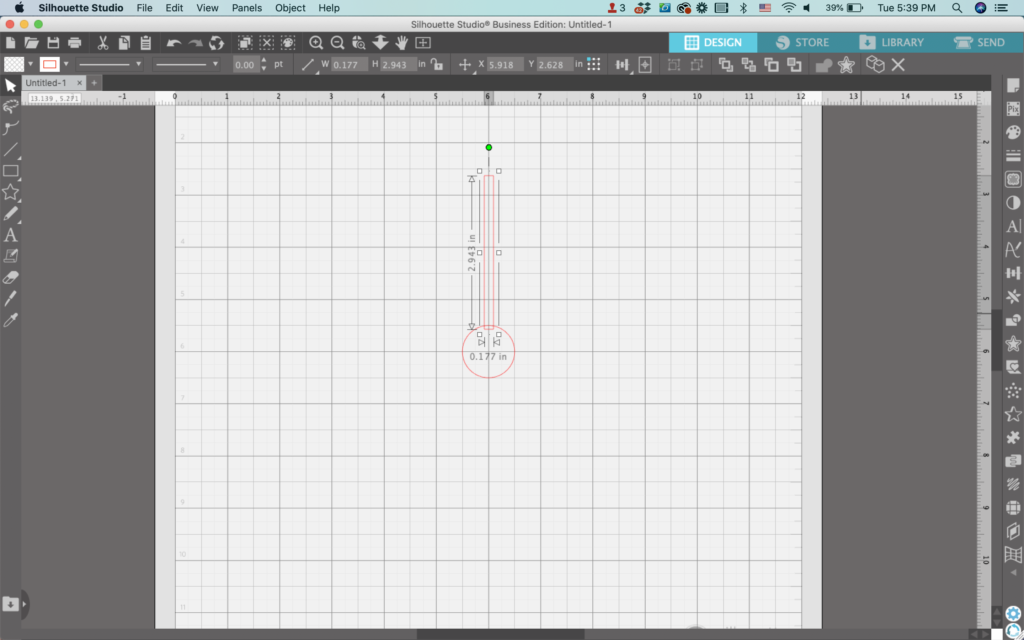
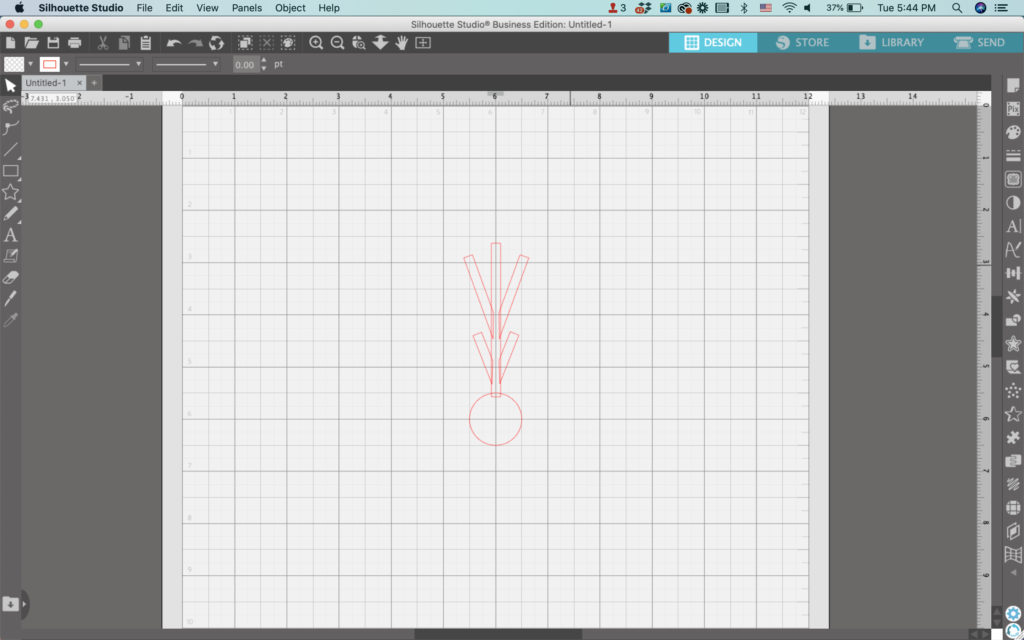
    3. Draw a skinny rectangle and move it into place like shown below. It should overlap the circle a small amount.

    Silhouette Studio Screenshot - cuttingforbusiness.com.

    4. Add additional small rectangles up and down the long rectangle you made. I added four, but feel free to add as many as you’d like.

    Silhouette Studio Screenshot - cuttingforbusiness.com.

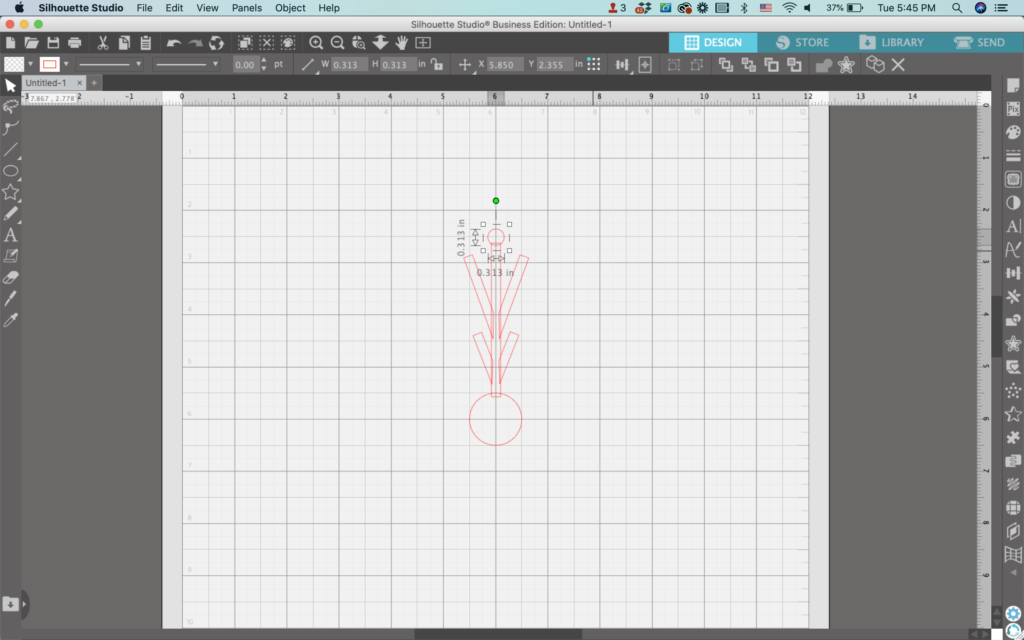
    5. Add any additional details. I’ve add a circle on top of the long rectangle.

    Silhouette Studio Screenshot - cuttingforbusiness.com.

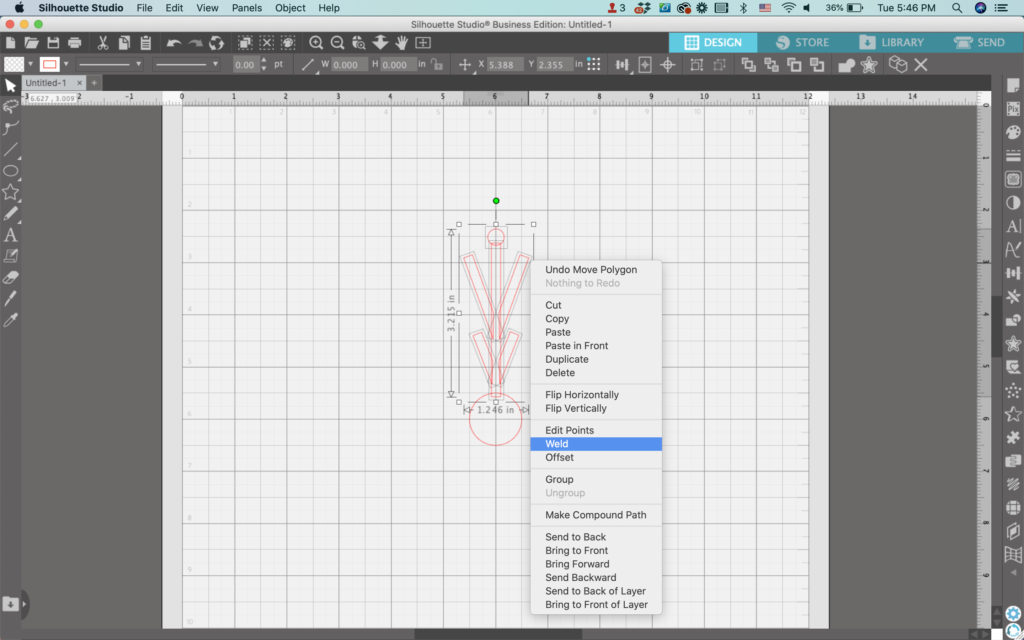
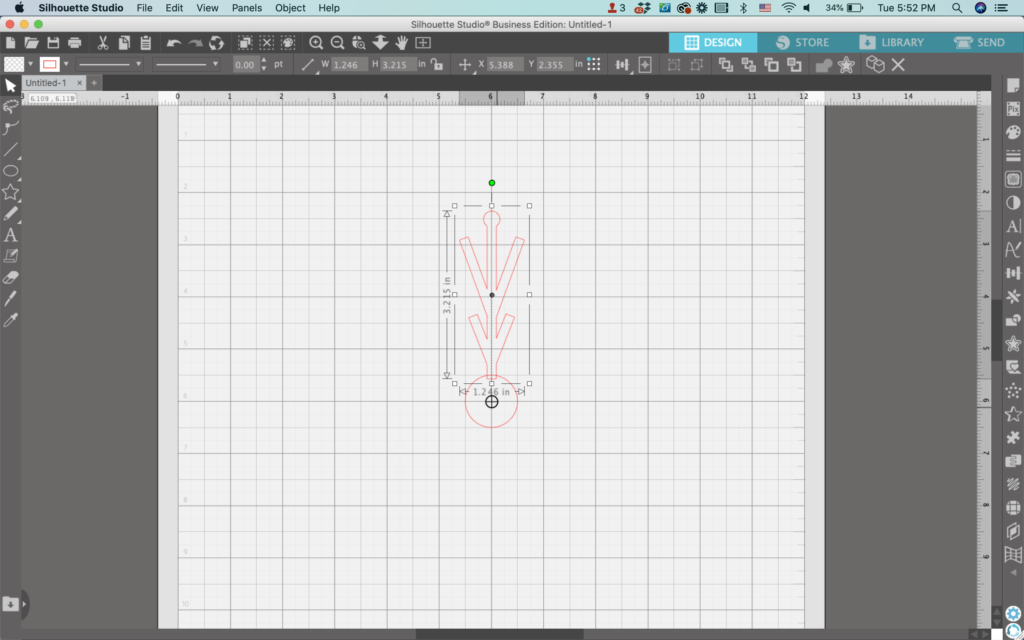
    6. Select all the pieces, right click, and choose ‘Weld’. Be cautious not to weld the snowflake spoke to the center circle.

    Silhouette Studio Screenshot - cuttingforbusiness.com.

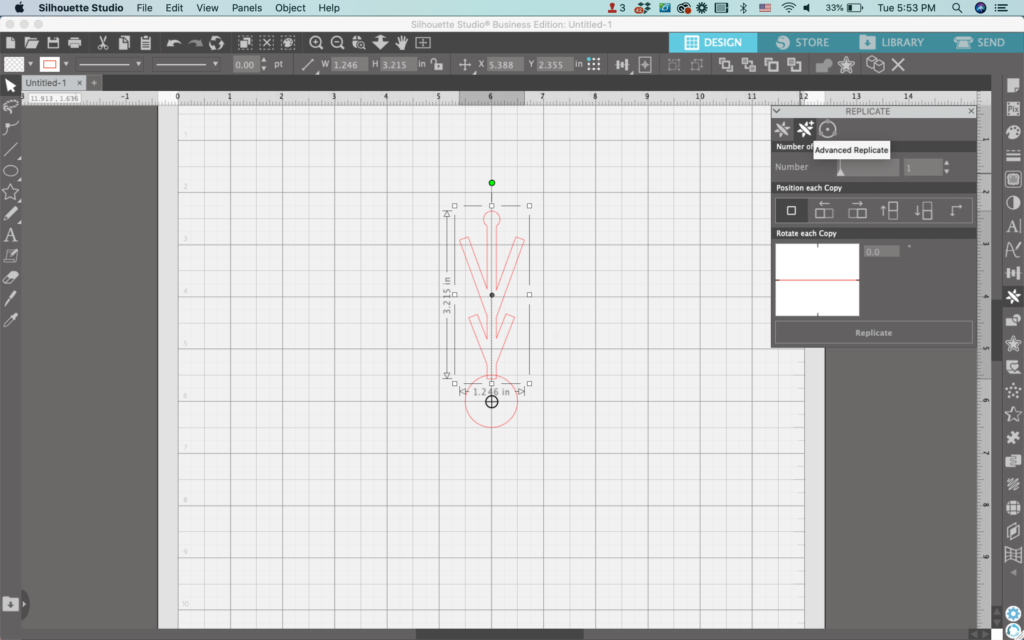
    7. Drag the snowflake spoke’s ‘Center of Rotation’ to the center of the circle. (That’s the circle with the crosshair in it.) If you do not see a circle with a crosshair in it, click the snowflake spoke and press the letter ‘o’ on your keyboard. Make sure that the center of rotation lands on the exact center of the circle or this won’t work correctly.

    Silhouette Studio Screenshot - cuttingforbusiness.com.

    8. Navigate to ‘Panels’, then ‘Replicate’. Then, click on the ‘Advanced Replicate’ Panel. (It’s the second tab.)

    Silhouette Studio Screenshot - cuttingforbusiness.com.

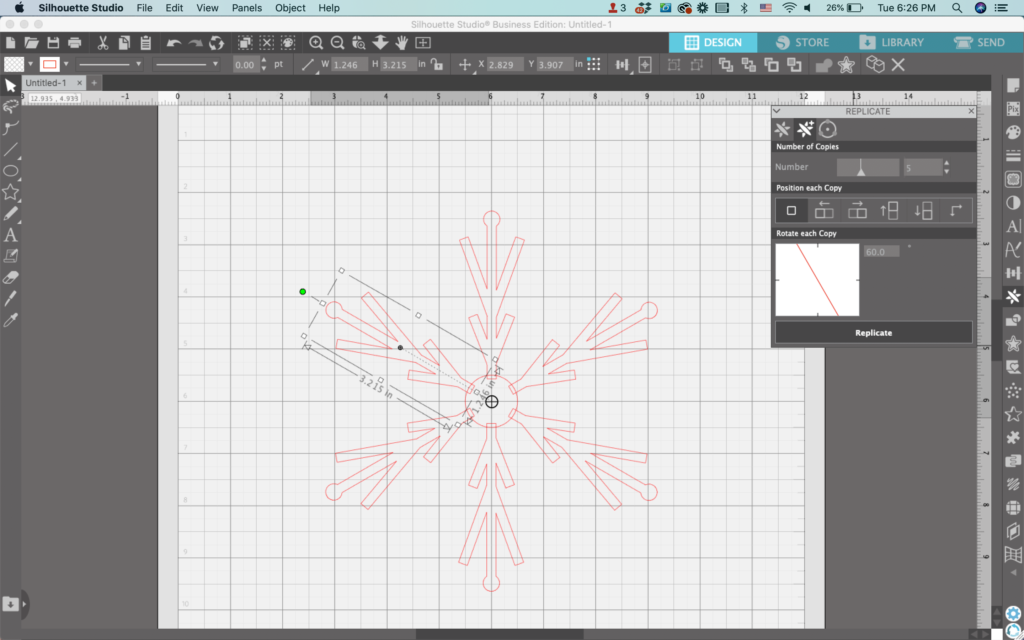
    9. Change the settings in the Replicate Panel. Enter the number of additional snowflake spokes you want to add. In this case, I want 6 total spokes, so I enter 5 in the number box – since one spoke is already in the design.

    You can skip the ‘Position each Copy’ section for this tutorial.

    Now, take 360 (the total number of degrees in a circle) and divide it by the number of total snowflake spokes you want. In this tutorial, I’d like 6 total snowflake spokes. The math equation becomes: 360 divided by 6 equals 60. I enter 60 into the ‘Rotate each Copy’ box.

    Finally, click the ‘Replicate’ button. If you set it up correctly, you’ll end up with a 6 spoke snowflake.

    Silhouette Studio Screenshot - cuttingforbusiness.com.

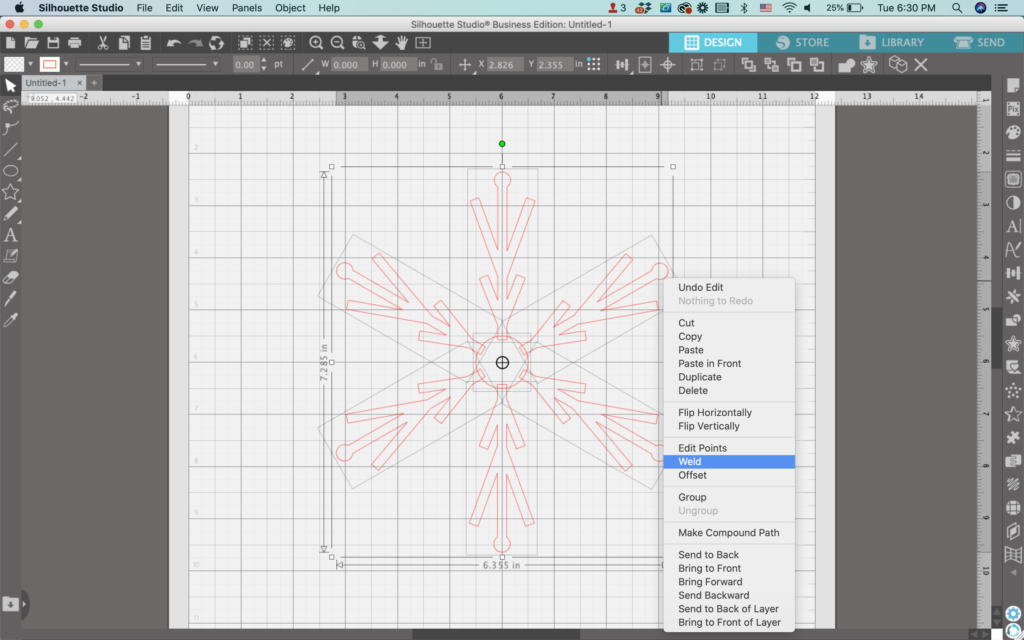
    10. Select all the pieces of the design, right click, and select ‘Weld’.

    Silhouette Studio Screenshot - cuttingforbusiness.com.

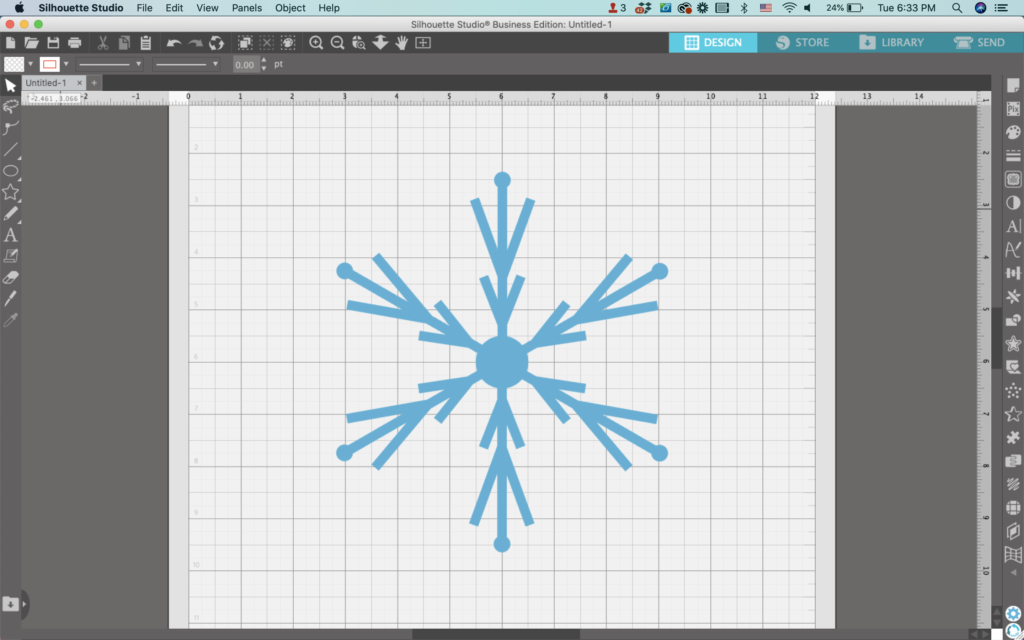
    11. Add color to finish off your design.

    Silhouette Studio Screenshot - cuttingforbusiness.com.

    By changing the design of the spoke, altering the number of spokes used, or alternating short and long spokes, it is easy to make different styles of snowflakes. Remember: No two snowflakes are the same!

    Bonus: Make One Snowflake into Two Unique Designs

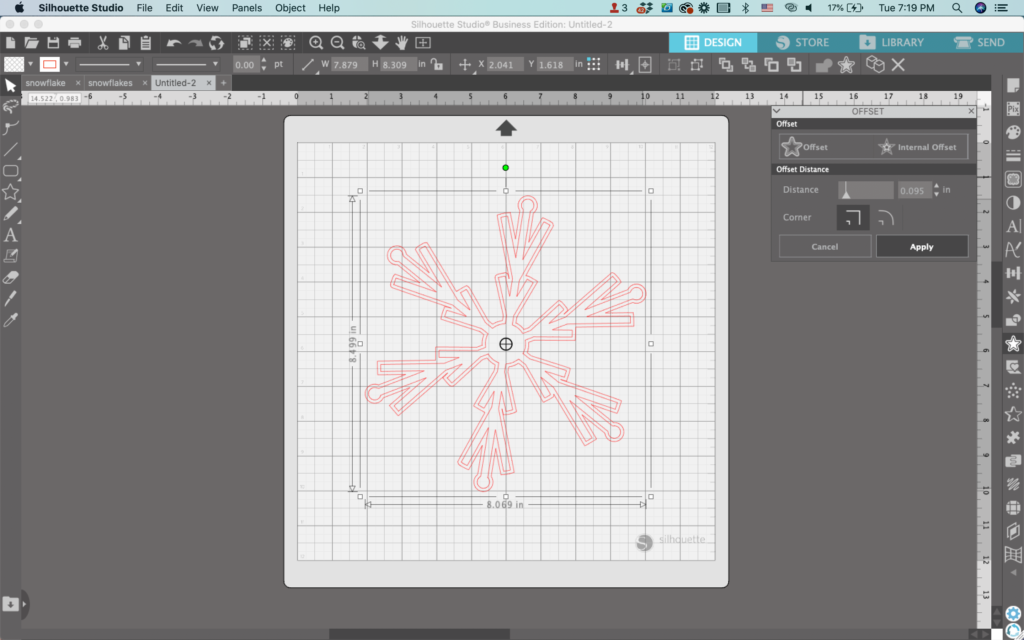
    12. Using the snowflake you just created, perform an offset.

    Silhouette Studio Screenshot - cuttingforbusiness.com.

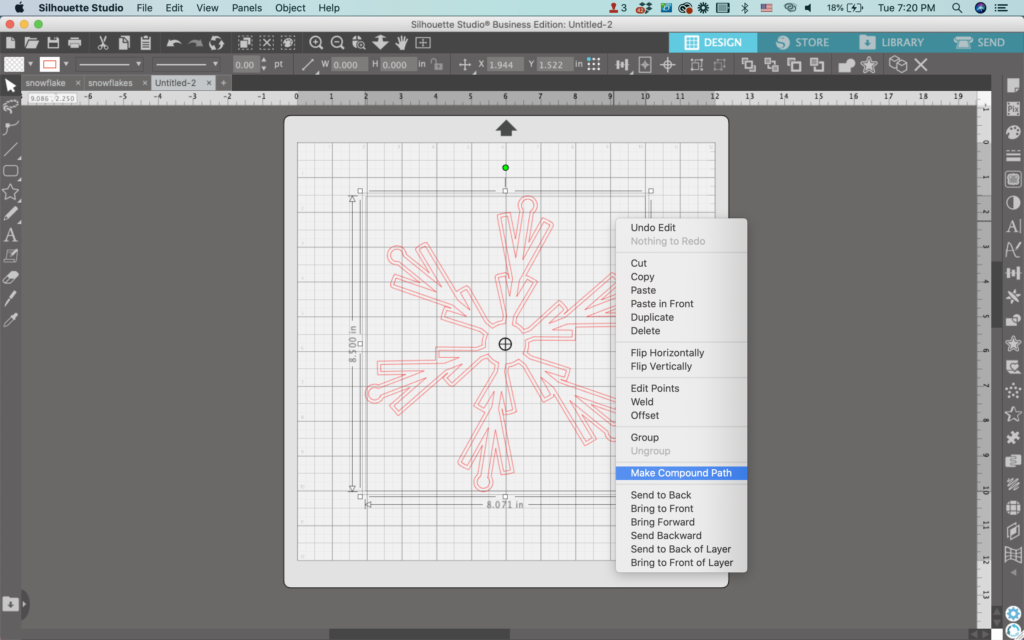
    13. Select the snowflake and the offset, right click, and select ‘Make Compound Path’.

    Silhouette Studio Screenshot - cuttingforbusiness.com.

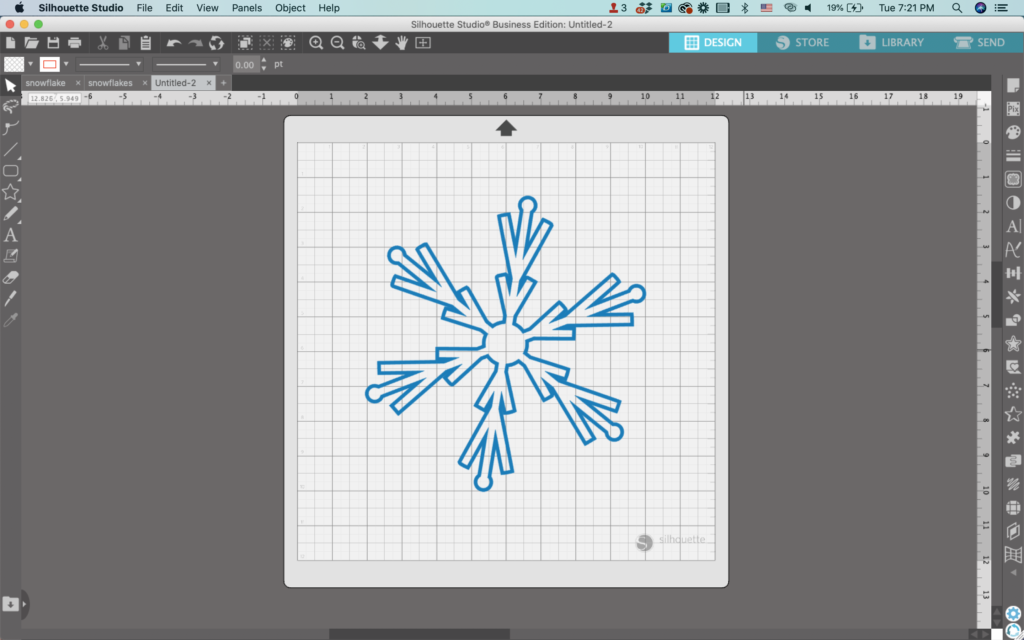
    14. Fill the outline with color.

    Silhouette Studio Screenshot - cuttingforbusiness.com.

    That’s it! Your snowflakes are ready to go!

    Don’t Forget to Save!

    To save your new SVG creation, head to ‘File’, ‘Save As’, ‘Save to Hard Drive’, name the file, then select ‘SVG’ from the dropdown menu.

    Want More SVG Tutorials?

    View more Design with Me SVG tutorials.

  • Silhouette Studio Tutorial: Watercolor Jack-o-Lanterns

    Design with Me is a new regular feature on Cutting for Business! Each Friday, I’ll bring you a new Silhouette Studio tutorial featuring how to design an SVG.

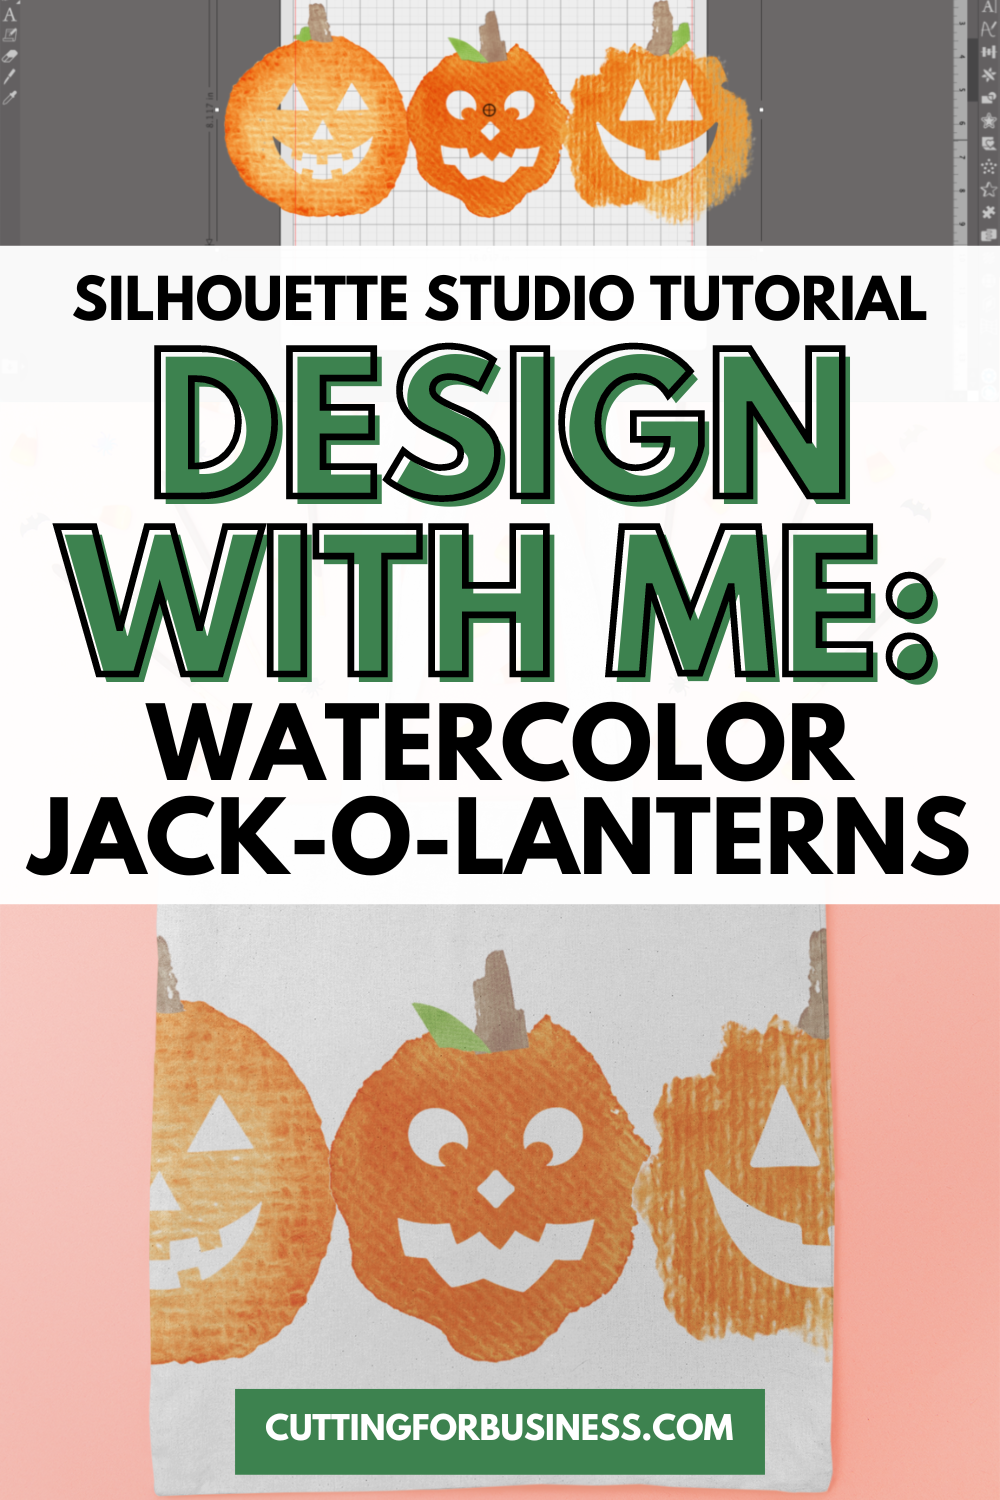
    Let’s talk Halloween! Today, we are going to do a quick tutorial to create watercolor jack-o-lanterns.

    Silhouette Studio Tutorial: Watercolor Jack-o-Lanterns - cuttingforbusiness.com

    Silhouette Studio Tutorial: Watercolor Jack-o-Lantern Faces

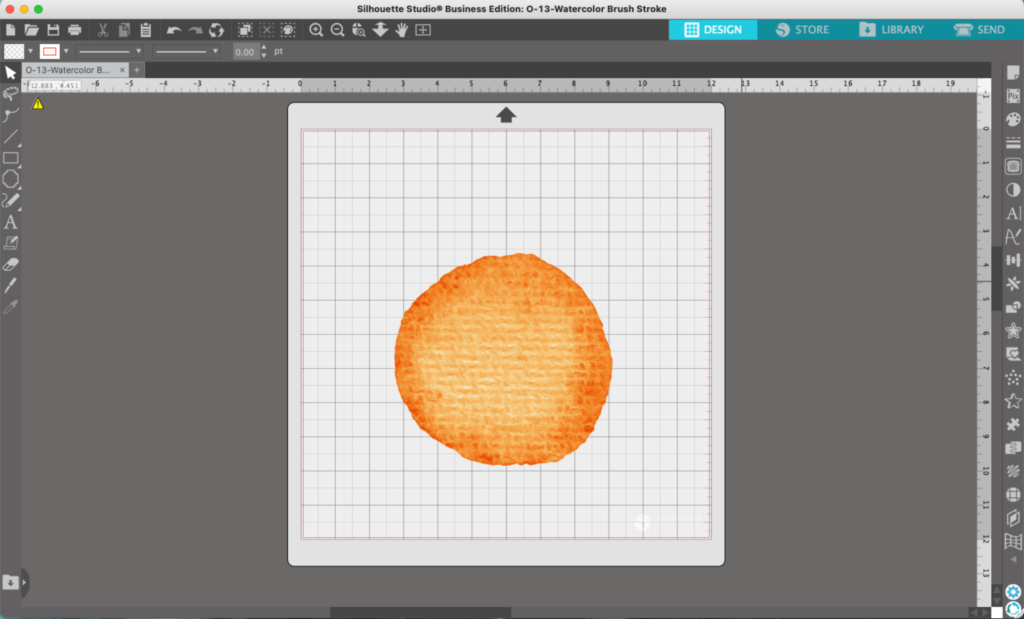
    These jack ‘o lanterns are so easy to create. First, you’ll need some watercolor splotches and some jack ‘o lantern faces.

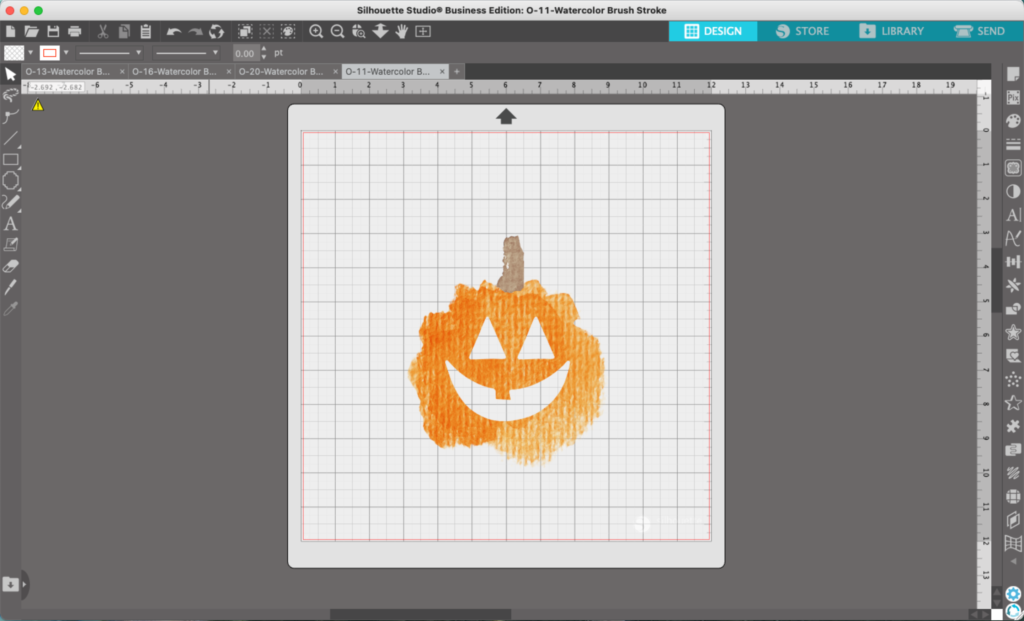
    1. In Silhouette Studio, open your watercolor splotch.
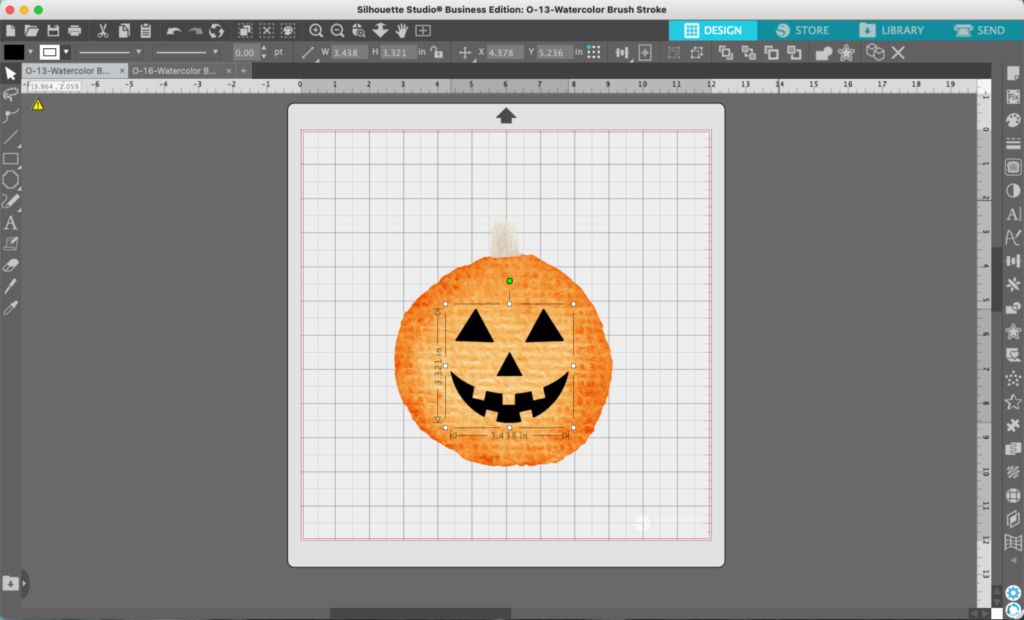
    Silhouette Studio Screenshot - cuttingforbusiness.com.

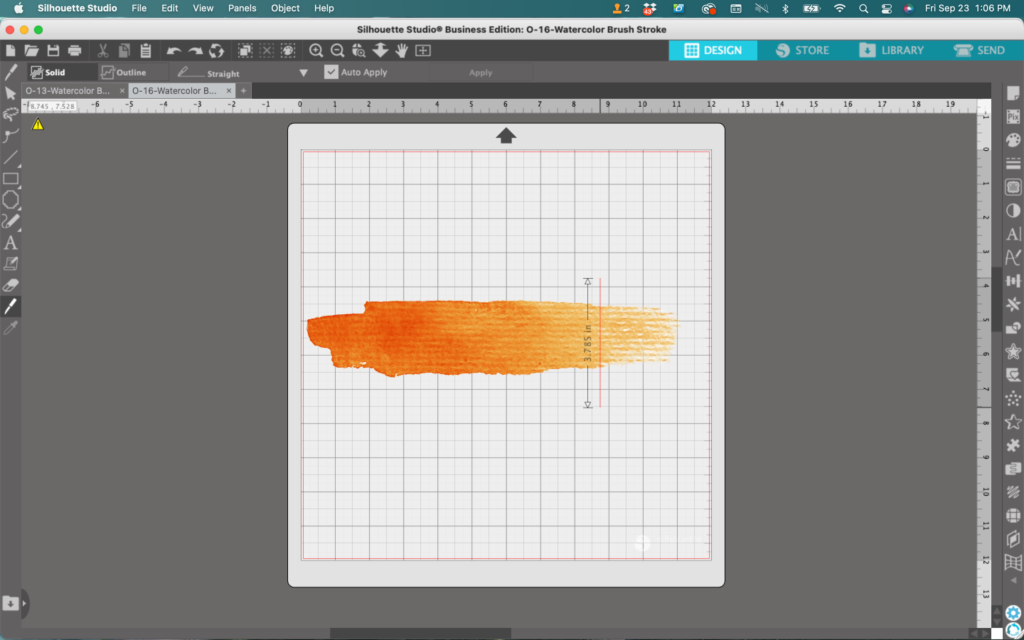
    2. Now, I need to add a stem to turn my splotch into a pumpkin. I’d like these to also look like watercolor, so I’m going to open another splotch from my watercolor pack and use the knife tool to fashion it into a stem.

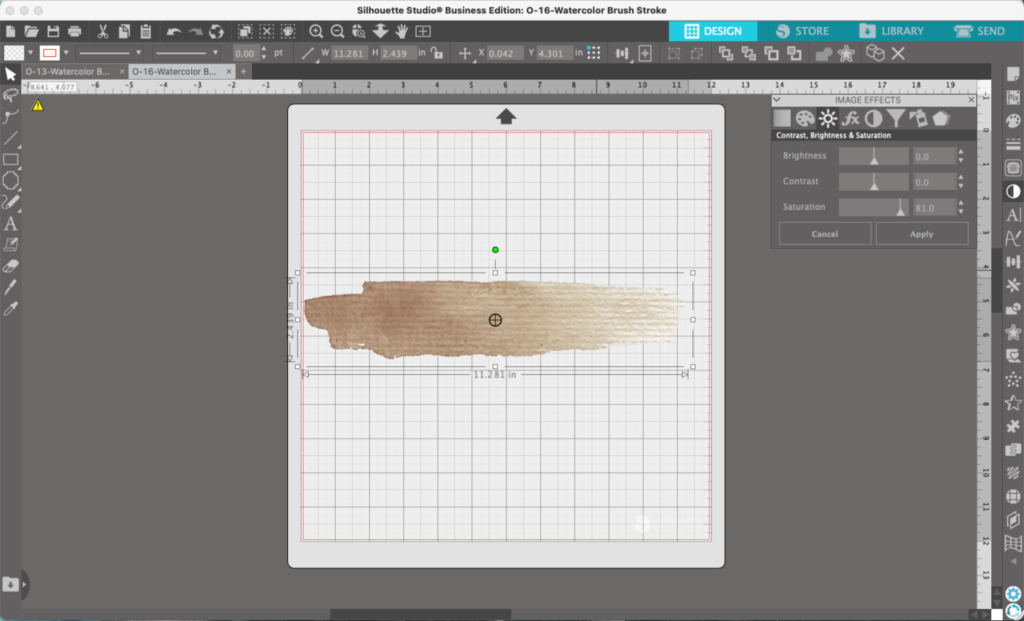
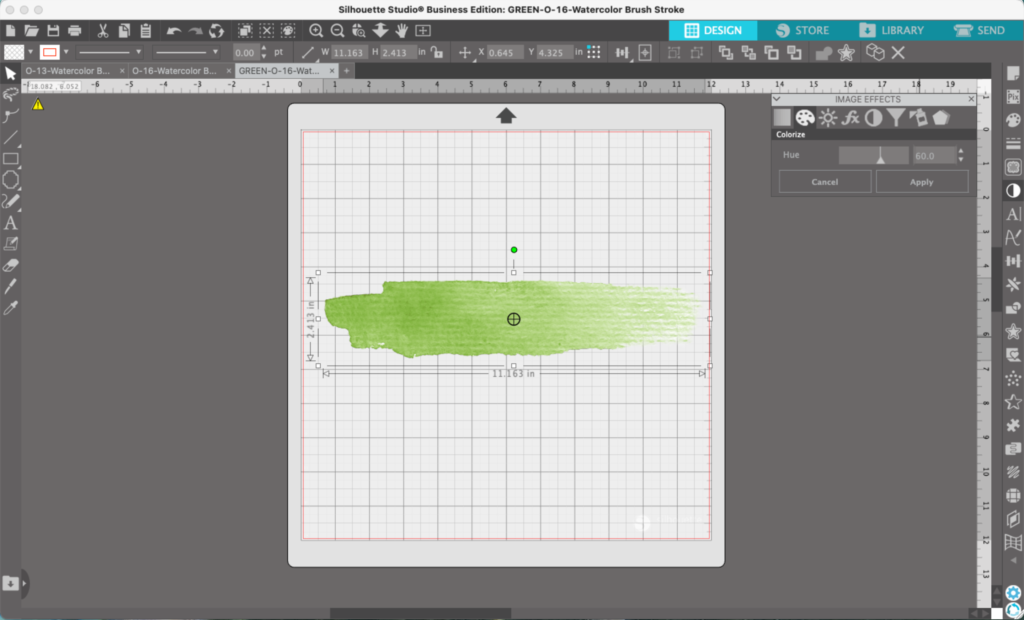
    Pumpkin stems aren’t yellow, so let’s change the color. Since it is an image, we cannot simply change the fill color. Instead, head to ‘Panels’, then ‘Image Effects’. Move the sliders around on the tabs to change the color. (This only works on PNG and JPG files, and it doesn’t work on all images.)

    Silhouette Studio Screenshot - cuttingforbusiness.com.
    Silhouette Studio Screenshot - cuttingforbusiness.com.

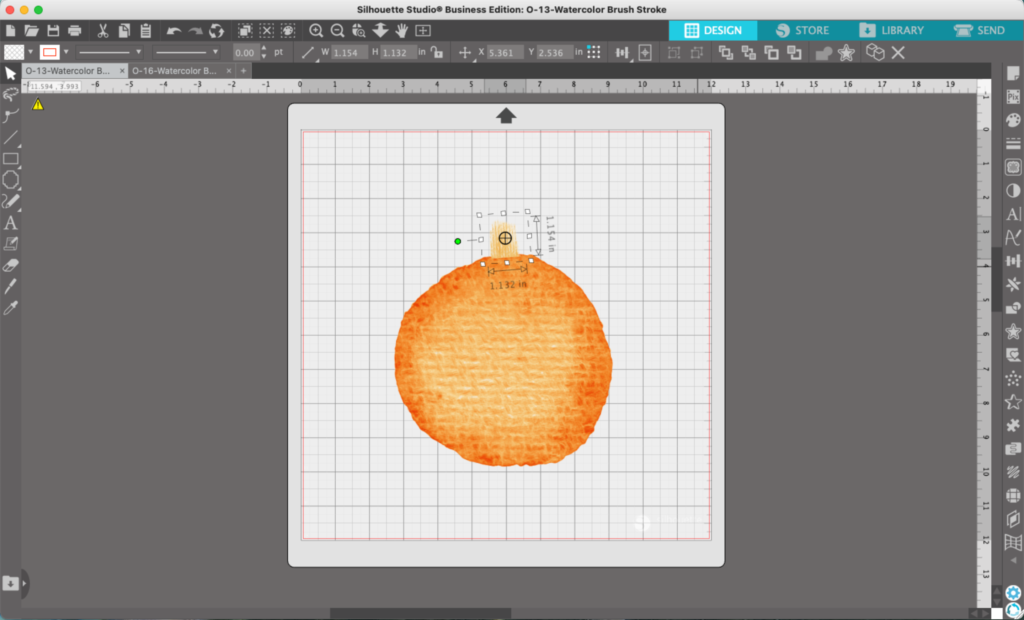
    3. Once you cut a section of the watercolor to use for a stem, copy and paste it onto the mat with your circle watercolor splotch.

    Silhouette Studio Screenshot - cuttingforbusiness.com.

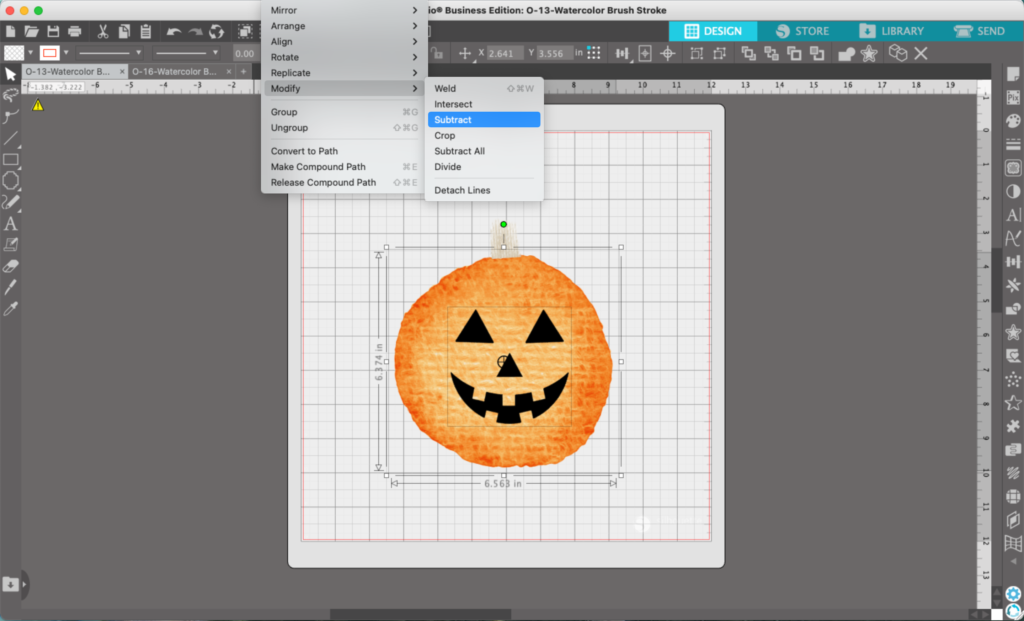
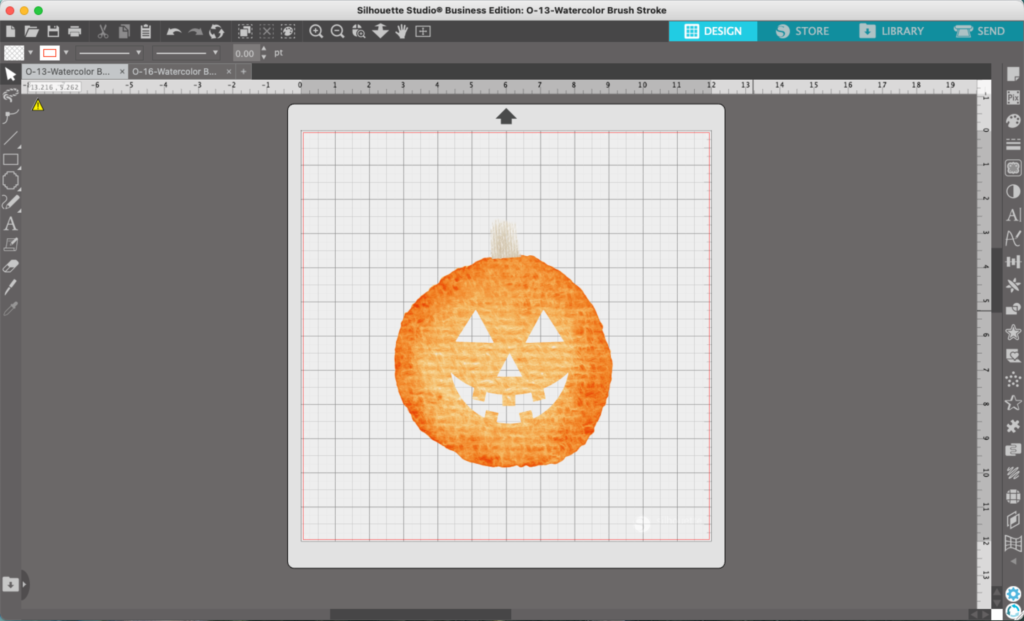
    4. Add your jack ‘o lantern face. You can either choose to leave your face black or select the pumpkin and the face, then navigate to ‘Object’, ‘Modify’, and ‘Subtract’ to subtract the face from your pumpkin.

    Silhouette Studio Screenshot - cuttingforbusiness.com.
    Silhouette Studio Screenshot - cuttingforbusiness.com.
    Silhouette Studio Screenshot - cuttingforbusiness.com.

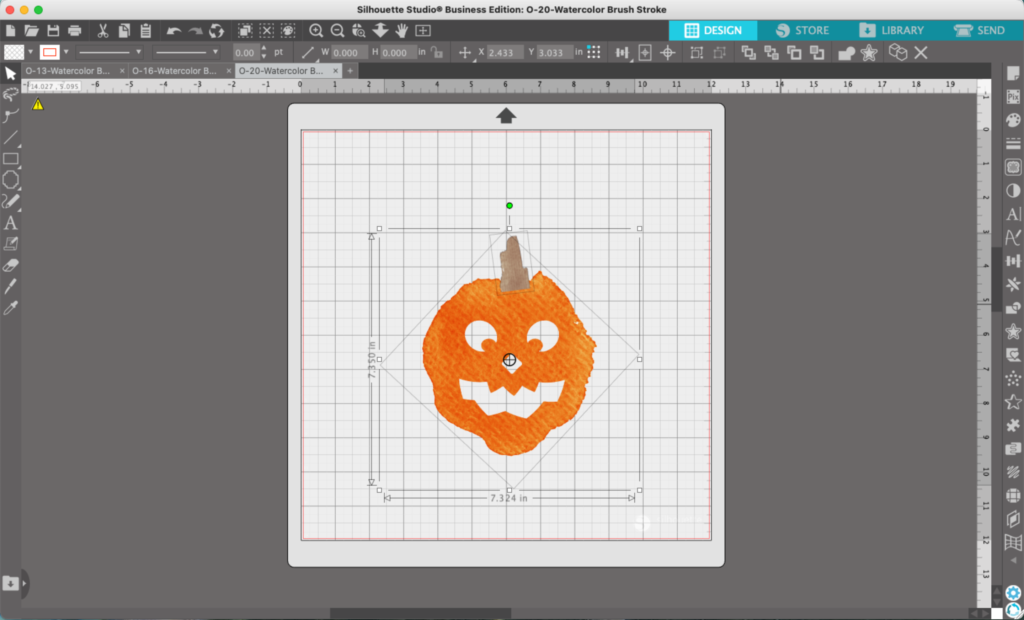
    6. Repeat the process using a different shaped watercolor splotch and a different face.

    Silhouette Studio Screenshot - cuttingforbusiness.com.

    7. Repeat the tutorial once more, again use a different watercolor splotch and face.

    Silhouette Studio Screenshot - cuttingforbusiness.com.

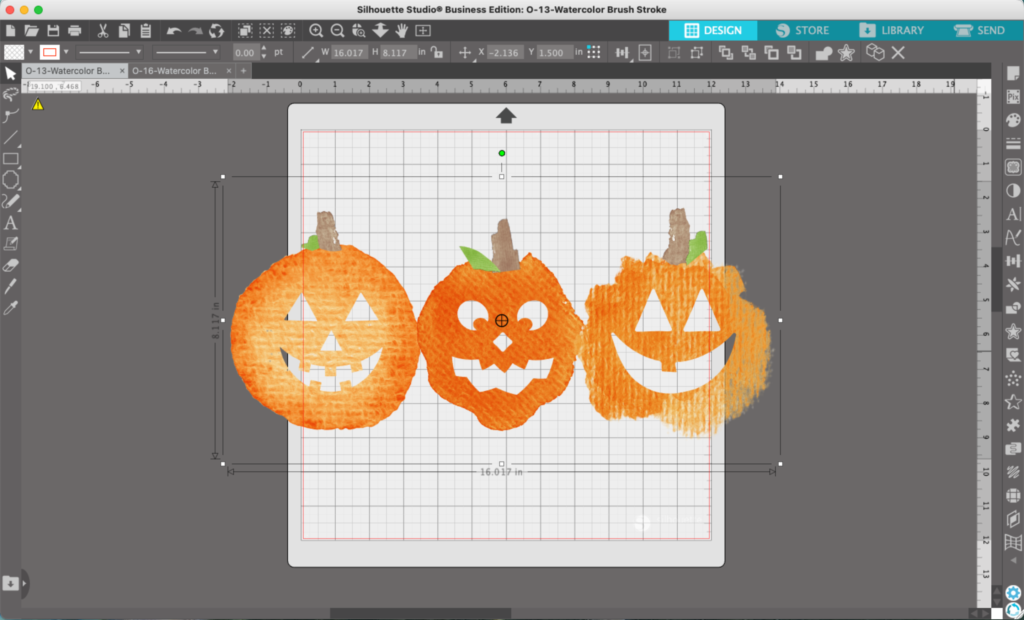
    8. Copy and paste all the jack ‘o lanterns onto one mat. Add any finishing details like leaves.

    Silhouette Studio Screenshot - cuttingforbusiness.com.

    Wondering how I created the leaves? I used the same process as the stem: Navigate to ‘Panels’, ‘Image Effects’, and adjust the sliders until you get green. Then use the knife to cut off a piece to use as a leaf.

    Silhouette Studio Screenshot - cuttingforbusiness.com.

    That’s it! Your watercolor jack-o-lanterns are ready to go!

    Don’t Forget to Save!

    To save your new SVG creation, head to ‘File’, ‘Save As’, ‘Save to Hard Drive’, name the file, then select ‘SVG’ from the dropdown menu.

    Want More SVG Tutorials?

    View more Design with Me SVG tutorials.
  • Silhouette Studio Tutorial: How to Create Plaid Patterns

    Design with Me is a new regular feature on Cutting for Business! Each Friday, I’ll bring you a new Silhouette Studio tutorial featuring how to design an SVG.

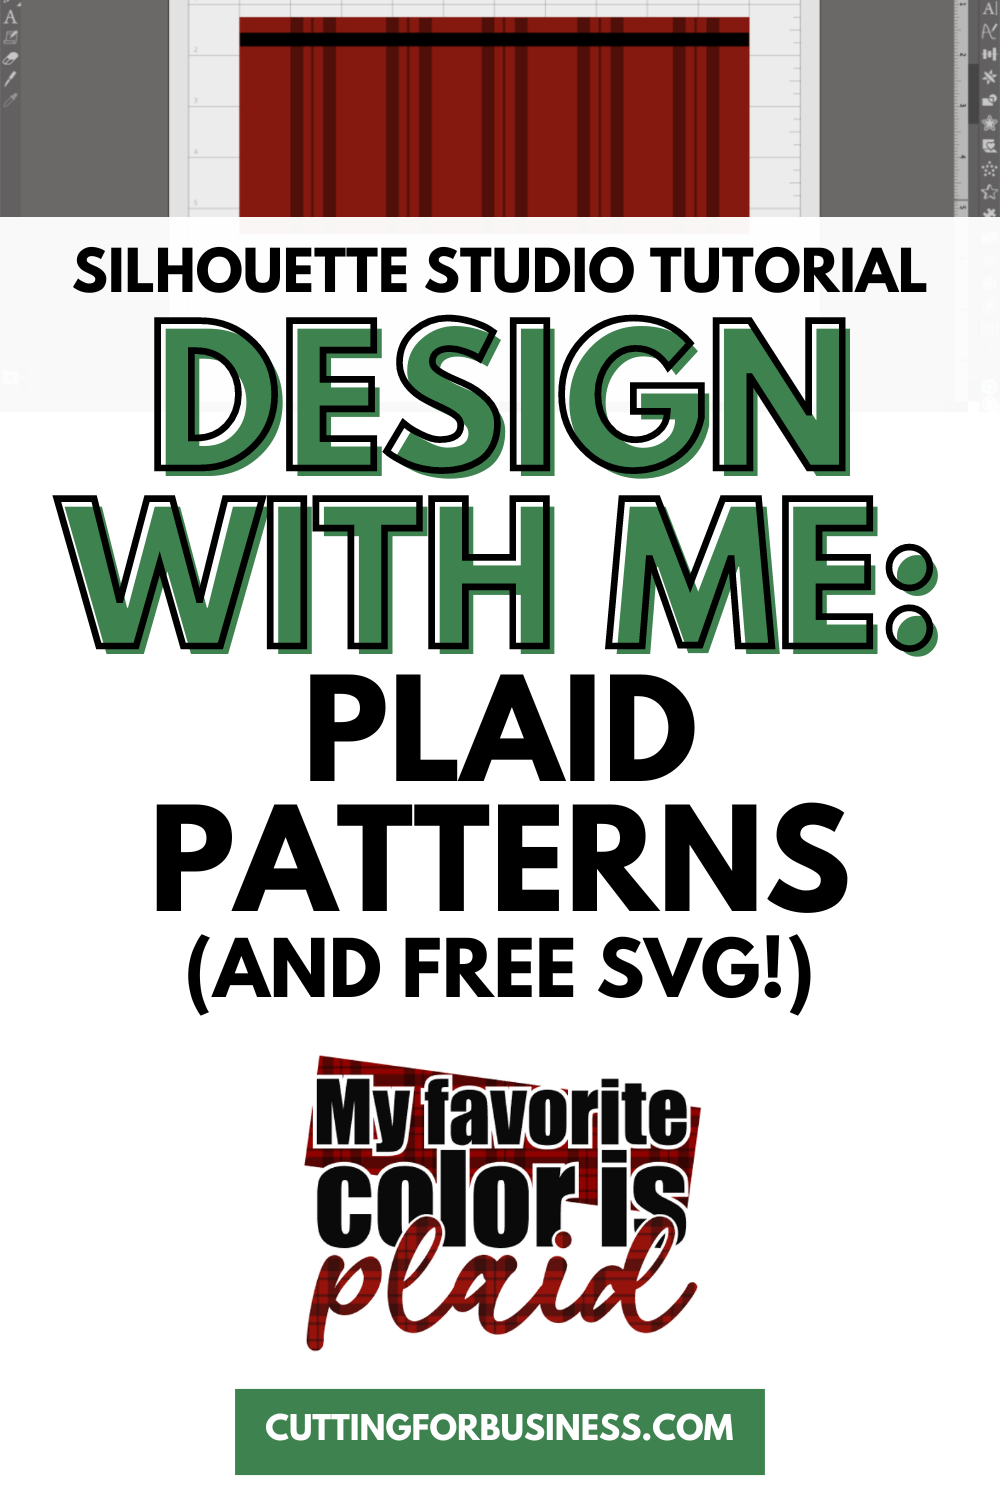
    Fall is the perfect time to break out plaid everything. So, let’s look at a Silhouette Studio Tutorial How to Create Plaid Patterns – from scratch!

    Silhouette Studio Tutorial: How to Create Plaid Patterns - cuttingforbusiness.com

    Silhouette Studio Tutorial: How to Create Plaid Patterns

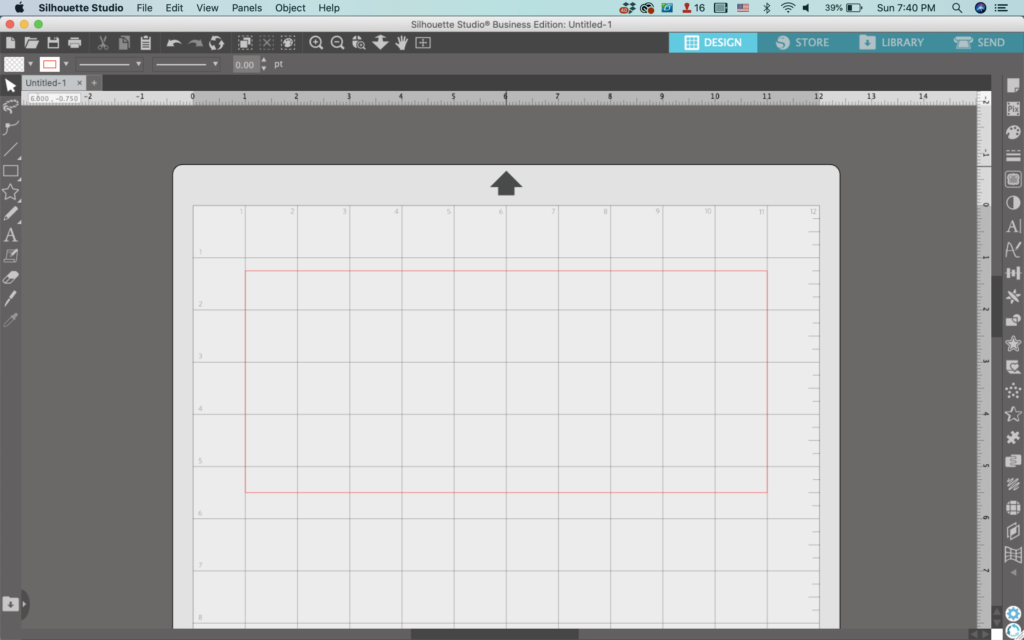
    1. Draw a large rectangle.
    Silhouette Studio Screenshot - cuttingforbusiness.com.

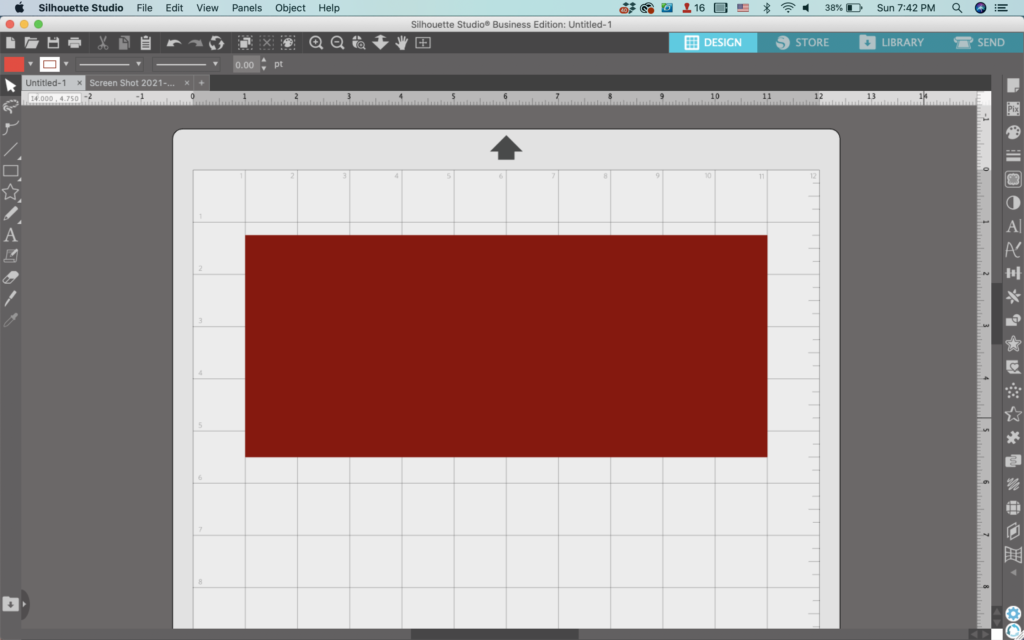
    2. Fill the rectangle with a color.

    Silhouette Studio Screenshot - cuttingforbusiness.com.

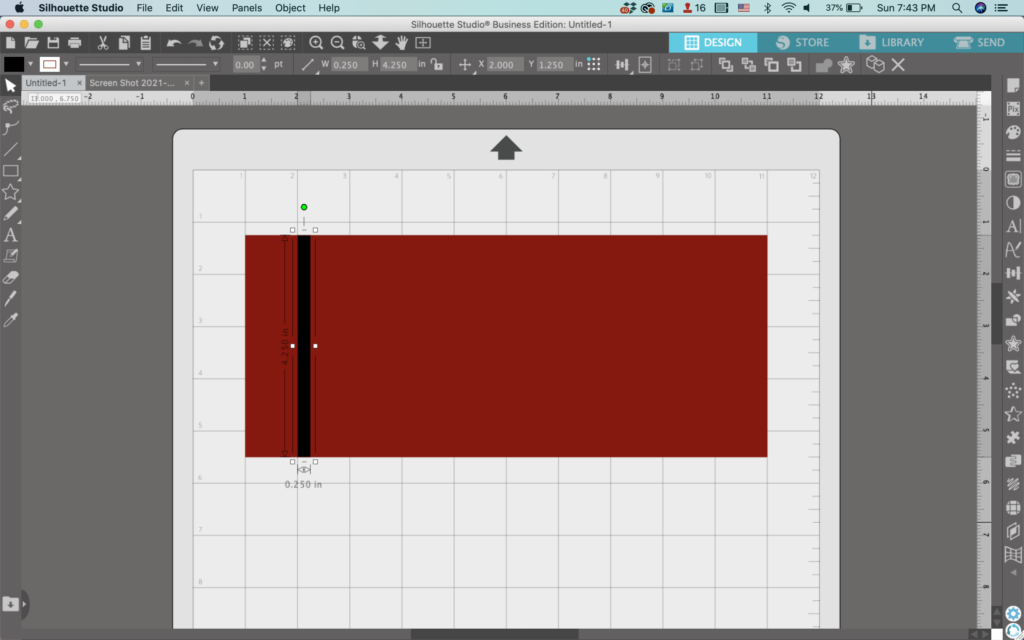
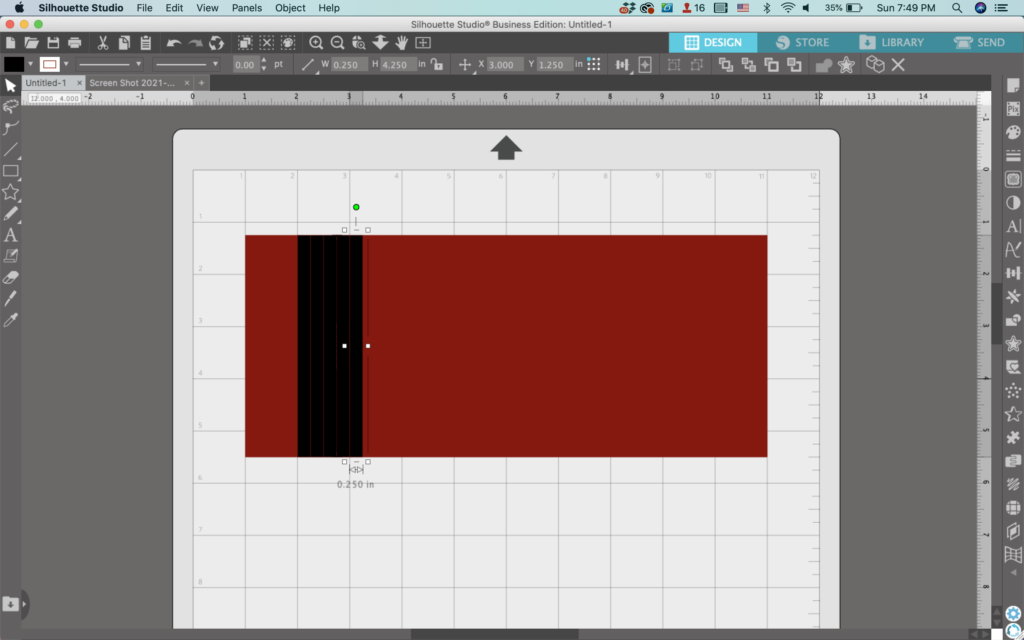
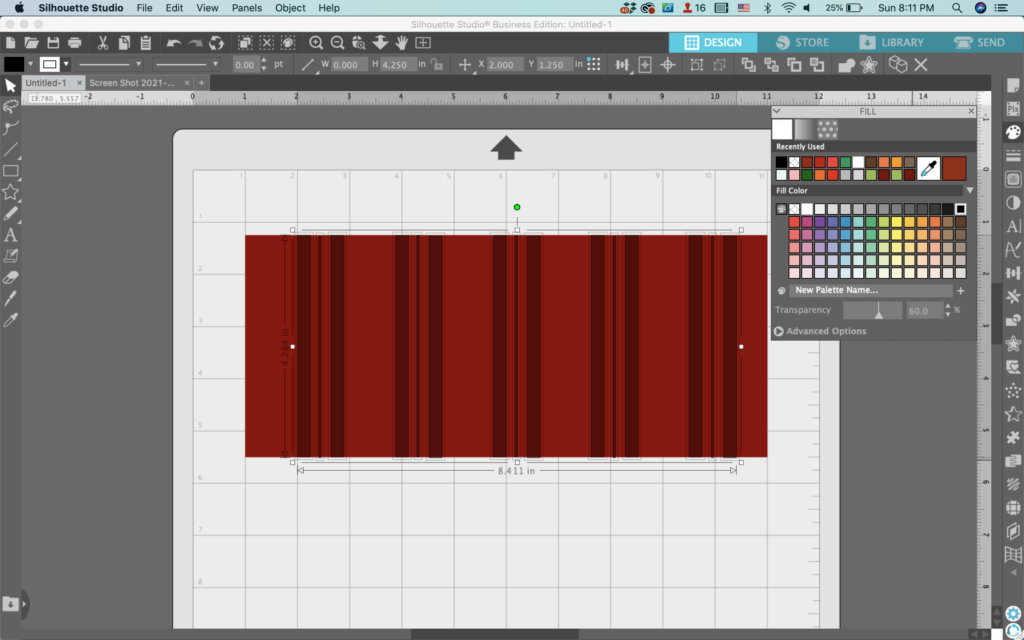
    3. Draw a long, skinny rectangle. Fill that rectangle with a color.

    Silhouette Studio Screenshot - cuttingforbusiness.com.

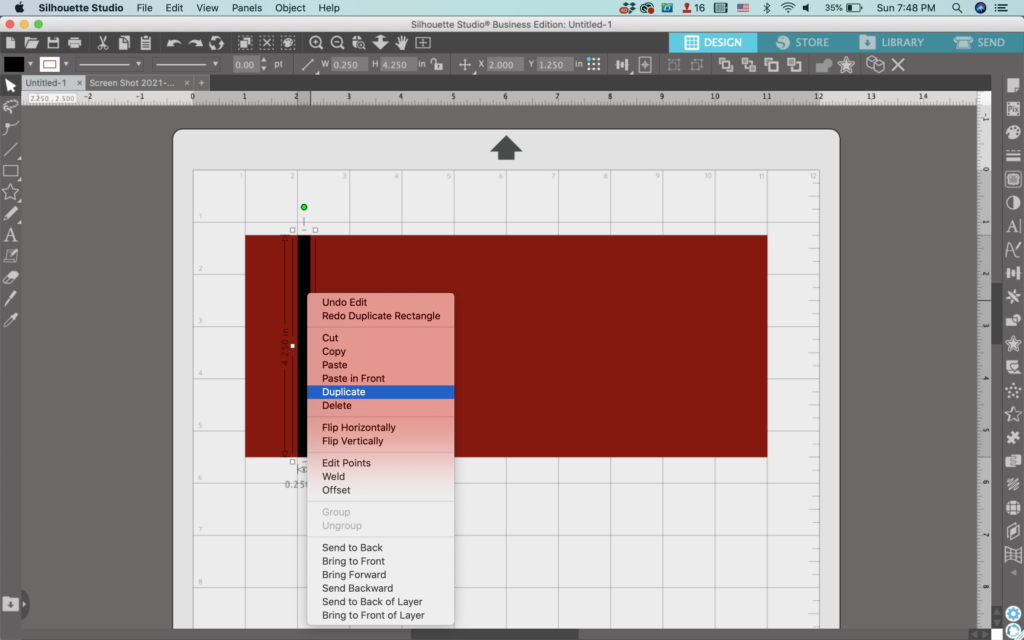
    4. Right click and select ‘Duplicate’ to make a copy. Do this several times so you have a number of copies.

    Silhouette Studio Screenshot - cuttingforbusiness.com.
    Silhouette Studio Screenshot - cuttingforbusiness.com.

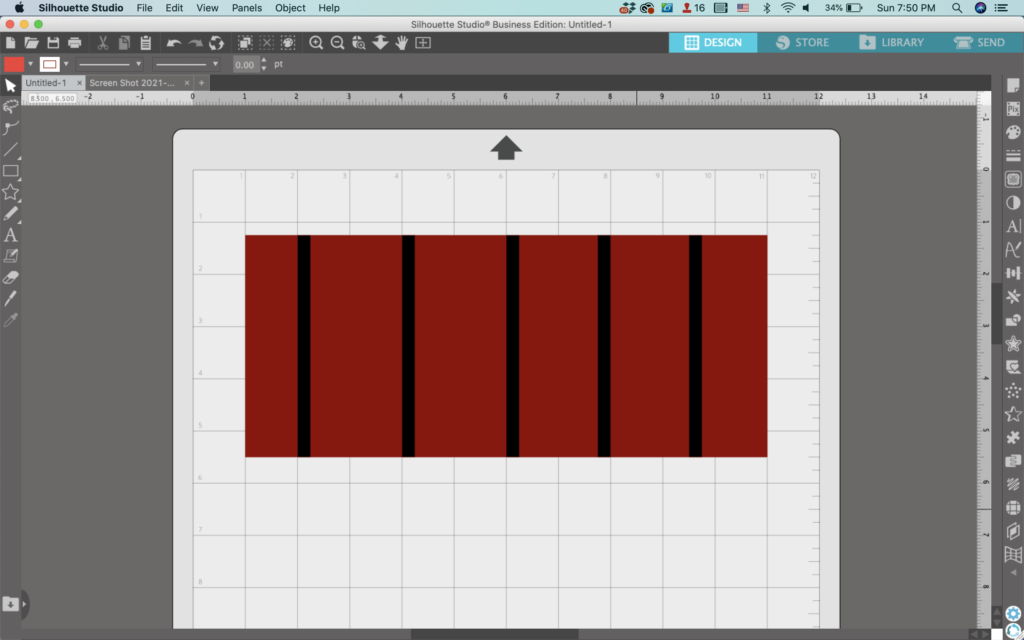
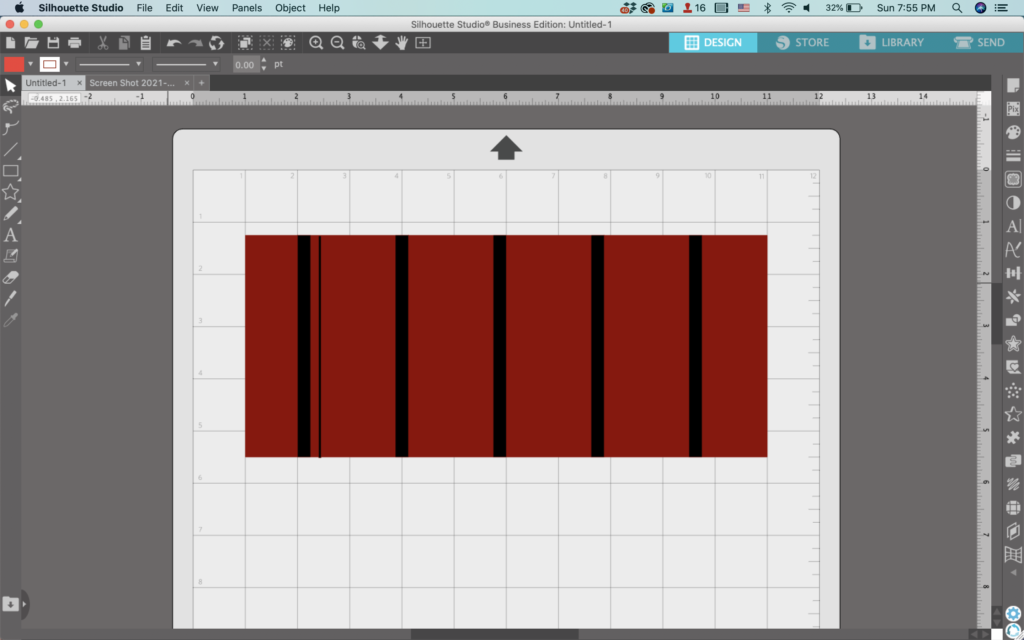
    5. Spread the copies out across the large rectangle.

    Silhouette Studio Screenshot - cuttingforbusiness.com.

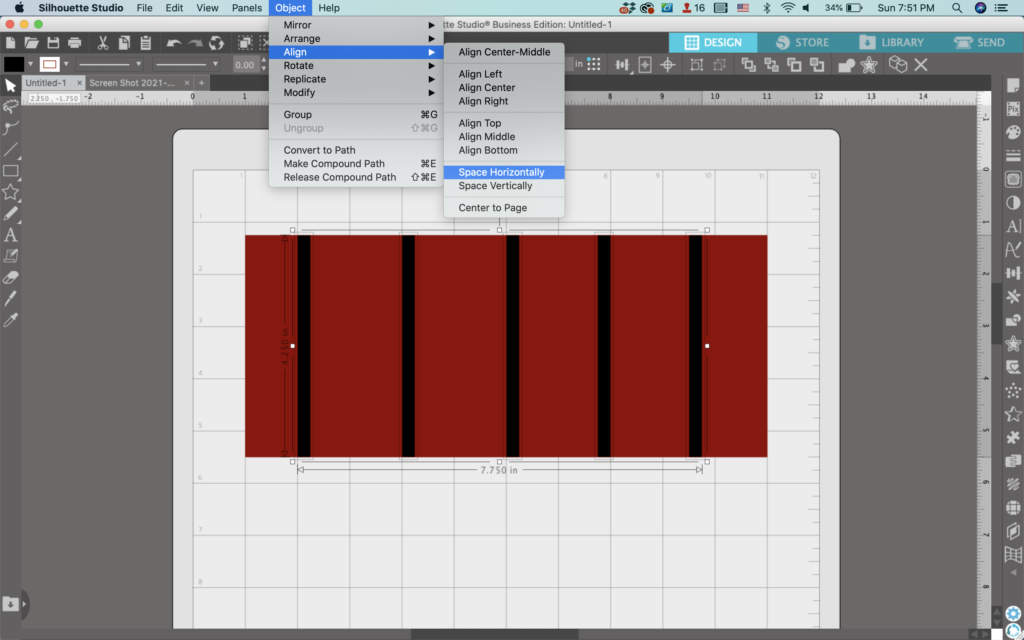
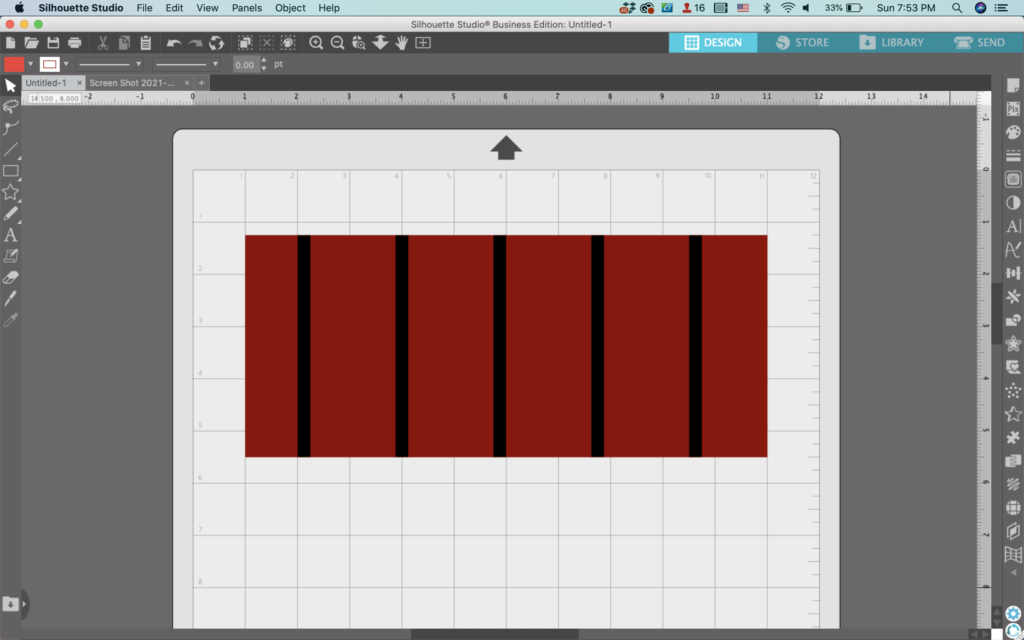
    6. Hold down the SHIFT key and select all the skinny rectangles. Then, navigate to ‘Object’, ‘Align’, and ‘Space Horizontally’. You’ll be left with perfectly spaced skinny rectangles.

    Silhouette Studio Screenshot - cuttingforbusiness.com.
    Silhouette Studio Screenshot - cuttingforbusiness.com.

    7. Draw a skinny rectangle and place it to the right of the first skinny rectangle you made.

    Silhouette Studio Screenshot - cuttingforbusiness.com.

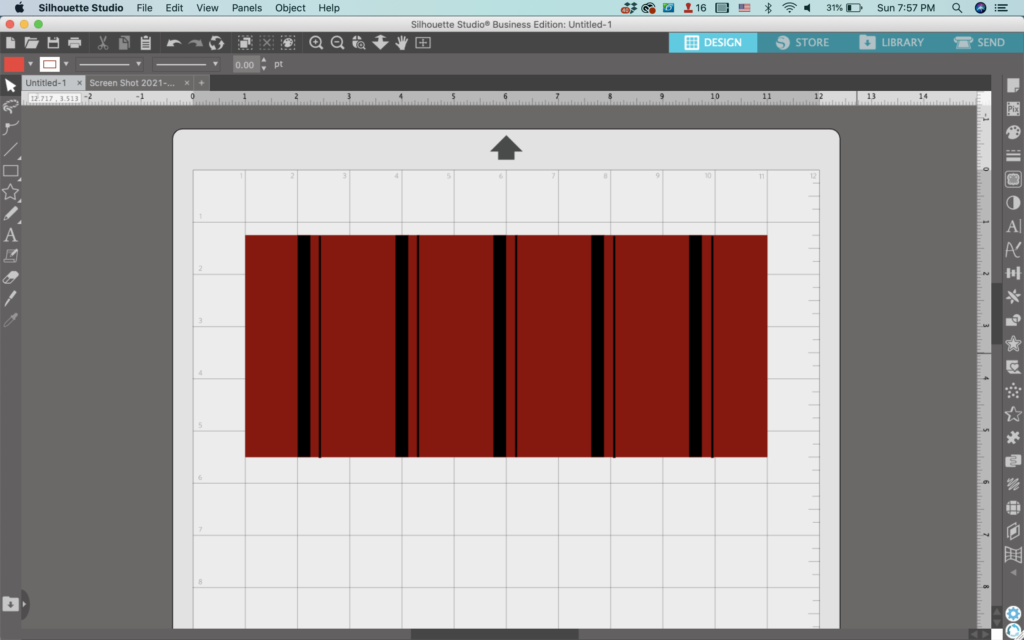
    8. Repeat steps 4, 5, and 6 to duplicate the rectangle, space the duplicates out, then use the align command to space them horizontally.

    Silhouette Studio Screenshot - cuttingforbusiness.com.

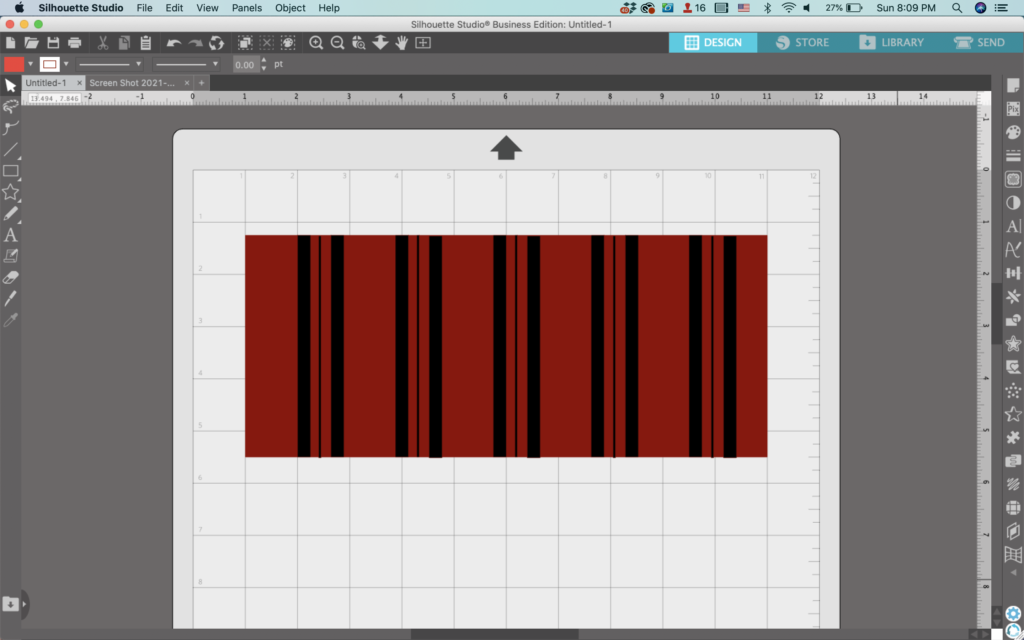
    9. Repeat steps 4, 5, and 6 several times until you are happy with the amount of vertical lines. Remember, it is your choice… you are the designer.

    Silhouette Studio Screenshot - cuttingforbusiness.com.

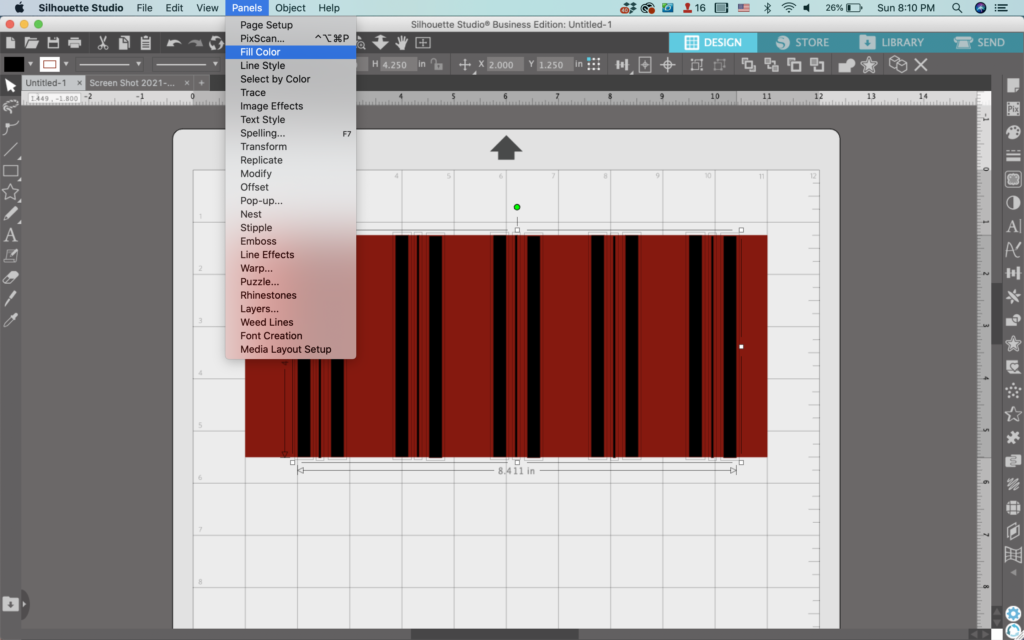
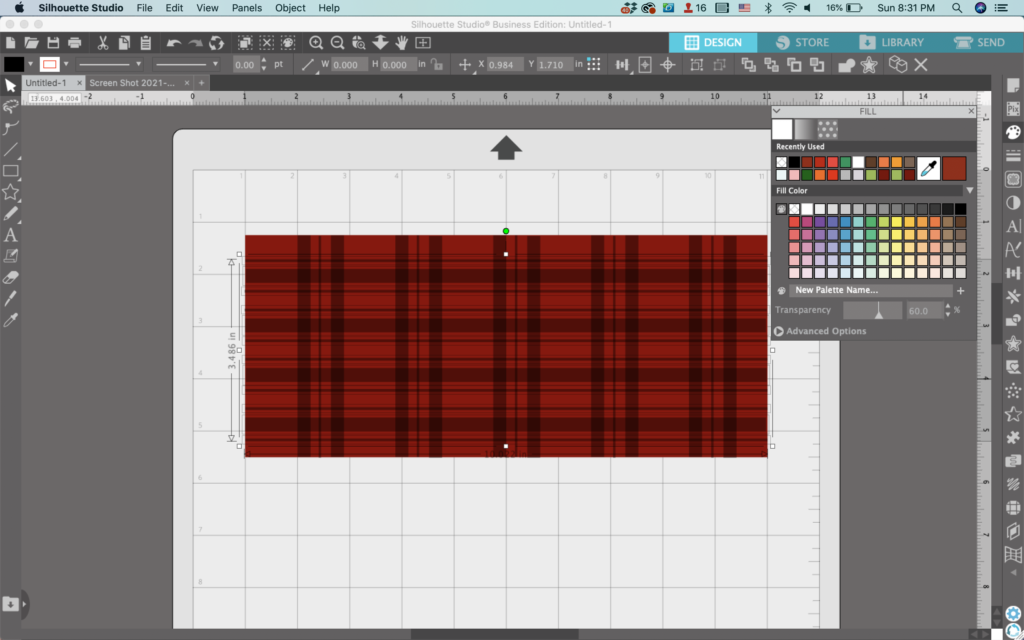
    10. Select all the black rectangles. Then, navigate to ‘Panels’, then ‘Fill Color’.

    Silhouette Studio Screenshot - cuttingforbusiness.com.

    11. Slide the transparency slider over to make them transparent. In this tutorial, I chose 60% transparency, but again, it’s your choice.

    Silhouette Studio Screenshot - cuttingforbusiness.com.

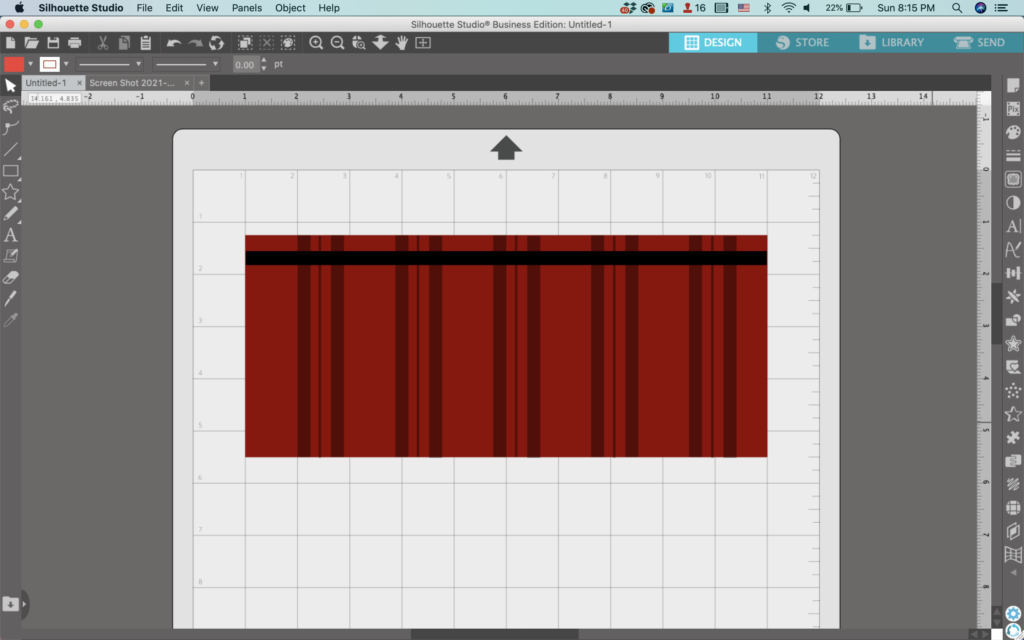
    12. Now, draw a skinny rectangle that is horizontal instead of vertical.

    Silhouette Studio Screenshot - cuttingforbusiness.com.

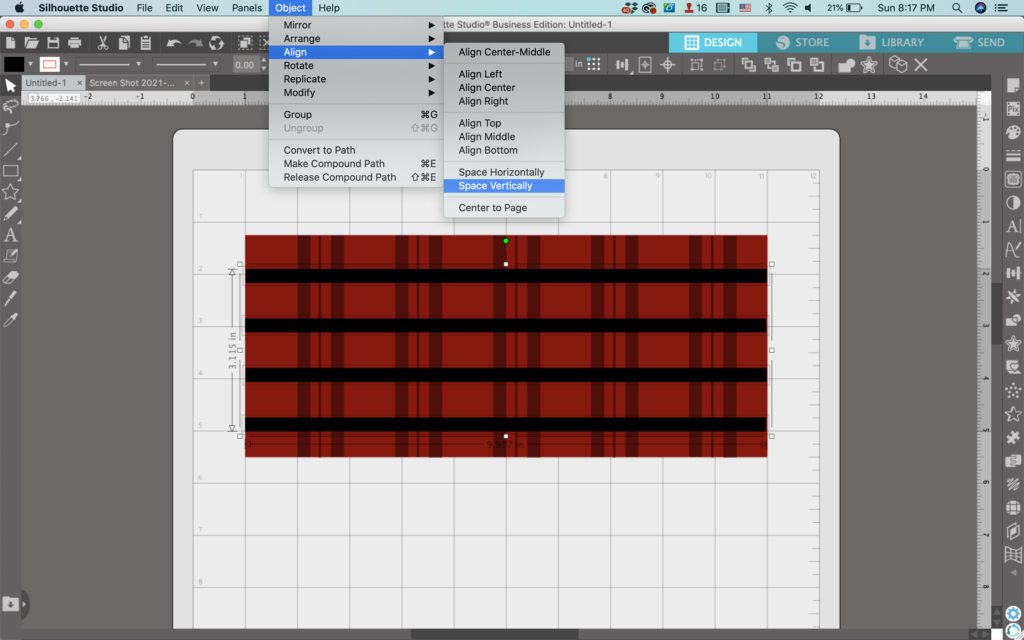
    13. Again, repeat steps 4, 5, and 6 multiple times to make more horizontal rectangles. Spread them out, then align them vertically.

    Silhouette Studio Screenshot - cuttingforbusiness.com.

    14. Add more horizontally rectangles, remembering to space them vertically.

    Silhouette Studio Screenshot - cuttingforbusiness.com.

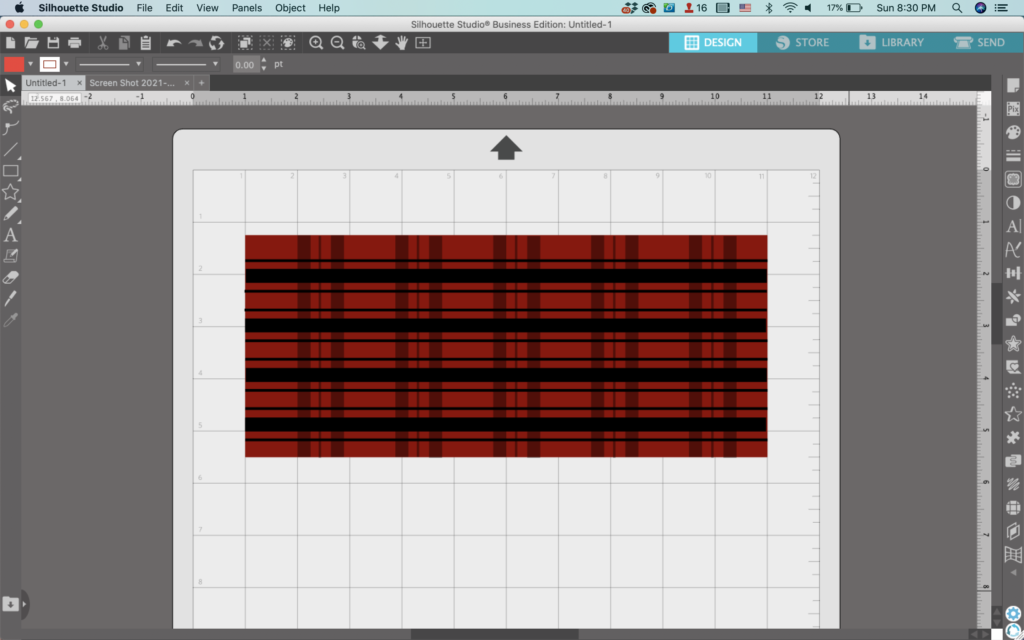
    15. Select all the horizontal lines and again navigate to ‘Panels’, ‘Fill Color’. Slide the transparency slider over to the same amount you did with the vertical lines.

    Silhouette Studio Screenshot - cuttingforbusiness.com.

    16. Voila! Instant plaid. Use it in a design, printable, or however else you’d like.

    Don’t Forget to Save!

    To save your new SVG creation, head to ‘File’, ‘Save As’, ‘Save to Hard Drive’, name the file, then select ‘SVG’ from the dropdown menu.

    Want More SVG Tutorials?

    View more Design with Me SVG tutorials.
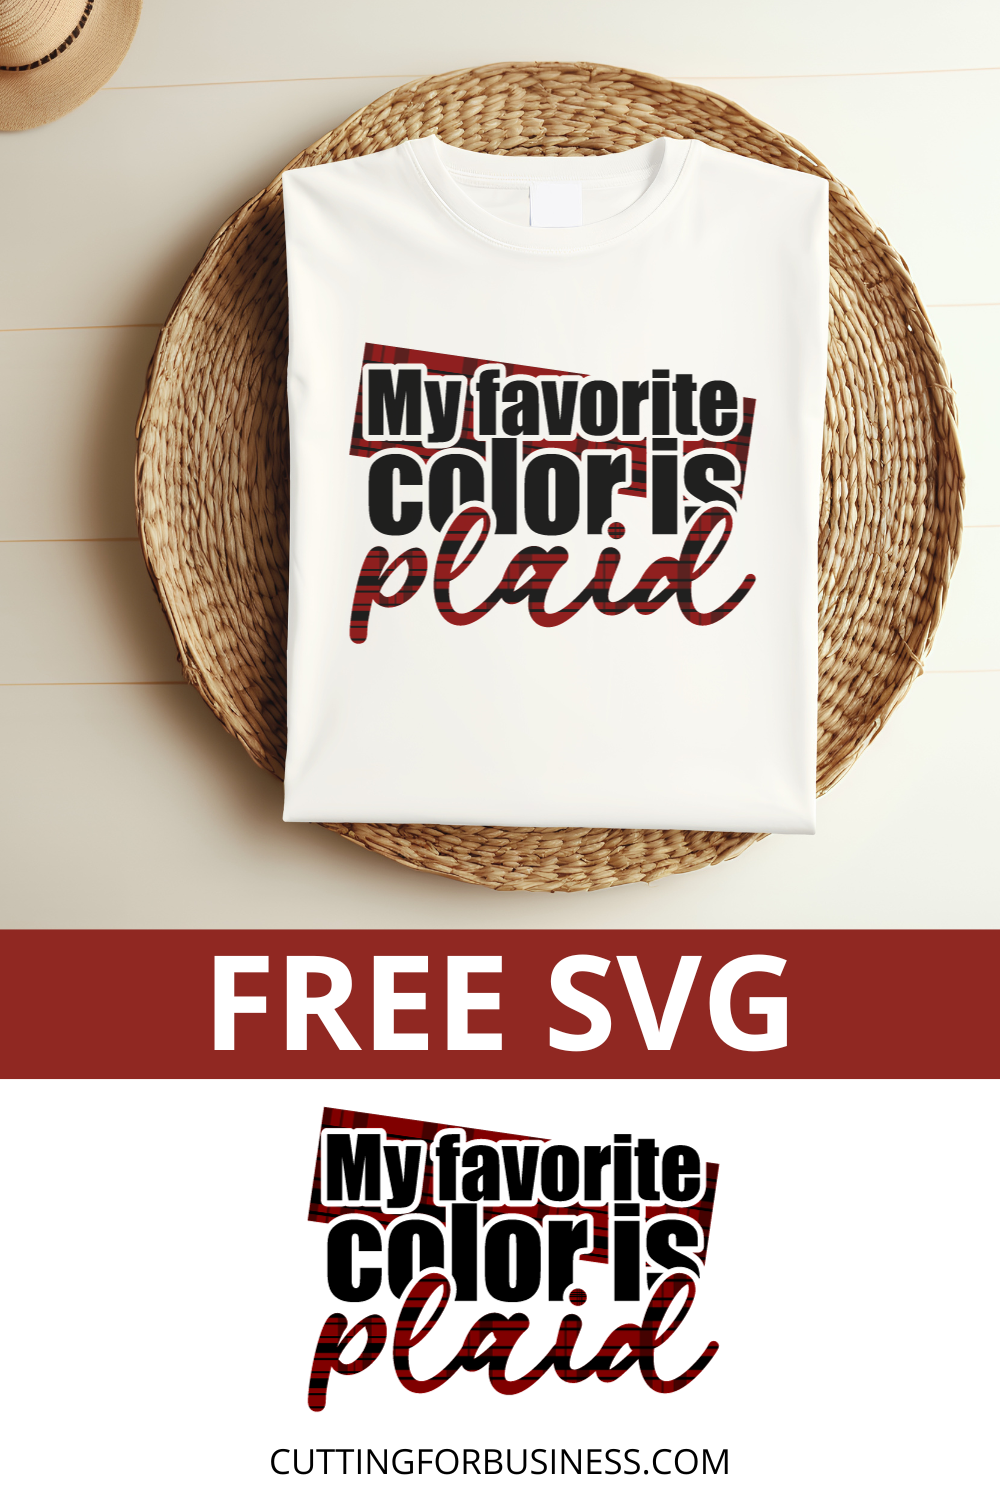
    Free My Favorite Color is Plaid SVG - cuttingforbusiness.com
  • Silhouette Studio Design Tutorial: Fall Spiral SVG

    Design with Me is a new regular feature on Cutting for Business! Each Friday, I’ll bring you a new Silhouette Studio tutorial featuring how to design an SVG.

    Today, let’s look at creating a fall spiral SVG.

    Silhouette Studio Tutorial: Fall Spiral SVG - cuttingforbusiness.com

    There’s a great quote in the book The Great Gatsby about Fall. Since The Great Gatsby entered the public domain in 2020, I can safely use quotes from the book without fear of copyright infringement. Today, I’m turning a quote from the book into a fall cut file. Let’s look at it.

    Silhouette Studio Tutorial: Fall Spiral SVG

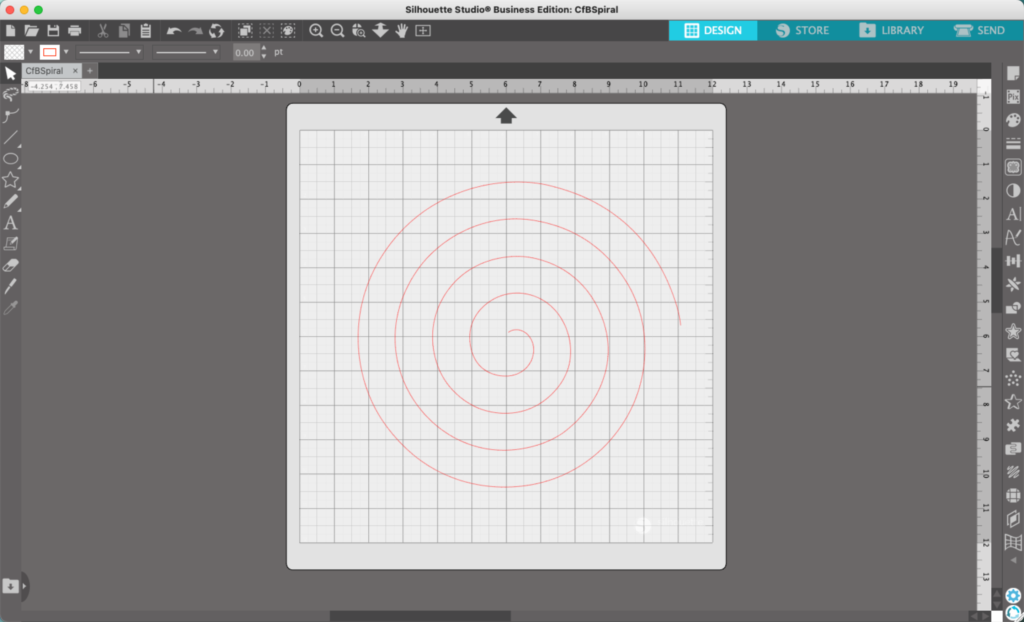
    1. Start by downloading this single line spiral I created. Then, open it in Silhouette Studio.
    Silhouette Studio screenshot - cuttingforbusiness.com.

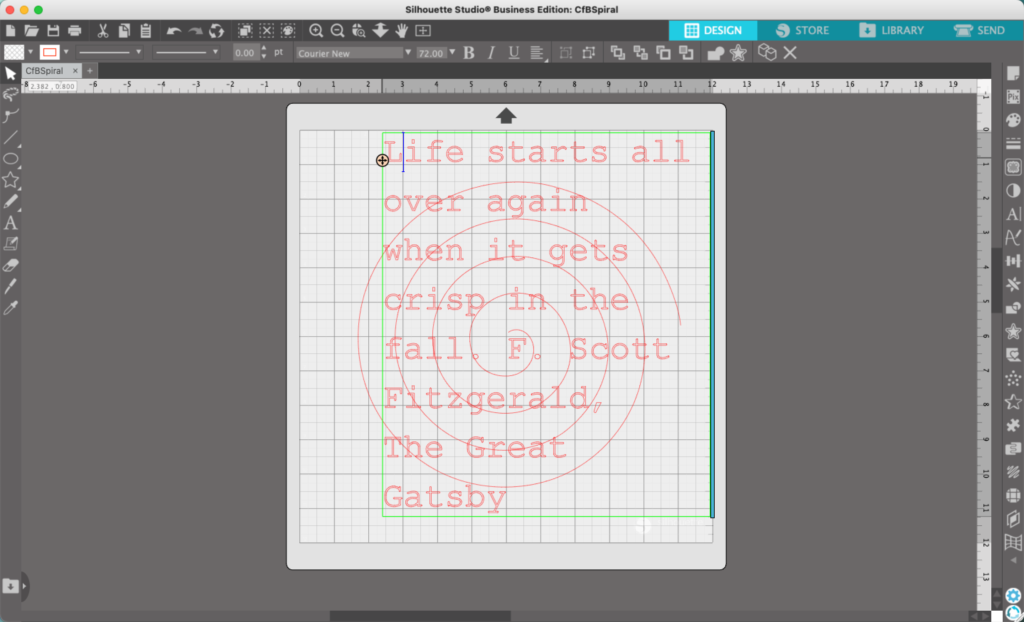
    2. Type out a string of fall related words or a fall quote. For example: Fall, autumn, hayrides, flannel, pumpkins, and so on. In this tutorial, I’m using the quote, “Life starts all over again when it gets crisp in the fall.” from The Great Gatsby.

    Silhouette Studio screenshot - cuttingforbusiness.com.

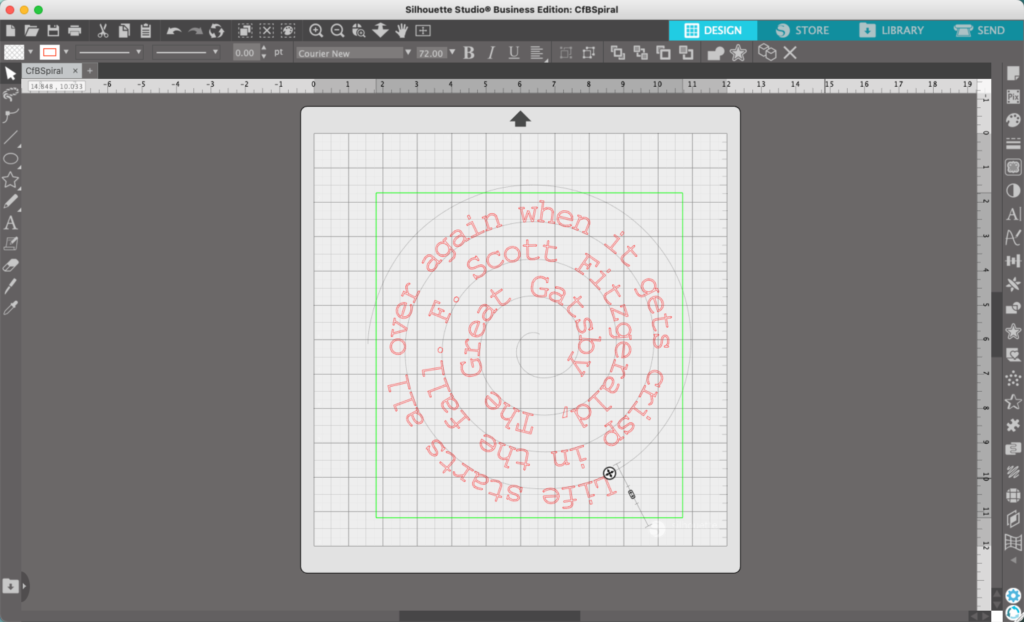
    3. Double click the text to make the round handle appear. Drag the round handle to the spiral. Now, this can be finicky in Silhouette Studio. My best advice is to zoom in. When zoomed in, you’ll have better control over the text and where it lands. When you are happy with the text on the spiral, click outside the text box.
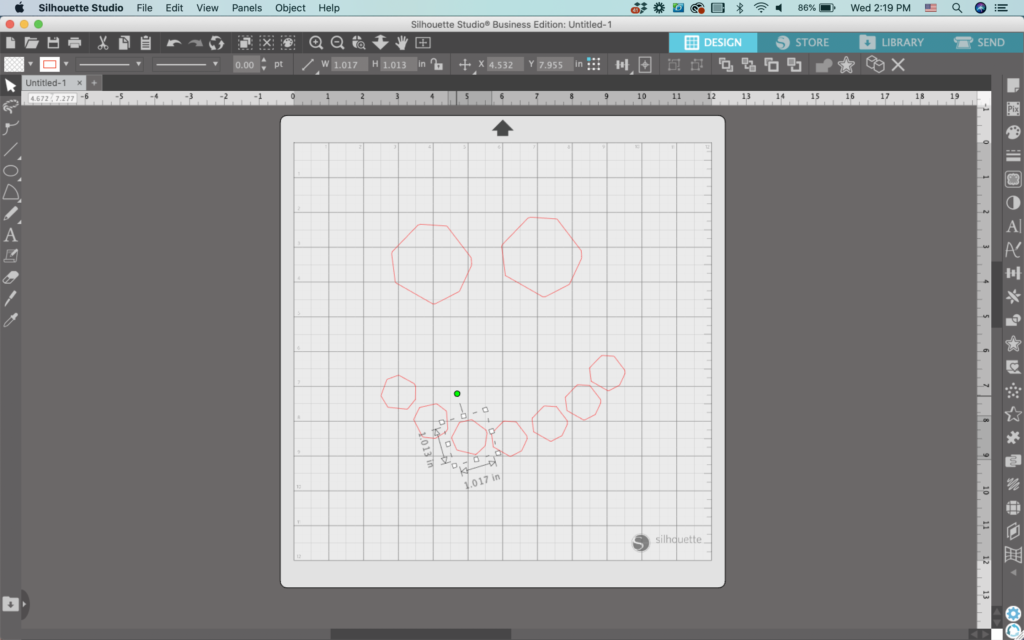
    Silhouette Studio screenshot - cuttingforbusiness.com.
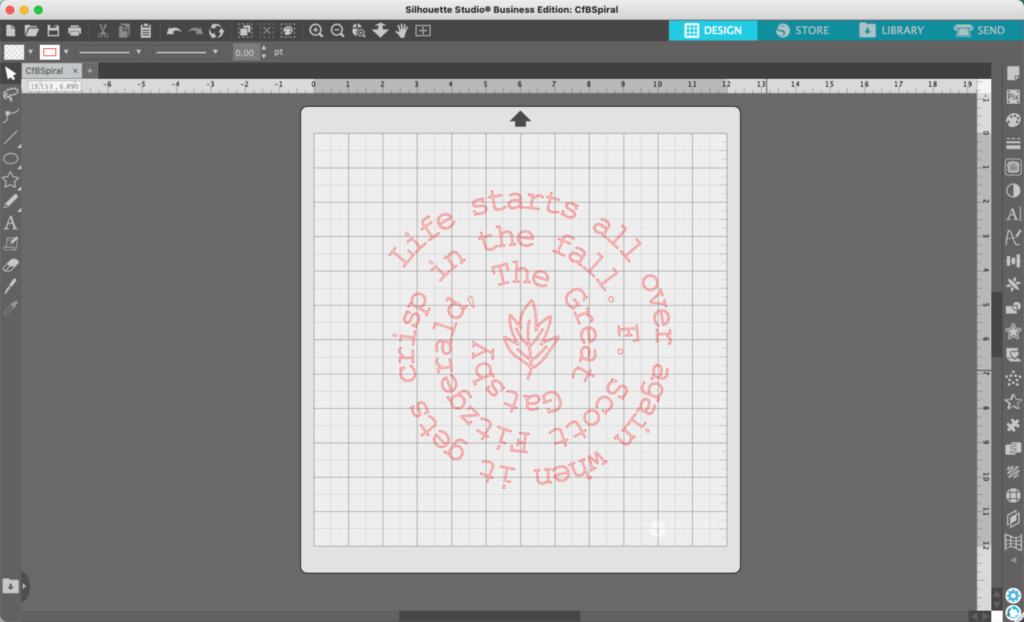
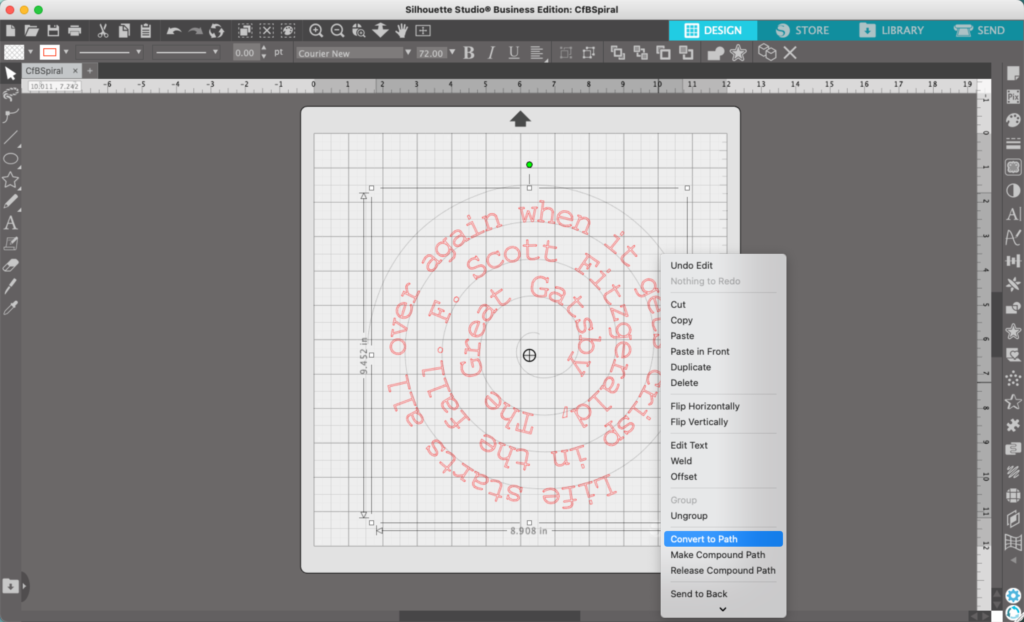
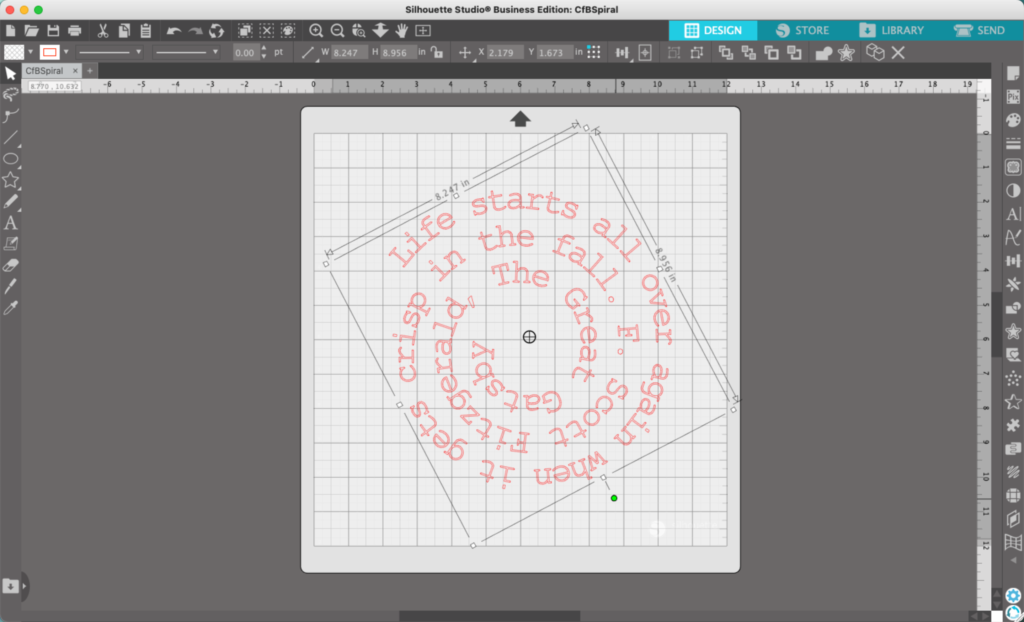
    4. Right click on the text and select ‘Convert to Path’.

    Silhouette Studio screenshot - cuttingforbusiness.com.

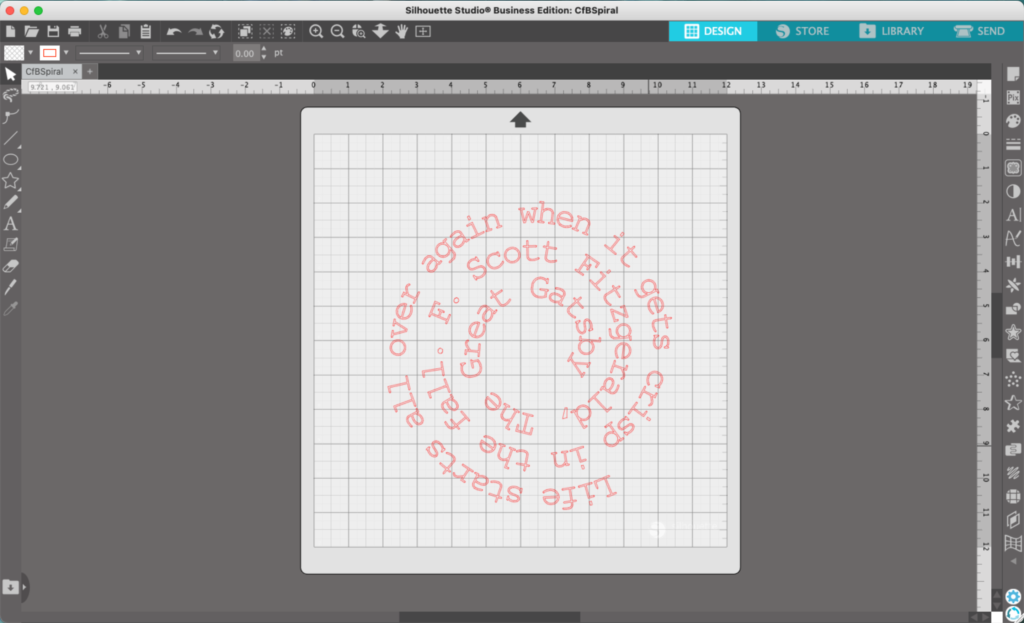
    5. You’ll notice that the spiral line turns from gray to red after converting it to a path. Click on the spiral line and delete it.

    Silhouette Studio screenshot - cuttingforbusiness.com.

    6. Now, depending on your quote, it may land with the beginning upside down like mine did. Click the text and rotate it using the green circle.

    Silhouette Studio screenshot - cuttingforbusiness.com.

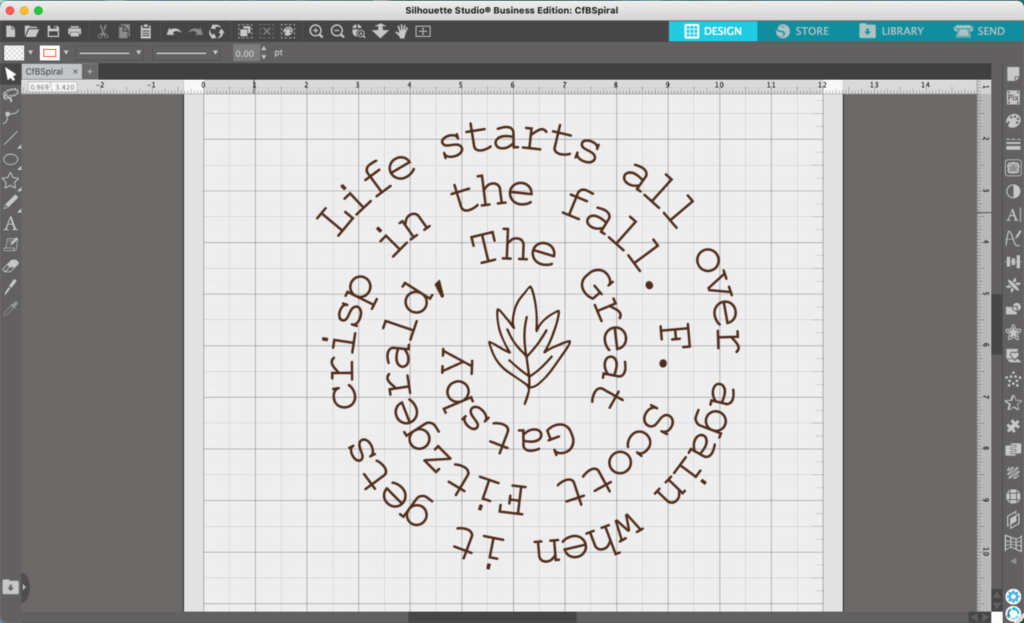
    7. Finish your design off with a dingbat in the middle. In this tutorial, a fall leaf from the Fall Feels font worked perfectly!

    Silhouette Studio screenshot - cuttingforbusiness.com.

    Add some color and your design is finished.

    Silhouette Studio screenshot - cuttingforbusiness.com.
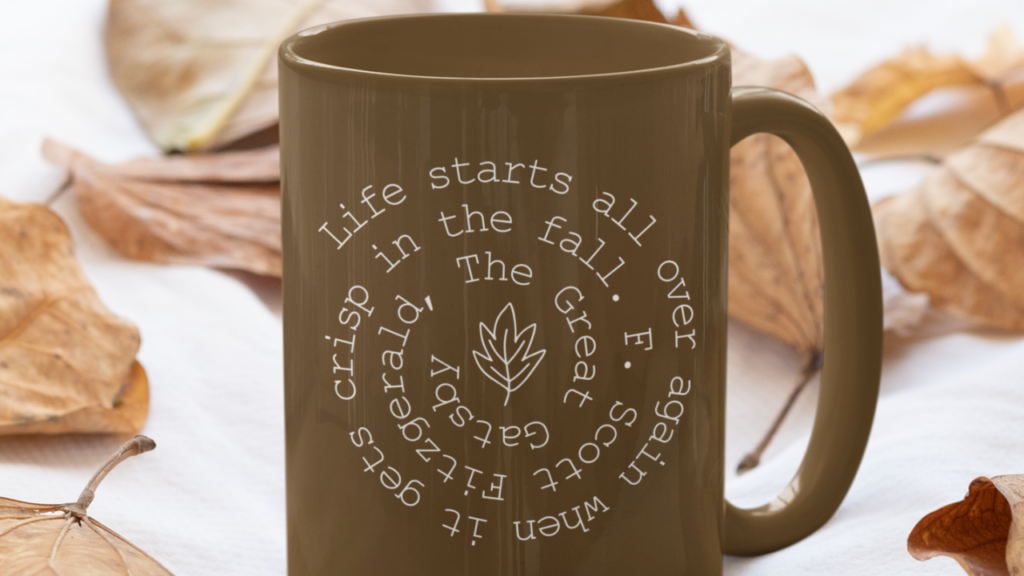
    Fall Spiral SVG Silhouette Design Tutorial - cuttingforbusiness.com.

    To save your new SVG creation, head to ‘File’, ‘Save As’, ‘Save to Hard Drive’, name the file, then select ‘SVG’ from the dropdown menu.

    Want More SVG Tutorials?

    View more Design with Me SVG tutorials.