Author: christine

  • CB09 Blade Holder and Blades in Your Silhouette Cameo

    Several readers have written to me asking if I knew how to save money on supplies they use daily – like their Silhouette Cameo blades which wear out fast. Here are two ways to save money on your blades.

    CB09 Blades

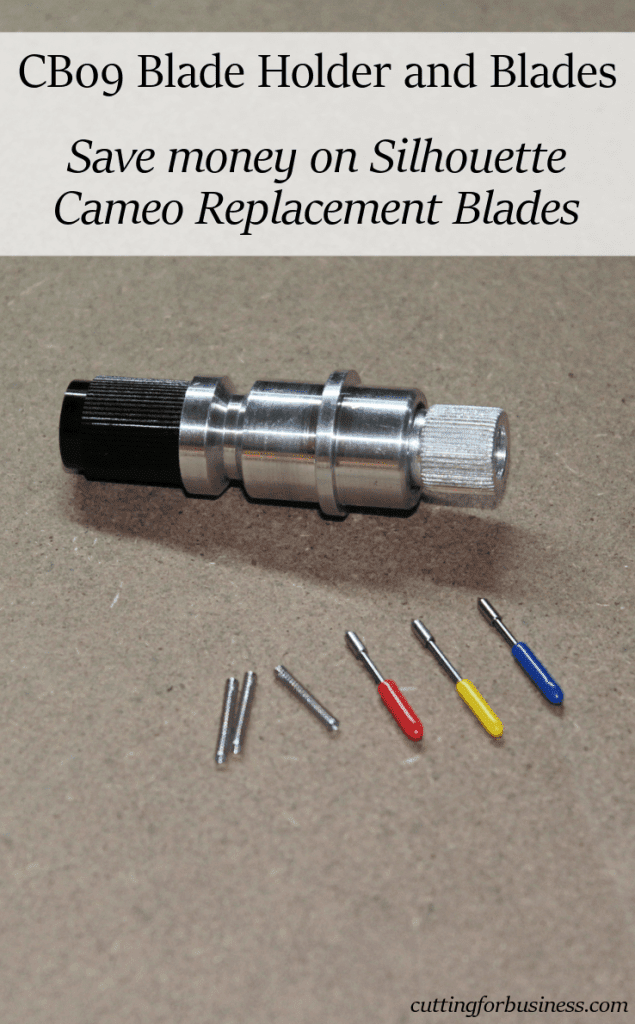
    Use a third party blade and blade holder like the CB09 blades by Graphtec. I personally use CB09 blades in my Silhouette Cameo because they are cheaper and last longer. I pay about $2 per blade for replacement blades. You’ll also need to buy the blade holder once, it should be between $15 and $18 via Amazon or Ebay. CB09 blades come in three different angles: 30, 45, and 60 degrees. The idea is that you should choose a different angle blade depending on the material you are cutting. These are the general guidelines that I follow: 30 degree blade: Good for fabric and heavy duty materials like thin cardboard and leather. More of the blade is in contact with the material than the other blade angles. 45 degree blade: Good everyday blade. This is what I use for most of my cuts including paper and vinyl. 60 degree blade: Cuts the most intricate designs and delicate cuts. I use the 60 degree blade for vellum and freezer paper. The smallest portion of the blade is in contact with the material being cut compared to the other blade angles.

    You can find the CB09 blade holder and blades on Amazon, but they are usually cheaper on Ebay. (See this link for current listings.) Most sellers are located overseas, so plan about 2-3 weeks to receive your purchase.

    CB09 Blade Assembly

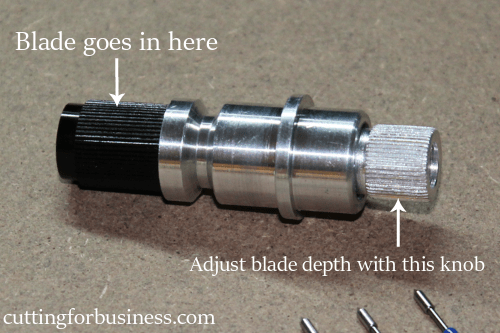
    The CB09 blades need to be put inside the blade holder before you use them. Here are instructions on how to do so:

    1. Take your CB09 blade and place it inside the spring.
    2. Unscrew the black tip and place the blade with the spring inside the black portion. Screw the black portion back onto the blade holder.
    3. Adjust the blade depth by turning the silver knob at the top of the blade holder.
    4. Place the blade in your Silhouette Cameo and you are ready to go.
    CB09 Blade Holder and Blades in Your Silhouette Cameo by cuttingforbusiness.com

    Quick Tip: To figure out the blade depth when you are first starting with the CB09 blades, you can look up the recommended setting in Silhouette Studio for the material you are cutting. Then, adjust the Cameo blade to that blade depth by setting the blade to the corresponding number. Lastly, holding your CB09 blade holder next to your Cameo blade, set the blade to the same height as the Cameo blade. Use the Silhouette Studio test cut feature to make sure that your CB09 blade cuts well before using it on your project.

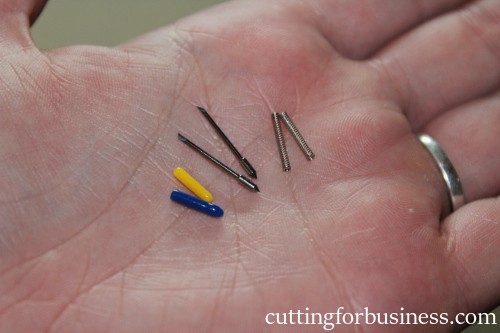
    WARNING: There are a few types of CB09 blades on the market. You’ll want to purchase the blades with colorful caps and springs with them, not the larger ones. As an aside, the caps are not color coded to the blades angle. I’ve ordered from a few different vendors and they do not seem to be standardized (Example: From one seller, the 30 degree blade may have a yellow cap, while another seller may ship the 30 degree blade with the red cap). The blades that you want to order are tiny. Here they are in the palm of my hand to show you a size reference. (I don’t have giant man hands – just average female hands!)
    CB09 Blade Holder and Blades in Your Silhouette Cameo by cuttingforbusiness.com

    Using a Price Watch App on Amazon

    If you are not willing to void your Silhouette Cameo warranty, I totally understand. You should try to stock up on Silhouette Cameo blades when they are on sale at Amazon.com which is often. My favorite way to watch sales on Amazon is to use a price tracking app such as CamelCamelCamel. Basically, you find the product you are interested in buying on Amazon, then you copy the product URL to CamelCamelCamel. You tell CamelCamelCamel what price you want to pay, and they notify you when the product drops to or below that price. The website also offers historical pricing for the product which will help you decide what price to set your alert at. (If you are interested, the highest price on the Silhouette replacement blade on Amazon has been $12.99 and the lowest has been $6.49.) Pricing is currently $7.45, so head to Amazon now if you want to pick up a few extra blades. If you subscribe on Amazon for blades to automatically be sent to you, they are currently priced at $7.08.
    CB09 Blade Holder and Blades in Your Silhouette Cameo by cuttingforbusiness.com

  • Can You Legally Make and Sell Military Products in Your Craft Business?

    Did you know that if you are selling something with a military logo, military name, or military insignia you must get a license to do so? Today, we are going to look at the trademark concerns and licensing requirements for each of the five US military branches.
    What Does the Military Have Trademarked?

    The military branches collectively hold over 500 different trademarks on their logos, slogans, and names. It is safe for all Silhouette and Cricut crafters to assume that any product they are selling with the name of a military branch or logo should be licensed. This includes phrases such as U.S. Army, U.S. Army, Semper Fidelis, A Few Good Men, Blue Angels, and many more. To find out if a specific phrase or mark is trademarked, head to U.S. Patent and Trademark Office TESS Search Engine online. This allows you to type in your phrase or mark to see if it is trademarked. If you locate a trademarked term you’d like to use, click on it and see what the trademark details are. It is possible that a phrase is trademarked on certain items (for example a phrase may be trademarked for use on cups but not shirts).

    A special note on insignias: If you are interested in obtaining a license on an official seal, you should know that official military seals cannot be used for any commercial purpose.

    Branch Specific Information

    Each branch of the military has different licensing requirements and contact information. The specifics of each branch make it difficult to provide comprehensive information, so the remainder of this post will summarize the processes and give you links for more information.

    U.S. Navy

    • Offers a thorough application available online through this link. The application asks for company information, banking information, business financials, and suggests proposed sample products. If your application is approved, you will then be sent the licensing application packet.
    • FAQ regarding the U.S. Navy licensing program are located here.

    U.S. Marine Corps

    • The USMC is the friendliest military branch in terms of licensing for crafters. They offer three different licensing programs: one for large businesses, one for small businesses, and one for hobbyists. This means that if your business makes less than $5,000 per year, sells directly to your customers, and does not use an outside manufacturer, you do not have to file an application. Instead, you should fill out the Hobbyist License Agreement, pay a small fee ($25 or $50 depending on sales), and submit royalty information annually. After joining their program, you’ll receive a Hobbyist number which should be included in all of your listings. The Hobbyist number will actually make your listings more compelling, as it shows customers that you are official with the Marines and they approve your product!
    • If your sales are $5000.01 or more per year, you’ll need to fill out the licensing application for small business located here.
    • FAQ regarding the USMS licensing program are located at this link.

    U.S. Air Force

    • The U.S. Air Force offers a lengthy application online which asks for company information, banking information, a business plan, and requires product samples.
    • The U.S. Air Force maintains a list of license holders on their website. If you are interested in U.S. Air Force images, read through the list to see if similar requests have been honored in the past.
    • FAQ regarding the U.S. Air Force licensing program can be found at this link.

    U.S. Coast Guard

    • The U.S. Coast Guard offers an application online that asks basic business information, your product plans and ideas, and ask for specific samples including product samples and brochures from your business.
    • The U.S. Coast Guard maintains a list of FAQ located at this link.

    U.S. Army

    • The U.S. Army has a brand portal, which requires you to register before accessing, located at this link. The registration took about 24 hours to be approved by the U.S. Army web team. Information from within the portal answers questions about licensing, as well as strict brand requirements including which fonts can be used.

    What if You Don’t Want to Get a License?

    It is important to get a license or other permission if you use a trademarked design or slogan, including those related to the US Military. Unfortunately, trademark holders can (and will!) seek legal actions against you and/or your business for infringement.

    Note: This article previously appeared on Terri Johnson Creates, but was removed after a website redesign. It was updated April 15, 2021.

    Licensing Concerns for Handmade Military Products with your Silhouette by cuttingforbusiness.com
  • Where to Buy Acrylic Blanks for Your Silhouette or Cricut Craft Business

    Time again for another Supplier Spotlight on Cutting for Business. Today, we are shopping with Craft Chameleon, a frequent retailer at the All Things Silhouette Conference.

    Who Is Craft Chameleon?

    Craft Chameleon is an online craft store that sells acrylic blanks, metal, glass blanks, punches, dies, headbands, dog tags, jewelry and findings, burlap items, tassels, and much more. Craft Chameleon is owned by Jamie Omahen and was originally founded and operated as Punch Place Plus.

    It is important to note that while Craft Chameleon caters to professional crafters, you do not need to provide any official business forms to be able to place an order.

    What We Shopping For

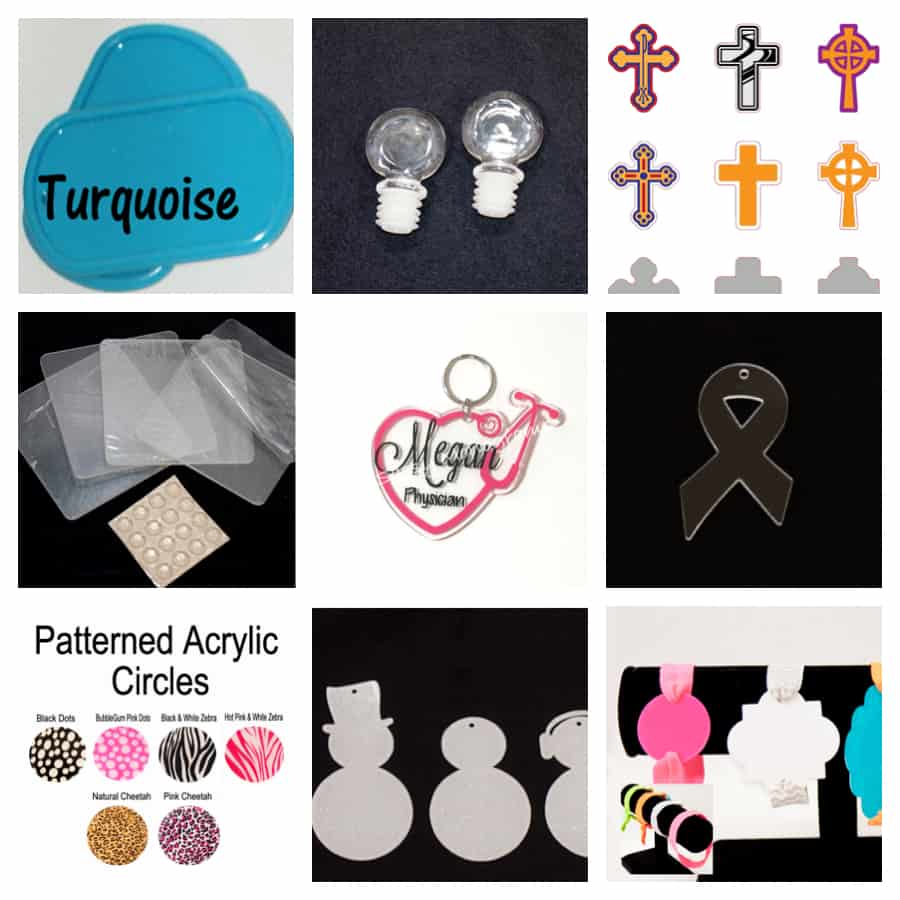
    Today, we are looking for precut, acrylic blanks to use in keychains. Luckily, Craft Chameleon offers hundreds of different styles and shapes. Also, if you’ve got a laser cutter like a Glowforge, you can pick up acrylic sheets you can cut.

    Here is an image I put together that shows just a tiny fraction of the items available for sale through Craft Chameleon:

    Where to Buy Acrylic Blanks for Your Silhouette Business + GIVEAWAY by cuttingforbusiness.com

    Don’t Miss This!

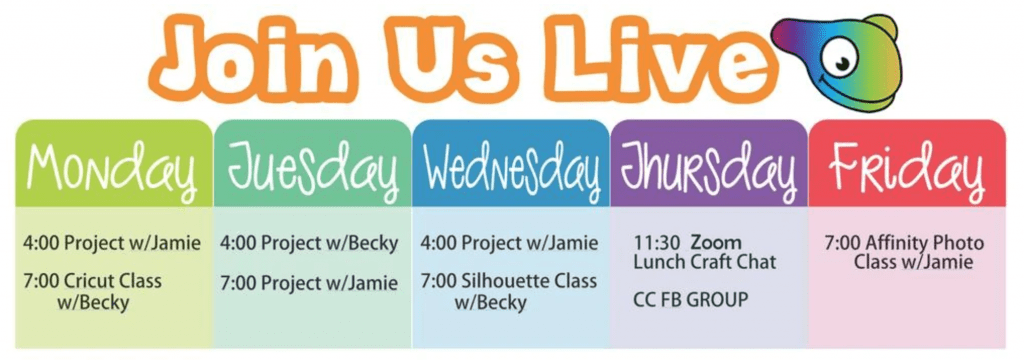
    Owner Jamie is hands on and regularly participates in the Craft Chameleon Facebook Page. Through the Facebook Page, you’ll find flash sales, templates, buy ins, influencer interviews, craft alongs, and more. Here is their sample schedule:

    Oh! If you are in Missouri, be sure to drop in the store located in Maryland Heights.

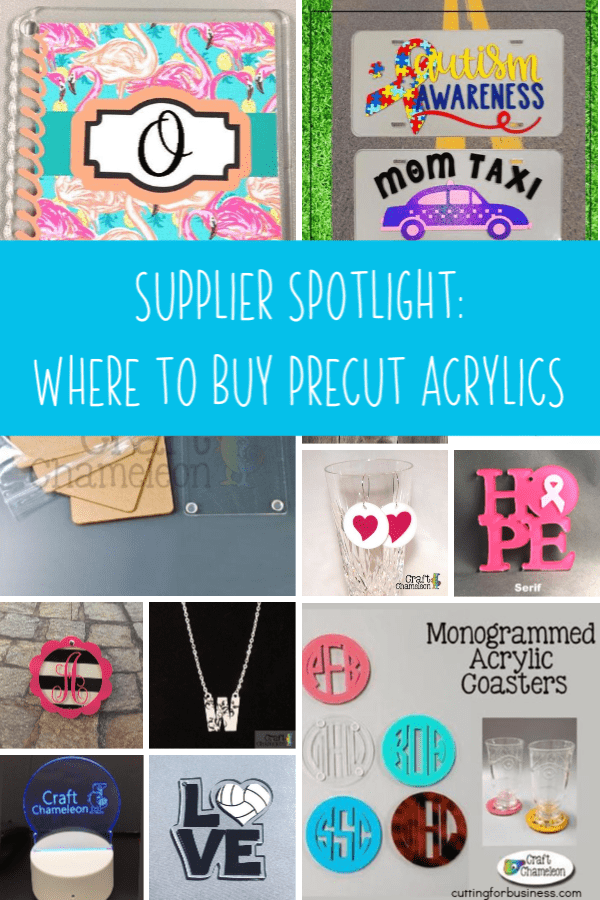
    Supplier Spotlight: Where to Buy Precut Acrylic Shapes for Silhouette and Cricut Businesses - by cuttingforbusiness.com.
  • How to Schedule Pins on Pinterest in Your Craft Business

    We are wrapping up our discussion of automating social media to make more time to run your Silhouette or Cricut based business today. We’ve covered Facebook and Instagram, so let’s head to Pinterest. I think automating Pinterest is a huge timesaver, because I get sidetracked (I’m sure I’m not the only one!) on Pinterest and could literally spend hours looking at tutorials, craft projects, recipes, and more.

    My Pinterest Social Media Strategy

    • Pin between 20 to 40 pins per day, across all my boards. Pinterest experts recommend anywhere between 20 to 40 pins, so that is what I follow. They also note that you should pin across all your boards, and that you should post a mix of content including your own products, repins of pins already on Pinterest, and new pins that you’ve added from around the internet.
    • Follow new accounts about once a week. I usually try to follow about 10 new accounts each week.
    • Click each pin I post to make sure that the image goes to where it should. This is important, because Pinterest has a lot of dead pins (those that don’t go to a website, because the website is no longer online) and spam pins (those that go to somewhere other than the image shown, including not safe for work sites).
    • Rather than flood my boards with new content daily, I use a “drip” method, where pins are posted one at a time throughout the day. This is important, because Pinterest users access Pinterest throughout the day. For the most part, Pinterest feeds are organized in chronological order. If you pin a bunch of Pinterest pins at the same time at 8am, a user that logs in at 5pm likely won’t see your pins because they will be too far down their feed. By “dripping” pins in throughout the day, your pins have a better chance of being seen by more users.
    • Schedule most of my weekly content on Sunday evenings.

    Scheduling Pinterest Content

    • Just as a reminder, scheduling your Pinterest pins can help you cut down on the time you spend on Pinterest, plus it helps you be more consistent.
    • I have tried a few different Pinterest scheduling services and prefer BoardBooster. BoardBooster offers a free trial, and a variety of services. If the service works for you, there are several plans to choose from. There is also a referral program that you can earn credits for referring new users. Links found in this tutorial are my referral link, but I’d recommend this service even if I didn’t get a subscription credit. For this tutorial, we are only looking at two features of BoardBooster, the scheduling tool and the looping tool.
    • BoardBooster works by creating secret boards within Pinterest. You pin the content to your secret boards and BoardBooster “drips” the content into your selected board throughout the day. It is a newer service, but I have experienced zero issues with it throughout my first 6 months using BoardBooster.

    Tutorial for Scheduling Pinterest Content:

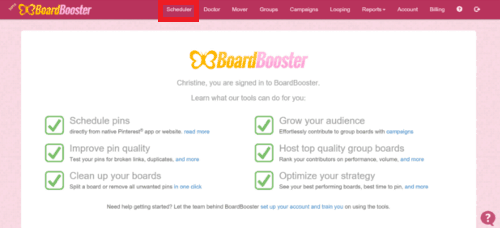
    1. Create an account at BoardBooster and log in.

    2. From the menu across the top, select “Scheduler”.

    Scheduling Pinterest Pins for Your Silhouette or Cricut Business by cuttingforbusiness.com

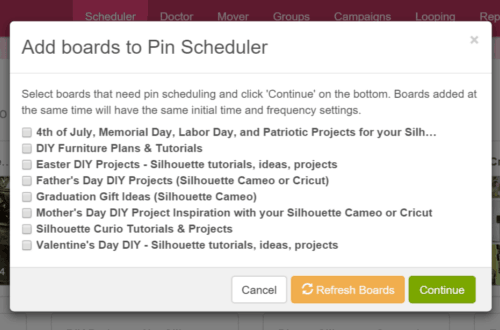
    3. Next, BoardBooster is going to ask you to connect your boards to the service. Select your boards and click continue. (Note: You can add as many boards as you want, but you can only add them in groups of 10.)

    Scheduling Pinterest Pins for Your Silhouette or Cricut Business by cuttingforbusiness.com

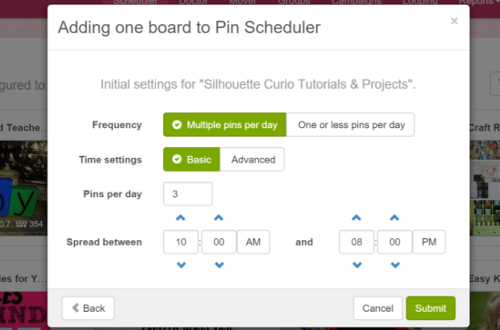
    4. Choose settings for your secret board to push your pins to Pinterest. Experiment with the settings to see what works well for your Pinterest profile. You can change these settings at a later time. Click “Submit” and let BoardBooster create your boards. It’ll take a few minutes for the boards to be added to BoardBooster and your secret boards to be created.

    Scheduling Pinterest Pins for Your Silhouette or Cricut Business by cuttingforbusiness.com

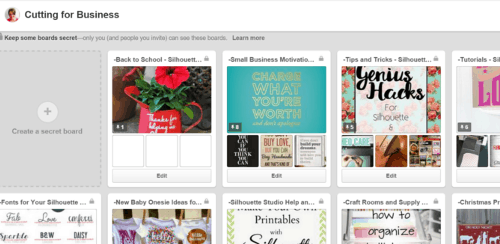
    4. Once your secret boards are created, you can head to your Pinterest profile. You’ll be able to see the secret boards that BoardBooster created. If your board name is “Silhouette Curio Tutorials & Projects”, your secret board name is “-Silhouette Curio Tutorials & Projects” (Notice the dash at the beginning of the secret board). Here is a screenshot of some of my secret boards.

    Scheduling Pinterest Pins for Your Silhouette or Cricut Business by cuttingforbusiness.com

    5. Now, you’ll just need to fill up your secret boards and keep them full. You add pins to your secret board the same way you pin now, and BoardBooster does all the magic behind the scenes. That’s it! Isn’t that cool?

    Looping on BoardBooster

    The other feature of BoardBooster that we are going to look at today is looping. This BoardBooster feature takes the oldest pin on a specified board and repins it to the top. This can help you if you’ve recently had many new followers, or if you have a lot of pins, because it helps refresh older content to a brand new audience. Boardbooster can delete the original pin, or if it has a lot of repins or comments, leave it there. Setting up looping in BoardBooster only takes a minute.

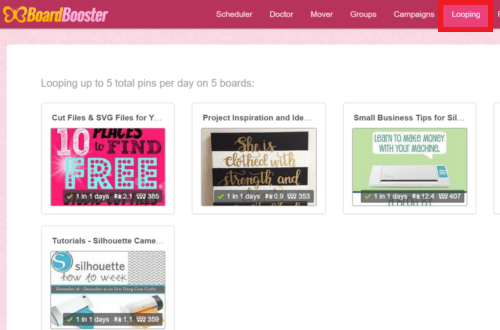
    1. Log into BooardBooster and select “Looping” from the top menu.

    Scheduling Pinterest Pins for Your Silhouette or Cricut Business by cuttingforbusiness.com

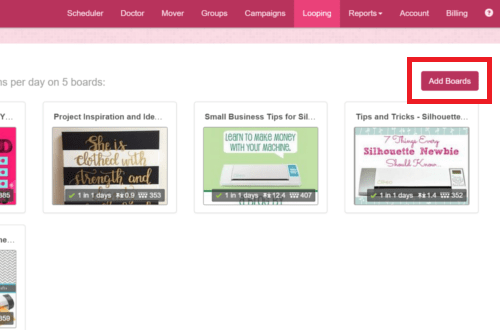
    2. I only “loop” on a handful of boards, which are my most popular boards. To add a board to start looping, select “Add Boards”.

    Scheduling Pinterest Pins for Your Silhouette or Cricut Business by cuttingforbusiness.com

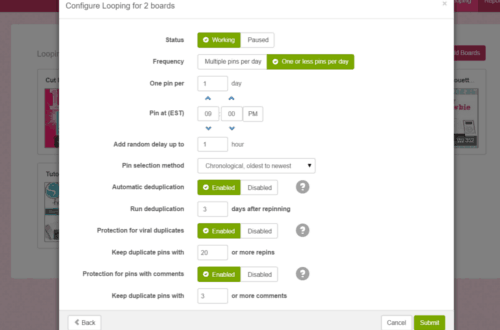
    3. Next, you’ll need to select your settings. I usually choose to only loop one pin per day, in the evening. I turn deduplication on, which means that Boardbooster will remove duplicate pins every few days. I protect any pin that has more than 20 repins by not having BoardBooster delete the original pin after it is repinned. You’ll want to experiment with the settings to find out what works for your business. Here is a screenshot of my settings. When you are ready, click “Submit” and looping is set up. It’s just that easy!

    Scheduling Pinterest Pins for Your Silhouette or Cricut Business by cuttingforbusiness.com

    That’s as far into BoardBooster as we are going to go today. You should browse it if you have time, as there are several other helpful features. Oh! If your business is not on Pinterest yet – head to this post.

    Before you go, take a second to follow Cutting for Business on Pinterest. Then, save the image below to Pinterest.

    How to Schedule Pinterest Pins in Your Craft Business - Silhouette Cameo or Portrait and Cricut Explore or Maker - by cuttingforbusiness.com

  • How to Schedule Instagram Posts for Your Craft Business

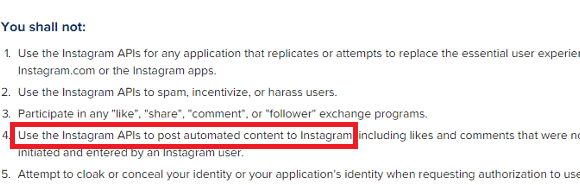
    Yesterday we looked at scheduling social media content for your Silhouette or Cricut business on Facebook. Today, we are continuing the series as we head to Instagram. You won’t find as many scheduling websites or apps for Instagram, because it is against the Instagram terms of service for developers to use the API (that’s technical talk for the computer programming that runs the site) to post automated content. Here’s the statement from the API documentation:

    Scheduling Instagram Posts for Your Silhouette or Cricut Business - by cuttingforbusiness

    My Instagram Social Media Strategy

    • Post to my Instagram at least once a day.
    • Share different content on Instagram than I share on other social media outlets. I tend to share more personal details of my life on Instagram, including family photos and my personal DIY and crafting projects. It allows people that are interested in getting to know me learn about me through pictures. For small business owners, you can do the same. Many people buy handmade products because they like the people that sell them. Instagram is a great way to get to “know” the crafter behind the products.
    • Like and comment on other users photos at least once per day.
    • Follow new Instagram accounts regularly.
    • Reply to each comment on my Instagram posts.
    • Schedule most of my weekly content on Sunday evenings.

    Scheduling Instagram Content

    • Like I mentioned in the previous post about Facebook, scheduling content helps you be more consistent across social media, and it cuts down on the amount of daily time you have to spend with social media.
    • (Update: Latergramme has changed their name to Later. Everything remains the same except for the name change.) I have tried several Instagram scheduling tools, and have settled on Later as my favorite. Since Later can’t actually post the content for me without violating Instagram’s Terms of Use, here is how it works: You schedule the content either on the website or through the smartphone app. When the scheduled message is ready to go live, Later sends you a notification on your phone. You are then able to open the post in Instagram, paste the text, and push publish. This process is within the limits of the Instagram Terms of Use.

    Tutorial for Scheduling Instagram Content:

    1. Create an account at Later, and log in.

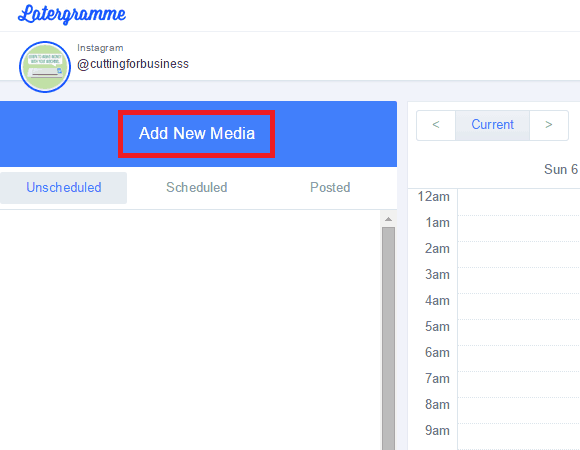
    2. Click “Add New Media” from the left hand side of the screen.

    Scheduling Instagram Posts for Your Silhouette or Cricut Business - by cuttingforbusiness

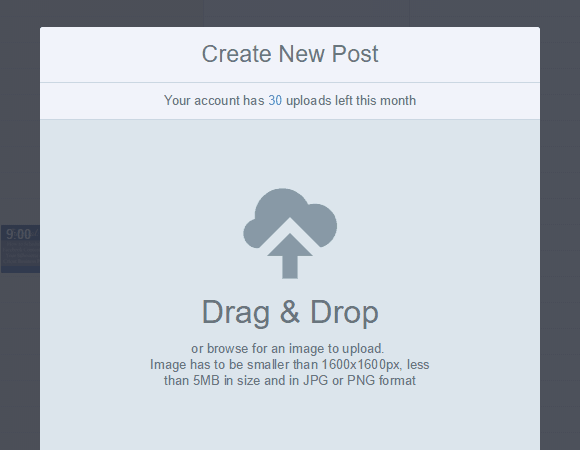
    3. Upload your image by dragging it into the popup box or by browsing to it on your computer. Size must be smaller than 1600px by 1600px and bigger than 640px by 640px.

    Scheduling Instagram Posts for Your Silhouette or Cricut Business - by cuttingforbusiness

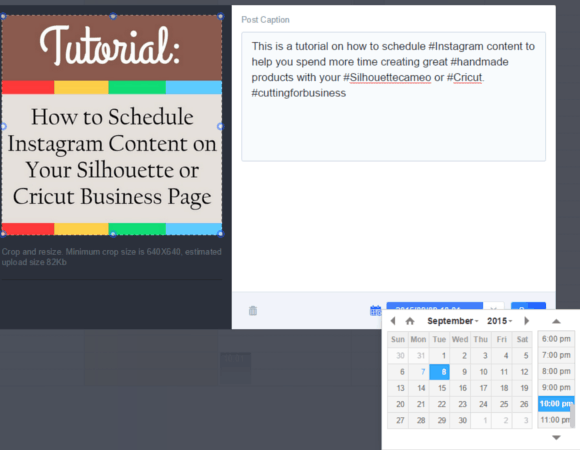
    4. Crop your image if needed and write your content. Using the calendar at the bottom, select a date and time and click “Save”.

    Scheduling Instagram Posts for Your Silhouette or Cricut Business - by cuttingforbusiness

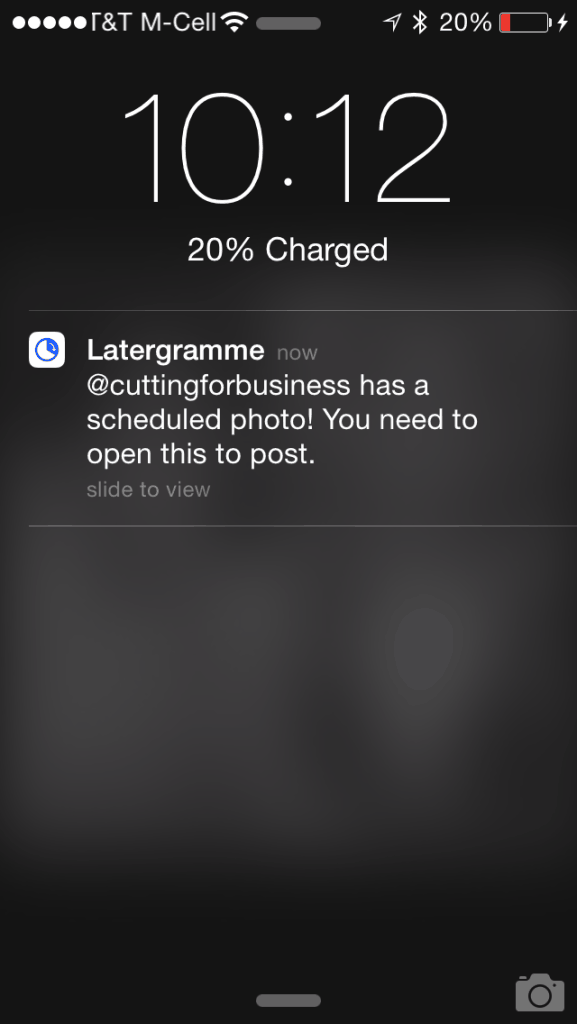
    5. When the time comes for your post to go live, Later will send you a notification on your phone that looks like this:

    Scheduling Instagram Posts for Your Silhouette or Cricut Business - by cuttingforbusiness

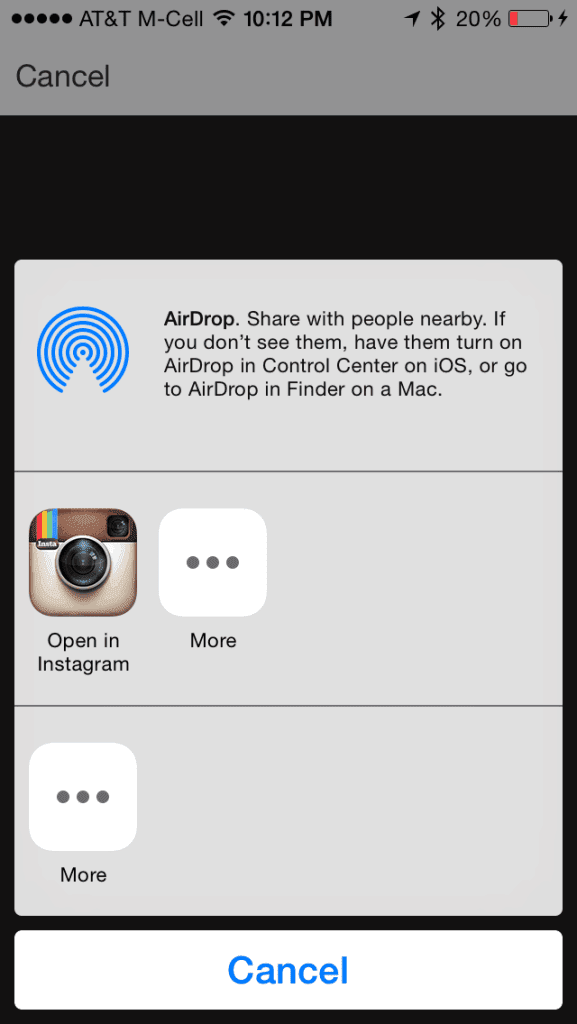
    6. When you open the notification, you’ll be able to select “Open in Instagram”:

    Scheduling Instagram Posts for Your Silhouette or Cricut Business - by cuttingforbusiness

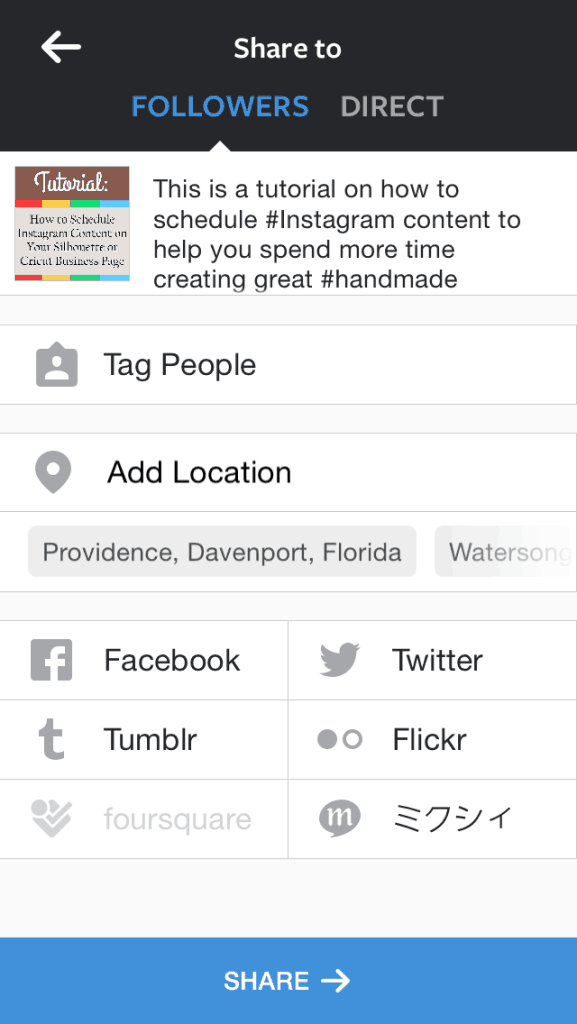
    7. You should now be in Instagram. Paste the description you wrote into the caption space, and hit “Share”.

    Scheduling Instagram Posts for Your Silhouette or Cricut Business - by cuttingforbusiness

    It’s just that simple! My disclaimer: I gave you screenshots for every step of the way and this looks like a long process, but it takes less than a minute once you get the hang of it.

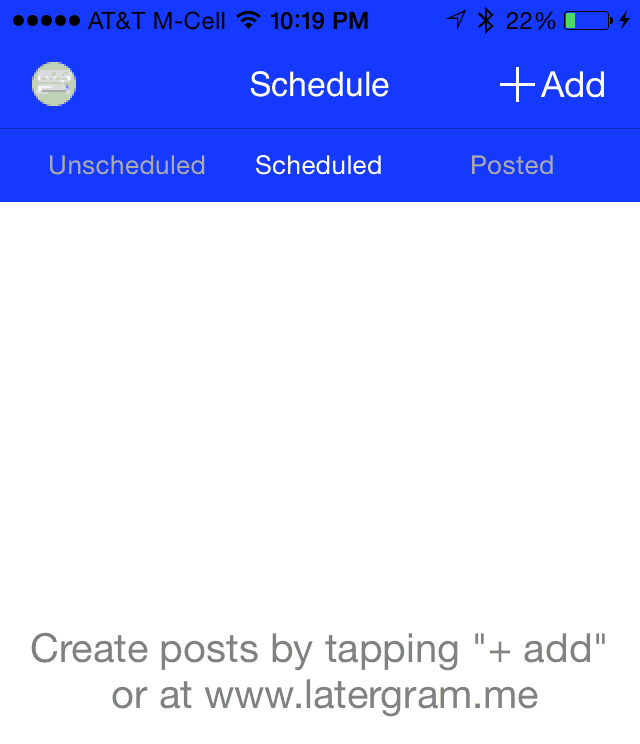
    If you’d prefer to only use the app to schedule your messages and not use a computer, you should skip steps 1-4. Instead, you would open the app on your smartphone, and use the “+Add” link in the top right hand corner. The app will prompt you to upload your photo, add a caption, then schedule a date and time:

    Scheduling Instagram Posts for Your Silhouette or Cricut Business - by cuttingforbusiness

    Tomorrow, we will wrap up this quick series on social media automation when we head to Pinterest to schedule pins.

    Was this article helpful? Share the love and pin the image below on Pinterest.

    How to Schedule Instagram Posts in Your Craft Business - Silhouette Cameo or Portrait and Cricut Explore or Maker - by cuttingforbusiness.com

  • How to Schedule Facebook Posts in Your Craft Business

    Cutting for Business readers, have you ever sat down at your computer, tablet, or phone – logged into your Facebook, Pinterest, or Instagram account and gotten sidetracked? Did you get sucked down the social media black hole and look up “a few minutes later” only to realize that you just spent 30 minutes, an hour, or more liking a friend’s baby photos, checking out the latest trends on Instagram, or pinning future craft projects on Pinterest?

    If so, these next three posts are for you! Today, tomorrow, and Wednesday I will show you how to automate three popular social media networks that you may use to promote your Silhouette or Cricut made products. For each network I will share what works for me, and a tutorial on how to schedule your content. To start, let’s look at Facebook.

    My Facebook Social Media Strategy

    • Post to my Facebook Business Page at least once a day.
    • Share a mix of content including my blog posts (or your products), related content from around the internet, and deals or sales of related products. The key is to share a mix of content and not simply your products for sale – as you may bore your audience. For ideas on what to post to keep your Facebook Business Page interesting, see this post.
    • Have at least one day of regular content where Facebook followers know what to expect. On Cutting for Business, I have Sold It Sunday on Sundays, Supplier Spotlights on Thursdays, and Freebie Fridays on Friday. Since most Cutting for Business readers are building their businesses, you could have “Behind the Scenes at XYZ Business” on a certain day, “Customer Photo Sharing Day”, “New Product Day”, “Inspiration of the Week”, or “Get to Know the Owner/Designer/Creator”. You readers are a creative bunch, so get creative!
    • Like or reply to each and every comment posted on my Facebook Business Page. Since Facebook followers access Facebook at different times throughout the day, I do not like or reply to each comment as they come in. Sadly, if I did, I would never get anything else done. Instead, I check in about 3 times per day and handle everything in groups.
    • Schedule most of my weekly content on Sunday evenings.

    Scheduling Facebook Content

    • There are a number of third party apps and websites that will allow you to schedule content on Facebook. Some are available for free, while others are monthly subscriptions. I have tried several of them – and they work. However, I have noticed that I get many, many more Facebook views, comments, and likes when I schedule directly in Facebook. If you are interested in trying out a third party service, my favorite was Hootsuite.
    • Why would you want to schedule Facebook content for your business page? It frees up more time to spend on other aspects of your business, and helps you stay more consistent with your social media efforts. While you can schedule content, you cannot schedule it and forget about it. You must remember to log in regularly and acknowledge Facebook followers who like or comment on your content.

    Tutorial for Scheduling Facebook Page Content on a Computer:

    1. Log into your Facebook Business Page account.

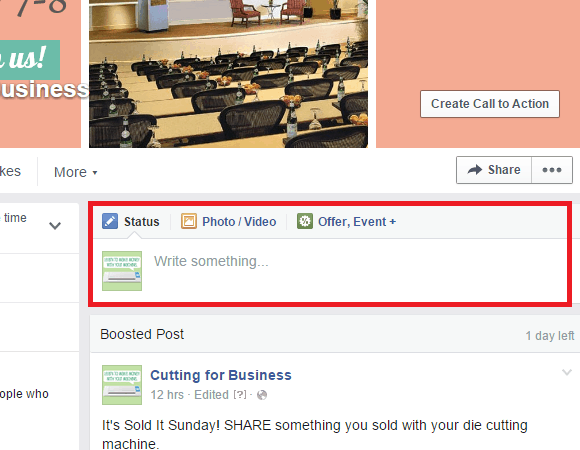
    2. Create a status update, image post, video, or offer like you normally would.

    Social Media Automation in Your Silhouette Business - Facebook - by cuttingforbusiness.com

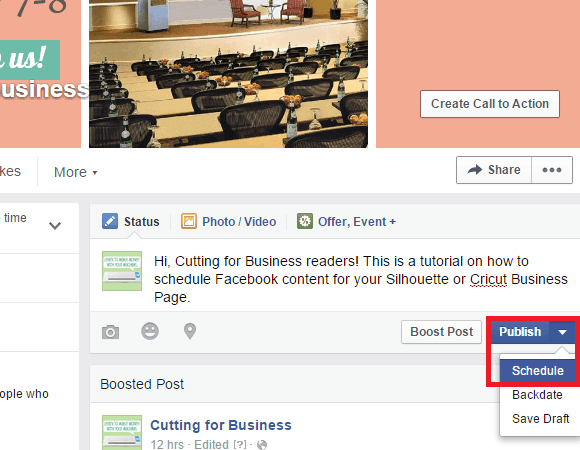
    3. Click the small arrow to the right of “Publish”, then click “Schedule”.

    Social Media Automation in Your Silhouette Business - Facebook - by cuttingforbusiness.com

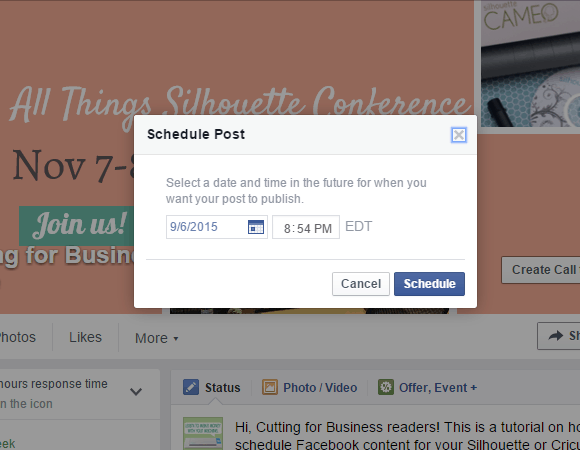
    4. Choose a date and time for your content to be posted and click “Schedule”.

    Social Media Automation in Your Silhouette Business - Facebook - by cuttingforbusiness.com

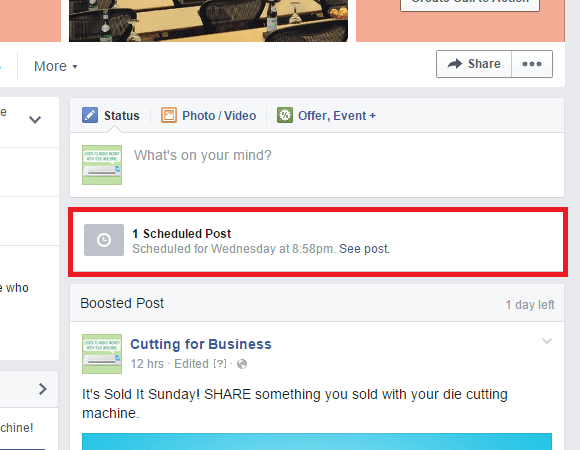
    5. That’s it! You can view or edit your scheduled messages from the link that appears on your Facebook Business Page. If you’d prefer to schedule content from the Facebook Pages App, continue below.

    Social Media Automation in Your Silhouette Business - Facebook - by cuttingforbusiness.com

    Tutorial for Scheduling Facebook Content from the Facebook Pages App:

    1. Log into your Facebook Page on the App.

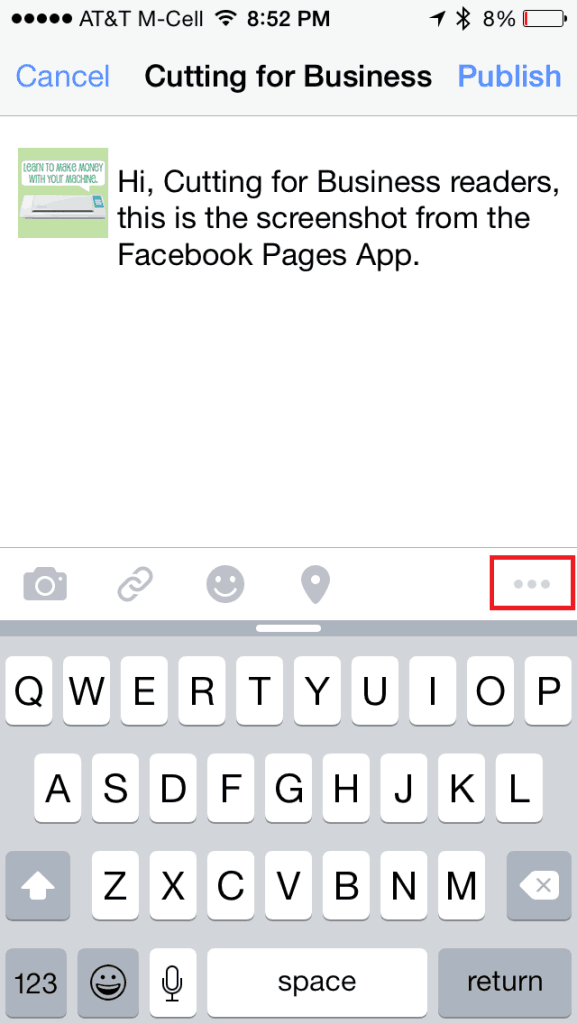
    2. Write your content. Select the More Options Menu (that’s the three horizontal dots on the right hand side):

    Social Media Automation in Your Silhouette Business - Facebook - by cuttingforbusiness.com

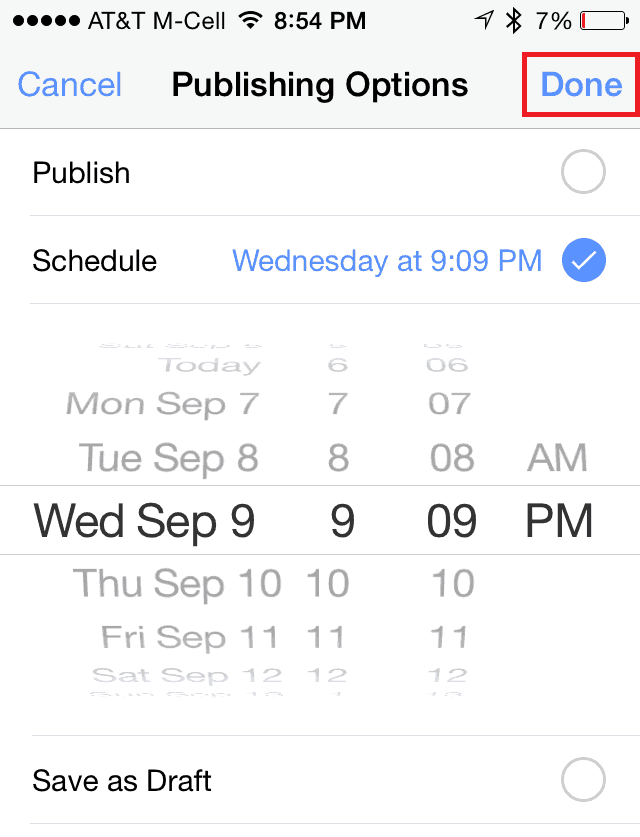
    3. Choose a date and time for your content to be published, and click “Done”.

    Social Media Automation in Your Silhouette Business - Facebook - by cuttingforbusiness.com

    That’s it! If you haven’t started your Silhouette or Cricut Facebook Business Page yet, see this post for instructions on how to start one.

    Continue on to How to Schedule an Instagram post.

    Save this post to Pinterest:

    How to Schedule Facebook Posts in Your Craft Business - Save time in your Silhouette Portrait or Cameo and Cricut Explore or Maker business - by cuttingforbusiness.com

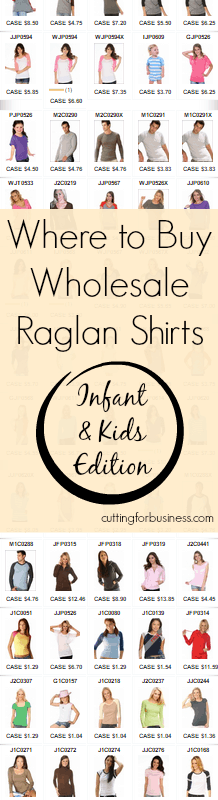
  • Where to buy Wholesale Raglan (Baseball) Shirts for Infants, Toddlers, and Kids

    Welcome back to Supplier Spotlight on Cutting for Business! In last week’s Spotlight, I highlighted my favorite supplier for adult sized raglan shirts. Today, we are looking at raglan shirts in infant, toddler, and kids sizes.

    My preferred supplier for smaller sized raglan shirts is Kavio!. For the best pricing, you’ll want to register with Kavio! as a wholesale buyer by submitting your tax ID number. Don’t forget to give them a copy of your resale license to make sure that you are not charged sales tax.

    Styles/Colors/Sizes/Pricing

    V-Neck 3/4 Sleeve Raglan is available in the following colors: Dark Heather Grey/Black, Dark Heather Grey/Cardinal, Dark Heather Grey/Cobalt Blue, Dark Heather Grey/Grape, Dark Heather Grey/Island Blue, Dark Heather Grey/Navy, Dark Heather Grey/Pinot, Dark Heather Grey/Red, Dark Heather Grey/Orange, Dark Heather Grey/Watermelon. Sizes 6 months to 24 months are available, as well as girls 3-6x and 7-16. Infant size pricing is based on quantity ordered: 1-11 pieces $4.00, 12-71 pieces $3.75, and 72+ pieces $3.50. Little girls pricing is based on quantity ordered: 1-11 pieces $3.70, 12-71 pieces $3.45, and 72+ pieces $3.20. Big girls pricing is also based on quantity ordered: 1-11 pieces $5.05, 12-71 pieces $4.80, and 72+ pieces $4.55.

    Where to buy Wholesale Raglan (Baseball) Shirts for Infants, Toddlers, and Kids by cuttingforbusiness.com
    Photo credit: kavio.com

    V-Neck Short Sleeve Raglan is available in the following colors: Dark Heather Grey/Black, Dark Heather Grey/Cardinal, Dark Heather Grey/Cobalt Blue, Dark Heather Grey/Grape, Dark Heather Grey/Island Blue, Dark Heather Grey/Navy, Dark Heather Grey/Pinot, Dark Heather Grey/Red, Dark Heather Grey/Orange, Dark Heather Grey/Watermelon. Sizes 6 months to 24 months are available, as well as girls 3-6x and 7-16. Infant size pricing is based on quantity ordered: 1-11 pieces $3.45, 12-71 pieces $3.20, and 72+ pieces $2.95. Little girls pricing is based on quantity ordered: 1-11 pieces $3.70, 12-71 pieces $3.45, and 72+ pieces $3.20. Big girls pricing is also based on quantity ordered: 1-11 pieces $4.45, 12-71 pieces $4.20, and 72+ pieces $3.95.

    Where to buy Wholesale Raglan (Baseball) Shirts for Infants, Toddlers, and Kids by cuttingforbusiness.com
    Photo credit: kavio.com

    Unisex Infants Raglan Short Sleeve Bodysuit is available in the following colors: Baby Pink/Hot Pink, Black/Red, Lime/Kelly Green, White/Baby Pink, White/Black, White/Blue, White/Cobalt Blue, White/Heather Grey, White/Navy, and White/Red. Sizes 6 months to 24 months are available. Pricing is based on quantity ordered: 1-11 pieces $3.95, 12-71 pieces $3.70, and 72+ pieces $3.45.

    Where to buy Wholesale Raglan (Baseball) Shirts for Infants, Toddlers, and Kids by cuttingforbusiness.com
    Photo credit: kavio.com

    Unisex Infants Scoop Neck Raglan Long Sleeve Top is available in the following colors: White/Blue, White/Cobalt Blue, White/Lemon, White/White. Sizes 6 months to 24 months are available. Pricing is $1.91 each.

    Where to buy Wholesale Raglan (Baseball) Shirts for Infants, Toddlers, and Kids by cuttingforbusiness.com
    Photo credit: kavio.com

    Youth Crew Neck Raglan Short Sleeve is available in the following colors (these are reverse style with the color on the body and the sleeves are white): Baby Pink/White, Black/White, Blue/White, Brown/White, Cardinal White, Heather Grey/White, Kelly Green/White, Heather/White, Navy/White, Red/White, Orange/White. Sizes XS to XL are available. Pricing is based on quantity ordered: 1-11 pieces $3.40, 12-71 pieces $3.15, and 72+ pieces $2.90.

    Where to buy Wholesale Raglan (Baseball) Shirts for Infants, Toddlers, and Kids by cuttingforbusiness.com
    Photo credit: kavio.com

    While they last – Youth Raw Edge Raglan Sleeveless Tank is available in the following colors: White/Baby Pink, White/Blue, White/Navy, White/Red. Sizes XS to XL are available. Currently on sale for $1.10 each!

    Where to buy Wholesale Raglan (Baseball) Shirts for Infants, Toddlers, and Kids by cuttingforbusiness.com
    Photo credit: kavio.com

    In addition to the infants, toddlers, and kids sizes, Kavio! carries a full line of sizes for women, juniors, and men. I prefer to buy women’s sizes at Bella+Canvas like I mentioned last week – only because I like the fit better – I’m slightly top heavy. I only gave you a sample of the styles available at Kavio! for raglan shirts. If you search their website for “raglan” you’ll find that there are more than 80 different styles available including burnout, raglans with stripes on the arms, hoodie style raglans, and many more.

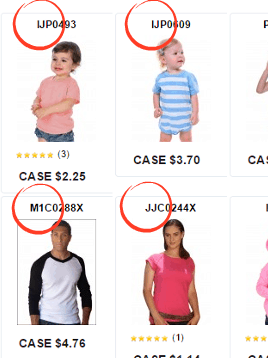
    One last tip! When you run a search on Kavio!, the results are displayed without their product title. If you look at the first letter of the item number, you can figure out the department without having to open the product details. W is for women, M is for men, J is for juniors, B is for boys, G is for girls, and I is for infants.

    Where to buy Wholesale Raglan (Baseball) Shirts for Infants, Toddlers, and Kids by cuttingforbusiness.com

    If you found this post helpful – be sure to share pin the image below:

    Where to Buy Wholesale Raglan (Baseball) Shirts for Infants, Toddlers, and Kids by cuttingforbusiness.com

    To find this post again quickly on Cutting for Business, search keyword RAGLANINFANT.

  • How to Host a Craft Holiday Market in Your Home

    Let’s wrap up this quick series on at home parties and workshops with your Silhouette or Cricut with how to host a holiday craft market in your home. If you’ve never attended an event like this, the concept is simple: it’s a mini craft show hosted in someone’s home – and similar to the home parties I wrote about yesterday. I have a good friend who has been hosting a large holiday craft market in her home each November for more than 15 years. She chimed in on this article and gave me her biggest secrets.

    How to Host a Craft Holiday Market in Your Home

    Before the Event

    1. Gather a group of crafty friends and decide on an evening to hold the event. Like I previously noted, a weekday evening for an hour or two usually works well.
    2. Decide what products each vendor friend will contribute to the evening. This concept works best if there is an assortment of products around a central theme, like Christmas. Products should complement each other and not work against other vendors. For example: Invite your good friend who makes jellies or jams, your favorite embroidery friend, someone who sells knitted goods, a pallet sign maker, a tee shirt creator, even independent consultants for large companies, and so on.
    3. Decide on the number of guests that your home can accommodate, and be sure that each vendor has a limited of attendees.
    4. Create a flyer with the details of the event for participants to distribute. Again, it is a good idea to offer an email copy and a printed copy.

    At the Event

    1. Set up tables around your home as well as light refreshments to serve to guests.
    2. Have each vendor set up their products for sale as they would at any other craft show.
    3. Set up products around your home from different vendors for sale. You could replace your current wall decor with products for sale or add a welcome sign for sale near the front door. Get creative and show guests the products in action.
    4. Use a centralized checkout. It is easiest to have one person in charge of checkout and guests pay for the products from all the vendors at one time. This is easy to do if you provide everyone the same price tags in different colors. Each vendor then writes their prices on their assigned color coded tag, and attaches the tags to their products. When guests checkout, the cashier records each vendor’s sales and packages the products.
    5. Consider having door prizes, a raffle, or goody bags with samples and business cards for each guest to take home. One strategy is to raffle off a one-of-a-kind gift basket that has a small sample from each vendor that participates in the event.
    6. Matching tee shirts for all vendors can help pull the event together.
    7. At the end of the event, the sales are totaled and money is distributed to each vendor.

    How Do You Make Money at a Holiday Market?

    First, you’ll sell the products you make at the event. Since the event is geared to be a close knit affair with friends of your friends, this is a great way to expand your local reach. Additionally, you could consider taking a small percentage of the total sales to cover your expenses and generosity of opening your home for the event or have the vendors pay a small entry fee. At-home holiday markets are definitely some of my favorite events to attend, have you ever been to one?

    How to Host a Craft Holiday Market in Your Home by cuttingforbusiness.com

  • How to Host an At-Home Party with Your Silhouette or Cricut

    Yesterday I talked about hosting workshops using your Silhouette Cameo or Cricut. Today, we are going to explore a similar idea: having in-home parties with your Silhouette or Cricut die cutting machine. If you’ve ever attended a Tupperware, Pampered Chef, Scentsy, Origami Owl, or any other at home party you will probably be familiar with the idea.

    Steps to host an in-home party with your die cutting machine:

    Before the Party

    1. Find a friend who is interested in having the party in their home.
    2. With your friend, you both decide what project will be created and choose a date for the party. Like I mentioned in yesterday’s post, one to two hour long parties on weekday evening usually work well for many people. If you are in need of projects ideas – head to Pinterest!
    3. You create some basic flyers (its a good idea to offer both email format and hard printed copies) of the project of the night for your friend to distribute, which also details the cost for each participant.
    4. Your friend then invites her friends to the party to create the project. It generally works best if your friend collects the payments from each participant before the night of the party and gets them to you beforehand. Cash or checks work well in this case. If you’d prefer to accept credit cards, after an attendee RSVP’s to your friend – you can contact them directly to collect payment via credit card. In my opinion, collecting payments at the party is not a good idea because you will have to pay all the supplies out of pocket. Additionally, you may have people who don’t show up because they haven’t paid anything – leaving you with wasted supplies. Lastly, it is time consuming to collect payments the evening of the party.

    At the Party

    1. Your friend prepares some refreshments for the party.
    2. You arrive before the party to setup and you bring all the supplies for each participant to complete the project of the night. In addition to your machine(s) and project supplies, you may also need to bring tables, chairs, newspaper (to cover tables), and aprons for all participants.
    3. You demonstrate each step of the project and attendees create the project alongside you.
    4. Attendees are able to leave that evening with a completed project.
    5. Be sure to have information available and be ready to book additional in-home parties.
    6. Always remember to take photos of everyone with their completed project. They are great for future advertising, and social media.

    How do you make money holding in-home parties?

    For those familiar with home based party companies, you may know that consultants or representatives make a commission based on the amount of products they sell. With Silhouette or Cricut based in-home parties, you will not be selling anything. Instead, you’ll make money based on the amount that each participant pays to attend the party. Let’s look at an example:

    I offer an in-home party and the chosen project is a 12″ by 12″ painted wooden sign. My cost per project is $2.50 for wood, $1.00 for paint, $1.50 for transfer paper, and $0.70 for vinyl. We will add $1 for machine wear and tear, and another $1 for gas mileage. My total cost per project is $7.70. If I charged $25 per attendee, and eight people attended the party, I’d make $200 in attendee fees. If I subtract $77.00 (total cost of supplies for eight projects, plus one demonstration product, plus no charge for the hostess of the party to create an item) that leaves me with $123.00 left as profit – not a bad payrate for a few hours of time.

    One last concern is compensation to the hostess who opened her home and invited her friends to the party, as well as served refreshments. I’d suggest two things: 1) Give the hostess the demonstration product you made during the party. 2) Bring samples to the party of other projects that attendees can book for a party in their home. You can then leave these samples with the hostess as a thank you gift.

    If home parties are your thing, consider assembling a small team beneath you and could design all the projects and your team could go out and offer the classes. This would allow you to make commissions from your ideas that would be charged to your team members. With a little creativity, you could turn this into a much larger venture than just a few home parties. Tomorrow, we will wrap up our discussion on at-home parties with How to Host a Holiday Market in Your Home.

    How to Host an At-Home Party with Your Silhouette or Cricut by cuttingforbusiness.com

  • How to Host a Workshop with Your Silhouette Cameo

    I’ve written a few posts about ways to make money with your Silhouette Cameo that don’t include selling products online. These ideas include selling digital designs to other crafters and working with local businesses. Another trendy way to make money with your Silhouette or Cricut is to host a workshop where you teach others how to complete a project using the Silhouette or Cricut. The idea is that they sign up for the class, show up with nothing, and leave with a completed project. You may be familiar with this style of workshop is you’ve attended a painting or pottery night out.

    What You’ll Need to Plan to Host a Workshop

    Location – You’ll need to have a place to offer the workshop. The number of people in the workshop will determine how large of a space that you’ll need.

    • Hold the workshop in your home – a great option if you know the participants.
    • Rent a space for an evening from a church, local small business, virtual office, or conference room at a local hotel.
    • Lease a space and set up a permanent workshop storefront.

    Supplies – As the host, you’ll need to provide all the supplies for each participant to complete their project. You will also need to provide a workspace for each participant. When hosting my own classes (an aside: do you know that I used to teach crafting classes at Michaels Arts and Crafts stores?), I used these tables and put two to three crafters at each table. Your supplies will vary depending on the project, but could include precut wood, basic power tools, vinyl, cardstock, measuring tapes, weeding tools, paint, paint supplies, aprons for participants, and basic art supplies like scissors, measuring tapes, and pencils.

    Project Ideas – Pinterest is a great source of project ideas! Here is my list of projects that lend themselves well to workshops:

    • Wooden home decor – You can either choose to have the wood sanded and painted, or you can invest in power tools and have the participants cut and/or sand the wood before painting it. You can then distribute precut vinyl designs to each participant and they can weed and apply it after you teach the technique. If participants are painting their own wood, you need to account for drying time and may have to do a two part workshop.
    • Floating frames – The participants choose a design before arriving and you have it precut and ready to weed. After weeding the design, participants are shown how to apply the design to their frame and they apply it.
    • Anything holiday related – Classes that are related to the closest upcoming holiday are always popular. For example, consider teaching how to make vinyled Christmas ornaments in December, a football themed project in the fall, or a gift for their sweetheart in February.
    • T-Shirts – T-shirts are quick and easy projects to demonstrate during workshops. You’ll need to be sure to have at least one heat press for participants to use.

    Class Day and Length – You’ll need to consider the length of the class when choosing projects. Most people have various commitments, so I’d suggest limiting the time to between an hour or two on a weekday evening.

    Sign Up and Payments – Generally, when you advertise the class, you’ll advertise for a specific project and you’ll offer between 2 and 4 different design options. The participant signing up for the class will choose their design when they pay for the class. If you have more than 4 people attending the workshop, I would precut the designs using your die cutter before they arrive (or invest in several die cutting machines.) Otherwise, waiting for the machine to cut each design becomes quite time consuming. All participants should prepay for the workshop before attending. A reasonable workshop price is between $30 and $60. To determine your price you’ll need to take into account the cost of the space, all project materials, wear and tear on your machines, and the cost of your time – including set up and clean up.

    Finally, at the end of the workshop, be sure to give participants information on the next workshop. Then, take photos of the participants with their projects. You can use these for future advertising and social media! If you aren’t ready to find a space to hold workshops with your Silhouette or Cricut, have you considered hosting in-home parties? We will look at that tomorrow on Cutting for Business.

    How to Host a Workshop with Your Silhouette Cameo - by cuttingforbusiness.com