Author: christine

  • How to Create Product Mockups in Silhouette Studio

    Successful online stores have a wide variety of items available for customers to purchase. Fellow crafters understand that supplies are expensive, and making a sample of each color you have available or each design can be impossible. The solution is to do a mockup, which is basically showing a customer what the completed item will look like without physically making it.

    The process of making a mockup is easy: 1) Create your product design, 2) Save it with a transparent background, and 3) Layer the design onto an image of whatever you plan to apply the final design to (t-shirt, mug, wooden board).

    Here are step-by-step instructions in Silhouette Studio:

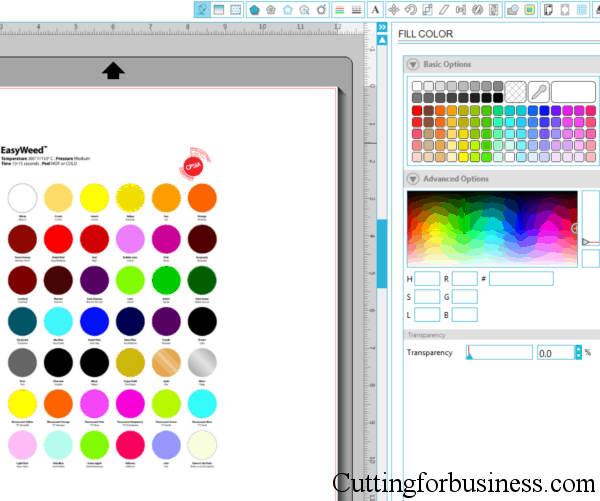
    1) Create your design in Silhouette Studio. For this example, I am using a “Love” design for a decorative throw pillow. Fill your design with the color of vinyl, paper, or paint that you will be using in your final product. I will be using red, but none of the standard reds available in the Silhouette Studio color palette are exactly the right shade. Since I will be using Siser Easyweed Heat Transfer Vinyl, I start by opening the Siser Easyweed color chart in Silhouette Studio (Click “File”, then “Open”.)
    Creating Product Mockups in Silhouette Studio - by cuttingforbusiness.com

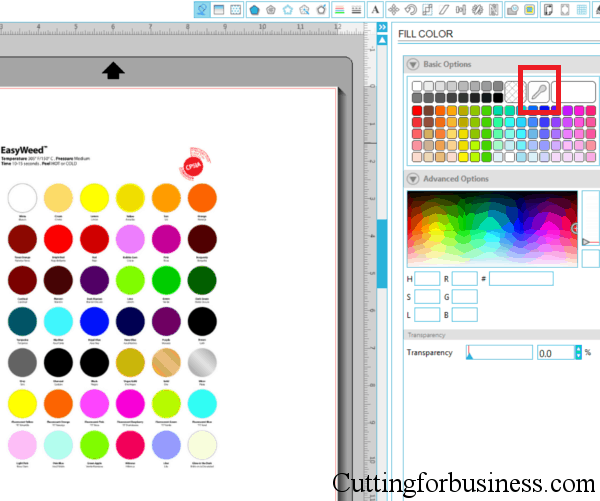
    2) Next, from the “Fill Color Window” (1st icon in the row along the top right side), you’ll want to select the dropper tool. Using the dropper tool, click the color from the color chart (or paint color chart, etc) that you will be using in your final product.
    Creating Product Mockups in Silhouette Studio - by cuttingforbusiness.com

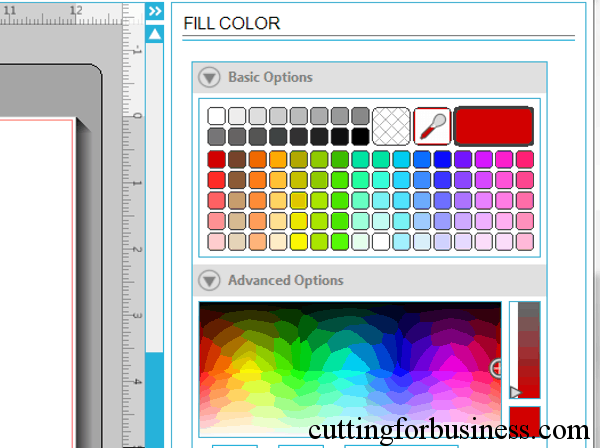
    3) The color that you selected is now active in the palette.
    Creating Product Mockups in Silhouette Studio - by cuttingforbusiness.com

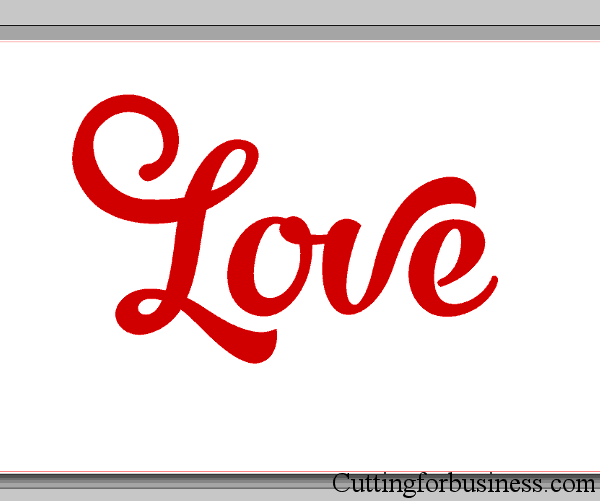
    4) Fill in your design with your selected color and save it. You’ll need it in a few minutes.
    Creating Product Mockups in Silhouette Studio - by cuttingforbusiness.com

    5) Take a photo of the item you will be applying the design to, or use a photo from your supplier. Personally, I prefer to use photos that I take myself, as it creates a more realistic look for the mockup. I feel that supplier photos with white backgrounds give products a sterile look. Here are my photos. The first is a photo from the supplier of the pillowcase, while the second is a photo I took of the pillowcase.
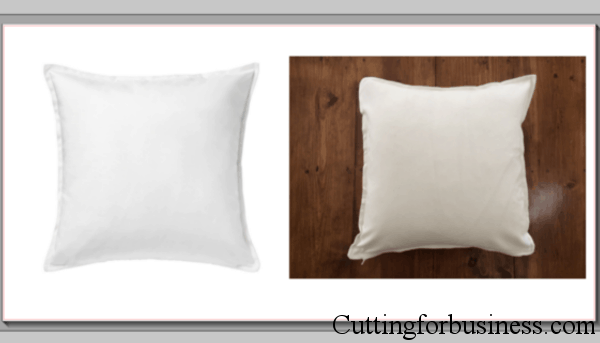
    Creating Product Mockups in Silhouette Studio - by cuttingforbusiness.com

    6) Next, drag your design onto your images. (If you are using Silhouette Studio Designer Edition and need to bring your design to the top layer, right click and select “Bring to front”.)
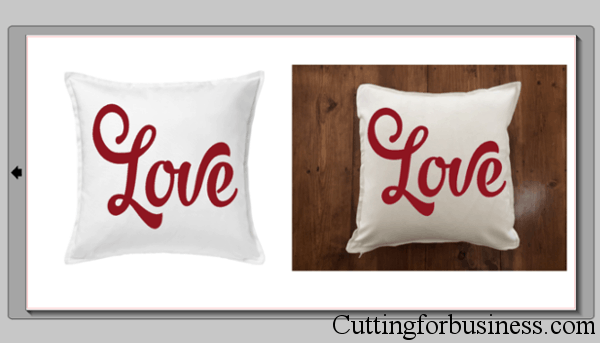
    Creating Product Mockups in Silhouette Studio - by cuttingforbusiness.com

    7) If your cut lines are showing you have two options: a) From the “Line Color” menu, change the lines to transparent, or b) From the “Line Color” menu, change the lines to the same color as your design.
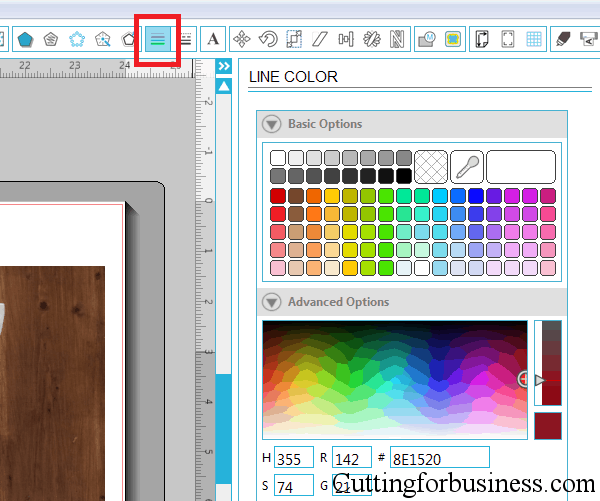
    Creating Product Mockups in Silhouette Studio - by cuttingforbusiness.com

    8) Now you’ll need to get your designs out of Silhouette Studio. To save them as a .jpg or .png file, you can use a virtual printer, like Bullzip. I have a full tutorial for using Bullzip located here, but quickly: 1) Install Bullzip 2) From Silhouette Studio, click “File”, “Print”, and select “Bullzip PDF Printer”. Create a file name and select the file format and Bullzip will virtually print it to your computer. Depending on your computer, you can also take a screenshot (CNTL + ALT + PRTSCN) or use the snipping tool. After getting your image out of Silhouette Studio, you can crop it in any photo editor and add your watermark.

    Here’s the final result of my product mockups. The first two are the mockups I just created, and the third one is the final product.
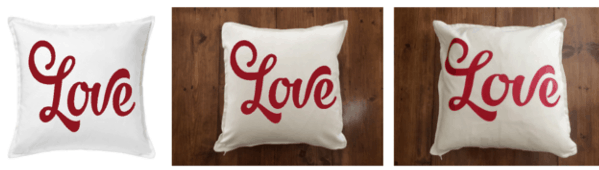
    Creating Product Mockups in Silhouette Studio - by cuttingforbusiness.com

    In closing, product mockups are a great way to offer a large number of products without needing to create each one of them. If your not the best photographer (like me!) you can purchase blank mockups through etsy.com or creativemarket.com.

    Etsy sellers: Etsy restricts mockups from being used as the first image in your Etsy listing. If you plan to use mockups on Etsy, you need to first read their Listing Photos help page. This page outlines that mockups are allowed as the second through fifth photo only – however Etsy’s enforcement of this policy is spotty.

    Read more mockup tips on Cutting for Business, just click here.

    Save this post to Pinterest:
    How to Create Product Mockups in Silhouette Studio - by cuttingforbusiness.com

  • 14 Tips for Crafters to Keep Social Media Interesting

    I’ll be honest with you, I was looking through some small business Facebook Pages a few days ago and so many of them were boring and repetitive. On a few of the pages, they just seemed to post products for sale – and nothing else.

    Let me tell you a secret: Fans get bored of the same content day in and day out. To keep their attention (and their wallets open), vary the content you post on social media. visit a lot of crafter’s Facebook Business Pages to browse, and a lot of them are boring! If you sell mainly through your Facebook Business Page, your wall can easily become simply a list of items for sale.

    14 Post Ideas to Keep Your Social Media Interesting

    1. Post your new supplies. If you got a large order of supplies in recently, photograph them and put the photo on your Facebook Business Page wall with a comment such as, “Just got all these supplies in! Can’t wait to start creating!”
    2. Post new machines. Did you recently get a new crafting machine? Whether it is a heat press, a new sublimination printer, or an extra large cutter – share your excitement! You don’t have to be specific with your post. Saying something like, “Got an upgraded plotter today and I am excited to be able to add large wall decals to my store in the coming weeks!” is sufficient.
    3. Share your mistakes. If you have a crafting blunder, post it! A short status update like, “I’m working on a new technique and trying to perfect it!” or “Sometimes things don’t always work as planned!” works well.
    4. Share something from another network. If you are active on other social media sites, be sure to post your links to Twitter, Instagram, or Pinterest on your Facebook wall. Remember, not everyone uses their Facebook account daily, but they may log into another social media site.
    5. Post a tease. If you have a new product coming out, use a photo editor to crop only a piece of the photo and put it on your Facebook Business Page. Ask for customers to guess what you have created. Always be sure to post the full photo at a later time.
    6. Share a review. Did a customer email you a nice comment or review? Post a screenshot of their comments, along with a thank you to them. Be sure to edit out their personal details with photo editor.
    7. Share big news. Land a big job? Brag about it! If you recently received an order for a large number of items, be sure to share the news! You can easily turn one large order into several more when customers know you can handle big jobs!
    8. Post about the weather. While it may seem odd for a crafter to post about the weather, weather is something that everyone can relate to. If the snow has you stuck inside, tell your customers that, and share that you are excited to be crafting indoors. If it’s a beautiful day out, post a photo of your latest creation and note that you finished it just in time to go outside and enjoy the sunshine.
    9. Share simple DIY projects or instructions. If you create decals for car windows, post a video showing how to install the car decal. If you show how easy and fast the process is, a customer who was on the fence about ordering may place that order.
    10. Show photos of items in progress. I’m not saying offer full tutorials on how to create your items, but share small snippets of items that you are working on. For example, if you make handpainted wooden signs and paint them in groups, take a photo of a group of them drying in your studio.
    11. Share your generosity. Are you making items to donate to a cause or an event? Be sure to share your photos with your Facebook fans. Not only will you be able to show off your items, but you’ll be helping promote the cause as well.
    12. Let customers know if you’re busy. Bogged down with orders? Let your Facebook fans know. A simple update like, “I’m booked solid with orders until xx/xx (date), so if you are looking to place an order soon, please remember to get your order in as soon as possible.” This often works well to get people to place an order they’ve been thinking about placing. (Alternatively, if you are closing due to a vacation or other event, be sure to let your customers know in enough time to place an order.)
    13. Share product packaging. Post photos of your product packaging or carefully wrapped breakable items. A unique aspect of handmade items is the way that they come beautifully wrapped. Show off your packaging to your customers.
    14. Wish them a happy XYZ day. Use the holidays to your advantage. Sure, you should wish your customers a happy holiday on major holidays, but did you know that there is a website that has holidays for nearly every day of the year? Visit Days of the Year, and find a few holidays that work well with the items you sell and wish your customers happy xxxx day along with a photo of one of your products. For example, if you sell etched pie plates, you could wish your customers a happy National Pie Day (January 23rd) with a picture of one of your etched pie plates.

    Remember, social media is meant to be used as a conversation. You wouldn’t have in conversation in person where you only told people what you sell, so don’t do it online.

    If you still need inspiration for what to post on social media, head to this post on content calendars.

    Was this information helpful? Save the image below to Pinterest.

    14 Post Ideas for Crafters to Keep Their Social Media Interesting - A good read for Silhouette Portrait or Cameo and Cricut Explore or Maker small business owners. By cuttingforbusiness.com.


  • How to Sell Crafts on Facebook

    Wondering about a good place to sell your handmade crafts? Consider Facebook. Facebook is the largest social media network in the world, with nearly two billion people using the network (as of 2022).

    Let’s take a look at how to sell crafts on Facebook.

    How to Sell Crafts on Facebook

    Why You Need a Facebook Business Page

    As I’ve mentioned in my last post, it is against the terms and conditions of Facebook to use a personal page for business purposes. Instead, you’ll need to create a Facebook Business Page.

    How to Sell Crafts on Facebook - An overview of 6 ways crafters can use the network in the craft business - by cuttingforbusiness.com.

    How to Sell Directly From Your Facebook Business Page

    You can think of your Facebook Business Page as your own little slice of Facebook.

    There are two easy ways to sell directly on your Facebook Page:

    • List the product on your website, Etsy Shop, Goimagine Shop and then post a link to your product on your Facebook Page. As your followers see your link, they can click it to be taken to your shop and purchase the product.
      • Pros
        • Listing your product on Facebook will make it appear on the feed of your followers. This can then be shared by your followers with their friends, and their friends, and so on.
      • Cons
        • To share product links, you’ll need to have a shop set up somewhere else.
        • Facebook greatly limits the reach of Business Page posts. You may need to use paid advertising to get your link seen.
    • You can also post take a picture of your item, list a price, and post it to your Facebook Page. To collect orders, you can have people comment on your image or send a message to your page. After you receive each order, you would send them an online invoice or otherwise collect their payment.
      • Pros
        • This method of selling on your Facebook Page is free.
        • Again, with Facebook limiting the reach of your post, it may be difficult to be seen.
      • Cons
        • It can be difficult to keep up with this method of selling. If you are making many sales like this, you’ll need to be incredibly organized with sending invoices, collecting payments, knowing what products you have in stock, and keeping up with customers.

    How to Sell Through Facebook Groups

    Facebook Groups are designed to be communities that share a common theme or interest.

    There are two different ways to sell crafts on Facebook through Facebook Groups:

    • Create your own group and sell to customers in it.
      • Pros
        • It’s free.
        • Facebook Groups are being promoted by Facebook in many ways, including tv commercials.
      • Cons
        • It can be difficult to get customers to join your group, especially if you are only selling products.
        • Constantly managing a growing Facebook Group can be time consuming.
      • Good practices: Set up a Facebook Group that is directly related to the products you sell. For example, if you sell products related to your local area you could set up a group called ‘Things to Do in XYZ Area’. In this group, you can share interesting things to do in your local area – as well as promote your products.
    • Join groups where you can sell your products.
      • Pros
        • It’s free. It may be easier to sell products in an established group, rather than starting your own.
        • Most areas (cities, states, counties) have local buying and selling groups. Also, if you cannot ship your craft products, these are great places to sell.
      • Cons
        • Some groups allow selling, while others don’t. Be sure you know the rules of the group.
        • You are at the mercy of the group’s admins. I’ve seen groups with amazing, supportive admins; but I’ve also seen groups where admins will delete posts or ban members for no logical reason.
    How to Sell Crafts on Facebook - Great for Silhouette and Cricut Crafters - by cuttingforbusiness.com.

    How to Sell Through Facebook Shops

    Facebook has its own area on your Facebook Business Page to list your products called a Facebook Shop.

    • Pros
      • Customers can check out right on Facebook and make a purchase without leaving the network. Many users don’t want to leave the platform – and quite frankly – Facebook doesn’t want them leaving the site either.
      • Setting up a Facebook Shop is free and pretty straight forward.
      • Facebook Shops are optimized for mobile devices.
    • Cons
      • You are at the mercy of Facebook’s policies when selling through Facebook Shops.
      • You will pay Facebook’s fees when you sell an item. Current fees are 5% per shipment, or a flat fee of $0.40 for shipments of $8.00 or less.

    How to Sell Through Facebook Marketplace

    Facebook Marketplace is the area of Facebook dedicated to selling products on Facebook. It differs from your shop in a few ways. In your shop, only products you list are shown and your shop is accessible through a tab on your Facebook Page. In contrast, Facebook Marketplace is an area where lots of individuals and businesses have listings.

    To sell on Facebook Marketplace, you create a listing and it appears on the Facebook Marketplace.

    • Pros
      • It’s free to list on Marketplace and free if sold locally and not shipped.
    • Cons
      • There are a lot of listings on Facebook Marketplace, so there is a lot of potential for competition.
      • It costs 5% per shipment, or a flat fee of $0.40 for shipments of $8.00 or less.
      • You are at the mercy of Facebook’s policies when selling on Facebook Marketplace.
    How to Sell Crafts on Facebook - by cuttingforbusiness.com

    How to Sell Through Facebook Live Shopping

    Facebook Live is a video service for Facebook where you can sell products.

    • Pros
      • Through live video, you can connect better with your audience, ask questions, and better show off your products.
      • Through Facebook Live Shopping, customers can purchase right during the video.
    • Cons
      • You’ll need to plan ahead to have a successful Live Shopping stream.

    How to Sell Through Connected Apps on Facebook

    There are a number of apps that allow you to sell on Facebook through the app. These were more popular before Facebook created Facebook Shops.

    However, if you currently sell through a service that has an app or widget for Facebook Shops, you may want to look into it. The app or widget might let you bulk upload products to your Facebook Shop or automatically send newly listed products to your Facebook Shop. For example, I know that Shopify offers a Facebook channel.

    How to Sell Your Silhouette Cameo or Cricut Handmade Crafts on Facebook - by cuttingforbusiness.com
  • How to Create a Facebook Page for your Craft Business

    Ready to get your new business out to the world? A great place to start is Facebook. It is against Facebook’s terms and conditions to use your personal account to represent something other than yourself. Instead, you’ll need to create a Facebook Page. It’s important to note that you must have a personal Facebook account to create a Page. Here is a step-by-step tutorial to create your Page:

    1) Log into your Facebook account.

    2) From the blue bar at the top of the page, click the down arrow on the far right hand side, then choose “Create Page”.

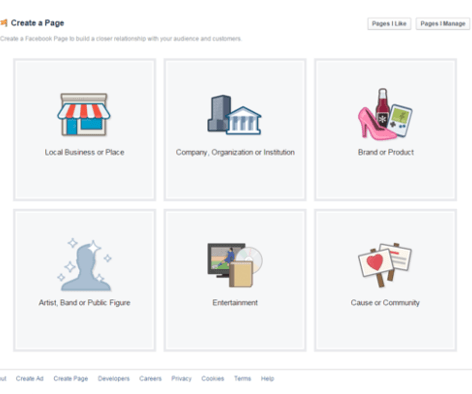
    3) Choose the category for your business page. If you do not have a storefront that the public can come shop at (most Silhouette and Cricut crafters do not) do not choose Local Business or Place. You’ll most likely want to choose “Company, Business, or Institution” then “Retail and Consumer Merchandise”, “Company”, or “Small Business”. Alternatively, if you only sell one product or one product line, you could choose “Brand or Product”, then the category of your product. After choosing your category, enter the name of your small business.

    How to create a Facebook page for your Silhouette Cameo or Cricut Explore Business - by cuttingforbusiness.com

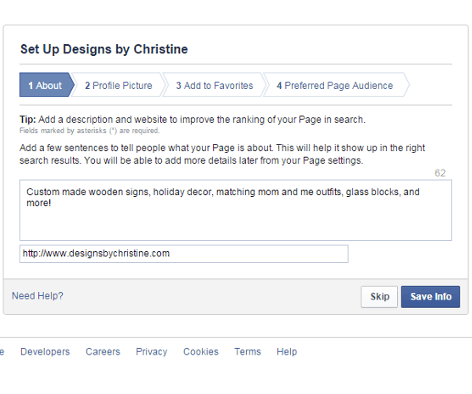
    4) Next enter a short description of your page, and your website address (if you have one) and click “Save”.

    How to create a Facebook page for your Silhouette Cameo or Cricut Explore Business - by cuttingforbusiness.com

    5) Now, you’ll need a profile photo for your page. I suggest you upload your business logo. If you do not have a logo, put a picture of one of your recent creations, and plan to update it.

    How to create a Facebook page for your Silhouette Cameo or Cricut Explore Business - by cuttingforbusiness.com

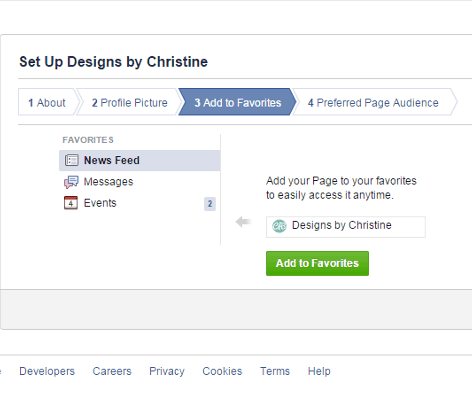
    6) Add your page to your Facebook favorites to make it easy for you to find.

    How to create a Facebook page for your Silhouette Cameo or Cricut Explore Business - by cuttingforbusiness.com

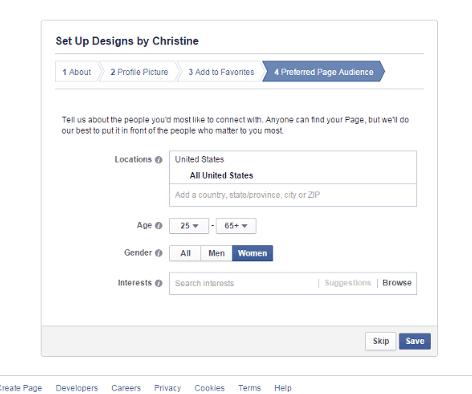
    7) Now, you’ll need to choose some specifics about people who may like, or may buy, your items. I chose United States, as I currently plan to only ship to the US. I also selected women, since most of my products are “girly” or geared towards women. You can then select interests based on your items by using the “Browse” link. For example, if you create pet item, you’ll want to select people that like animals. Click “Save” when you are ready to move forward.

    fb6

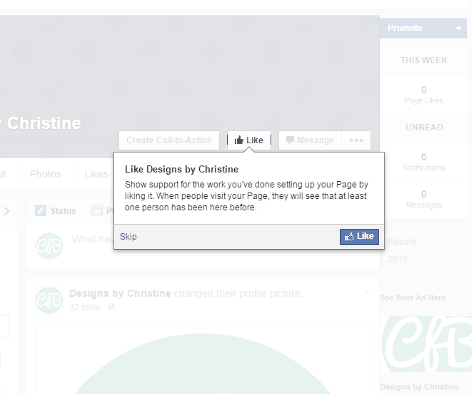
    8) You are almost finished. Next, you’ll want to like your new page and begin posting. Facebook will also prompt you to share your new page with your friends (optional).

    How to create a Facebook page for your Silhouette Cameo or Cricut Explore Business - by cuttingforbusiness.com

    9) Lastly, add a cover photo (photos of some recently created items are a great idea!) to your profile by clicking “Add Cover” in the top left hand corner. This feature works the same as adding a cover photo to your personal Facebook page. If you don’t have a photo ready to go, I suggest you head over to pagemodo.com or canva.com and create one. Both sites are free and easy to use with a drag and drop editors to help you create a cover photo.

    That’s it! Congratulations on your new Facebook Page! The key to having a successful Facebook Business Page is gaining new likes, and posting regularly. Read more about social media on Cutting for Business.

    Share this post on Pinterest:

    Silhouette Cameo or Cricut Crafters: How to Create a Facebook Page for your Craft Business - by cuttingforbusiness.com

  • Tutorial: How to Send a Paypal Invoice

    Yesterday, I compared credit card readers to help you decide which credit card reader worked best of your small business. But, how can you accept payments from customers that are not ordering through an online marketplace and they are not local? Besides having the customer mail you a check, you can also use online invoicing. Online invoicing means that a customer is emailed an invoice with links for them to pay with their credit card. After paying the invoice, they will be emailed a receipt and you will be notified. Depending on which invoicing system you use, the money is either deposited to your bank account or into your account.

    If you are using an accounting program like Quickbooks, Xero, or Wave, an online invoicing tool is usually built into the program. Similarly, if you are using a credit card reader, many of those services also have online invoicing available.

    If you already use Paypal to accept payments, you can also use it to send customer invoices. Your customer does not have to have a Paypal account to pay the invoice.

    How to Send a Paypal Invoice

    1) Log into your Paypal account.

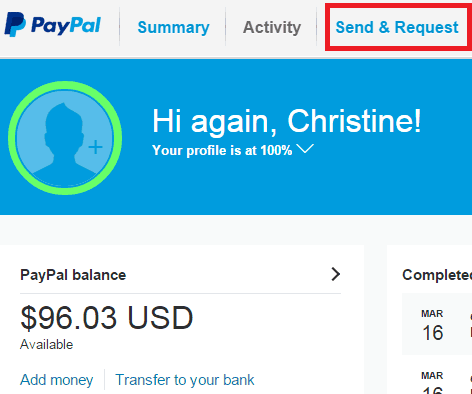
    2) Click “Send & Request” from the choices across the top.

    Selling items made with your Silhouette Cameo - Online Invoicing - by cuttingforbusiness.com

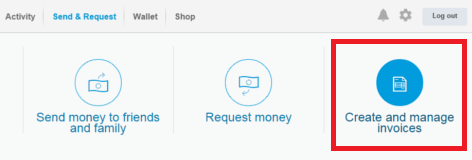
    3) Choose “Create and manage invoices” from the next screen.

    Selling items made with your Silhouette Cameo - Online Invoicing - by cuttingforbusiness.com

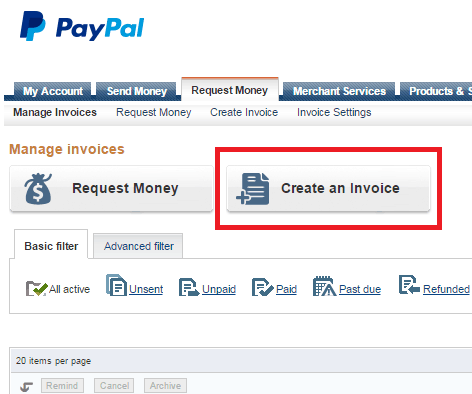
    4) Click “Create an Invoice”.

    Selling items made with your Silhouette Cameo - Online Invoicing - by cuttingforbusiness.com

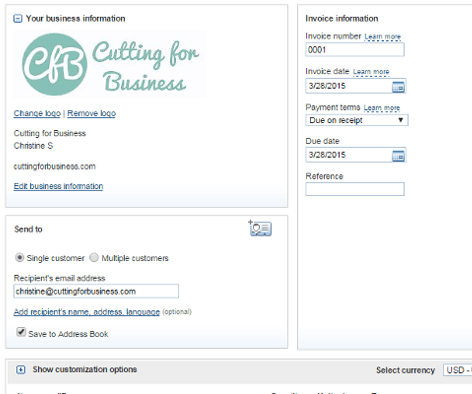
    5) Enter your business information and your customer information. You can give your invoice any number you want, and set the due date for whenever. I chose to leave mine, “Due on Receipt”.

    Selling items made with your Silhouette Cameo - Online Invoicing - by cuttingforbusiness.com

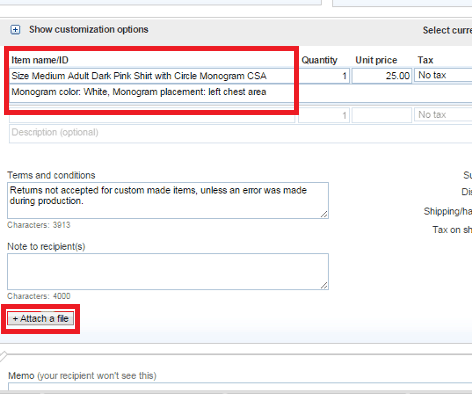
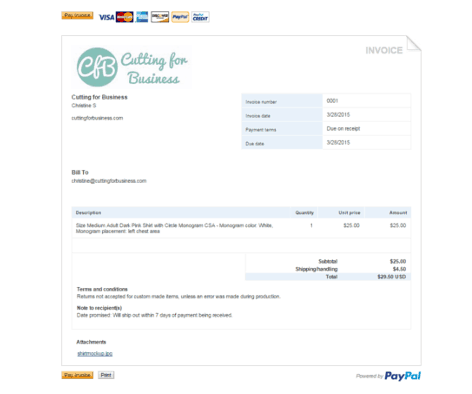
    6) Pay close attention to the description of the item, and be as specific as possible when writing the description. In this example my customer is buying a pink shirt with a white monogram on the chest area. My description states “Size Medium Adult Dark Pink Shirt with Circle Monogram CSA, Monogram color: White, Monogram placement: left chest area”. In the event there is a problem with the transaction, a thorough description may prevent you from having to refund a customer.

    Selling items made with your Silhouette Cameo - Online Invoicing - by cuttingforbusiness.com

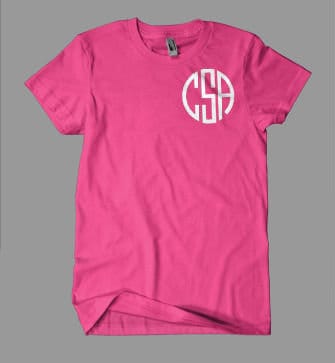
    Near the bottom of the Paypal invoice, you can also attach a file. This is a great place to attach a mockup of the item or a sample photo of the item if you have one available. I attached a simple mockup of the shirt design.

    Selling items made with your Silhouette Cameo - Online Invoicing - by cuttingforbusiness.com

    7) Once you are satisfied with the invoice, click “Preview” to see it. If you will be selling a similar item, you can also choose to save the invoice as a template. Here is what my completed invoice looks like when it is sent to my customer:

    Selling items made with your Silhouette Cameo - Online Invoicing - by cuttingforbusiness.com

    8) After previewing the invoice, click “Send” to email it to your customer. Once the customer pays, you will receive a notification that payment has been made, and you’ll be ready to start creating!

    Again, it is a wise business move to always get your customer to pay for your item before you begin making it. No seller ever wants to put the supplies and time into an item, especially a custom item that you might not be able to resell, and then have the customer not follow through with the sale.

    Save this post to Pinterest:
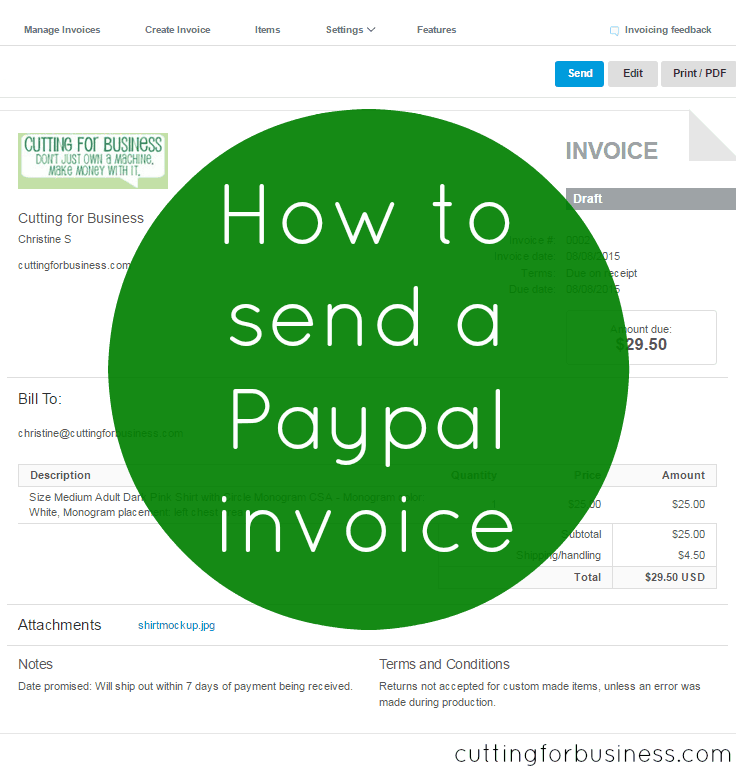
    How to send a Paypal invoice - by cuttingforbusiness.com

  • How to Price Crafts for Sale – Pricing Formula

    Wondering how to price crafts for sale? Before you start a craft business, you must know how to price your handmade items. There is nothing worse than designing an item, creating it, packaging it, selling it, and then realizing you made no profit – or worse – you lost money selling an item!

    Craft Pricing Formula

    There are a number of pricing formulas out there, but this is the one I like the most. It takes into account supplies, labor, and overhead costs.

    Generally, a handmade item is priced using a formula similar to this:

    Cost of Supplies + Labor + Portion of Overhead = Total Costs
    Total Costs x 2 = Wholesale Price
    Wholesale Price x 2 = Retail Price

    Let’s break down the parts of the formula.

    How to Price Crafts for Sale - by cuttingforbusiness.com.

    How to Figure Out the Cost of Supplies

    The cost of your supplies is how much you paid for the supplies. This is straightforward. However, it can get tricky if you use a portion of a supply in a project for sale.

    For example, if you make a tshirt using a half a sheet of vinyl, you’d only use half of the cost of the sheet of vinyl in your formula. Similarly, if you use a third of a container of glitter in your product – you’d only use 1/3rd the total cost of the glitter in your formula.

    How to Figure Out Labor Costs

    The labor costs are how much you want to pay yourself. There are too many times where I have seen crafters selling products, and not paying themselves. Sadly, you are not going to be in business long if you aren’t making any money.

    So how much should you pay yourself? I talk in length about how much to pay yourself in another post.

    How to Figure Out Overhead Costs

    Don’t forget: When figuring out your overhead costs, you’ll need to take into account everything you used to create your item. From the software costs, machine costs, actual supplies used, packaging (box or envelope, packing supplies, tape, the label paper you used), the cost of the scale you used, the amount of electricity used, the space in your home or studio, even a portion of your advertising costs or store fees.

    How to Price Crafts for Sale - Great for Silhouette Cameo or Portrait and Cricut Explore or Maker crafters - by cuttingforbusiness.com.

    How to Price Crafts for Sale Example

    Example: I’m selling a personalized glitter tumbler sealed with epoxy. After creating the tumbler, the customer will pick up.

    Supplies and costs:

    • Stainless steel tumbler. $1.39.
    • Glitter. I use one quarter of a container that cost $5.99. One quarter of $5.99 is roughly $1.50.
    • Epoxy. I purchase epoxy by the gallon for $50.00 and can make 35 tumblers with one gallon. 1/35th of a gallon costs $1.42.
    • Vinyl. I use one quarter of a sheet of adhesive vinyl to add personalization to the tumbler. One sheet of adhesive vinyl costs $1.42. One quarter of a sheet is $0.36.
    • Total supply costs: $5.56.

    Labor:

    • I pay myself $10 an hour to make tumblers, based on my experience and expertise. It takes me one hour to make the tumbler.

    Overhead: Things like electricity, space in my home studio, online store fees, legal fees, and more all go into the overhead of your business. You can think of your business overhead as the amount it costs you each month to keep your business running – or your break even point.

    Here’s how to figure out your monthly overhead:

    1. List out all expenses in your business for the previous month.
    2. Add these expenses together. This was your total overhead for the month.
    3. Divide by 744 (the total number of hours per month in a month with 31 days).

    Let’s do it: $450 (total expenses)/744 = .60

    What does .60 mean? This figure is your monthly overhead cost by hour. Simply add it to your labor rate in the formula and the overhead costs are accounted for.

    My adjusted labor rate is $10.60 an hour.

    Put the numbers into the formula:

    Cost of Supplies + Labor + Portion of Overhead = Total Costs
    Total Costs x 2 = Wholesale Price
    Wholesale Price x 2 = Retail Price

    $5.56 + $10.00 + (which includes my overhead) = $16.16

    $16.16 x 2 = $32.32

    $32.32 x 2 = $64.64.

    This gives us a selling price of $33 wholesale and $65 retail.

    How to Price Your Silhouette Cameo or Cricut Crafts for Sale - by cuttingforbusiness.com

    Online Craft Calculators

    There are a number of online craft calculators available, as well as a handful of apps. Honestly, they will all use a different variation of one of the popular pricing formulas. If you find one you love, use it. If not, just grab your calculator and the formula above to price crafts for sale.

    One more thing: Have you ever heard of dynamic pricing? You may not have, but you see it every day. Your prices should be dynamic, not static. Read more about dynamic and static pricing.

  • How to Set Goals for Your Craft Business – The SMART Way with Free Printables

    Do you want to start a craft business? Great! Today, let’s talk about how to set goals for your craft business – the SMART way.

    Before you start writing down goals, you have to understand how to set them.

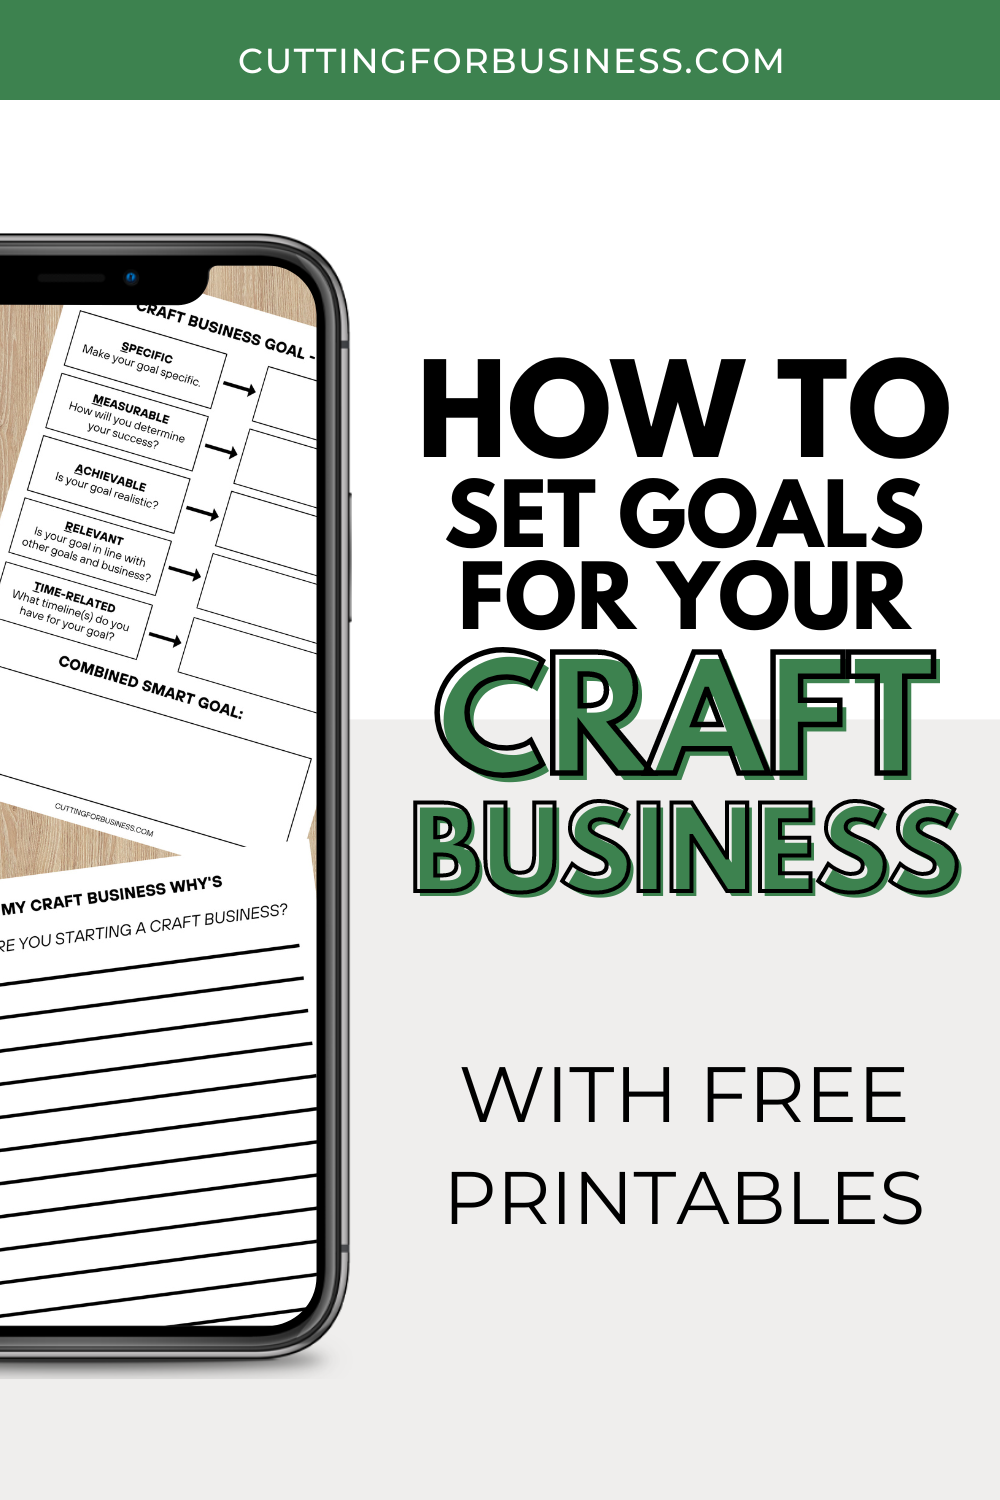
    How to Set Goals for Your Craft Business - The SMART Way with Free Printables - cuttingforbusiness.com.

    What is Your Craft Business Reason Why?

    Before I start writing down my goals, I always write down my whys. Why am I doing this? What is the end goal?

    Take a few minutes and write down your whys. Here are some ideas to get you started:

    • Do you want to make extra money to take your family out for special events?
    • Would you like to stockpile money for a large purchase such as a vacation, a new car, or a home?
    • Is your household budget tight and you’d like to supplement it?
    • Do you have debt and you’d like to pay it down?
    • Do you eventually want to quit your full time job or become part time and craft for money?
    • Do you just need a creative outlet to relieve stress?

    What are SMART Goals?

    In 1981, George T. Duran wrote a paper on writing goals for corporate managers. In it, he introduced his SMART method. If you’d like to read it, Temple University has a copy online.

    The acronym SMART stands for:

    • Specific
    • Measurable
    • Assignable Achievable
    • Realistic Relevant
    • Time-related

    Since 1981, the acronym has evolved and there are several variations of it. One variation substitutes ‘assignable’ with ‘achievable’. Since many craft businesses are run by one person, it makes sense to use this version. Another variation substitutes ‘realistic’ with ‘relevant’. It also makes sense to use this variation because ‘achievable’ and ‘realistic’ become too similar.

    The idea with SMART goals is to include each SMART criteria in your goal.

    SMART Goals Criteria

    Specific. This criteria reminds us to make our goal specific.

    • Goal: Expand my craft business to make more money.
    • Goal with SMART criteria: Expand my craft business by adding Print on Demand products to make more money.

    Measurable. It’s hard to evaluate progress towards a goal without a way to measure it. This SMART criteria tells us to make sure our goals are measurable.

    • Goal: Sell Print on Demand products to make more money in my craft business.
    • Goal with SMART criteria: Sell $500 worth of Print on Demand products per month for the first three months.

    Achievable. Goals must be achievable, and this SMART criteria makes sure our goals can be met. Don’t confuse this with easy, though. Your goal should still challenge you – but be realistic.

    • Goal: Add Print on Demand products next month and sell enough to buy a new car in 7 days. (This goal isn’t very realistic – nor achievable for most of us.)
    • Goal with SMART criteria: Add 30 Print on Demand products to my craft business within the next 30 days, and sell $500 worth of products in each of the first three months.

    Relevant. This SMART criteria reminds us that our goal should be relevant. In this example, a craft business.

    • Ask yourself: Does my goal fit in with my other goals and my ultimate vision? In this example, I want to bring up overall sales in my craft business.
    • Answer: Yes, to bring up overall sales in my craft business, adding Print on Demand products is relevant.

    Time-related. All goals need to have an expiration or timeline. This SMART criteria helps us know when the goal ends.

    • Goal: Add Print on Demand products to my craft business.
    • Goal with SMART criteria: Add 30 Print on Demand products in the next 30 days, then re-evaluate goal progress at 60, 90, and 120 days.

    Combining them all into one SMART goal:

    Expand my craft business to make more money by adding Print on Demand products. Introduce Print on Demand by adding 30 Print on Demand products to my store in 30 days with a goal of selling $500 a month for the first three months. Re-evaluate goal progress at 60, 90, and 120 days.

    Follow Up on Your Goals

    Wait! We aren’t quite done yet. If I can stress anything about writing goals, it is that you have to check in with your goal progress regularly.

    You’ll see that in the time-related SMART criteria, I added specific intervals at which to check on my progress. At that point, I can re-evaluate to see what is working and what isn’t.

    I find it helpful to keep my goal in front of me as much as possible. I do this by using a simple worksheet I created and hanging it in my workspace.

    Free Printable Worksheets

  • How to Accept Payments for Your Handmade Products – Selling in Person

    If you plan on selling your handmade items, you’ll need to be able to accept payments. When selling through an online marketplace (like Etsy or Artfire), the marketplace collects the payment from the customer on your behalf. The marketplace then takes a portion of the sale (their processing fees) and deposits the rest into your account. But, if you are selling in person, you’ll need a method of collecting payments.

    How to Collect Payments in Person

    1) Cash or checks. Cash or checks are the easiest way to collect funds from local customers. Remember to allow checks to clear before giving the customer their item.

    2) Credit card readers. There are a number of small business credit card readers available. The credit card readers use your smartphone or tablet and process the customer payment on your behalf. The company then takes a portion of the sale for processing the payment and deposits the remaining funds into your account. The needs of each small business vary, so compare your options to figure out which reader suits your small business best. For example, if you primarily take orders over the phone, make sure you choose a credit card reader with lower fees for keyed in transactions. To help you decide which will work best for your needs, I’ve summarized some main points about each in the chart below. Links to each credit card reader can be found at the end of the article.

    Information below updated 4/11/16.

    Reader Cost Fees Deposit Availability Other Notes
    Square Free. Order online. $10 in office or electronic stores that is credited back to your account after use. Swiped: 2.75%, Keyed in: 3.5% + $0.15 1 business day, includes all business processed before 8pm ET the preceding day. Additional features likes a register app, Square store, and more available. Email only customer service.
    PayAnywhere Free. Order online. $15 in office or electronic stores that can be credited back to your account after use. Swiped: 2.69%, Keyed: 3.49% + $0.19 1 business day, includes all business processed before 5pm ET the preceding day. Storefronts available for larger vendors. Rates for storefronts from 1.69% (and up) per swipe.
    Quickbooks
    GoPayment by Intuit
    Free. Order online. Two plans available. 1) $0 monthly, Swiped: 2.40% + $0.25, Keyed in: 3.40% + $0.25 2) $19.95 monthly, Swiped:  1.75% + $0.25, Keyed in: 3.15% + $0.25 2-3 business days Automatically imports information into Quickbooks for easy accounting.
    Etsy Card Reader Free. Order online. Swiped: 2.75%, Keyed in: 3% + $0.25 Money goes to your Etsy shop account and is deposited each Monday. Earlier deposits are available. No Etsy transaction fees from items listed in your shop and paid via the card reader. No listing fees for items sold via the Quick Listing (not listed in your Etsy shop).
    Paypal Here by Paypal Free. Order online. Swiped: 2.7%, Keyed in: 3.5% + $0.15 Money goes to your Paypal account for you to transfer to your bank when ready. Money is instantly available with the Paypal debit card. Can also accept payment from your customer’s Paypal account.
    Amazon Local Register

    No longer accepting customers.

    $10, but receive a credit for transaction fees once you use reader. Order online. Swiped: 2.5%, Keyed in: 2.75% Capable of next business day deposits, just need to set it up. Amazon states that they have stabilized the card reader to make swiping easier. Card reader is larger than other brands.
    Flint No reader needed. App is free from Google Play or App Store. Processes through Stripe. 2.9% + $0.30. Within 2 business days. Simply take a photo of the card and it is securely processed. Image is not stored on your device. Optional integration with Quickbooks. Mixed reviews online.

    Update 10/26/15: The USA has recently switched to EMV credit card readers. Learn more about them in this post.

    Always Collect Payment First

    A quick (but important) note for newer sellers: Always collect payment before you begin working on any item for any customer. No seller ever wants to put the supplies and time into an item, especially a custom item that you might not be able to resell, and then have the customer not follow through with the sale.

    Having customers pay in person is great for fairs and local sales, but what if you need to collect payment for items that you aren’t selling through an online marketplace, and the customer is not local? Online invoicing is a great way to easily do so. Read on to part two of this article, which covers online invoicing.

    But first, save this post to Pinterest:
    Which credit card reader is best for your craft business? - by cuttingforbusiness.com


    Links to credit card reader websites

    Square
    PayAnywhere
    Quickbooks GoPayment by Intuit
    Etsy Card Reader
    Paypal Here
    Flint

  • Do’s and Don’ts of Watermarking Your Product Photos

    I’m sure you’ve seen one of those pictures on social media that asks you to share the image to see how far it goes, and it has hundreds of thousands of shares. This illustrates how fast one image can move around online.

    So what does that have to with your Silhouette or Cricut craft business? It shows that once you post an image online, it doesn’t matter where you post it, your image can potentially be seen by millions of people quickly.

    Clearly, it’s pretty important to protect your images.

    Watermarks are a great ‘first line of defense’ against theft of your images. But, there are a few rules to follow when watermarking images.

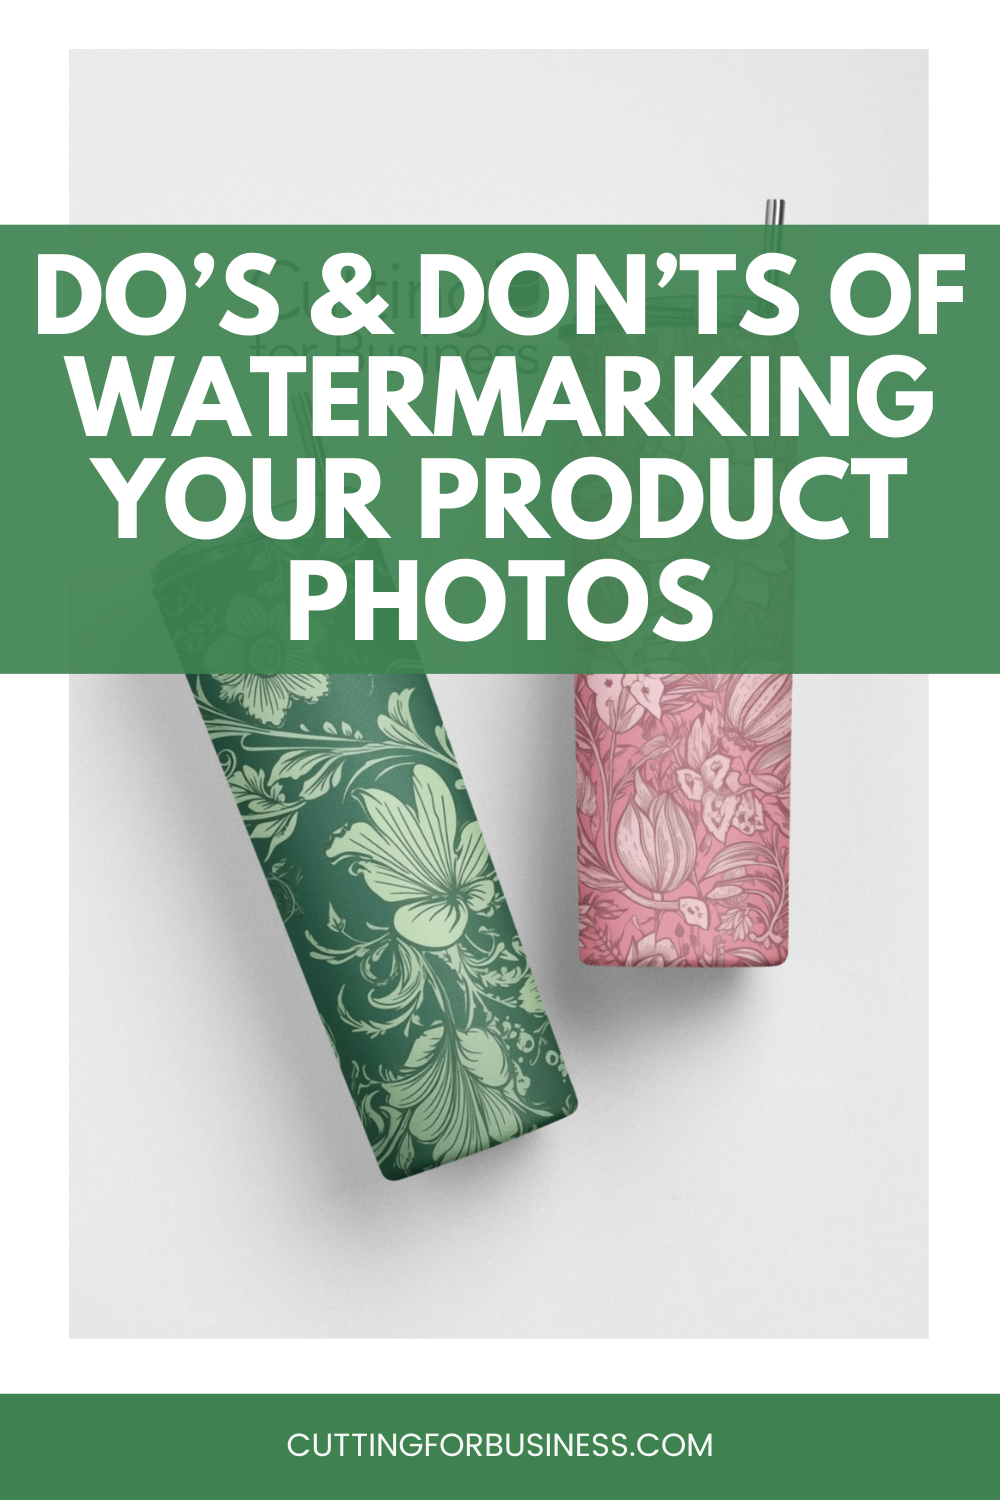
    Do's and Don'ts of Watermarking Your Product Photos - cuttingforbusiness.com

    What is a Watermark?

    A watermark is an image or text that is placed somewhere on your product pictures to claim ownership. Watermarks often detract other crafters from stealing your pictures and using them as their own.

    4 Watermarking Do’s and Don’ts

    Don’t let your watermark detract from your item. If your buyer cannot clearly see your item, they are likely to pass it up. This watermark is too distracting.

    Do's and Don'ts of Watermarking Your Product Photos - Example 1 - cuttingforbusiness.com

    Do make your watermark overlap a small portion of your item. It is easy to crop out a watermark that is in the background or the corner of your photo. To prevent people from doing this, simply overlap your watermark onto the edge of your item.

    Do's and Don'ts of Watermarking Your Product Photos - Example 2 - cuttingforbusiness.com

    Don’t make your watermark too light to read.

    Do's and Don'ts of Watermarking Your Product Photos - Example 3 - cuttingforbusiness.com

    Do use your business name or name in your watermark. Phrases like ‘Do Not Copy’ or ‘Not Your Picture’ don’t claim ownership. Read more about why you shouldn’t use generic watermarks.

    Do's and Don'ts of Watermarking Your Product Photos - Example 4 - cuttingforbusiness.com

    How Can You Create Watermarks?

    You can use any photo editor like Canva, PicMonkey, Photoshop, or similar to create watermarks. Additionally, there are several mobile apps available for adding watermarks – just check your app store.

    Alternatives to Watermarks

    I know that not every crafter likes watermarks. Read some of the concerns with watermarks and alternative methods to protecting your product photos.

  • 10 Places to Sell Crafts Online with Pros & Cons

    Wondering where to sell your crafts online? Thinking about selling handmade products made with your Silhouette or Cricut?

    I’ve compiled a list of places to sell crafts online – and I’ve included some pros and cons to each.

    10 Places to Sell Crafts Online with Pros & Cons - cuttingforbusiness.com.

    10 Places to Sell Crafts Online

    Locally/Word-of-Mouth

    When first starting out, your friends and family make great customers. It is not uncommon to give a gift to a friend or family member, and have them return to you to ask you to create something for them.

    • Pro: Friends and family want to see you succeed, and will often pass on your information to their friends.
    • Con: Friends and family often want items made for really cheap (or free!) – remember to take into account your time, supplies, and talents.
    • Costs: Free. Don’t forget to give your friends and family members business cards.

    Locally Online

    Most areas have local Buy and Sell groups through Facebook, Facebook Marketplace, and hyperlocal apps.

    • Pro: It’s usually free to list in these groups.
    • Con: With region specific groups, you have a limited market.
    • Cost: Free.

    Craft Shows, Fairs, and Co-ops

    These types of sales require you to bring items to a location and set up a display with other crafters.

    • Pro: Potential buyers can see and touch your items, and meet you in person.
    • Con: Depending on your location, craft fairs may be hard to find. Also, it is a lot of work to haul items to a place, set up a display, and take it all down later. Some craft fairs require submitting products for sale before acceptance into the show, while others require you be legally set up as a business – so be sure to get information in advance.
    • Costs: Range from a few dollars for a local crafts fair to $1000’s for well known shows.

    Local Stores and Boutiques

    Local stores and boutiques will often accept items to be sold in their store from crafters. Arrangements are often made based on a commission or consignment model.

    • Pro: Local stores can increase your exposure.
    • Con: Dealing with store owners, potential theft, and damaged products can be difficult. Make sure to have your agreement in writing.
    • Costs: Vary from store to store.

    Etsy

    Probably the most well known and popular marketplace for handmade items online.

    • Pro: Lots of buyers, and easy to set up, relatively inexpensive.
    • Con: Lots of competition and many shops may offer items similar to your own. Finding a name that isn’t in use for your Etsy shop can be difficult. Additionally, many overseas importers are on the site selling goods for a fraction of the price of actual handmade.
    • Cost: Setting up a shop is free, and each item listed is $0.20 for four months (or until sold – whichever comes first). For items that sell, an additional fee is required. Additionally, payment processing costs may apply.

    Shopify

    In contrast to Etsy, Shopify is an online ecommerce platform that many crafters sell through.

    • Pro: More creative control over layouts than Etsy and a number of extensions to add functionality to your site.
    • Con: Shopify doesn’t drive traffic to your shop. It is similar to having your own standalone website.
    • Cost: $29 to $299 per month.

    Amazon Handmade

    Amazon has its own division of the website for handmade products.

    • Pro: Amazon mixes Handmade on Amazon products with regular catalog products for better exposure.
    • Con: It can be difficult and slow to get accepted into Amazon Handmade.
    • Cost: Handmade deducts a 15% referral fee, with no additional listing or payment processing fees.

    Your Website

    A stand alone website that you create (or you pay to have a web designer create).

    • Pro: Low amount of overhead costs for selling items.
    • Con: Time consuming to set up, there is a constant need to promote your website to drive traffic to it, and sales are often slow (or non-existent) until your website is well established.
    • Cost: Free to $1000’s.

    Social Media

    Many social media channels have a way to sell directly in the app or through the platform.

    • Facebook: Crafters can sell through Facebook Groups, Marketplace, or your own Business Page. Remember, it is against the terms and conditions to sell through your personal page.
      • Pro: Facebook is the largest social media network online. Selling on Facebook is well suited to people that have a large amount of friends that will help support the new business page by liking posts and sharing them.
      • Con: Facebook is constantly changing their algorithms for pages, which means the posts you make from your business page may only be shown to a small portion of people that “like” your page. Most recently, Facebook is pushing for business pages to pay for ads on Facebook to receive exposure.
      • Cost: Marketplace fees vary. There is no fee to sell in Facebook Groups or Marketplace.
    • Instagram: Crafters can sell products with Instagram Shopping directly in the app.
      • Pro: Instagram is highly visual with a supportive handmade community.
      • Con: You must use amazing photos to be successful on Instagram.
      • Cost: The fees can be steep at 5% flat fee per shipment. For products under $8.00, a flat fee of $0.40 is charged.
    • TikTok: Through Shopify, crafters can sell directly on TikTok.
      • Pro: TikTok is growing at a rapid pace.
      • Con: Selling directly on TikTok is limited to a few partnerships at the moment, but there is a strong suspicion that TikTok Shops is on the way.
      • Cost: Currently through Shopify or Teespring.
    • Pinterest: Crafters can on Pinterest through Pinterest Shopping.
      • Pro: Pinterest continues to be a high traffic site.
      • Con: You’ll still need a site for users to actually purchase through.
      • Cost: Using Pinterest Shopping features are free.

    Smaller Marketplaces

    There are a number of smaller marketplaces that are either very niche, are up and coming, or area out of the United States. Here are a few of them:

    • Artfire.com: Artfire is an artisan marketplace that was built by artisans for artisans. In addition to handmade items, you can also find artisan goods, fine art, supplies, and more.
    • Folksy: Folksy is an online marketplace for handmade goods and craft supplies based in the U.K.
    • Misi: Misi is an other online marketplace for handmade products based in the U.K.
    • Ebay: Over the years, Ebay has evolved into a wonderful place to sell items. Handmade items don’t do as well as they used to on Ebay.
    • iCraft: Icraft is a smaller marketplace for handmade products.
    • Mercari: Mercari is an app that allows selling all kinds of products. Some crafters do well on the platform.
    • Goimagine: Goimagine is an up and coming marketplace that donates its profits to charity. I’ve written an article on Goimagine with more information about the marketplace.
    • IndieCart: IndieCart (formerly Hyena Cart) is an older marketplace that has been merged with Hyena Cart. The marketplace offers handmade goods.
    • Felt: Felt is an online platform for crafters based in New Zealand.

    Where Do I Recommend You Sell?

    I often give this advice to new sellers when they ask me where the best place to sell is: First, start with your friends and family. This allows you to get a feel for selling products and dealing with customers.

    Next, open a shop on Etsy or another marketplace. Etsy is a great first step into online selling, because they can provide the buyers.

    Last, strive to move to your own website. After you master online selling, stop relying on a marketplace and quit paying the fees. After you’ve started your own website, feel free to leave your Etsy store (or other marketplace) open with a limited number of products to help drive traffic to your website. This idea may seem overwhelming at first, but remember to start small and take it one step at a time.

    The first step to selling your handmade items is setting some goals for your new business, so read on.