Category: Uncategorized

  • 10 Characters in the Public Domain for Crafters to Use Freely

    Earlier in the week, I touched on using famous quotes in products you sell. If you remember, I talked about being able to use things that are in the public domain. Today, I’m giving you a list of things that are in the public domain.

    Sometimes with all this copyright and trademark information I share, it makes me feel like a ‘Debbie Downer’. So often, I highlight things that you can’t make or use without I often share information

    What Does Public Domain Mean?

    Before we get any further, let’s talk about the public domain. Things that are in the public domain are texts, photos, designs, and more where the copyright has expired or forfeited. This means that anyone in the public (you included!) can use the

  • Facebook Groups:

    Facebook is dynamic and ever changing. Lately, it seems they are putting effort into making Facebook Groups more meaningful places to interact with others.

    This is important: Starting last week, Facebook is removing inactive members from Facebook Groups. Why is this important to Silhouette and Cricut small business owners? If you’ve got a Facebook Group for your Silhouette or Cricut small business, it’s

    Personally, if you don’t have a Facebook Group for your Silhouette or Cricut small business, now is a good time to start one.

  • Tutorial: How to Create Custom 3D Christmas Ornaments with Silhouette Alta

    I don’t know about you, but the last few months I have been having a blast with my Silhouette Alta! I went from never even seeing a 3D printer in person to being pretty proficient using my Alta.

    Today I’m showing you how I designed and created a custom 3D printed ornament. I’ve broken it down step by step.

    Note: This tutorial uses Silhouette Studio Business Edition and Silhouette 3D.

    How to Create Custom 3D Christmas Ornaments with the Silhouette Alta

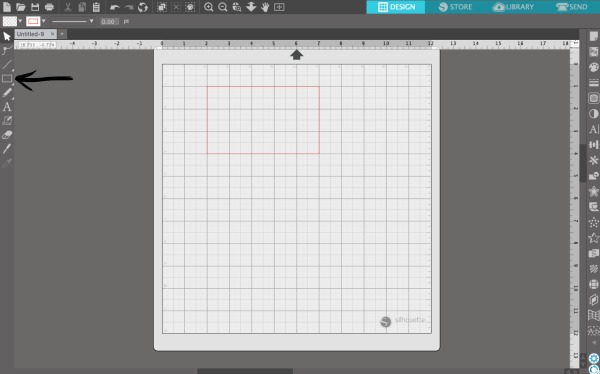
    1. Open Silhouette Studio and open a new blank mat. Draw a rectangle using the drawing tools. I sized mine at 5 inches by 3 inches. Tutorial: How to Create Custom 3D Christmas Ornaments with Silhouette Alta - by cuttingforbusiness.com
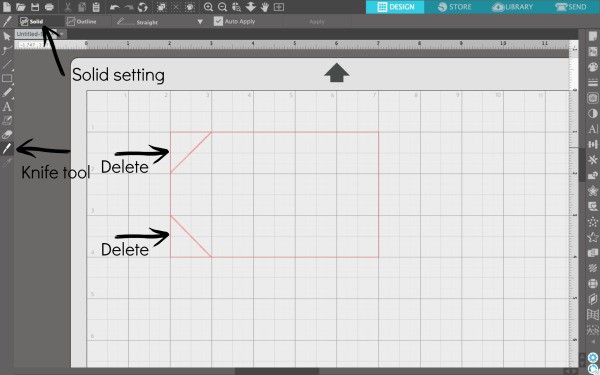
    2. Next, we need to make the rectangle look like a gift tag. Using the knife tool, slice off the two left corners. You’ll want to be sure that your knife setting is ‘Solid’. You can delete the triangle pieces. Tutorial: How to Create Custom 3D Christmas Ornaments with Silhouette Alta - by cuttingforbusiness.com
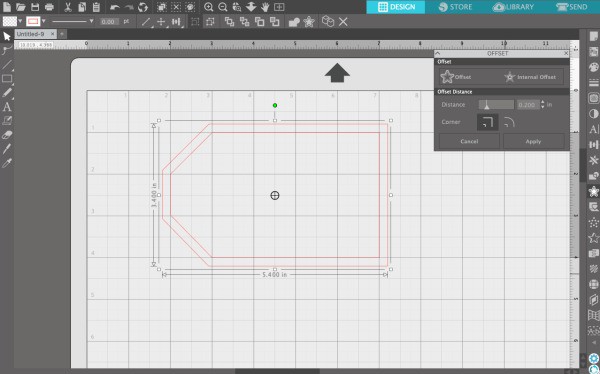
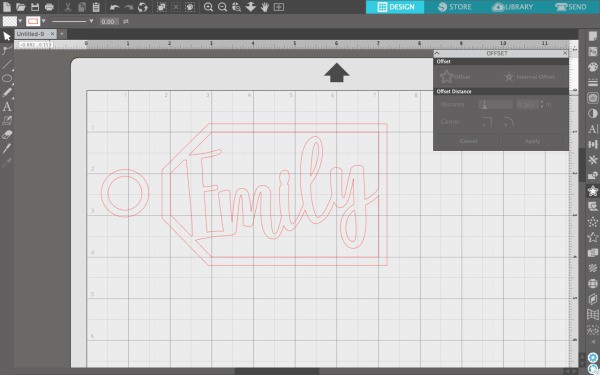
    3. Now, offset the tag shape you’ve created. I used an offset of 2.0, with sharp corners as seen in the screenshot below. Tutorial: How to Create Custom 3D Christmas Ornaments with Silhouette Alta - by cuttingforbusiness.com
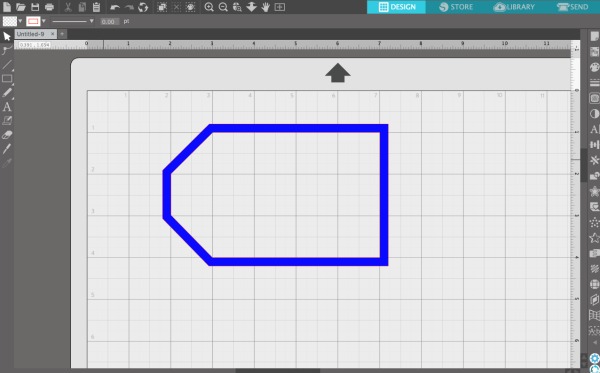
    4. Right now, the shape is solid. We are going to want to make it hollow. Select both tag shapes, then navigate to ‘Object’, ‘Modify’, ‘Subtract’. Our tag is now hollow. If you want to check this, fill the tag with color as I have in the below screenshot. Tutorial: How to Create Custom 3D Christmas Ornaments with Silhouette Alta - by cuttingforbusiness.com
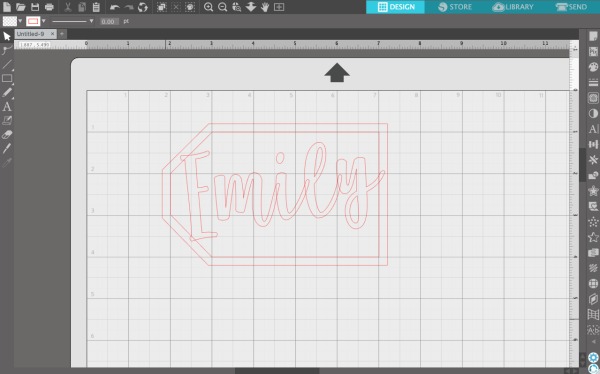
    5. Let’s personalize the ornament. Using a font of your choice, add a name inside the tag. I used this fontTutorial: How to Create Custom 3D Christmas Ornaments with Silhouette Alta - by cuttingforbusiness.com
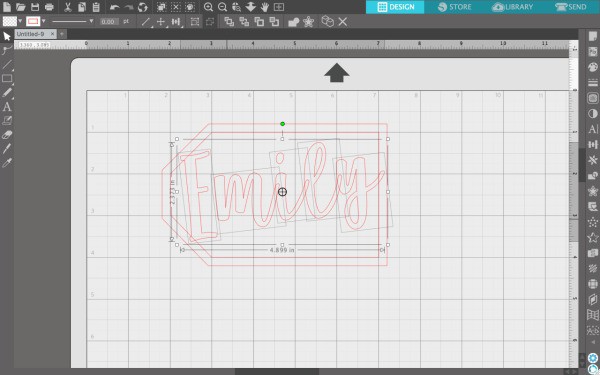
    6. Now, we need to make sure that all of the portions of the name touch each other. Right click on the name and select ‘Ungroup’. All of your letters will become separate. Tutorial: How to Create Custom 3D Christmas Ornaments with Silhouette Alta - by cuttingforbusiness.com
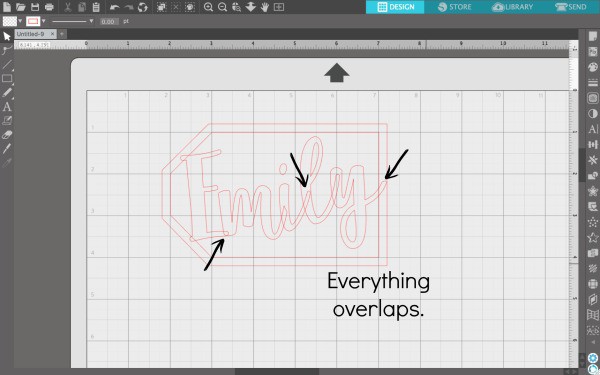
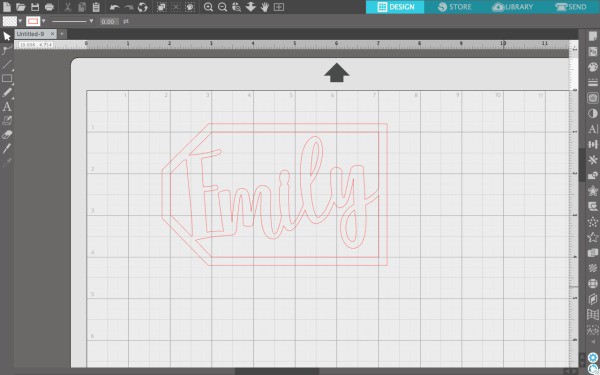
    7. Drag around the letters to make them all overlap each other. This ensures that when we print it, it is a one piece product. Be sure to overlap the letters onto the tag, too.Tutorial: How to Create Custom 3D Christmas Ornaments with Silhouette Alta - by cuttingforbusiness.com
    8. Extra step: If you have letters with loose ‘pieces’ like the dot of the ‘i’ – there’s one more step you’ll need to do. Right click the letter and select ‘Release compound path’. This separates the ‘i’ and the dot. Move the dot so that it overlaps. Tutorial: How to Create Custom 3D Christmas Ornaments with Silhouette Alta - by cuttingforbusiness.com
    9. Navigate to ‘Edit’, then ‘Select All’. Right click and select, ‘Weld’. The ornament will become one piece. Tutorial: How to Create Custom 3D Christmas Ornaments with Silhouette Alta - by cuttingforbusiness.com
    10. One final step: Add a ring to hang the ornament from. Draw a circle and offset it like we did in step 3. Tutorial: How to Create Custom 3D Christmas Ornaments with Silhouette Alta - by cuttingforbusiness.com
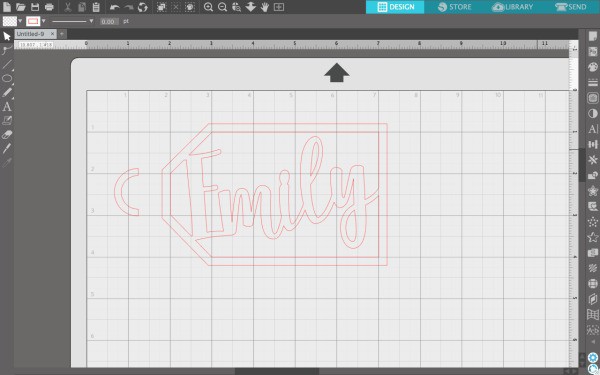
    11. Subtract the inner circle from the outer (as we did in step 4). Then, slice it in half and delete the right half. Tutorial: How to Create Custom 3D Christmas Ornaments with Silhouette Alta - by cuttingforbusiness.com
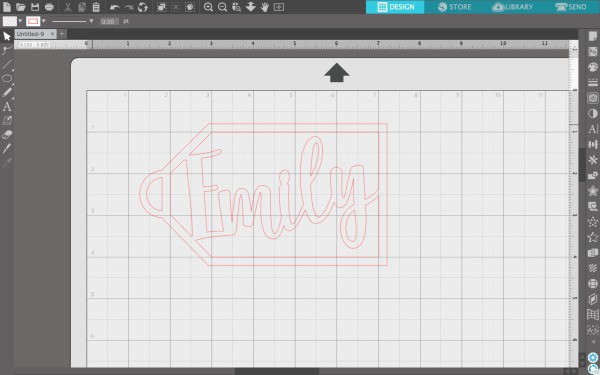
    12. Last, move your half circle over the tag and weld them together (as we did in step 9). Tutorial: How to Create Custom 3D Christmas Ornaments with Silhouette Alta - by cuttingforbusiness.com
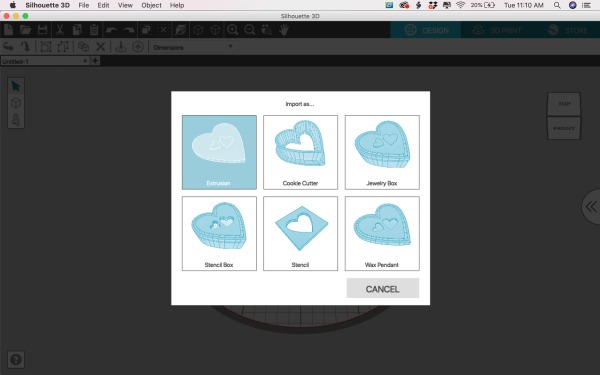
    13. Save the design to your hard drive. Now, open Silhouette 3D. You’ll import your design as an ‘Extrusion’. Tutorial: How to Create Custom 3D Christmas Ornaments with Silhouette Alta - by cuttingforbusiness.com
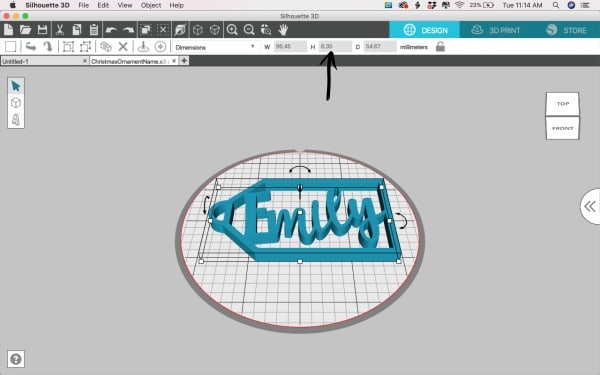
    14. Adjust the height of your ornament. I chose 0.25 inches – which translates to 6.35 mm. Adjust the size of your ornament if needed.Tutorial: How to Create Custom 3D Christmas Ornaments with Silhouette Alta - by cuttingforbusiness.com
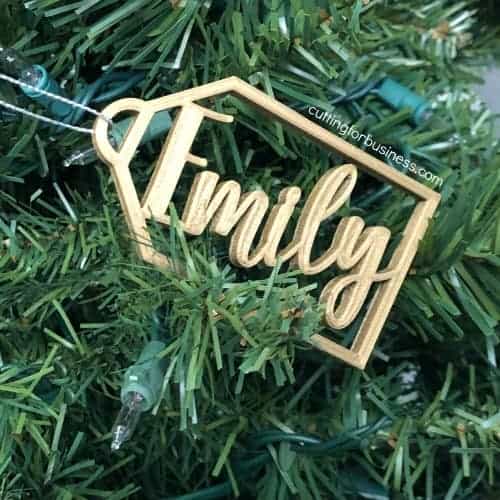
    15. That’s it! Print it! I used this bronze PLA filament I picked up on Amazon a few months ago. I did not sand or do anything to finish the final ornament.

    Tutorial: How to Create Custom 3D Christmas Ornaments with Silhouette Alta - by cuttingforbusiness.com

    I couldn’t be happier with the finished product. Now, I’ve just got three more kids to make ornaments for!

    Looking for more about the Silhouette Alta? Click here.

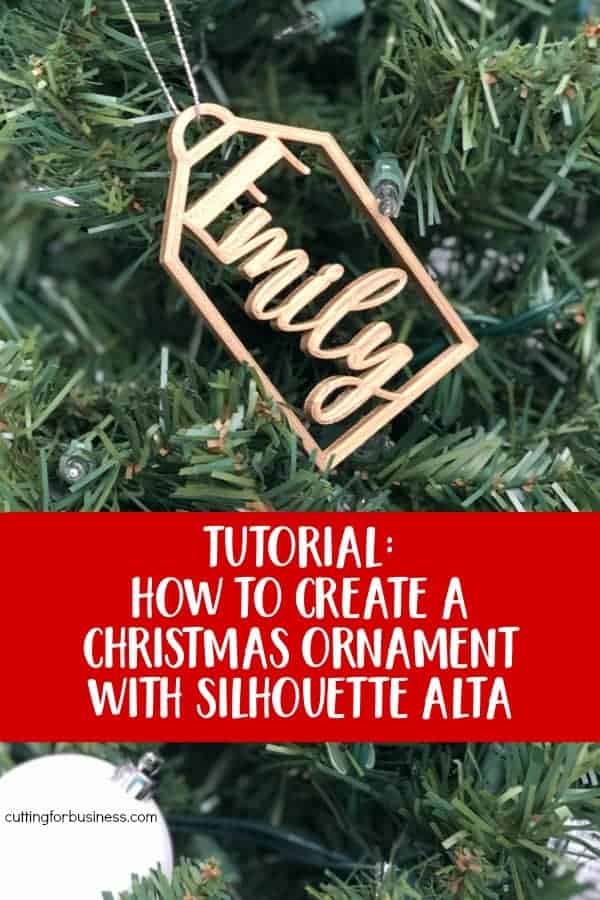
    Did you enjoy this tutorial? Save the image below to Pinterest.

    Tutorial: How to Create Personalized, Custom 3D Christmas Ornaments with Silhouette Alta

  • Retiring Forever: The Ultimate Cancer SVG Cut File Bundle

    Retired Content: This bundle has been retired. My family and I thank you again for the tremendous support of everyone during our time in need. It makes me proud of the Cutting for Business community I have built over the years.


    “No evidence of disease.” On Monday, these powerful words were shared with Will by his oncology team. 615 days ago, when my husband was diagnosed with Stage 4 Diffuse Large B Cell Non Hodgkins Lymphoma we didn’t know if we’d ever hear these words. But now, Will is cancer free.

    It’s time to retire The Ultimate Cancer SVG Bundle. And, what better way to retire it than send 100% of the remaining proceeds to the Leukemia and Lymphoma Society? The Ultimate Cancer Bundle will be available on the Cutting for Business blog until February 29th. After that, it’ll be gone forever – hopefully just like Will’s cancer.

    What’s Included in The Ultimate Cancer Bundle:

    • 21 different original SVG cut files for Silhouette or Cricut.
    • A font key which includes links to each font used in the designs.
    • Commercial use, meaning you can sell products made with a designs.

    Click here to purchase The Ultimate Cancer SVG Bundle for $10.
    The bundle will arrive in your email immediately after payment has been made.

    Making a Difference

    • 100% of the proceeds from each bundle sale ($10 total) will be donated to the Leukemia and Lymphoma Society. This organization was invaluable to us in giving us more information about the disease and treatments.

    Click here to purchase The Ultimate Cancer SVG Bundle for $10.
    The bundle will arrive in your email immediately after payment has been made.

    Here’s the really mushy part: Thank you. I am forever indebted to all the loyal and generous Cutting for Business readers that sent their prayers and well wishes. Some helped set up meal trains for our family, some sent greeting cards, gift cards, and handmade gifts; while others lent their time and talents to make sure Cutting for Business remained online. If you’ve got a second today, please also visit these sites run by truly amazing women:

    • Terri Johnson of Terri Johnson Creates. Thank you for picking up the phone. I doubt you even heard the words I was saying through my tears, but it meant the world to me. Thanks for the endless support online, through texts, and emails. I love you.
    • EllyMae Habets of Silhouette Secrets+. Thank you for sharing so many of my posts and sending so many cards. After the Montana post card, we’ve added Montana to our list of places to visit with the kids.
    • Karen Kroupa of Seaver Brook Designs. Thank you for loving and supporting us. Thank you for watching my social media and cooking us yummy food.
    Retiring Forever: The Ultimate Cancer SVG Cut File Bundle - Silhouette Cameo and Portrait or Cricut Explore or Maker - by cuttingforbusiness.com
  • How to Run a Mystery Subscription Box Using Your Silhouette or Cricut

    There’s one thing that is certain about small business: uniqueness and originality sell. Today, I wanted to share some ideas I have about running a mystery box subscription service using your Silhouette or Cricut. This is an idea I’ve had in my head for many months, and I’ve finally gotten around to putting it in action.

    Before we get started, my storyline is cheesy. For that, I’m sorry. I am not a fiction writer, but I am an experienced escape room player and I’ve been to several mystery dinner theaters. Oh yeah, we’ve done several of the Mysterious Package Company experiences.

    How to Create a Mystery Box Subscription Service Using Your Silhouette or Cricut

    The way I see this working is that customers sign up one month in advance of receiving their first box so you’ll know how many “boxes” you’ll need to create.

    Customers actually won’t receive a single box, they will receive five boxes/envelopes throughout the month, about one per week. Each shipment to customers will reveal a little bit more about the case. The fifth and last envelope will reveal the solution to the case.

    Here is the sample case I put together and will mail to a friend of mine:

    The Story: Characters, and Plot

    The premise of the story is that a retired local detective has obtained permission to reopen some cold cases from decades ago and is asking for the public’s help in solving the cases. Since the current case took place near your address, you are being asked to help out.

    Envelope 1

    A letter from the detective introducing himself, explaining what he’s doing, and asking for your assistance and cooperation throughout the process. A photo of a male murder victim is enclosed.

    Envelope 2

    Evidence: Diary pages of the victim’s wife, detailing life in the time before her husband was found brutally murdered. A copy of a life insurance policy of the victim. List of belongings in the room when when detectives originall

    (At this point, people will likely think that the victim was killed by his wife so that she could collect on his life insurance policy. Hello!? This is an unsolved case from decades ago! It’s not that simple!)

    Envelope 3

    Receipt from charity donation of entire life insurance settlement.

  • The GDPR and Your Etsy Shop: How to Make it Compliant

    Remember that super important post about the GDPR that I urged everyone to read recently on Cutting for Business? If you didn’t read it yet, grab some coffee and head here. Today I’ve got great news: Etsy has made it easy to comply with GDPR regulations that take effect May 25, 2018.

    How to Make Your Etsy Shop GDPR Compliant

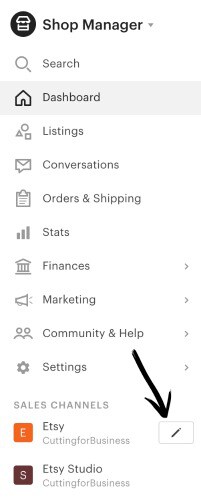
    1. Log into your Etsy shop and navigate to your ‘Shop Manager’. Then, scroll down the left hand menu until and click the pencil icon next to your Etsy shop. The GDPR and Your Etsy Shop: How to Make it Compliant - by cuttingforbusiness.com
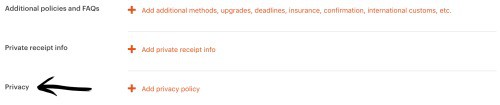
    2. Scroll down until you reach the recently added section, Privacy Policy. The GDPR and Your Etsy Shop: How to Make it Compliant - by cuttingforbusiness.com
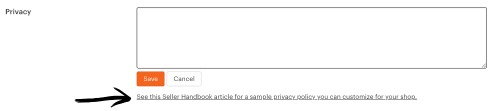
    3. Click the plus sign to add your privacy policy. You can include anything you’d like, but here is what Etsy says you must include, according to the GDPR guidelines (paraphrased by me):
    • the personal information you collect;
    • the legal bases you rely on to collect, use, and share personal information;
    • the third parties with whom you share personal information (for example, Google Analytics);
    • the length of time you keep the personal information;
    • if you are transferring personal information outside of Europe, and how the transfer will be handled;
    • your buyers’ rights regarding the use of their personal information; and
    • how your buyers can contact you with privacy-related requests.

    The GDPR and Your Etsy Shop: How to Make it Compliant - by cuttingforbusiness.com

    After writing your Privacy Policy for Etsy, be sure that you save it. Your new Privacy Policy will appear on your main shop page under Privacy Policy. Here’s a look at mine live on Etsy (scroll down to the ‘Policies’ section).

    Etsy’s Example Privacy Policy

    Etsy has an example of a good Privacy Policy at this link. You could copy and paste it as Etsy suggests, then alter it to fit your needs. For my Etsy shop, I copied and pasted and altered the sample Privacy Policy Etsy provided. Here is the text of my Privacy Policy on Etsy:

    “This Privacy Policy describes how and when I collect, use, and share information when you purchase an item from me, contact me, or otherwise use my services through Etsy.com or its related sites and services.

    This Privacy Policy does not apply to the practices of third parties that I do not own or control, including Etsy or any third party services you access through Etsy. You can reference the Etsy Privacy Policy to learn more about its privacy practices.

    Information I Collect

    To fulfill your order, you must provide me with certain information (which you authorized Etsy to provide to me), such as your name, email address, mailing address, payment information, and the details of the product that you’re ordering. You may also choose to provide me with additional personal information (for a custom order, for example), if you contact me directly.
    Why I Need Your Information and How I Use It

    I rely on a number of legal bases to collect, use, and share your information, including:
    • as needed to provide my services, such as when I use your information to fulfill your order, to settle disputes, or to provide customer support;
    • when you have provided your affirmative consent, which you may revoke at any time, such as by signing up for my mailing list;
    • if necessary to comply with a legal obligation or court order or in connection with a legal claim, such as retaining information about your purchases if required by tax law; and
    • as necessary for the purpose of my legitimate interests, if those legitimate interests are not overridden by your rights or interests, such as 1) Providing and improving my services. I use your information to provide the services you requested and in my legitimate interest to improve my services; and 2) Compliance with the Etsy Seller Policy and Terms of Use. I use your information as necessary to comply with my obligations under the Etsy Seller Policy and Terms of Use.

    Information Sharing and Disclosure

    Information about my customers is important to my business. I share your personal information for very limited reasons and in limited circumstances, as follows:
    • Etsy. I share information with Etsy as necessary to provide you my services and comply with my obligations under both the Etsy Seller Policy and Etsy Terms of Use.
    • Service providers. I engage certain trusted third parties to perform functions and provide services to my shop, such as delivery companies. I will share your personal information with these third parties, but only to the extent necessary to perform these services.
    • Business transfers. If I sell or merge my business, I may disclose your information as part of that transaction, only to the extent permitted by law.
    • Compliance with laws. I may collect, use, retain, and share your information if I have a good faith belief that it is reasonably necessary to: (a) respond to legal process or to government requests; (b) enforce my agreements, terms and policies; (c) prevent, investigate, and address fraud and other illegal activity, security, or technical issues; or (d) protect the rights, property, and safety of my customers, or others.

    How Long I Store Your Information

    I retain your personal information only for as long as necessary to provide you with my services and as described in my Privacy Policy. However, I may also be required to retain this information to comply with my legal and regulatory obligations, to resolve disputes, and to enforce my agreements. I generally keep your data for the following time period: 7 years.
    Transfers of Personal Information Outside the EU

    I may store and process your information through third-party hosting services in the US and other jurisdictions. As a result, I may transfer your personal information to a jurisdiction with different data protection and government surveillance laws than your jurisdiction. If I am deemed to transfer information about you outside of the EU, I rely on Privacy Shield as the legal basis for the transfer, as Google Cloud is Privacy Shield certified.

    Your Rights

    If you reside in certain territories, including the EU, you have a number of rights in relation to your personal information. While some of these rights apply generally, certain rights apply only in certain limited cases. I describe these rights below:
    • Access. You may have the right to access and receive a copy of the personal information I hold about you by contacting me using the contact information below.
    • Change, restrict, delete. You may also have rights to change, restrict my use of, or delete your personal information. Absent exceptional circumstances (like where I am required to store data for legal reasons) I will generally delete your personal information upon request.
    • Object. You can object to (i) my processing of some of your information based on my legitimate interests and (ii) receiving marketing messages from me after providing your express consent to receive them. In such cases, I will delete your personal information unless I have compelling and legitimate grounds to continue using that information or if it is needed for legal reasons.
    • Complain. If you reside in the EU and wish to raise a concern about my use of your information (and without prejudice to any other rights you may have), you have the right to do so with your local data protection authority.

    How to Contact Me

    For purposes of EU data protection law, I, Christine Schinagl, am the data controller of your personal information. If you have any questions or concerns, you may contact me at christine@cuttingforbusiness.com.”

    Quick Things to Remember

    • Filling in your Privacy Policy on Etsy makes your Etsy shop GDPR compliant, as long as all the GDPR required information is included in your Privacy Policy.
    • You’ll still have to make your mailing list and stand alone website GDPR compliant, as well as your presence on other marketplaces.

    Together, we will get through this. Remember, even if you are not located in the EU, the GDPR likely still applies to you. Again, be sure to read my previous post on it at this link.

    Was this article helpful? Share the image below on Pinterest.

    The GDPR and Your Etsy Shop: How to Make it Compliant - A must read for craft business owners who sell on Etsy - by cuttingforbusiness.com

  • FAQ: Silhouette Alta – What Is It and What Can It Do?

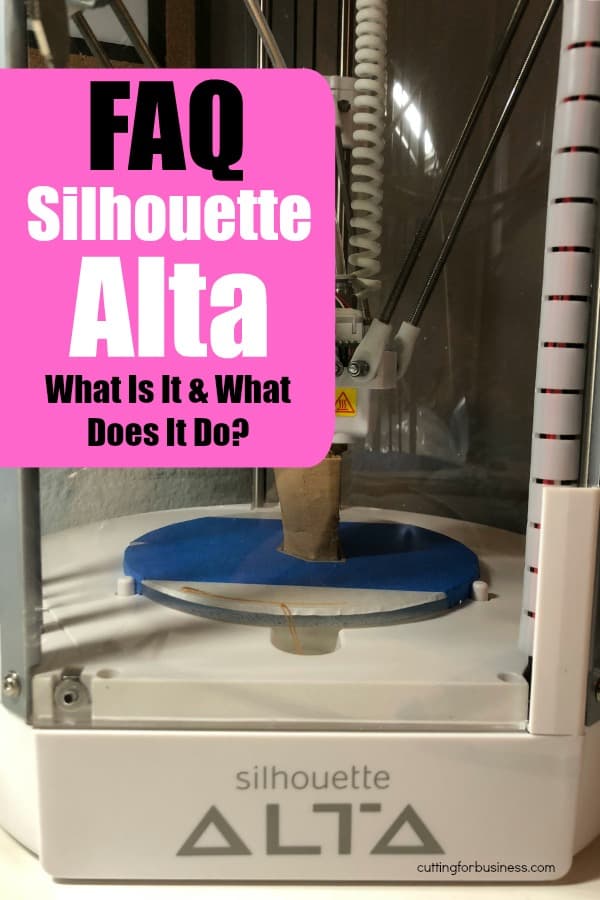
    Earlier this summer, Silhouette released the Silhouette Alta. In contrast with the Portrait, Cameo, and Curio, this machine doesn’t cut materials. Instead, it is a 3D printer that prints designs. Today, I’ll go over some basic information about the machine. Later in the week, I will share some tidbits of information I’ve discovered while using my Silhouette Alta, ideas about things to print, how to price your 3D printed designs, and a list of places to find free 3D print files.

    FAQ: Silhouette Alta

    Q: How much does it cost?
    A: The Silhouette Alta retails for $299.99 as of August, 2018. You can purchase it at this link on Amazon or through Swing Design at this link.

    Q: How does the machine work?
    A: The Silhouette Alta heats up and melts the PLA filament. It prints your 3D model from the bottom up in very thin layers.

    Q: How big is it?
    A: The Silhouette Alta measures 19 inches by 10 inches by 9 inches.

    Q: What material does it use?
    A: The Silhouette Alta uses a common plastic called PLA filament. PLA filament is biodegradable and BPA free. Silhouette offers white label PLA in seven colors: black, blue, red, green, yellow, pink, and white that you can purchase at this link.

    Q: Can you use other filament that is not Silhouette brand?
    A: Yes. You can use any 1.75 inch PLA filament. I’ve tested this multipack that includes bronze, marble, gold, and wood, and have had great results with all four PLA filaments. (It also includes a sample pack of color changing PLA!)

    Q: How large can it print?
    A: The Silhouette Alta can print up to 4.7 inches tall and 4.2 inches wide.

    Q: What are the computer requirements?
    A: You’ll need at least Windows 10 or Mac 10.8 and 4GB of free space on your hard drive.

    Q: How hard is it to use?
    A: I was surprised when I set up my Silhouette Alta that it is pretty much plug and play. The machine comes prebuilt (unlike many 3D printers) and leveled. Once you upload or create a design, you load the PLA filament and click the ‘Print’ button. The Silhouette Alta then prints your design.

    Q: How do you set it up anyway?
    A: There’s no need for anyone to recreate a setup tutorial. Silhouette offers one at this link.

    Q: What about the software?
    A: The software, Silhouette 3D, is offered free. If you’d like to try it before you buy it, download it (free!) at this link.

    Q: Can you design in the software?
    A: Currently, the software is limited in what you can do with it. It is also glitchy and shuts down often. Unfortunately, this is pretty common with any new electronic device/software when it is first debuted. To use my own designs with the Silhouette Alta, I’ve been first creating them in Silhouette Studio, then using Silhouette 3D to print it. That’s one awesome thing about Silhouette 3D – it will convert .studio files to a 3D version. I expect that over the coming months and years that the software will improve. I still remember those days when Silhouette Studio was pretty basic!

    Q: What kind of files can you use?
    A: The Silhouette Alta/Silhouette 3D accepts .STL, .OBJ, and .S3D file formats.

    Q: Can you use other software with the Silhouette Alta?
    A: Yes. You can use other popular 3D modeling software and save it as a compatible file. Then, open it in Silhouette 3D and print it on the Alta.

    Still want more information about the Silhouette Alta? Check back tomorrow when I share a list of tips I’ve learned so far using the Silhouette Alta.

    Love this post? Share it!
    FAQ: Silhouette Alta - What Is It and What Can It Do? - by cuttingforbusiness.com

  • 25+ Things to Print with a Silhouette Alta

    Getting excited about the new Silhouette Alta? If you’ve been following along all week, I’ve given you a FAQ about the Alta and things I wish I knew about it. Now, let’s look at some ideas to get you started with 3D printing.

    25+ Things to Print with a Silhouette Alta

    • Jewelry – From earrings and necklaces to charms and rings, the lightweight nature of PLA lends itself well to jewelry making.
    • Beads – While we are talking jewelry making, don’t forget you can make your own beads if you like stringing projects.
    • Headbands – Again, the lightweight material makes for great headbands.
    • Keychains – Keychains are easy enough for a first project.
    • Magnets – Like keychains, magnets are good beginner projects.
    • Cookie cutters/Stamps – The Silhouette 3D program even has a setting for cookie cutters!
    • Scrapbook/Hair bow embellishments – Can’t find the flat back piece you need? Print a custom one.
    • 3D Flowers – Move over rolled flowers, there’s a new flower in town and it is 3D printed!
    • Stamps – Grab a stamp pad and print out some custom reusable stamps. You can easily glue them to a block of wood. Or, if you’ve got a Silhouette Mint, use this link to make more stamp blocks!
    • Leather stamps – If you work with leather, try printing your own leather stamps.
    • Texture plates for embossing and clay – Nothing better than having the ability to print any pattern you want.
    • Reusable stencils – I’m a child of the 1980’s and loved my stencils and colored pencils. I may whip up a few for my kids (and reminisce the whole time they print)!
    • Board game pieces – Love making custom game boards with your Portrait or Cameo? Now you can make custom board game pieces.
    • 3D names – From desk decor to place cards, 3D printed names are perfect for those who like to customize. Don’t stop with names, you can create 3D monograms, too!
    • Cupcake and cake toppers – While paper based cupcake and cake toppers are popular, 3D printed ones might hold up better.
    • Figurines – Be sure to avoid trademark and copyright infringement if you plan to sell them.
    • Molds – If you like to work with clay, resin, or soap, you could print your own molds.
    • Containers – Need a container to hold your vitamins, safety pins, staples, or more? Use the Silhouette Alta.
    • Miniatures – Love crafting miniature goods? Love furnishing dollhouses? The Silhouette Alta will be invaluable to you!
    • Christmas ornaments – Making customized Christmas ornaments is pretty easy with a 3D printer.
    • Bookmarks – Love to read? Make your own bookmarks.
    • Decor – I’ve already got a stash of decor items I can’t wait to print. From a desk organizer to some light switch covers, there’s a million projects.
    • Vases – There are so many different vases available online for 3D printers, I almost feel obligated to print one.
    • Bookends – Lightweight decorative bookends are possible with the Alta.
    • Phone and tablet stands – Need a holder for your device? 3D print it!
    • Replacement hardware and pieces – Something break around your house? Fix it with a custom printed 3D replacement.
    • Tools – Need a certain size tool and can’t use what you have? 3D print yourself what you need, whenever you need it!
    • Large models – You could conquer a large model if you broke each piece down into smaller pieces. Then, snap or glue them together after you print them. Everything from houses and people to castles and planes would be possible.

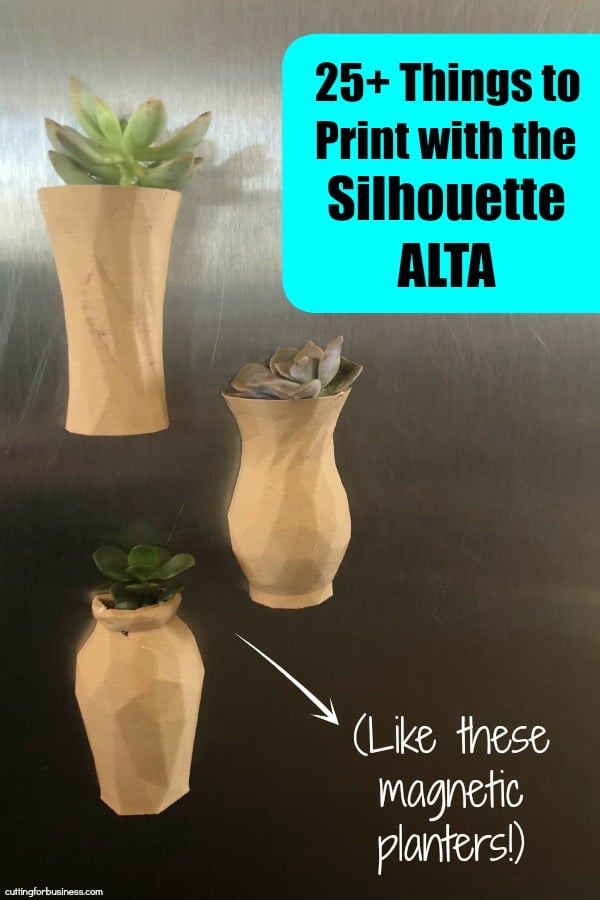
    My most recent 3D print was this set of 3 half vases. I used this wood like PLA filament. After they printed, I attached these round magnets to the back using E6000 glue. Now, they are home to live succulents and hang on my refrigerator.

    Love these ideas? Save the image below to Pinterest!

    25+ Things to Print with a Silhouette Alta - 3D Printer - by cuttingforbusiness.com

  • 15 Places to Find Free (and Cheap!) Files for Silhouette Alta

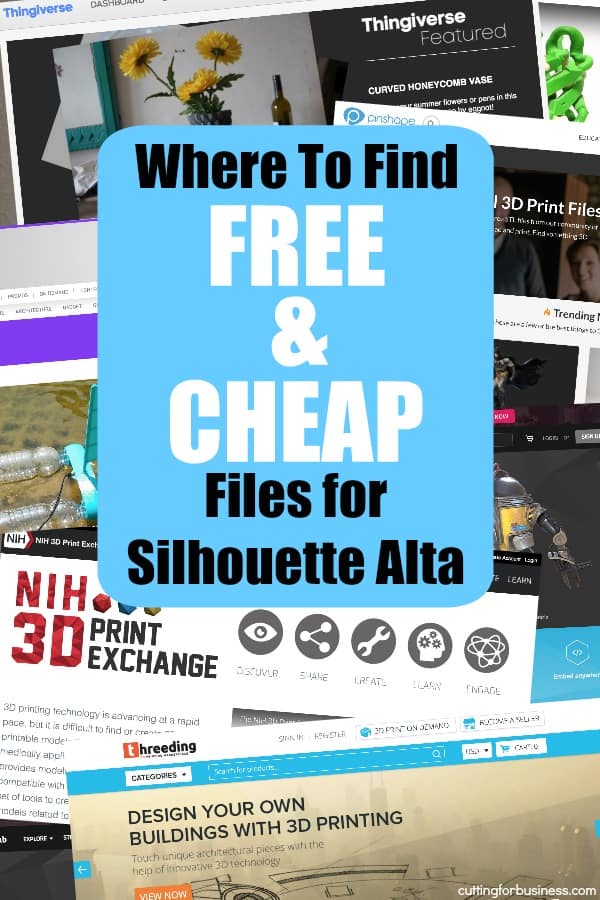
    Ready to start using your Silhouette Alta? First, don’t forget that your purchase comes with a $25 credit to the Silhouette Design Store. Next, I’ve scoured the internet for websites where you can download .STL files to print on your Silhouette Alta.

    15 Places to Find Free (and Cheap!) Files for Silhouette Alta

    Search Engines for 3D Files

    The sites above are websites and marketplaces that offer 3D files for free and purchase. There are also a few search engines that will search the sites above, forums, and other places on the internet. They are helpful if you are looking for a specific type of design instead of browsing. They are:

    Just a gentle reminder: Be sure to read the licensing information included with any file you download on the internet. Similarly to cut files and fonts, 3D files are available for personal use and commercial use. (Need a refresher on the difference? See this post.)

    That’s it! Thanks for sticking with me all week long during my unofficial ‘Alta Week’! I’m excited to watch crafters push the limits of the Silhouette Alta to see what it can do.

    Why not share this post with another 3D crafter?

    15 Places to Find Free (and Cheap!) Files for Silhouette Alta - 3D Printer - 3D Printing - by cuttingforbusiness.com

  • How to Price 3D Printed Designs

    Thinking of selling designs you’ve printed with your Silhouette Alta? Awesome! But first, you’ll need to learn how to price your printed design. Let’s take a look at it today.

    How to Price 3D Printed Designs

    Unlike pricing other handmade goods, you’ll need a scale to price your 3D printed designs. Why? PLA filament is bought by weight, not by foot or inches.

    Here’s the formula that you’d use to find out how much your 3D design cost you in materials:

    (Cost of PLA spool) divided by (Weight of the spool) = (Material cost of PLA) multiplied by (1000 to convert to grams if needed*) = Material cost of PLA in grams
    *You must figure the weight of the spool in the same measurement as you weigh your finished 3D design. If you weigh your design in kilograms, there’s no need to convert to grams. If your finished product weighs less than a kilogram, you must convert to grams.

    then,

    (Material cost of PLA) multiplied by (Weight of your 3D Design) = Material cost of finished printed design

    then,

    (Material cost of finished printed design) + (Cost of your time to design, electricity used, packaging materials, and so on) = Total Costs

    and finally, 

    (Total Costs) x 2 = Wholesale Price
    (Wholesale Price) x 2 = Retail Price

    An Example

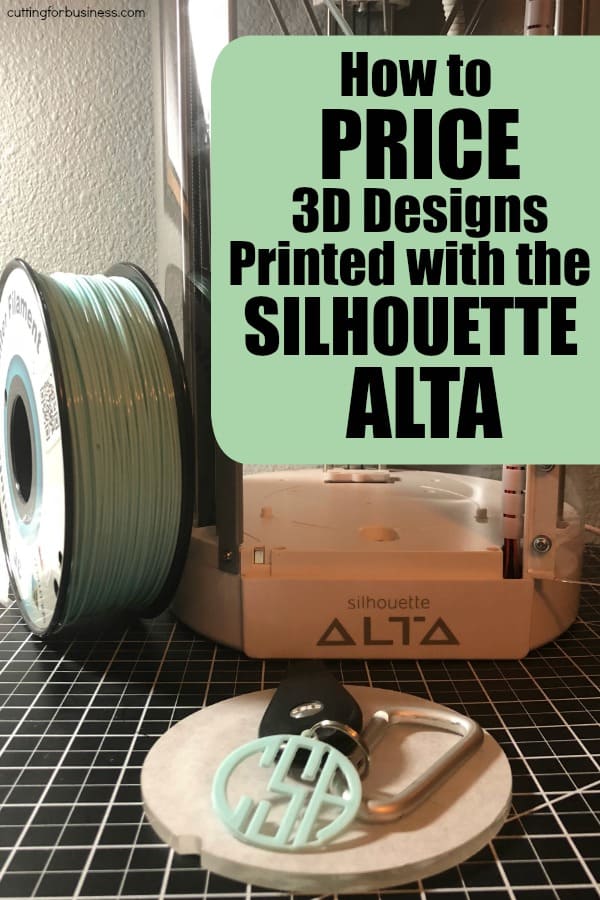
    I recently purchased this (gorgeous!) Mint PLA filament. It cost $17.99 for 1 kilogram of material. Let’s pop those numbers into the formula above:

    ($17.99) divided by (1 kilogram) = $17.99 per kilogram. However, my printed design is quite small, so we must convert this to grams. There are 1000 grams per kilogram. So, $17.99 divided by 1000 is 0.01799. In dollars this works out to $0.02 per gram (rounded).

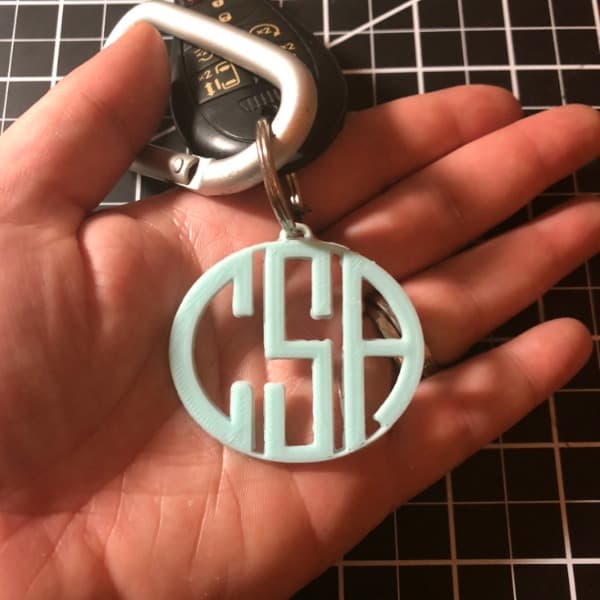
    Then, I printed this 3D monogram keychain. How to Price 3D Printed Designs with Silhouette Alta - 3D Printer - 3D Printed - by cuttingforbusiness.com

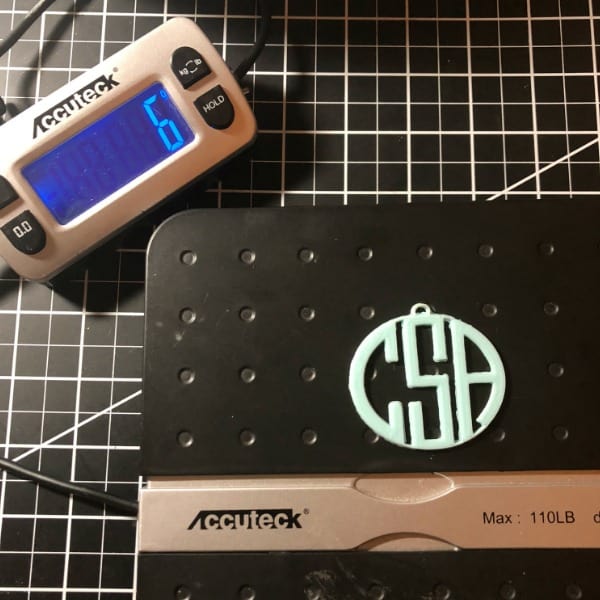
    It weighs 6 grams using my Accuteck scale.How to Price 3D Printed Designs with Silhouette Alta - 3D Printer - 3D Printed - by cuttingforbusiness.comTo put those numbers into the formula above:
    ($0.02) multiplied by (6) = $0.12 in material costs.

    Now, $0.12 is the cost of your PLA materials. It doesn’t take into account your design and print time, consumable materials (like tape), electricity used, packaging materials, shipping and selling fees, and so on.

    Let’s give those numbers a value:

    • Design time and checking in on the machine: 10 minutes at $10 an hour ($1.70 rounded)
    • Consumables: Packaging materials, tape, and electricity would be less than $1.
    • To simplify the example, I have no shipping or selling fees as I’m selling it locally.

    Then, I add those together and I get $2.82. That gives me a wholesale price of $5.64 and a retail price of $11.28.

    Could I sell a customized monogram keychain for $11.28? Absolutely!

    Shapeways

    If you are interested in selling 3D printed designs but don’t have a Silhouette Alta, or the Alta isn’t large enough for a design you have to do, I urge you to look into Shapeways. Shapeways is well known company that you can outsource your 3D designs to. Find them at shapeways.com.

    Was this post helpful? If so, save it to Pinterest.

    How to Price 3D Printed Designs with Silhouette Alta - 3D Printer - 3D Printed - by cuttingforbusiness.com