Blog

  • Why Your Craft Business Needs Multiple Streams of Income & How to Do It

    I’m sure you’ve heard the phrase, multiple streams of income before. Lots of business people throw it around on blogs, articles, and podcasts. If you haven’t, picture an octopus in your head with eight different tentacles. At the end of each tentacle, imagine one way that your small business earns money. This is what is meant by multiple streams of income.
    Why Your Craft Business Needs Multiple Streams of Income & How to Do It - cuttingforbusiness.com

    Why Do You Want Multiple Streams of Income?

    The concept behind multiple streams of income is awesome – create as many streams of income in your small business as you can. If one stream has a slow day, week, or month; the other revenue streams will continue making money. The term multiple streams of income goes hand in hand with the old saying, “Don’t put all your eggs in one basket”.

    How Do You Set Up Multiple Streams of Income in Your Craft Business?

    This is great and all – but what the business experts don’t tell you is HOW. How can you create multiple streams of income in your craft business? Let’s take a look at three different craft businesses and how they are arranged to have multiple streams of income.

    Example 1: Handmade Seller – Physical Products

    • Business Information: This seller does handmade vinyl work including cups, tumblers, tee shirts, and decals.
    • Number of Streams of Income: 5
      • Sells through stand alone website.
      • Sells products through an Etsy shop.
      • Sells products through a Facebook page and group.
      • Sells wholesale shirts through a local boutique in her home town.
      • Sells at craft shows and events throughout the year; attending at least one show a month.

    Example 2: Handmade Seller – Digital Products

    • Business Information: This seller sells digital cut files.
    • Number of Streams of Income: 6
      • Sells digital cut files through a stand alone website.
      • Sells (the same) digital cut files through Etsy.
      • Sells (the same) digital cut files through Creative Market.
      • Sells digital bundles through font and design bundling websites like Design Bundles.
      • Writes a weekly tutorial on her website using her designs with supplies that can be purchased on Amazon. Earns money through the affiliate program every time someone purchases supplies. (Learn more about affiliate programs.)
      • Earns money passively through ads on her website. (Learn more about passive income passive income.)

    Example 3: Silhouette or Cricut Instructor

    • Business Information: This seller teaches new Silhouette or Cricut owners how to use their machine.
    • Number of Streams of Income: 6
      • Earns money from one-on-one classes in her area.
      • Earns money from group classes in her area.
      • Offers videos on a YouTube channel, which makes passive income.
      • Sells project kits at the end of each group class she teaches.
      • Sell project kits online through a stand alone website.
      • Attends craft shows to sell seasonal items, but talks to customers about classes during the show.

    Before you get out there and starting selling everywhere, know that you’ll need to be able to keep up with each income stream as you add it. First, create a plan. Then, put your plan into action.
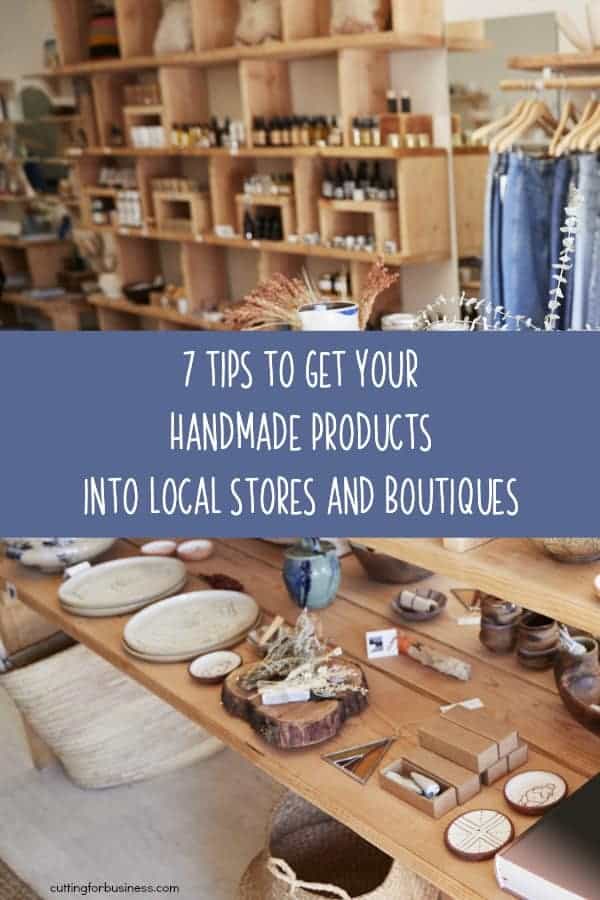
  • 7 Tips to Get Your Handmade Products into Local Stores and Boutiques

    Ready to expand your Silhouette or Cricut small business? Why not put your handmade products into local shops and boutiques in your area? While it may sound like a daunting task, it isn’t that difficult. Today, I’m sharing seven tips to help you get your products into locally owned shops.

    7 Tips to Get Your Handmade Products into Local Stores & Boutiques

    1. Do research before you contact any shops or stores. Take an afternoon and drive around your local area. Make a list of shops in the area. Go inside the shops as a shopper. Take notes on the condition of the store, the products they offer, the pricing, and how the employees respond to you. Ask yourself: “Would my products be a good fit in this store?” When you return home, dig around on the internet for more information about the shops you liked. Do they have an online presence? Do they have good buyer reviews?
    2. Do an audit of your business. Make sure your business is in tip top shape by asking yourself these questions: Is my branding consistent? Are my logo and tagline effective? Is my social media and website up to date? Are recent customer reviews great? Are my company licenses for my city, county, and state up to date? If anything needs attention, fix it before you start trying to get your products into stores.
    3. Make sample products. Make several different products that you plan to try to get into the store. Be sure to package them as you would if the store were selling them today.
    4. Prepare a presentation and know your numbers. I’m not talking about a power point presentation where you will stand in the front of a room and talk at an owner. Instead, lay out points that you’d want to discuss during a conversation with the store owner. Prepare wholesale pricing sheets to present to the owner. Remember these two things: 1) A store owner can’t pay retail price for your products. 2) Not every product you make will be good to sell in a local store.
    5. Reach out to the store owner. Social media is a great way to make contact with the store owner or buyer. Simply introduce yourself and ask for some time to sit down and talk to the owner about carrying your handmade products in their shop or boutique. Never, and I mean never, walk into a store with the intention of getting your products into the store without a previous scheduled appointment. I mean, as a company owner, you are busy. Assume that the store owner is just as busy as you are.
    6. Be confident on the day of the meeting. Show up on time and prepared. Talk about your products, but also ask questions about the store and the store owner. Show the store owner that you’ve done research about their store before you walked in the door. Leave the owner with information relating to your shop and schedule a follow up appointment. One trick that I’ve used in the past is to leave the store owner with a sample book of my products or more information about me. I then schedule a time the following week to pick it up and hopefully ‘seal the deal’.
    7. Stick with it. Don’t expect to get your products into every store you speak with. And, don’t take it personally. Just move to the next store on your list and start over. Building a business takes time – don’t expect it to grow overnight.

    Having trouble with pricing for stores or wholesale? First, head to this post – then this one.

    Was this post helpful? Save the image below to Pinterest.

    7 Tips to Get Your Handmade Products into Local Stores and Boutiques for Silhouette Portrait or Cameo and Cricut Explore or Maker Crafters - by cuttingforbusiness.com


  • 5 Business Card Tips + Where to Order Business Cards for Your Craft Business

    I had an interesting conversation recently with a Silhouette business owner. She detailed to me how she spent hours printing and cutting her own business cards using her Silhouette Cameo 3 every week. She was looking for advice on being able to speed up the process so she could take care of others things in her business. My exact comment to her was: “Stop making your own business cards and just order them.”

    There’s a few things I want to share with you:

    1. Unfortunately, most business cards ultimately end up in the trash. This is especially true at craft shows and fairs when buyers walk around and pick up cards here and there.
    2. Your time can be better spent doing creating, designing, marketing, packaging, and shipping in your business – rather than making business cards.

    5 Best Practices for Business Cards in Your Craft Business

    1. Make your cards unique. I just shared with you that most business cards end up in the trash. Make yours stand out and keep it out of the trash.
    2. Consider an upgrade. Most sites offer upgrades. From types of paper, to colored edges, and different shapes, upgrades can make your cards stand out from the rest.
    3. Include relevant information. Include the important details (Business name, what you do, how to contact you) – but don’t include everything. No need to list every social media profile you own, your fax number (because who uses faxing anymore?), event schedule, and so on.
    4. Have a few different versions. I often design business cards for the occasion. For example, if you will be selling at a senior center – there’s really no reason to include your Instagram account. The demographic of Instagram and the senior center don’t mesh well. Instead, consider printing your text slightly larger than you normally do for ease of use for the customer base.
    5. Put pictures of your products right on your card. It might be a small space, but you’ve both sides. This reminds me of that blog post about product based business cards

    The best tip of all? You can’t promote yourself through business cards if you don’t carry them with you. Have a small stack of business cards on you at all times.

    Recommended Places to Order Business Cards

    • Vistaprint – Cost effective and widely used by all types of businesses. But, buyer beware! Complete the checkout process carefully because they try to sell you all kinds of other things.
    • Moo – This is where I get my business cards. My favorite thing about Moo? You can print multiple business card images in each box.

    Was this post helpful? Save the image below to Pinterest.


    5 Business Card Tips + Where to Order Business Cards for Your Silhouette Portrait or Cameo and Cricut Explore or Maker Craft Business - by cuttingforbusiness.com

  • How Crafters Can Use Free AI Tools as Grammar Checkers

    I recently wrote an article on how to make names plural for crafters. Now, it’s time to talk about grammar. Specifically, grammar on your website, product listings, social media, and more.

    Remember, everything you write or say online is a direct reflection of your business. Customers will not take you seriously if you have spelling or grammatical errors in your texts.

    This article used to highlight four different paid, online grammar checkers. But, with the creation of free online AI tools – there is no needs for crafters to pay for these services.

    Below, I’ll show you how to use both ChatGPT and Gemini to proofread. However, there are many AI bots that can proofread.

    How Crafters Can Use Free AI Tools as Grammar Checkers - cuttingforbusiness.com

    How to Use Free AI Tools for Grammar Checking

    ChatGPT

    You can use the popular, free chatbot to proofread your text. It’s easy! First, tell ChatGPT what you want it to do. Then, copy and paste your text.

    ChatGPT Examples

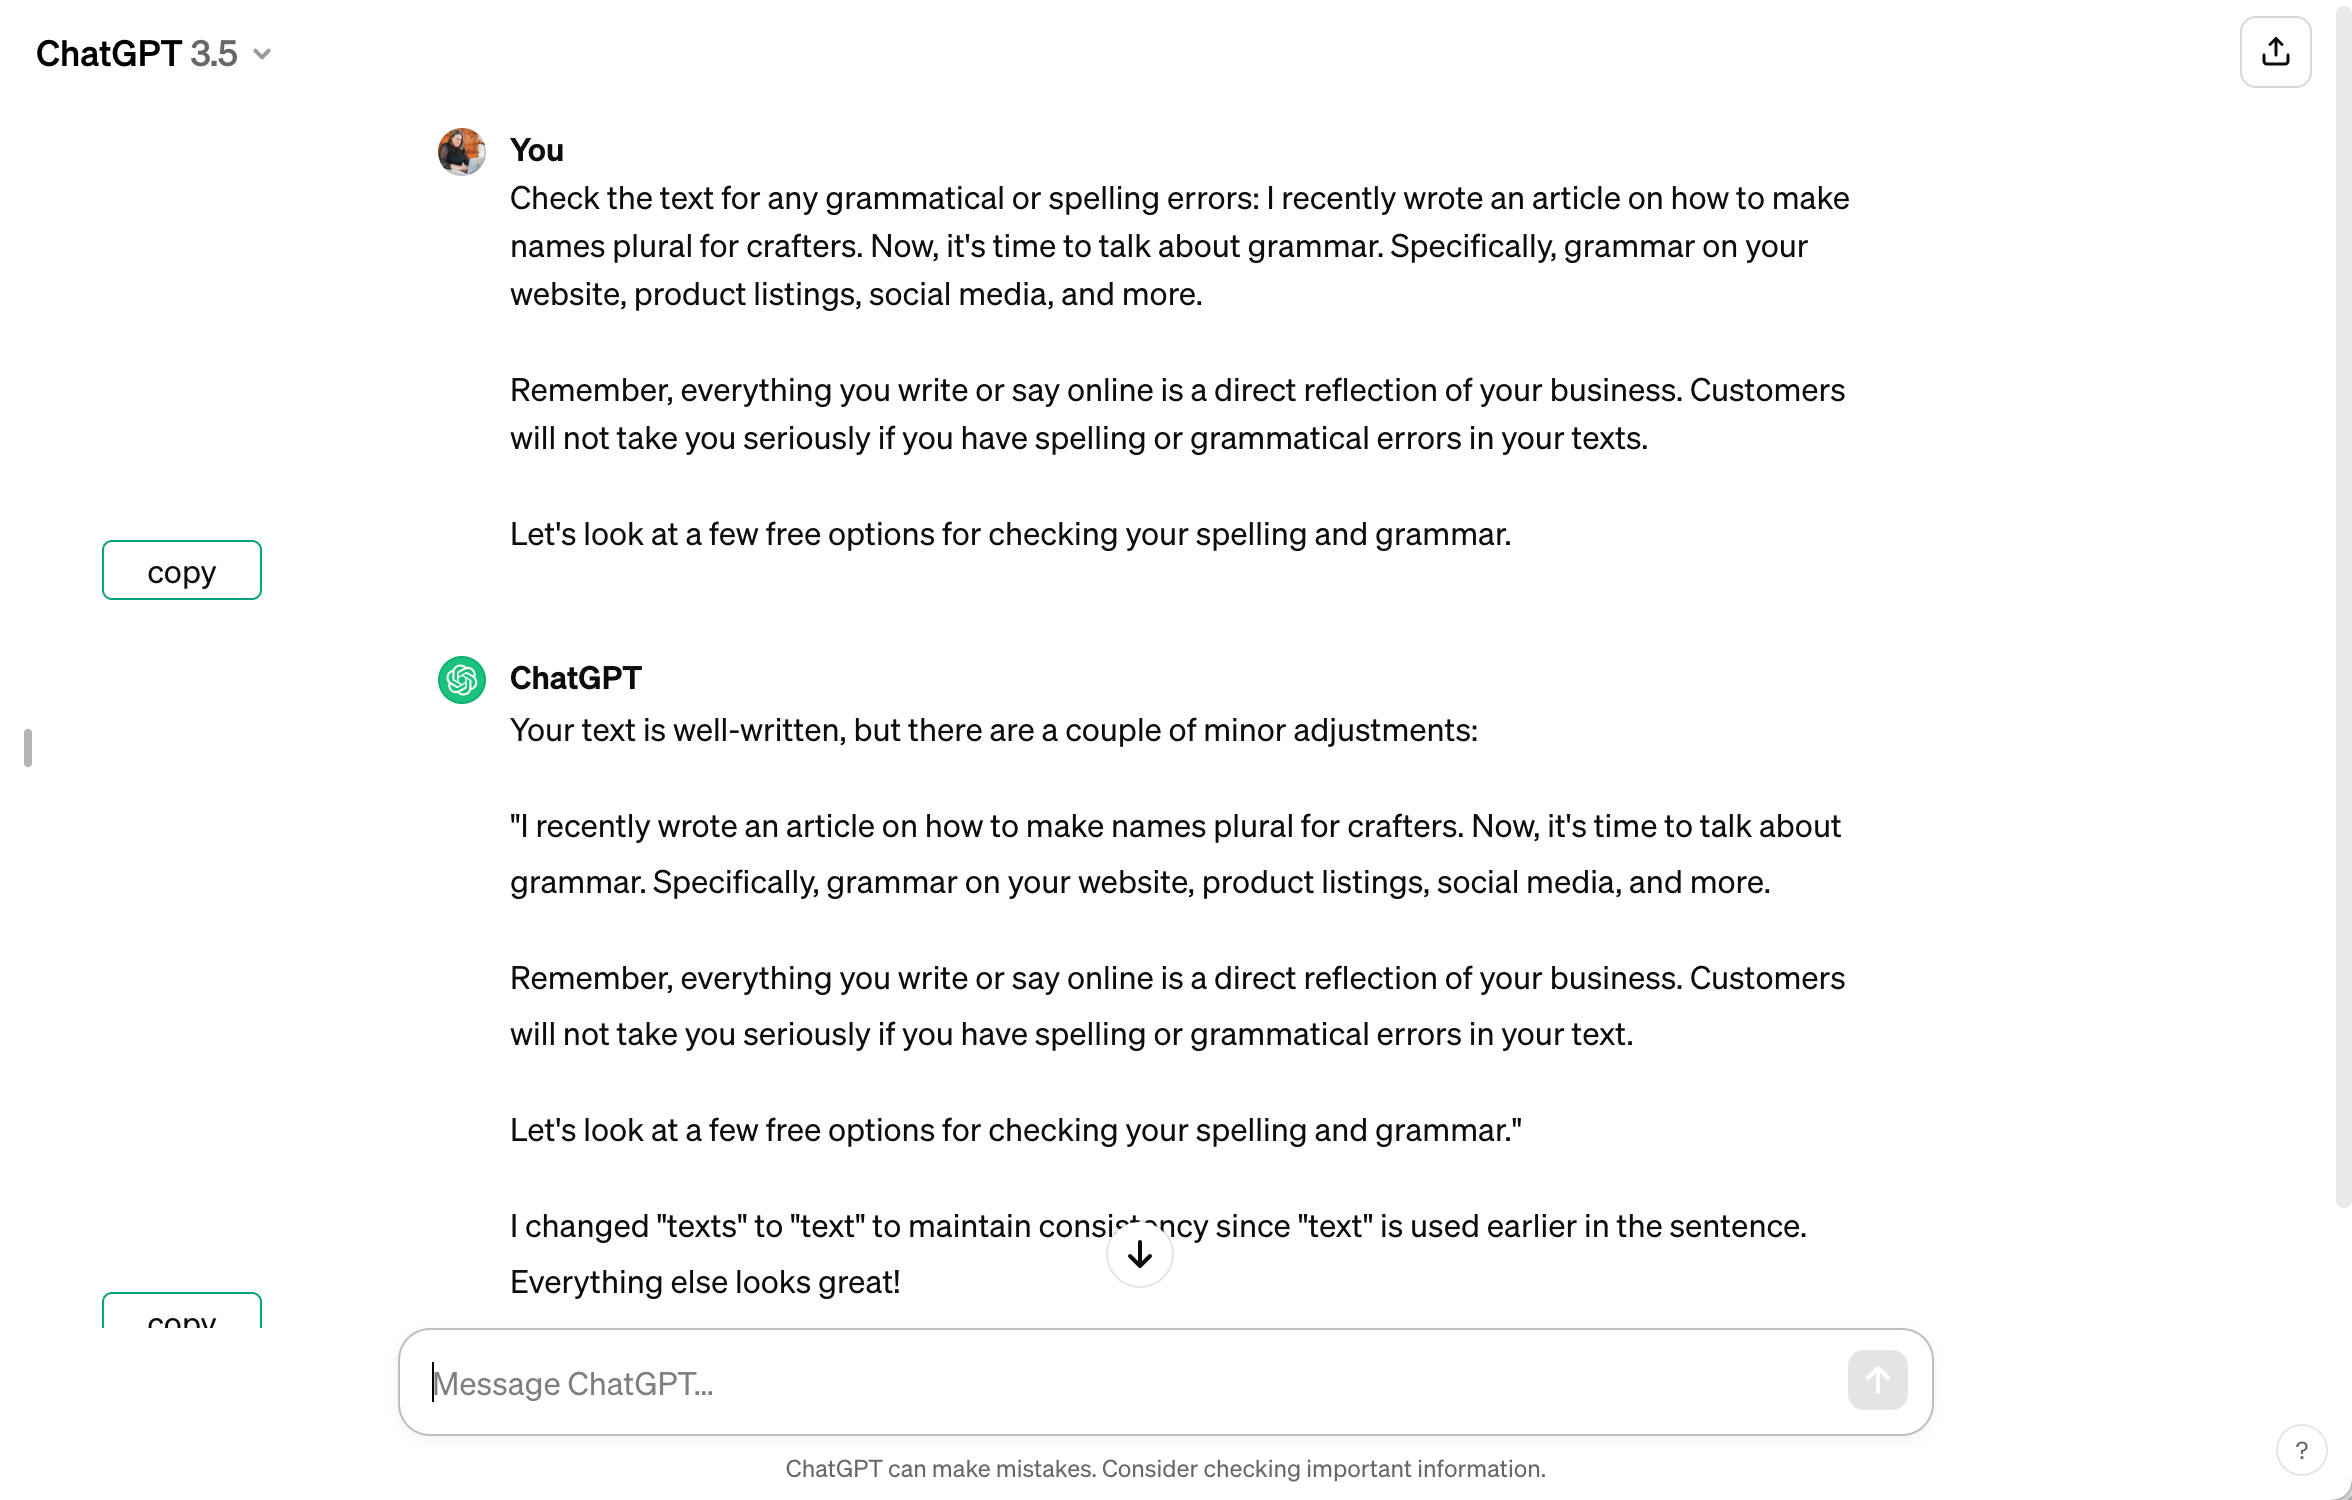
    Use ChatGPT to correct spelling and grammar errors:

    ChatGPT Screenshot - cuttingforbusiness.com

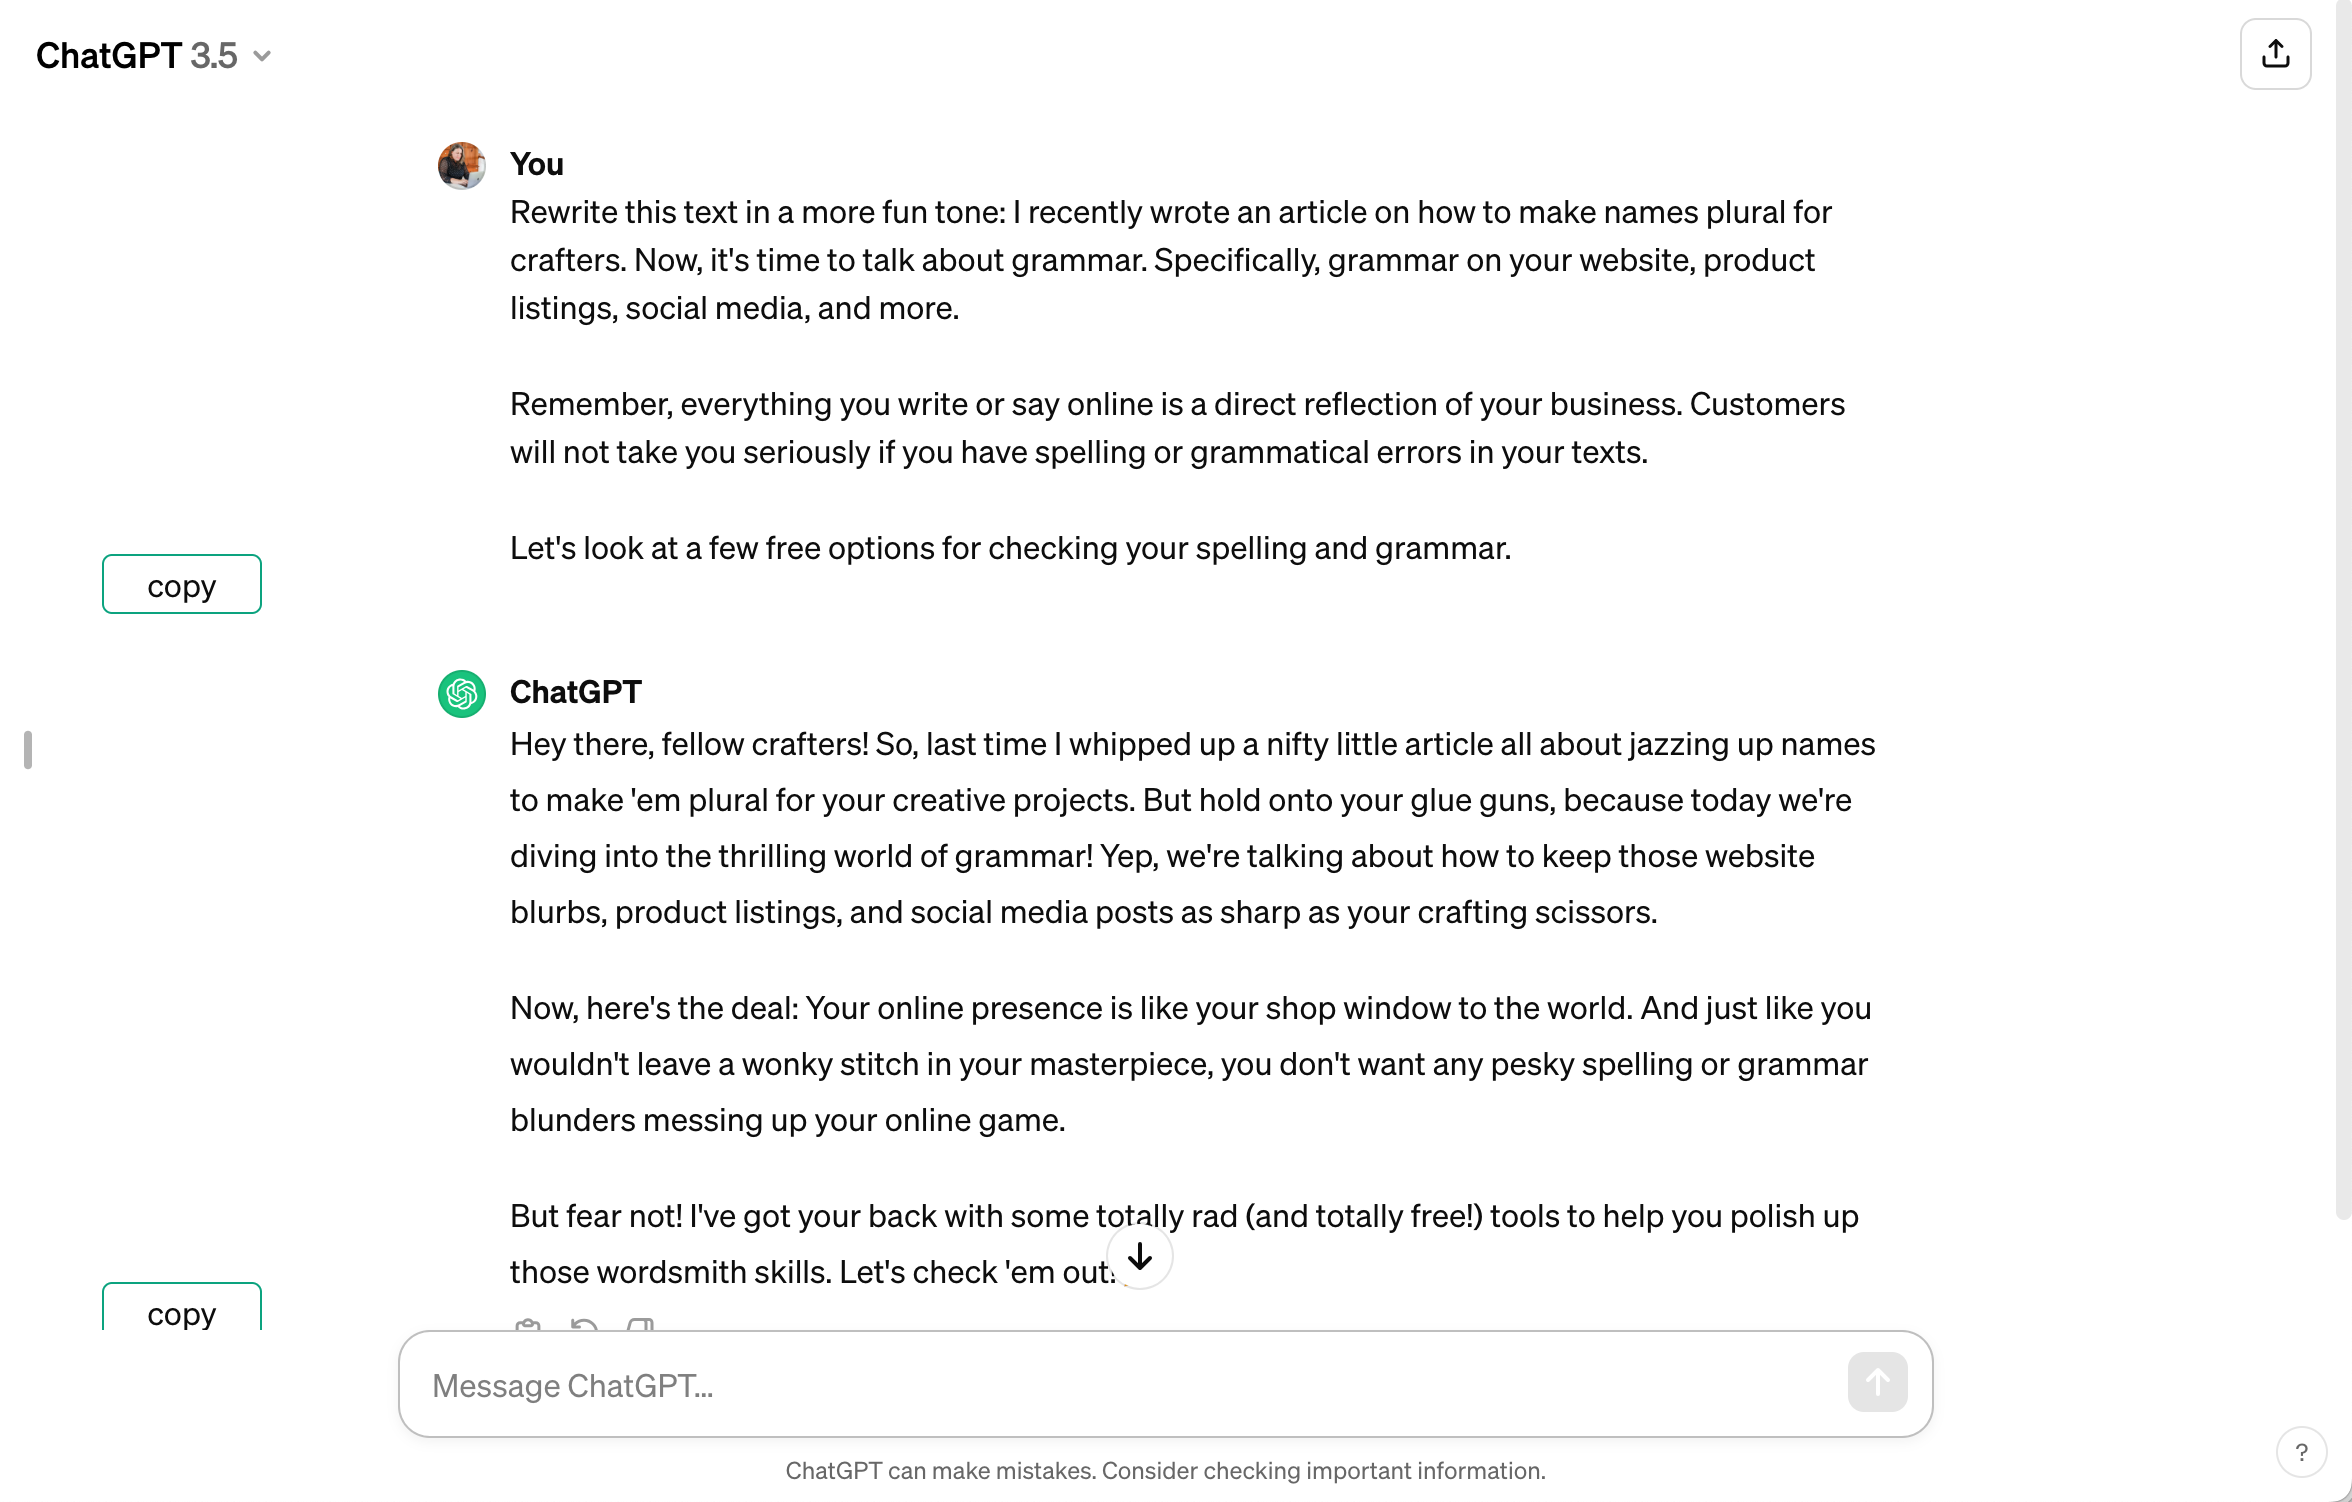
    Ask ChatGPT to rewrite your text in a certain tone:

    ChatGPT Screenshot - cuttingforbusiness.com

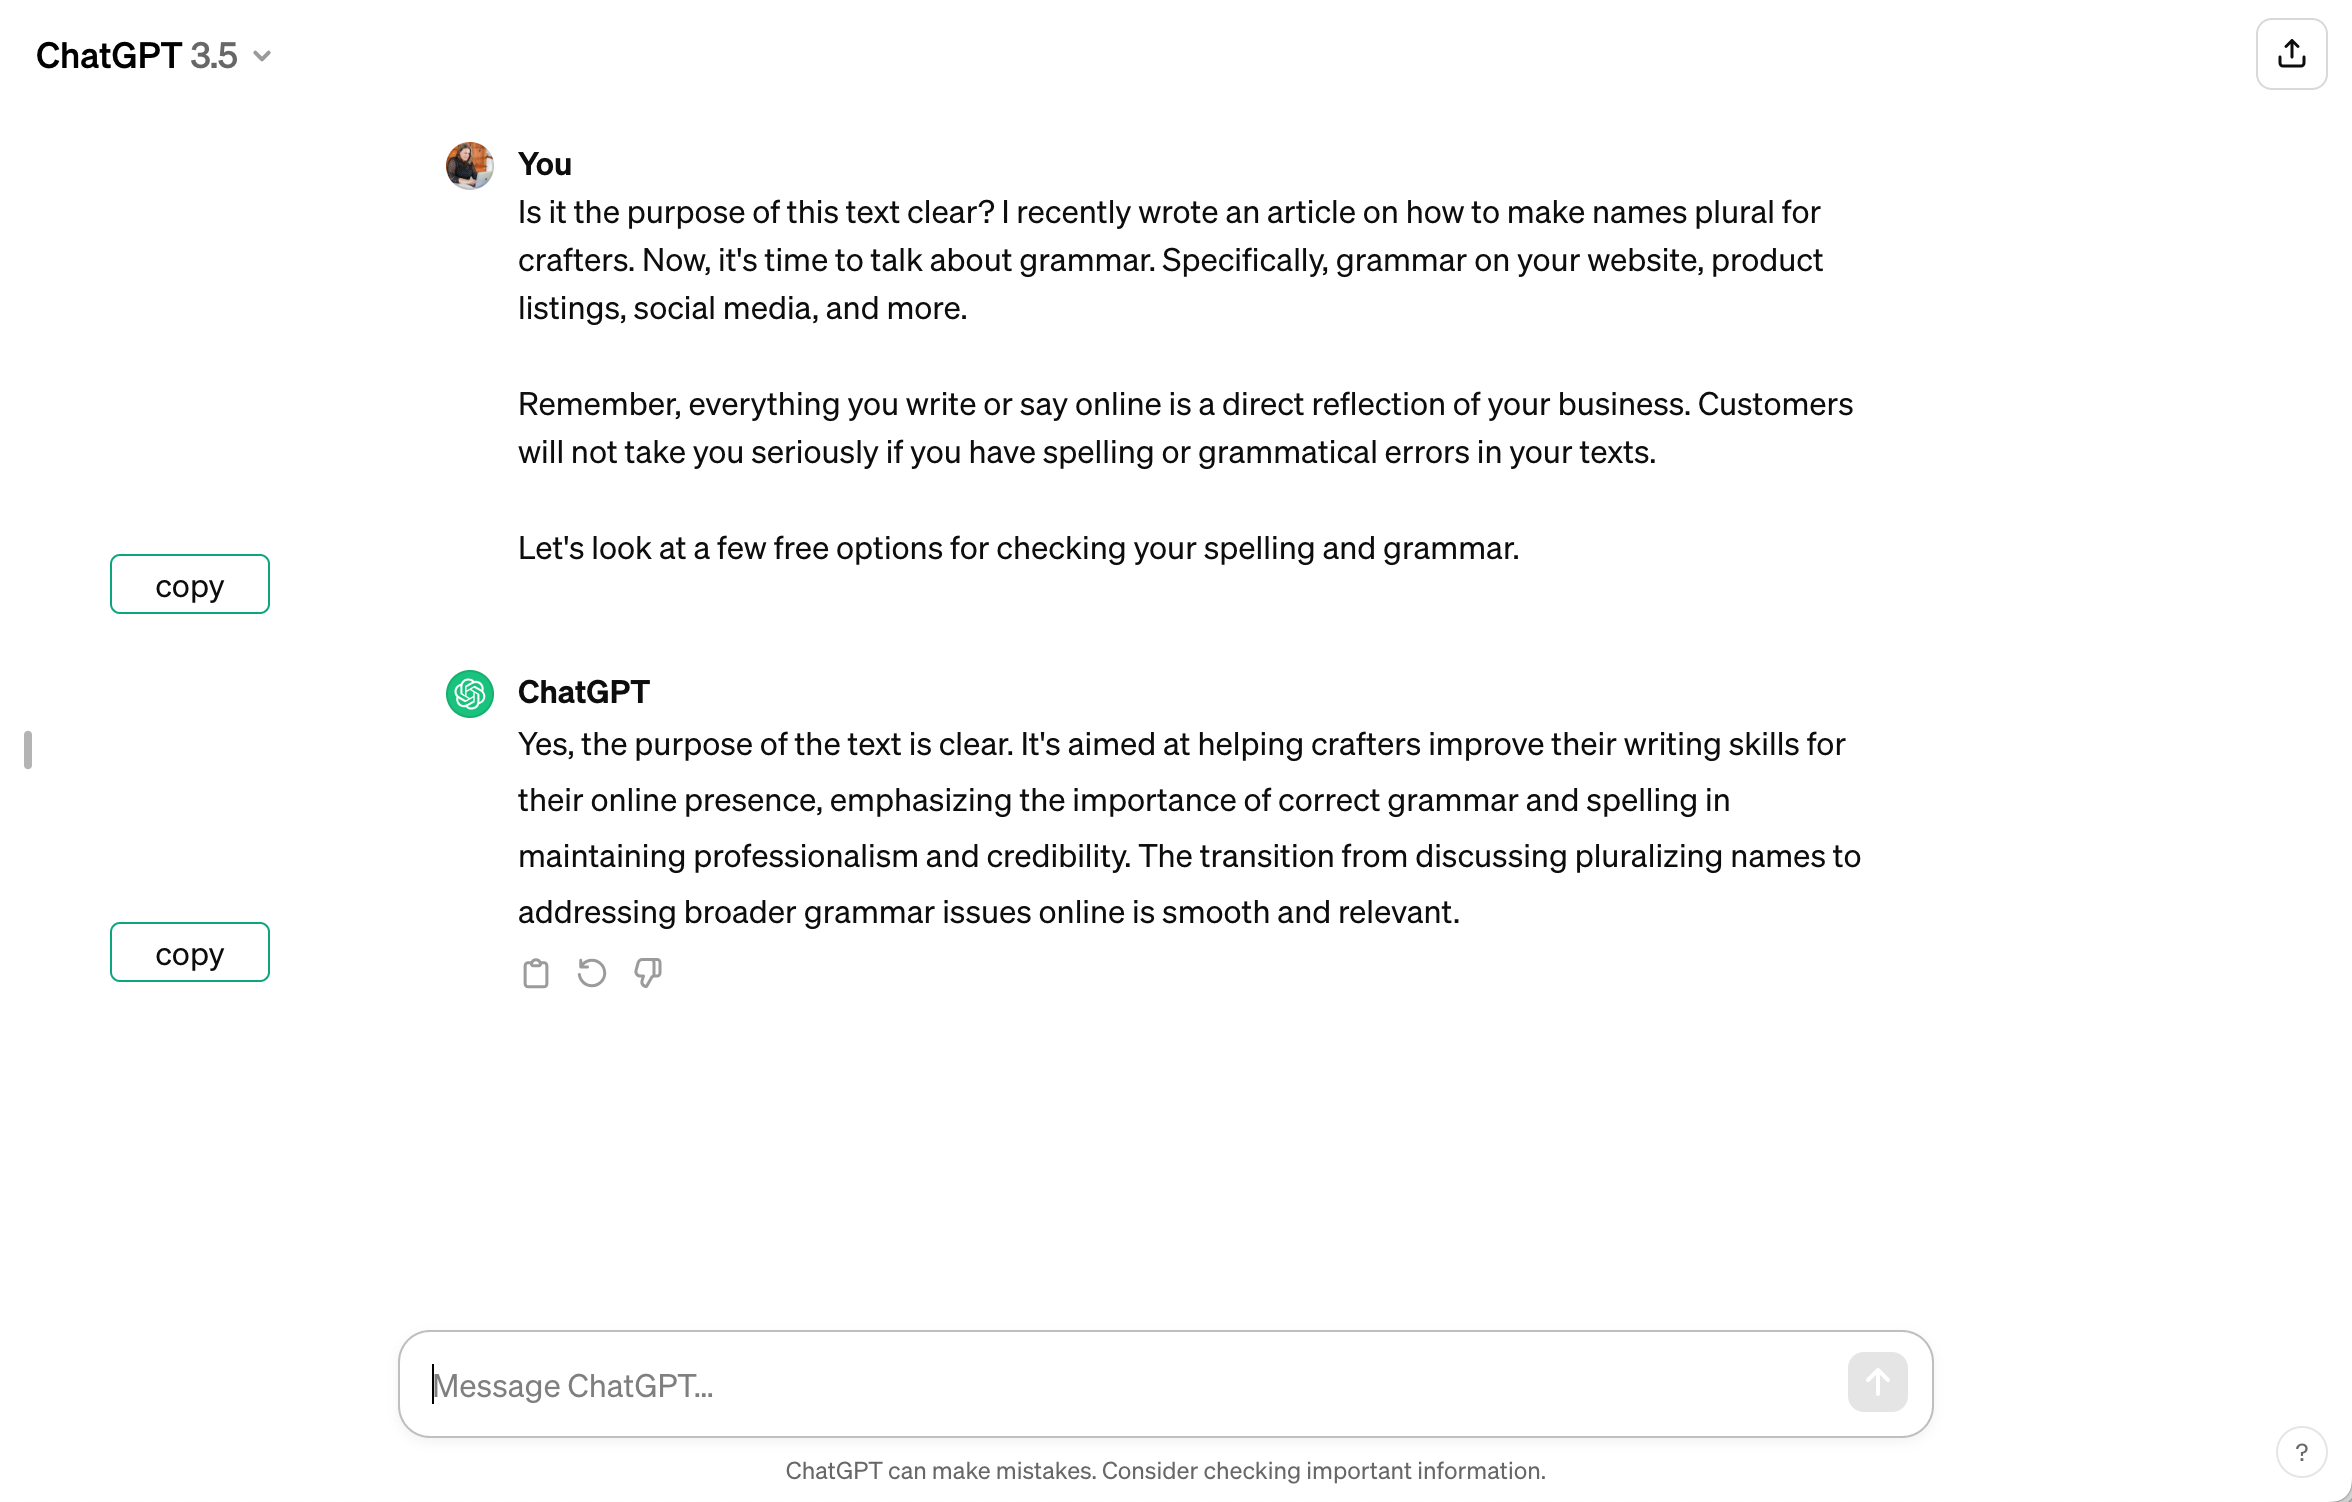
    Check to make sure your point is clear in ChatGPT:

    ChatGPT Screenshot - cuttingforbusiness.com

    Gemini

    If you don’t like ChatGPT, try Google’s Gemini. Gemini works the same way as ChatGPT.

    Gemini Examples

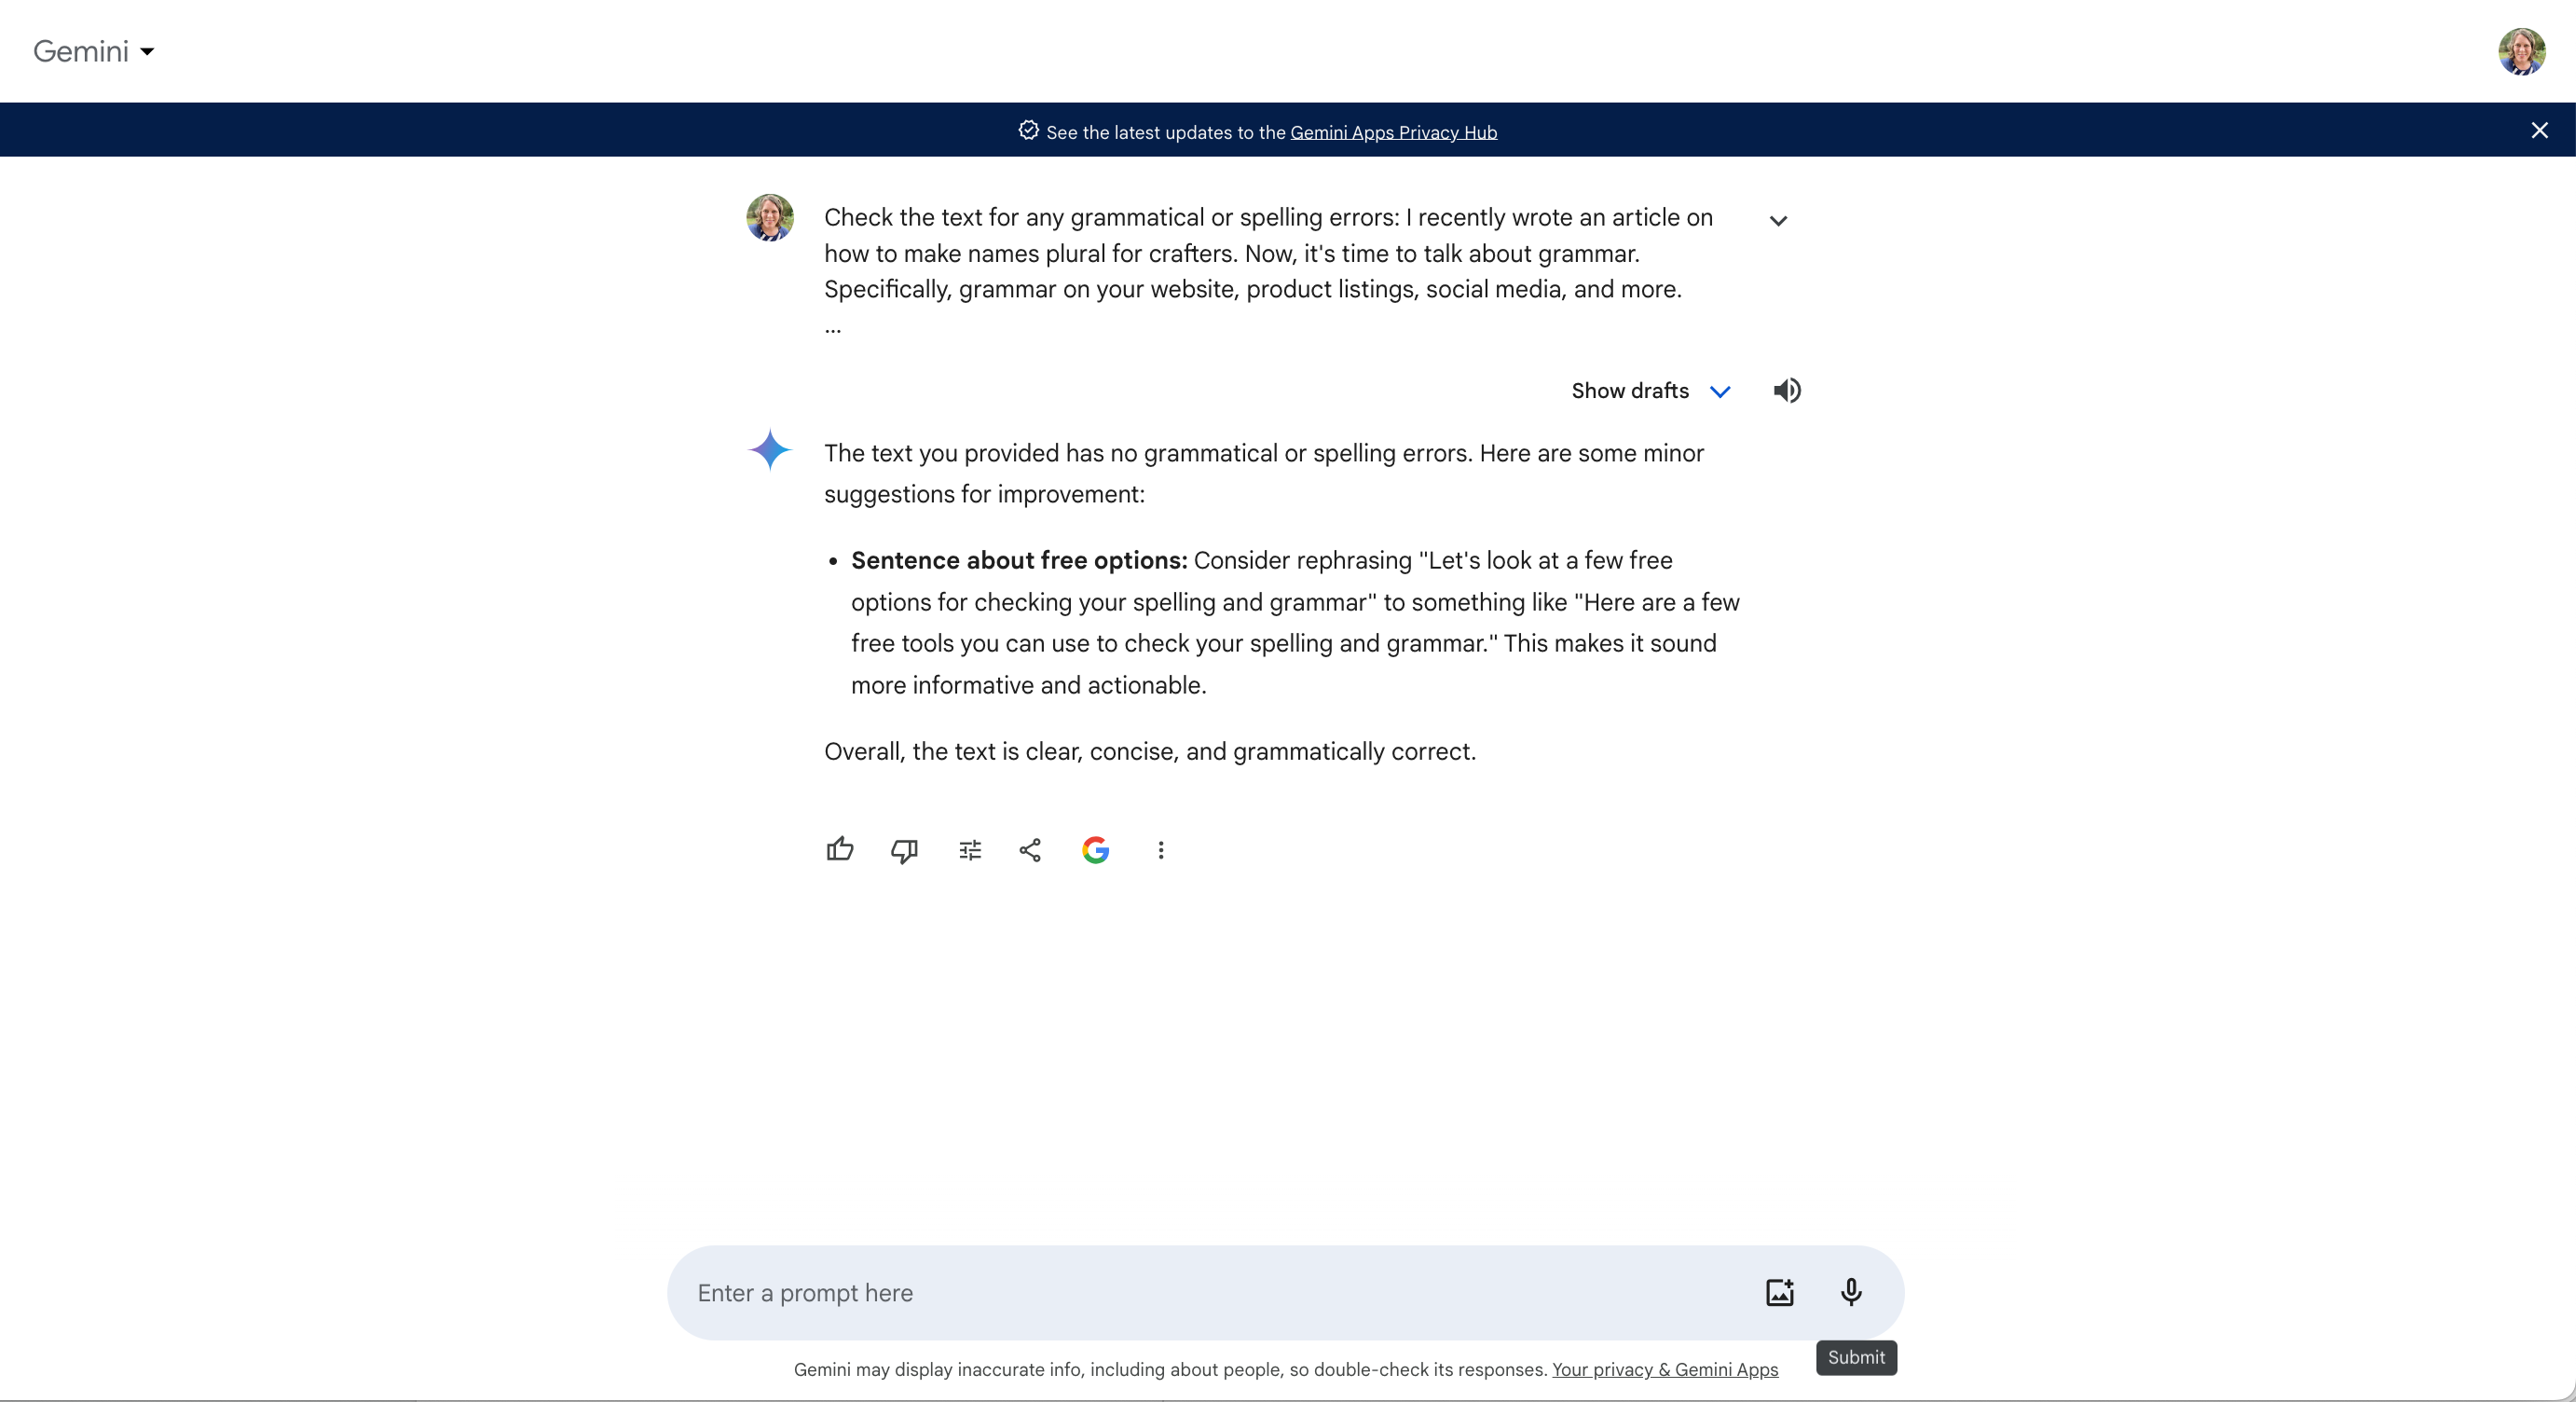
    Use Gemini to correct spelling and grammar errors:

    Gemini Screenshot - cuttingforbusiness.com

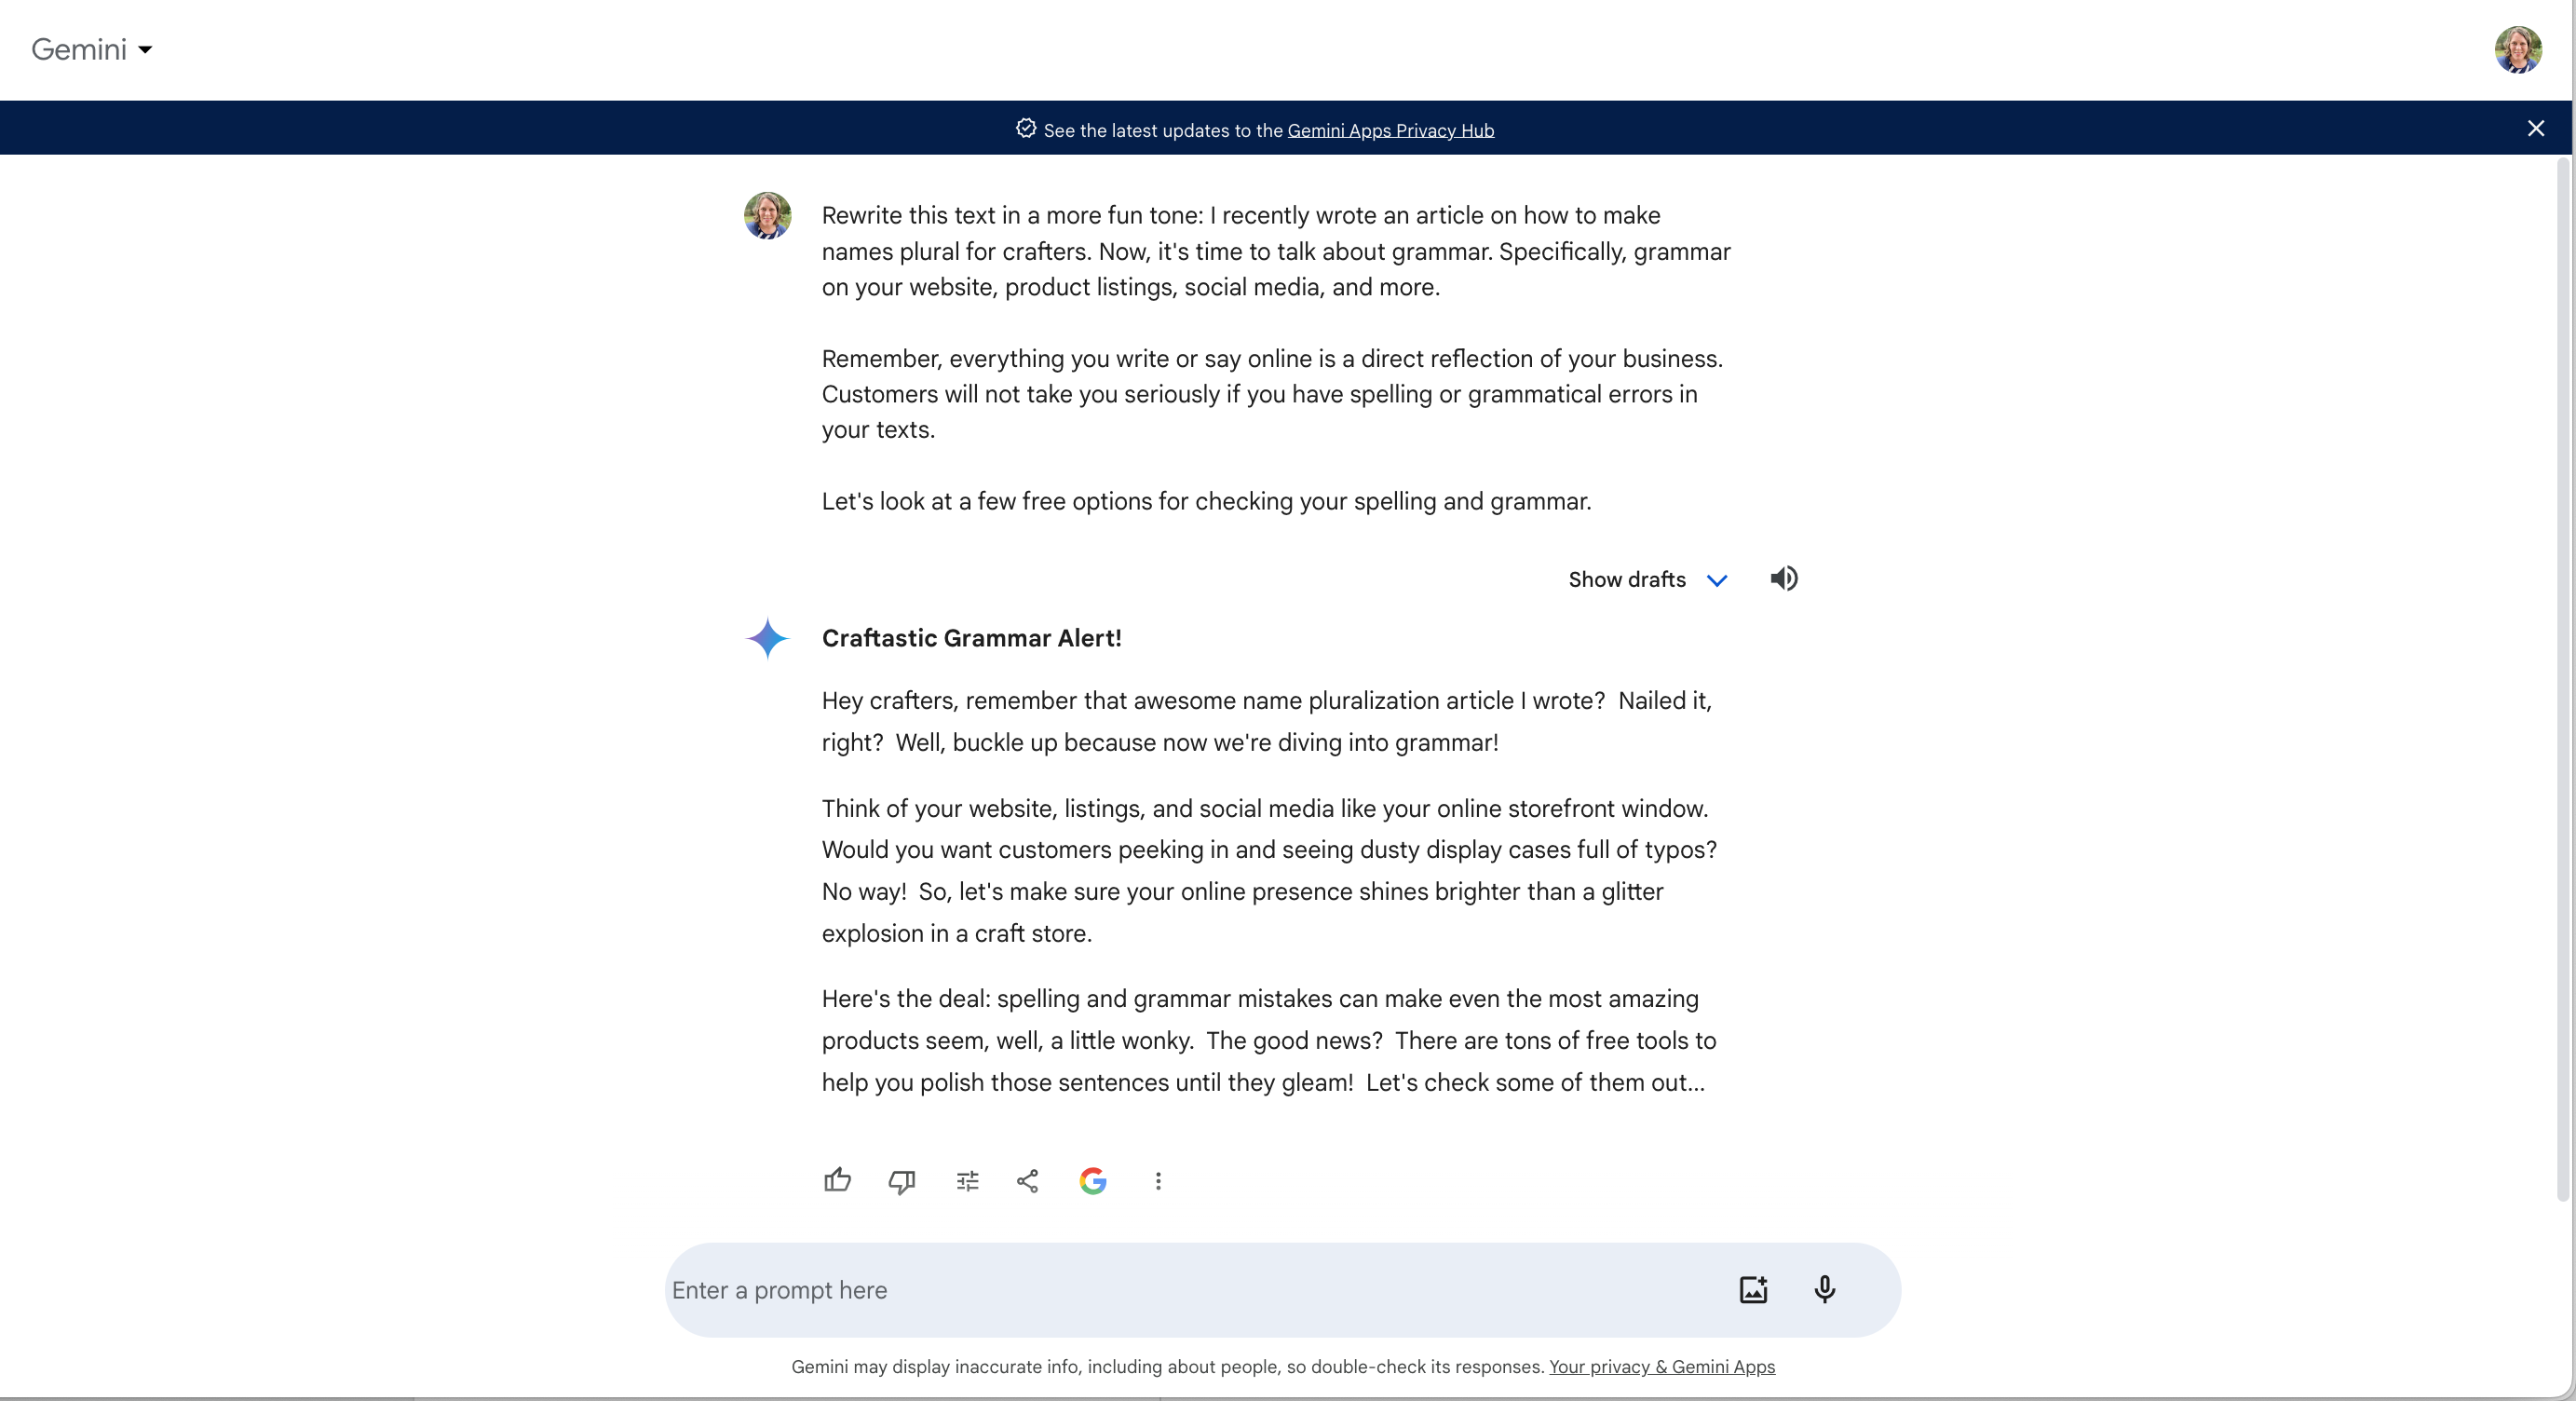
    Ask Gemini to rewrite your text in a certain tone:

    Gemini Screenshot - cuttingforbusiness.com

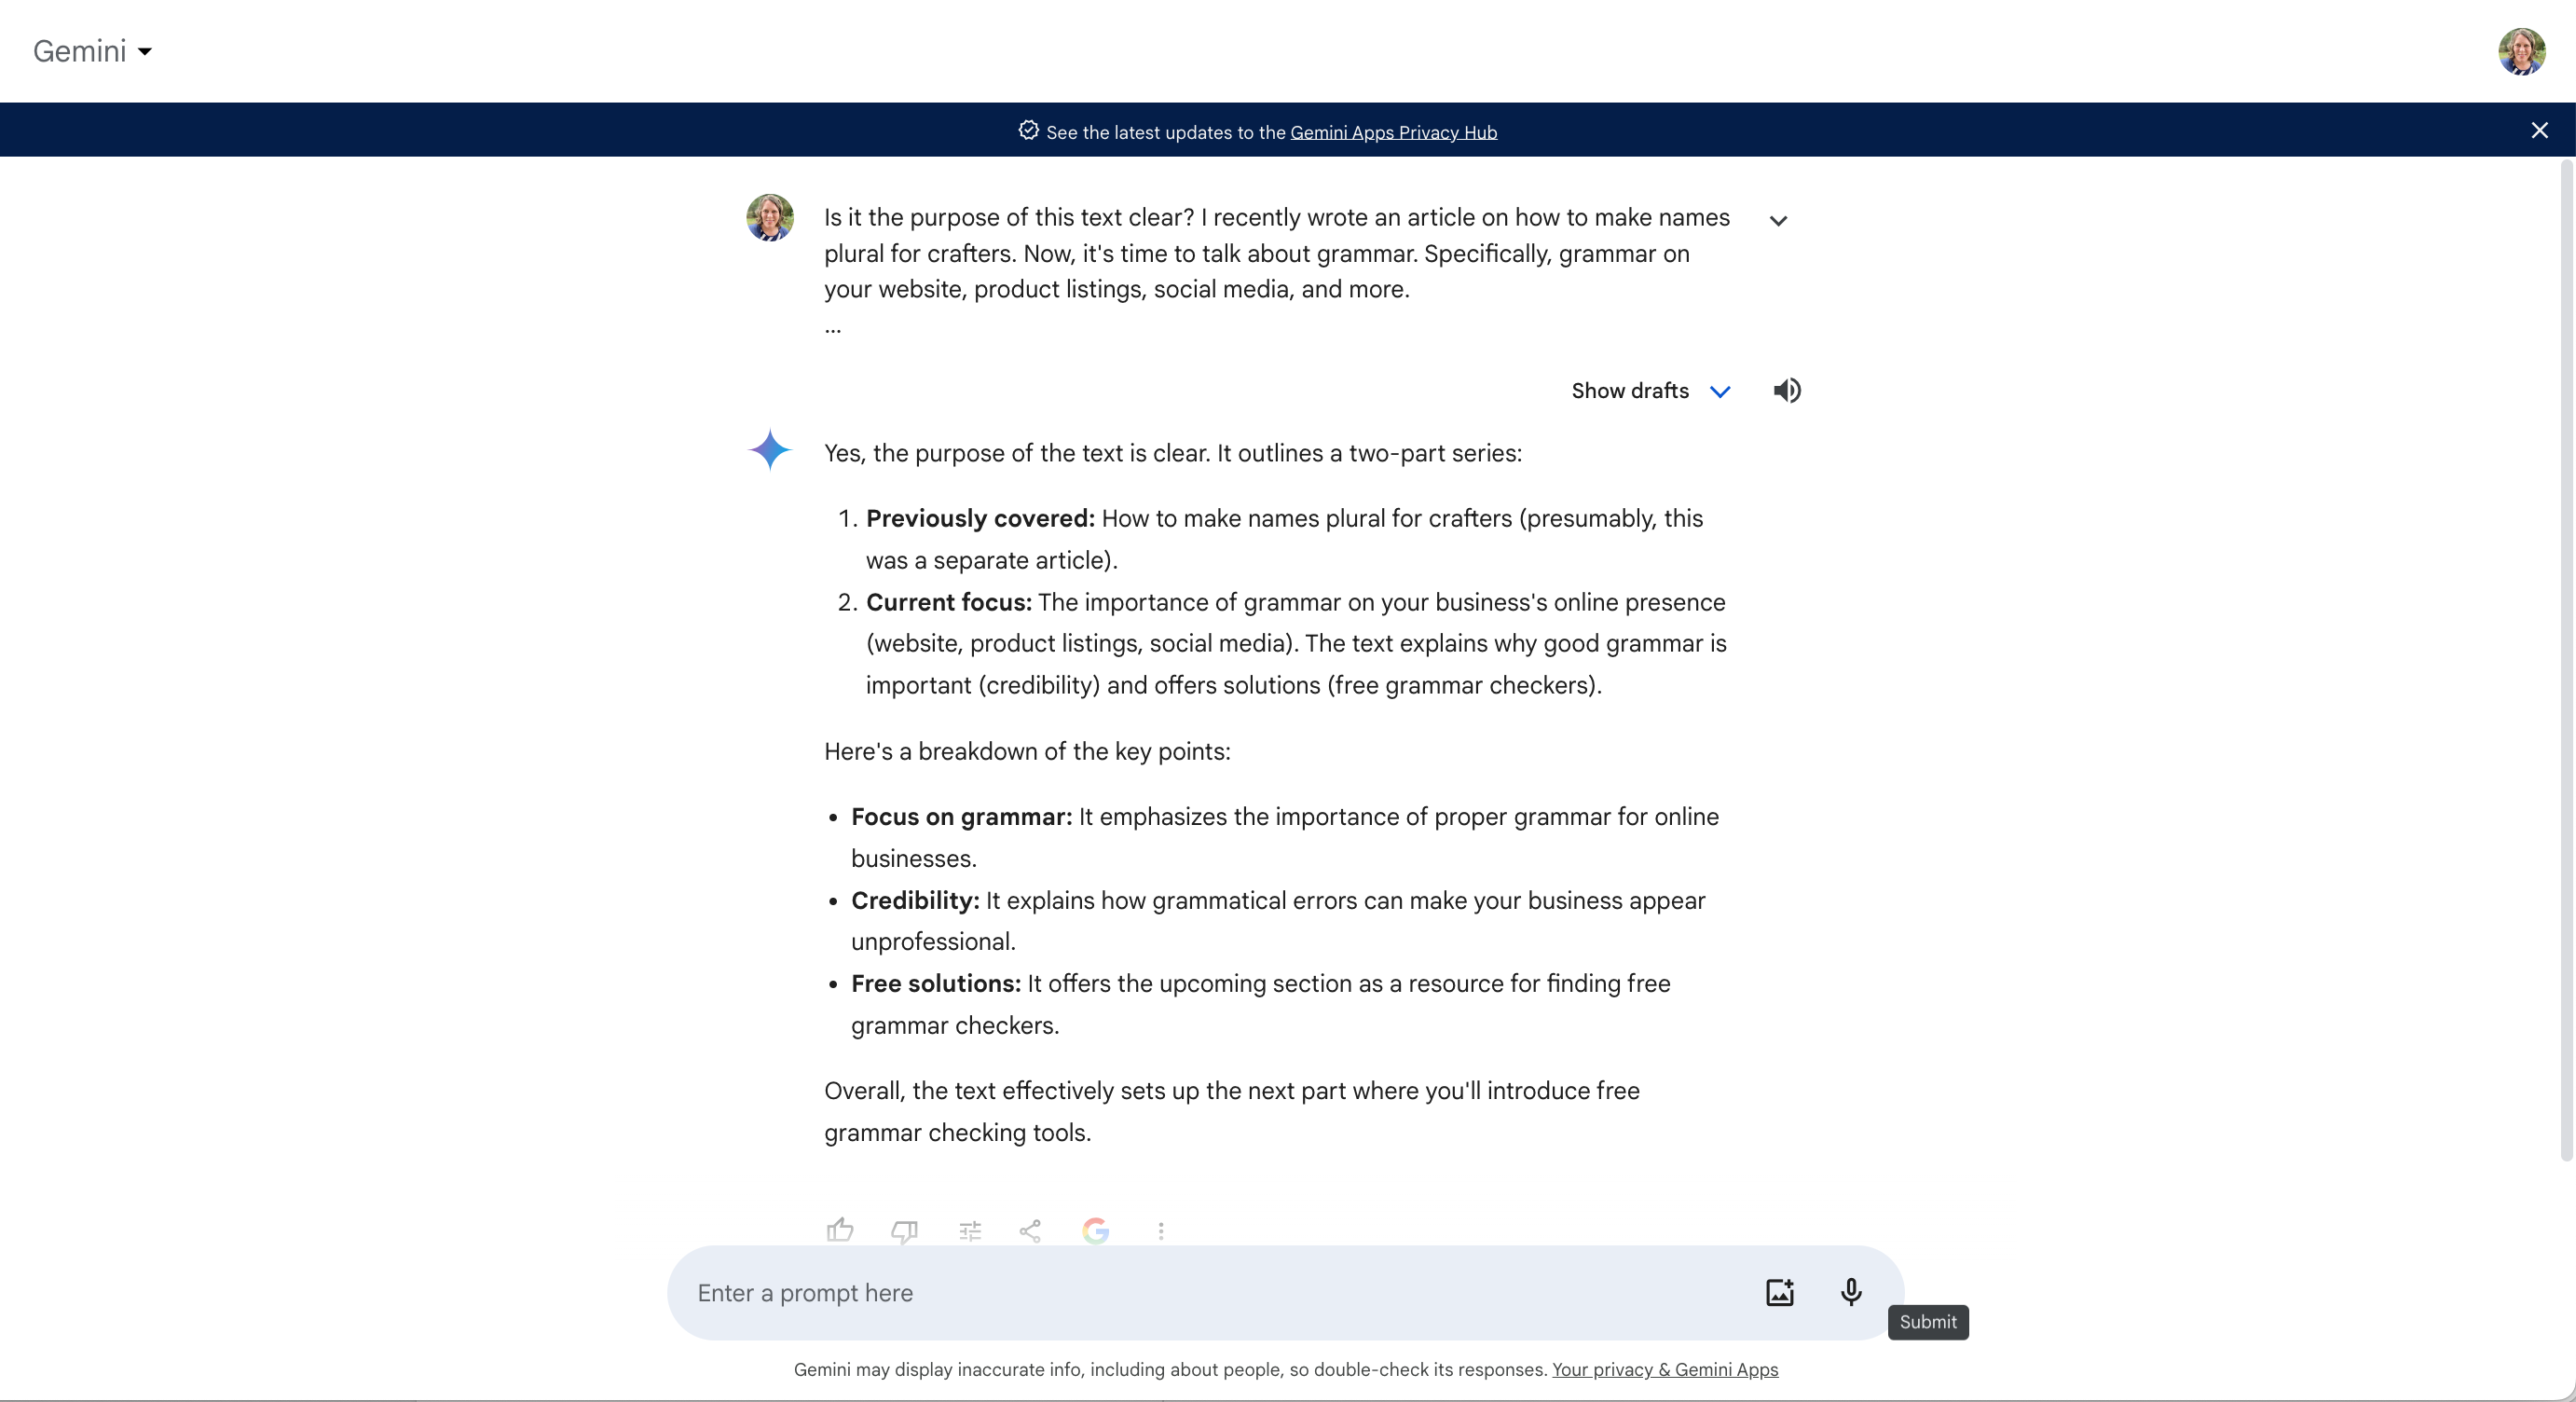
    Check to make sure your point is clear in Gemini:

    Gemini Screenshot - cuttingforbusiness.com

    That’s it! Using an online grammar checker takes only minutes, but is often overlooked. Why not take a few minutes today to grammar check your About Me page, your product listings, and other important pages in your craft business?

    More Uses for ChatGPT in Your Craft Business

    I’ve written several articles about creative ways to use ChatGPT in your craft business.

  • 4 Reasons to Not Prewash Apparel Before Applying Heat Transfer Vinyl (HTV) in Your Craft Business

    To prewash or not to prewash before you apply heat transfer vinyl (HTV)… that is the question.

    If you are making and selling shirts or other apparel in your Silhouette or Cricut craft business, you may receive conflicting advice. I hear this is often disputed in the sewing world, too.

    I say no prewashing apparel before embellishing it.

    Below, I’ve listed my four reasons.

    4 Reasons to Not Prewash Apparel Before Applying Heat Transfer Vinyl (HTV) in Your Craft Business - cuttingforbusiness.com.

    4 Reasons to Not Prewash Apparel Before Applying Heat Transfer Vinyl (HTV)

    After Washing, Shirts Become Used – Not New

    Shirts that have been washed feel different than shirts that haven’t been washed. Customers expect a brand new item when purchasing. Similarly, prewashing can lead to shrinking.

    Most Manufacturers Don’t Recommend It

    Most manufacturers note that there is no reason to prewash a shirt before applying heat transfer vinyl (HTV) to it.

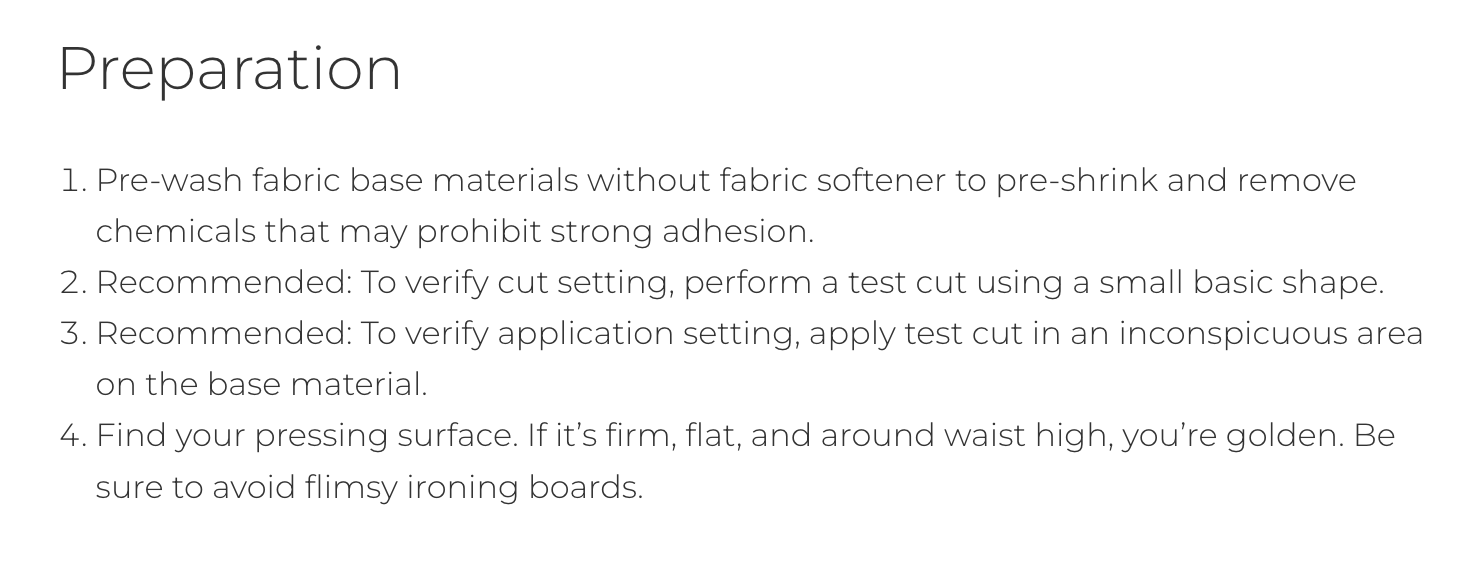
    The only manufacturer that recommends prewashing your garment is Cricut. And honestly, I have no idea why they have this recommendation. They elude in the screenshot below to not getting a strong adhesion if not washed. Honestly, if your heat transfer material is not sticking, you have either a temperature, time, or pressure issue.

    Cricut says:

    Source: cricut.com

    Siser says:

    siserna.com

    Customers May Have Allergies or Sensitivities

    Many people are allergic or sensitive to dyes and fragrances. Even if you opt to use a fragrance free or dye free detergent, you can not guarantee your customer won’t have an allergic reaction. To prevent these issues, skip prewashing.

    It’s Time Consuming

    I don’t know about you, but I have enough laundry to do with 4 kids, a husband, and a few dogs. Honestly, the last thing I need is more laundry.

    Pre-pressing

    While I recommend you don’t prewash, I do recommend you pre-press. Pre-pressing (which means to iron or use your heat press on your blank before you apply the heat transfer vinyl design) removes wrinkles and moisture and shrinks the material.

    Pre-pressing is recommended for most materials.

    Tell me in the comments: Do you pre wash apparel before embellishing?

  • Tailwind Tribes: What Are They and How They Can Help Your Craft Business

    I’ve talked about Tailwind in my Pinterest Boot Camp book before. Today, I wanted to share with you one of their newer features: Tailwind Tribes.

    What is Tailwind?

    Tailwind is a Pinterest management company that allows you to schedule pins, find content to pin, and generally manage your Pinterest profile. As a side note, Tailwind has also gotten into Instagram management. I have not explored their features for Instagram yet. This post focuses on the Pinterest aspect of Tailwind Tribes only.

    What are Tailwind Tribes?

    Tailwind Tribes are groups of Pinterest users that promote each other’s content. Generally, in order to share one of your pins to the group, you must first share another member’s pin. There are Tailwind Tribes to suit every need from travel to cooking to Etsy sellers and crafters.

    Let’s take a look at Tailwind Tribes in action.

    How to Use Tailwind Tribes

    1. Visit Tailwind’s website. Then, sign up through the ‘Signup with Pinterest’ button.Tailwind Tribes: What Are They and How They Can Help Your Craft Business - by cuttingforbusiness.com
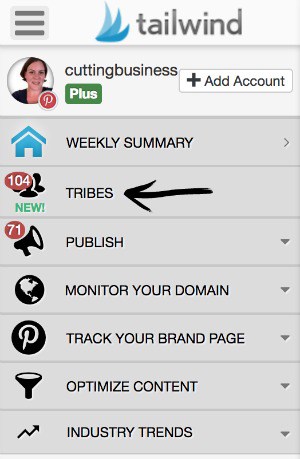
    2. Once logged in, navigate to Tribes on the left navigation menu. Tailwind Tribes: What Are They and How They Can Help Your Craft Business - by cuttingforbusiness.com
    3. The first thing you are going to want to do is to look for Tailwind Tribes related to your business. To search, use type keywords into the search bar. Some example keywords could be, ‘Handmade’, ‘Etsy’, ‘Rustic’, ‘Jewelry’, ‘Home Decor’, and so on. Tailwind Tribes: What Are They and How They Can Help Your Craft Business - by cuttingforbusiness.com
    4. Before you join a Tailwind Tribe, choose wisely, you can only have 5 tribe requests open at a time. Personally, I’m selective on the Tailwind Tribes that I join and always look at the rules before applying. Tailwind Tribes: What Are They and How They Can Help Your Craft Business - by cuttingforbusiness.com
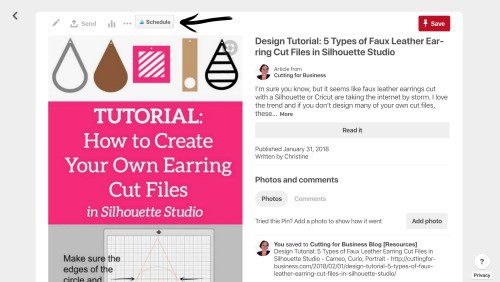
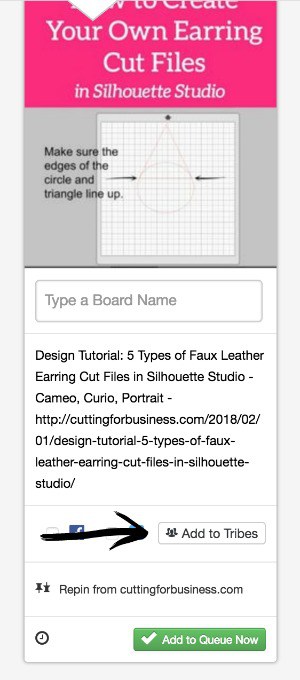
    5. After you’ve joined (and been approved if needed), begin to add your content. I find it easiest to have the Tailwind App browser extension installed on my computer (Google Chrome). Here’s a link to download it. Then, I visit my Pinterest profile and click on the pin I want to add to a Tailwind Tribe. Next, click the ‘Schedule’ button:Tailwind Tribes: What Are They and How They Can Help Your Craft Business - by cuttingforbusiness.comThen the ‘Add to Tribes’ button:
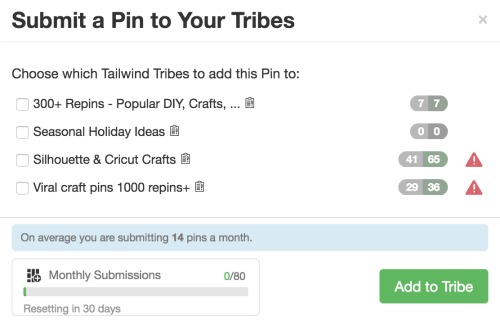
      Tailwind Tribes: What Are They and How They Can Help Your Craft Business - by cuttingforbusiness.comLastly, choose the appropriate Tailwind Tribe. (Tip: The red triangle indicates that I’ve already added that pin to that specific tribe.)
      Tailwind Tribes: What Are They and How They Can Help Your Craft Business - by cuttingforbusiness.com If you already have pins loaded in Tailwind, you can also schedule directly from there.
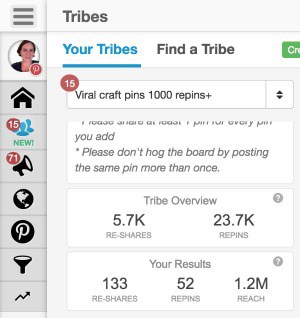
    6. Repeat the process for as many pins as you’d like to add to the Tailwind Tribe. As you continue using Tailwind Tribes, you can check your statistics from each tribe under ‘Tribe Overview – Your Results’. Tailwind Tribes: What Are They and How They Can Help Your Craft Business - by cuttingforbusiness.com
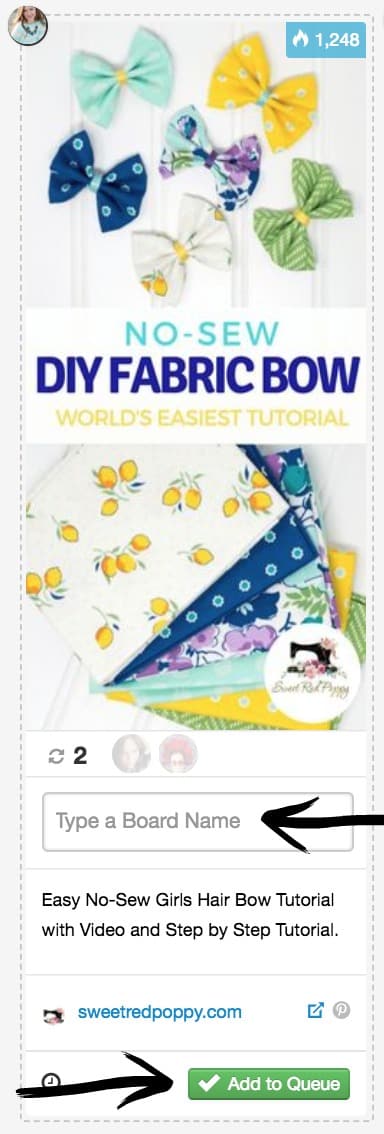
    7. For most Tailwind Tribes, you’ll also need to share fellow Tribe content. To do so: Choose a pin from a fellow tribemate. Choose what board you’d like to add it to, then click the ‘Add to Queue’ button. In case you are wondering, the number in blue at the top is the number of times a pin has been pinned on Pinterest. If you’d like to check the source of the pin before repinning it, click the blue link near the bottom.Tailwind Tribes: What Are They and How They Can Help Your Craft Business - by cuttingforbusiness.com

    While Tailwind Tribes are relatively new, not only have I experienced growth of the blog through them; small craft businesses have seen dramatic effects as well.

    Tailwind Tribes Pricing

    It’s good to know that Tailwind Tribes is free… for the time being. By joining now, you can ensure a free forever account that allows you 10 tribe memberships and up to 80 pins a month. Beyond that, you’d need a paid plan: Tailwind Tribes: What Are They and How They Can Help Your Craft Business - by cuttingforbusiness.com

    Psst, if you want to try out Tailwind’s other features or a power up for Tribes, here is a link for a $15 credit. (New users only.)

    Was this tutorial helpful? Save it to Pinterest.

    Tailwind Tribes: What Are They and How They Can Help Your Craft Business - by cuttingforbusiness.com

  • How to Create an Email Template Library to Save Time in Your Craft Business

    If there’s one thing that almost all Silhouette and Cricut small business owners have told me, it’s that they need more time in their days to get things done! In my opinion, I manage my time well and wanted to share a time saving secret I use to respond to emails quickly: My custom made email template library. Today I’m sharing how to create your own email template library.

    How to Create an Email Template Library for Your Craft Business

    1. Identify the questions that you get asked the most in your small business and write out a list. I do this by looking through old emails.
    2. Write a generic response email for each commonly asked question.
    3. Save each response email you’ve written to a folder on your computer. Depending on what mail program you use to manage your emails, you may also be able to save them to your ‘Drafts’ folder or a custom folder like ‘Saved Emails’.
    4. When a customer asks one of your commonly asked questions, copy and paste your prewritten email into your response. Be sure to take a minute to personalize the email with their name. No one likes to get an automatic response style email.

    Creating an email template library can drastically cut down on the time you spend answering emails. Remember, to cut down on the actual amount of emails that you receive, be sure you have a FAQ page. See what other pages I recommend your have on your website at this link.

    Love this idea? Save it to Pinterest!

    How to Create an Email Template Library to Save Time in Your Silhouette or Cricut Craft Business - by cuttingforbusiness.com

  • 6 Ways to Prevent Burnout in Your Craft Business

    I see so many craft business owners that work their businesses hard for a year or so, then lose interest. I think that much of this has to do with burnout.

    It’s not surprising that burnout would be common since craft business owners wear so many hats: Designer, Creator, Researcher, Accountant, Tax Filer, Customer Service Representative, Shipper, Web Designer, Social Media Manager, and so many more.

    Today, let’s look at ways that you can prevent burnout in your small business.

    6 Ways to Prevent Burnout in Your Craft Business - cuttingforbusiness.com.

    6 Ways to Prevent Burnout in Your Craft Business

    Create and Abide by Office Hours

    Nearly every entrepreneur I’ve ever talked to works more hours in their business than they would if they worked for someone else. (Myself included!) Since we are driven people, we need to remember there is more to life than our business.

    One good way to tackle this is by setting clear work hours. I’ve written about the importance of office hours.

    Change Up Your Schedule/Scenery Once in a While

    Schedules are great – I honestly live and die by mine – but monotony can set in from doing the same thing over and over again day in and day out.

    I have found that I can refresh my mind by just working from a different room – or even sitting outside.

    Change Up Your Products

    This goes hand in hand with changing up your schedule. While it might sound like more work, change up the products you offer once in a while. Creating the same thing over and over can lead to serious burnout.

    This can be as simple as running a weekend sale on something you don’t normally create – like tumblers or tshirts.

    Don’t Procrastinate

    I’m sure there are tasks in your business that you don’t enjoy doing (hello, accounting!). However, stop the urge to procrastinate and keep up with unenjoyable tasks. If you don’t they can snowball into huge projects that will leave you with a feelings of burnout.

    Seek Help When You Are Overwhelmed

    If you are buried in things to do, call in an older child, family member, or friend to help conquer your to do list. Remember to pay them accordingly, even if it is just in free product. Similarly, if a task is too hard (like designing a logo or building a website) hire someone to take care of it for you. Fiverr is a great place to find help for one off tasks.

    Treat Yourself

    I’m not talking about a full out spa day every other day, but treat yourself once in a while. From grabbing a fancy coffee at the local shop or bingeing on your favorite Netflix show for an entire day – find something that you enjoy doing and regularly do it as a reward for your hard work.

    Tell me in the comments, how do you prevent burnout in your craft business?

  • How to Close Your Craft Business with Free Printable Checklists

    I talked about signs that it might be time to close your craft business. Today, let’s look at what you need to do to actually close your craft business.

    You’ve got two options: 1) Liquidate your supplies and inventory, or 2) Sell your business.

    In general, if your business is not profitable (you aren’t making any money) I’d recommend liquidating your supplies. If your business is profitable (making money) I’d recommend selling it to another crafter.

    How to Close Your Craft Business with Free Printable Checklists - cuttingforbusiness.com.

    How to Liquidate Your Craft Business

    1. Make the Decision to Close Your Business. Don’t take the decision lightly, and definitely don’t feel guilty about it.
    2. Sell Off All Unnecessary Supplies and Inventory. In other words, host a ‘Going Out of Business’ sale.
    3. Pay Off Any Remaining Business Debts. If your business is closing, you’ll want to make sure you get rid of debts and credit card balances related to your business.
    4. Say Goodbye to Your Customers. I recommend posting on all of your social media networks, posting a notice in your shop or store, and emailing your subscribers.
    5. Let Suppliers Know You are Closing. If you have relationships with wholesale suppliers, drop them an email to let them know you are closing.
    6. Delete Social Media Profiles. Decide whether you will unpublish or delete your social media accounts, then do it.
    7. Unpublish Your Website and Remove Product Listings Online. This includes any marketplaces you sell through like Etsy or Amazon Handmade.
    8. Stop All Automatic Billing Services and Close Your Accounts. Services that you might need to cancel include accounting programs, website hosting plans, photo editing software subscriptions, mailing lists, domain names, and so on. Additionally, don’t forget to close any business accounts you may have.
    9. Dissolve Your Company. If you are a registered company, you’ll need to contact your state, county, or city to find out how to dissolve your business. If you do not officially dissolve your business, you will still be responsible for tax and business filings.
    10. Keep the Records. You’ll want to keep all business records on hand for use the following tax year.

    How to Sell Your Craft Business

    1. Make the Decision to Close Your Business. Again, there’s no need to feel guilty about it.
    2. Decide on a Price for Your Business. Either sell off just the business or your business and your remaining supplies. Be prepared to back up your asking price with business documentation. Also, be clear on what is included with the business sale.
    3. List Your Business for Sale. You can sell it through crafting groups, online marketplaces, Etsy, or a business broker.
    4. Get Documents. Create or obtain documents that spell out the purchase price, date of transfer, and what is being transferred to a new owner. I’d recommend having an attorney draw up a document for you and your buyer.
    5. Let Customers Know. A quick note to your customers about the ownership changing hands is usually sufficient. Don’t forget to thank them for their support and get them excited about the new owner.
    6. Transfer Everything. After you’ve received a cleared payment, you’ll need to transfer your website or shop to the new owner. Don’t forget to also transfer social media pages, subscriptions, and email addresses.
    7. Cancel or Close Anything Not Being Transferred. If it isn’t being transferred to the new owner, don’t forget to close or cancel it. This includes bank accounts and credit cards.
    8. Dissolve Your Company. Depending on your agreement with the new owner, you may still need to dissolve your company in your state/county/city.
    9. Be Available for the New Owner. Likely, the new owner will need a little bit of training or support to get started. Be available for them for a predetermined period of time.
    10. Keep the Records. Of course, keep all records of your business and the sale filed away until the next tax season.

    Free Printable Checklists

    Closing your business can be a lot of work, but once it’s done you can return to your life. Or, move onto your next big thing. Either way, I wish you the best of luck.

  • 5 Signs That It Might Be Time to Close Your Craft Business

    Today, I’m sharing some signs that it might be time to close your craft business.

    Honestly, this post is hard to write. I blog about starting craft businesses and running and growing craft businesses. And I truly want everyone to succeed.

    However, I have to be realistic – running a craft business isn’t for everyone or even every season in life.

    5 Signs That it Might Be Time to Close Your Craft Business - cuttingforbusiness.com.

    5 Signs That it Might Be Time to Close Your Craft Business

    You No Longer Enjoy Running Your Craft Business

    If you no longer enjoy running your craft business, it is time to move on. I’m not talking about the occasional bad day here or there – everyone has those. I’m talking about disliking many aspects of your business, not enjoying working with customers, and finding it a chore instead of a joy to create products. The best business owners love what they do.

    You’ve Had a Life Change

    If you’ve had a life change that isn’t compatible with running a craft business, it may be time to close your craft business. Perhaps you started your craft business before you had a newborn at home, before you had multiple kids, before your husband or wife took on a new job, or before you moved to a different location.

    Maybe you are having health issues and can’t deal with your business right now? Whatever the reason, people and seasons of our lives change.

    Customer Don’t Love Your Products Anymore

    If customers are constantly having problems and complaining about the products you make, it may be time to close your business. Happy customers are good for business, and if every customer is unhappy – it might just not be right for you.

    There’s No Market For Your Products or the Market is Overly Saturated

    If there’s no market for the products you make, there’s no reason to keep at it. Either change your product lineup to more desirable products, or close down your business. Similarly, if you’ve been at it for a while and you can’t break into an overly saturated market, ask yourself if it’s really worth it. It might be a sign to close down your business.

    You Aren’t Making Any Money

    If you aren’t making any money, it might be time to close your craft business. If you’ve been at it a while (more than a year) and you are constantly spending more than you make, it might be time to call it quits. A business that constantly sucks money and doesn’t make any isn’t good for anyone.

    What to Do After You Decide to Close Your Craft Business

    If you’ve made the decision that it’s time to close your business, there’s still work to do to properly shut down your business. I’ve created a checklist to close your craft business.