Blog

  • 30 Things to Do When Your Craft Business is Slow

    Is your business slower than usual right now?

    There’s no need to panic, because all businesses experience ups and downs. In fact, slow times can be beneficial because you can get a few extra tasks done.

    Today, I’m sharing some ideas of things you can do to keep yourself busy during slower business periods.
    30 Things to Do When Your Craft Business is Slow - cuttingforbusiness.com

    30 Things to Do When Your Craft Business is Slow

    1. Take a Break

    Everyone needs a break sometime. If your business is usually busy and it gets slow – roll with it and take some time off. And, don’t feel guilty about it – not even for a single second.

    2. Clean Your Craft Room/Space

    There, I said it. You know it needs to be done – so go do it. Maybe even invite a friend or two over to help.

    3. Declutter Your Online Existence

    After you tackle the craft room, dive into a digital declutter. I’ve got tips for you in this post and this post.

    4. Make Something for Yourself

    So many times when I talk to Silhouette and Cricut small business owners, they can’t remember the last thing that they made for themselves. In many cases, you bought the machine to create stuff for yourself. Go back to your roots and make a few things for yourself!

    5. Make Gifts for the Year

    If you aren’t into making things for yourself, make a list of all the gifts you’ll need for the rest of the year and make them. You’ll thank yourself when birthdays, anniversaries, and Christmas roll around!

    6. Stock Your Inventory Full of Ready to Ship Products

    When you get busy again you’ll be ahead of the game. Or, use the products you make at an upcoming craft show or fair.

    7. Schedule Social Media

    Save time later by scheduling engaging content on social media ahead of time. At the same time, if there is a network that you aren’t familiar with, get to studying and using it. A content calendar can greatly help you.

    8. Catch Up on Accounting

    If you are one to let your accounting slip through the cracks from time to time, a slow period is the perfect time to catch up. While you are working on accounting, a quick audit can tell you what you can cut out to save money.

    9. Narrow in on Your Niche

    Your niche is your thing. Spend some time focusing in on yours. Not convinced a niche is the way to go? Read my thoughts here.

    10. Audit Your Business for Trademark Violations

    While is isn’t fun, trademarks are a big deal. Remove any products that are trademarked to another company that you are using without permission. Need help? Head to this section of the blog.

    11. Work on Your Pricing

    Prices shouldn’t be static. Instead, they should be ever changing. In slow periods, lower your prices. Read more about dynamic pricing in this post.

    12. Rebrand Your Business

    If you aren’t happy with your branding, change it. This designer has gotten great feedback for logos by other Cutting for Business readers. Don’t forget to read about colors and small businesses in this post.

    13. Retake Your Product Photos

    In many craft businesses, there’s always room for improved photos. Hey, improved photos might even end your slow period. Need photography tips? I’ve got them here.

    14. Freshen Up Your Paperwork

    If you include paperwork like instructions with your products, freshen them up to fit with your branding. I’ve got some you can use at this link.

    15. Research and Work on SEO

    Time spent working on search engine optimization is never time wasted. Those titles, tags, and descriptions are powerful – so use them correctly.

    16. Experiment with New Products

    If you currently work with vinyl, try working with paper. If you only work with jewelry making, pick up some vinyl. Maybe sublimation is right for you?

    17. Create New Designs and Products

    Expanding your current line of products is a great way to spend your down time.

    18. Network with Other Makers

    There’s thousands of other makers and small business owners that you can connect with on social media. Find a couple that have products who complement yours and reach out to them.

    19. Volunteer or Network with a Charity

    In addition to helping the charity, it’s a good way to get your business name out there.

    20. Start a Website or Update Your Website

    If you don’t already have one, a slow time is a great time to start one. Here’s some resources on Cutting for Business.

    21. Work on Building Your Email List

    I’ve said it several times on the blog before, but email lists are often your best bet for reaching customers. Read more in this post and this one.

    22. Create a Library of Email Templates

    If you regularly email similar information to customers, build a small library of emails to use. Then, when you need one it is just a quick copy and paste and you are done.

    23. Film Some Videos

    Video marketing is here to stay. Put together a video or two to use in your craft business. I’ve got some resources for video marketing here.

    24. Enroll in a Class, Register for a Conference, or Attend a Tradeshow

    Your class could be business related or it can be for pleasure. A few of my favorite online class providers are Udemy, Skillshare, and CreativeLive. For conferences and shows, here is a list of reasons why I recommend them.

    25. Create a Passive Income Stream

    Head to this series on the blog and learn more.

    26. Get to Know Your Customers Better

    Take a look at your analytics and see what patterns you can learn about your customers and the demographic you attract. Create a loyalty program or survey your customers. I’ve got an easy to implement loyalty program here and information about surveying in this post and this one.

    27. Start Selling on a New Platform

    If you don’t use Etsy; try it. Haven’t checked out TpT; head here.

    28. Start Shipping Internationally

    If you only ship to the USA, you’ve got the world waiting for your products. Get some tips in this post.

    29. Find New Wholesale Suppliers

    Searching for new suppliers can be tedious, but if your business is slow – it’s a great time. Here are some of my favorites.

    30. Make Your Business Official

    Let’s face it, paperwork is time consuming. Government paperwork is even worse. Use your down time to get it all sorted out. Confused about whether you have a business or a hobby? Here’s what the IRS says.

    While your business is slow, you definitely won’t be! What do you do when your business is slow?
  • Tutorial: How to Use Sublimation Markers

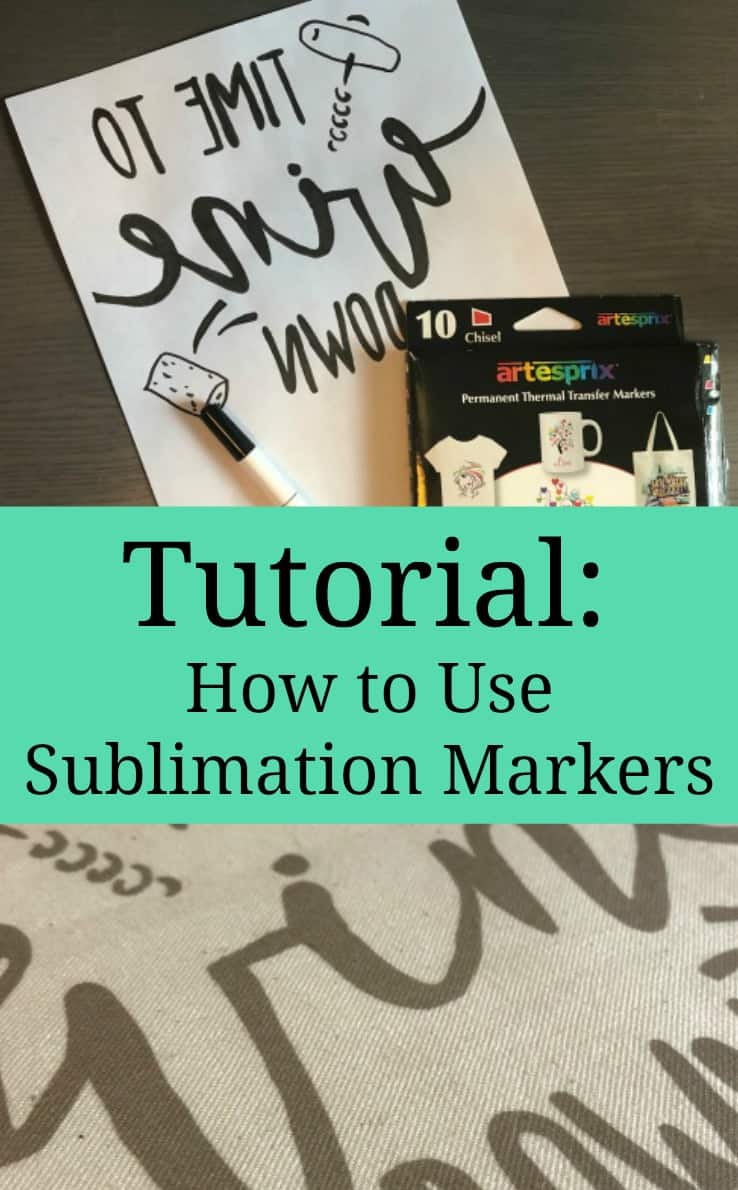
    I’ll be honest, before Clay from Coastal Business Supplies reached out and offered to send me some sublimation markers – I had never heard of them. But, once the package arrived I couldn’t wait to try them out! Today I’m sharing some information and a tutorial on how to use sublimation markers.

    What are Sublimation Markers?
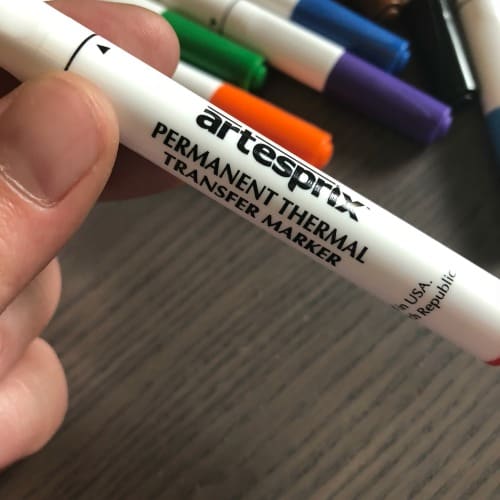
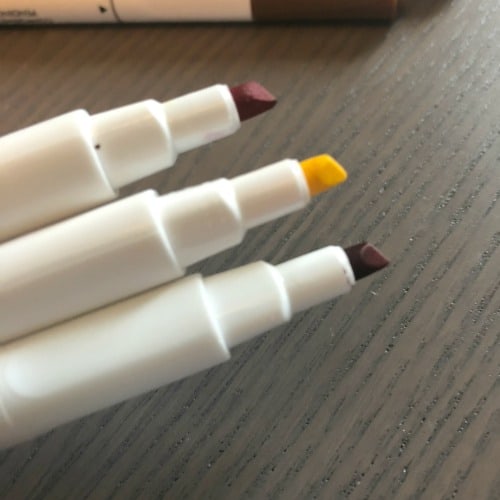
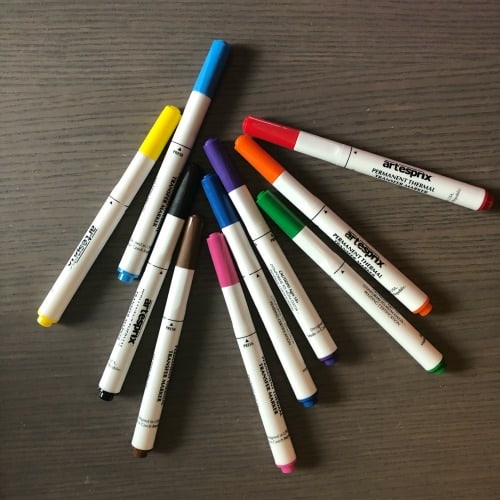
    Sublimation markers are markers that have sublimation ink inside of them. They look and work like a regular marker. The markers I received are made by Artesprix and had 10 markers in the package.

    Tutorial: How to Use Sublimation Markers - by cuttingforbusiness.com
    Tutorial: How to Use Sublimation Markers - by cuttingforbusiness.com
    Tutorial: How to Use Sublimation Markers - by cuttingforbusiness.com

    Stop! If you aren’t familiar with the process of sublimation, head to this post first. Good news for those wanting to use the sublimation markers? You don’t need any sublimation supplies, just a heat press or iron, plain paper, and the sublimation markers.

    Tutorial: How to Use Sublimation Markers

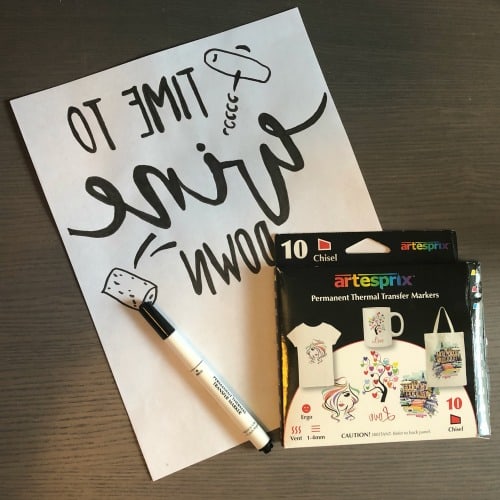
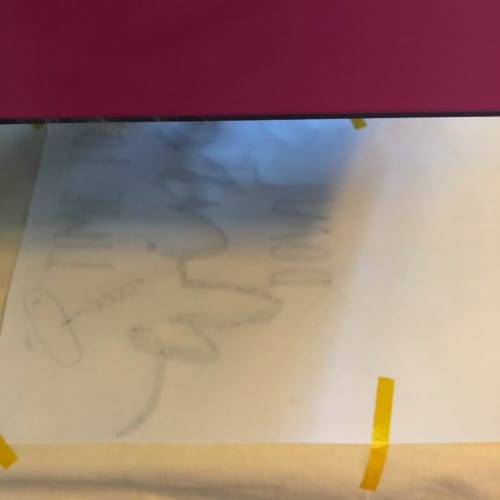
    1. Draw a design on a blank piece of plain paper using the sublimation markers. I used white printer paper. When drawing, remember that your design will be pressed onto your blank item and it will be a mirror image of whatever you draw. (This means that if you are writing text, your text will need to be written backwards!) I’m no artist, so I purchased this design and traced it mirrored with the markers. If you do handlettering or calligraphy though – these are a must buy for you! Tutorial: How to Use Sublimation Markers - by cuttingforbusiness.com
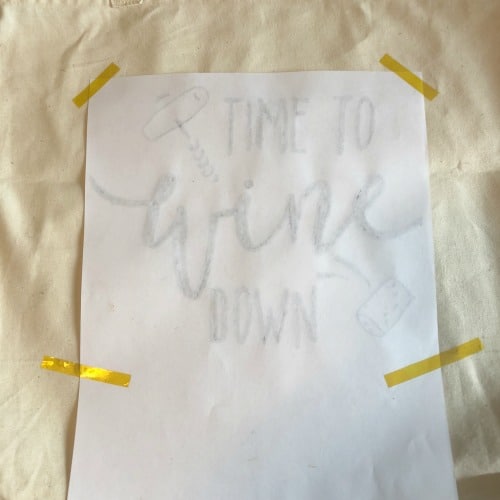
    2. Place the design onto your blank product. You must use a polyester blank or a specially prepared sublimation blank. I taped my design in place with heat transfer tape so that it wouldn’t slide around when I closed my Happy Crafters Pink PressTutorial: How to Use Sublimation Markers - by cuttingforbusiness.com
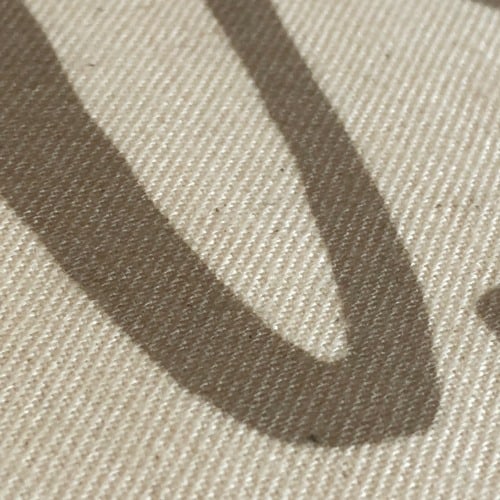
    3. Press the design. Now, the marker box instructions say to press for 45 to 300 seconds with a heat press or iron at 350 to 400 degrees. I settled with 100 seconds – but there was no logic to this. I actually think I should have pressed longer to get brighter colors. Tutorial: How to Use Sublimation Markers - by cuttingforbusiness.com
    4. Remove the paper and tape and admire your work! Tutorial: How to Use Sublimation Markers - by cuttingforbusiness.com
      Tutorial: How to Use Sublimation Markers - by cuttingforbusiness.com
      Tutorial: How to Use Sublimation Markers - by cuttingforbusiness.com

    Originally, when I knew these markers were being sent to me I had planned on letting my kids draw on paper and press the design onto something for them. The back of the box states to ‘Keep out of reach of children’, so I gave that a pass – but might supervise them while drawing and see how that goes.

    Using the sublimation markers was quick, easy, and fun. I plan to experiment with them more in the future.

    If you love this idea or tutorial, save the image below to Pinterest.

    Tutorial: How to Use Sublimation Markers - by cuttingforbusiness.com

  • Spring Marketing Ideas for Craft Businesses

    The Spring season is almost here. Spring is a great time for new products, new customers, or a Spring sale. And, that means plenty of opportunities for Silhouette and Cricut craft businesses to make money.

    Let’s look at a some Spring marketing ideas for your craft business.

    Spring Marketing Ideas for Craft Businesses - cuttingforbusiness.com

    Spring Marketing Ideas for Craft Businesses

    Use these marketing themes throughout the Spring months in your products, social media platforms, and promotions.

    Renewal

    Nature shows us that Spring is a time for renewal. Focus your marketing efforts on fresh starts and color palettes that feature bright colors like greens, yellows, pinks, purples, and light blues.

    Milder Weather

    As the snow melts and temperatures rise, Spring is the time for many to head to their gardens. Products focused on gardening and spending time outdoors will sell well. With Earth Day in April, small businesses can focus on green living and creating.

    Spring Cleaning

    For many, Spring is a time to deep clean and purge with a good cleaning. Use this concept in your craft business to get rid of old inventory that you haven’t been able to move. An ‘in with the new and out with the old’ social media campaign could work well.

    Spring Fling

    Many companies will hold ‘Spring Fling’ sales. Market this idea with your favorite product. You might describe it as ‘easy to fall in love with fast and on sale until (date)’.

    Spring Break

    Across the country, schools will be out for Spring Break. Spring is an excellent time to start marketing your summer products early – for those customers that may be traveling to vacation at the beach. You can market everything from personalized sun hats or visors, custom beach towels, and shirts with fun sayings.

    Outdoor Events

    With warmer weather, craft fairs and shows can be held outdoors. Consider signing up for an outdoor event, or a space at your local farmer’s market.

    Taxes/Tax Refunds

    With taxes in the United States due in April, many think of Spring as ‘tax time’. Theme promotions on your social media around a ‘Tax Relief Sale’ or a ‘Tax Refund Sale’. Since many customers receive refunds, focus on reminding them they can spend their tax refund on a product in your shop.

    Graduation

    In late Spring, graduations start. You could theme products to kindergarten graduation, middle school graduation, high school graduation, or college graduation. Remember to aim products towards both gifts for graduates and gifts to help them in their next step in life.

    Major Holidays in Spring

    St. Patrick’s Day

    Think all things luck, lucky, and green. While consumers don’t spend a lot of money on St. Patrick’s Day, lower priced items usually sell well. Consider theming your St. Patrick’s Day products to specific groups or professions.

    Product Ideas to Sell: Shirts, Irish blessing signs and decor, leprechaun treat bags or traps, and drinkware or drinkware decals.

    Easter

    Last year, the National Retail Federation estimated that Americans spent an average of $192.01 on Easter. This is divided into these main categories: Candy, food, gifts, clothing, and decorations. (Source.)

    In 2024, Easter falls early: March 31. Be sure to get your Easter products ready to sell early. You can choose either a religious path or an Easter bunny path in your craft business.

    Product Ideas to Sell: Small products like keychains, plush, and personalized goods that can be put into Easter baskets, custom Easter basket tags, matching family shirts, home decor, Easter themed garland, Easter table decor, or DIY Easter egg decorating kits with vinyl stencils.

    Cinco de Mayo

    While Cinco de Mayo isn’t a huge celebration in much of Mexico, in the US, we use it to celebrate Mexican-American heritage.

    If you recognize Cinco de Mayo in your business, be sure to be culturally aware and respectful. There is a great article on this from Better Homes and Gardens.

    Possible Collaborations for Cinco de Mayo: Partner with a local Mexican restaurant or a Mexican owned local business.

    Mother’s Day

    At some time, everyone has had or has a mother. Include customers in your social media promotions. Increase customer engagement by asking your customers to share a photo of their mother or them with their mother across your social channels.

    Also, when marketing for Mother’s Day, be sure your target audience is dads. Dads are often primary shoppers for Mother’s Day.

    Product Ideas to Sell: Mother’s Day cards, photo frames, tote bags, custom jewelry, mom-themed decals, or monogrammed kitchen accessories.

    Companies to Partner with This Spring

    Spring is the perfect time to partner with local businesses. Collaborating with other businesses can help your business reach a wider audience and and bring you new potential customers.

    Here are some ideas:

    • Florists
    • Landscapers & lawn care providers
    • Realtors
    • Pressure washing companies
    • Home organizers
    • Plant nurseries
    • Cleaning services
    • Wedding and event planners

    No matter what you plan for Spring in your craft business, I hope this article on Spring marketing ideas has helped you. Look for some crafting inspiration? I’ve got a list of Spring sayings to get you started.

  • Tutorial: How to Create Custom Packaging Stickers with a Dymo 4XL

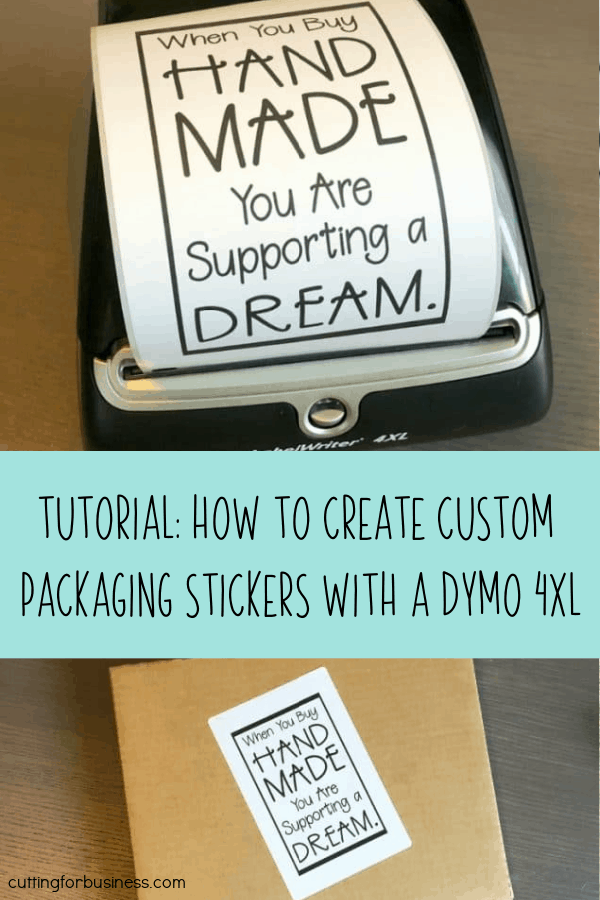
    You probably already know that I’m in love with my Dymo 4XL label printer. If you aren’t familiar with them, it’s a printer that prints shipping labels on sticker paper. My favorite thing? The Dymo 4XL uses thermal paper and heat to print – so it doesn’t require ink! A few years ago when I got it, I wrote about how much I loved it – read that post here.

    Recently, I’ve been doing more with my Dymo 4XL – like printing stickers to put on the outside of the packages I ship. Today, I’m sharing how I create these stickers.

    How to Create Custom Packaging Stickers with a Dymo 4XL

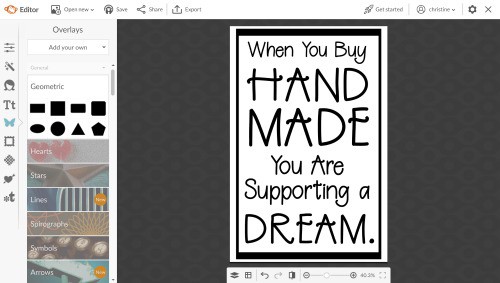
    1. Head to your favorite photo editor. For this tutorial, I’m using PicMonkey.
    2. Set your canvas size to 4 inches by 6 inches (1500 pixels by 1000 pixels for vertical layout or 1000 pixels by 1500 pixels for horizontal layout). Tutorial: How to Create Custom Packaging Stickers with a Dymo 4XL - Great for Silhouette Cameo or Cricut Explore or Maker Small Business Owners - by cuttingforbusiness.com
    3. Create your design. When creating, remember that the Dymo 4XL only prints in black. I used the Berrylicious font to create my sticker.Tutorial: How to Create Custom Packaging Stickers with a Dymo 4XL - Great for Silhouette Cameo or Cricut Explore or Maker Small Business Owners - by cuttingforbusiness.com
    4. Once you’ve designed your sticker, save it to your computer using the ‘Export’ button. Then, print it!

    Ideas for Stickers with the Dymo 4XL

    • Thank your customer for shopping handmade (or local).
    • Tell your customer that you loved creating their handmade order.
    • Announce the arrival of their happy mail!
    • Remind your customer to leave you a five star review.
    • Use your business logo, name, and website to help promote your brand.

    Get out there, and get creative! Your Dymo 4XL doesn’t have to be just for printing shipping labels.

    Love this idea? Save the image below to Pinterest.

    Tutorial: How to Create Custom Packaging Stickers with a Dymo 4XL in Your Craft Business - by cuttingforbusiness.com
  • Tutorial: How to Cut Out Wood Words & Shapes Using a Scroll Saw

    Last year, I shared a tutorial on using your Silhouette or Cricut and a scroll saw to cut out shaped blanks that you could paint or stain. (Missed it? Read it here.) I’ve been meaning to add another, and today I finally got around to it!

    In the first tutorial, I kept the scroll saw cuts super simple. This time, this tutorial features more difficult cuts – like cutting out the centers of text. You’ll also notice that I used a thicker wood – 1/2 inch select pine.

    How to Cut Out Wood Words & Shapes Using a Scroll Saw

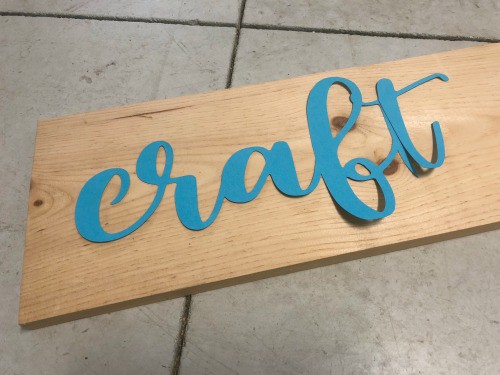
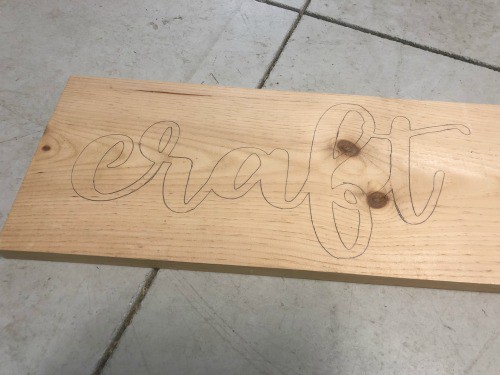
    1. Use your Silhouette or Cricut to cut a template from cardstock. I used the Hello Wedding font and the word Craft. After cutting your cardstock template, trace around it on your wood using a pencil. Tutorial: How to Cut Out Wood Words & Shapes Using a Scroll Saw and Your Silhouette Portrait or Cameo and Cricut Explore or Maker - by cuttingforbusiness.com
      Tutorial: How to Cut Out Wood Words & Shapes Using a Scroll Saw and Your Silhouette Portrait or Cameo and Cricut Explore or Maker - by cuttingforbusiness.com
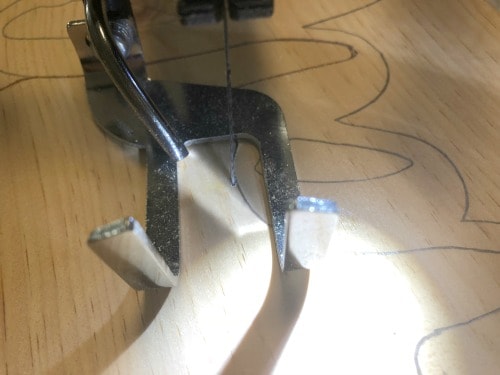
    2. Begin your scroll saw cuts and cut around the entire outside of your word or shape. Cutting with a scroll saw is much like using a sewing machine. As you complete more projects, you’ll get better at doing smooth rounded edges and corners. The one thing that helps me is to constantly keep my wood moving. (If you are curious, I don’t have a fancy scroll saw. Read more about it here.)Tutorial: How to Cut Out Wood Words & Shapes Using a Scroll Saw and Your Silhouette Portrait or Cameo and Cricut Explore or Maker - by cuttingforbusiness.com
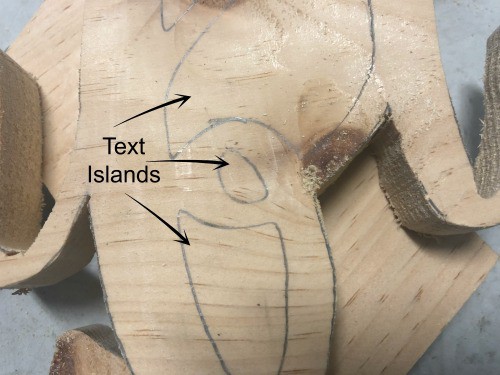
    3. After you’ve cut around the outside of the design, drill holes into the insides of the text (these are called islands). Now, consult your scroll saw manual to find out how to remove the blade. On my scroll saw, I turn a knob which releases the tension in the blade and allows me to remove and rethread the blade through my drilled hole. Then, you’ll cut out all of the islands. Tutorial: How to Cut Out Wood Words & Shapes Using a Scroll Saw and Your Silhouette Portrait or Cameo and Cricut Explore or Maker - by cuttingforbusiness.com
      Tutorial: How to Cut Out Wood Words & Shapes Using a Scroll Saw and Your Silhouette Portrait or Cameo and Cricut Explore or Maker - by cuttingforbusiness.com
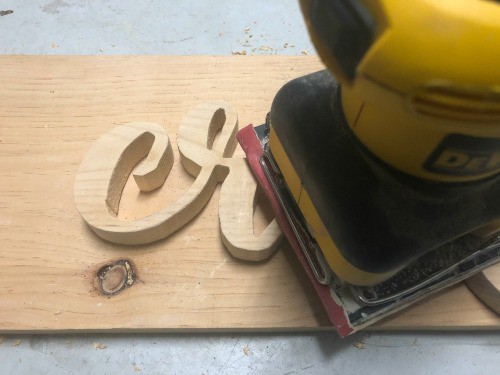
    4. After you’ve cut your shape, sand down any rough edges. (Need tips for sanding? Head to this post.) I used my palm sander for the front, back, and edges and sandpaper for the islands and other nooks and crannies. Tutorial: How to Cut Out Wood Words & Shapes Using a Scroll Saw and Your Silhouette Portrait or Cameo and Cricut Explore or Maker - by cuttingforbusiness.com
    5. Stain or paint your wood word or shape. I used spray on stain (wood stain that comes in a spray paint can). This is the first project that I’ve used it and was happy with the results. Here’s the exact one I used. After staining and painting, your wood word is ready to add a hanger to the back and hang on the wall. I usually use screw in sawtooth hangers.
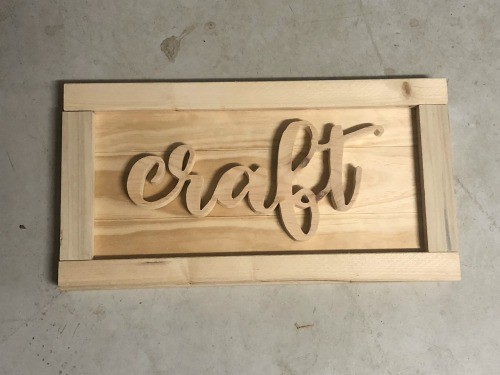
    6. I decided to mount my word onto a frame on made with some wood scraps laying around my garage. I used basic wood nails to nail everything together. Here’s a link to a tutorial on the blog if you’d like to make a frame, too. Oh! I painted the background white using this.
      Tutorial: How to Cut Out Wood Words & Shapes Using a Scroll Saw and Your Silhouette Portrait or Cameo and Cricut Explore or Maker - by cuttingforbusiness.com

    Love this tutorial? Save the image below to Pinterest!

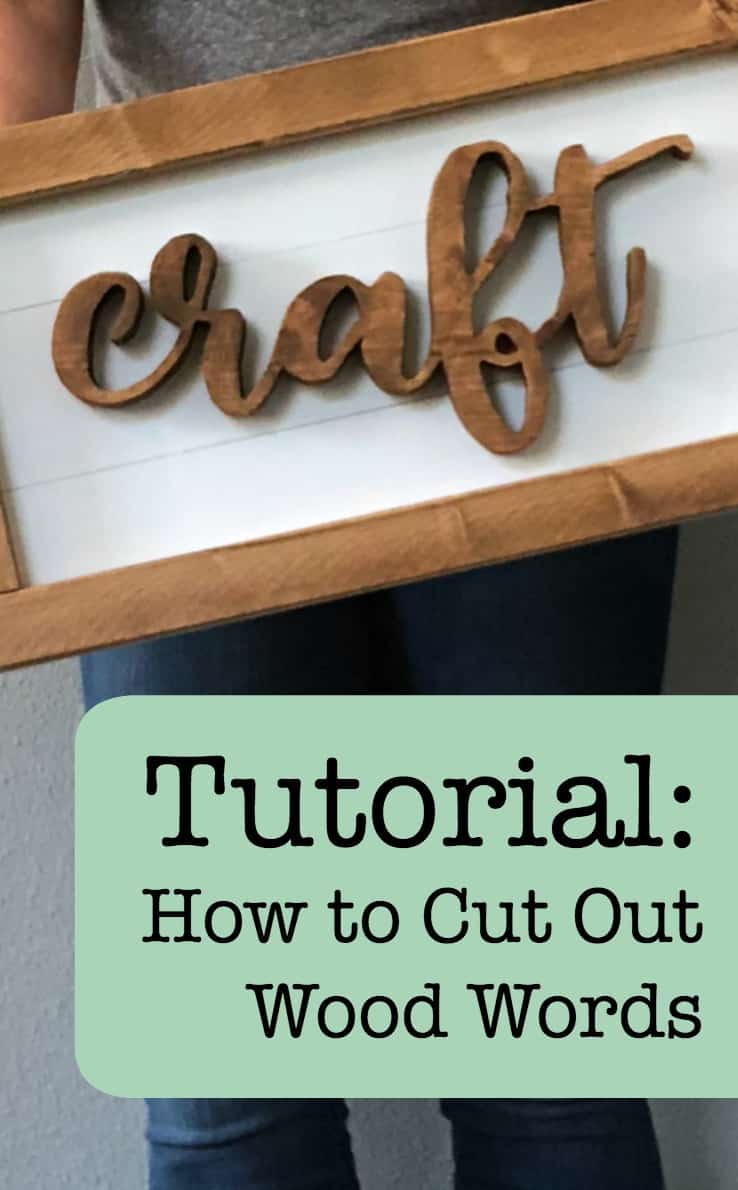
    Tutorial: How to Cut Out Wood Words & Shapes Using a Scroll Saw and Your Silhouette Portrait or Cameo and Cricut Explore or Maker - by cuttingforbusiness.com

  • What is an EIN Number? Do You Need One?

    As you’re working through your tax paperwork for 2018, you might come across a blank spot on paperwork to write your EIN number. Today, we are going to take a brief look at EIN numbers and your craft business.

    What is an EIN Number?

    EIN stands for Employer Identification Number. An EIN number, also called a FEIN (Federal Employer Identification Number) or Federal Tax Identification Number, is a unique way to identify your business. It’s 9 digits long and is public record – meaning anyone that knows your business name can look up your EIN number online.

    Do You Need an EIN Number?

    Generally, if you are incorporated as a sole proprietorship or a single member LLC with no employees, you do not have to obtain an EIN number. Instead, you can use your social security number on official paperwork.

    There are a few circumstances where a sole proprietorship or single member LLC might need an EIN number. These aren’t likely in craft businesses, but for others that may happen upon this article, click here for the IRS EIN Number Quiz.

    With identity theft so common is our modern times, I prefer to use my EIN number on paperwork related to my business instead of my social security number. I mean, once I turn over my social security number, I can’t control whether or not the paperwork gets left on a desk for someone else to spy. Since an EIN number is free, I’d recommend you also get one.

    How to Get an EIN Number

    Now that you know it’s free, let me also tell you that it is fast and easy to obtain. First, go to this link at the IRS website and then complete the form. After the IRS successfully validates your information, your EIN number is immediately available.

    If you’d prefer to fax or mail your EIN application, click here for instructions.

    That’s it! Dealing with the government usually isn’t fast and painless, but this time it is!

    If this article was helpful, save the image below to Pinterest!

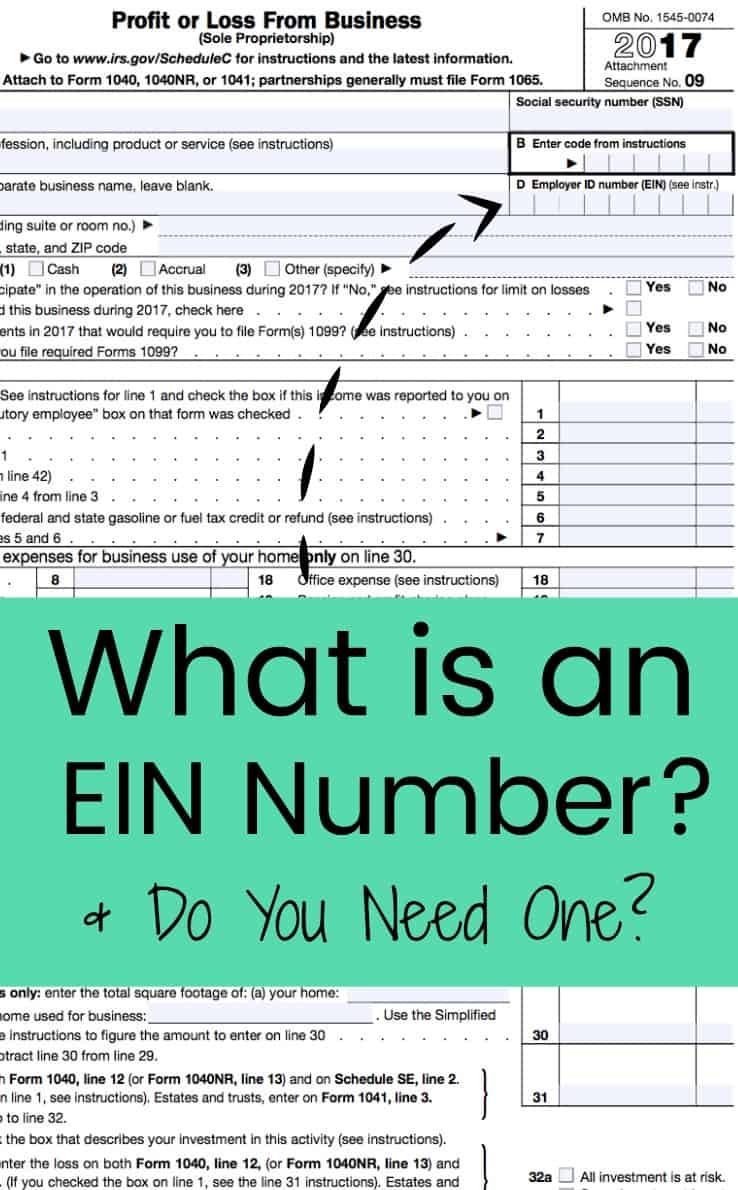
    What is an EIN Number? Do You Need One? Great for Silhouette Cameo, Curio, or Portrait and Cricut Explore or Maker Crafters - by cuttingforbusiness.com

  • FAQ: Social Media Content Calendars

    I hear from craft business owners all the time that they would love to be more active on social media, but they have a hard time deciding what to post.

    Today, let’s look at content calendars and how they can help your craft business.

    FAQ: Content Calendars - cuttingforbusiness.com.

    What are Social Media Content Calendars?

    Social media content calendars are outlines of what you will post on social media each day. You use them to both plan your social media strategy and to keep your posting on track.

    Why Should I Use a Content Calendar?

    Using a social media content calendar helps you become more effective on social media. They also save time when scheduling social media posts on Facebook, Instagram, Twitter, and Pinterest.

    How Do I Create a Social Media Content Calendar?

    While creating your own calendar sounds daunting, it really isn’t. Follow these steps to create your own:

    1. Make a list of content ideas you’d like to post about.
    2. Print out a blank calendar. Any weekly or monthly layout will do.
    3. On each day, write a different theme. Some examples include:
      • Monday: A product you sell.
      • Tuesday: A picture of you working on a product.
      • Wednesday: A picture of your packaging.
      • Thursday: A customer review.
      • Friday: A coupon code for your shop.
      • Saturday: A link to another social media network.
      • Sunday: A funny meme that relates to you or your business.
      • Monday: Behind the scenes at your company.

    The best part? After you create a calendar, you can reuse it month after month.

    How to Create a Social Media Content Calendar Using ChatGPT

    One great use of ChatGPT is to create your own customized content calendar. Let’s take a look at an example:

    ChatGPT Prompt: Write a 30 day content calendar for a company selling digital SVG cut files to use on Facebook. Keep the tone light and fun.

    ChatGPT Response:

    “Day 1: Let the Cutting Begin!

    • Share a colorful image of a finished project created using your SVG cut files.
    • Invite followers to join the crafting fun with your digital cut files.
    • Ask them to comment with their favorite crafting tool or machine.

    Day 2: Monday Motivation ✨

    • Post an inspirational quote related to creativity and crafting.
    • Encourage followers to start their week with a burst of creative energy.
    • Share an image showcasing one of your intricate and unique SVG designs.

    Day 3: Crafty Quiz Time!

    • Create a fun quiz to determine the perfect SVG cut file for different crafting personalities.
    • Ask followers to comment with their quiz results and tag a crafting buddy.
    • Offer a special discount on the recommended SVG cut file for the day.

    Day 4: Let’s Get Punny!

    • Share a funny crafting-related pun or joke.
    • Encourage followers to comment with their favorite crafting puns.
    • Offer a small prize to the follower with the most creative pun.

    Day 5: Show Off Your Skills!

    • Ask followers to share images of their latest projects made with your SVG cut files.
    • Feature some of the best submissions on your page.
    • Thank them for their creativity and offer a discount code for their next purchase.

    Day 6: Fun Fact Friday

    • Share an interesting fact about SVG cut files or the crafting world.
    • Encourage followers to share their own crafting facts in the comments.
    • Offer a surprise giveaway to one lucky participant.

    Day 7: Sunday Funday DIY

    • Provide a simple, quick DIY project using one of your SVG cut files.
    • Encourage followers to try it out and share their results.
    • Feature some of the most creative and unique interpretations.

    Day 8: Crafting Hacks

    • Share a useful crafting hack or tip related to working with SVG cut files.
    • Ask followers to share their own favorite hacks in the comments.
    • Offer a discount code on a popular SVG cut file for the day.

    Day 9: Monday Mood Boost

    • Share an image of a vibrant and colorful project made with your SVG cut files.
    • Ask followers to describe their current crafting mood using emojis.
    • Reply with an emoji that represents your excitement for their creations.

    Day 10: Crafting Confessions

    • Post a lighthearted question asking followers to share their funniest crafting mishap or bloopers.
    • Share a funny anecdote or mishap that happened during your own crafting process.
    • Offer a discount code on SVG cut files as a token of appreciation for their shared stories.

    Day 11: Crafters’ Spotlight

    • Highlight a talented crafter who uses your SVG cut files in their creations.
    • Share their story, showcase their work, and provide a link to their social media or website.
    • Encourage followers to support and follow their fellow crafters.

    Day 12: Trivia Time!

    • Post a trivia question related to crafting or SVG cut files.
    • Ask followers to guess the correct answer in the comments.
    • Reward the first person to answer correctly with a special discount code.

    Day 13: Creative Caption Contest

    • Share an amusing or intriguing image related to crafting.
    • Ask followers to come up with the most creative caption for the image.
    • Select the top three captions and let followers vote for the winner.

    Day 14: Show Us Your Craft Room!

    • Ask followers to share images of their craft rooms or creative spaces.
    • Comment with emojis or positive remarks on their organization skills.
    • Feature some of the most inspiring and well-arranged craft rooms.

    Day 15: Midweek Surprise Giveaway

    • Announce a surprise giveaway for followers who have made a purchase in the past month.
    • Encourage others to participate by sharing their favorite SVG cut file in the comments.
    • Select a winner randomly and announce the prize.

    Day 16: Crafter’s Playlist

    • Share a curated playlist of upbeat and inspiring songs to craft along with.
    • Ask followers to share their favorite crafting tunes in the comments.
    • Create a collaborative Spotify playlist with their suggestions.

    Day 17: Fun with Filters!

    • Share a tutorial on how to use various editing filters to transform SVG cut files.
    • Encourage followers to try it out and share their edited designs.
    • Feature some of the most unique and eye-catching creations.

    Day 18: Friday Freebie Extravaganza!

    • Release multiple free SVG cut files for your followers.
    • Announce a limited-time offer to download the files for free.
    • Encourage followers to tag their crafty friends to spread the word.

    Day 19: Crafty Doodles ️

    • Share a fun and simple doodle tutorial related to crafting or your SVG cut files.
    • Encourage followers to try it out and share their doodles in the comments.
    • Offer a discount code on a popular SVG cut file for the day.

    Day 20: Weekend Crafting Challenge

    • Present a crafting challenge using one of your SVG cut files.
    • Ask followers to create something unique and share their creations.
    • Select a winner based on creativity and announce a special prize.

    Day 21: Craft Room Organization Tips ️

    • Share tips and tricks for organizing craft rooms or creative spaces.
    • Include photos or videos of well-organized craft rooms for inspiration.
    • Ask followers to share their own organization hacks in the comments.

    Day 22: Unleash Your Inner Artist

    • Share an SVG cut file design that allows customization and personalization.
    • Encourage followers to get creative and add their unique touch to the design.
    • Share examples of personalized projects made with the same SVG cut file.

    Day 23: Craft Supply Haul

    • Showcase a selection of essential crafting supplies that complement your SVG cut files.
    • Provide links or recommendations for where followers can purchase them.
    • Offer a discount code on one of the showcased SVG cut files.

    Day 24: Crafty Inspirations

    • Share a collection of beautiful and inspiring craft projects made by talented creators.
    • Emphasize the versatility of your SVG cut files in creating stunning designs.
    • Encourage followers to try new techniques inspired by the showcased projects.

    Day 25: Interactive Poll

    • Post a poll asking followers to vote for their favorite SVG cut file category (e.g., animals, floral, typography).
    • Share the poll results and announce a surprise discount on the winning category.
    • Encourage followers to tag friends who might be interested in the winning category.

    Day 26: Crafting Self-Care ‍♀️

    • Share the importance of self-care and relaxation while crafting.
    • Offer suggestions for incorporating self-care practices into their crafting routine.
    • Provide a discount on SVG cut files with soothing and calming designs.

    Day 27: Crafting with Kids ‍ ‍

    • Share simple and fun crafting projects suitable for children using your SVG cut files.
    • Provide step-by-step instructions and safety tips for crafting with kids.
    • Encourage followers to share their creations made with their little ones.

    Day 28: Crafters’ Pet Parade

    • Ask followers to share photos of their furry crafting companions.
    • Create a collage or video compilation of the adorable pets crafting alongside their owners.
    • Offer a discount code on SVG cut files featuring pet-related designs.

    Day 29: Customer Appreciation Day

    • Express gratitude to your loyal customers and followers.
    • Offer an exclusive discount or freebie as a thank-you gesture.
    • Share heartwarming testimonials and success stories from satisfied customers.

    Day 30: Crafting Goals

    • Encourage followers to share their crafting goals or projects they want to accomplish.
    • Provide motivational words of encouragement and support.
    • Offer a special discount on SVG cut files to help them achieve their goals.”

    Interested in AI and ChatGPT? Read my article on ways to use ChatGPT in your craft business.

    Where Can I Find Pre Made Content Calendars?

    If you don’t feel like creating your own content calendars, no worry. There are plenty of marketing and small business bloggers online who offer free ones. Here’s a few of my favorites:

    • Rachel Rofe has a 31 day social media calendar. It isn’t tied to a particular month and can be used all year. View it here.
    • Constant Contact has a social media challenge. Again, I like it because it isn’t tied to a particular month. View it here.
    • Classy Career Girl has a 31 day calendar. It can be used in any month. See it here.

    After you’ve got your calendar ready to go, don’t forget to schedule your social media posts. Here’s how to schedule:

  • Design Tutorial: 5 Types of Faux Leather Earring Cut Files in Silhouette Studio

    I’m sure you know, but it seems like faux leather earrings cut with a Silhouette or Cricut are taking the internet by storm. I love the trend and if you don’t design many of your own cut files, these are a great place to start because they are created with simple shapes.

    I’ve said it so many times on the blog before: One way to make your business stand out during trends is to create your own cut files. Of course, doing so insures that your products look different from other small businesses. Let’s get designing!

    Design Tutorial: 5 Type of Faux Leather Earrings in Silhouette Studio

    (Note: The following tutorials use Business Edition, version 4.1.206.)

    Design 1: Teardrop

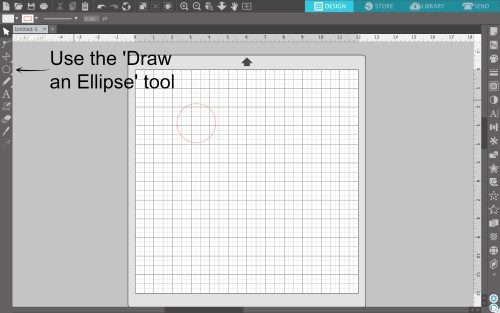
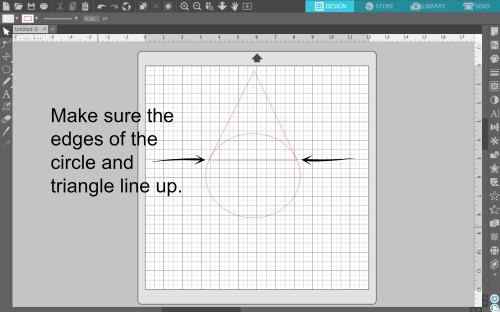
    1. Once in Silhouette Studio, draw a circle using the ‘Draw an Ellipse’ tool. DIY Design Tutorial: 5 Types of Faux Leather Earrings in Silhouette Studio for Cameo, Portrait, or Curio - By cuttingforbusiness.com
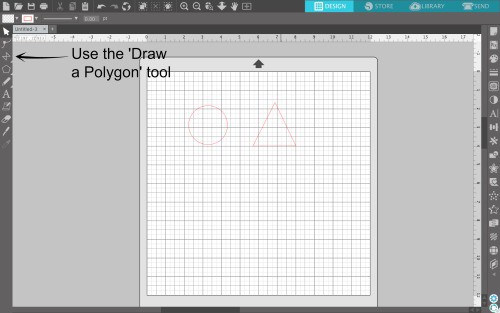
    2. Draw a triangle using the ‘Draw a Polygon’ tool. DIY Design Tutorial: 5 Types of Faux Leather Earrings in Silhouette Studio for Cameo, Portrait, or Curio - By cuttingforbusiness.com
    3. Drag the circle onto the bottom of the triangle. Resize the circle if needed to make sure that it lines up with the bottom corners of the triangle. DIY Design Tutorial: 5 Types of Faux Leather Earrings in Silhouette Studio for Cameo, Portrait, or Curio - By cuttingforbusiness.com
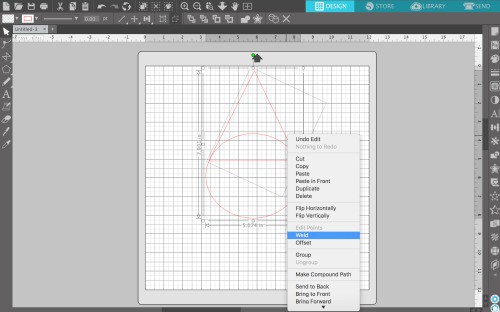
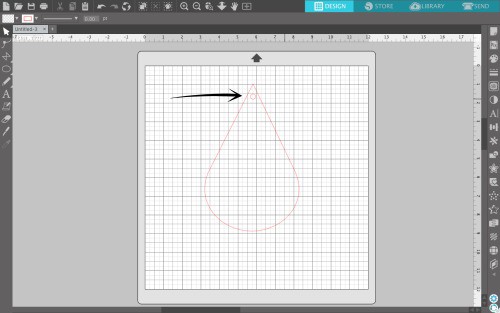
    4. Select both the triangle and the circle and right click, then select ‘Weld”. DIY Design Tutorial: 5 Types of Faux Leather Earrings in Silhouette Studio for Cameo, Portrait, or Curio - By cuttingforbusiness.com
    5. Draw another small circle. This time, hold down the ‘Shift’ key to keep it round (instead of oval). Drag this circle where you want to attach the earring hardware. DIY Design Tutorial: 5 Types of Faux Leather Earrings in Silhouette Studio for Cameo, Portrait, or Curio - By cuttingforbusiness.com
    6. Finally, ‘Select All’ (Command/Control + A on your keyboard). Then, right click and ‘Group’, then right click and ‘Duplicate’. You’ve got two earring designs ready to resize then cut.

    Design 2: Hollow Teardrops

    Now that you’ve mastered the simple teardrop, let’s make it hollow. This is perfect for layered style earrings!

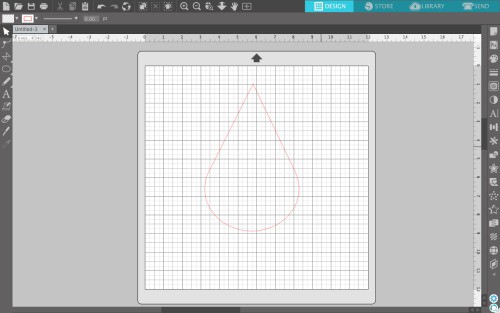
    1. Using the above tutorial, let’s go back to step 4. After welding your triangle and circle, you’ll end up with something like this: DIY Design Tutorial: 5 Types of Faux Leather Earrings in Silhouette Studio for Cameo, Portrait, or Curio - By cuttingforbusiness.com
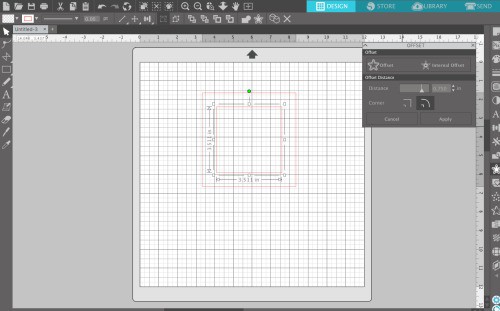
    2. Now, you’ll use the ‘Offset Panel’ (‘Panels’, ‘Offset’) to do an internal offset. Experiment with the offset amount to get the result you want. Click the ‘Apply’ button when you are satisfied. DIY Design Tutorial: 5 Types of Faux Leather Earrings in Silhouette Studio for Cameo, Portrait, or Curio - By cuttingforbusiness.com
    3. After you add a small circle for the earring hardware, this hollow teardrop is ready to cut.

    Design 3: Striped Hollow Teardrops

    Enjoying designing? After you create the hollow teardrop above, add some rectangles across it to make stripes.

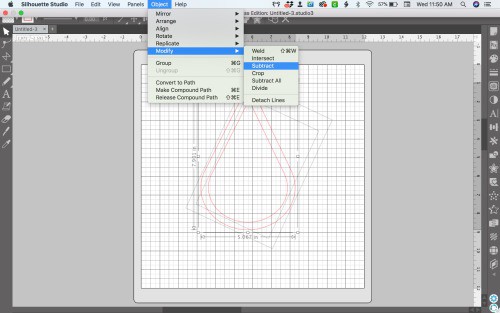
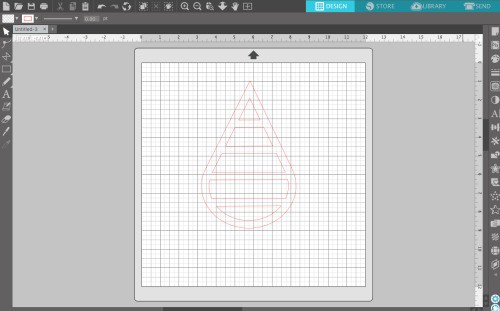
    1. From the last step in the tutorial above, select both teardrops, then navigate to ‘Object’, ‘Modify’, and ‘Subtract’. The inner teardrop will be subtracted from the outer teardrop leaving only an outline. DIY Design Tutorial: 5 Types of Faux Leather Earrings in Silhouette Studio for Cameo, Portrait, or Curio - By cuttingforbusiness.com
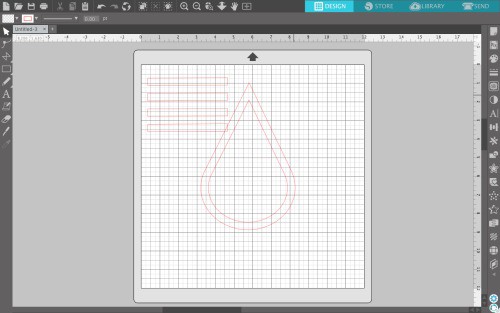
    2. Draw a skinny rectangle and duplicate it a few times. DIY Design Tutorial: 5 Types of Faux Leather Earrings in Silhouette Studio for Cameo, Portrait, or Curio - By cuttingforbusiness.com
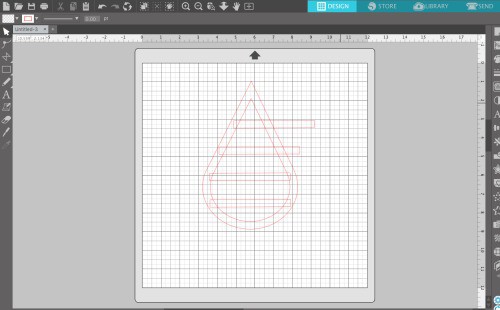
    3. Drag your rectangles across your teardrop outline – spacing them evenly. DIY Design Tutorial: 5 Types of Faux Leather Earrings in Silhouette Studio for Cameo, Portrait, or Curio - By cuttingforbusiness.com
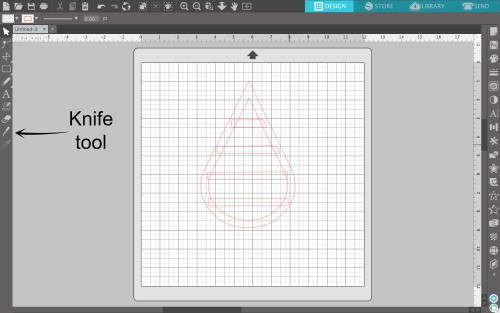
    4. Use the knife tool to cut off the excess of the rectangles, then delete the excess. DIY Design Tutorial: 5 Types of Faux Leather Earrings in Silhouette Studio for Cameo, Portrait, or Curio - By cuttingforbusiness.com
    5. ‘Select all’ the pieces, then right click to ‘Weld’ them together. DIY Design Tutorial: 5 Types of Faux Leather Earrings in Silhouette Studio for Cameo, Portrait, or Curio - By cuttingforbusiness.com
    6. After you add a hole for the earring wire to attach to and resize, this file is ready to cut.

    Design 4: Diagonal Striped Square

    Tired of the teardrop shape? Try out a square.

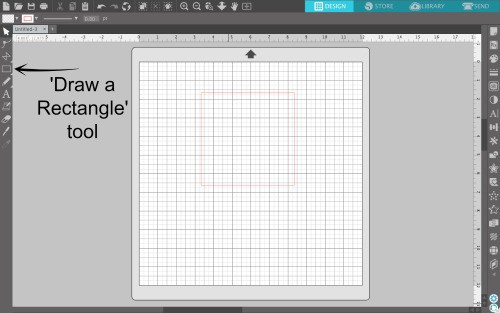
    1. Draw a box using the ‘Draw a Rectangle’ tool. Hold down the ‘Shift’ key to make it square. DIY Design Tutorial: 5 Types of Faux Leather Earrings in Silhouette Studio for Cameo, Portrait, or Curio - By cuttingforbusiness.com
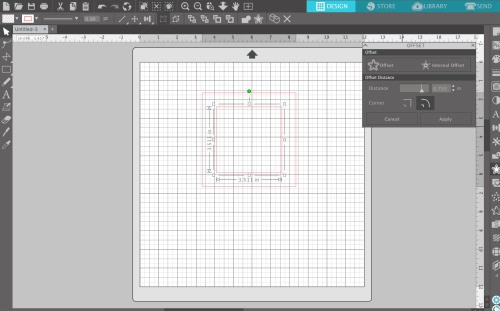
    2. Use the offset function as we did in Design 2 above to create a second box inside the first. DIY Design Tutorial: 5 Types of Faux Leather Earrings in Silhouette Studio for Cameo, Portrait, or Curio - By cuttingforbusiness.com
    3. Navigate to ‘Object’, ‘Modify’, and ‘Subtract’. The inner box will be subtracted from the outer box leaving only an outline. DIY Design Tutorial: 5 Types of Faux Leather Earrings in Silhouette Studio for Cameo, Portrait, or Curio - By cuttingforbusiness.com
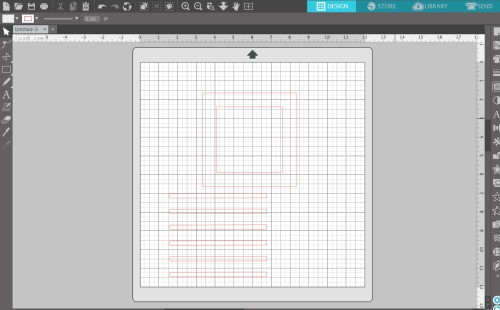
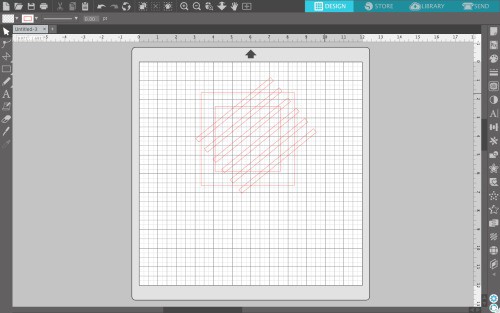
    4. Draw several rectangles and duplicate them. DIY Design Tutorial: 5 Types of Faux Leather Earrings in Silhouette Studio for Cameo, Portrait, or Curio - By cuttingforbusiness.com
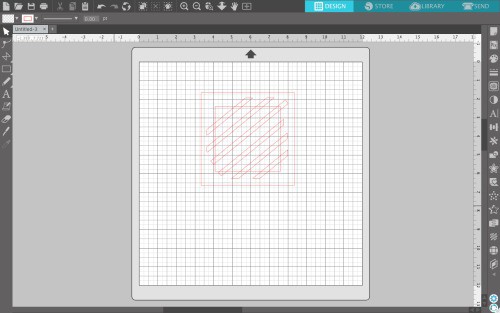
    5. Draw them across your square design – spaced evenly. DIY Design Tutorial: 5 Types of Faux Leather Earrings in Silhouette Studio for Cameo, Portrait, or Curio - By cuttingforbusiness.com
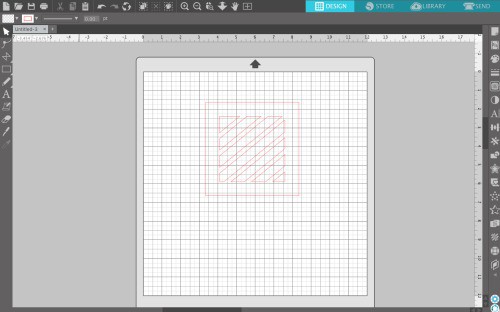
    6. Use the knife tool to cut away the excess diagonal lines. DIY Design Tutorial: 5 Types of Faux Leather Earrings in Silhouette Studio for Cameo, Portrait, or Curio - By cuttingforbusiness.com
    7. ‘Select all’ the pieces, then right click to ‘Weld’ them together. DIY Design Tutorial: 5 Types of Faux Leather Earrings in Silhouette Studio for Cameo, Portrait, or Curio - By cuttingforbusiness.com
    8. After you add a hole for the earring wire to attach to and resize, this file is ready to cut.

    Design 5: Rectangle Cut Out

    One more before you go!

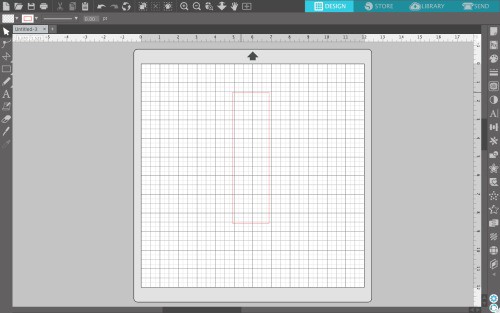
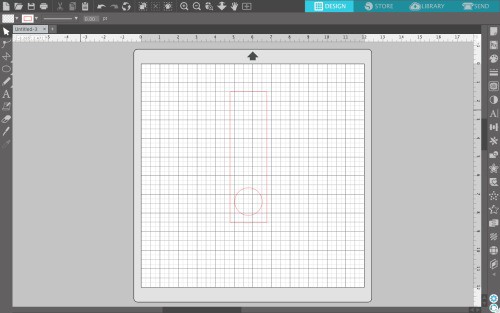
    1. Prefer something a little different? Start with a skinny rectangle. DIY Design Tutorial: 5 Types of Faux Leather Earrings in Silhouette Studio for Cameo, Portrait, or Curio - By cuttingforbusiness.com
    2. Add any shape to the bottom center (circle, heart, leaf, and so on). Then subtract it from the rectangle. DIY Design Tutorial: 5 Types of Faux Leather Earrings in Silhouette Studio for Cameo, Portrait, or Curio - By cuttingforbusiness.com
    3. After you add a hole for the earring wire to attach to and resize, this file is also ready to cut.

    As you can see, there’s no need to buy cut files to create earrings in Silhouette Studio. All you need is a few minutes.

    Don’t forget: I’ve got free earring card templates to mount your earrings on after you create them in this post.

    Need help with the actual earring assembly? Hop over to this tutorial by Lycia.

    Love design tutorials? I can only keep them coming if you save the image below to Pinterest.

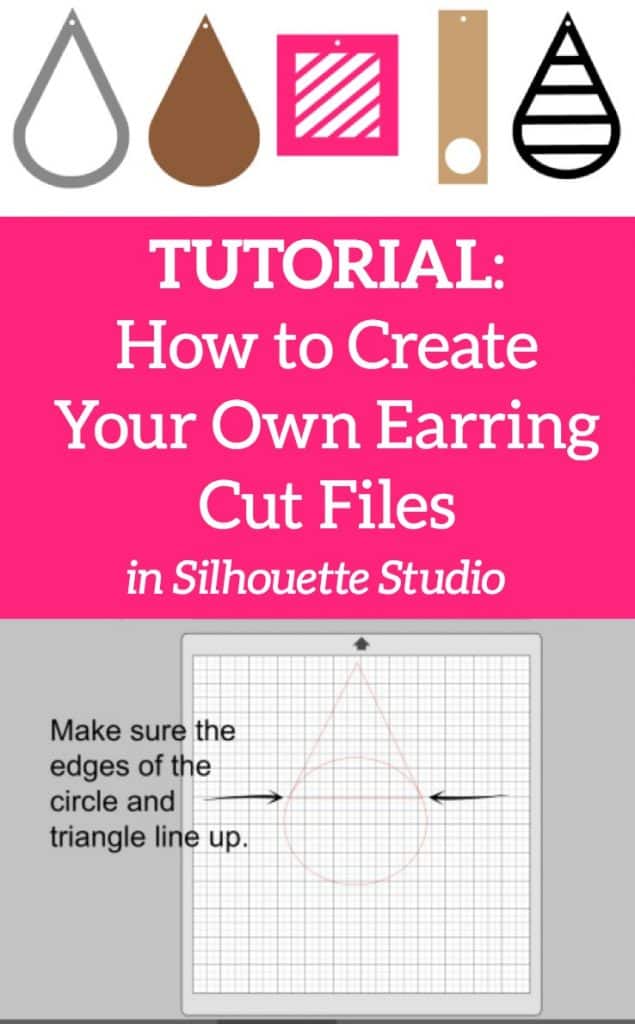
    DIY Design Tutorial: 5 Types of Faux Leather Earring Cut Files in Silhouette Studio for Cameo, Portrait, or Curio - By cuttingforbusiness.com

  • Free eBook: How to Start a Website with Wix for Your Silhouette or Cricut Business

    What better way than to start the day than a brand new ebook? And this time, it’s free! Like I mentioned earlier in the year, I’m going to talk more about how to start your own website this year on Cutting for Business.

    Why? Since I started this blog, I’ve always urged readers to have a goal to end with their own website. (Read more about this here.) I’ve been trying to find good resources to share for certain platforms with step-by-step guides to walk you through starting a website for your craft business. I’ve noticed that the resources already online are either outdated or — aren’t easy to follow.

    First up, let’s look at how to start a website for your craft business using Wix. If you aren’t familiar with Wix, it’s a WYSIWYG (that stands for What You See Is What You Get) website builder.

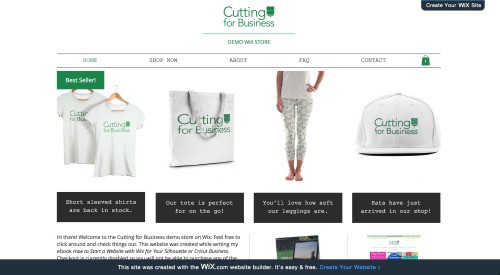
    Demo Wix Site

    I’ve created a demo website on Wix that you can view at this link.

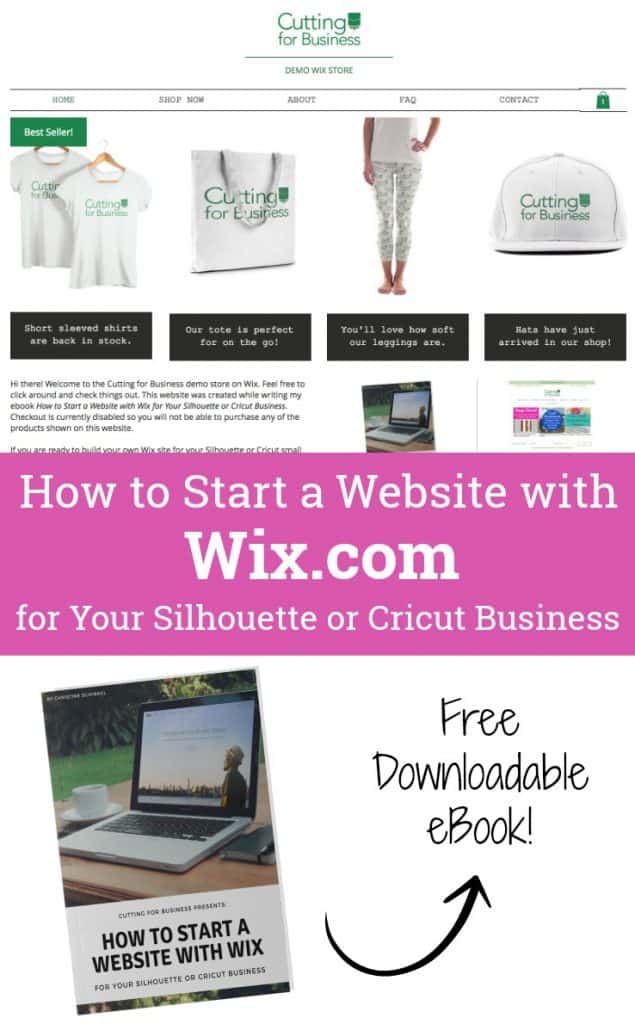
    Free eBook: How to Start a Wix Website for Your Silhouette Cameo or Portrait or Cricut Explore or Maker Business - by cuttingforbusiness.com

    Download the Guide

    This mini guide is entirely free and is 24 pages from cover to cover. It’s in PDF format and available at this link.

    Love the guide? Save the image below to Pinterest and help spread the word!

    Free eBook: How to Start a Wix Website for Your Silhouette Cameo or Portrait or Cricut Explore or Maker Business - by cuttingforbusiness.com

  • 3 Ways to Build an Email List without a Website

    You’ve heard me say it before, but email lists are a great way to stay in contact with your customers. Why? I’ve gone on and on about it in this post. Basically, email lists are the most direct way to reach your customers – without worrying about barriers on social media. If you don’t have a website for your Silhouette or Cricut small business – you can still build your email list. Let’s look at how:

    How to Build an Email List without a Website

    1. Use your business cards. After you’ve started your email list, include a link to it on your business cards or care instructions. Since mailing list signup links can be long and ugly, use a service such as tinyurl.com to make it shorter and easier to type.
    2. Use your email signature. I’m sure you have a memorable signature that you end all of your business emails with. (If not, hop over to this post to learn more.) Consider putting an email list signup form link right in your signature.
    3. Use social media.
      1. On Instagram: Use the link on your bio page to link to your email list signup page.
      2. On Facebook: There are a number of ways you can promote your email list signup page. First, you can create a pinned post that contains the link. Or, you can regularly promote it on your Facebook Page wall by saying things like, “XYZ Business just sent out coupon codes to email subscribers. If you aren’t one, join now at (insert link)”. Additionally, some mailing list providers have integrations in place to connect a tab on your Facebook Page with their service.
      3. On Pinterest: Create a few pins that link to your email list signup forms.
    4. (Bonus!) Use Etsy. If you are an Etsy shop owner, include a link to your email list signup form at the end of the descriptions of your most popular listings. It’s a great call to action!

    That’s it! For something that only takes a few minutes, it can be a huge impact on your Silhouette or Cricut small business. Don’t forget that once you get email list members – regularly send them emails!

    Love this post? Save the image below to Pinterest.

    3 Ways to Build an Email List without a Website - A great read for Silhouette Portrait or Cameo and Cricut Explore or Maker small business owners - by cuttingforbusiness.com