Blog

  • All Things Silhouette Conference Recap – November 2016

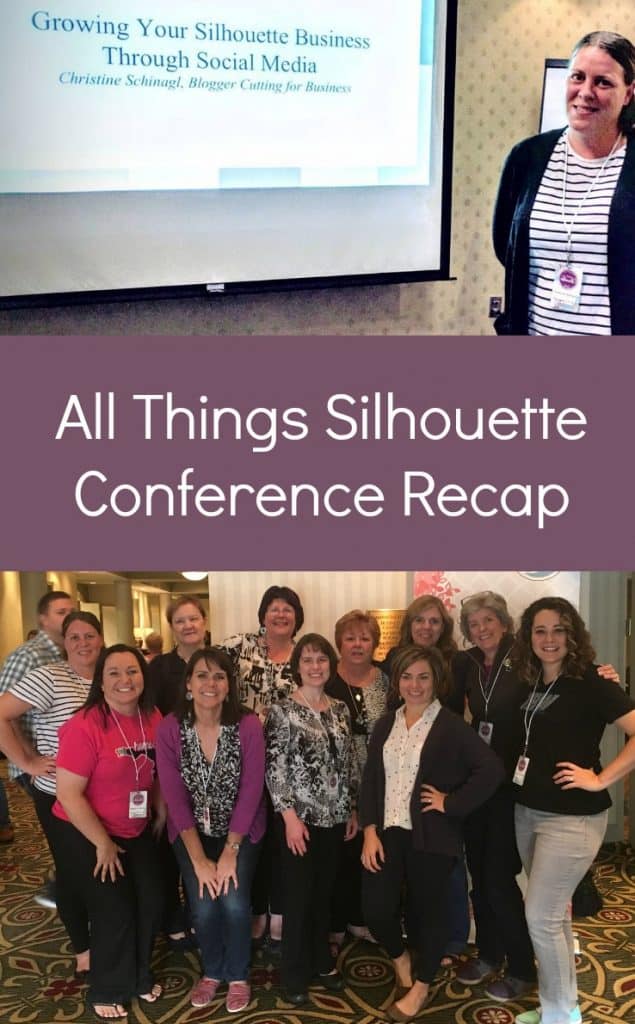
    I got back from the All Things Silhouette Conference in Peachtree City, Georgia yesterday! This is the fourth conference I’ve taught at, and today I’m sharing pictures (lots of them!) from the event.

    The Classes & Instructors

    There were over 50 different classes that ranged from getting to know your Camo, Curio, or Mint to layering vinyl, cutting clay, advanced Silhouette Studio functions, using your Silhouette for business, and everything in between!

    Classes were taught by the Silhouette team, popular bloggers, Silhouette Design Store designers, and crafting experts: Melissa Viscount of Silhouette School, Lori Whitlock of Lori Whitlock, Terri Johnson of Terri Johnson Creates, Becky Dykes from My Paper Craze, Kelly Wayment of Finding Time to Create, Mags Bonham of Really Unique Creations, Jason Geary from Expressions Vinyl, Kendall Ehat from Silhouette, Shelley Stokes from Cedar Canyon Textiles, Jamie Omahen from Craft Chameleon, Lisa Potts from The Rhinestone World, Joe Piazza of Siser North America, Spencer Livingston from Silhouette, Jesse Leue from Silhouette, Karen Kroupa owner at Seaver Brook Designs, Jared Barbosa from Heat Press Nation, Richard Blowedow from SewingMachine.com, and of course – yours truly!

    The Fun Extras

    If classes weren’t enough for you, there was a font contest, a tee shirt contest, a craft swap, door prizes, delicious food, and wall to wall craft supplies, machines, and product information in vendor hall!

    See the Pictures


    I hope to see you at one of the 2017 conferences. What classes would you like to see at a future conference? Let me know in the comments!

    Share this post on Pinterest:

    Video recap of the All Things Silhouette Conference - A Cameo, Curio, and Mint Enthusiasts Dream! By cuttingforbusiness.com.

  • How I Have Over 12,000 Etsy Sales in Less Than a Year

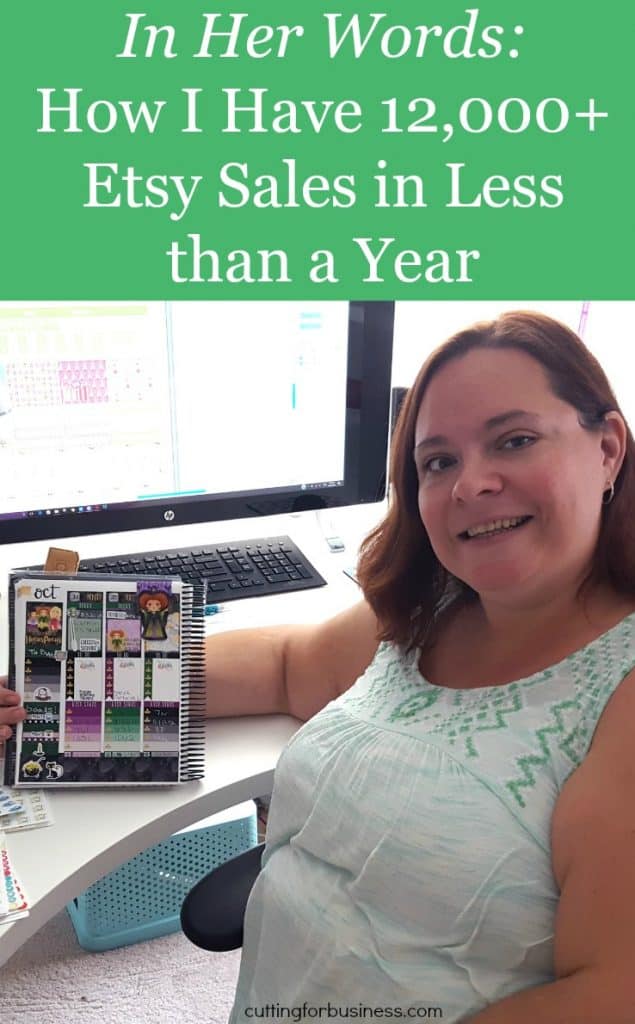
    It’s time for another In Their Words feature on Cutting for Business! Today, I’ve invited Amy from Adorably Amy Designs to share her small business story in her words. Amy’s Etsy shop has been open less than a year and she has over 12,000 sales! Here’s what Amy has to say:

    Like so many other people, I used to have a nine-to-five job. I was good at office-type stuff, so that is what I did. But in my heart, I longed to do something more creative. For a long time, I channeled that creativity into making websites, scrapbooking, and I even ran a photography business on the side for awhile. Then, I had my son. My husband and I decided pretty quickly I would stay at home to raise Lucas, and I gladly left behind the office environment. Though my days were filled with diapers, tears, first smiles and steps, and a whole lot of love, I still yearned to let my creativity run free. Sadly, time just didn’t allow for the pursuits I had loved in the past.

    Fast forward five years. Life with a rambunctious five year old was more challenging than ever. School, appointments, errands, family time. Everything was happening at once, and I struggled to keep up.

    On a whim, I picked up a planner, because I needed to organize our life better, and the calendar on my phone was just not cutting it. I quickly became obsessed with all things planner related, but most especially stickers! I started out just buying stickers, because man, there were so many out there! Almost anything you could want to decorate and organize!

    But after a while, I looked around and saw how much I was spending and thought, “why don’t you make these for yourself?” It could save money, and allow me the creative outlet I so desperately needed. An idea was born, and pretty soon I couldn’t get it out of my head. I picked up a Cameo and started designing and making stickers. After a month or so of using them myself, as well as sharing them with my friends, I had so many people asking me to offer my designs that I decided to give selling them a try. I didn’t rush right in, since I knew the planner sticker market was saturated, with a lot of people offering a lot of the same things. Since drawing is not my strong suit, I knew I’d need to rely on clipart for my designs, and a lot of sticker makers seemed to be getting clipart from the same places. I knew if I was going to set up a shop of my own, I needed to have something different, something not a lot of shops had.

    After a lot of thought, and some trial and error, I opened shop, and in the eight months I’ve been in business, my shop has grown to over twelve thousand sales. In that time, I’ve followed a few simple steps that have enabled me to be successful and stand out in a crowded market, and I’m pleased to share them with you. I hope you’ll get some inspiration from them!

    Step 1 – Find a unique product and market the heck out of it!

    For me, that unique product was stickers for personal size planners. Most shops at that time were pretty much exclusively carrying stickers for Erin Condren or A5 planners. I had friends that had small personal planners and could never find nice products. From the beginning, I decided to carry all of my designs in both full size and personal size stickers (which I call “Teenies”). I advertised those Teenies anywhere and everywhere I could, and people bought them in droves. In my first six months Teenies were the bulk of my orders. They kept business flowing in while I heavily marketed my shop and drummed up interest in my other products. At this point, my business is split about 50/50 between full size and Teenies.

    Step 2 – Network, Network, Network!

    Networking with other shops really helped me when I first started out and still continues to. Connecting with other shops via swaps can be great advertising for them and for you. I love getting to try products from other shops, and it also gets my products out there! We each post pics on our Facebook and/or Instagram, so we can tap into each other’s customer bases. This especially works if you pick shops that have a slightly different style than your own, since you’re showing their customers something they haven’t seen before. Networking also lets me make friends in my seller community. Support from people who have been where you are is key to succeeding in a tough market.

    Step 3 – Giveaways!

    Giveaways go hand in hand with networking with other shops. I have joined a few groups on Facebook made especially for planner sticker sellers, and through these groups I join up with other shops to be part of loop giveaways on Instagram. You earn followers for your Instagram, thereby increasing your potential customer base. I have also done giveaways of my own when my shop hits milestones. Whether you go it alone or join up with a collective, letting people try your product for free is a great way to spread the word about your shop.

    Step 4 – Excel in Customer Service

    I never forget that without my customers, my shop is just a place filled with pretty pictures of pretty products. I strive to make sure every order is perfect every time, but in a crowded market, that’s not always enough. Going above and beyond can make a huge difference in whether or not the customer comes back, leaves a good review, or recommends you to their friends. I include little extras in orders, offer discount codes for repeat customers, jot notes on orders if time allows, and interact with my customers in any way I can via my Instagram and my Facebook group. The bottom line is that keeping a customer is easier than finding a new one. By always making it a priority to make my customers happy, I’ve gained a lot of loyal customers that shop with me over and over again. Without them, I’d be nothing!

    Step 5 – Keep evolving!

    The planner market is ever-changing. What’s popular today is different than what was popular a year or even even six months ago. This is the case for all markets, but it seems especially true in the planner market. People are always looking for something new and different. The only way to stay ahead of the game is to keep in touch with the trends in your market, to find out what is popular, and do it. If my customers can’t find something with me, they will shop elsewhere, so I make it a point to try to anticipate what they might want. For example, the “doodle” (or hand drawn) style is very popular in stickers right now. Since I can’t draw a lick, I search out clipart that is drawn in that style, and have even contracted an artist to “doodle” exclusively for my shop. But when the market changes, I’ll be ready for it, because I’m flexible enough to give my customers what they want.

    It’s crazy to realize I haven’t even been open a year. While I don’t consider my shop to be huge (yet), I keep very busy and I love what I do. I get to make my own hours, work from home, wear pajamas whenever I want, and be around for my kiddo. Still, it’s not all fun and games. I work a lot more hours than I would at a normal job. I am always connected to my phone or computer, serving my customers, or thinking of ways to innovate and improve my products. But I wouldn’t change a minute of it. Owning my own Etsy shop is the dream job I never knew I wanted!

    I hope you find motivation in Amy’s story. It takes a lot of guts to write your story from your heart to be shared with thousands of online readers. Stop by Amy’s Etsy shop, favorite a few products, shop, or connect on social media to say thanks for sharing:

    Do you have a great story based around your Silhouette Cameo or Cricut based business? Share it with me at christine@cuttingforbusiness.com and you might see your story featured here.
    Share Amy’s story on Pinterest:

    How I Have Over 12,000 Etsy Sales in Less Than a Year Using my Silhouette Cameo - by cuttingforbusiness.com

  • Mini Guide: Pinterest Boot Camp for Silhouette & Cricut Businesses

    Buy It NowClick here to purchase Pinterest Boot Camp for Silhouette & Cricut Businesses.


    More Information

    • Pinterest Boot Camp for Silhouette & Cricut Businesses is a 7 day self study guide. Each day I present information about specific tasks, and you are expected to complete the tasks before moving to the next day.
    • You do not have to have a Pinterest account to use the guide.
    • This mini guide is geared towards owners of Silhouette and Cricut small businesses, but can be used by anyone.
    • No tutorials for creating craft projects are included in this guide.
    • You’ll be rocking Pinterest for your small business when you get to the end of the guide.
    • Buy with confidence: I have 100K + Pinterest followers and millions of profile visits each month. Verify this at this link.

    Buy Now

    • Pinterest Boot Camp for Silhouette & Cricut Businesses is a 35 page ebook and costs $10. Click here to purchase. After purchasing, it will be emailed to you automatically. (Please check your spam/junk folder if you don’t see it.)
    Ebook - Mini Guide: Pinterest Boot Camp for Silhouette Portrait, Cameo, or Curio & Cricut Explore, Maker, or Joy Businesses - by cuttingforbusiness.com.
  • Hire Out Household Chores to Make More Time for Your Business

    I’ve written before about hiring help in your small business. (See these posts: When to Hire Help, Things to Consider When Hiring Help, and Hiring Virtual Help.) But, I know that many Silhouette Cameo and Cricut small business owners are hesitant to either share their crafting knowledge, uneasy about inviting someone into their home, or just don’t have enough steady work for an employee. Today, let’s look at hiring help from another perspective – household chores.

    Instead of hiring someone to help you in your business, consider hiring someone to take care of the mundane day-to-day household chores. Here’s some ideas of easy to hire chores to give you more time in your business:

    • Cleaning – Imagine the time you’ll gain if you aren’t sweeping, mopping, or vacuuming all the time!
    • Child Care – You could hire someone to watch your child or children for a few hours a week, or put them into a daycare or school setting.
    • Carpooling – If you spend hours driving older kids to and from school each day, consider setting up a carpool with neighborhood families. Each family takes a turn and takes and picks up the children from school. You’ll be able to gain a few extra hours in your week since you won’t have to deal with transportation daily.
    • Lawn Care – Hiring out lawn care or landscaping can free up time in your day to work on your business.
    • Snow Removal – This is backbreaking work anyway, hire it out and free up time in your day!
    • Laundry Services – Many dry cleaners and laundry mats offer drop off laundry services priced per pound.
    • Meal Swaps – While it isn’t easy to hire out cooking, you could join a meal swap with other families in your neighborhood. Each family cooks the same dish (one for each family) and swaps meals. You’ve instantly got ready to cook meals. When you spend less time in the kitchen, you’ll have more time in your day!
    • Home Improvement – If you are working on a large home project, hire it out and let the pros take it over! You’ll save time (and frustration!) of not having to do it yourself.

    When hiring help, consider neighbors, college students, or online classifieds such as Care.com. Did you know that Care.com has a whole section on their site for housekeeping? Save on a membership when you click through the banner below:


    Tell me, Cutting for Business readers, do you hire out help in your home or do you DIY everything? Let me know in the comments.

    Save this post to Pinterest:

    Hire Out Household Chores to Make More Time for Your Silhouette Cameo or Cricut Explore Business - by cuttingforbusiness.com

  • Tutorial: Wood Grain Christmas Ornaments with Silhouette or Cricut

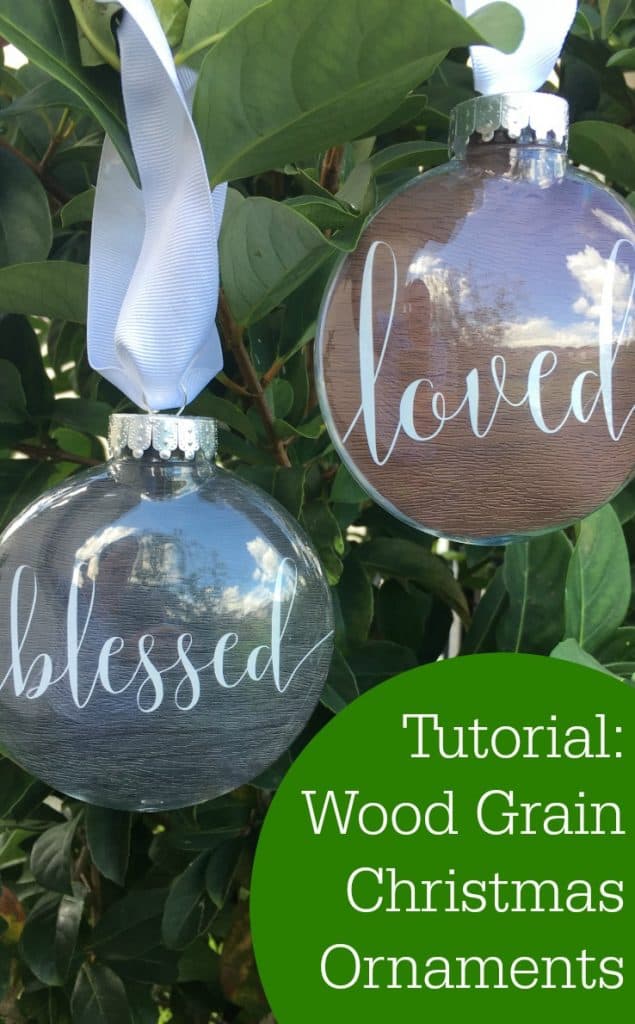
    I’ve seen so many Silhouette Cameo and Cricut small business owners preparing to sell glitter Christmas ornaments for the upcoming holiday season. While I love seeing so many beautiful glittered ornaments – I know that this ultimately means that sellers are likely to face more competition and a lower selling price this year. Why not skip the glittered ornaments for today and try out something a little different? Today, I’m sharing a tutorial for wood grain ornaments:

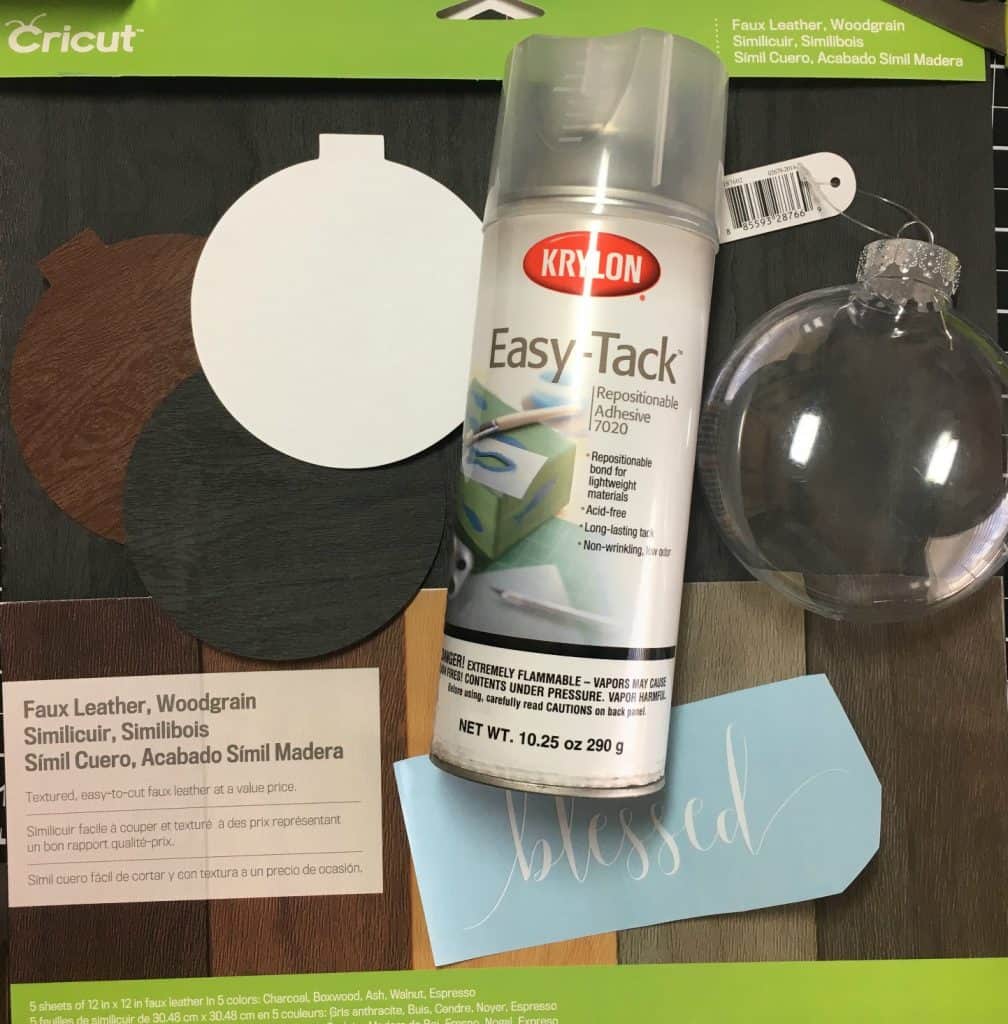
    Supplies

    Tutorial: Wood Grain Christmas Ornaments with Silhouette Cameo or Cricut by cuttingforbusiness.com

    Wood Grain Christmas Ornament Tutorial

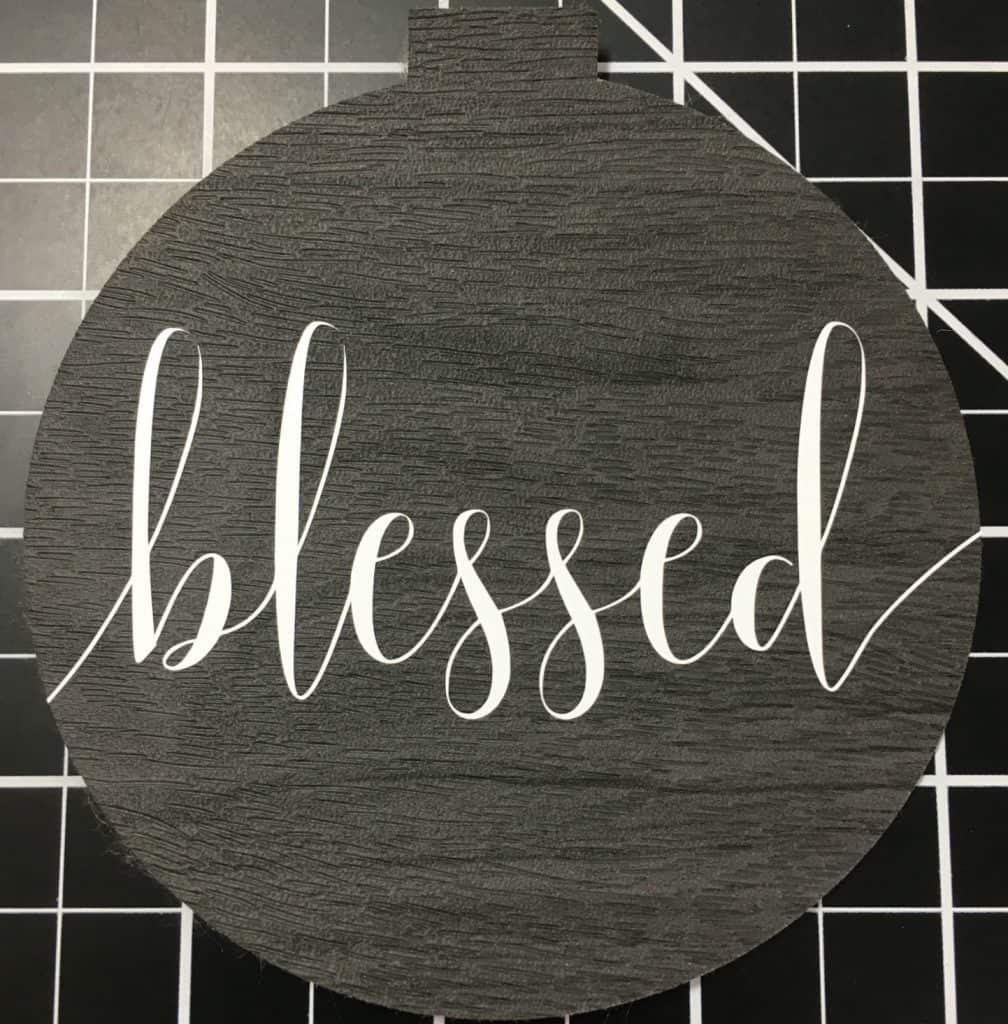
    1. Gather all your supplies and create a design in Silhouette Studio or Design Space. I created two simple text designs (blessed and loved) using Smoothline Script.
    2. Cut a circle insert shape for your ornament using cardstock. Download the insert I designed (depending on the size of your ornament, you may need to size up or down) or create your own.
    3. Cut out the faux leather woodgrain the same size as you made your insert in the last step. I cut it on my Silhouette using the preset chipboard settings. Cut settings for Cricut are listed in the package.
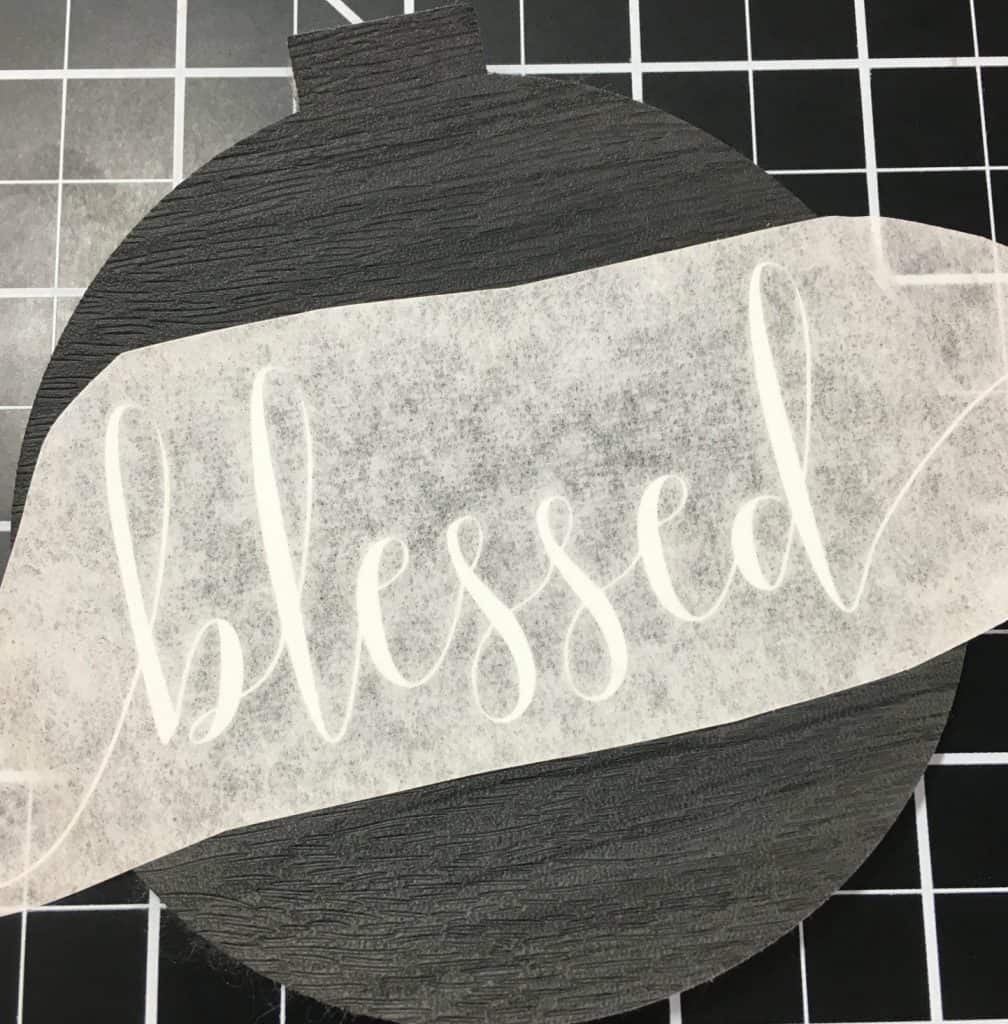
    4. Place your vinyl design onto the faux material using transfer tape. Tutorial: Wood Grain Christmas Ornaments with Silhouette Cameo or Cricut by cuttingforbusiness.com
      Tutorial: Wood Grain Christmas Ornaments with Silhouette Cameo or Cricut by cuttingforbusiness.com
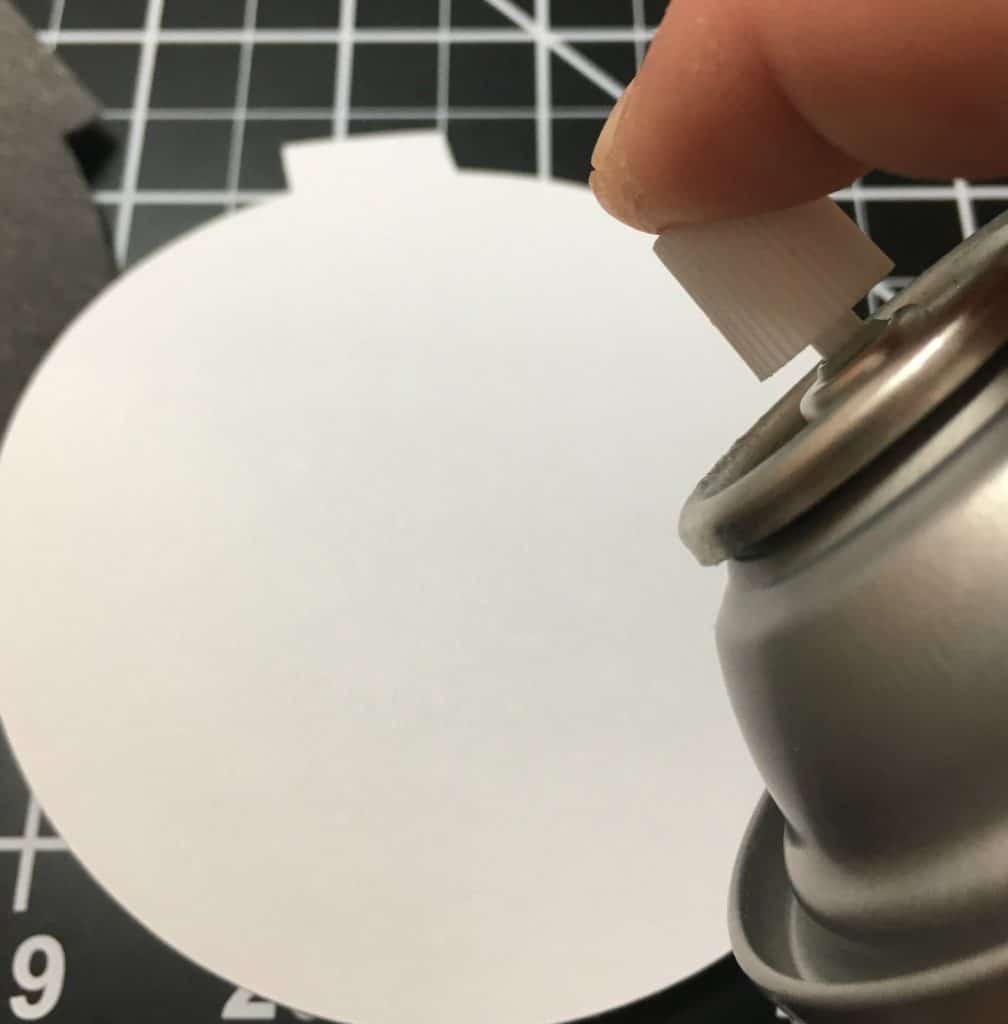
    5. Use glue or spray adhesive to attach your faux material to the cardstock. The faux material is a little floppy, so you’ll need to reinforce it. Allow a few minutes for it to set before moving on.Tutorial: Wood Grain Christmas Ornaments with Silhouette Cameo or Cricut by cuttingforbusiness.com
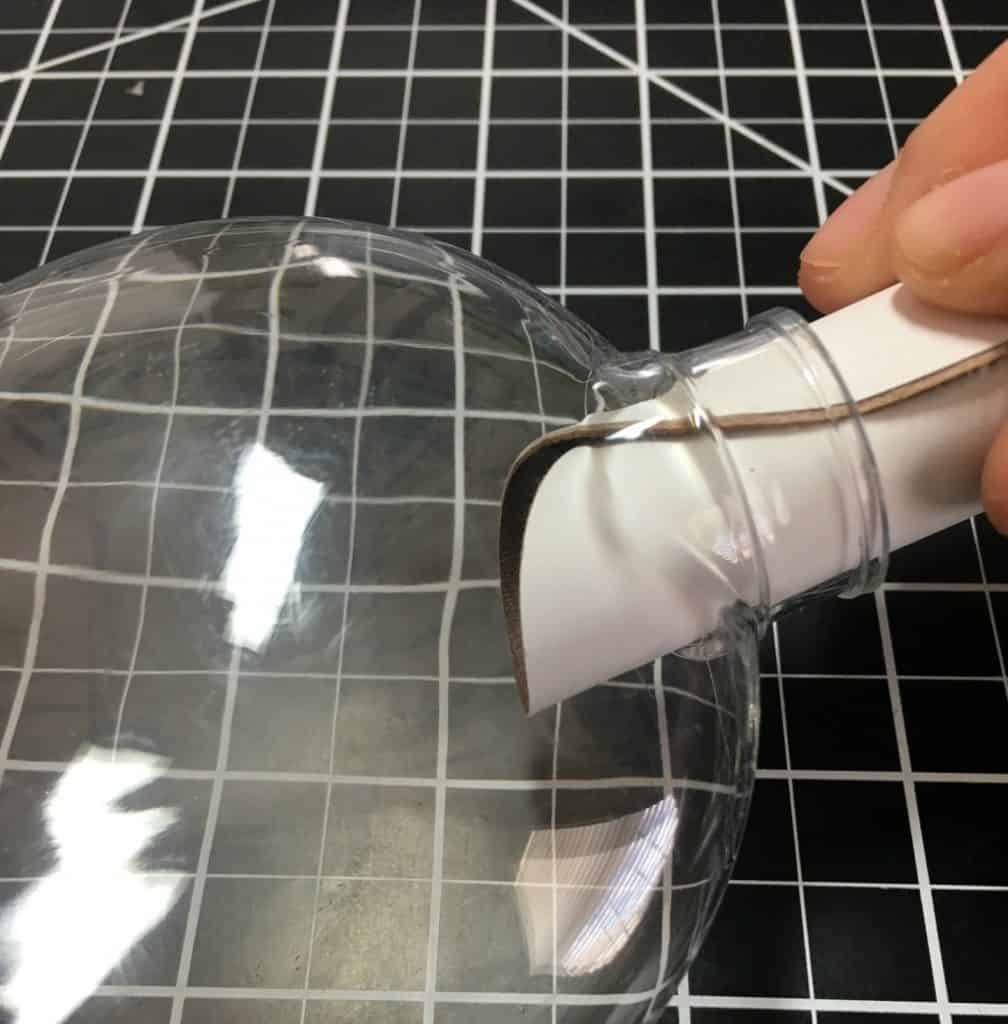
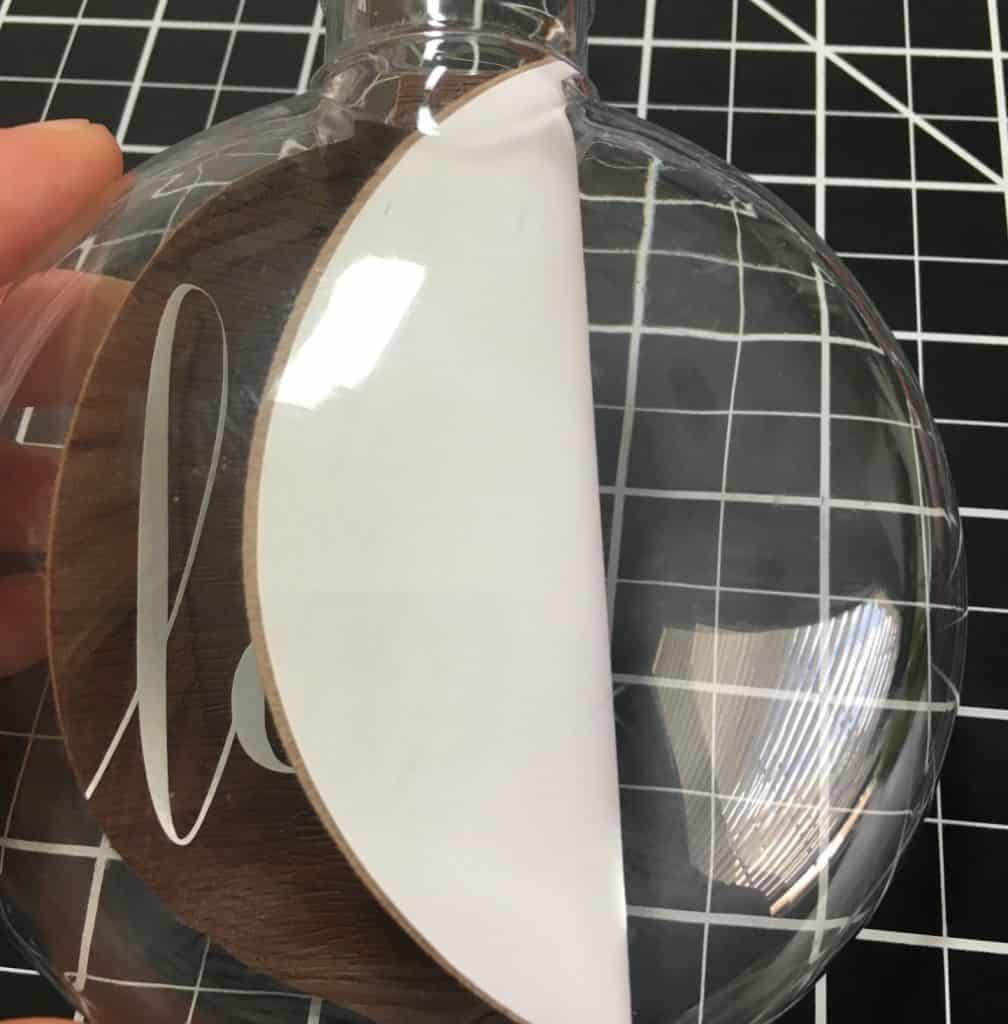
    6. Roll the cardstock and faux material and place it inside your blank ornament. You may need to use the end of a pencil to help it unroll. Tutorial: Wood Grain Christmas Ornaments with Silhouette Cameo or Cricut by cuttingforbusiness.com
      Tutorial: Wood Grain Christmas Ornaments with Silhouette Cameo or Cricut by cuttingforbusiness.com
    7. That’s it! Place the ornament top back on and finish with a ribbon for hanging. See both my finished Christmas ornaments in the photo below.

    Did you like this tutorial? Save it to Pinterest:

    Tutorial: Wood Grain Christmas Ornaments with Silhouette Cameo or Cricut by cuttingforbusiness.com

  • How to Cut with 2 Silhouette Cameos at the Same Time

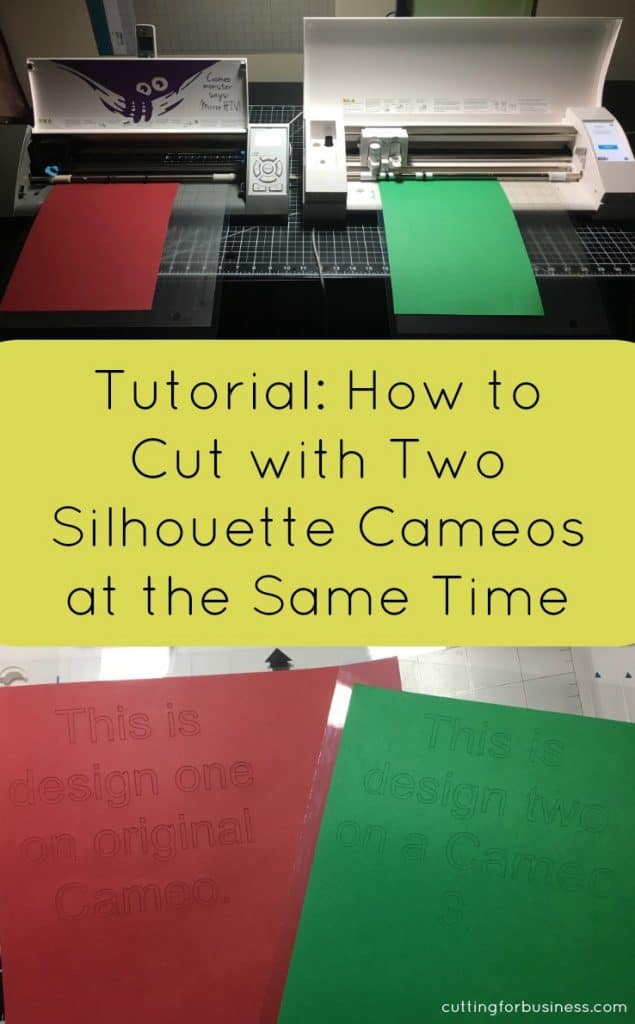
    With the release of the Silhouette Cameo 3, I’ve had several readers asking questions about running two machines at once. As I’ve mentioned on the blog before, you’ll need Silhouette Studio Business Edition. I’ve previously written about Business Edition:

    Step by Step Tutorial on How to Cut on Multiple Cameos from the Same Computer

    1. Plug in both machines and connect them to your computer.
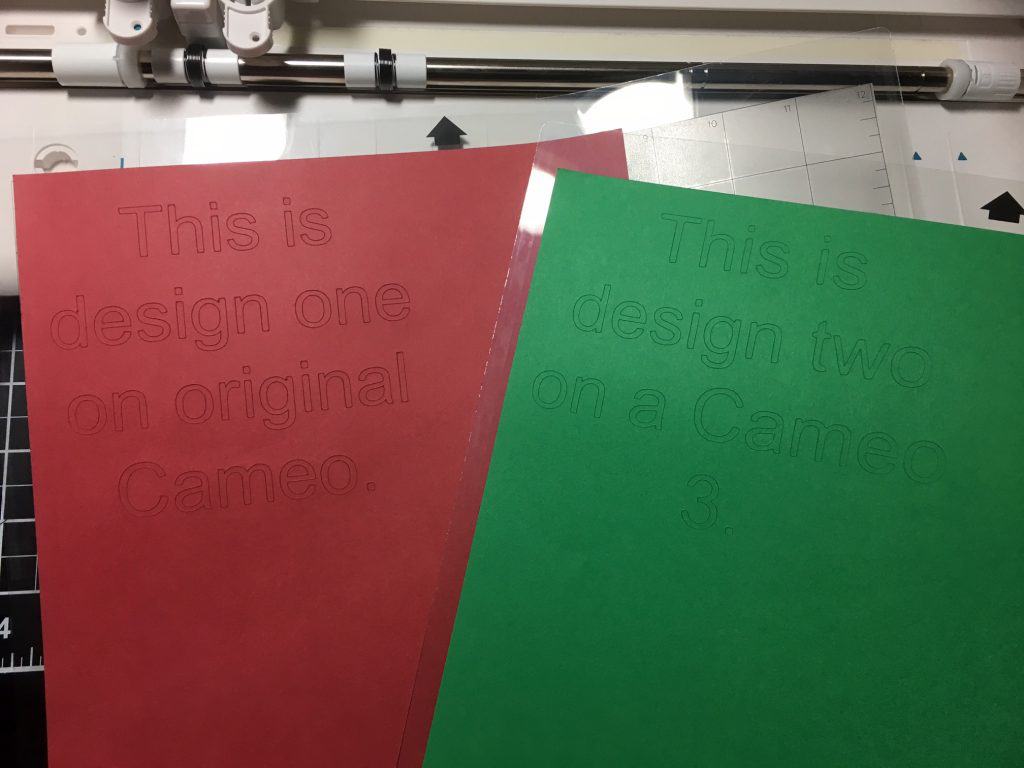
    2. Load both machines with material. For this tutorial, I’ve got red cardstock in an original Cameo and green cardstock in a Cameo 3.
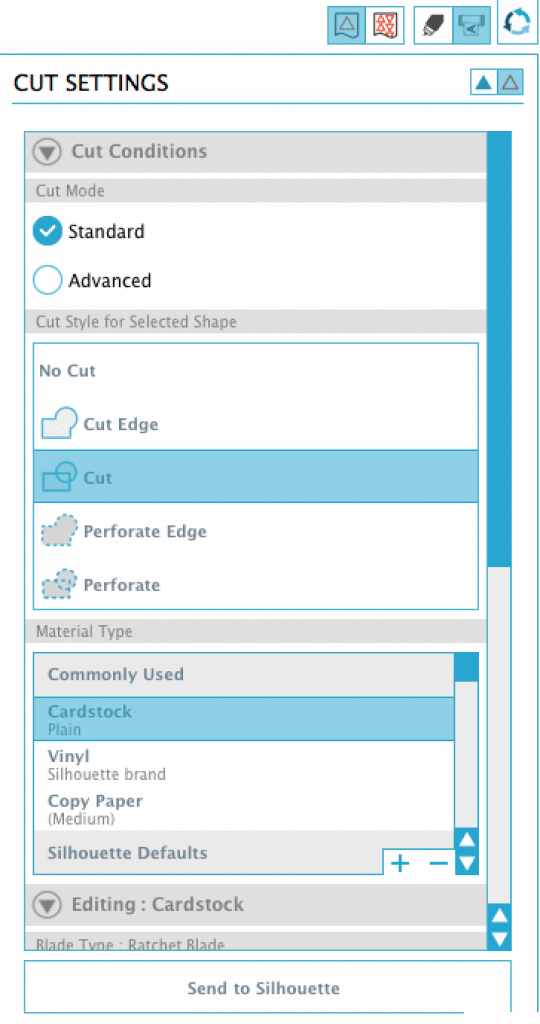
    3. In Silhouette Studio, choose the first design you want to cut and select the appropriate cut settings. How to Cut with 2 Silhouette Cameos at the Same Time from the Same Computer - cuttingforbusiness.com
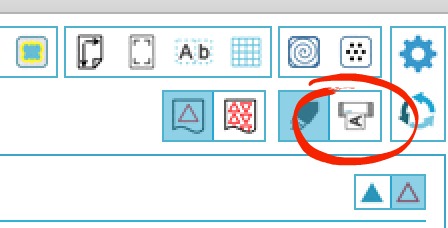
    4. Instead of clicking “Send to Silhouette”, you’ll use the icon on the toolbar: How to Cut with 2 Silhouette Cameos at the Same Time from the Same Computer - cuttingforbusiness.com
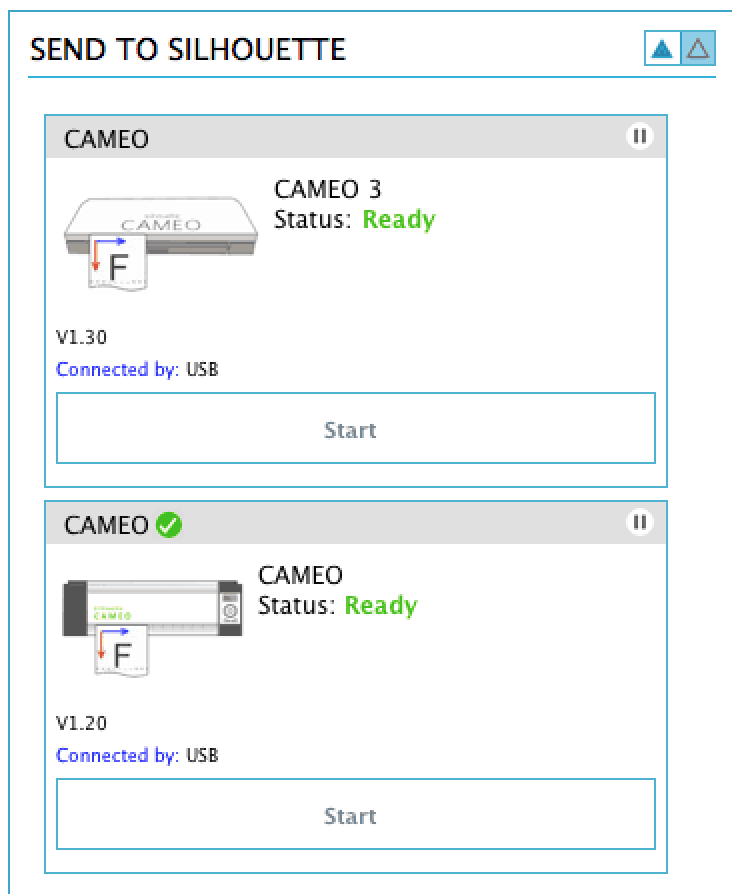
    5. Now, you’ll be able to choose which machine you want to use. Choose which Cameo to send the design to and click “Start”. How to Cut with 2 Silhouette Cameos at the Same Time from the Same Computer - cuttingforbusiness.com
    6. While the first machine is cutting, you can either cut the same design on a different machine or use an entirely different design. To start the second machine, you’ll repeat steps 3 to 5. That’s it! Here’s a quick photo of the cuts:How to Cut with 2 Silhouette Cameos at the Same Time from the Same Computer - cuttingforbusiness.com

    It’s like music to my ears:

    FAQ

    Q: Can I run an older model Silhouette Cameo with a Silhouette Cameo 3?
    A: Yes, you can run any combination of Cameos: Original Cameo with Original Cameo, Cameo 2 with Original Cameo, Cameo 2 with Cameo 3, and so on.

    Q: Do I have to cut the same design on both Cameos?
    A: No, you can cut different designs on each Cameo or you can cut with one and sketch with another.

    Q: How many machines can I run at the same time?
    A: This is related to your computer’s ability. I’ve seen four and five Cameos at the same time, but I only have 3 machines.

    Did you find this helpful? Save it to Pinterest:

    How to Cut with 2 Silhouette Cameos at the Same Time from the Same Computer - cuttingforbusiness.com

  • Where to Buy Blank Maternity Shirts for Crafting

    Yikes, Cutting for Business readers! I had to make a few maternity shirts lately, and let me say that blank maternity shirts were not easy to find! Today, I’m sharing a list of sites I found the carry blank maternity shirts – perfect for Silhouette Cameo or Cricut crafting.

    Where to Find Maternity Shirts for Crafting

    • Monag – As I mentioned in a previous post, Monag carries lots of infant blanks and maternity shirts as well. Short sleeve shirts were around $5 each, while long sleeve were around $4 each (currently on sale). Discounts are available on bulk purchases. Of the sites listed, Monag had the largest style and color selection; colors included black, white, grey, navy, pink, green, brown, and red.
    • CTS Maternity – Offers black or white short sleeve and black long sleeve blank shirts. Short sleeve are $8.50, long sleeve are $10. No need for tax ID to order.
    • Preggers and Proud Maternity Blanks – Offers black and white tanks, short sleeve, and long sleeve shirts. Tanks and shorts sleeve are $8.75 each, long sleeve are $9.95 each. No need for tax ID to order.
    • LAT Apparel – Offers short sleeve maternity shirts in pink, bright pink, black, or white. I didn’t register for LAT Apparel to see prices because I was looking for long sleeve.
    • Local retail – I’m guessing that unless you need maternity shirts in bulk, you should be able to find them locally (Old Navy, Target, Walmart) for competitive prices.

    Was this post helpful? Save it to Pinterest:

    Where to Buy Blank Maternity Shirts for Crafting - Perfect for Silhouette Cameo or Cricut Crafters - by cuttingforbusiness.com

  • Tutorial: Paper Portraits with Silhouette Cameo

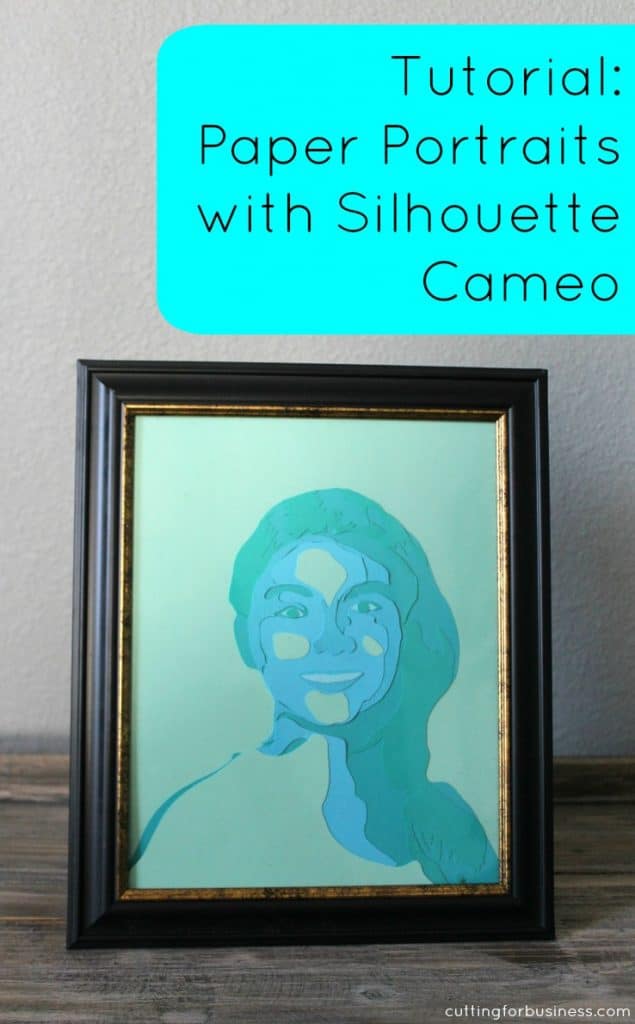
    I’m always racking my brain for creative products for Silhouette and Cricut users to make and sell in their small business. Today, I’m showing you how to make paper portraits using your Silhouette Cameo. What I love about paper portraits is that they are cheap to make, and will sell for a high profit.

    Supplies

    Paper Portrait Tutorial

    1. First, choose a photo.
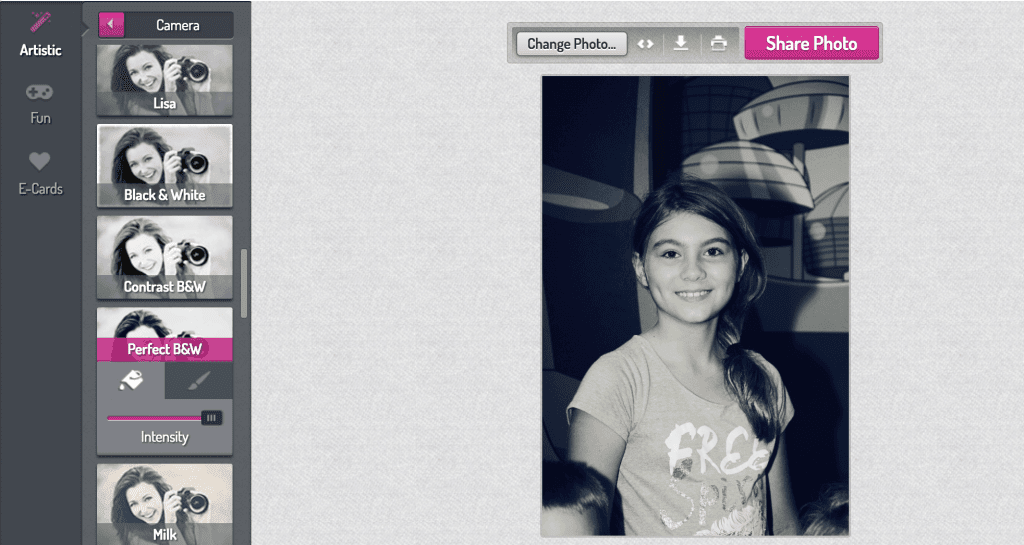
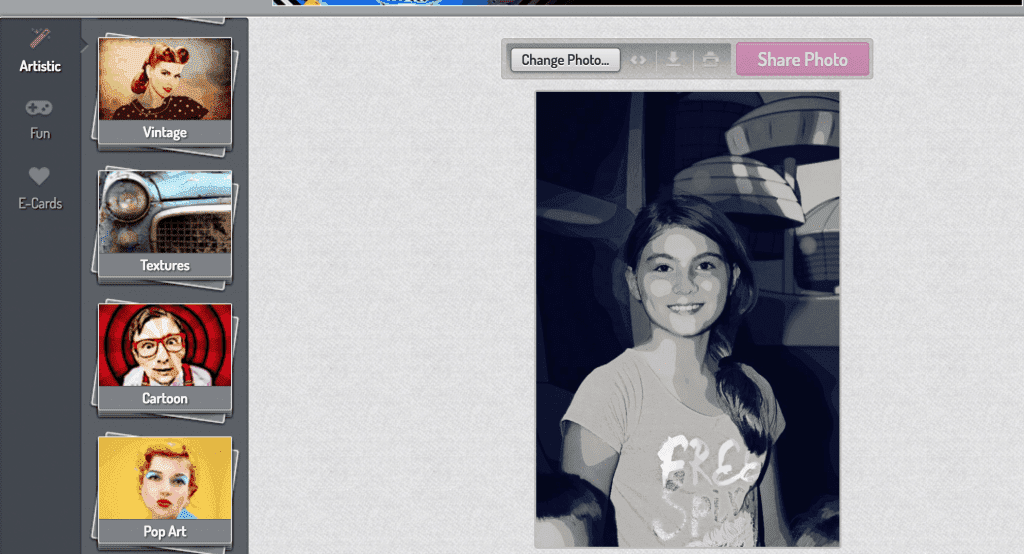
    2. Next, you’ll want to use a photo editor to change the photo to black and white. I used Photomania, which is free, however feel free to use whatever photo editor you’d like. Once in Photomania, choose “Artistic”, “Camera”, and “Black and White”. Save your photo and download it. Tutorial: DIY Paper Portrait Project Idea with Silhouette Cameo - by cuttingforbusiness.com
    3. Using Photomania, reopen your black and white photo and posterize it. In Photomania, choose “Artistic”, “Pop Art”, “Posterize”. Save your photo and download it. Tutorial: DIY Paper Portrait Project Idea with Silhouette Cameo - by cuttingforbusiness.com
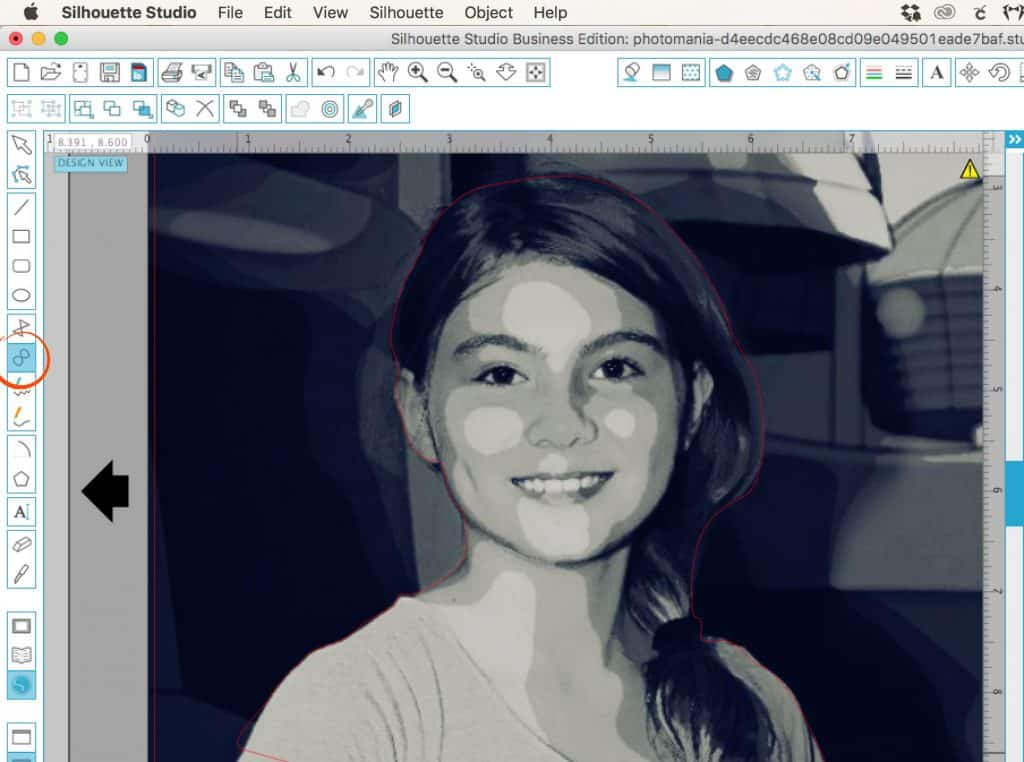
    4. Open your photo in Silhouette Studio. (“File”, “Open”.) Using the “Draw a Curve Tool” (I circled it in the photo below) you will manually trace around each color in the photo, starting with the outline of your subject. You can see my outline in red in the image below.Tutorial: DIY Paper Portrait Project Idea with Silhouette Cameo - by cuttingforbusiness.com
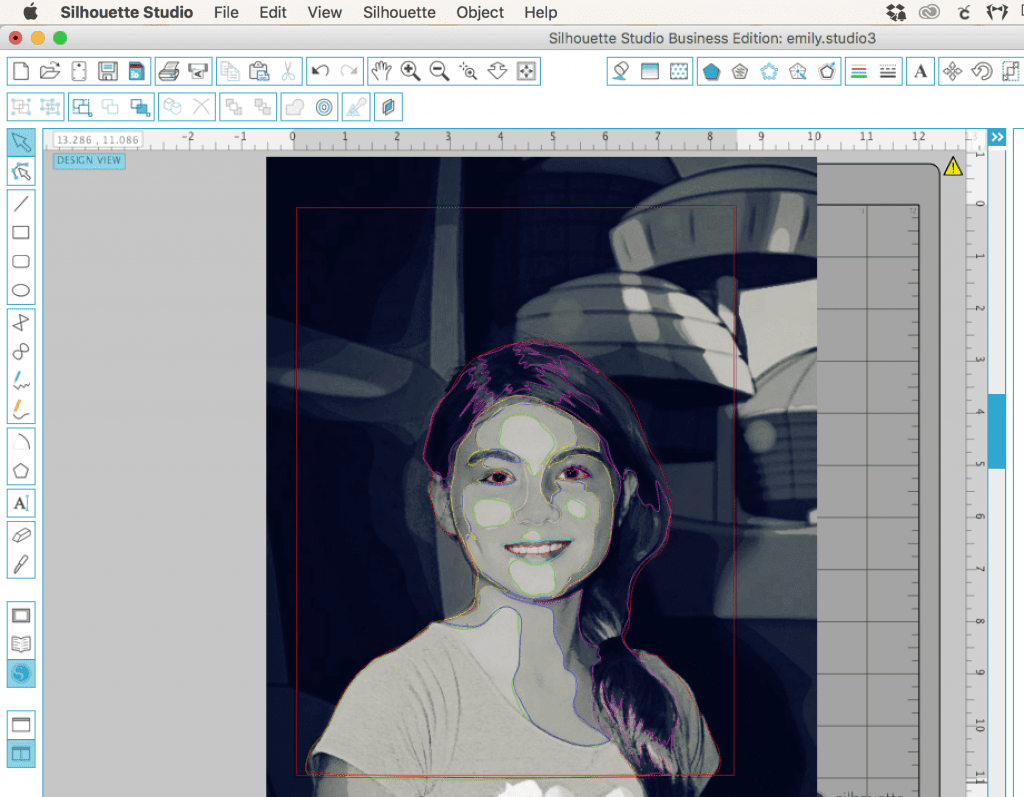
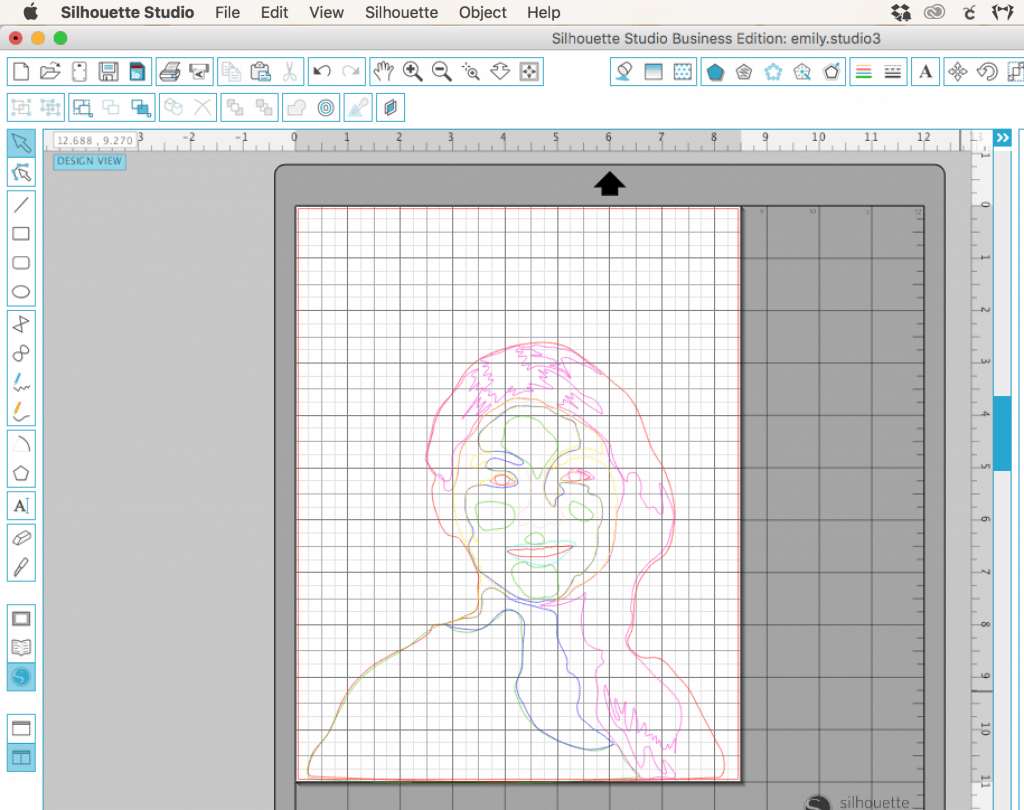
    5. Repeat step 4 and manually trace each color in your photo, starting at the darkest color. In my photo above, I first traced the hair, then the eyes, then the shadows on the outside edges of her face, and so on. For each color, you’ll want to change your line color. Here’s what my photo looks like after tracing each color: Tutorial: DIY Paper Portrait Project Idea with Silhouette Cameo - by cuttingforbusiness.comTutorial: DIY Paper Portrait Project Idea with Silhouette Cameo - by cuttingforbusiness.com
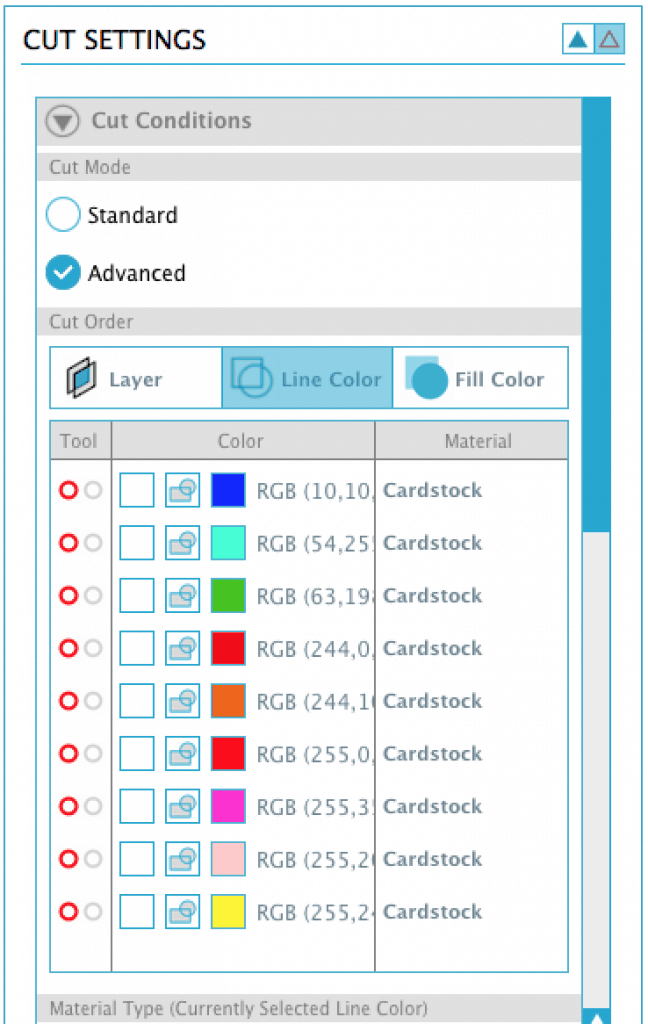
    6. Once you’ve traced everything, it’s time to cut. It’s easiest to use the advanced cut settings and cut by line color. When setting up your cut, choose “Advanced”, then “Line Color”. For your first cut, cut the outline of your subject from the darkest color cardstock you have. Tutorial: DIY Paper Portrait Project Idea with Silhouette Cameo - by cuttingforbusiness.com
    7. Repeat step 6 to cut out all of your traced shapes. Remember to go from darkest color in your photo to lightest color in your photo using first the darker cardstock and ending with the lightest cardstock.
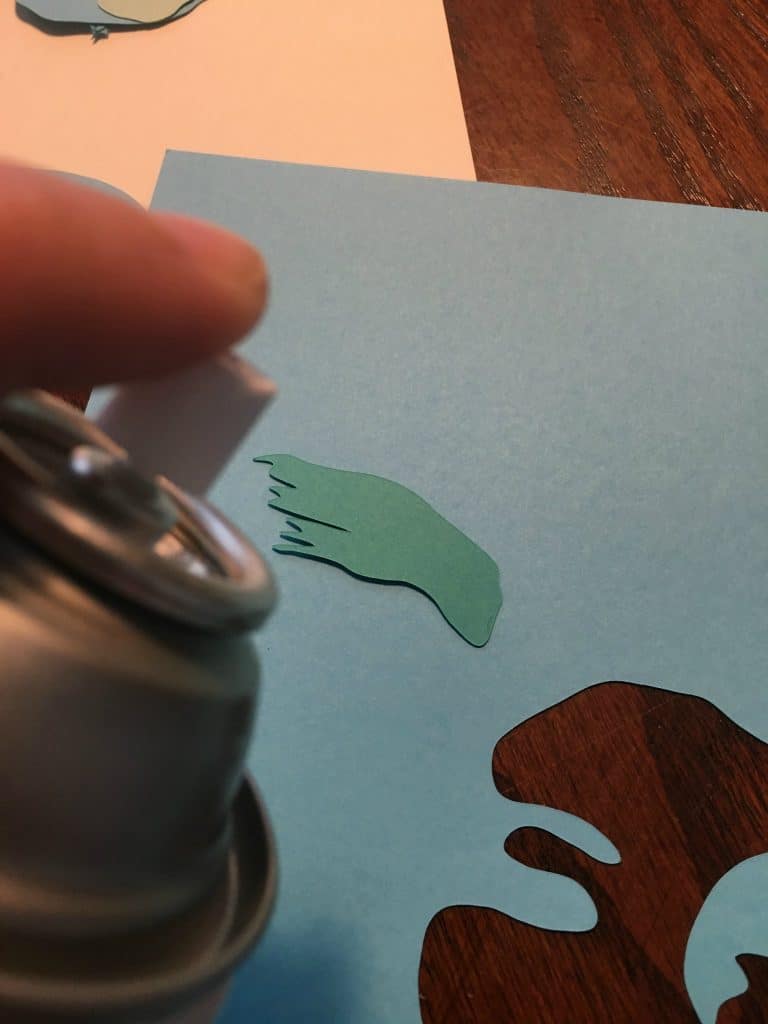
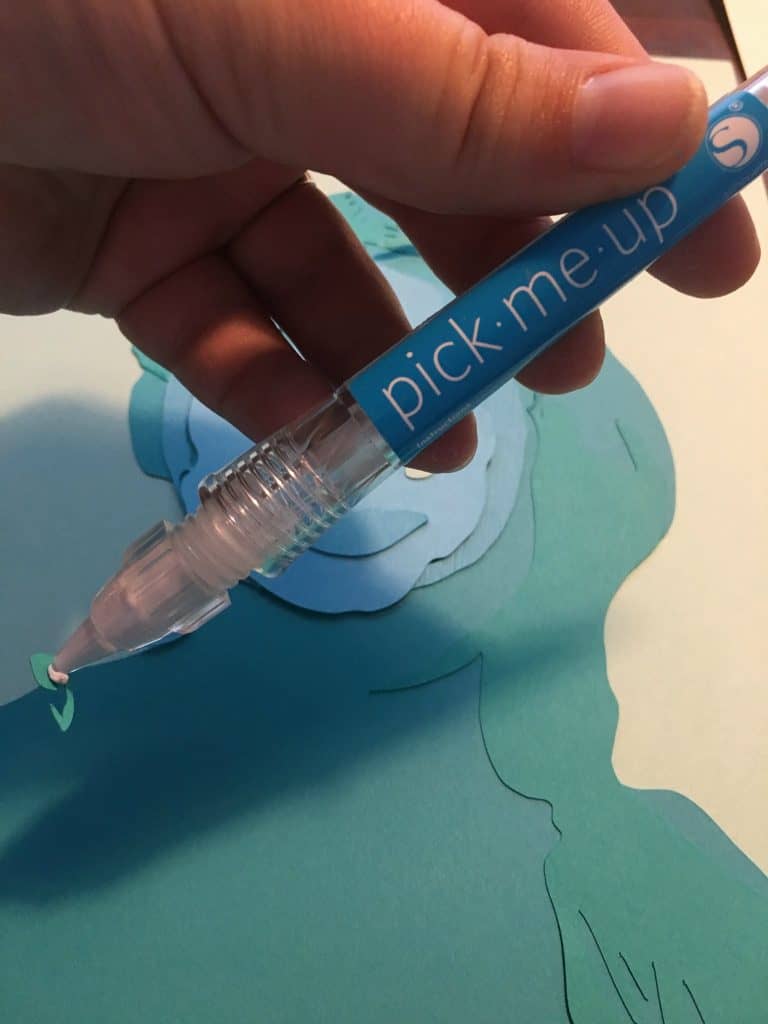
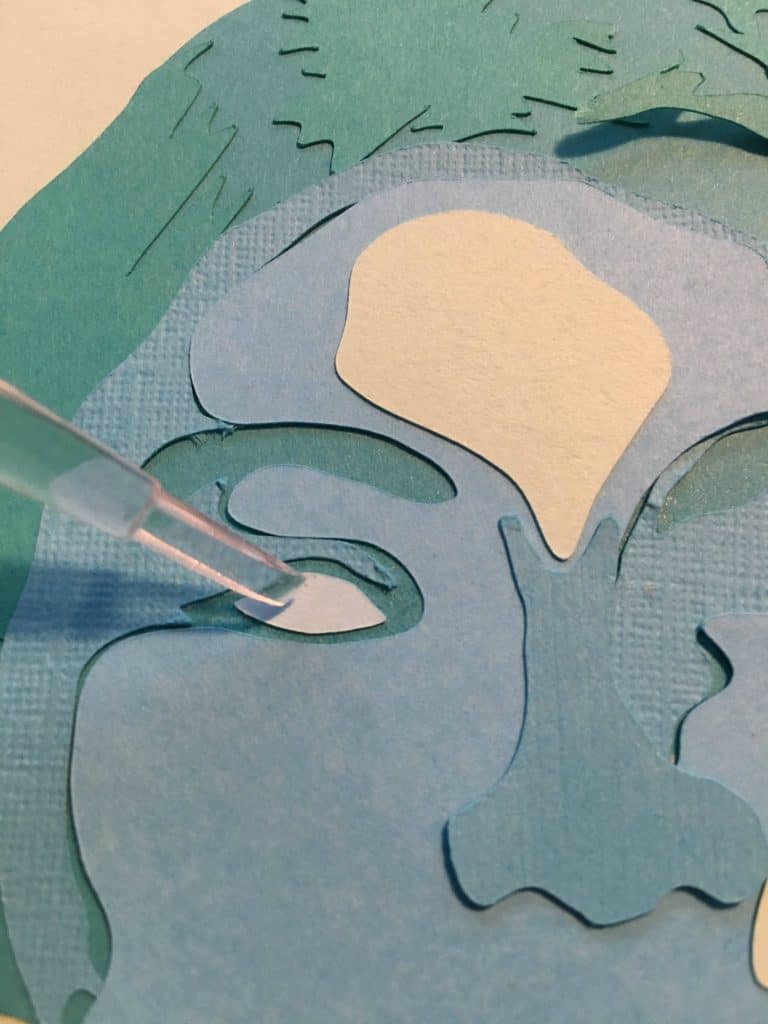
    8. Use repositionable adhesive spray to assemble your paper portrait from the bottom up. A few notes: 1) A little spray adhesive goes a long way. 2) Spray adhesive is sticky. I found the Pick Me Up tool to be invaluable when assembling the picture. Tutorial: DIY Paper Portrait Project Idea with Silhouette Cameo - by cuttingforbusiness.com
      Tutorial: DIY Paper Portrait Project Idea with Silhouette Cameo - by cuttingforbusiness.com
      Tutorial: DIY Paper Portrait Project Idea with Silhouette Cameo - by cuttingforbusiness.com
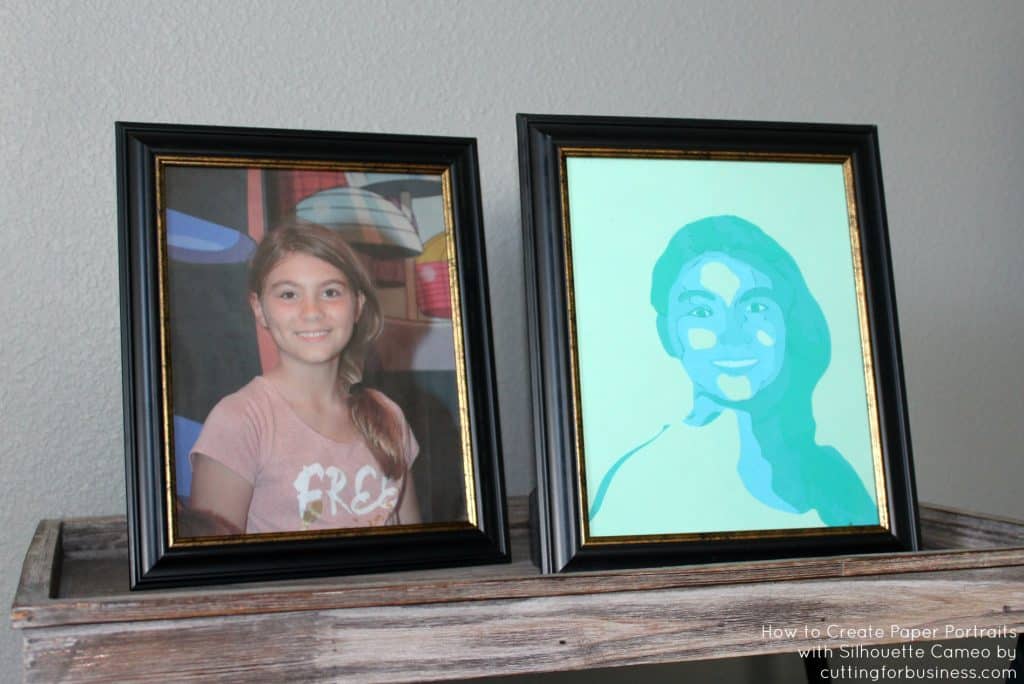
    9. Once you’ve assembled everything, frame it and you are all set! Below is a side by side of my original photo and my paper portrait: Tutorial: DIY Paper Portrait Project Idea with Silhouette Cameo - by cuttingforbusiness.com

    If you plan to make and sell paper portraits with your Silhouette Cameo, consider the mood that is conveyed through different color schemes. For example, black, white, and grays convey sophistication, while reds and pinks set a feminine mood and so on.

    Love this tutorial? Save it to Pinterest:

    Tutorial: DIY Paper Portrait Project Idea with Silhouette Cameo - by cuttingforbusiness.com

  • Free Download: Editable Photo Consent & FAQ

    There’s so much more to running a business with your Silhouette or Cricut than making a few products and sticking them up for sale. Today, we are going to quickly look at photo consent forms.

    What is a Photo Consent or Photo Release?

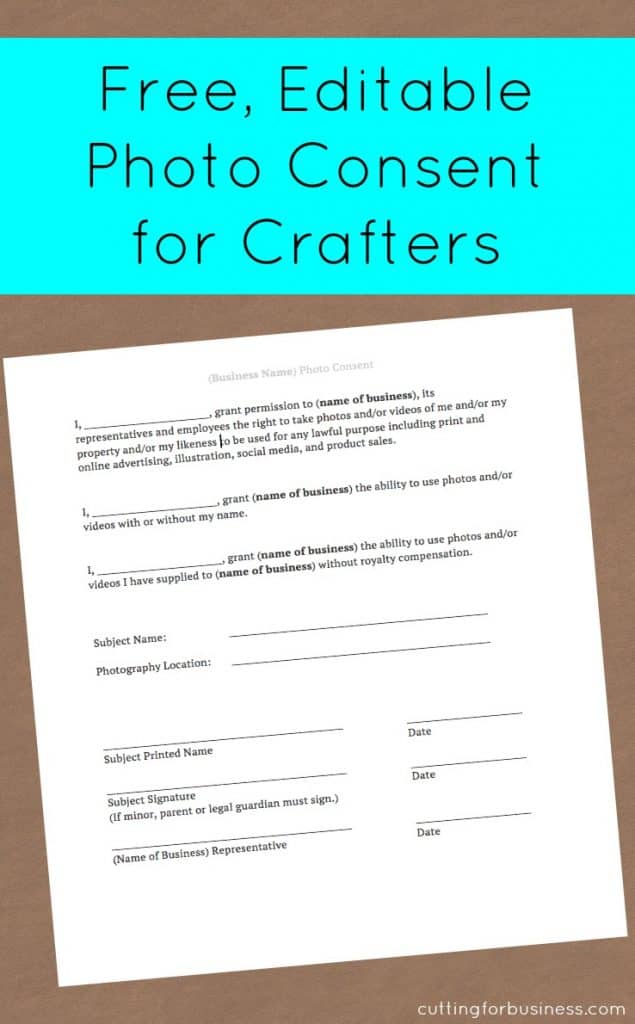
    A photo consent or release is simply a document that gives permission to you or your small business to use images of a person or property that you’ve taken.

    When Do You Need a Photo Consent or Photo Release?

    You’ll want to have a signed photo consent or release on file anytime you are taking pictures of a person or their property to use for online sales, social media, advertising, or on your website. Basically, if you plan to sell a product that includes a person or their property in the photos – you’ll want a release. A few exceptions: if you are photographing the general public, you don’t need a release. For example, you are taking photos of a busy market with hundreds of people in your shot. You do not need to get signed release from each person. Another time when you don’t need a photography release is if the photos are newsworthy. Although this doesn’t apply to most Silhouette or Cricut sellers, if you were taking photos and selling to a newspaper or news source you would not need a release.

    What About Photographing Children?

    If you are photographing children under the age of 18 (in the USA) a parent or guardian will need to sign the photo consent.

    Today, I’m sharing an editable version of a simple photo consent. Ready to download? First, save this post to Pinterest. Then, download the form below.

    Free Download: Editable Photo Consent & FAQ - Great for Silhouette Cameo or Cricut Crafters - by cuttingforbusiness.com
  • What are Alibaba, AliExpress, and DHgate?

    As your small business grows, it is likely that you will want to buy supplies in bulk to save money. As I’ve written about in a previous post, you have to understand the process of how a product gets to you. The cheapest way to get a product is buying directly from the manufacturer. But how does a home based or small store get in touch with a manufacturer? One way is to use a marketplace to connect. That’s where Alibaba, AliExpress, and DHgate can help you.

    What are Alibaba, AliExpress, and DHgate?

    These are online marketplaces where buyers and manufacturers can connect. When you are buying through Alibaba, AliExpress, and DHgate you are not buying from the marketplace; instead you are buying from a seller that advertises in the marketplace. (Think of these marketplaces like Etsy. Etsy only connects buyers and sellers, you don’t buy or sell products to Etsy.)

    What’s the difference between Alibaba, AliExpress, and DHgate?

    Alibaba and DHgate are both marketplaces that connect manufacturers and large wholesale sellers to buyers. In most cases, you’ll need to buy in large quantities. AliExpress (a division of Alibaba) connects manufacturers who sell in smaller quantities to sellers.

    Tips for Ordering through Alibaba, AliExpress, and DHgate

    • Plan ahead. Many of the manufacturers in these marketplaces are overseas. After you place an order, the manufacturer will likely need to make the product and then ship it overseas to you.
    • Watch for scammers. There are many “middlemen” on these sites. These people buy cheap from the manufacturer then sell at a higher price to you. After you ask a few questions, it’s pretty easy to sort through the scammers.
    • Ask questions. Be sure to inquire about production time, MOQ (minimum order quantity), delivery method and time, potential customs issues, payment arrangements, quality control, and more. Be mindful of time zone differences and that English may not be the first language of the person answering your inquiries.
    • Request samples. Most manufacturers will provide discounted or free samples. Since actual products can vary from the pictures provided online, always ask for samples.
    • Negotiate. When dealing with manufacturers, there is usually room for price negotiation.
    • Pay through a method that offers protection. If the seller is wanting a wire transfer – run! If they don’t deliver the goods, you’ll have no way to get your money back. Instead, use Paypal or an escrow arrangement.
    • Read feedback. The marketplaces provide feedback much like Etsy or Ebay. Read through the feedback before purchasing.
    • Use common sense. There’s always manufacturers in these marketplaces that are selling knockoffs. Beware that knockoff products are subject to seizure at the US borders. If it seems to good to be true – it likely is!

    Have you ordered from a manufacturer that you’ve connected with through Alibaba, AliExpress, or DHgate? Share your experience in the comments.

    Save this post on Pinterest to educate another crafter:

    What are Alibaba, AliExpress, and DHgate? Perfect for Silhouette Cameo and Cricut small business owners. By cuttingforbusiness.com.