Blog

  • An Unexpected Journey to a Silhouette Based Home Business

    In the In Their Words series on Cutting for Business, I invite readers to share how they got into a Silhouette or Cricut business or how they they’ve overcome challenges or obstacles. Today, I’m turning over the blog to Sara to share how her life journey isn’t what she planned – but how she is thriving today. I’m turning it over to Sara:

    As the owner, designer, and trainer of CutFiles4U, I honestly can say that being where I am today was never a goal I had. It’s nothing I wanted.

    My friends might describe me as passionate. I’ve always been that way. If I like something, I give it my all. With that drive starting at the early age of 4, I was a swimmer and a gymnast for two decades.

    I grew up in the woods of Northeast Alabama with my Southern California parents and two younger siblings. We had well water, and cable didn’t run down our street, so we played outside in the woods and had to create our own fun. Needless to say, our youth was a bit different than most.

    My jobs weren’t the everyday norm either. I worked as a gymnastics coach, water fitness and swim instructor, lifeguard and water front director at gyms, rec centers, and Girl Scout camps from my very early teens through college. Girl Scouts is the only place I ever crafted. I wasn’t particularly crafty but enjoyed making friendship bracelets and such. Dance, art, music, and most things creative and right-brained were never my strong suit. In fact, I often joked that the right side of my brain barely operated.

    In college, I didn’t know what I wanted to be when I grew up. I loved my computer and recreation classes and knew I loved sports and teaching. Eventually, I wanted to be a strong and independent woman in the work force. I had no plans to marry or have children, so after graduating from college with a computer science degree, I had to make a choice: pursue coaching gymnastics at the college level or use my computer science degree. After much anguish, I chose computer science and dove into technical writing.

    I enjoyed my technical writing career for 12 years. Midway through that career, I met my future husband, formed an amazing life with him, and married three years later at the age of 33. Three years after that, we thought perhaps we’d try getting pregnant to have one child. Being diagnosed with some health conditions, I left the corporate life and got back in the water to ensure a healthy pregnancy while enjoying a change of pace. I started my own aquatics business, Splash Water Safety, and soon after started working at an indoor pool. I enjoyed a busy schedule packed with teaching swim lessons, water fitness, Kids Swim Club, and CPR while certifying lifeguards and water safety instructors. Busy is pretty much the way I’ve always done it.

    Once pregnant later that year, at 6 weeks, we learned we were expecting two babies. Two babies – twins! I almost fell off the table. My doctor told me then that I would go on modified bed rest at 26 weeks with no more work for the rest of my pregnancy. I thought that was pretty drastic. The initial shock stayed with my husband for days and with me for weeks. I worried for months. How on earth would we manage? I left corporate America for a healthy pregnancy. We didn’t plan for this. 2 babies! 2 to feed, 2 to change, 2 to dress, 2 to sooth, 2 to hold, 2 to entertain and teach, 2 to referee, and of course, 2 to love. We connected with our local Mothers of Multiples group, which has been a true lifesaver for me. And we got busy educating ourselves on our new future.

    In no time, I was saying goodbye to coworkers, clients, and my paycheck and thinking how smart my doctor was after all. The last trimester I was on strict bed rest and in real discomfort. A year and a half after leaving corporate and at the age of 37, we delivered our girl/boy twins respectively at 36 weeks 4 days weighing 7 lbs. 8 oz. for Victoria and 5 lbs. 15 oz. for Zachary. And thus our journey really began.

    It was 2013 and I quickly realized I wasn’t going back to work for a while. Feeding, changing, and caring for the babies around the clock every three to four hours was my new full-time job. In the early months while I tandem breastfed, I was so tired that I didn’t know what time it was or what day it was. I just knew it was dark or it was light – no joke! I lived from one hour to the next. The log we kept was my only sanity. My husband took one night shift with the babies so I could sleep for more than 3 hours per day. That was heaven. After 3.5 long months, they started sleeping through the night and I could finally remember my name and carry on a simple adult conversation.

    At 4 months, I returned to the water for a couple hours twice a week. My employer has childcare for members. So I took them to childcare at work and my husband would pick them up on his way home giving me 15 minutes of solitude on my drive home without any crying, double stroller, diaper bags, loading, or unloading.

    At 7 months, I was working 5 days a week and quickly losing my mind. During this time, my aunt graciously gave me a Xyron Wishblade craft cutter she just wasn’t using. We couldn’t afford personalized clothing or gifts for our children, so I reverse engineered the software and figured out how to use the outdated Wishblade and was surprised at everything I could make. At the same time, I was trying to figure out how I could stay home with my still-very-needy twins as we approached their first birthday. It was at that point that I dropped my part-time aquatics job from 5 to 3 days per week and started cutting vinyl for our rambunctious and inquisitive twins, but nap time and bedtime were my only work windows. And honestly, I needed that time for sleep and quiet myself. So craft time remained limited.

    Through lots of research, I decided it was time to invest in a Silhouette Cameo. Over the next year, I tinkered with it every now and then as I needed or wanted something made. It wasn’t long after that friends and family wanted customized things too. In 2015, Two Lucky Designs was born. I was finally bringing home a little extra cash while staying home and enjoying the new activity even though I was working late, early in the morning, or while my husband was watching the kids. It seemed like I was crafting every spare moment of the day when I wasn’t tending to the twins. It was exhausting but stimulating to use my brain for not only something creative but something grown-up, as well. I needed a break from kids between my own toddler twins and young swim students, and this seemed to be a great reprieve.

    My love for design and customization grew, and I took note of how much time I spent prepping to cut, weed, and apply the designs. In January of 2016, I launched CutFiles4U so I could sell some of these designs with the prep work done including layering markers, material-saving weeding boxes and cutouts, some instructions when needed, and color coordinated fill and cut lines. At the same time as the launch of CutFiles4U, our twins gave up their nap when we converted their cribs to toddler beds. With them growing and changing, I found it possible to get 10 minutes here and maybe even 30 minutes there working on designs on my laptop wherever the kids were playing – living room, playroom, outside, or wherever. They finally didn’t need to touch me all the time but still needed to see me. I learned to snuggle and work some too, which was helpful and necessary.

    Shortly after the launch of CutFiles4U, I found out about an upcoming Silhouette conference, invited my crafty aunt, and we decided to go. It was there that I realized I wasn’t a beginner to intermediate user but an advanced user with lots of knowledge to offer. My technical writing and computer science background coupled with my teaching abilities gave me the idea to write tutorials and start offering tips, tricks, and step-by-step instructions making the Silhouette experience more enjoyable, efficient, and precise for other crafters who may not have the same background, passion, or desire to figure it out.

    CutFiles4U grew and expanded as this year progressed. It wasn’t long and Two Lucky Designs, CutFiles4U, and Splash Water Safety were keeping me very busy. CutFiles4U went from having just an Etsy shop to having a Facebook group and Twitter account, and then Pinterest followed by a blog, and then a Facebook page, an app, and most recently YouTube

    Just last fall once outdoor swim lessons for Splash Water Safety were finished for the year, I added craft parties to the mix. I hosted my first Craft Adventure with friends at no cost to them. This was quite literally an event for me to have some fun girl time at our home. It was a first (in years) since the kids came along. Chris graciously took the kids out that evening for this special occasion. I cooked dinner. We hung out. Then, as kids came home, we evacuated to the craft room, made Christmas ornaments, and had a grand time.

    Around the same time, I also hosted my first in-person training focused on Silhouette Studio. In the end, I had two attendees and was pleased with the outcome. I’ve had additional craft parties and already have both parties and trainings scheduled in 2017.

    Looking ahead, 2017 is already shaping up to be a full year for CutFiles4U with more firsts and lots more of everything else from designs to training to parties.

    I started writing this on Christmas Eve of 2016 and our twins were 3.5 years of age. With each passing year, I find more ways to squeeze in work, passion, family, and education for all of us. It’s always a balancing act and sometimes we fall off. It’s not the fall that defines us. It’s the climb back up with perseverance that shapes and molds the character, emotions, and well-being of each of us. Tears are a real part of life, but it’s the things that make us cry that make the climb worth it.

    I had a clear path growing up. I didn’t want to get married or have children. I knew I’d go to college and work for the rest of my life. With age, I knew I wanted to be a corporate women – strong, independent, and smart. I wanted to be innovative and ground-breaking. While I still want many of these things, I never expected to veer off of course so much. Life experience is continuously changing our paths. We start out on a paved road and often times end up stomping through the jungle.

    Embrace opportunity in front of you even if it’s not what you pictured. Marrying Chris, having the twins, and having my own businesses… All of these have been life-changing and I never saw any of them coming until they were right in front of me. Sometimes you can’t plan what you should be doing, but you can create opportunity or take advantage of the opportunity before eventually making it your plan.

    “Create your own happiness. It’s the biggest and best DIY project for each of us.”

    Sara Beth Gilbert
    Owner/Designer/Trainer at CutFiles4U

    Wow, I find Sara’s story so relatable. I never grew up saying, “I want to be a blogger” – instead, blogging found me. Did you always want to own your own craft based shop? Share in the comments: how did you get into your Silhouette or Cricut small business? Don’t forget to hop on over and show Sara some love at these links: Mobile App, Etsy Shop, Facebook Page and Group, Pinterest, Twitter, Blog, YouTube, or classes.

    Read more from the In Their Words series on Cutting for Business here or share your story with me at christine@cuttingforbusiness.com.

    Share Sara’s story on Pinterest:
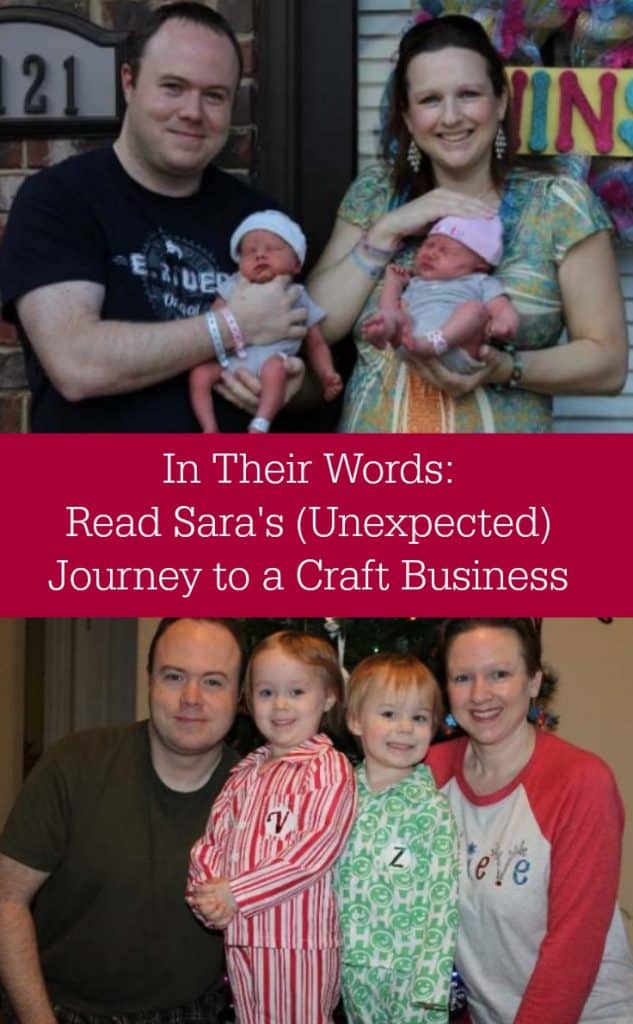
     In Their Words - Read Sara's Unexpected Journey to a Silhouette Cameo based small business - by cuttingforbusiness.com

  • DIY Morse Code Valentine’s Cards

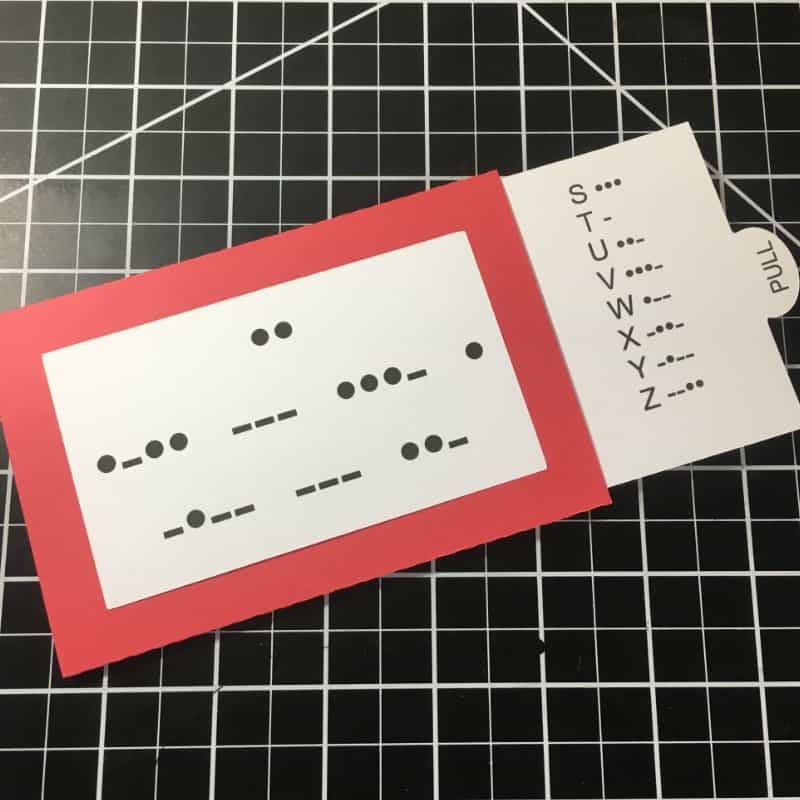
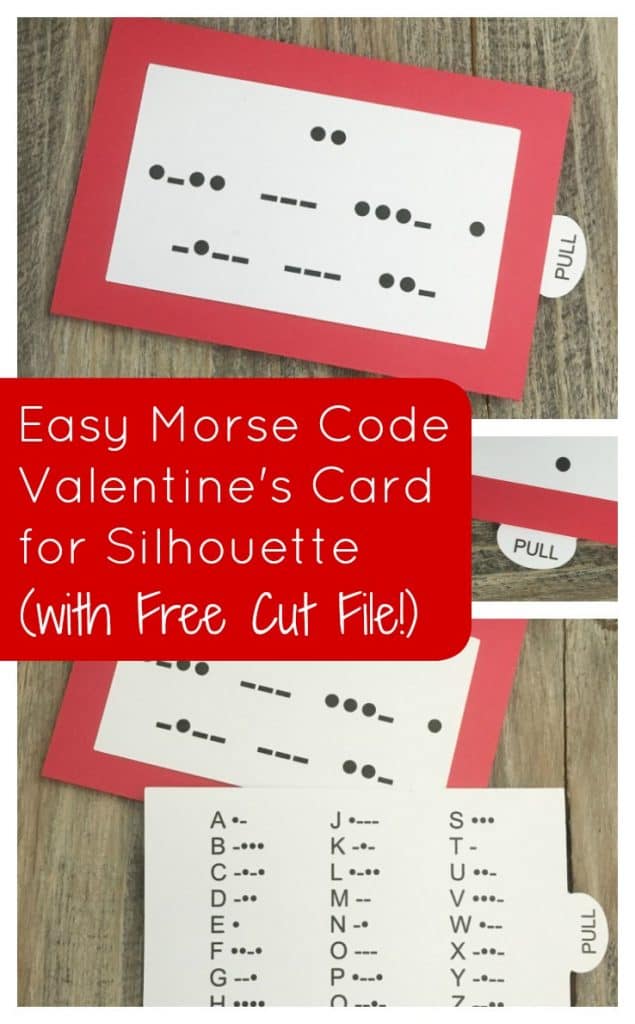
    Remember that post on mind dumping from yesterday? This is one of the projects that I’ve had in my idea book forever. I thought it would be neat to have an Etsy shop called “Morse Cards” and make a line of Morse Code cards. My idea was inspired by all the Morse Code jewelry over on Etsy. If you have seen these, click here to view one of my favorite shops. To create your own Morse Code card using a Silhouette Cameo, continue on.

    DIY Morse Code Valentine’s Cards

    Supplies Needed

    Step by Step Tutorial

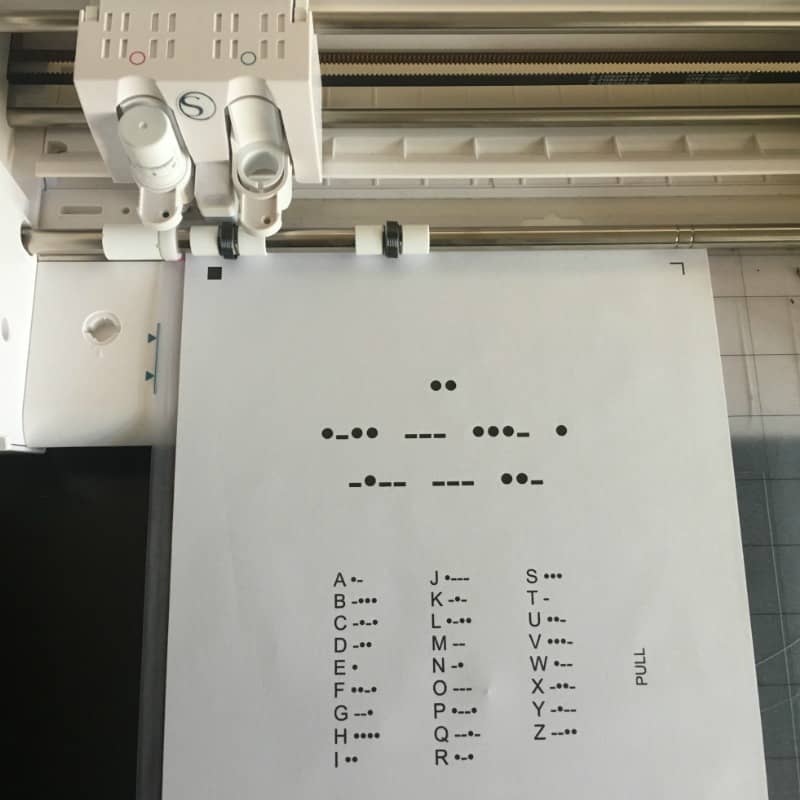
    1. Use print and cut to first print the pull tab insert and the design on the front. The message on the cut file included below is “I love you” To create your own message use the middle dot (Option and 8 on a Mac or ALT 0183 on Windows) and hypens to create each letter. DIY Morse Code Valentine's Cards for Silhouette Cameo (Includes free cut files!) by cuttingforbusiness.com
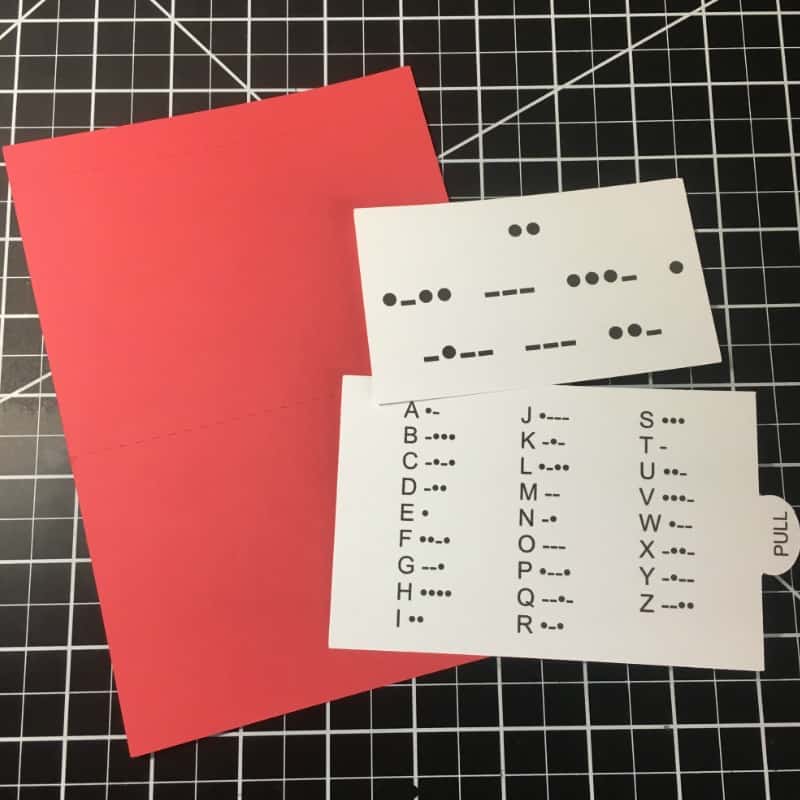
    2. Cut the card using the included cut file on your colored cardstock. DIY Morse Code Valentine's Cards for Silhouette Cameo (Includes free cut files!) by cuttingforbusiness.com
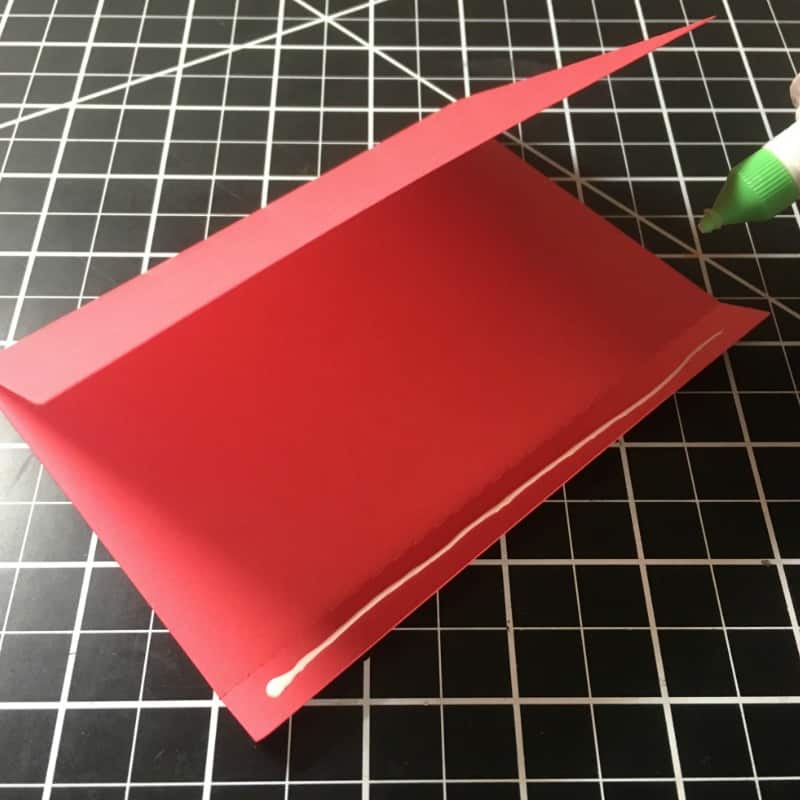
    3. Fold the card on the fold lines and glue the flap together. DIY Morse Code Valentine's Cards for Silhouette Cameo (Includes free cut files!) by cuttingforbusiness.com
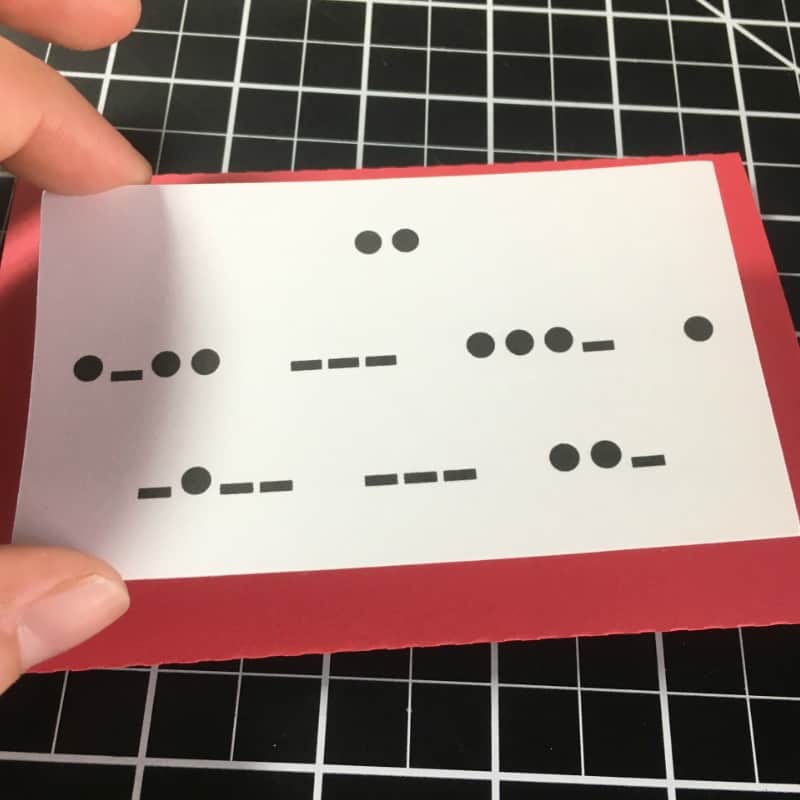
    4. Attach the message to the front of the card. DIY Morse Code Valentine's Cards for Silhouette Cameo (Includes free cut files!) by cuttingforbusiness.com
    5. Insert the decoder into the card. DIY Morse Code Valentine's Cards for Silhouette Cameo (Includes free cut files!) by cuttingforbusiness.com

    That’s it! I love a good, quick project!

    Save this tutorial to Pinterest:

    DIY Morse Code Valentine's Cards for Silhouette Cameo (Includes free cut files!) by cuttingforbusiness.com

    Download the cut files in .studio3 format here and here.

  • How (and Why!) to Mind Dump in Your Craft Business

    I don’t know about you, but I have a lot of ideas! Since you are a small business owner, I bet that you have a lot of ideas, too! Human brains aren’t able to remember everything we think of, so the best way to keep track of all your ideas is to write them down. Today, I’m going to share the way that I use to keep up with all my brilliant (and not so brilliant!) ideas.

    What is Mind Dumping?

    Mind dumping is the process of writing down all the ideas that you come up with on a daily basis. For me, these may be blog posts, craft projects, design ideas, recipes to try, motivational quotes I come across, and anything else. Ideally, you spend 10 to 15 minutes a day writing down ideas that have crossed your mind since the last time you wrote them down.

    Some people like to write down ideas as soon as they get up in the morning, but I prefer to write down my ideas before I go to bed. The idea behind mind dumping is to free your brain to think of new ideas and concentrate on things you are working on; instead of trying to remember ideas.

    The best thing about mind dumping is a book full of ideas to reference. When I’m having a creative block, I head to my idea book to get through it. Usually, within a few minutes, I’m crafting a new project. If you need more help to get unstuck from a creative rut, head to this post.

    Three Easy Ways to Mind Dump Daily

    1. Write all of your ideas down in a notebook reserved for ideas. You don’t need anything fancy. A simple spiral notebook works well.
    2. Write all your ideas on small pieces of paper and put them in a jar. Again, no need for any fancy paper or jar – post it notes and a mason jar work great.
    3. Use a note taking app on your phone, tablet, or computer to record your ideas daily. There’s a number of them available, one of my favorites being Evernote.

    My Challenge to You

    For the rest of the week, mind dump daily and see if it helps you focus better on daily tasks and remember your ideas.

    Love this idea? Save the image below to Pinterest.

    How (and why!) to Mind Dump in Your Silhouette Cameo or Cricut Creative Business - by cuttingforbusiness.com

  • How to Survey Customers Using Rafflecopter

    Yesterday, I showed you how to use SurveyMonkey to survey your customers. Near the end of the article, I mentioned that you can get a better response rate if you offer a reward to customers that complete your survey. Today, I’m going to show you how to easily run a giveaway while collecting responses from customers through Rafflecopter. (Hint: You might have recently seen me do this through my Christmas giveaways!). Like SurveyMonkey, Rafflecopter is easy to use and has a free plan.

    How to Survey Your Customers through Rafflecopter

    1. Create an account at rafflecopter.comHow to Survey Customers Using Rafflecopter. Perfect for Silhouette Cameo or Cricut small business owners. By cuttingforbusiness.com.
    2. After logging in, click the “New Giveaway” button. How to Survey Customers Using Rafflecopter. Perfect for Silhouette Cameo or Cricut small business owners. By cuttingforbusiness.com.
    3. Click the “Add a Prize” button. How to Survey Customers Using Rafflecopter. Perfect for Silhouette Cameo or Cricut small business owners. By cuttingforbusiness.com.
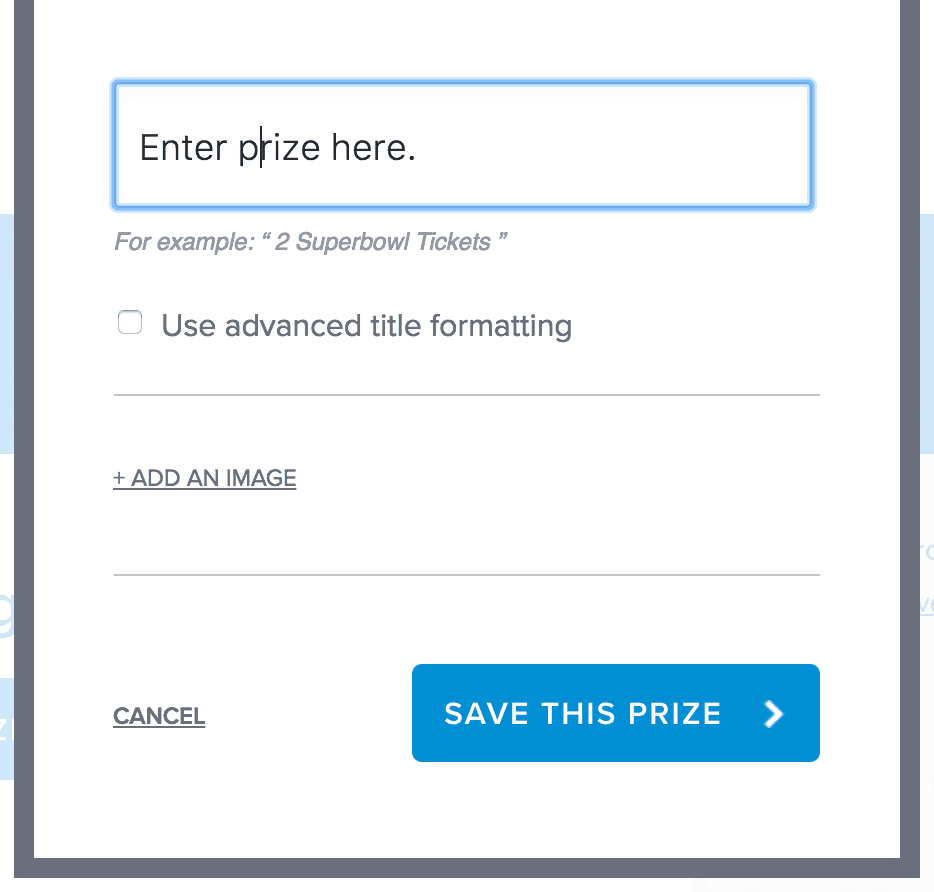
    4. Add your prize, along with a photo if you have one. How to Survey Customers Using Rafflecopter. Perfect for Silhouette Cameo or Cricut small business owners. By cuttingforbusiness.com.
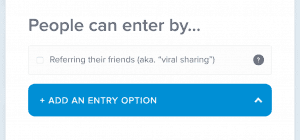
    5. Next, click “Add an Entry Option” under People can enter by. How to Survey Customers Using Rafflecopter. Perfect for Silhouette Cameo or Cricut small business owners. By cuttingforbusiness.com.
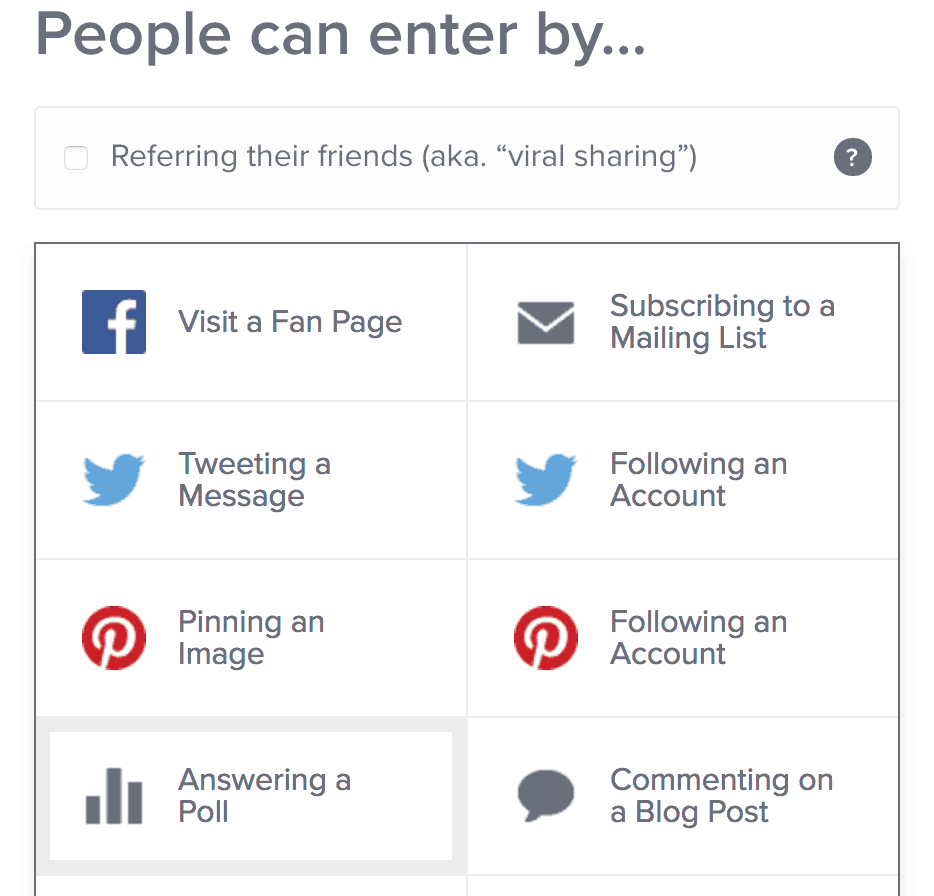
    6. Now, click “Answering a Poll”.How to Survey Customers Using Rafflecopter. Perfect for Silhouette Cameo or Cricut small business owners. By cuttingforbusiness.com.
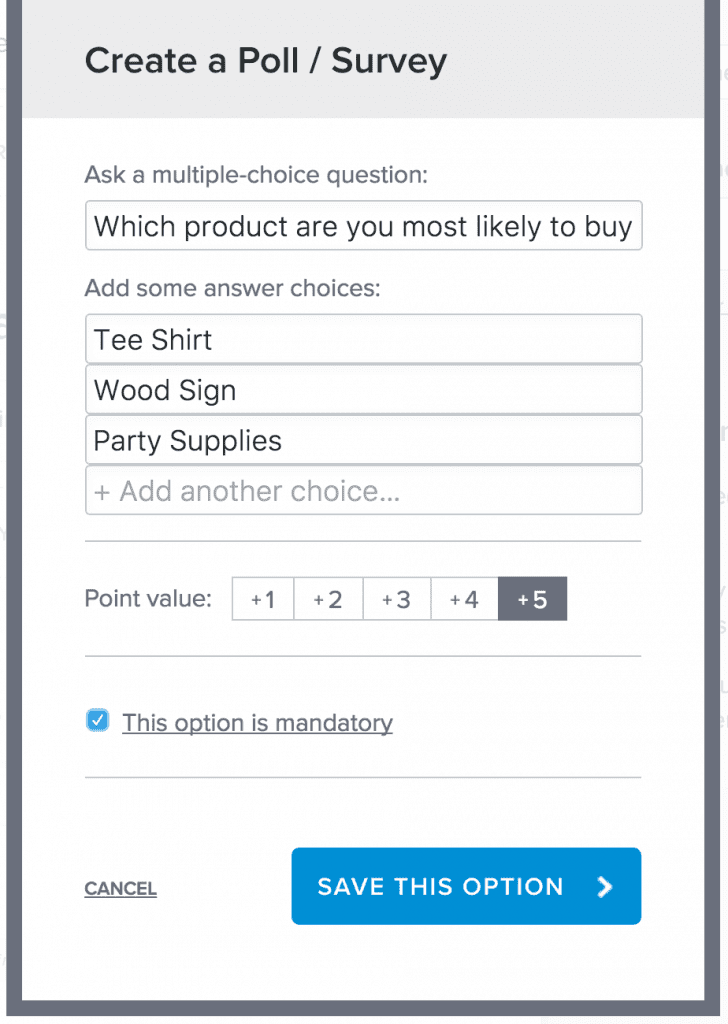
    7. Here you will enter your questions and answers. Unlike SurveyMonkey, you can only offer multiple choice questions. The point value you assign is the number of giveaway entries a person receives for completing the survey. Lastly, you can choose whether or not the questions are mandatory. Finally, click the “Save this Option” button.How to Survey Customers Using Rafflecopter. Perfect for Silhouette Cameo or Cricut small business owners. By cuttingforbusiness.com.
    8. When you are finished with all questions, you’ll choose the amount of time before you choose a winner and click the “Preview and Install” button. How to Survey Customers Using Rafflecopter. Perfect for Silhouette Cameo or Cricut small business owners. By cuttingforbusiness.com.
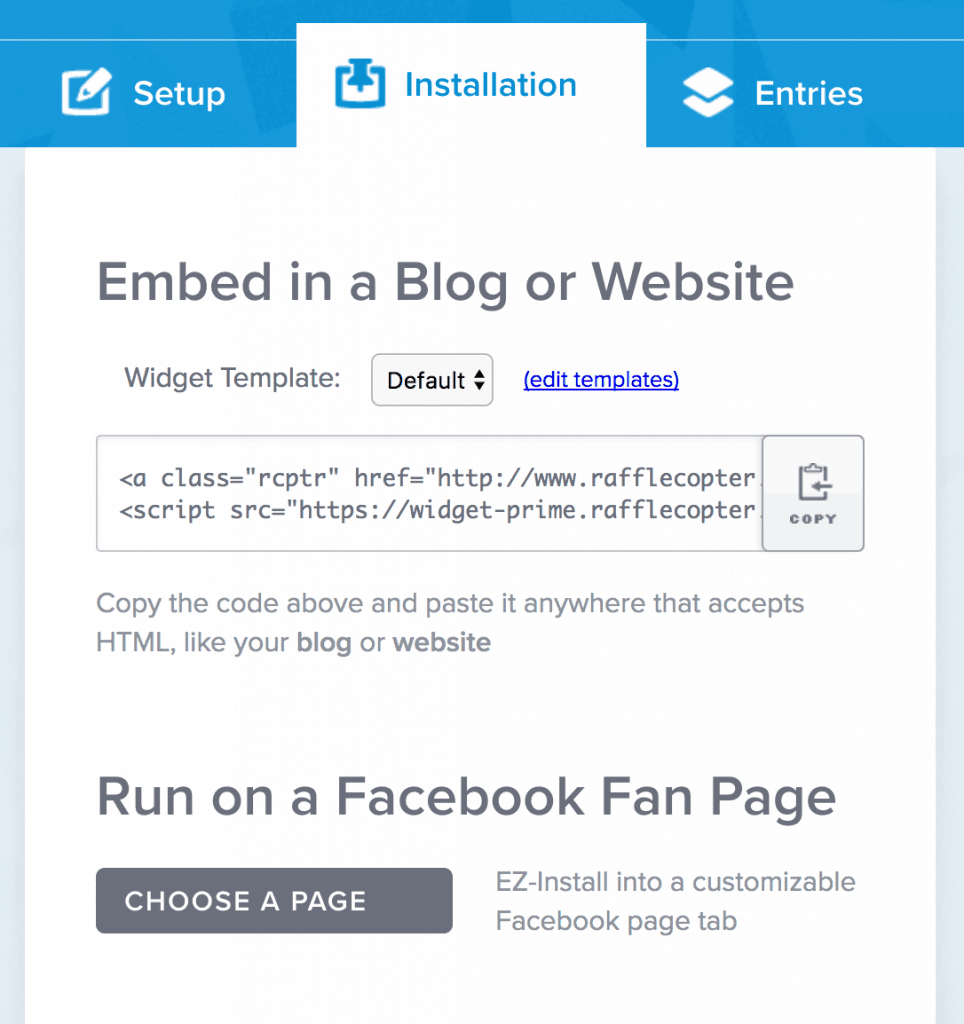
    9. To distribute your survey, you can post the code on your website or Facebook page. How to Survey Customers Using Rafflecopter. Perfect for Silhouette Cameo or Cricut small business owners. By cuttingforbusiness.com.

    When customers complete your survey, you’ll be able to see the entries from the “Entries” tab.

    Giveaway Ideas for Survey Respondents

    Need ideas for what to giveaway to encourage customers to complete your survey? Gift cards for your shop or website or gift baskets of your popular products usually work well.

    Save this post to Pinterest:

    How to Survey Customers Using Rafflecopter. Perfect for Silhouette Cameo or Cricut small business owners. By cuttingforbusiness.com.

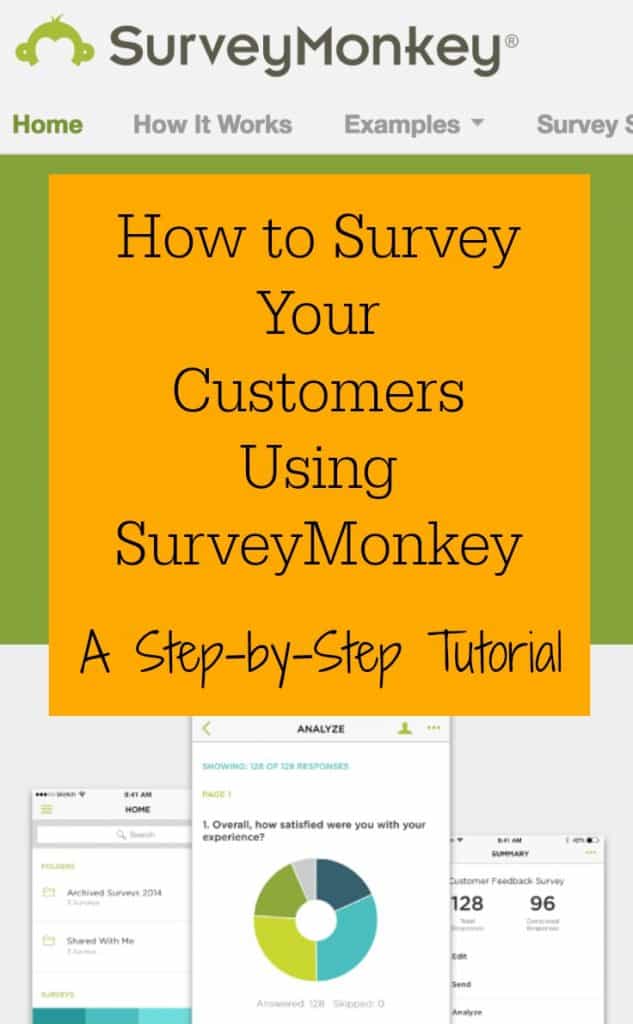
  • How to Survey Customers Using SurveyMonkey

    Surveying your customers is a great way to get feedback about your products, customer service, or future product lineup. In fact, it is one of the easiest ways to find out if what you are doing in your Silhouette or Cricut business is “working”. There are many ways to survey customers, but today and tomorrow I am going to show you two easy ways. Today, let’s look at using SurveyMonkey to survey your customers. The best thing about SurveyMonkey – it is easy to use, they have a free plan, and a handy mobile app.

    How to Survey Your Customers through SurveyMonkey

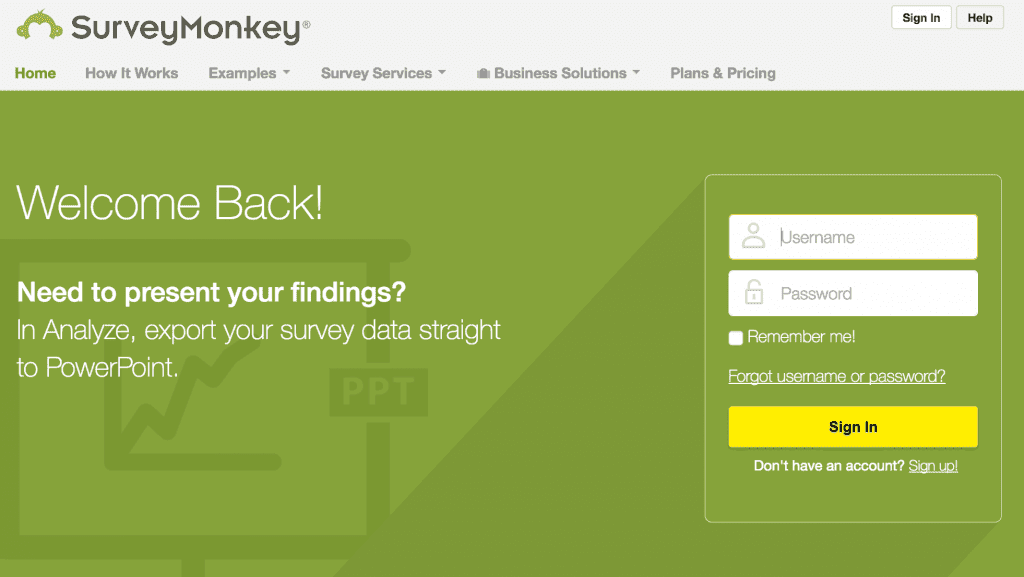
    1. Visit surveymonkey.com and create an account. How to Survey Customers Using SurveyMonkey - Great for Silhouette Cameo or Cricut small business owners - by cuttingforbusiness.com
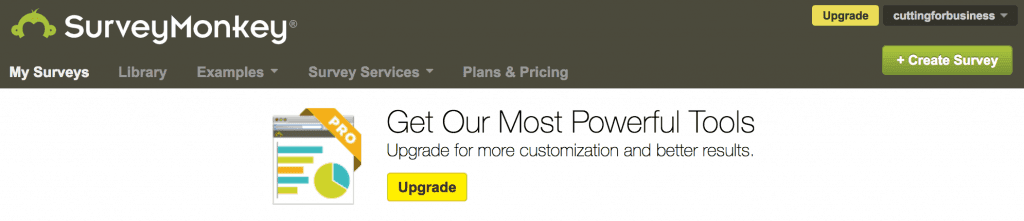
    2. After logging in, click the “Create Survey” button in the top right corner. How to Survey Customers Using SurveyMonkey - Great for Silhouette Cameo or Cricut small business owners - by cuttingforbusiness.com
    3. Next, you’ll create your survey questions. You can either start from scratch or modify a free template. For this tutorial, we are starting from scratch. Click the “Start from Scratch” button. How to Survey Customers Using SurveyMonkey - Great for Silhouette Cameo or Cricut small business owners - by cuttingforbusiness.com
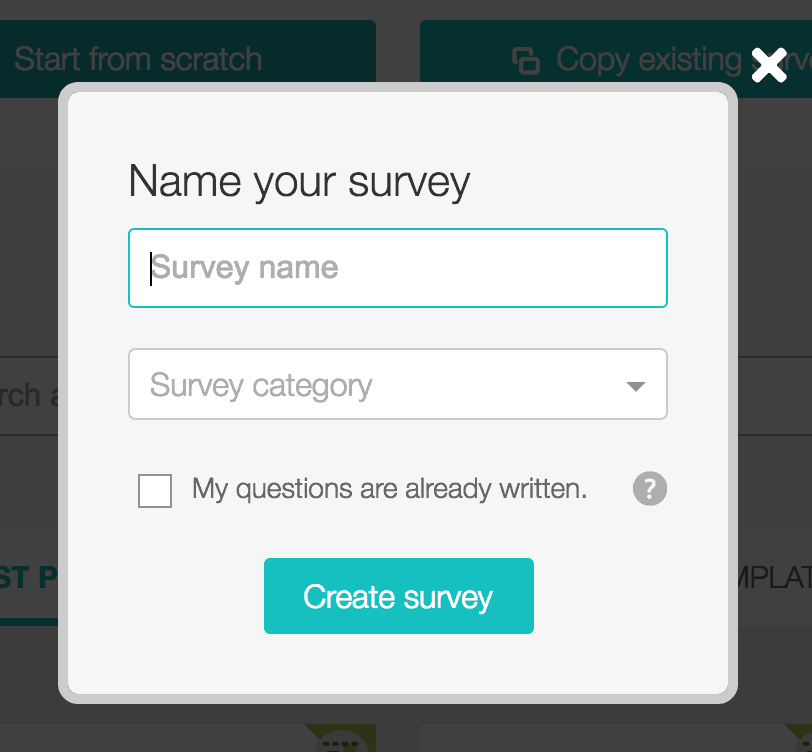
    4. Enter a name and choose a category. Then, click “Create survey”.How to Survey Customers Using SurveyMonkey - Great for Silhouette Cameo or Cricut small business owners - by cuttingforbusiness.com
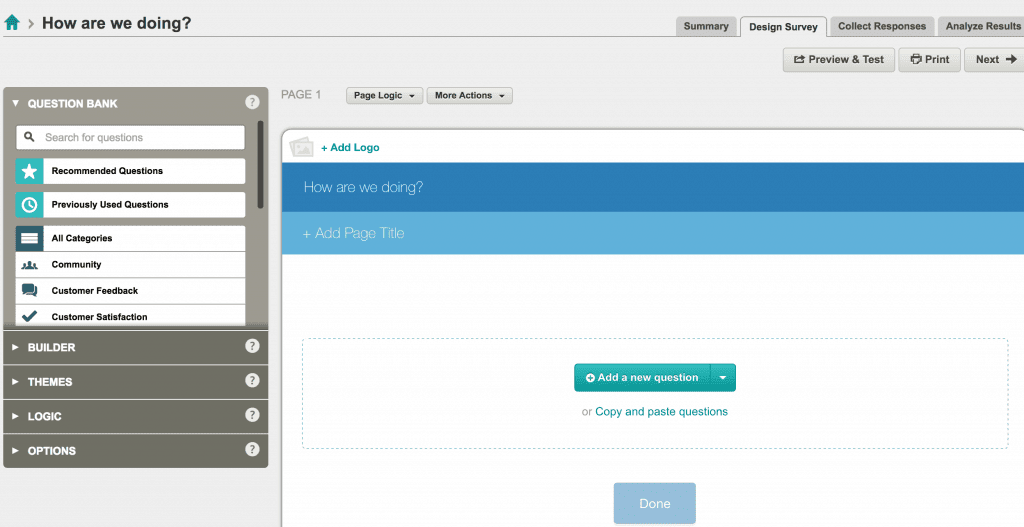
    5. Now, you’ll click the “Add a new question” button. How to Survey Customers Using SurveyMonkey - Great for Silhouette Cameo or Cricut small business owners - by cuttingforbusiness.com
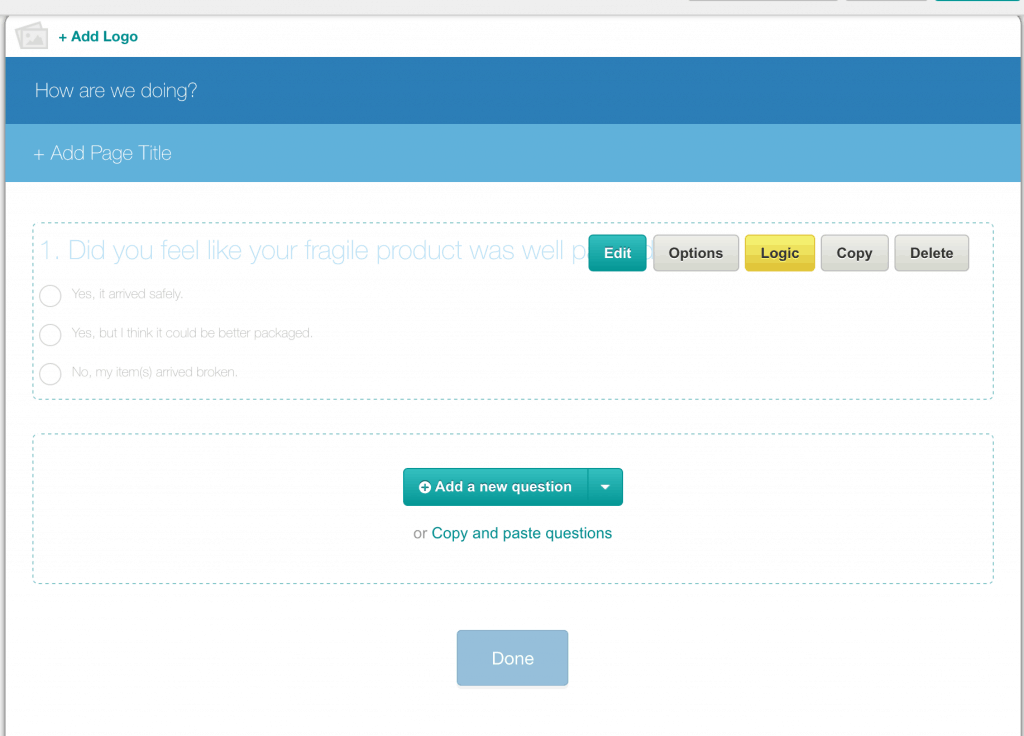
    6. Next, you’ll be able to write your questions. From the dropdown in the center of the page, you’ll be able to select a question format such as multiple choice, short answer, star rating, etc. Add all your questions and select the “Next” button when finished. (You can also choose to add your custom logo!) How to Survey Customers Using SurveyMonkey - Great for Silhouette Cameo or Cricut small business owners - by cuttingforbusiness.com
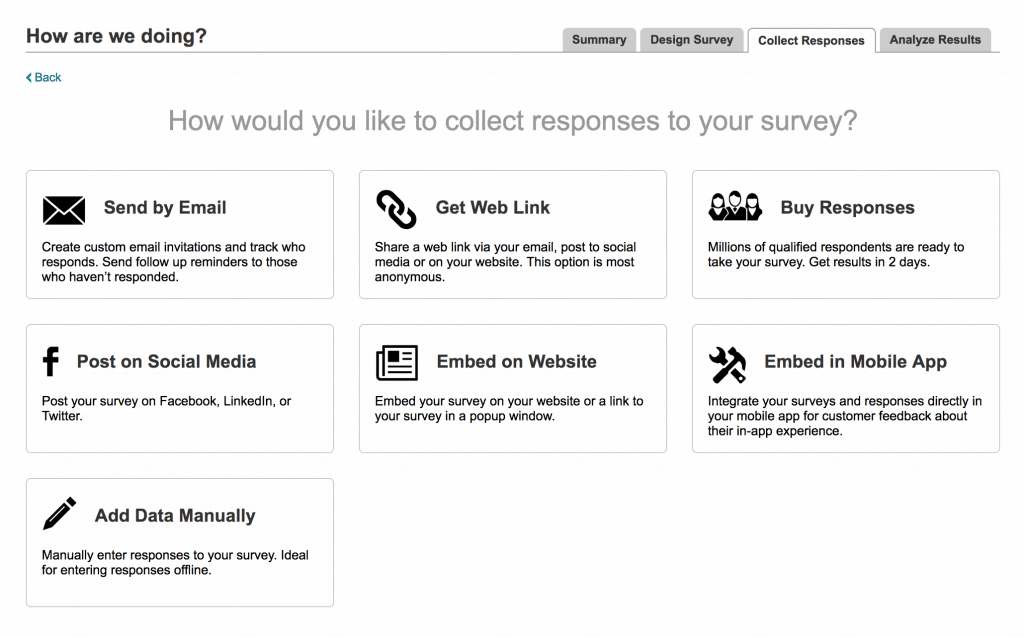
    7. Once you finished writing your survey questions, you’ll be able to choose how to get the survey to your customers. How to Survey Customers Using SurveyMonkey - Great for Silhouette Cameo or Cricut small business owners - by cuttingforbusiness.com

    When customers complete your survey, you’ll be to analyze the responses and make changes (or keep doing what you are doing!) in your business. To review your responses in SurveyMonkey, click “My Surveys” from the top navigation bar. This allows you to analyze the responses you’ve collected.

    Types of Questions to Ask Customers

    Before you write your survey, brainstorm what you want to find out from your customer. There is no point of having a survey if you don’t have an end goal. Here’s a quick list of ideas to get your started:

    • Ordering – How was the ordering process? Was the website easy to use?
    • Order Frequency – How often do you order?
    • Packaging – Did you like the packaging? Was your item well packed?
    • Shipping – Do you feel the shipping costs were reasonable? Was your package shipped on schedule?
    • Products – What future products would you like to see? What is your least favorite product?
    • Recommendations – Would you recommend us to a friend?
    • Logo/Branding – What do you think of when you hear our business name? What do you think of when you look at our logo?

    Some customers will dismiss surveys without filling them out. One great way to boost your survey responses is to tie it to a reward. Read on to the next post and learn about surveying customers through Rafflecopter.

    Save this post to Pinterest:

    How to Survey Customers Using SurveyMonkey - Great for Silhouette Cameo or Cricut small business owners - by cuttingforbusiness.com

  • How to Survey Customer Using Rafflecopter

    Good business owners constantly evaluate their business and tweak it to make higher profits, have better customer satisfaction, and expand to new markets. One way to get valuable feedback is to survey your customers. stopped here.

  • How to Connect Google Analytics to Your Etsy Shop

    Ever wonder where customers are finding your Etsy shop, or what they are looking at? While Etsy has limited data available – Google analytics can give you more information. Below you’ll find a step by step tutorial to connect Google Analytics to your Etsy shop.

    How to Connect Google Analytics to your Etsy Shop

    1. Sign up for a Google Analytics account or sign into your existing account.
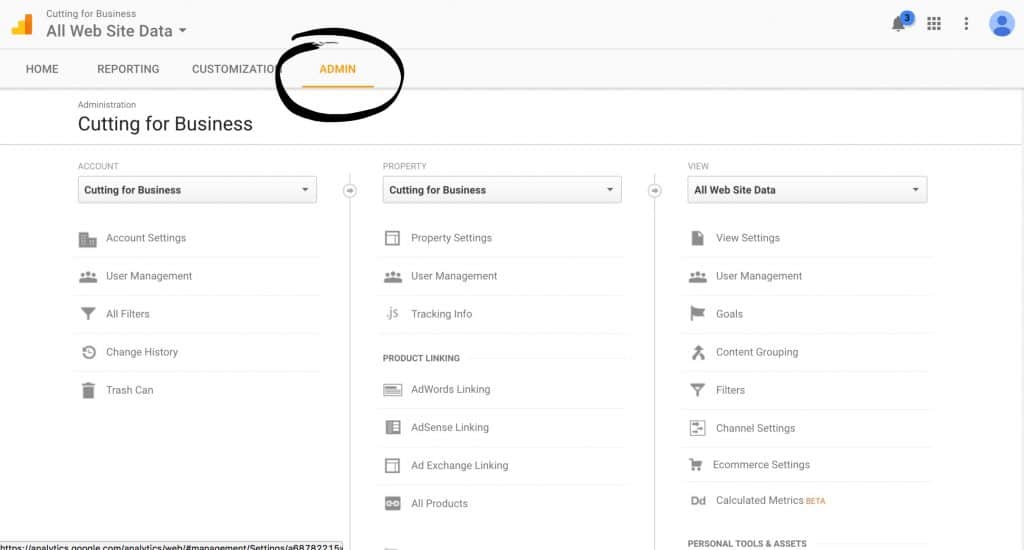
    2. Click the “Admin” tab at the top of the page. How to Connect Google Analytics to Your Etsy Shop - Perfect for Silhouette Cameo or Cricut small business owners - by cuttingforbusiness.com
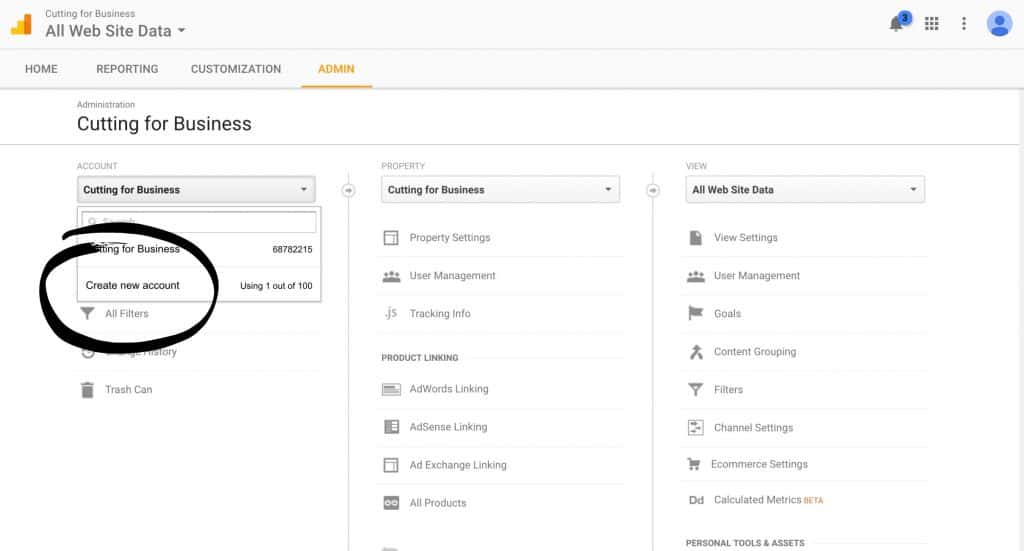
    3. From the account dropdown, select “Add new account”. How to Connect Google Analytics to Your Etsy Shop - Perfect for Silhouette Cameo or Cricut small business owners - by cuttingforbusiness.com
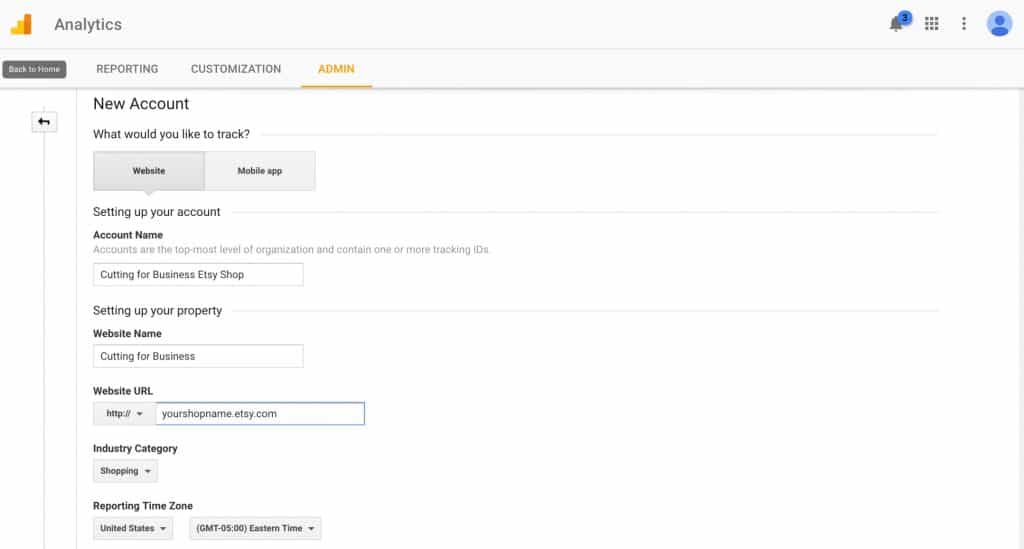
    4. Fill in the basic information. Your shop URL is yourshopname.etsy.com. Be sure to put your actual shop name where I put “yourshopname”. How to Connect Google Analytics to Your Etsy Shop - Perfect for Silhouette Cameo or Cricut small business owners - by cuttingforbusiness.com
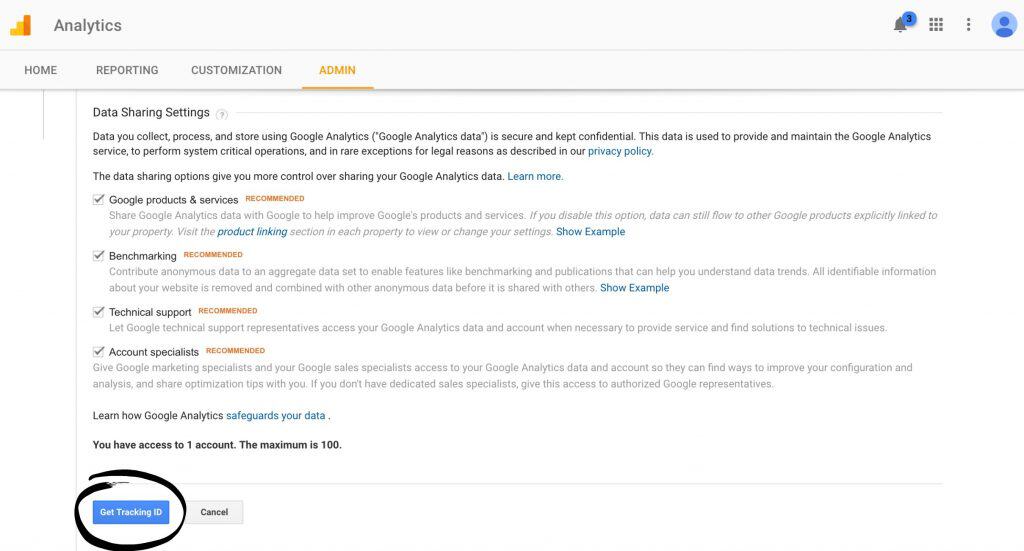
    5. Next, choose the permissions to give Google. I leave everything checked, but it is your personal preference. Click the “Get Tracking ID” button.How to Connect Google Analytics to Your Etsy Shop - Perfect for Silhouette Cameo or Cricut small business owners - by cuttingforbusiness.com
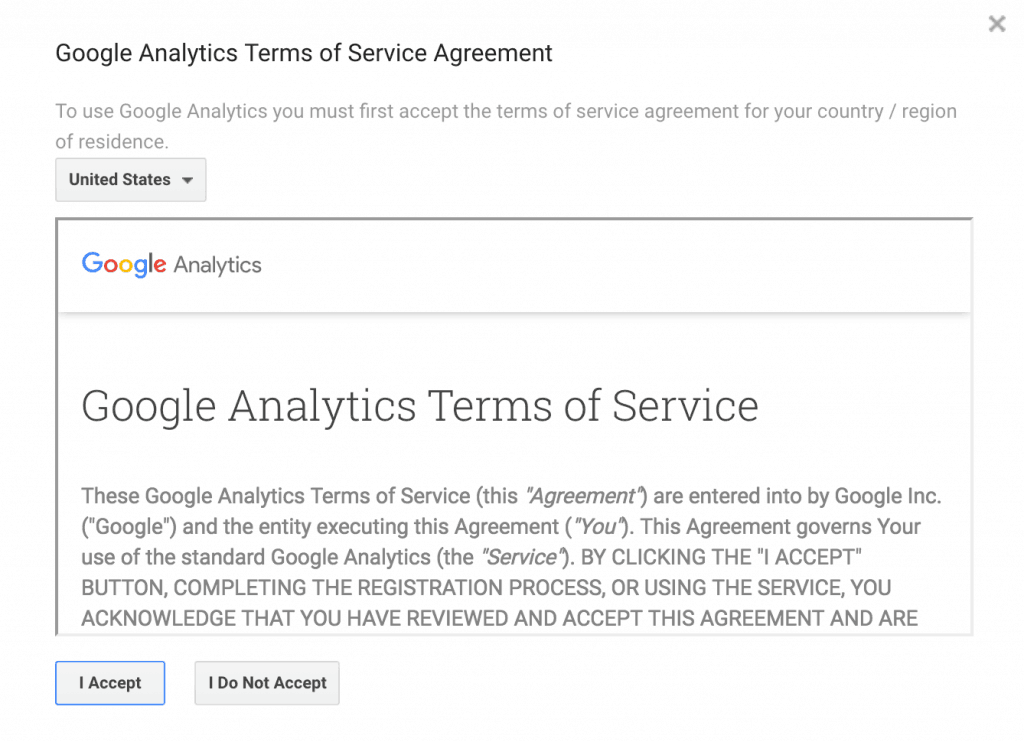
    6. Read and accept Google’s Terms of Service. How to Connect Google Analytics to Your Etsy Shop - Perfect for Silhouette Cameo or Cricut small business owners - by cuttingforbusiness.com
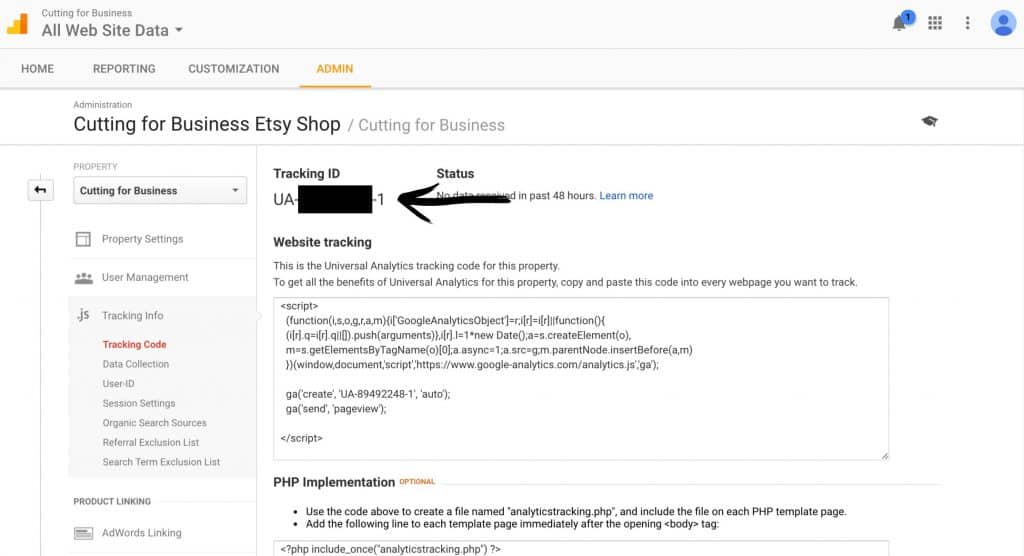
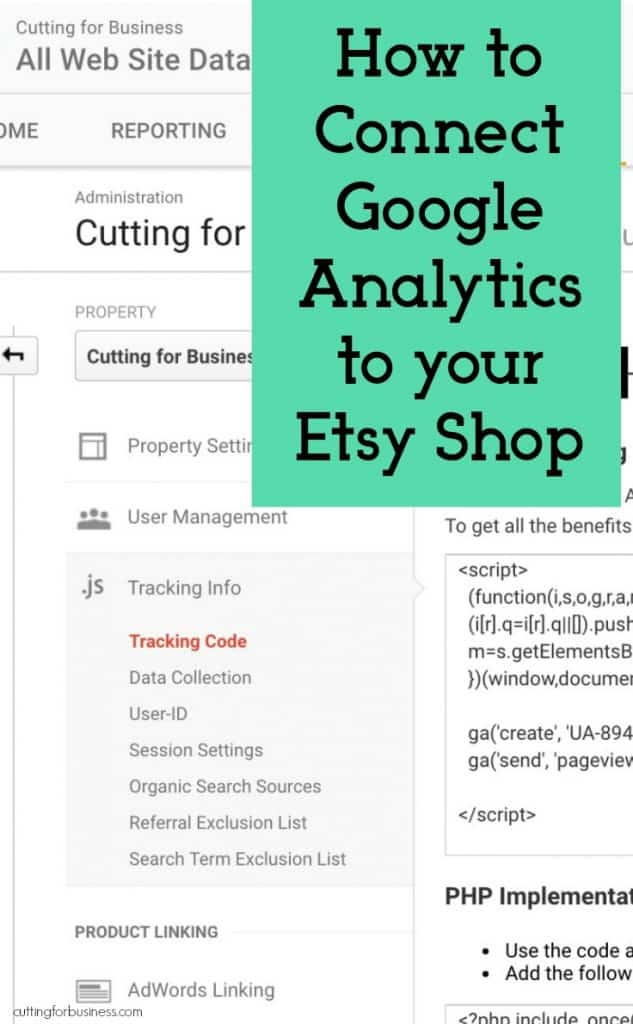
    7. Copy and paste the Tracking ID which starts with UA, then dashes and numbers. (Mine has been blacked out in the screenshot below.) How to Connect Google Analytics to Your Etsy Shop - Perfect for Silhouette Cameo or Cricut small business owners - by cuttingforbusiness.com
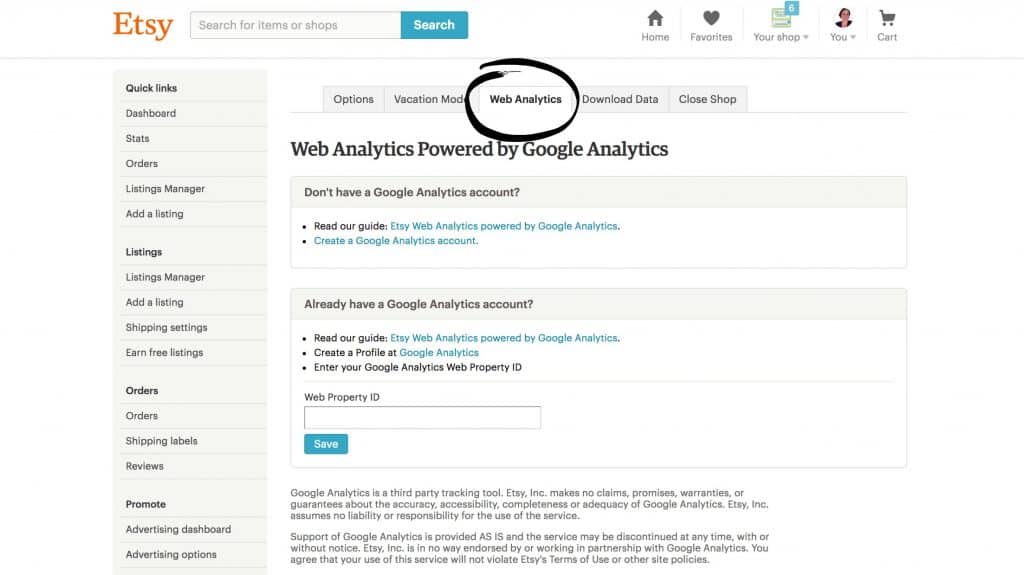
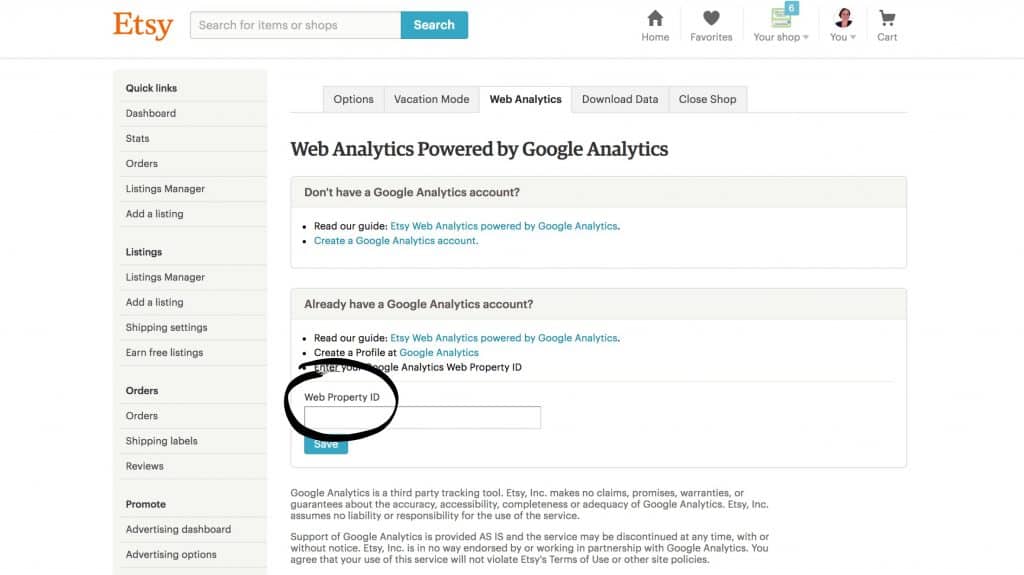
    8. Now, you’ll head to your Etsy shop. Click “Your Shop”, then “Shop Settings”, then “Options”, then the “Web Analytics” tab. How to Connect Google Analytics to Your Etsy Shop - Perfect for Silhouette Cameo or Cricut small business owners - by cuttingforbusiness.com
    9. Last, copy and paste the Tracking ID from Google to the box labeled “Web Property ID” and click the “Save” button. How to Connect Google Analytics to Your Etsy Shop - Perfect for Silhouette Cameo or Cricut small business owners - by cuttingforbusiness.com

    Now What?

    Great! You’ve got Google Analytics connected to your Etsy shop. It’ll take about 24 hours to start seeing statistics. To check your statistics, you’ll visit your Google Analytics account. Here’s a quick guide to what you are seeing when you click on the Google Analytics “Reporting” tab:

    • Users: This is the number of unique visitors to your Etsy shop. For example, if I visit your shop 10 times, I will be counted 1 time as a user.
    • Sessions: These are basically page views. This is the number of page views in your Etsy shop. If I click 5 products in your Etsy shop, I’ll be counted as 5 in the sessions.
    • Average Visit Duration: The amount of time I spend in your Etsy shop.
    • Direct traffic: These are people that typed in your Etsy shop address to land in your shop.
    • Referral Traffic: These are visitors that were referred from a link on another site.
    • Search Traffic: This is visitors that landed on your site from search engines.

    More

    • The “All Traffic”, then “Channels” tells you where customers are finding your site. You can click on “Social”, “Organic Search”, “Direct”, and “Referral”. From the “Social” report, you can see which social media networks are most effective. From “Organic Search” you can see what search terms led customers to your shop, from “Direct” you’ll see the number of people that typed in your address directly, and the “Referral” link tells you what other sites have a link to your site where customers have clicked through and landed in your shop.

    I urge you to click around and explore your new Google Analytics account. There is lots of available data for you to sift through.

    Was this tutorial helpful? I’d love if you pinned it on Pinterest:
    How to Connect Google Analytics to Your Etsy Shop - Perfect for Silhouette Cameo or Cricut small business owners - by cuttingforbusiness.com

  • How to Use a Vinyl Stencil on Barnwood or Reclaimed Wood

    Today’s post is a follow up to my post Why Does Paint Bleed when Using a Vinyl Stencil? In that post, I showed you how to use a vinyl stencil to get a perfect design every time. The takeaway from that was sand the surface well and use tiny amounts of paint. After posting that article, I got a lot of reader questions about how to stencil on rough wood such as barnwood, pallet wood, or reclaimed wood. Today, let’s tackle that.

    Why Is it Difficult to Stencil on Rough Wood?

    Most crafters who use barnwood or reclaimed wood want to save the texture of the wood, and don’t want to sand it. The uneven surface makes it difficult to get a good seal of the stencil and paint will bleed everywhere. I’ve seen some crafters use Mod Podge over the whole board before applying the stencil, but that discolors the wood and leaves a shiny finish over the wood.

    Supplies Needed

    How to Stencil on Rough Wood

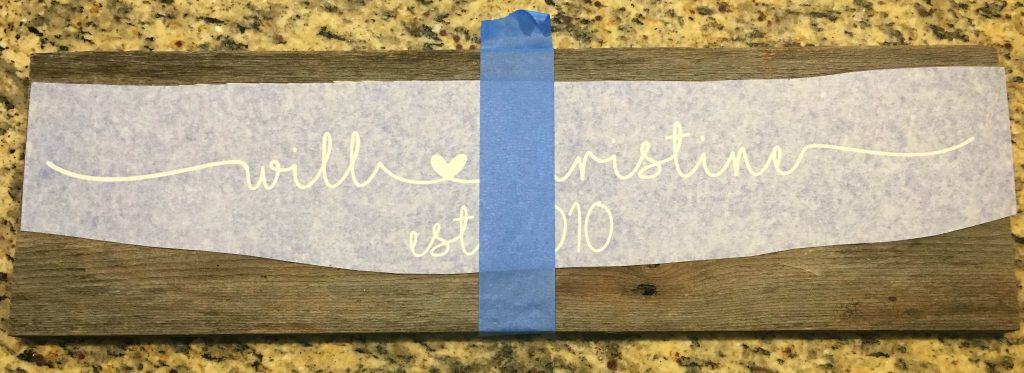
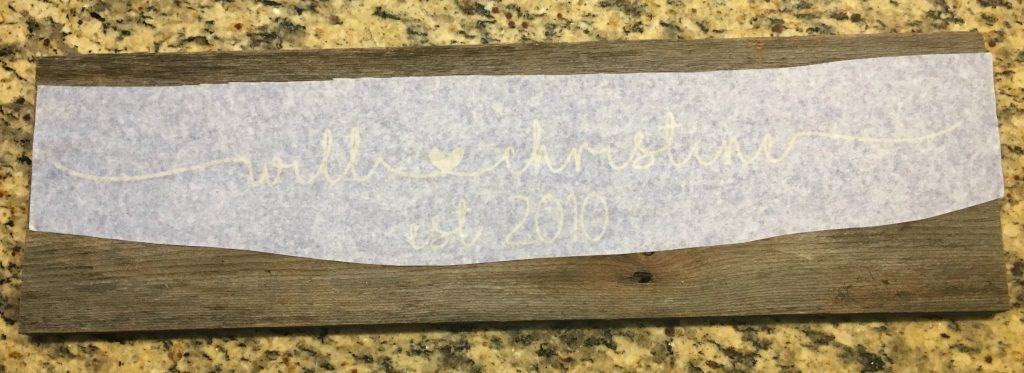
    1. Cut your vinyl stencil using your Silhouette Cameo or Cricut. Weed the design and apply transfer tape. I prefer to use the hinge method to apply the vinyl designs. First, align the design and tape across the center.How to Use a Vinyl Stencil on Barnwood or Reclaimed Wood with your Silhouette Cameo or Cricut - by cuttingforbusiness.com
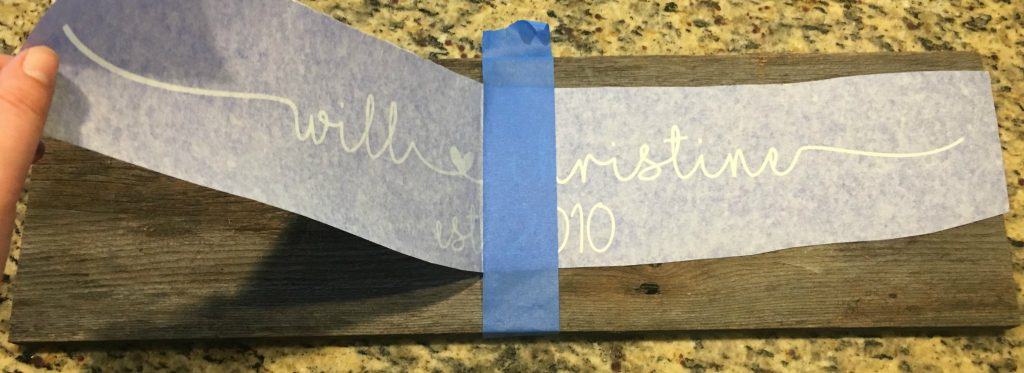
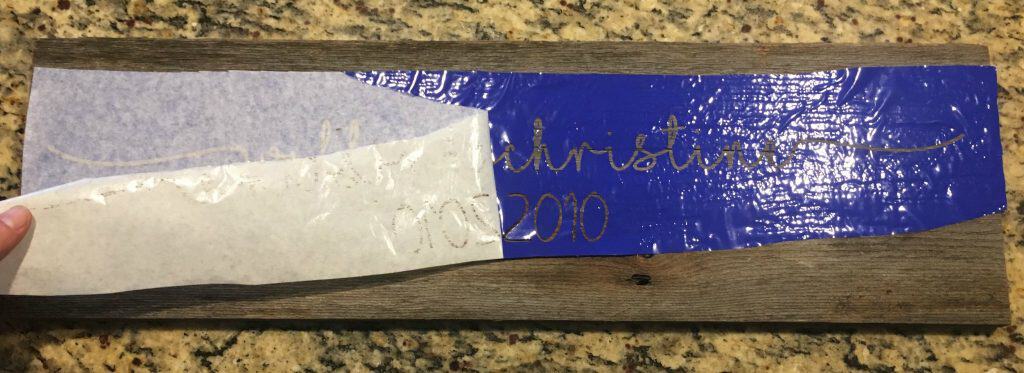
      Next, remove the paper backing from the left side of the design and apply it to the wood.How to Use a Vinyl Stencil on Barnwood or Reclaimed Wood with your Silhouette Cameo or Cricut - by cuttingforbusiness.com
      Remove the painter’s tape and the paper backing from the right side of the wood and apply it.How to Use a Vinyl Stencil on Barnwood or Reclaimed Wood with your Silhouette Cameo or Cricut - by cuttingforbusiness.com
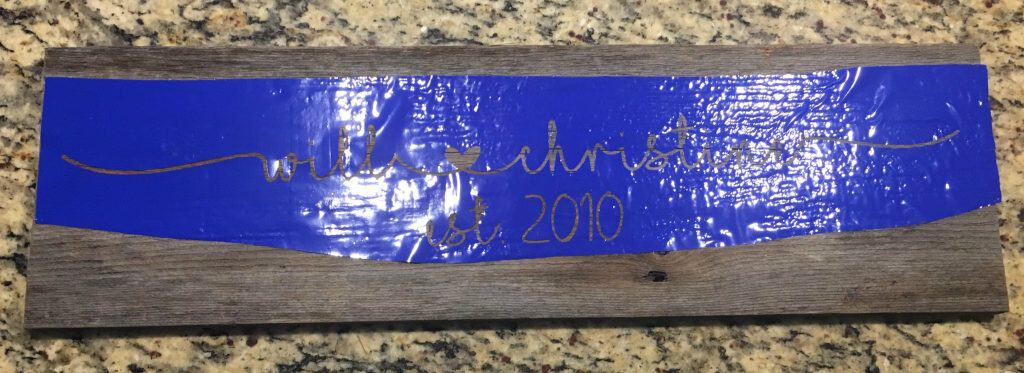
      Last, remove the transfer tape.How to Use a Vinyl Stencil on Barnwood or Reclaimed Wood with your Silhouette Cameo or Cricut - by cuttingforbusiness.com
      If you look close, you’ll notice that my vinyl stencil doesn’t stick well to my wood. How to Use a Vinyl Stencil on Barnwood or Reclaimed Wood with your Silhouette Cameo or Cricut - by cuttingforbusiness.com
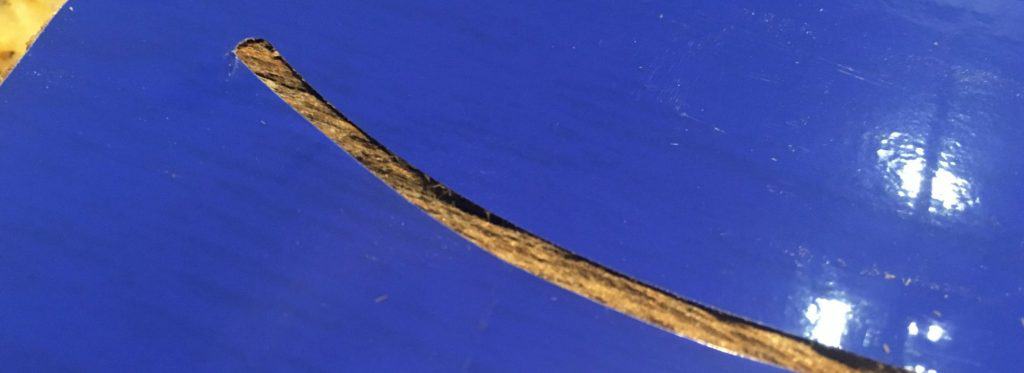
      You can see in this picture that if I painted this, it would run under the stencil and make a huge mess. Due to the uneven wood texture, the vinyl simply doesn’t stick well.How to Use a Vinyl Stencil on Barnwood or Reclaimed Wood with your Silhouette Cameo or Cricut - by cuttingforbusiness.com
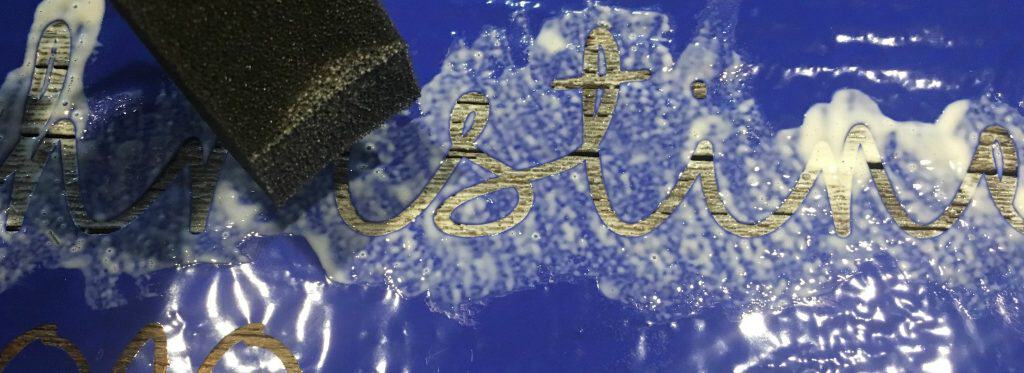
    2. My solution is to apply a coat of Mod Podge to the area I want to paint. (Mod Podge is basically watered down glue. If you don’t have some on hand, make your own with Elmer’s Glue and water.) The Mod Podge glues the stencil in place and seals the edges so the paint won’t bleed. Apply Mod Podge with a foam brush and allow it to dry. How to Use a Vinyl Stencil on Barnwood or Reclaimed Wood with your Silhouette Cameo or Cricut - by cuttingforbusiness.com
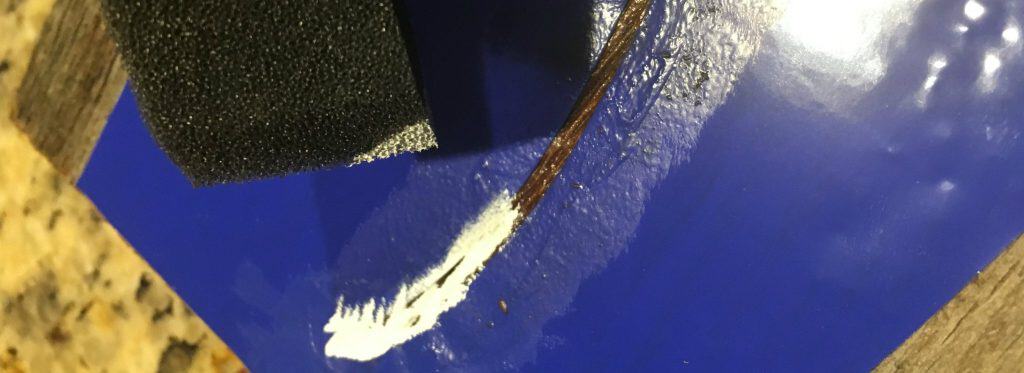
    3. After the Mod Podge dries, apply paint with a foam brush. Remember to use a tiny amount of paint! How to Use a Vinyl Stencil on Barnwood or Reclaimed Wood with your Silhouette Cameo or Cricut - by cuttingforbusiness.com
    4. Peel the stencil before the paint is dry. How to Use a Vinyl Stencil on Barnwood or Reclaimed Wood with your Silhouette Cameo or Cricut - by cuttingforbusiness.com

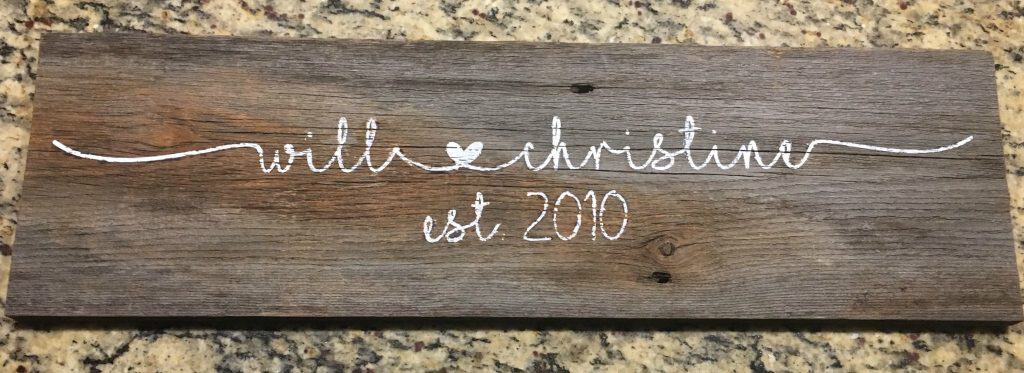
    To finish up your sign, add hanging hardware to the back. Don’t have a source for barnwood? Did you know you can order it on Etsy? Click here.

    Love this tutorial? Save it to Pinterest:
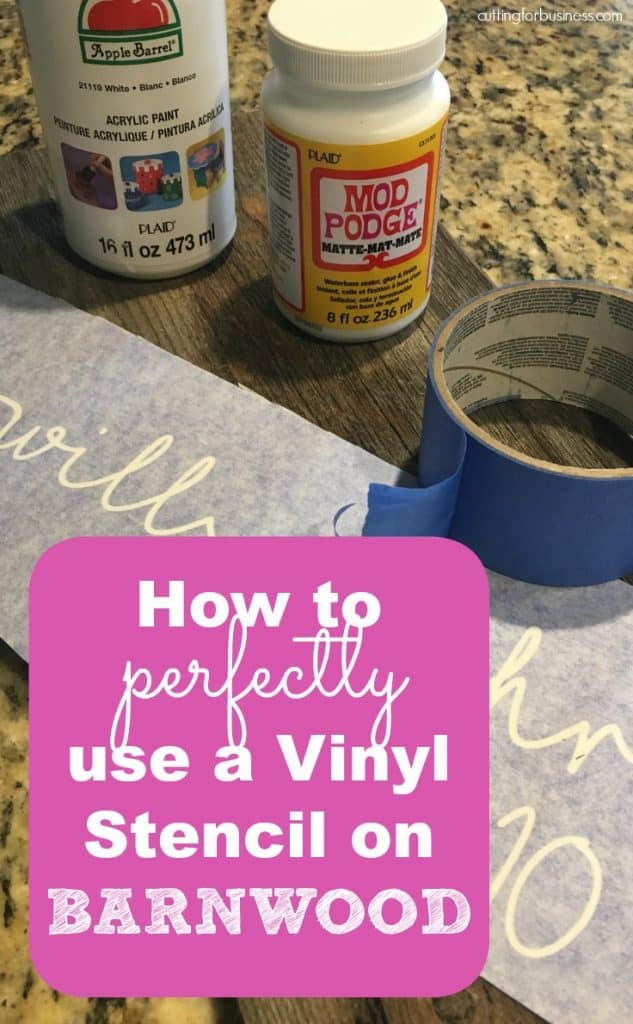
    How to Use a Vinyl Stencil on Barnwood or Reclaimed Wood with your Silhouette Cameo or Cricut - by cuttingforbusiness.com

  • DIY Teacher Library Stickers and Sticker Paper Review

    This year, 5th grade is doing a Secret Santa between the students. So, I’ve taken it upon myself to be the teacher’s Secret Santa! For the first day, I decided to do stickers for her personal book collection, made with my Silhouette Cameo 3 and a simple print and cut. This is perfect timing, because OnlineLabels.com recently sent me some sticker paper to try out.

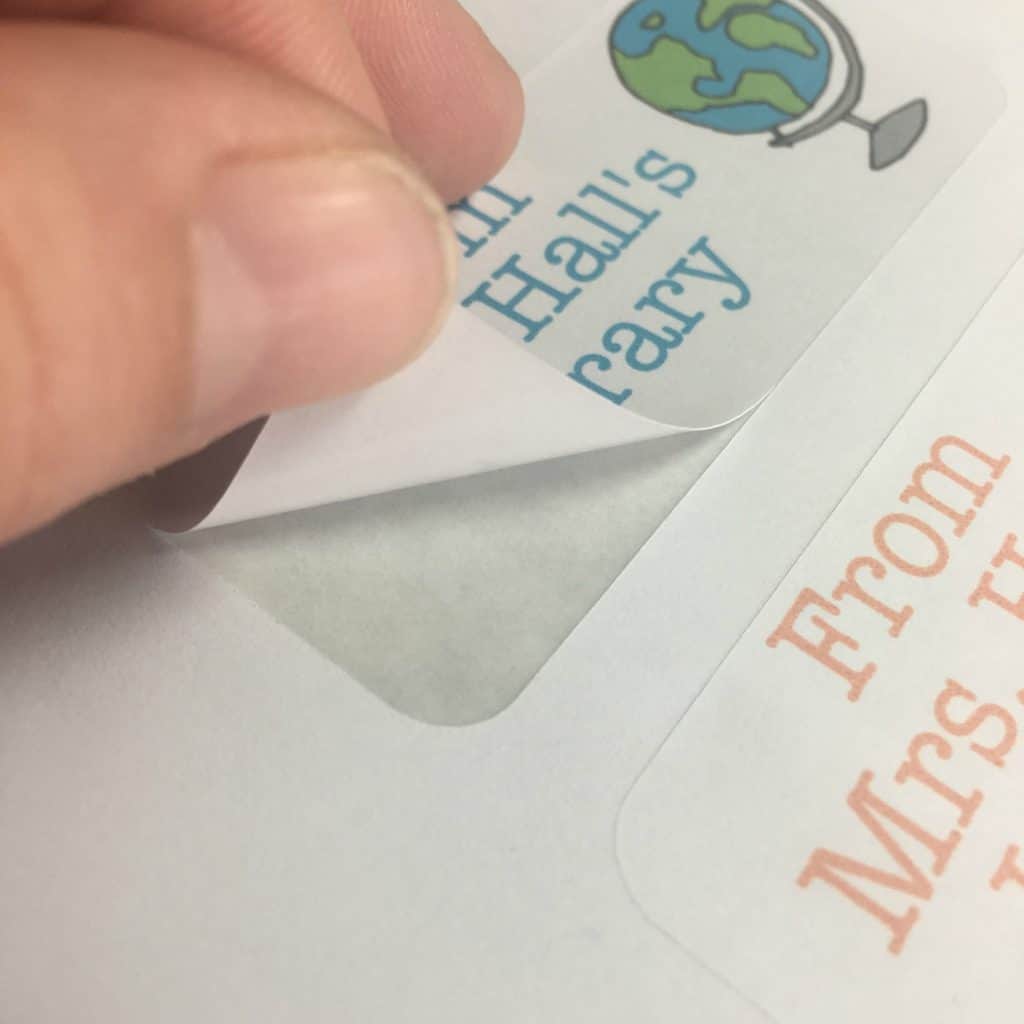
    The product I used in this project was 8.5″ by 11″ standard white matte sticker paper (item OL177WX) which can be found at this link. Pricing is based on quantity purchased, but ranges from $0.12 to $0.07 per sheet. Now, I’ve used a lot of different sticker papers, and this one was great! The paper weight was perfect for everyday use, it kiss cut wonderfully (using a rachet blade, depth 2, speed 4, thickness 6), and the stickiness is enough to keep the sticker wherever I put it.

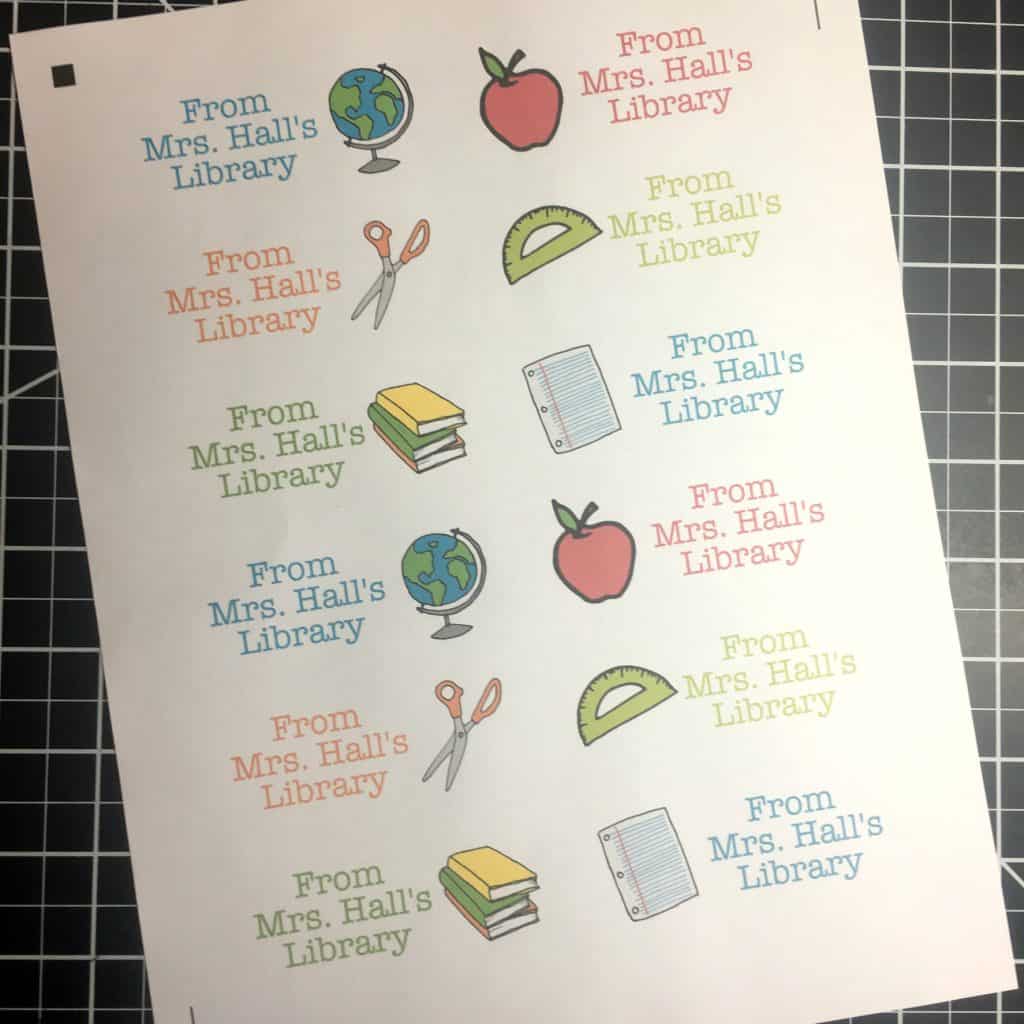
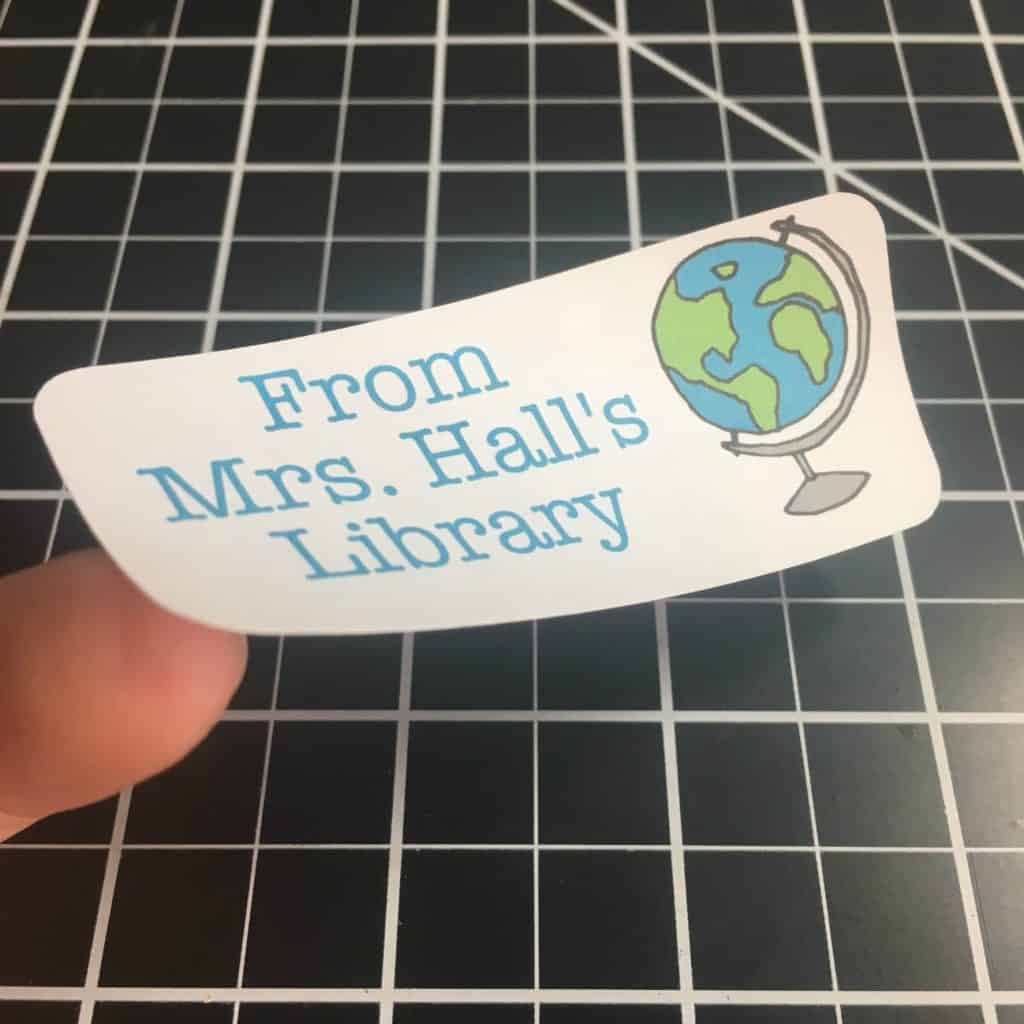
    Here’s a few pictures of the stickers I created:

    DIY Teacher Library Stickers and Sticker Paper Review - Great Back to School or Christmas Gift - by cuttingforbusiness.com.

    DIY Teacher Library Stickers and Sticker Paper Review - Great Back to School or Christmas Gift - by cuttingforbusiness.com. DIY Teacher Library Stickers and Sticker Paper Review - Great Back to School or Christmas Gift - by cuttingforbusiness.com.

    Want to make your own stickers? Download the file in .studio3 format here, you’ll just need to add your own text.

    Thanks OnlineLabels.com for sending me product to try out!

    Save this post to Pinterest:
    DIY Teacher Library Stickers and Sticker Paper Review - Great Back to School or Christmas Gift - by cuttingforbusiness.com.

  • Free Monogram Madness Decal Sale Graphics

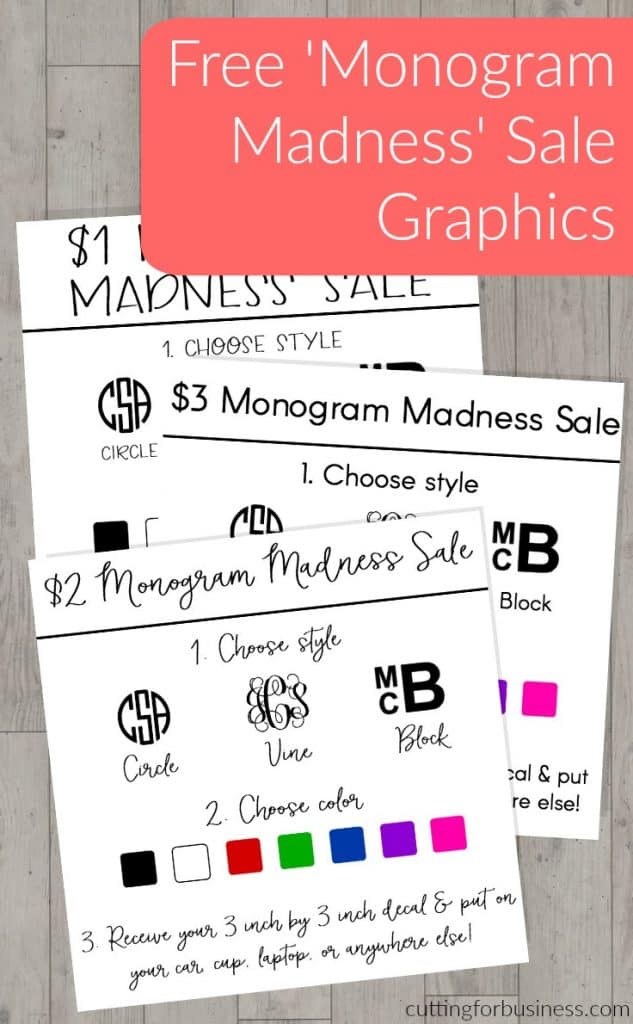
    Need some quick cash this holiday season? Why not run a Monogram Madness Sale using your Silhouette Cameo or Cricut? Today, I’m giving you ready to use graphics to host your own sale on social media.

    How to Run a Monogram Madness Sale

    1. Choose your favorite Monogram Madness sale graphic.
    2. Post it on social media along with instructions for ordering, payment, and shipping (if needed). In most cases, you can just put the monogram decal in a plain envelope with a stamp.
    3. Create the order and mail it out.
    4. Enjoy some extra money this holiday season.

    Fonts I Used

    Sample Facebook Post

    • Monogram Madness Vinyl Decal Sale – all orders ship in 3 days. Comment with style, monogram, color, and Paypal email address for invoice. (Post with image.)

    Sample Instagram Post

    • #Monogram Madness Sale! 3 inch by 3 inch #vinyl #decal. Perfect for #laptop, #car, #notebook, and more! DM or comment with style, monogram, color, and Paypal email address – ships free! #monograms #monogrameverything #monogramlove #monogramitall #monogramlife #monogramobsessed (Post with image.)

    How to Edit the Graphics

    • Need to make a change to the graphics provided? No problem!
      • Download your favorite graphic and open it in PicMonkey.com.
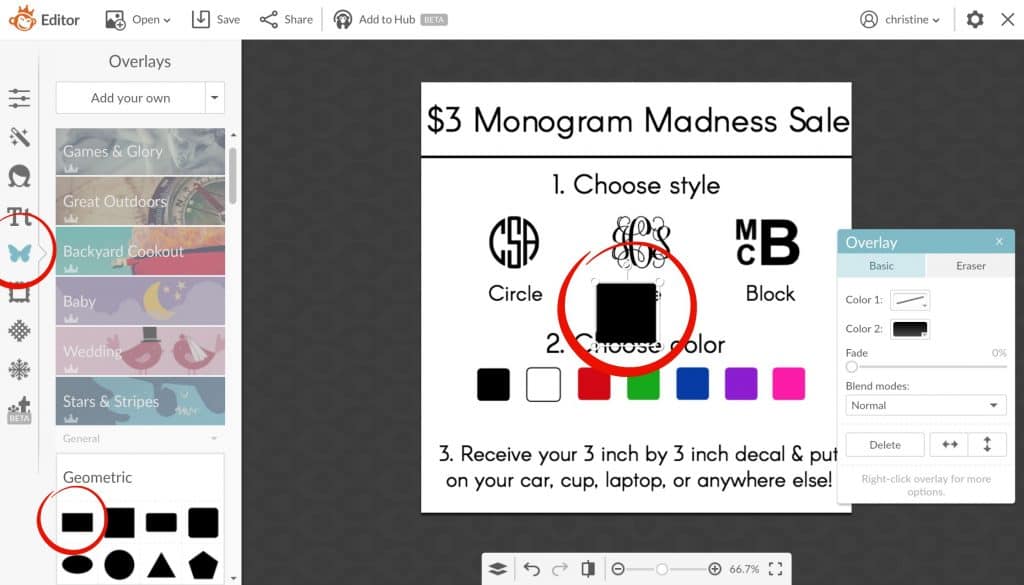
      • On the left hand side, choose the butterfly icon, then choose the rectangle overlay. Free Monogram Madness Sale Graphics for Silhouette Cameo or Cricut Explore Small Business Owners - by cuttingforbusiness.com.
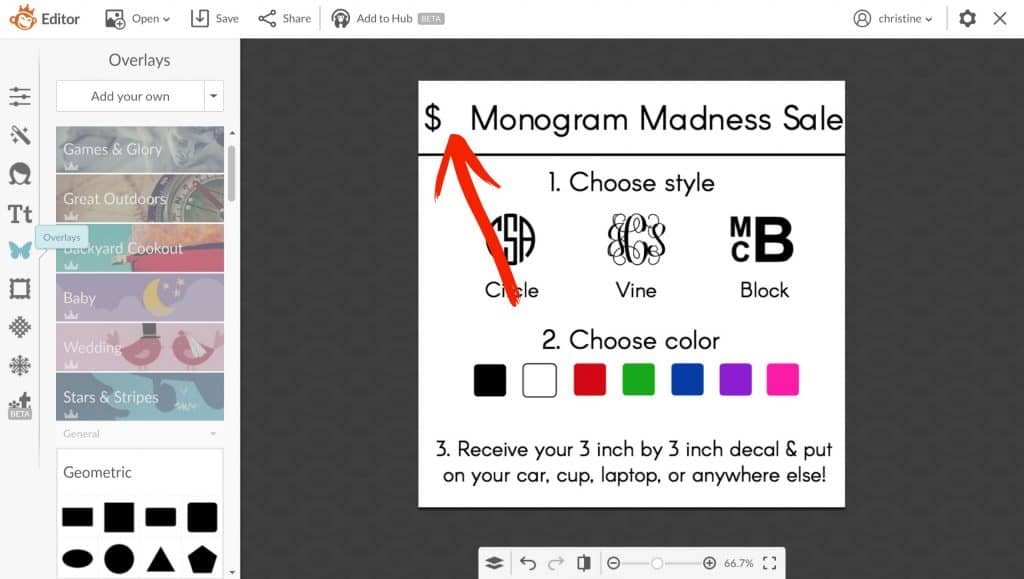
      • Change the overlay color to white and cover anything you want to change with the white box. (I removed the price in the example below.)Free Monogram Madness Sale Graphics for Silhouette Cameo or Cricut Explore Small Business Owners - by cuttingforbusiness.com.
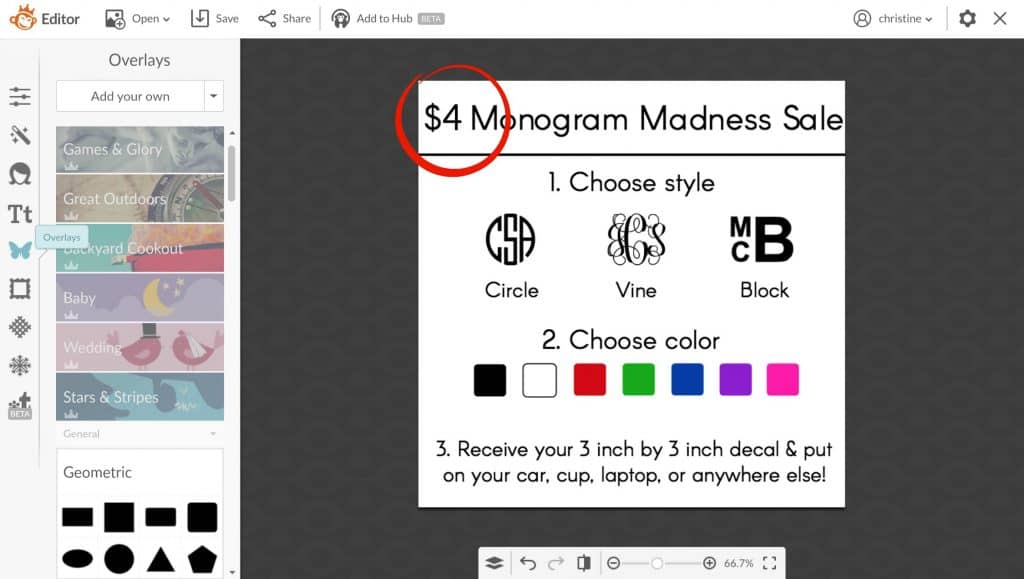
      • Add your edited text over the white box. Free Monogram Madness Sale Graphics for Silhouette Cameo or Cricut Explore Small Business Owners - by cuttingforbusiness.com.

    Ready to download? First, save the image below to Pinterest. Then, download the graphics below.

    Free Monogram Madness Sale Graphics for Silhouette Cameo or Cricut Explore Small Business Owners - by cuttingforbusiness.com.

    [WPSM_INFOBOX id=9291]