Blog

  • How to Sell Advertising Space in Your Silhouette or Cricut Craft Business

    This week, I’ve covered a lot of information about passive income and affiliate programs. As we wrap up our talks about passive income, let’s take a quick look at selling advertising space to other companies.

    Option 1: Ads on Your Website

    Why Add Ads to Your Website?

    If you have a standalone website (not Etsy or another marketplace) you can add advertisements to your website. In this type of passive income, you get paid each time that an ad is shown or clicked. The ads shown are generally based on the visitor’s search history. As an example, you can see ads on this website at the top of the any page and in the sidebar on the right hand side.

    How to Implement Ads on Your Website

    The easiest way to get started with ads on your website is through Google Adsense. Simply visit Google Adsense and sign up for a free account. After being approved as a publisher, you’ll install a piece of HTML code on your website and ads will be shown. After installation, there is no maintenance and you’ll be paid monthly.

    Thinking to Your Future Ads

    As your website grows and gets more traffic, you might be able to join an ad network. Ad networks install code on your website and manage the relationship between advertisers and your website. When joining an ad network, you typically make more money per ad – but they have minimum traffic requirements.

    Option 2: Sell Ad Space to Businesses

    If you don’t want to put random advertisements on your website, you can also sell ad space directly to advertisers in newsletters, social media, or your website. In this case, you look at the amount of people in your audience, set a price, and set a duration for the ad length. You then find an interested business and charge them for you to advertise or mention them. Let’s look at a few examples:

    • If you make wood signs and have a large Instagram following, you could mention the supplier where you get your wood for signs cut. In this case, you’d get paid to mention your supplier.
      • “I’d never be able to get so many signs done if it weren’t for @ABCWOODCUTTER. Here’s what just arrived from them.” #ad
    • If you are active with local customers, you could team up with local service providers like realtors, cleaning services, or babysitting services.
      • On a flyer advertising an upcoming sign party, advertise for a local ‘Kid’s Night In’ at the local trampoline park. Mention that while the kids are jumping, Mom and Dad can be making signs.

    Still looking for more ways to make money in your craft business? Head to this post on multiple streams of income in your business.

    Was this post helpful? Save it to Pinterest.
    How to Sell Advertising Space in Your Silhouette or Cricut Craft Business - by cuttingforbusiness.com

  • How to Earn Affiliate Income in Your Silhouette or Cricut Business

    Yesterday, I defined active versus passive income in your Silhouette or Cricut small business. While most businesses are active, you can have a passive component. How? Through the use of affiliate programs!

    What are Affiliate Programs?

    As I mentioned yesterday, affiliate programs pay affiliates for promoting or recommending products. As you’ve seen here on the Cutting for Business blog, I often recommend products and services. When you click my referral link and purchase, I get a small percentage of the sale price. It’s important to note that the buyer doesn’t pay more from clicking on the link. Since affiliate income works in a hands off manner, it is considered passive income.

    How to Incorporate Affiliate Programs in Your Craft Business

    There are a few different ways to start using affiliate programs in your small business. Here’s an overview:

    • Identify products that your buyers would be interested in purchasing. You’ll need to make sure that your recommendations make sense! Here’s some examples:
      • If you sell customized shirts, you could recommend coordinating bottoms like leggings, shorts, or pants that match or complement your designs. Similarly, if you sell customized infant bodysuits, you could promote coordinating accessories like a bow or headband. An affiliate program through Etsy is available on the Affiliate Window platform (see link below) if you want to promote other handmade goods.
      • If you sell planner accessories or stickers, you could suggest planners to your buyers. As an example, Erin Condren offers a referral program where you can earn money on each planner related sale you make on their site.
      • If you sell cut files, you could recommend cutting machines, vinyl, paper, or fonts. Cricut has an affiliate program, as does Amazon.
      • If you sell party decor, you could recommend coordinating party supplies like tablecloths or cups to match your decor line. Affiliate programs at party suppliers might work well.
      • If you sell wooden signs, you could suggest coordinating room decor to your buyers. Affiliate programs like Wayfair or Amazon might be a good fit.
    • Apply for the affiliate program. Usually, you fill out a quick application and wait a few days to be approved.
    • Use a special link to promote a product or service.
    • Earn passive income each time someone makes a purchase through your link(s).

    Where to Find Affiliate Programs

    The best way to find affiliate programs is to go to the site you want to promote and search for affiliate programs. Another easy way is to join affiliate program networks. Here’s a few of my favorites:

    1. Shareasale
    2. Affiliate Window
    3. Amazon
    4. Commission Junction

    Once you join a network and are approved, simply browse or search for companies and products to promote.

    Where to Put Affiliate Links

    You can use affiliate program links on social media, your website, or even within your Etsy listings.

    Required Disclosures

    One more important note about affiliate programs. The FTC requires that you disclose that you are using affiliate links. Here’s a link to read more.

    Affiliate programs are a great way to bring in passive income to your Silhouette or Cricut small business. Tomorrow, I’ll share concrete, real life examples of using Amazon’s affiliate program in your craft business.

    Save this post to Pinterest:

    How to Earn Affiliate Income in Your Silhouette or Cricut Business - by cuttingforbusiness.com

  • Active versus Passive Income – What’s the Difference?

    For the rest of the week, we are going to look at active versus passive income. Most Silhouette and Cricut small businesses are classified as active income businesses, but there is no reason that a small business owner can’t also collect passive income.

    What is the Difference Between Active and Passive Income?

    Active income is income that you receive for selling a product or a service. Typically, you are “hands on” (hence, active) when you earn active income. Here are some examples of active income:

    • Working a 9 to 5 job is considered active income. You receive money for completing tasks.
    • Selling at a craft show is active income, you make products, set up shop, and sell products to customers.
    • In general, selling online is active income because you create the products, market them, answer customer questions, and package and ship them. There is a component that is passive, because if you sell online – you are often making money 24 hours a day, 7 days a week.

    In contrast, when you earn passive income you are generally “hands off”. You are not doing anything for the money. Here are some examples of passive income:

    • Investments are passive income. You invest one time and receive income based on that investment.
    • In the craft world, cut file designs and ebooks are generally considered passive income because you design or write them once – then sell them digitally which is hands off.
    • Silhouette and Cricut small businesses can take advantage of affiliate programs to earn more passive income. This style of program works by using special links that a company has given to you to promote or suggest their products.

    In my mind, there is nothing better than passive income to accompany the active income you are already making. Now, why did I tell you all this? Tomorrow, we are going to talk about affiliate programs.

    Save this post to Pinterest:

    Active versus Passive Income in Your Silhouette or Cricut Craft Business - What's the Difference? - by cuttingforbusiness.com

  • Tutorial: How to Use iPad Pro as a Drawing Tablet in Silhouette Studio

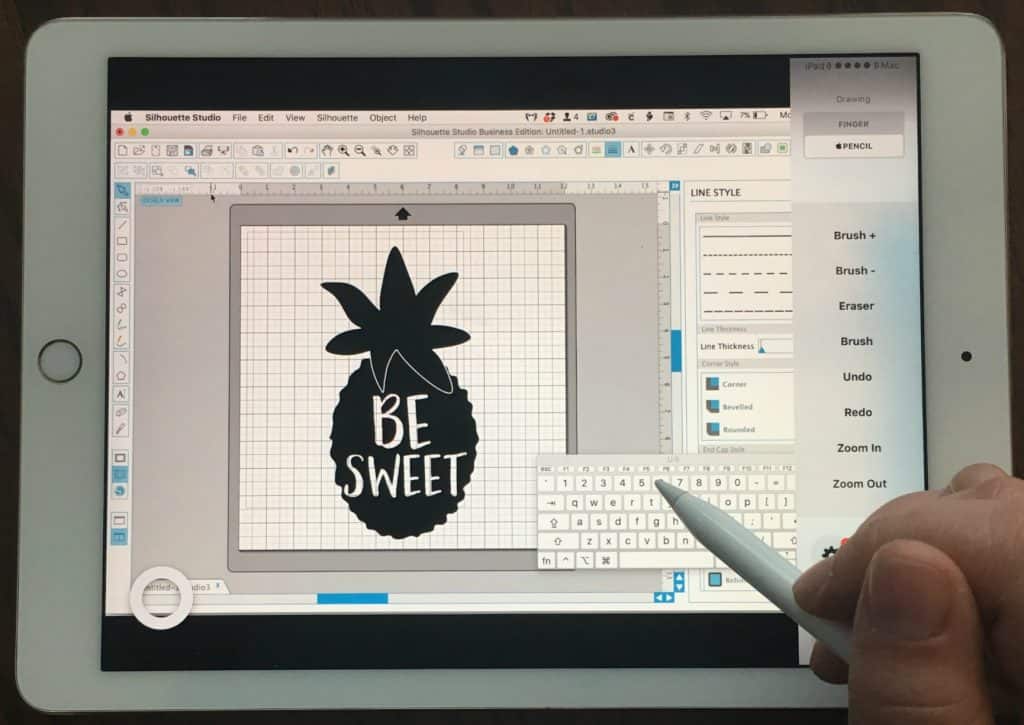
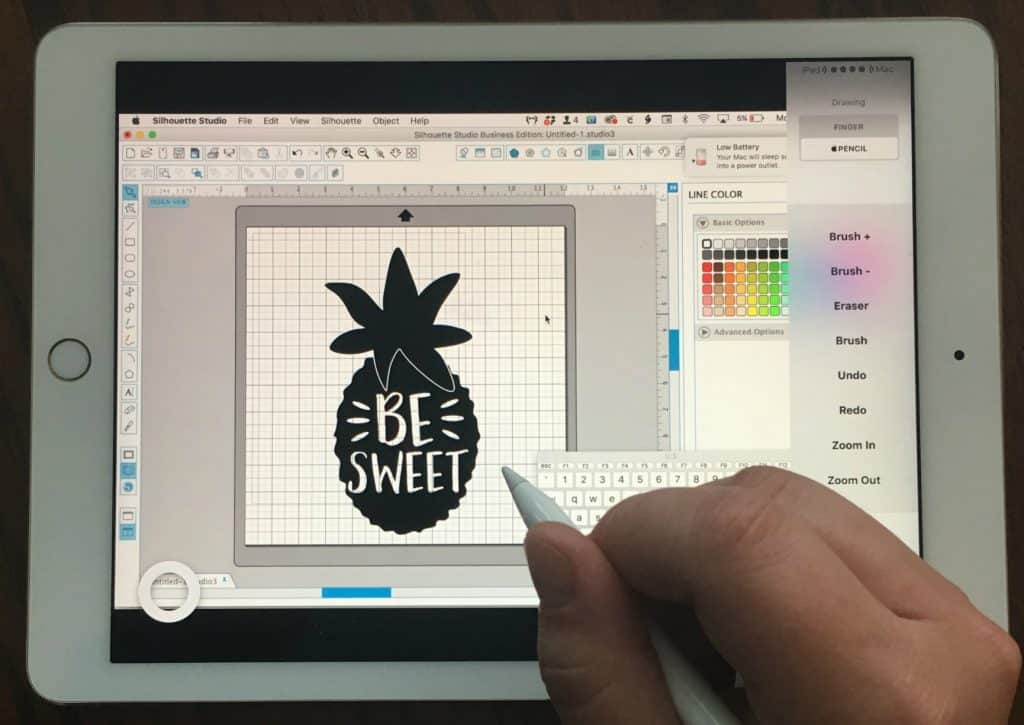
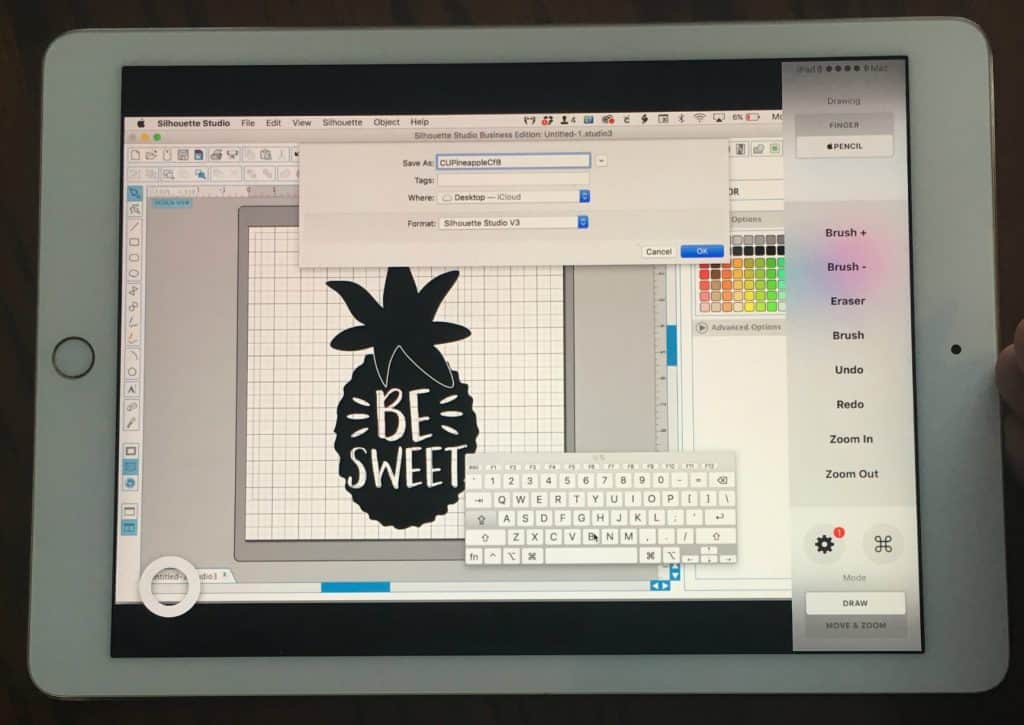
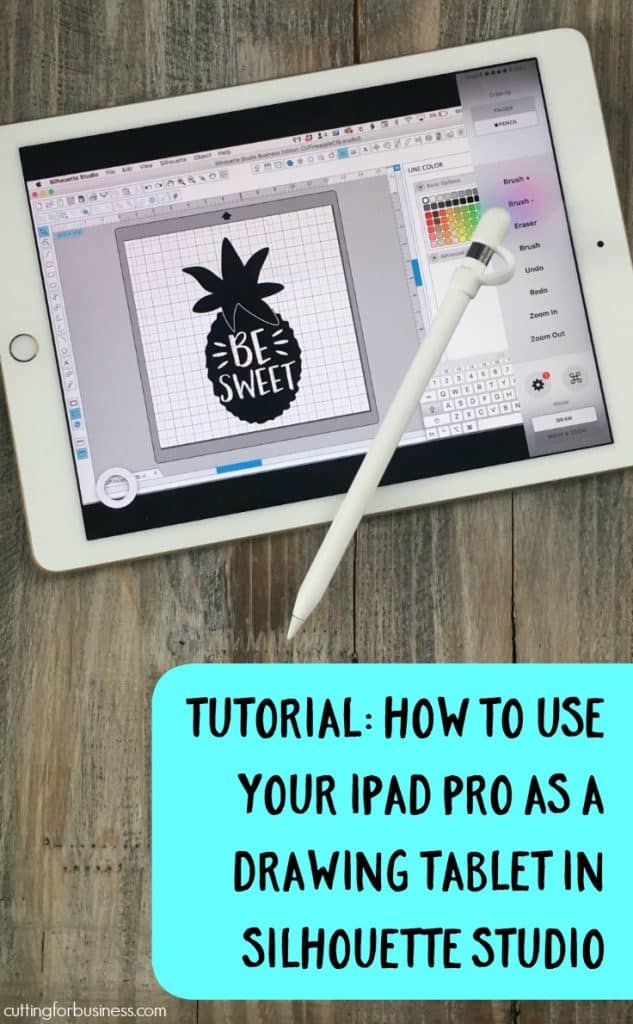
    Do you draw? Do you use Silhouette Studio? Do you have a Mac computer? Do you have an iPad Pro and an Apple Pencil? If you answered yes to all these – then this tutorial is for you! You can take all these things and combine them together to use your iPad Pro as a drawing tablet in Silhouette Studio!

    How to Use Your iPad Pro as a Drawing Tablet with Silhouette Studio

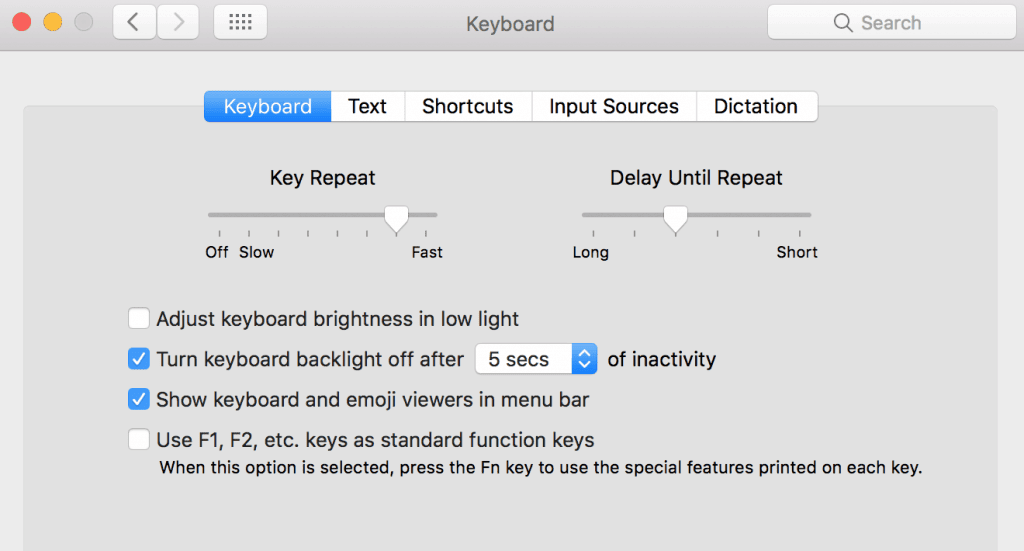
    1. Enable the onscreen keyboard. Here’s how: Go to “System Preferences” then “Keyboard”. Check the box, “Show keyboard and emoji viewers in menu bar”. Tutorial: How to Use iPad Pro as a Drawing Tablet in Silhouette Studio - Great for Silhouette Cameo, Curio, Mint Owners who like to draw! By cuttingforbusiness.com.
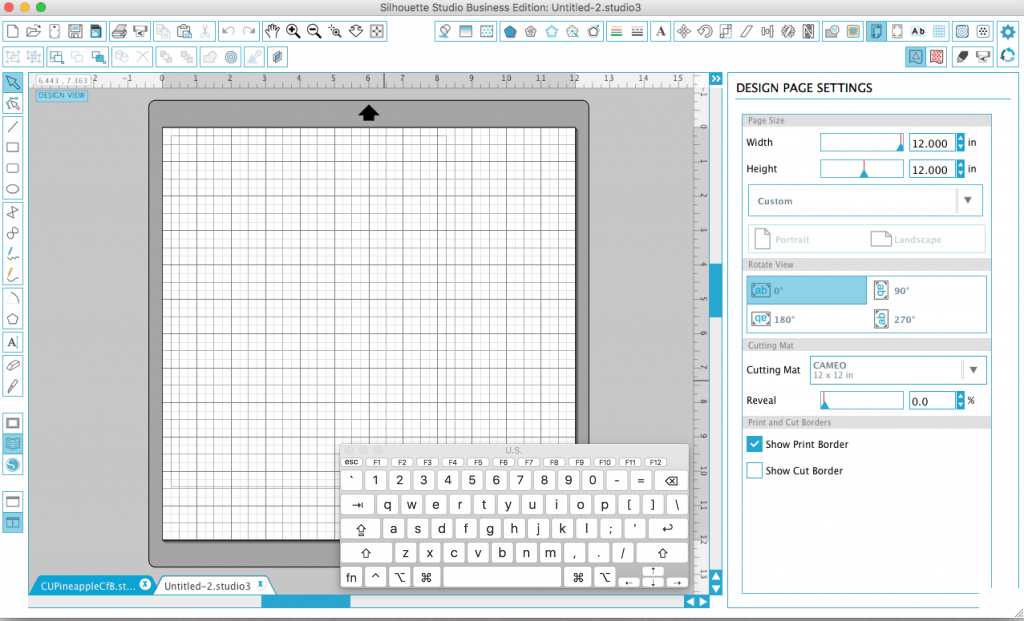
    2. From the menu bar on your Mac, click the keyboard icon and select “Show Keyboard Viewer”. You’ll now have a mini keyboard on your screen. Tutorial: How to Use iPad Pro as a Drawing Tablet in Silhouette Studio - Great for Silhouette Cameo, Curio, Mint Owners who like to draw! By cuttingforbusiness.com.
    3. Open Silhouette Studio on your Mac.
    4. Install Astropad on your Mac and your iPad Pro.
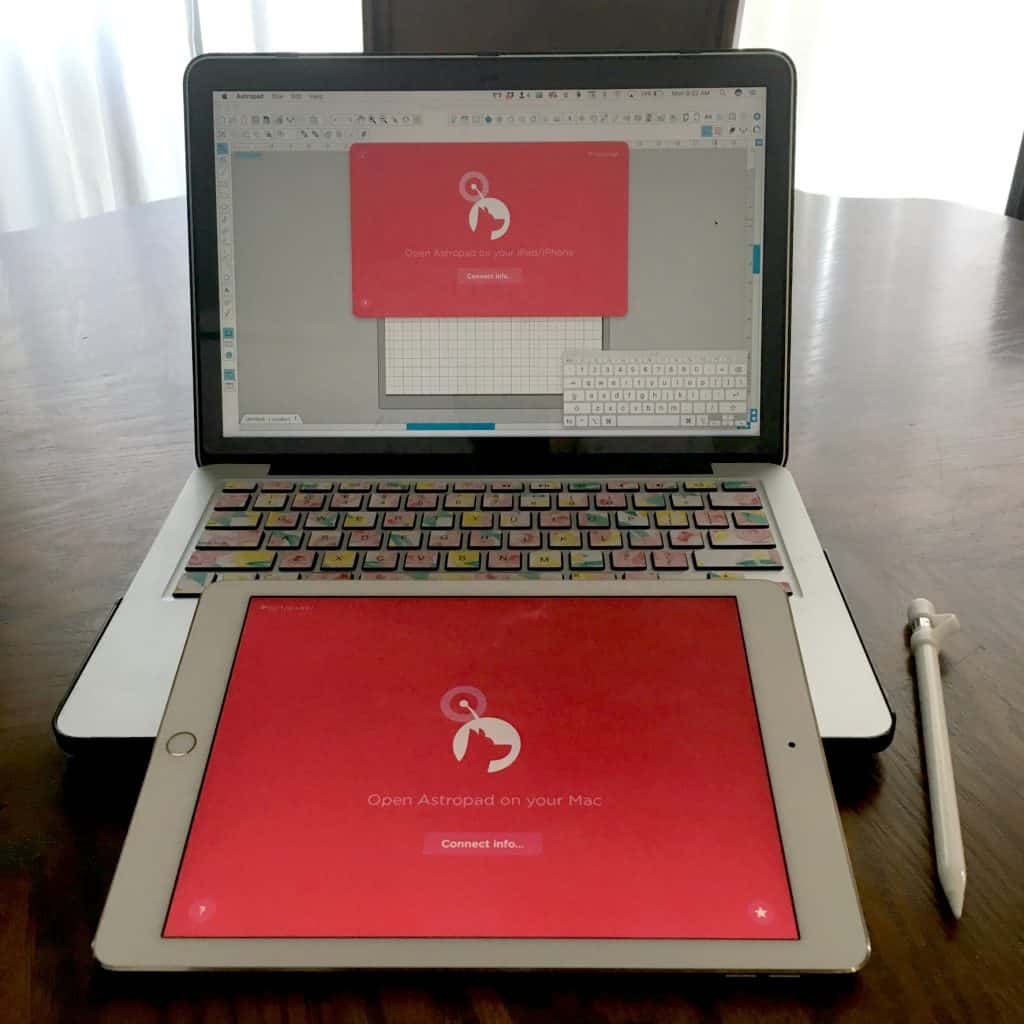
    5. Open Astropad on both your Mac and your iPad Pro. You’ll need to make sure that both your Mac and iPad Pro are on the same wifi network. Tutorial: How to Use iPad Pro as a Drawing Tablet in Silhouette Studio - Great for Silhouette Cameo, Curio, Mint Owners who like to draw! By cuttingforbusiness.com.Astropad will connect and you’ll see Silhouette Studio displayed on your iPad. Tutorial: How to Use iPad Pro as a Drawing Tablet in Silhouette Studio - Great for Silhouette Cameo, Curio, Mint Owners who like to draw! By cuttingforbusiness.com.
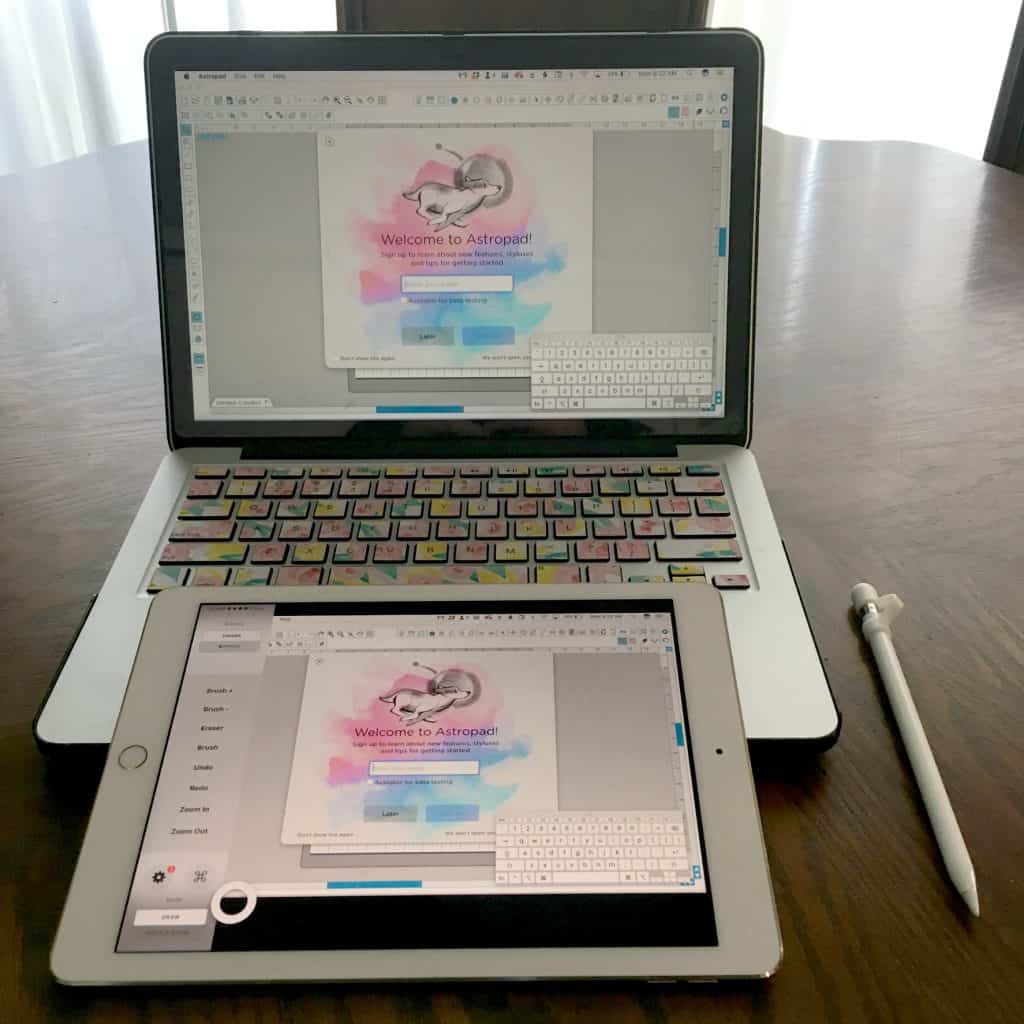
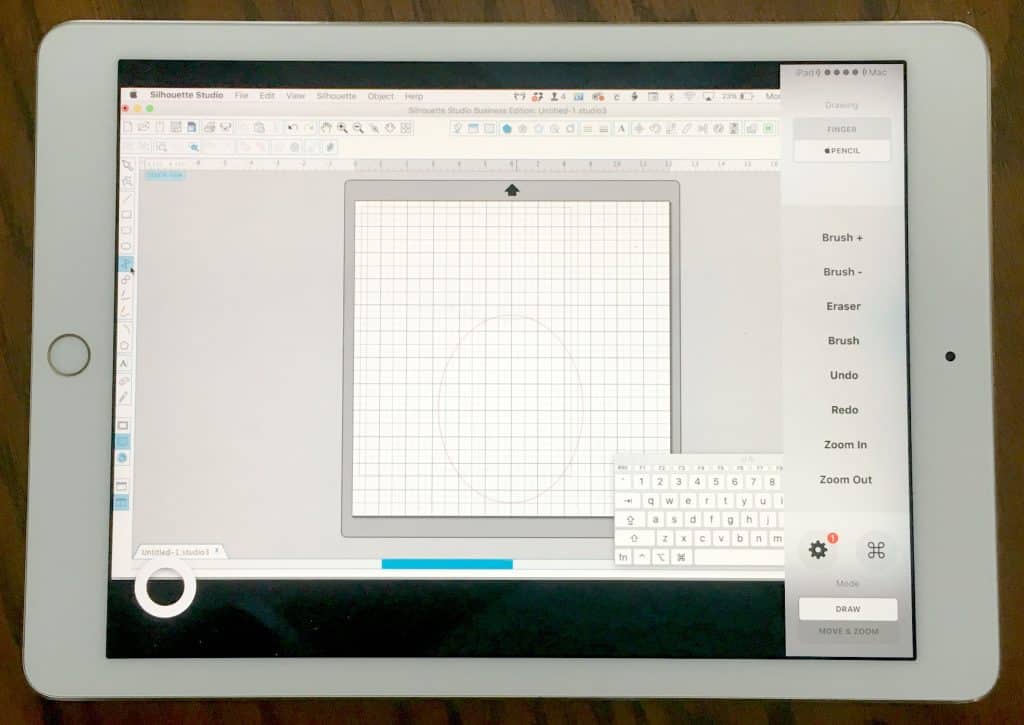
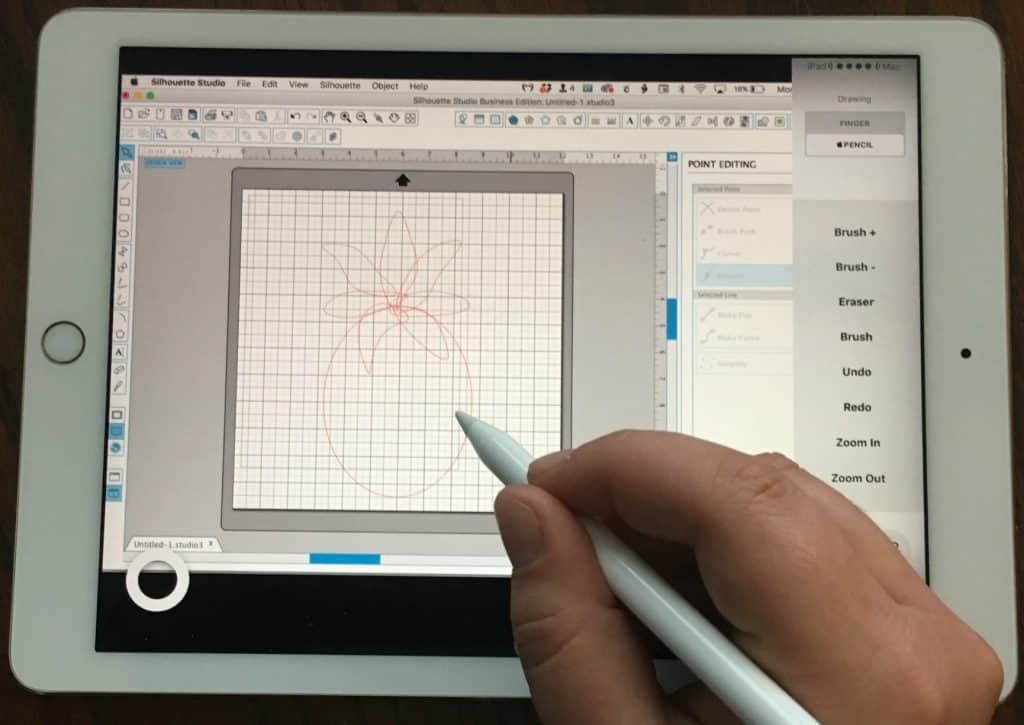
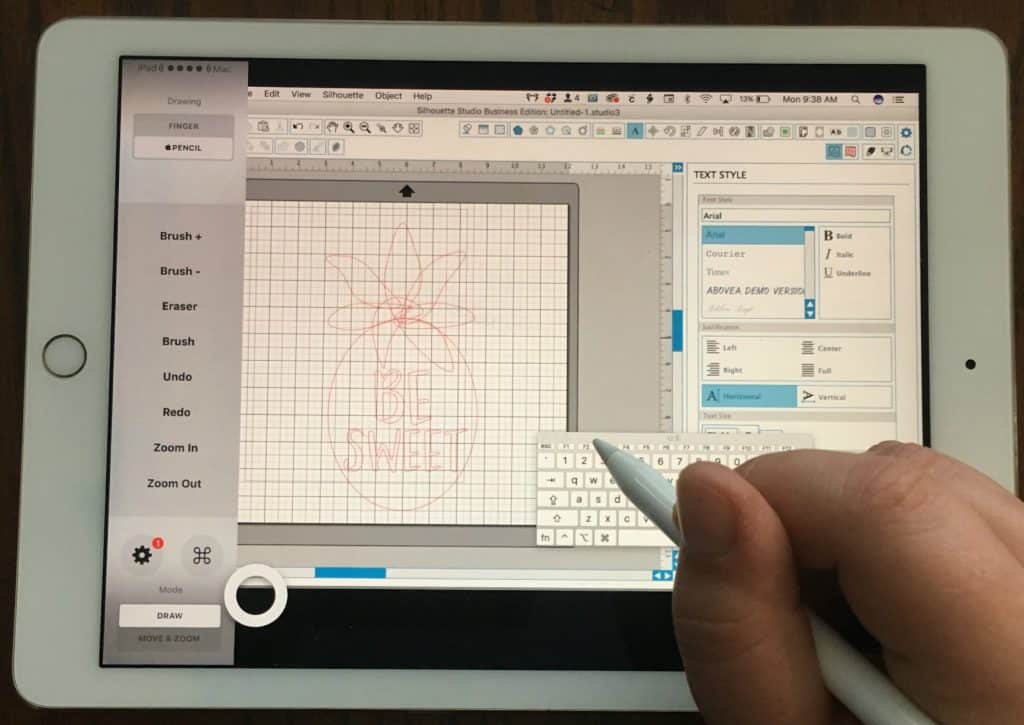
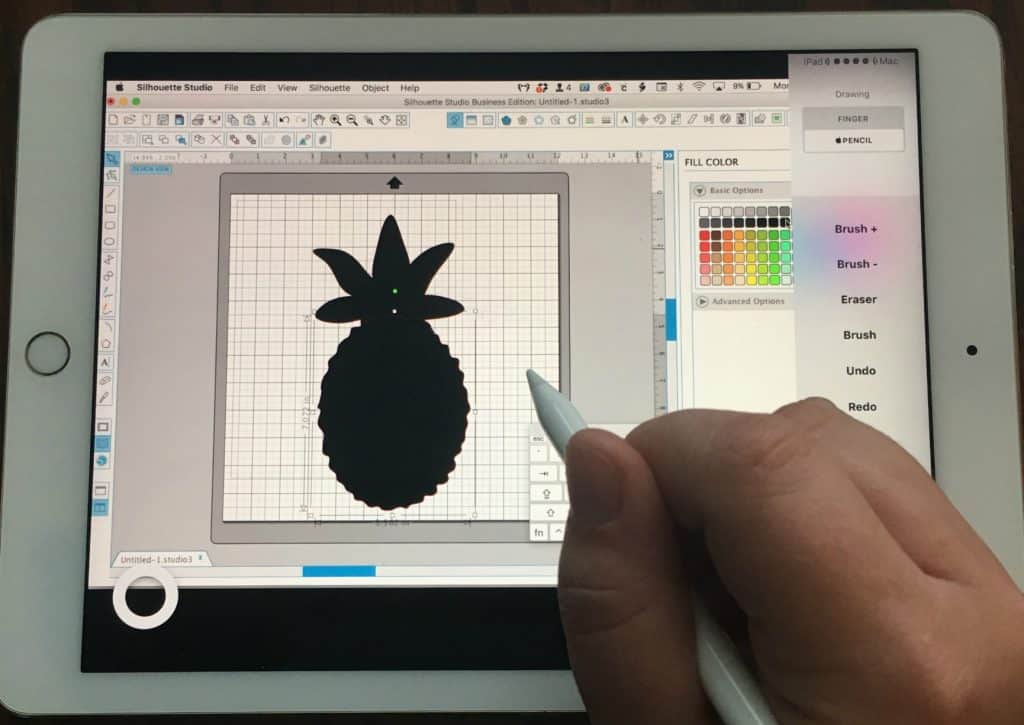
    6. Close the welcome screen, and you can start drawing – right in Silhouette Studio! You’ll use all the same tools and all the functions you know in Silhouette Studio, but they will be right on your iPad Pro. These next photos show me designing a pineapple cut file. (As a side note – I’m not a great artist – but I’ll show you my process.) Tutorial: How to Use iPad Pro as a Drawing Tablet in Silhouette Studio - Great for Silhouette Cameo, Curio, Mint Owners who like to draw! By cuttingforbusiness.com.
      Tutorial: How to Use iPad Pro as a Drawing Tablet in Silhouette Studio - Great for Silhouette Cameo, Curio, Mint Owners who like to draw! By cuttingforbusiness.com.
      Tutorial: How to Use iPad Pro as a Drawing Tablet in Silhouette Studio - Great for Silhouette Cameo, Curio, Mint Owners who like to draw! By cuttingforbusiness.com.
      Tutorial: How to Use iPad Pro as a Drawing Tablet in Silhouette Studio - Great for Silhouette Cameo, Curio, Mint Owners who like to draw! By cuttingforbusiness.com.
      Tutorial: How to Use iPad Pro as a Drawing Tablet in Silhouette Studio - Great for Silhouette Cameo, Curio, Mint Owners who like to draw! By cuttingforbusiness.com.
      Tutorial: How to Use iPad Pro as a Drawing Tablet in Silhouette Studio - Great for Silhouette Cameo, Curio, Mint Owners who like to draw! By cuttingforbusiness.com.
      Tutorial: How to Use iPad Pro as a Drawing Tablet in Silhouette Studio - Great for Silhouette Cameo, Curio, Mint Owners who like to draw! By cuttingforbusiness.com.

    Pretty neat, huh!? A few notes before you run off to try it yourself:

    1. I use Astropad Standard which costs a one time fee of $29. While this is expensive for an app, this is cheaper than a drawing pad and it works great. Astropad also works on iPhones and other iPads, but you wouldn’t be able to use the Apple Pencil unless you have an iPad Pro.
    2. Astropad says that they are working on adding in program keyboards for 2017. Until this happens, you’ll need to turn on the Mac keyboard viewer to type anything.
    3. You should be able to do this with Cricut Design Space as well as many other programs.
    4. Special thanks to Beau Lindsly Studio for originally introducing me to Astropad.
    5. If you don’t have a cap to keep up with your Apple Pencil top, grab one here.

    Save this post to Pinterest:

    Tutorial: How to Use iPad Pro as a Drawing Tablet in Silhouette Studio - Great for Silhouette Cameo, Curio, Mint Owners who like to draw! By cuttingforbusiness.com.

  • Tutorial: Product Design Mockups in Cricut Design Space

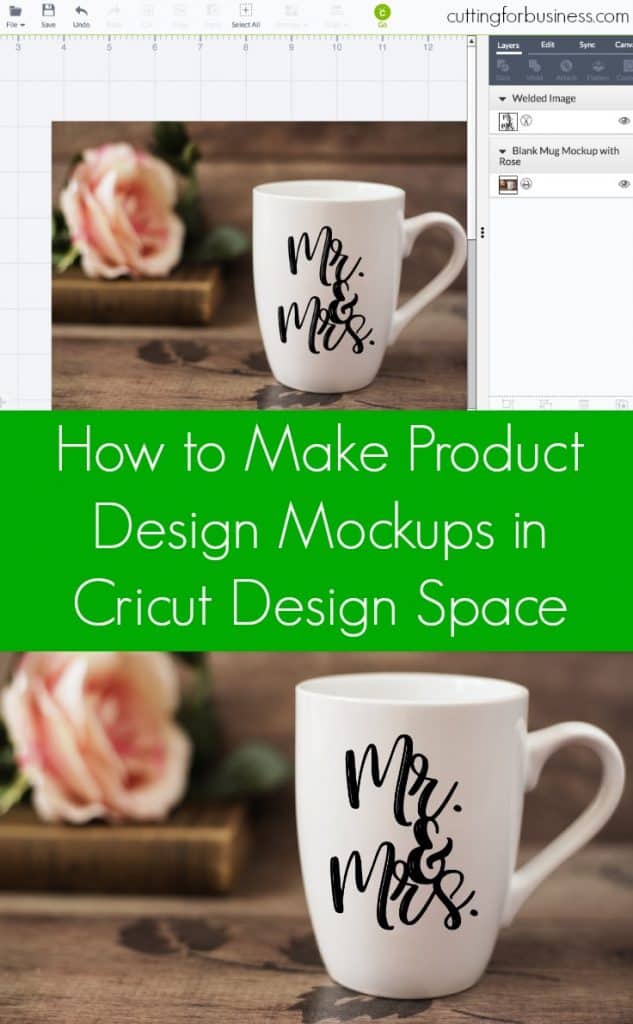
    There’s a handful of tutorials on how to create product mockups on the Cutting for Business blog. Most of these tutorials are geared towards Silhouette Studio users. Since so many Cricut users have been asking me how to create product mockups in Design Space, here’s a quick tutorial.

    How to Create Product Mockups in Cricut Design Space

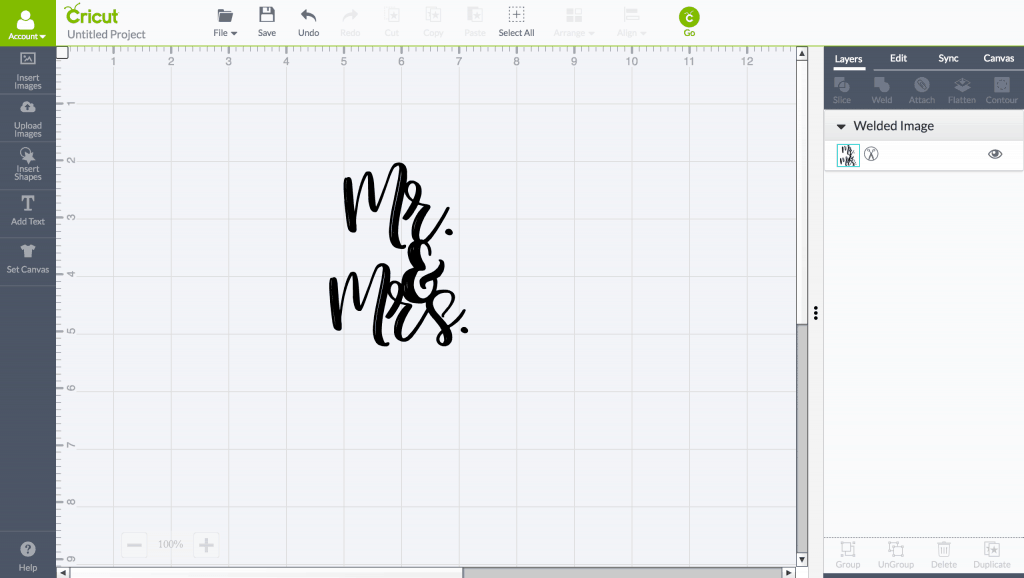
    1. Create your design in Cricut Design Space. Tutorial: Product Design Mockups in Cricut Design Space - Perfect for Cricut Explore Business Owners - by cuttingforbusiness.com
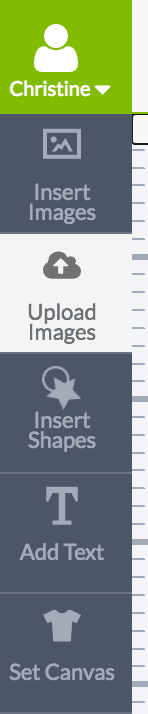
    2. Either take a photo of your blank item or purchase and download a product mockup. Then, click “Upload Images” on the left hand side. Tutorial: Product Design Mockups in Cricut Design Space - Perfect for Cricut Explore Business Owners - by cuttingforbusiness.com
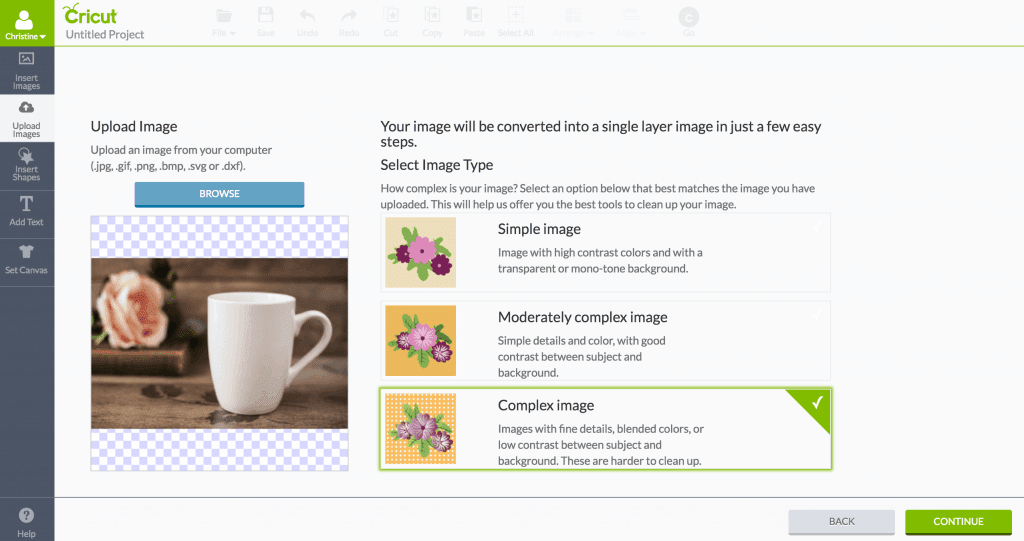
    3. Choose your image and click the “Continue” button. Tutorial: Product Design Mockups in Cricut Design Space - Perfect for Cricut Explore Business Owners - by cuttingforbusiness.com
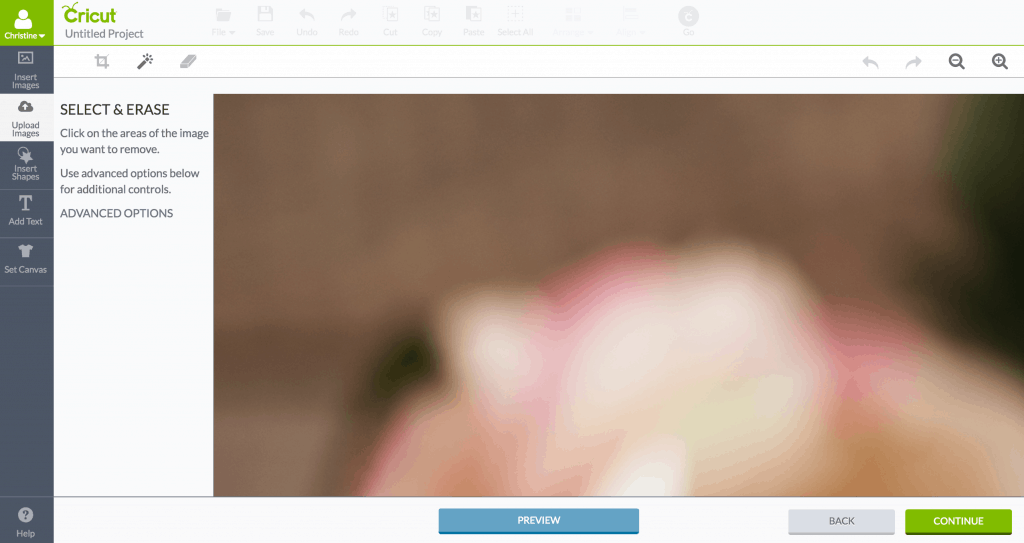
    4. No need to clean up the image, so just click the “Continue” button again. (Note: My image looks blurry because it is very large.)Tutorial: Product Design Mockups in Cricut Design Space - Perfect for Cricut Explore Business Owners - by cuttingforbusiness.com
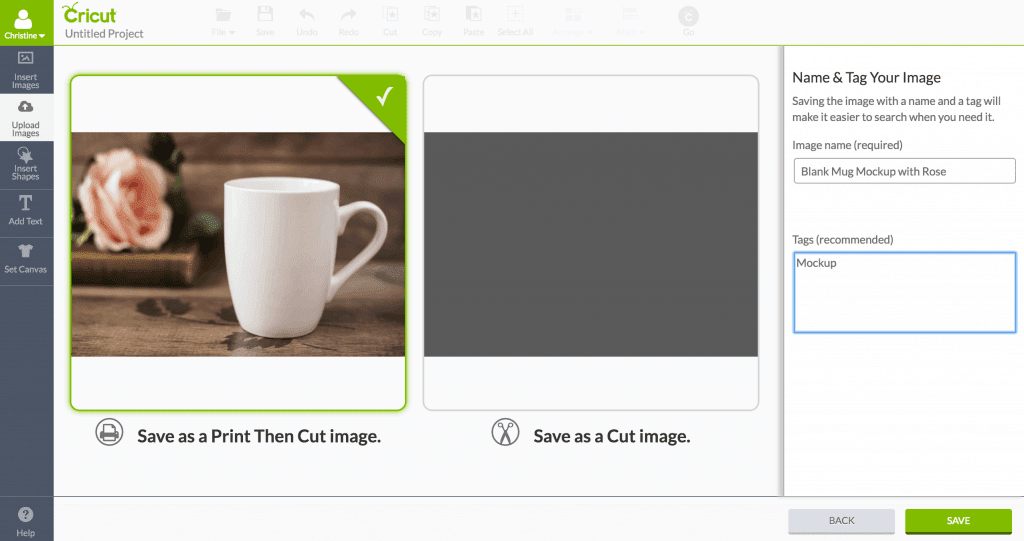
    5. Select “Save as a Print Then Cut image” and click “Save”. Tutorial: Product Design Mockups in Cricut Design Space - Perfect for Cricut Explore Business Owners - by cuttingforbusiness.com
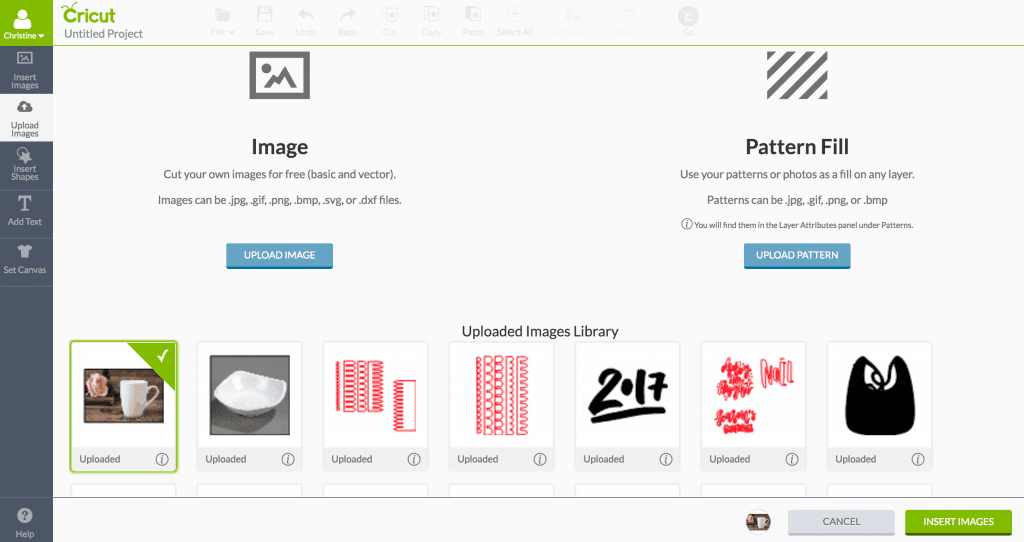
    6. Select your image and click “Insert Images”. Tutorial: Product Design Mockups in Cricut Design Space - Perfect for Cricut Explore Business Owners - by cuttingforbusiness.com
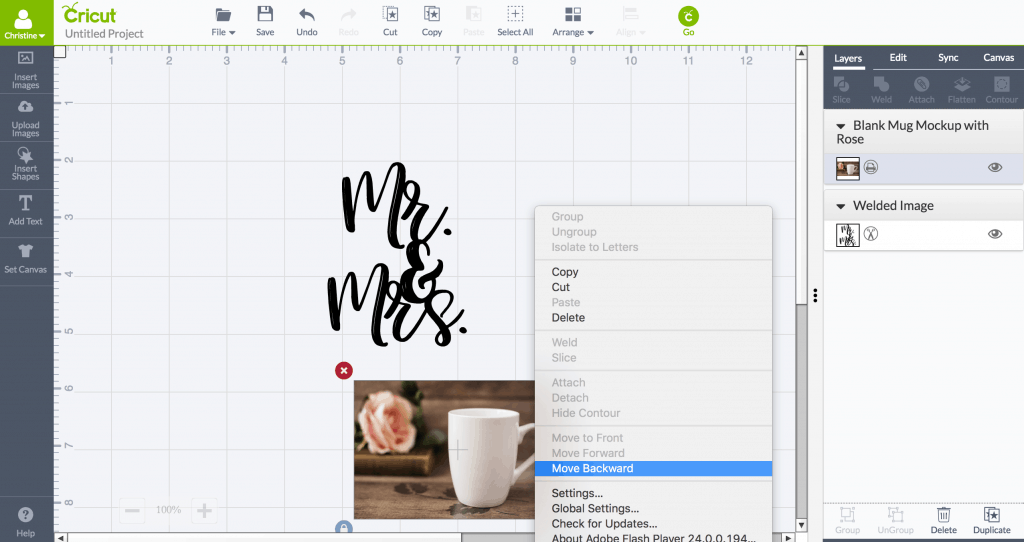
    7. Right click your image and click “Move backward” to get it behind your design. Tutorial: Product Design Mockups in Cricut Design Space - Perfect for Cricut Explore Business Owners - by cuttingforbusiness.com
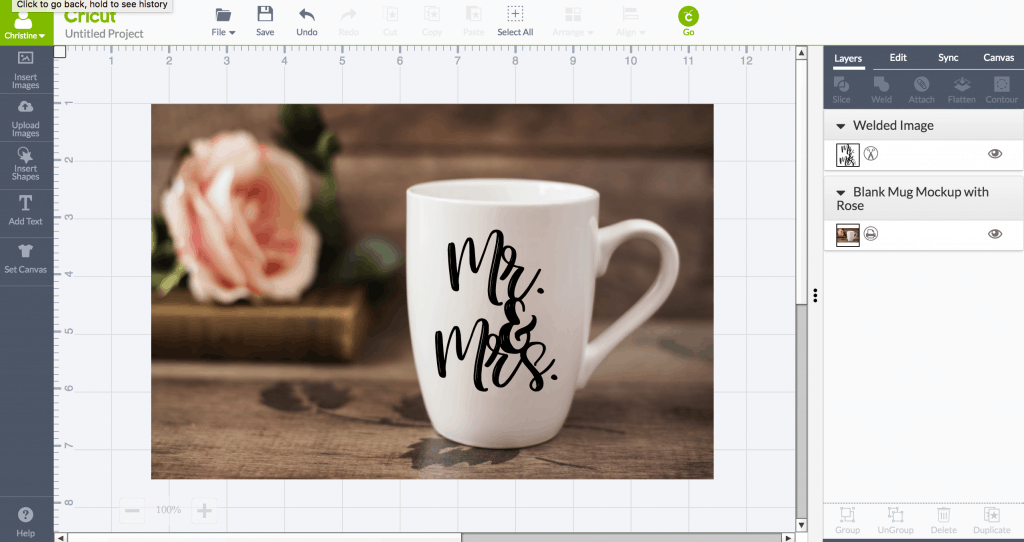
    8. Drag your the image and design around until it looks how you want it to. Tutorial: Product Design Mockups in Cricut Design Space - Perfect for Cricut Explore Business Owners - by cuttingforbusiness.com
    9. Now, you’ll save it by taking a screenshot. On Mac, click “Command”, “Shift”, and “4” at the same time, then drag the rectangle around your image to save it. On Windows, use the snipping tool. Here’s my finished mockup image: Tutorial: Product Design Mockups in Cricut Design Space - Perfect for Cricut Explore Business Owners - by cuttingforbusiness.com

    Wondering where to get mockup images? You can purchase on Etsy, Creative Market, or stock photo sites.

    Save this tutorial to Pinterest:

    Tutorial: Product Design Mockups in Cricut Design Space - Perfect for Cricut Explore Business Owners - by cuttingforbusiness.com

  • Scroll Saw + Silhouette Cameo or Cricut Wood Shape Tutorial

    If you are a member of the Cutting for Business Insider’s Club on Facebook, you may remember that I got a scroll saw for Christmas. I’ve used it several times and feel that I am comfortable enough with it to write a tutorial today!

    What is a Scroll Saw?

    A scroll saw looks similar to a long arm sewing machine. It has a fixed blade that makes intricate cuts. The process of cutting wood is similar to sewing because you move the wood around to cut it on the blade.

    My Scroll Saw

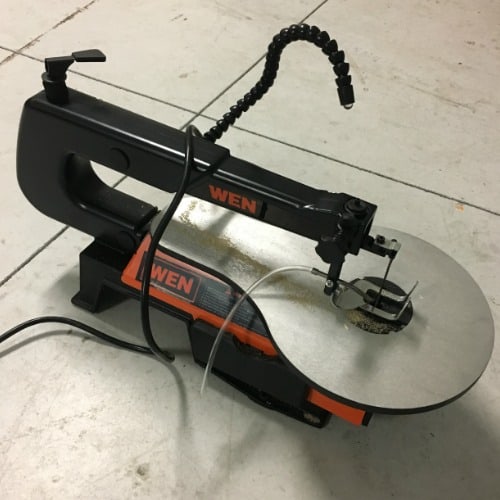
    Santa brought me an inexpensive scroll saw with the promise that if I use and master it – it will be upgraded. Probably a good idea, because sometimes I am convinced that I need things and when I get them – I barely use them! (Anyone else?!) Here’s a picture of my scroll saw and a link to purchase it.

    Scroll Saw + Silhouette Cameo or Cricut Explore Wood Shape Tutorial - Mason jar project - by cuttingforbusiness.com

    Wood Shape Scroll Saw Tutorial

    Supplies Needed

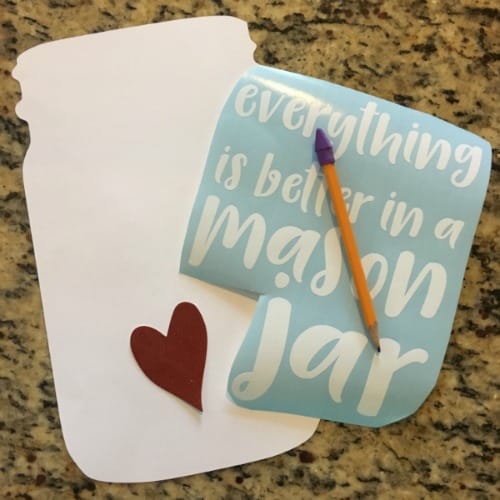
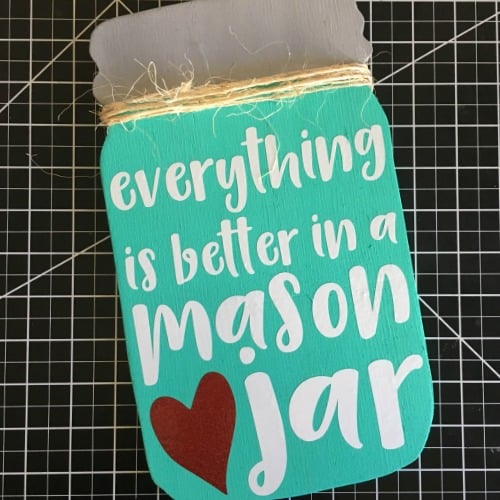
    Prep work before the tutorial begins: Cut all shapes with your Silhouette or Cricut. For this project, I cut the mason jar shape in scrap cardstock and the text and heart in adhesive vinyl.

    Scroll Saw + Silhouette Cameo or Cricut Wood Shape Tutorial - Mason jar project - by cuttingforbusiness.com

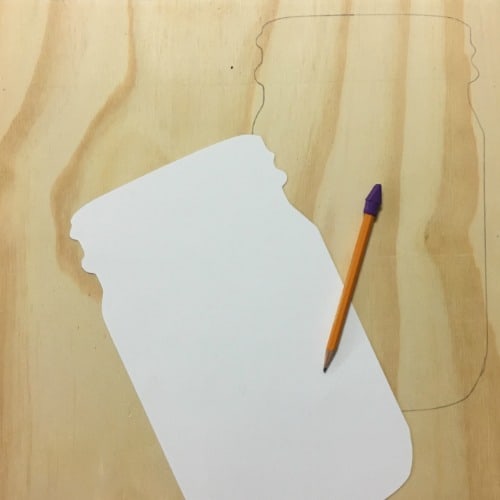
    1. Using a pencil, trace around your shape to create a line to follow when cutting. Scroll Saw + Silhouette Cameo or Cricut Explore Wood Shape Tutorial - Mason jar project - by cuttingforbusiness.com
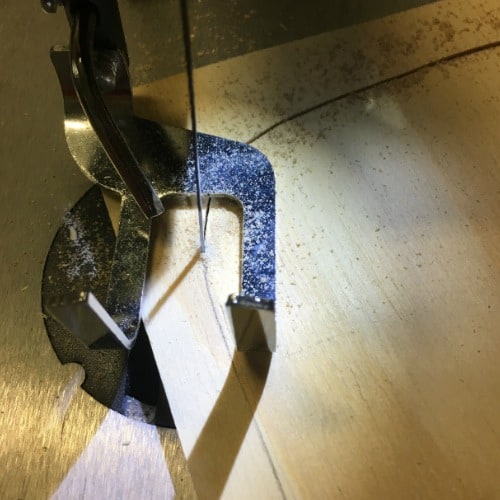
    2. Cut the wood shape out using your scroll saw. Scroll Saw + Silhouette Cameo or Cricut Explore Wood Shape Tutorial - Mason jar project - by cuttingforbusiness.com You’ll see in this photo that I’m using my hands to guide the wood along my pencil line: Scroll Saw + Silhouette Cameo or Cricut Explore Wood Shape Tutorial - Mason jar project - by cuttingforbusiness.com
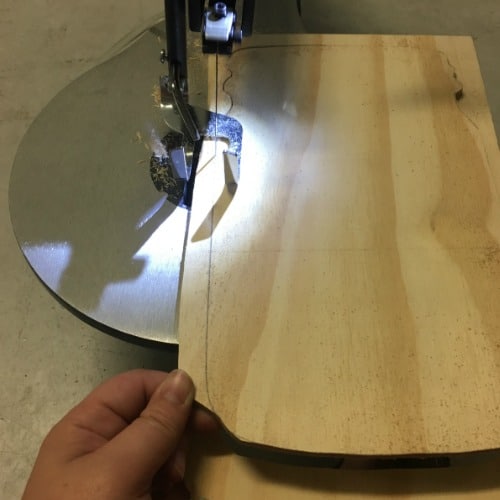
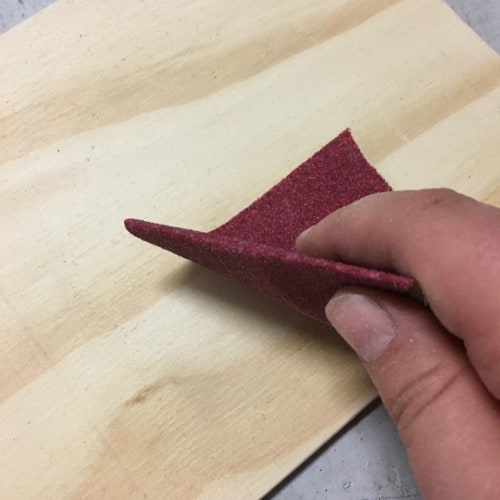
    3. Sand the edges of the wood shape. My cuts were pretty smooth, so I sanded it by hand. Scroll Saw + Silhouette Cameo or Cricut Explore Wood Shape Tutorial - Mason jar project - by cuttingforbusiness.com
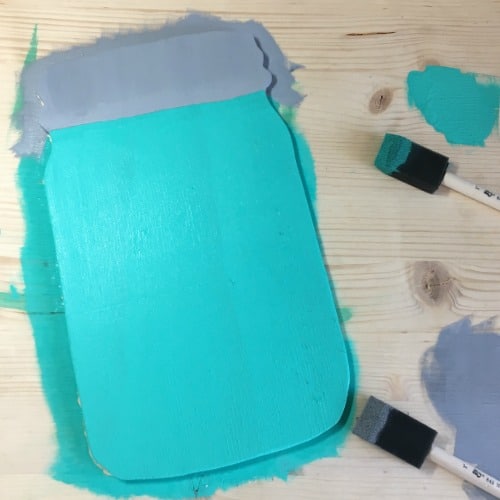
    4. Brush off all the sawdust and paint your wood shape as desired. Scroll Saw + Silhouette Cameo or Cricut Explore Wood Shape Tutorial - Mason jar project - by cuttingforbusiness.com
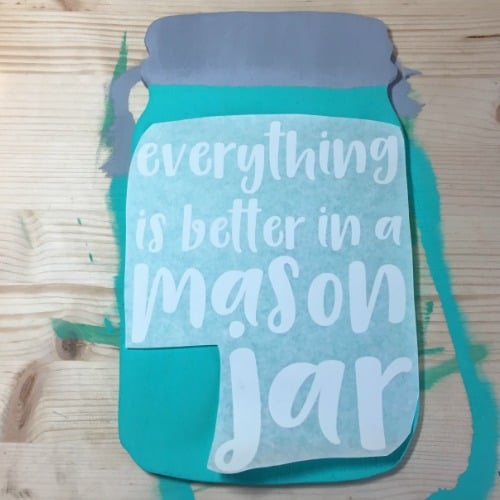
    5. Add vinyl or paint the text onto your shape.Scroll Saw + Silhouette Cameo or Cricut Explore Wood Shape Tutorial - Mason jar project - by cuttingforbusiness.com
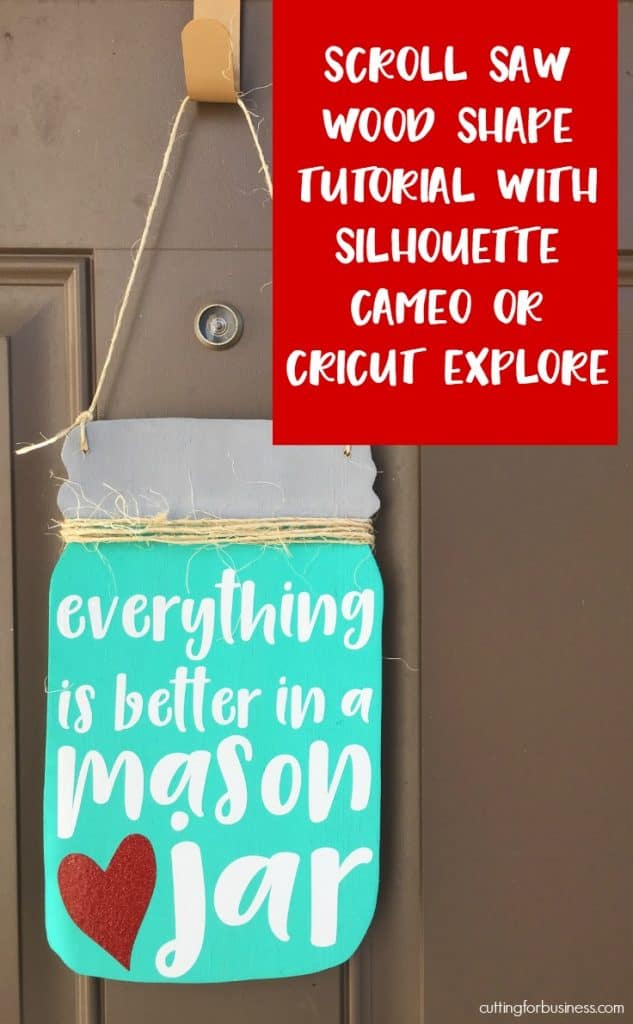
    6. Add some twine to finish off your wood mason jar. I also drilled holes in the top and strung twine through as a hanger.Scroll Saw + Silhouette Cameo or Cricut Explore Wood Shape Tutorial - Mason jar project - by cuttingforbusiness.com

    If you are interested, here is a picture of another cut on my scroll saw. To cut the insides of the letters, I first drilled a large hole then put the blade through the hole and cut.

    Scroll Saw + Silhouette Cameo or Cricut Explore Wood Shape Tutorial - Mason jar project - by cuttingforbusiness.com

    Download the cut files I used in this tutorial at this link.

    If you’ve purchased my book, 15 Parties to Host with Your Silhouette or Cricut, you could easily use this tutorial during a party!

    Save this post to Facebook or Pinterest:

    Scroll Saw + Silhouette Cameo or Cricut Explore Wood Shape Tutorial - Mason jar project - by cuttingforbusiness.com

  • Top 4 Overcrowded Silhouette Cameo and Cricut Business Niches

    Yesterday, I talked about some of the cheapest businesses to start with your Silhouette or Cricut. It’s not surprising that the cheapest niches can sometimes be the most crowded. Let’s take a minute to look more into which niches are the most crowded. (Not sure about the whole ‘niche’ thing? Learn more here.)

    Top 4 Overcrowded Silhouette and Cricut Niches

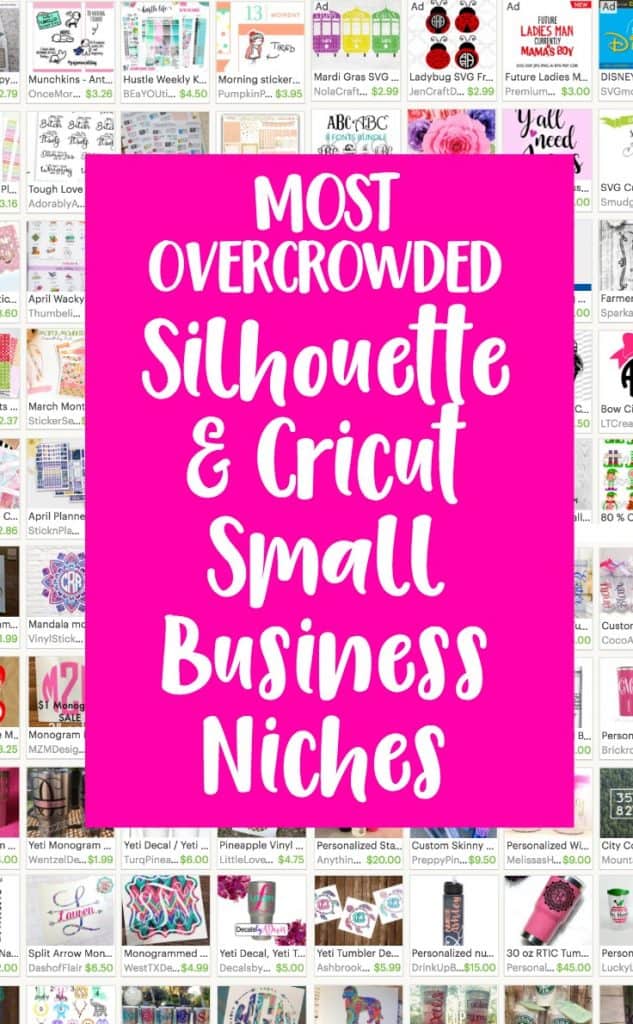
    1. Planner Stickers – On an Etsy search for “planner stickers”, we find over 348,000 listings already there. If you are planning to break into this niche, you’ve got a way to go to get to the top pages.
    2. SVG Cut Files – A quick search on Etsy for “SVG Cut Files” brings up over 443,000 cut file listings. I’d say that if you want to break into this crowded niche, you must have unique designs unlike others on the market already.
    3. Monogram Decals – On Etsy, there are over 63,000 listings for “monogram decal”. Hard to compete with those already established!
    4. Tumblers – A quick search of Etsy for “custom tumbler” brings up about 73,000 listings. That’s a lot of competition.

    Moral of today’s post? Think outside the proverbial “box”. The most successful Silhouette and Cricut businesses I come across are the ones that are offering unique products or services. Don’t be afraid to be different – it’s quite profitable!

    Save this post to Pinterest:

    Top 4 Overcrowded Silhouette Cameo and Cricut Business Niches - by cuttingforbusiness.com

  • Top 3 Cheapest Silhouette and Cricut Businesses to Start

    I know a lot of crafters dream of starting their own businesses, but they lack the funds to actually get started. Is this you? If so, don’t worry – I’ve got some ideas for you.

    Just like a car dealership is more expensive to start than a take out restaurant, some craft businesses are cheaper to start than others.

    Let’s take a look at some of the cheaper businesses you can start with your Silhouette or Cricut.

    3 Cheapest Silhouette and Cricut Businesses to Start - cuttingforbusiness.com.

    Top 3 Cheapest Silhouette and Cricut Businesses to Start

    Decals

    Decals appeal to a wide variety of buyers because they can be applied to cars, computers, walls, windows, cups, and more. You can start out by offering a limited number of decal colors. As your business grows, you can expand to other colors and even patterns.

    Supplies: Silhouette or Cricut, adhesive vinyl, weeding tools, transfer tape, and photo mailers or mailing tubes.

    Stickers

    Custom made stickers are hot! Whether you choose to market to the planner fanatics, teachers, or other small businesses you’ll need a good understanding of print and cut/print then cut. Start with basic sticker paper and add additional options like holographic or foil after your business is established.

    Supplies: Sticker paper, photo mailers, and a printer.

    Digital Products

    The cheapest Silhouette or Cricut business to start is selling digital products. You could specialize in SVG cut files, fonts, seamless patterns, or printables. Since you’ll be selling digital goods, you won’t need any physical supplies!

    Supplies: Design program like Silhouette Studio or Adobe

    If you are interested in selling SVGs, be sure to check out my article the Do’s and Don’ts of Selling SVG Cut Files.

    What is your opinion on the cheapest Silhouette and Cricut businesses to start? I’d love to hear them.

  • How to Create an Effective ‘About Me/Us’ Page for Your Craft Business

    Most marketplaces (Etsy, Ebay, Shopify, and so on) give business owners a place to connect or share a company history on an About Me or About Us page. I see a lot of small business owners skip this page or use it wrong – at least in my opinion. There are as many opinions about how to create the perfect About Me or About Us page online as there are on the recent political changes in the United States. I’ve skimmed many of these articles and just don’t buy into a lot of the tips.

    Today, I’m sharing 4 tips to create an effective About Me or About Us page:

    1. Keep it short and sweet. No need to tell your whole life story. You don’t want to bore your customer, take up too much time when they could be shopping on your site, or reveal too many personal details.
    2. Write in first person language. This means using words such as ‘I’ and ‘my’. The core of a handmade craft business is the person behind it. Write your About Me or About Us page from your point of view.
    3. Share a photo or two of yourself. The internet is so anonymous – share an actual photo of yourself.
    4. Connect with your ideal buyer. To me, this is the most important aspect of your About Me or About Us page. All your page needs to do to be effective is to connect with your potential buyer. Why? People buy from people they “like”. Either share a story that your ideal buyer can relate to or share details about running your business that are relatable. For example, if you sell baby related goods and started your business during your pregnancy – share this. Or, if you craft to stay at home with your kids or an aging parent, share these details and a few pictures.

    There you go – simple and straightforward. Head over to my About Me page or head to yours and update it.

    Save this post to Pinterest or Facebook:


    How to Create an Effective 'About Me/Us' Page for Your Craft Business - Silhouette Portrait or Cameo and Cricut Explore or Maker - by cuttingforbusiness.com

  • DIY Macbook Keyboard Skin with Silhouette Cameo

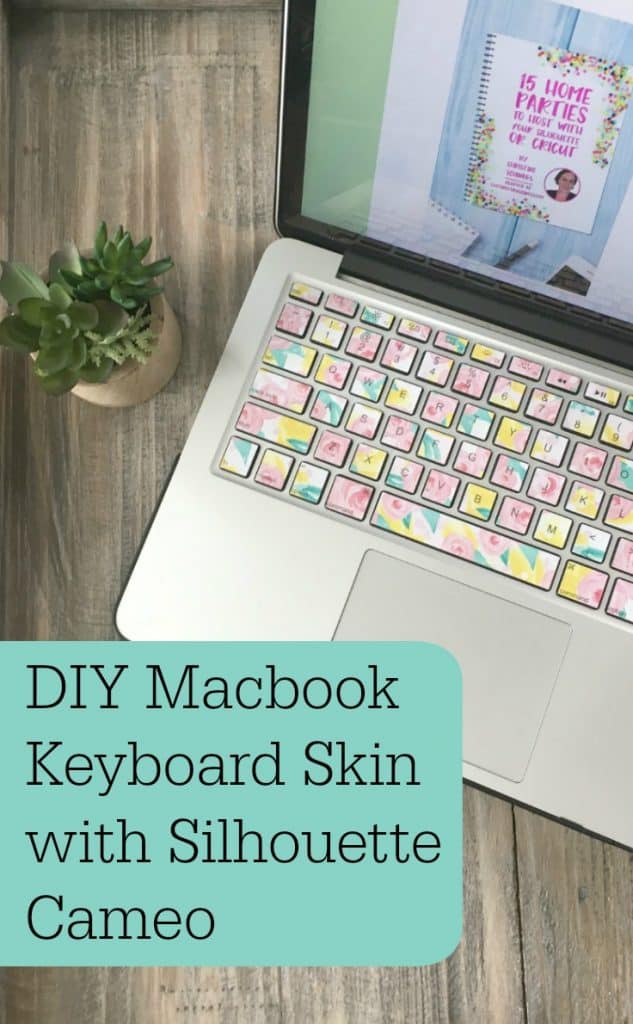
    Whether it is designing and cutting, listing products for sale, or handling customer inquiries – Silhouette and Cricut small business owners spend a lot of time on the computer. I thought today that I would share the tutorial on how I made a keyboard skin for my MacBook Pro. If you have a recent Mac, the files should work for you, too. If you don’t use a Mac computer, I’ve included the method I used to make the file later in the post.

    Supplies Needed

    Silhouette Cameo
    Pixscan mat
    Printable vinyl

    Macbook Pro Keyboard Skin Tutorial

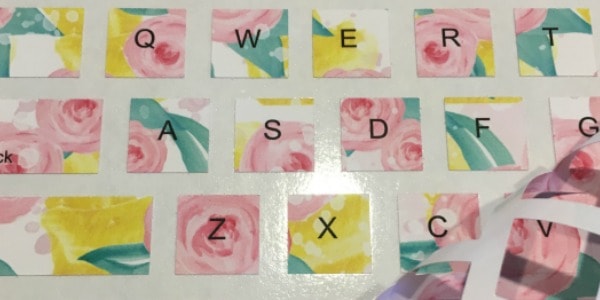
    1. Purchase or download a 300 dpi seamless background of your choice. You can find these all over online. The floral print background that I’ve used on my keyboard can be found in this Etsy shop.
    2. Download the zip file for this tutorial at this link. It’s important that you not resize any of the files I have provided.
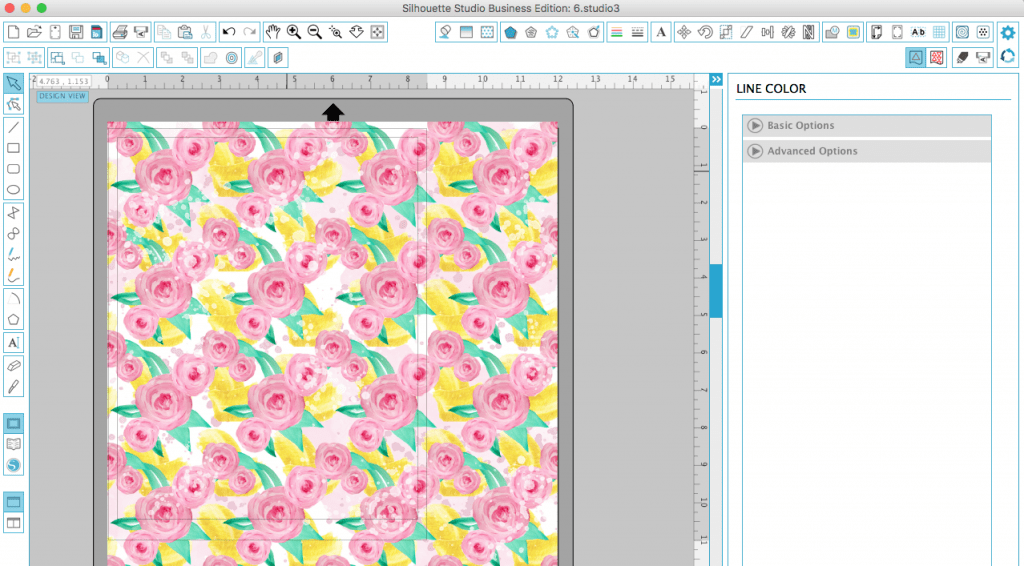
    3. Open your background in Silhouette Studio. DIY Macbook Keyboard Skin with Silhouette Cameo by cuttingforbusiness.com
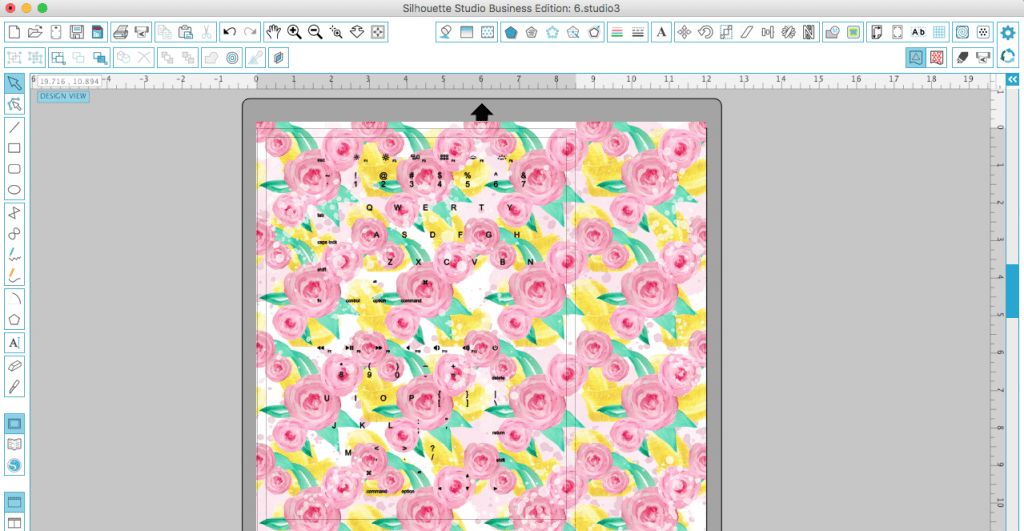
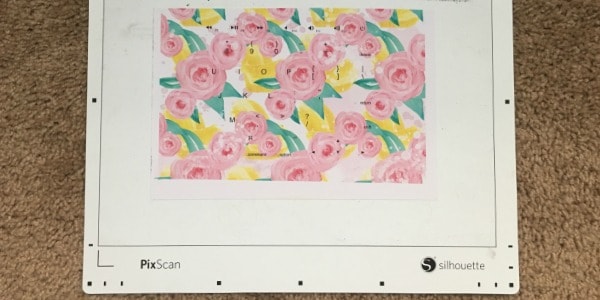
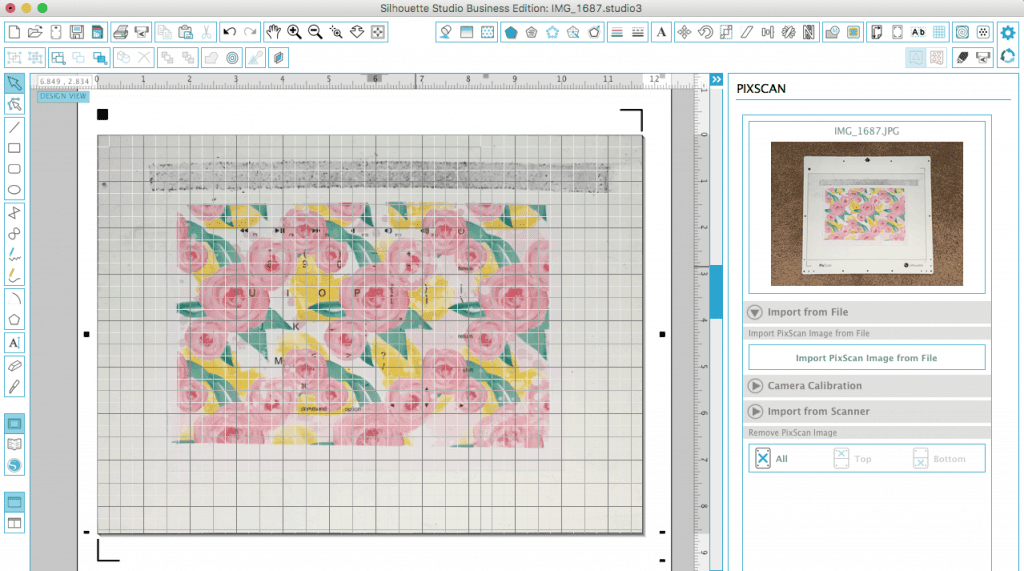
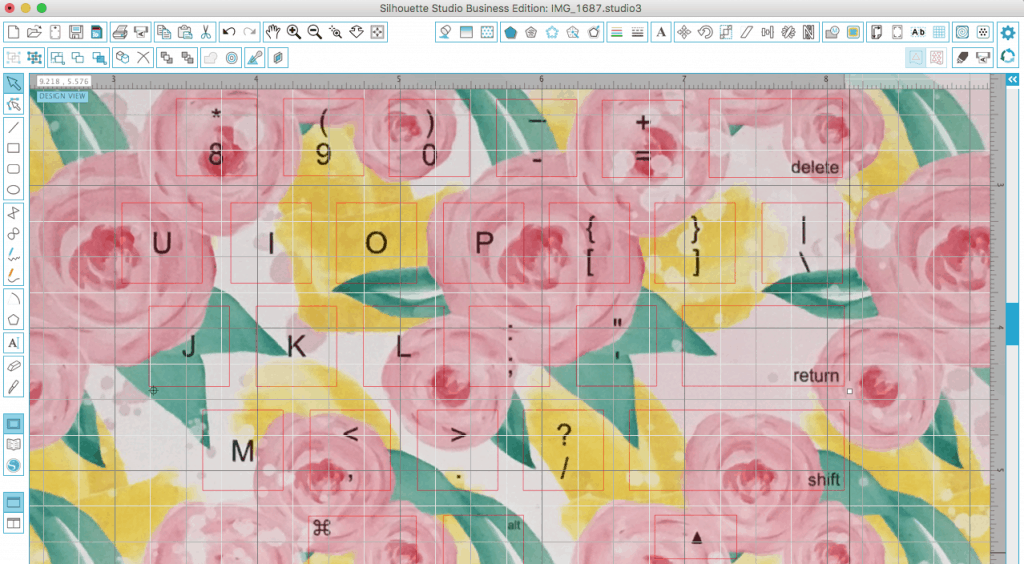
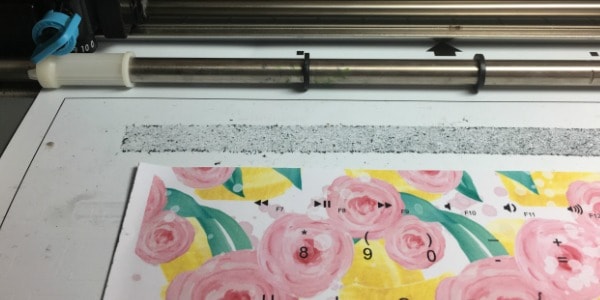
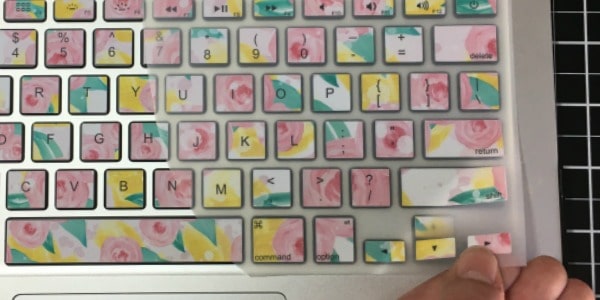
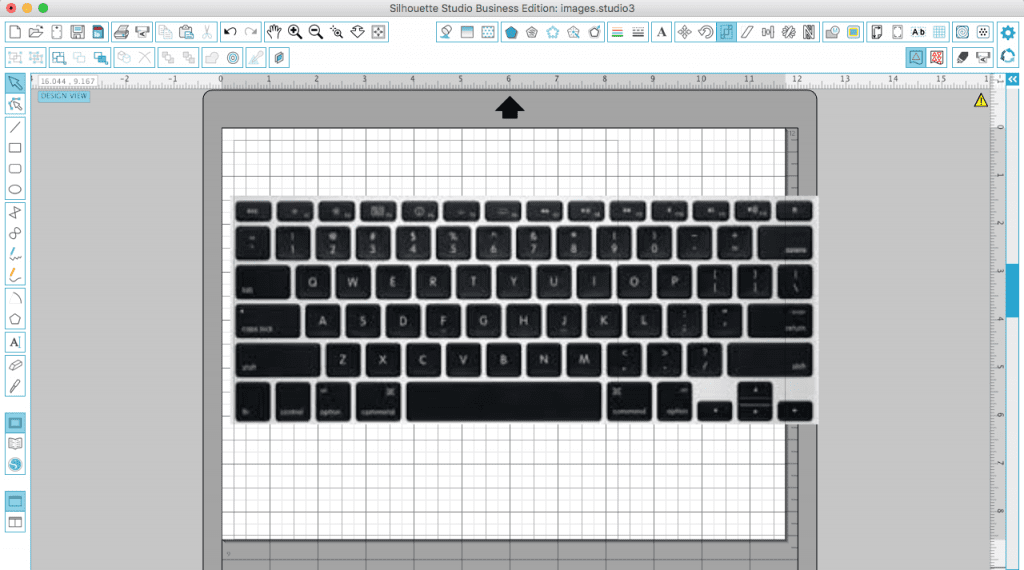
    4. Open the file called “KeyboardLetters.studio3” (downloaded in step 2) and place it on top of your background like shown in the photo. DIY Macbook Keyboard Skin with Silhouette Cameo by cuttingforbusiness.com5. Print the design on printable adhesive vinyl. I used a matte finish vinyl, but you could also use your favorite sticker paper. Cut the design in half. Unfortunately, the keyboard decal is slightly larger than the print area for a standard printer. So, I’ve broken it into two halves. DIY Macbook Keyboard Skin with Silhouette Cameo by cuttingforbusiness.com6. Place the design onto your Picscan mat. Take a clear photo of the design on your mat. DIY Macbook Keyboard Skin with Silhouette Cameo by cuttingforbusiness.com7. Upload the Pixscan image to Silhouette Studio. DIY Macbook Keyboard Skin with Silhouette Cameo by cuttingforbusiness.com8. Overlay the file RightKeyboard.studio3 onto your Pixscan image. You’ll need to move it around to make sure the placement is perfect. I found it easiest to zoom in on the design to get it lined up just right. DIY Macbook Keyboard Skin with Silhouette Cameo by cuttingforbusiness.com9. Load your Pixscan mat into your Silhouette and cut the keyboard decal. DIY Macbook Keyboard Skin with Silhouette Cameo by cuttingforbusiness.com10. Weed the excess vinyl from the keyboard decal. DIY Macbook Keyboard Skin with Silhouette Cameo by cuttingforbusiness.com11. Apply transfer paper to the decal. Turn your computer off and apply the decal to the keys.DIY Macbook Keyboard Skin with Silhouette Cameo by cuttingforbusiness.com12. Repeat steps 6 to 11 to do the other side of your keyboard using the LeftKeyboard.studio3 file you downloaded earlier.
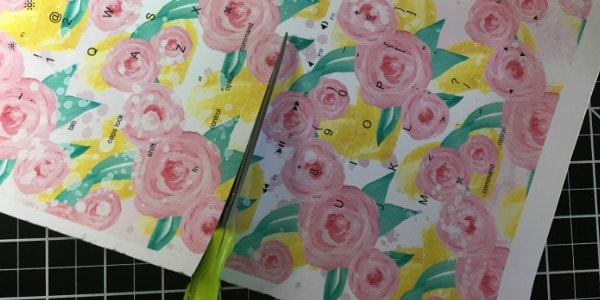
    Now, if you don’t have a recent Mac computer – or you are interested in the process – here’s how I did this:

    1. I took a good photo of my computer keyboard from above. I then opened it in Silhouette Studio. Next, I measured the keyboard and resized it to the exact same size in Silhouette Studio using the “Scale” function.DIY Macbook Keyboard Skin with Silhouette Cameo by cuttingforbusiness.com
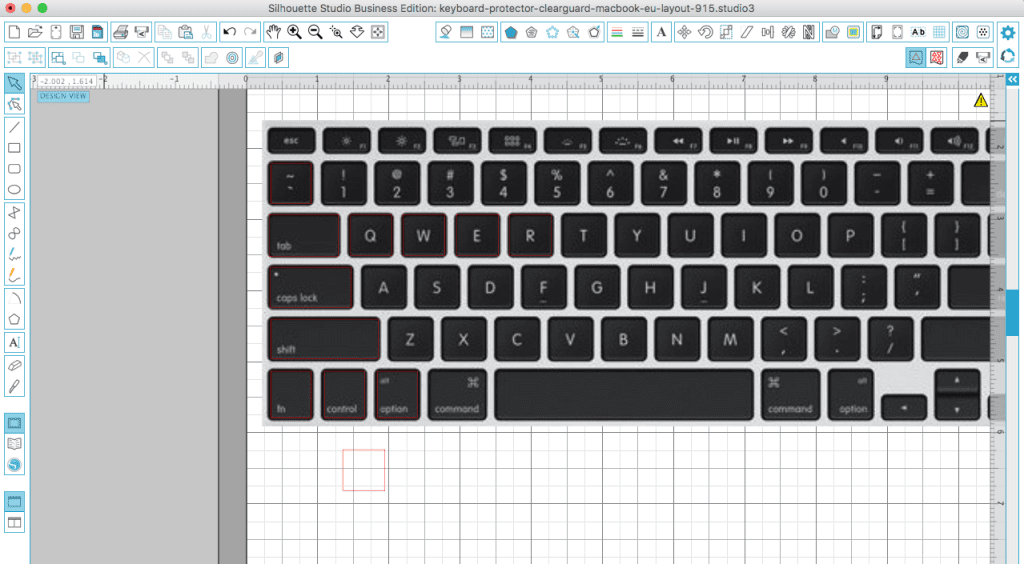
    2. I drew squares and rectangles over each of the keys. I stopped several times and did actual cuts on my Silhouette to make sure that the decals would fit the keys. DIY Macbook Keyboard Skin with Silhouette Cameo by cuttingforbusiness.com
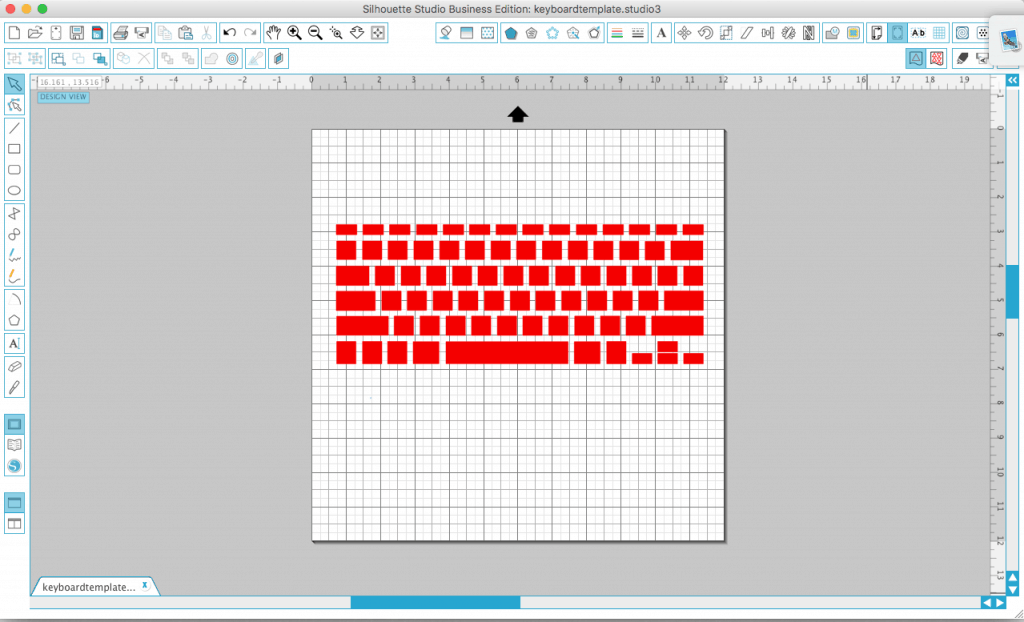
    3. After all the keys had boxes on them, I deleted the photo of my keyboard. Here’s what I was left with:DIY Macbook Keyboard Skin with Silhouette Cameo by cuttingforbusiness.com
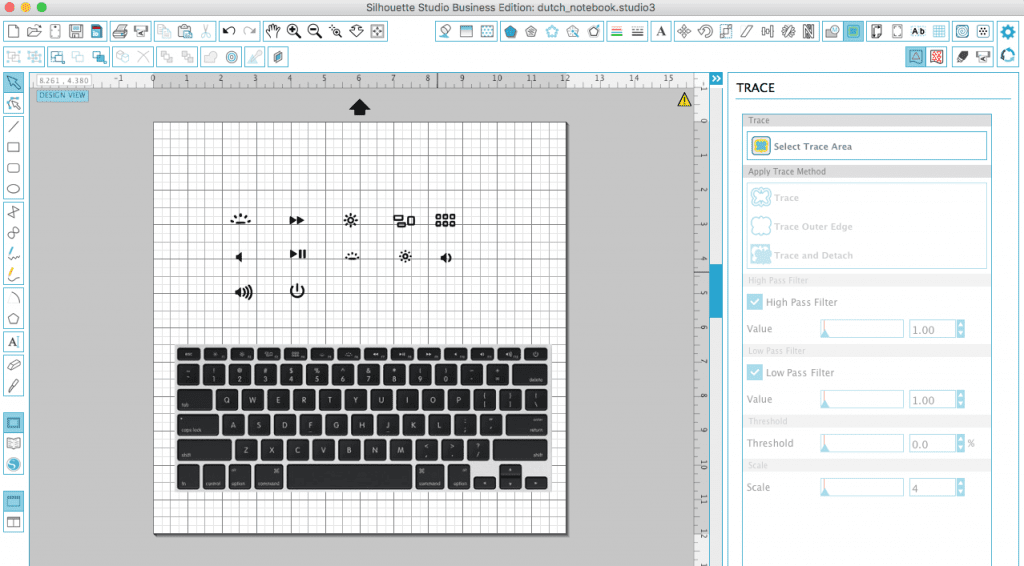
    4. I then typed each letter onto the keys using Arial font. I used the “Align” function to make sure the letters were all lined up. Then, I traced the icons that I couldn’t type using the “Trace” function. DIY Macbook Keyboard Skin with Silhouette Cameo by cuttingforbusiness.com

    I’d be lying if I said this was a quick project to design from scratch. It took me longer than I expected, but I absolutely love my new keyboard decal!

    Save this tutorial to Pinterest or Facebook – just hover over the image below or tap it on mobile:

    DIY Macbook Keyboard Skin with Silhouette Cameo by cuttingforbusiness.com