Blog

  • List of Out of the Box Places to Set Up Shop this Holiday Season

    When you own a small craft business, you can sell your goods wherever you can. Whether you choose Etsy, your own website, craft shows, or social media currently, there are always other alternatives. Today, I’m going to introduce you to another idea – small, fleeting popup shops.

    What is a Pop Up Shop?

    A pop up shop is a temporary retail space. For large stores, pop up shops are generally set up in busy mall spaces, reception areas of large office buildings, and empty strip mall locations. But, you don’t have to be set up in giant, expensive spaces to have a pop up shop.

    Why are Pop Up Shops a Good Idea?

    Pop up shops are easy ways to reach new customers and test out new products. My favorite part about pop up shops are that the costs associated with them is small. When making arrangements to use a space, pitch it as a service for the customers that will shop in the pop up. Posing yourself as an asset to the owner of the space may get you a space to use for free for a few hours. If you can’t negotiate a free space, a small percentage of your sales may get you the space you need to host a pop up shop.

    What do You Need to Host a Pop Up Shop?

    You’ll need your products, a proper display for your products, tables, a credit card reader, business cards, and bags to put merchandise in. Think of your popup shop as a solo craft show display.

    Places to Hold a Pop Up Shop

    With a little creativity – and maybe some smooth talking – you can host a pop up shop wherever you can get permission. Here’s some ideas to start your brain storming:

    • Your house
      • Similar to hosting a holiday market in your home, set up your shop and invite a few friends over to shop.
    • A friend or family member’s house
      • Take your products with you and set up in someone else’s home. Bring a few snacks and make a night out of it!
    • A large office building
      • Pop up shops in large office buildings are a great way to reach a number of people at the same time.
    • Hospital break room
      • If you have the means to get into a hospital break room for a few hours, consider offering doctor and nurse themed products for sale.
    • School
      • The front office staff at your local school might love a pop up shop with school or teacher related products. If you can plan your pop up shop around teacher appreciation week, it’ll be even more popular!
    • Real Estate Office
      • Grab your display and head to your local real estate office. Offer products that are real estate themed or those that agents can purchase as gifts for their clients.
    • Salon
      • Grab your products and head to a salon for a few hours in the afternoon. Consider products that pamper or decor related to relaxing – or stick with stylist themed items.
    • Barber
      • A barber shop demographic is slightly different from a salon, because men tend to frequent them. If you can schedule a pop up shop with gifts before Mother’s Day or Christmas you may do very well. (I mean, stop in for a haircut and buy a gift for the wife for Mother’s Day with no extra effort!? It’s a win-win!)
    • A Cafe or Deli
      • Know a cafe owner? Set up shop during the busy lunch period!
    • Bars/Breweries/Wineries
      • If you’ve got a craft beer brewery or a local winery in town, arrange to set up a shop for a few hours inside on a busy weekend afternoon. Make your merchandise themed.

    Themed Merchandise for Your Pop Up Shop

    As I’ve mentioned above, the space that you choose for your pop up shop will dictate the type of products you sell. When planning what products to take to your pop up shop, ask yourself: What type of person frequents this location?

    Now, get out there – set up a pop up – and make lots of money! Where can you think of to host a pop up shop? Leave your suggestion in the comments.

    Was this post helpful? Save the image below to Pinterest.

    List of Out of the Box Places to Set Up Shop this Holiday Season - Silhouette Portrait or Cameo and Cricut Explore or Maker - by cuttingforbusiness.com

  • Tutorial: How to Etch Acrylic with your Silhouette Curio

    In the crafting small business world, I think that the Silhouette Curio is underutilized! To inspire you to try out a Silhouette Curio in your business  – I’ve invited Jamie from Craft Chameleon over to show us how to etch with the Curio. I’m turning it over to Jamie now:
    Up your game and etch your customer’s acrylic items for a value added product with your Silhouette
    Curio. This tutorial assumes you have a working knowledge of your curio machine. Let’s get started!

    Supplies Needed

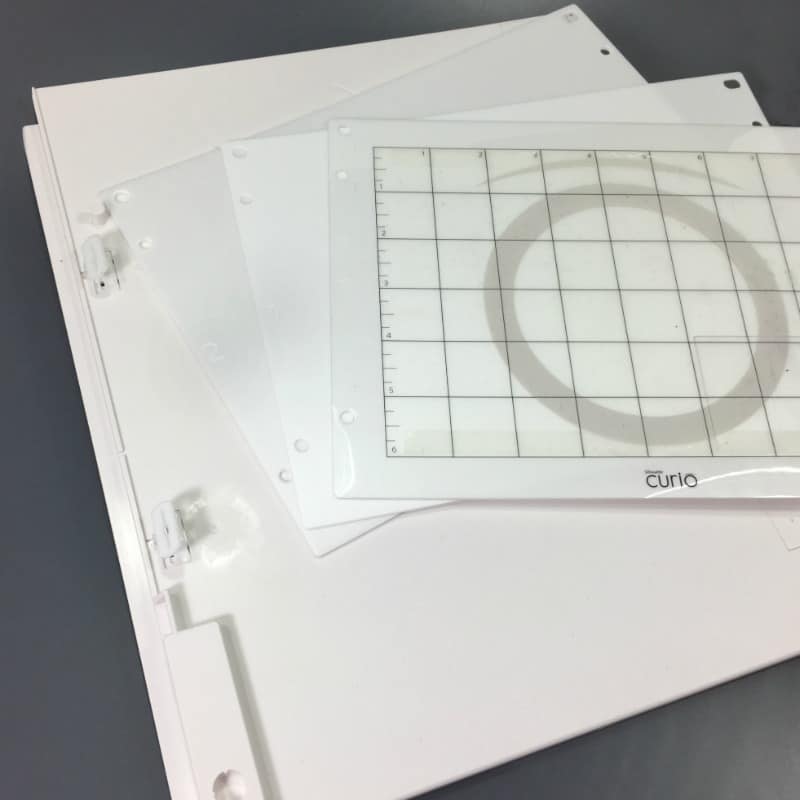
    Small platform and mats 2, 1 and top mat (1)
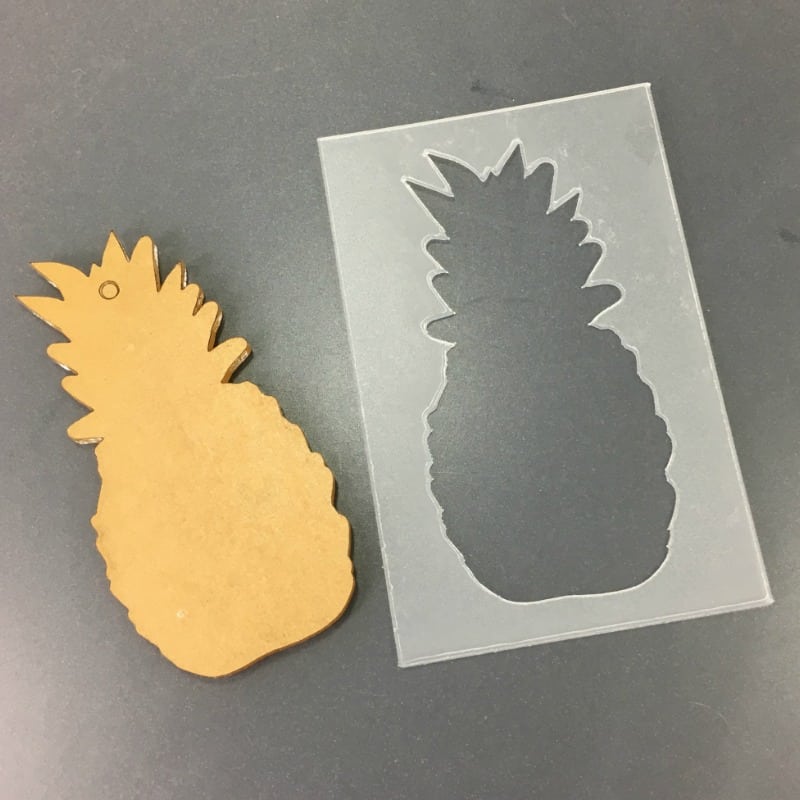
    Acrylic Shape
    Plastic or cardboard template
    Tutorial: Etch Acrylic with your Silhouette Curio - by cuttingforbusiness.com Tutorial: Etch Acrylic with your Silhouette Curio - by cuttingforbusiness.com Tutorial: Etch Acrylic with your Silhouette Curio - by cuttingforbusiness.com

    Tutorial: How to Etch Acrylic with a Silhouette Curio

    First set up your small platform with mats 2, 1 and the top cutting mat. This will give you a platform of 4.
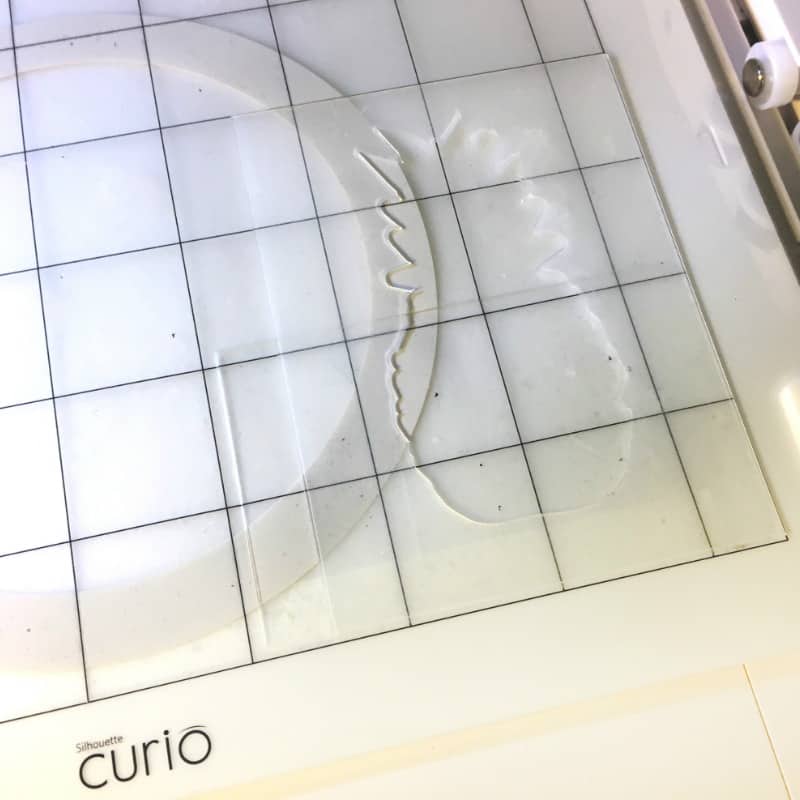
    Next take your acrylics template and determine where to put it on your mat. This needs to be a precise
    location. I used the lower right hand corner. Make sure your mat is very sticky. If the mat is not sticky
    your template and acrylic will move which will cause a failure in etching your acrylic. Press the template
    down firmly.
    Tutorial: Etch Acrylic with your Silhouette Curio - by cuttingforbusiness.com
    Remove the protective coverings on top and bottom of acrylics. If the bottom covering is paper it can be
    left on, your option.
    Tutorial: Etch Acrylic with your Silhouette Curio - by cuttingforbusiness.com
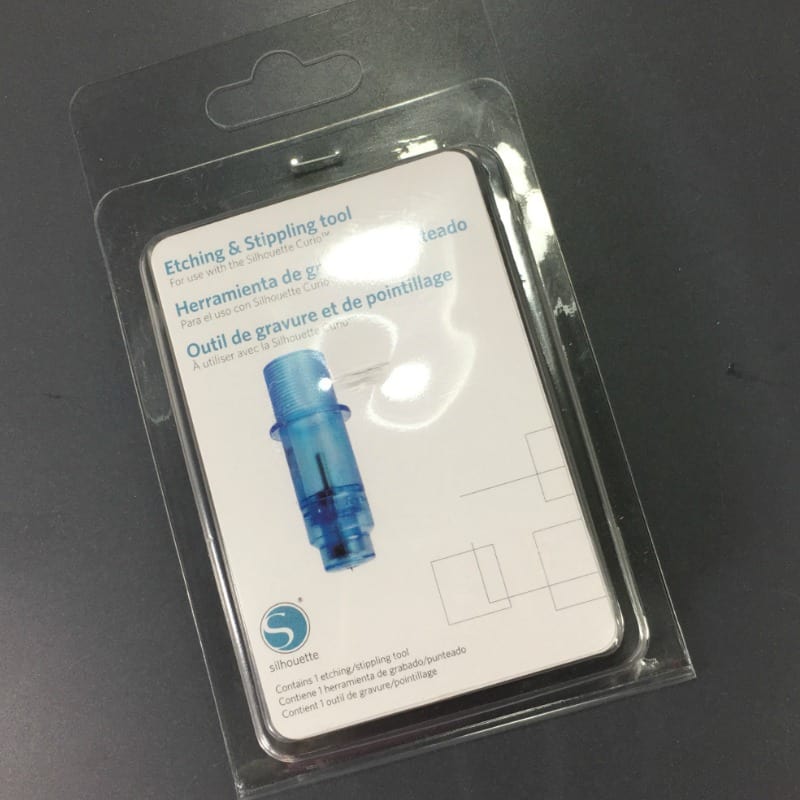
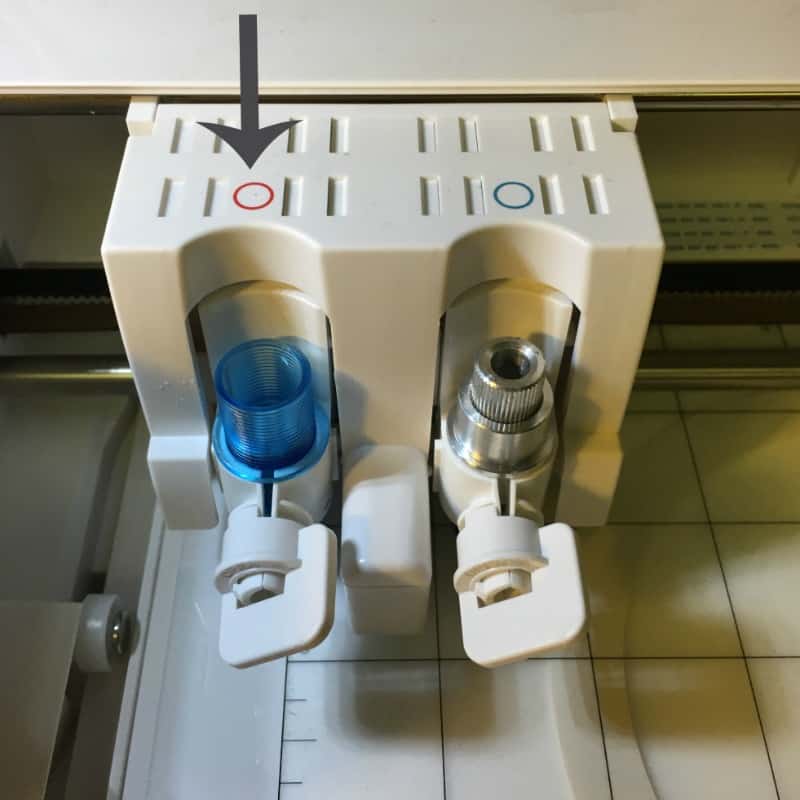
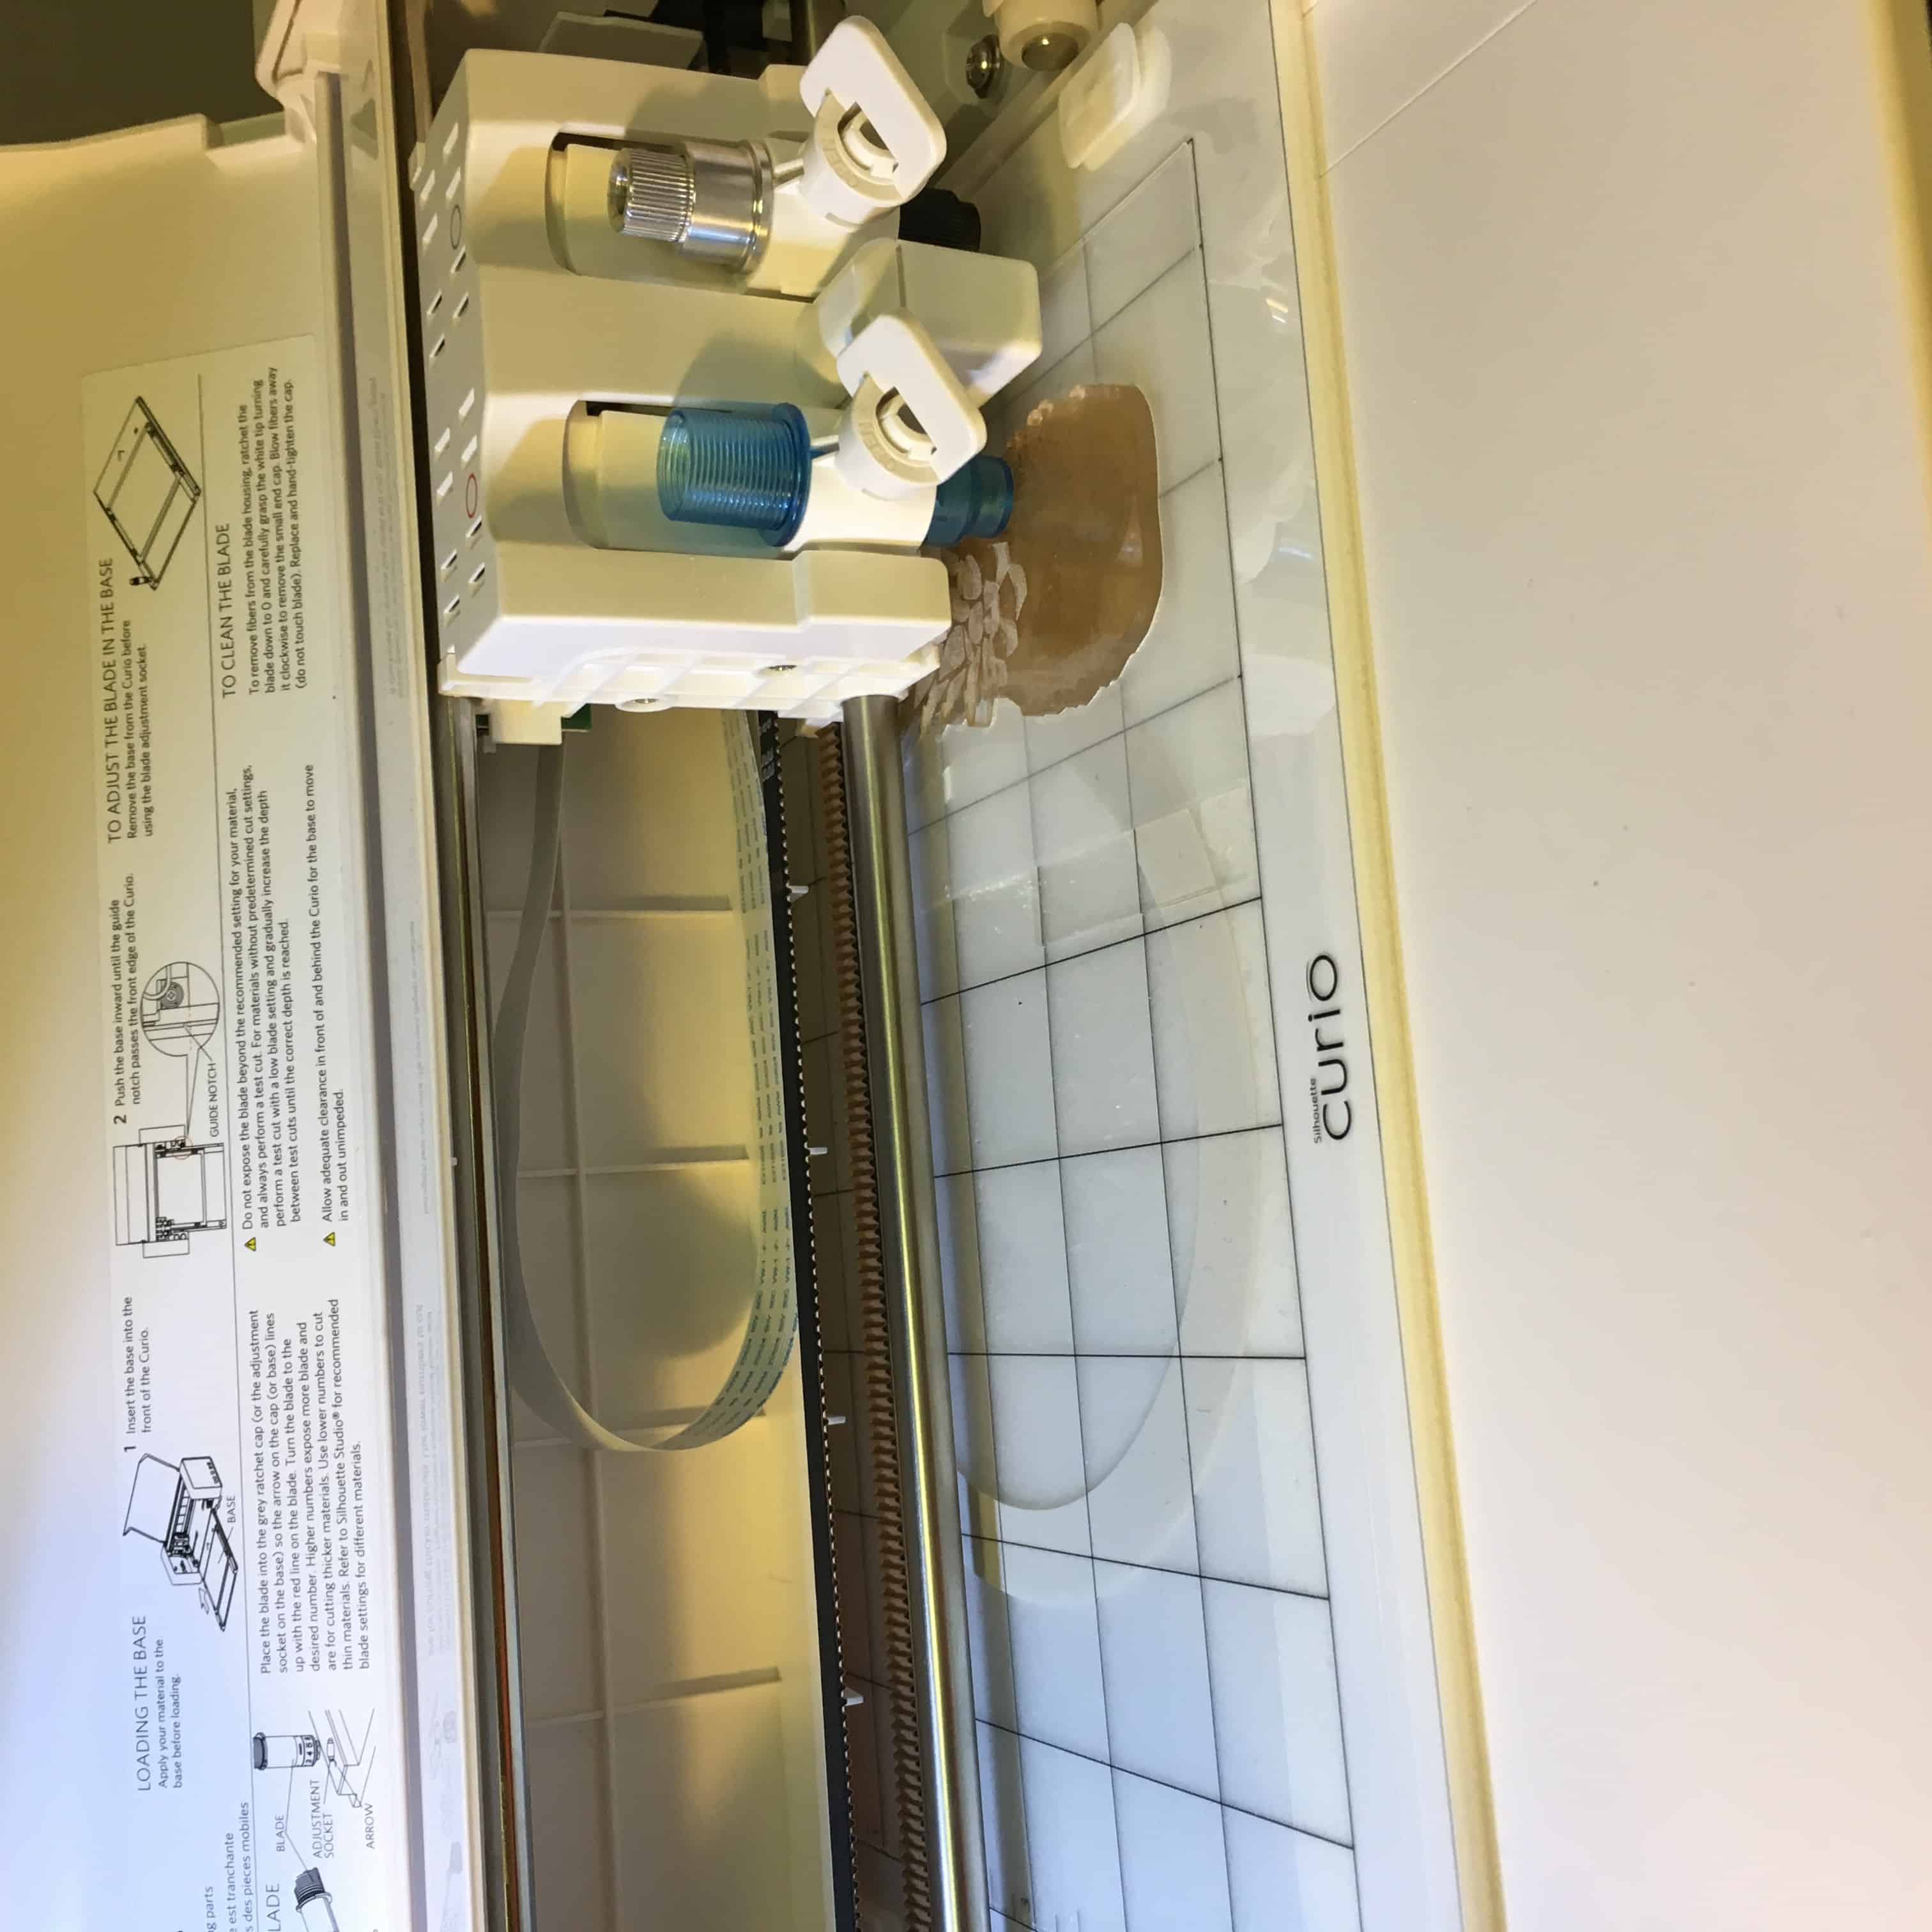
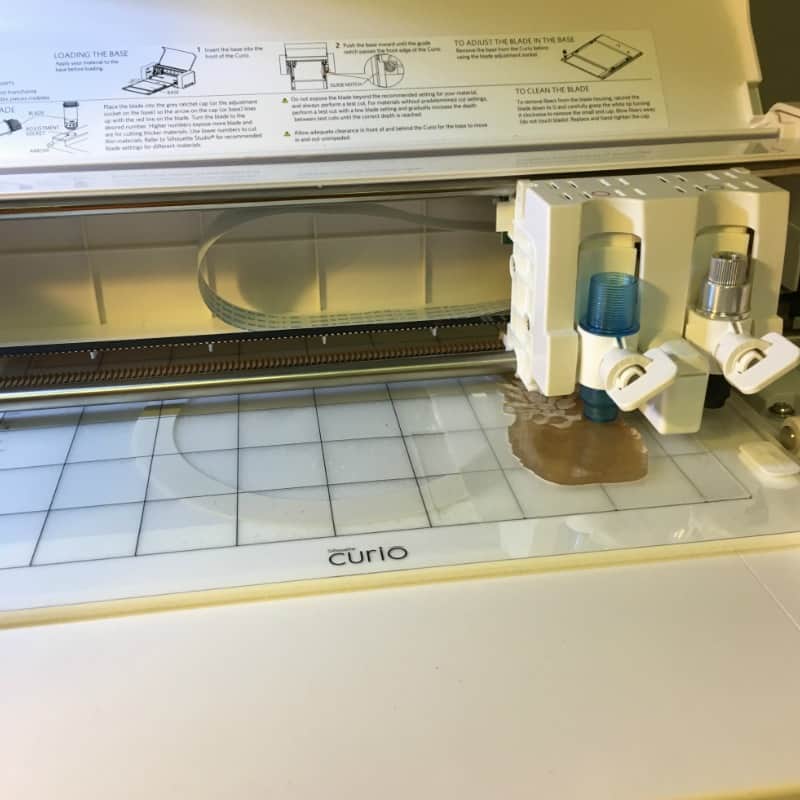
    Load the platform into the curio and add the etching tool into the first or red section of the cutting head.
    Tutorial: Etch Acrylic with your Silhouette Curio - by cuttingforbusiness.com
    Place your acrylic inside the template. Press firmly. Then open your file on the curio software. Tutorial: Etch Acrylic with your Silhouette Curio - by cuttingforbusiness.com
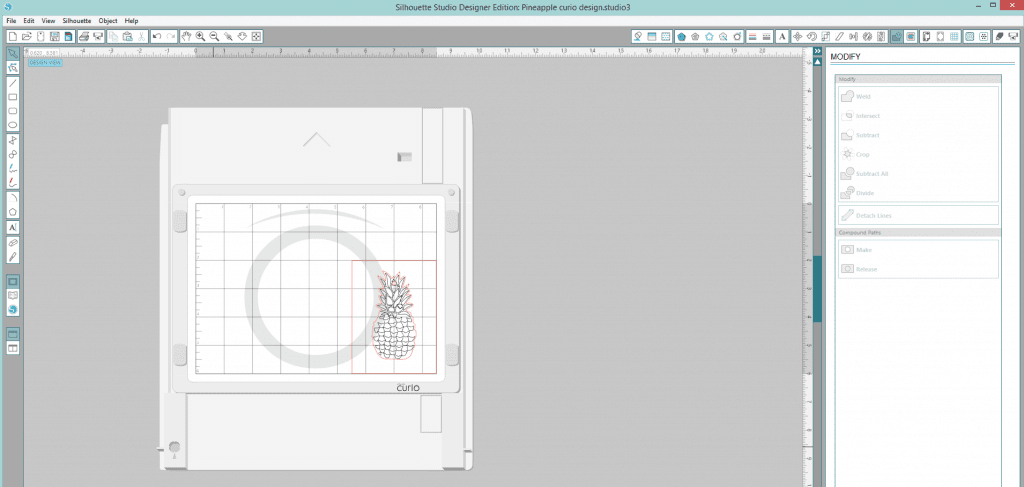
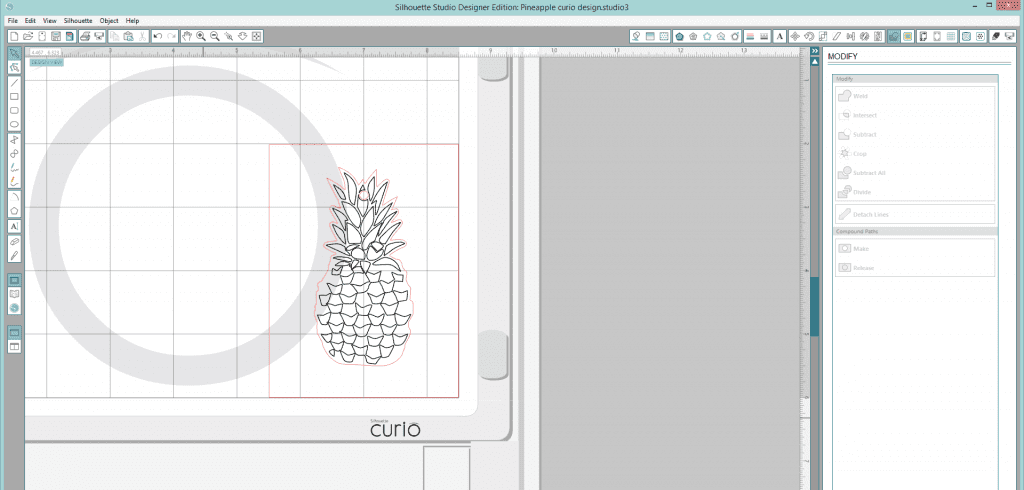
    Set up your template and acrylic cut file in your software to match the exact layout on the machine. Remember your rule is your friend in this step. Precision is key!
    Tutorial: Etch Acrylic with your Silhouette Curio - by cuttingforbusiness.com
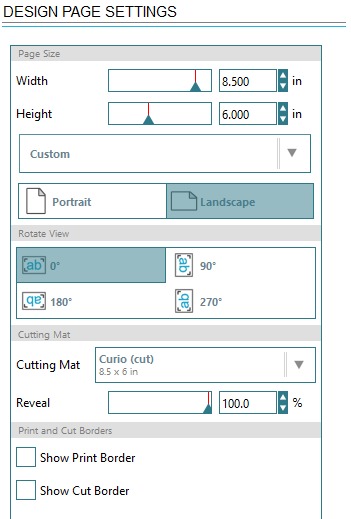
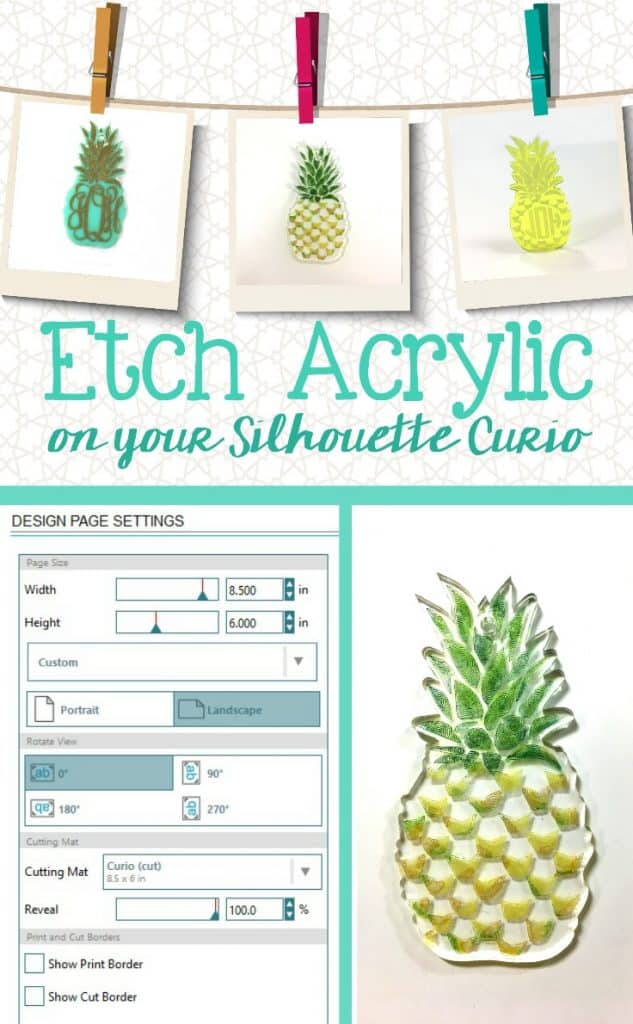
    Open the Design Page Settings tab. Using the settings shown in the photo below to set up your page. Tutorial: Etch Acrylic with your Silhouette Curio - by cuttingforbusiness.com
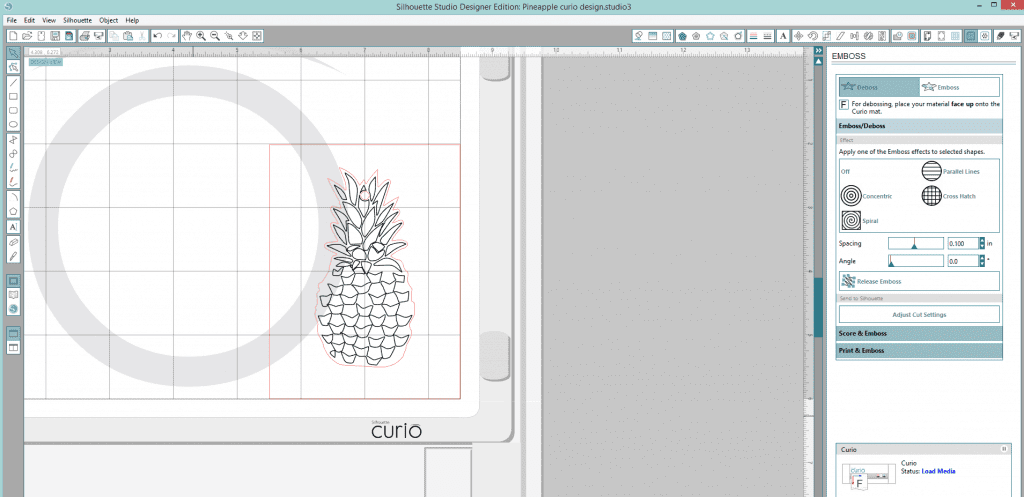
    Next open the Emboss/Deboss tab.
    Tutorial: Etch Acrylic with your Silhouette Curio - by cuttingforbusiness.com
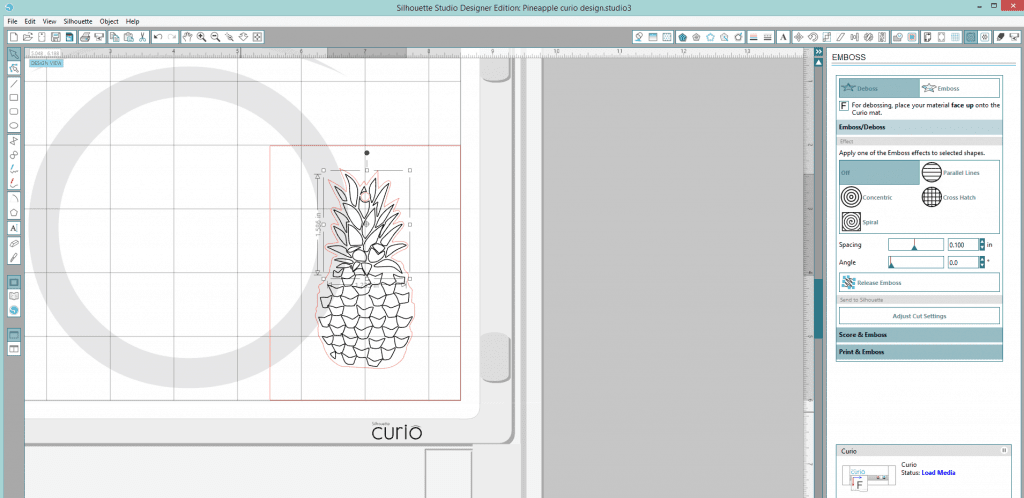
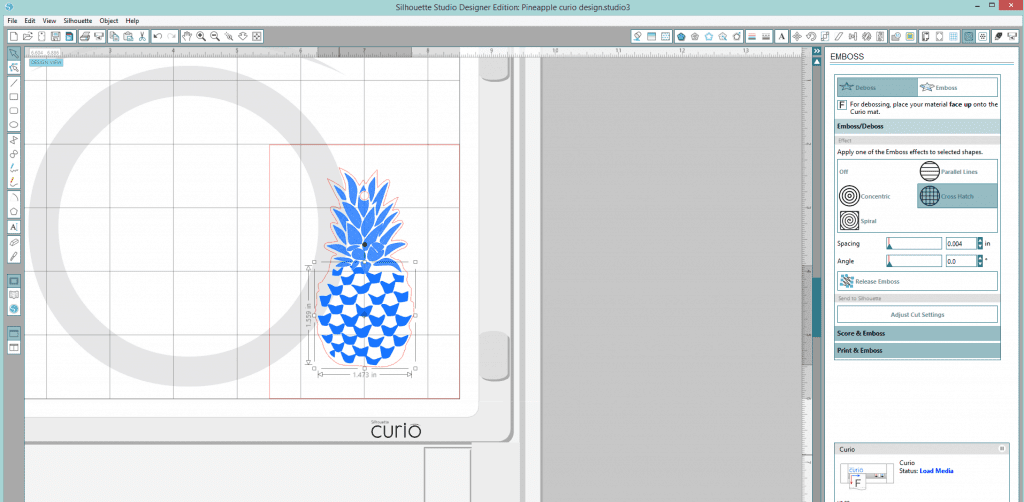
    Select the area to deboss or emboss. I use deboss as my setting.
    Tutorial: Etch Acrylic with your Silhouette Curio - by cuttingforbusiness.com
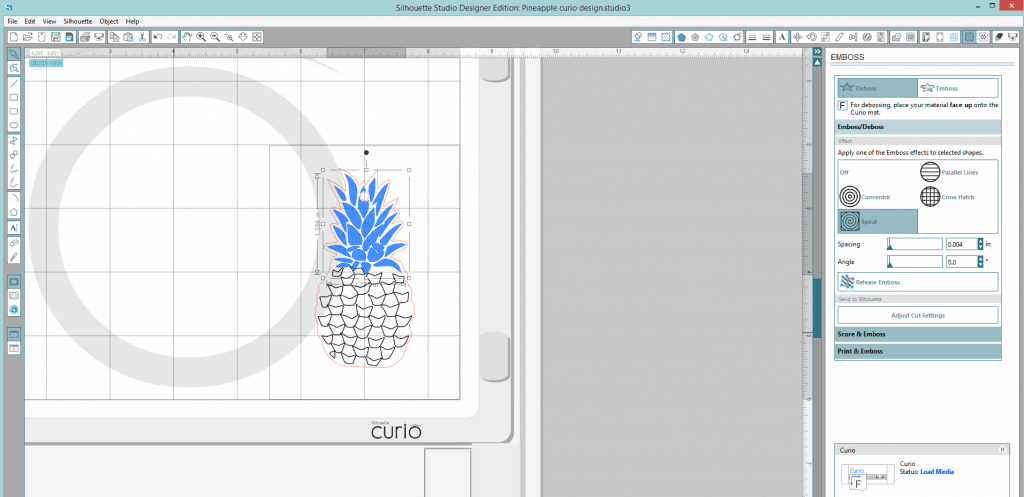
    Now choose the effect you want for that section. I choose the spiral for the leaves. Next you will set the
    spacing, the smallest spacing is .004 and will need to be typed into the box. The slider and arrows will
    not allow you to go this low.
    Tutorial: Etch Acrylic with your Silhouette Curio - by cuttingforbusiness.com
    Continue selecting the various sections you want to etch and the effects. Shown below is the cross hatch
    for the lower section of the acrylic.
    Tutorial: Etch Acrylic with your Silhouette Curio - by cuttingforbusiness.com
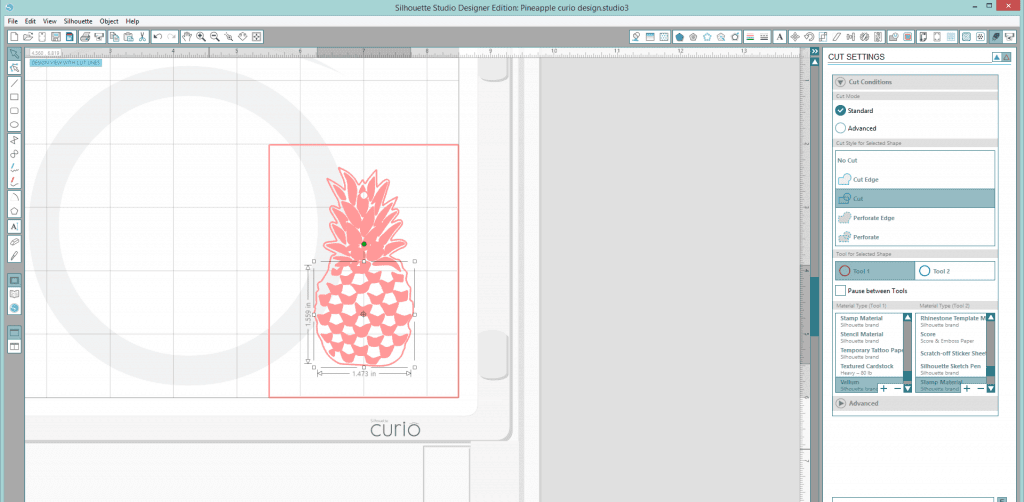
    Move over to the Cut Settings tab. Select the Cut setting followed by the Red Tool 1. Next we will
    select the material type for the Red Tool 1.
    Tutorial: Etch Acrylic with your Silhouette Curio - by cuttingforbusiness.com
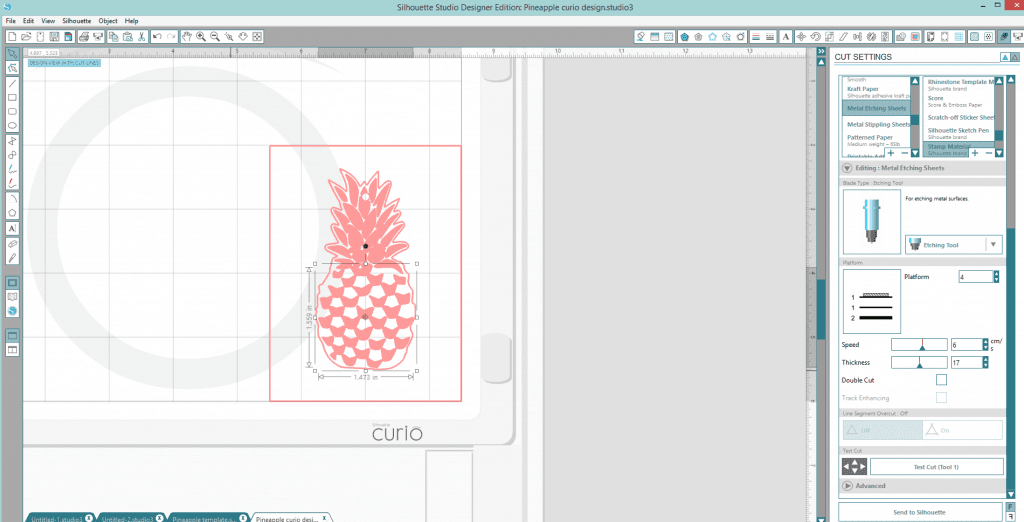
    Choose the metal etch settings for the Red Tool 1. We will modify the settings below to accommodate
    the acrylic. Our platform is set to 4, the speed is 6 and the thickness is 17.
    Tutorial: Etch Acrylic with your Silhouette Curio - by cuttingforbusiness.com
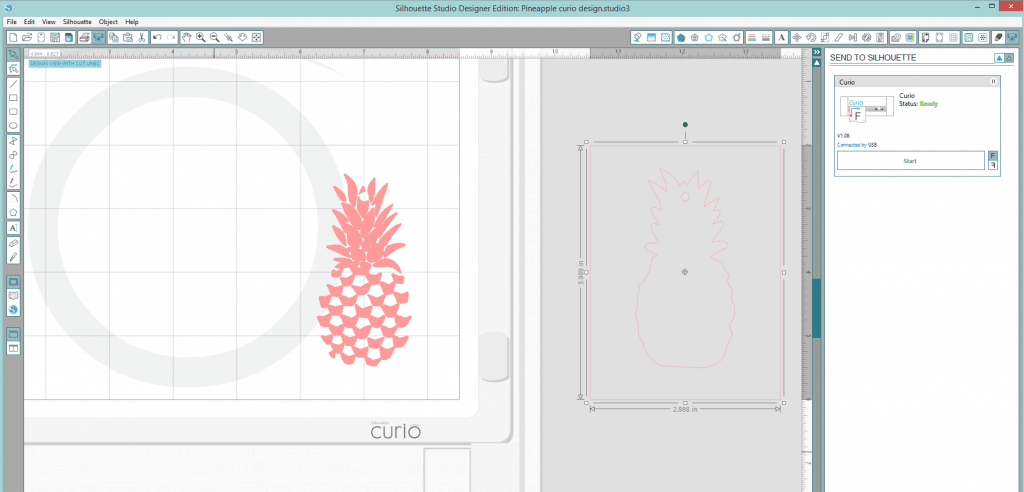
    Prior to etching, you will want to cut off the cut lines for your template or move it so it will not be etched. Then send your etching job to your curio.
    Tutorial: Etch Acrylic with your Silhouette Curio - by cuttingforbusiness.com
    Tutorial: Etch Acrylic with your Silhouette Curio - by cuttingforbusiness.comNow watch the magic happen!
    Tutorial: Etch Acrylic with your Silhouette Curio - by cuttingforbusiness.comTutorial: Etch Acrylic with your Silhouette Curio - by cuttingforbusiness.com
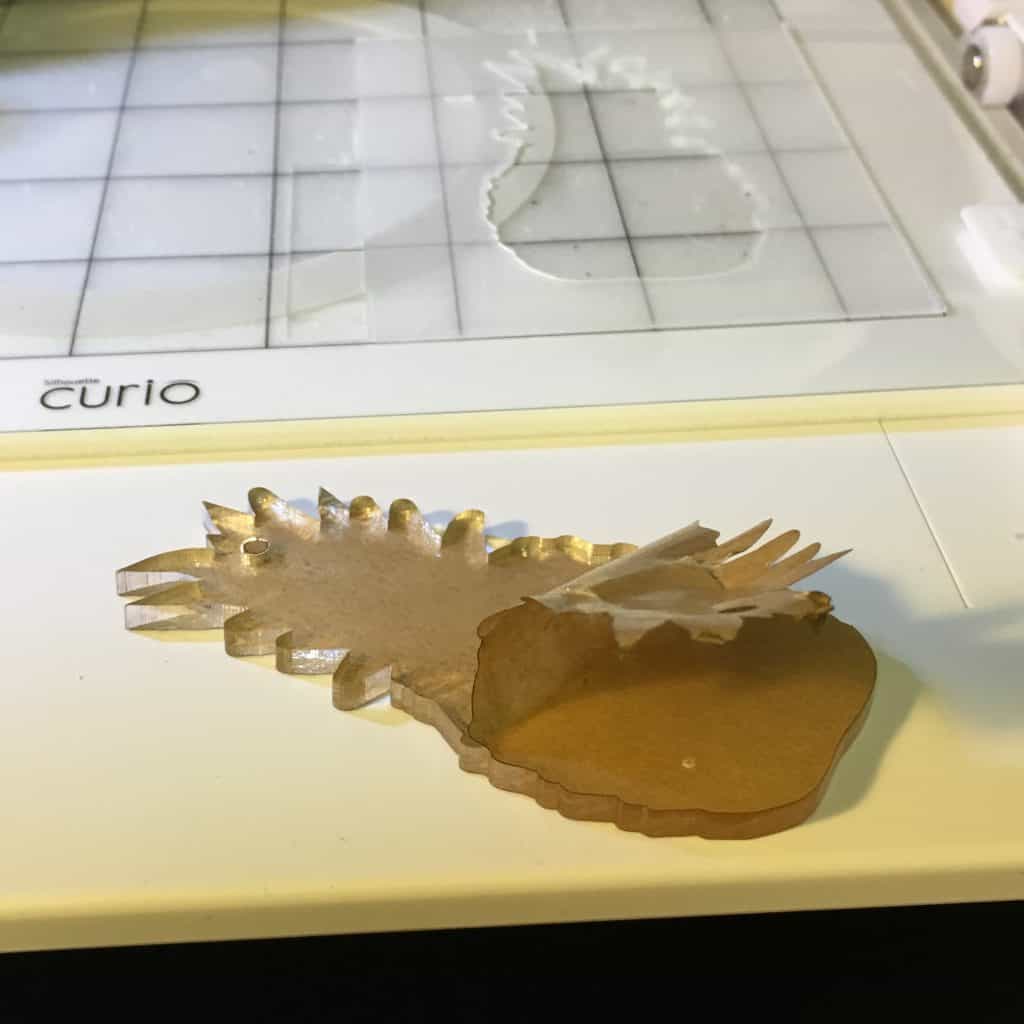
    When the item is etched carefully remove from the template with debris in place. You do not want that
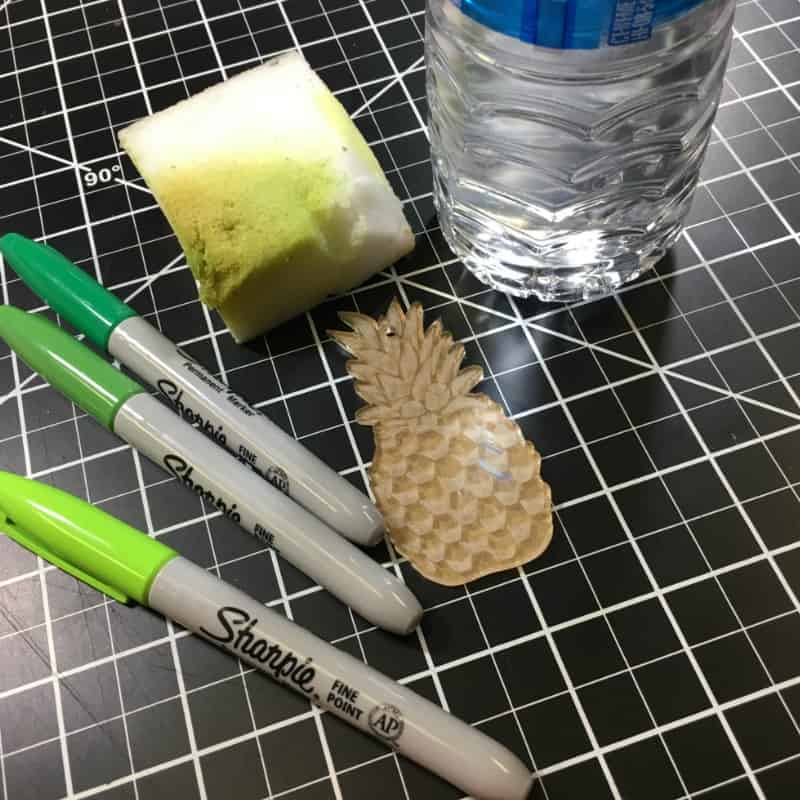
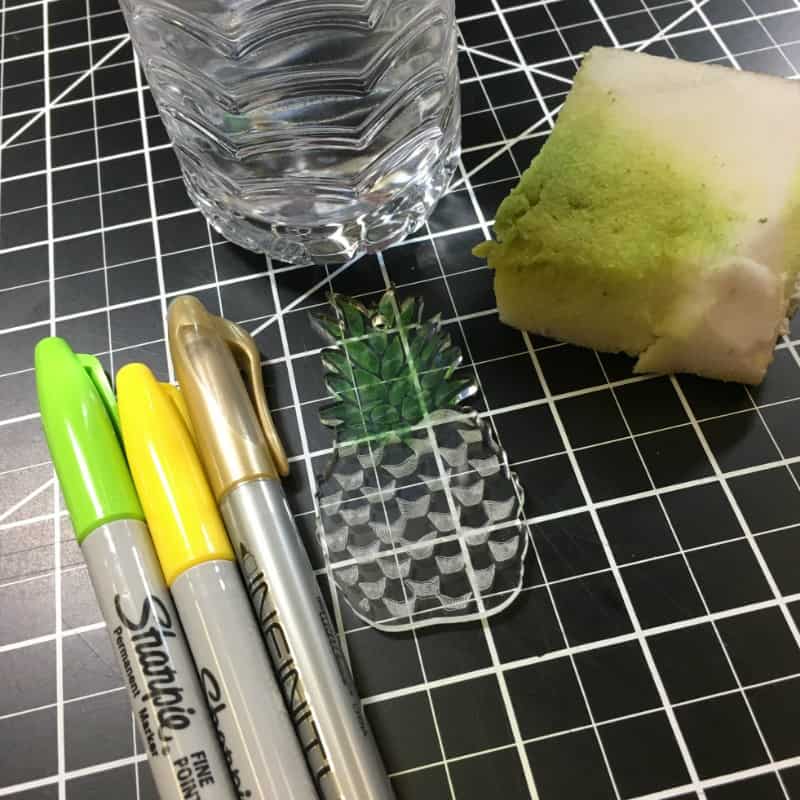
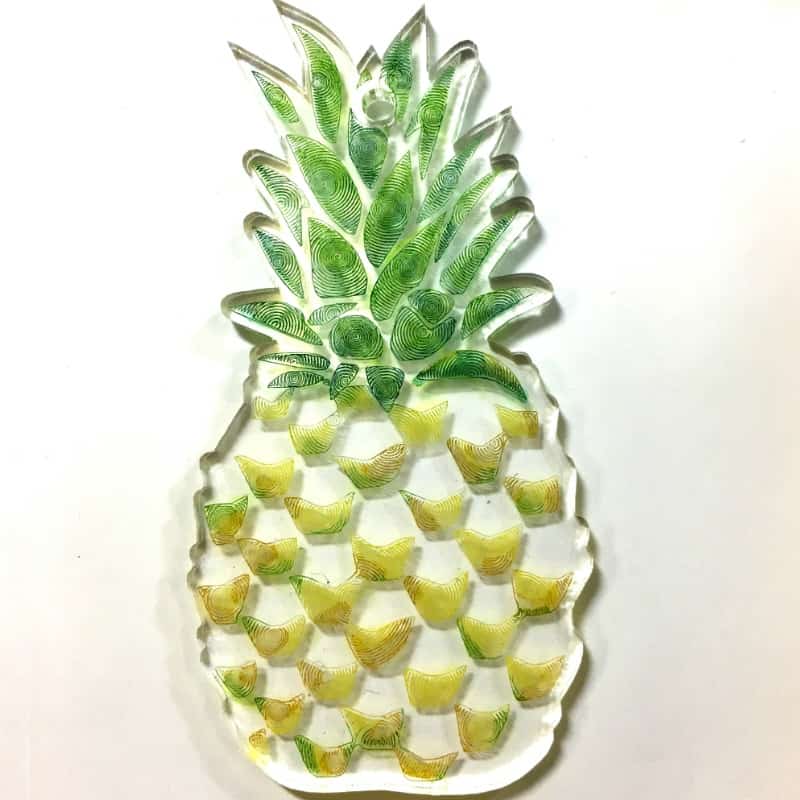
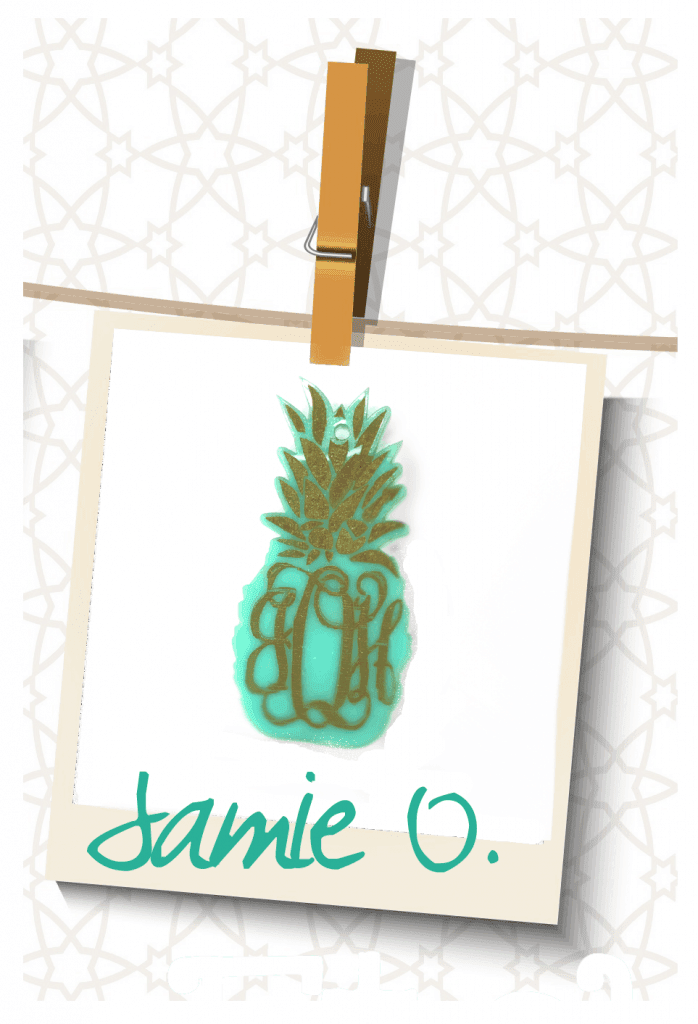
    to get on your mat as it will affect the mat’s stickiness. Once removed from the Curio, clean the surface of the acrylic with water and a soft rag. Now it is complete or ready to embellish. Shown here we used sharpies and a wet magic eraser to add color.
    Tutorial: Etch Acrylic with your Silhouette Curio - by cuttingforbusiness.com
    Tutorial: Etch Acrylic with your Silhouette Curio - by cuttingforbusiness.com
    Tutorial: Etch Acrylic with your Silhouette Curio - by cuttingforbusiness.com
    Now let’s see what you create for your customers using your Silhouette Curio!
    Jamie
    Craft Chameleon
    For more information on purchasing acrylics with etching cut files and coordinating plastic templates please join the Craft Chameleon Blanks Facebook group.
    Craft Chameleon
    Thanks so much Jamie for stopping in today – I can’t wait to try out etching with my Curio!
    Save this post to Pinterest:
    Tutorial: Etch Acrylic with your Silhouette Curio - by cuttingforbusiness.com
  • Tutorial: How to Tag Your Products in Facebook Posts

    Now that you’ve had time to set up your Facebook shop – there’s one more awesome feature I have to tell you about: the ability to tag products from your Facebook shop in Facebook posts! (I know, how cool is that?!)

    Tutorial: How to Tag Your Products in Facebook Posts

    1. Set up products in your Facebook shop. See this post to get setup, and this post to help you manage it once set up.
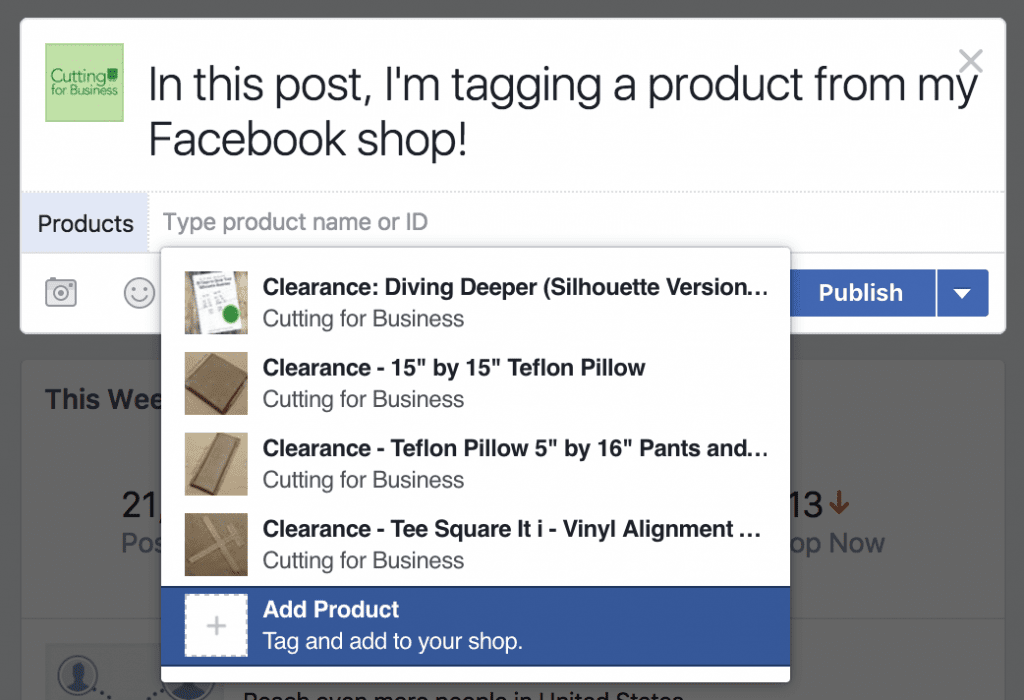
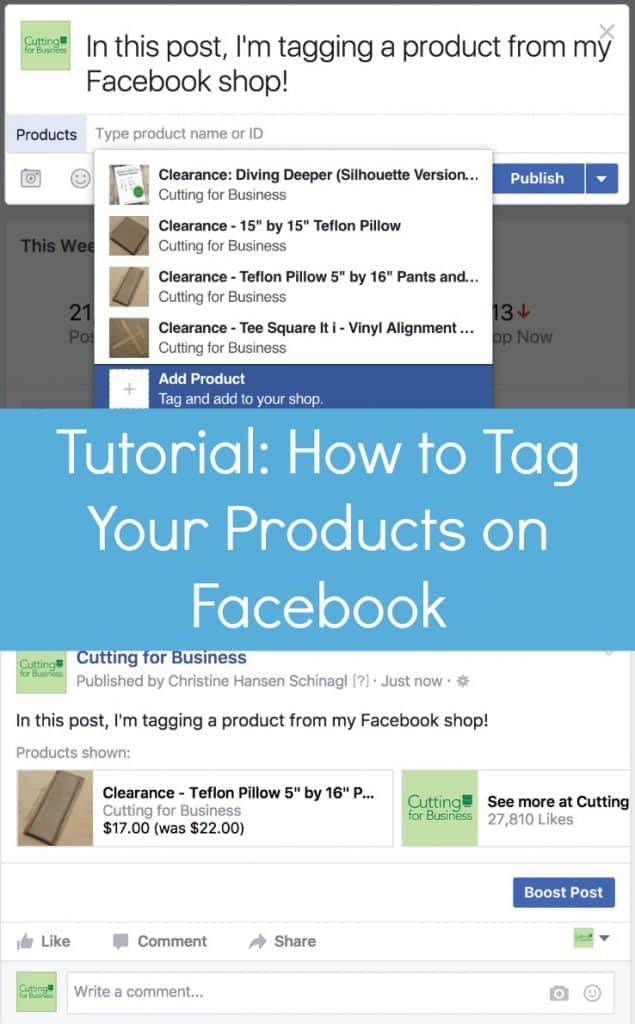
    2. Go to your Facebook business page and write a post. Click the “Tag a Product” icon. Tutorial: How to Tag Your Products in Facebook Posts - Great for Silhouette Cameo or Cricut Explore small business owners with a shop - by cuttingforbusiness.com
    3. When you click the icon, you’ll see the products currently listed in your Facebook shop. Tutorial: How to Tag Your Products in Facebook Posts - Great for Silhouette Cameo or Cricut Explore small business owners with a shop - by cuttingforbusiness.com
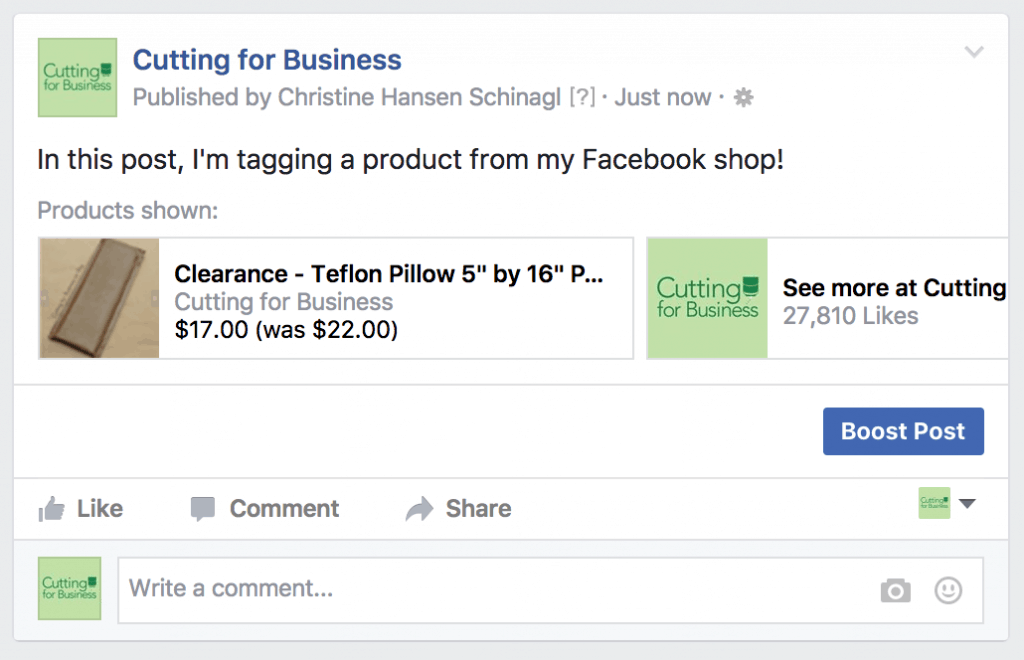
    4. Choose a product and publish the post. When someone clicks on the product, they will be able to purchase it. Here’s what the post will look like once it is live on your Facebook page: Tutorial: How to Tag Your Products in Facebook Posts - Great for Silhouette Cameo or Cricut Explore small business owners with a shop - by cuttingforbusiness.com

    Isn’t that great? I see a million different uses for it. For example, when a customer sends you a picture of your product in action – you can post it to Facebook and tag the product in your Facebook shop so others can buy it!

    Note: The product tagging doesn’t seem available yet in the Facebook pages app. Best to do this from a browser.

    Save this tutorial to Pinterest:

    Tutorial: How to Tag Your Products in Facebook Posts - Great for Silhouette Cameo or Cricut Explore small business owners with a shop - by cuttingforbusiness.com

  • How to Manage Your Facebook Shop

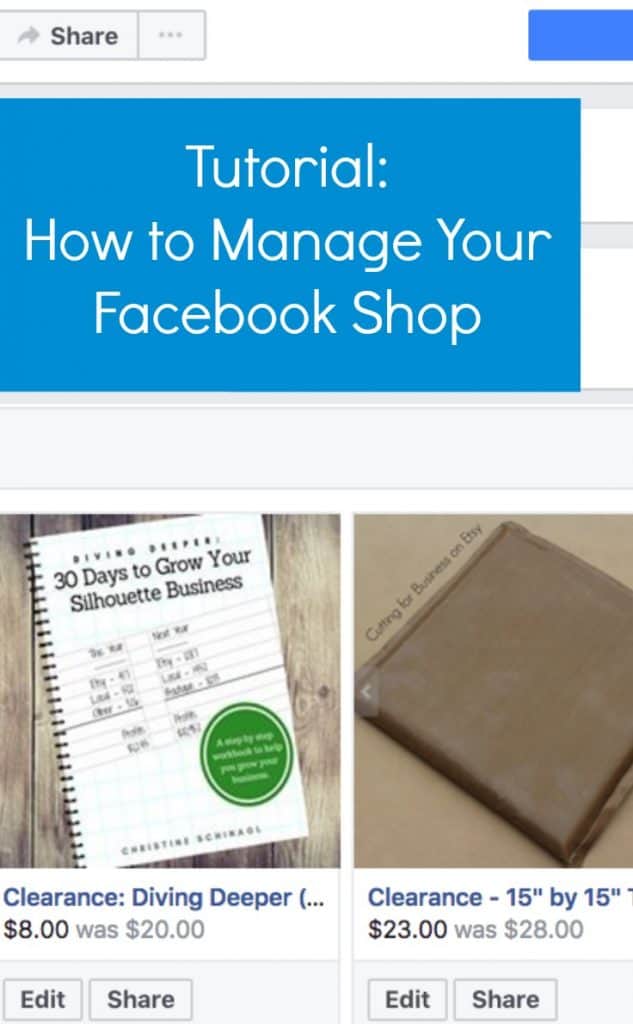
    Yesterday we looked at setting up a shop on Facebook. Today, I’m going to show you how to manage your shop and give you answers to a few questions you may have.

    How do You Access Your Shop?

    Customers will access your shop at facebook.com/yourpagename/shop.

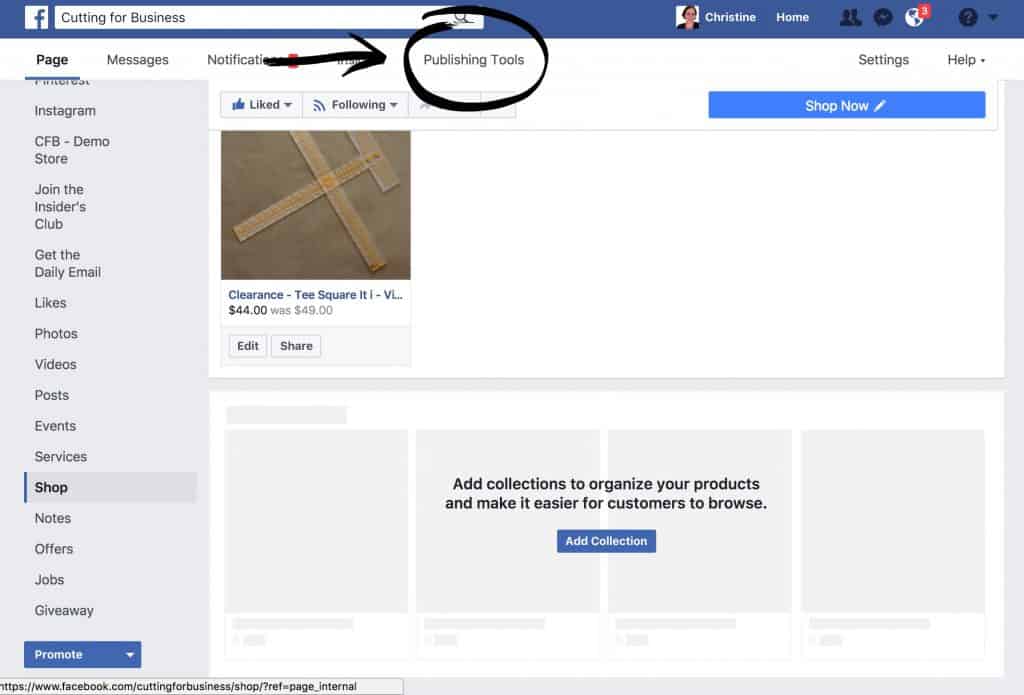
    Here’s how you will access your shop: Log into your Facebook page. From the top navigation bar, you’ll see the “Publishing Tools” link. How to Manage Your Facebook Shop - Great for Silhouette Cameo or Cricut Explore Small Business Owners - by cuttingforbusiness.com

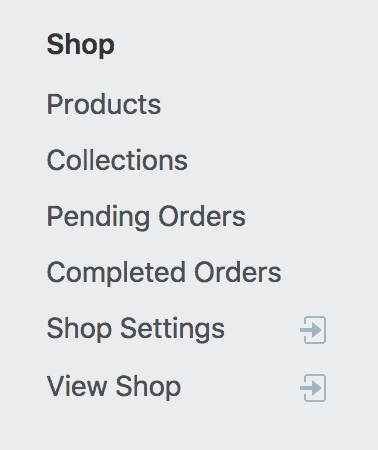
    After clicking it, you’ll see a section for your shop. The options are pretty self explanatory:

    How to Manage Your Facebook Shop - Great for Silhouette Cameo or Cricut Explore Small Business Owners - by cuttingforbusiness.com

    What Guidelines Do I Need to Know?

    It’s a good idea to look over the guidelines for images (no mockups allowed!), descriptions, and variations. Here’s a link to them.

    What Happens When You Get an Order in Your Facebook Shop?

    1. You’ll receive a notification through Facebook about the pending order.
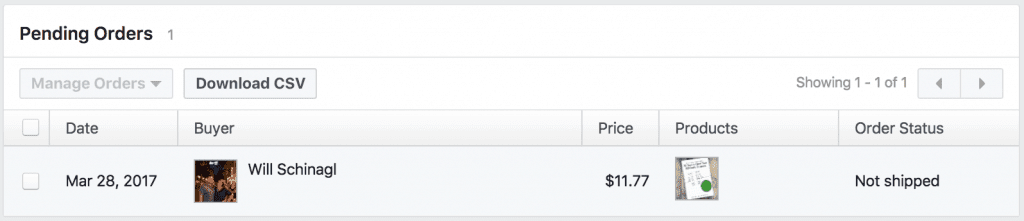
    2. The order will appear under “Pending Orders”. How to Manage Your Facebook Shop - Great for Silhouette Cameo or Cricut Explore Small Business Owners - by cuttingforbusiness.com
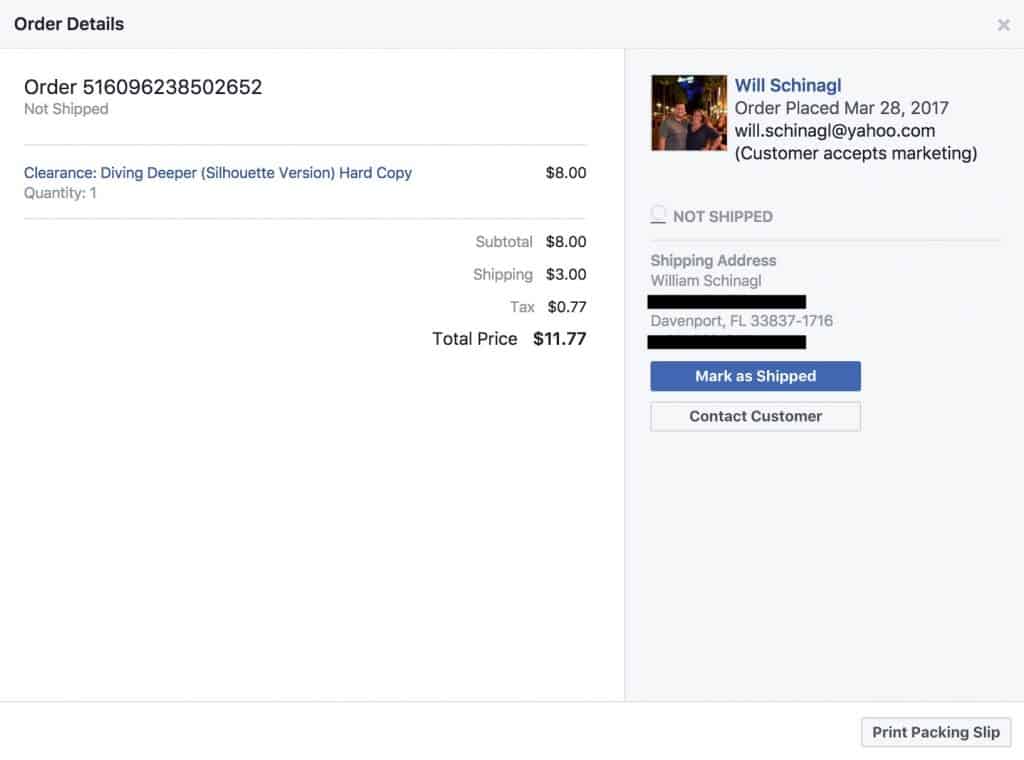
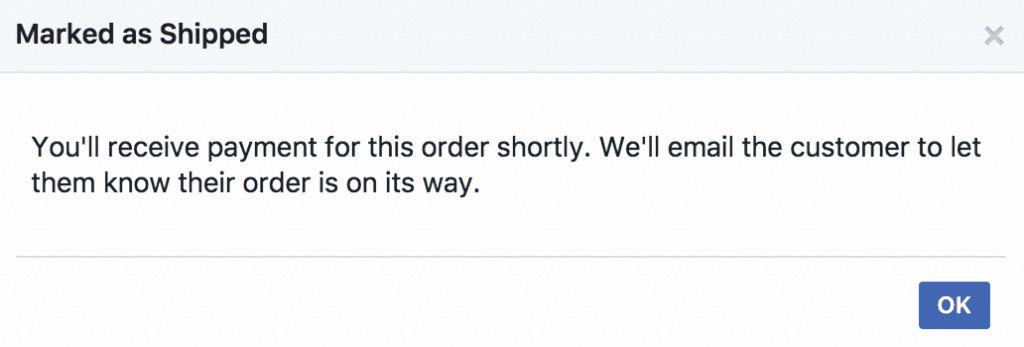
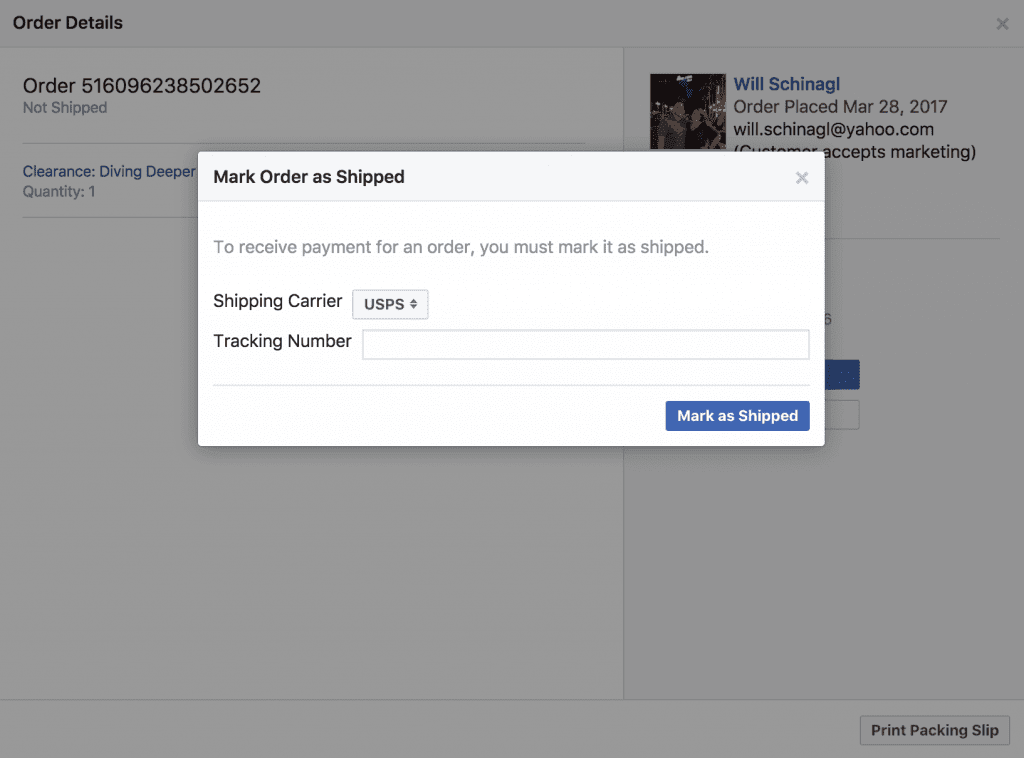
    3. Once you click on it, you’ll get details about the order and you’ll be able to print a packing slip and mark the item as shipped. It is extremely important that you mark the order as shipped, or you will not get paid. (In other words, Facebook does not process the payment until it is marked shipped.) How to Manage Your Facebook Shop - Great for Silhouette Cameo or Cricut Explore Small Business Owners - by cuttingforbusiness.com To mark the item as shipped, you’ll enter the tracking number. How to Manage Your Facebook Shop - Great for Silhouette Cameo or Cricut Explore Small Business Owners - by cuttingforbusiness.com How to Manage Your Facebook Shop - Great for Silhouette Cameo or Cricut Explore Small Business Owners - by cuttingforbusiness.com
    Can You Print Shipping Labels through Facebook?

    No, if you receive payments through Paypal, you’ll print the shipping labels through Paypal.

    How Much Does it Cost to Sell on Facebook?

    It’s free, however, you’ll pay processing fees through Paypal or Stripe.

    Is Selling on Facebook Better than Etsy/Amazon/a website?

    This is strictly my opinion, but having a Facebook shop is great for:

    • New sellers just starting out.
    • Those that are currently selling only on Facebook buy/sell/trade groups or social media. (No more trying to juggle orders through comments or messages!)
    • Sellers currently selling elsewhere and looking to add another venue for buyers to purchase products.

    Facebook shops are quite limited in what you can do with them, so they aren’t ideal to fully scale your business. Here’s a few things to think about:

    • Facebook shops are not well known, buyers may not trust shopping from them.
    • There are no customization options available in terms of color or layouts. What you see is what you get. In terms of what you see is what you get – at this time, you cannot set shop policies. Facebook assigns an automatic 45 day return period for customers and a 5 business day turnaround period. Neither of these options can be changed.
    • Facebook is known for making changes and could eliminate the store option at any time.
    • While shops are currently free, I doubt they will remain free forever.
    Don’t forget: If you have a website domain name that you aren’t using, you could always forward your domain directly to your Facebook shop – see this post.

    Tomorrow, I’ve got one more Facebook shop related tutorial – so check back then!

    Now that you’ve got more information about creating and managing a Facebook shop, tell me: Will you start one?

    Save this tutorial to Pinterest:


    How to Manage Your Facebook Shop - Great for Silhouette Cameo or Cricut Explore Small Business Owners - by cuttingforbusiness.com

  • Tutorial: How to Set Up a Facebook Shop

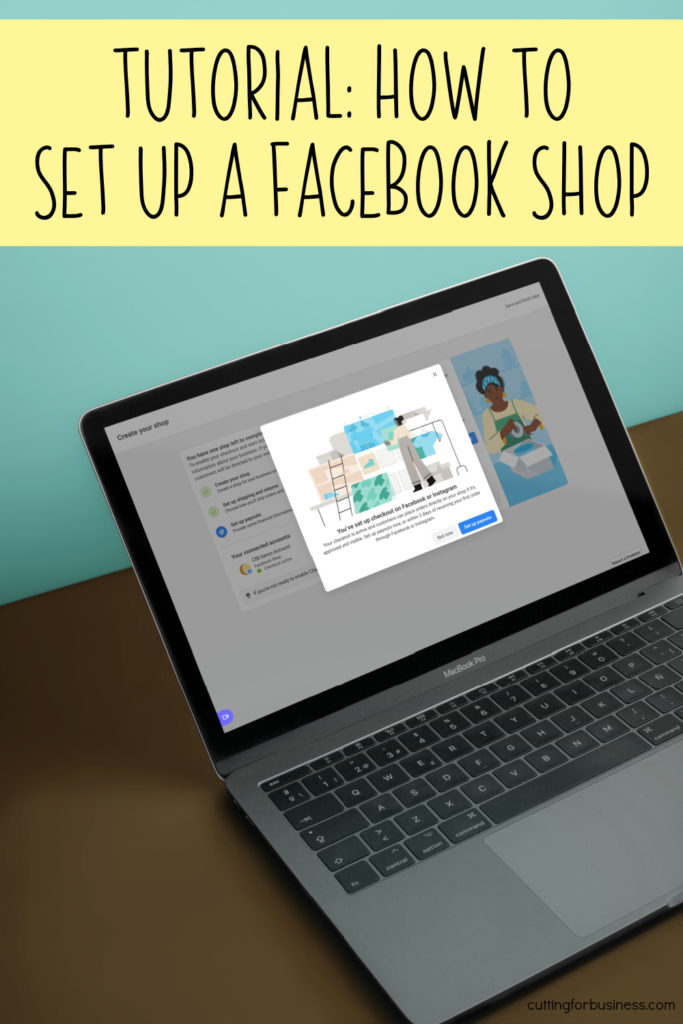
    Ready to start selling crafts on Facebook? This page will show you how to set up a Facebook Shop.

    Tutorial: How to Set Up a Facebook Shop - Great for Silhouette and Cricut Crafters - by cuttingforbusiness.com.

    Tutorial: How to Set Up a Facebook Shop

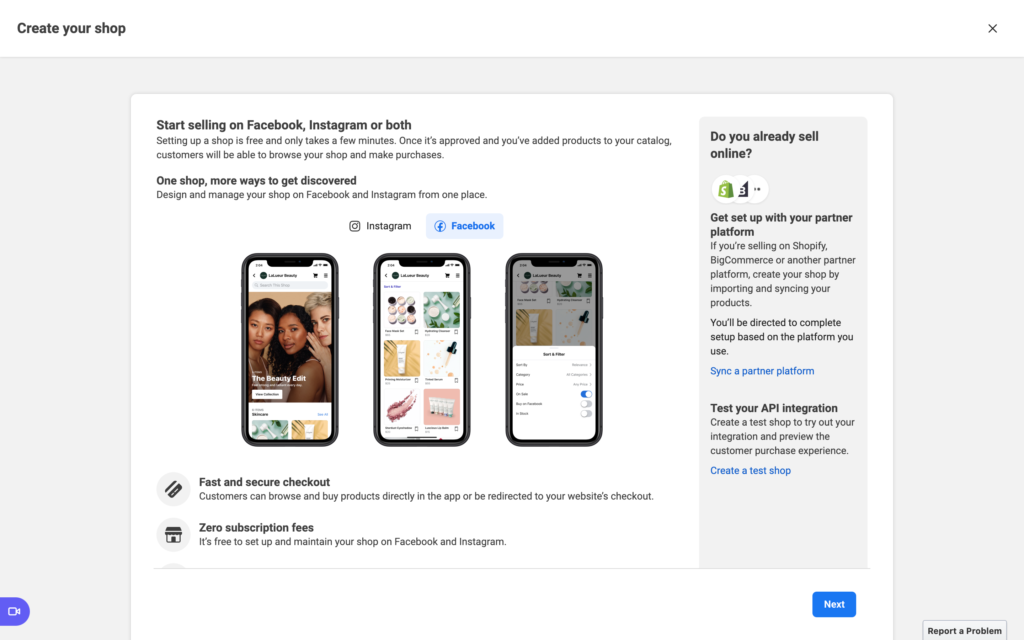
    1. Visit the Create Your Shop page on Facebook. Read the information and click the ‘Next’ button near the bottom of the page.
    Facebook Screenshot - Tutorial: How to Set Up a Facebook Shop - Great for Silhouette and Cricut Crafters - by cuttingforbusiness.com.

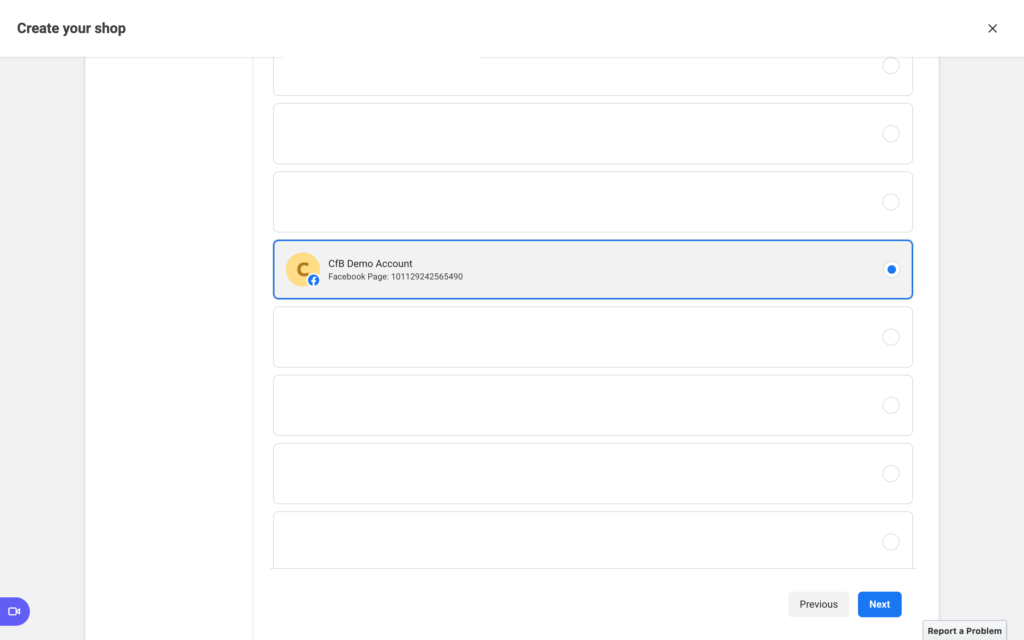
    2. Choose your Facebook Page. If you have multiple pages, you may see several pages listed. If you do not have a Facebook Page, choose ‘Create a new Page’. Click the ‘Next’ button.

    Facebook Screenshot - Tutorial: How to Set Up a Facebook Shop - Great for Silhouette and Cricut Crafters - by cuttingforbusiness.com.

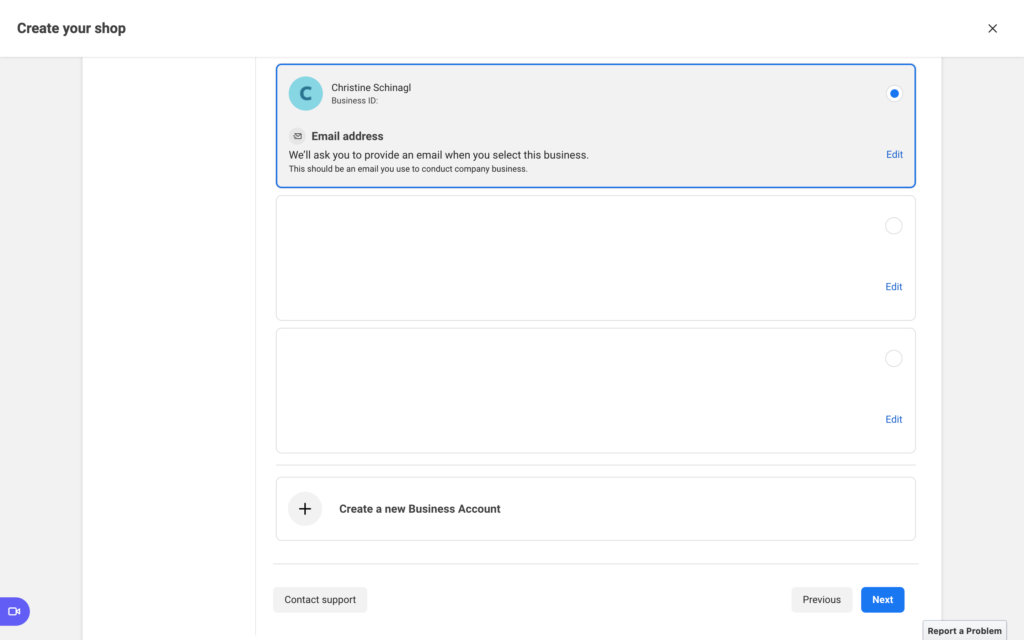
    3. Choose your business account. If you do not have one, choose ‘Create a new Business Account’. Click the ‘Next’ button.

    Facebook Screenshot - Tutorial: How to Set Up a Facebook Shop - Great for Silhouette and Cricut Crafters - by cuttingforbusiness.com.

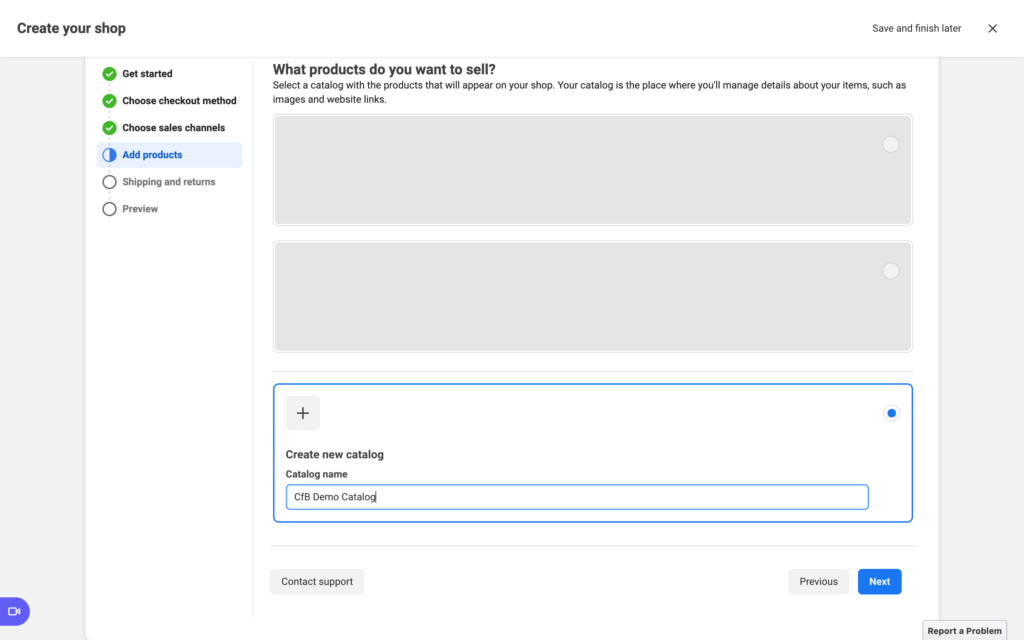
    4. If you’ve previously uploaded products, select your catalog. If not, select ‘Create new catalog’ and give it a name. Then, click the ‘Next’ button.

    Facebook Screenshot - Tutorial: How to Set Up a Facebook Shop - Great for Silhouette and Cricut Crafters - by cuttingforbusiness.com.

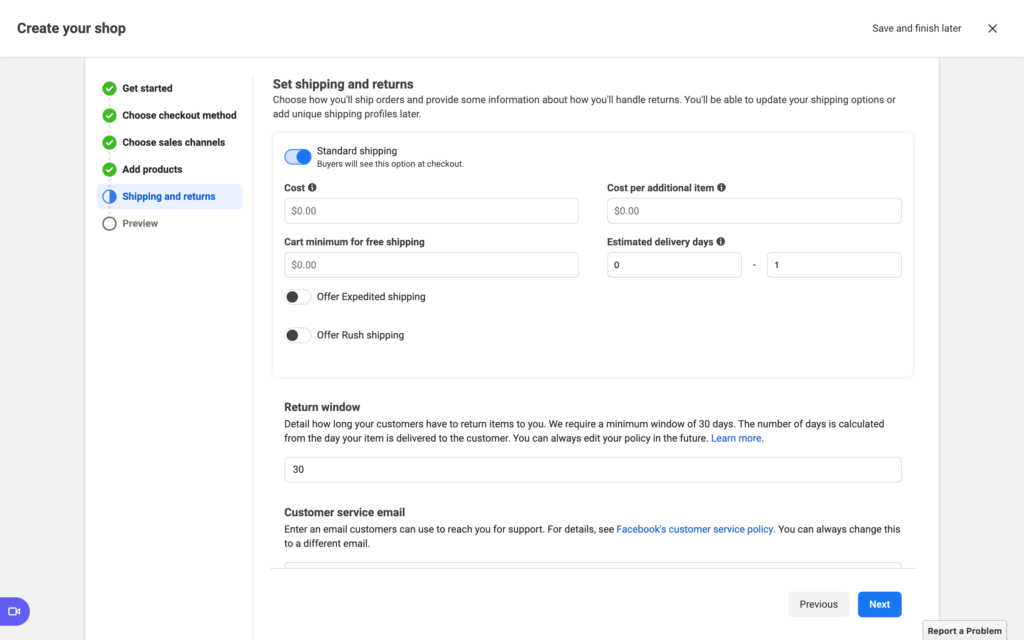
    5. Set your shipping preferences, return window, and customer service email address. Click the ‘Next’ button.

    Facebook Screenshot - Tutorial: How to Set Up a Facebook Shop - Great for Silhouette and Cricut Crafters - by cuttingforbusiness.com.

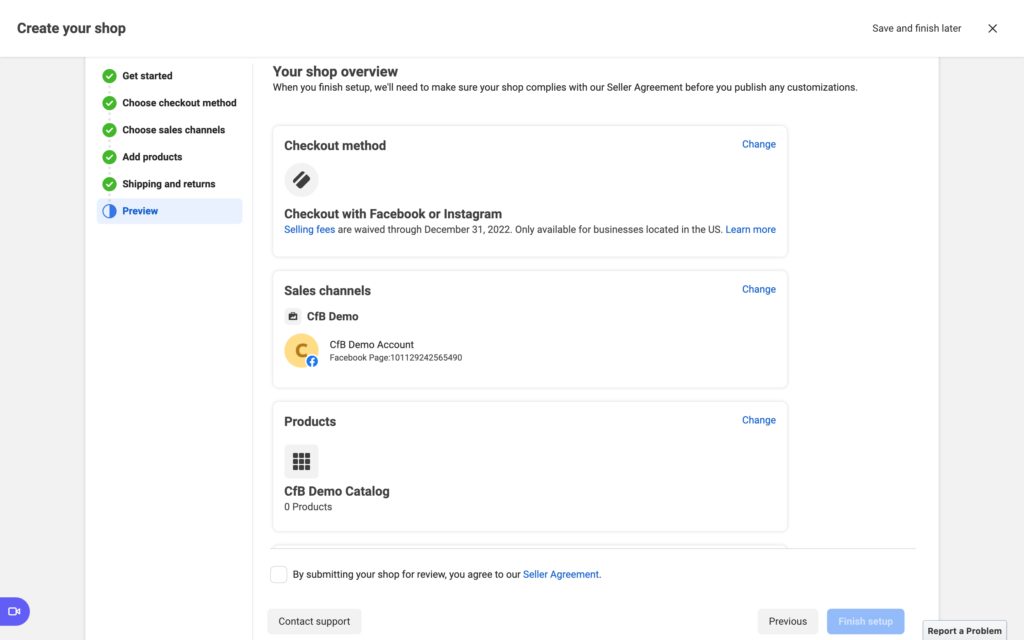
    6. Verify the ‘Your shop overview’ page for accuracy. Correct anything that needs correcting. Read the Seller Agreement, then agree to it. Click the ‘Finish setup’ button.

    Facebook Screenshot - Tutorial: How to Set Up a Facebook Shop - Great for Silhouette and Cricut Crafters - by cuttingforbusiness.com.

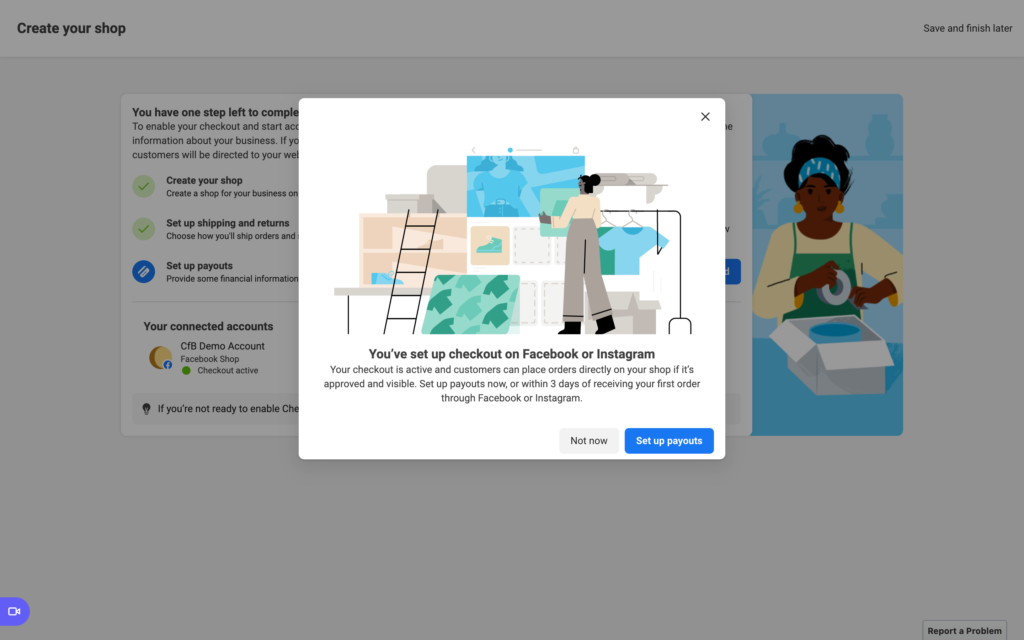
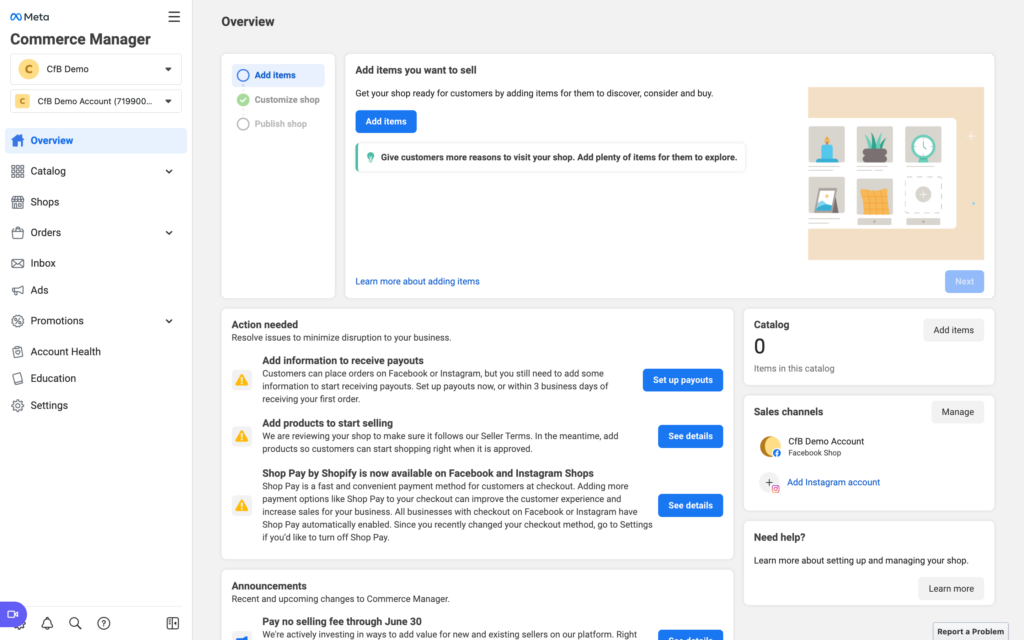
    7. Click the ‘Set up payouts’ button to tell Facebook where to send the money you make. If you do not want to set up payouts now, you can do it within 3 days of receiving your first order.
    Facebook Screenshot - Tutorial: How to Set Up a Facebook Shop - Great for Silhouette and Cricut Crafters - by cuttingforbusiness.com.

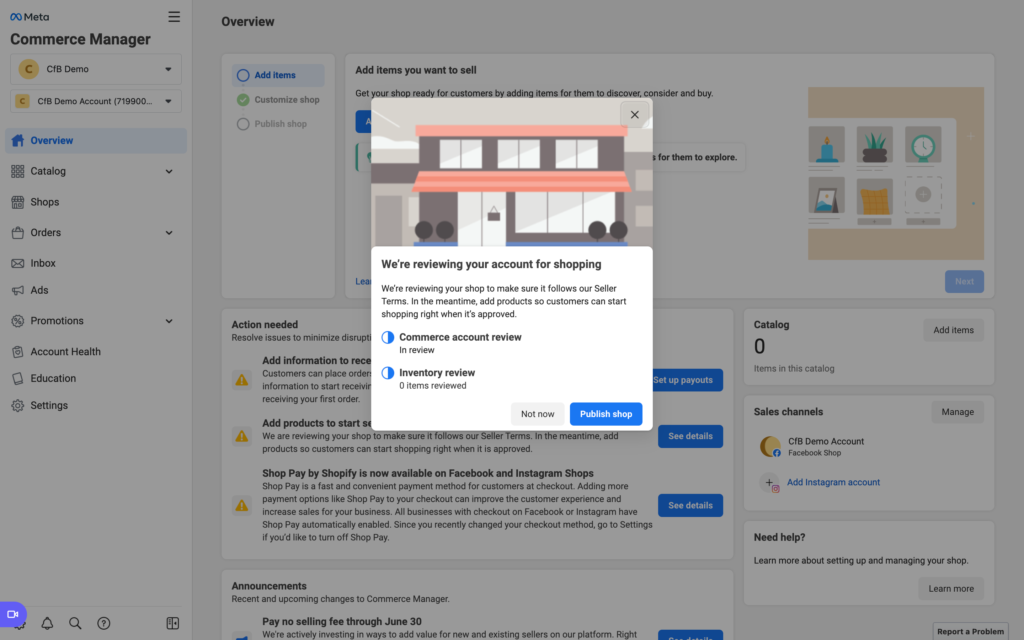
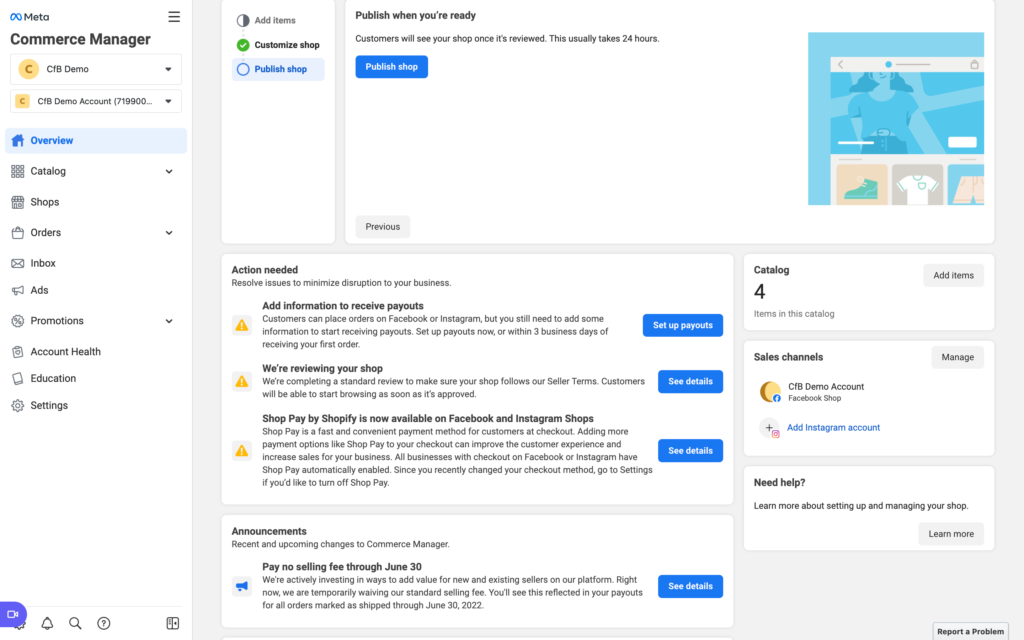
    8. Your shop is under review. You can choose to publish your shop now, or wait until after it has been reviewed. If you choose to publish now, it won’t be shown until after it’s been reviewed. Choose either the ‘Not now’ or ‘Publish shop’ button.

    Facebook Screenshot - Tutorial: How to Set Up a Facebook Shop - Great for Silhouette and Cricut Crafters - by cuttingforbusiness.com.

    9. Now that you are set up and being reviewed, it is time to add products. Click the ‘Add items’ button.

    Facebook Screenshot - Tutorial: How to Set Up a Facebook Shop - Great for Silhouette and Cricut Crafters - by cuttingforbusiness.com.

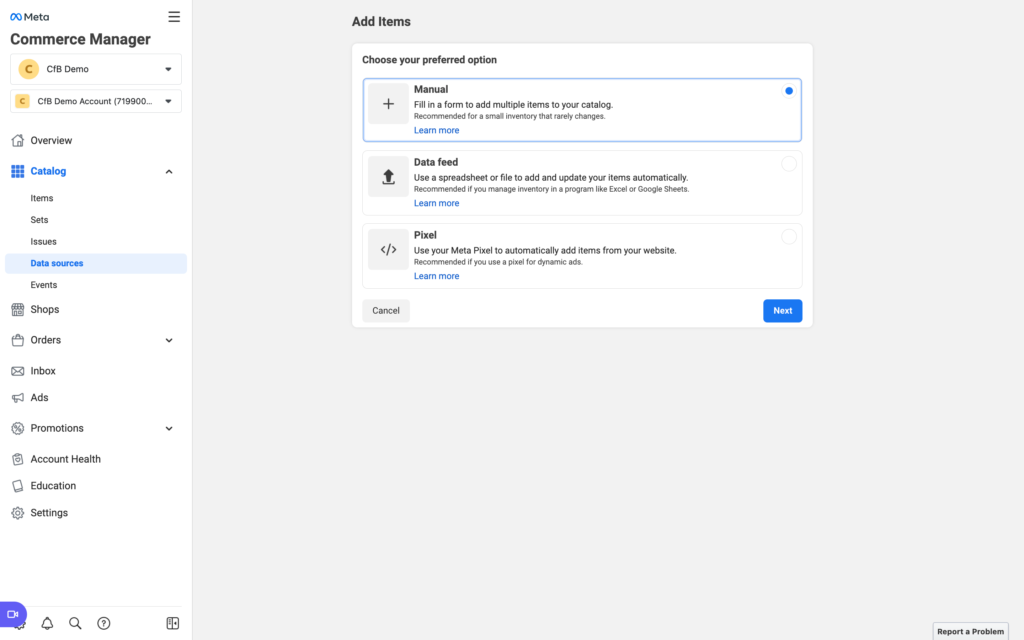
    10. You can choose to add products manually, through a spreadsheet, or automatically off your website. I’ll show you how to manually add them. Select ‘Manual’ then click the ‘Next’ button.

    Facebook Screenshot - Tutorial: How to Set Up a Facebook Shop - Great for Silhouette and Cricut Crafters - by cuttingforbusiness.com.

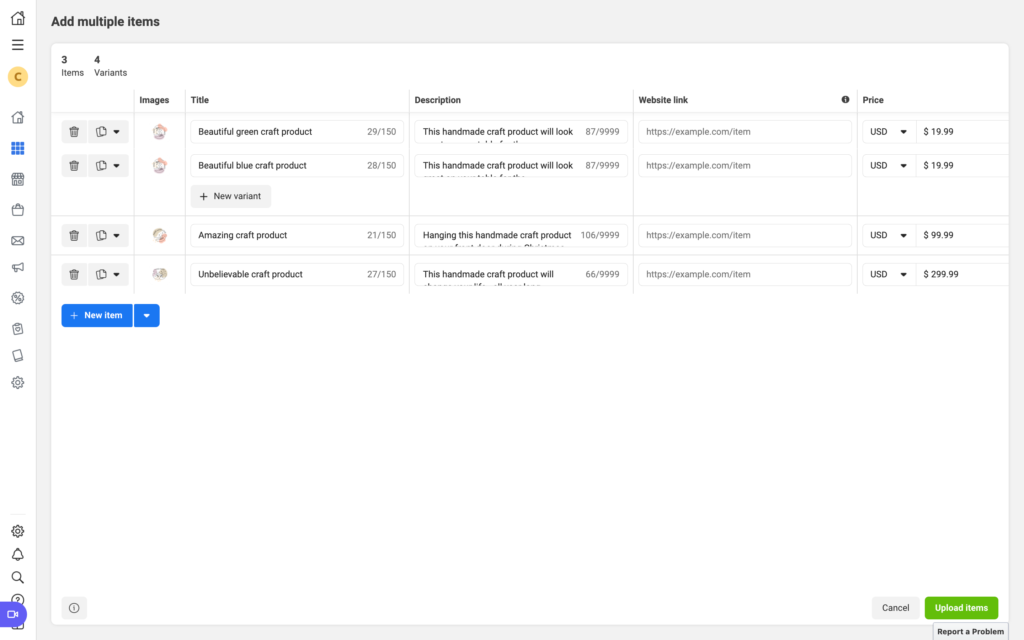
    11. Enter the details of your product. You’ll need to add:

    • Images: You can add multiple images. All images should be at least 500px by 500px.
    • Variants: You can add variants. For example: sizes or colors.
    • Description: Write a good description for your product. I have tips for writing good product descriptions.
    • Website link: This space allows you to add a link to the product on your website.
    • Price: Enter your price.

    Click the ‘Upload items’ button when you are finished.

    Facebook Screenshot - Tutorial: How to Set Up a Facebook Shop - Great for Silhouette and Cricut Crafters - by cuttingforbusiness.com.

    12. Facebook Commerce Manager gives you a nice overview of your shop. The ‘Action needed’ section provides a to do list of things for you to do.

    Facebook Screenshot - Tutorial: How to Set Up a Facebook Shop - Great for Silhouette and Cricut Crafters - by cuttingforbusiness.com.

    A Few Other Things

    Before you head to create your own Facebook Shop, here are a few odds and ends:

    • From the ‘Overview’ screen, under ‘Sales Channels’ you can put your shop on Instagram and Facebook Marketplace.
    • Under ‘Promotions’, the marketing list gives you an option to allow customers to subscribe to your list. You can download subscribers from this section as well.
    • Under ‘Education’, you can get help and reach out to the Support team for account related issues.

    When you have a few minutes, I recommend clicking around and exploring.

  • Tutorial: Stained Glass Look Tulip Window Cling Using Transparent Vinyl

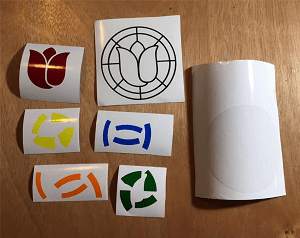
    When Adele from Homesteader Chic asked about sharing a tutorial using window cling material, I couldn’t say yes fast enough! Adele and her daughter Sarah sell commercial use digital cut files featuring country-themed and farmhouse sign designs. Homesteader Chic is a mom-daughters-granddaughters business–each household in the family has at least one cutting machine, and several family members design cut files. Adele’s granddaughters (and grandsons!) are busy makers too! I’ll turn it over to Adele for the tutorial:

    When Sarah was young, our family lived in Germany, where hand-snipped paper crafts were enjoyed by all ages. We learned to make Fensterbilder, stained glass-like window hangings made with colored transparent paper. Three decades later and back in the US, Sarah applies the same principles to make beautiful designs for glass and clear plastic projects using transparent vinyl.

    Stained Glass Window Cling Tutorial

    Supplies:

    Steps:

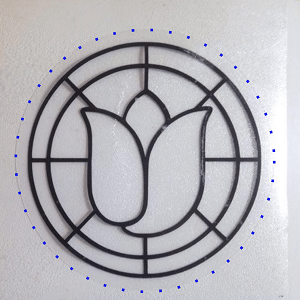
    1. Download the design file and save to your computer. Open the file in your cutting machine design software. Select all and group (this is important so all pieces will nest well). With the design grouped, adjust size of design so the gray circle is the size you’d like the finished window cling to be. For more tips, see the layout guide included in your zip file.
    1. Ungroup design. Separate the design elements on your design screen.
    1. Cut the design elements from vinyl and weed. If you are new to cling vinyl or transparent vinyl, test cut to check settings. We use a slighter higher blade setting than we do for Oracal 651.
      • Large gray circle = clear cling vinyl solid circle
      • Outline piece = dark opaque vinyl (keep outlines)
      • Colored pieces = colored transparent vinyl (keep cutout shapes)

    Tutorial: Stained Glass Look Tulip Window Cling Using Transparent Vinyl - For Silhouette Cameo or Cricut Explore - by homesteaderchic.com for cuttingforbusiness.com

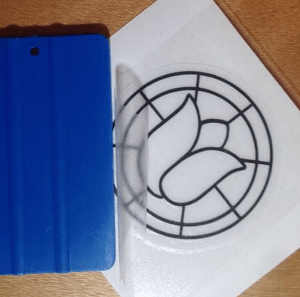
    1. Leave the clear cling vinyl circle on its backing and lay vinyl-side up on table. Press out any wrinkles or bubbles.
    1. Apply transfer tape to the outline piece.
    1. Prepare to apply outline vinyl carefully to the cling vinyl. Cling vinyl may stretch if the adhesive vinyl is removed, so we try to get it placed correctly the first time to avoid this.
    2. First lay the outline piece, with unsticky transfer tape side down, over the cling vinyl circle and center it to get an idea of the width of the cling vinyl margin. Lift the outline piece off.

    Tutorial: Stained Glass Look Tulip Window Cling Using Transparent Vinyl - For Silhouette Cameo or Cricut Explore - by homesteaderchic.com for cuttingforbusiness.com

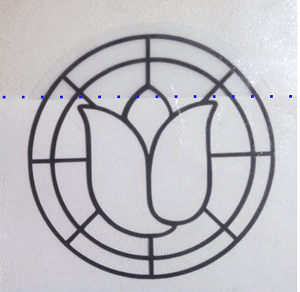
    1. Place the scrap backing sheet, shiny side up, over most of the cling vinyl, leaving an inch or two of the circle exposed at the top. Hold the top of the outline piece, adhesive side down, just above the top of the cling vinyl and center it, allowing for a cling vinyl margin. Gently lay the outline piece in place on the small exposed part of the cling vinyl circle and press to adhere.

    Tutorial: Stained Glass Look Tulip Window Cling Using Transparent Vinyl - For Silhouette Cameo or Cricut Explore - by homesteaderchic.com for cuttingforbusiness.com

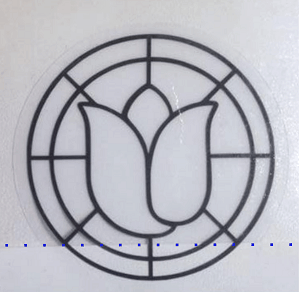
    1. Gradually pull the backing sheet down and smooth the outline piece farther downward until the entire outline is adhered to the cling vinyl.

    Tutorial: Stained Glass Look Tulip Window Cling Using Transparent Vinyl - For Silhouette Cameo or Cricut Explore - by homesteaderchic.com for cuttingforbusiness.com

    1. Remove transfer tape, again with a gentle touch. Instead of pulling the tape up, peel the tape backwards flat over itself, while holding the adhesive vinyl in place.

    Tutorial: Stained Glass Look Tulip Window Cling Using Transparent Vinyl - For Silhouette Cameo or Cricut Explore - by homesteaderchic.com for cuttingforbusiness.com

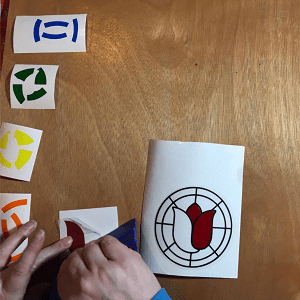
    1. Using small pieces of transfer tape, your fingers, or tweezers, add the colored pieces one at a time, fitting them into the outline piece like a puzzle. If you need to adjust pieces, remember to peel instead of pulling. Press to set in place.

    Tutorial: Stained Glass Look Tulip Window Cling Using Transparent Vinyl - For Silhouette Cameo or Cricut Explore - by homesteaderchic.com for cuttingforbusiness.com

    Tutorial: Stained Glass Look Tulip Window Cling Using Transparent Vinyl - For Silhouette Cameo or Cricut Explore - by homesteaderchic.com for cuttingforbusiness.com

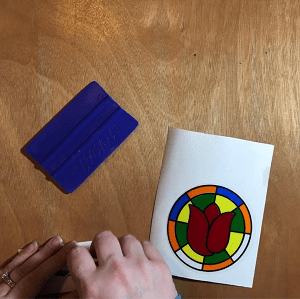
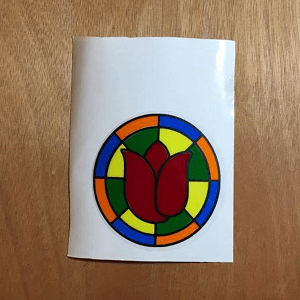
    1. Lay the vinyl backing sheet over the design and go over the design with a scraper or a brayer to secure all pieces. Voila! It’s finished!Tutorial: Stained Glass Look Tulip Window Cling Using Transparent Vinyl - For Silhouette Cameo or Cricut Explore - by homesteaderchic.com for cuttingforbusiness.com
    1. Remove window cling from backing. Moisten cling vinyl side and attach to window or other surface. The cling vinyl will be on the window side, the colored vinyl towards you.

    View more stained glass cut files (plus a whole lot more!) at Homesteader Chic. Love this tutorial? Save it to Pinterest:

    Tutorial: Stained Glass Look Tulip Window Cling Using Transparent Vinyl - For Silhouette Cameo or Cricut Explore - by homesteaderchic.com for cuttingforbusiness.com

  • Tutorial: Faux Wood Frames on Wooden Signs

    Yesterday, I shared a tutorial to create wood frames on wood signs. I understand that not everyone has the tools or time to do them. Today, I’m sharing a tutorial for faux wood frames.

    Faux Wood Frame Tutorial

    Supplies Needed

    • Wood for sign – For help choosing wood, see this post.
    • Paint/vinyl stencil to create your sign – This tutorial will work with whatever method and supplies you like best: vinyl, stencil, paint, stain, and so on.
    • Painters tapeBuy it in bulk to save.

    Tutorial

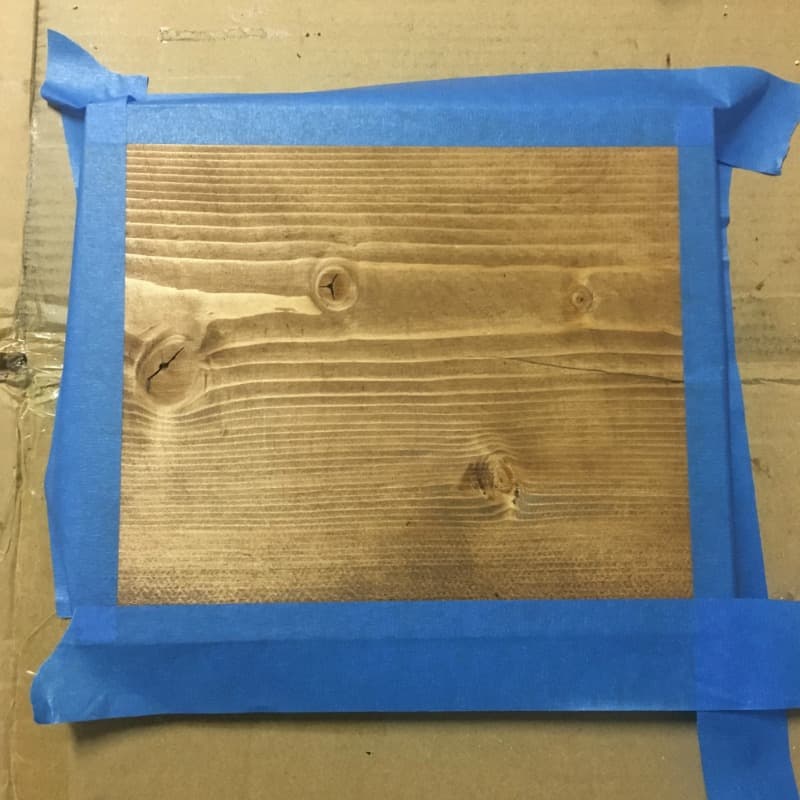
    1. Cut your wood to size (or have your local home improvement store cut it) and stain or paint it the color you want your “frame”. Then, tape all the edges with painter’s tape. When taping, you’ll want to be sure that you tape off the same width on all sides. Tutorial: Faux Wood Frames on Wooden Signs with Your Silhouette Cameo or Cricut Explore - by cuttingforbusiness.com
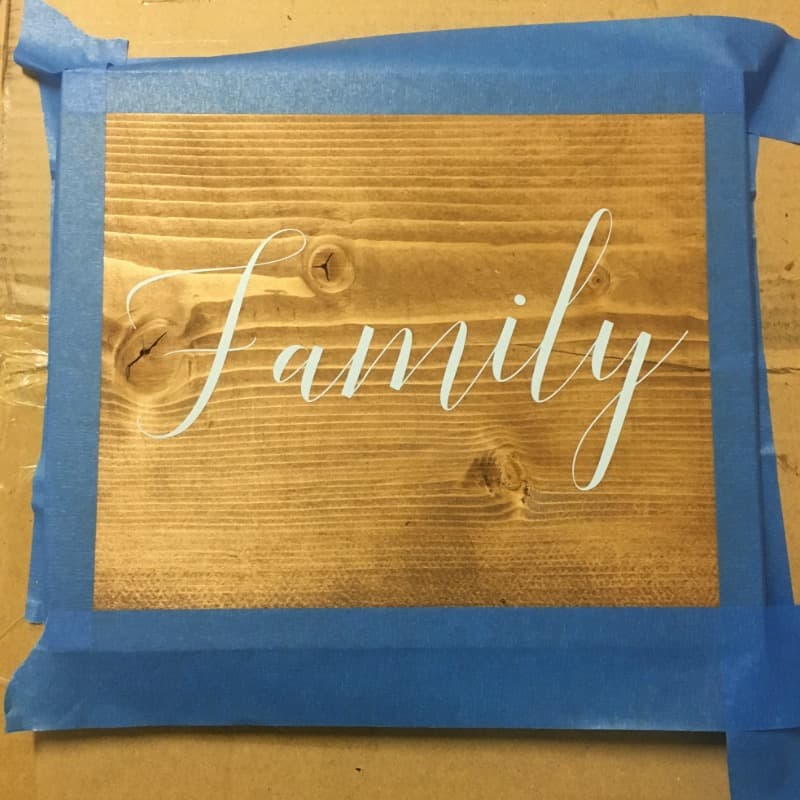
    2. Apply your vinyl design to the wood. Tutorial: Faux Wood Frames on Wooden Signs with Your Silhouette Cameo or Cricut Explore - by cuttingforbusiness.com
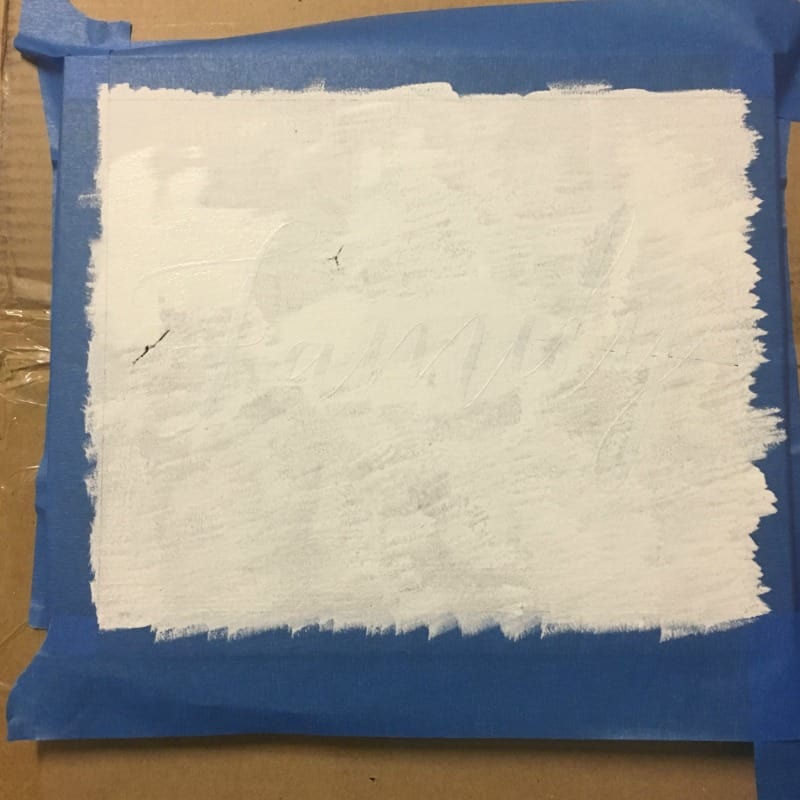
    3. Paint the entire sign. Tutorial: Faux Wood Frames on Wooden Signs with Your Silhouette Cameo or Cricut Explore - by cuttingforbusiness.com
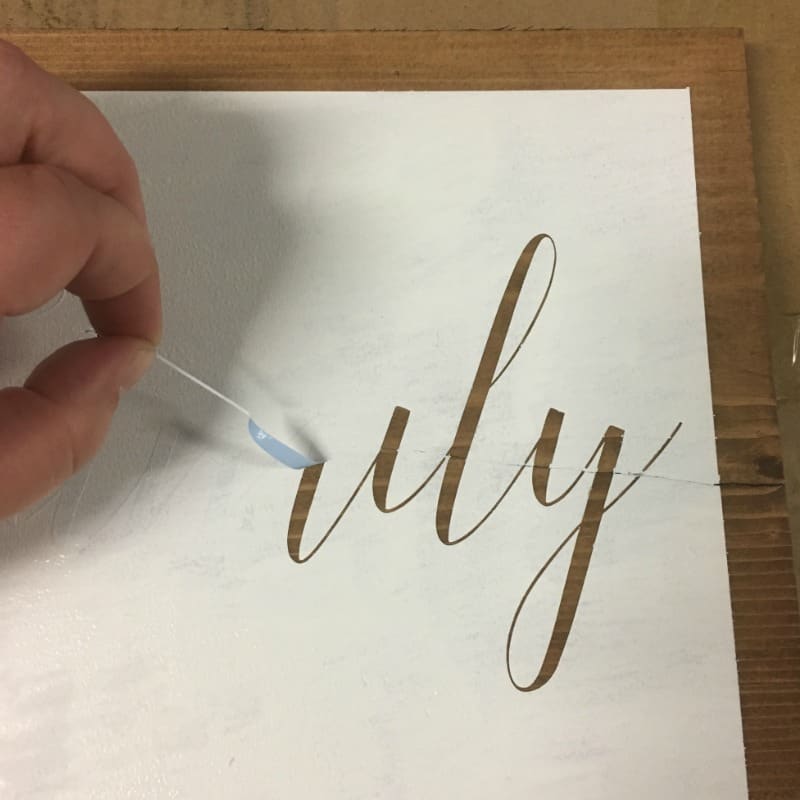
    4. Peel of the vinyl and painter’s tape and allow your sign to dry. Tutorial: Faux Wood Frames on Wooden Signs with Your Silhouette Cameo or Cricut Explore - by cuttingforbusiness.com

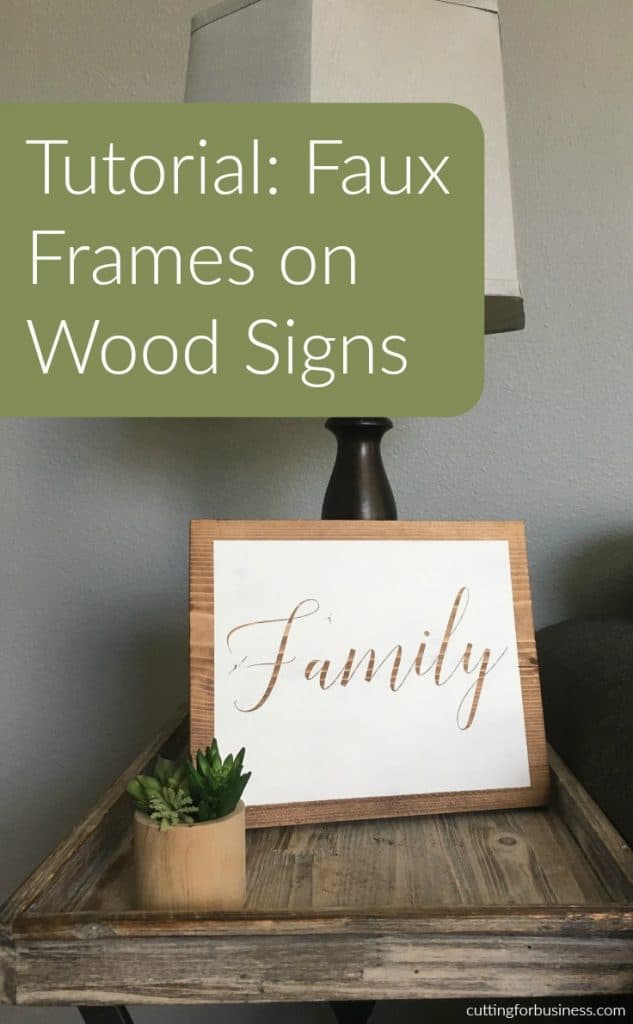
    That’s it! You can see my finished product in the photo below. This technique is a really quick and easy way to — not add a frame to your wood sign!

    Save this tutorial to Pinterest:

    Tutorial: Faux Wood Frames on Wooden Signs with Your Silhouette Cameo or Cricut Explore - by cuttingforbusiness.com

  • Tutorial: Sea Glass Jewelry with Silhouette or Cricut and Dremel

    Being the owner of a Silhouette Cameo or Cricut Explore can be totally life changing – because the machines are so flexible to be incorporated into so many different projects. Today, I’m thinking “outside the box” and sharing sea glass jewelry I recently made.

    First, I have to share my failure. Originally, this post was supposed to be an etched sea glass necklace tutorial using Etchall Etching Creme. When I etched the sea glass, the etch was so light that it was barely noticeable. So, I started over. I soaked my sea glass pendant in Etchall Dip ‘N Etch to erase my failure and started again. Now, here’s a tutorial to create a sea glass pendant using a Dremel tool.

    Sea Glass Jewelry Tutorial

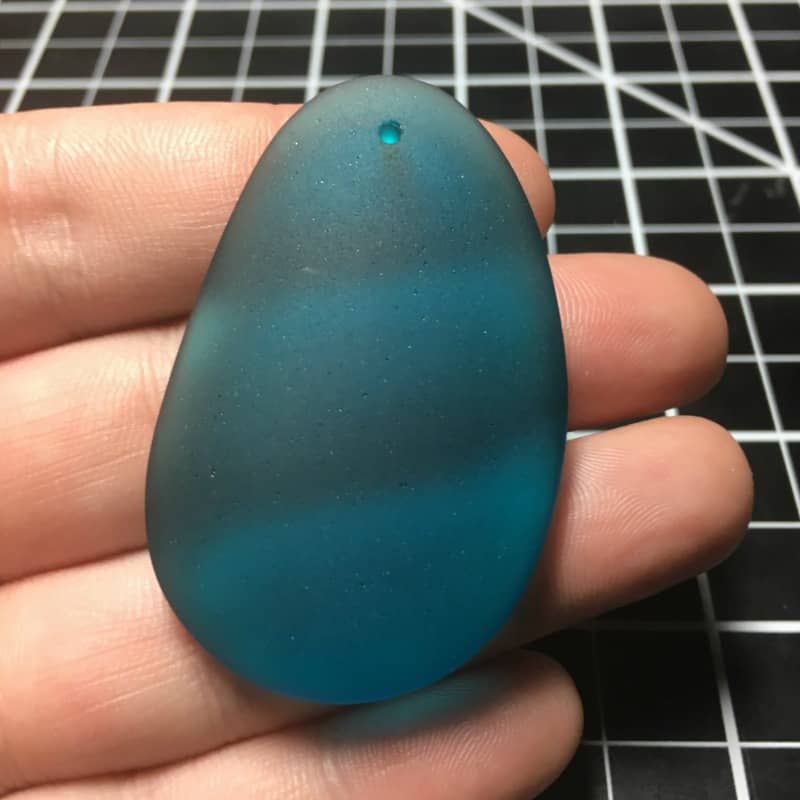
    1. Find some sea glass. If you aren’t familiar, sea glass is glass (from bottles, windows, etc) that was discarded or lost in the ocean. The waves tumble it to a nice frosted finish and it eventually washes on shore. It’s getting harder to find sea glass – because society uses less glass and more plastic in modern times. If you don’t live near the beach – you can order some here on Etsy (which is what I did). You’ll need to buy predrilled or drill a hole in it (mine came predrilled).Tutorial: Sea Glass Jewelry with Silhouette Cameo or Cricut Explore and Dremel - by cuttingforbusiness.com
    2. Create a design in Silhouette Studio or Cricut Design Space and cut it in vinyl. Weed it and apply it to your sea glass. You’ll see that there were little bits along the way that I didn’t weed out. No big deal.Tutorial: Sea Glass Jewelry with Silhouette Cameo or Cricut Explore and Dremel - by cuttingforbusiness.com
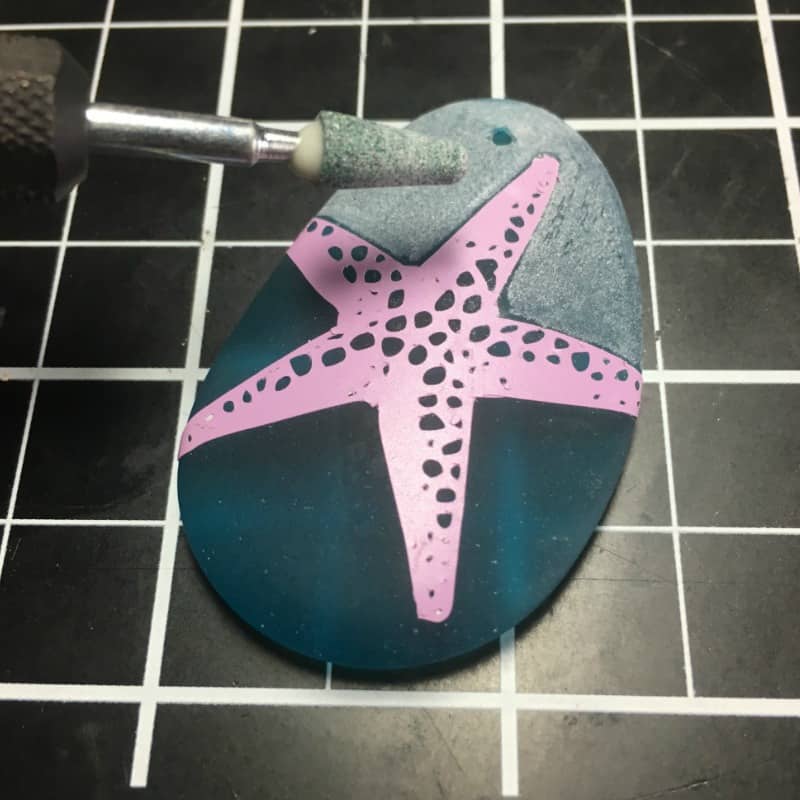
    3. Using a Dremel tool (I have a model 4000), and a grinding attachment you are going to grind off the top layer of glass around your vinyl.Tutorial: Sea Glass Jewelry with Silhouette Cameo or Cricut Explore and Dremel - by cuttingforbusiness.com
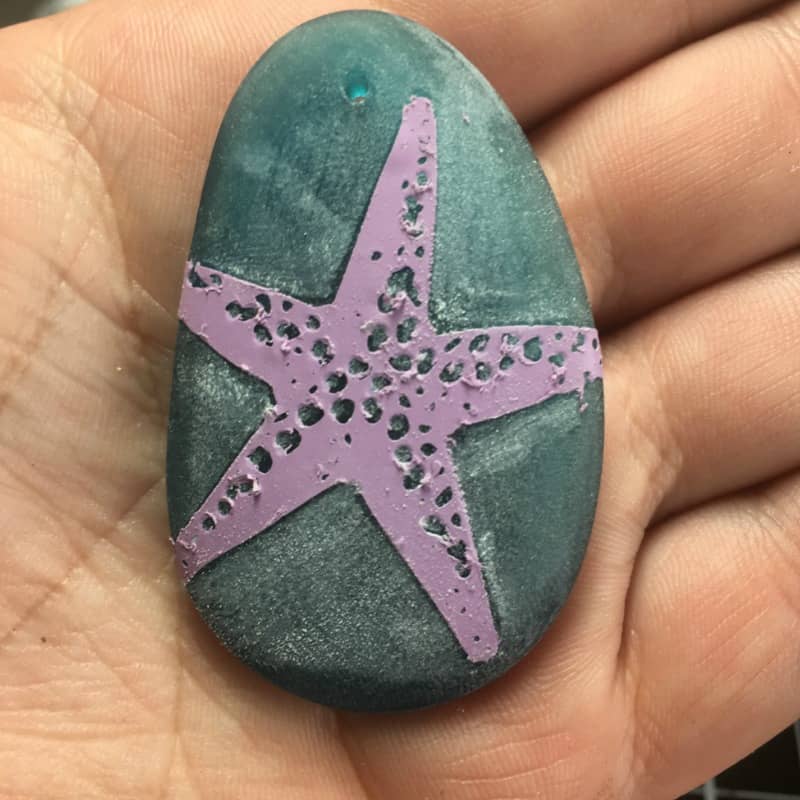
    4. Continue grinding until your go around your entire stencil and any bits in the middle. A smaller grinding tip would have been useful to me, but it wasn’t a big deal. Tutorial: Sea Glass Jewelry with Silhouette Cameo or Cricut Explore and Dremel - by cuttingforbusiness.com
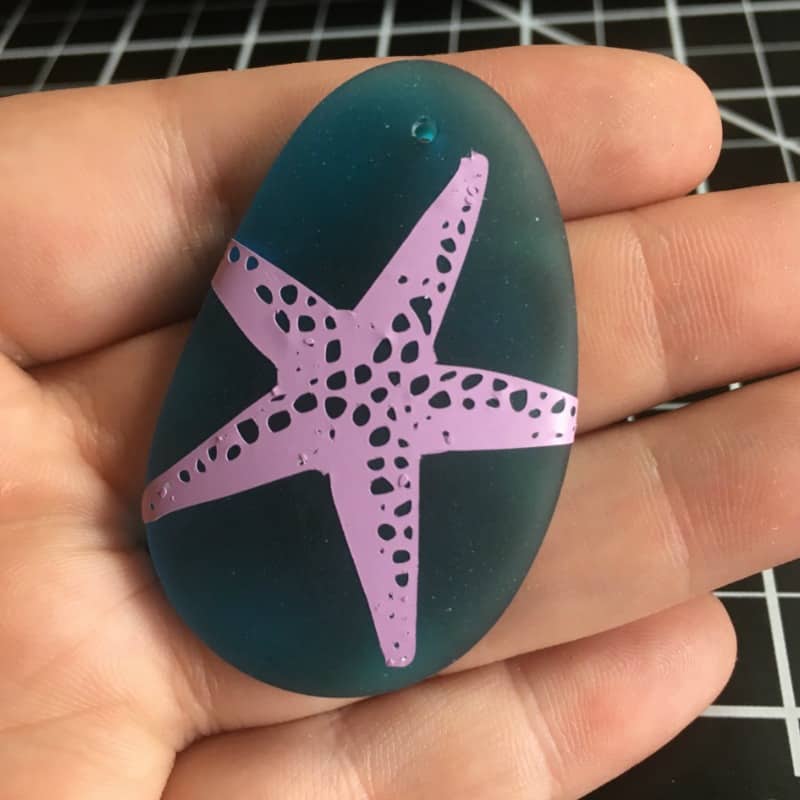
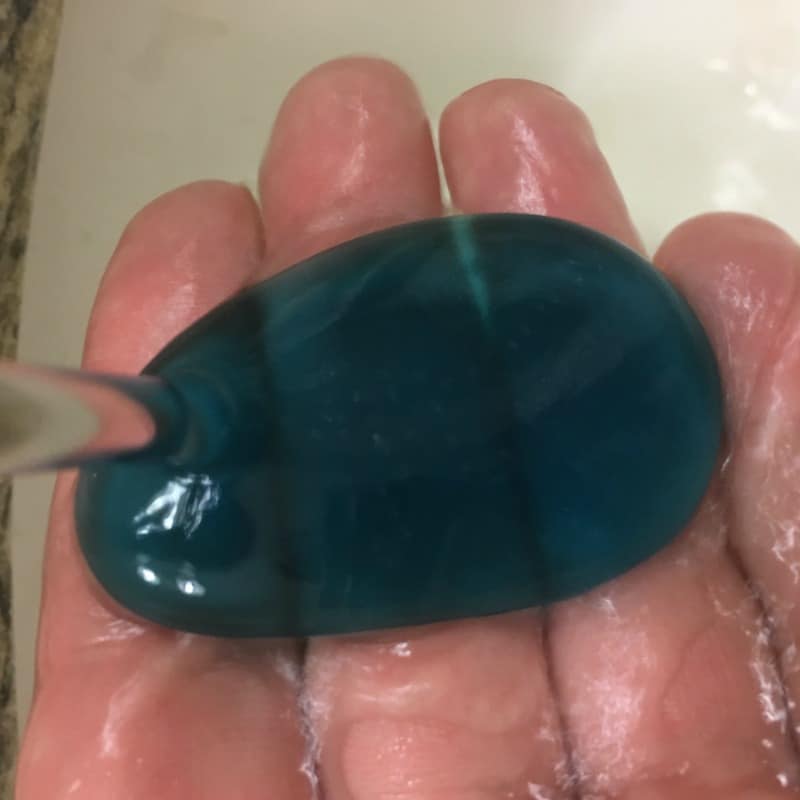
    5. Remove the stencil and rinse off the sea glass. Tutorial: Sea Glass Jewelry with Silhouette Cameo or Cricut Explore and Dremel - by cuttingforbusiness.com
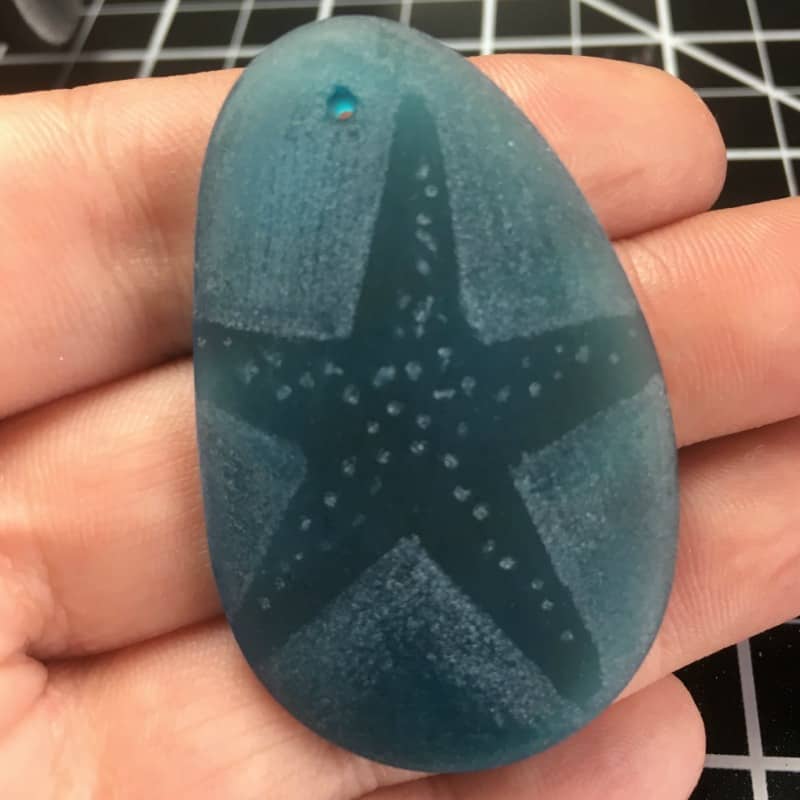
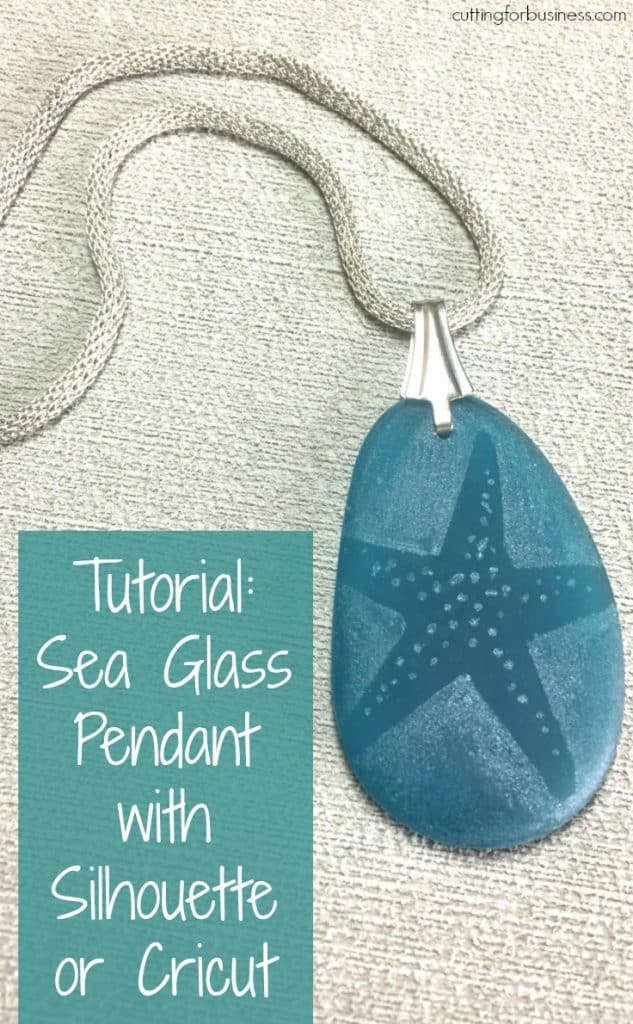
    6. When your sea glass dries, you’ll be able to touch up any spots you missed. Then, add a bail (that’s the mounting at the top that allow is to hang on a chain) and wear it – or sell it! Tutorial: Sea Glass Jewelry with Silhouette Cameo or Cricut Explore and Dremel - by cuttingforbusiness.com

    As I’ve said before, and I will continue to say – don’t be afraid to try new things with your Silhouette Cameo or Cricut Explore. Experiments can sometimes turn into profitable ventures!

    Save this post to Pinterest:

    Tutorial: Sea Glass Jewelry with Silhouette Cameo or Cricut Explore and Dremel - by cuttingforbusiness.com

  • Tutorial: Reverse Glass Etching with Silhouette or Cricut

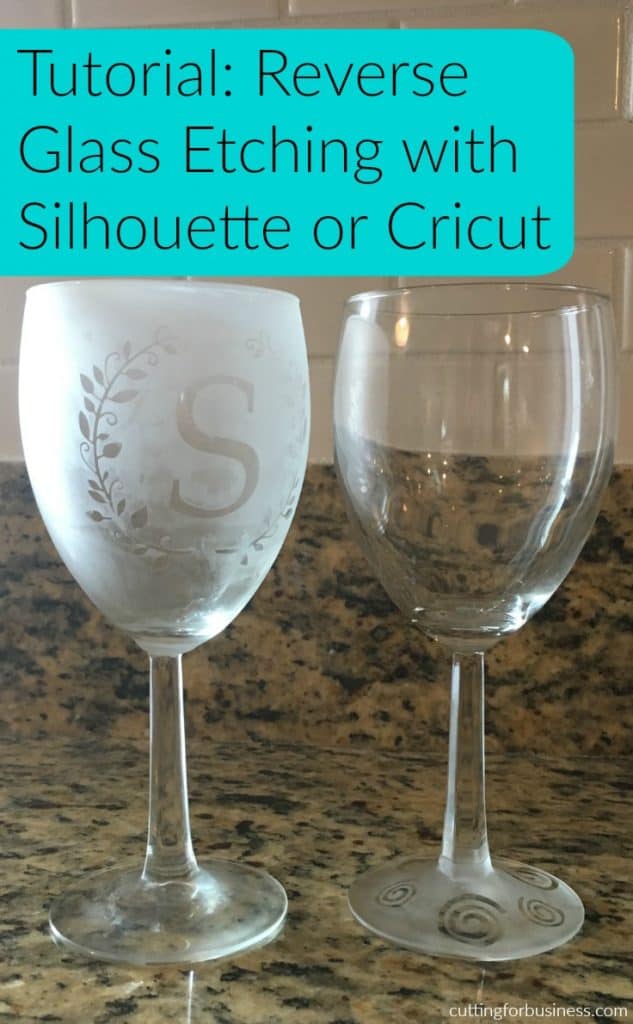
    Today, let’s look at something a bit different! I’m calling this ‘Reverse Etching’ – and it’s something I haven’t seen done among Silhouette or Cricut crafters. Usually, when people etch a surface they use vinyl as a stencil and etch inside the stencil. I was thinking to myself recently, why not use the negative space for the design? That’s just what I did over the weekend. Here’s how my two samples turned out and a tutorial.

    Reverse Glass Etching

    Supplies

    Process

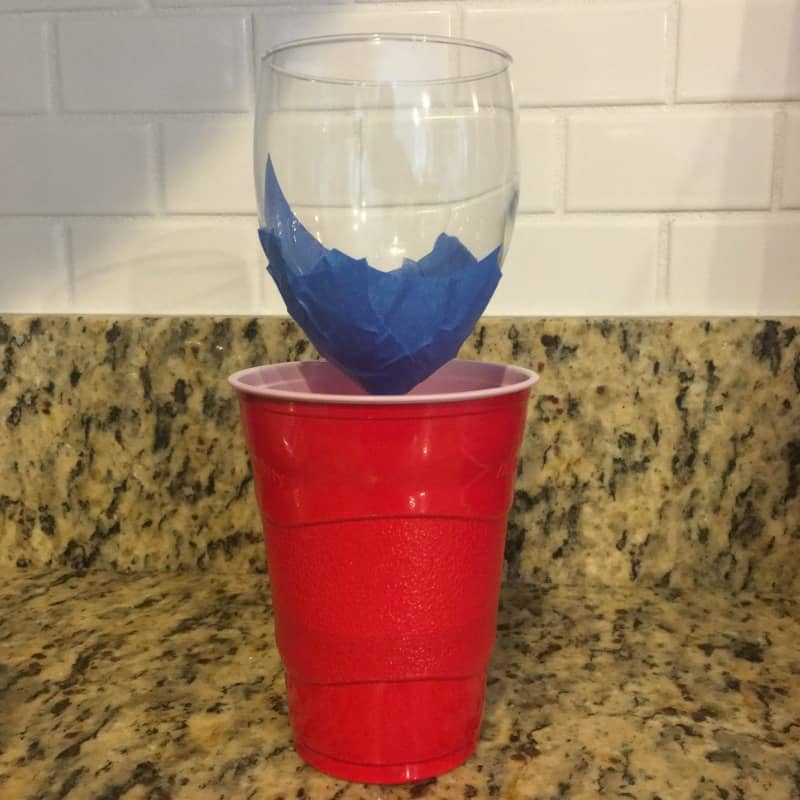
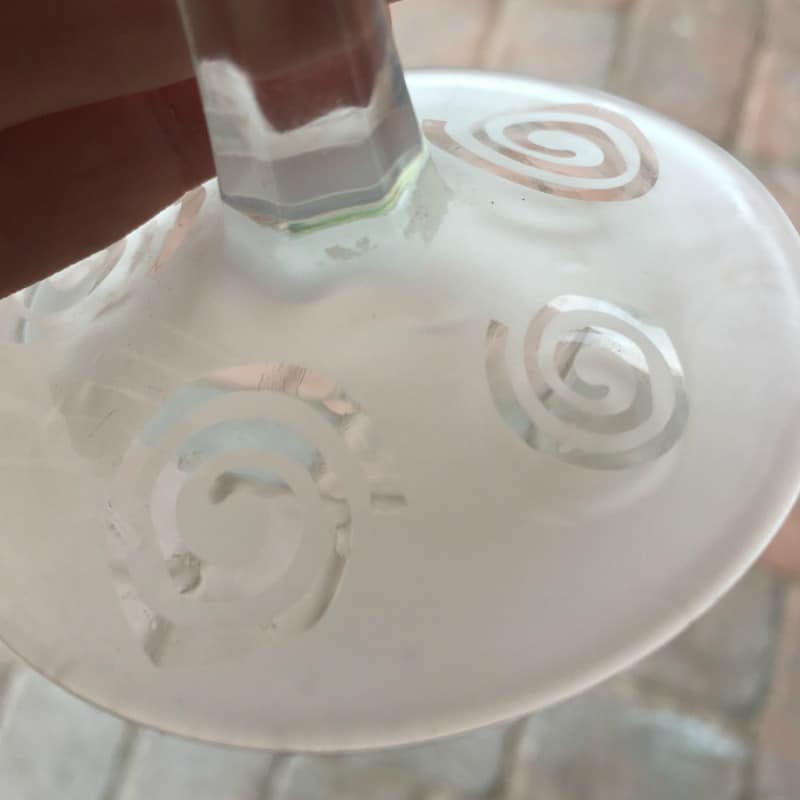
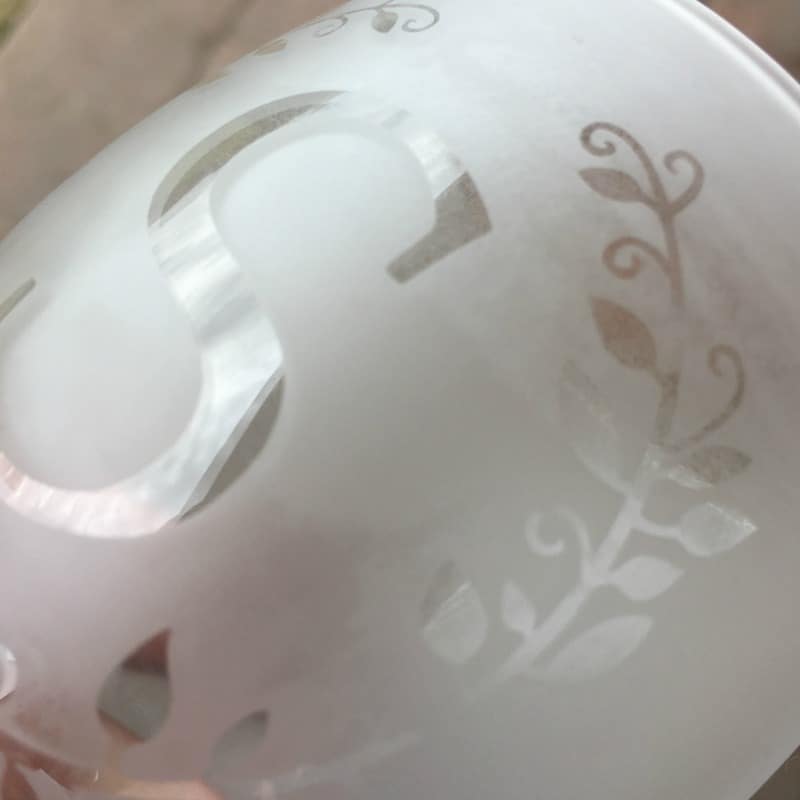
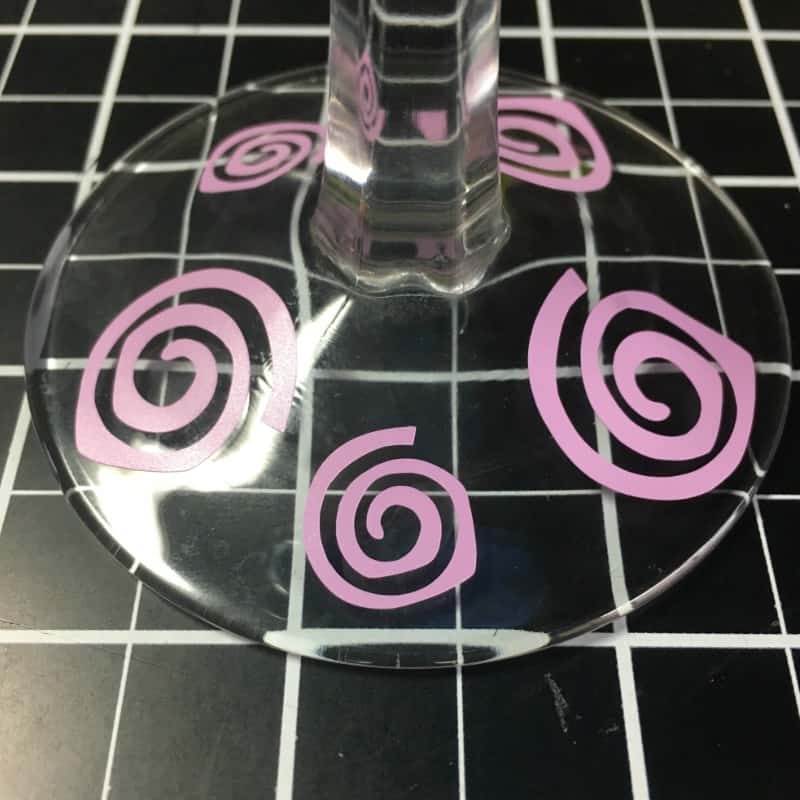
    1. Cut your design in vinyl, weed it, and apply it to the items to etch. For this tutorial, I made two different wine glasses. On one, I did just the base; while on the other I did the top half. Be sure to have anything that you don’t want etched covered. Painter’s tape is helpful! Tutorial: Reverse Glass Etching with Silhouette Cameo or Cricut Explore - by cuttingforbusiness.com
      Tutorial: Reverse Glass Etching with Silhouette Cameo or Cricut Explore - by cuttingforbusiness.com
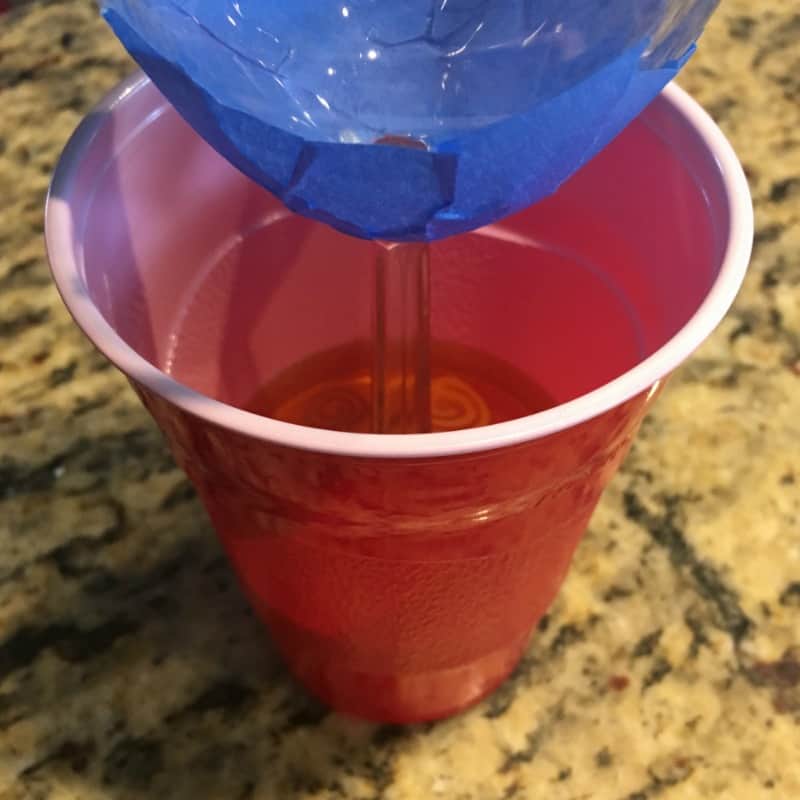
    2. Put your item to be etched into a plastic container and pour the Etchall Dip ‘n Etch over it. Allow the item to sit in the Etchall Dip ‘n Etch for 15 minutes. I just used a plastic cup. Tutorial: Reverse Glass Etching with Silhouette Cameo or Cricut Explore - by cuttingforbusiness.com
      Tutorial: Reverse Glass Etching with Silhouette Cameo or Cricut Explore - by cuttingforbusiness.com
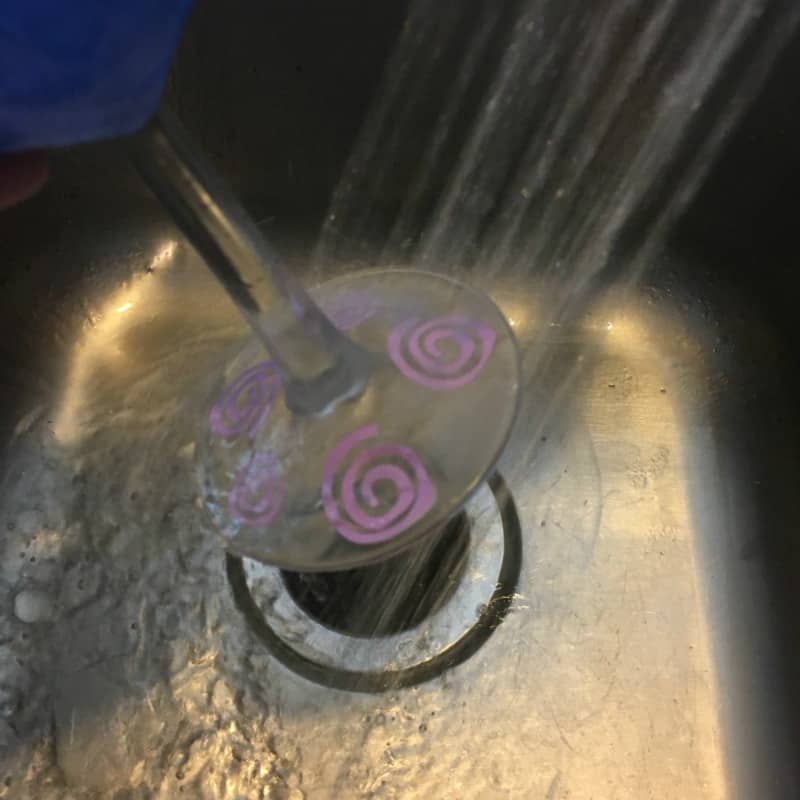
    3. After 15 minutes, remove the glass item and rinse it in a stainless steel sink. Pour the remaining Etchall Dip ‘n Etch back into the container to use again.Tutorial: Reverse Glass Etching with Silhouette Cameo or Cricut Explore - by cuttingforbusiness.com
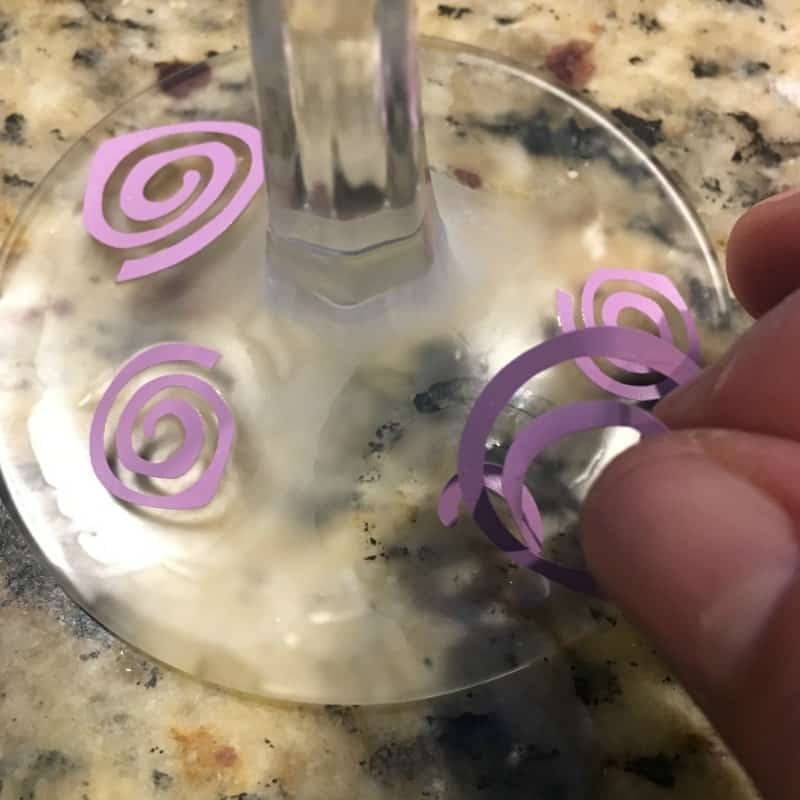
    4. Remove the vinyl and allow the item to dry. Tutorial: Reverse Glass Etching with Silhouette Cameo or Cricut Explore - by cuttingforbusiness.com
    5. My finished samples turned out great!Tutorial: Reverse Glass Etching with Silhouette Cameo or Cricut Explore - by cuttingforbusiness.com
      Tutorial: Reverse Glass Etching with Silhouette Cameo or Cricut Explore - by cuttingforbusiness.com

    Etchall Dip ‘n Etch versus Etchall Etching Creme

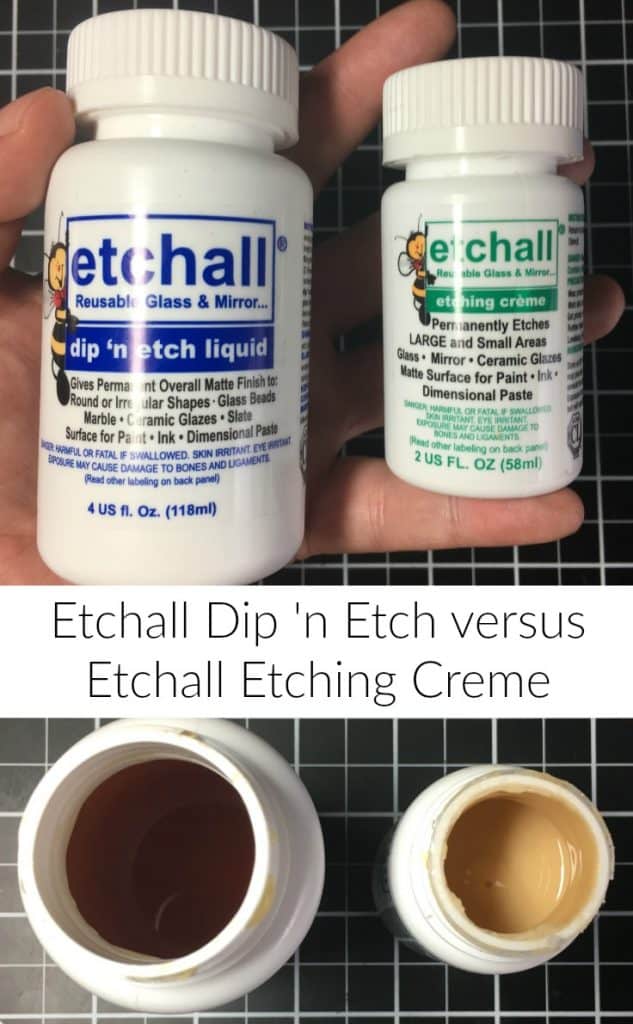
    These are two different products, but either can be used for this tutorial. Etchall Dip ‘n Etch is a amber colored liquid that you dip your item to be etched into for about 15 minutes. It is the consistency of water. Etchall Etching Creme is a thicker creme (think sunscreen) and is applied with a cotton swab or brush. You leave it on for only a few minutes. Both Dip ‘n Etch and Etching Creme can be reused.

    Tutorial: Reverse Glass Etching with Silhouette Cameo or Cricut Explore - by cuttingforbusiness.com

    Wondering about the vine I used above? Download it free at this link.

    Save this tutorial to Pinterest:

    Tutorial: Reverse Glass Etching with Silhouette Cameo or Cricut Explore - by cuttingforbusiness.com

  • Sweepstakes, Contests, and Lotteries – Why You Need to Know the Differences

    I see a lot of Silhouette Cameo and Cricut small business owners using social media giveaways to promote their businesses. Overall, this is usually an effective way to grow your small business. However, I’ve seen a few lately that worry me. These are ones that state: “Get entered to win with a purchase” or “Purchase xyz product for a chance to win”. As small business owners, we can’t have giveaways that require purchases. Unfortunately, these types of giveaways are classified as lotteries – which are illegal. Let’s look more at this:

    3 Types of Giveaways

    Sweepstakes – These are random chance giveaways. All participants have an equal chance of winning the prize.

    • Examples: Pick the name of the winner from a hat or a random number generator.

    Contests – In these types of giveaways, a participant submits something and it is judged – then a winner is picked.

    • Examples: Cutest customer photo wearing a shirt you made, or best caption on a photo for your upcoming product line.

    Lotteries – In these types of giveaways, a participant buys their way in to get a chance to win. Lotteries in the USA are government run – and cannot be run by small business owners.

    • Example: Raffle tickets are sold for a chance to win a prize. (It’s important to note that in most states, raffles are allowed for non-profit companies – which most small businesses are not.)

    Who Regulates Giveaways?

    Sweepstakes, contests, and lotteries are regulated by the state or country in which the participant lives in. Additionally, Federal agencies such as the FTC and FCC oversee them.

    How to Be Sure You Don’t Have a Lottery

    1. Be sure that your giveaways fall into the definitions above of sweepstakes or contests. Steer clear of lottery style giveaways.
    2. Be sure that your giveaway has clear terms including: 1) The prize to be won, 2) Define who can enter 3) Have a clear start and end date 4) Detail how to enter 5) Explain how to enter 6) Tell how the winner will be announced 7) Address what will happen in the event of technical difficulties.
    3. Research the laws that govern giveaways and contests.
    4. Reach out to an attorney for assistance for giveaways with high value prizes.

    A Few Miscellaneous Facts

    • It is good to know that Canada prohibits random chance giveaways. Instead, giveaways must have some element of skill.
    • Prizes worth more than $600 in the USA need to be reported to the IRS.

    Tell me, do you use giveaways to build your business?

    Save this post to Pinterest:

    Sweepstakes, Contests, and Lotteries - Why Silhouette Cameo and Cricut Business Owners Need to Know the Differences - cuttingforbusiness.com