Author: christine

  • 6 Steps to Start a Craft Business

    Yesterday, I shared my thoughts about starting a business immediately after getting a Silhouette, Cricut, Glowforge, xTool, or other crafting machine. If you didn’t get a chance to read that yet, read 6 Reasons to Wait to Start a Craft Business, but know that I recommend you wait at least 6 months.

    Wondering what path I do recommend you taking as a new seller?
    6 Steps to Start a Craft Business - cuttingforbusiness.com

    6 Steps to Start a Craft Business

    Get to Know Your Machine

    Get your machine out everyday and experiment with it. Create as many different projects as you can. Find out what you enjoy making as you discover your niche. During this discovery time, you’ll also learn what to do when your machine isn’t quite working correctly.

    Start Gifting your Craft Projects to Your Friends and Family

    After you’ve redecorated your house twice with your creations, made your kids 32 shirts each, and hosted five parties with handmade decor – it’s time to start giving your crafts as gifts. Gift to your most honest, brutal family members who will give you their unbiased opinions about your work. Now is a good time to learn how to take constructive criticism, too. Trust me on this: Not all customer feedback will be positive.

    Sell to Your Friends and Family

    Start getting to word out to your family and friends that you will take orders and make products for them. And, it won’t be free. Find out why you should charge your family and friends full price.

    Sell to Strangers

    If you are still enjoying making and selling products, get yourself out there and start selling to strangers. I recommend using apps like Craigslist, Nextdoor, Mercari, Instagram, and Facebook groups to start. It’s also a good time to focus in on your niche and pick a good business name.

    Start an Etsy Shop

    I think Etsy is a great place to start your handmade business because there’s plenty of customers. You’ll be able to get the hang of regular orders and dealing with customers. You’ll be tied to deadlines and you’ll have an opportunity to work on your photography skills and branding. Want free listings on Etsy?

    Move to Your Own Website

    As you master your craft and become an expert in your niche, it’s time to save yourself some fees and move to your own website. I really recommend you keep both your own website and your Etsy shop; since Etsy can help push traffic to your own site. I prefer a WordPress based setup, but services like Wix work well, too.

    I’ve put together this plan based on years in the handmade world as a seller, then as a blogger who works with craft business owners on a daily basis. Think you’re ready to get started? Ask yourself these questions.
  • 6 Reasons to Wait to Start a Craft Business

    Did you have to read the title of this post twice? I know… I’m normally everyone’s cheerleader for starting their craft business, but today, let’s have a quick chat about reasons to wait to start a craft business.

    Why am I writing this post? I see it every year: You received a Silhouette or Cricut for Christmas, along with a few supplies. By early January, you are in business and starting your own online shop.

    While I commend your eagerness – it’s likely that you just aren’t ready. Here’s why:

    6 Reasons to Wait to Start Your Craft Business - cuttingforbusiness.com

    6 Reasons to Wait to Start a Craft Business

    You Don’t Know the Machine

    It doesn’t matter whether you received a Silhouette, Cricut, Glowforge, xTool, Brother, or any other machine. If you’ve only been using it for a few weeks, you don’t know enough about it to sell products.

    Sadly, most crafters find this out when their machine jams, refuses to cut, cuts too deep, and so on. If you give yourself time to experiment and explore your machine, you’ll naturally learn how to fix it when it isn’t working quite right.

    You Don’t Have a Niche

    Maybe you got the machine to make tee shirts, maybe you are interested in making cups. What I’ve found in working with thousands of craft business owners over the years is that most of them found their niche in something that isn’t what they thought it would be.

    You Don’t Know Enough About Design Copyrights, Trademarks, or Commercial Use Licenses

    Just like anything else, there are rules you have to follow if you plan on selling. Before you start your business, take time to learn the rules. Of course, the Cutting for Business blog is a great place to start. Learn about copyrights and trademarks or licenses.

    You wouldn’t give a person a stethoscope and call them a doctor. You don’t give a person a Silhouette or Cricut and call them a craft business owner.

    Christine Schinagl, cuttingforbusiness.com

    Your Family Isn’t Ready for Your Commitment

    Have a lot of free time? Love spending it with your family? It’ll be gone. When I ask craft business owners the number one thing that they didn’t expect when they started their craft business; over and over I hear it’s more time consuming than they expected. I truly recommend sitting down with your immediate family and discussing your choice to start a business.

    There’s a Lot of Competition

    I am not going to lie: There are certain areas in the craft marketplace that are saturated. I’m talking thousands of crafters offering not only the same products, but the same exact designs.

    It can be difficult and frustrating to try to break into one of these areas as a newbie. Always remember, uniqueness sells – and it sells well.

    Your First Projects Will Suck

    I hate to be bold, but it’s true. While the first projects you make will certainly hold a special place in your heart, they will be nothing compared to what you will make in a year from now.

    So, how long should you wait? While it differs for every crafter, I recommend at least 6 months of daily use of the machine. I feel that in that time, you’ll have time to learn the ins and outs of your machine, perfect your products, and do research about starting your business.

  • Everything You Need to Know About Selling on Mercari

    I first covered Mercari on the Cutting for Business blog in 2019. Now, in 2024, Mercari remains a popular app to sell things – including crafts.

    I posted on Facebook at the end of March about Mercari eliminating all selling fees. I promised I’d follow up. Now, I’m following up.

    If you are already familiar with selling on Mercari, jump straight to the New Policies on Mercari section.

    Everything You Need to Know About Selling on Mercari - cuttingforbusiness.com

    What is Mercari?

    Mercari is a marketplace app available for phones. I’d compare it as being similar to Facebook Marketplace. However, unlike most Facebook Marketplace transactions, most Mercari transactions are shipped from seller to buyer.

    Mercari – The Good

    • There’s a handmade section in the app. There are a decent number of well made craft products for sale.
    • Mercari has been promoting on billboards around my local area. This suggests they are growing.
    • It’s easy to list: Snap a picture, write a description, add a price, and list it.
    • Mercari listings are free. If your item sells, there is a flat 10% fee. As of March 27, 2024, there are no selling fees.
    • You have 3 days to ship your item after a sale is made.
    • There’s a built in shipping label generator.
    • It’s safer than meeting up with strangers around your town.
    • In the event of problems, Mercari will act as a mediator between you and the buyer.

    Mercari – The Bad

    • Sellers don’t get paid until the buyer rates the product. If the buyer doesn’t rate the product, there is a system of checks and balances built into the app so that sellers still get paid.
    • Mercari isn’t somewhere that you can build your business. You don’t have a shop – just listings. I’ve found it good for one off sales – but it definitely isn’t a place to get your business name out.
    • Buyers on marketplace apps are often looking for a deal. In fact, Mercari advertises to buyers “… save up to 70% on millions of new and used items”. Buyers looking for a deal aren’t always compatible with the handmade market as a whole.
    • Mercari users can make offers on your listings. I find it annoying, but others might not mind. To deal with the offers, I always set my price a little higher than I want to sell it at. When the buyer submits an offer, they can then get my ideal selling price.

    Mercari Best Practices

    If you want to use Mercari in your craft business, here are a few recommendations:

    • Use actual product photos of the exact product the buyer will receive rather than mockups. Since the buyer has to rate you before you are paid, you need it to be clear exactly what they will receive.
    • Don’t do custom orders through Mercari. I always recommend to receive payment before a custom product is made. Since Mercari doesn’t do payments this way – there’s nothing worse than getting stuck with a custom product that you might not be able to resell.

    New Policies on Mercari

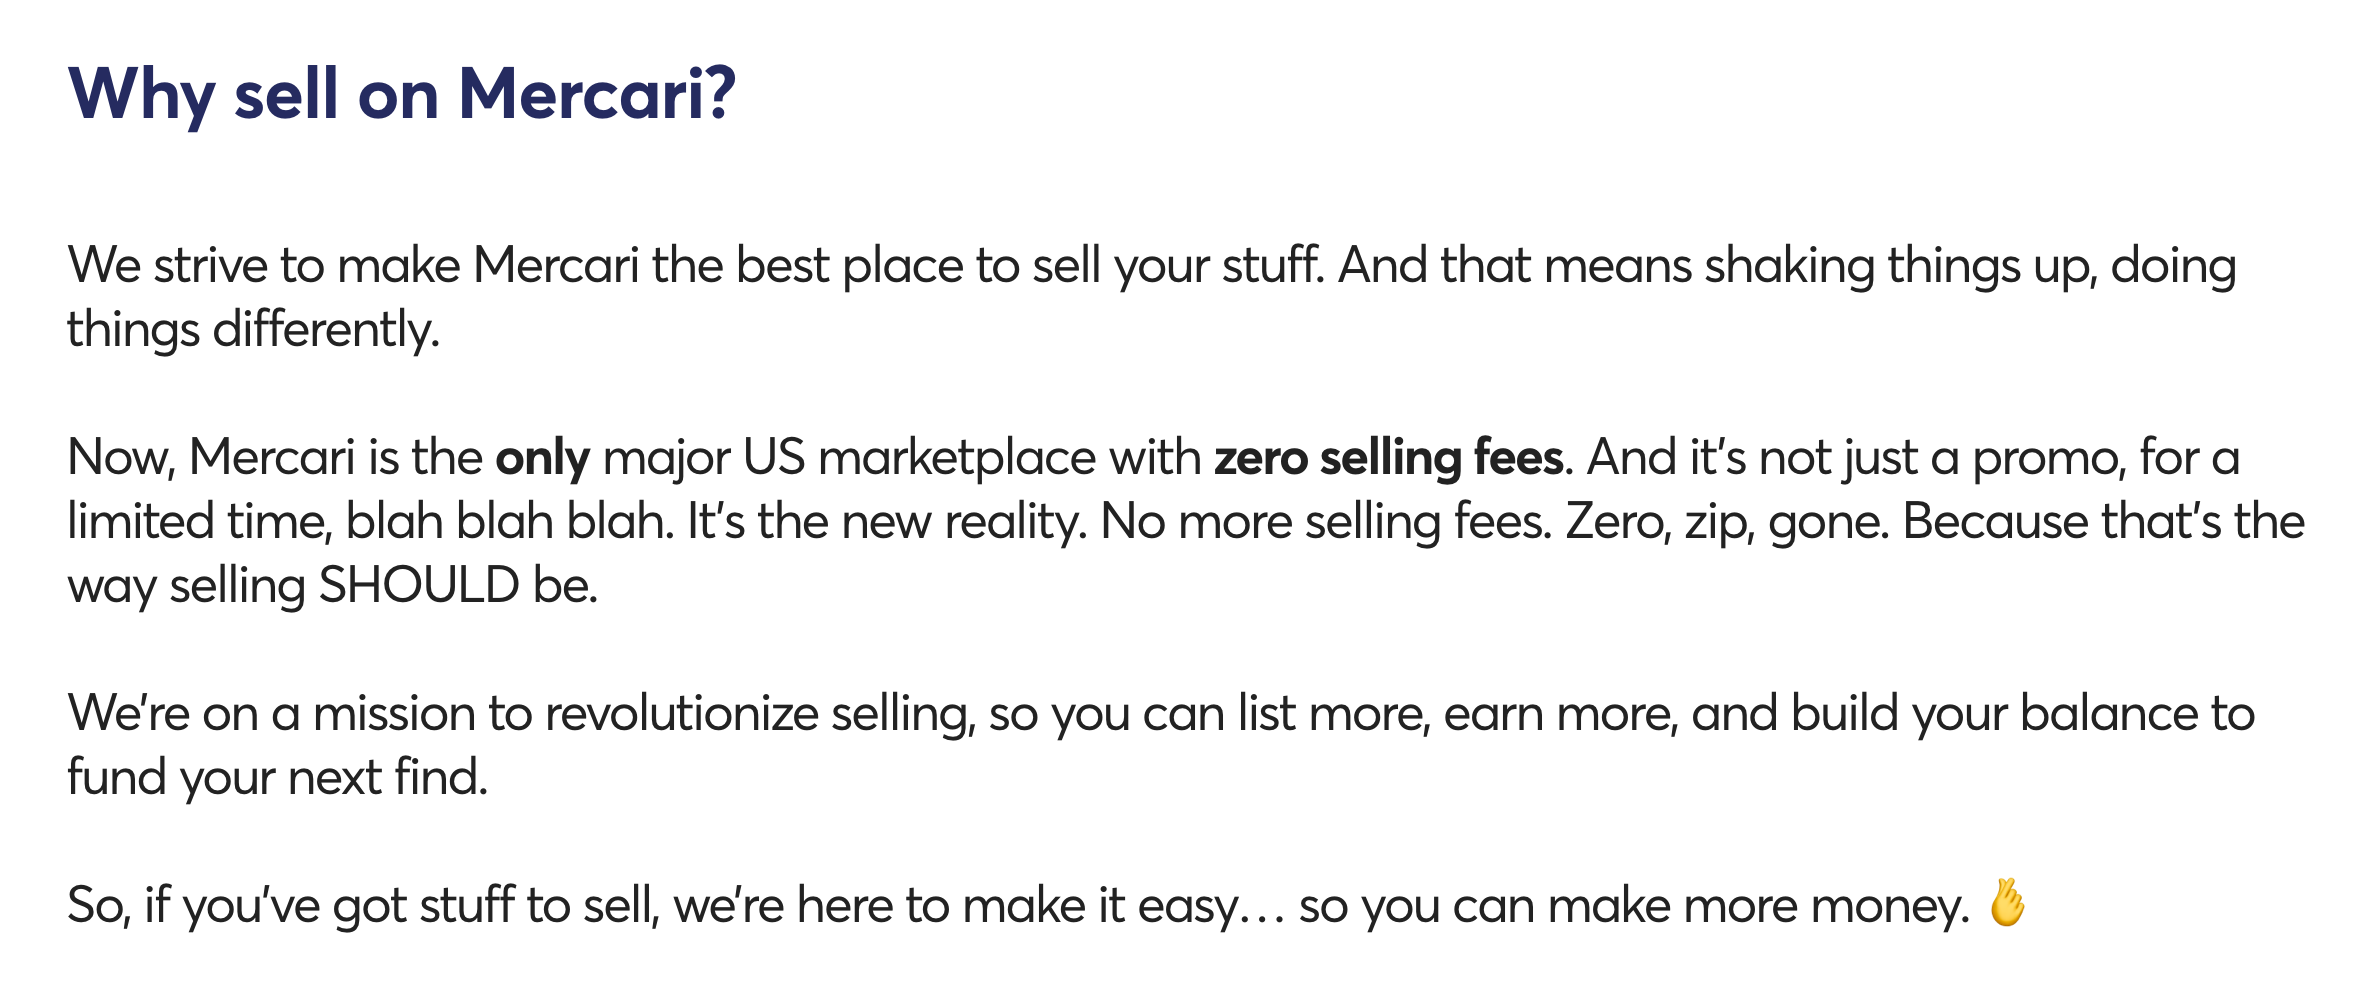
    But, there’s something new on Mercari. On March 27, 2024, Mercari announced that they were eliminating seller fees. They are marketing themselves as the first US marketplace to be fee free for sellers. As a seller, I think this is awesome! But… and there’s a huge but.

    Mercari screenshot - cuttingforbusiness.com

    Who Pays Fees on Mercari Now?

    Mercari has passed many of the fees from the seller side to the buyer side. Let’s look at the specifics.

    Seller Fees on Mercari

    1. Balance Transfer Fee: There is now a Balance Transfer Fee each time you take your earnings out from Mercari. It is $2 for an ACH deposit and $3 for an Instant Transfer.

    Buyer Fees on Mercari

    1. Service Fee: The Service Fee varies based on the category, but it appears to be between 9% and 10% for many categories. I couldn’t find the specifics spelled out on Mercari anywhere.
    2. Payment Processing Fee: $0.50 plus 2.9% of the transaction price (which includes the item price, shipping, service fee, and sales tax). This fee may not be refunded for returned or canceled orders. If you are paying with a balance in Mercari, the payment processing fee is waved.

    Mercari Checkout Screenshots

    Let’s check out how much these fees add to the buyer’s price.

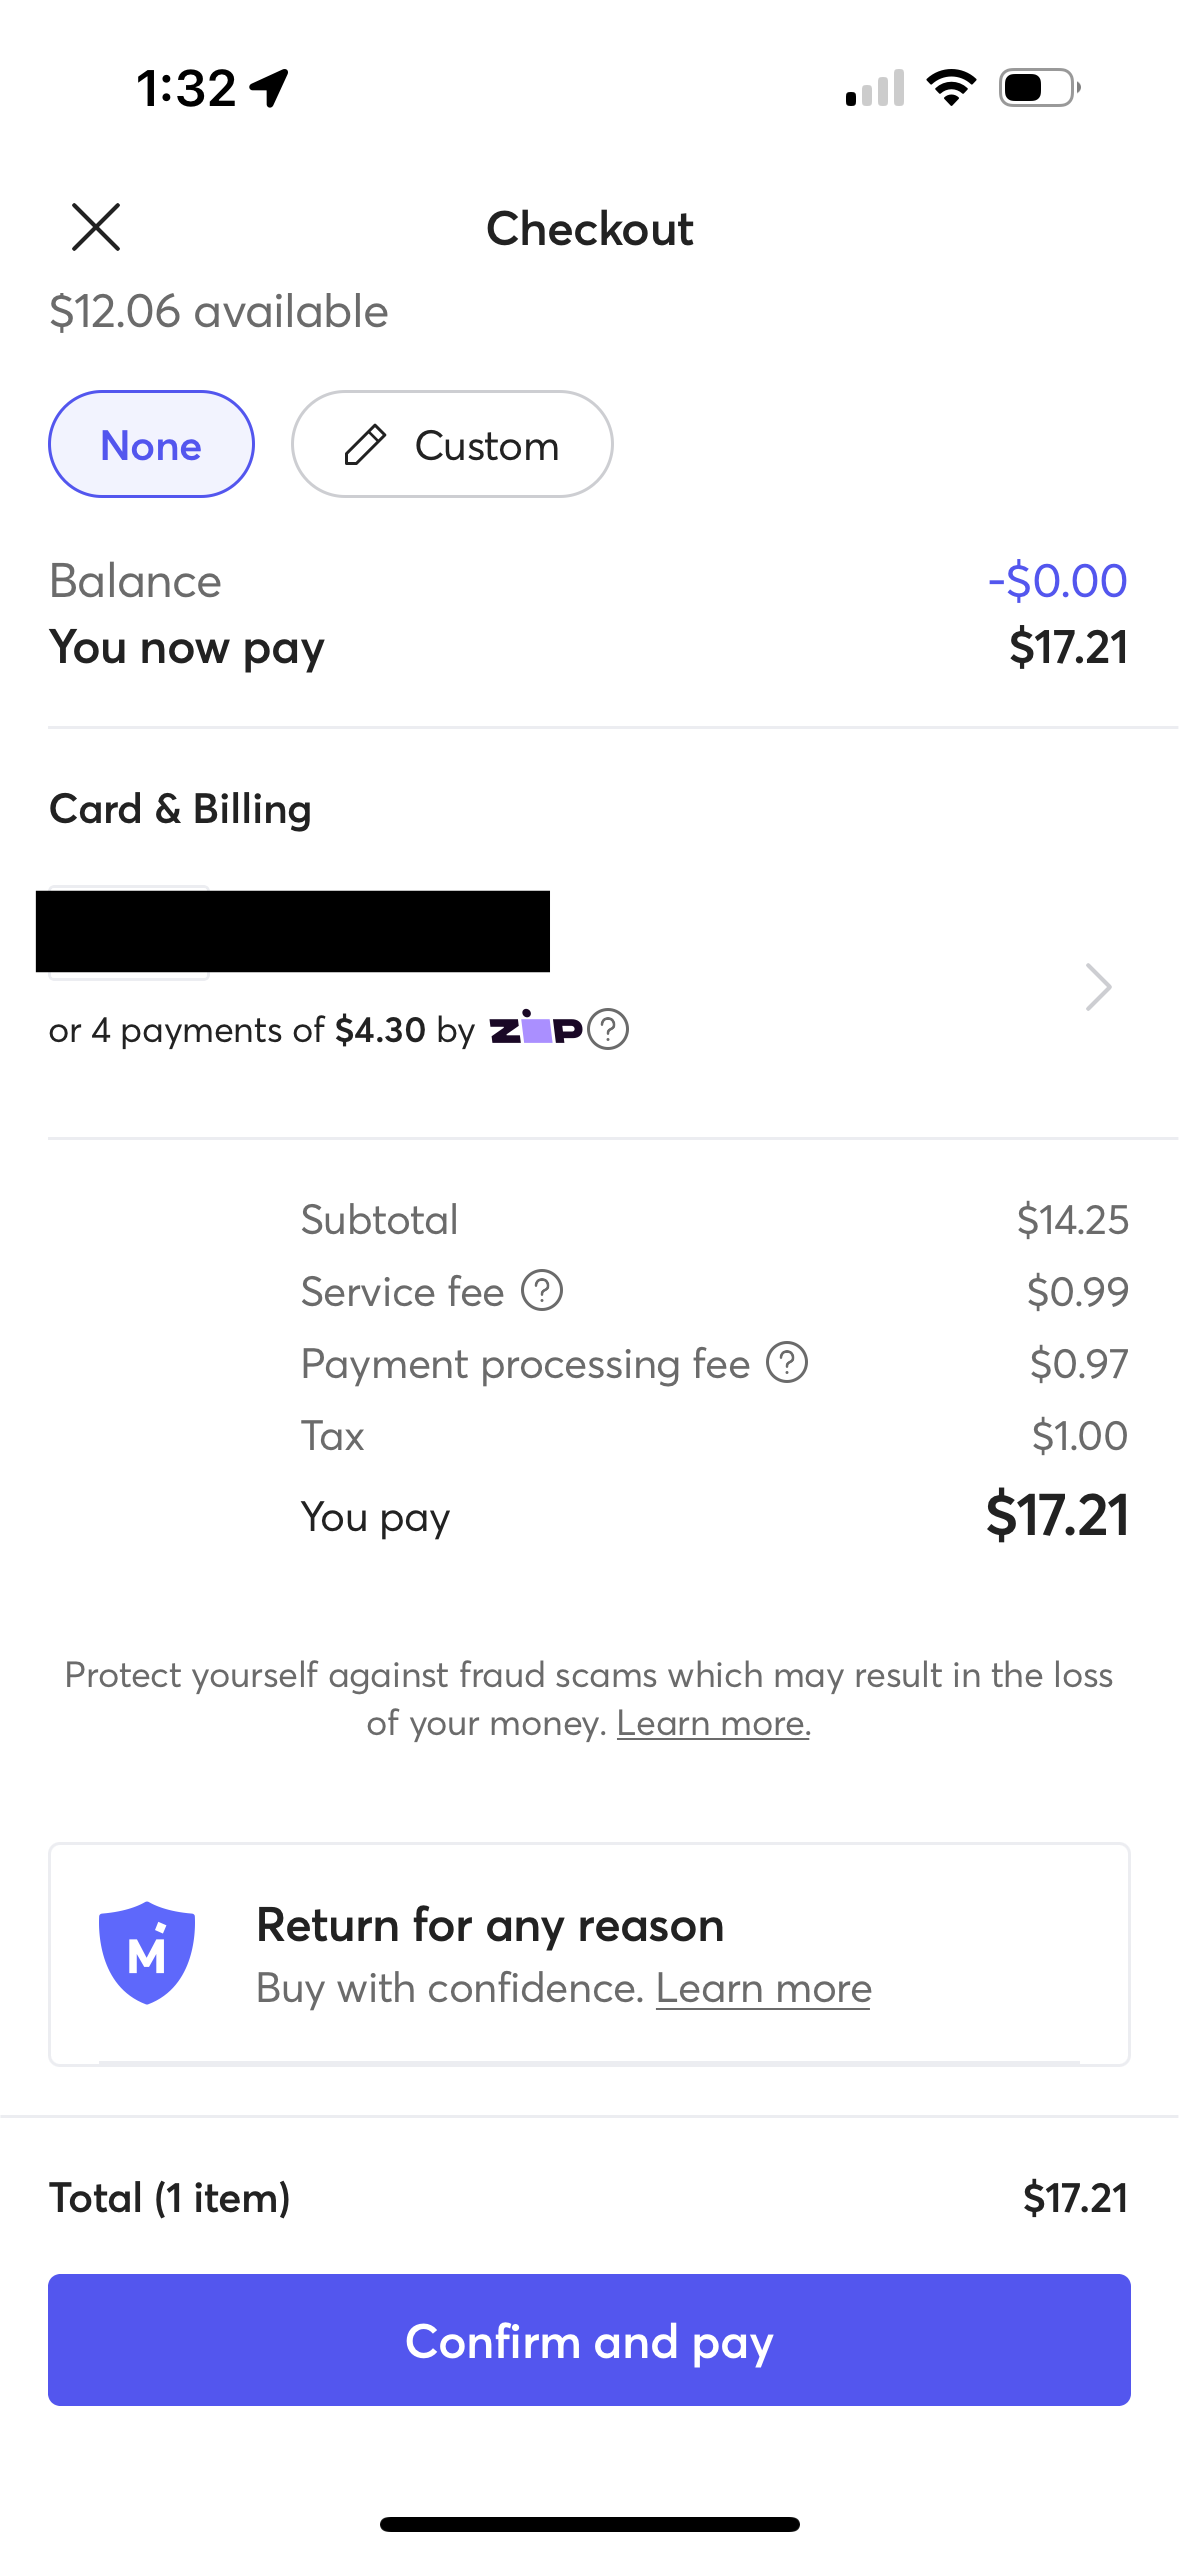
    On a $14.25 item, buyer pays $1.96 in fees. (Note: If paying with a Mercari balance, the fees would be $0.99. Also, fees may vary by category.)

    Mercari screenshot 1 - cuttingforbusiness.com

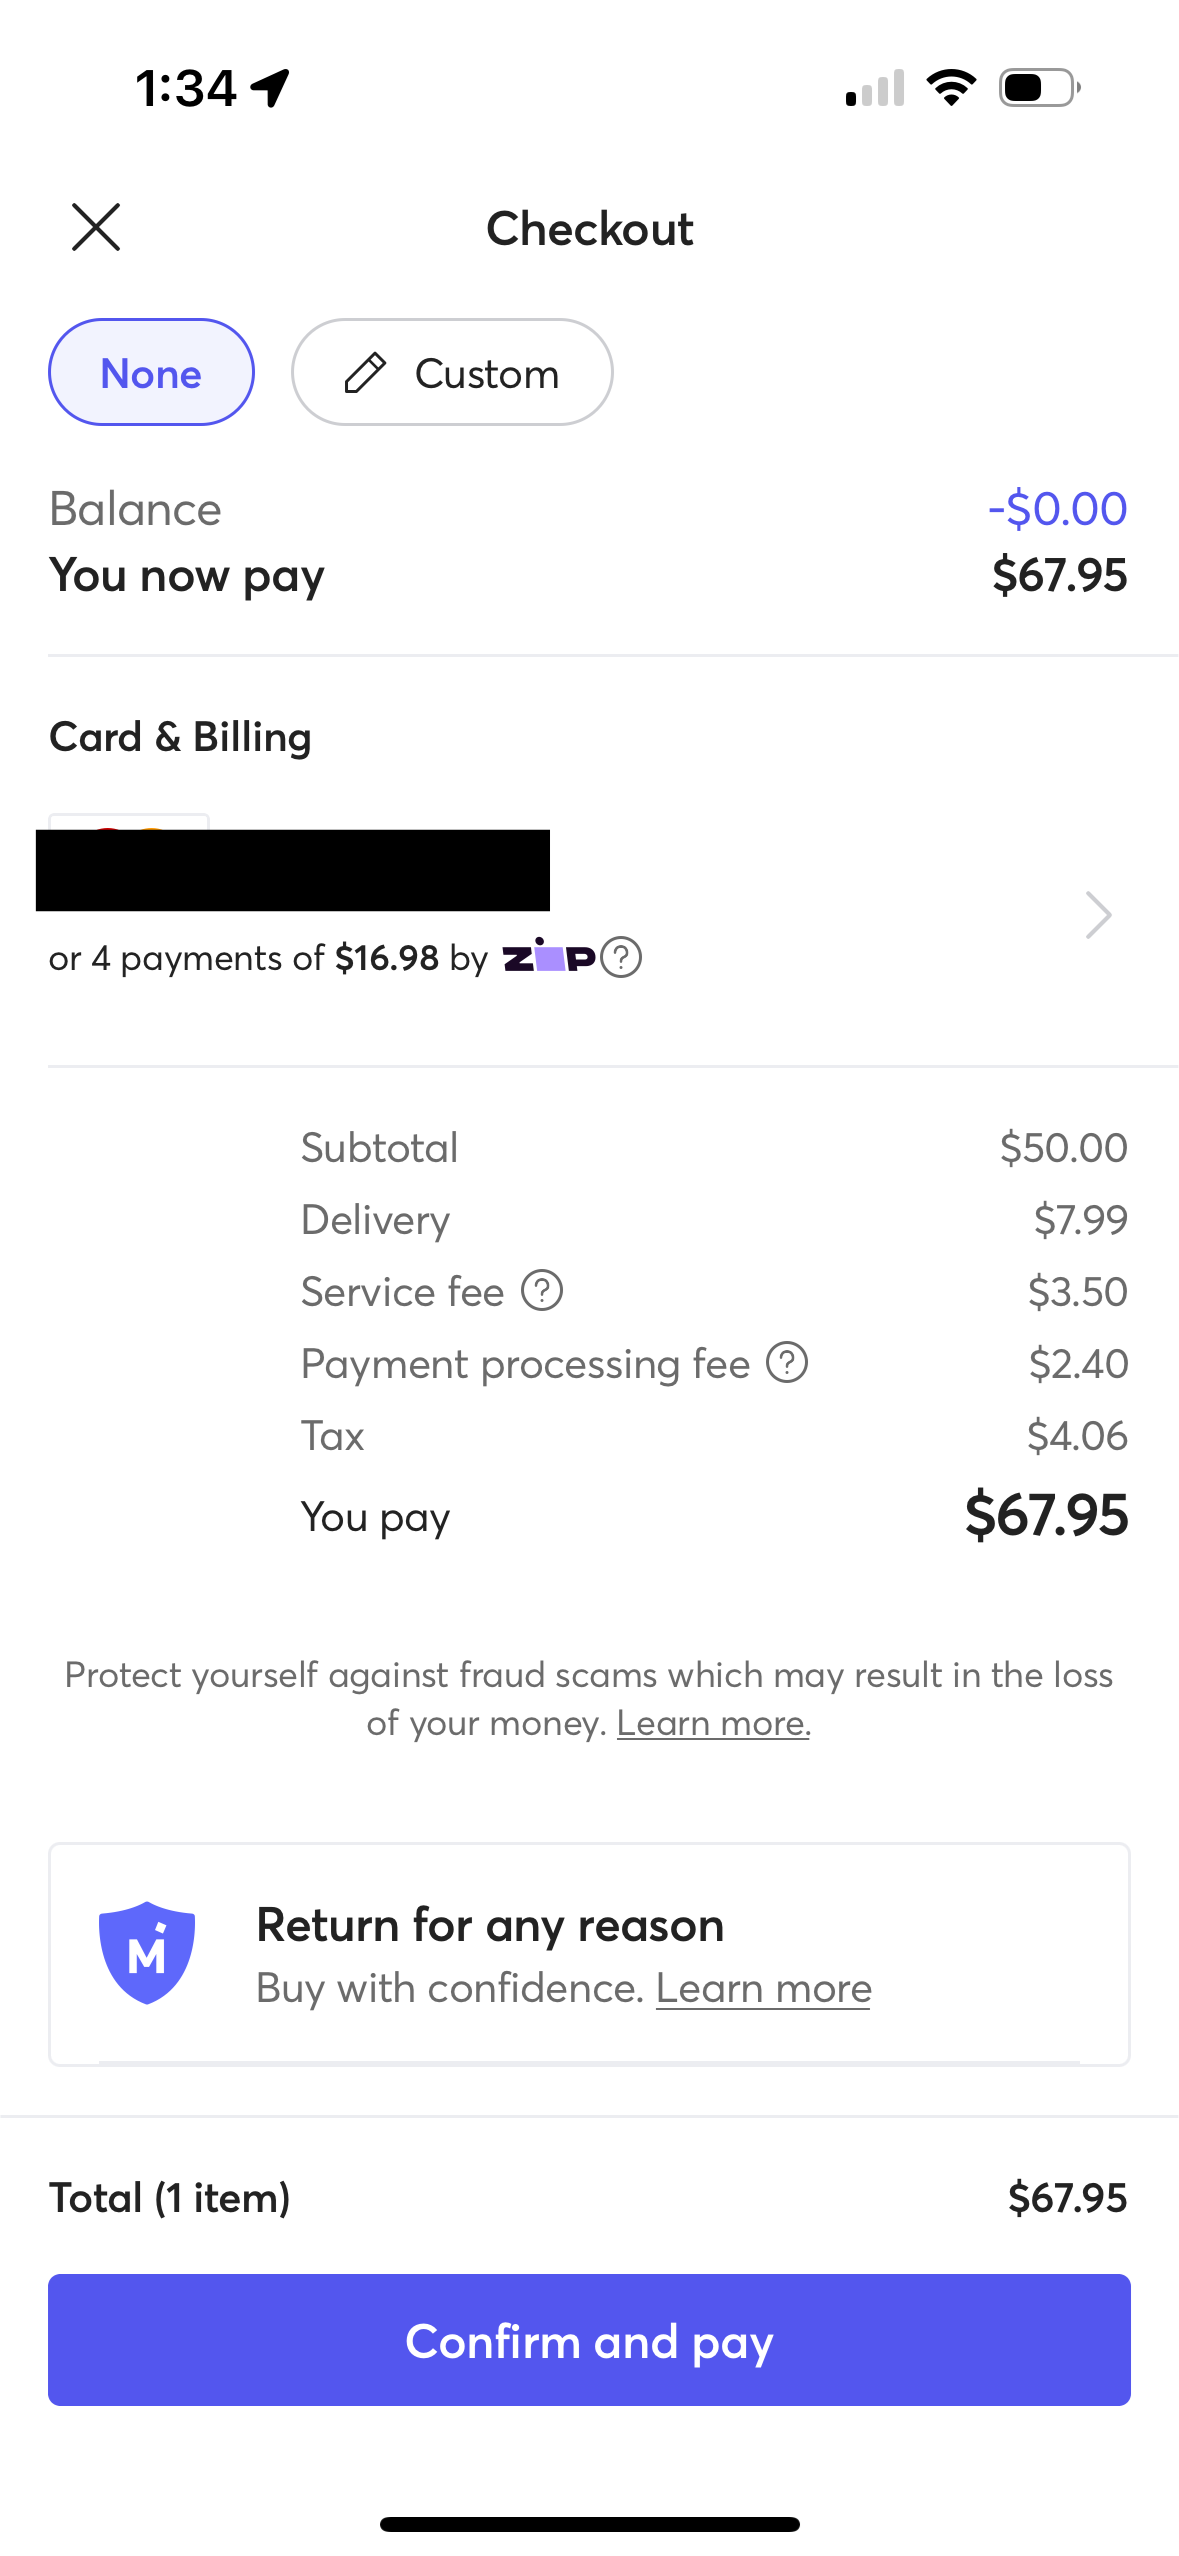
    On a $50 item, buyer pays $5.90 in fees. (Note: If paying with a Mercari balance, the fees would be $3.50. Also, fees may vary by category.)

    Mercari Screenshot 2 - cuttingforbusiness.com

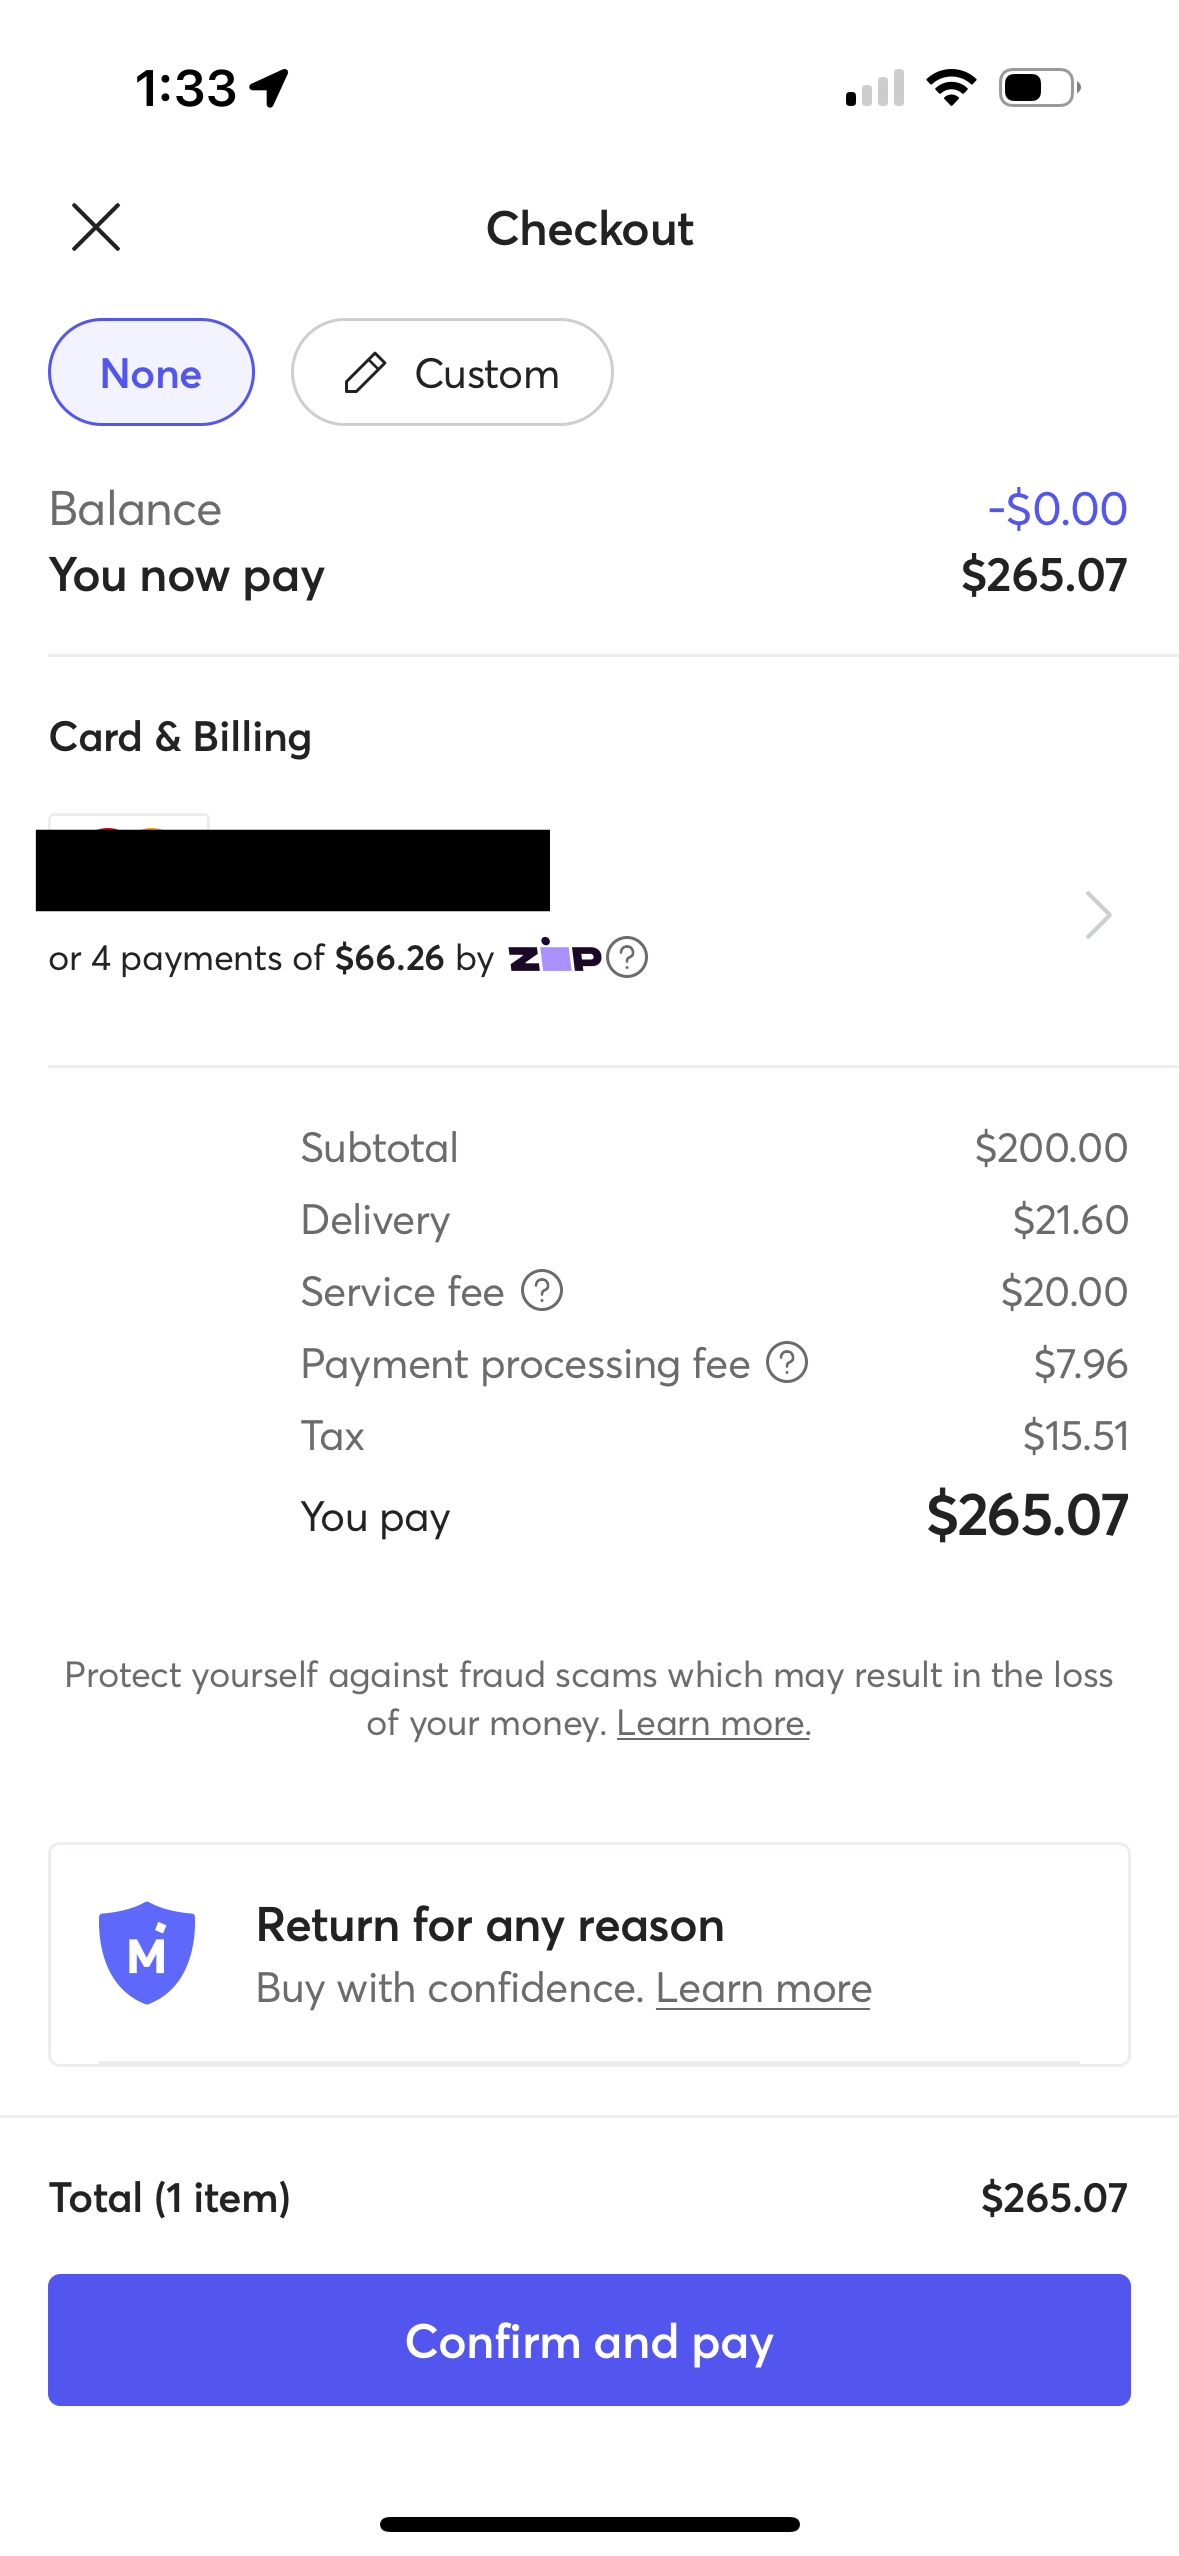
    On a $200 item, buyer pays $27.96 in fees. (Note: If paying with a Mercari balance, the fees would be $20.00. Also, fees may vary by category.)

    Mercari Screenshot 3 - cuttingforbusiness.com

    What Do You Think of Mercari’s New Fee Structure?

    Will this move by Mercari bring more sellers and less buyers on the platform? Let me know what you think in the comments.

    Read about the new fees on Mercari.

  • How to Achieve Your Craft Business Goals (+ Free Printable)

    Let’s build on my recent post on goals. Hopefully by now you’ve had time to draft up a few business goals for your Silhouette or Cricut business. If not – do that first – then come back here and work through this post.

    I see this happen the beginning of every year: Everyone sets a bunch of goals, throws the paper aside, and never looks back on it again. Sound familiar? I can only talk about the way I set and achieve goals – but – it works! Here’s my step-by-step method:

    How to Achieve Your Craft Business Goals

    1. Download and print my goal worksheet at this link. You’ll need one goal worksheet for each goal you have.
    2. Identify the top goals. I typically choose 1 – 3 goals that I want to work towards at the same time. Write one of your goals at the top of the worksheet.
    3. Next, write concrete steps you can take to achieve your goal. Be sure to set a deadline for each step. For example, if I want to increase the sales in my craft business I might set a goal for specific promotions tied to major holidays. My deadline for each would be near each holiday.
    4. Hang your goals worksheet somewhere you will see each day. It could be the wall of your workspace, your refrigerator, or even your bathroom mirror. I also usually set an alert on the calendar of my phone to remind me of the deadlines.
    5. After your key deadlines, complete the goal check in section of the worksheet. At this point, if you are not making progress on your goal, you may need to reevaluate it or the steps you are taking.
    6. Record the goal results. Once your time is up or you’ve completed your goal, fill in the Goal Results section of the worksheet.
    7. Create a follow up goal. If you haven’t achieved your goal, modify the goal, record it in a new worksheet and start working towards it again. If you have completed your goal (CONGRATS!), write a followup goal and repeat the process with a fresh goal worksheet.

    Was this post helpful? Save the image below to Pinterest.

    How to Achieve Your Craft Business Goals (+ Free Printable) - Silhouette Portrait or Cameo and Cricut Explore or Maker - by cuttingforbusiness.com


  • 25 Goal Ideas for Craft Businesses

    Know that you have to set goals for your craft business, but not sure what kind of goals to set? Today, I’m sharing a list of goal ideas for craft businesses.

    25 Goal Ideas for Craft Businesses - cuttingforbusiness.com.

    25+ Goal Ideas for Craft Businesses

    Financial Goal Ideas for Craft Businesses

    • $xx dollars in sales per week/month.
    • Reduce expenses in your craft business. You can start this by doing a spending audit.
    • Stay up to date with business accounting.
    • Make your business official with your city, state, or county. While I can’t tell you exactly how to do this – it differs in every state – view my list of where to go to start a business in your state.
    • Keep impulse buying in your business to a minimum. Read more about money wasters.
    • Pay off business debts and keep your business out of debt. Debt is no good – read how to keep your business out of debt.
    • Set up an automatic draft from your business bank account to a business savings account.

    Marketing Goal Ideas for Craft Businesses

    • Post regularly to social media.
    • Create a profile on a new-to-you social media network and start using it.
    • Start using a content calendar. I’ve got more information about content calendars.
    • Network with other small business owners to promote your products together.
    • Start marketing to a new demographic. If you currently make products primarily for moms, broaden your marketing to include other sets of people.

    Growth Goal Ideas for Craft Businesses

    • Get off the marketplace and start your own website.
    • Increase your customer loyalty with a loyalty program. Remember, the easiest customer to get is one you already have! Here’s my sample loyalty program.
    • Improve your branding. This could include your logo, brand colors, packaging, and so on.
    • Sign up for a business related course. One thing I commonly hear from small business owners is ‘my product pictures are bad’. Make it a goal to improve them!
    • Interact more with your customers to find out what they really want. Whether this is through social media or surveys, the best product is the one that fills a need.
    • Start something new. If you make and sell wood signs, consider hosting parties where others can make them, too. Pick up my 15 Parties ebook at this link.
    • Set up popup shops throughout the year to raise awareness about your business. When you set a goal, think of how many you could attend for the year – one a month? One per quarter? Here are ideas for popup shops.

    Time Management Goal Ideas for Craft Businesses

    • Improve your work life balance by setting regular office hours and sticking to them. Read my commentary on the importance of office hours.
    • Hire help in your craft business. From social media assistance to creating and packaging, take some of the burden off of you.
    • Plan a vacation. While it may seem counterproductive, all business owners need time to escape the reality and recharge. If you haven’t gone on vacation in years – plan on it this year. Even better? Use money from craft business to fund it.

    Productivity Goal Ideas for Craft Businesses

    • Set a number of products to produce each week or month. This could be digital or tangible products.
    • Switch your shop from custom made to ready to ship. Read my opinion on custom made products.
    • Purge your craft area of things you don’t need and keep it clean this year. While this may be wishful thinking, an uncluttered, organized workspace will improve your productivity. Read about my DreamBox.

    Spend some time today drafting up some goals for your Silhouette or Cricut craft business. Then, head over and grab my printable goal worksheets.

  • Tutorial: How to Create Custom 3D Christmas Ornaments with Silhouette Alta

    I don’t know about you, but the last few months I have been having a blast with my Silhouette Alta! I went from never even seeing a 3D printer in person to being pretty proficient using my Alta.

    Today I’m showing you how I designed and created a custom 3D printed ornament. I’ve broken it down step by step.

    Note: This tutorial uses Silhouette Studio Business Edition and Silhouette 3D.

    How to Create Custom 3D Christmas Ornaments with the Silhouette Alta

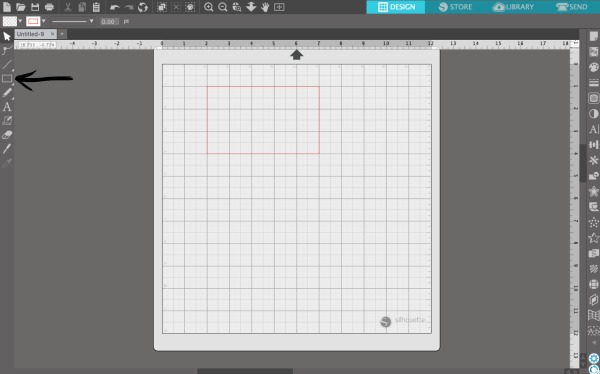
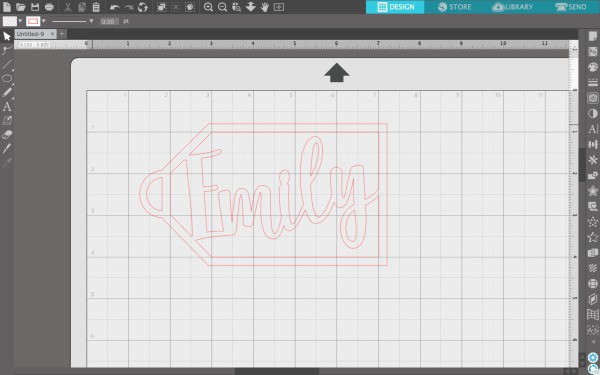
    1. Open Silhouette Studio and open a new blank mat. Draw a rectangle using the drawing tools. I sized mine at 5 inches by 3 inches. Tutorial: How to Create Custom 3D Christmas Ornaments with Silhouette Alta - by cuttingforbusiness.com
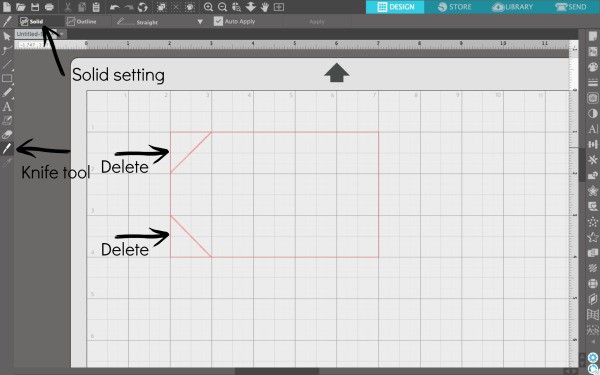
    2. Next, we need to make the rectangle look like a gift tag. Using the knife tool, slice off the two left corners. You’ll want to be sure that your knife setting is ‘Solid’. You can delete the triangle pieces. Tutorial: How to Create Custom 3D Christmas Ornaments with Silhouette Alta - by cuttingforbusiness.com
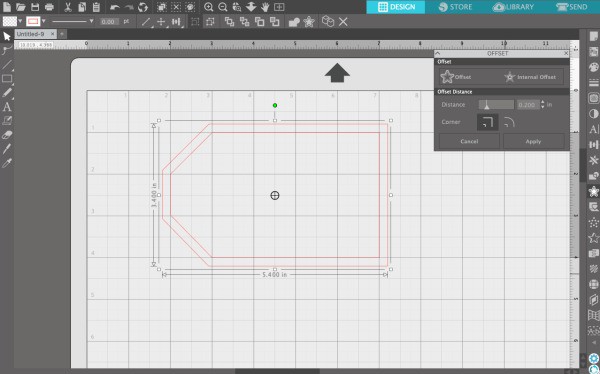
    3. Now, offset the tag shape you’ve created. I used an offset of 2.0, with sharp corners as seen in the screenshot below. Tutorial: How to Create Custom 3D Christmas Ornaments with Silhouette Alta - by cuttingforbusiness.com
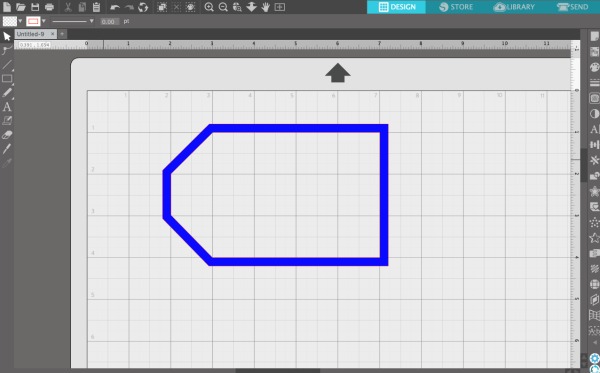
    4. Right now, the shape is solid. We are going to want to make it hollow. Select both tag shapes, then navigate to ‘Object’, ‘Modify’, ‘Subtract’. Our tag is now hollow. If you want to check this, fill the tag with color as I have in the below screenshot. Tutorial: How to Create Custom 3D Christmas Ornaments with Silhouette Alta - by cuttingforbusiness.com
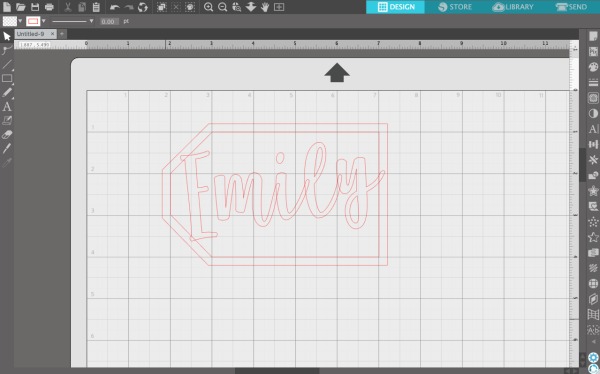
    5. Let’s personalize the ornament. Using a font of your choice, add a name inside the tag. I used this fontTutorial: How to Create Custom 3D Christmas Ornaments with Silhouette Alta - by cuttingforbusiness.com
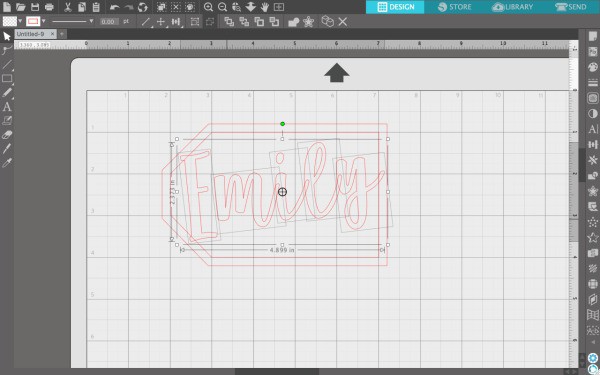
    6. Now, we need to make sure that all of the portions of the name touch each other. Right click on the name and select ‘Ungroup’. All of your letters will become separate. Tutorial: How to Create Custom 3D Christmas Ornaments with Silhouette Alta - by cuttingforbusiness.com
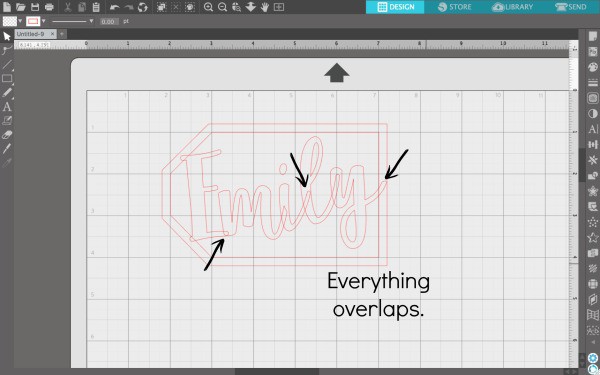
    7. Drag around the letters to make them all overlap each other. This ensures that when we print it, it is a one piece product. Be sure to overlap the letters onto the tag, too.Tutorial: How to Create Custom 3D Christmas Ornaments with Silhouette Alta - by cuttingforbusiness.com
    8. Extra step: If you have letters with loose ‘pieces’ like the dot of the ‘i’ – there’s one more step you’ll need to do. Right click the letter and select ‘Release compound path’. This separates the ‘i’ and the dot. Move the dot so that it overlaps. Tutorial: How to Create Custom 3D Christmas Ornaments with Silhouette Alta - by cuttingforbusiness.com
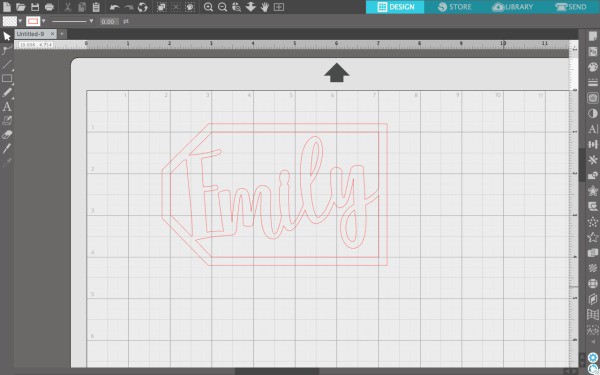
    9. Navigate to ‘Edit’, then ‘Select All’. Right click and select, ‘Weld’. The ornament will become one piece. Tutorial: How to Create Custom 3D Christmas Ornaments with Silhouette Alta - by cuttingforbusiness.com
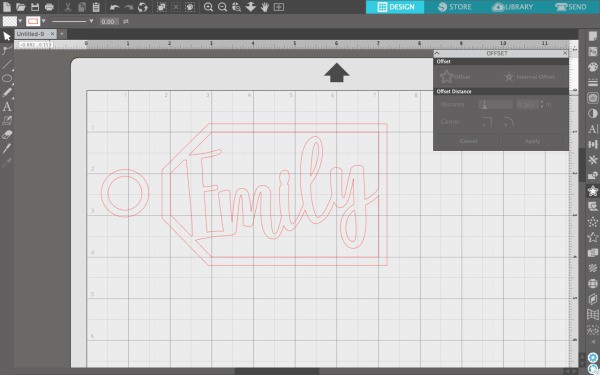
    10. One final step: Add a ring to hang the ornament from. Draw a circle and offset it like we did in step 3. Tutorial: How to Create Custom 3D Christmas Ornaments with Silhouette Alta - by cuttingforbusiness.com
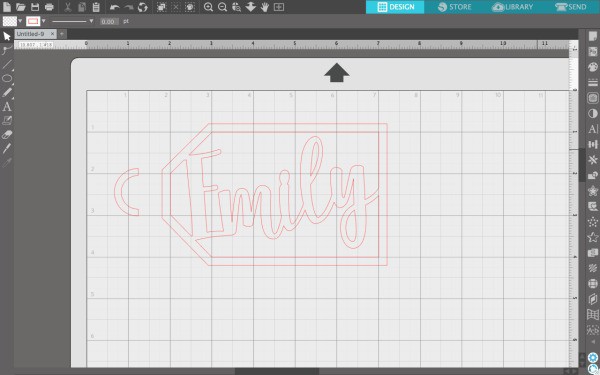
    11. Subtract the inner circle from the outer (as we did in step 4). Then, slice it in half and delete the right half. Tutorial: How to Create Custom 3D Christmas Ornaments with Silhouette Alta - by cuttingforbusiness.com
    12. Last, move your half circle over the tag and weld them together (as we did in step 9). Tutorial: How to Create Custom 3D Christmas Ornaments with Silhouette Alta - by cuttingforbusiness.com
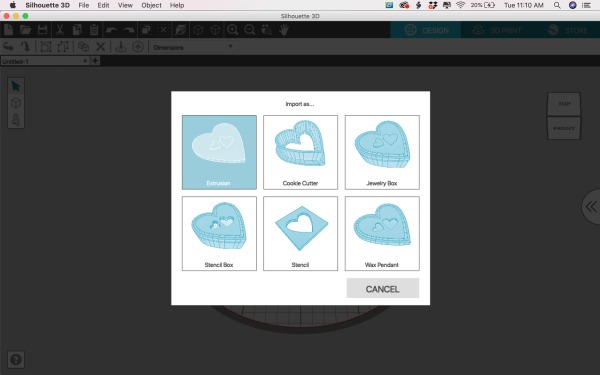
    13. Save the design to your hard drive. Now, open Silhouette 3D. You’ll import your design as an ‘Extrusion’. Tutorial: How to Create Custom 3D Christmas Ornaments with Silhouette Alta - by cuttingforbusiness.com
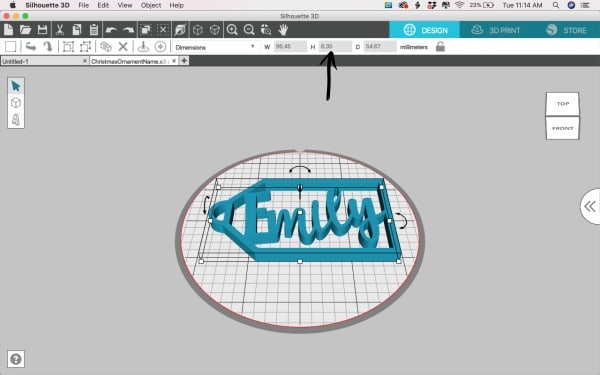
    14. Adjust the height of your ornament. I chose 0.25 inches – which translates to 6.35 mm. Adjust the size of your ornament if needed.Tutorial: How to Create Custom 3D Christmas Ornaments with Silhouette Alta - by cuttingforbusiness.com
    15. That’s it! Print it! I used this bronze PLA filament I picked up on Amazon a few months ago. I did not sand or do anything to finish the final ornament.

    Tutorial: How to Create Custom 3D Christmas Ornaments with Silhouette Alta - by cuttingforbusiness.com

    I couldn’t be happier with the finished product. Now, I’ve just got three more kids to make ornaments for!

    Looking for more about the Silhouette Alta? Click here.

    Did you enjoy this tutorial? Save the image below to Pinterest.

    Tutorial: How to Create Personalized, Custom 3D Christmas Ornaments with Silhouette Alta

  • What You Need to Know About Etsy’s New Billing Policy

    Last week Etsy announced changes to their method of billing shops for their Etsy fees. This change has been announced several times in the last few months and it has finally rolled out.

    What is Changes Did Etsy Make?

    Let’s refresh quickly:

    Old system: Shop owners sold products in their shop. On the first of each month, Etsy billed an outside credit card for the fees that shop owners accrued during the previous month.

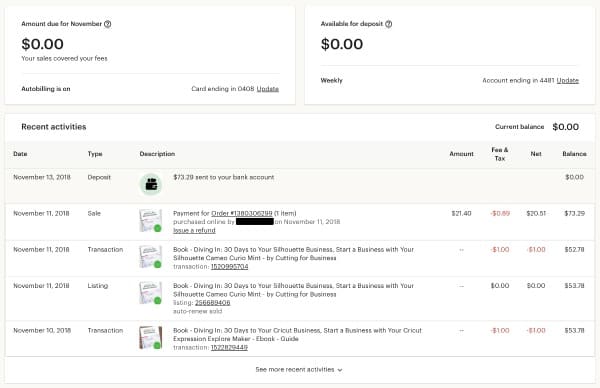
    New system: Etsy fees are deducted in real time from your shop payment account. This includes listing and transaction fees, marketing fees, and shipping labels purchased through Etsy. If your fees are more than you’ve made in your Etsy shop, you’ll be billed the first of the month.

    What Do I Think of the New Billing Method?

    Personally, I think it’s great. Here’s why:

    • No more surprise charges at the beginning of each month. I know that a lot of Etsy owners don’t keep a close watch on their fees every month and their bill can be a surprise. No more!
    • This change will make it more obvious if your shop is making money. Sadly, I see a lot of shops that don’t make any money – and the shop owner doesn’t work out the numbers to actually realize this!
    • This should reduce the amount of scam shops. I’m talking about those shops that set up for a few months, have a bunch of sales, receive their funds, don’t ship the products they’ve sold, and close down the bank account before they can be billed. (Unfortunately, many of these are overseas.)
    • It’s a smart business move for Etsy. By taking their fees out immediately, they won’t have to chase down shops that don’t pay. This should free up time to spend elsewhere on improving their marketplace. As sellers, we want a healthy marketplace.

    Etsy’s New Payment Account Page

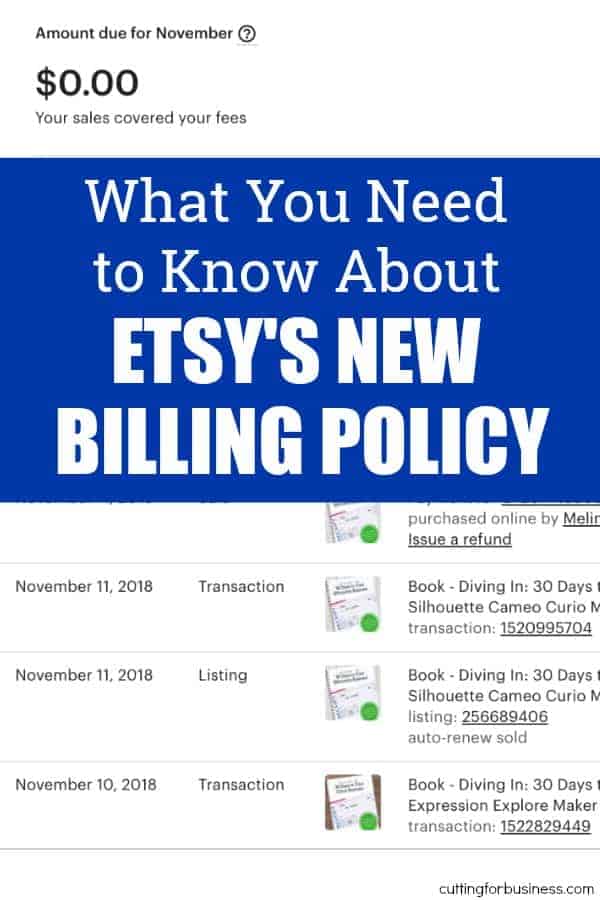
    In addition to new billing methods, Etsy has redesigned the payment account page. It’s pretty self explanatory, but it now shows the amount due to Etsy (in most cases, this will be $0), the amount available for deposit, and it breaks down the fees related to each listing. Here’s a peek:

    What You Need to Know About Etsy's New Billing Policy - A Must Read for Shop Owners - by cuttingforbusiness.com

    Read more about the changes at this link. What do you think of Etsy’s new billing method? Love it? Hate it? Let me know in the comments.

    Was this post helpful? Save the image below to Pinterest so another crafter can read it.

    What You Need to Know About Etsy's New Billing Policy - A Must Read for Shop Owners - by cuttingforbusiness.com

  • 10 Sale Ideas for At Home Craft Businesses

    In this uncertain time, the easiest way to give your small business a boost is to offer a sale. Buyers want and need stuff right now, but many are being more savvy with their money right now. Today, I’ve brainstormed some sale ideas you can use in your Silhouette or Cricut craft business.

    10 Sale Ideas for At Home Craft Businesses

    1. Percentage discounts or fixed fee discounts. Offer a substantial discount in your store or offer substantial discounts on certain items in your store. Examples include 50% off when you spend $50, 40% off the entire store, or $10 off when you spend $75.
    2. Free products. Advertise a free product with a minimum purchase of $XX. Examples of inexpensive products include decals (personalized or generic), keychains, earrings, headbands, holiday ornaments, cupcake toppers, or greeting cards.
    3. Gift certificates/cards. Give a gift certificate with a minimum purchase. This is a great way to encourage shoppers to return at a later time. Example: Free $15 gift certificate with $100 purchase.
    4. Free shipping. Consider extending free shipping to customers. Remember, you don’t have to take a loss by offering free shipping. Instead, build the price of shipping into your product price.
    5. Exclusive limited time products. Create a product or design and sell it only during your promotion. Customers will impulse buy what they can’t get again. For example, if you sell digital cut files: offer a special design that will only be sold for a limited time.
    6. Bounce backs. Offer a “bounce back” offer when you ship your products. It is likely that you will get some new customers during your sale, so offer them a coupon code to shop in your store again in their box.
    7. Timed promotions. Consider having timed promotions throughout the day or weekend. For example, from 8am to 12pm have a sale on one product, from 12pm to 4pm offer a different product on sale, and from 4pm to 8pm offer yet another product. This is particularly effective if your shop is celebrating a milestone like first year in business or five year anniversary.
    8. Free stuff. Host a giveaway for your sale. The easiest way to accomplish this is everyone who buys from you on a certain day will be automatically entered into your giveaway.
    9. Exclusive bundles. This works better in some shops that it does with others. Create an exclusive money saving bundle. For example, if you sell painted wooden signs: Offer a large sign with a smaller sign as a bonus.
    10. Ship same day. In the days of free 2 day shipping and even same day delivery, impatient shoppers want their purchase immediately. If possible, offer a fast turnaround time.

    Was this post helpful? Save the image below to Pinterest.

    10 Sale Ideas for At Home Craft Businesses - Silhouette - Cricut - by cuttingforbusiness.com
  • How to Turn Etsy Favorites into Buyers

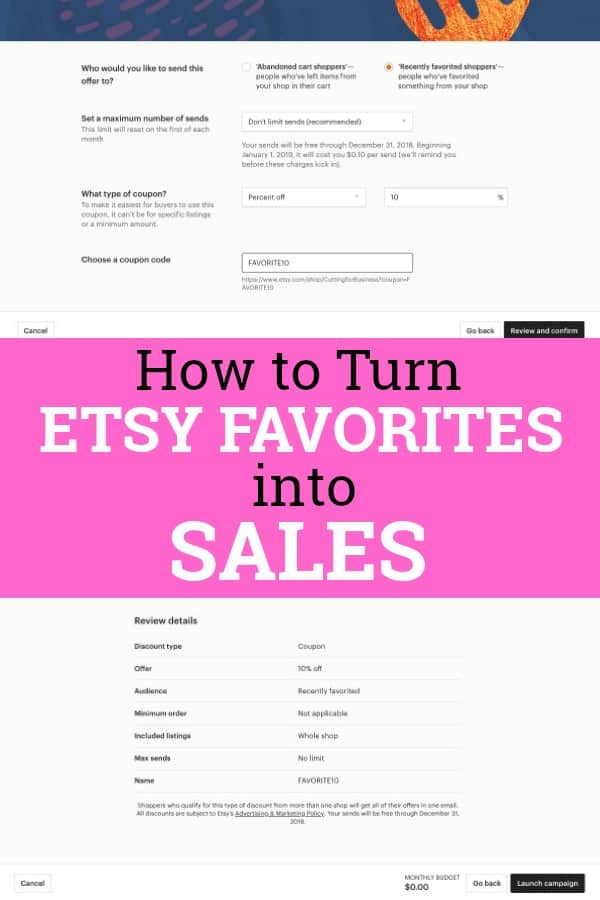
    Does your Etsy Shop get a lot of favorites but not as many sales as you’d like? If so, I’ve got the perfect tip for you today: Etsy now allows you to automatically send coupon codes to shoppers who favorite your shop. Let’s take a look at how this works.

    Tutorial: How to Automatically Send Coupon Codes to Shoppers Who Favorite Your Etsy Product or Shop

    1. Log into your Etsy account and navigate to ‘Marketing’ on the left hand side, then choose ‘Sales and coupons’.
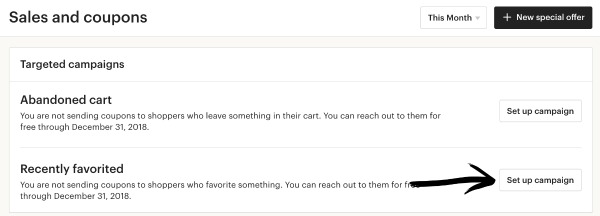
    2. Next to ‘Recently favorited’ click the ‘Set up campaign’ button. How to Turn Etsy Favorites into Buyers with Coupon Codes - by cuttingforbusiness.com
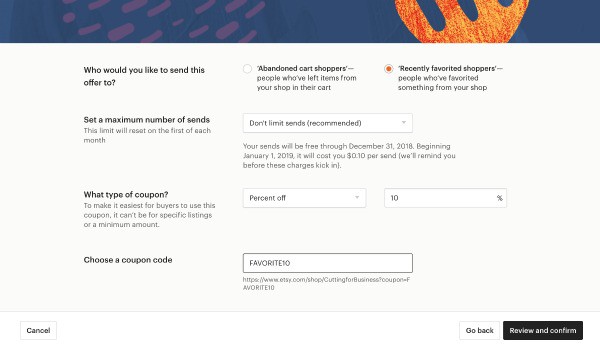
    3. Fill in the details of your promotion in the pop up window. You’ve got a few options to choose from, including ‘Abandoned Cart shoppers’ or ‘Recently favorited shoppers’. I have a hunch that ‘Recently favorited shoppers’ will reach more people, but ‘Abandoned cart shoppers’ may have a better conversion rate as these are likely more serious shoppers. However, that is just my thoughts. Continue on and fill in the maximum number of sends. This service is free through the end of 2018, but will cost $0.10 per email sent beginning in 2019. I left my setting at unlimited, but will change it once the fees start. Last, decide what type of coupon to offer. How to Turn Etsy Favorites into Buyers with Coupon Codes - by cuttingforbusiness.com
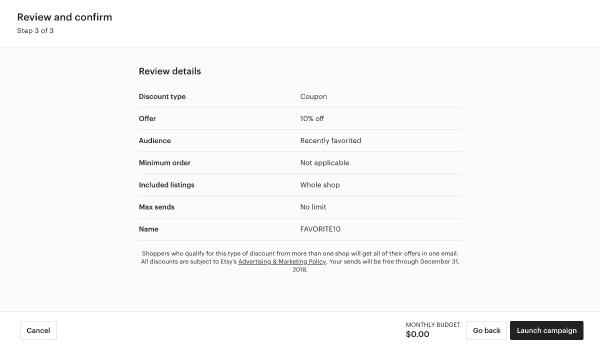
    4. That’s it! Click the ‘Review and confirm’ button. Once you are happy with the details, start the promotion by clicking the ‘Launch campaign’ button.How to Turn Etsy Favorites into Buyers with Coupon Codes - by cuttingforbusiness.com

    Was this post helpful? If so, I’d love for you to save the image below on Pinterest.

    How to Turn Etsy Favorites into Buyers with Coupon Codes - by cuttingforbusiness.com

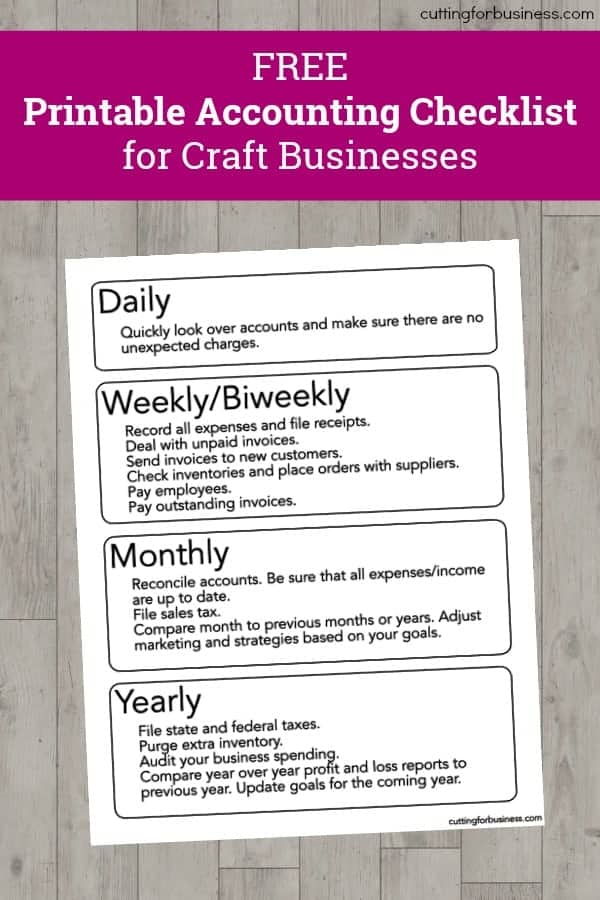
  • Free Printable Accounting Checklist for Craft Businesses

    Accounting always seems to be a sore spot when I bring up the topic in the Cutting for Business Insider’s Club. Actually, a few weeks ago I asked group members if their accounting was up to date in the Silhouette or Cricut small business. I wasn’t that surprised when a number of small business owners admitted that they were behind.

    There’s a funny thing about accounting: It can take hours, days, and weeks if you fall behind and have to play catch up. However, if you do tiny chunks of accounting every week, it doesn’t seem like much of a chore.

    Today, I’m sharing a checklist I created for Silhouette and Cricut small business owners to do small accounting tasks throughout the month so that it doesn’t snowball into a huge, overwhelming project.

    I realize that the checklist might not work for everyone, since accounting is not a ‘one size fits all’ situation. However, I urge you to take 30 minutes and create a similar checklist that works for your business.

    Ready to download? First, save the image below to Pinterest. Then download the free printable in the green box below. Need an accounting program? I’ve been a fan of Craftybase for years. Read more about it in this post.

    Free Printable Accounting Checklist for Craft Businesses - Great for Etsy shops - by cuttingforbusiness.com