Author: christine

  • How to Ship to APO/FPO/DPO Addresses

    I’ve had several readers email asking about APO, FPO, and DPO shipping in their Silhouette or Cricut business. Great news: While it may be unfamiliar to you, it’s really simple.

    FAQ About APO/FPO/DPO Shipping

    Q: What is APO/FPO/DPO shipping?

    A: This is the process for shipping to military members that are stationed overseas.

    Q: What does APO/FPO/DPO stand for?

    A: APO stands for Army/Air Post Office, FPO stands for Fleet Post Office, and DPO stands for Diplomatic Post Office.

    Q: How much does it cost?

    A: Shipping to an APO/FPO/DPO address costs the same amount as shipping within the US.

    Q: How do I address the package?

    A: You’ll use the address provided by your buyer, but it will generally look like this:

    BUYER NAME
    PSC 1 BOX 1111
    APO AE 09021

    Do not add any other information to the address.

    Q: Do I have to fill out a customs form?

    A: Yes, but it is short and easy to complete – taking a maximum of 30 seconds.

    Q: Can I ship to an APO/FPO/DPO address from Etsy or Paypal?

    A: Yes!

    Q: Anything else to know?

    A: Yes, when shipping to APO/FPO/DPO addresses through USPS, consider shipping Priority Mail over First Class Mail. Generally, First Class Mail will be sent by boat or ground and takes a really long time. However, Priority Mail is usually taken via plane and will arrive much faster. Additionally, there are special flat rate Priority Mail APO/FPO Flat Rate boxes you can pick up free from the USPS at this link.

    That’s it – it’s just that simple to ship to a military member stationed outside of the US.
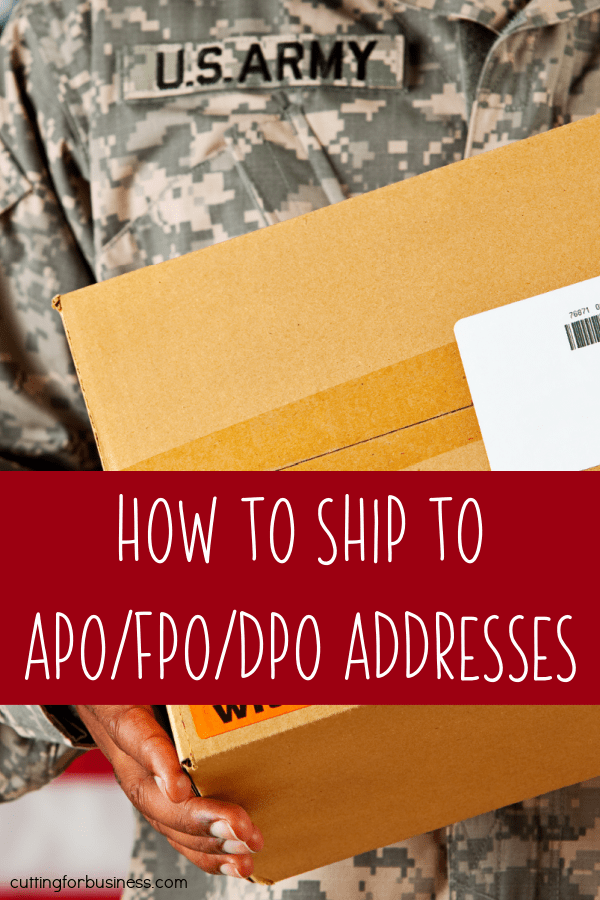
    How to Ship to APO/FPO/DPO Addresses in Your Craft Business - Military - by cuttingforbusiness.com.
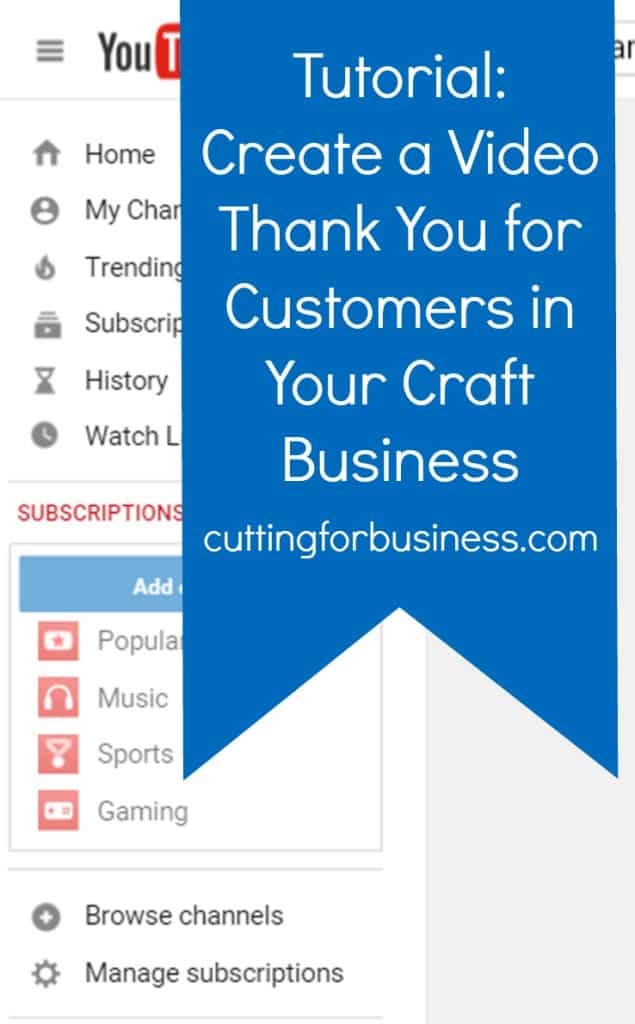
  • Tutorial: How to Create a Video Thank You in Your Craft Business

    A few months ago, I urged Cutting for Business readers to send handwritten thank you notes (or thank yous printed out in a nice font) with their handmade products. I recommend this because it is an effective way to show the human side of your small business. Today, let’s take the idea farther using videos. Imagine your customer opening their package with your handmade product inside and being able to view a short view of you thanking them for their order. Wouldn’t that be awesome? Well, it’s pretty easy, too!

    Tutorial to Create a Video Thank You for Your Craft Business

    1. Create a short video thanking your customer for their order. Consider telling them about an upcoming product launch or giving them a coupon code for their next order. Remember, use a tripod or prop up your camera so your video doesn’t have camera shake.
    2. Upload your video to a video hosting service. In this case, I used YouTube because it is easy to use and it’s free. Additionally, you can choose the privacy setting. I set my privacy setting to “Unlisted” which means that it is not visible in the search results and you must have a link to the video to view it.
    3. Next, you’ll need to be able to provide a short link to your customers to view your video. The link that YouTube provides is pretty long, so let’s shorten it.

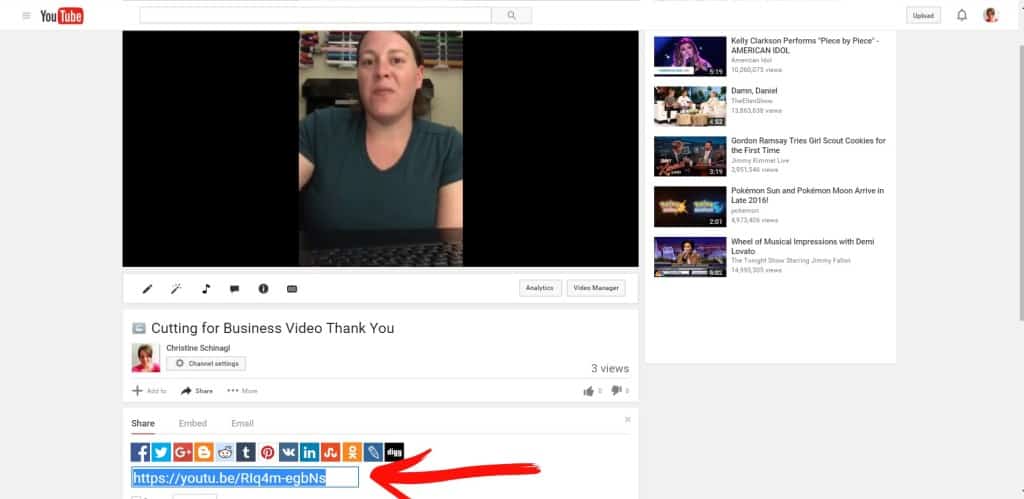
    First, copy and paste the “Share” link from YouTube:  Tutorial: How to Create a Video Thank You in Your Craft Business by cuttingforbusiness.com

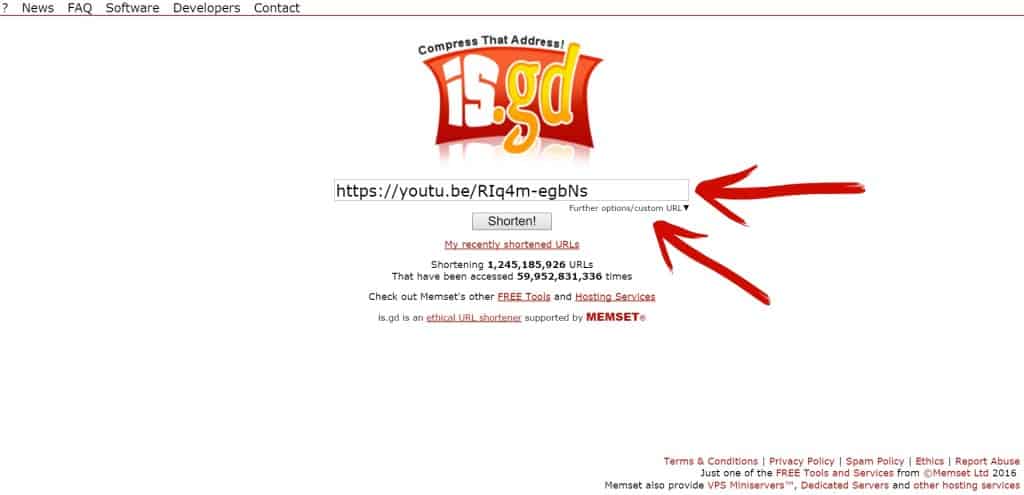
    Next, go to is.gd and copy the link into the box. Click on the link that says, “Further options/Custom URL”:

    Tutorial: How to Create a Video Thank You in Your Craft Business by cuttingforbusiness.com

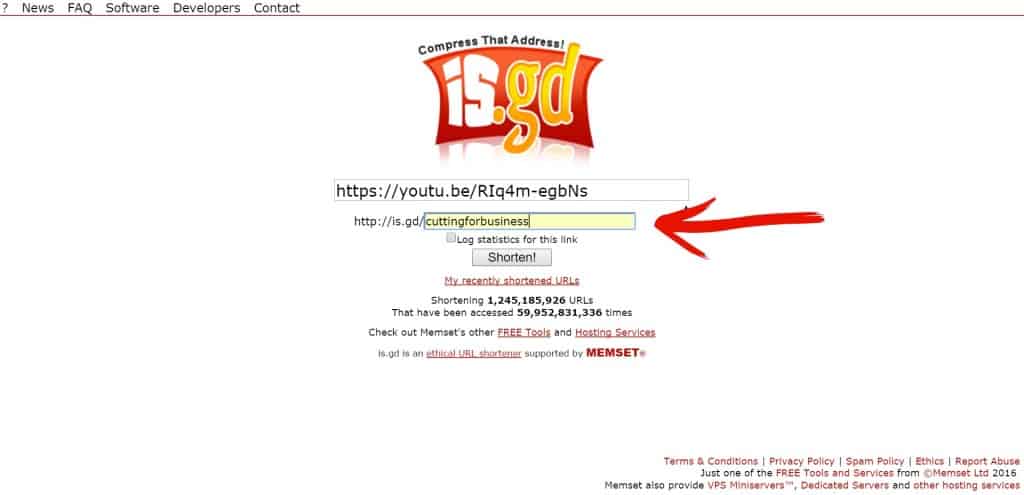
    Enter your business name or something else that your customer will recognize into the box and click “Shorten”:

    Tutorial: How to Create a Video Thank You in Your Craft Business by cuttingforbusiness.com

    Write down your new link.

    4. Now that you’ve got your shortened video link head over to Silhouette Studio or Cricut Design Space and design a Print and Cut/Print then Cut sticker with a catchy quote and the link to your video. Your catchy quote should make your customer want to type the link into their browser to view the video. Here’s a few ideas: “I want to thank you for your purchase, view this link”, “Get a coupon code for your next order at xyz business at this link”, “I’ve got a message for you at this link”.

    5. Stick your stickers onto your packing slip and start impressing your customers.

    6. Alternatively, you could also make a stamp with your Silhouette Mint (which have come way down in price)!

    What about QR Codes?

    I know that someone will ask about using a QR Code instead of using a shortened link. Unfortunately, QR codes are pretty much dead. Many, many people can’t scan them. I think we will see improved QR codes in the future, but the upcoming technologies aren’t easily accessed by small businesses right now.

    Want to see my video message?

    Tutorial: How to Create a Video Thank You in Your Craft Business by cuttingforbusiness.com

    Or click here: is.gd/cuttingforbusiness.

    If you enjoyed this tutorial, be sure to share it:

    Tutorial: How to Create a Video Thank You in Your Craft Business by cuttingforbusiness.com

  • Diving Deeper: 30 Days to Grow Your Silhouette or Cricut Business Book

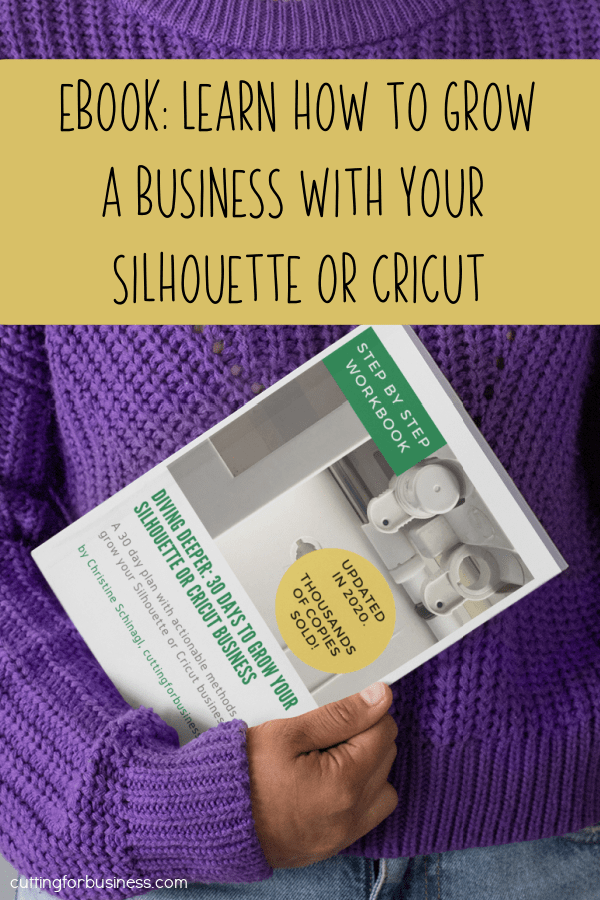
    Welcome back business owners! If you are looking for ways to grow your Silhouette or Cricut business, I’m here to help! This 52 page ebook, Diving Deeper: 30 Days to Grow Your Silhouette or Cricut Business is the follow up to my popular ebook Diving In: 30 Days to Start Your Silhouette or Cricut Business.

    Before buying Diving Deeper: 30 Days to Grow Your Silhouette or Cricut Business, you should have your small business open, have a Facebook business page, an Instagram business account, and a Pinterest business account. Additionally, you should be comfortable working with customers and any problems that arise, shipping products, and writing good titles, tags, and product descriptions according to basic SEO strategies.

    Buy a Copy

    Click here to buy Diving Deeper: 30 Days to Grow Your Silhouette or Cricut Business – Email Download and Print at Home

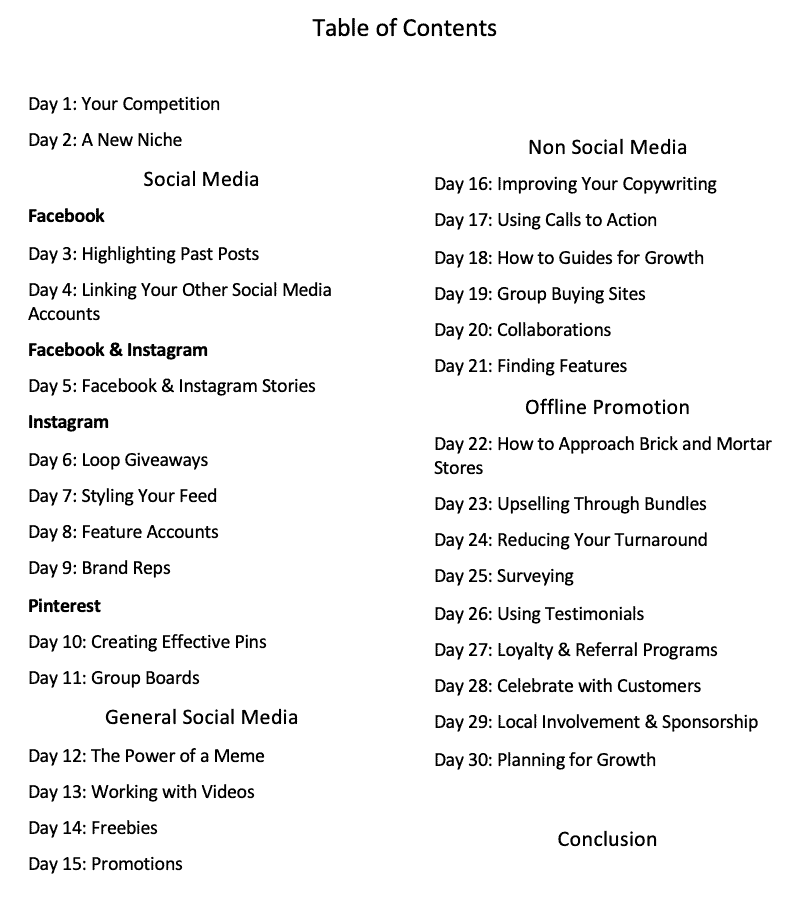
    Table of Contents

    Diving Deeper: 30 Days to Grow Your Silhouette or Cricut Business Table of Contents - cuttingforbusiness.com.

    More Details

    • If you aren’t ready for Diving Deeper, check out Diving In at this link.
    • Diving Deeper: 30 Days to Grow Your Silhouette or Cricut Business does not offer any project tutorials. You will need to know how to make the products you want to sell.
    • This workbook should not be read cover-to-cover. Instead, each day (1-30) is designed to be completed on separate days. Many days have tasks to complete before moving on to the next day.
    • If you need help or have questions, I’m just a click away and my contact information is listed in the workbook.
    • If you purchase the ebook version, you will need to print it at home and put it in a binder (52 pages).

    Buy Your Copy

    Click here to buy Diving Deeper: 30 Days to Grow Your Silhouette or Cricut Business – Email Download and Print at Home

    Diving Deeper: 30 Days to Grow Your Silhouette or Cricut Business - Portrait - Cameo - Curio - Mint - Explore - Air - Joy - by cuttingforbusiness.com
  • Where to Buy Beach Spikers for Silhouette or Cricut Crafting

    Warmer weather must be coming soon, because several Cutting for Business readers have asked where to buy beach spikers. If you aren’t familiar with these, they are can/bottle/drink/phone holders that you insert into the sand or dirt to hold stuff during summer fun. Most Cricut or Silhouette crafters add a vinyl decal to them.

    Where to Buy Beach Spikers

    The best option for the best pricing and largest selection of colors is to buy spikers straight from a manufacturer, like Spiker USA. One great thing about Spiker USA is that they are located in the United States, and they manufacture their goods here as well.

    Spiker Colors Available from Spiker USA

    White
    Red
    Royal Blue
    Yellow
    Hot Pink
    Teal
    Lime
    Purple
    Black
    Orange
    Garnet Red
    Kelly Green
    Silver
    Gold
    Carolina Blye
    Camo Days
    Lilac
    Coral
    Mist
    Blush
    Strawberry
    Kiwi
    Tangerine
    Blueberry
    Lemon
    Cherry

    Pricing & Minimum Order Quantities

    You must order in lots of 12, 24, 48, or 100 count. You can mix and match colors within the lot but you must order one of the totals I listed. Pricing is as follows: 12 – $4.50 each, 24 – $3.84 each, 48 – $3.32 each, and 100 – $2.95 each. Shipping is included in the 100 counts. I’ve seen custom made spikers retail for up to $20 on Etsy.

    Registration

    Registration on their wholesale website is required to order at wholesale pricing. The process was straightforward and you’ll just need your tax ID number. After registering, you are granted immediate access to the site and can order right away. (There’s even a coupon on the site for placing an order the same day you register!) If you don’t have a tax ID, you won’t be able to access the pricing above. While you are browsing the site, Spiker USA has other products for you to check out as well.


    Not just for drinks at the beach!

    I’m planning on using some spikers to create a container garden with the kids. Then, I am going to use my Silhouette Cameo or Cricut Explore Air to label each spiker with the name of the herb inside. Sounds cute, huh? Now, to just find the time!

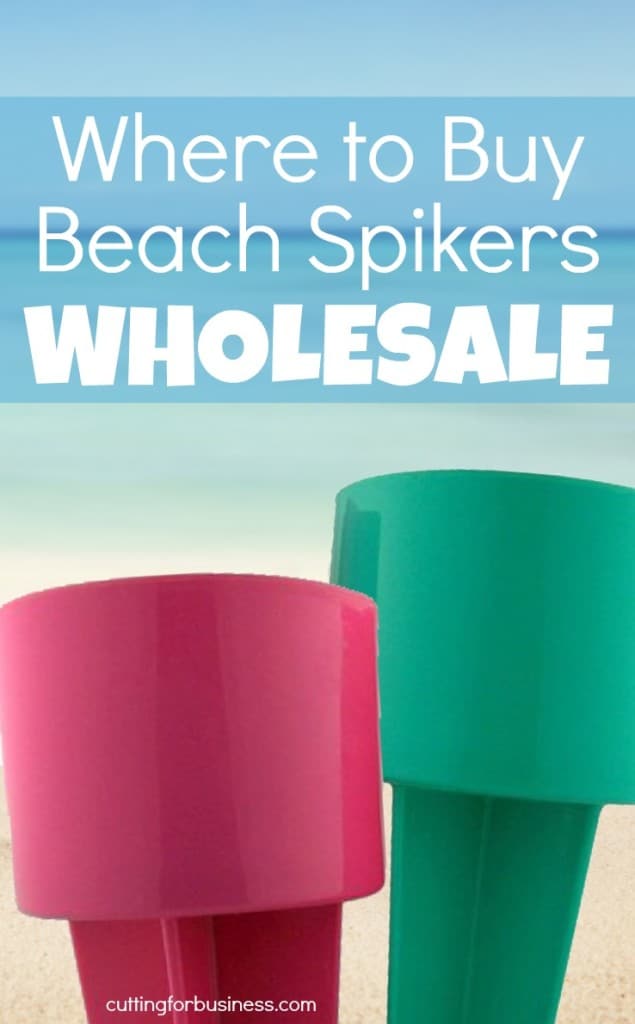
    Don’t forget to pin the image below to share it with another crafter!

    Where to Buy Beach Spikers for Silhouette Cameo or Cricut Crafting by cuttingforbusiness.com

     To find this post again quickly, use keyword: SUPPLYSPIKERS.
  • How to save as .png, .jpg, or .pdf in Silhouette Studio (Mac Version)

    This article has been recently updated to account for changes after the release of Silhouette Studio Version 4.

    Silhouette America recently rolled out an update to Silhouette Studio that allows users to save in more formats.

    Save as .JPEG and .PDF with Silhouette Studio Business Edition

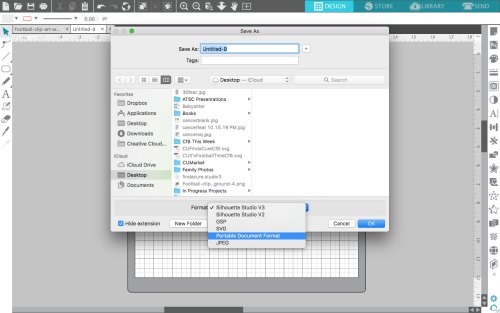
    To Save as .JPEG or .PDF in Silhouette Studio, go to ‘File’, ‘Save As’, ‘Save to Hard Drive’, then select either .JPEG or .PDF under ‘Format’ as shown below. You’ll need Silhouette Studio Business Edition – buy it here.

    How to save as .png, .jpg, or .pdf in Silhouette Studio (Mac Version) - by cuttingforbusiness.com

    Save as .PNG

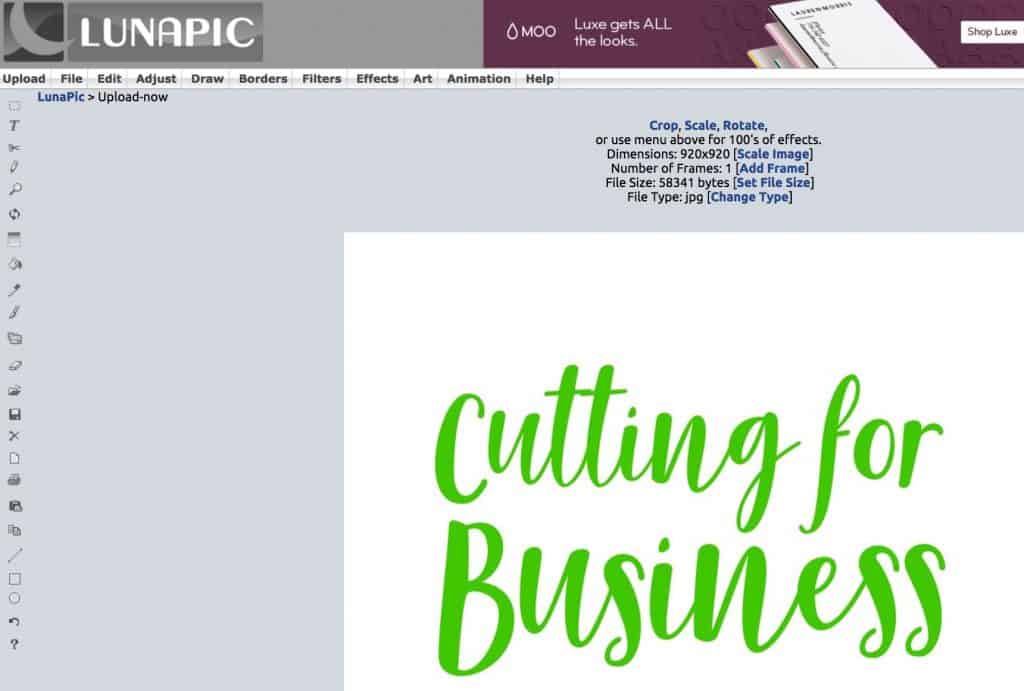
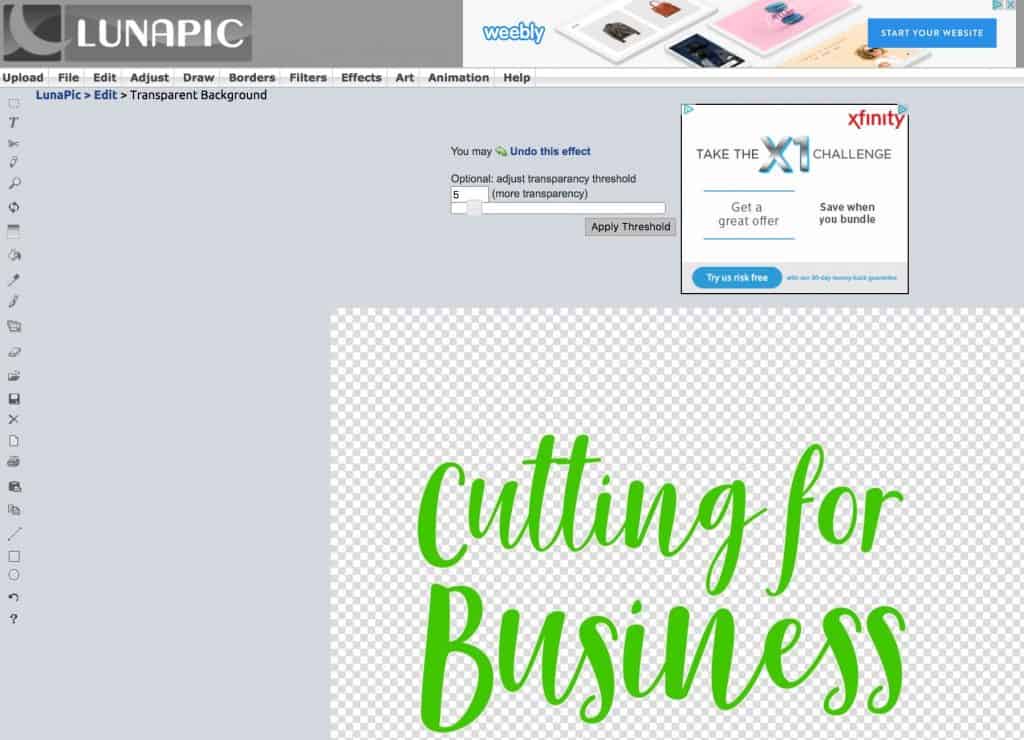
    Do you need to save as a .PNG with a transparent background? The easiest way to do this is to first save as a .JPEG, then remove the white background using Lunapic.com. Here’s how:

    1. Visit Lunapic.com and upload your .JPEG image using the ‘Browse’ button.How to save as .png, .jpg, or .pdf in Silhouette Studio (Mac Version) - by cuttingforbusiness.com
    2. Navigate to ‘Edit’, ‘Transparent Background’. Simply click on the white background and let Lunapic magically remove it for you! When the background is checkered instead of white, save it using the button near the bottom.How to save as .png, .jpg, or .pdf in Silhouette Studio (Mac Version) - by cuttingforbusiness.com

    That’s it! It’s just that fast and easy!

    Don’t have Business Edition?

    If you don’t have Silhouette Studio Business Edition, you can take a screenshot of your design. On a MAC computer, hold down ‘Command’ + ‘Shift’ + ‘4’. If you need a transparent background, you can do so using the above instructions for lunapic.com. On Windows 10, use the snipping tool. Hold down ‘ALT’ + ‘M’ to launch it. Again, if you need, you can use lunapic.com to create a PNG with a transparent background.

    Save this post to Pinterest:

    How to save as .png, .jpg, or .pdf in Silhouette Studio (Mac Version) by cuttingforbusiness.com courtesy of happyhootparties.etsy.com

  • How to Create a Stop Motion Video for Your Craft Business

    I’m sure you know that videos are a great way to advertise your craft business. In fact, one source states that in 2022, videos accounted for 82% of the global internet traffic.

    I recently shared a review of my Create Room DreamBox. Since the article posted, I’ve gotten a few emails about how I created the stop motion video.

    I created the DreamBox video using a technique called Stop Motion.

    How to Make a Stop Motion Video - cuttingforbusiness.com.

    What is a Stop Motion Video?

    A stop motion video is actually created using an animation technique. Stop motion videos are made by moving an object, then photographing the object, then moving the object, then photographing the object, and so on.

    When you string all the frames together and play them quickly, it looks like the object(s) is moving.

    Stop motion videos work the same way that flip books work.

    DreamBox Stop Motion Video

    How I Created the DreamBox Stop Motion Video

    1. I placed my phone on a tripod.
    2. I walked to my DreamBox and slightly opened it.
    3. I used my Apple Watch to remotely snap a photo.
    4. I walked to my DreamBox and opened it a little more.
    5. I snapped another photo.
    6. I walked to my DreamBox and opened it even more.
    7. I took another photo.
    8. I walked to my DreamBox and opened it all the way.
    9. I took yet another photo.
    10. I continued this process until I had opened my DreamBox, put some supplies on the table, cut a design from vinyl, put the supplies away, and closed the DreamBox.
    11. Between each step, I photographed.

    My DreamBox stop motion video consisted of 76 still photos.

    Stop Motion Studio Pro App

    After taking the photos, you’ll upload them to your favorite stop motion video app and the app will compile the photos into a video.

    The process using the app is straightforward: Upload your photos, choose a video playback speed, add music, save the video. The app I used is called Stop Motion Studio Pro.

    4 Tips for Creating Stop Motion Videos

    1. Have a plan for your video.
    2. You must use a tripod to keep your camera still while taking photographs.
    3. A remote shutter is a great way to make sure that your camera doesn’t move while photographing.
    4. Experiment with different video playback speeds to see which one looks best.

    Stop Motion Video Ideas for Crafters

    Vinyl Crafters: Weed something intricate in a video. I would cut the vinyl and tape it to your table or desk. Weed one piece at a time and take a photo after each piece is removed. An overhead tripod would be perfect.

    Paper Crafters: Assemble a paper craft in a video. After you add each paper piece or embellishment, take a photo.

    Shipping: It would be easy to make a stop motion video of your packages “walking” out the door or down your driveaway.

    Tell me in the comments: Have you ever made a stop motion video?

  • How to Use Stock or Styled Photos for Advertising in Your Craft Business

    This week we are going to look at creative ways to advertise your Silhouette or Cricut small business. If you aren’t a great photographer, consider using stock or styled photos or mockups for your advertising. I’ve showed you in the past how to create product mockups in Silhouette Studio, but today we are going to look at mockups for advertising.

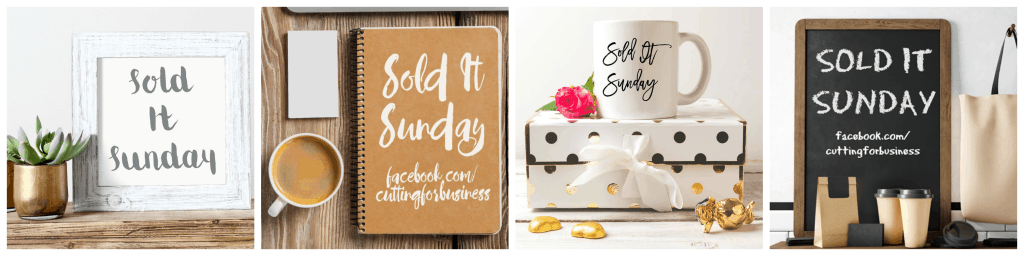
    I use mockups to advertise Sold It Sunday, and get asked about them regularly. Here’s a few sample images that you’ve probably seen on my Facebook page. Each of these images is a stock photo that I’ve added text to.

    How to Use Mockups for Advertising in Your Craft Business by cuttingforbusiness.com (Silhouette Cameo, Cricut)

    How to Create Mockup Images for Advertising

    Before you begin, you’ll need a stock image or styled photo in .jpg or .png format. You can find photos online or use an image of your own.

    • On Creative Market, search “Mockup”, “Styled Photo”, or “Stock Photo”. If you are looking for something in particular to use in an ad, search that term. For this tutorial, I searched the term “child”. The image I found is perfect to announce a sale for a children’s product line.
    • View mockups on The Hungry JPEG at this link.
    • Stock photo sites have lots of photos that you can use for mockups. My favorite stock photo site is Adobe Stock. If you’d like to try out Adobe Stock, click the banner below:

    Tutorial to Use Mockups or Styled Photos in Advertising

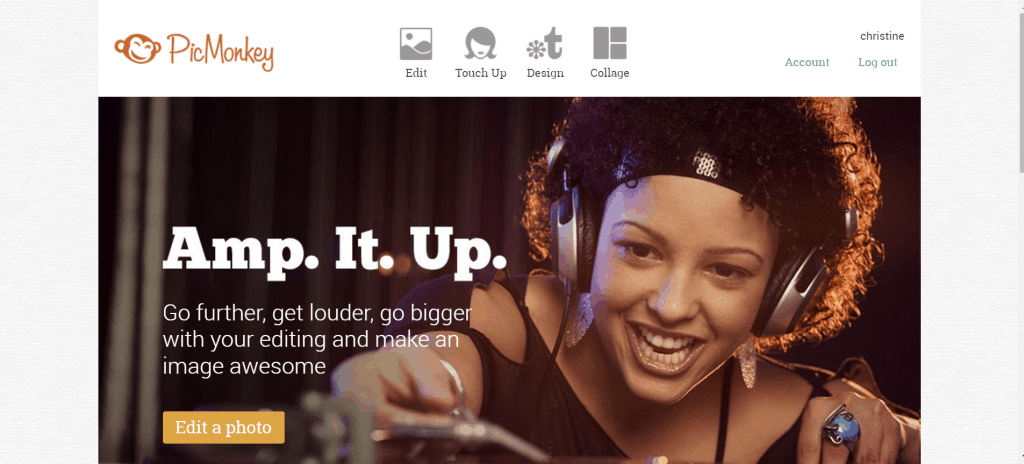
    1. You can use any photo editor, but this tutorial uses PicMonkey – which is free! Open PicMonkey and select “Edit” from the top menu. How to Use Mockups for Advertising in Your Craft Business by cuttingforbusiness.com (Silhouette Cameo, Cricut)
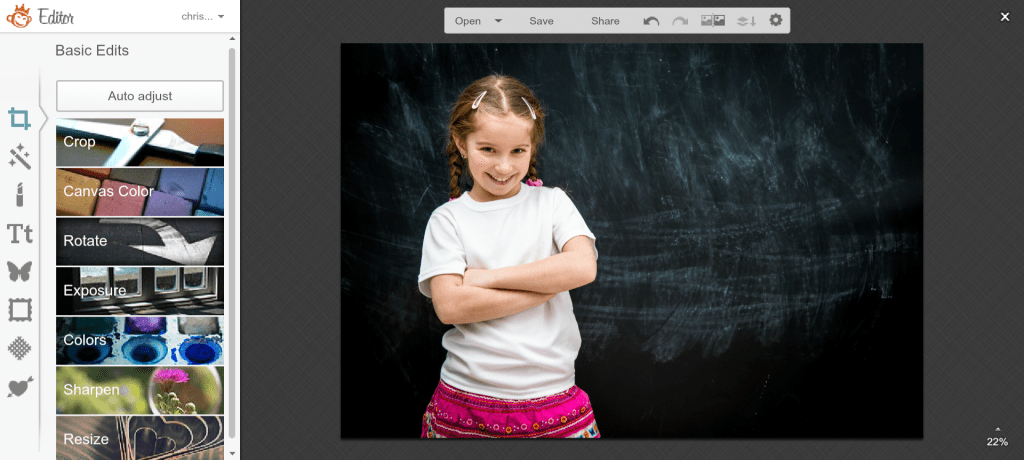
    2. Open your image in PicMonkey. How to Use Mockups for Advertising in Your Craft Business by cuttingforbusiness.com (Silhouette Cameo, Cricut)
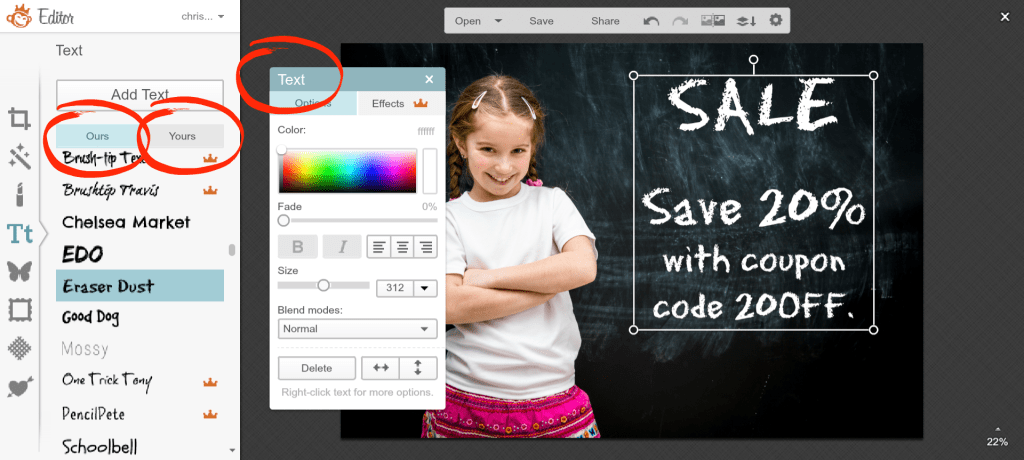
    3. From the left hand side, select the text tool by clicking on the “Tt”, then “Add Text”. Now, click anywhere on your image to add text. You can manipulate the text using the text pop out window as shown in the photo. You can also choose from the fonts on your computer or the fonts in PicMonkey (Yours – circled on the image below or Ours – also circled on the image). How to Use Mockups and Styled Photos for Advertising in Your Craft Business by cuttingforbusiness.com (Silhouette Cameo, Cricut)

    That’s it! After you are happy with your text, save the image by clicking “Save” at the top. Remember, keep your advertising text short and to the point.

    Bonus Steps: I purposely chose this photo because the girl is wearing a plain white shirt. I’m going to show you how to add a logo to her shirt. You’ll need a .png copy of your logo that has a transparent background.

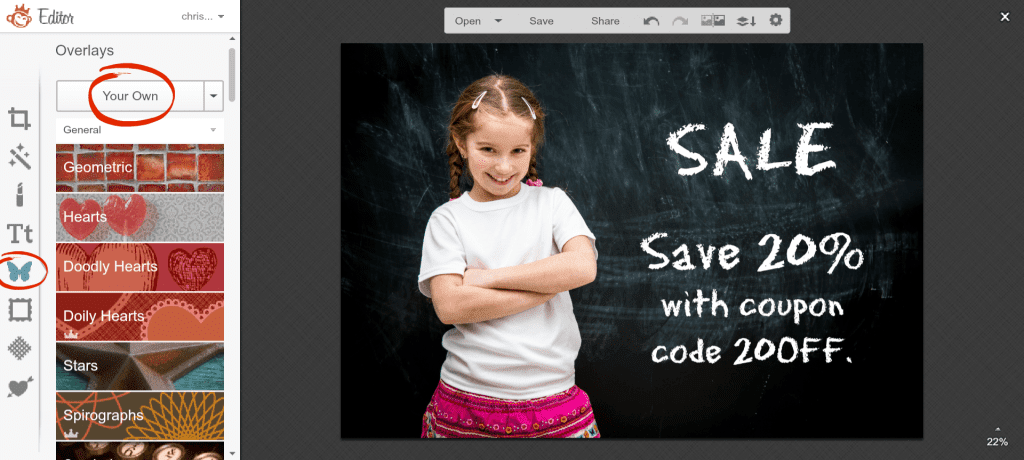
    1. From the menu on the left, click the butterfly icon, then click “Your Own”. How to Use Mockups and Styled Photos for Advertising in Your Craft Business by cuttingforbusiness.com (Silhouette Cameo, Cricut)
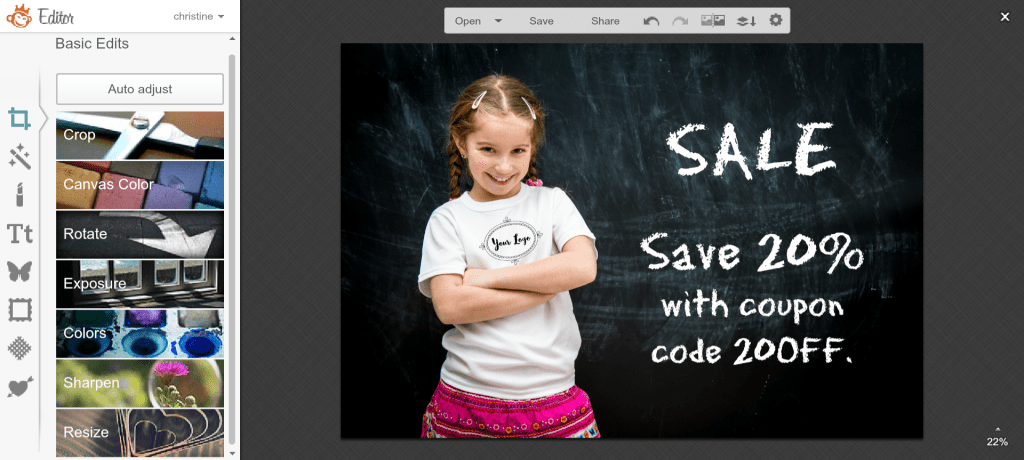
    2. Open your logo from your computer, and you’ll see it pop up on your image. Resize it and drag it into your desired location. Now, your photo is ready to use for advertising. How to Use Mockups and Styled Photos for Advertising in Your Craft Business by cuttingforbusiness.com (Silhouette Cameo, Cricut)

    Isn’t that easy? Did you like this tutorial? If so, be sure to share it on your favorite social media by hovering over the photo below.

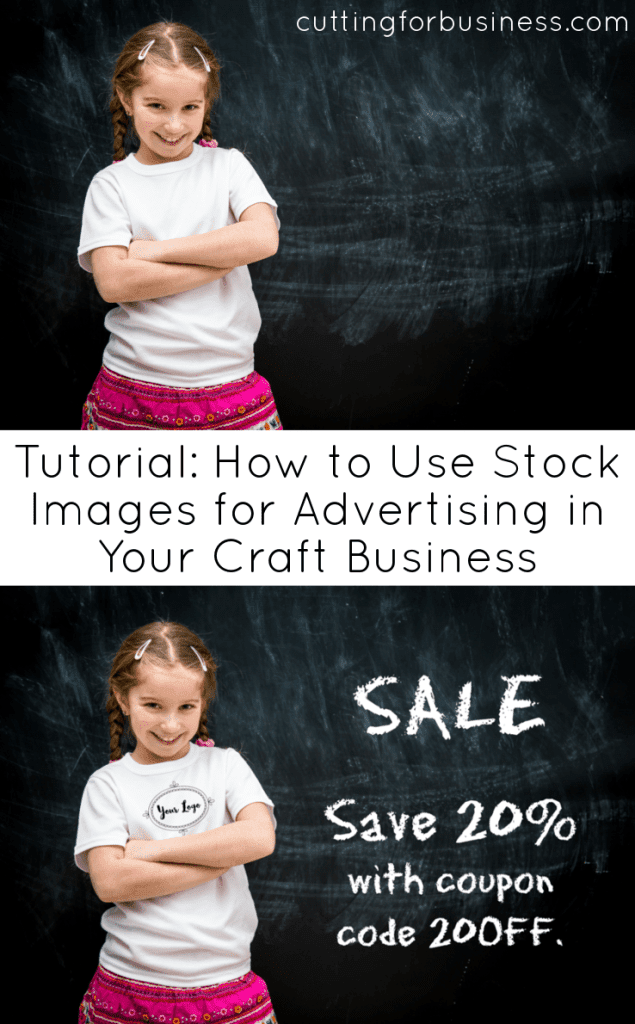
    How to use stock or styled images for advertising in your craft business by cuttingforbusiness.com (Silhouette Cameo, Cricut)

  • How to Create Slideshows for Advertising Your Craft Business

    Today we are continuing with easy types of video advertising for your Silhouette Cameo or Cricut small business. As I mentioned yesterday when we looked at slideshows with Flipagram, video marketing has become more popular than ever! Did you know that statistics show that video promotion is 600% more effective than print and direct mail combined? Let’s look at another style of slideshows that you can use in your Silhouette Cameo or Cricut small business.

    Sample Video Slideshow:

    How to Create Your Own Slideshow

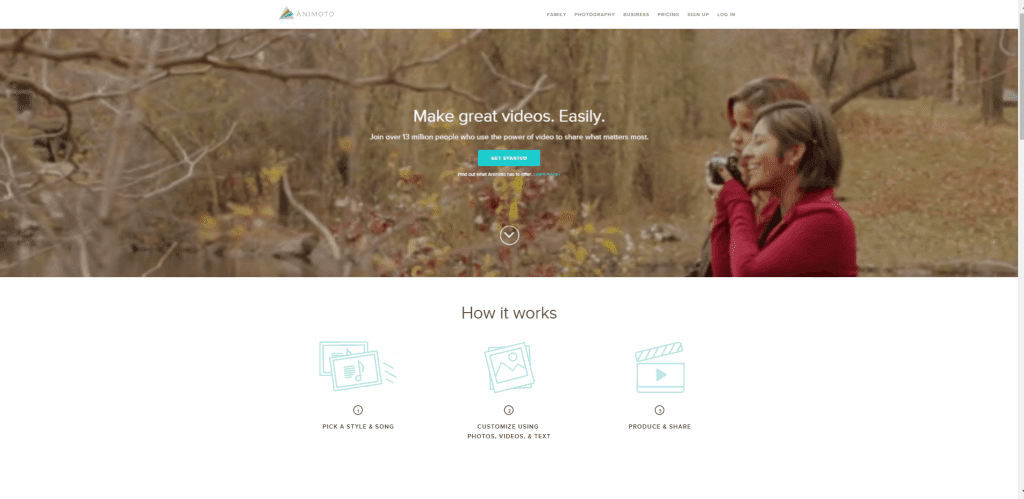
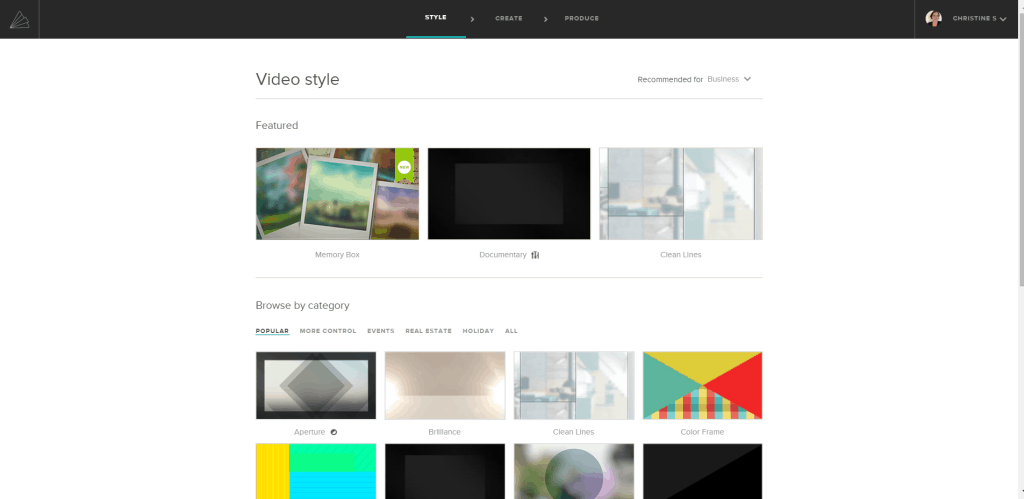
    1. Visit Animoto and create an account. I tested out several different slideshow makers for this post and found that Animoto was the most user friendly. How to Create Slideshows for Advertising Your Craft Business - by cuttingforbusiness.com, Make money with your Silhouette Cameo or Cricut
    2. Choose a theme for your slideshow. One of the things that I like best about Animoto is the premade themes that work well for small business advertising. The sample slideshow above uses the Clean Lines theme. When choosing a theme, go for something minimal that makes your photos stand out rather than the slideshow effects.How to Create Slideshows for Advertising Your Craft Business - by cuttingforbusiness.com, Make money with your Silhouette Cameo or Cricut
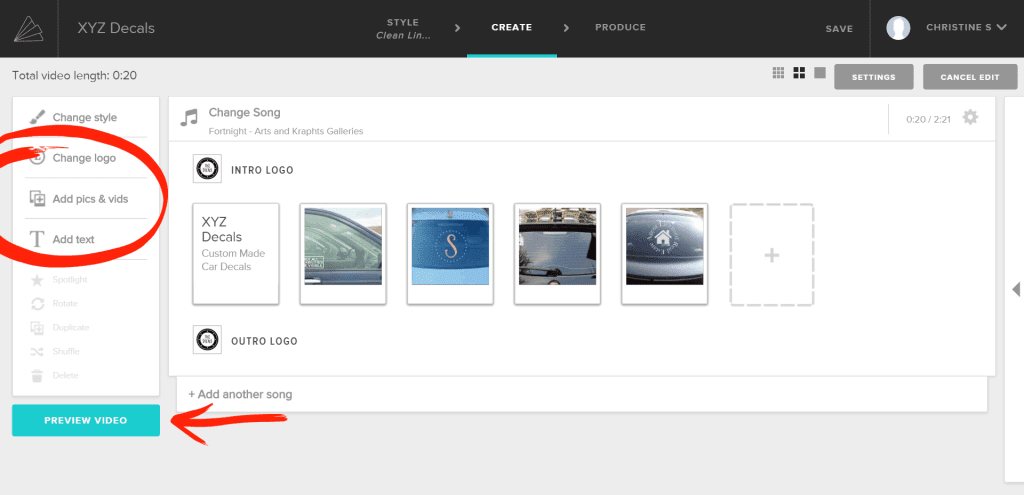
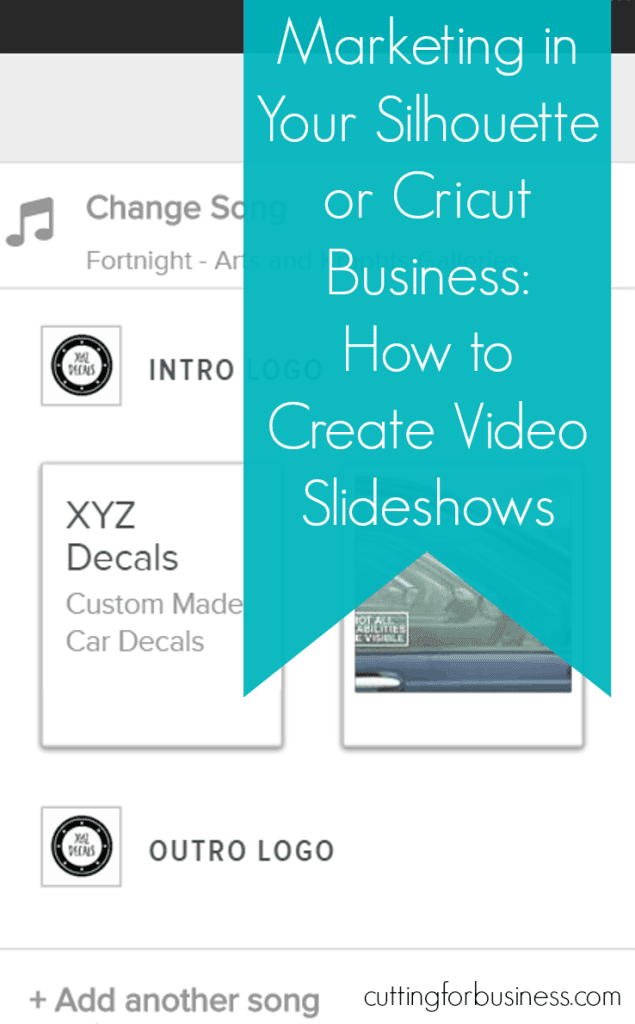
    3. Next, from the left hand side of the screen, you’ll upload photos and your logo. You can also change the soundtrack if you’d like. When you are finished, you can preview your slideshow. How to Create Slideshows for Advertising Your Craft Business - by cuttingforbusiness.com, Make money with your Silhouette Cameo or Cricut
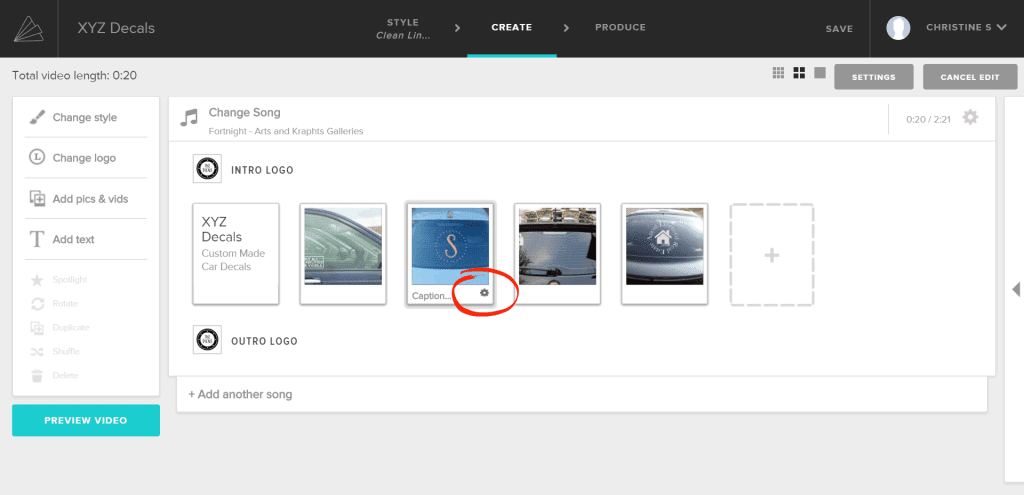
    4. If you want to edit your photos, there is a basic photo editor built into Animoto. Click on the gear under any photo. (I circled it in red in the photo below.) How to Create Slideshows for Advertising Your Craft Business - by cuttingforbusiness.com, Make money with your Silhouette Cameo or Cricut
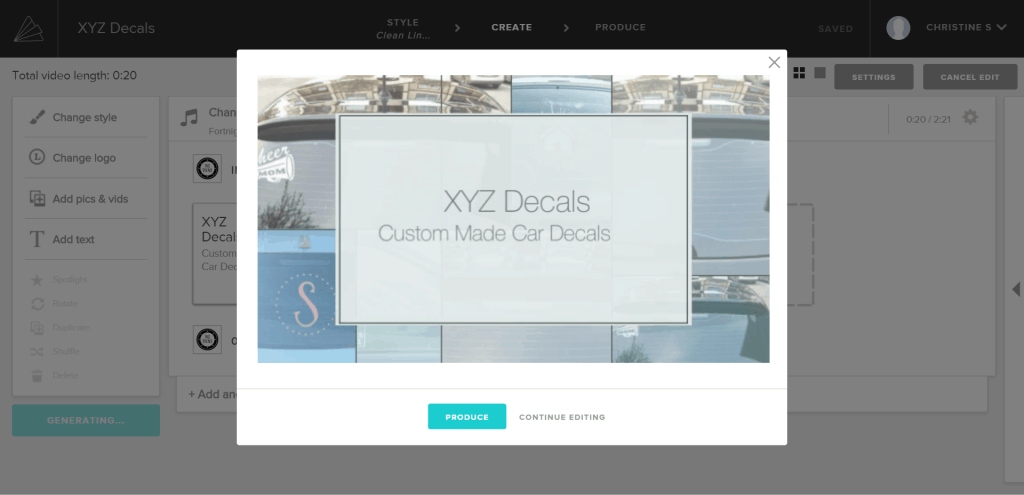
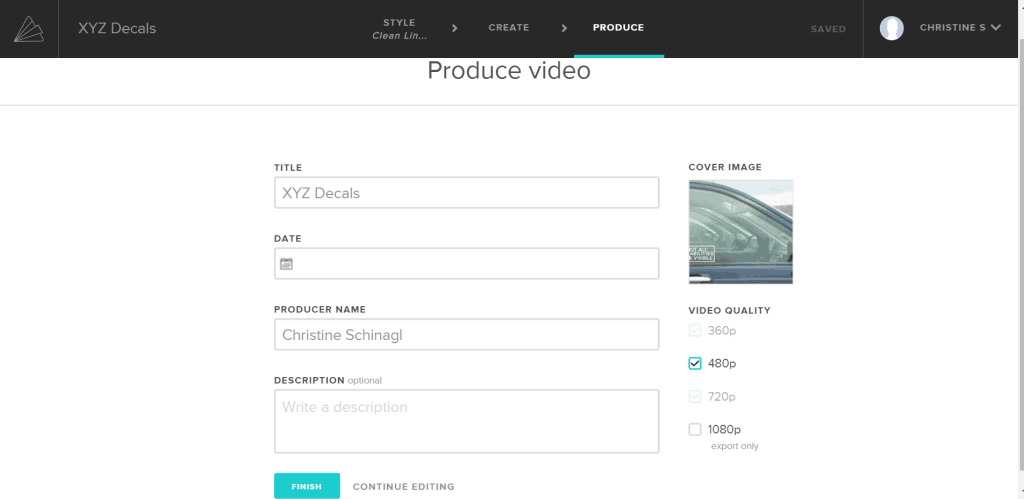
    5. When you are ready to publish your slideshow, click “Preview Video”, then “Produce”. How to Create Video Slideshows for Advertising Your Craft Business - by cuttingforbusiness.com, Make money with your Silhouette Cameo or Cricut
    6. You’ll now be able to save your video slideshow and click “Finish”.How to Create Video Slideshows for Advertising Your Craft Business - by cuttingforbusiness.com, Make money with your Silhouette Cameo or Cricut
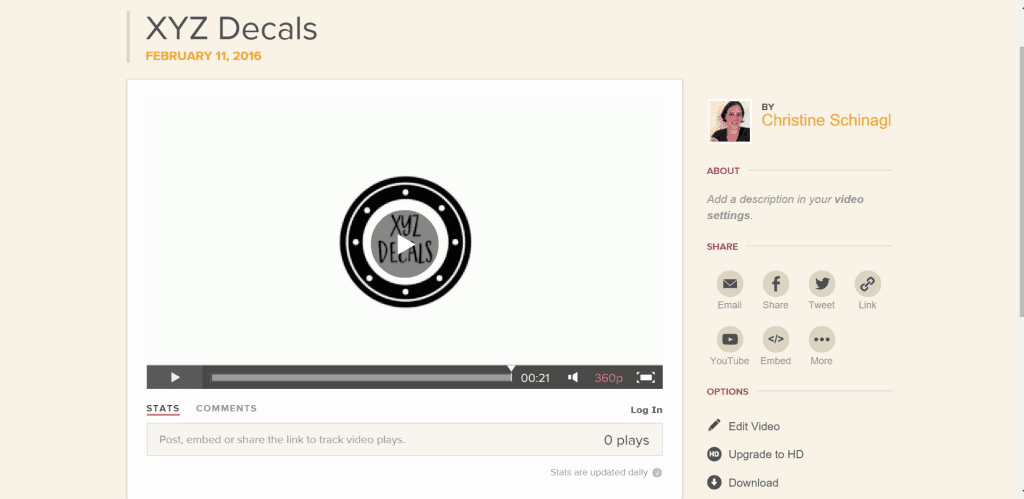
    7. After you produce your video slideshow, you can share it using the icons on the right hand side of the screen. How to Create Video Slideshows for Advertising Your Craft Business - by cuttingforbusiness.com, Make money with your Silhouette Cameo or Cricut

    A few tips before you start creating your video slideshow in Animoto: 1) Remember, your video should be a teaser that introduces your products quickly. For Facebook slideshows, I like to keep them under 59 seconds maximum and under 30 seconds if possible. For Instagram videos, your limit is 15 seconds. 2) Keep your slideshow to a theme. For example, if you sell many different types of products make several slideshows to use in advertising (one for decals, one for tumblers, one for shirts, one for decor). So, what slideshow will you create first? Let me know in the comments.

    How to Create Video Slideshows for Advertising Your Craft Business - by cuttingforbusiness.com, Make money with your Silhouette Cameo or Cricut

  • Why Didn’t I Get a 1099 from Etsy, Ebay, Amazon?

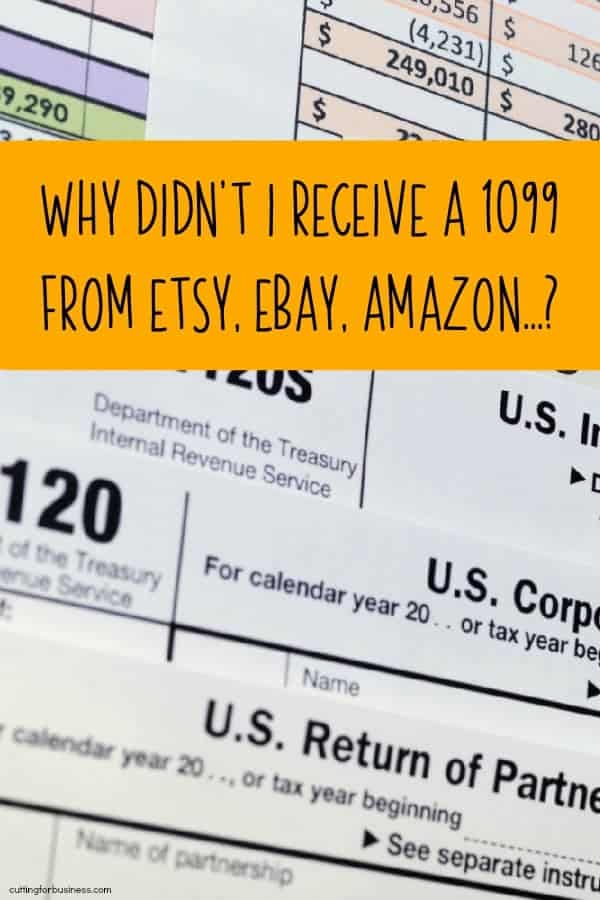
    Every year, as small business owners are preparing their taxes, I get the same question: When will I receive my 1099 from Etsy (or other online marketplace)? Answer: 1099’s are required to be mailed by January 31st. If you have not yet received it well past this date, you may have not met the qualifications.

    The laws are changing. The information below is good through 2021:

    What is a 1099-K?

    Similar to a 1099-MISC, a 1099-K reports gross sales from a payment processor. The figure shown on your 1099-K is your gross sales which include shipping, refunds, card processing fees, sales tax, and even canceled orders.

    Who Will Receive a 1099-K?

    In order to receive a 1099-K from Etsy, Amazon, Paypal, or Stripe, you must have had at least 200 direct checkouts AND $20,000 in transactions. If you do not meet both requirements, you will not receive a 1099-K.

    Starting in 2022, the federal threshold for issuing a 1099-K will drop from $20,000 and 200 transactions to $600 with no minimum transaction level. This means that you will receive a 1099-K if you have more than $600 in checkouts. This change is due to a new federal law called the American Rescue Plan Act.

    Why Didn't I Get a 1099 from Etsy, Ebay, Amazon? By cuttingforbusiness.com.
  • How to Convert .studio or .studio3 to .svg from Silhouette Studio

    Update: The tutorial below gives you more control over your SVG. If you would simply like to convert a simple .studio3 file to SVG automatically, head to this post. Also, if you are working in Silhouette Studio, saving as an SVG has been added to Business Edition!


    So far this week I’ve covered designing with text, creating your own designs, and saving as a .jpg, .png, or .pdf from Silhouette Studio. Today, let’s wrap up our discussion on designing with a quick tutorial on saving as an SVG from Silhouette Studio.

    What is an SVG?

    An SVG is a file format that stands for scalable vector graphic. Fancy words that just mean that the image can be resized without losing the quality (no grainy or blurry images). You can open SVG in any vector program, Silhouette Studio Designer Edition, or Cricut Design Space.

    Tutorial to save as SVG in Silhouette Studio

    1. First, prep your design in Silhouette Studio.
      • Color your image black and white. This tutorial works best when you have a high contrast image (black) and a solid background (white).
      • Group all pieces of your image together.
      • Turn off the grid on your virtual mat. Sometimes the grid lines will show if you don’t turn them off.
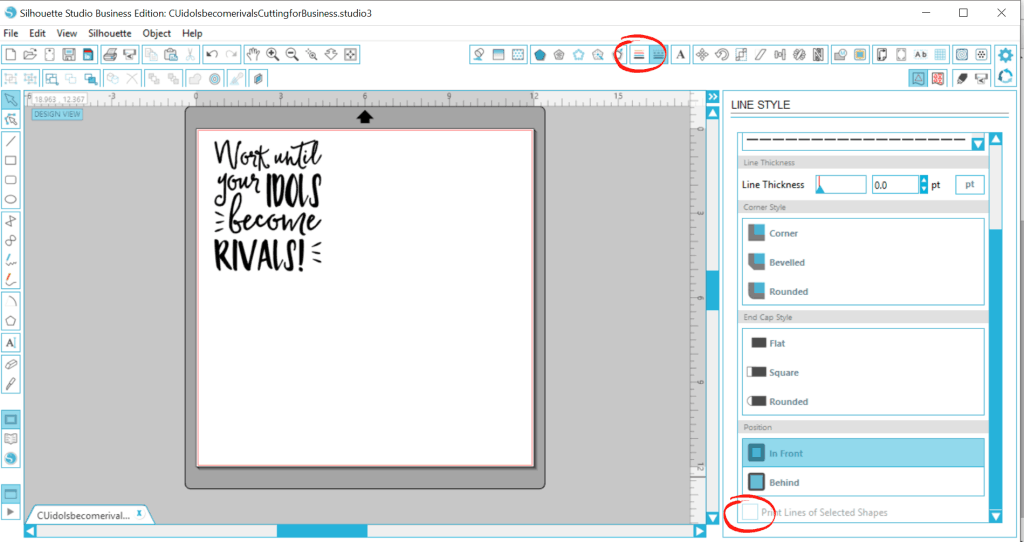
      • Color your lines black and make sure that the “Print Lines of Selected Shapes” is unchecked as shown in the image below: How to Convert .studio or .studio3 to .svg from Silhouette Studio
    2. Now, you’ll need to use a PDF Printer to virtually print your design to your computer in .png format. I covered gave a step by step tutorial to do this yesterday.
    3. Download and install Inkscape (it’s free).
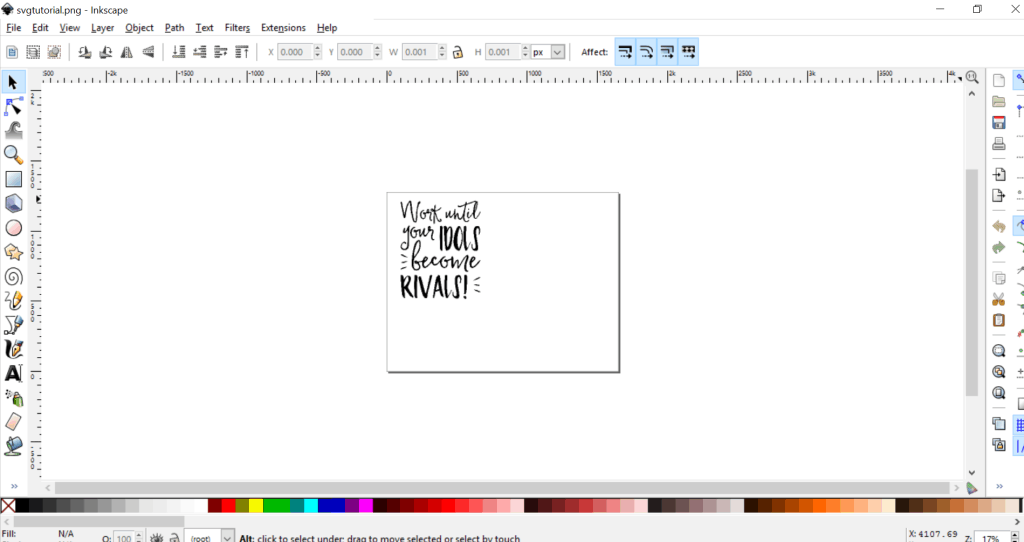
    4. Open your image in Inkscape. If you get a window to select the .png input, choose “Embed” and click “OK”.How to Convert .studio or .studio3 to .svg from Silhouette Studio by cuttingforbusiness.com
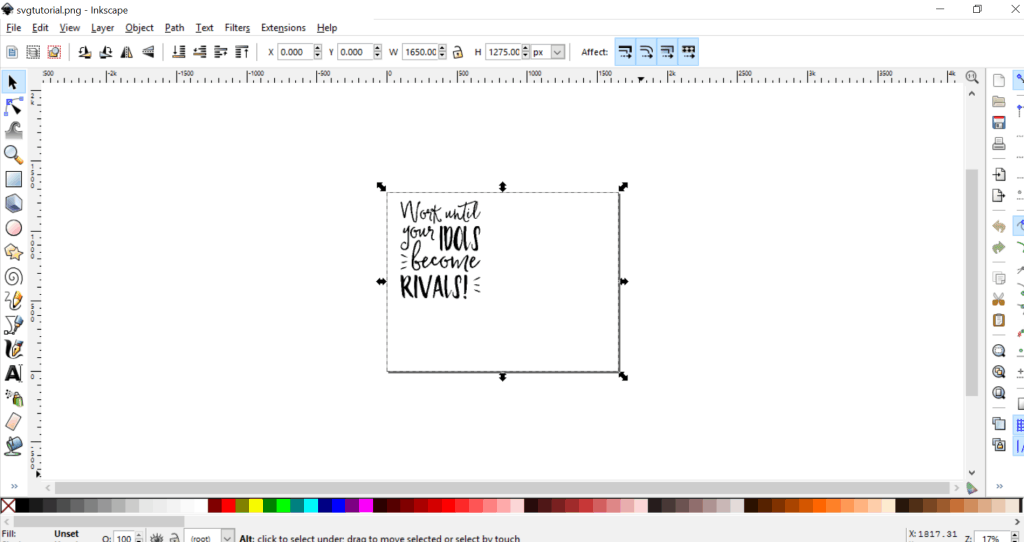
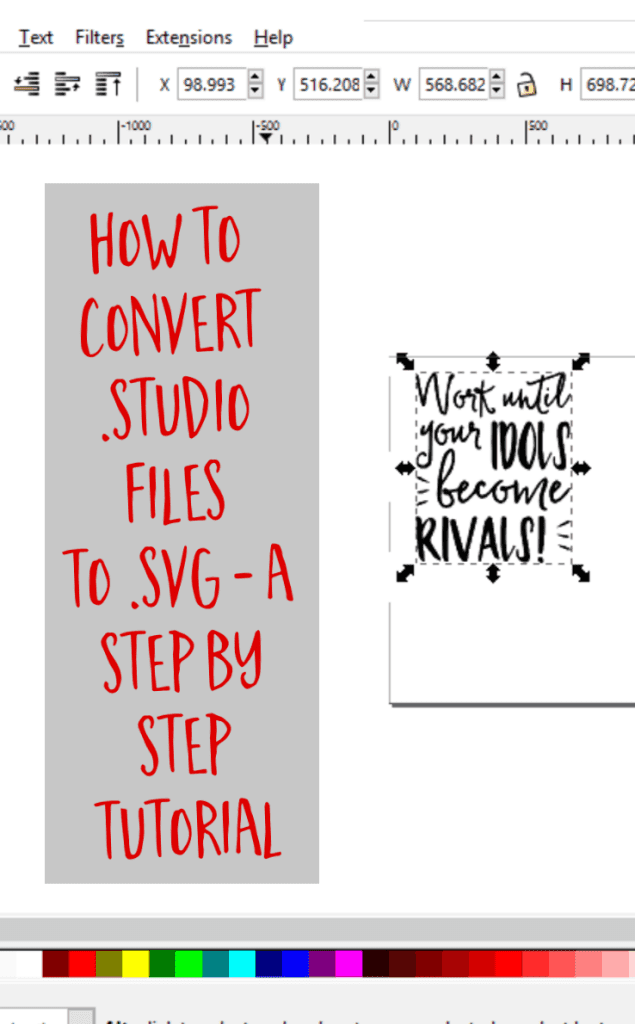
    5. Press “Control + A” to select all. You’ll notice that arrows appear around your project. How to Convert .studio or .studio3 to .svg from Silhouette Studio by cuttingforbusiness.com
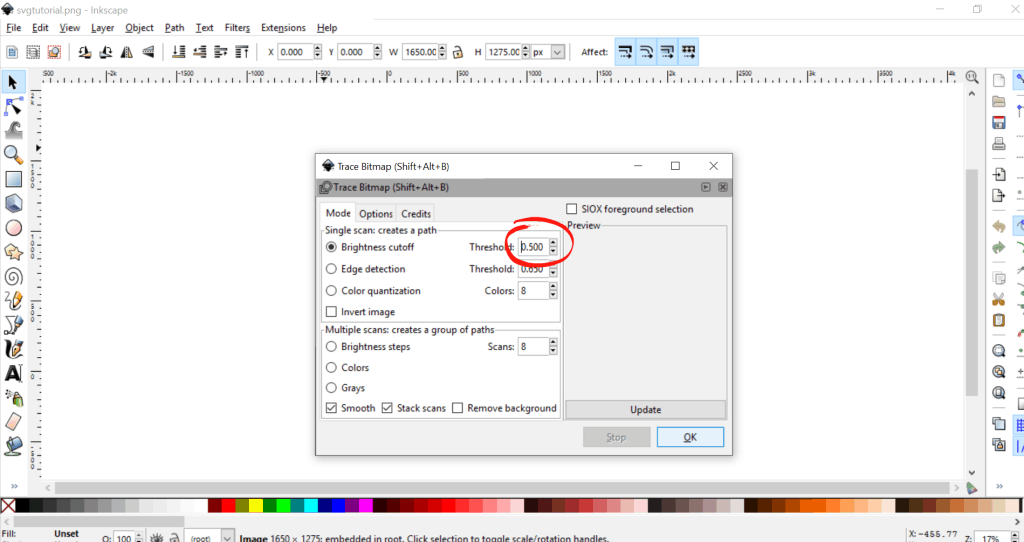
    6. From the menu at the top of Inkscape, go to “Path”, then “Trace Bitmap”. A pop up window will appear and you’ll will want to change the “Brightness cutoff” to .5 or higher. Then, click “Ok”. Close the “Trace Bitmap” box.How to Convert .studio or .studio3 to .svg from Silhouette Studio by cuttingforbusiness.com
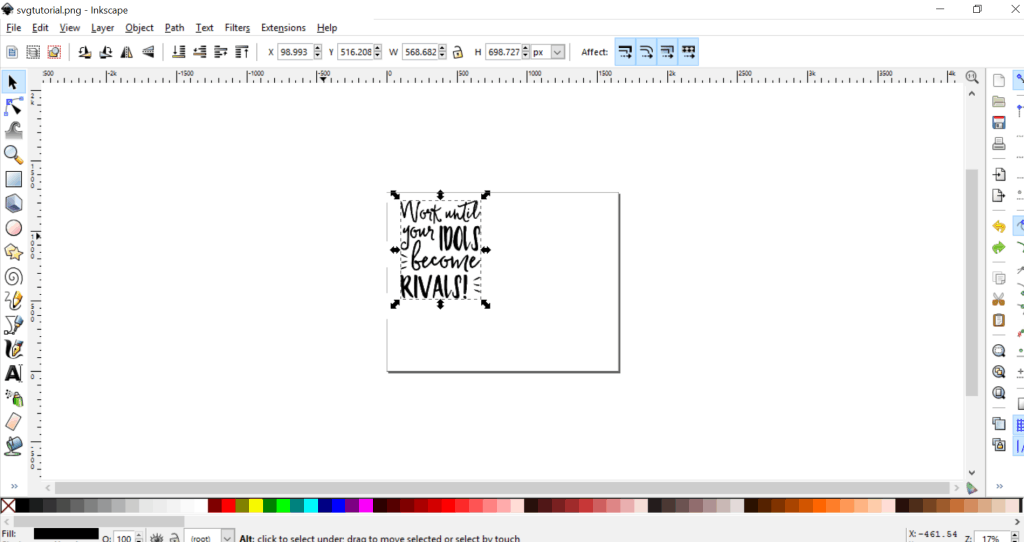
    7. Inkscape just worked it’s magic! It might not look different but you’ve now got two copies of your design. You’ll notice that the black arrows have moved and are now tightly around your design. How to Convert .studio or .studio3 to .svg from Silhouette Studio by cuttingforbusiness.com
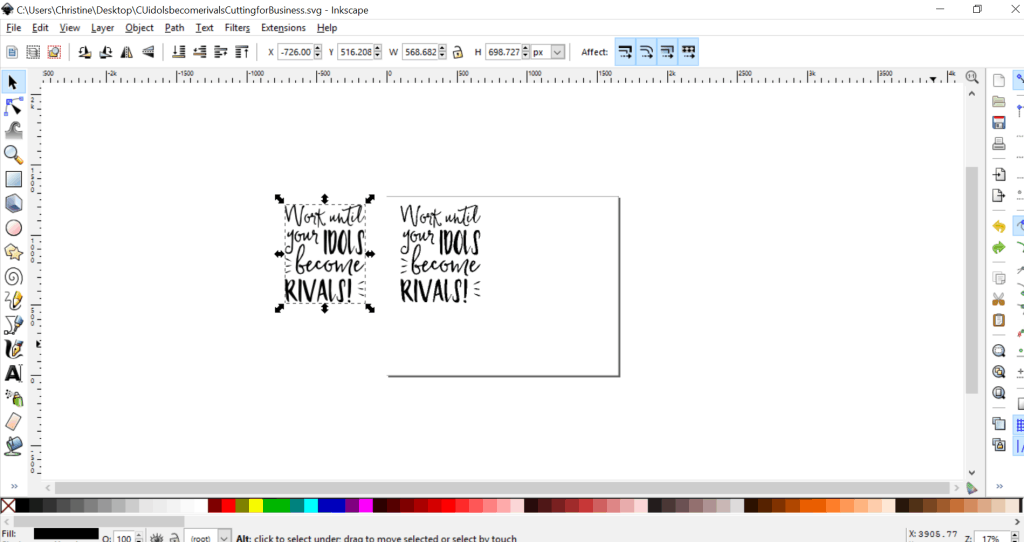
    8. Drag the top copy of the design over to reveal both designs. Delete the one in the back by selecting it and pressing your keyboard delete button. Drag your design back onto the project mat.How to Convert .studio or .studio3 to .svg from Silhouette Studio by cuttingforbusiness.com
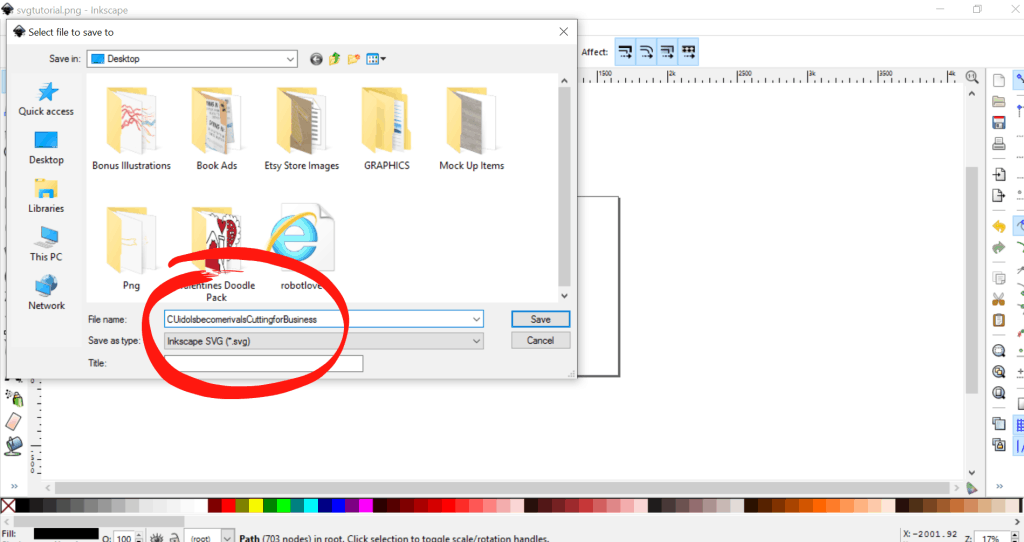
    9. Go to “File”, “Save As” to save your file. Be sure that “Inkscape SVG” is selected, name your file, and click “Save”. How to Convert .studio or .studio3 to .svg from Silhouette Studio by cuttingforbusiness.com

    That’s it, you are ready to go with your new SVG!

    How to Convert .studio or .studio3 to .svg from Silhouette Studio by cuttingforbusiness.com