Category: Design with Me (SVG Tutorials)

  • Silhouette Studio Tutorial: How to a Create Sketched Shape SVG

    Design with Me is a new regular feature on Cutting for Business! Each Friday, I’ll bring you a new Silhouette Studio tutorial featuring how to design an SVG.

    Let’s design some a sketched shape SVG today in Silhouette Studio.
    Silhouette Studio Tutorial: How to a Create Sketched Shape SVG - cuttingforbusiness.com

    Silhouette Studio Tutorial: Sketched Shape SVG

    1. In Silhouette Studio, use the ‘Draw a Curve Shape’ tool (it’s located in the ‘Line Tools’, which is the fourth icon on the left hand side) to draw a heart. Don’t stress if it isn’t perfect.
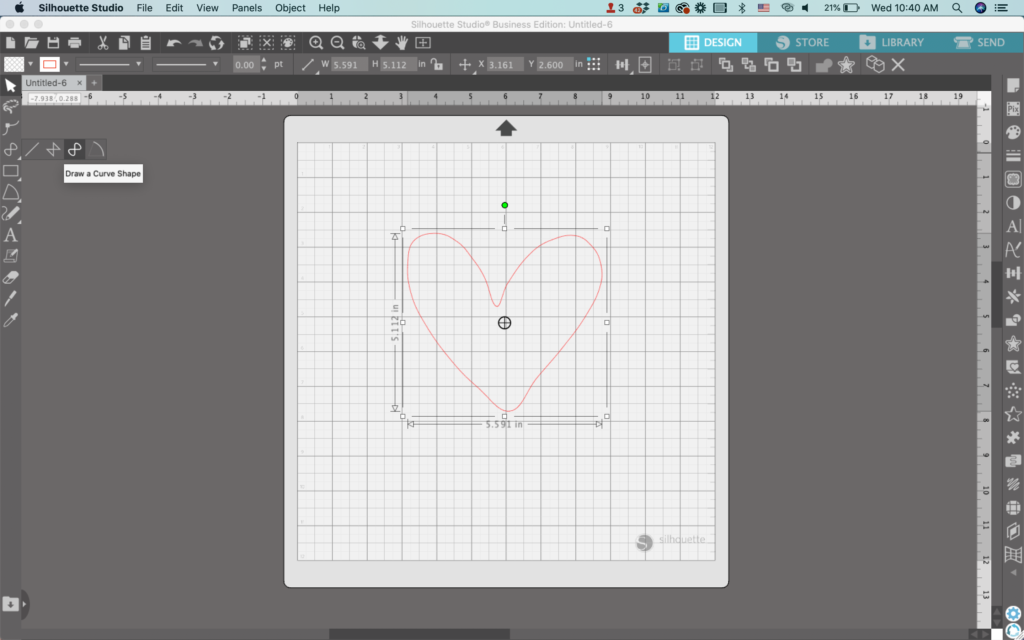
    Silhouette Studio Screenshot - cuttingforbusiness.com

    2. Double click the heart to open the ‘Point Editing’ Panel. Fine tune your heart. Personally, I find ‘Smooth’ and ‘Simplify’ to work great for this.
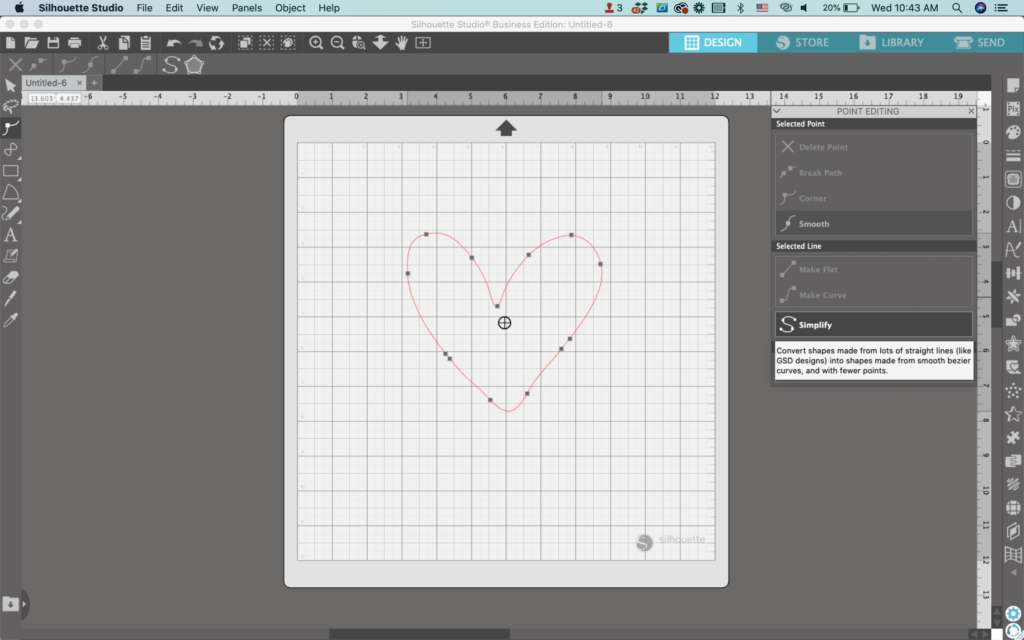
    Silhouette Studio Screenshot - cuttingforbusiness.com

    3. Navigate to ‘Panels’, then ‘Line Style’. Increase the thickness of the line. In this tutorial, I’m using a line thickness of 6.
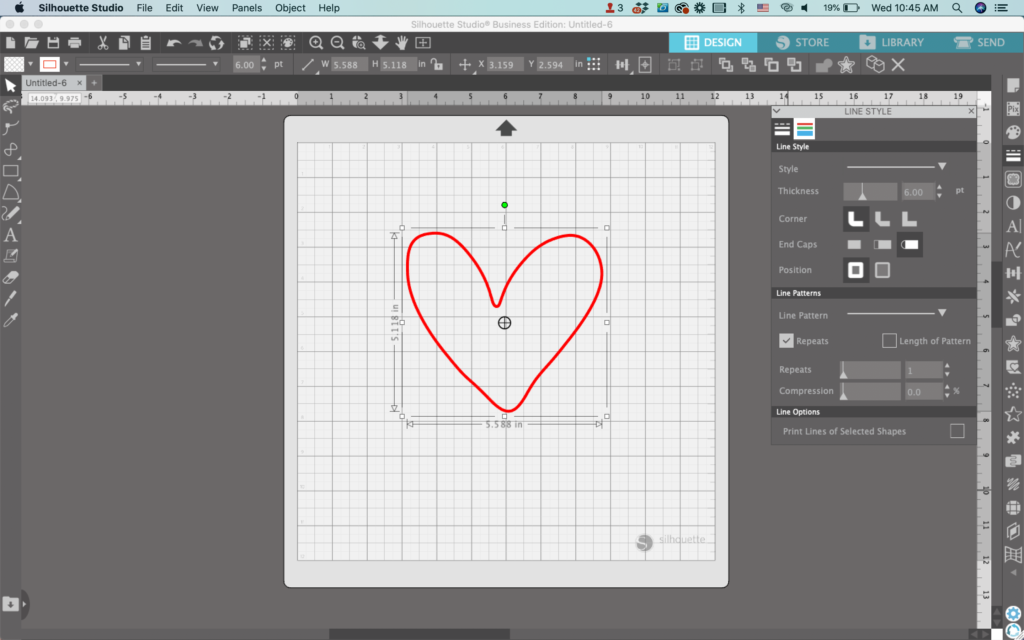
    Silhouette Studio Screenshot - cuttingforbusiness.com

    4. Right click the heart, then select ‘Duplicate’ to make a copy.
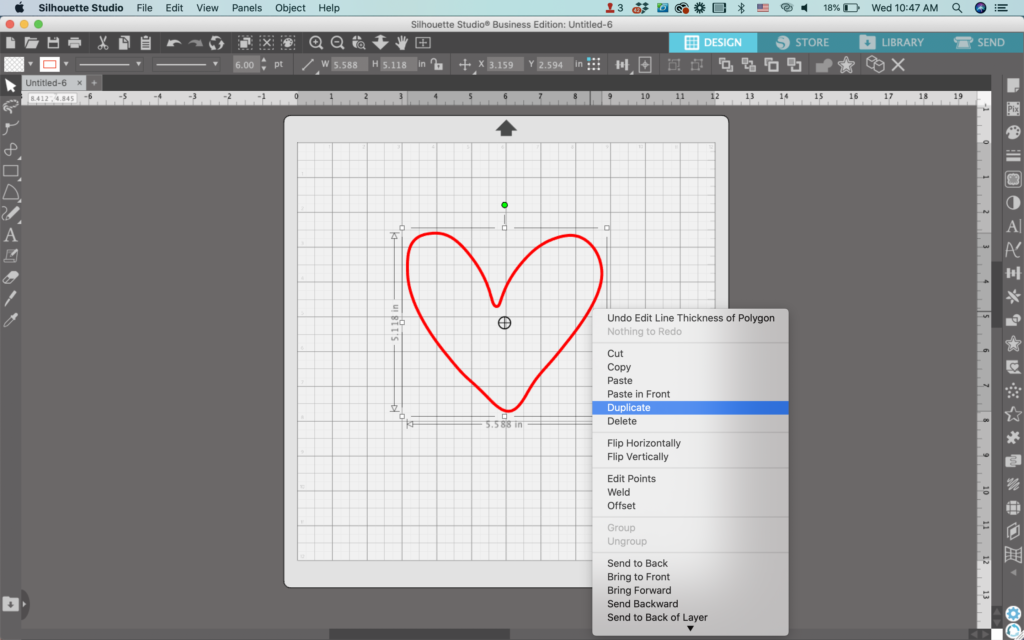
    Silhouette Studio Screenshot - cuttingforbusiness.com

    5. Drag the duplicate on top of the original, but offset it slightly. You can also resize it a bit or stretch it slightly.
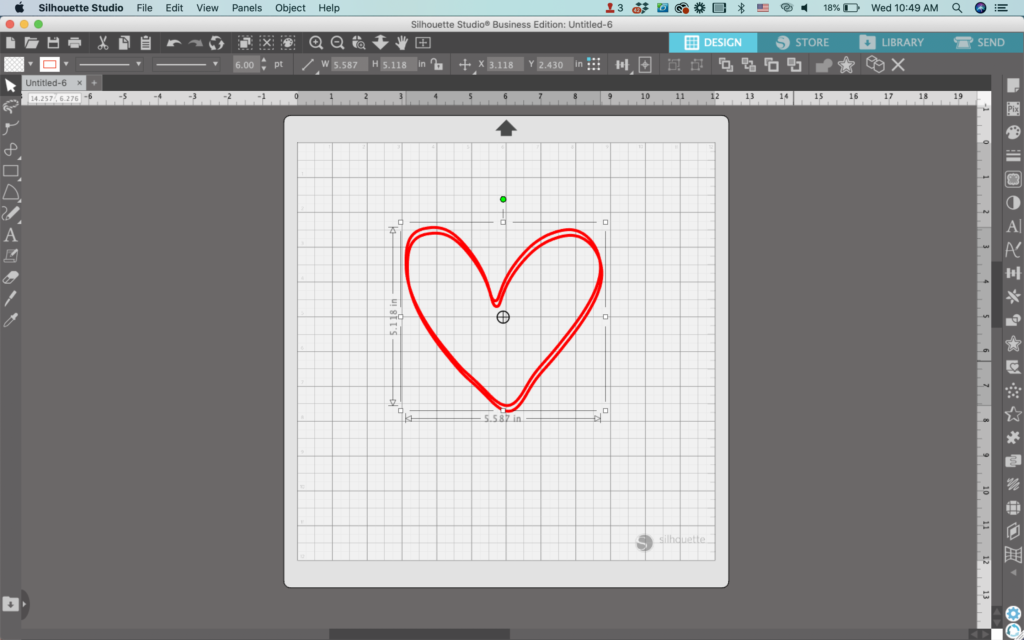
    Silhouette Studio Screenshot - cuttingforbusiness.com

    6. Repeat steps 4 and 5 once (maybe two or three times – you’re the designer so it’s your choice!).
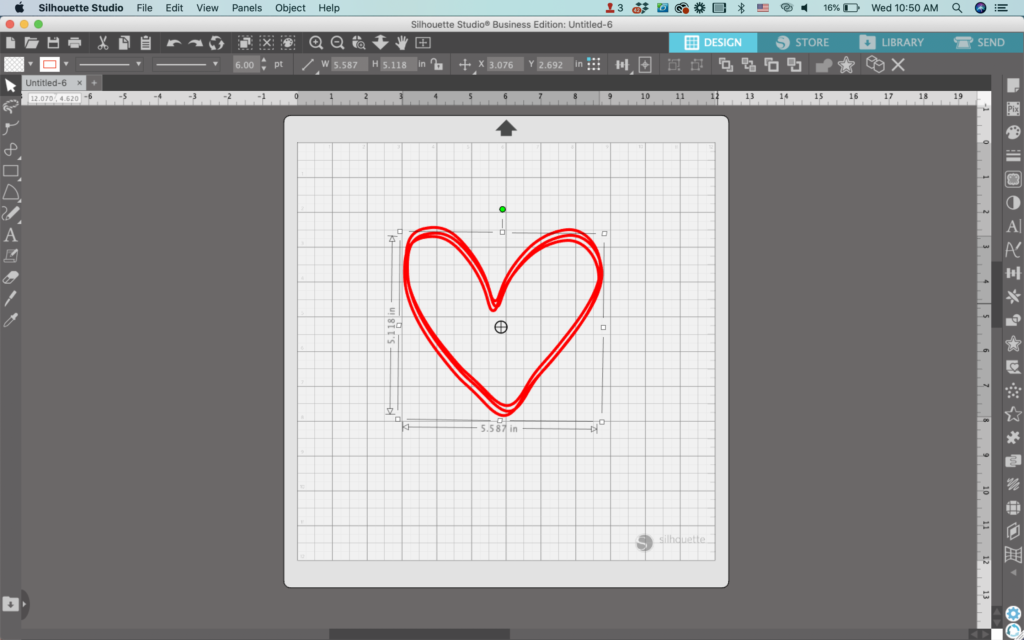
    Silhouette Studio Screenshot - cuttingforbusiness.com

    7. Navigate to ‘Panels’, then ‘Trace’, and trace your stack of hearts. Why? Right now, if you attempted to cut this, it will cut three hearts because these are simply lines. By tracing, you make it into a shape.
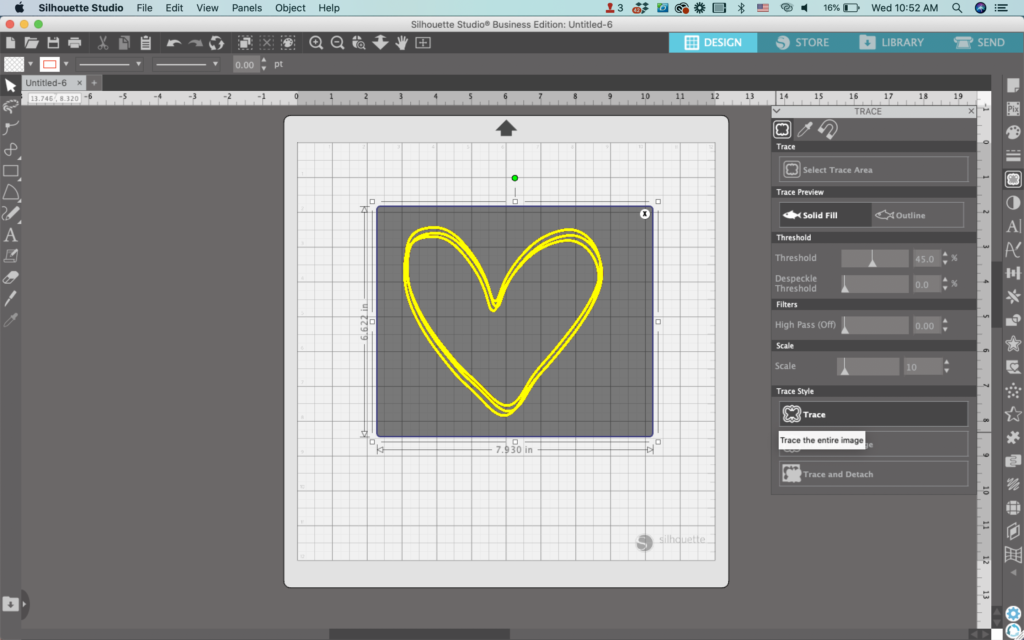
    Silhouette Studio Screenshot - cuttingforbusiness.com

    8. Delete the original line shapes. You’ll be left with a sketched shape.
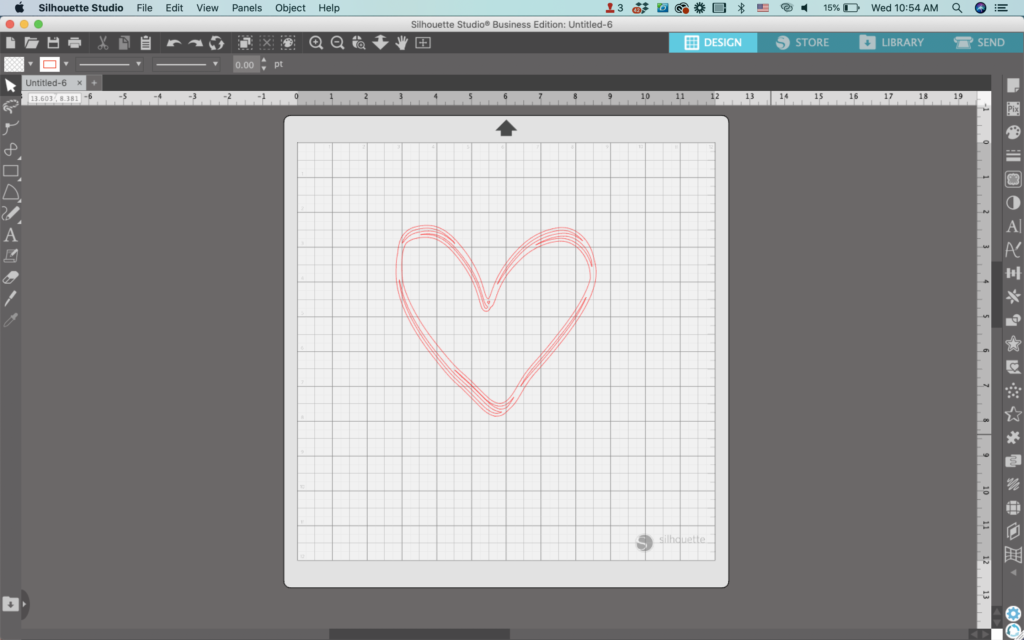
    Silhouette Studio Screenshot - cuttingforbusiness.com

    9. (Optional) Zoom in on your design and double click to open the ‘Point Editing’ Panel. Delete any pieces that might be hard to weed. This is especially helpful if you plan to cut the sketched shape in vinyl.
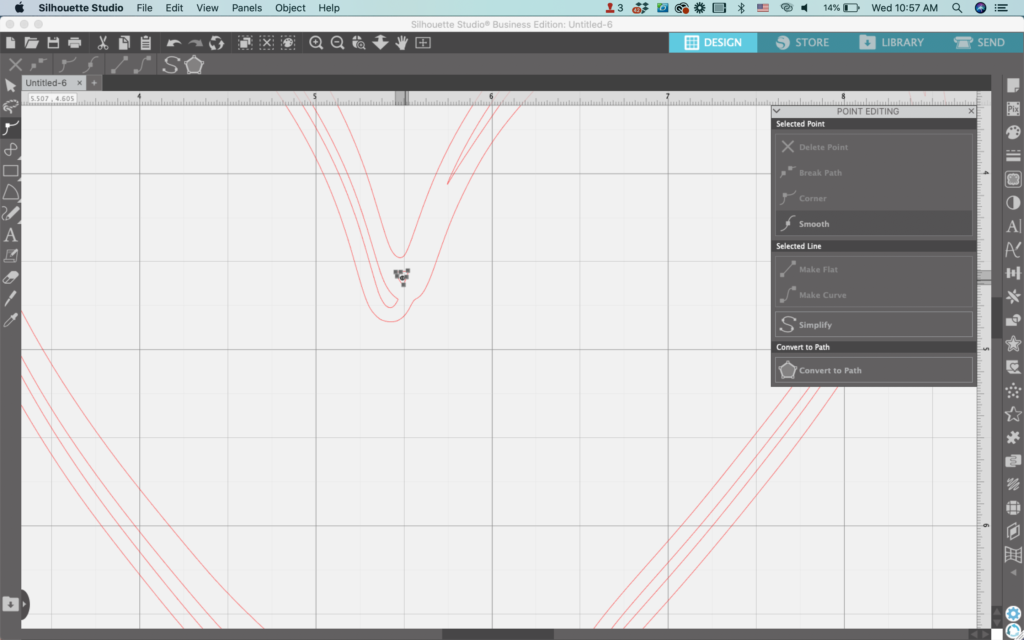
    Silhouette Studio Screenshot - cuttingforbusiness.com

    10. Fill your design with color.

    Silhouette Studio Screenshot - cuttingforbusiness.com

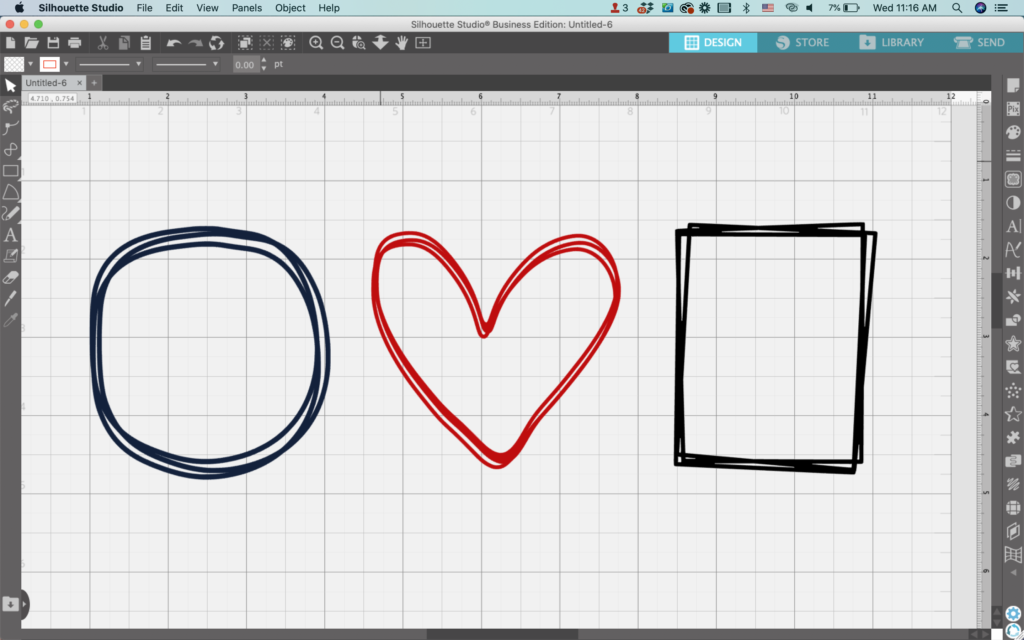
    While I demonstrated this technique with a heart, you can use any shape: star, rectangle, square, circle, oval, polygon, and so on.

    My finished designs looks like this:

    Sketched circle spice jar label:

    Sketched circle spice jar labels - cuttingforbusiness.com.

    Sketched heart Valentine’s Day wrapping paper:

    Sketched heart Valentine's Day wrapping paper - cuttingforbusiness.com.

    Don’t Forget to Save!

    To save your new SVG creation, head to ‘File’, ‘Save As’, ‘Save to Hard Drive’, name the file, then select ‘SVG’ from the dropdown menu.

    Want More SVG Tutorials?

    View more Design with Me SVG tutorials.
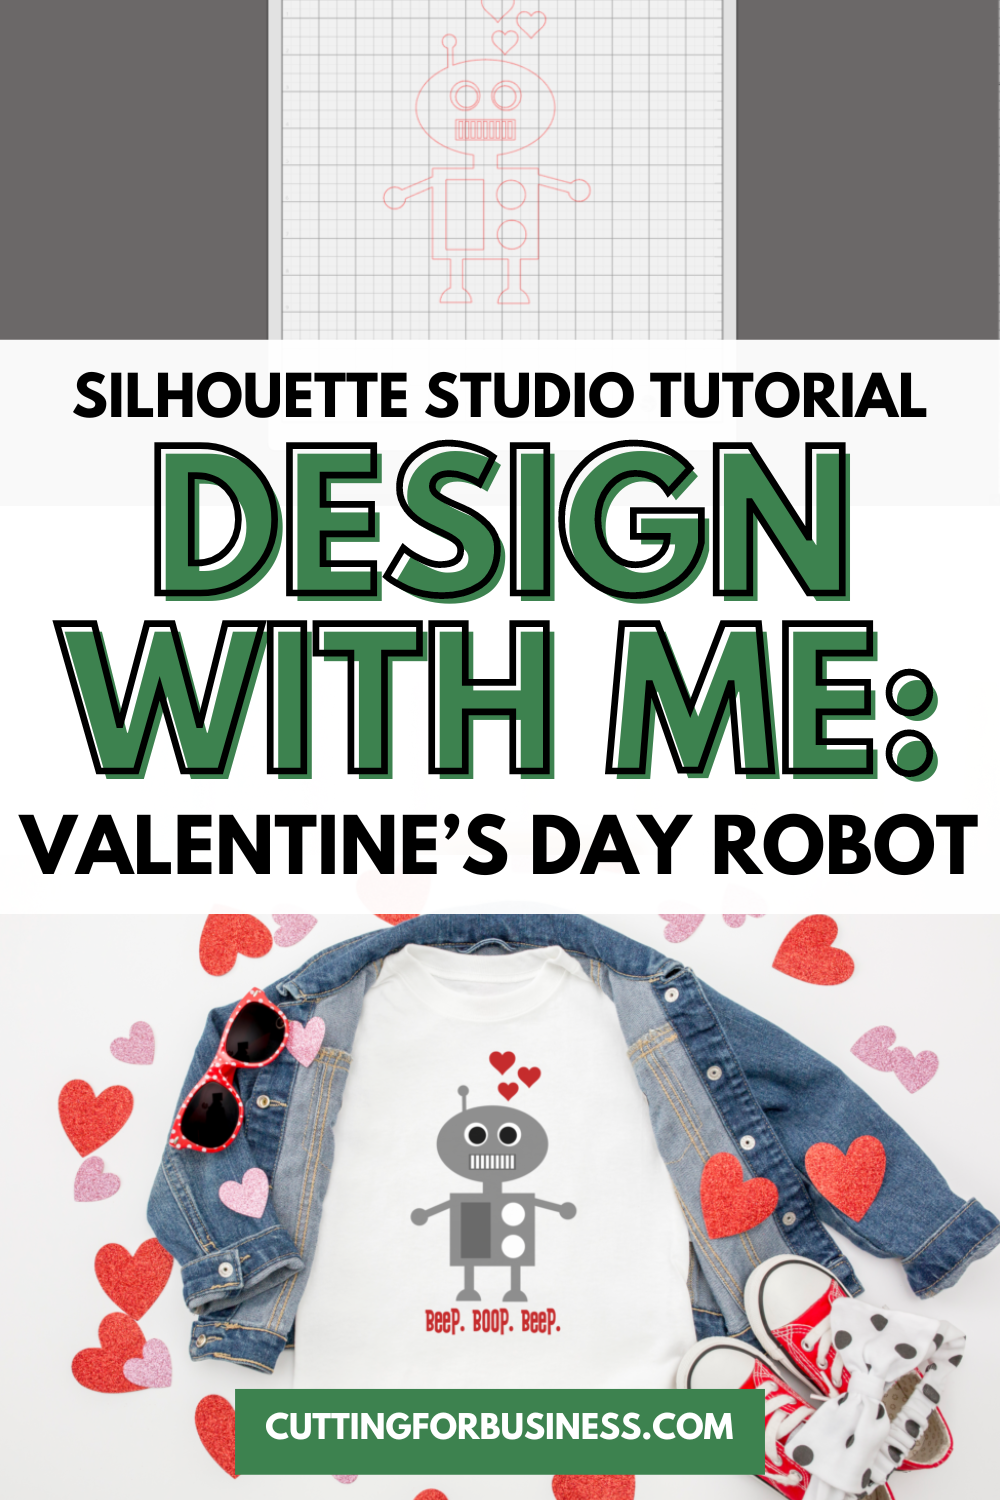
  • Silhouette Studio Tutorial: Valentine’s Day Love Robot SVG

    Design with Me is a new regular feature on Cutting for Business! Each Friday, I’ll bring you a new Silhouette Studio tutorial featuring how to design an SVG.

    Let’s talk Valentine’s Day today, specifically – how to make the cutest robot you’ve ever designed.

    Silhouette Studio Tutorial: Valentine's Day Robot - cuttingforbusiness.com

    Silhouette Studio Tutorial: Love Robot SVG

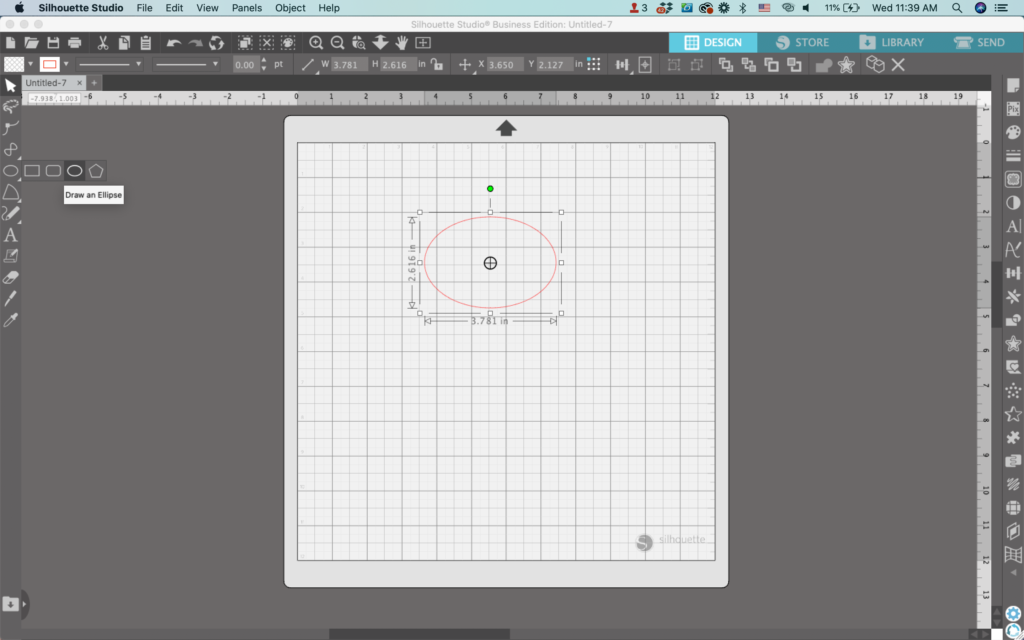
    1. In Silhouette Studio, use the ‘Draw an Ellipse’ tool to draw an oval. This will be the robot’s head.
    Silhouette Studio screenshot - cuttingforbusiness.com.

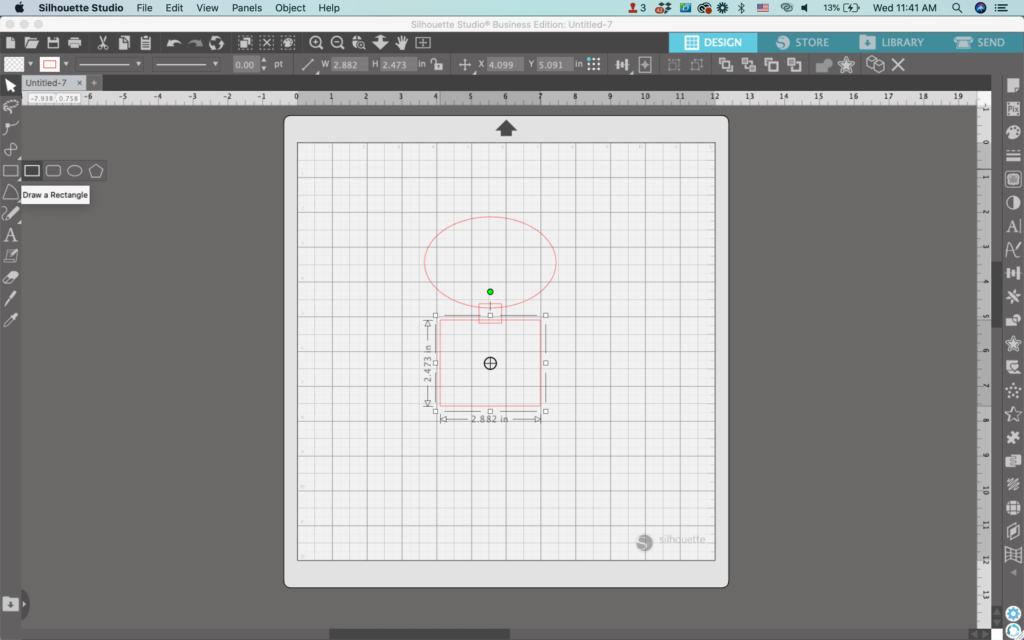
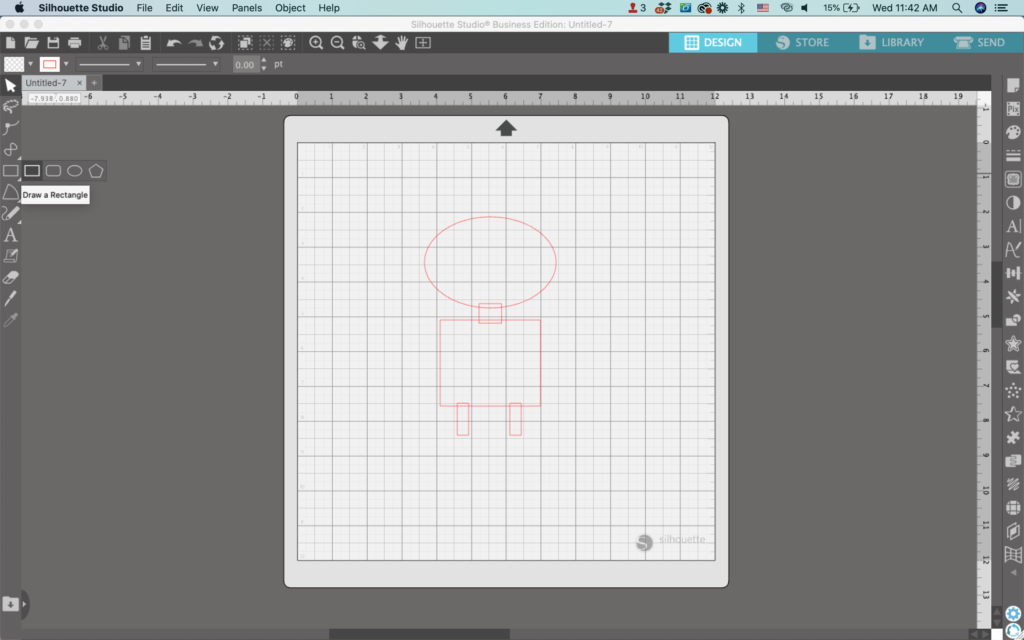
    2. Use the ‘Draw a Rectangle’ tool to draw both a neck and a body. Make sure that each body part slightly overlaps the next.

    Silhouette Studio screenshot - cuttingforbusiness.com.

    3. Draw two additional rectangles for the robot’s legs. Again, make sure they slightly overlap the body.

    Silhouette Studio screenshot - cuttingforbusiness.com.

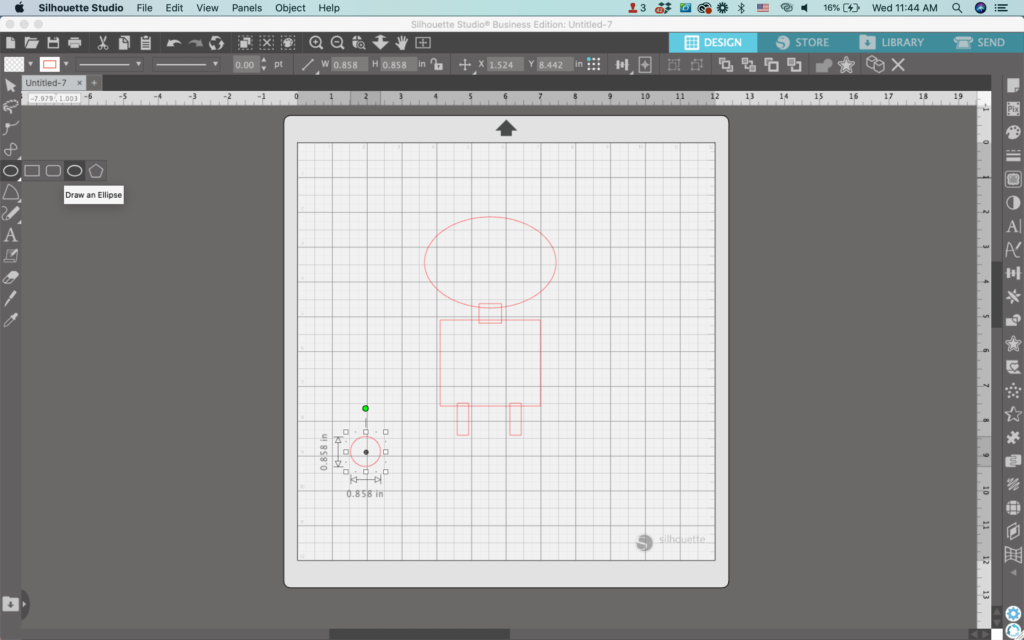
    4. Use the ‘Draw an Ellipse’ tool while holding down the SHIFT key to make a perfect circle.

    Silhouette Studio screenshot - cuttingforbusiness.com.

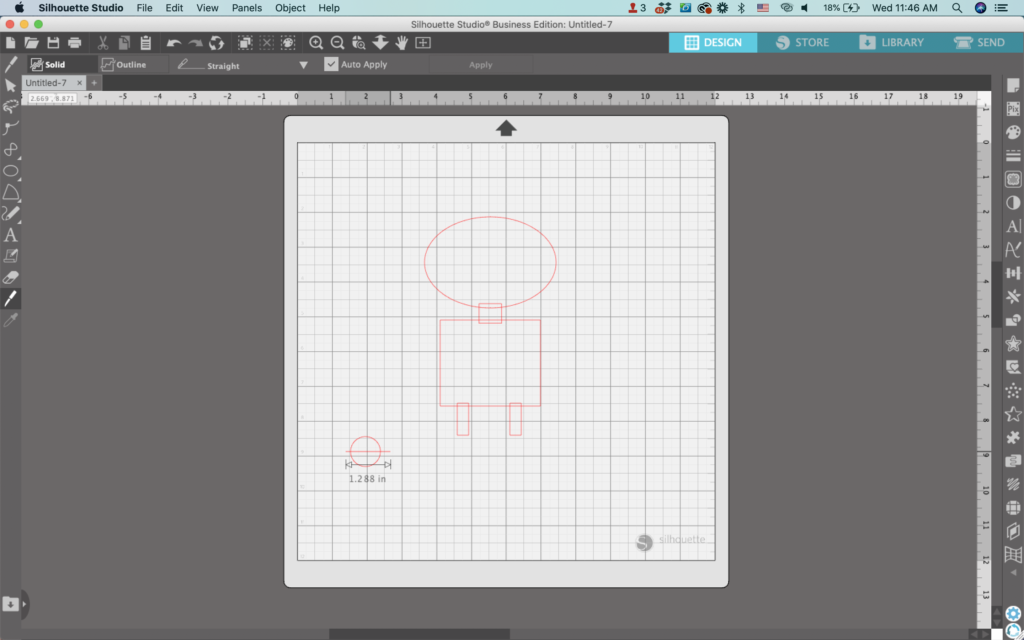
    5. With the ‘Knife Tool’ (it’s second from the bottom on the left hand side), slice the circle in half. Be sure the knife setting is set to ‘Solid’.

    Silhouette Studio screenshot - cuttingforbusiness.com.

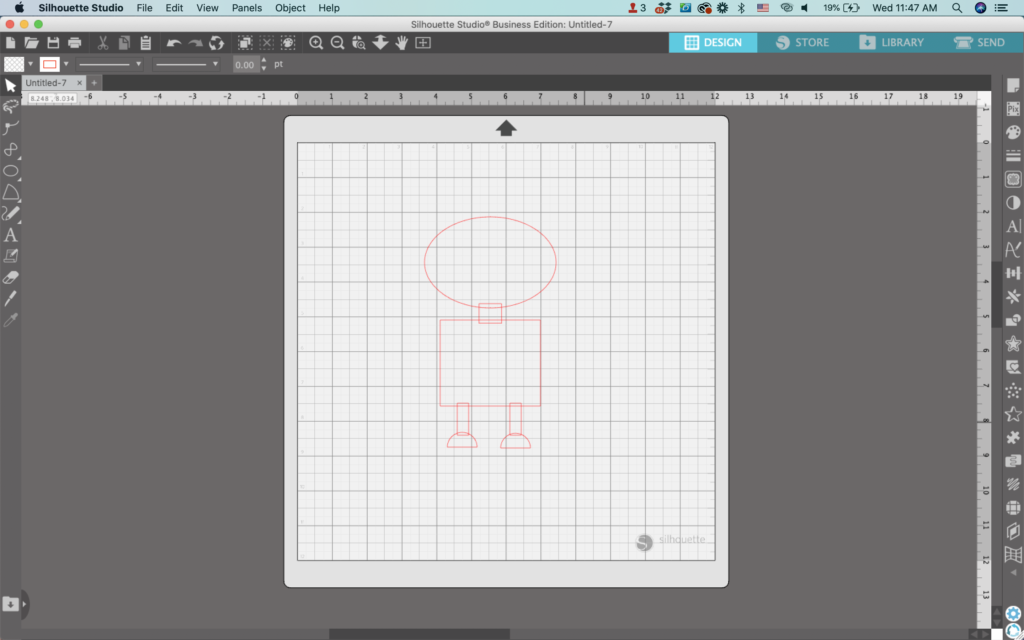
    6. Move the half circles into place to make the robot’s feet. Of course, make sure they overlap slightly.

    Silhouette Studio screenshot - cuttingforbusiness.com.

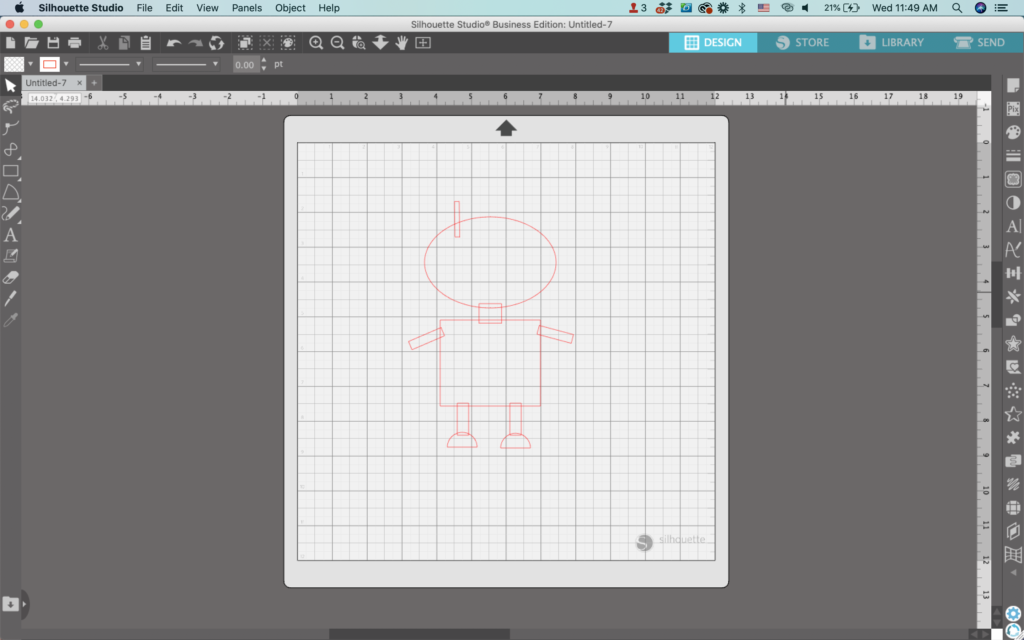
    7. Draw three additional rectangles using the ‘Draw a Rectangle’ tool. Move them into place as the robot’s arms and an antenna. Again, overlap them slightly with the shape next to it.

    Silhouette Studio screenshot - cuttingforbusiness.com.

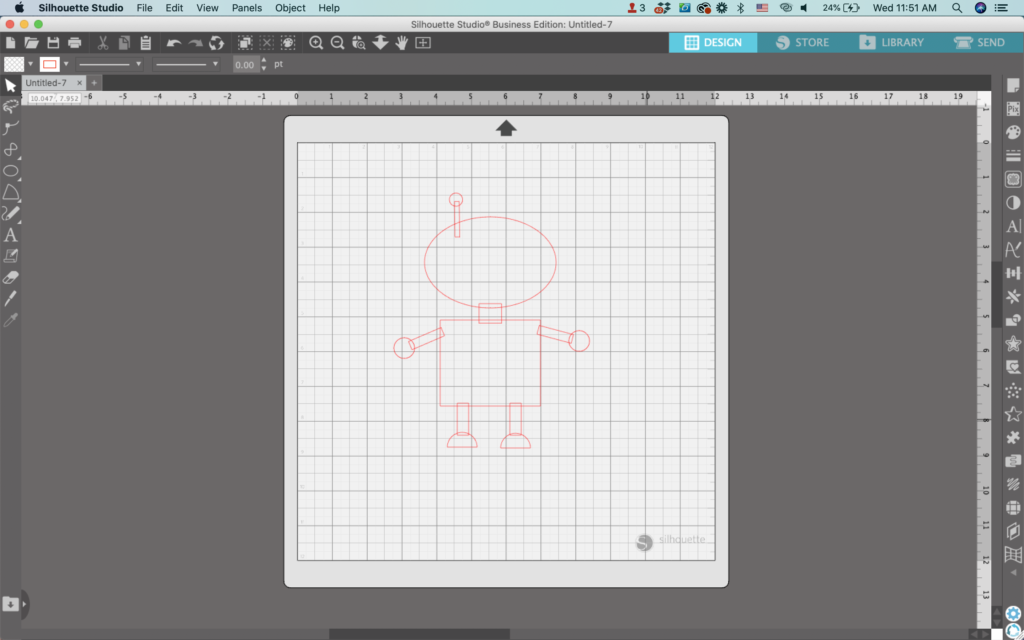
    8. Draw three circles using the ‘Draw an Ellipse’ tool. Move them into place as the robot’s arms and antenna topper. You guessed it: They should overlap the other pieces slightly.

    Silhouette Studio screenshot - cuttingforbusiness.com.

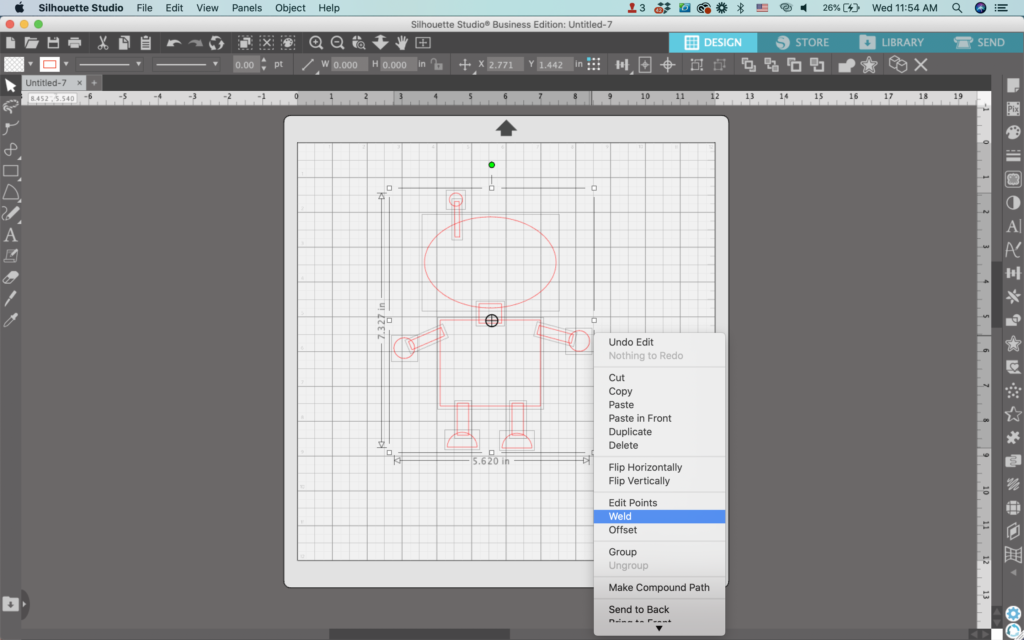
    9. Select all the robot’s pieces and right click, then select ‘Weld’ to group the pieces together.

    Silhouette Studio screenshot - cuttingforbusiness.com.

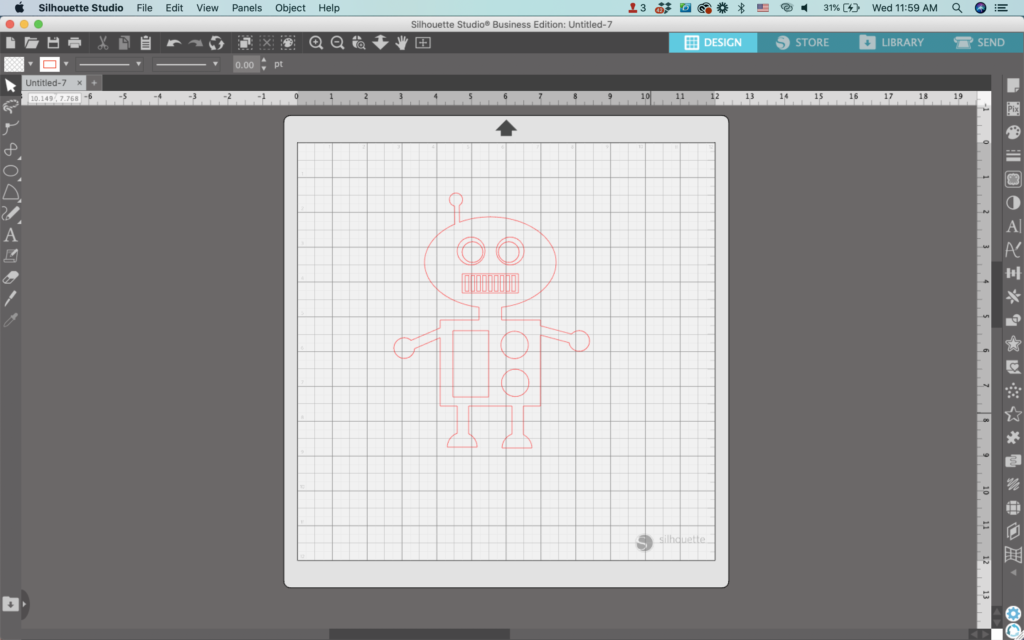
    10. Using shapes, add additional details like buttons on the robot’s body, eyes, and a mouth.

    Silhouette Studio screenshot - cuttingforbusiness.com.

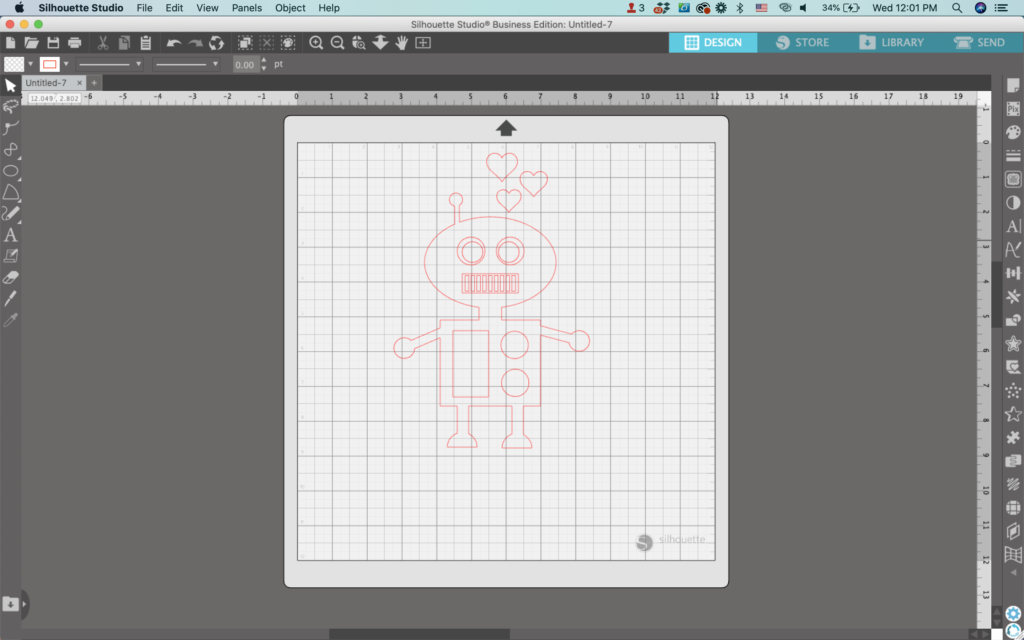
    11. Add a few hearts around the robot. To make the hearts, I used the Border Bits font.

    Silhouette Studio screenshot - cuttingforbusiness.com.

    12. Fill your design with color and add any additional details. I added some robot ‘words’ to the bottom of my design using the ZP Ex Boyfriend font. My final design looks like this:

    That’s it! Your design is ready to go!

    Don’t Forget to Save!

    To save your new SVG creation, head to ‘File’, ‘Save As’, ‘Save to Hard Drive’, name the file, then select ‘SVG’ from the dropdown menu.

    Want More SVG Tutorials?

    View more Design with Me SVG tutorials.
  • Silhouette Studio Tutorial: Easy Stretched Letter Christmas Ornament SVG

    Design with Me is a new regular feature on Cutting for Business! Each Friday, I’ll bring you a new Silhouette Studio tutorial featuring how to design an SVG.

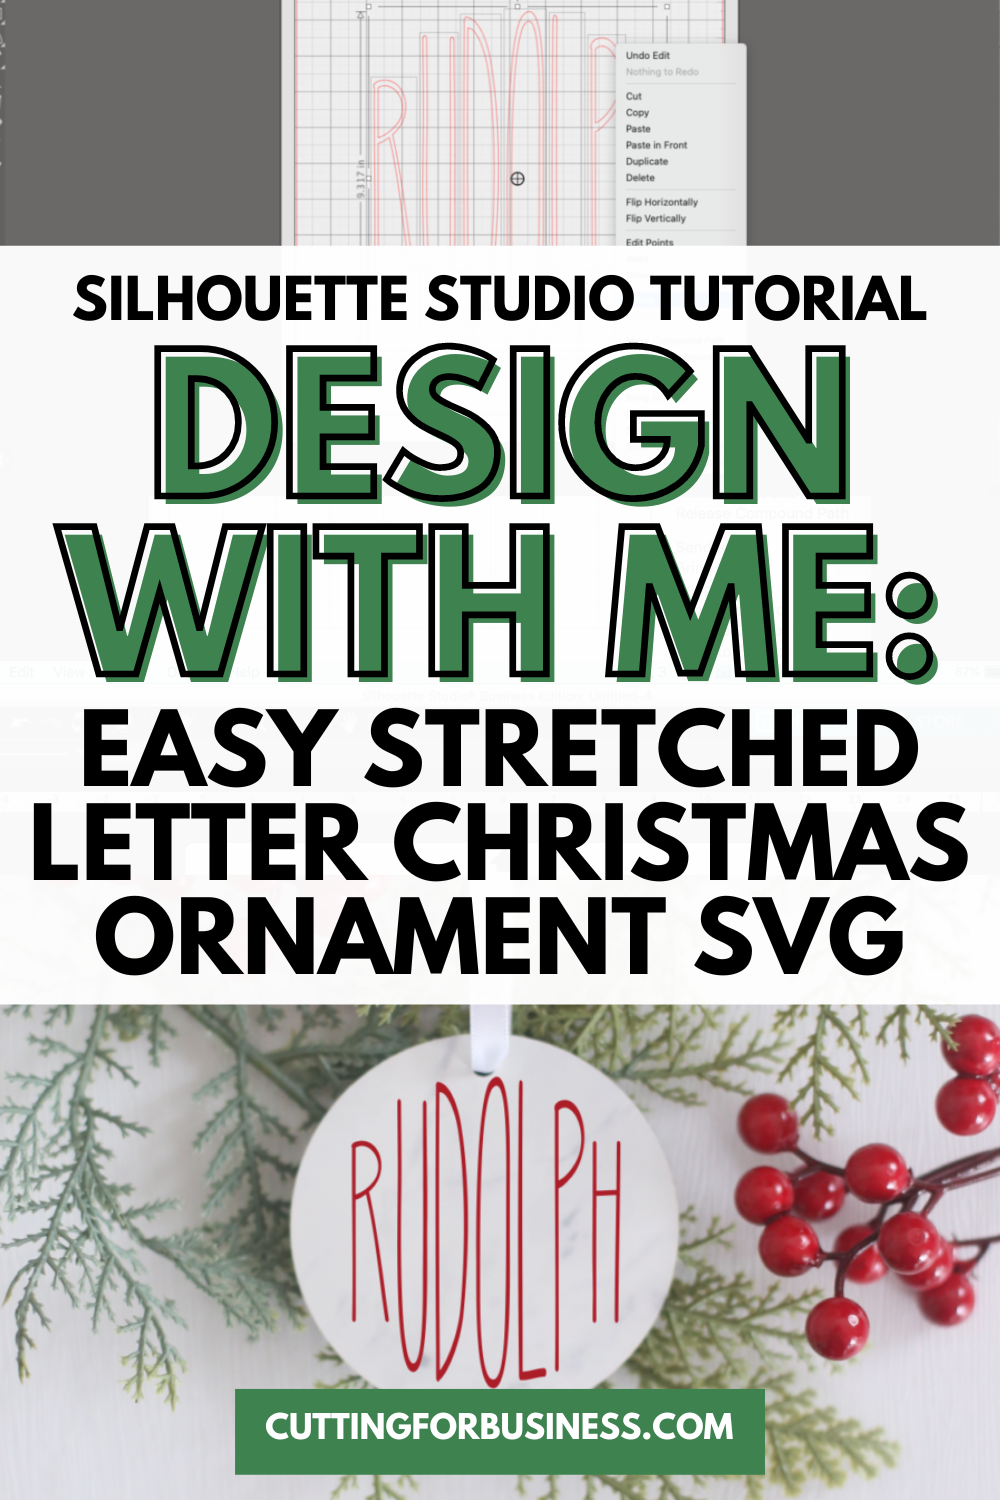
    Today, let’s make a stretched letter Christmas ornament SVG. In general, it’s not a good idea to stretch fonts. However, if you use the right font, you can bend the rules a little bit.

    So what font should you use? I find that fonts advertised as “hand lettered”, “hand drawn”, and “skinny” can be usually be stretched and not look weird. Let’s take a look.

    Silhouette Studio Tutorial: Easy Stretched Letter Christmas Ornament SVG - cuttingforbusiness.com

    Silhouette Studio Tutorial: Easy Stretched Letter Christmas Ornament SVG

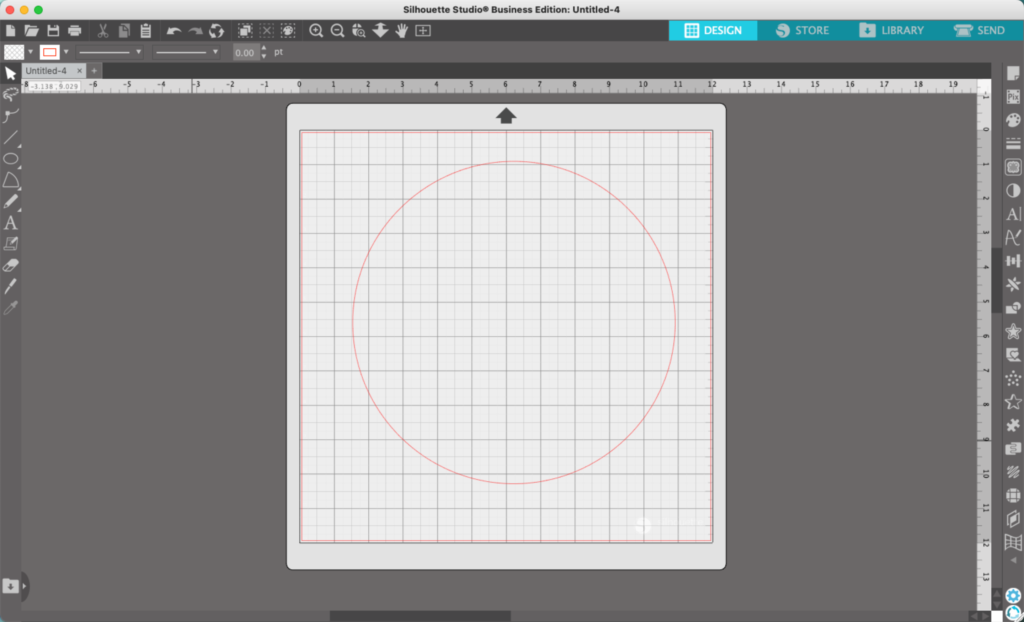
    1. Draw a large circle in Silhouette Studio. We will end up deleting this at the end, it is just going to be a guideline.
    Silhouette Studio Screenshot - cuttingforbusiness.com

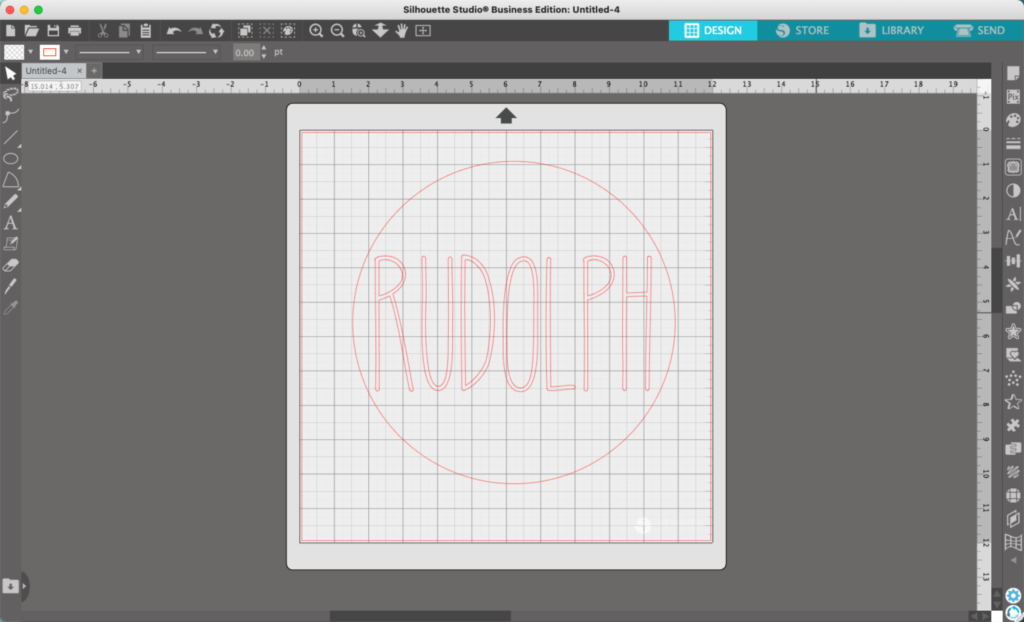
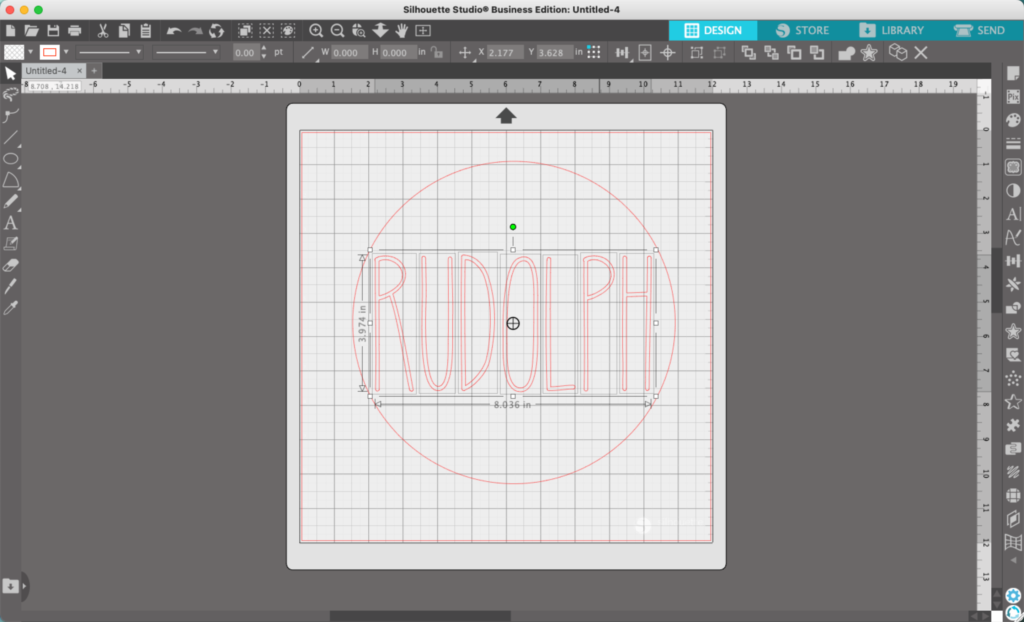
    2. Write a single Christmas-y word in the circle. Use a font style that I talked about at the beginning. In this tutorial, I’ll use Rudolph – my favorite reindeer.

    Silhouette Studio Screenshot - cuttingforbusiness.com

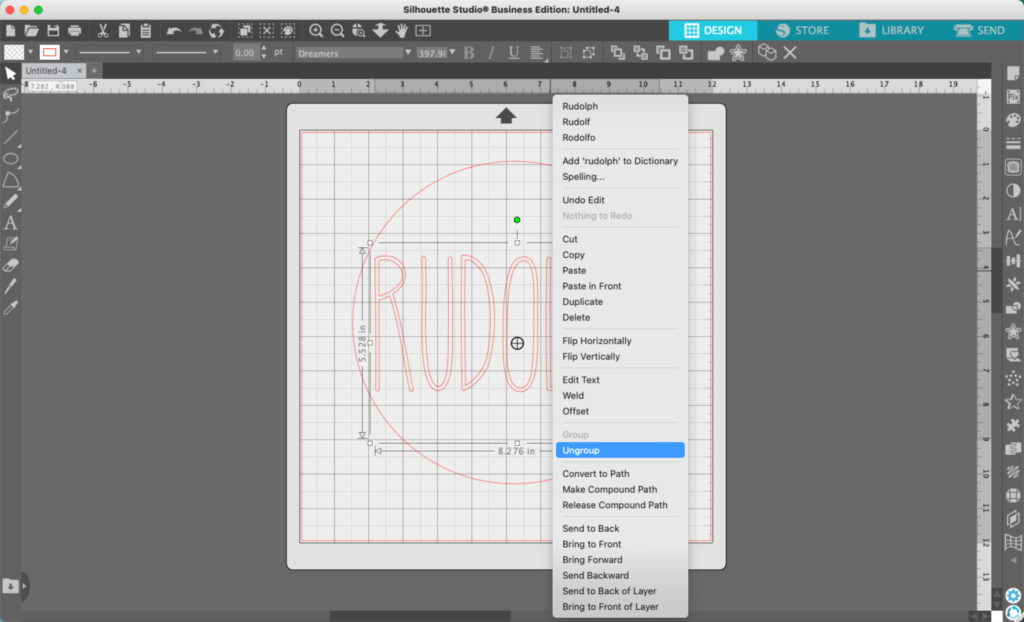
    3. Right click on your text and select ‘Ungroup’.

    Silhouette Studio Screenshot - cuttingforbusiness.com
    Silhouette Studio Screenshot - cuttingforbusiness.com

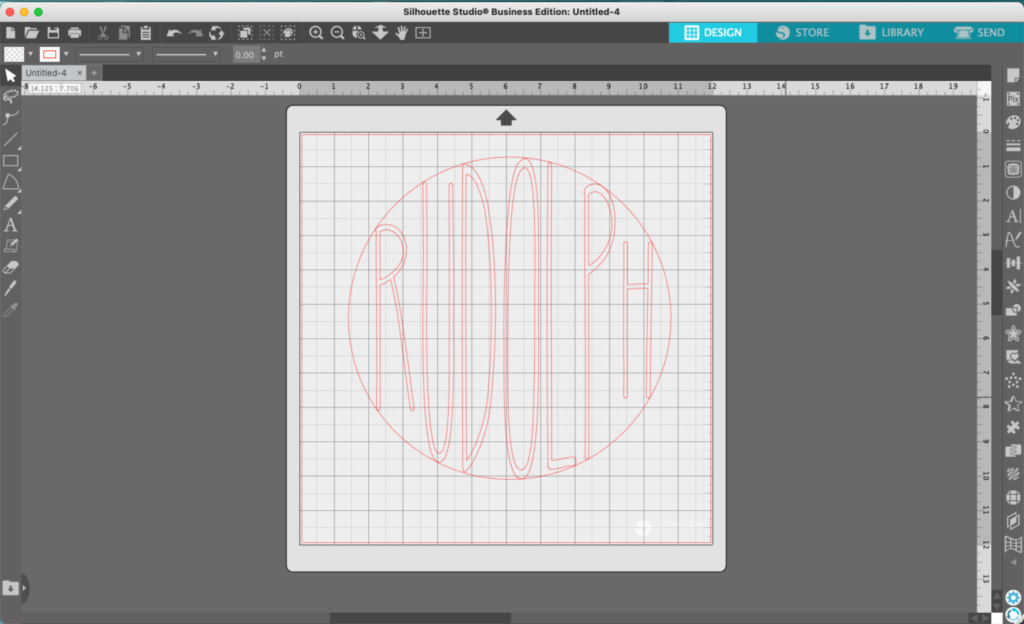
    4. Drag each letter so that it is touching both the top and bottom of the circle.

    Silhouette Studio Screenshot - cuttingforbusiness.com

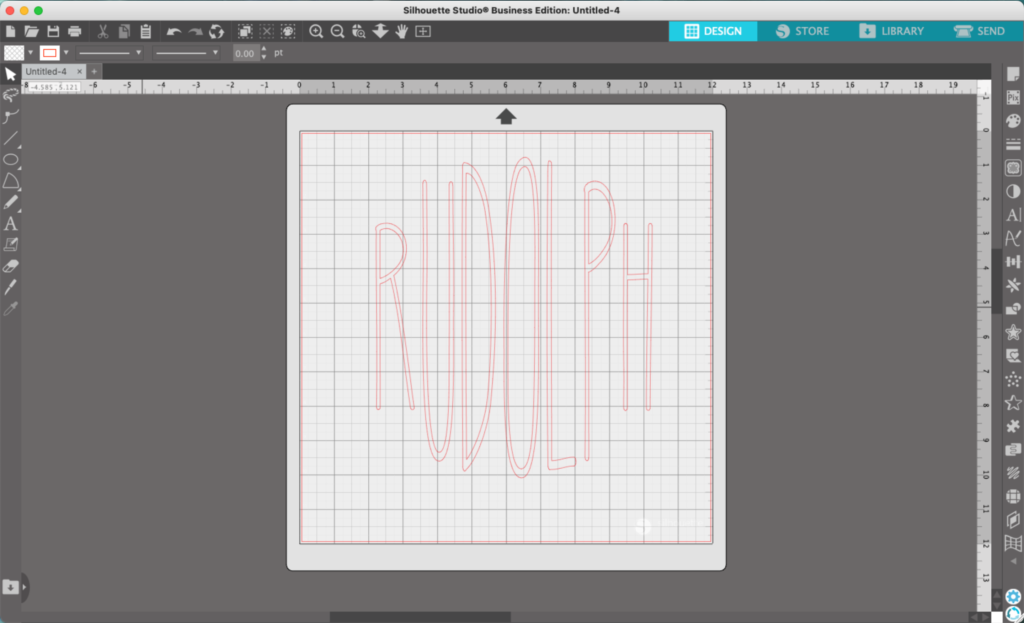
    5. Delete the circle.

    Silhouette Studio Screenshot - cuttingforbusiness.com

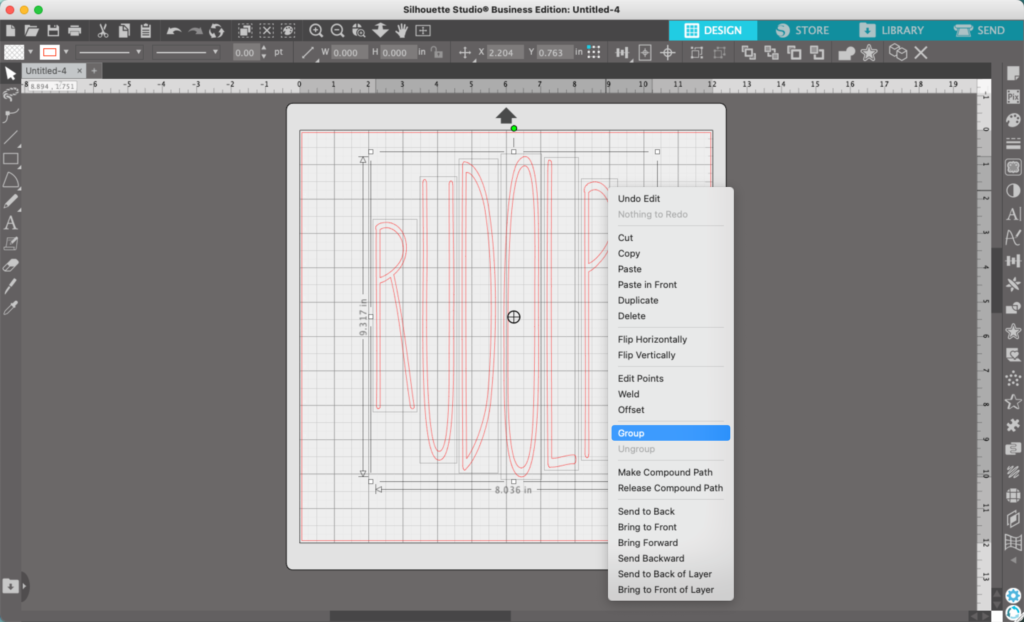
    6. Select all the letters and group them back together.

    Silhouette Studio Screenshot - cuttingforbusiness.com

    7. Add color to finish the design. My finished project looks like this:

    Silhouette Studio Tutorial: Stretched Letter Christmas Ornament SVG - cuttingforbusiness.com

    Font used: Dreamers.

    Don’t Forget to Save!

    To save your new SVG creation, head to ‘File’, ‘Save As’, ‘Save to Hard Drive’, name the file, then select ‘SVG’ from the dropdown menu.

    Want More SVG Tutorials?

    View more Design with Me SVG tutorials.
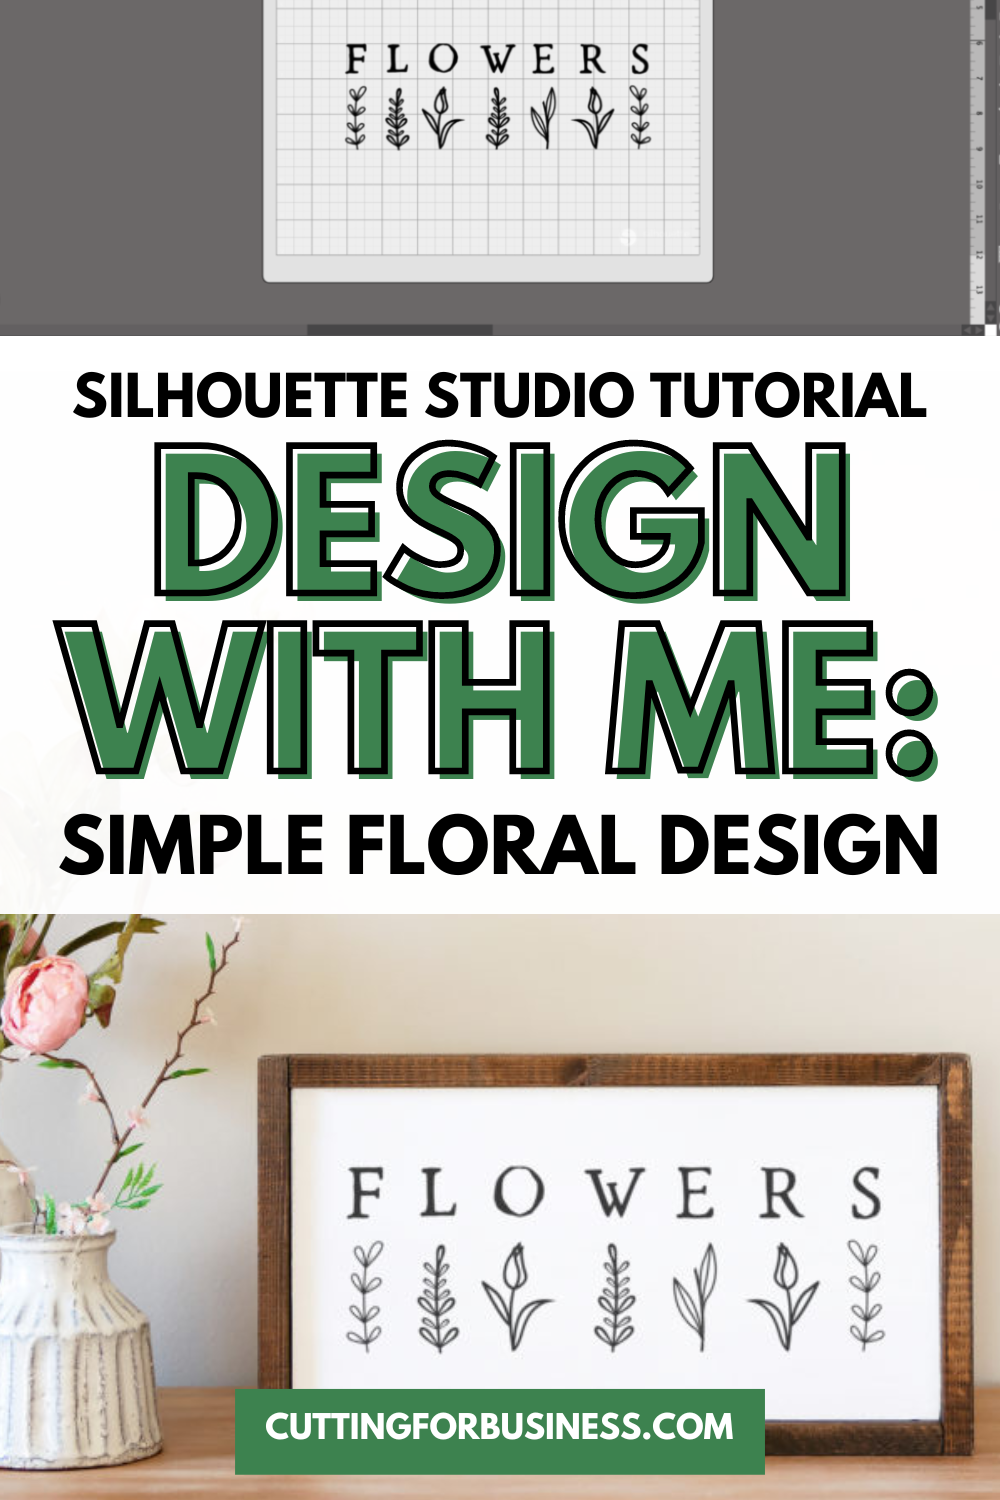
  • Silhouette Studio Tutorial: Simple Floral SVG

    Design with Me is a new regular feature on Cutting for Business! Each Friday, I’ll bring you a new Silhouette Studio tutorial featuring how to design an SVG.

    Spacing is so important in design, and it can have such an impact on the feel of the design overall.

    While I normally keep my spacing tight, it’s fun to do something s p a c e d o u t once in a while, too.

    Let’s take a look with this spring-y design tutorial for a simple floral SVG:

    Silhouette Studio Tutorial: Simple Floral SVG - cuttingforbusiness.com

    Silhouette Studio Tutorial: Simple Floral SVG

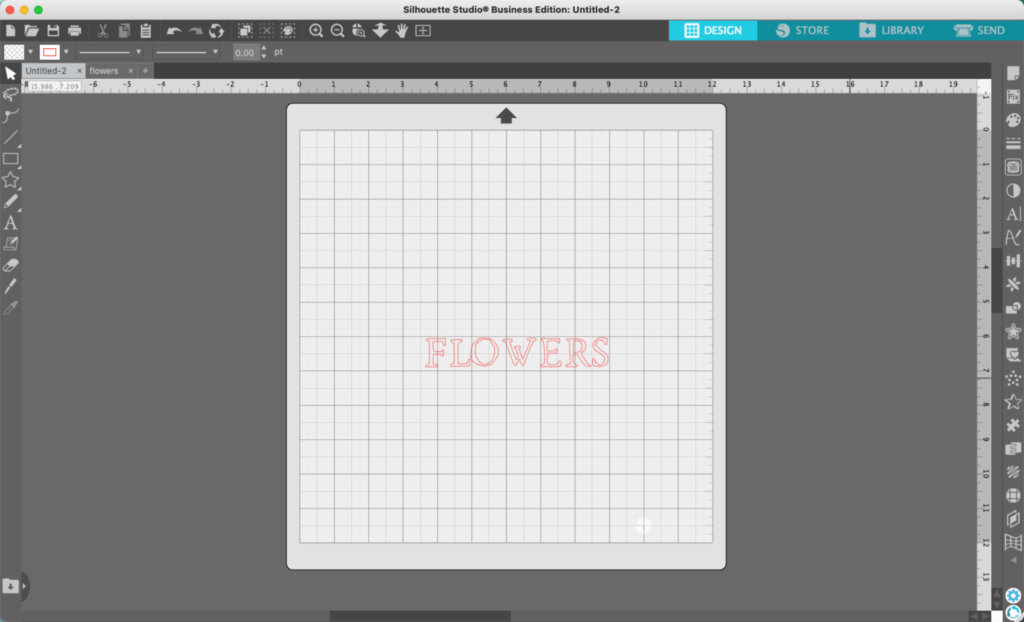
    1. In Silhouette Studio, type a word. In this tutorial, I’m using the Spring Market font.
    Silhouette Studio Screenshot - cuttingforbusiness.com

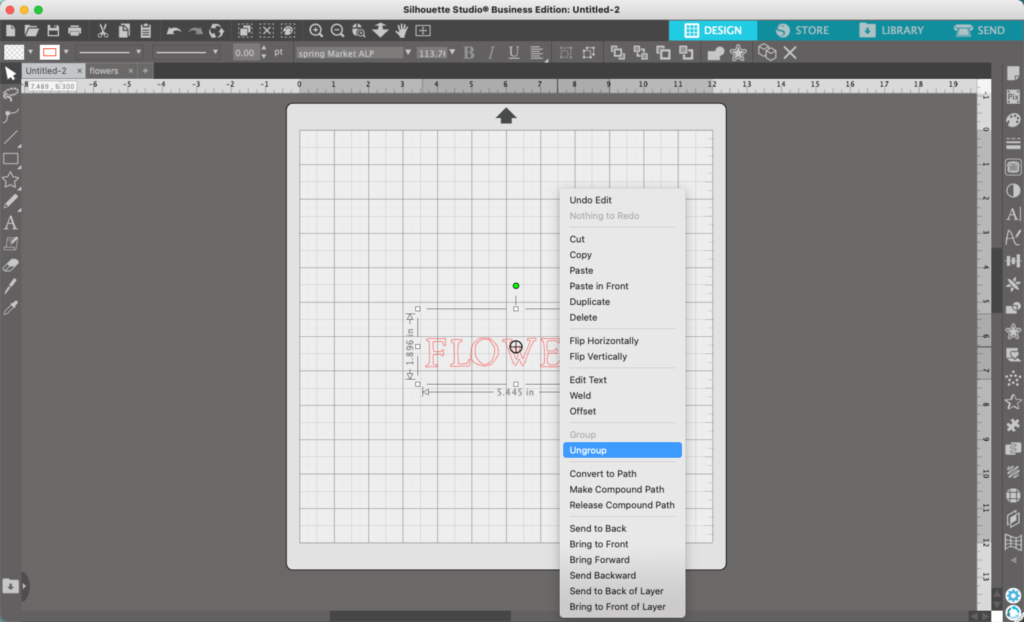
    2. Right click on the word and ‘Ungroup’ it.

    Silhouette Studio Screenshot - cuttingforbusiness.com

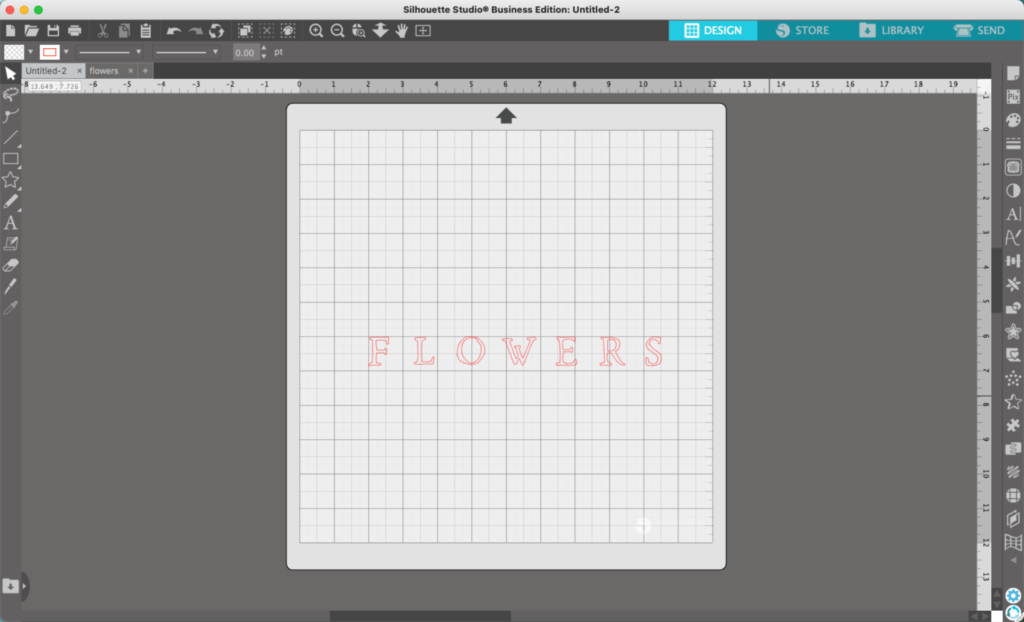
    3. Drag the letters apart. I just eyeballed this, so they aren’t evenly spaced.

    Silhouette Studio Screenshot - cuttingforbusiness.com

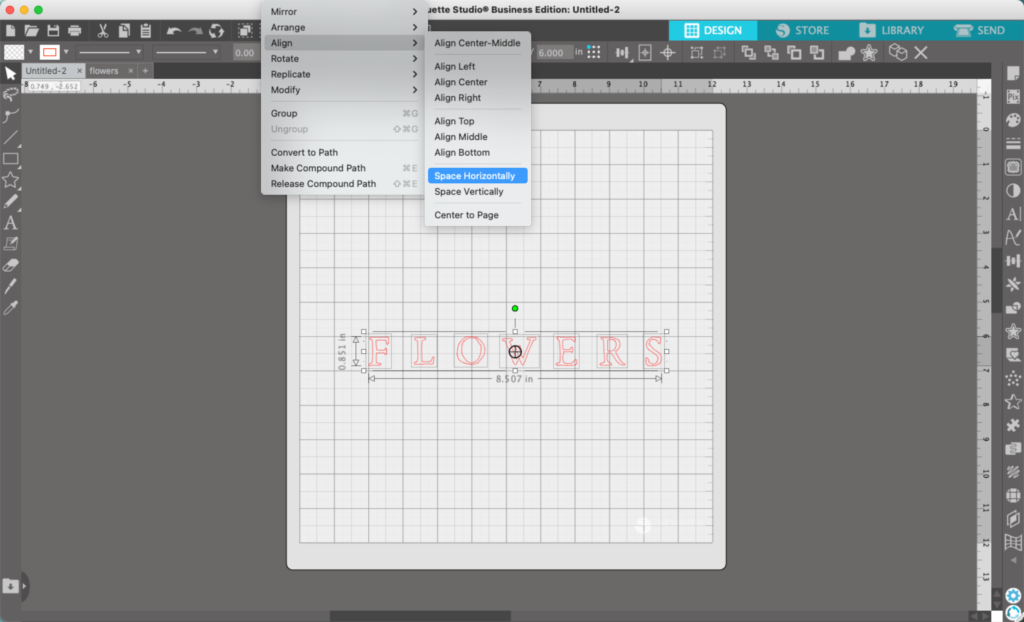
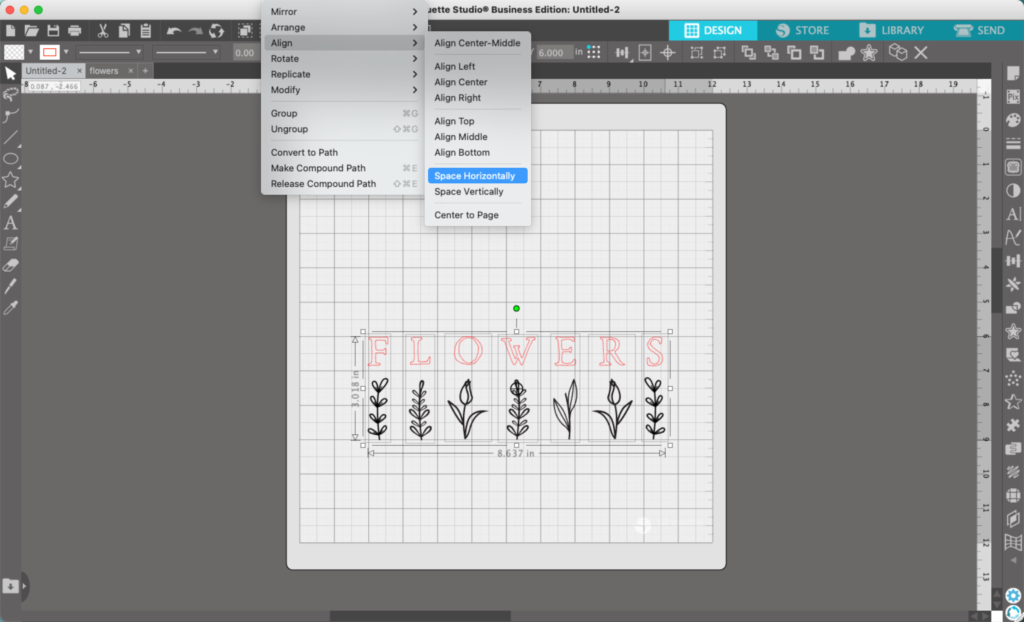
    4. Select all the letters, then navigate to ‘Object’, ‘Align’, ‘Space Horizontally’.

    Silhouette Studio Screenshot - cuttingforbusiness.com

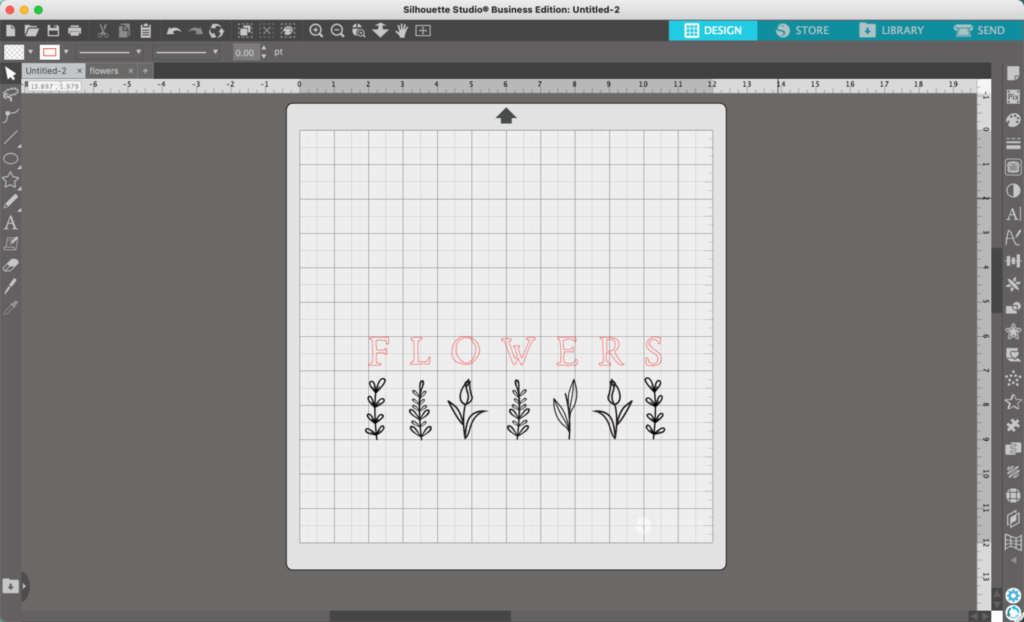
    5. Grab your flowers (either drawn or purchased clip art) and place one flower on top or below each letter. There is a free set of floral dingbats right now on Font Bundles.

    Silhouette Studio Screenshot - cuttingforbusiness.com

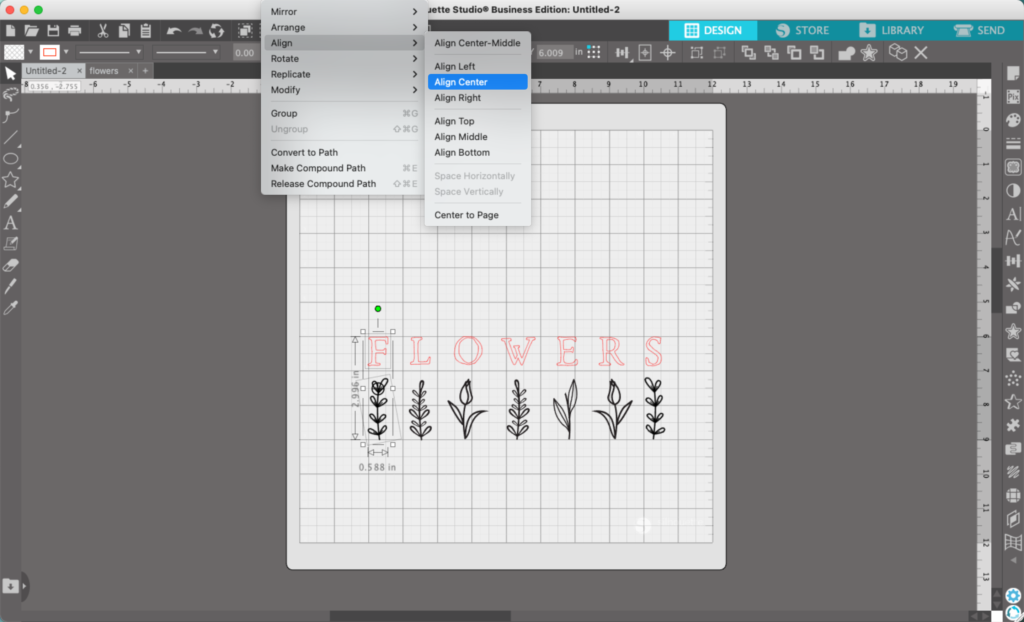
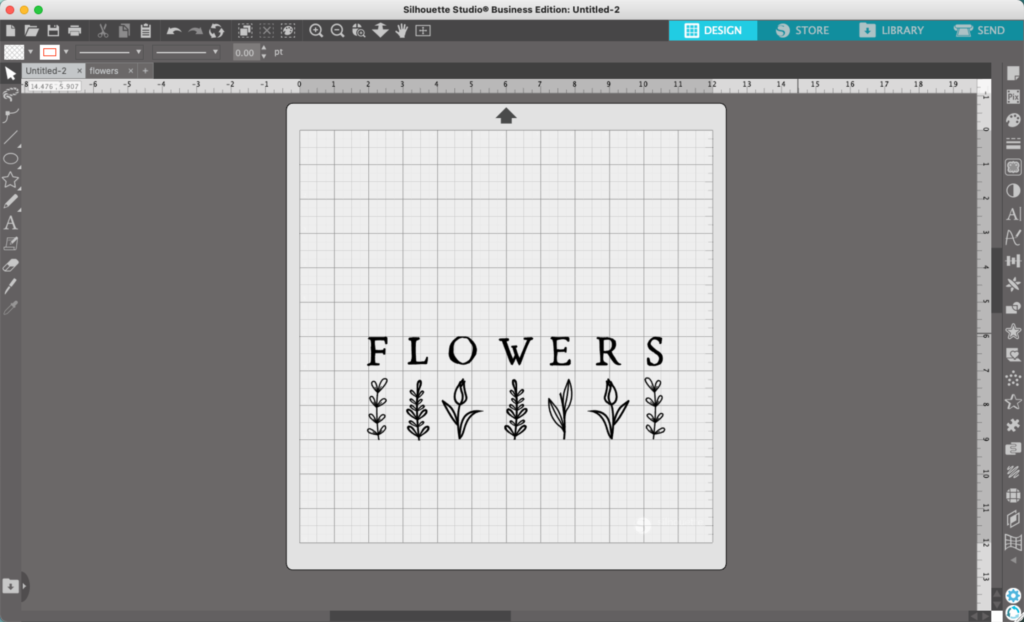
    6. Select each letter and flower partner and navigate to ‘Object’, ‘Align’, ‘Center’. Repeat this process for each letter and flower partner.

    Silhouette Studio Screenshot - cuttingforbusiness.com

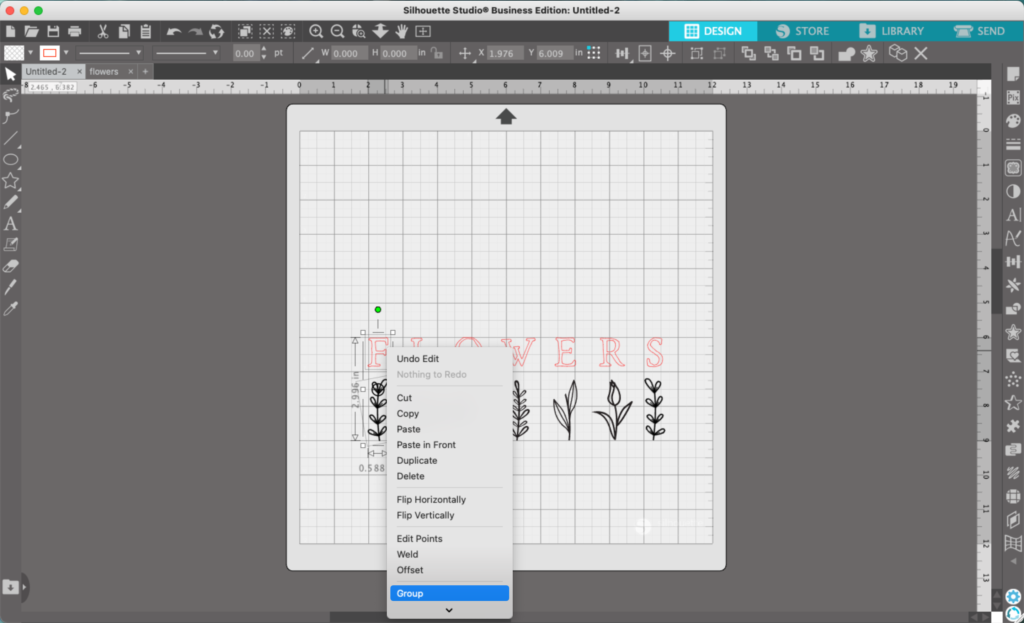
    7. Select each letter and its partner again and right click, then ‘Group’ them together. Repeat for all the letters.

    Silhouette Studio Screenshot - cuttingforbusiness.com

    8. Now, the spacing between each group needs tidied up. Select everything and navigate to ‘Object’, ‘Align’, ‘Space Horizontally’.

    Silhouette Studio Screenshot - cuttingforbusiness.com

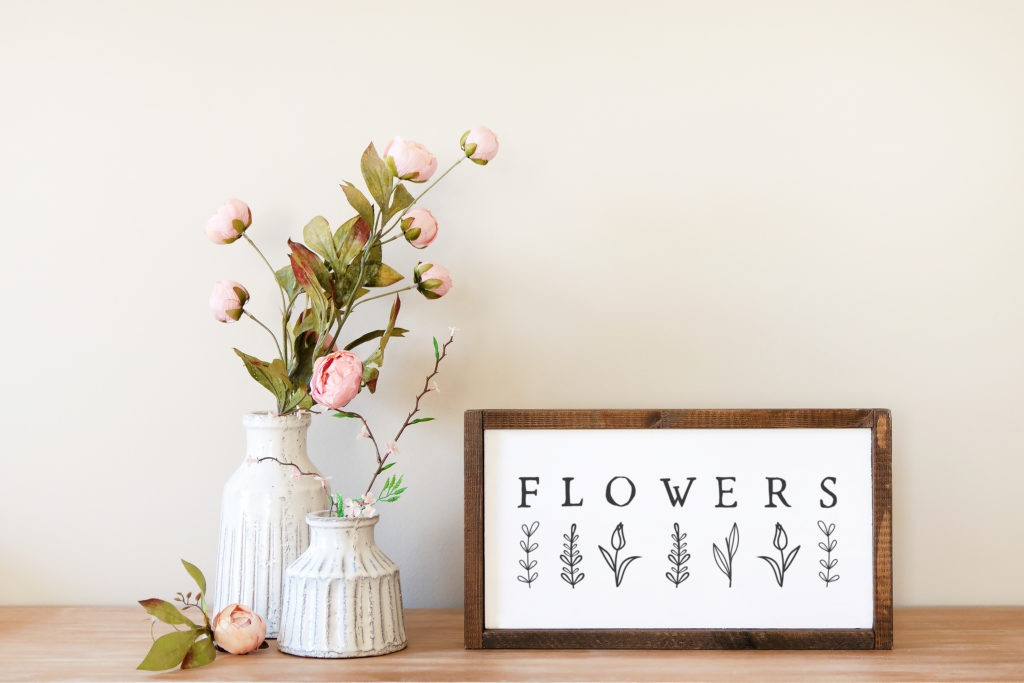
    9. Add color to the design. My finished design looks like this:

    Silhouette Studio Screenshot - cuttingforbusiness.com
    Silhouette Studio Tutorial: Simple Spring Flower SVG - cuttingforbusiness.com

    That’s it! Your design is ready to go!

    Don’t Forget to Save!

    To save your new SVG creation, head to ‘File’, ‘Save As’, ‘Save to Hard Drive’, name the file, then select ‘SVG’ from the dropdown menu.

    Want More SVG Tutorials?

    View more Design with Me SVG tutorials.
  • Silhouette Studio Tutorial: Wavy Retro Text SVG

    Welcome to another Design with Me on Cutting for Business! Each week, I’ll bring you a new Silhouette Studio tutorial featuring how to design an SVG.

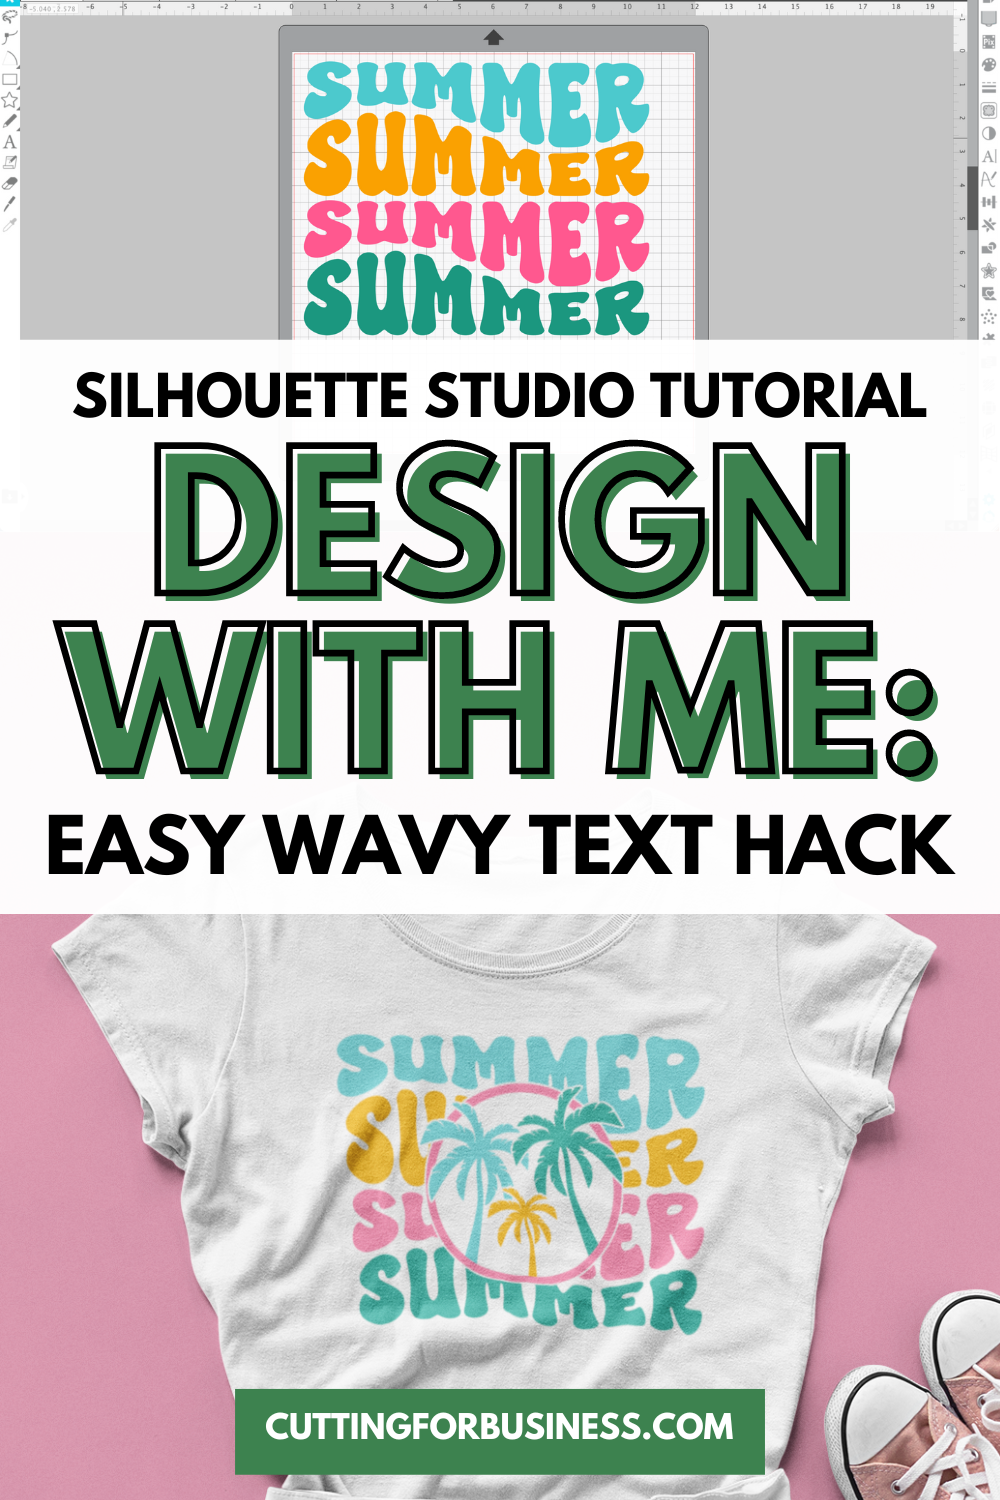
    Wavy retro text designs are in! Let’s take a look at them today.

    Silhouette Studio Tutorial: Wavy Retro Text SVG - cuttingforbusiness.com

    Silhouette Studio Tutorial: Wavy Retro Text SVG

    Most of my tutorials are done completely in Silhouette Studio. And, this wavy retro text design can be made entirely in Silhouette Studio, but the warp tool is clunky and takes a long time. Today, let’s look at the fastest, easiest way to create a wavy text design.

    First, you’ll need the perfect bubbly retro font. These are a few of my favorites: Abstract Groovy, Gentry, Super Spicy, and Super Funky.

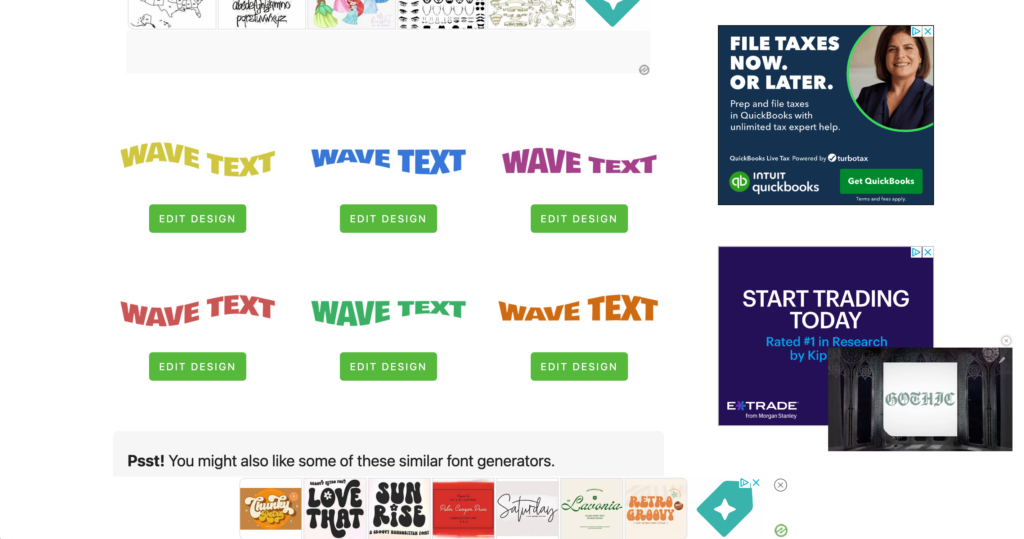
    1. Head over to Vector Dad’s free Wavy Text Generator. Now, the resource is free – but there are a lot of ads. The ads likely help pay Susrut’s (Vector Dad’s owner) site expenses and provide a small income. After you arrive on the site, scroll down until you find this section:
    Vector Dad Screenshot - cuttingforbusiness.com

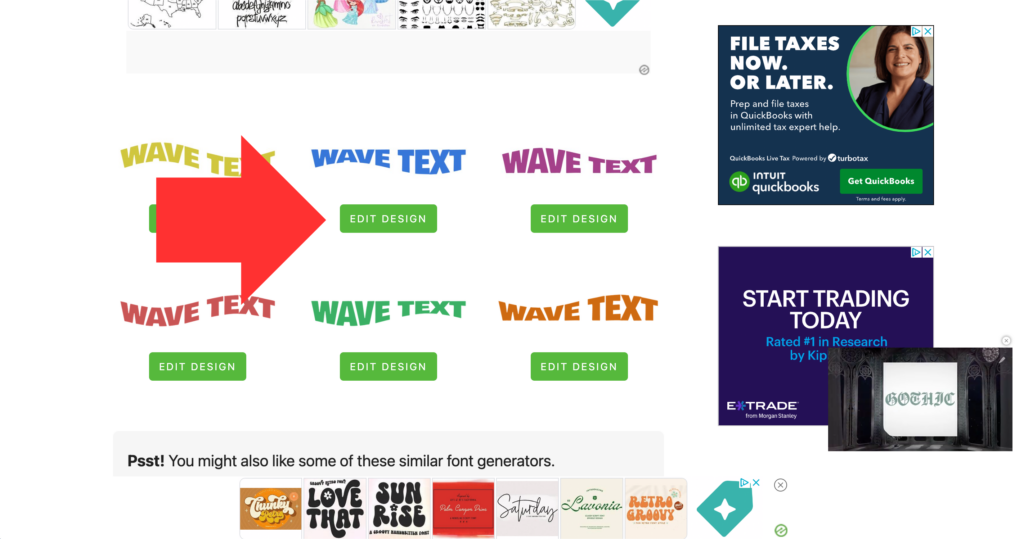
    2. Click on the ‘Edit Design’ button under the blue wave text.

    Vector Dad Screenshot - cuttingforbusiness.com

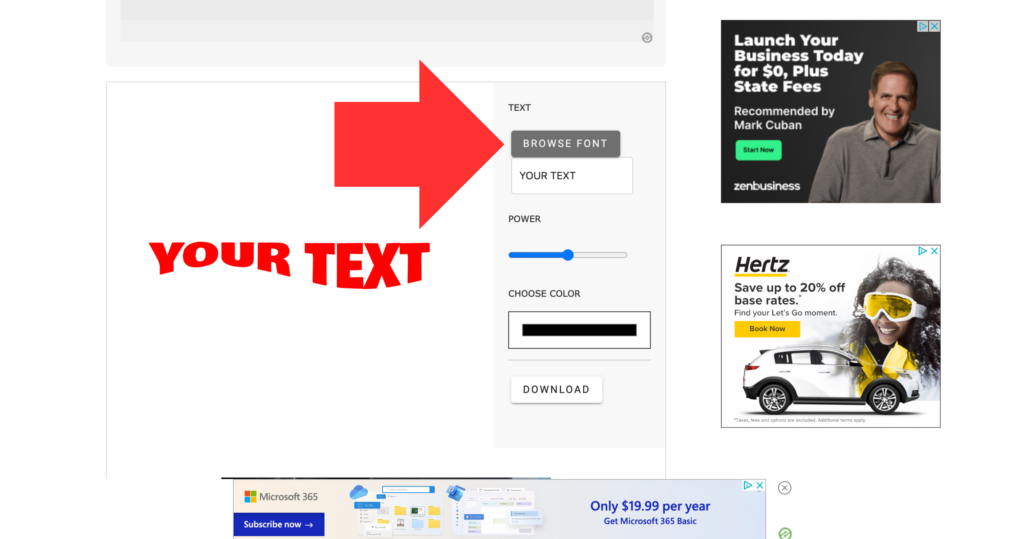
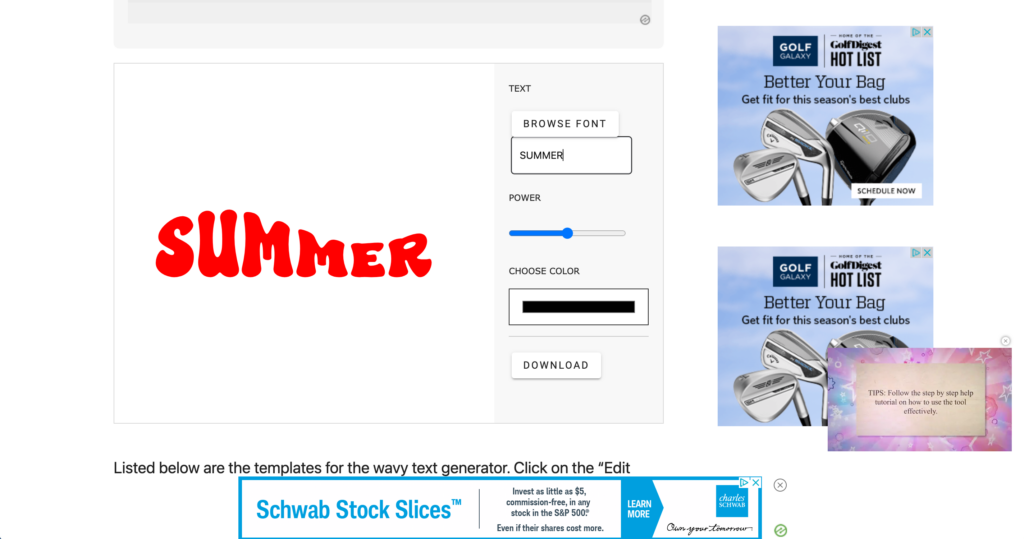
    3. Once the editor loads, click the ‘BROWSE FONT’ button and upload the .ttf version of the font you’d like the generator to use. I’m using the Super Spicy font.

    Vector Dad Screenshot - cuttingforbusiness.com

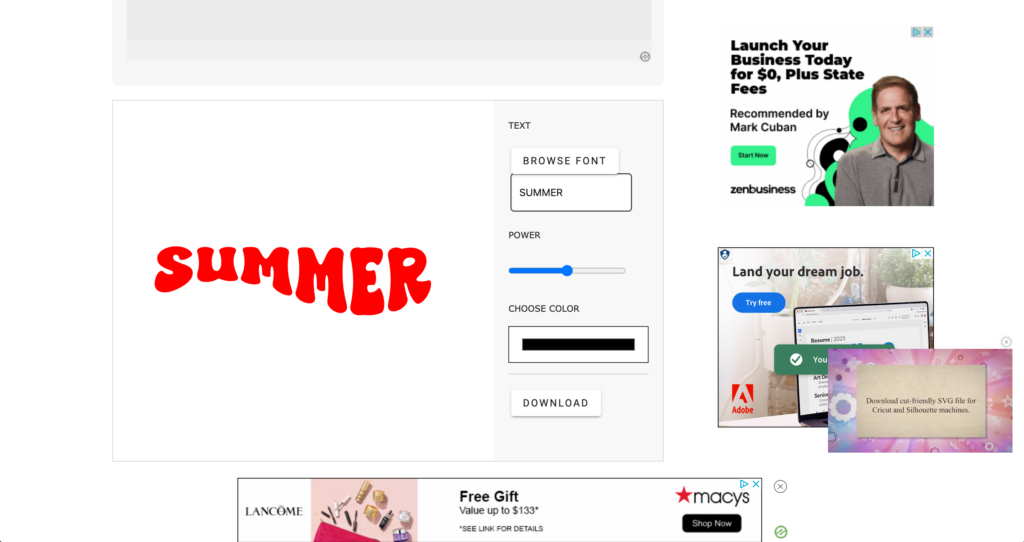
    4. Then, enter your word into the ‘YOUR TEXT’ box. I’m using the word ‘summer’.

    Vector Dad Screenshot - cuttingforbusiness.com

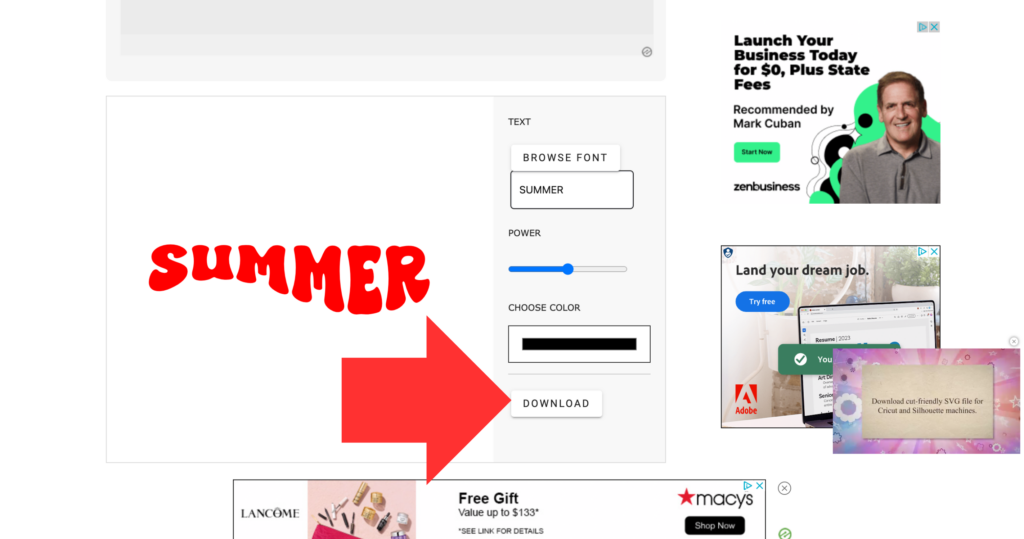
    5. Click the ‘DOWNLOAD’ button and download as an SVG.

    Vector Dad Screenshot - cuttingforbusiness.com

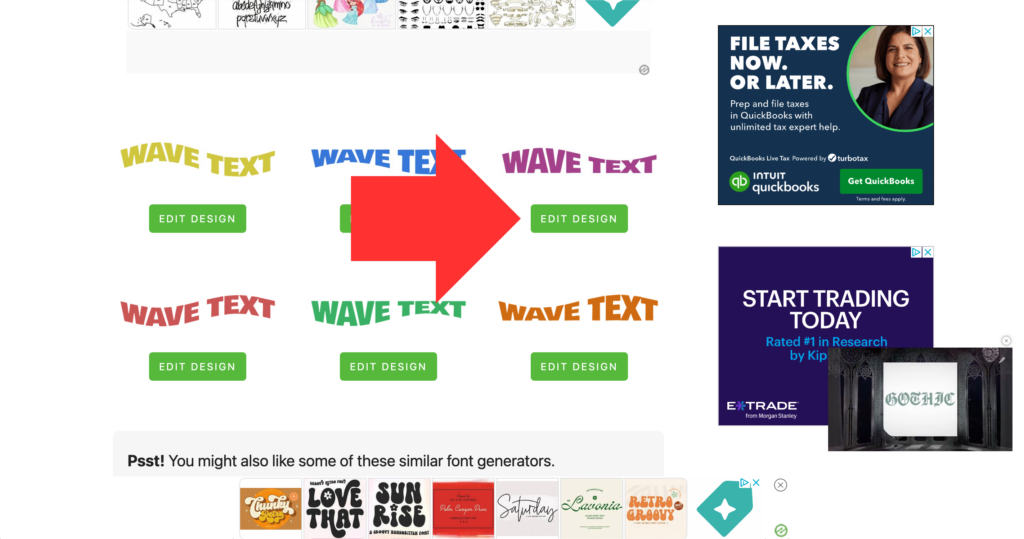
    6. Return to the generator and this time, click the ‘EDIT DESIGN’ button under the purple text.

    Vector Dad Screenshot - cuttingforbusiness.com

    7. Add your font, and word. Again, I’m still using the Super Spicy font and the word ‘summer’. Then, download the word as an SVG.

    Vector Dad Screenshot - cuttingforbusiness.com

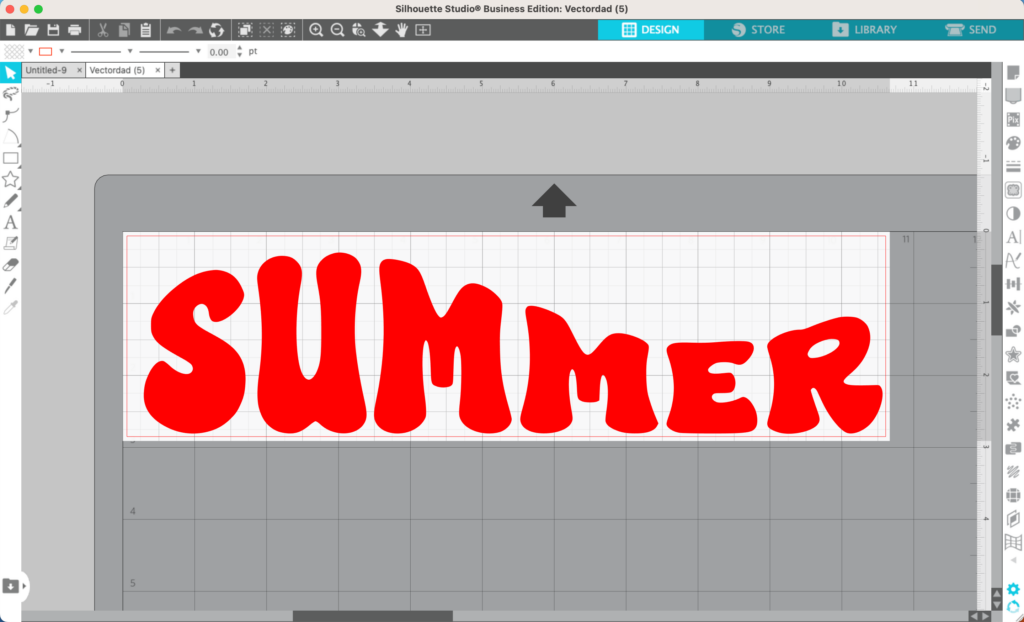
    8. Head to Silhouette Studio and open both files you just created.

    Vector Dad Screenshot - cuttingforbusiness.com

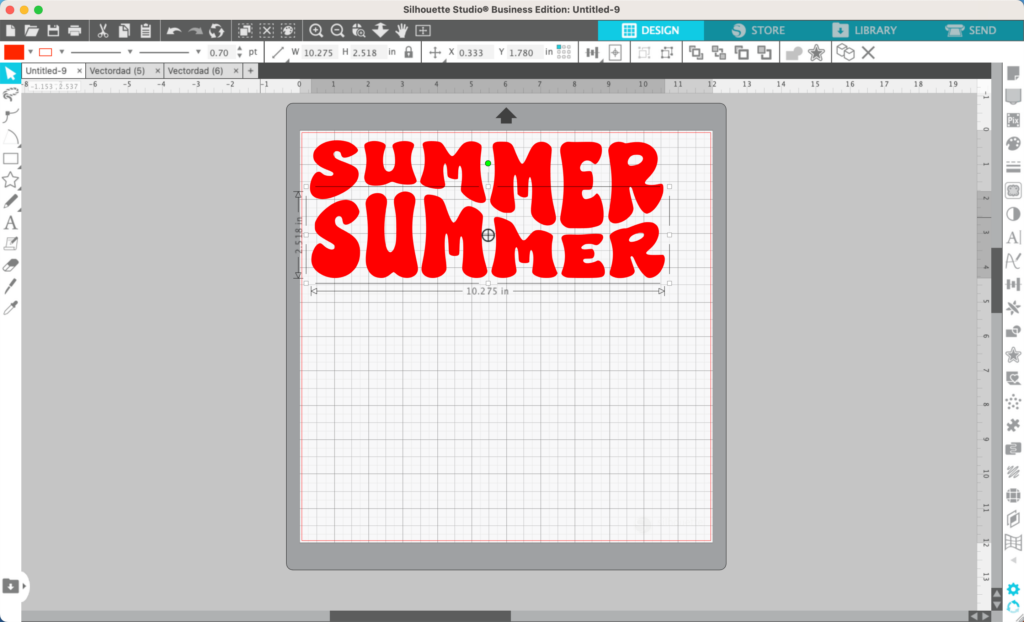
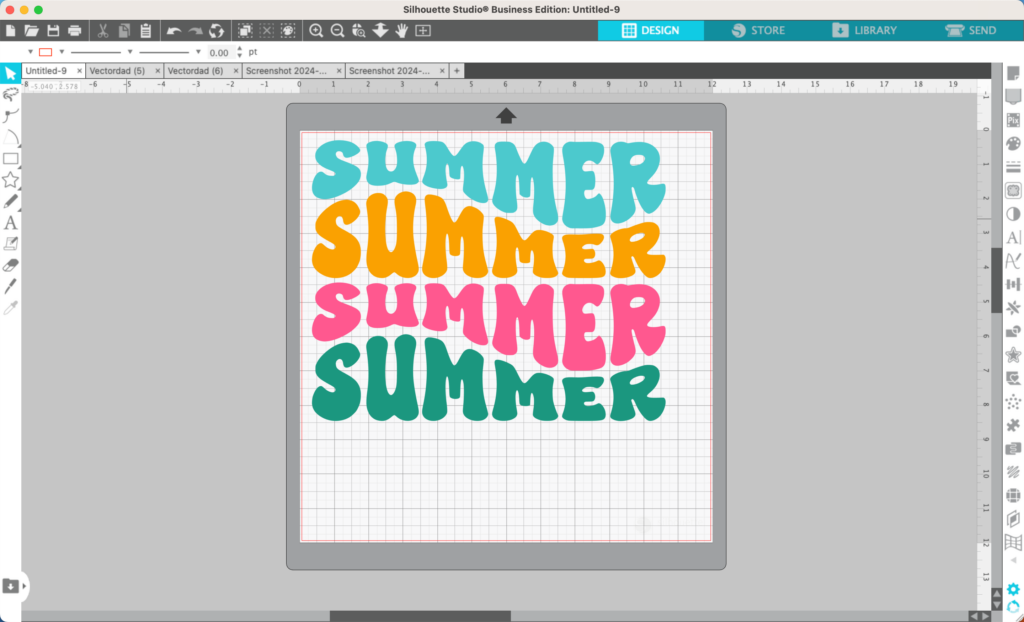
    9. Copy and paste both words you created onto one mat. (And admire how nicely they fit together!)

    Vector Dad Screenshot - cuttingforbusiness.com

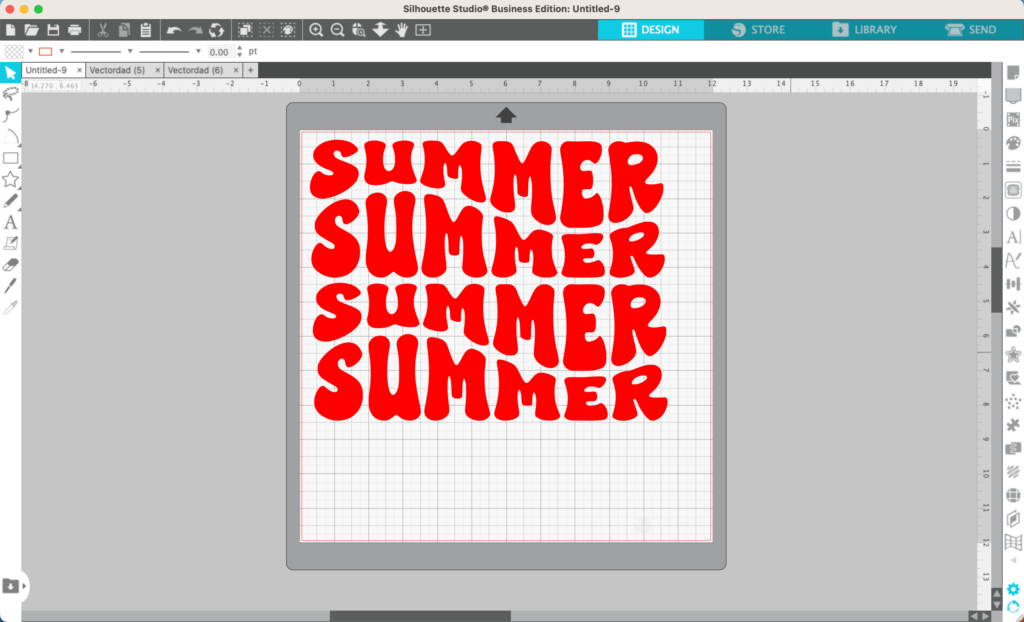
    10. Duplicate both words until you’ve got your word four times.

    Vector Dad Screenshot - cuttingforbusiness.com

    11. Adjust the spacing (Object – Align). Then, add color.

    Vector Dad Screenshot - cuttingforbusiness.com

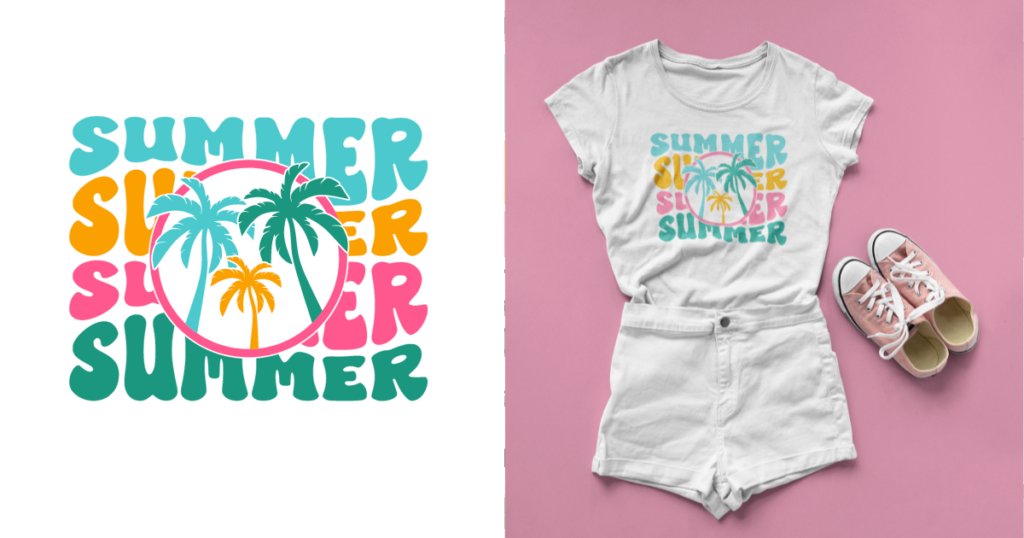
    12. Now, you can group everything together and your SVG design is done.

    Or, you can add some additional details. To complete my design, I added a knocked out circle in the middle with some palm trees. If you’d like to download it, it’s available on my Buy Me a Coffee page.

    Don’t Forget to Save!

    To save your new SVG creation, head to ‘File’, ‘Save As’, ‘Save to Hard Drive’, name the file, then select ‘SVG’ from the dropdown menu.

    Want More SVG Tutorials?

    View more Design with Me SVG tutorials.
  • Silhouette Studio Tutorial: Vintage Four Leaf Clover SVG

    Design with Me is a new regular feature on Cutting for Business! Each Friday, I’ll bring you a new Silhouette Studio tutorial featuring how to design an SVG.

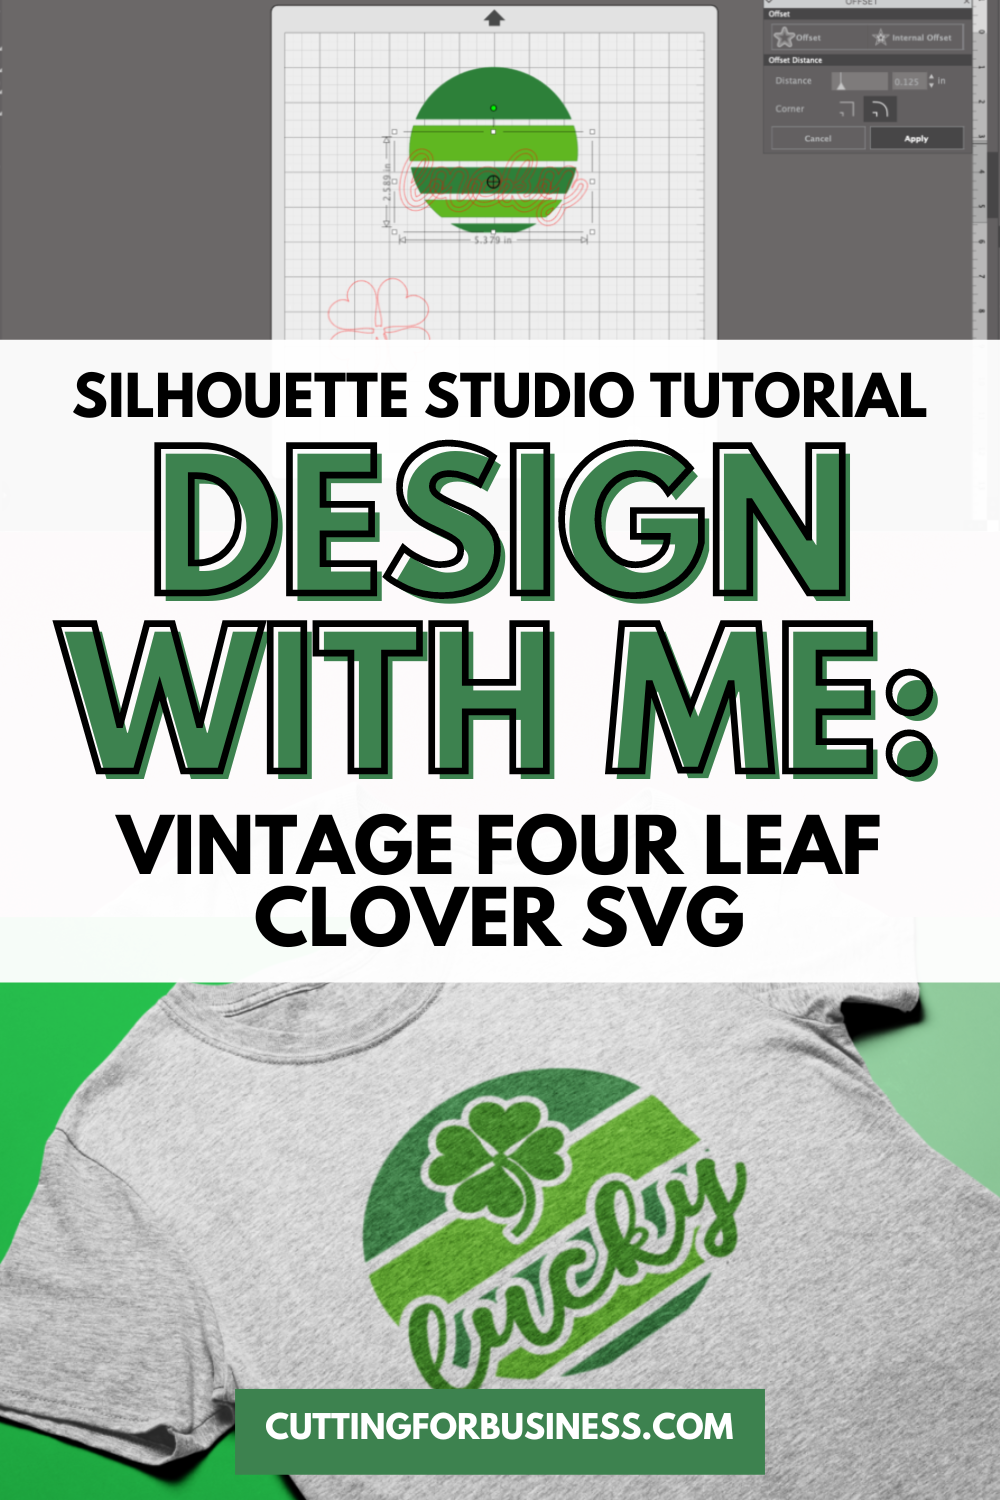
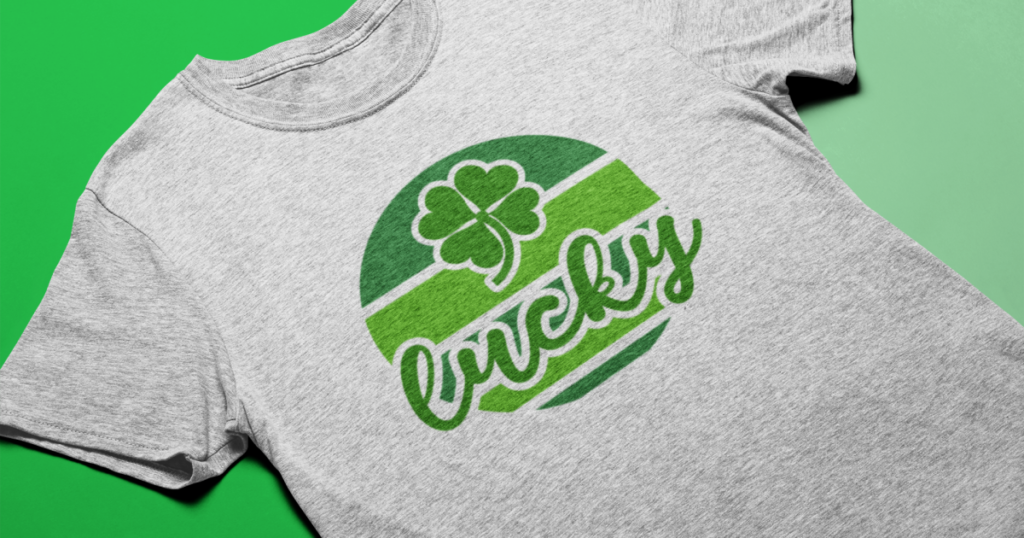
    Before you pour the green beer and roll around in four leaf clovers for luck, let’s design a vintage four leaf clover SVG.

    Silhouette Studio Tutorial: Vintage Four Leaf Clover SVG - cuttingforbusiness.com

    Silhouette Studio Tutorial: Simple Floral SVG

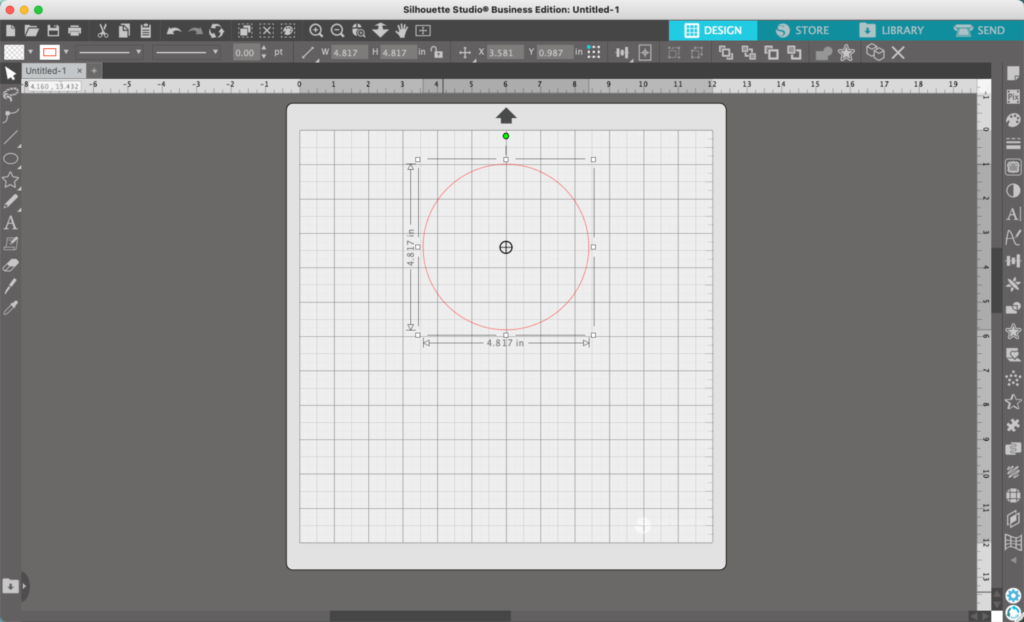
    1. In Silhouette Studio, draw a circle. Hold down the SHIFT key to make a perfect circle.
    Silhouette Studio Screenshot - cuttingforbusiness.com

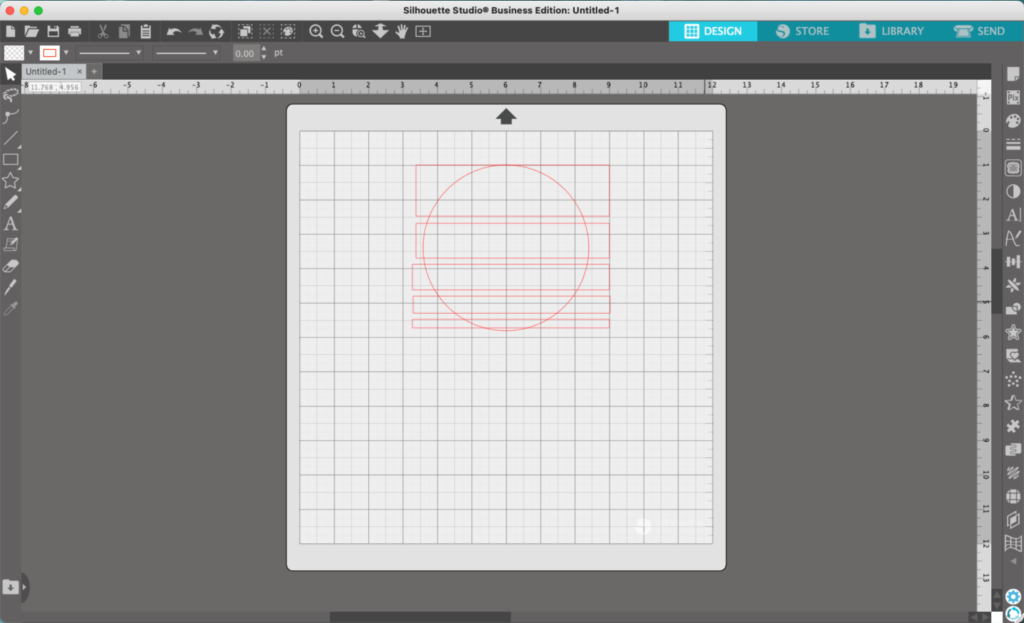
    2. Draw rectangles across the circle. I made the rectangles largest at the top, and getting smaller as they go down the circle.

    Silhouette Studio Screenshot - cuttingforbusiness.com

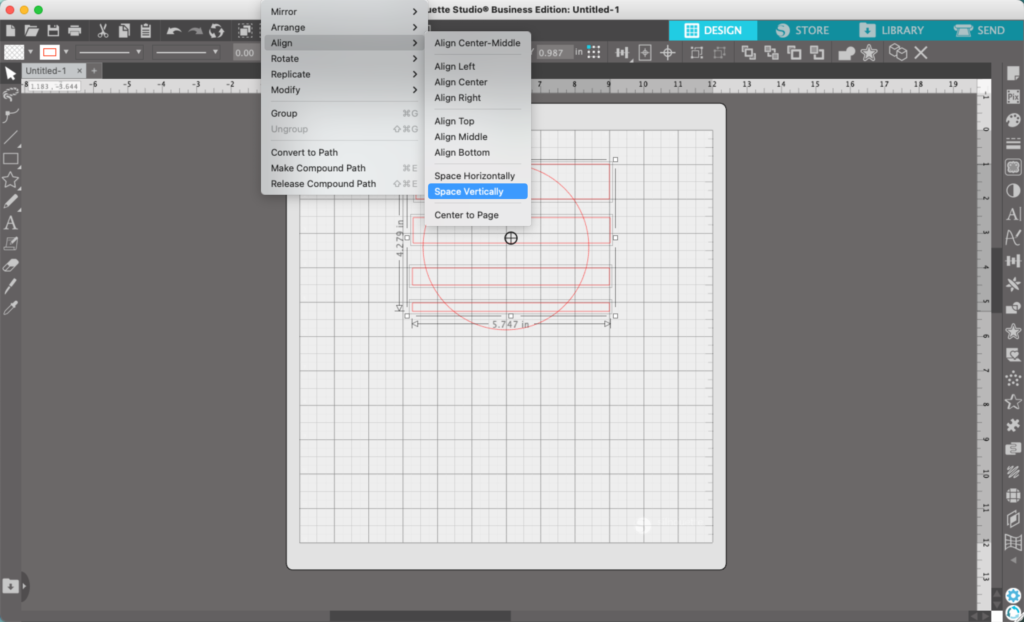
    3. Select all the rectangles, then navigate to ‘Object’, ‘Align’, ‘Space vertically’.

    Silhouette Studio Screenshot - cuttingforbusiness.com

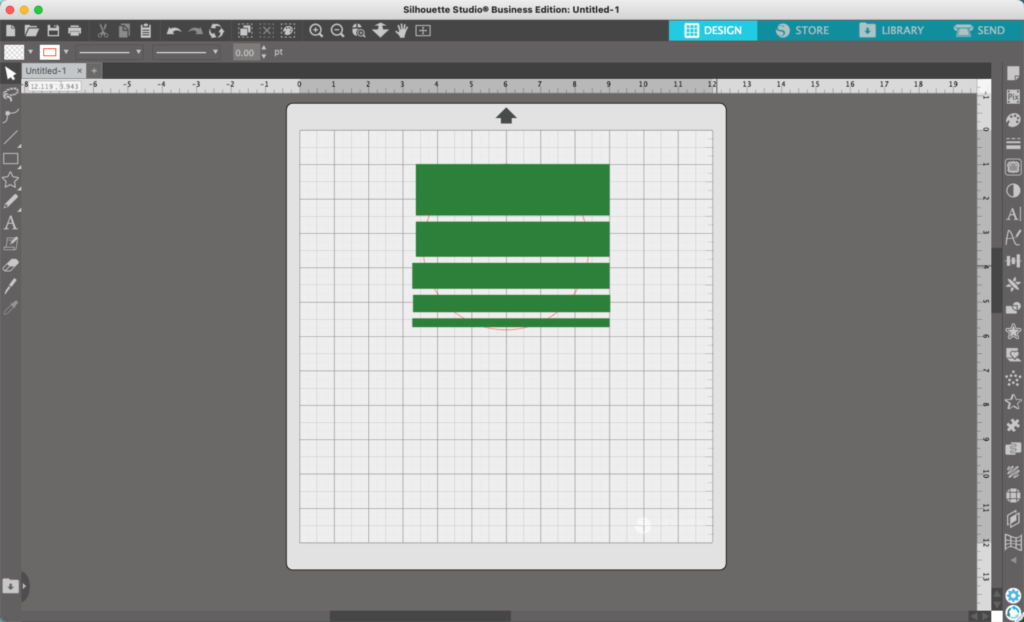
    4. Add color to the rectangles.

    Silhouette Studio Screenshot - cuttingforbusiness.com

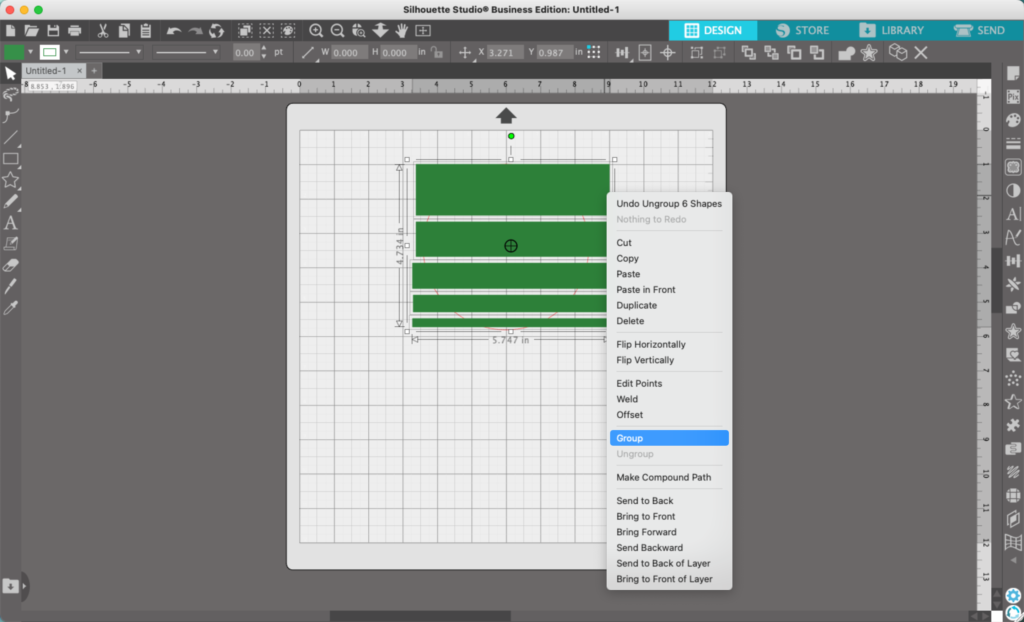
    5. Select the rectangles, right click, and ‘Group’ them together.

    Silhouette Studio Screenshot - cuttingforbusiness.com

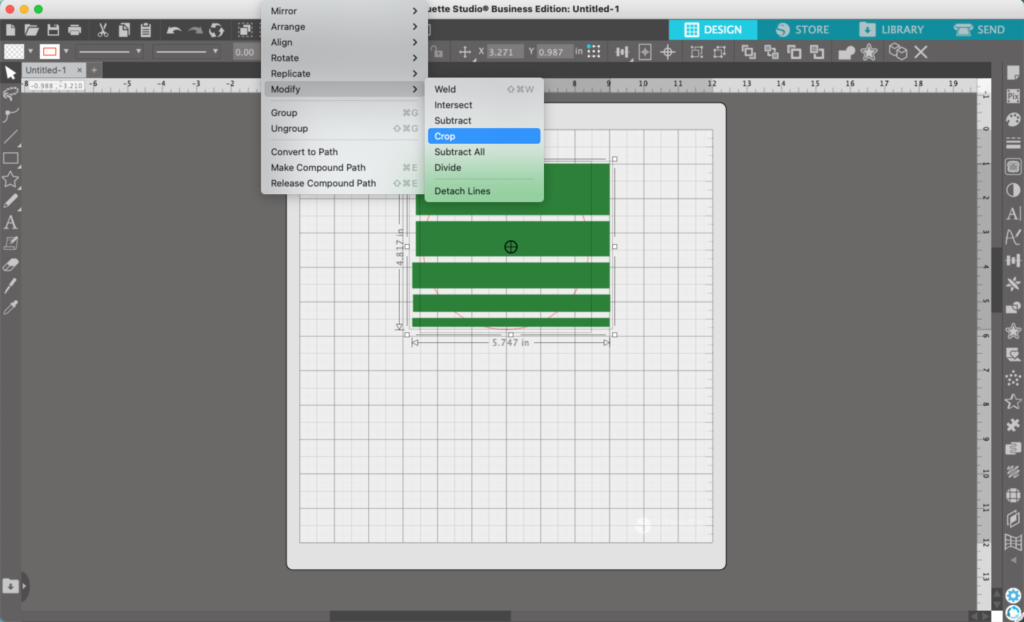
    6. Select both the rectangles and the circle, then navigate to ‘Panels’, ‘Object’, then ‘Crop’.

    Silhouette Studio Screenshot - cuttingforbusiness.com

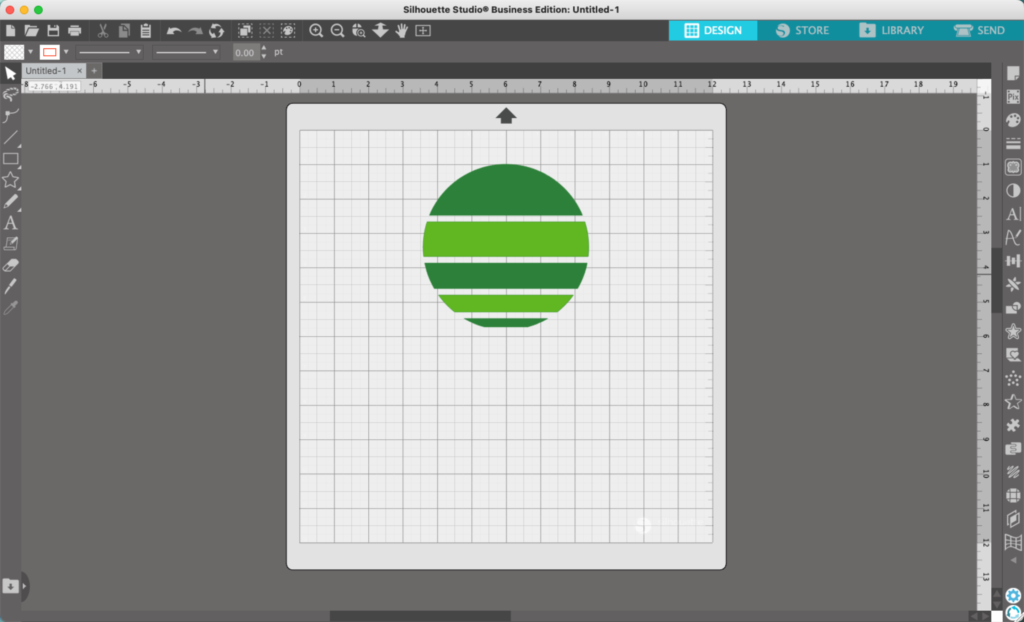
    7. To add interest to the design, I colored two of the former rectangles a different shade of green.

    Silhouette Studio Screenshot - cuttingforbusiness.com

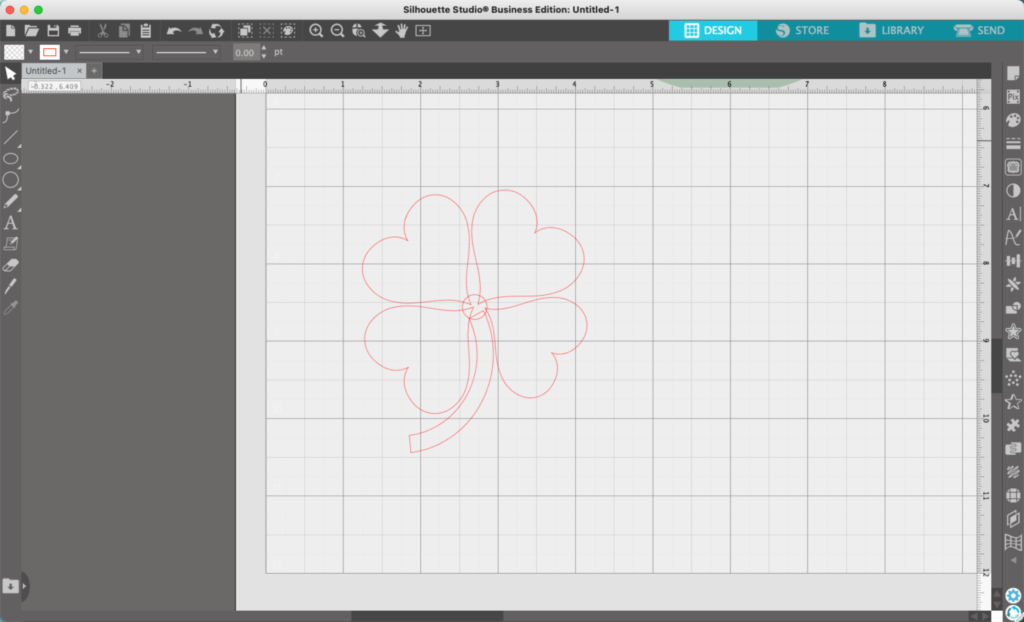
    8. Off the side of the circle, use Flexishapes to create a four leaf clover. It’s four hearts, a stem that I crafted from the third Flexishape in the first row, and a circle in the middle.

    Silhouette Studio Screenshot - cuttingforbusiness.com

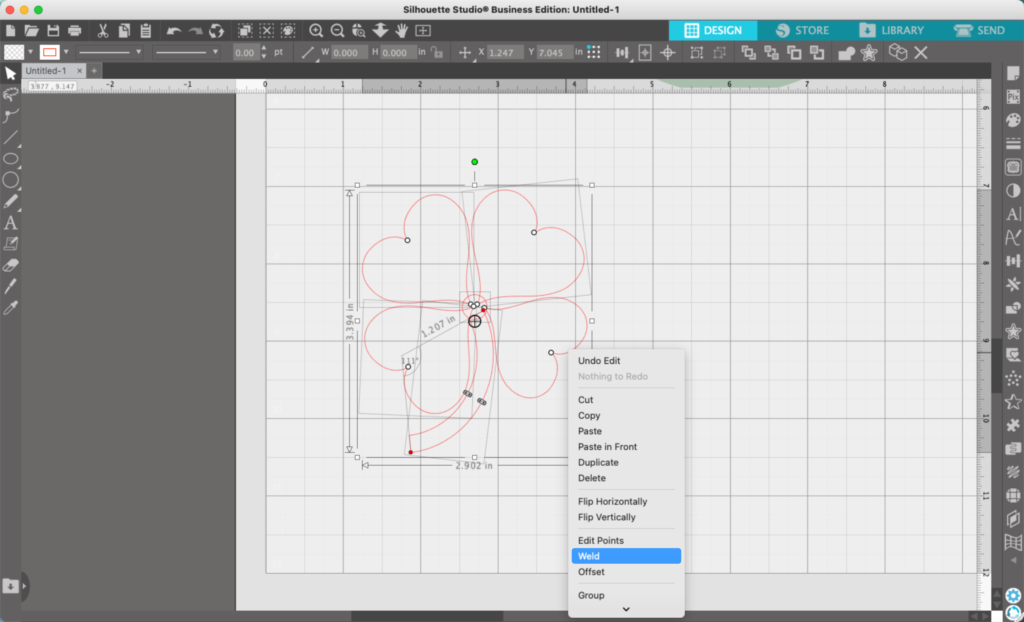
    9. Right click and select ‘Weld’ to weld the clover together.

    Silhouette Studio Screenshot - cuttingforbusiness.com

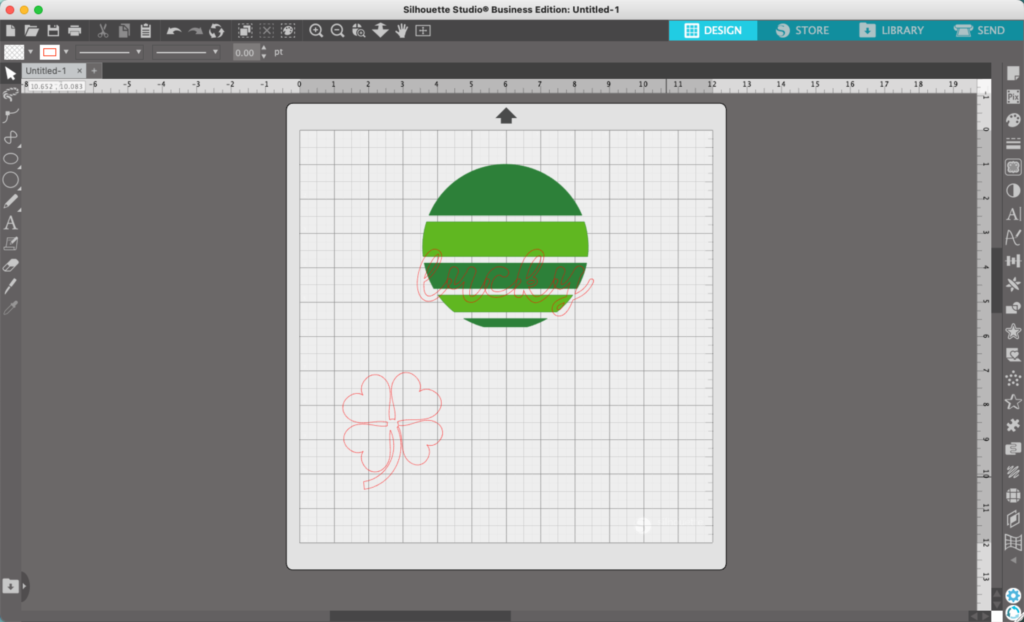
    10. Go back to the circle design and add a St. Patrick’s Day word. I’m using the word ‘Lucky’ in Watershed font.

    Silhouette Studio Screenshot - cuttingforbusiness.com

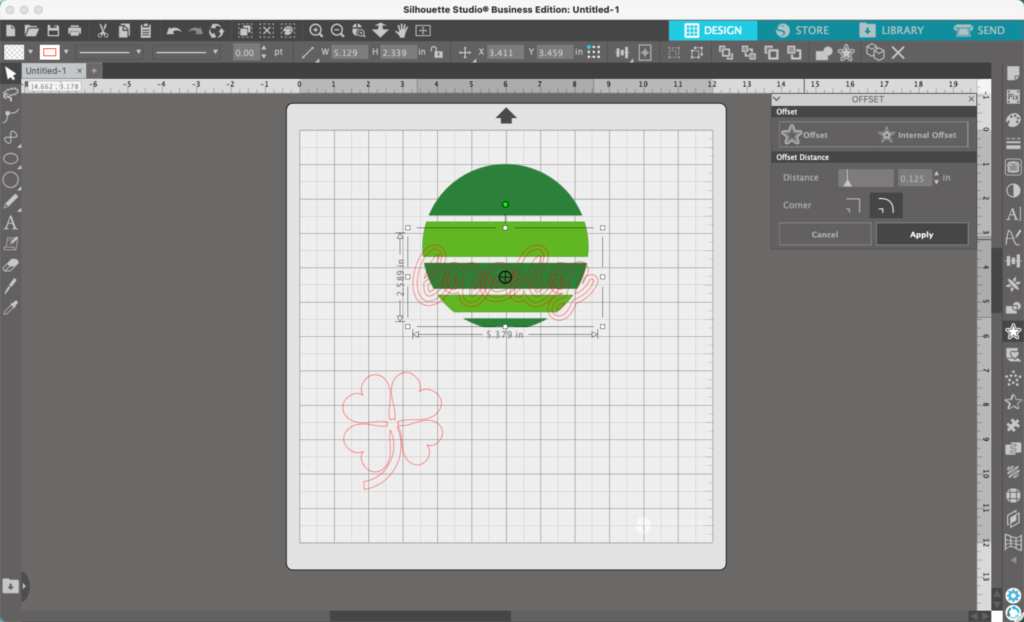
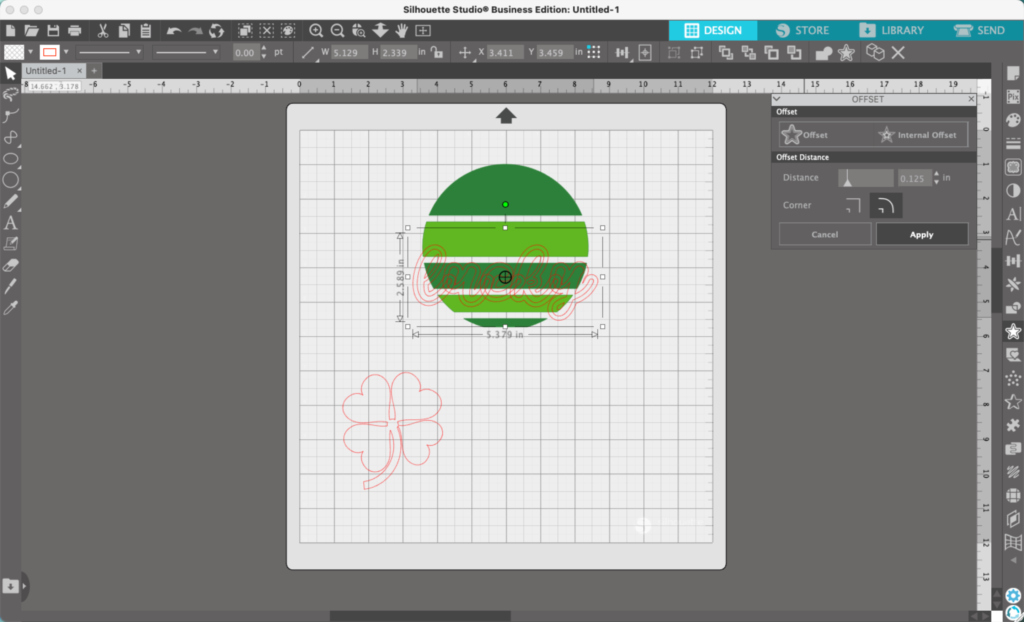
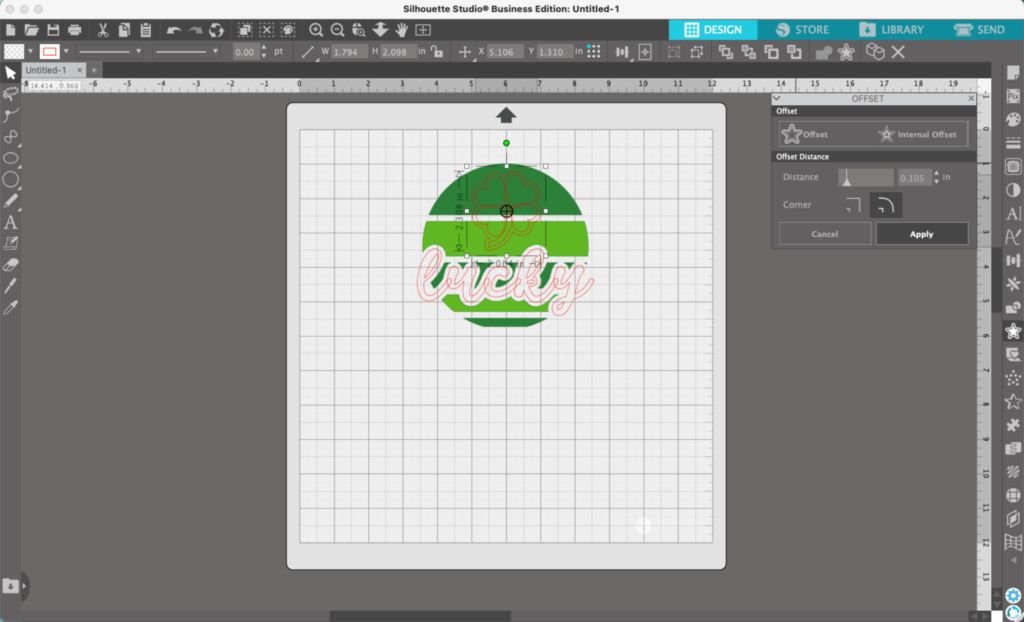
    11. Navigate to ‘Panels’, ‘Offset’, and perform an offset on the word.

    Silhouette Studio Screenshot - cuttingforbusiness.com

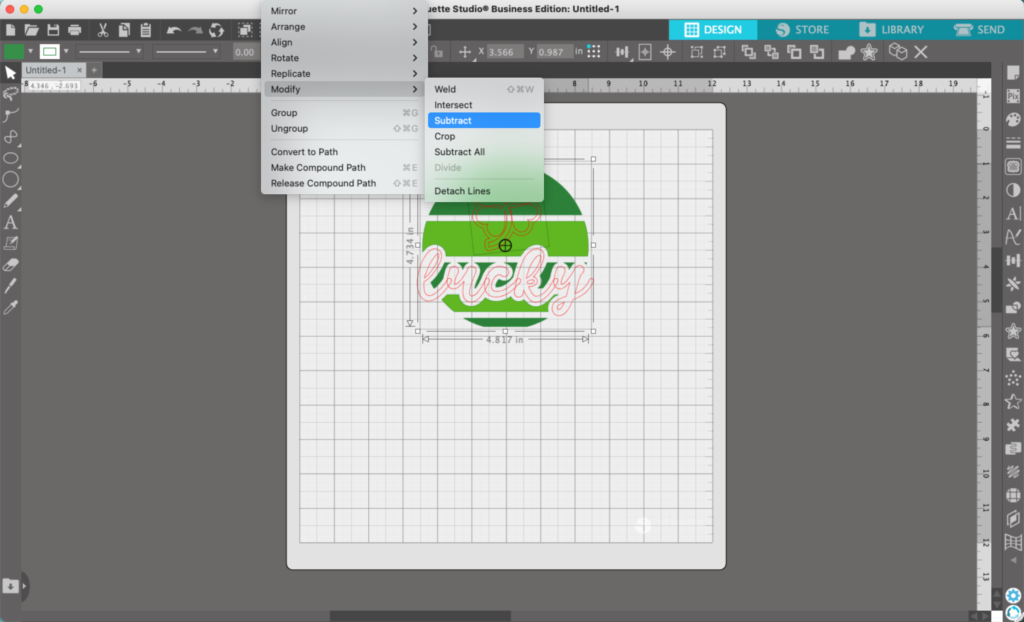
    12. Select both the circle and the word’s offset. Then, navigate to ‘Modify’, ‘Subtract’.

    Silhouette Studio Screenshot - cuttingforbusiness.com

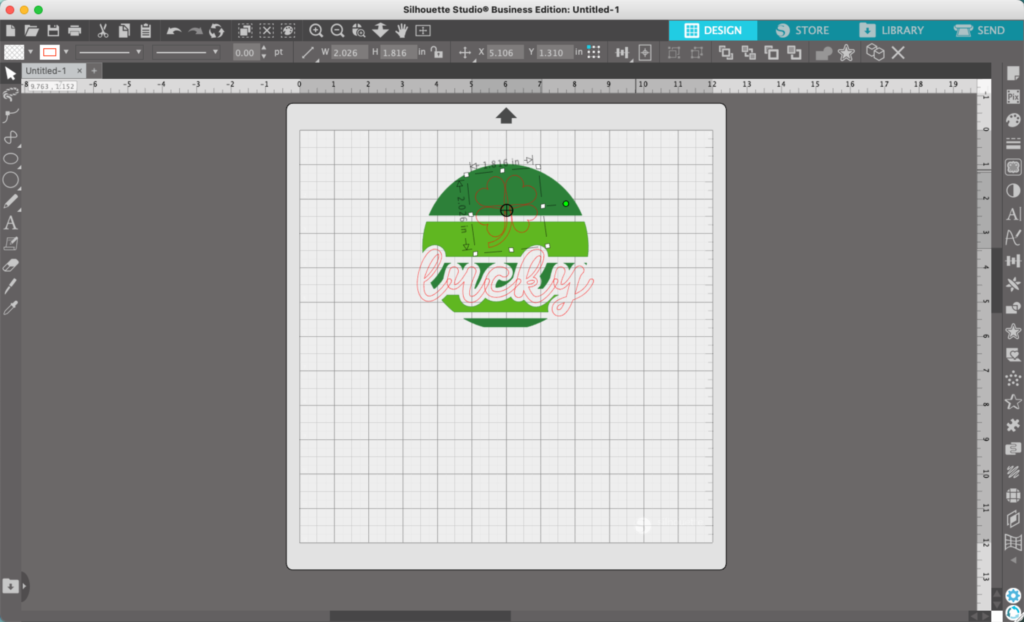
    13. Move the four leaf clover on top of your circle.

    Silhouette Studio Screenshot - cuttingforbusiness.com

    14. Perform an offset on the four leaf clover.

    Silhouette Studio Screenshot - cuttingforbusiness.com

    15. Then, select the circle and the offset of the clover. Navigate to ‘Object’, ‘Modify’, and ‘Subtract’.

    Silhouette Studio Screenshot - cuttingforbusiness.com

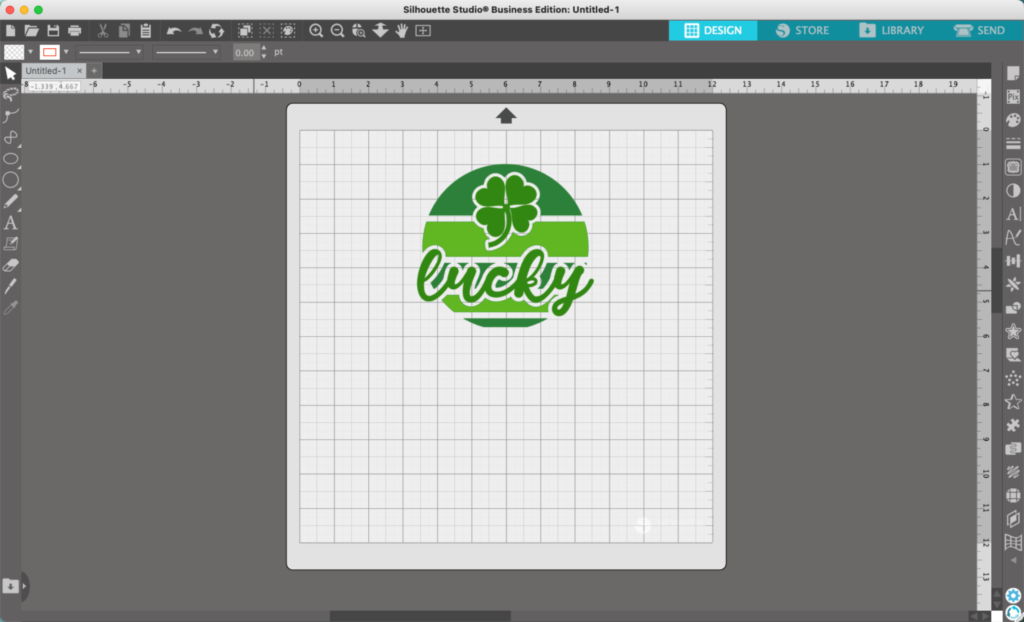
    16. Finishing touches. Weld the text together. Then, add the final colors.

    Silhouette Studio Screenshot - cuttingforbusiness.com
    Silhouette Studio Tutorial: Vintage Four Leaf Clover SVG - cuttingforbusiness.com

    That’s it! Your design is ready to go!

    Don’t Forget to Save!

    To save your new SVG creation, head to ‘File’, ‘Save As’, ‘Save to Hard Drive’, name the file, then select ‘SVG’ from the dropdown menu.

    Want More SVG Tutorials?

    View more Design with Me SVG tutorials.
  • Silhouette Studio Tutorial: Spring Typography Collage

    Today, let’s take a look at designing word collage SVG files.

    Before you start, brainstorm a quick list of spring related words. Here are some to get you started:

    • Spring
    • Bees
    • Flowers
    • Birds
    • Garden
    • Rain
    • Blossoms
    • Markets
    • Plants
    • Grow

    If you’re having a hard time coming up with Spring related words, this is the perfect task for ChatGPT.

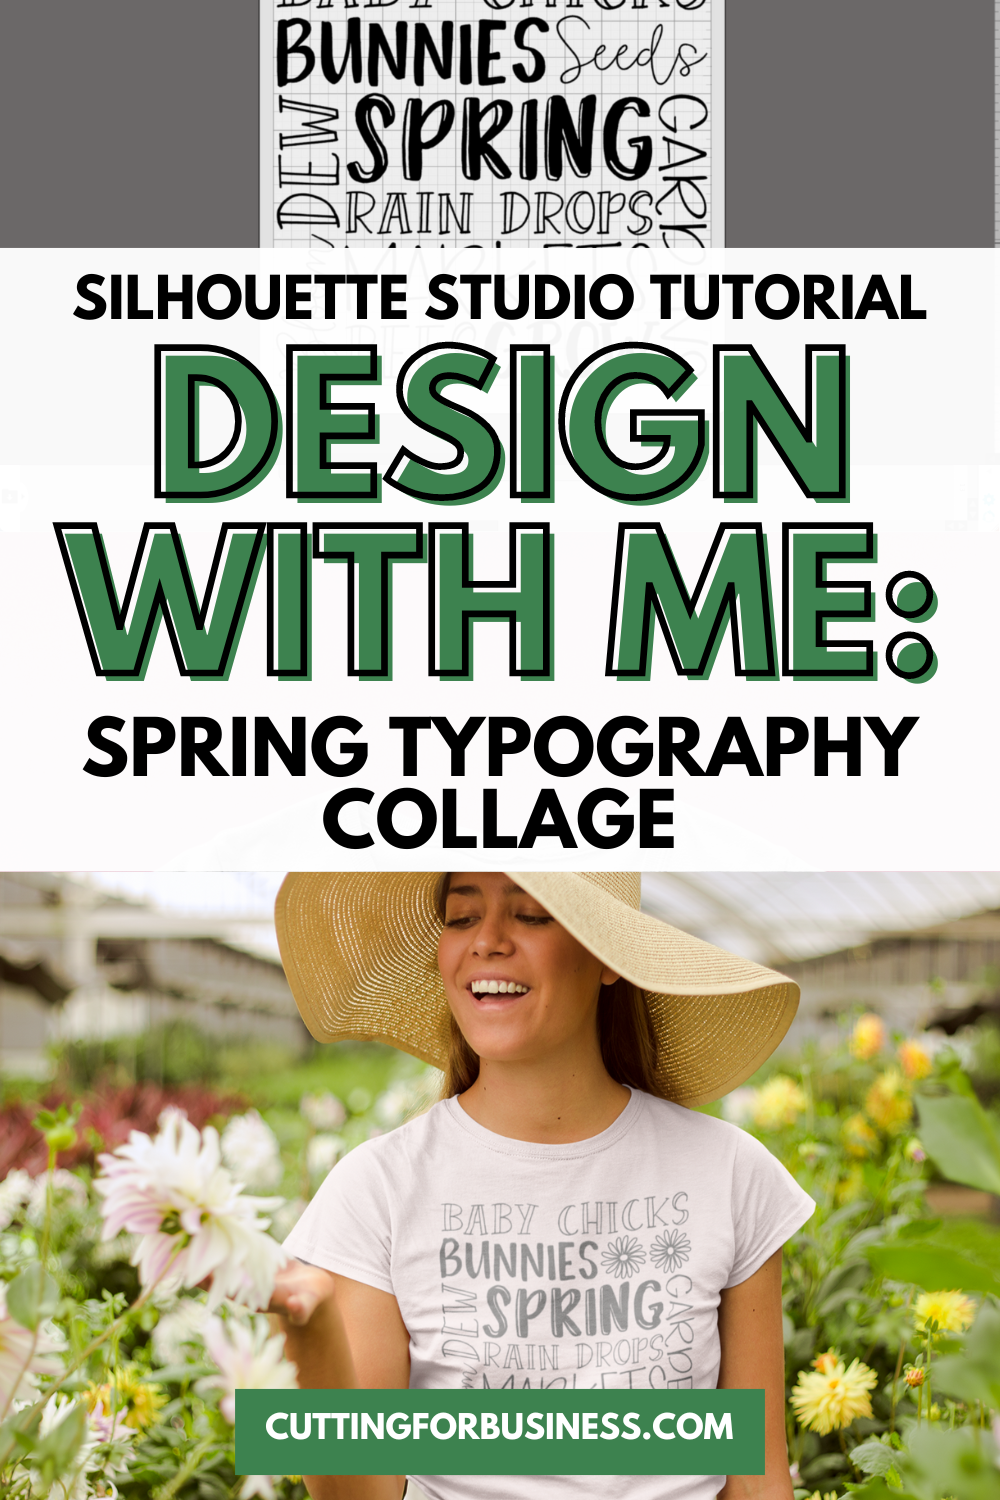
    Silhouette Studio Tutorial: Spring Typography Collage - cuttingforbusiness.com

    Tutorial: Spring Typography Collage Design

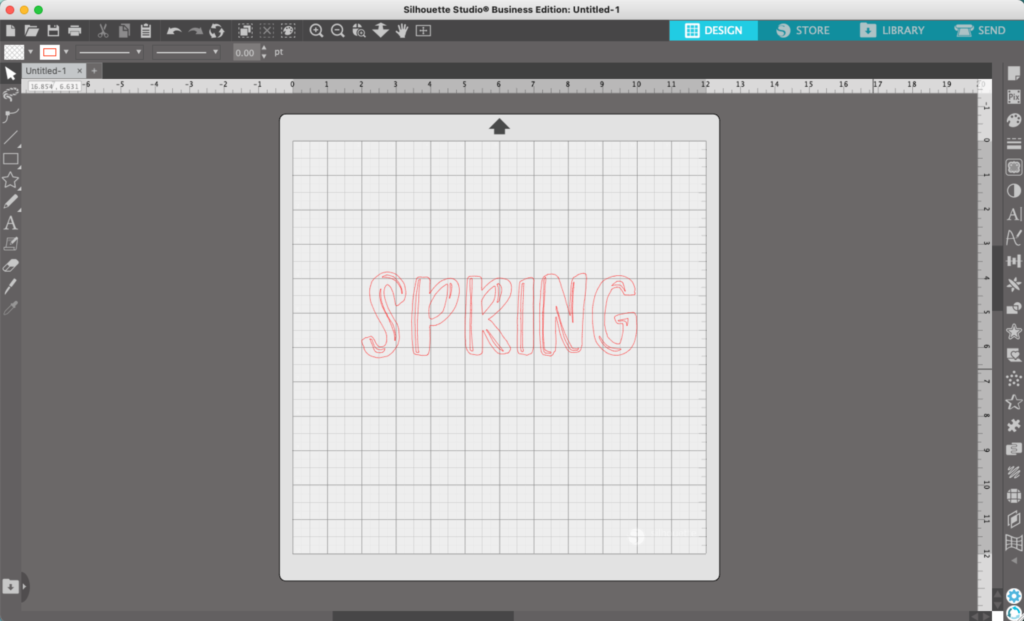
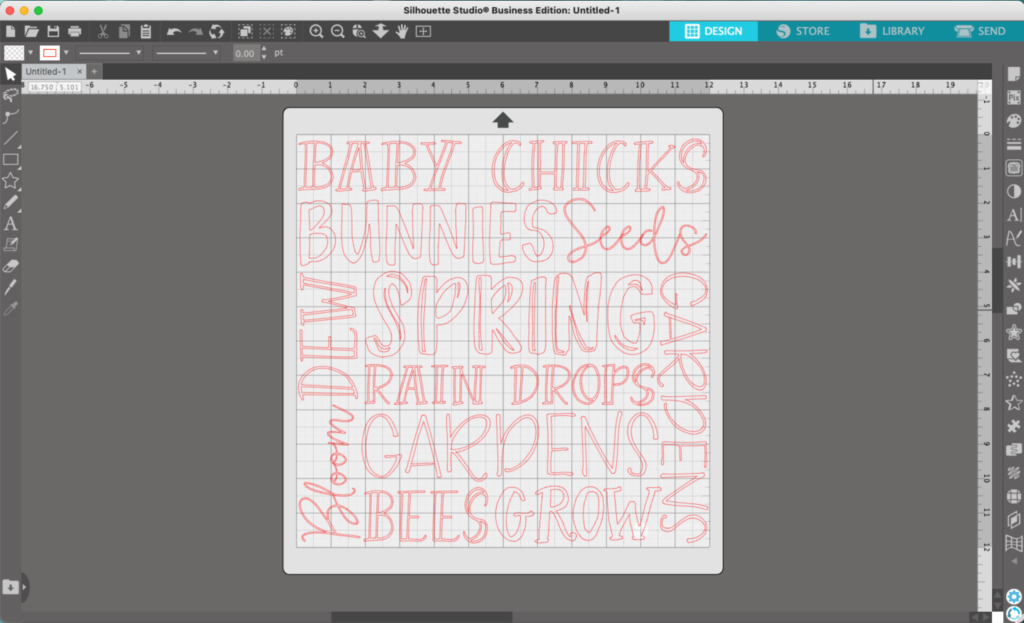
    1. In Silhouette Studio, add a word in the center of the mat.
    Silhouette Studio Screenshot - cuttingforbusiness.com

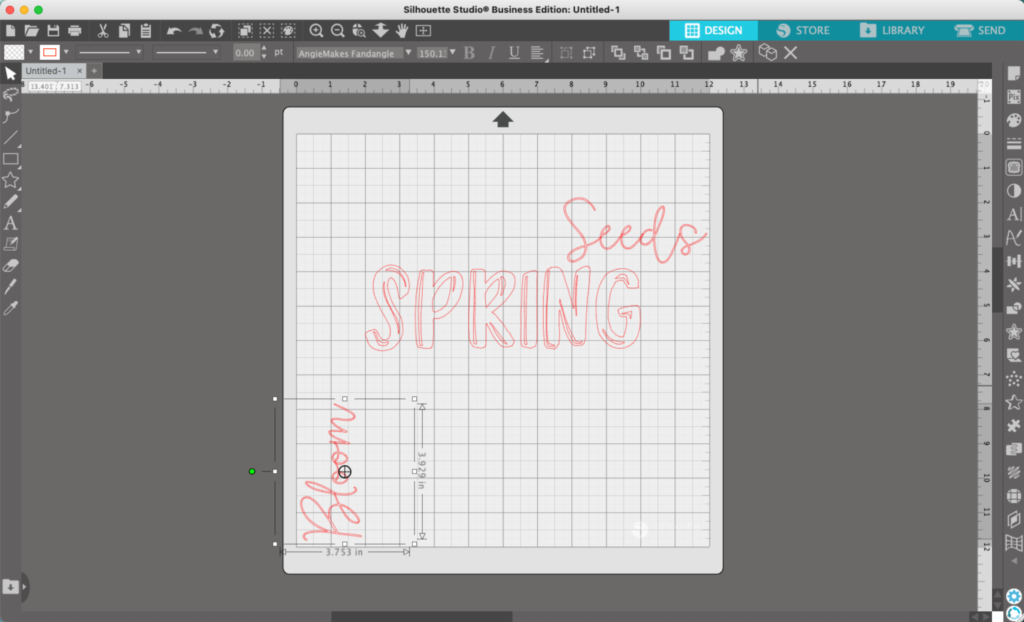
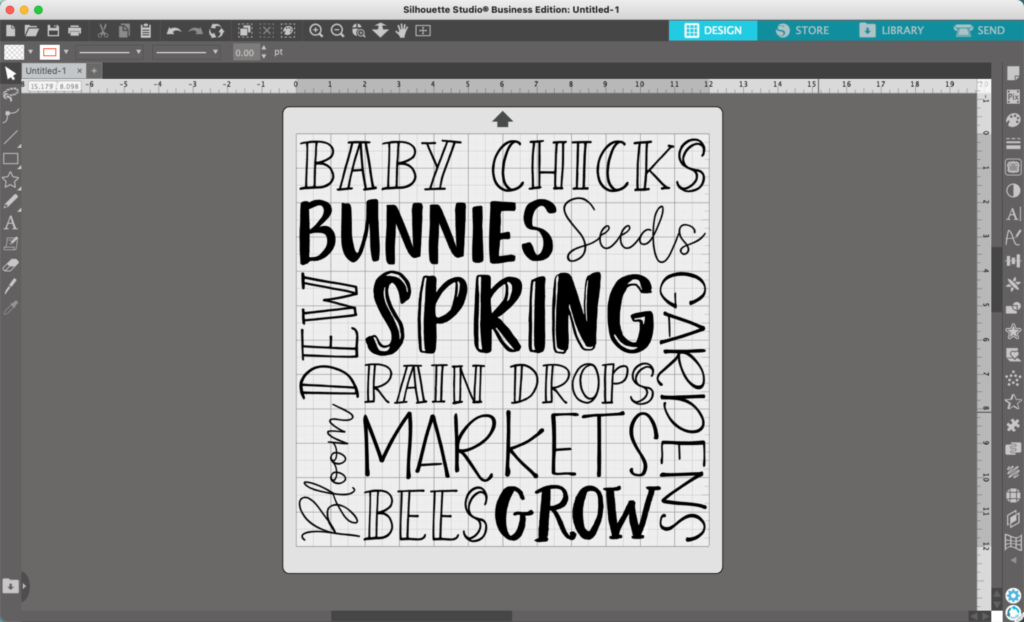
    2. Add more words, turning some of them on their side. When designing these typography collages, I like to use the largest font on my focus word in the center. I make all other text smaller.

    Silhouette Studio Screenshot - cuttingforbusiness.com

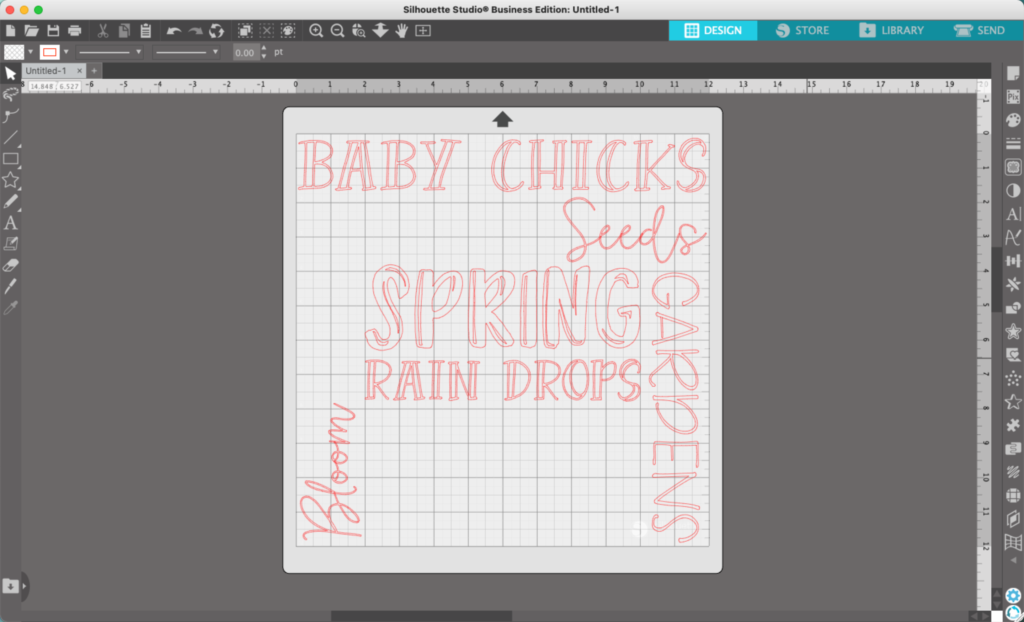
    3. Add more words. For fonts, I’m breaking the rules of 2 – 3 fonts per design. However, I’m using a set of fonts that are designed to work together.

    Silhouette Studio Screenshot - cuttingforbusiness.com
    Silhouette Studio Screenshot - cuttingforbusiness.com

    5. Fine tune placement and alignment. (And, correct any mistakes – whoops!) Then, add color to your design.

    Silhouette Studio Screenshot - cuttingforbusiness.com

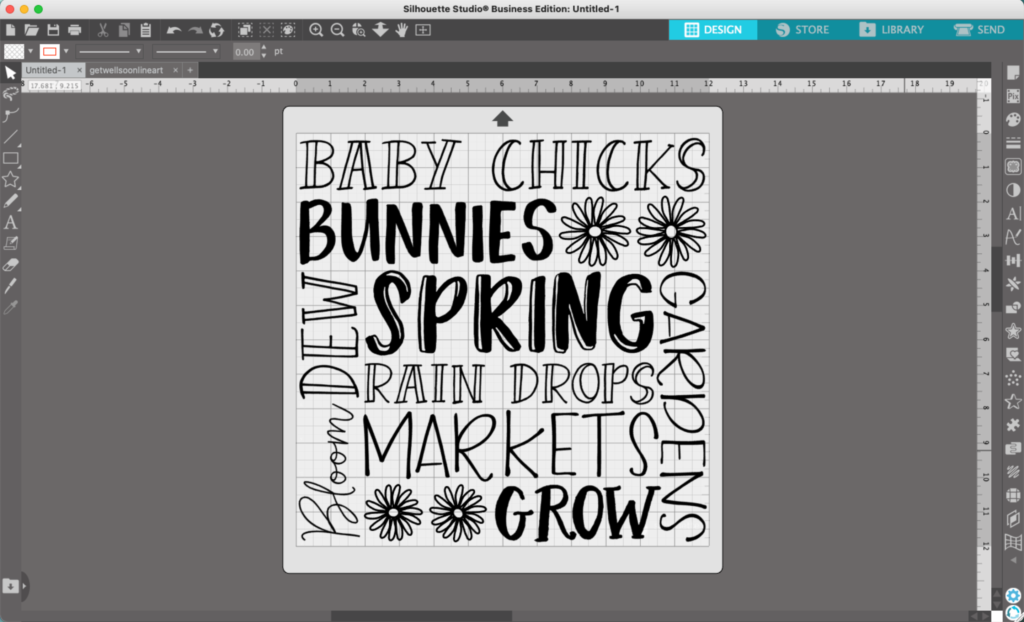
    But, what if you have weird spaces you can’t fill in the design? While I lucked out with this design, sometimes you’ll have small areas you can’t fill. In these cases, I usually fill with a related clipart.

    For example:

    Silhouette Studio Screenshot - cuttingforbusiness.com
    Spring Typography SVG Design Tutorial - cuttingforbusiness.com.

    That’s it! Your design is ready to go!

    Don’t Forget to Save!

    To save your new SVG creation, head to ‘File’, ‘Save As’, ‘Save to Hard Drive’, name the file, then select ‘SVG’ from the dropdown menu.

    Want More SVG Tutorials?

    View more Design with Me SVG tutorials.
  • Silhouette Studio Tutorial: Watercolor Jack-o-Lanterns

    Design with Me is a new regular feature on Cutting for Business! Each Friday, I’ll bring you a new Silhouette Studio tutorial featuring how to design an SVG.

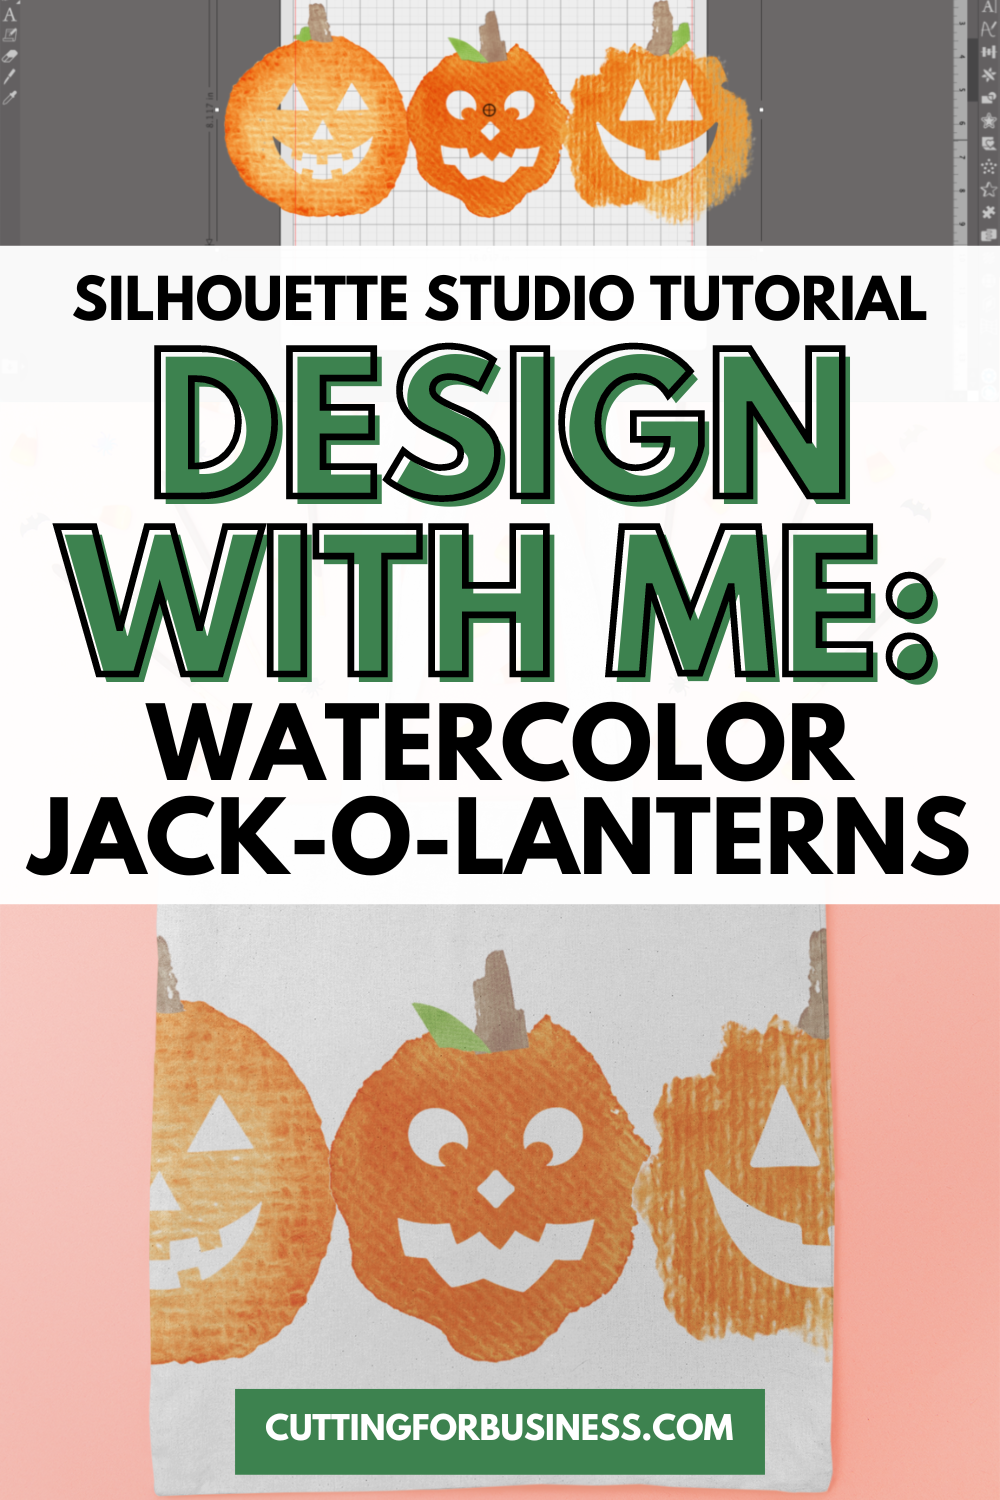
    Let’s talk Halloween! Today, we are going to do a quick tutorial to create watercolor jack-o-lanterns.

    Silhouette Studio Tutorial: Watercolor Jack-o-Lanterns - cuttingforbusiness.com

    Silhouette Studio Tutorial: Watercolor Jack-o-Lantern Faces

    These jack ‘o lanterns are so easy to create. First, you’ll need some watercolor splotches and some jack ‘o lantern faces.

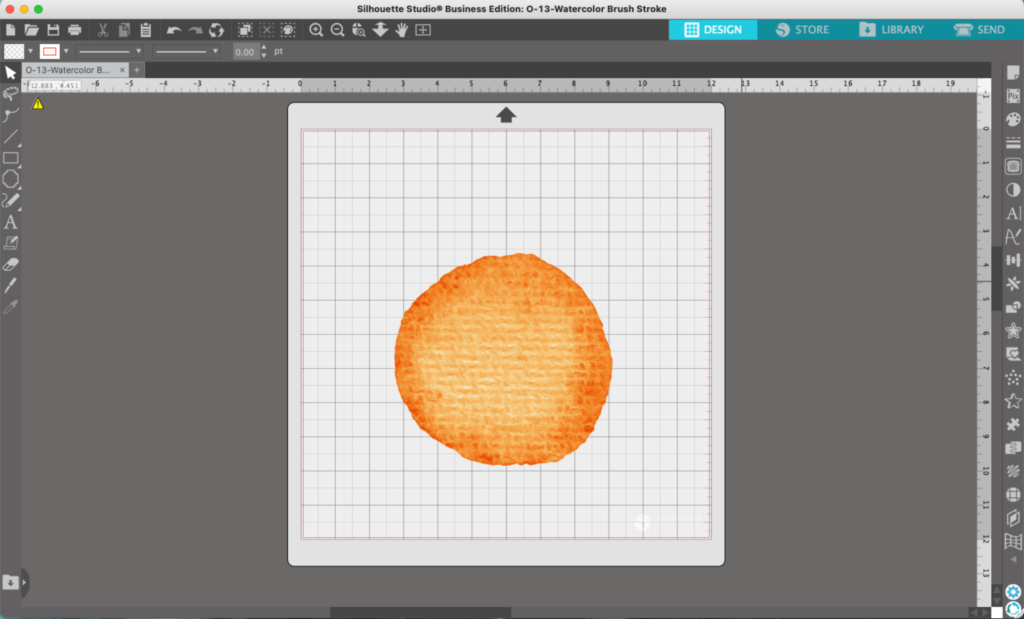
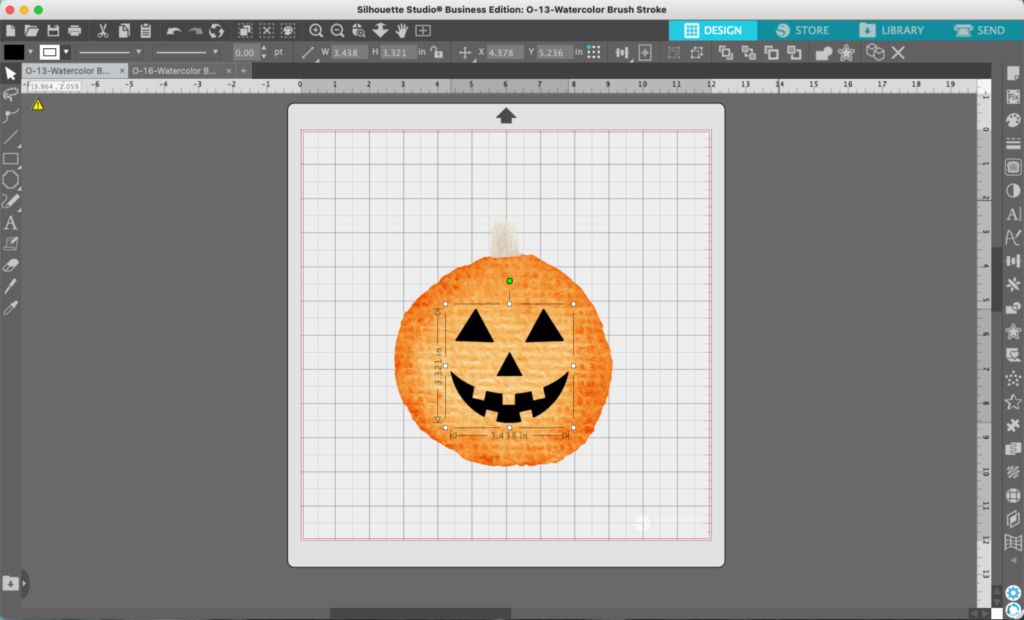
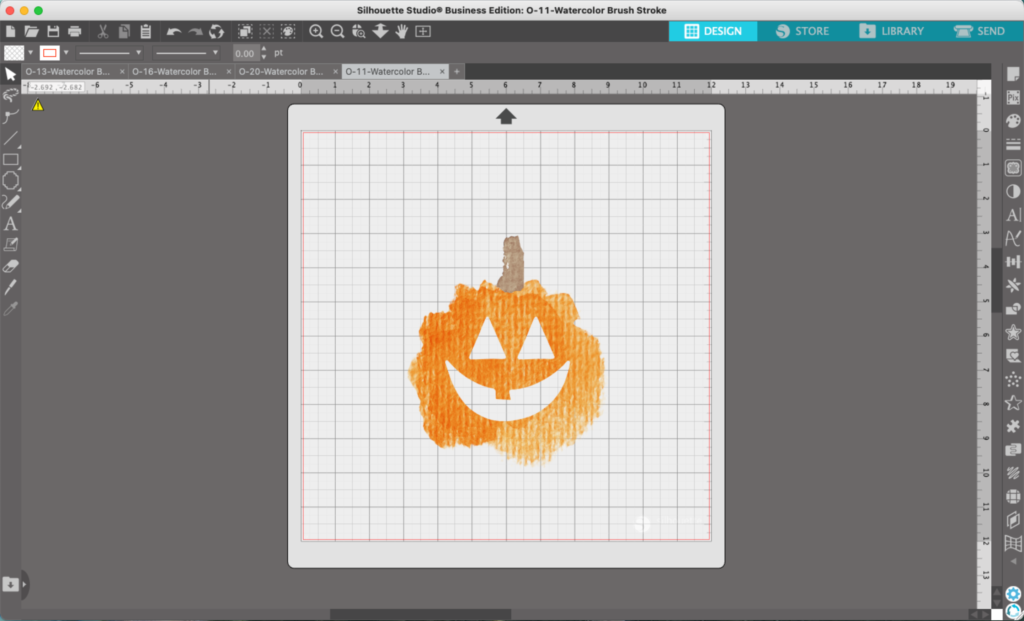
    1. In Silhouette Studio, open your watercolor splotch.
    Silhouette Studio Screenshot - cuttingforbusiness.com.

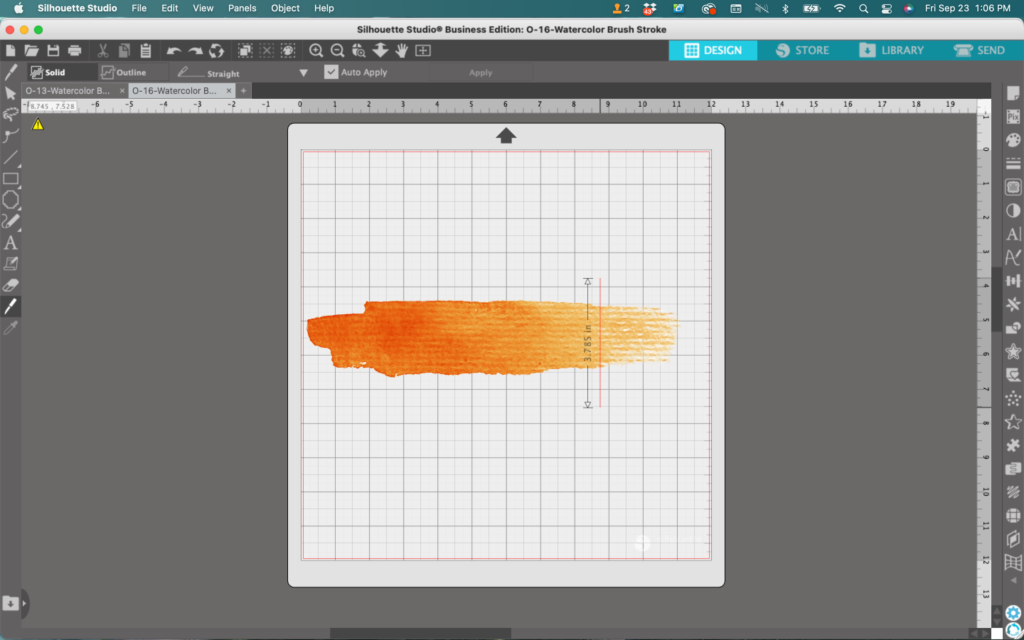
    2. Now, I need to add a stem to turn my splotch into a pumpkin. I’d like these to also look like watercolor, so I’m going to open another splotch from my watercolor pack and use the knife tool to fashion it into a stem.

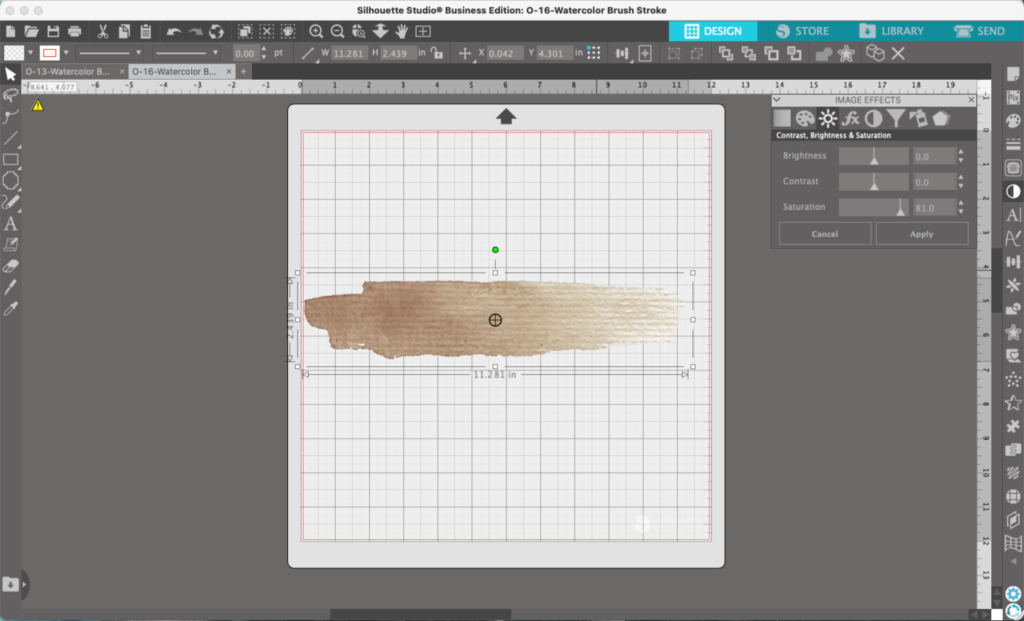
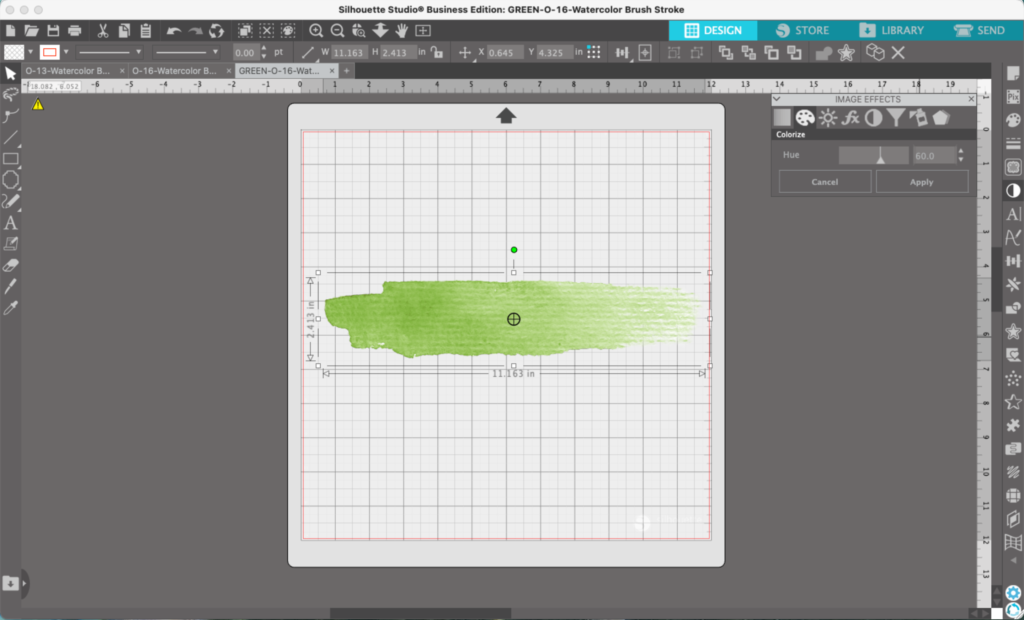
    Pumpkin stems aren’t yellow, so let’s change the color. Since it is an image, we cannot simply change the fill color. Instead, head to ‘Panels’, then ‘Image Effects’. Move the sliders around on the tabs to change the color. (This only works on PNG and JPG files, and it doesn’t work on all images.)

    Silhouette Studio Screenshot - cuttingforbusiness.com.
    Silhouette Studio Screenshot - cuttingforbusiness.com.

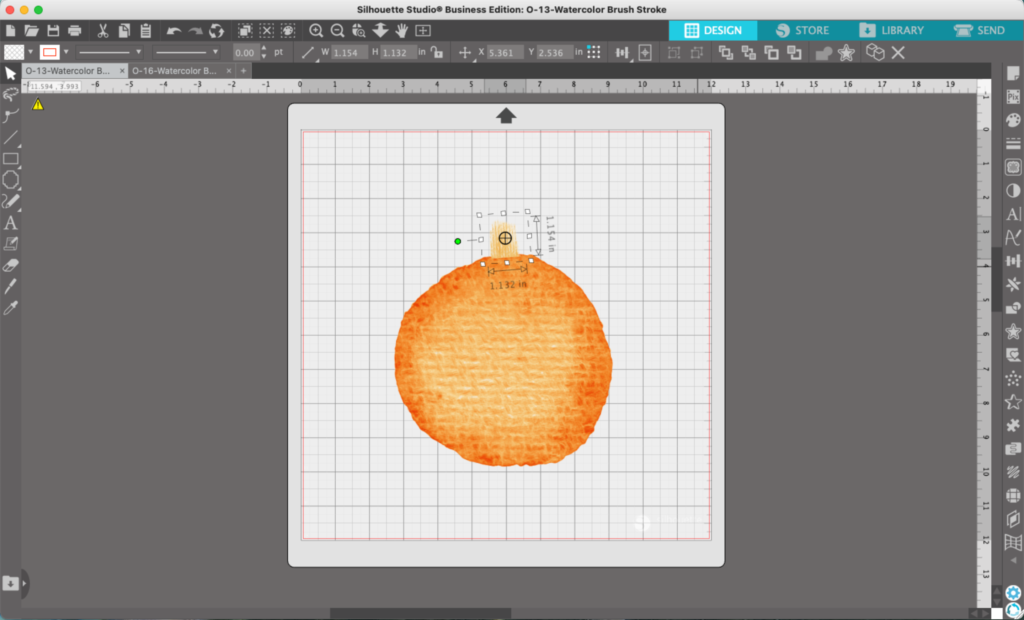
    3. Once you cut a section of the watercolor to use for a stem, copy and paste it onto the mat with your circle watercolor splotch.

    Silhouette Studio Screenshot - cuttingforbusiness.com.

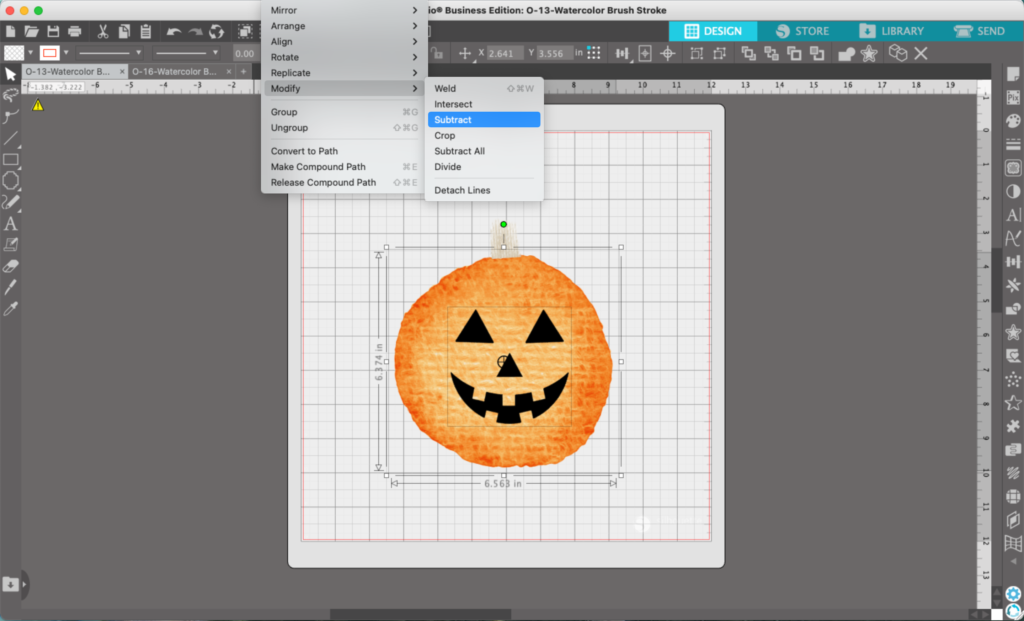
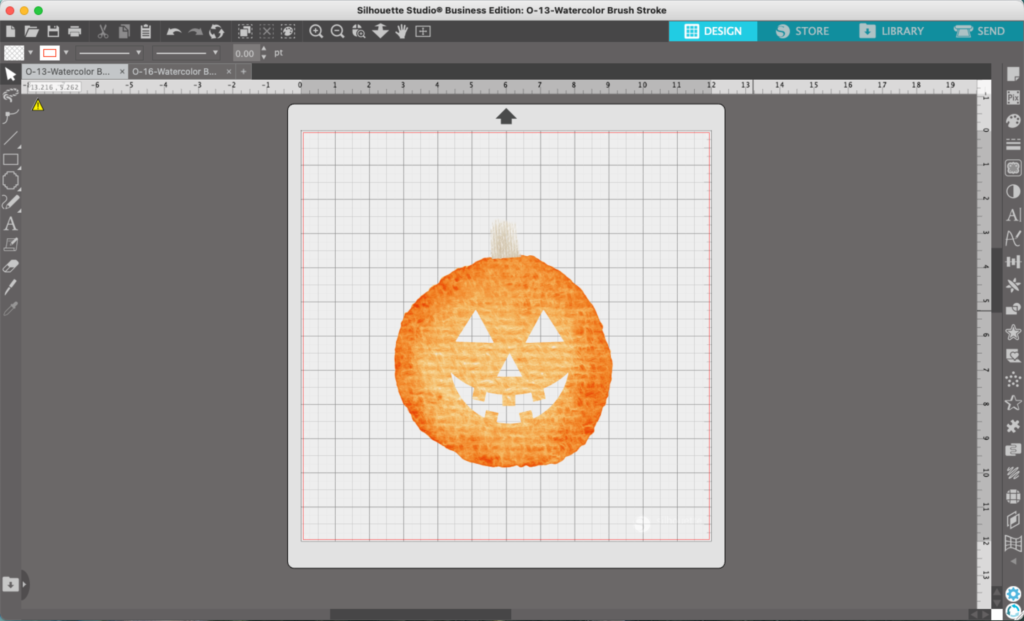
    4. Add your jack ‘o lantern face. You can either choose to leave your face black or select the pumpkin and the face, then navigate to ‘Object’, ‘Modify’, and ‘Subtract’ to subtract the face from your pumpkin.

    Silhouette Studio Screenshot - cuttingforbusiness.com.
    Silhouette Studio Screenshot - cuttingforbusiness.com.
    Silhouette Studio Screenshot - cuttingforbusiness.com.

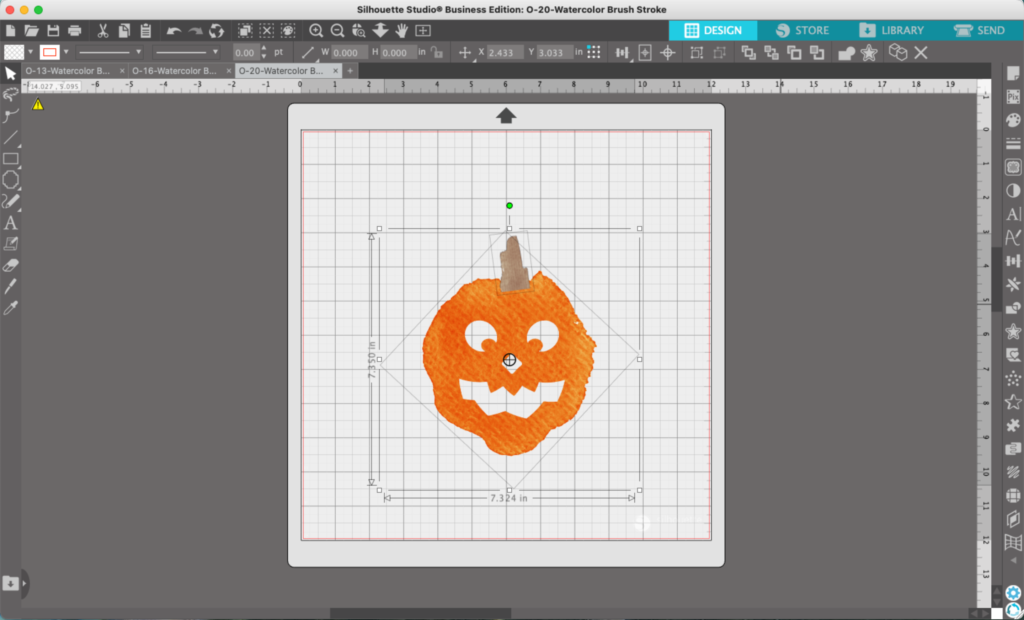
    6. Repeat the process using a different shaped watercolor splotch and a different face.

    Silhouette Studio Screenshot - cuttingforbusiness.com.

    7. Repeat the tutorial once more, again use a different watercolor splotch and face.

    Silhouette Studio Screenshot - cuttingforbusiness.com.

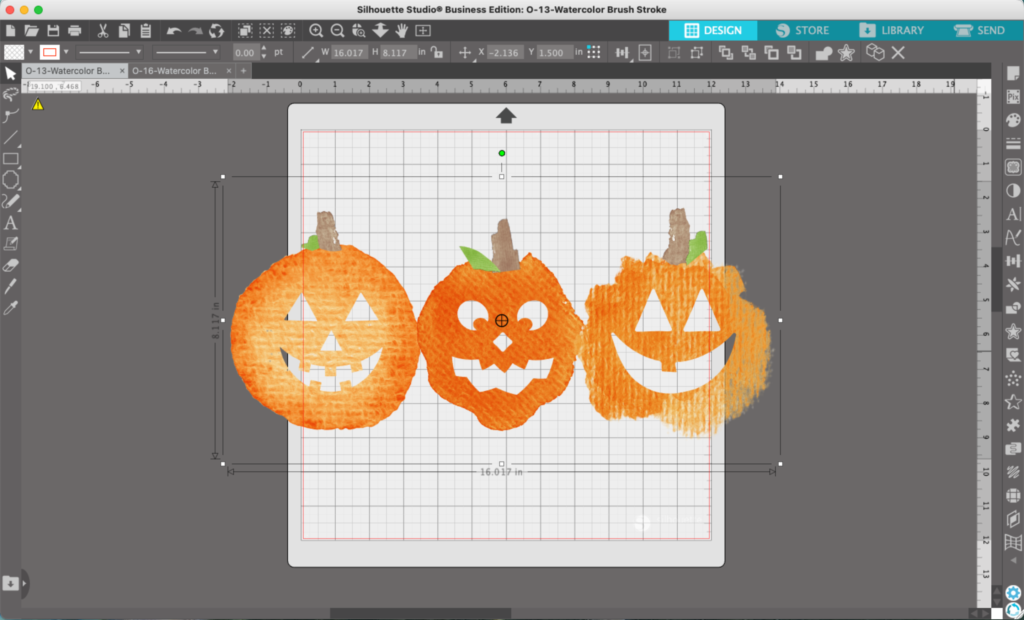
    8. Copy and paste all the jack ‘o lanterns onto one mat. Add any finishing details like leaves.

    Silhouette Studio Screenshot - cuttingforbusiness.com.

    Wondering how I created the leaves? I used the same process as the stem: Navigate to ‘Panels’, ‘Image Effects’, and adjust the sliders until you get green. Then use the knife to cut off a piece to use as a leaf.

    Silhouette Studio Screenshot - cuttingforbusiness.com.

    That’s it! Your watercolor jack-o-lanterns are ready to go!

    Don’t Forget to Save!

    To save your new SVG creation, head to ‘File’, ‘Save As’, ‘Save to Hard Drive’, name the file, then select ‘SVG’ from the dropdown menu.

    Want More SVG Tutorials?

    View more Design with Me SVG tutorials.
  • Silhouette Studio Tutorial: How to Design Snowflakes

    Design with Me is a new regular feature on Cutting for Business! Each Friday, I’ll bring you a new Silhouette Studio tutorial featuring how to design an SVG.

    Let’s talk snow. Whether you love it or hate it, snow is coming for much of the country.

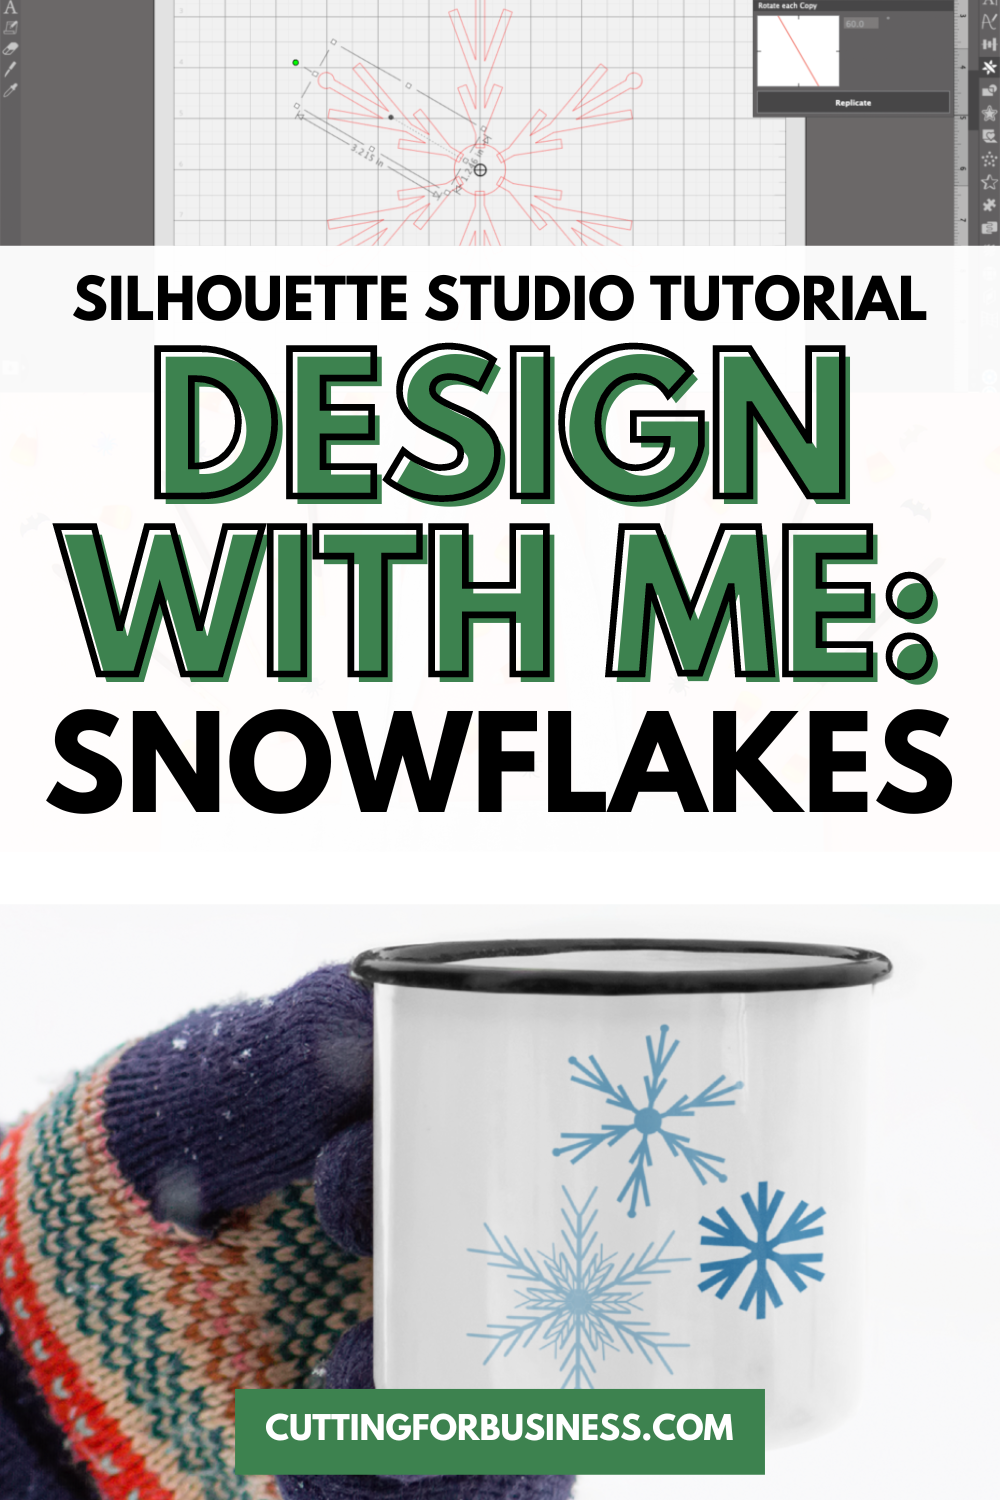
    Today, let’s create one-of-a-kind snowflakes.

    Silhouette Studio Tutorial: How to Design Snow Flakes - cuttingforbusiness.com.

    Silhouette Studio Tutorial: Snowflakes

    Before we dive in to the tutorial, make sure that your design mat is set to a square. In this tutorial, I’m using a 12″ by 12″ square. If you need to check your settings, head to ‘Panels’, ‘Page Setup’.

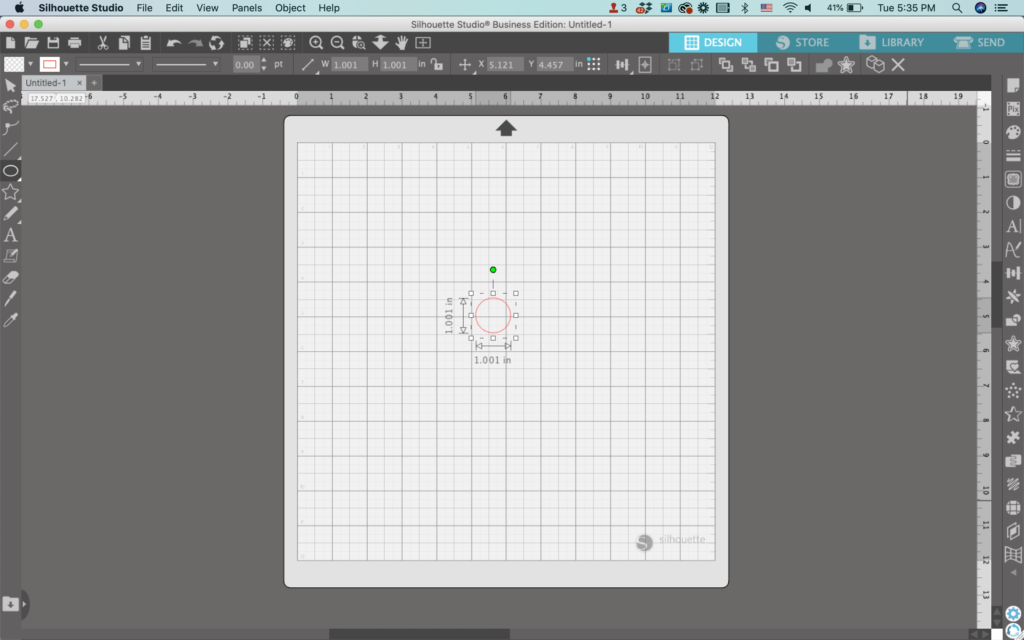
    1. In Silhouette Studio, draw a circle. Be sure to hold down the SHIFT key to make it perfectly round.
    Silhouette Studio Screenshot - cuttingforbusiness.com.

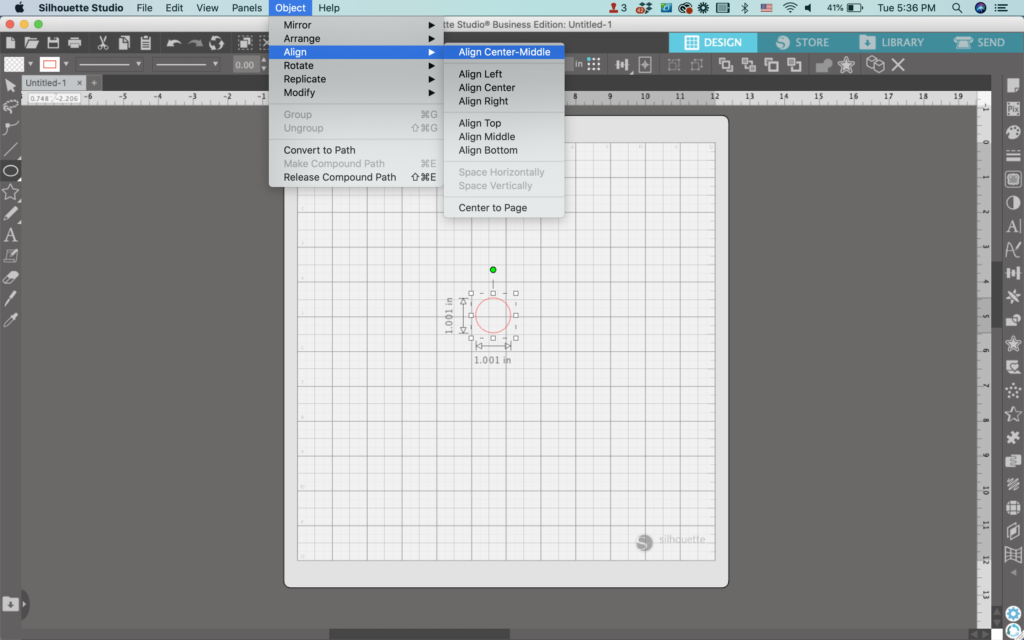
    2. With the circle selected, navigate to ‘Align’, then ‘Align Center-Middle’. This will move your circle to the middle of the page. (This is why it’s important to have a square design mat for this tutorial.)

    Silhouette Studio Screenshot - cuttingforbusiness.com.

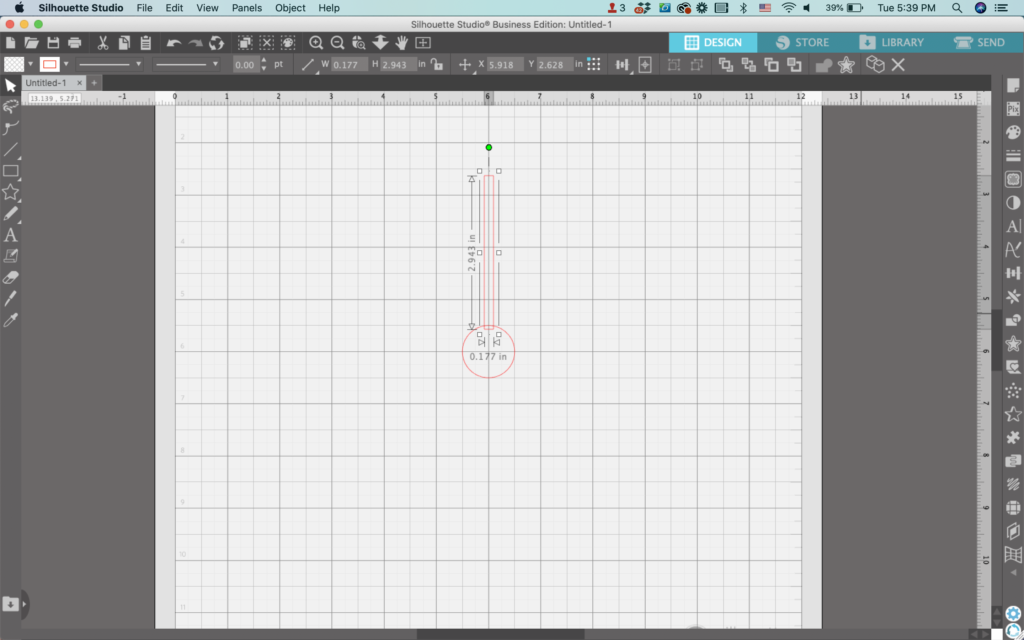
    3. Draw a skinny rectangle and move it into place like shown below. It should overlap the circle a small amount.

    Silhouette Studio Screenshot - cuttingforbusiness.com.

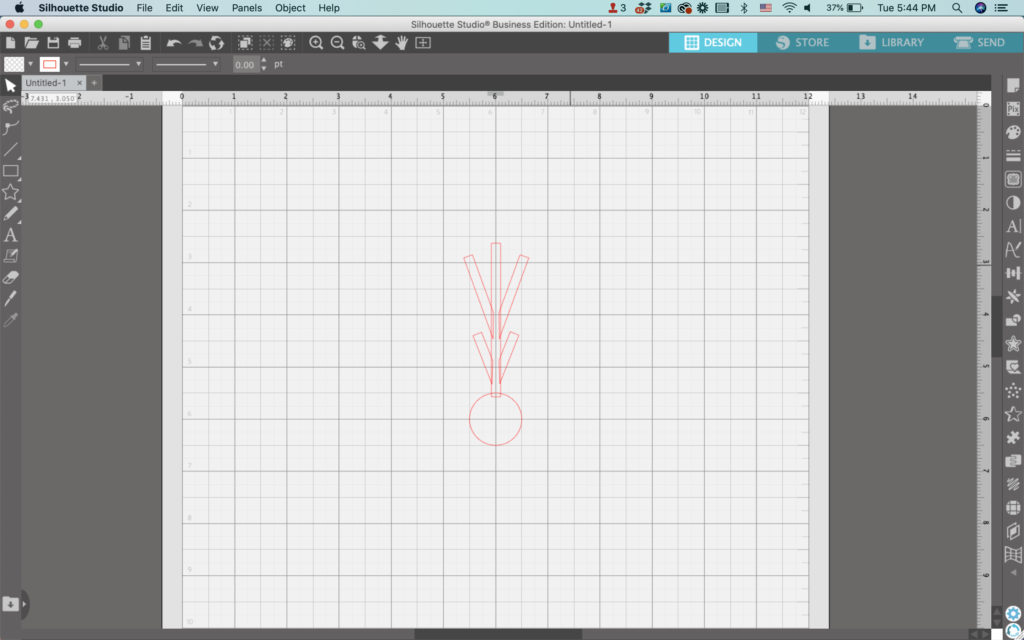
    4. Add additional small rectangles up and down the long rectangle you made. I added four, but feel free to add as many as you’d like.

    Silhouette Studio Screenshot - cuttingforbusiness.com.

    5. Add any additional details. I’ve add a circle on top of the long rectangle.

    Silhouette Studio Screenshot - cuttingforbusiness.com.

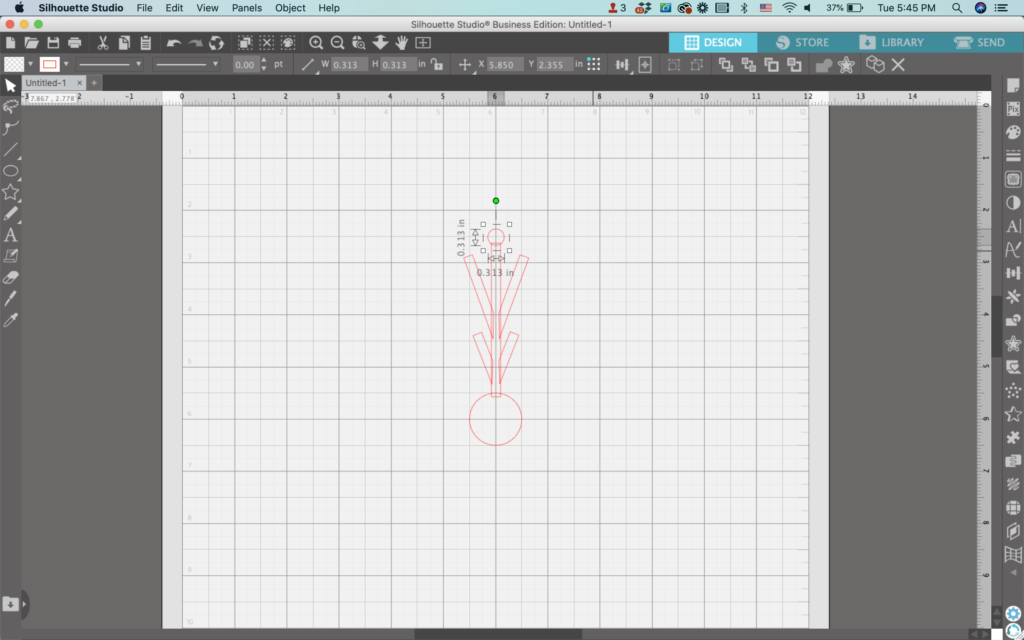
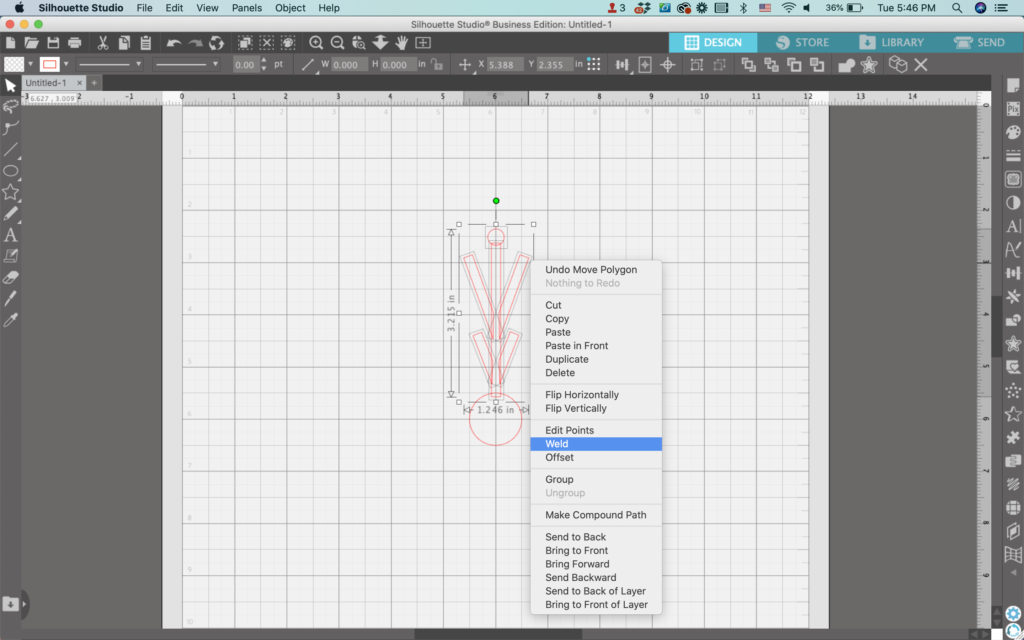
    6. Select all the pieces, right click, and choose ‘Weld’. Be cautious not to weld the snowflake spoke to the center circle.

    Silhouette Studio Screenshot - cuttingforbusiness.com.

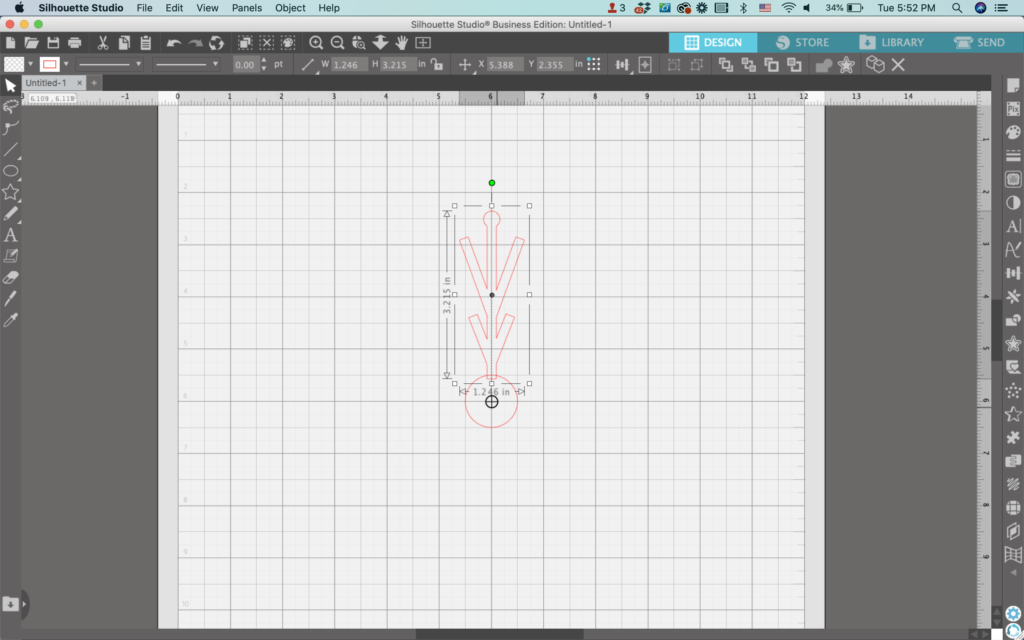
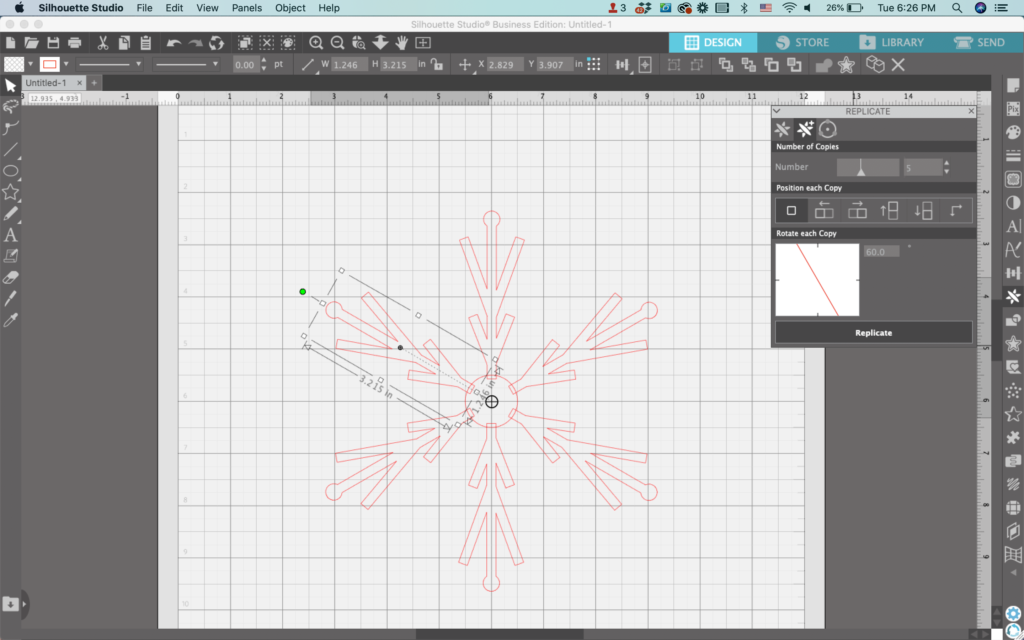
    7. Drag the snowflake spoke’s ‘Center of Rotation’ to the center of the circle. (That’s the circle with the crosshair in it.) If you do not see a circle with a crosshair in it, click the snowflake spoke and press the letter ‘o’ on your keyboard. Make sure that the center of rotation lands on the exact center of the circle or this won’t work correctly.

    Silhouette Studio Screenshot - cuttingforbusiness.com.

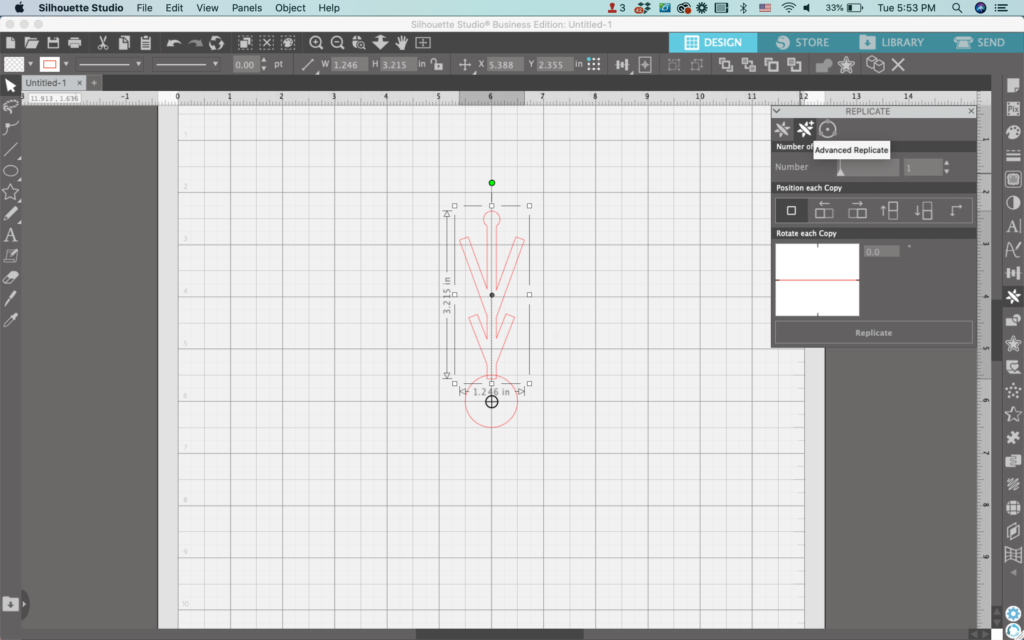
    8. Navigate to ‘Panels’, then ‘Replicate’. Then, click on the ‘Advanced Replicate’ Panel. (It’s the second tab.)

    Silhouette Studio Screenshot - cuttingforbusiness.com.

    9. Change the settings in the Replicate Panel. Enter the number of additional snowflake spokes you want to add. In this case, I want 6 total spokes, so I enter 5 in the number box – since one spoke is already in the design.

    You can skip the ‘Position each Copy’ section for this tutorial.

    Now, take 360 (the total number of degrees in a circle) and divide it by the number of total snowflake spokes you want. In this tutorial, I’d like 6 total snowflake spokes. The math equation becomes: 360 divided by 6 equals 60. I enter 60 into the ‘Rotate each Copy’ box.

    Finally, click the ‘Replicate’ button. If you set it up correctly, you’ll end up with a 6 spoke snowflake.

    Silhouette Studio Screenshot - cuttingforbusiness.com.

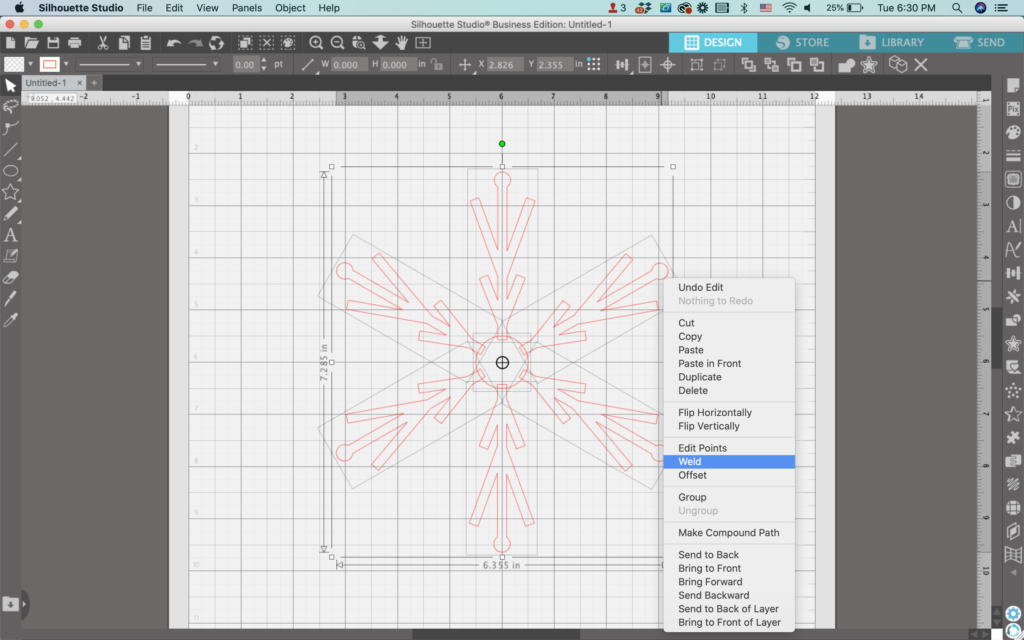
    10. Select all the pieces of the design, right click, and select ‘Weld’.

    Silhouette Studio Screenshot - cuttingforbusiness.com.

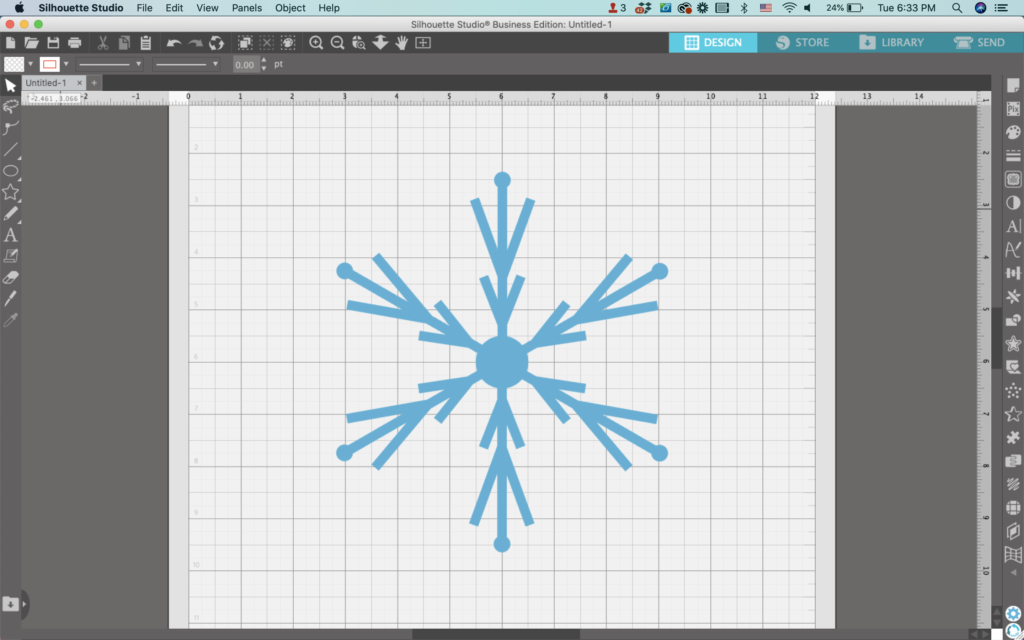
    11. Add color to finish off your design.

    Silhouette Studio Screenshot - cuttingforbusiness.com.

    By changing the design of the spoke, altering the number of spokes used, or alternating short and long spokes, it is easy to make different styles of snowflakes. Remember: No two snowflakes are the same!

    Bonus: Make One Snowflake into Two Unique Designs

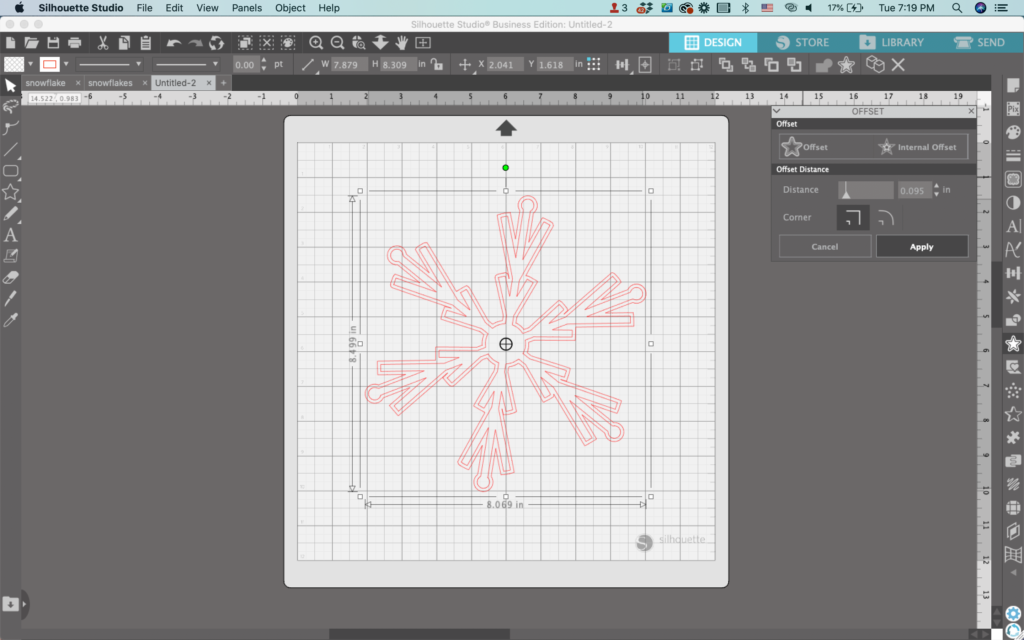
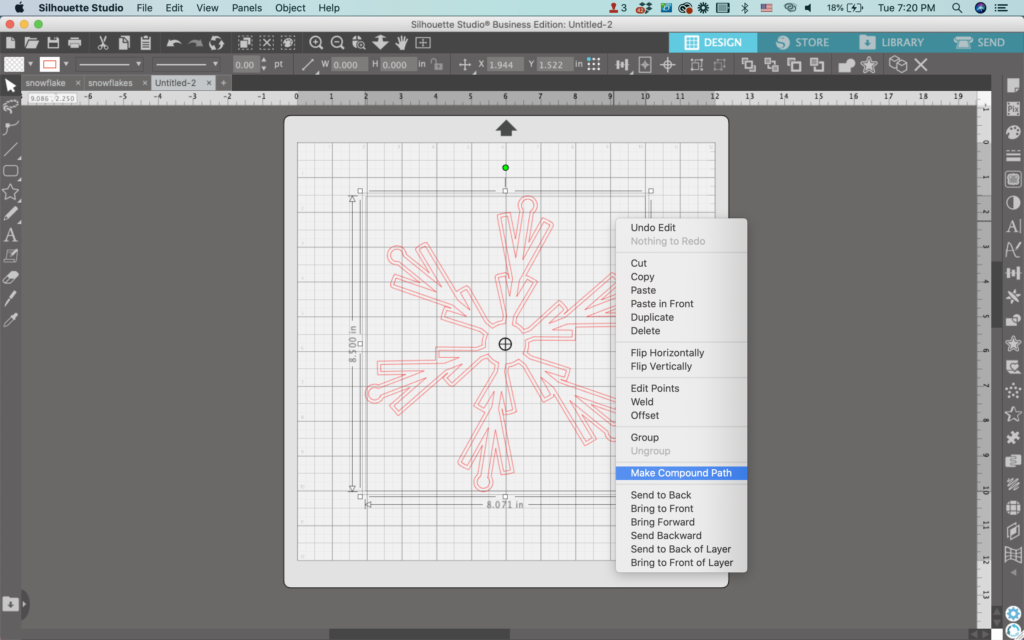
    12. Using the snowflake you just created, perform an offset.

    Silhouette Studio Screenshot - cuttingforbusiness.com.

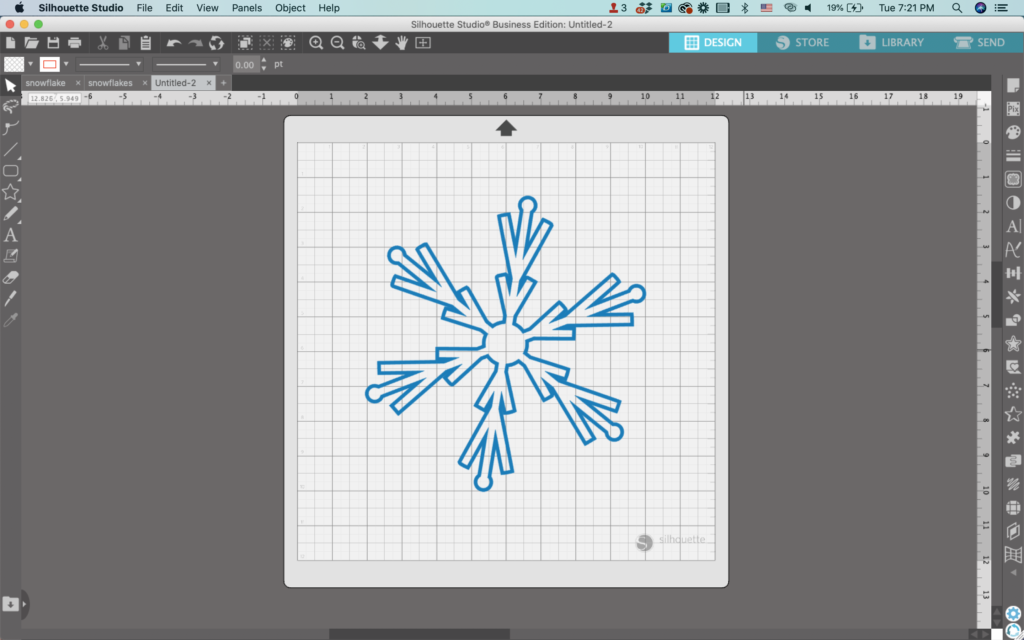
    13. Select the snowflake and the offset, right click, and select ‘Make Compound Path’.

    Silhouette Studio Screenshot - cuttingforbusiness.com.

    14. Fill the outline with color.

    Silhouette Studio Screenshot - cuttingforbusiness.com.

    That’s it! Your snowflakes are ready to go!

    Don’t Forget to Save!

    To save your new SVG creation, head to ‘File’, ‘Save As’, ‘Save to Hard Drive’, name the file, then select ‘SVG’ from the dropdown menu.

    Want More SVG Tutorials?

    View more Design with Me SVG tutorials.
  • Silhouette Studio Tutorial: Classic Snowman Faces

    Design with Me is a new regular feature on Cutting for Business! Each Friday, I’ll bring you a new Silhouette Studio tutorial featuring how to design an SVG.

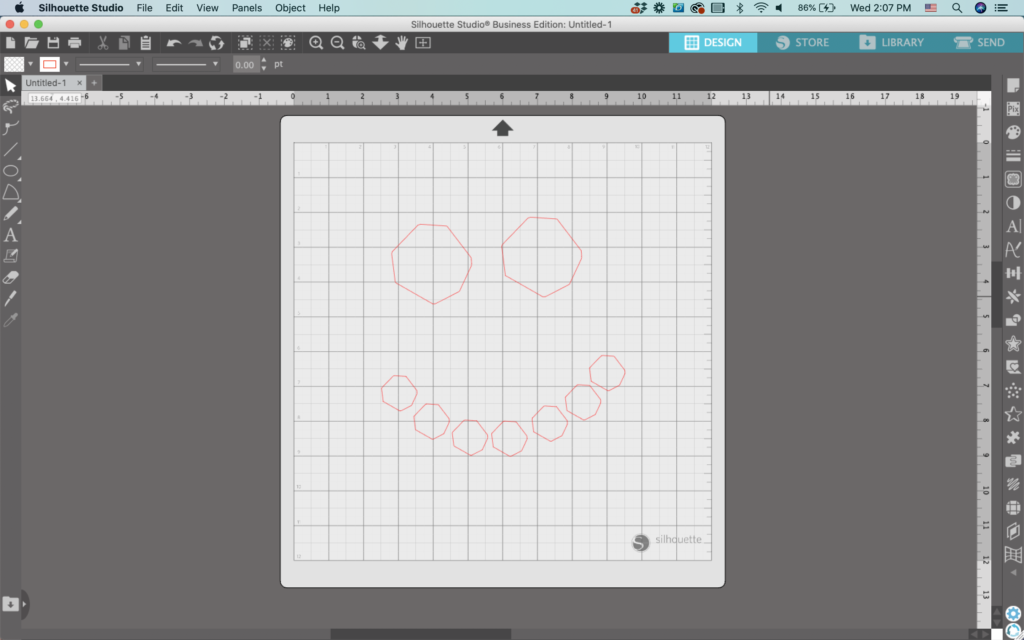
    My favorite cold weather activity when I was a kid was building snowmen. Of course, I rolled the snow into a ball, added rocks for eyes and a mouth, and topped it off with a carrot nose.

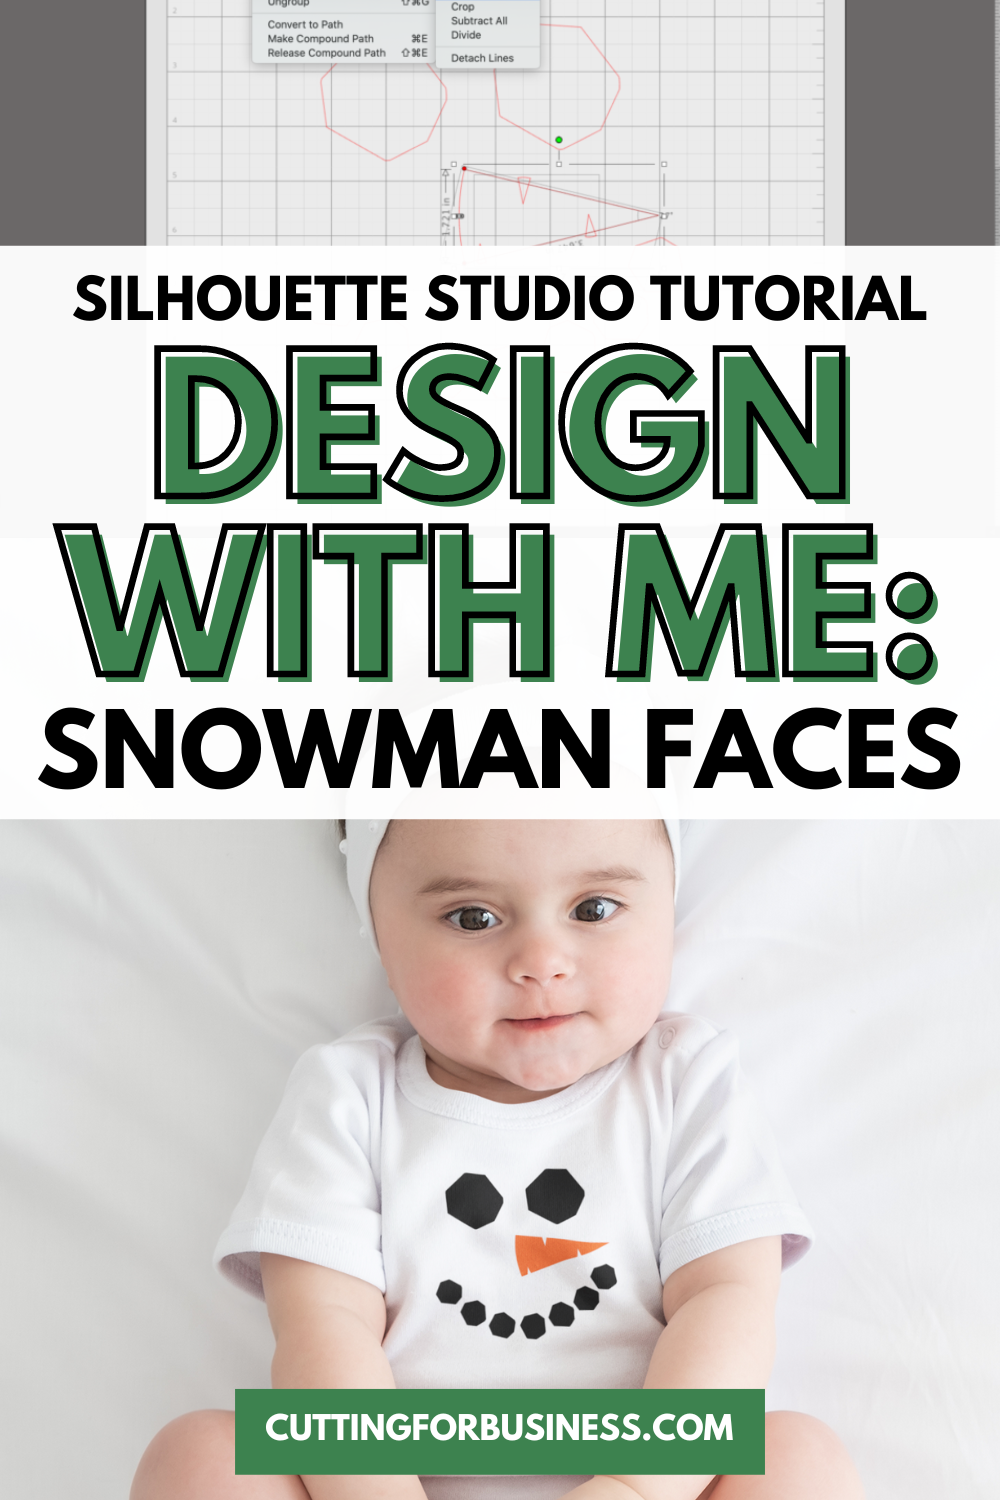
    Today, let’s take a look at how to make a classic snowman face in Silhouette Studio.

    Silhouette Studio Tutorial: Snowman Faces - cuttingforbusiness.com.

    Silhouette Studio Tutorial: Classic Snow Man Faces

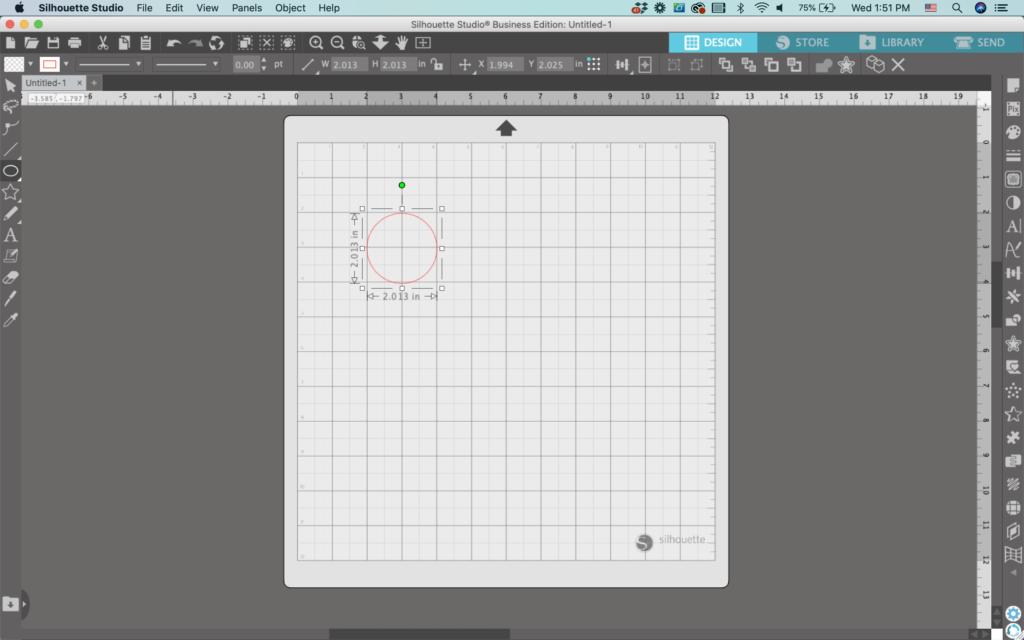
    1. In Silhouette Studio, draw a circle. Hold down the SHIFT key to make it a perfect circle.
    Silhouette Studio Screenshot - cuttingforbusiness.com

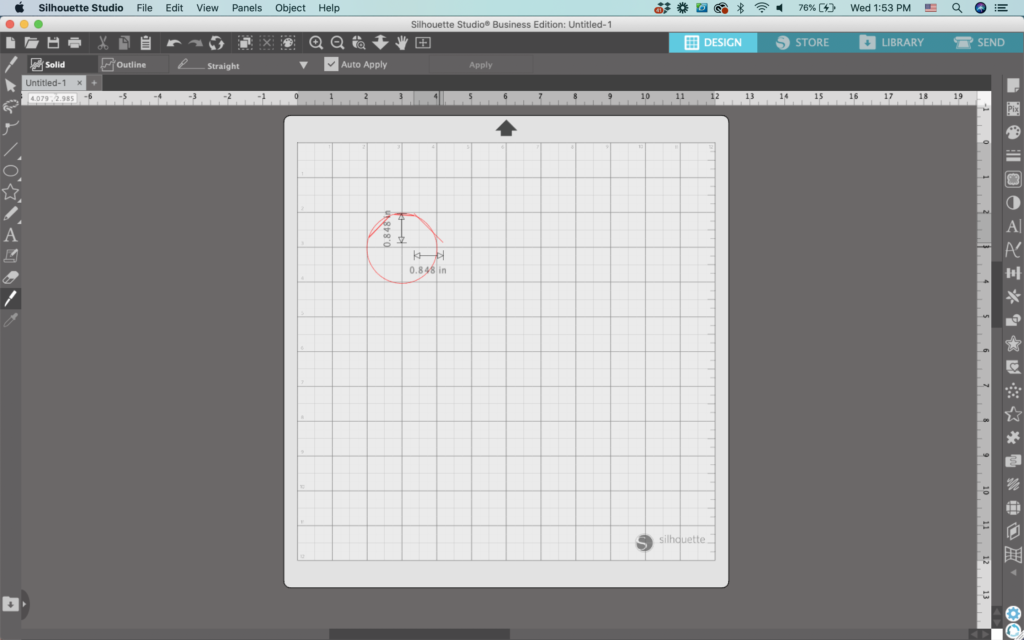
    2. Use the knife tool to slice off a sliver on every side of circle. Be sure that the knife setting is set to ‘Solid’ instead of ‘Outline’.

    Silhouette Studio Screenshot - cuttingforbusiness.com

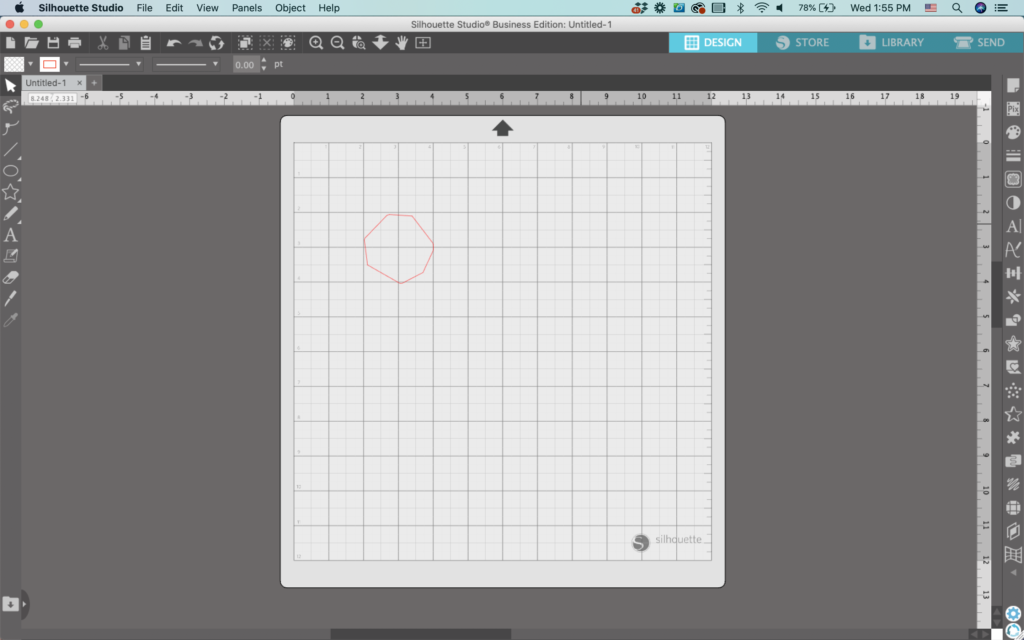
    3. Delete all the ‘small slivers’. This will leave you with a shape that resembles a rock.

    Silhouette Studio Screenshot - cuttingforbusiness.com

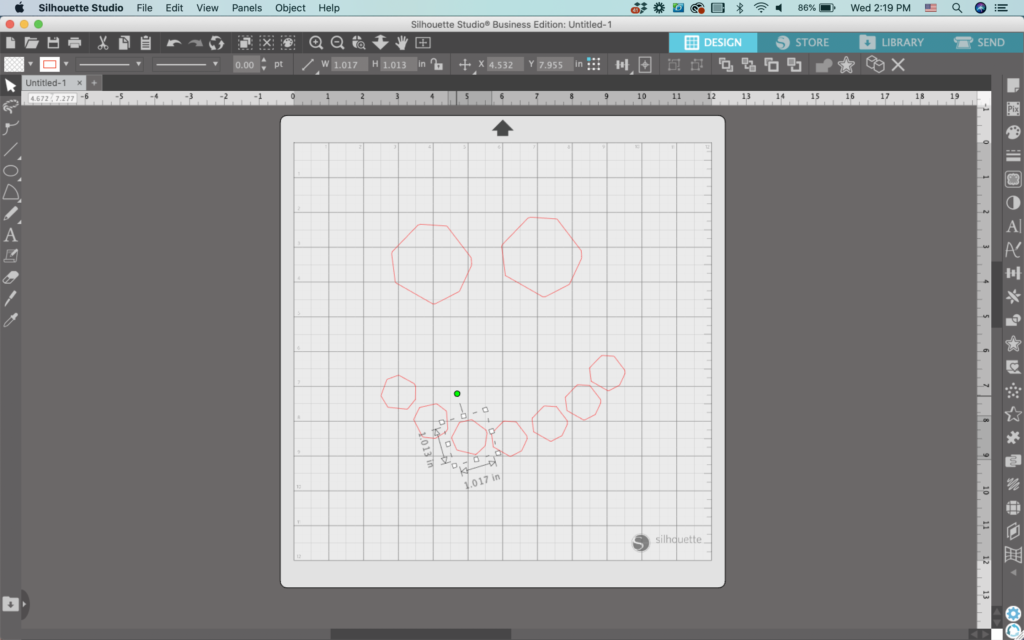
    4. Either copy and paste or right click and ‘Duplicate’ the rock shape several times. Resize as needed and move them into place to form two eyes and a mouth.
    Silhouette Studio Screenshot - cuttingforbusiness.com

    5. Rotate each rock piece slightly to make them look less uniform. You could also slightly resize them if you want.

    Silhouette Studio Screenshot - cuttingforbusiness.com

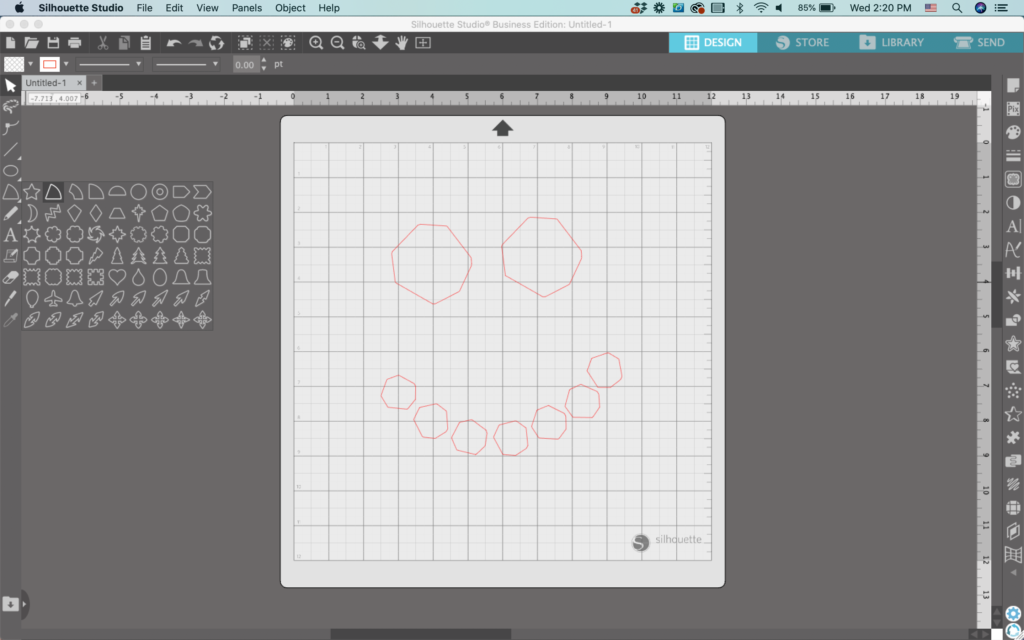
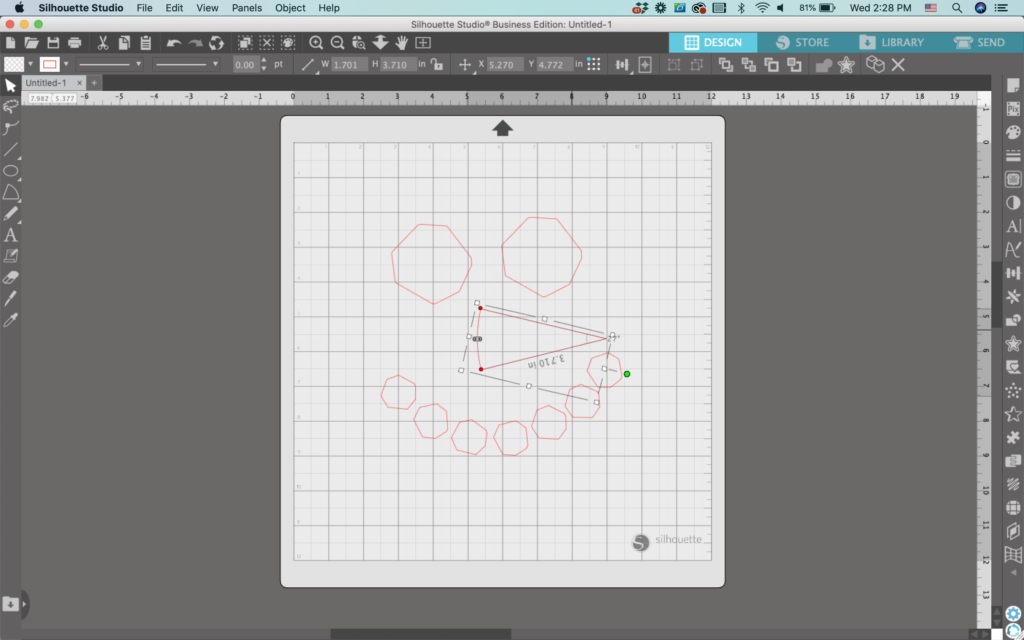
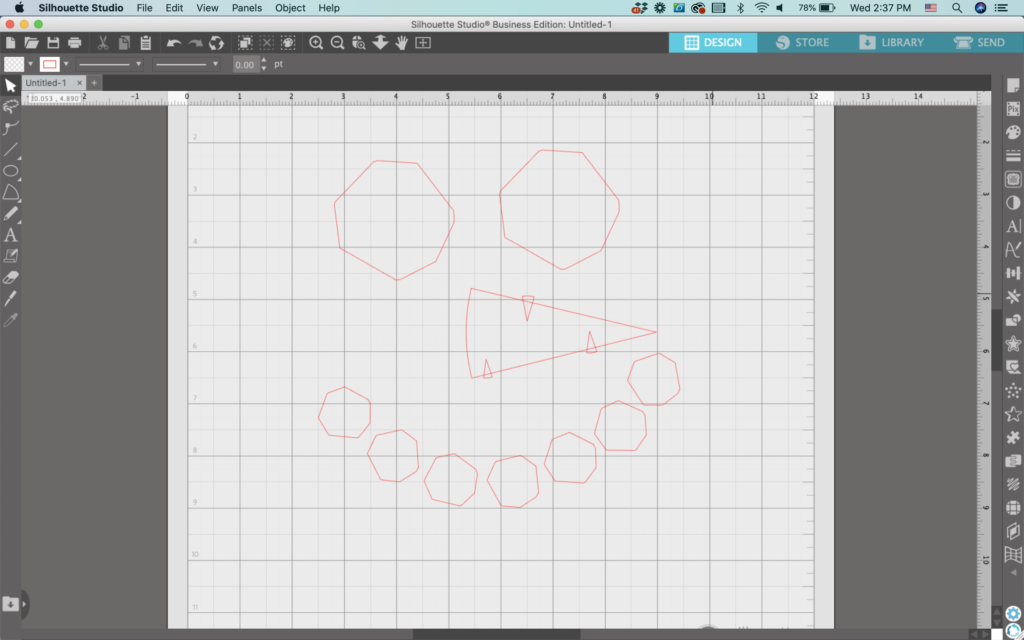
    6. Using Flexishapes, create a nose. I think the second shape in the first row makes the perfect carrot shape.

    Silhouette Studio Screenshot - cuttingforbusiness.com
    Silhouette Studio Screenshot - cuttingforbusiness.com

    7. To make the carrot look more like a carrot, use the same Flexishape tool to create some smaller shapes. Move them into place around the sides of the carrot.
    Silhouette Studio Screenshot - cuttingforbusiness.com

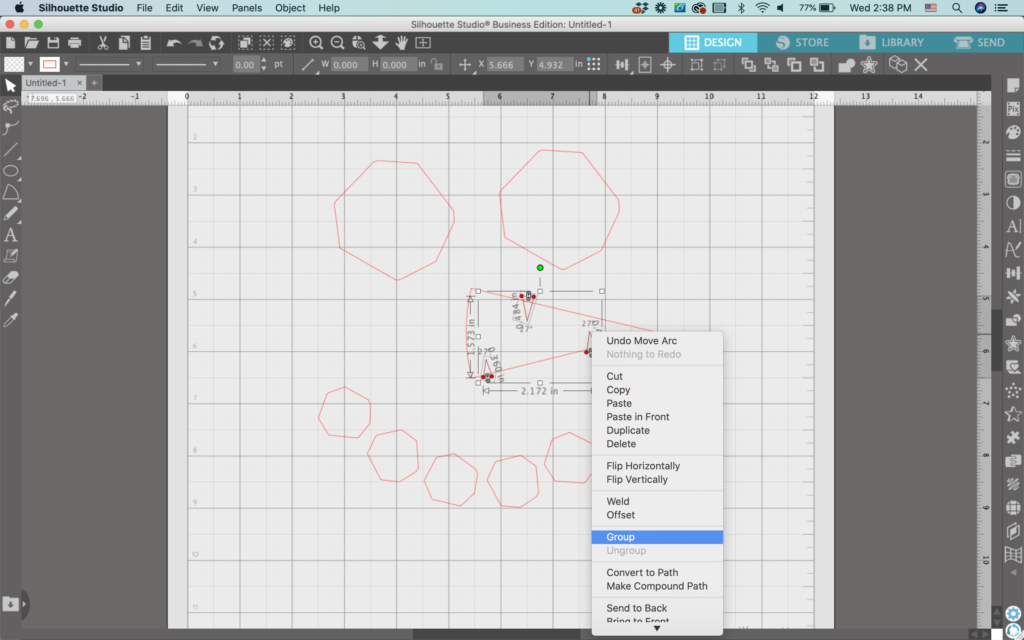
    8. Select all the tiny shapes you made and right click, then ‘Group’ them together.

    Silhouette Studio Screenshot - cuttingforbusiness.com

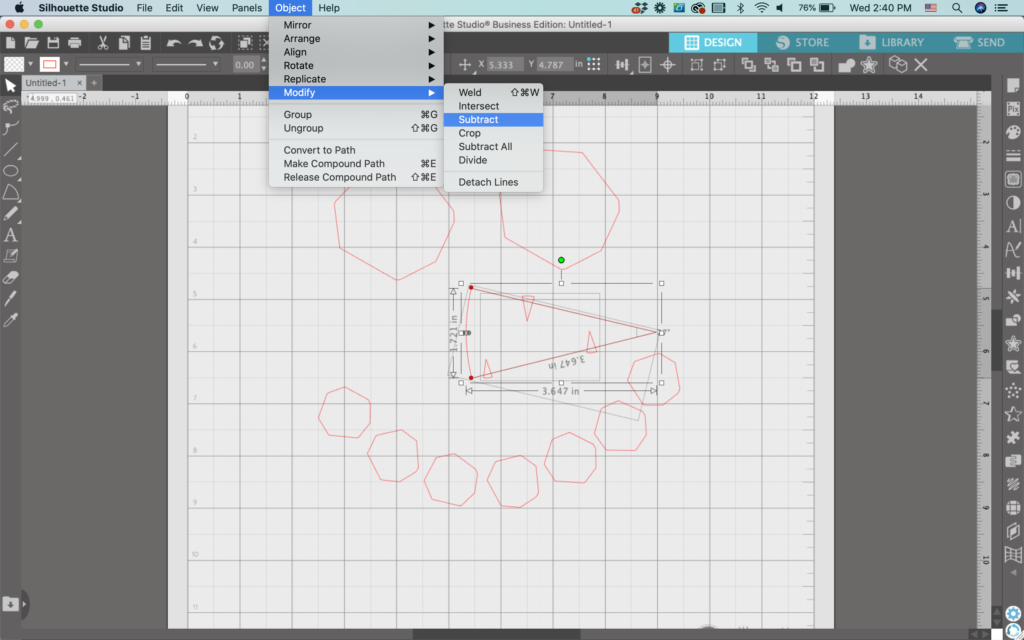
    9. Select both the carrot nose and the group of small triangles and navigate to ‘Object’, then ‘Subtract’ to subtract them from the larger shape.

    Silhouette Studio Screenshot - cuttingforbusiness.com

    10. Add color to your design. My completed design looks like this:

    That’s it! Your snowman face is ready to go!

    Don’t Forget to Save!

    To save your new SVG creation, head to ‘File’, ‘Save As’, ‘Save to Hard Drive’, name the file, then select ‘SVG’ from the dropdown menu.

    Want More SVG Tutorials?

    View more Design with Me SVG tutorials.