Category: Design with Me (SVG Tutorials)

  • Silhouette Studio Tutorial: Repeating Word Designs

    Design with Me is a new regular feature on Cutting for Business! Each Friday, I’ll bring you a new Silhouette Studio tutorial featuring how to design an SVG.

    Want to know a secret? I like designs that I can create quickly and easily. Honestly, I don’t want to sit for hours working on a design. While I’ve said it before, I’ll say it again: If it takes more than 20 minutes to design – it probably isn’t for me.

    Today, let’s take a look at a 5 minute design project: How to create a repeating word design. This one is Christmas themed – but you can use any word or theme that you want.
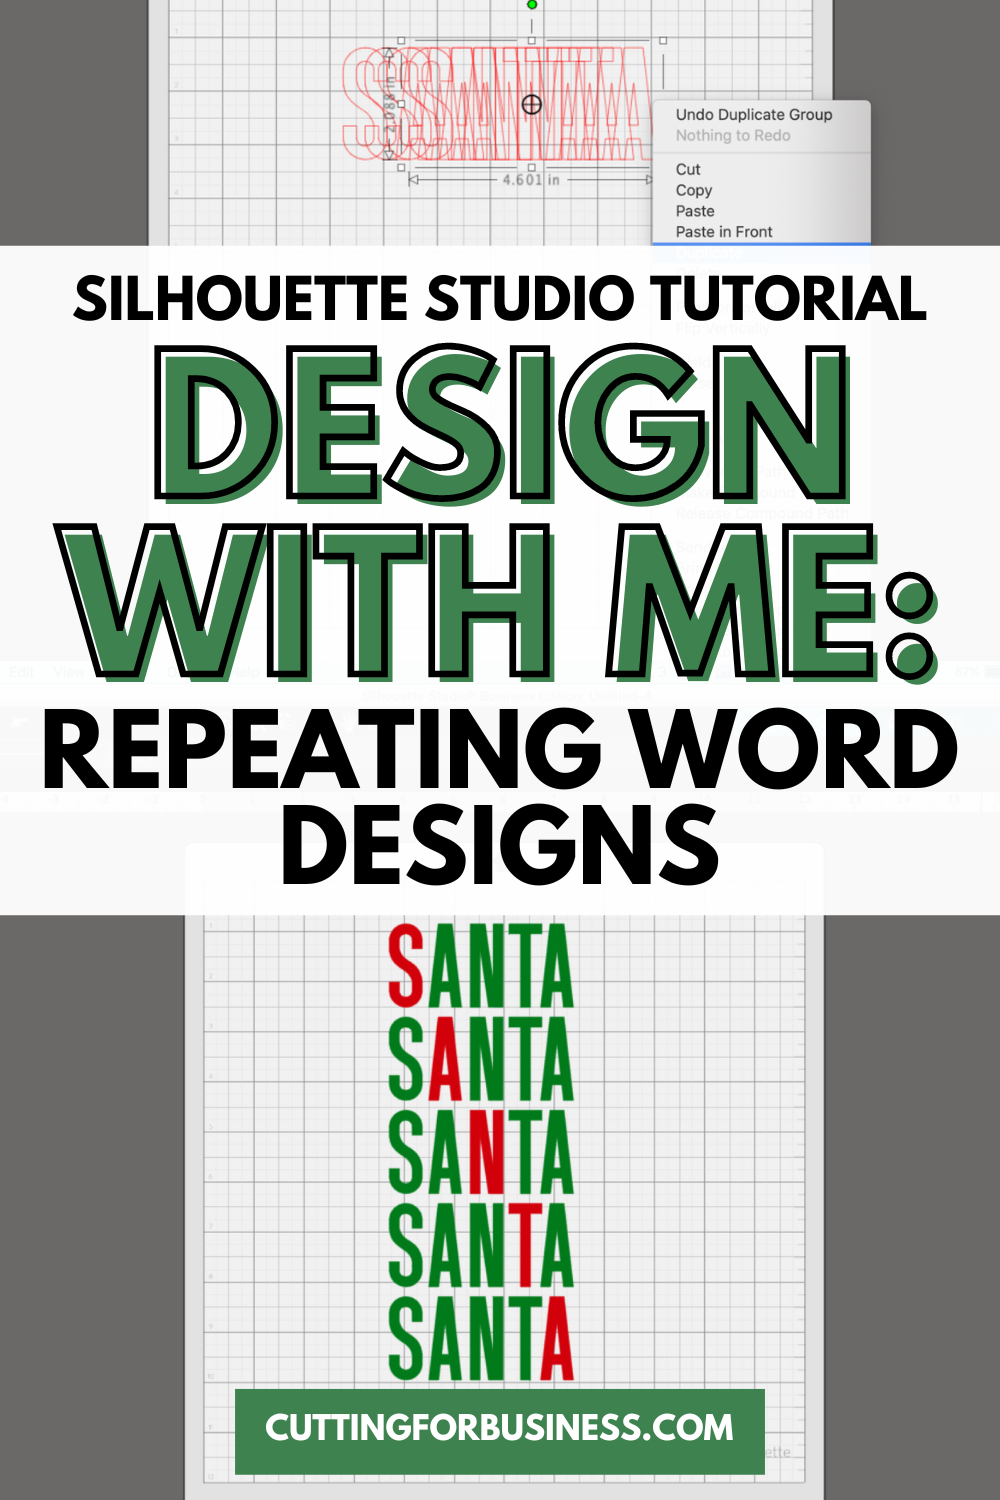
    Silhouette Studio Tutorial: Repeating Word Designs - cuttingforbusiness.com

    Silhouette Studio Tutorial: Repeating Word Design

    1. Type your word in Silhouette Studio in an easy to read printed font. In this tutorial, I’m using the Singo font. It’s best to use a 3, 4, or 5 letter word.
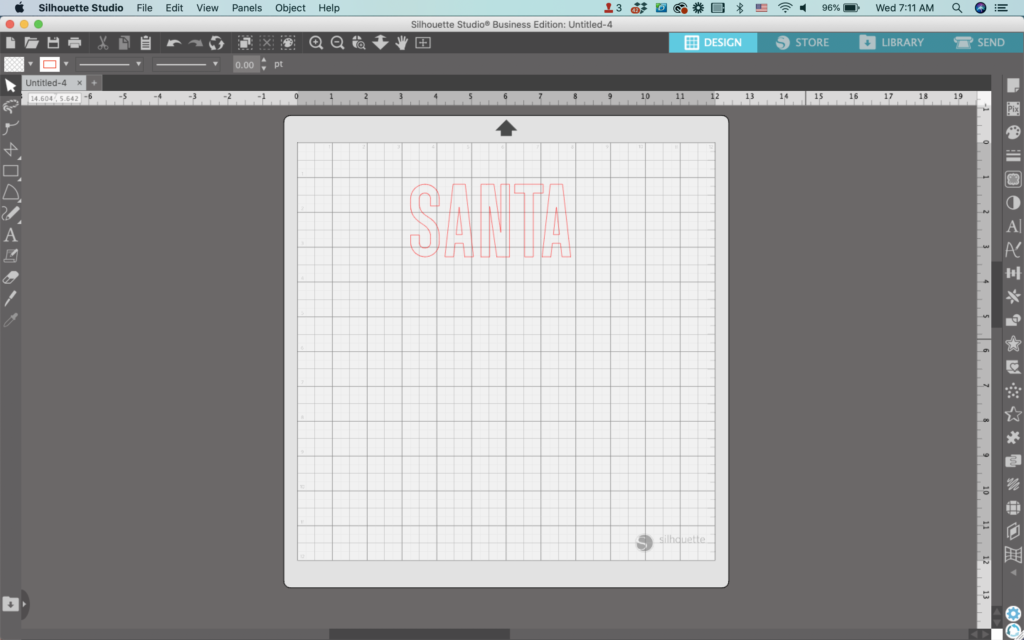
    Silhouette Studio Screenshot - cuttingforbusiness.com.

    2. Right click the word and duplicate it the same number of times as letters in the word. For example, the word ‘Santa’ has 5 letters in it, so I duplicated it 5 times. If your word has 4 letters, duplicate it 4 times.
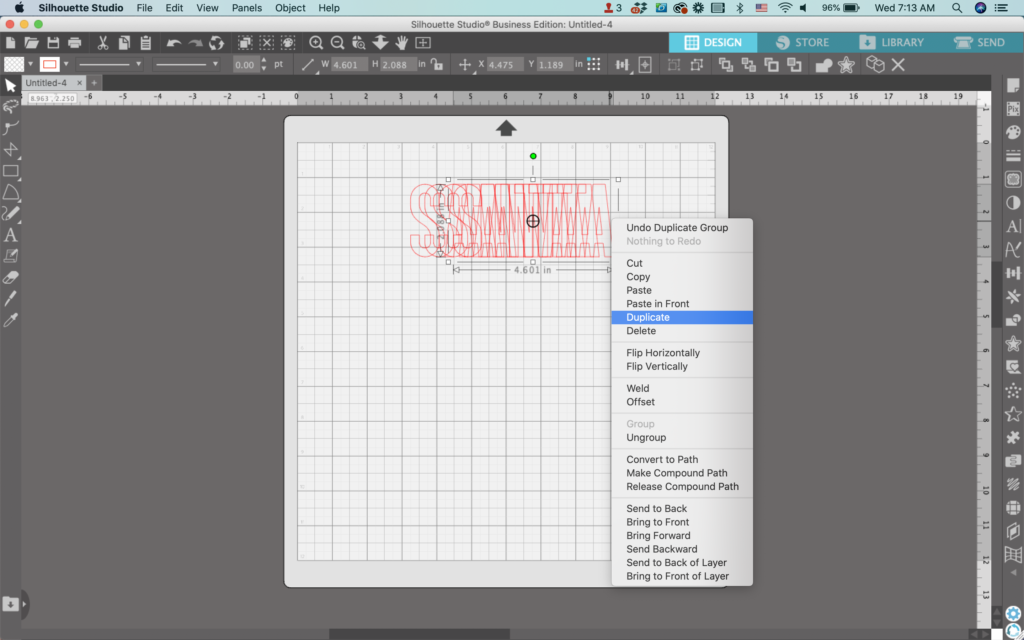
    Silhouette Studio Screenshot - cuttingforbusiness.com.

    3. Drag the words so they are stacked on top of one another.
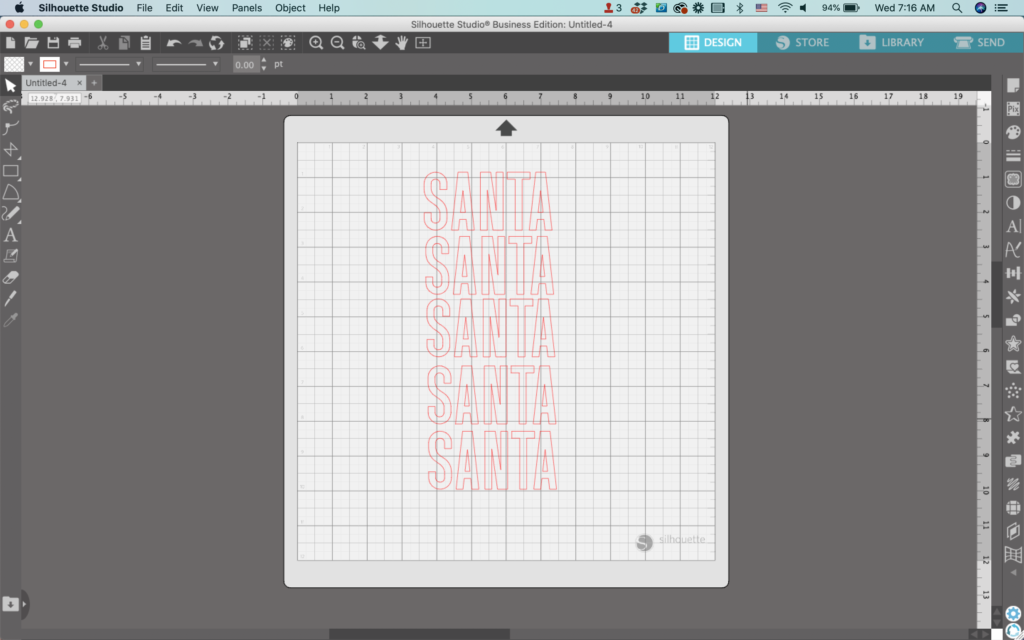
    Silhouette Studio Screenshot - cuttingforbusiness.com.

    4. Fine tune the alignment of the words. I like to use ‘Align Center’ and ‘Space Vertically’ to help me.
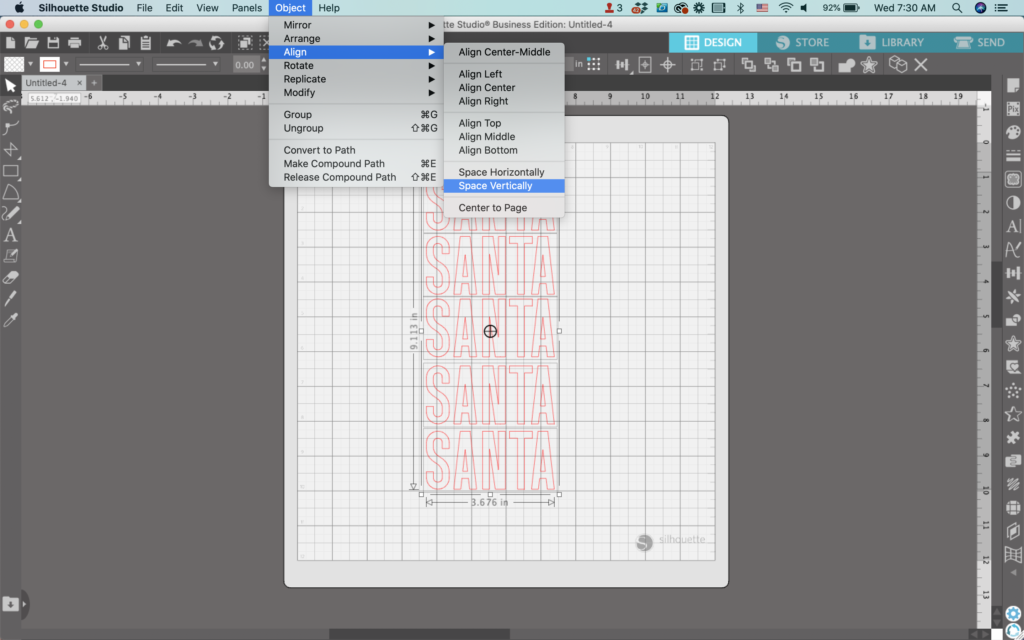
    Silhouette Studio Screenshot - cuttingforbusiness.com.

    5. Start with the top word and right click, then ungroup it. Add a fill color to the first letter. Then, fill in the rest of the letters in a different color.
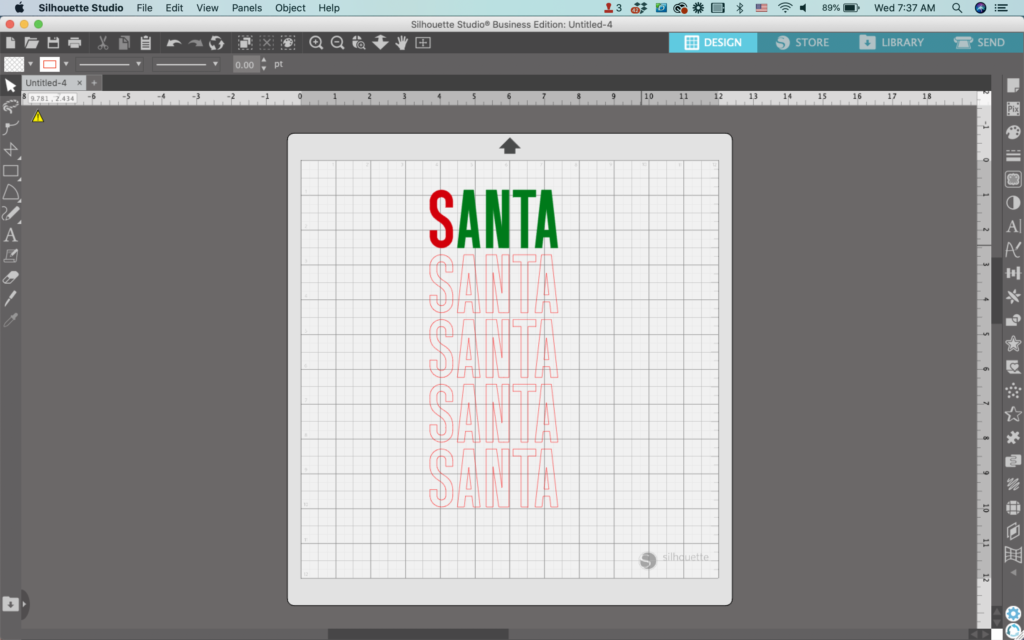
    Silhouette Studio Screenshot - cuttingforbusiness.com.

    6. Repeat step 5 for the second word. This time color the second letter a different color from the rest.
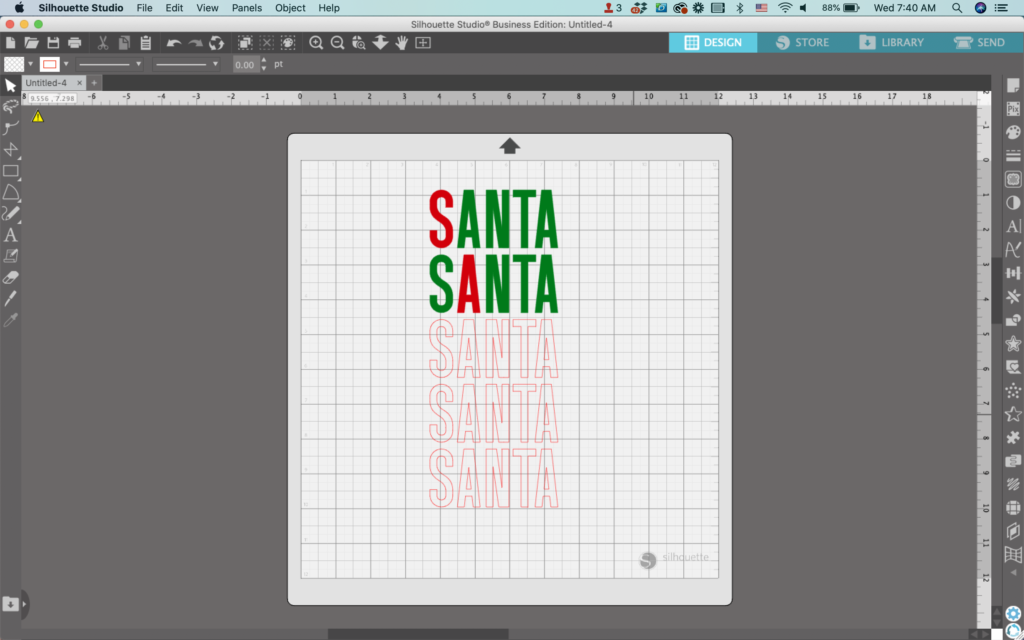
    Silhouette Studio Screenshot - cuttingforbusiness.com.

    7. Continue ungrouping words and filling in the letters until you’ve done all the words.
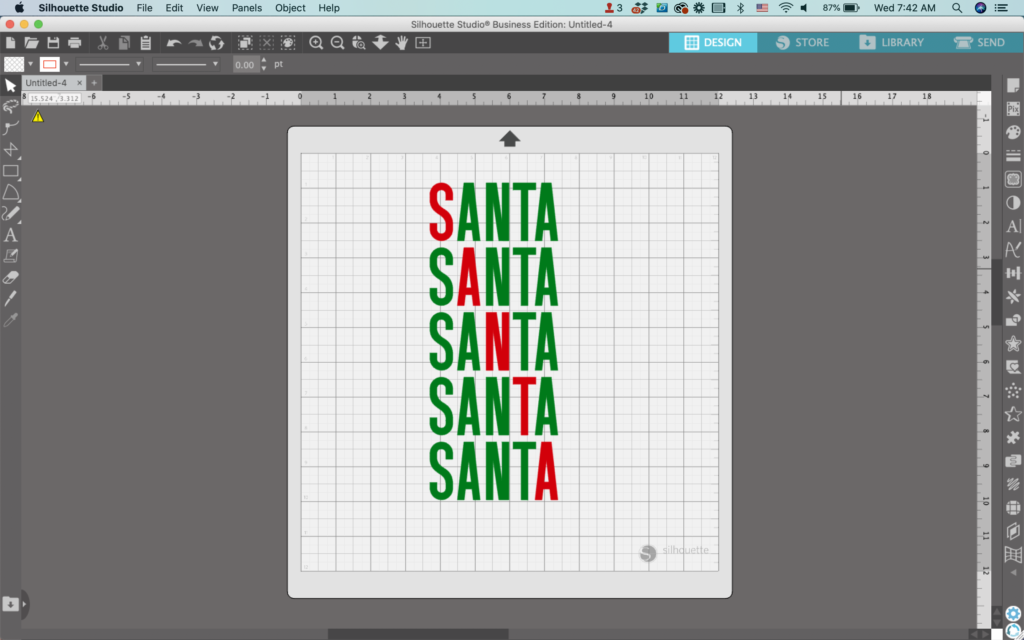
    Silhouette Studio Screenshot - cuttingforbusiness.com.

    8. If desired, add additional details to finish your design. I used the Watershed font to finish off the design.

    Santa Claus Design - cuttingforbusiness.com

    That’s it! Your repeating word design is ready to go!

    Download my Joy, Joy, Joy SVG or Merry, Merry, Merry Christmas SVG.

    3, 4, and 5 Letter Christmas Words

    I mentioned above that this design works best with 3, 4, and 5 letter words. Here are a list of words to get you started:

    • Joy
    • Elf
    • Noel
    • Snow
    • Tree
    • Yule
    • Merry
    • Frost

    Need more ideas? Ask ChatGPT for a “list of short Christmas words”.

    Don’t Forget to Save!

    To save your new SVG creation, head to ‘File’, ‘Save As’, ‘Save to Hard Drive’, name the file, then select ‘SVG’ from the dropdown menu.

    Want More SVG Tutorials?

    View more Design with Me SVG tutorials.
  • Silhouette Studio Tutorial: Santa’s Footprints SVG

    Design with Me is a new regular feature on Cutting for Business! Each Friday, I’ll bring you a new Silhouette Studio tutorial featuring how to design an SVG.

    When I write tutorials, I try to include a mix of in depth tutorials – and quick ones where you can sit down and in 15 minutes you can have an SVG ready to cut.

    Today’s Santa’s footprints tutorials is a quick one!

    Silhouette Studio Tutorial: Santa's Footprints SVG - cuttingforbusiness.com.

    Silhouette Studio Tutorial: Santa’s Footprints

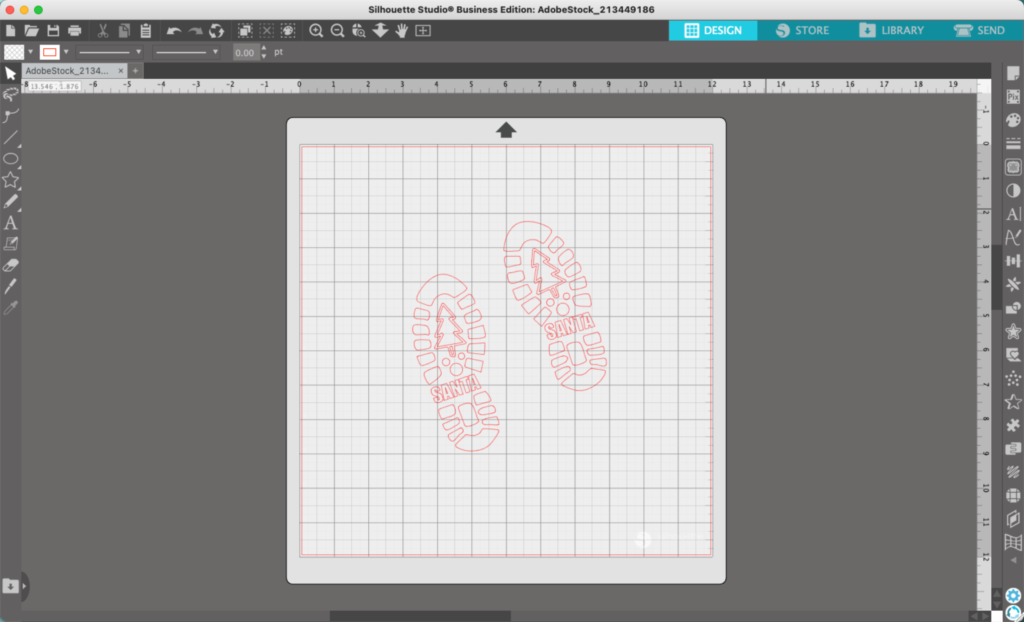
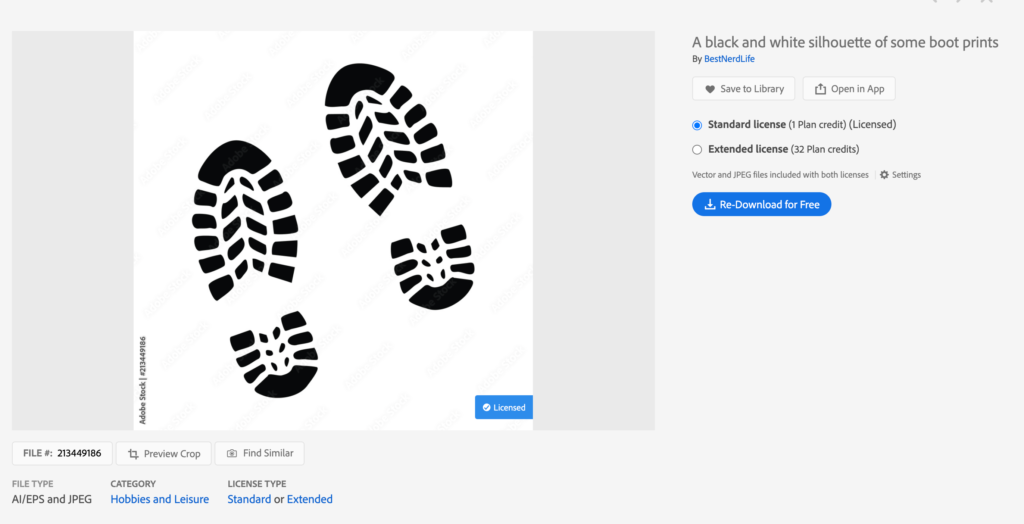
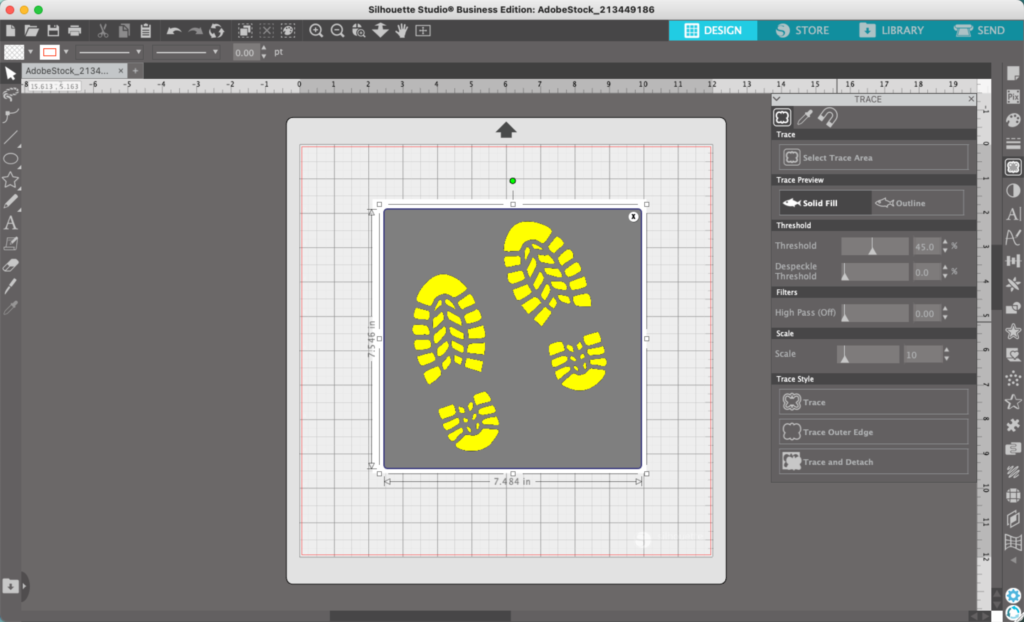
    1. Grab a boot sole clip art from your favorite source. Double check the license to make sure it has commercial use. I grabbed mine from Adobe Stock.
    Adobe Stock Screenshot - cuttingforbusiness.com.

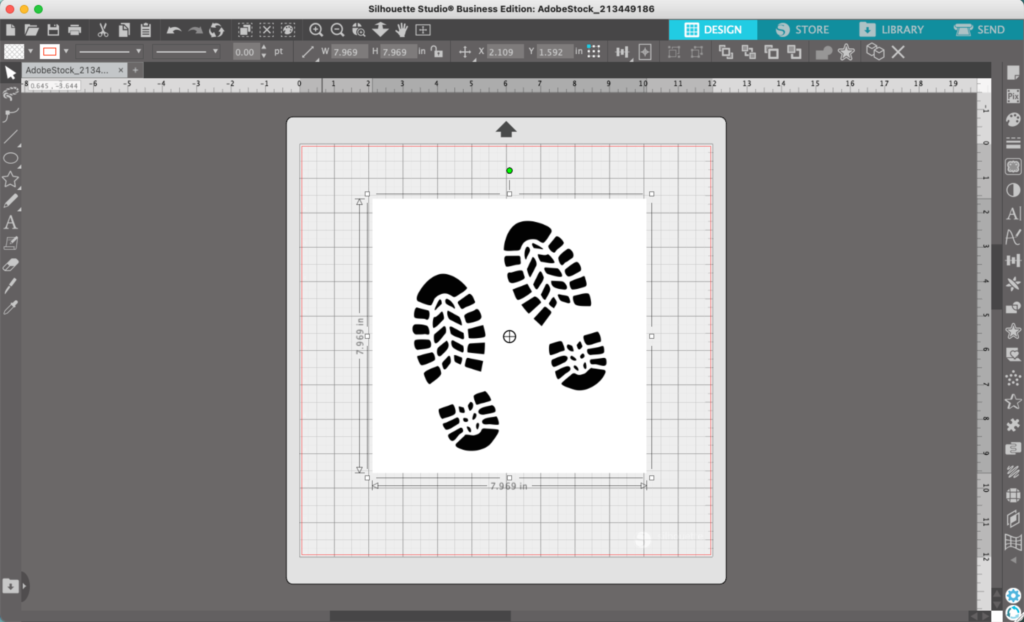
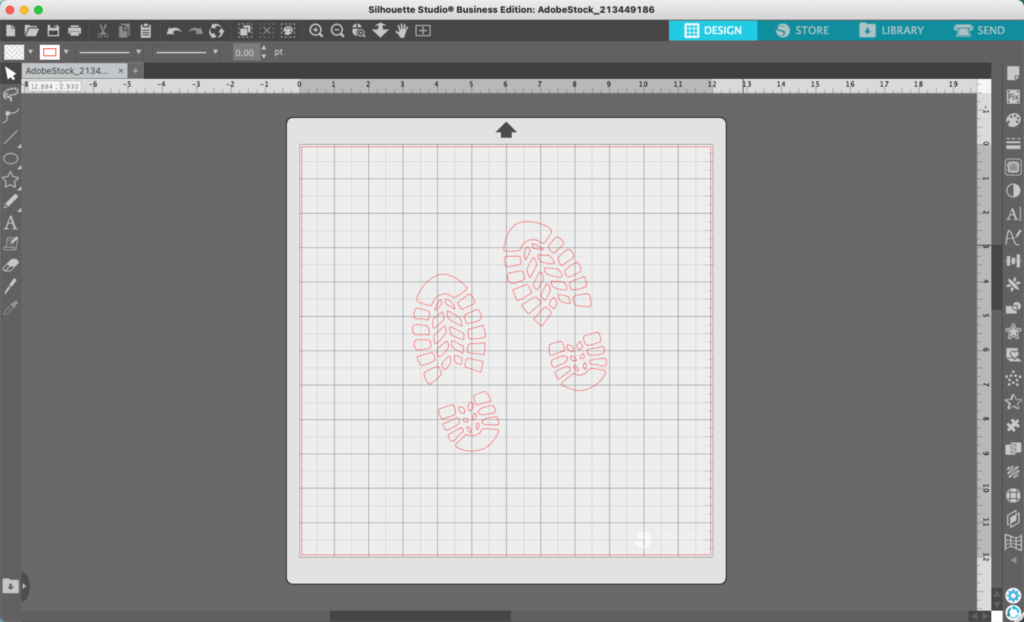
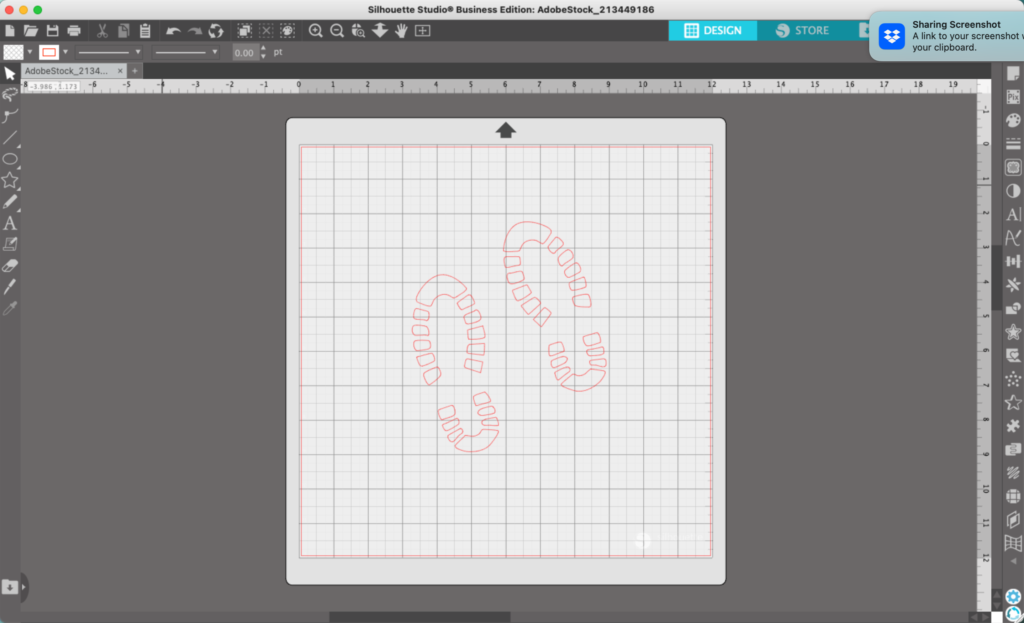
    2. Open the image in Silhouette Studio, then navigate to ‘Panels’, ‘Trace’. Trace the image and delete the original.

    Silhouette Studio Screenshot - cuttingforbusiness.com.
    Silhouette Studio Screenshot - cuttingforbusiness.com.
    Silhouette Studio Screenshot - cuttingforbusiness.com.

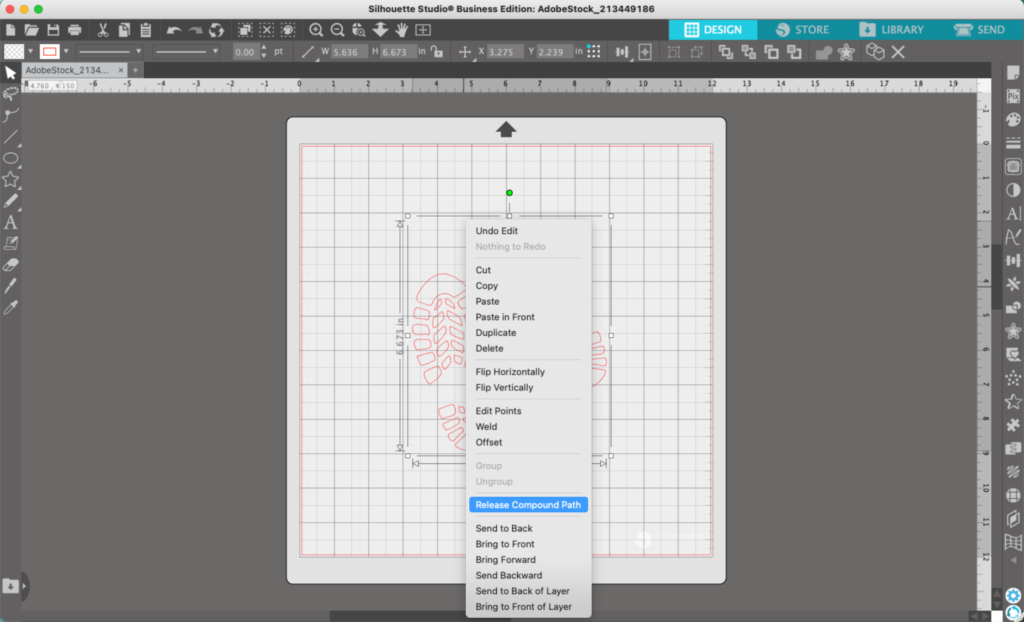
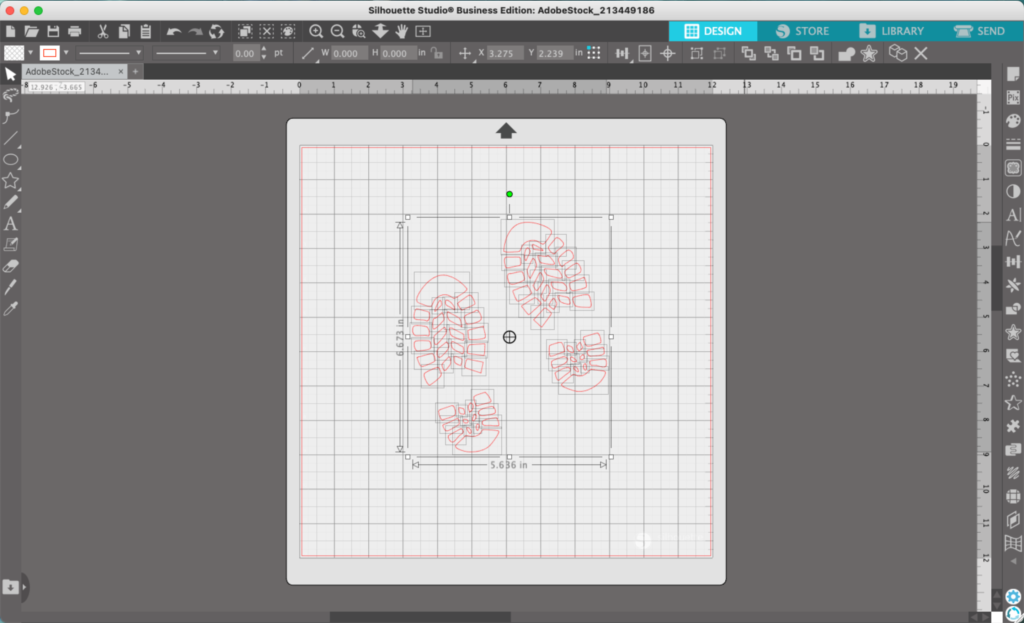
    3. Right click the boot soles and select ‘Release Compound Path’. This allows you to manipulate each piece of the boot sole independently.

    Silhouette Studio Screenshot - cuttingforbusiness.com.
    Silhouette Studio Screenshot - cuttingforbusiness.com.

    4. Delete all the interior pieces of the boot soles.

    Silhouette Studio Screenshot - cuttingforbusiness.com.

    5. Use your favorite Christmas dingbat font and fill the interior of the boot sole with Christmas-y things. For this tutorial, I used the Country Trees font for the tree.

    Silhouette Studio Screenshot - cuttingforbusiness.com.

    That’s it! Your Santa’s footprints are done!

    In a hurry? You can design one sole, then duplicate it and mirror it for a second sole. Don’t forget to reverse your text if you have any in your design.

    My finished design looks like this when used with some flour on the floor:

    Silhouette Studio Tutorial: Santa's Footprints SVG - Finished Design - cuttingforbusiness.com.

    Don’t Forget to Save!

    To save your new SVG creation, head to ‘File’, ‘Save As’, ‘Save to Hard Drive’, name the file, then select ‘SVG’ from the dropdown menu.

    Want More SVG Tutorials?

    View more Design with Me SVG tutorials.
  • Silhouette Studio Tutorial: String of Christmas Lights SVG

    Design with Me is a new regular feature on Cutting for Business! Each Friday, I’ll bring you a new Silhouette Studio tutorial featuring how to design an SVG.

    ‘Tis the season! Do you decorate the outside of your house? I’m sad to say that we don’t decorate the outside of our house. Unfortunately, our home sits so far off the road – our lights wouldn’t be seen.

    So, let’s draw some Christmas lights.

    Silhouette Studio Tutorial: String of Christmas Lights SVG - cuttingforbusiness.com

    Silhouette Studio Tutorial: String of Christmas Lights SVG

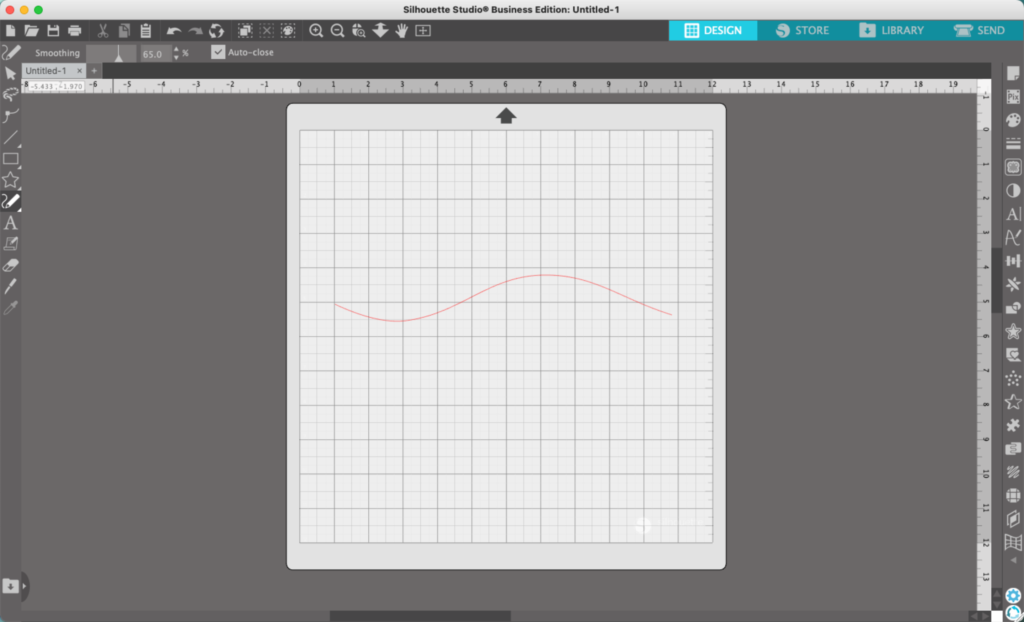
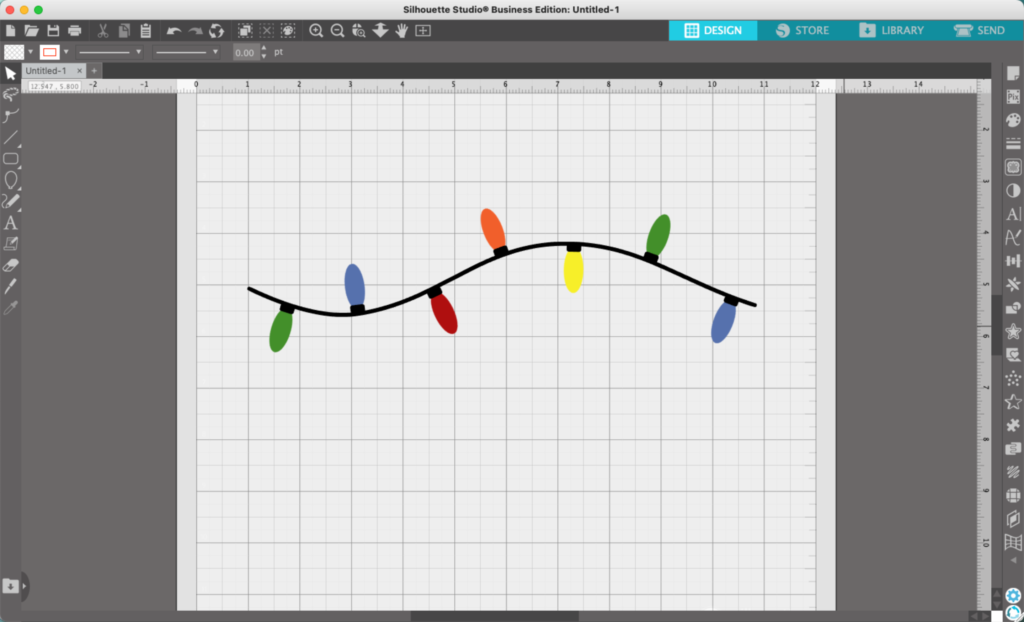
    1. In Silhouette Studio, draw a wavy line using the ‘Draw Smooth Freehand’ tool. If your line isn’t smooth, you can change the amount of smoothing in the toolbar. I keep mine set around 60% to 70%.
    Silhouette Studio Screenshot - cuttingforbusiness.com

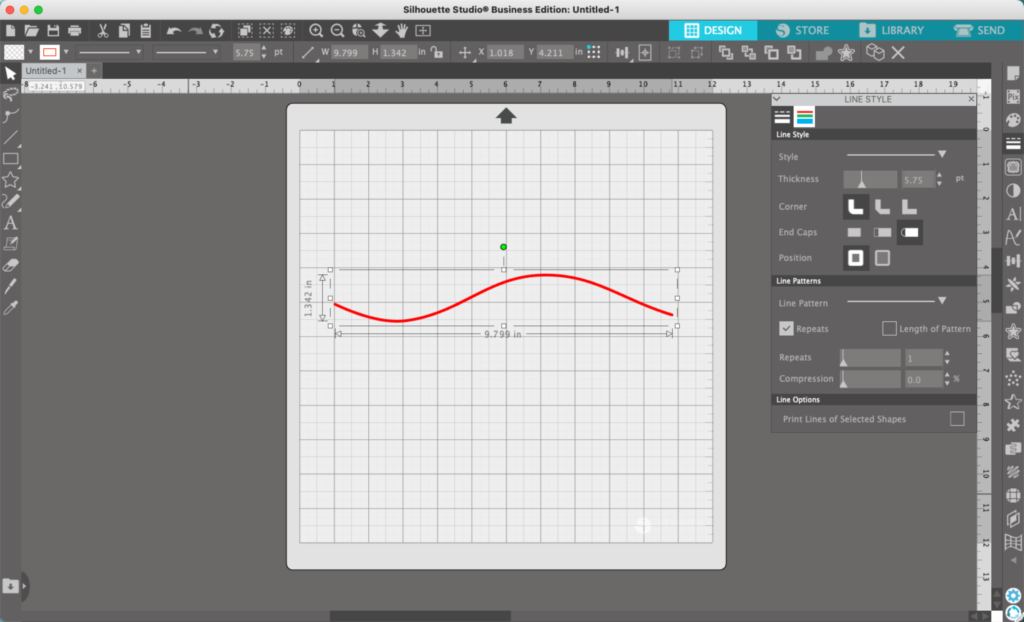
    2. Navigate to ‘Panels’, ‘Line Style’. Thicken your line.

    Silhouette Studio Screenshot - cuttingforbusiness.com

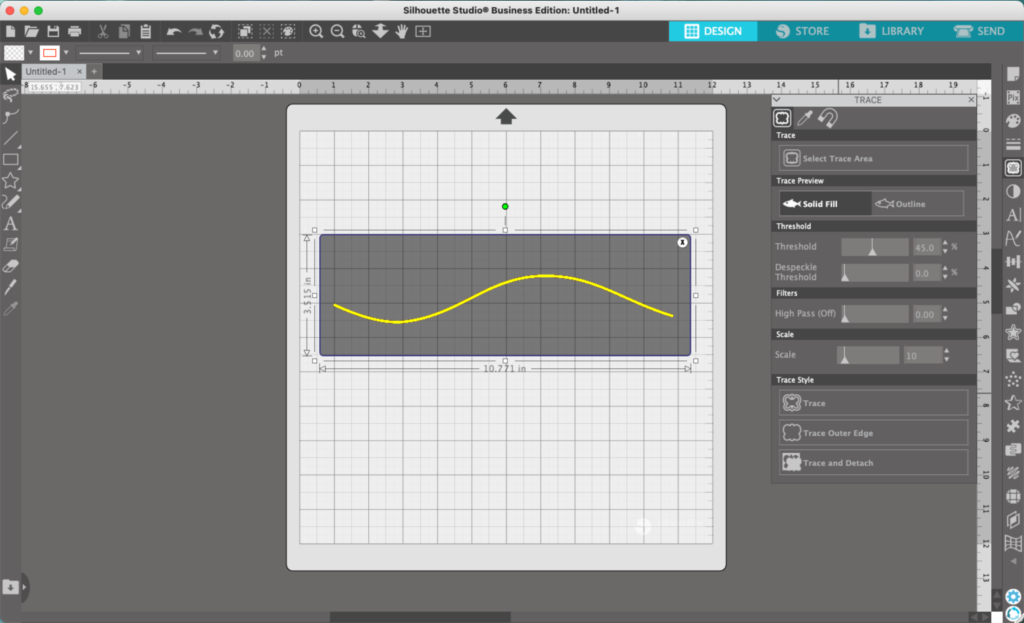
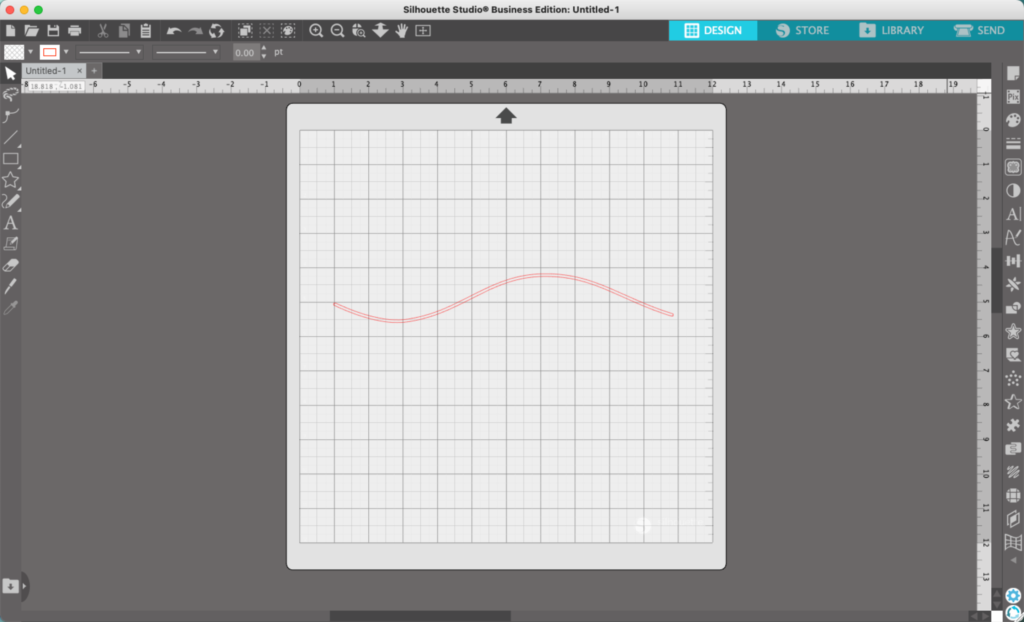
    3. From ‘Panels’, navigate to ‘Trace’. Trace your thickened line and delete the original.

    Silhouette Studio Screenshot - cuttingforbusiness.com
    Silhouette Studio Screenshot - cuttingforbusiness.com

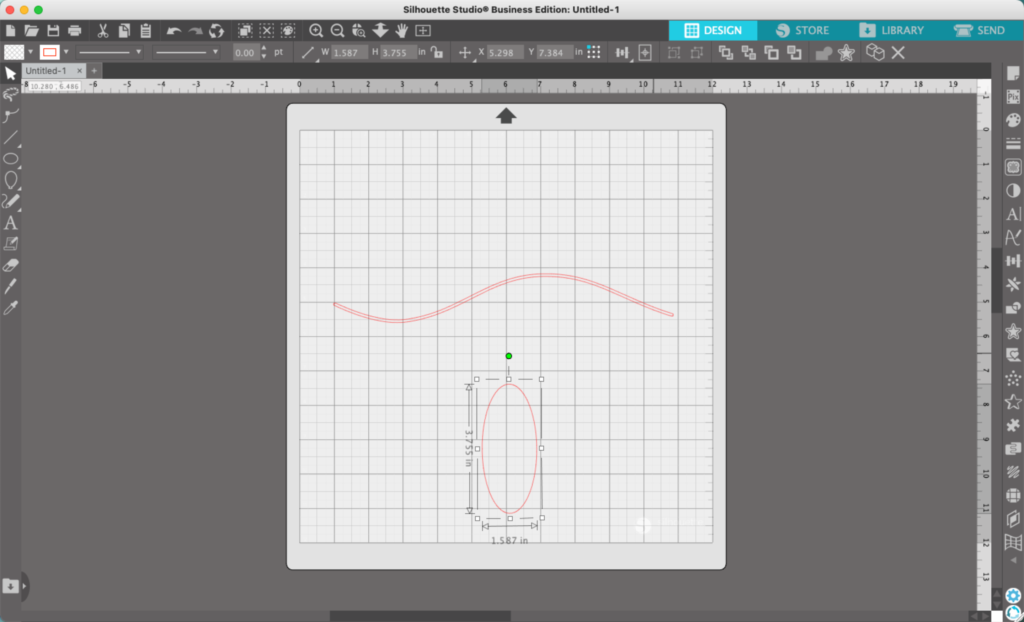
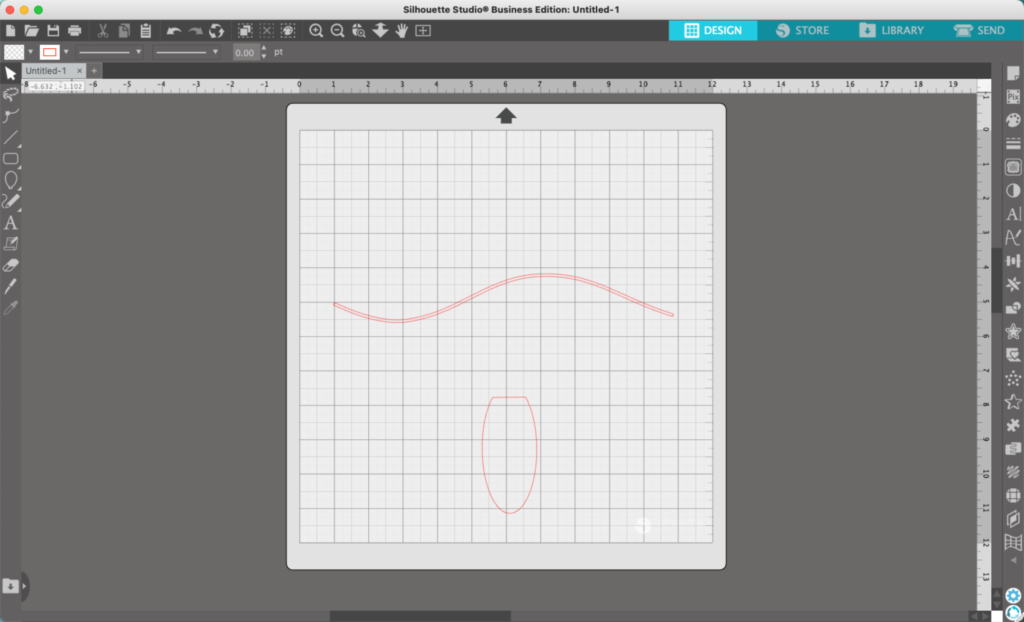
    3. Use the ‘Draw an Ellipse’ tool to draw an oval, or choose from Flexishapes. In Flexishapes, the teardrop and the balloon will both probably work.

    Silhouette Studio Screenshot - cuttingforbusiness.com

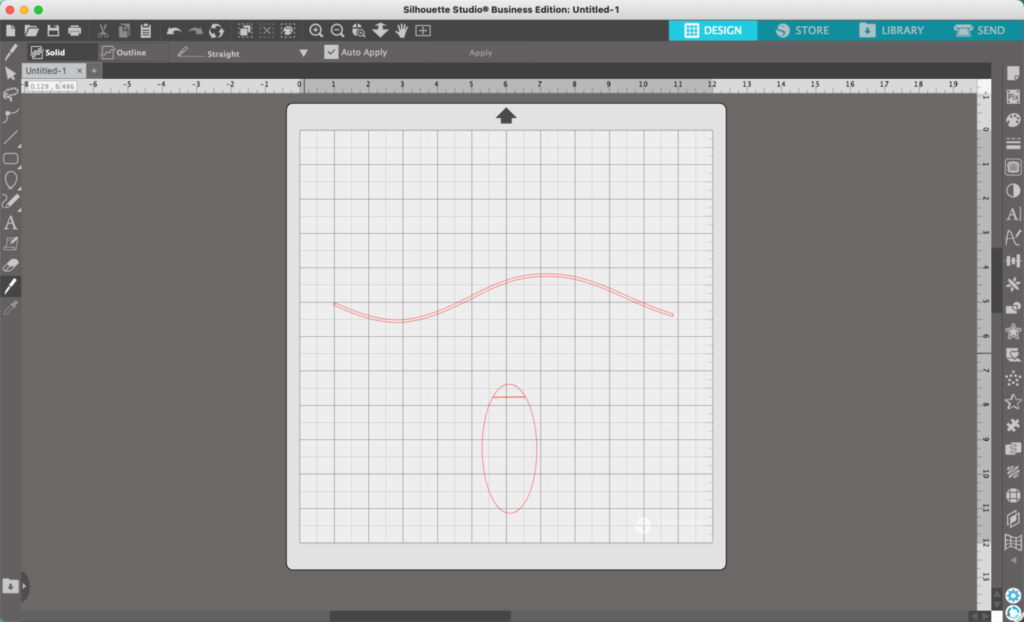
    4. Use the knife tool to slice off a section of the oval. Then, delete it.

    Silhouette Studio Screenshot - cuttingforbusiness.com
    Silhouette Studio Screenshot - cuttingforbusiness.com

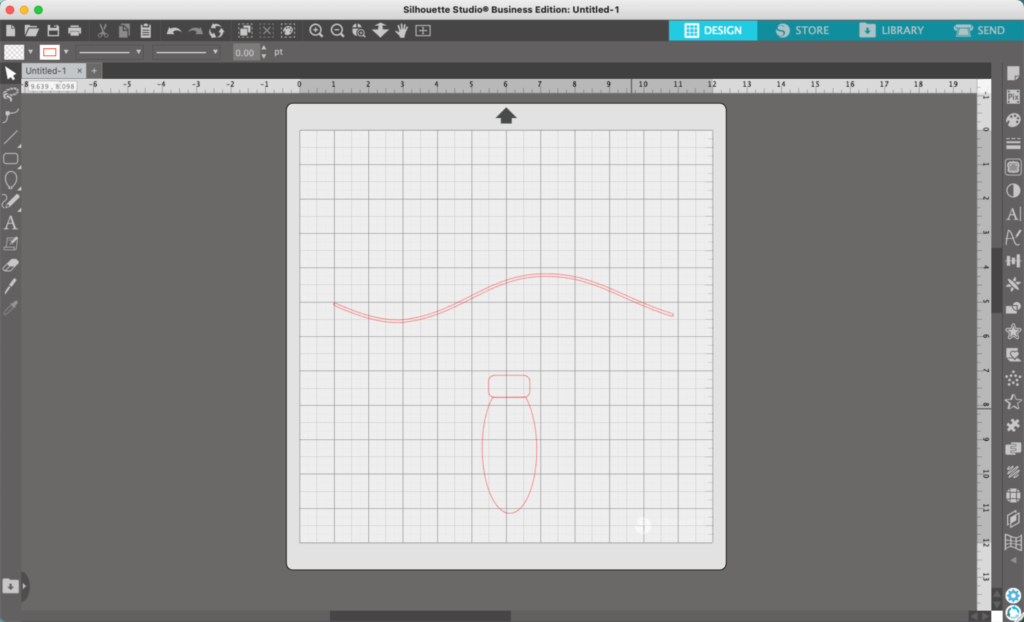
    5. Draw a rectangle using the ‘Rounded Rectangle’ tool to use as the lightbulb base.

    Silhouette Studio Screenshot - cuttingforbusiness.com

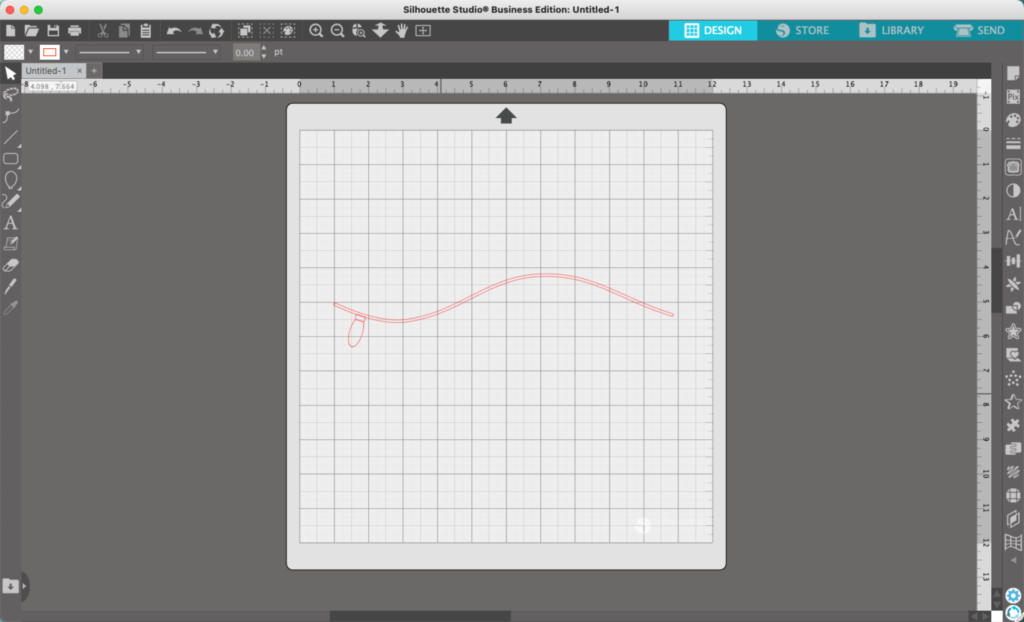
    6. Select both parts of the light and move it into place on your string

    Silhouette Studio Screenshot - cuttingforbusiness.com

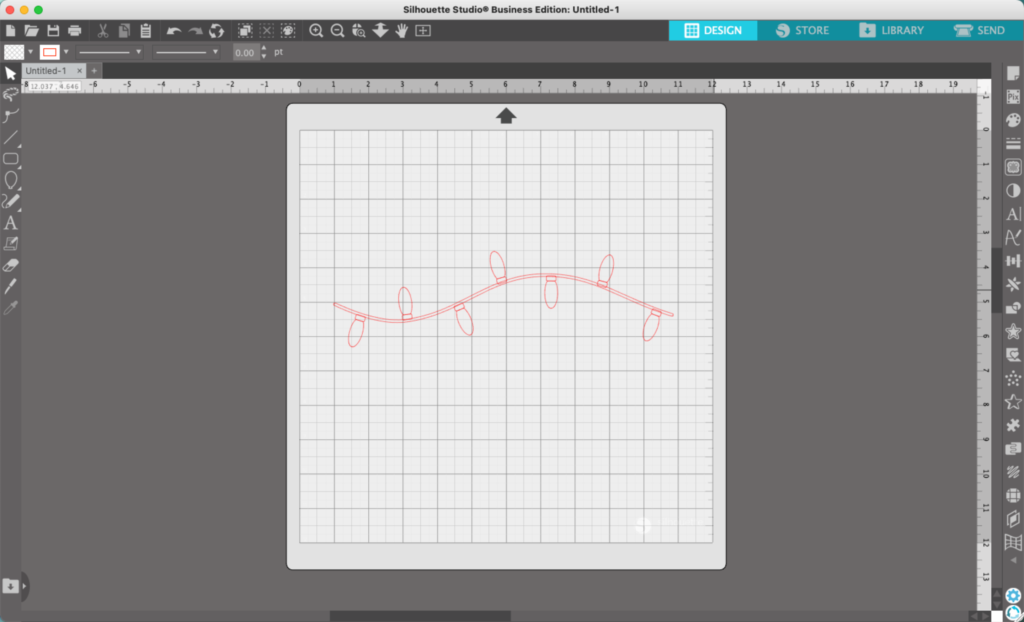
    7. Duplicate the bulb and place several copies along the string.

    Silhouette Studio Screenshot - cuttingforbusiness.com

    8. Add color to the design. You’ll likely want to weld the bulb bases to the string, unless you are cutting the design in paper – then you might not.

    Silhouette Studio Screenshot - cuttingforbusiness.com

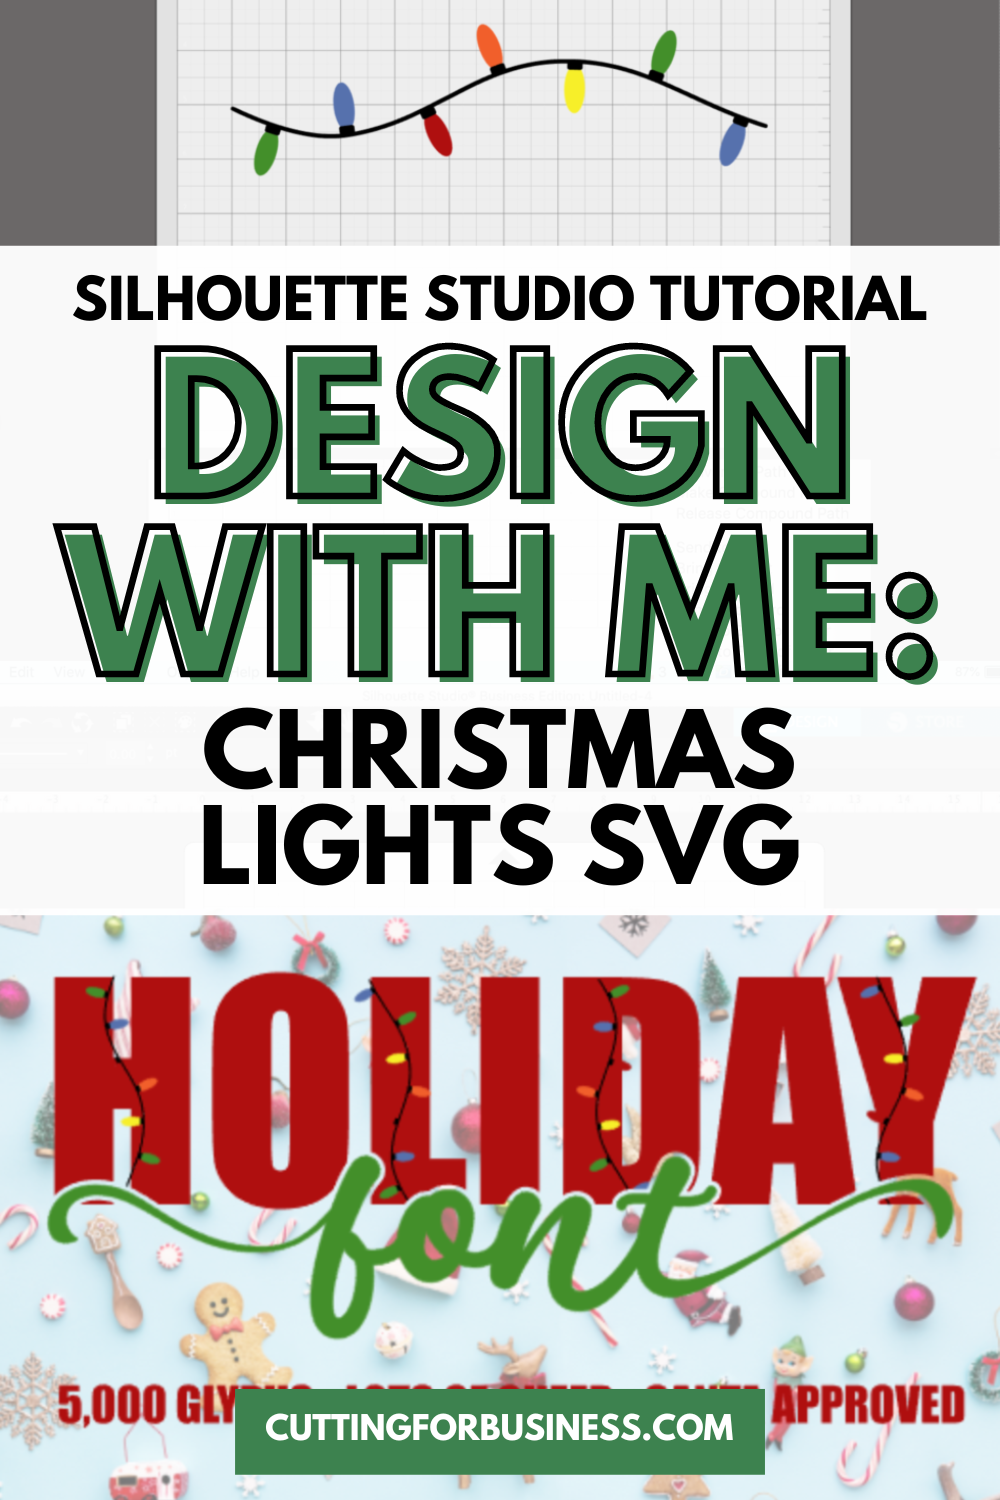
    I used the lights in a sample font intro page:

    Holiday Font Intro Sample - cuttingforbusiness.com.

    That’s it! Your string of Christmas lights is ready to go!

    Don’t Forget to Save!

    To save your new SVG creation, head to ‘File’, ‘Save As’, ‘Save to Hard Drive’, name the file, then select ‘SVG’ from the dropdown menu.

    Want More SVG Tutorials?

    View more Design with Me SVG tutorials.
  • Silhouette Studio Tutorial: Abstract Boho Rainbow SVG

    Design with Me is a new regular feature on Cutting for Business and it starts today! Each Friday, I’ll bring you a new Silhouette Studio tutorial featuring how to design an SVG.

    Today, we are kicking off this new feature with creating an abstract Boho Rainbow SVG.

    Step-by-step tutorial to create abstract boho rainbow SVG files in Silhouette Studio - cuttingforbusiness.com.

    Design with Me Tutorials are created with intermediate Silhouette Studio users in mind. It’s helpful to know the basics of designing in Silhouette Studio before starting the tutorials.

    All Design with Me tutorials use Silhouette Studio Business Edition. If you do not have Silhouette Studio Business Edition, some tools may not be available in your Silhouette Studio Edition. Get Silhouette Studio Business Edition.

    Tutorial: Abstract Boho Rainbow SVG

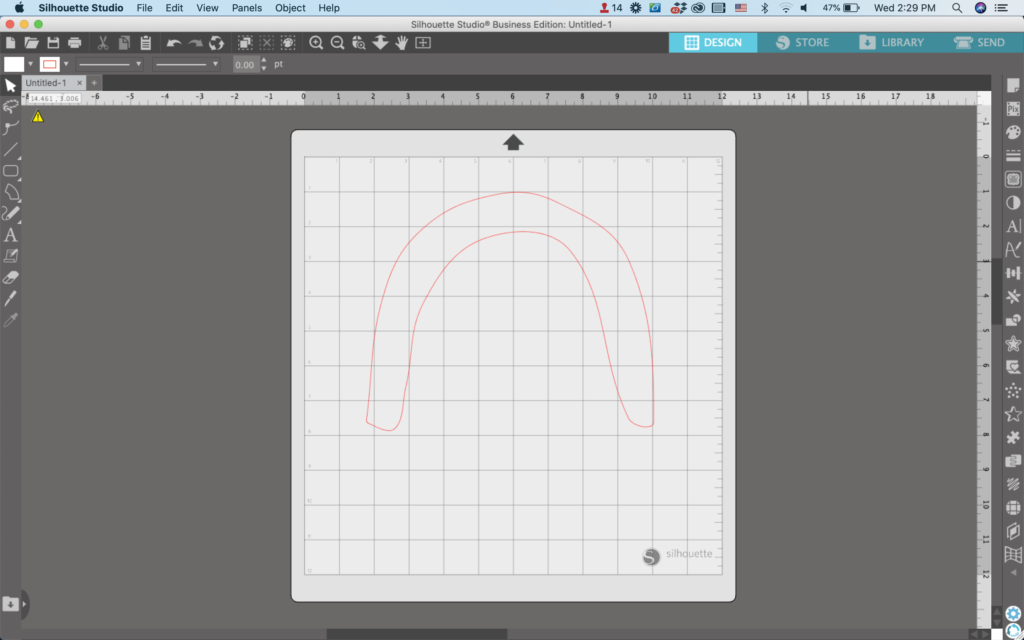
    In Silhouette Studio, use the Draw Smooth Freehand tool (7th tool on the left) and draw a shape that resembles a rainbow. Be sure to start and finish at the same spot.

    Silhouette Studio Screenshot - cuttingforbusiness.com.

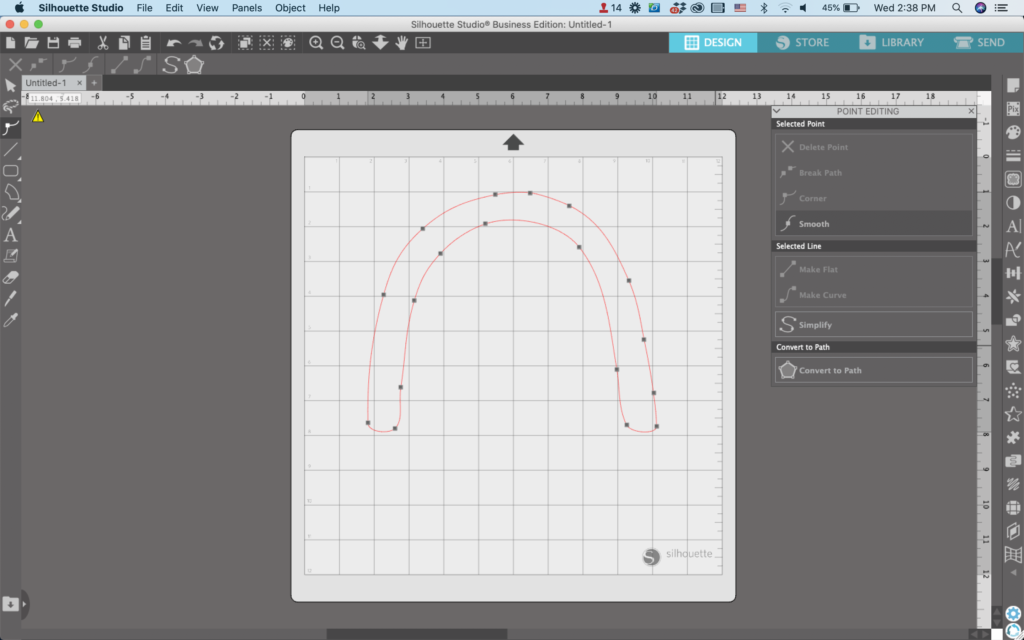
    Double click your rainbow to make the Point Editing Panel appear. Use the Point Editing Panel to smooth out edges and make your rainbow more uniform by dragging the points around.

    Silhouette Studio Screenshot - cuttingforbusiness.com.

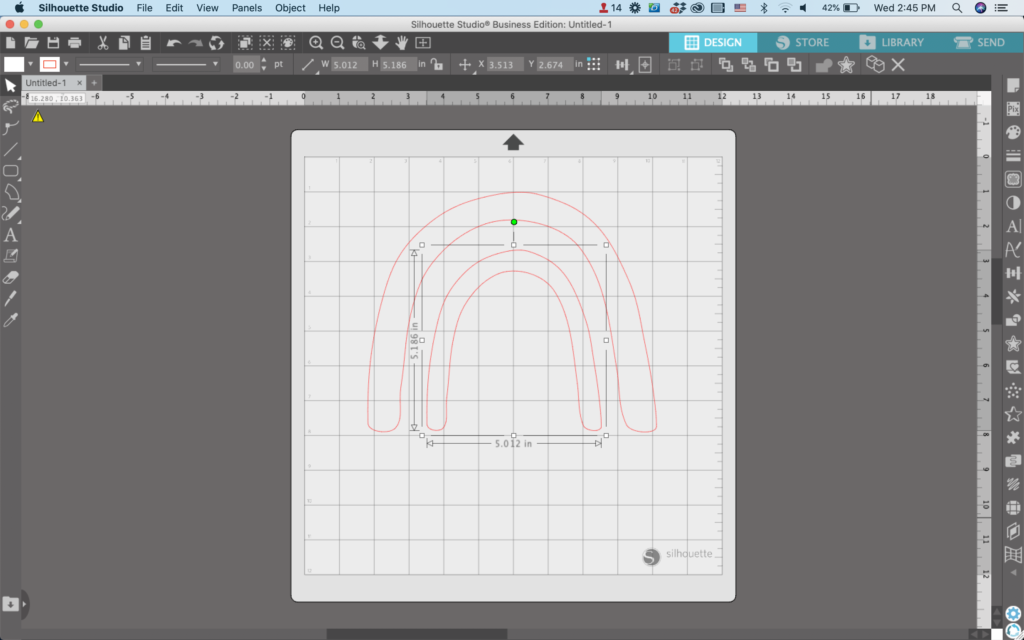
    Right click and ‘Duplicate’ your first rainbow. Move the copy inside the first rainbow shape you drew, dragging the edges to make it fit. Leave a negative space layer between the two shapes.

    Silhouette Studio Screenshot - cuttingforbusiness.com.

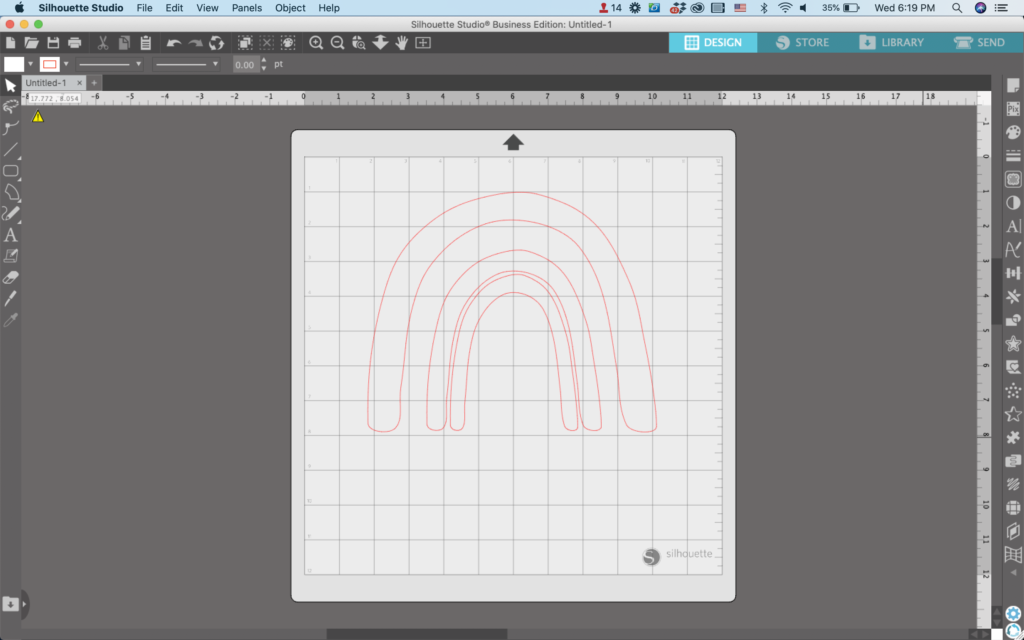
    Right click to duplicate the interior rainbow. Resize it to fit in the middle of the other rainbow shapes.

    Silhouette Studio Screenshot - cuttingforbusiness.com.

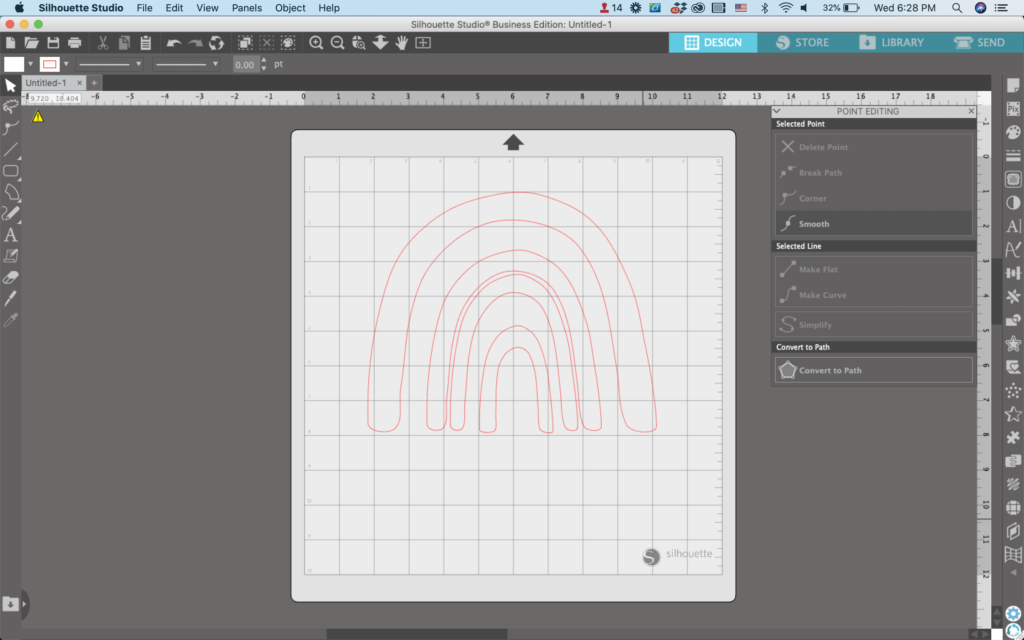
    Repeat the above step to duplicate rainbows until only a small space remains in the middle. Point edit the rainbows as desired.

    Silhouette Studio Screenshot - cuttingforbusiness.com.

    Here’s the fun part: The styling! Once you’ve built the rainbow foundation – there is so much freedom to be creative when you fill in the rainbow pieces. Add patterns, solid colors, dots, dashes, flowers… add anything!

    Here are 4 examples of boho rainbows styled for fall:

    Abstract Boho Rainbow example - cuttingforbusiness.com.

    To save your new SVG creation, head to ‘File’, ‘Save As’, ‘Save to Hard Drive’, name the file, then select ‘SVG’ from the dropdown menu.

    Want More SVG Tutorials?

    View more Design with Me SVG tutorials.
    Prefer to not design your own SVG? Download my Christmas Boho Rainbow SVG.

  • Silhouette Studio Design Tutorial: Stacked Pumpkin SVG

    Design with Me is a new regular feature on Cutting for Business! Each Friday, I’ll bring you a new Silhouette Studio tutorial featuring how to design an SVG.

    Today, let’s look at creating a stacked pumpkin SVG.

    Silhouette Studio Design Tutorial: Stacked Pumpkin SVG - cuttingforbusiness.com

    Tutorial: Stacked Pumpkin SVG

    It’s almost fall! Let’s take a look at creating a stacked pumpkin cut file today.

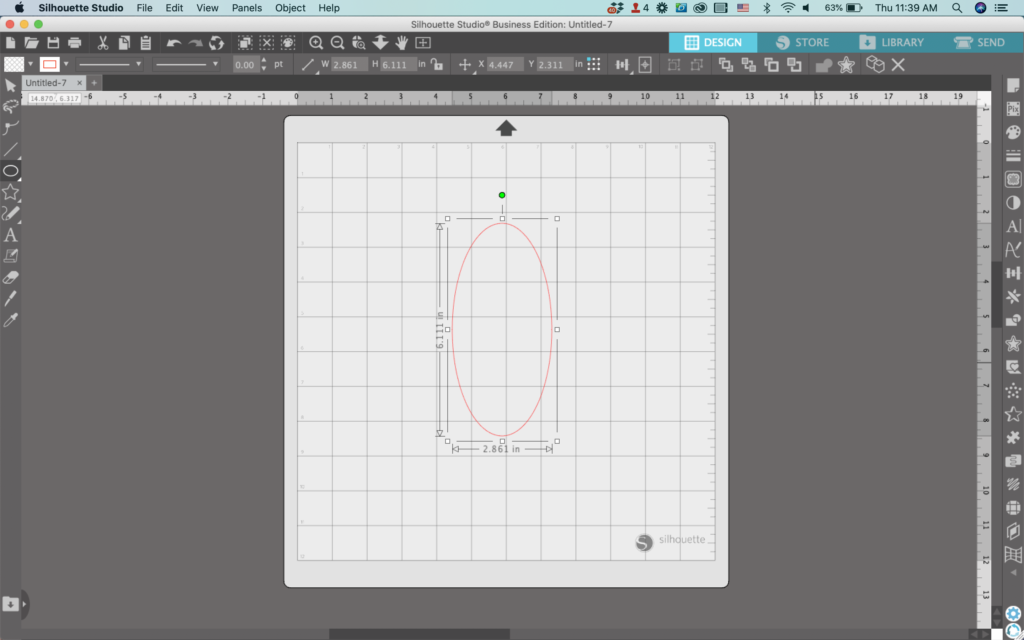
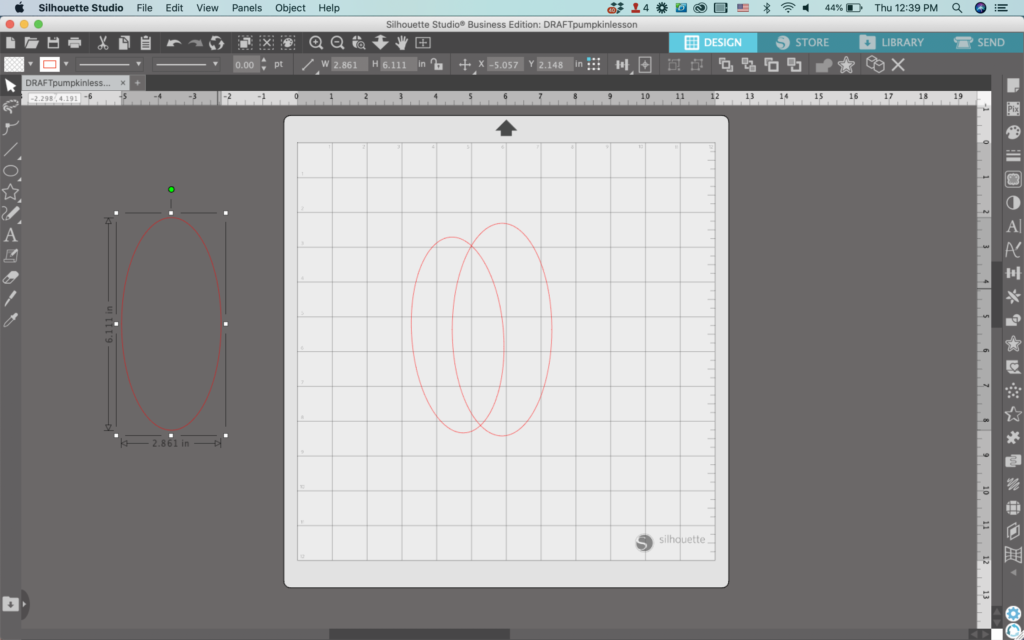
    1. In Silhouette Studio, draw a vertical oval.
    Silhouette Studio Screenshot - cuttingforbusiness.com

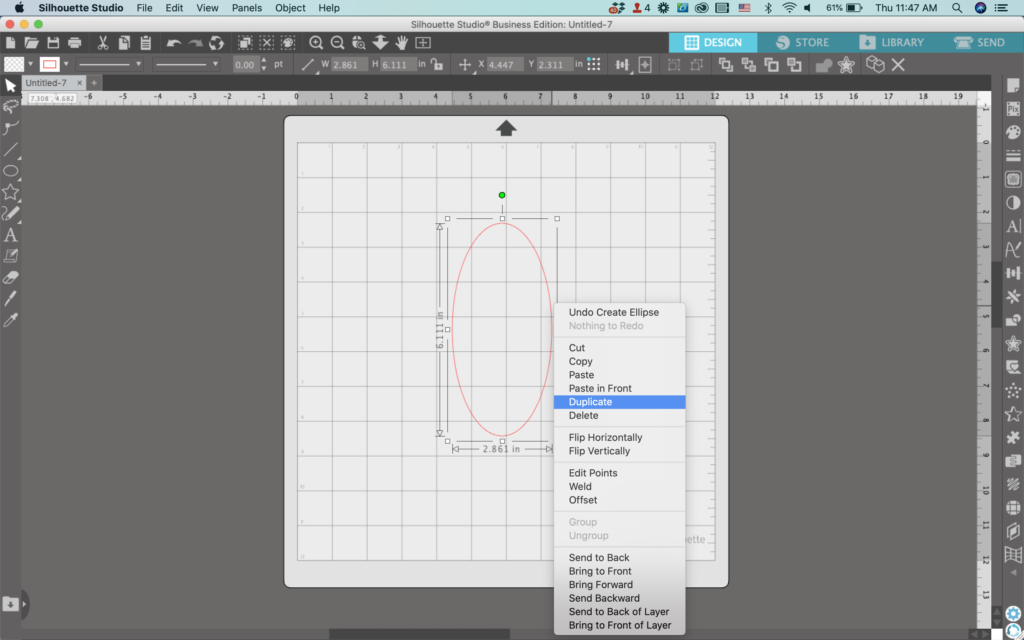
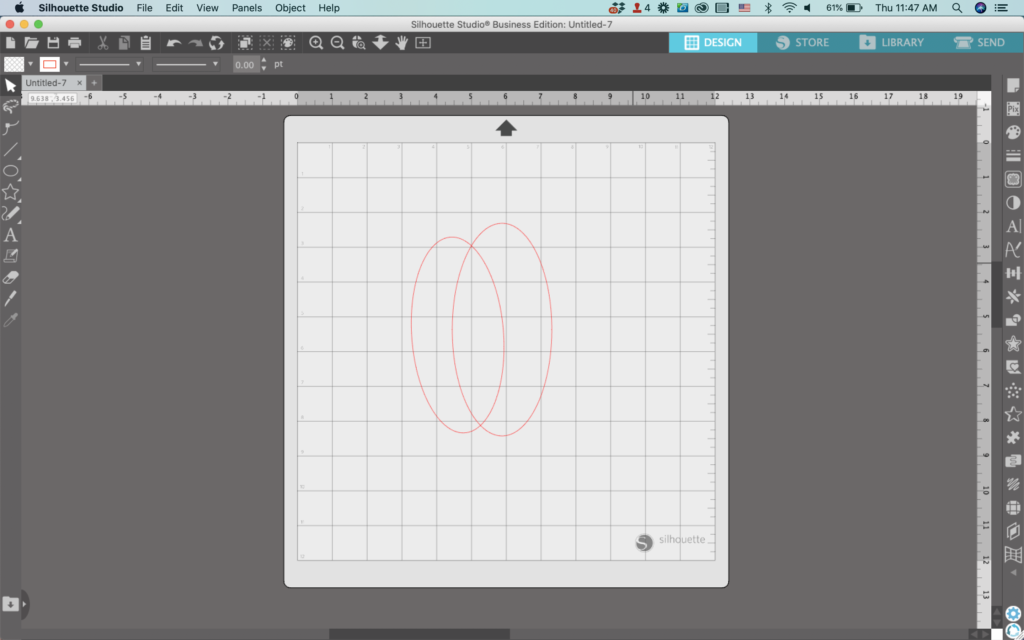
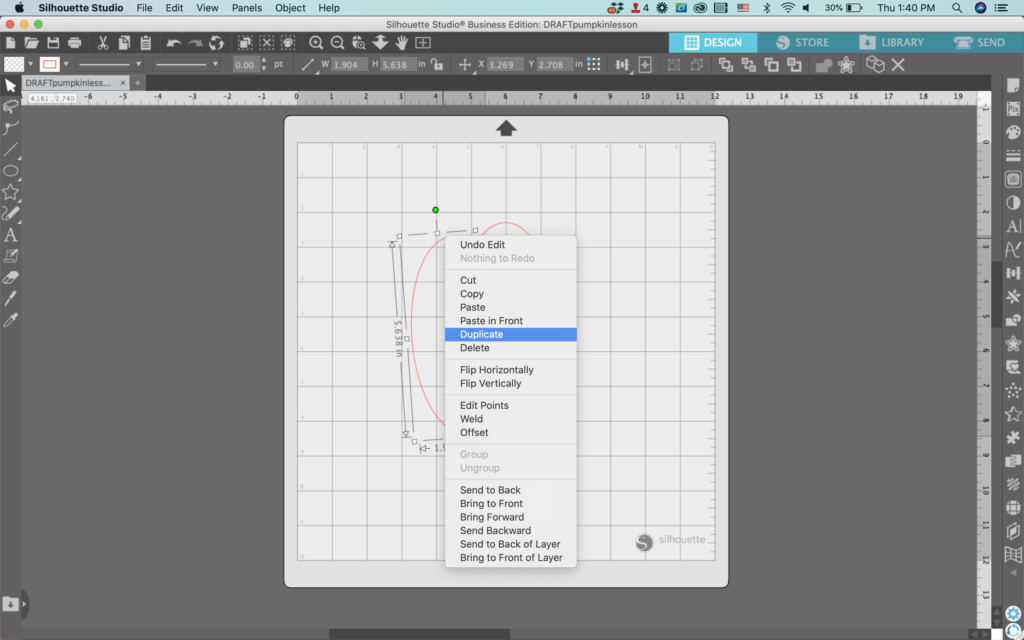
    2. Duplicate the oval and move it to the left of the first oval. Rotate it slightly and resize it a little smaller.

    Silhouette Studio Screenshot - cuttingforbusiness.com
    Silhouette Studio Screenshot - cuttingforbusiness.com

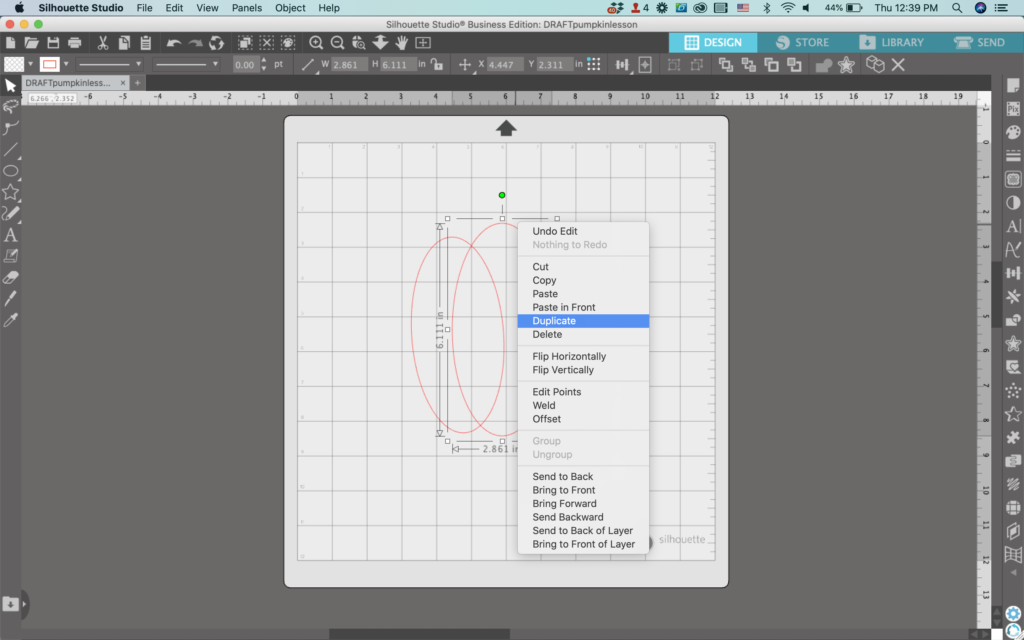
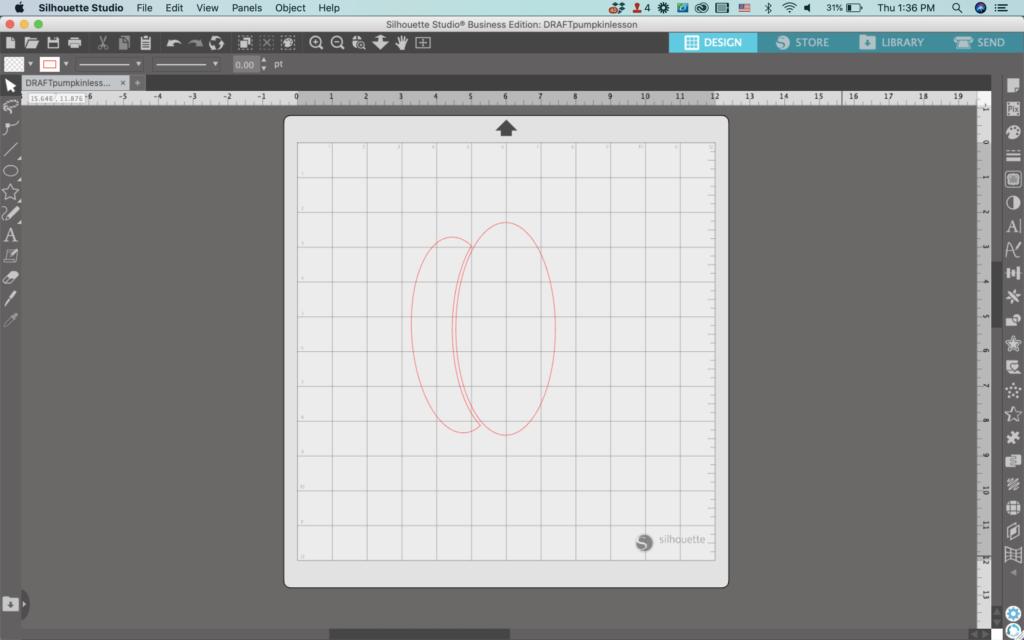
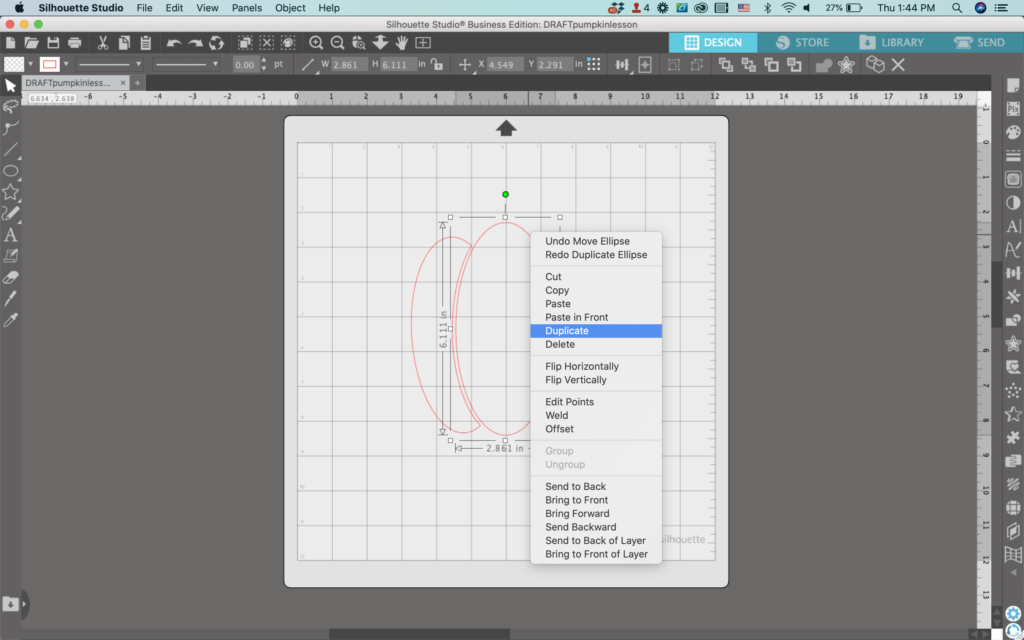
    3. Duplicate the first oval and move the copy off to the side.

    Silhouette Studio Screenshot - cuttingforbusiness.com
    Silhouette Studio Screenshot - cuttingforbusiness.com

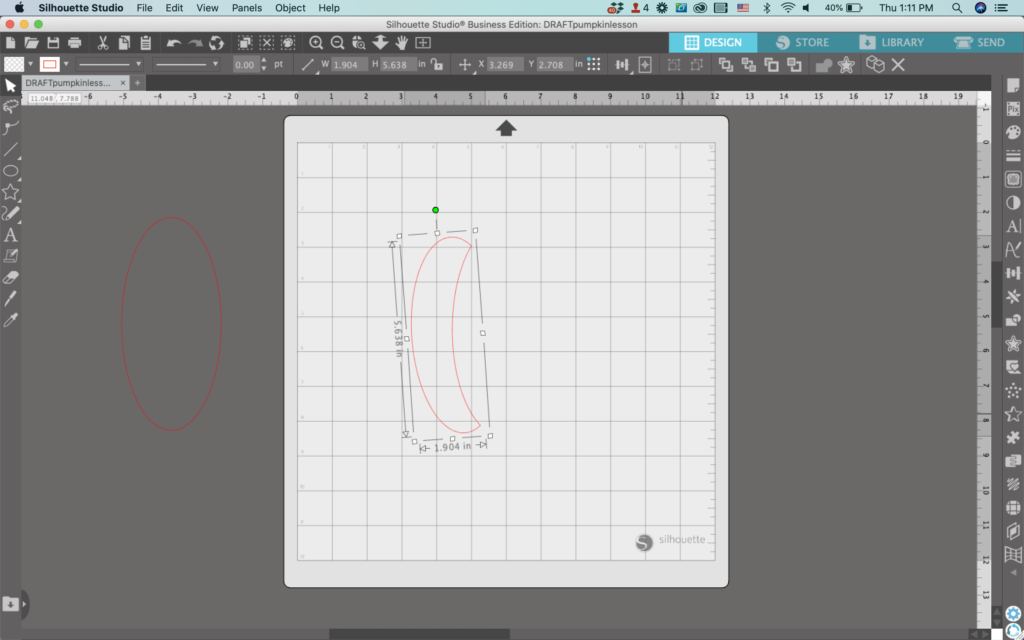
    4. Select both ovals and navigate to ‘Object’, ‘Modify’, and ‘Subtract’. This will leave you with a half moon shape.

    Silhouette Studio Screenshot - cuttingforbusiness.com

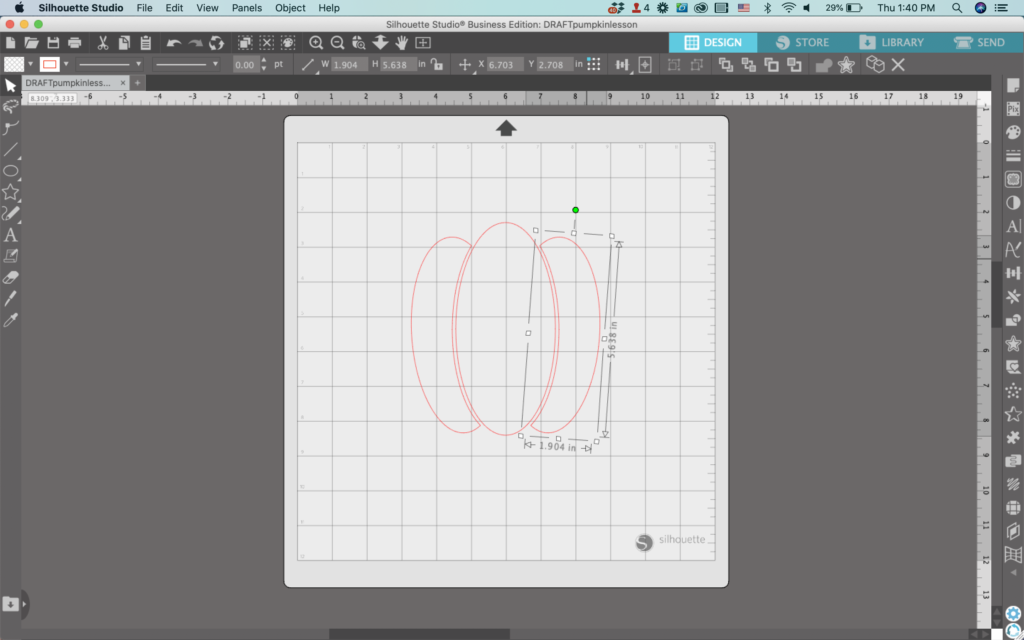
    5. Move the extra oval into place. I like to leave a small gap so that it can easily be cut in vinyl, but you can also butt it up against the half moon shape.

    Silhouette Studio Screenshot - cuttingforbusiness.com

    6. Duplicate the half moon shape. Then, navigate to ‘Object’, ‘Flip Horizontally’ to create a mirror image of your oval. Finally, move it into place on the right side of the pumpkin.

    Silhouette Studio Screenshot - cuttingforbusiness.com
    Silhouette Studio Screenshot - cuttingforbusiness.com

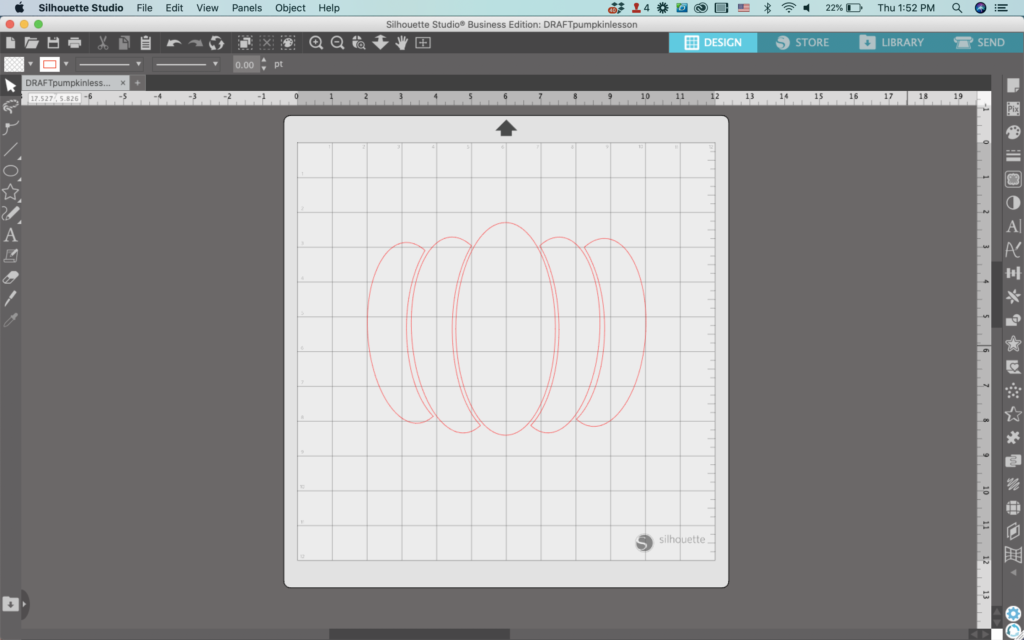
    7. Duplicate both the outermost sections on each side of the pumpkin. Then, place one on each side of the pumpkin. When finished, you should have something that looks like a pumpkin.

    Silhouette Studio Screenshot - cuttingforbusiness.com
    Silhouette Studio Screenshot - cuttingforbusiness.com

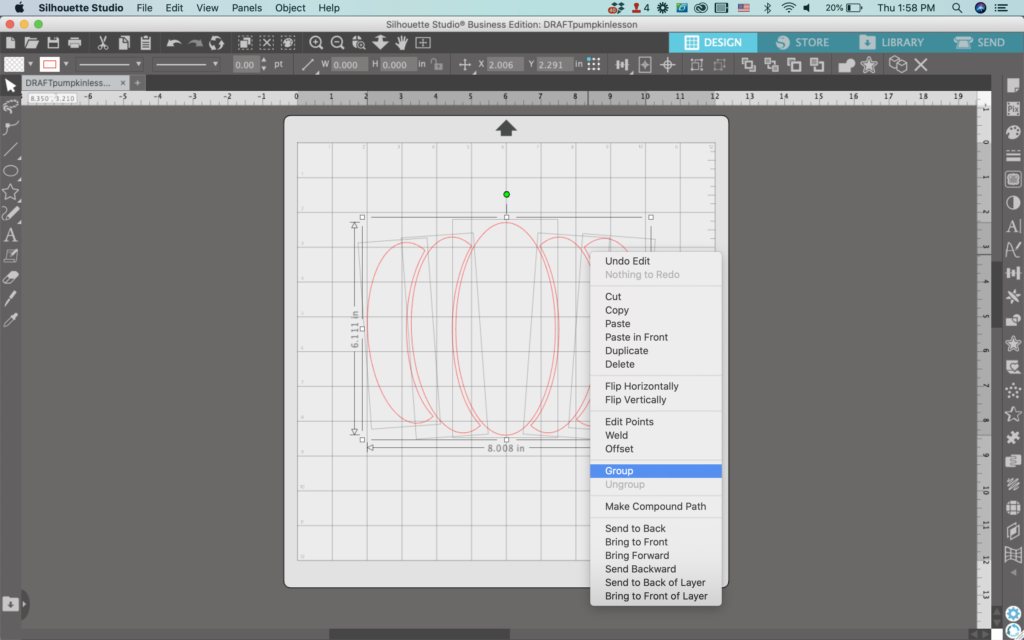
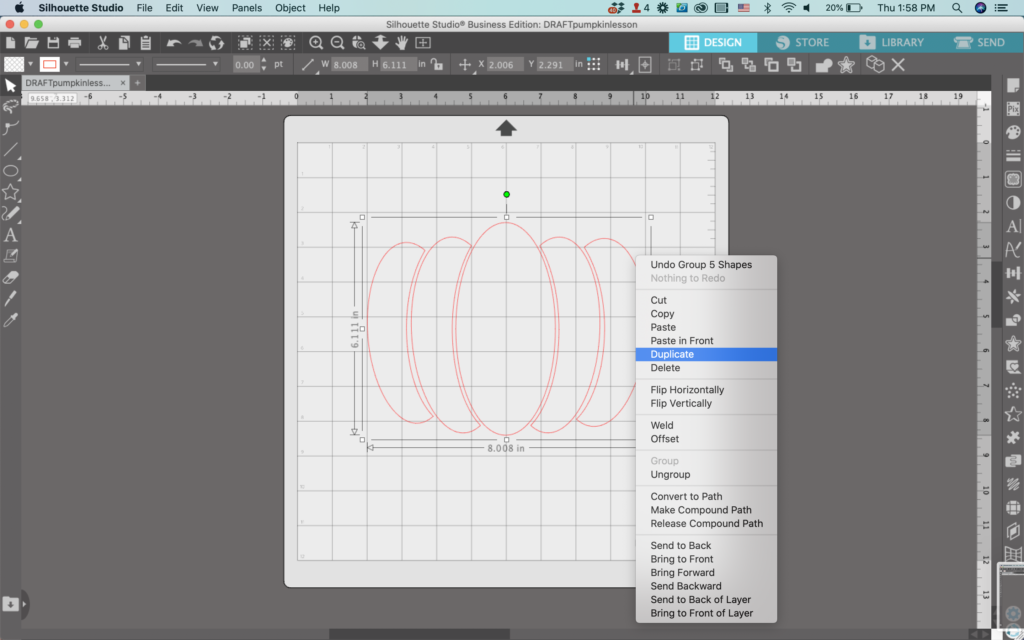
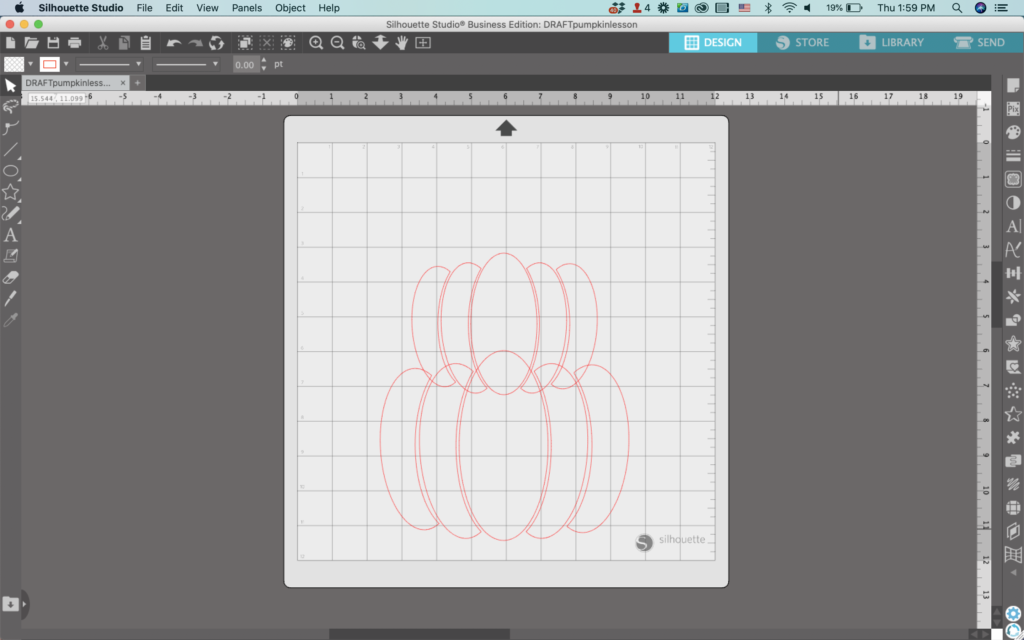
    8. Select all your shapes and right click, then select ‘Group’. Next, right click and select ‘Duplicate’ to make a second pumpkin. Arrange your pumpkins on top of each other.

    Silhouette Studio Screenshot - cuttingforbusiness.com
    Silhouette Studio Screenshot - cuttingforbusiness.com
    Silhouette Studio Screenshot - cuttingforbusiness.com

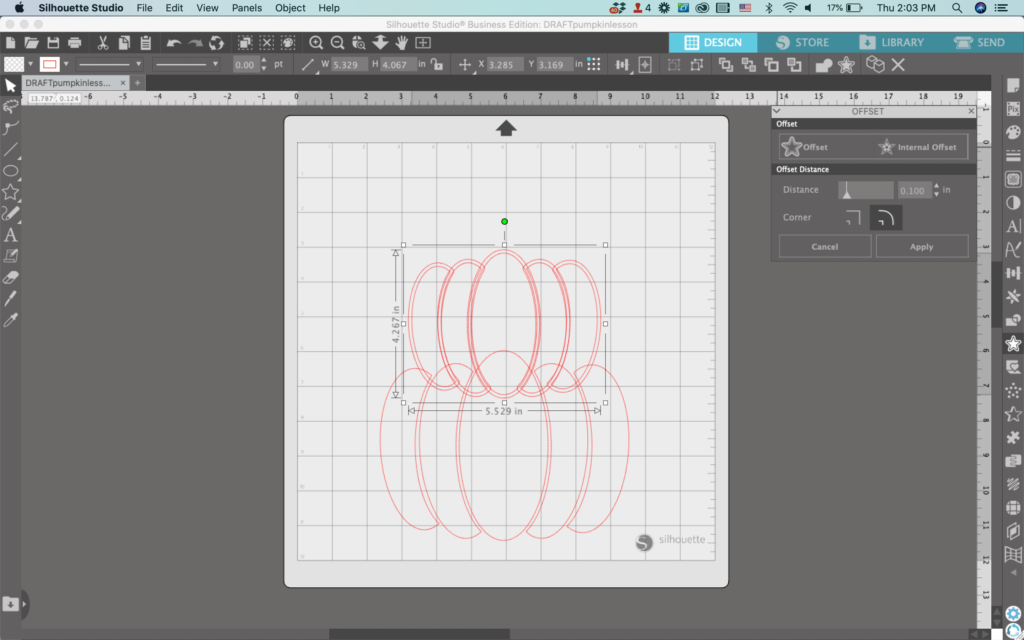
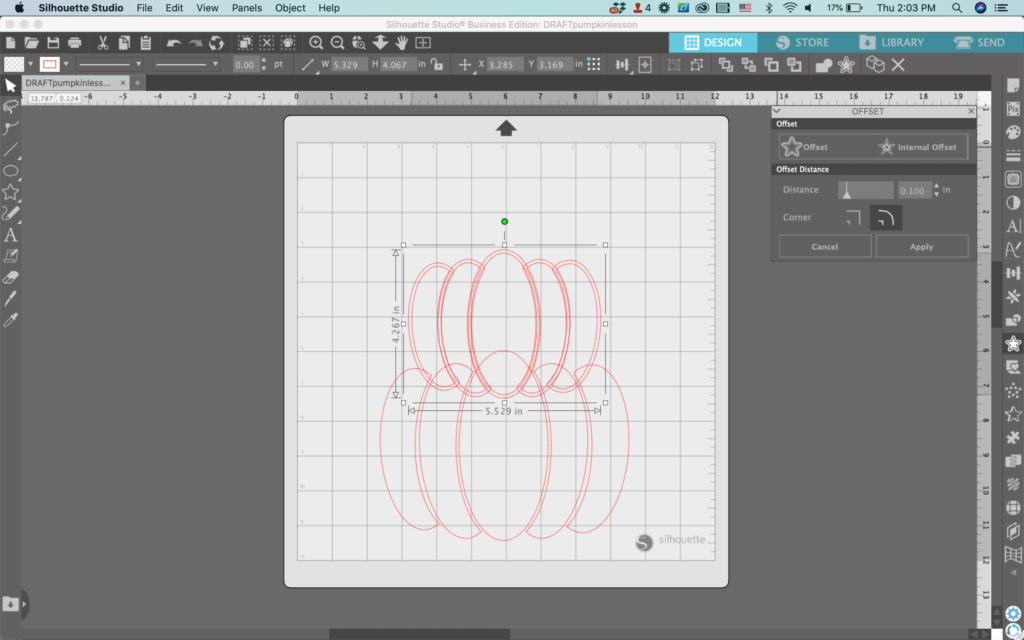
    9. Head to ‘Panels’, ‘Offset’, then offset the top pumpkin slightly.

    Silhouette Studio Screenshot - cuttingforbusiness.com

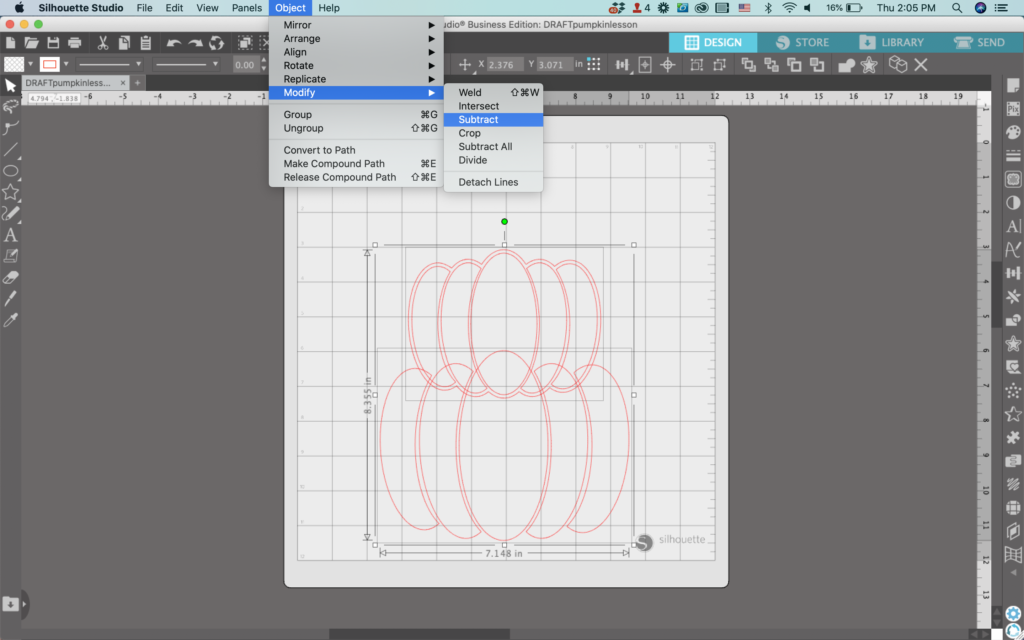
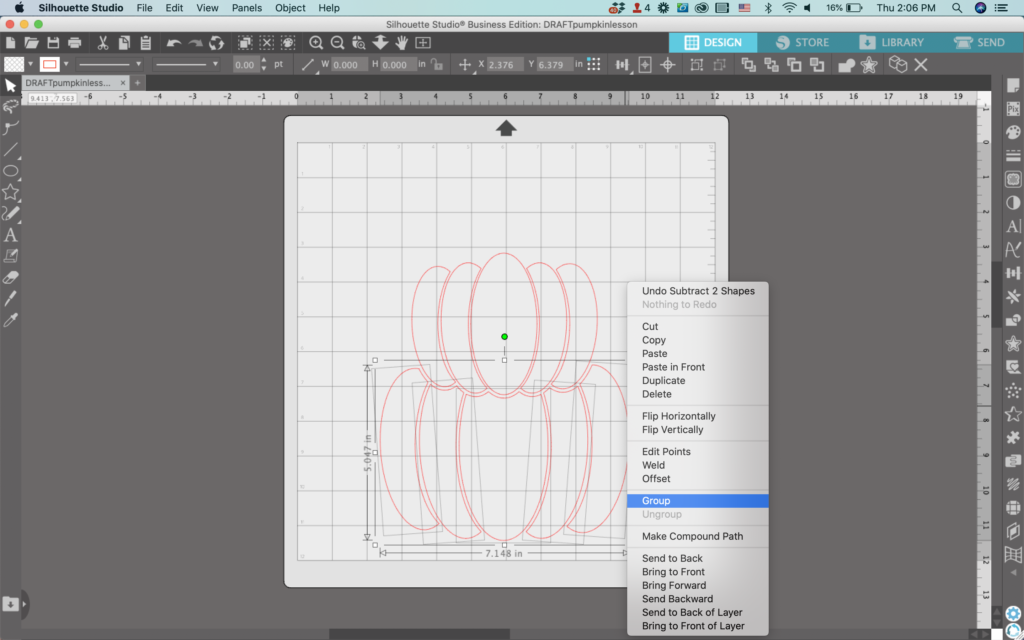
    10. Select the bottom pumpkin and the top pumpkin’s offset, and navigate to ‘Object’, ‘Modify’, and ‘Subtract’. Then right click to ‘Group’ it back together.

    Silhouette Studio Screenshot - cuttingforbusiness.com
    Silhouette Studio Screenshot - cuttingforbusiness.com
    Silhouette Studio Screenshot - cuttingforbusiness.com

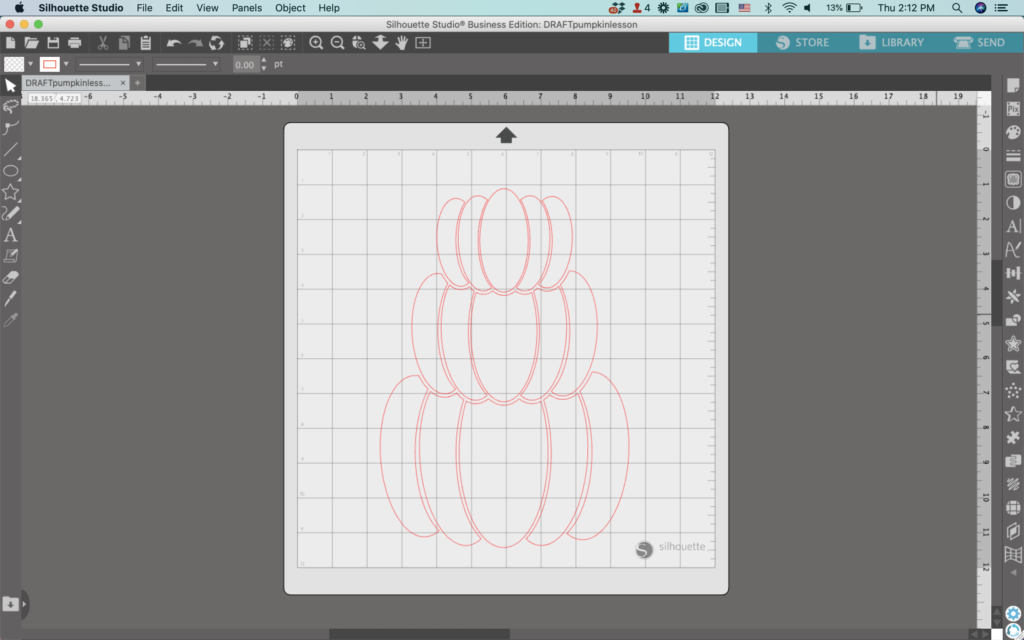
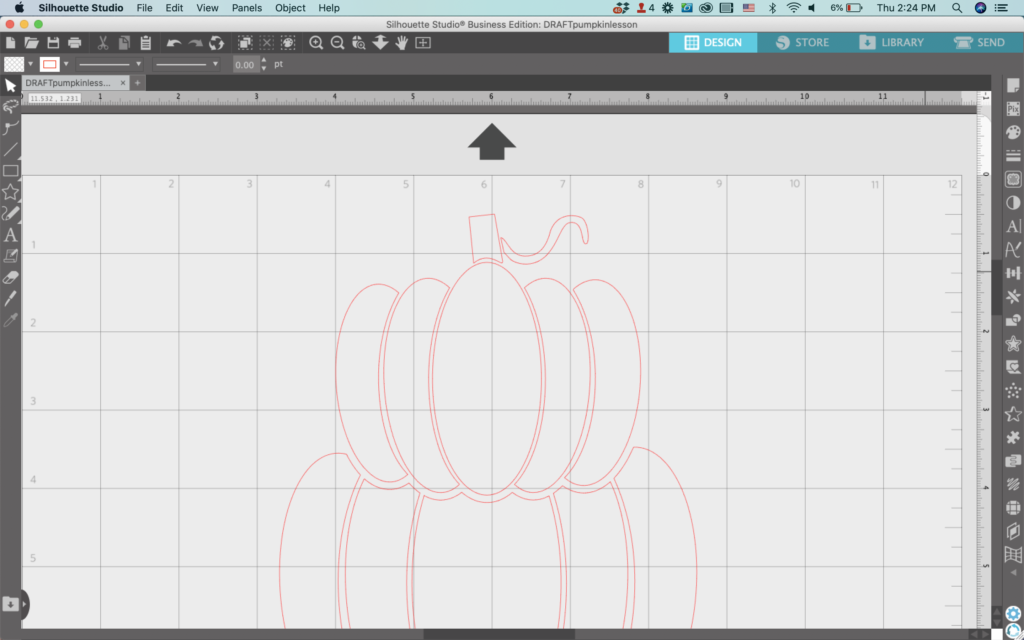
    11. Duplicate the top pumpkin and repeat steps 9 and 10 to add a 3rd pumpkin to the stack. When finished, it should look similar to this:

    Silhouette Studio Screenshot - cuttingforbusiness.com

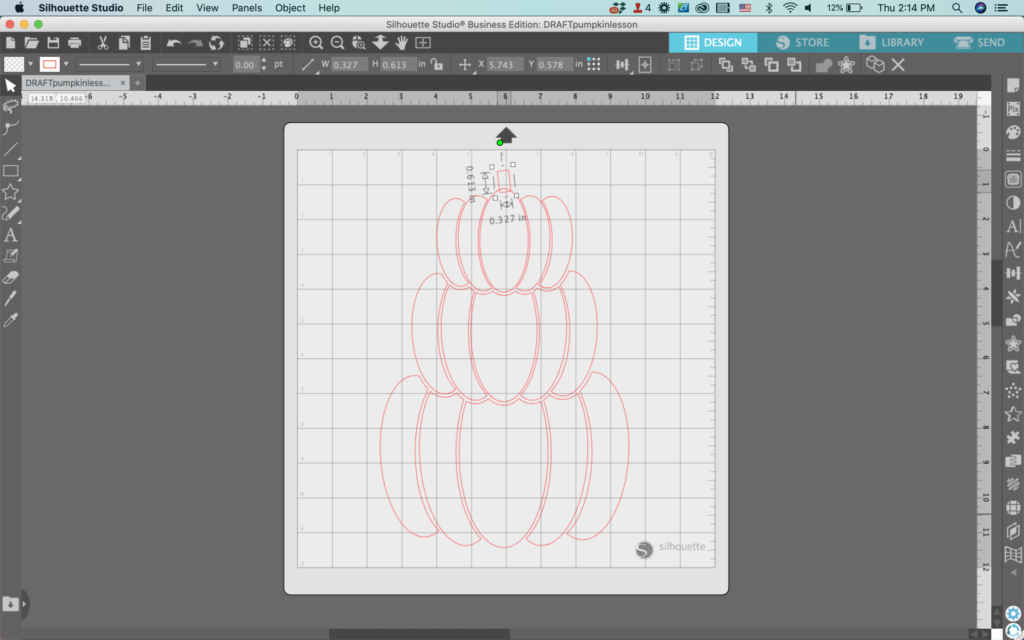
    12. Draw a small rectangle and place it in the center of the top pumpkin. Rotate it slightly.

    Silhouette Studio Screenshot - cuttingforbusiness.com

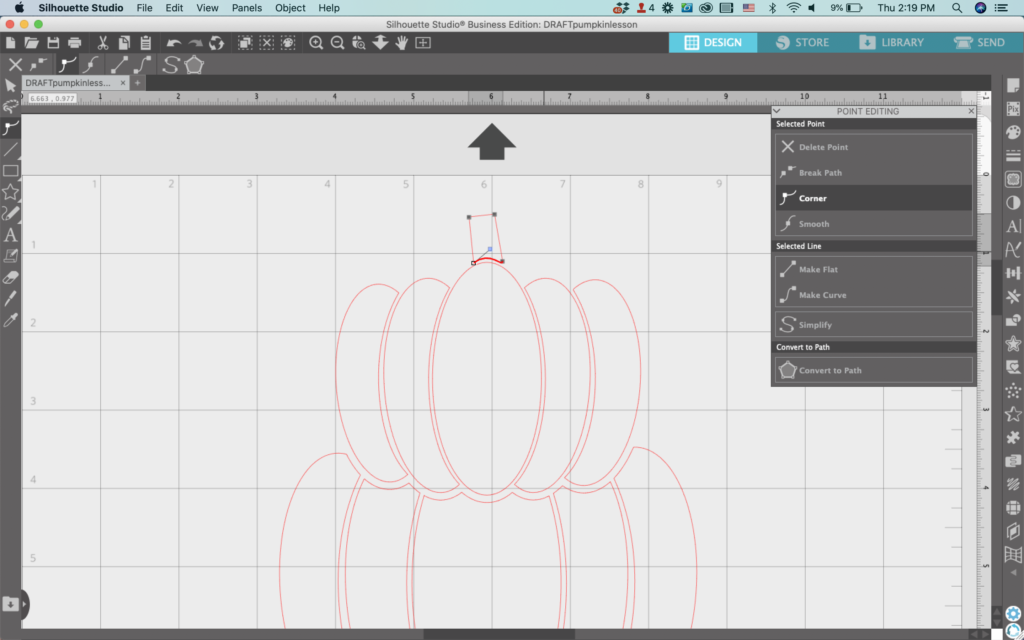
    13. Double click the stem to open the ‘Point Editing’ Panel. Make the bottom of the stem curve around the top of the pumpkin.

    Silhouette Studio Screenshot - cuttingforbusiness.com

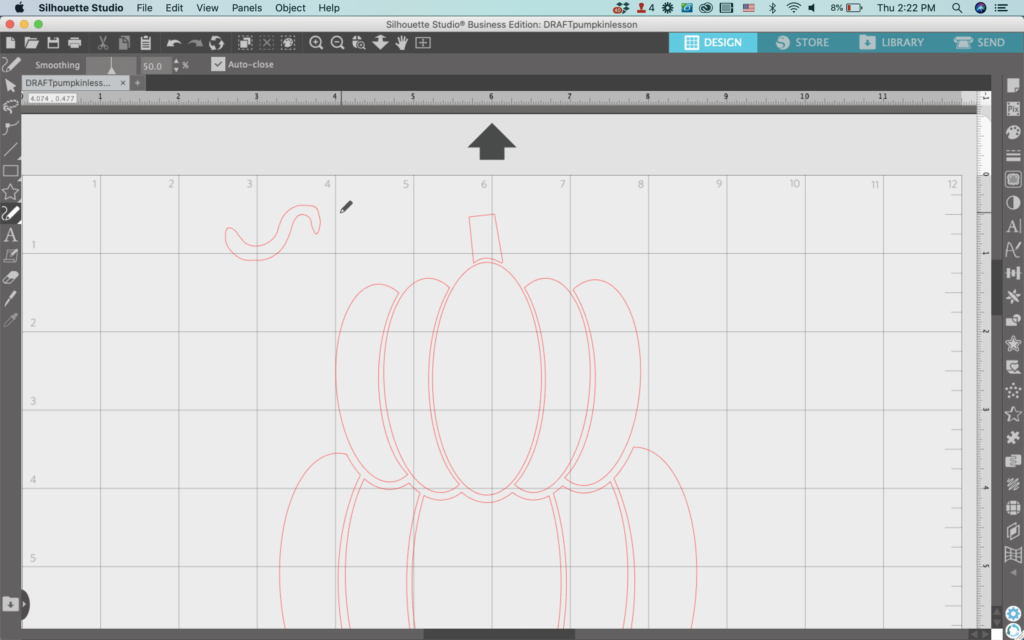
    14. Use the ‘Draw Smooth Freehand’ tool to draw a piece of vine. Point edit it if necessary, then move it into place.

    Silhouette Studio Screenshot - cuttingforbusiness.com
    Silhouette Studio Screenshot - cuttingforbusiness.com

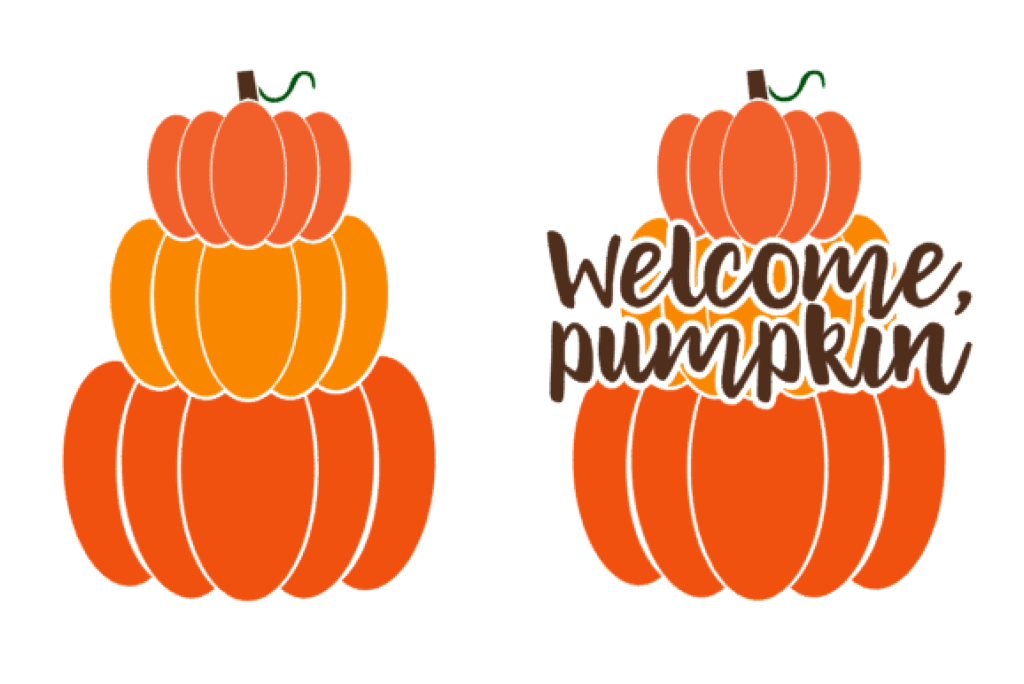
    15. Add color, additional details, or text to complete the design. Don’t forget, you can also stop after step 7, add a stem and/or a vine and finish with a single pumpkin.

    Curious about the font? I used Stephanie Jane.

    Silhouette Studio Design Tutorial: Stacked Pumpkin SVG - cuttingforbusiness.com
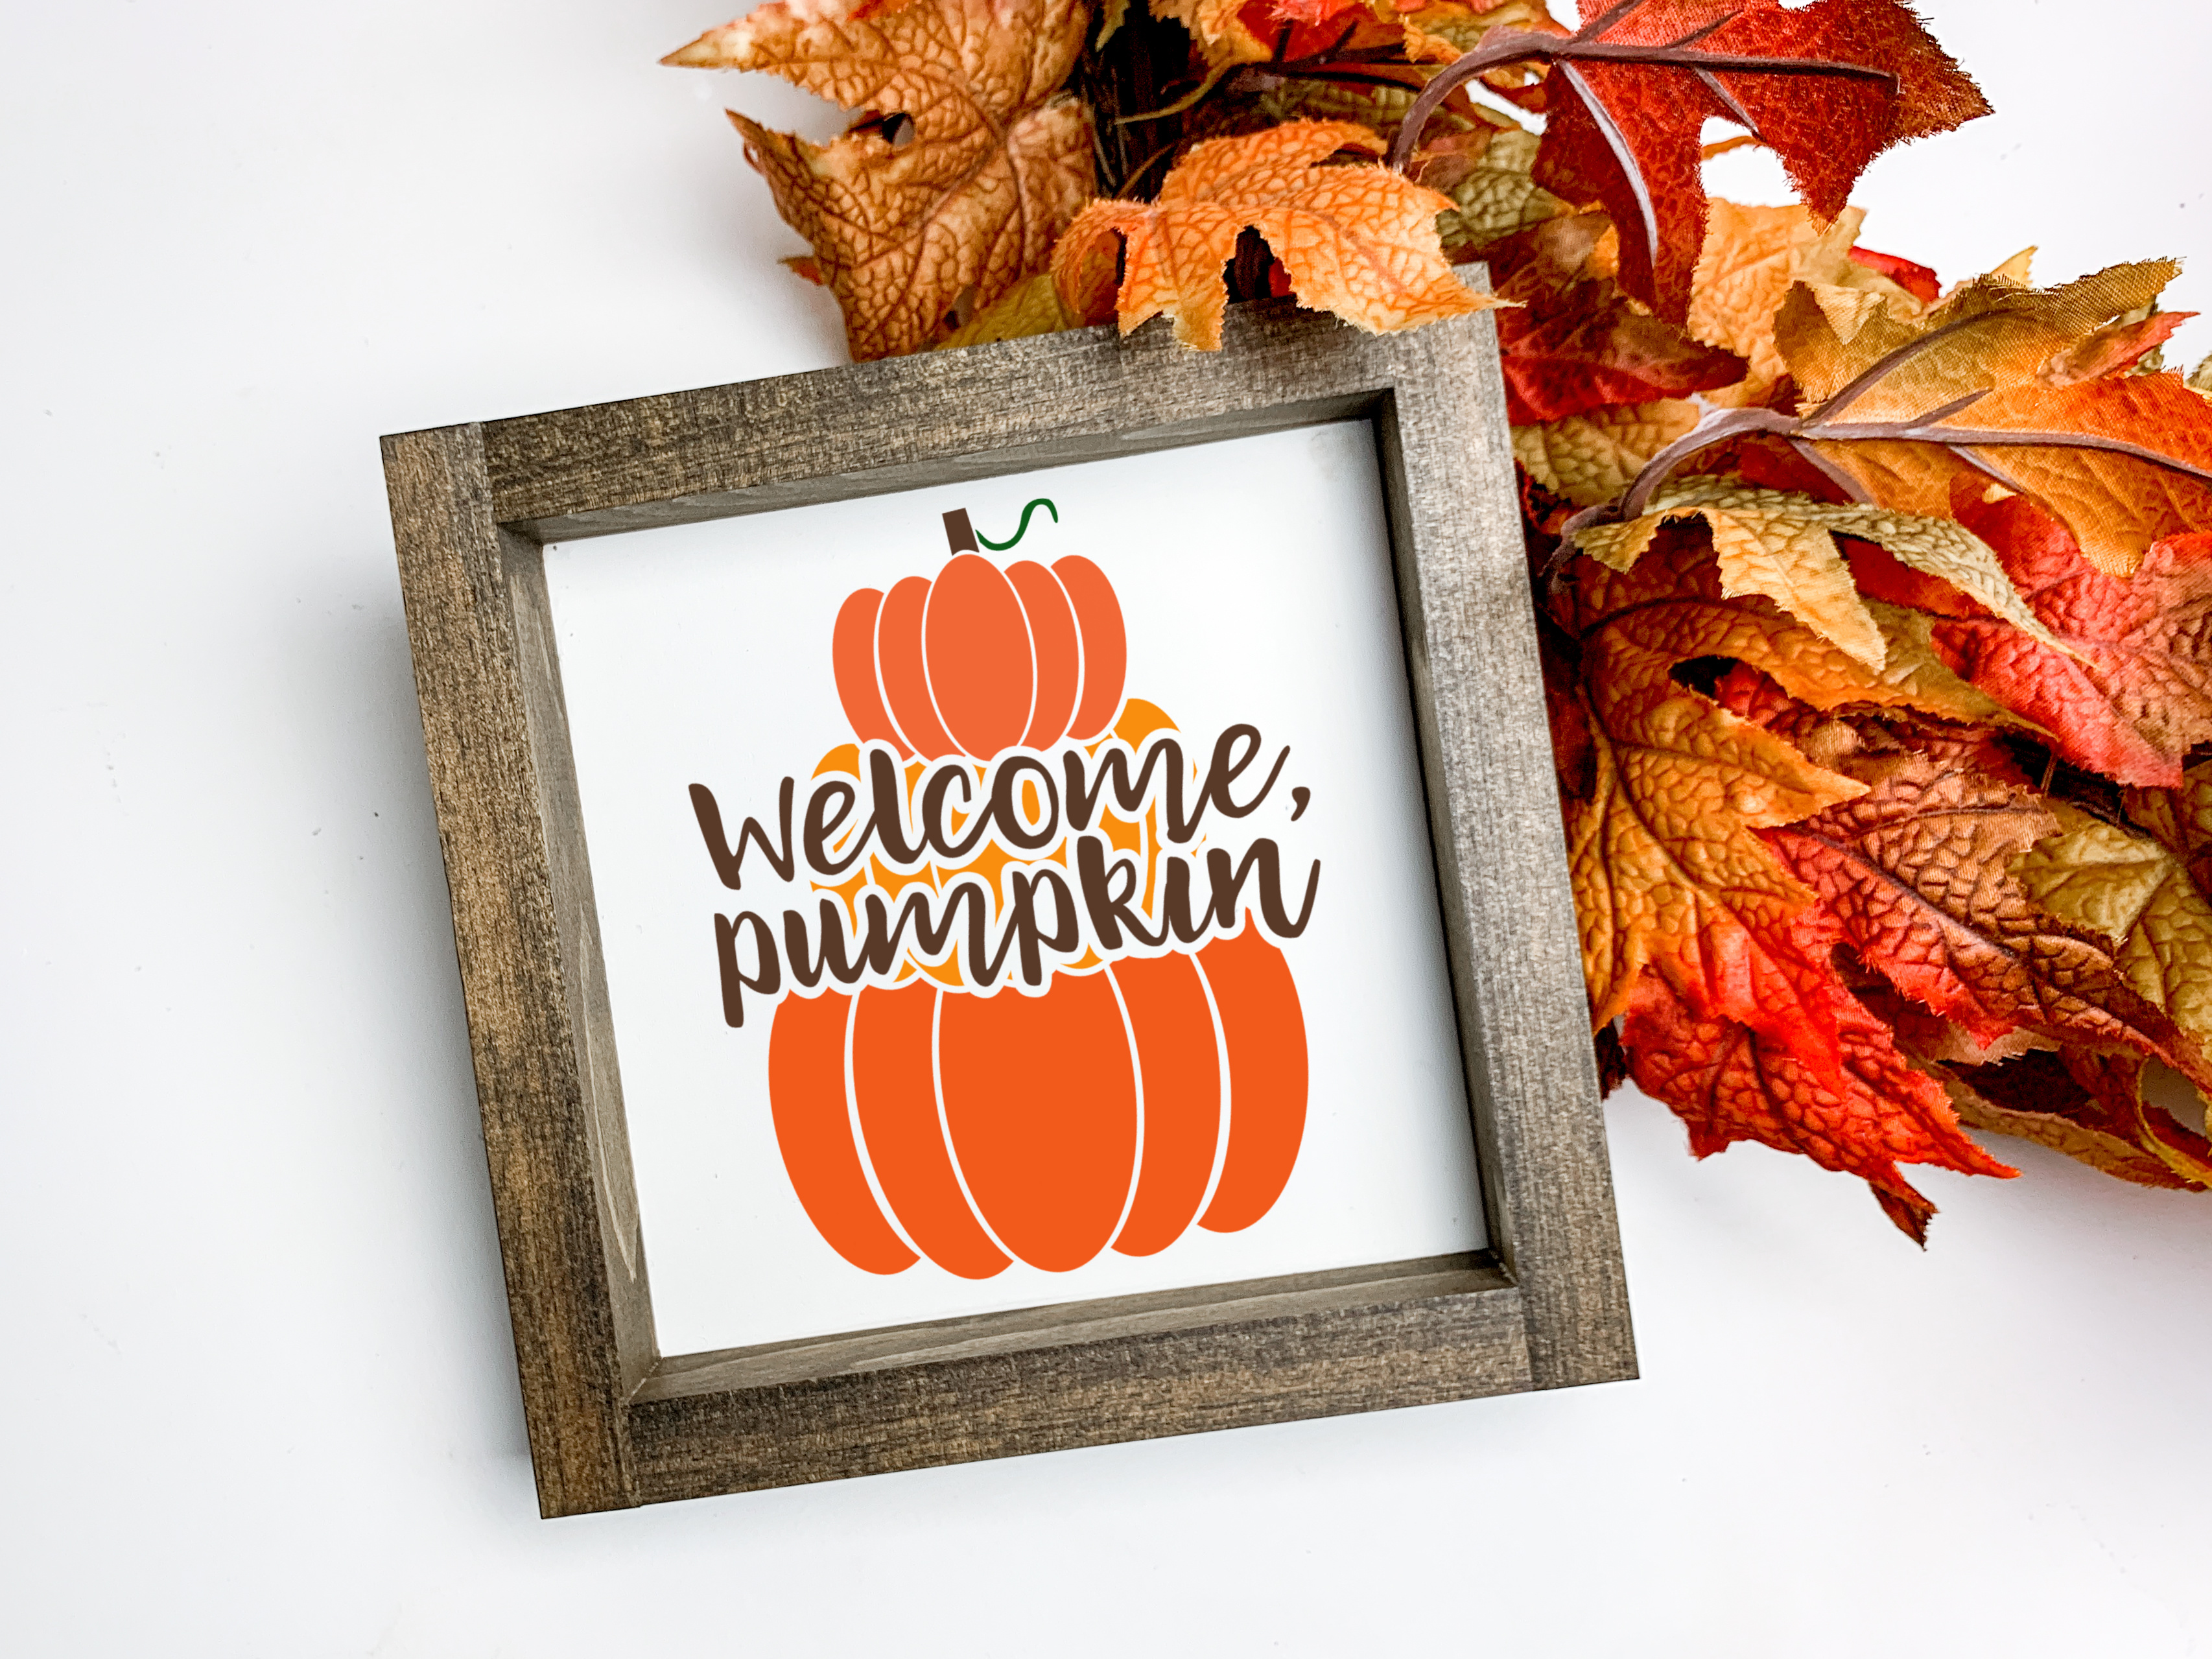
    Silhouette Studio Design Tutorial: Stacked Pumpkin SVG - cuttingforbusiness.com

    To save your new SVG creation, head to ‘File’, ‘Save As’, ‘Save to Hard Drive’, name the file, then select ‘SVG’ from the dropdown menu.

    Want More SVG Tutorials?

    View more Design with Me SVG tutorials.
  • Silhouette Studio Design Tutorial: Stretched Letter Filled Pumpkin SVG

    Design with Me is a new regular feature on Cutting for Business! Each Friday, I’ll bring you a new Silhouette Studio tutorial featuring how to design an SVG.

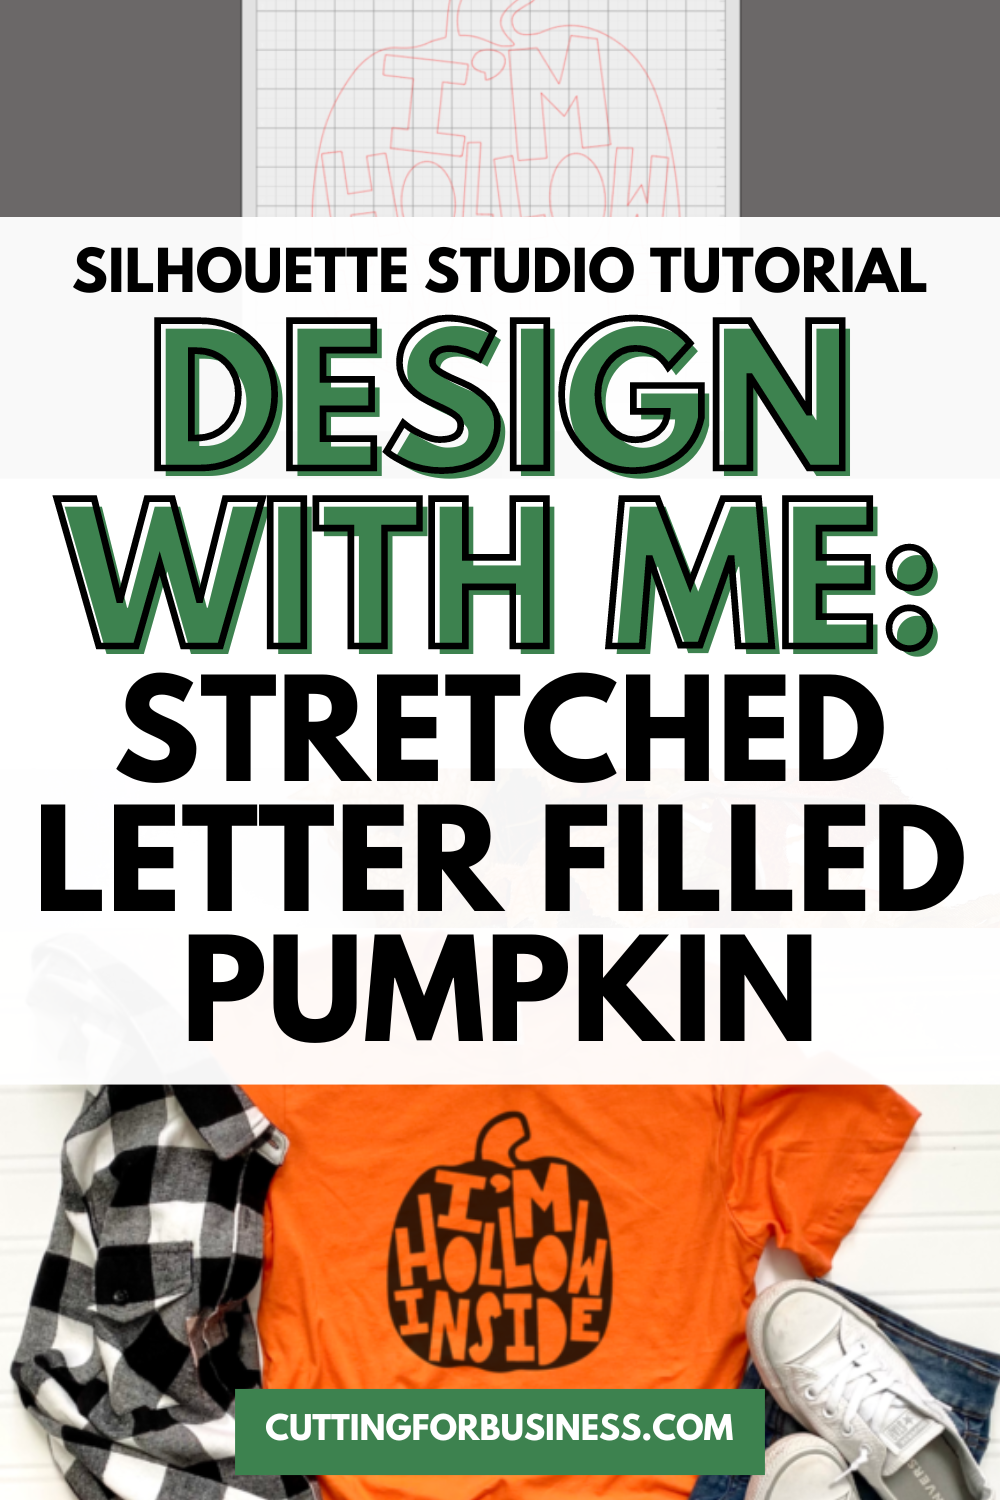
    Today, let’s look at creating a stretched letter filled pumpkin SVG.

    Silhouette Studio Tutorial: Stretched Letter Filled Pumpkin SVG - cuttingforbusiness.com.

    Silhouette Studio Tutorial: Stretched Letter Filled Pumpkin SVG

    Ahhh, smell that? That’s the smell of fall! Let’s look at another tutorial. Today, I’ll use a pumpkin pun to make a letter filled pumpkin design.

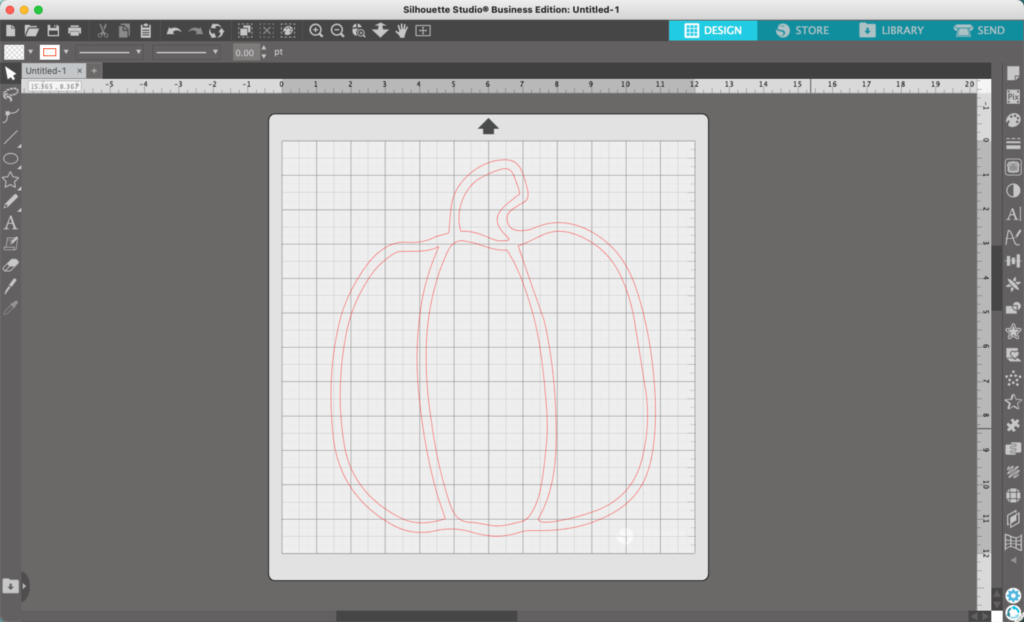
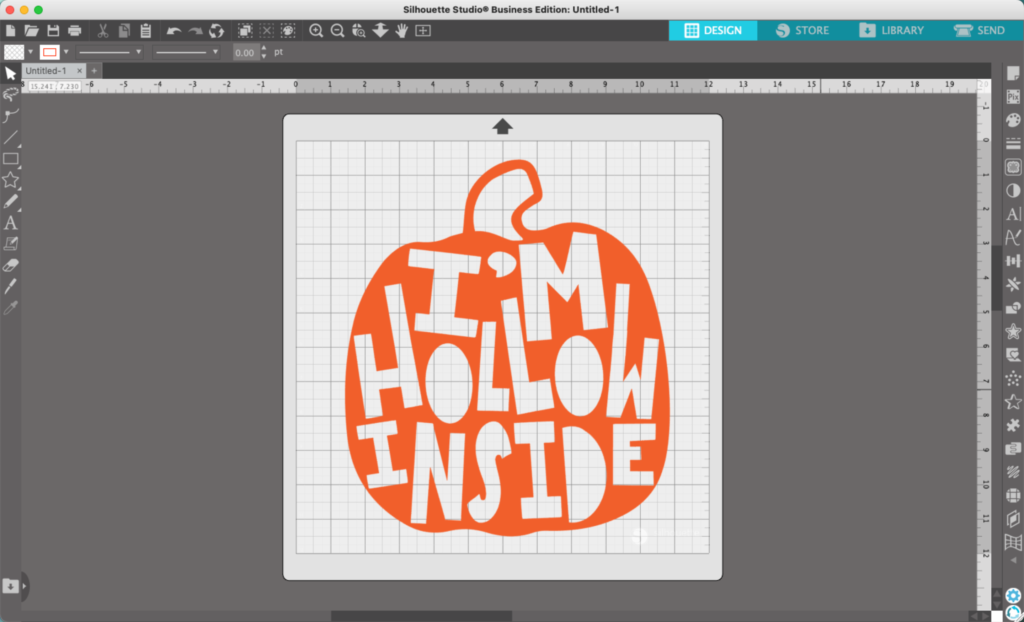
    1. Start with a pumpkin shape. It can be a dingbat from a font, a pumpkin you designed, or a pumpkin you’ve previously designed (hint, hint – view this tutorial). For this tutorial, I’m using a dingbat from the Fall Feels font.
    Silhouette Studio screenshot - cuttingforbusiness.com.

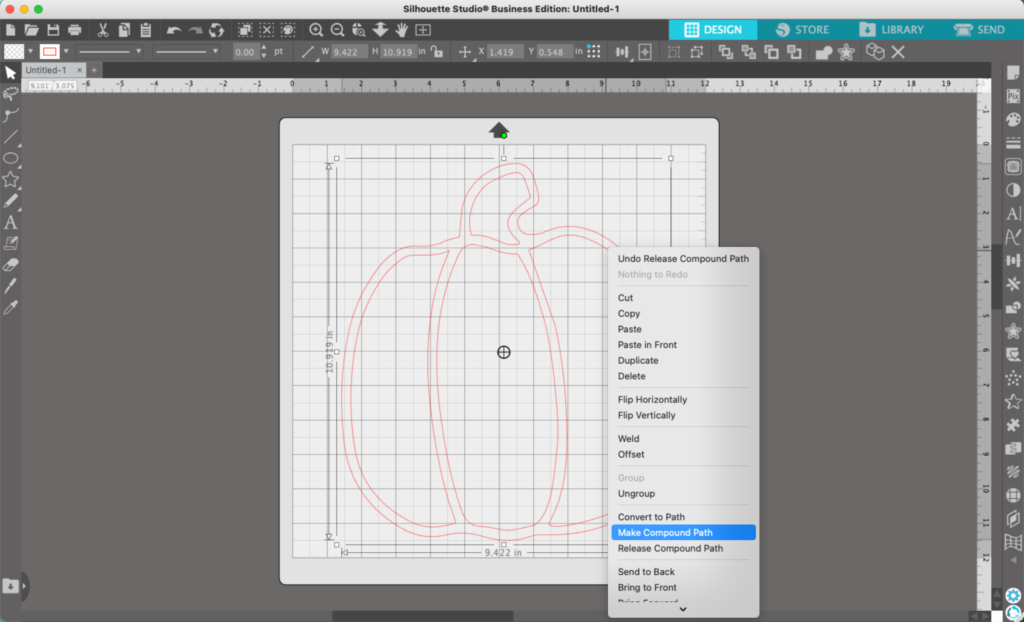
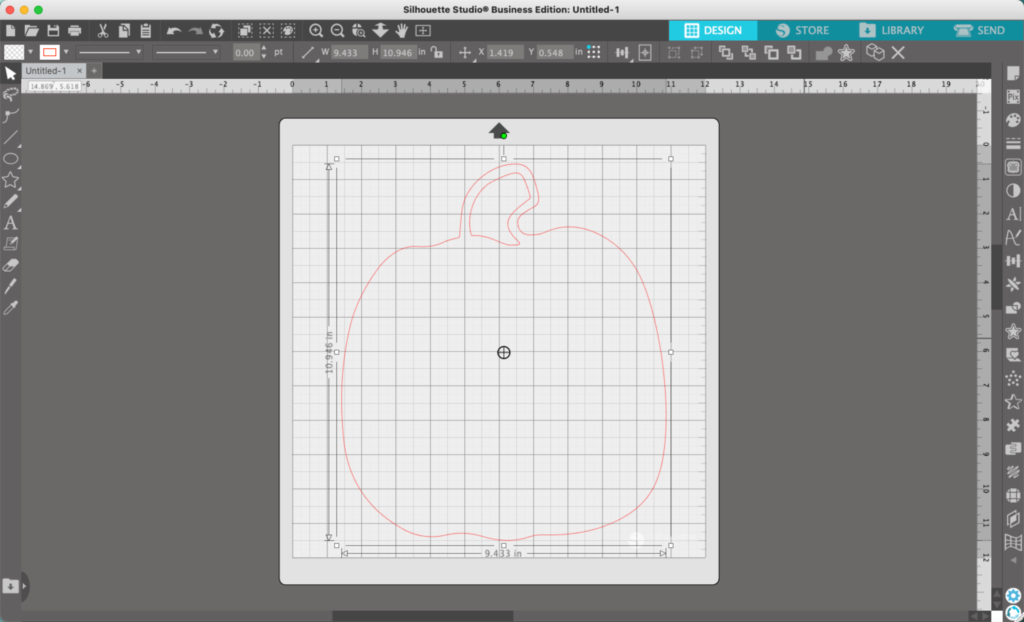
    2. (Optional) Right click on the dingbat if needed, then click ‘Make Compound Path’. This will allow you to easily delete anything in the center of your pumpkin. I chose to leave the steam detail inside the pumpkin.

    Silhouette Studio screenshot - cuttingforbusiness.com.
    Silhouette Studio screenshot - cuttingforbusiness.com.

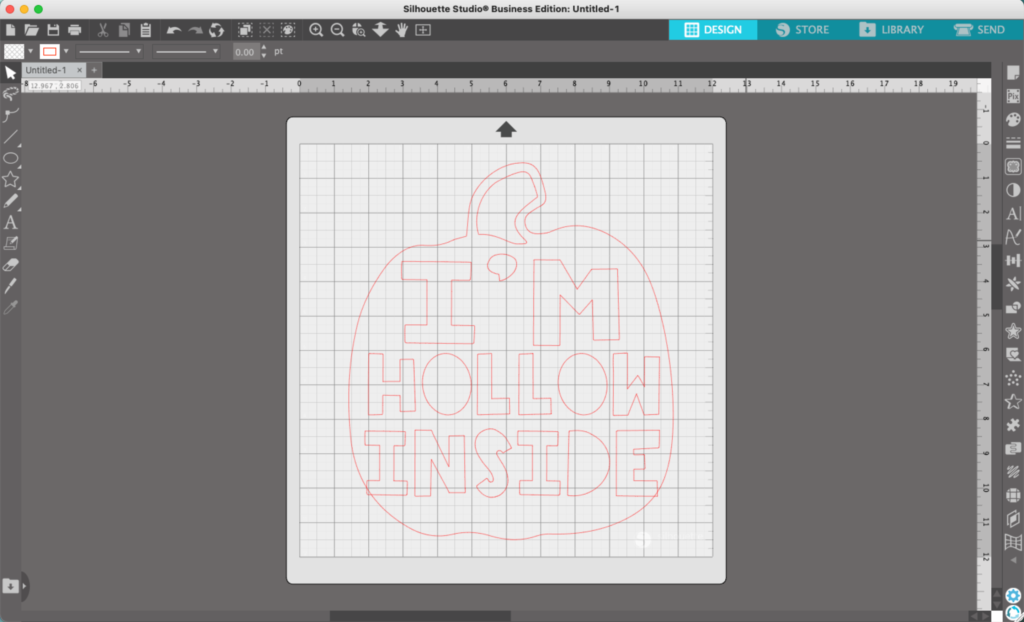
    2. Pick a fun or funky font. Something a little different. For this tutorial, I’m using this font. Add your text and put it in place.

    Silhouette Studio screenshot - cuttingforbusiness.com.

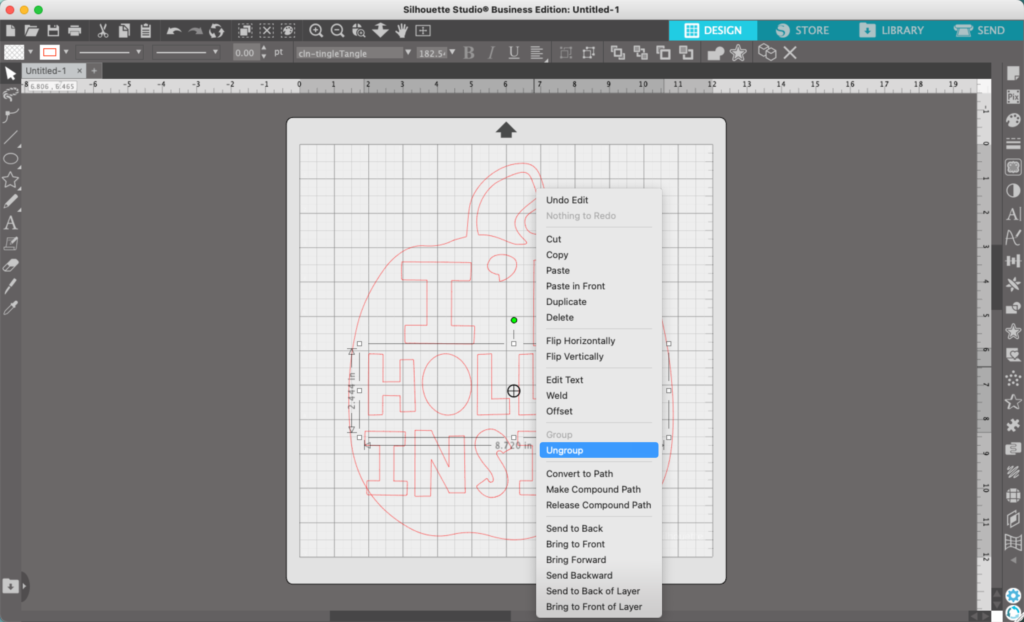
    3. Right click on each of the words, then select ‘Ungroup’.

    Silhouette Studio screenshot - cuttingforbusiness.com.

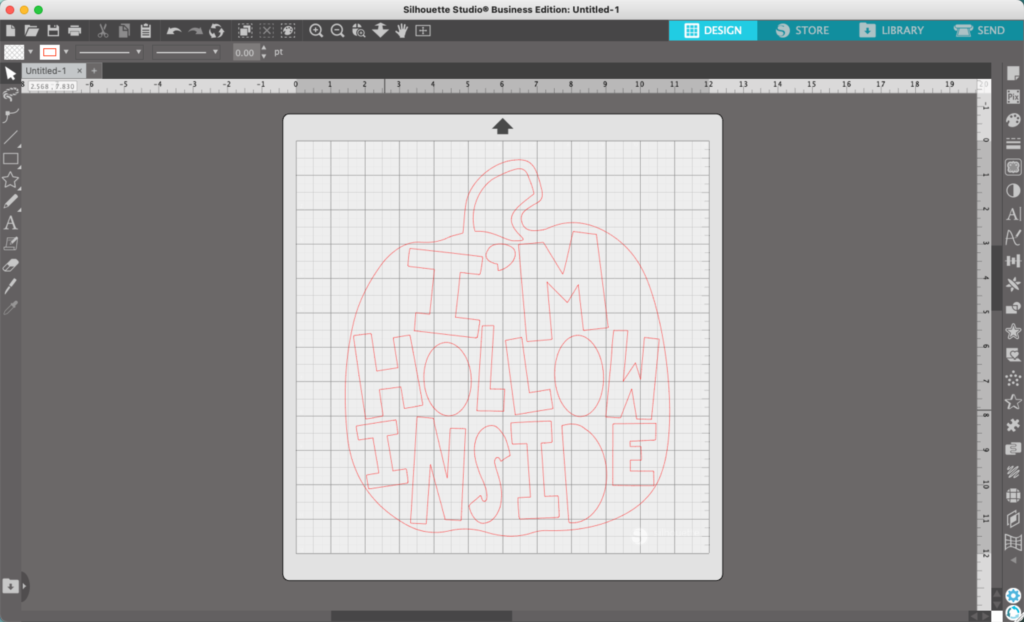
    4. You can now rotate, stretch, and move each letter independently. So, move through each word and letter and move it around. Go crazy! The only ‘rule’ is that you cannot go outside the pumpkin outline.

    Silhouette Studio screenshot - cuttingforbusiness.com.

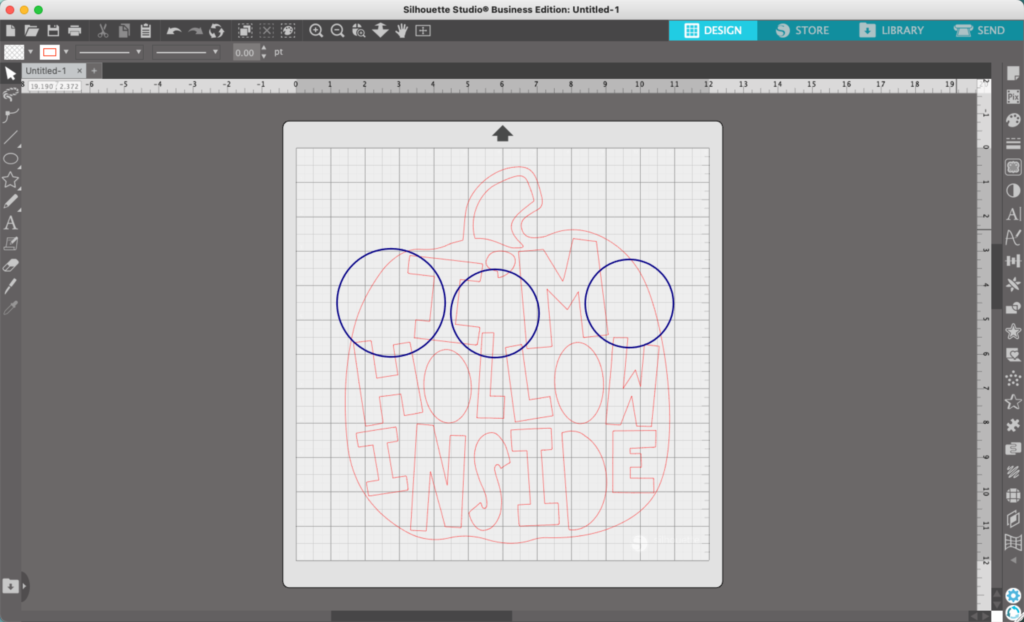
    5. After rotating and moving my letters around, I’ve got some empty spaces. I’ve circled them in blue.

    Silhouette Studio screenshot - cuttingforbusiness.com.

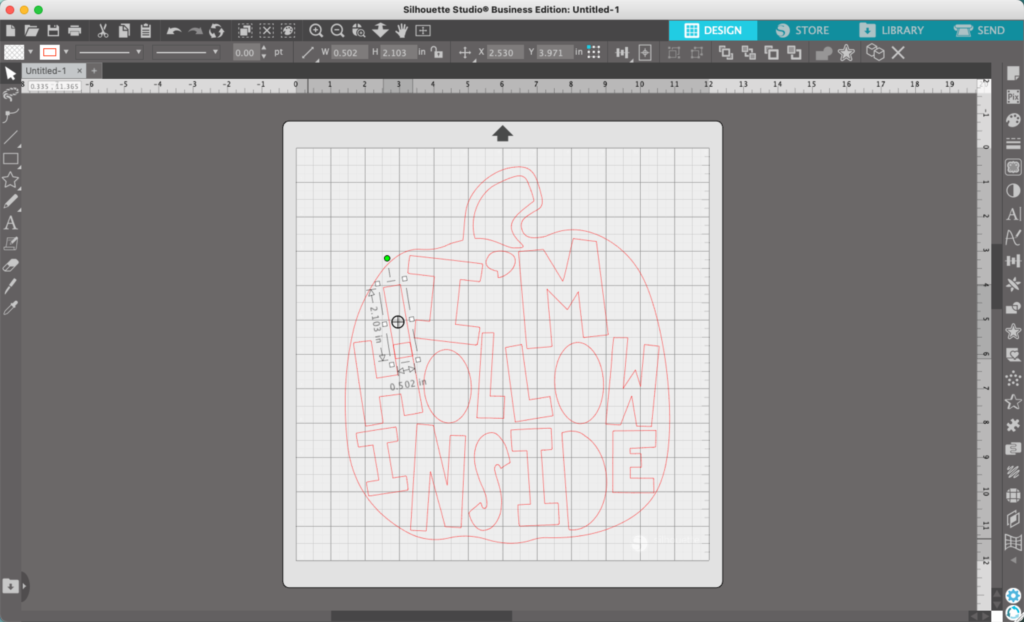
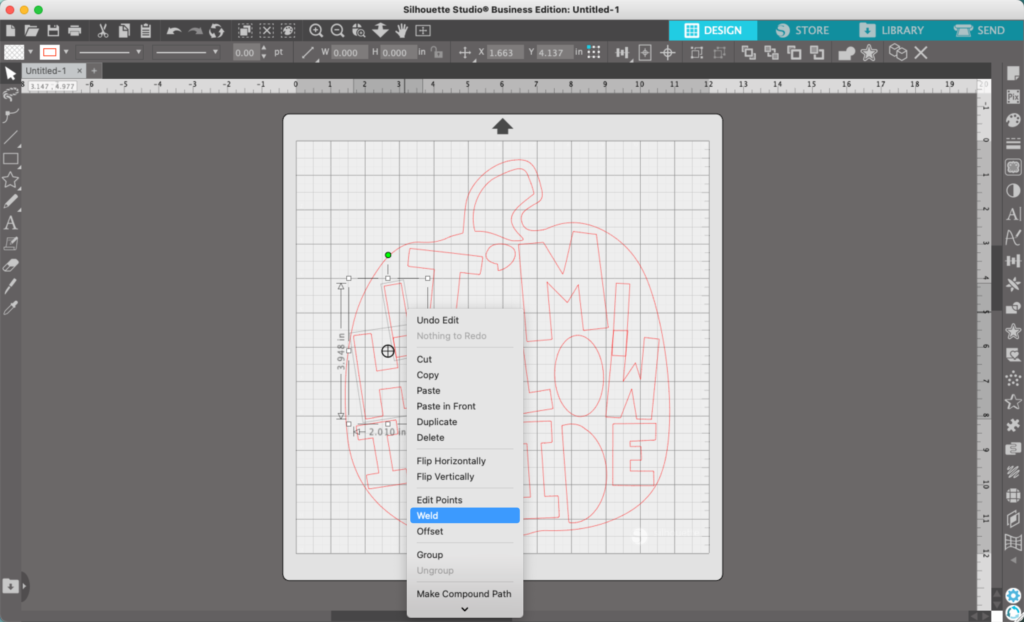
    6. To fix the spaces, I extended the letters by adding a rectangle to each, then welding the rectangle to the letter. (Reminder: To weld, select both the rectangle and the letter, then right click and select ‘Weld’.)

    Silhouette Studio screenshot - cuttingforbusiness.com.
    Silhouette Studio screenshot - cuttingforbusiness.com.

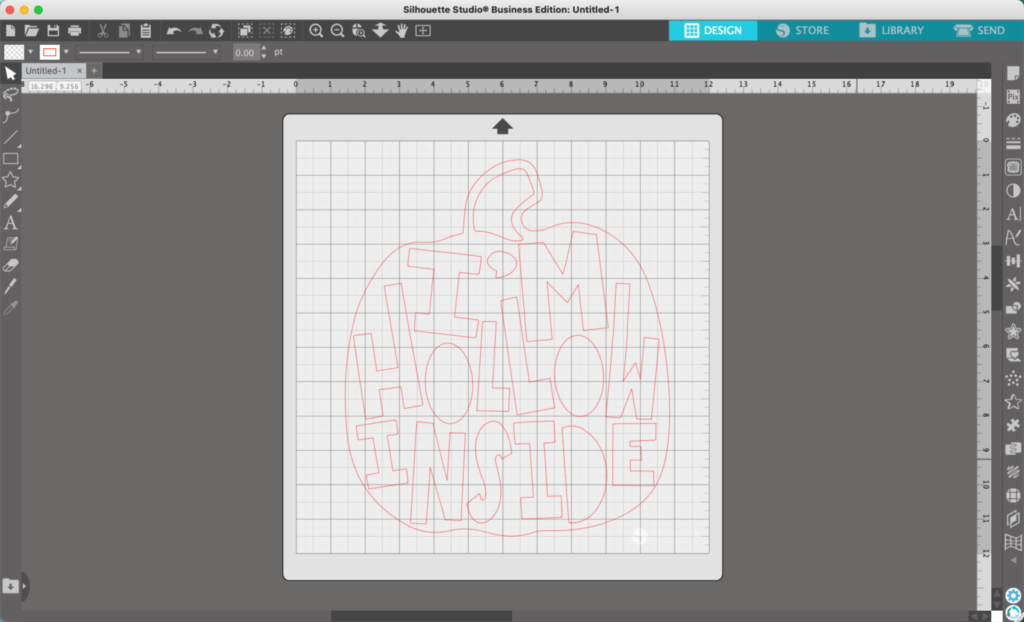
    7. Keep fine tuning until you are happy with the final design.

    Silhouette Studio screenshot - cuttingforbusiness.com.

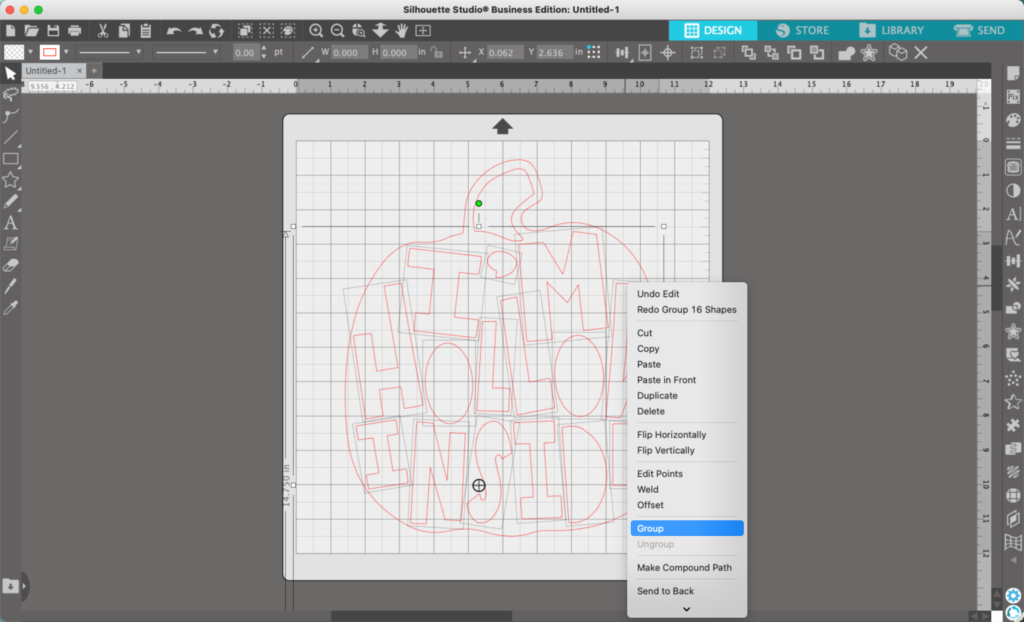
    8. Group all the interior letters and pieces together by selecting them all, right clicking, then choosing ‘Group’.

    Silhouette Studio screenshot - cuttingforbusiness.com.

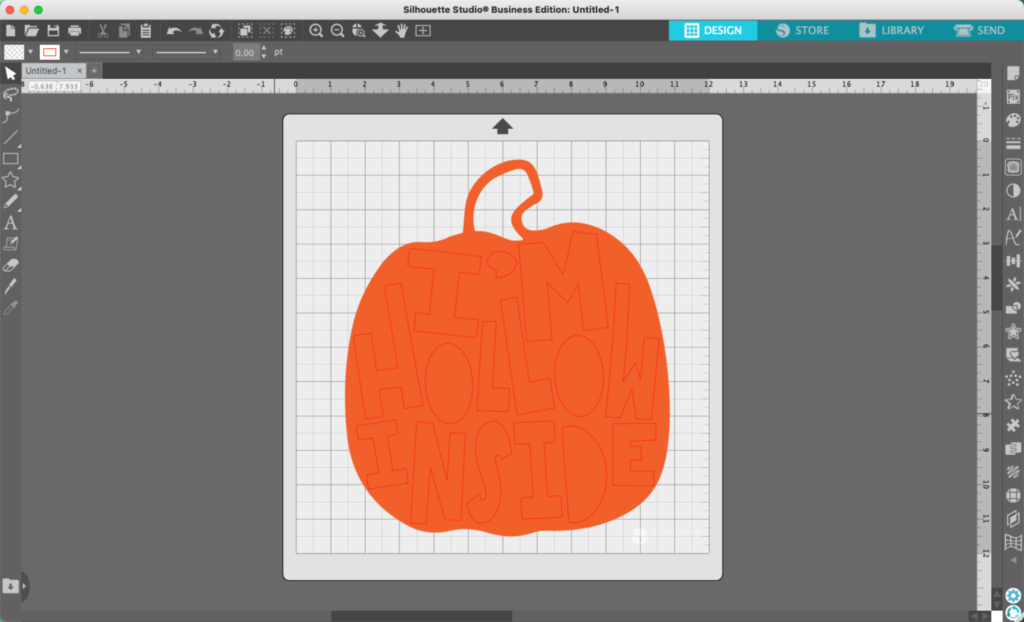
    9. Fill the pumpkin shape with color.

    Silhouette Studio screenshot - cuttingforbusiness.com.

    10. Select the pumpkin, then interior letters (and pieces if you have any), and head to ‘Object’, ‘Modify’, ‘Subtract’.

    Silhouette Studio screenshot - cuttingforbusiness.com.

    That’s it! You could follow these steps with so many different shapes and fonts for unlimited designs.

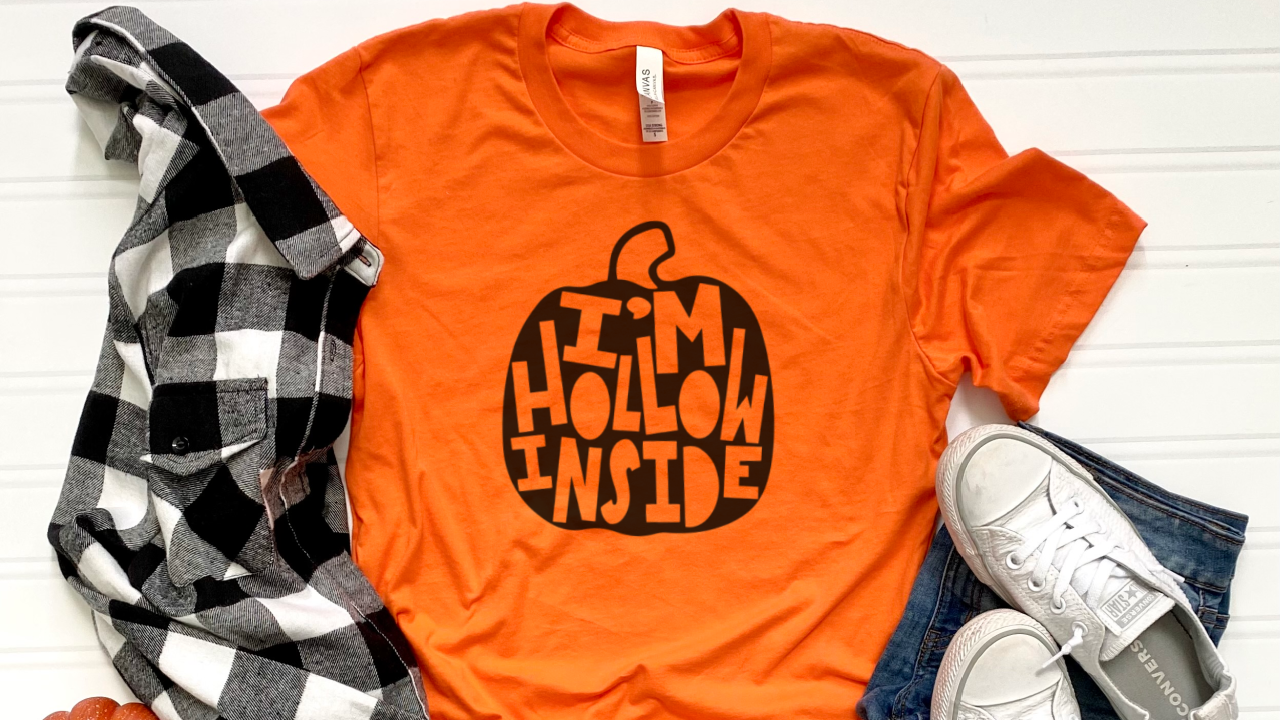
    I'm Hollow Inside t-shirt design tutorial - cuttingforbusiness.com

    To save your new SVG creation, head to ‘File’, ‘Save As’, ‘Save to Hard Drive’, name the file, then select ‘SVG’ from the dropdown menu.

    Want More SVG Tutorials?

    View more Design with Me SVG tutorials.
  • Silhouette Studio Design Tutorial: Fall Spiral SVG

    Design with Me is a new regular feature on Cutting for Business! Each Friday, I’ll bring you a new Silhouette Studio tutorial featuring how to design an SVG.

    Today, let’s look at creating a fall spiral SVG.

    Silhouette Studio Tutorial: Fall Spiral SVG - cuttingforbusiness.com

    There’s a great quote in the book The Great Gatsby about Fall. Since The Great Gatsby entered the public domain in 2020, I can safely use quotes from the book without fear of copyright infringement. Today, I’m turning a quote from the book into a fall cut file. Let’s look at it.

    Silhouette Studio Tutorial: Fall Spiral SVG

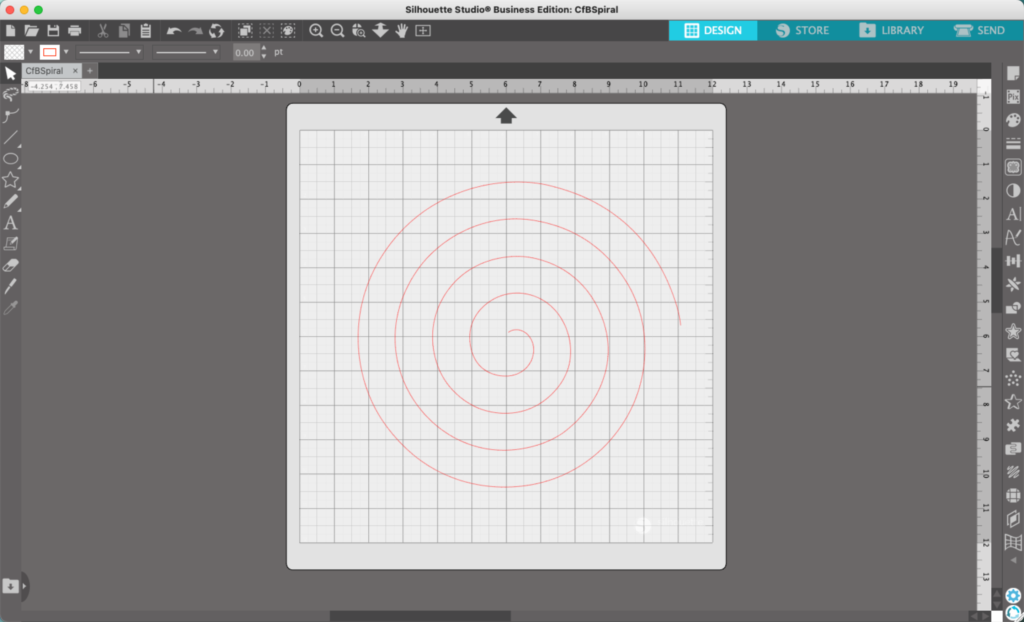
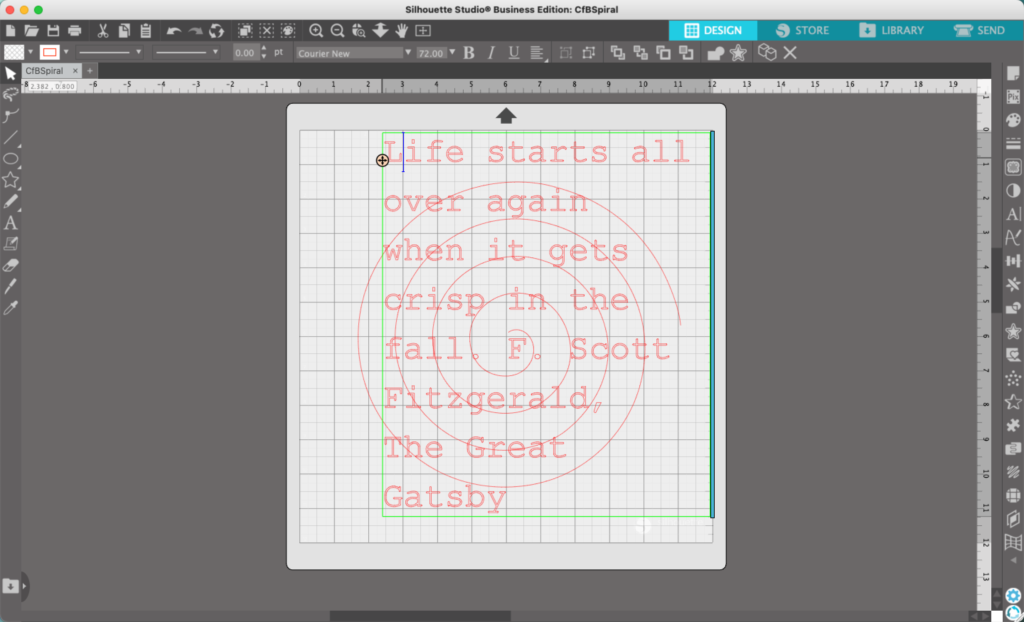
    1. Start by downloading this single line spiral I created. Then, open it in Silhouette Studio.
    Silhouette Studio screenshot - cuttingforbusiness.com.

    2. Type out a string of fall related words or a fall quote. For example: Fall, autumn, hayrides, flannel, pumpkins, and so on. In this tutorial, I’m using the quote, “Life starts all over again when it gets crisp in the fall.” from The Great Gatsby.

    Silhouette Studio screenshot - cuttingforbusiness.com.

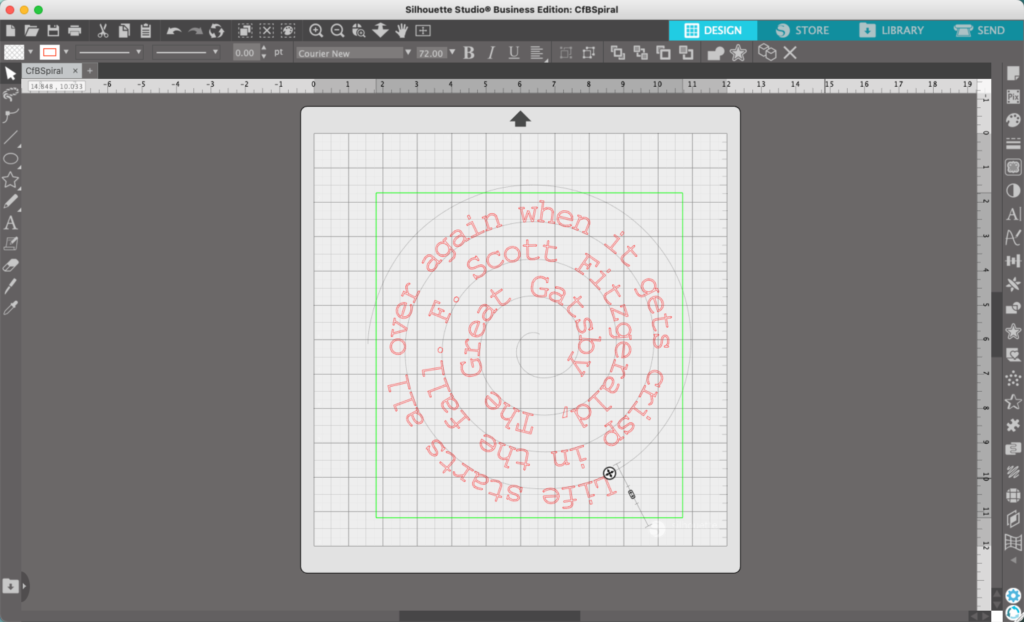
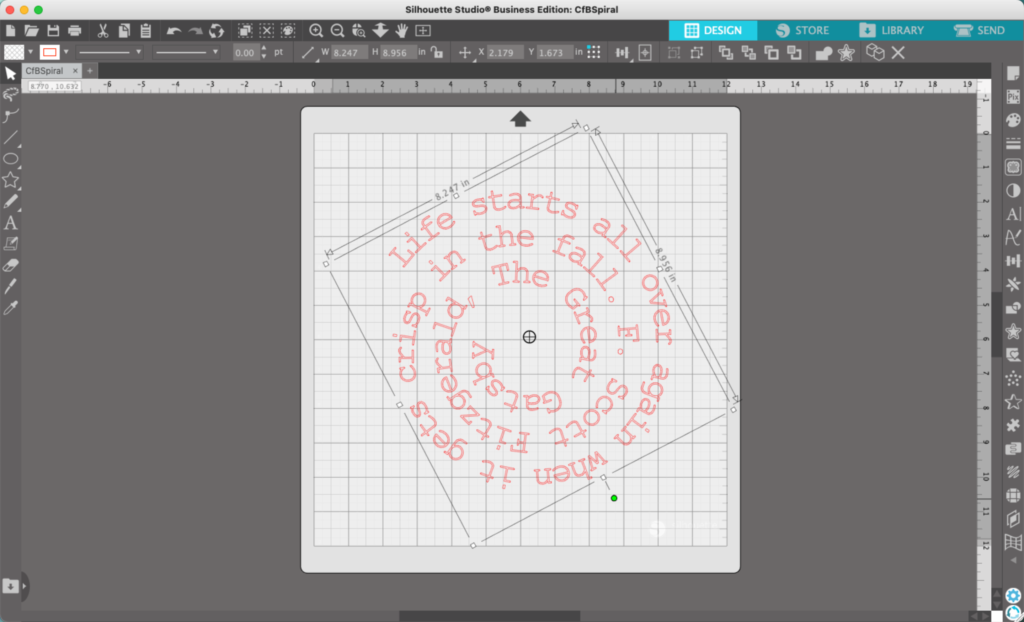
    3. Double click the text to make the round handle appear. Drag the round handle to the spiral. Now, this can be finicky in Silhouette Studio. My best advice is to zoom in. When zoomed in, you’ll have better control over the text and where it lands. When you are happy with the text on the spiral, click outside the text box.

    Silhouette Studio screenshot - cuttingforbusiness.com.

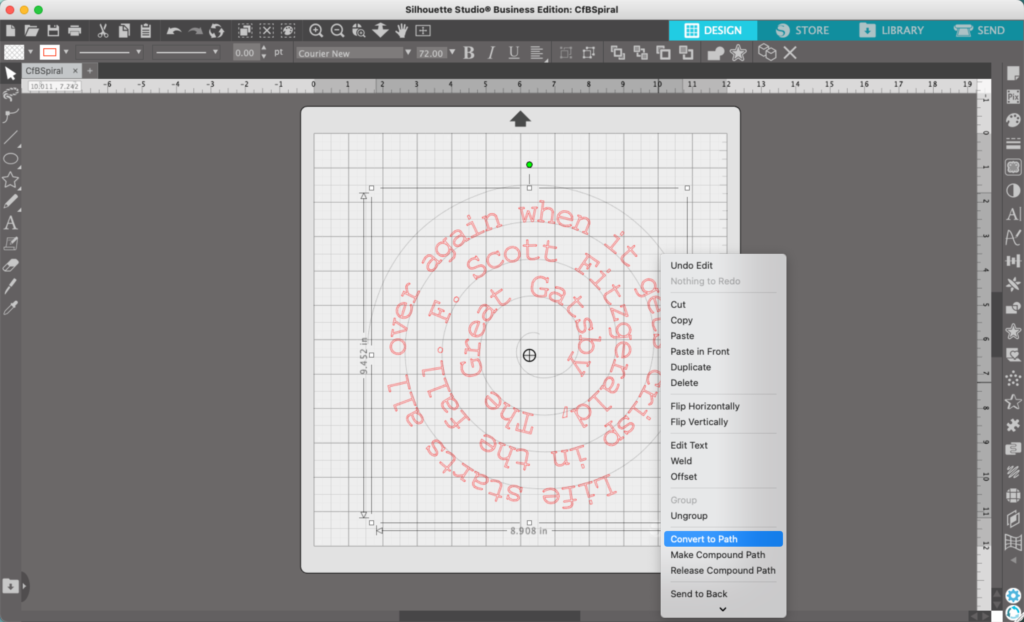
    4. Right click on the text and select ‘Convert to Path’.

    Silhouette Studio screenshot - cuttingforbusiness.com.

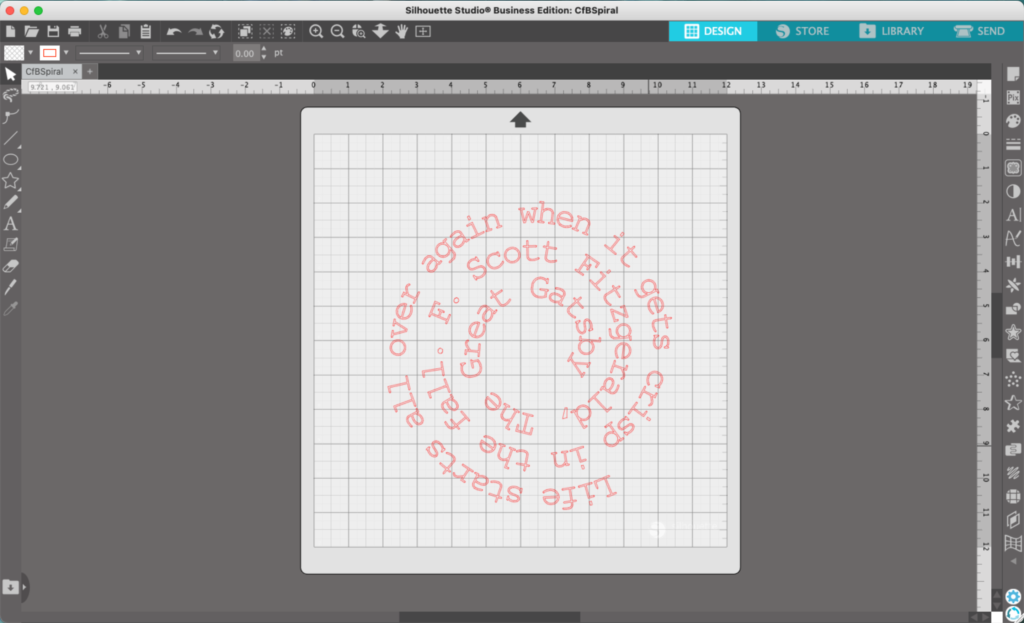
    5. You’ll notice that the spiral line turns from gray to red after converting it to a path. Click on the spiral line and delete it.

    Silhouette Studio screenshot - cuttingforbusiness.com.

    6. Now, depending on your quote, it may land with the beginning upside down like mine did. Click the text and rotate it using the green circle.

    Silhouette Studio screenshot - cuttingforbusiness.com.

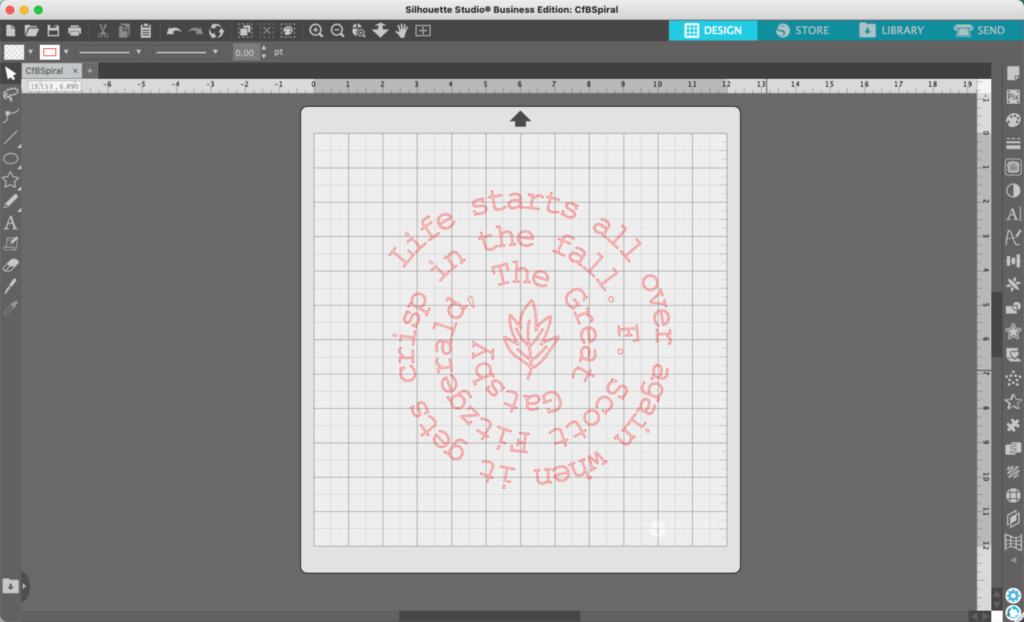
    7. Finish your design off with a dingbat in the middle. In this tutorial, a fall leaf from the Fall Feels font worked perfectly!

    Silhouette Studio screenshot - cuttingforbusiness.com.

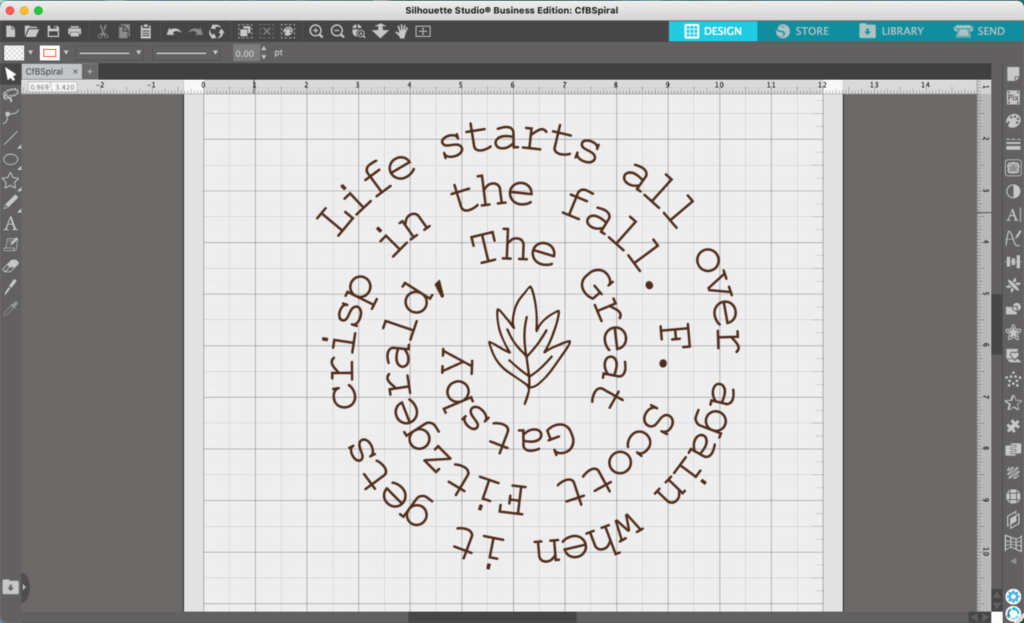
    Add some color and your design is finished.

    Silhouette Studio screenshot - cuttingforbusiness.com.
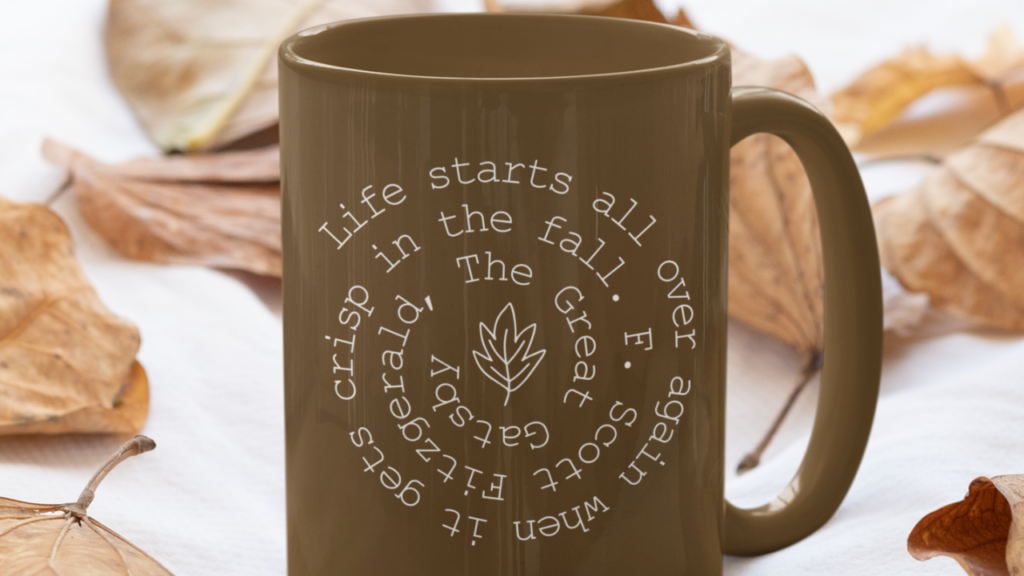
    Fall Spiral SVG Silhouette Design Tutorial - cuttingforbusiness.com.

    To save your new SVG creation, head to ‘File’, ‘Save As’, ‘Save to Hard Drive’, name the file, then select ‘SVG’ from the dropdown menu.

    Want More SVG Tutorials?

    View more Design with Me SVG tutorials.
  • Silhouette Studio Tutorial: How to Create Plaid Patterns

    Design with Me is a new regular feature on Cutting for Business! Each Friday, I’ll bring you a new Silhouette Studio tutorial featuring how to design an SVG.

    Fall is the perfect time to break out plaid everything. So, let’s look at a Silhouette Studio Tutorial How to Create Plaid Patterns – from scratch!

    Silhouette Studio Tutorial: How to Create Plaid Patterns - cuttingforbusiness.com

    Silhouette Studio Tutorial: How to Create Plaid Patterns

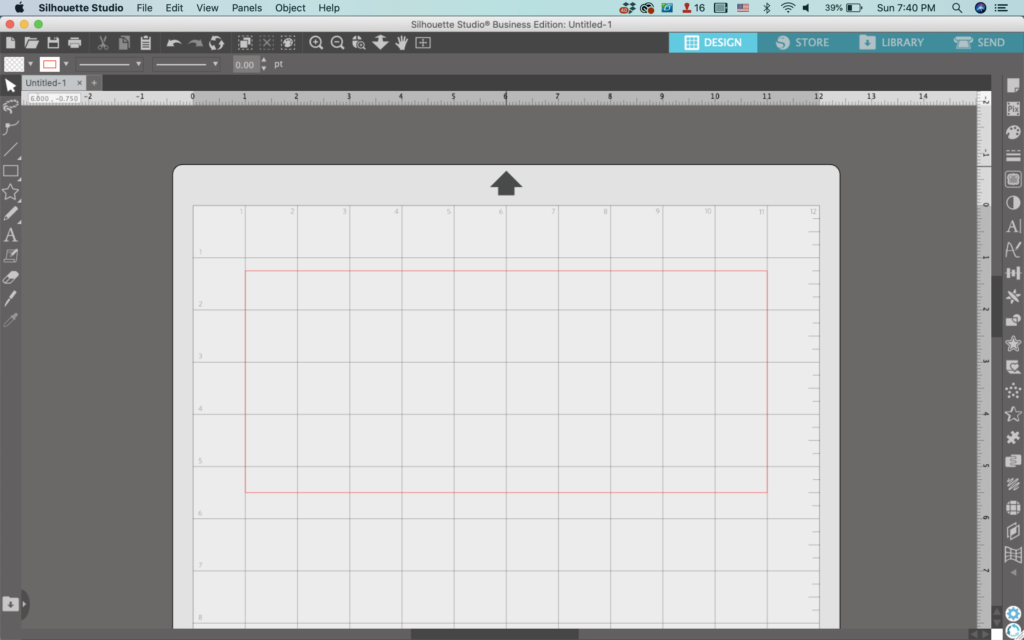
    1. Draw a large rectangle.
    Silhouette Studio Screenshot - cuttingforbusiness.com.

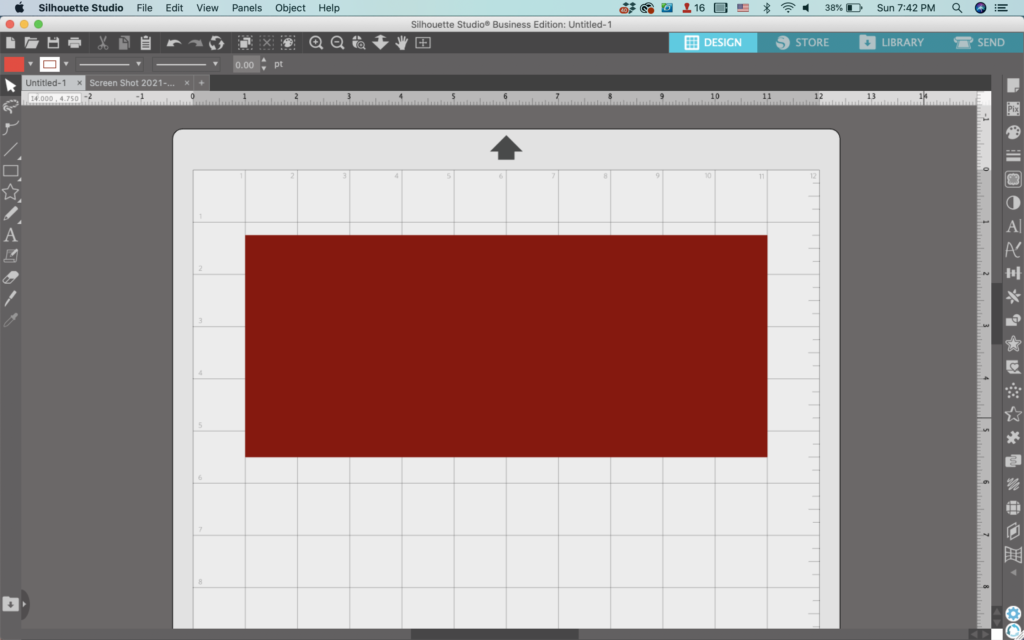
    2. Fill the rectangle with a color.

    Silhouette Studio Screenshot - cuttingforbusiness.com.

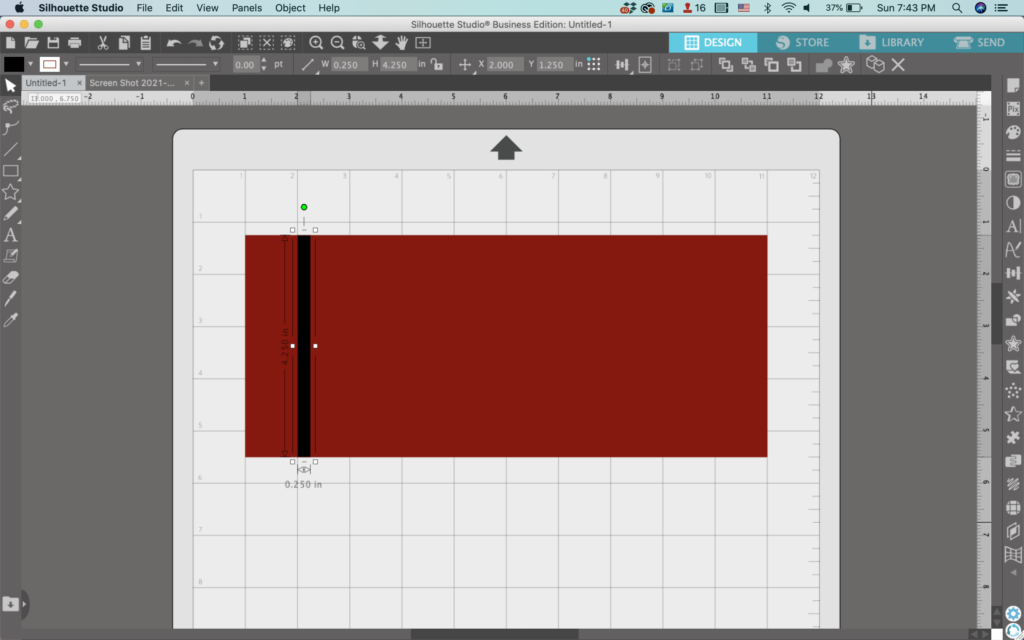
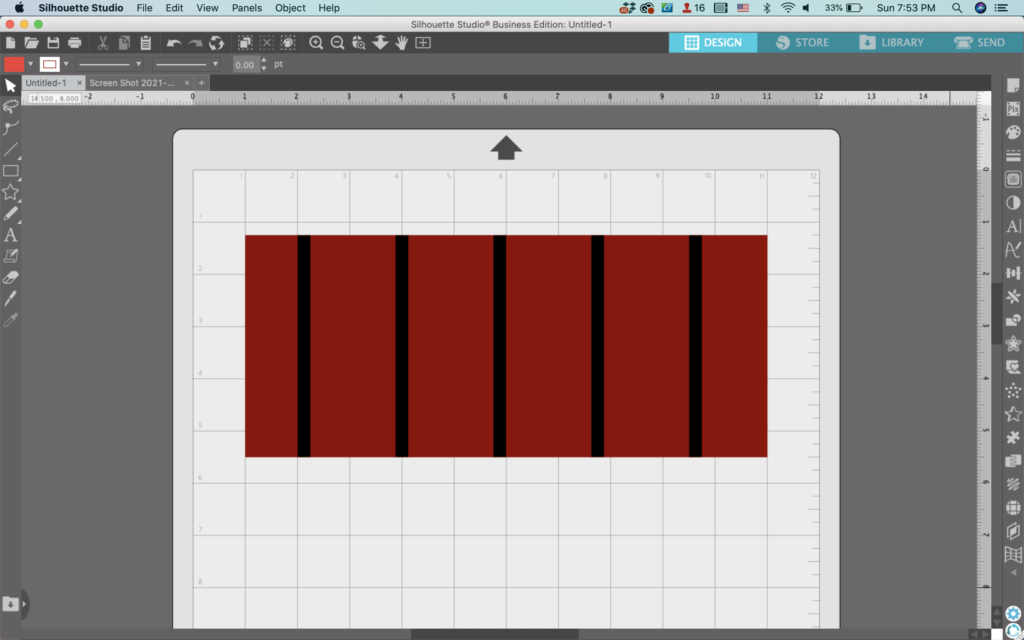
    3. Draw a long, skinny rectangle. Fill that rectangle with a color.

    Silhouette Studio Screenshot - cuttingforbusiness.com.

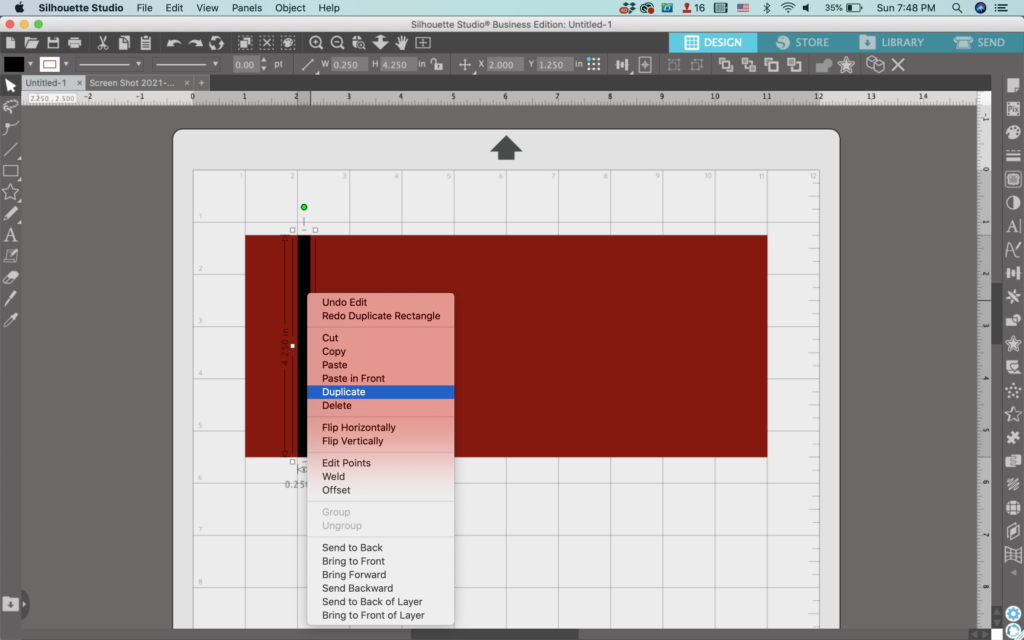
    4. Right click and select ‘Duplicate’ to make a copy. Do this several times so you have a number of copies.

    Silhouette Studio Screenshot - cuttingforbusiness.com.
    Silhouette Studio Screenshot - cuttingforbusiness.com.

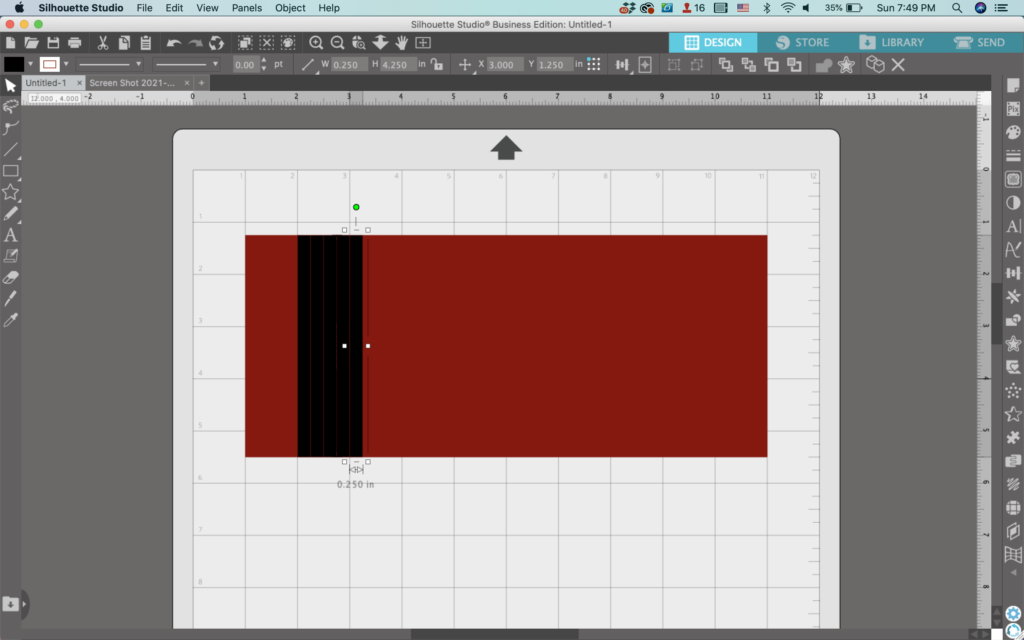
    5. Spread the copies out across the large rectangle.

    Silhouette Studio Screenshot - cuttingforbusiness.com.

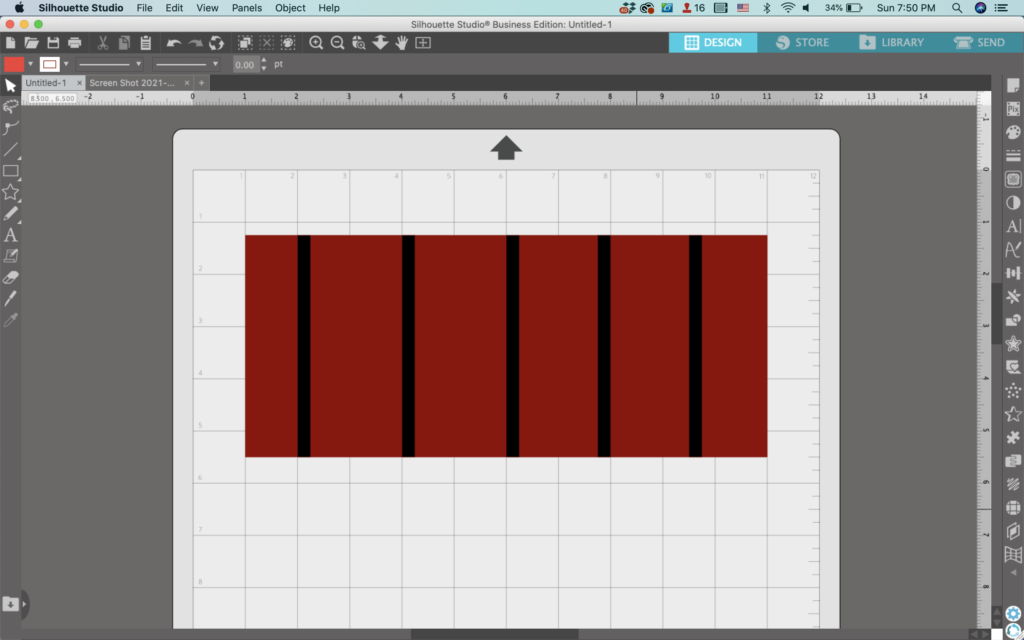
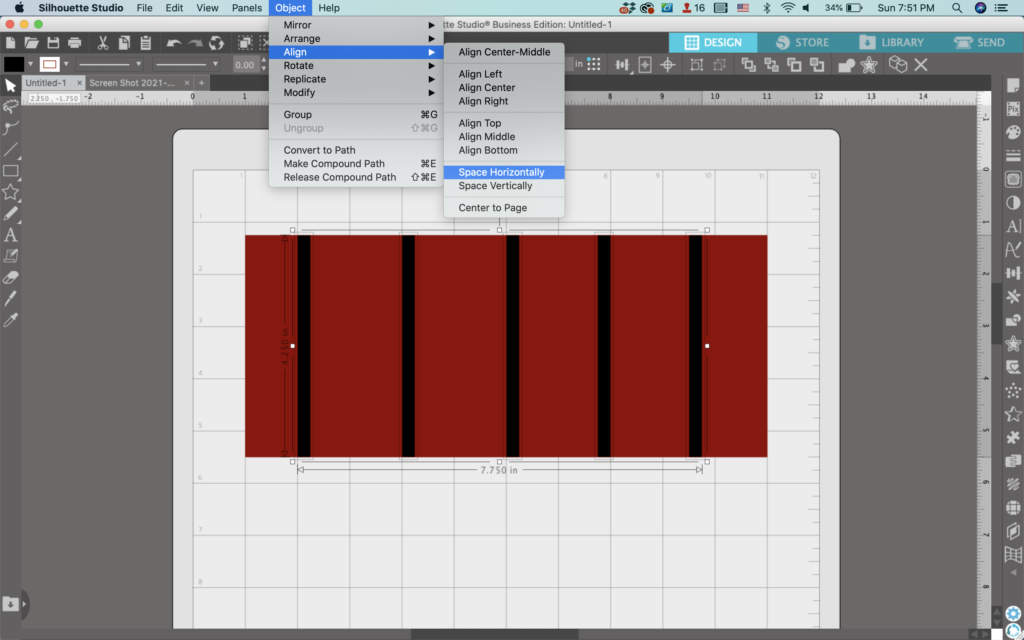
    6. Hold down the SHIFT key and select all the skinny rectangles. Then, navigate to ‘Object’, ‘Align’, and ‘Space Horizontally’. You’ll be left with perfectly spaced skinny rectangles.

    Silhouette Studio Screenshot - cuttingforbusiness.com.
    Silhouette Studio Screenshot - cuttingforbusiness.com.

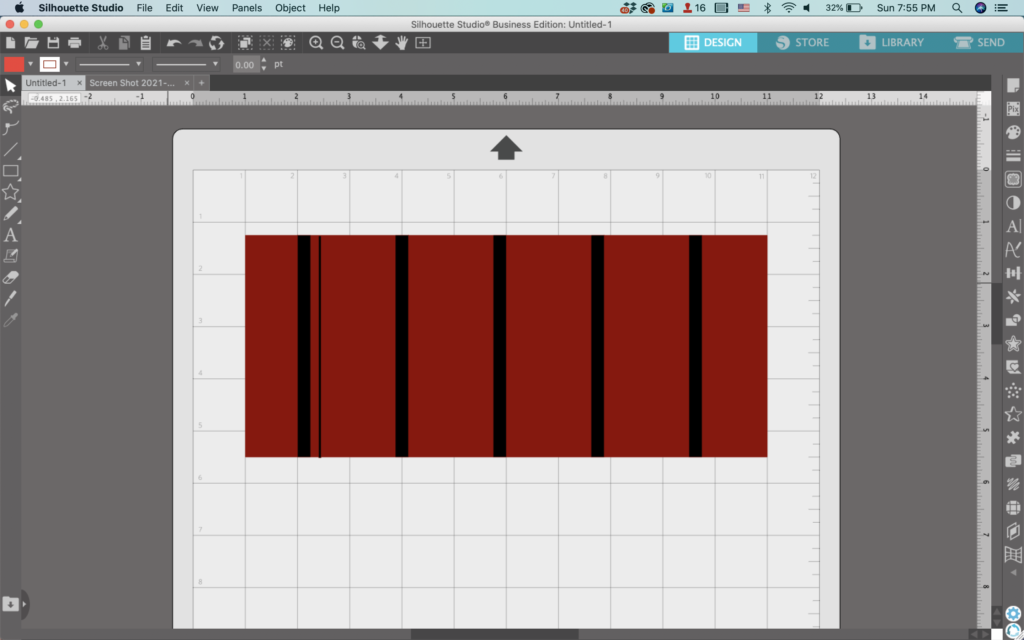
    7. Draw a skinny rectangle and place it to the right of the first skinny rectangle you made.

    Silhouette Studio Screenshot - cuttingforbusiness.com.

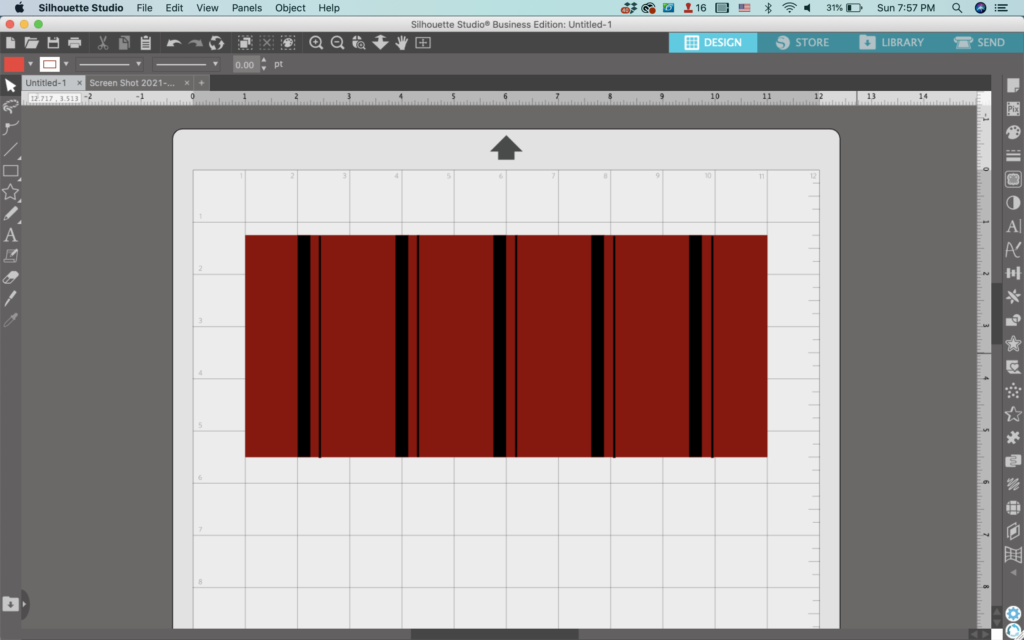
    8. Repeat steps 4, 5, and 6 to duplicate the rectangle, space the duplicates out, then use the align command to space them horizontally.

    Silhouette Studio Screenshot - cuttingforbusiness.com.

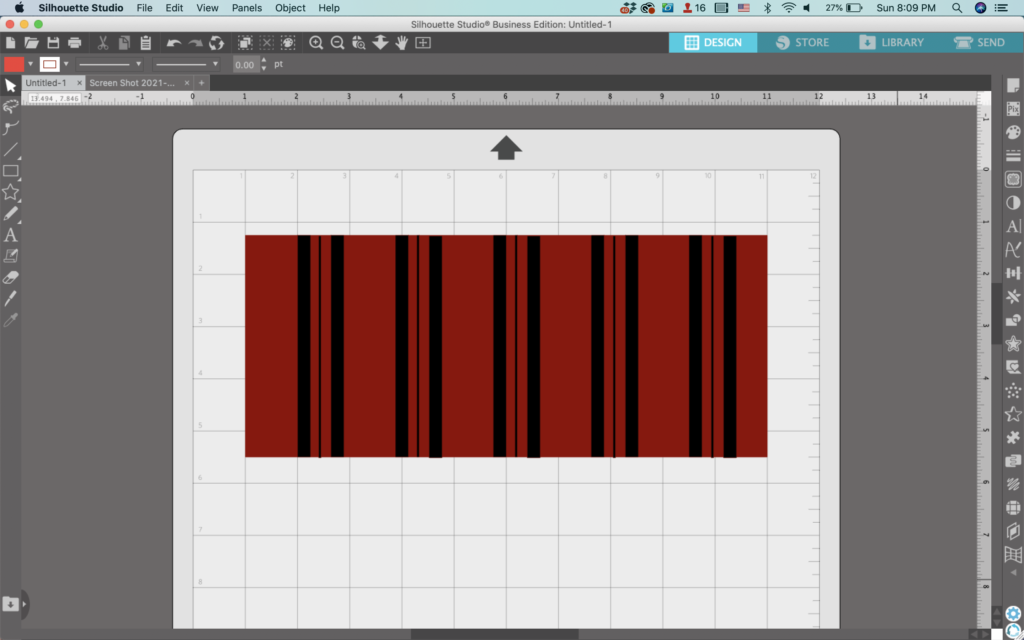
    9. Repeat steps 4, 5, and 6 several times until you are happy with the amount of vertical lines. Remember, it is your choice… you are the designer.

    Silhouette Studio Screenshot - cuttingforbusiness.com.

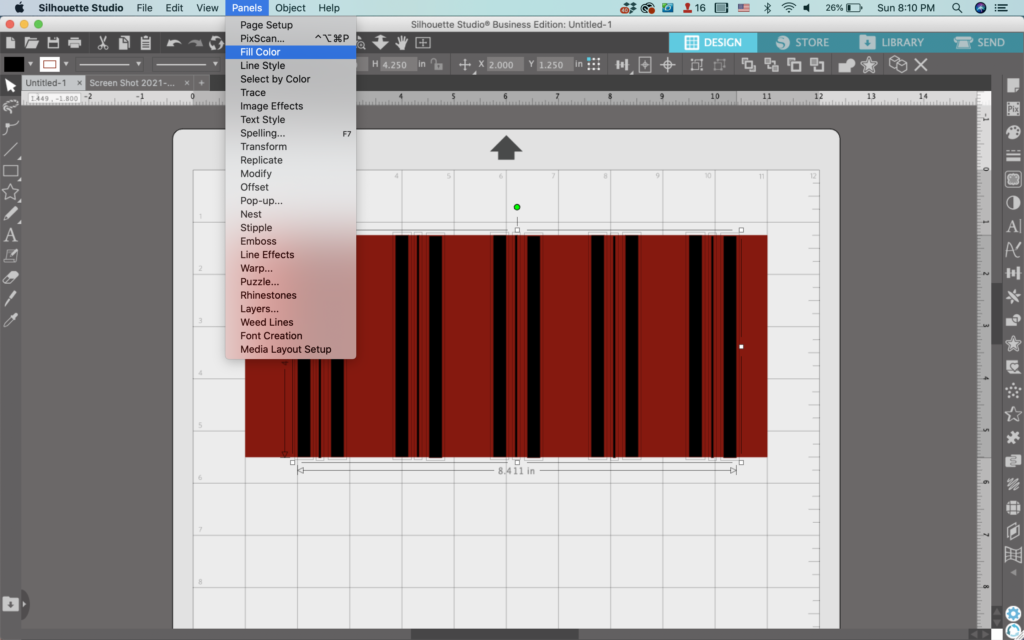
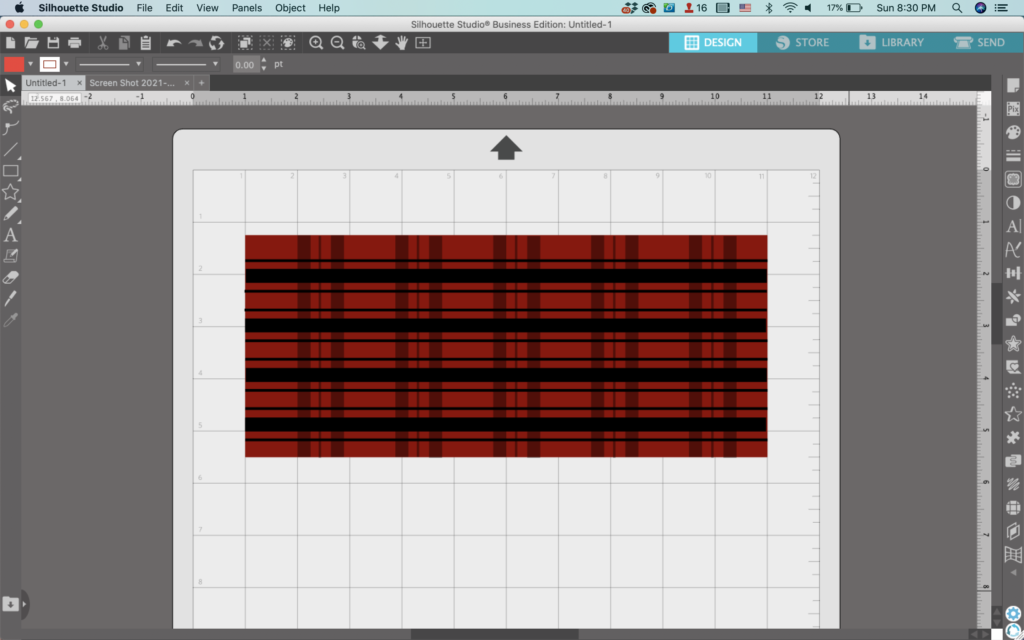
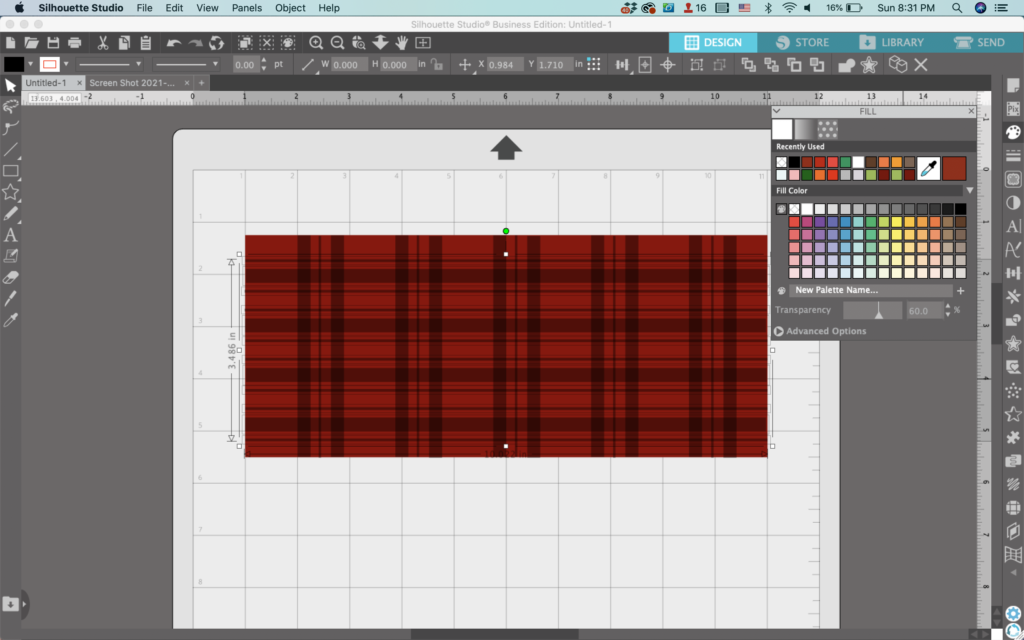
    10. Select all the black rectangles. Then, navigate to ‘Panels’, then ‘Fill Color’.

    Silhouette Studio Screenshot - cuttingforbusiness.com.

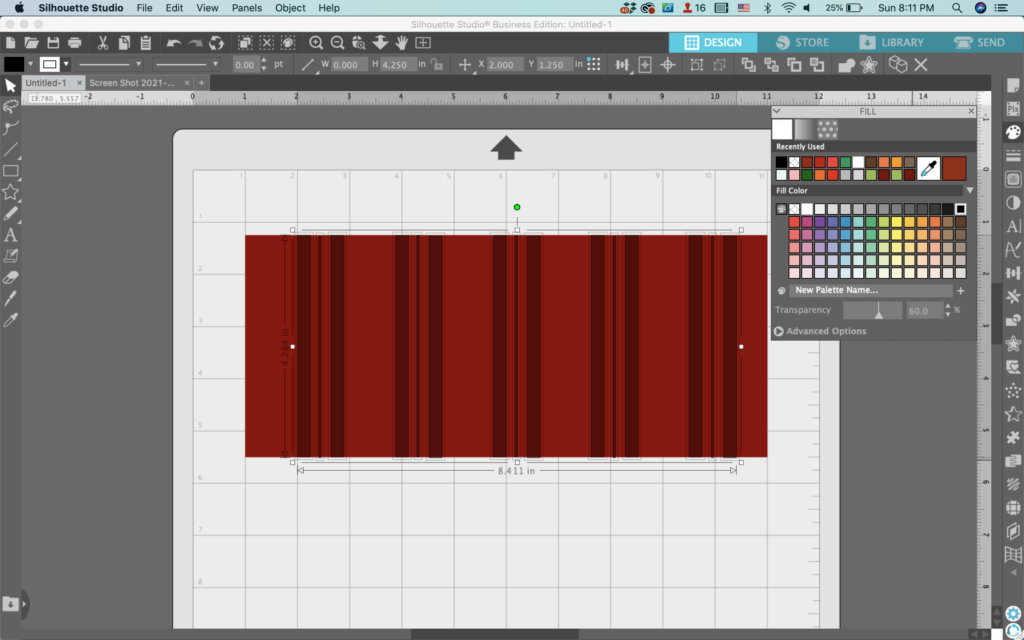
    11. Slide the transparency slider over to make them transparent. In this tutorial, I chose 60% transparency, but again, it’s your choice.

    Silhouette Studio Screenshot - cuttingforbusiness.com.

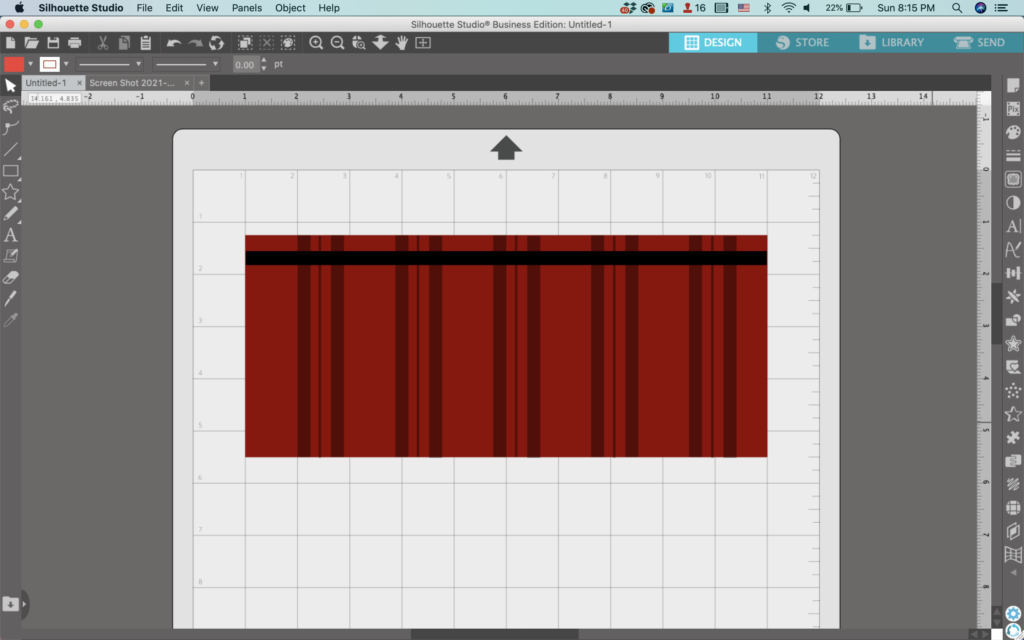
    12. Now, draw a skinny rectangle that is horizontal instead of vertical.

    Silhouette Studio Screenshot - cuttingforbusiness.com.

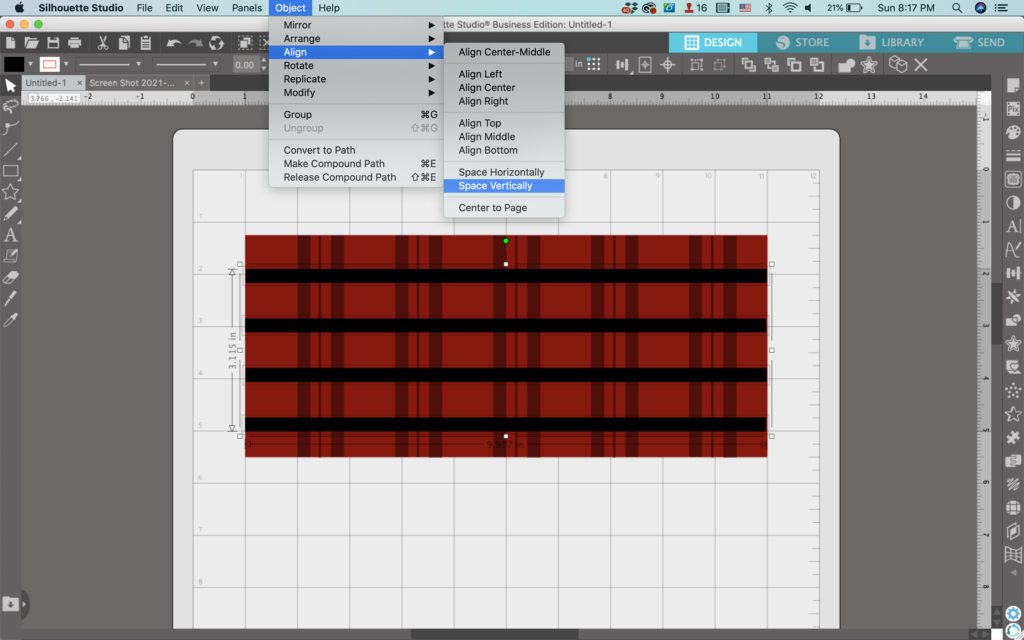
    13. Again, repeat steps 4, 5, and 6 multiple times to make more horizontal rectangles. Spread them out, then align them vertically.

    Silhouette Studio Screenshot - cuttingforbusiness.com.

    14. Add more horizontally rectangles, remembering to space them vertically.

    Silhouette Studio Screenshot - cuttingforbusiness.com.

    15. Select all the horizontal lines and again navigate to ‘Panels’, ‘Fill Color’. Slide the transparency slider over to the same amount you did with the vertical lines.

    Silhouette Studio Screenshot - cuttingforbusiness.com.

    16. Voila! Instant plaid. Use it in a design, printable, or however else you’d like.

    Don’t Forget to Save!

    To save your new SVG creation, head to ‘File’, ‘Save As’, ‘Save to Hard Drive’, name the file, then select ‘SVG’ from the dropdown menu.

    Want More SVG Tutorials?

    View more Design with Me SVG tutorials.
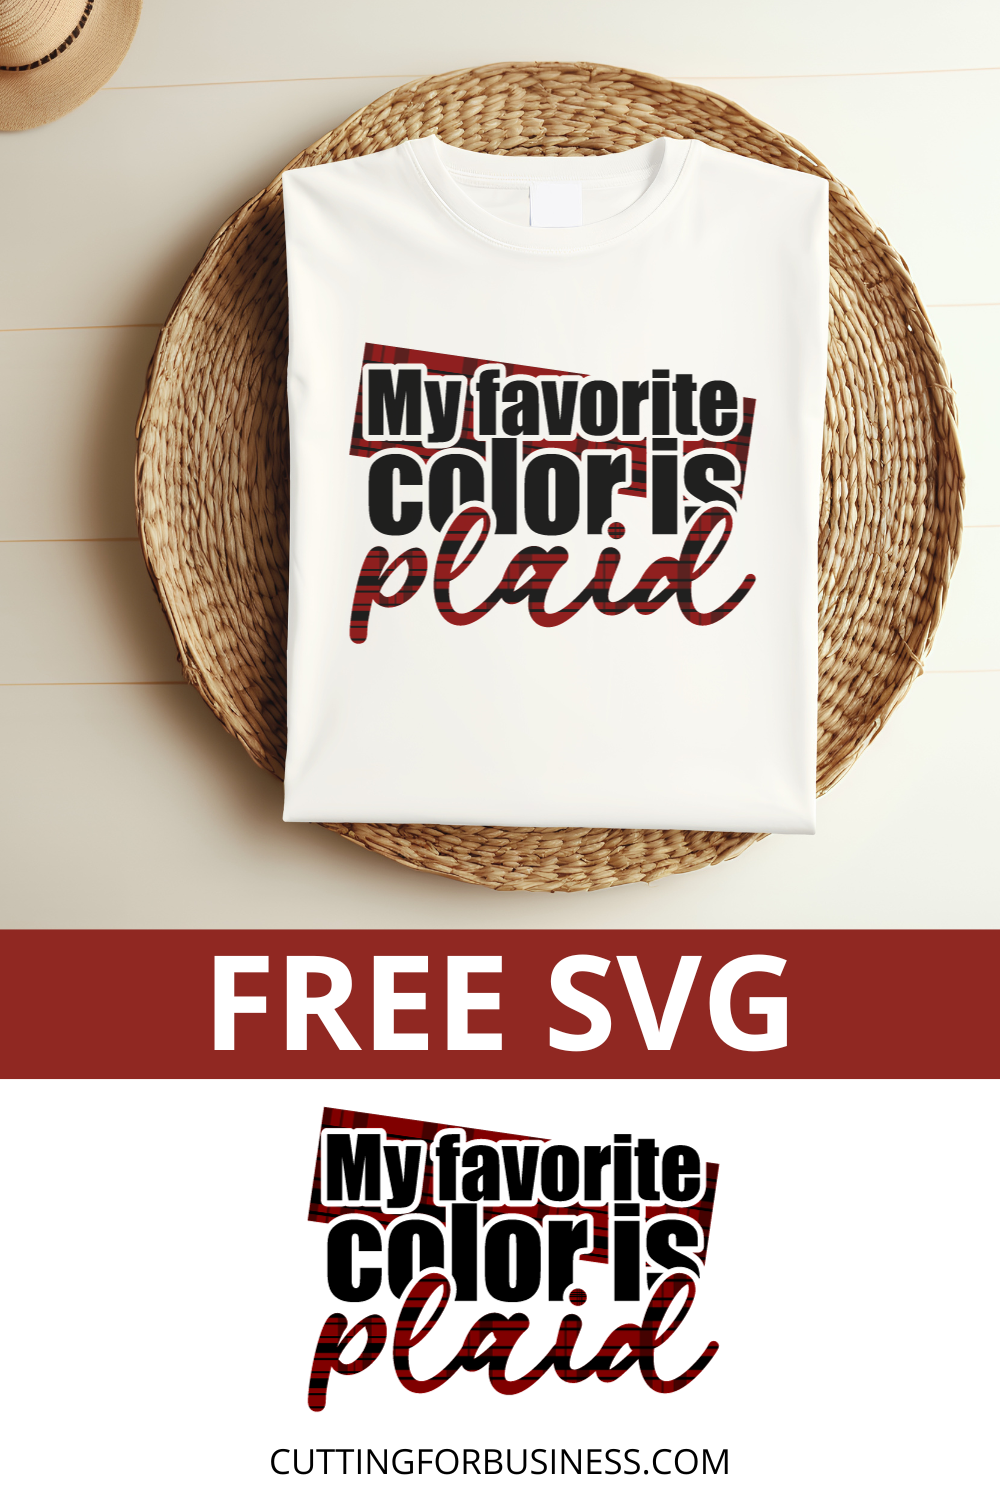
    Free My Favorite Color is Plaid SVG - cuttingforbusiness.com
  • Silhouette Studio Tutorial – How to Draw Fireworks

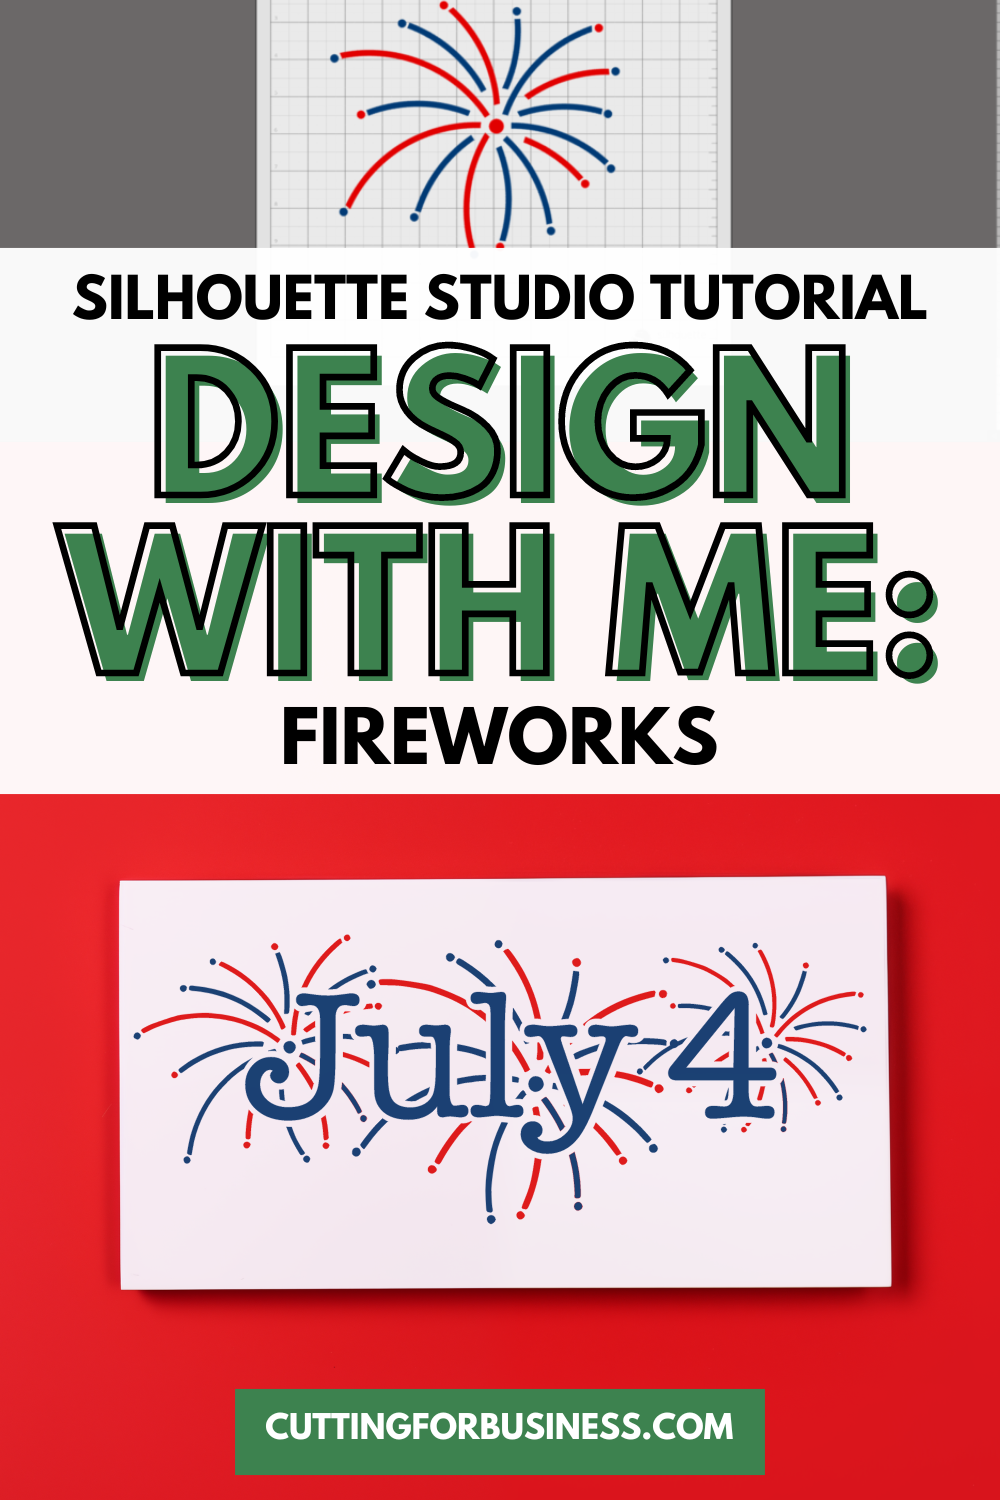
    It seems that fireworks and summer go hand in hand. With July 4th coming up soon, I figured today would be perfect to take a few minutes to share a Silhouette Studio tutorial to draw fireworks.

    Silhouette Studio Tutorial - How to Draw Fireworks - cuttingforbusiness.com

    Tutorial: How to Draw Fireworks

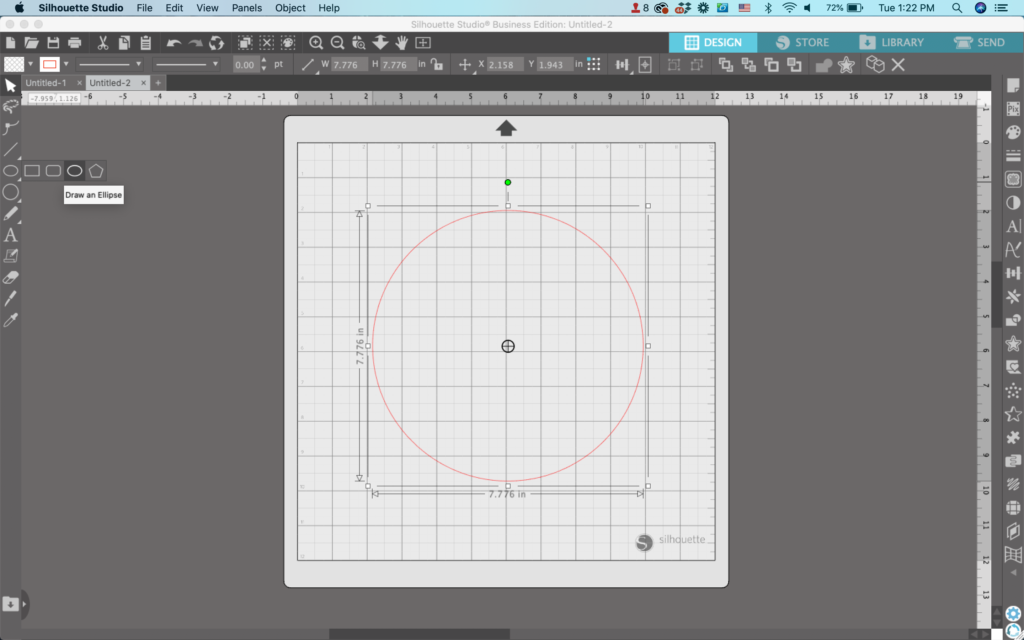
    1. Draw a circle in Silhouette Studio using the ‘Draw Ellipse’ tool. Be sure to hold down the SHIFT key to make it a perfect circle.
    Silhouette Studio Screenshot - cuttingforbusiness.com

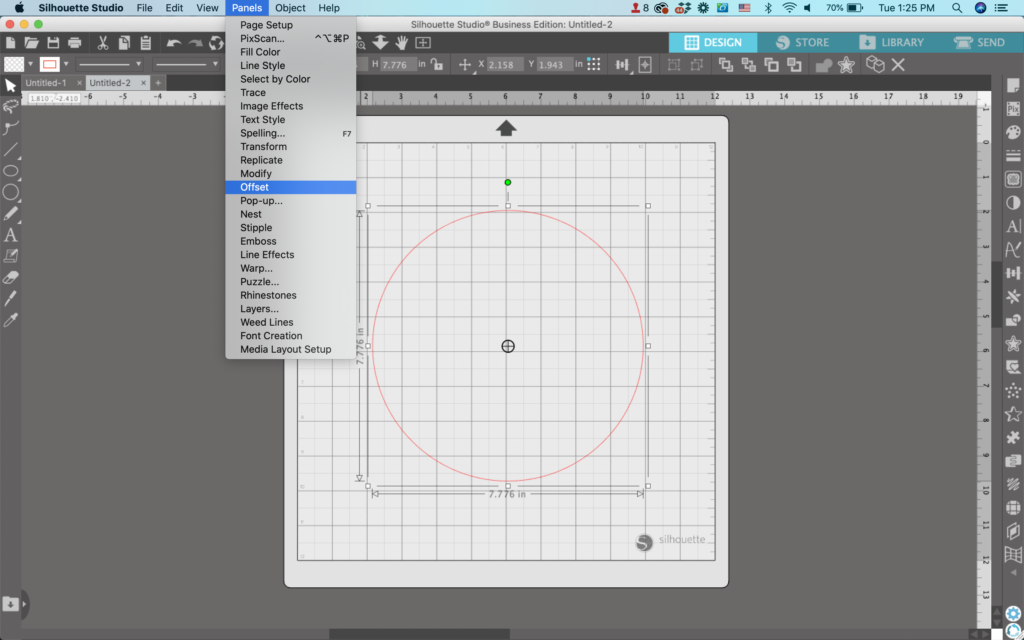
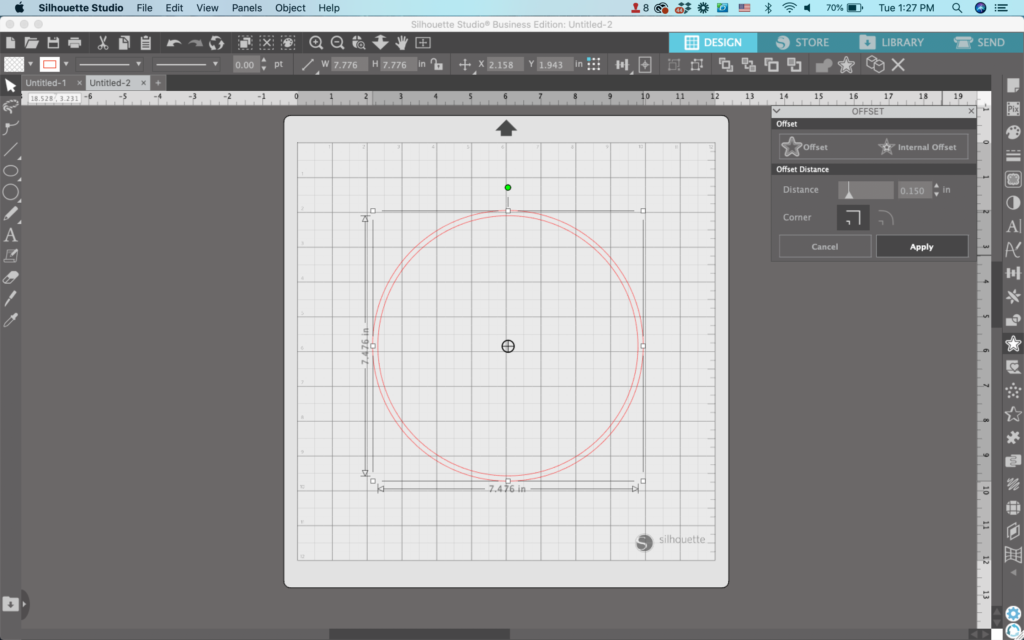
    2. Navigate to ‘Panels’, ‘Offset’. Then, create an offset of your circle. The thickness is your choice, but I stick towards a thinner offset.

    Silhouette Studio Screenshot - cuttingforbusiness.com
    Silhouette Studio Screenshot - cuttingforbusiness.com

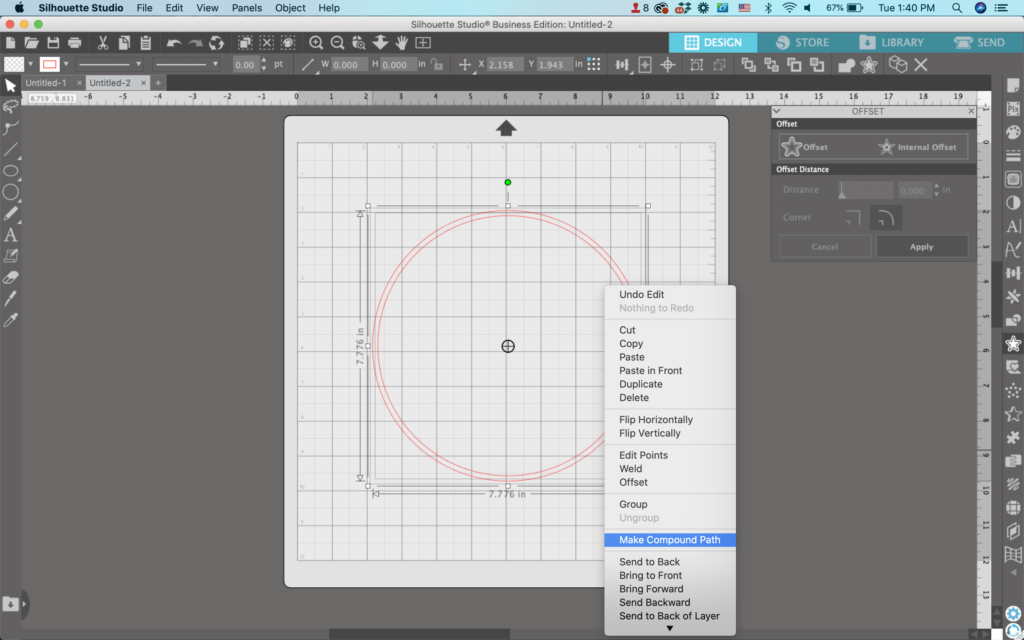
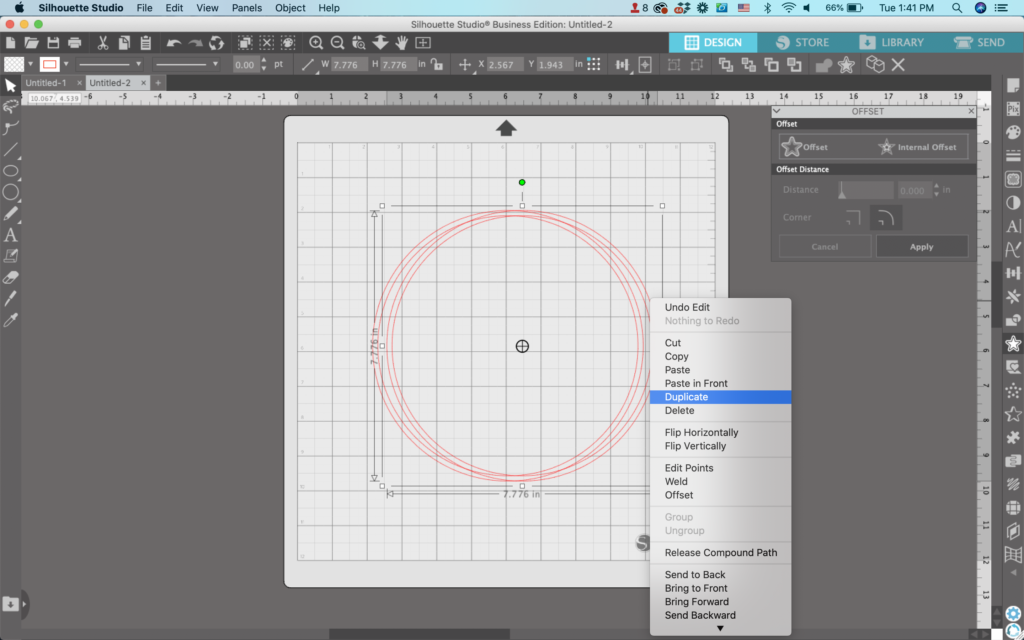
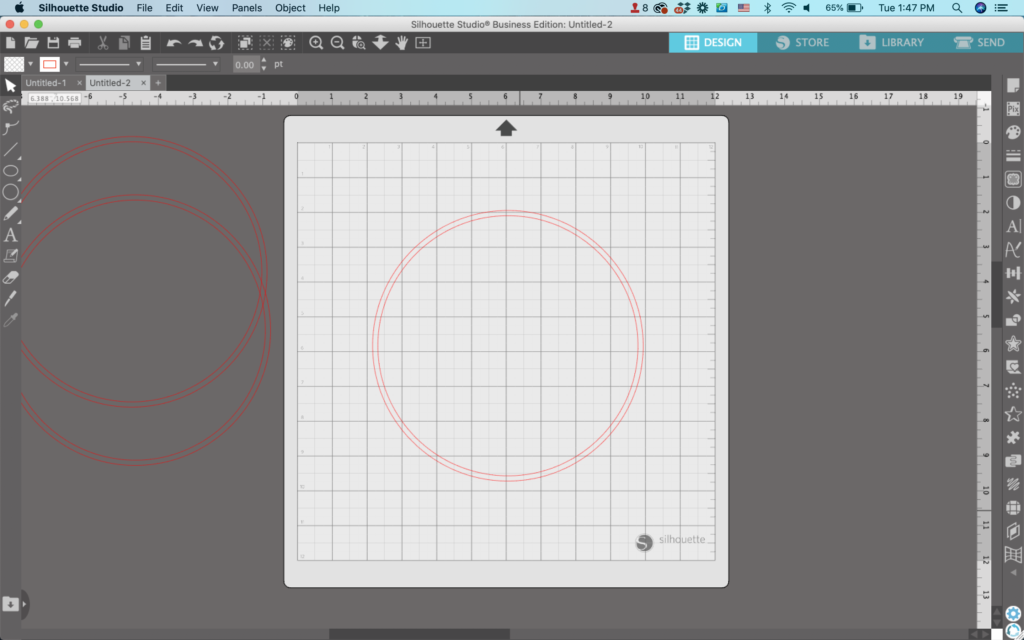
    3. Select both circles and right click, then choose ‘Make Compound Path’.

    Silhouette Studio Screenshot - cuttingforbusiness.com

    4. Right click again and duplicate your circle a few times. Then, move the duplicates off to the side.

    Silhouette Studio Screenshot - cuttingforbusiness.com
    Silhouette Studio Screenshot - cuttingforbusiness.com

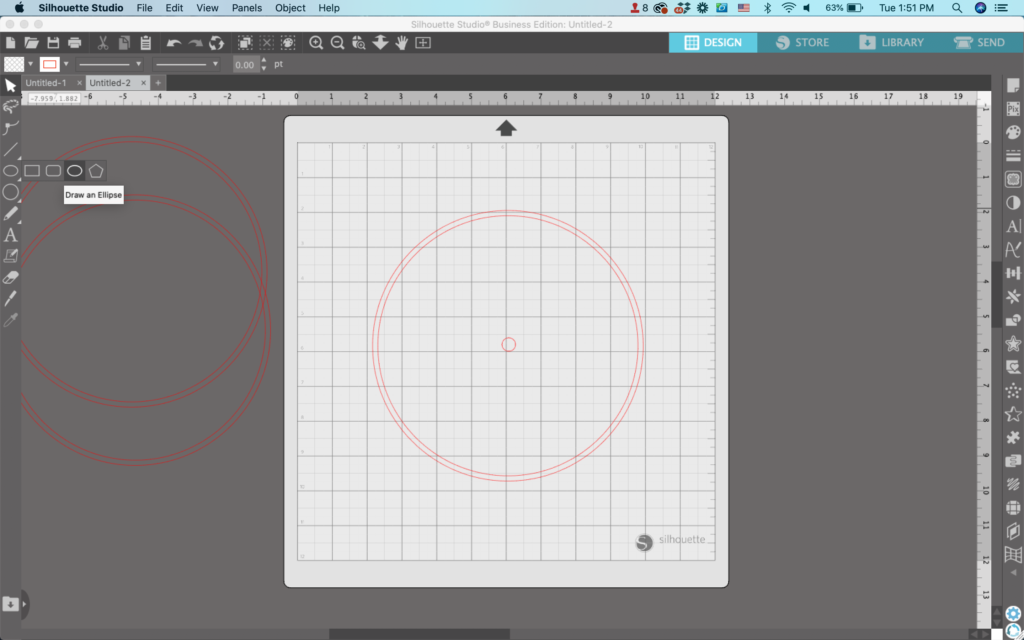
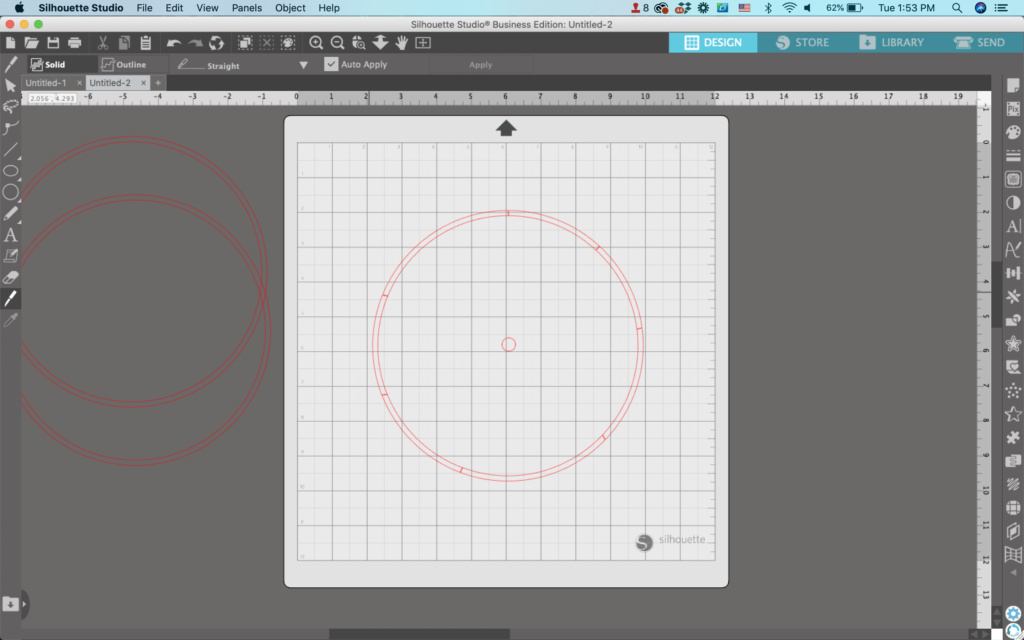
    5. Draw a tiny circle towards the middle of the mat. Again, hold down the SHIFT key to make a perfect circle.

    Silhouette Studio Screenshot - cuttingforbusiness.com

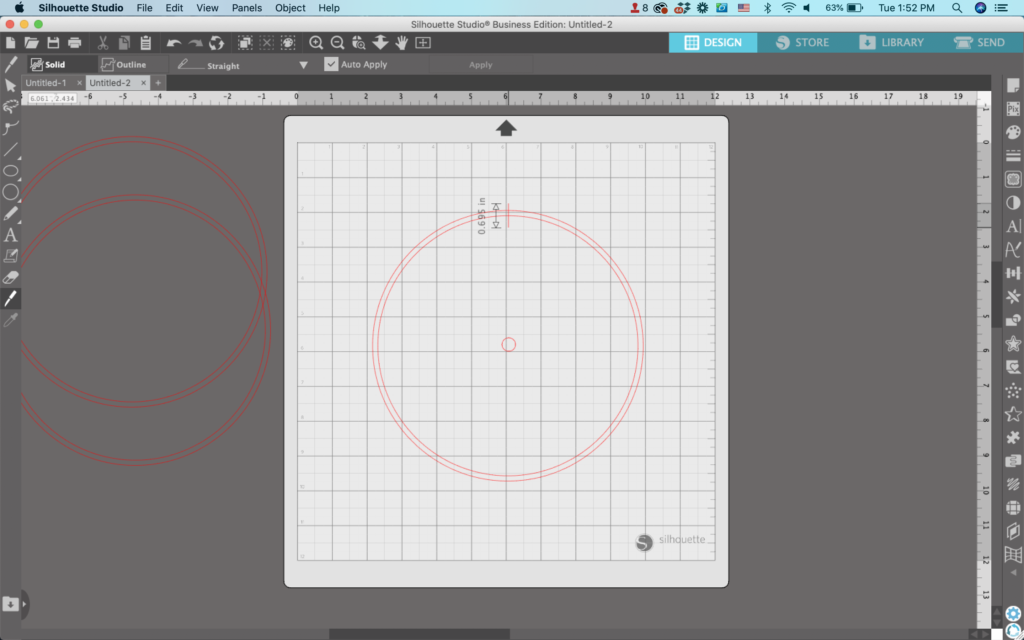
    6. Using the knife tool, cut the circle into pieces. No need for precision.

    Silhouette Studio Screenshot - cuttingforbusiness.com
    Silhouette Studio Screenshot - cuttingforbusiness.com

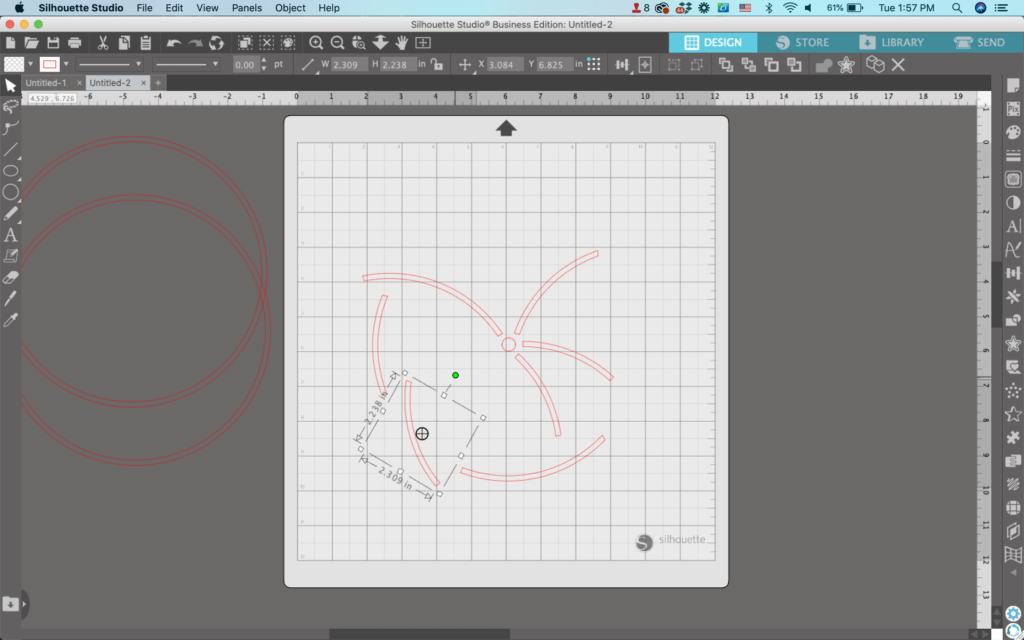
    7. Drag the pieces of the circle around the tiny circle to start constructing your firework. Use the green circle to rotate the pieces.

    Silhouette Studio Screenshot - cuttingforbusiness.com

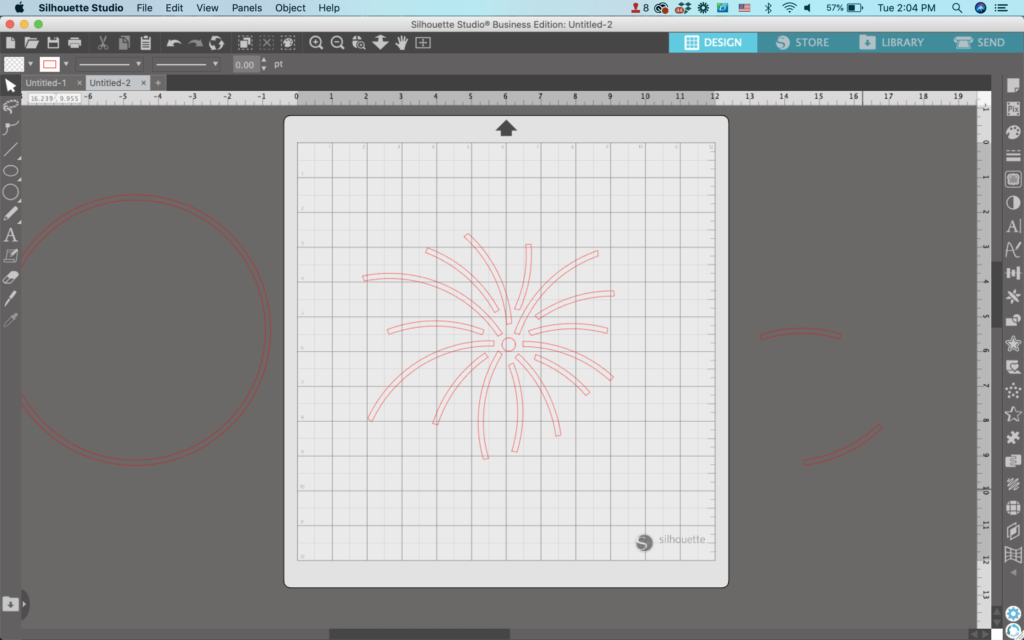
    8. When you’ve placed all the pieces from the first circle, use a knife to cut the next circle and place those pieces. The placement and number of pieces you use in your firework are up to you.

    Silhouette Studio Screenshot - cuttingforbusiness.com

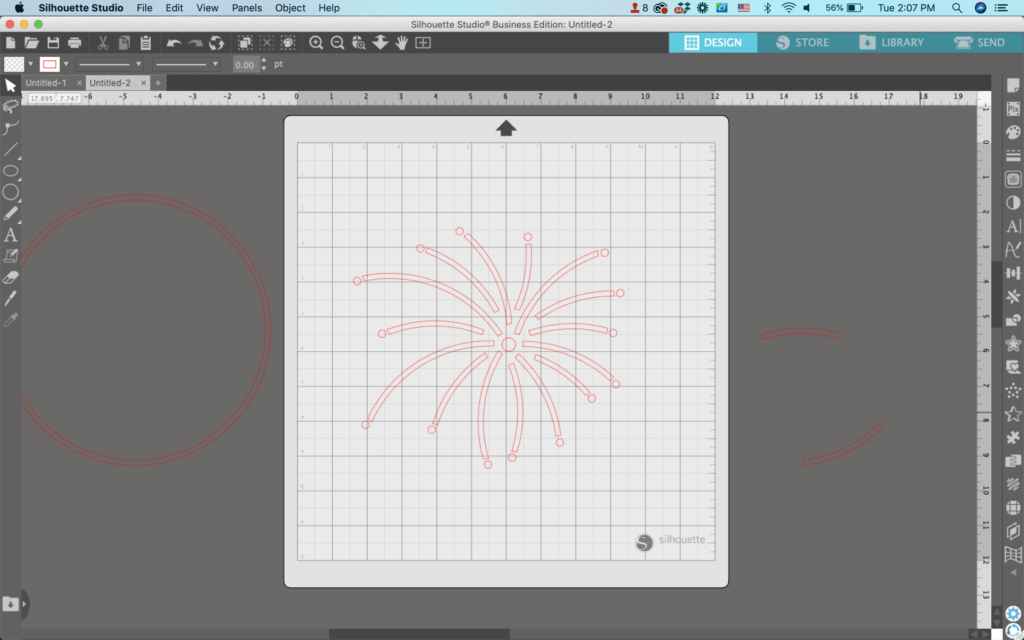
    9. Add circles to the tips of each firework.

    Silhouette Studio Screenshot - cuttingforbusiness.com

    10. Delete any remaining circles/circle pieces. Then, add color or additional details.
    Silhouette Studio Screenshot - cuttingforbusiness.com

    That’s it! Your design is ready to go!

    Don’t Forget to Save!

    To save your new SVG creation, head to ‘File’, ‘Save As’, ‘Save to Hard Drive’, name the file, then select ‘SVG’ from the dropdown menu.
    Want More SVG Tutorials?

    View more Design with Me SVG tutorials.