Category: Social Media

  • How to Sell Crafts on Instagram

    Whether you are looking for an alternative to Facebook or Etsy, or if you want to broaden your customer base, Instagram may be right for you. If you aren’t familiar with Instagram, it is an image and video social media site – utilized mainly from phones. Instagram boosts over 200 million registered users, and is a great place to offer items for sale. It is free, and best of all, the handmade community is exploding on Instagram.

    How to Get Started on Instagram

    1) Download Instagram from the App Store or Google Play.

    2) Register for an account.

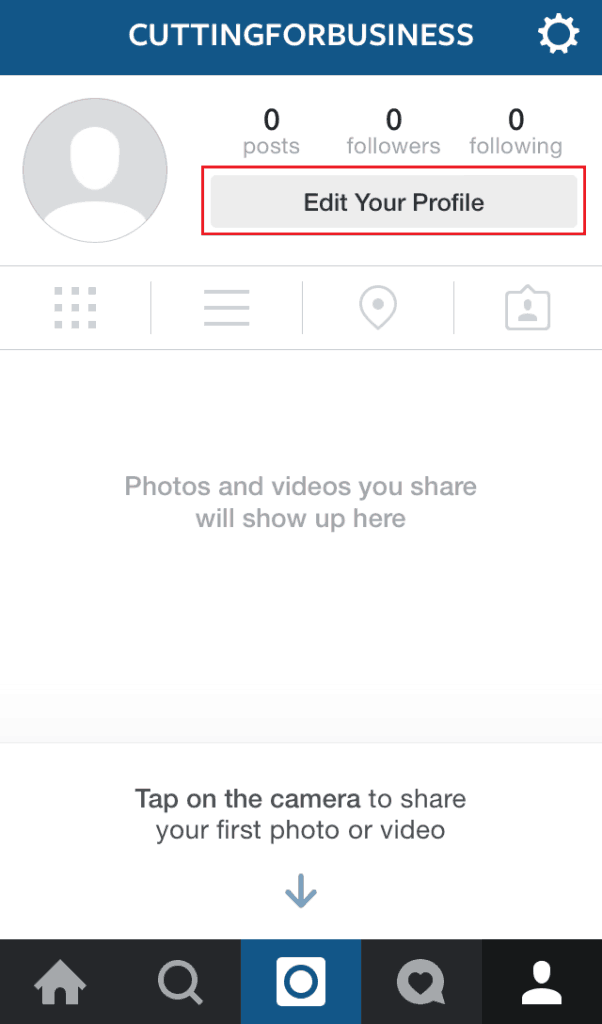
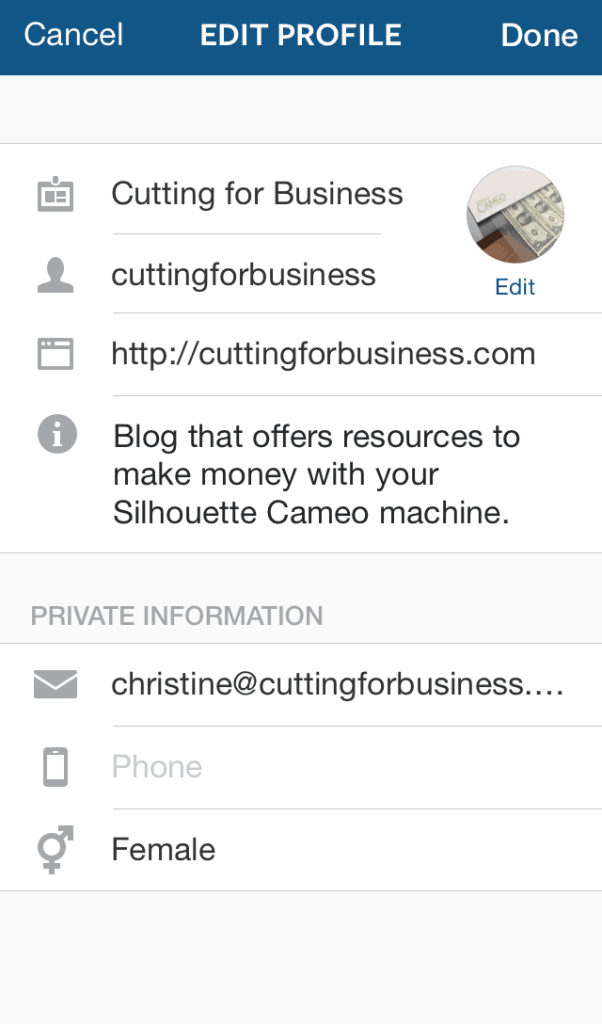
    3) After registering, the first thing you will want to do is update your profile. From the main screen, choose “Edit Your Profile”. You’ll want to add your business name, website address or store URL, and a short description about your company. This is the only place on Instagram you’ll be able to list your business details, so be sure to fill it in.
    Sell your Silhouette Cameo crafts on Instagram - cuttingforbusiness.com Sell your Silhouette Cameo crafts on Instagram - cuttingforbusiness.com

    4) That’s it! Your account is ready to go!

    Best Practices for Instagram

    Don’t be intimidated by Instagram. Once you get the hang of it, it’s really easy to use.

    • Instagram is highly visual, and beautiful photos perform best.
    • The text that accompanies your picture is referred to as a caption.
    • All images must be square. Update: All images do not have to be square.
    • Filters are overlays that can be applied to your photos when you upload them to Instagram. Try not to drastically change the look or feel of your photo by using filters. Personally, I skip using filters most of the time.
    • Hashtags are a must. A hashtag is merely a keyword with the “#” sign before it, and a way to categorize images across all of Instagram. When you put a hashtag in your caption, other people can tap on it and see all the other images that have the same hashtag.
    • Your profile must be public to run a business. Put simply, people can’t follow your business if it is set to private.

    An additional method to set up a store on Instagram

    There are also a number of websites and apps that will integrate with Instagram to help you sell, keep track of orders, and some accept payments for you. The easiest one to use based on my quick trial of a handful of them is Instaorders. Setting it up and getting running takes just a few minutes. I won’t add a full tutorial, as there isn’t much to it. First, visit instaorders.com. Next, sign in with your Instagram log in information, and fill out your profile, then price your items. That’s it! Publish your new store link to Instagram and start collecting orders!

    Ready to really rock hashtags on your new Instagram account? Head to this post for an easy to implement strategy.

    Save this post to Pinterest:
    How to Sell Crafts on Instagram - Great for Silhouette Cameo or Cricut small business owners - by cuttingforbusiness.com

    Disclosure: I received no compensation from the companies mentioned in this article, nor was I approached by any company to write this article.
  • How to Sell Crafts on Facebook

    Wondering about a good place to sell your handmade crafts? Consider Facebook. Facebook is the largest social media network in the world, with nearly two billion people using the network (as of 2022).

    Let’s take a look at how to sell crafts on Facebook.

    How to Sell Crafts on Facebook

    Why You Need a Facebook Business Page

    As I’ve mentioned in my last post, it is against the terms and conditions of Facebook to use a personal page for business purposes. Instead, you’ll need to create a Facebook Business Page.

    How to Sell Crafts on Facebook - An overview of 6 ways crafters can use the network in the craft business - by cuttingforbusiness.com.

    How to Sell Directly From Your Facebook Business Page

    You can think of your Facebook Business Page as your own little slice of Facebook.

    There are two easy ways to sell directly on your Facebook Page:

    • List the product on your website, Etsy Shop, Goimagine Shop and then post a link to your product on your Facebook Page. As your followers see your link, they can click it to be taken to your shop and purchase the product.
      • Pros
        • Listing your product on Facebook will make it appear on the feed of your followers. This can then be shared by your followers with their friends, and their friends, and so on.
      • Cons
        • To share product links, you’ll need to have a shop set up somewhere else.
        • Facebook greatly limits the reach of Business Page posts. You may need to use paid advertising to get your link seen.
    • You can also post take a picture of your item, list a price, and post it to your Facebook Page. To collect orders, you can have people comment on your image or send a message to your page. After you receive each order, you would send them an online invoice or otherwise collect their payment.
      • Pros
        • This method of selling on your Facebook Page is free.
        • Again, with Facebook limiting the reach of your post, it may be difficult to be seen.
      • Cons
        • It can be difficult to keep up with this method of selling. If you are making many sales like this, you’ll need to be incredibly organized with sending invoices, collecting payments, knowing what products you have in stock, and keeping up with customers.

    How to Sell Through Facebook Groups

    Facebook Groups are designed to be communities that share a common theme or interest.

    There are two different ways to sell crafts on Facebook through Facebook Groups:

    • Create your own group and sell to customers in it.
      • Pros
        • It’s free.
        • Facebook Groups are being promoted by Facebook in many ways, including tv commercials.
      • Cons
        • It can be difficult to get customers to join your group, especially if you are only selling products.
        • Constantly managing a growing Facebook Group can be time consuming.
      • Good practices: Set up a Facebook Group that is directly related to the products you sell. For example, if you sell products related to your local area you could set up a group called ‘Things to Do in XYZ Area’. In this group, you can share interesting things to do in your local area – as well as promote your products.
    • Join groups where you can sell your products.
      • Pros
        • It’s free. It may be easier to sell products in an established group, rather than starting your own.
        • Most areas (cities, states, counties) have local buying and selling groups. Also, if you cannot ship your craft products, these are great places to sell.
      • Cons
        • Some groups allow selling, while others don’t. Be sure you know the rules of the group.
        • You are at the mercy of the group’s admins. I’ve seen groups with amazing, supportive admins; but I’ve also seen groups where admins will delete posts or ban members for no logical reason.
    How to Sell Crafts on Facebook - Great for Silhouette and Cricut Crafters - by cuttingforbusiness.com.

    How to Sell Through Facebook Shops

    Facebook has its own area on your Facebook Business Page to list your products called a Facebook Shop.

    • Pros
      • Customers can check out right on Facebook and make a purchase without leaving the network. Many users don’t want to leave the platform – and quite frankly – Facebook doesn’t want them leaving the site either.
      • Setting up a Facebook Shop is free and pretty straight forward.
      • Facebook Shops are optimized for mobile devices.
    • Cons
      • You are at the mercy of Facebook’s policies when selling through Facebook Shops.
      • You will pay Facebook’s fees when you sell an item. Current fees are 5% per shipment, or a flat fee of $0.40 for shipments of $8.00 or less.

    How to Sell Through Facebook Marketplace

    Facebook Marketplace is the area of Facebook dedicated to selling products on Facebook. It differs from your shop in a few ways. In your shop, only products you list are shown and your shop is accessible through a tab on your Facebook Page. In contrast, Facebook Marketplace is an area where lots of individuals and businesses have listings.

    To sell on Facebook Marketplace, you create a listing and it appears on the Facebook Marketplace.

    • Pros
      • It’s free to list on Marketplace and free if sold locally and not shipped.
    • Cons
      • There are a lot of listings on Facebook Marketplace, so there is a lot of potential for competition.
      • It costs 5% per shipment, or a flat fee of $0.40 for shipments of $8.00 or less.
      • You are at the mercy of Facebook’s policies when selling on Facebook Marketplace.
    How to Sell Crafts on Facebook - by cuttingforbusiness.com

    How to Sell Through Facebook Live Shopping

    Facebook Live is a video service for Facebook where you can sell products.

    • Pros
      • Through live video, you can connect better with your audience, ask questions, and better show off your products.
      • Through Facebook Live Shopping, customers can purchase right during the video.
    • Cons
      • You’ll need to plan ahead to have a successful Live Shopping stream.

    How to Sell Through Connected Apps on Facebook

    There are a number of apps that allow you to sell on Facebook through the app. These were more popular before Facebook created Facebook Shops.

    However, if you currently sell through a service that has an app or widget for Facebook Shops, you may want to look into it. The app or widget might let you bulk upload products to your Facebook Shop or automatically send newly listed products to your Facebook Shop. For example, I know that Shopify offers a Facebook channel.

    How to Sell Your Silhouette Cameo or Cricut Handmade Crafts on Facebook - by cuttingforbusiness.com
  • 14 Tips for Crafters to Keep Social Media Interesting

    I’ll be honest with you, I was looking through some small business Facebook Pages a few days ago and so many of them were boring and repetitive. On a few of the pages, they just seemed to post products for sale – and nothing else.

    Let me tell you a secret: Fans get bored of the same content day in and day out. To keep their attention (and their wallets open), vary the content you post on social media. visit a lot of crafter’s Facebook Business Pages to browse, and a lot of them are boring! If you sell mainly through your Facebook Business Page, your wall can easily become simply a list of items for sale.

    14 Post Ideas to Keep Your Social Media Interesting

    1. Post your new supplies. If you got a large order of supplies in recently, photograph them and put the photo on your Facebook Business Page wall with a comment such as, “Just got all these supplies in! Can’t wait to start creating!”
    2. Post new machines. Did you recently get a new crafting machine? Whether it is a heat press, a new sublimination printer, or an extra large cutter – share your excitement! You don’t have to be specific with your post. Saying something like, “Got an upgraded plotter today and I am excited to be able to add large wall decals to my store in the coming weeks!” is sufficient.
    3. Share your mistakes. If you have a crafting blunder, post it! A short status update like, “I’m working on a new technique and trying to perfect it!” or “Sometimes things don’t always work as planned!” works well.
    4. Share something from another network. If you are active on other social media sites, be sure to post your links to Twitter, Instagram, or Pinterest on your Facebook wall. Remember, not everyone uses their Facebook account daily, but they may log into another social media site.
    5. Post a tease. If you have a new product coming out, use a photo editor to crop only a piece of the photo and put it on your Facebook Business Page. Ask for customers to guess what you have created. Always be sure to post the full photo at a later time.
    6. Share a review. Did a customer email you a nice comment or review? Post a screenshot of their comments, along with a thank you to them. Be sure to edit out their personal details with photo editor.
    7. Share big news. Land a big job? Brag about it! If you recently received an order for a large number of items, be sure to share the news! You can easily turn one large order into several more when customers know you can handle big jobs!
    8. Post about the weather. While it may seem odd for a crafter to post about the weather, weather is something that everyone can relate to. If the snow has you stuck inside, tell your customers that, and share that you are excited to be crafting indoors. If it’s a beautiful day out, post a photo of your latest creation and note that you finished it just in time to go outside and enjoy the sunshine.
    9. Share simple DIY projects or instructions. If you create decals for car windows, post a video showing how to install the car decal. If you show how easy and fast the process is, a customer who was on the fence about ordering may place that order.
    10. Show photos of items in progress. I’m not saying offer full tutorials on how to create your items, but share small snippets of items that you are working on. For example, if you make handpainted wooden signs and paint them in groups, take a photo of a group of them drying in your studio.
    11. Share your generosity. Are you making items to donate to a cause or an event? Be sure to share your photos with your Facebook fans. Not only will you be able to show off your items, but you’ll be helping promote the cause as well.
    12. Let customers know if you’re busy. Bogged down with orders? Let your Facebook fans know. A simple update like, “I’m booked solid with orders until xx/xx (date), so if you are looking to place an order soon, please remember to get your order in as soon as possible.” This often works well to get people to place an order they’ve been thinking about placing. (Alternatively, if you are closing due to a vacation or other event, be sure to let your customers know in enough time to place an order.)
    13. Share product packaging. Post photos of your product packaging or carefully wrapped breakable items. A unique aspect of handmade items is the way that they come beautifully wrapped. Show off your packaging to your customers.
    14. Wish them a happy XYZ day. Use the holidays to your advantage. Sure, you should wish your customers a happy holiday on major holidays, but did you know that there is a website that has holidays for nearly every day of the year? Visit Days of the Year, and find a few holidays that work well with the items you sell and wish your customers happy xxxx day along with a photo of one of your products. For example, if you sell etched pie plates, you could wish your customers a happy National Pie Day (January 23rd) with a picture of one of your etched pie plates.

    Remember, social media is meant to be used as a conversation. You wouldn’t have in conversation in person where you only told people what you sell, so don’t do it online.

    If you still need inspiration for what to post on social media, head to this post on content calendars.

    Was this information helpful? Save the image below to Pinterest.

    14 Post Ideas for Crafters to Keep Their Social Media Interesting - A good read for Silhouette Portrait or Cameo and Cricut Explore or Maker small business owners. By cuttingforbusiness.com.


  • How to Create a Facebook Page for your Craft Business

    Ready to get your new business out to the world? A great place to start is Facebook. It is against Facebook’s terms and conditions to use your personal account to represent something other than yourself. Instead, you’ll need to create a Facebook Page. It’s important to note that you must have a personal Facebook account to create a Page. Here is a step-by-step tutorial to create your Page:

    1) Log into your Facebook account.

    2) From the blue bar at the top of the page, click the down arrow on the far right hand side, then choose “Create Page”.

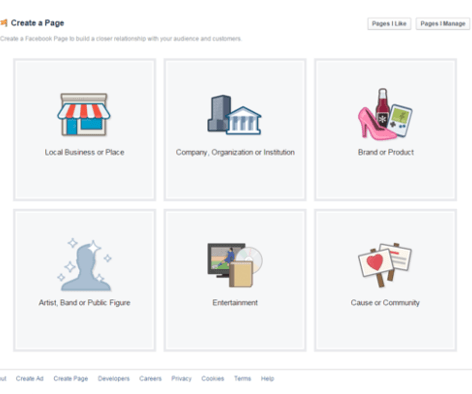
    3) Choose the category for your business page. If you do not have a storefront that the public can come shop at (most Silhouette and Cricut crafters do not) do not choose Local Business or Place. You’ll most likely want to choose “Company, Business, or Institution” then “Retail and Consumer Merchandise”, “Company”, or “Small Business”. Alternatively, if you only sell one product or one product line, you could choose “Brand or Product”, then the category of your product. After choosing your category, enter the name of your small business.

    How to create a Facebook page for your Silhouette Cameo or Cricut Explore Business - by cuttingforbusiness.com

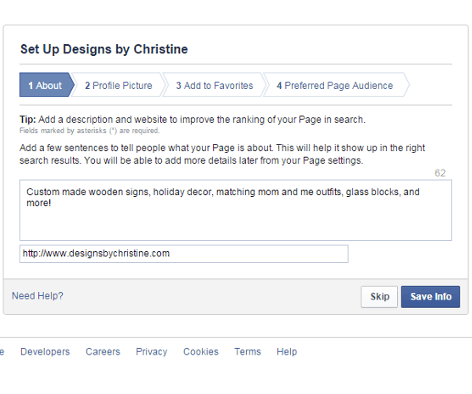
    4) Next enter a short description of your page, and your website address (if you have one) and click “Save”.

    How to create a Facebook page for your Silhouette Cameo or Cricut Explore Business - by cuttingforbusiness.com

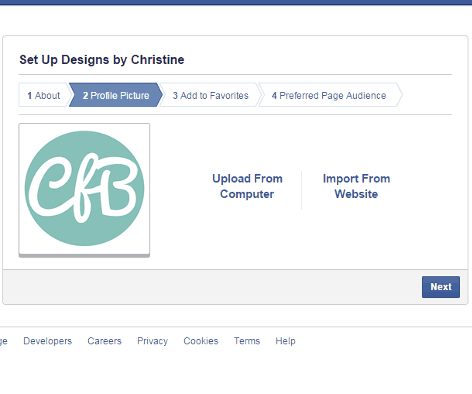
    5) Now, you’ll need a profile photo for your page. I suggest you upload your business logo. If you do not have a logo, put a picture of one of your recent creations, and plan to update it.

    How to create a Facebook page for your Silhouette Cameo or Cricut Explore Business - by cuttingforbusiness.com

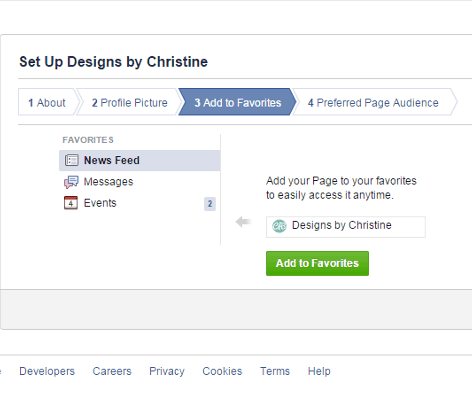
    6) Add your page to your Facebook favorites to make it easy for you to find.

    How to create a Facebook page for your Silhouette Cameo or Cricut Explore Business - by cuttingforbusiness.com

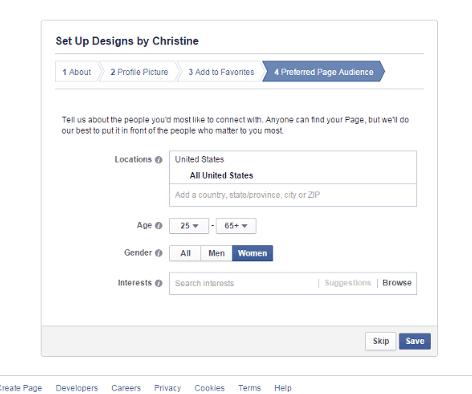
    7) Now, you’ll need to choose some specifics about people who may like, or may buy, your items. I chose United States, as I currently plan to only ship to the US. I also selected women, since most of my products are “girly” or geared towards women. You can then select interests based on your items by using the “Browse” link. For example, if you create pet item, you’ll want to select people that like animals. Click “Save” when you are ready to move forward.

    fb6

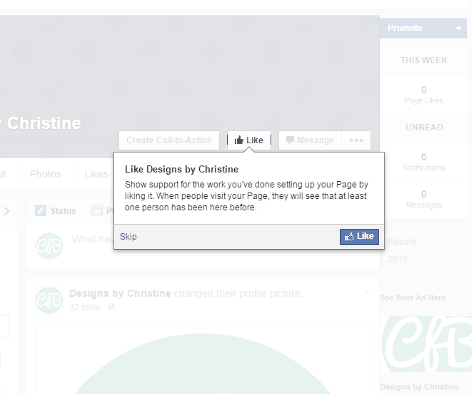
    8) You are almost finished. Next, you’ll want to like your new page and begin posting. Facebook will also prompt you to share your new page with your friends (optional).

    How to create a Facebook page for your Silhouette Cameo or Cricut Explore Business - by cuttingforbusiness.com

    9) Lastly, add a cover photo (photos of some recently created items are a great idea!) to your profile by clicking “Add Cover” in the top left hand corner. This feature works the same as adding a cover photo to your personal Facebook page. If you don’t have a photo ready to go, I suggest you head over to pagemodo.com or canva.com and create one. Both sites are free and easy to use with a drag and drop editors to help you create a cover photo.

    That’s it! Congratulations on your new Facebook Page! The key to having a successful Facebook Business Page is gaining new likes, and posting regularly. Read more about social media on Cutting for Business.

    Share this post on Pinterest:

    Silhouette Cameo or Cricut Crafters: How to Create a Facebook Page for your Craft Business - by cuttingforbusiness.com