Category: Social Media

  • 8 Facebook Automations for Your Business

    I’ll be honest: Facebook is time consuming – sometimes for a small return. For example, on Cutting for Business, Facebook traffic accounts for less than 2% of referrals to my site. But, I spend a lot too much time creating posts, scheduling posts, and answering messages.

    So, I recently dug into Facebook automations. Today, I’m sharing 8 different Facebook automations you can use to spend less time on Facebook, and more time crafting or running your business.

    The best thing about all these automations? They are free. There’s no need to sign up for additional services, because they are included right in Facebook’s Meta Business Suite.
    8 Facebook Automations to Give You More Time in Your Craft Business - cuttingforbusiness.com

    8 Facebook Automations for Your Business

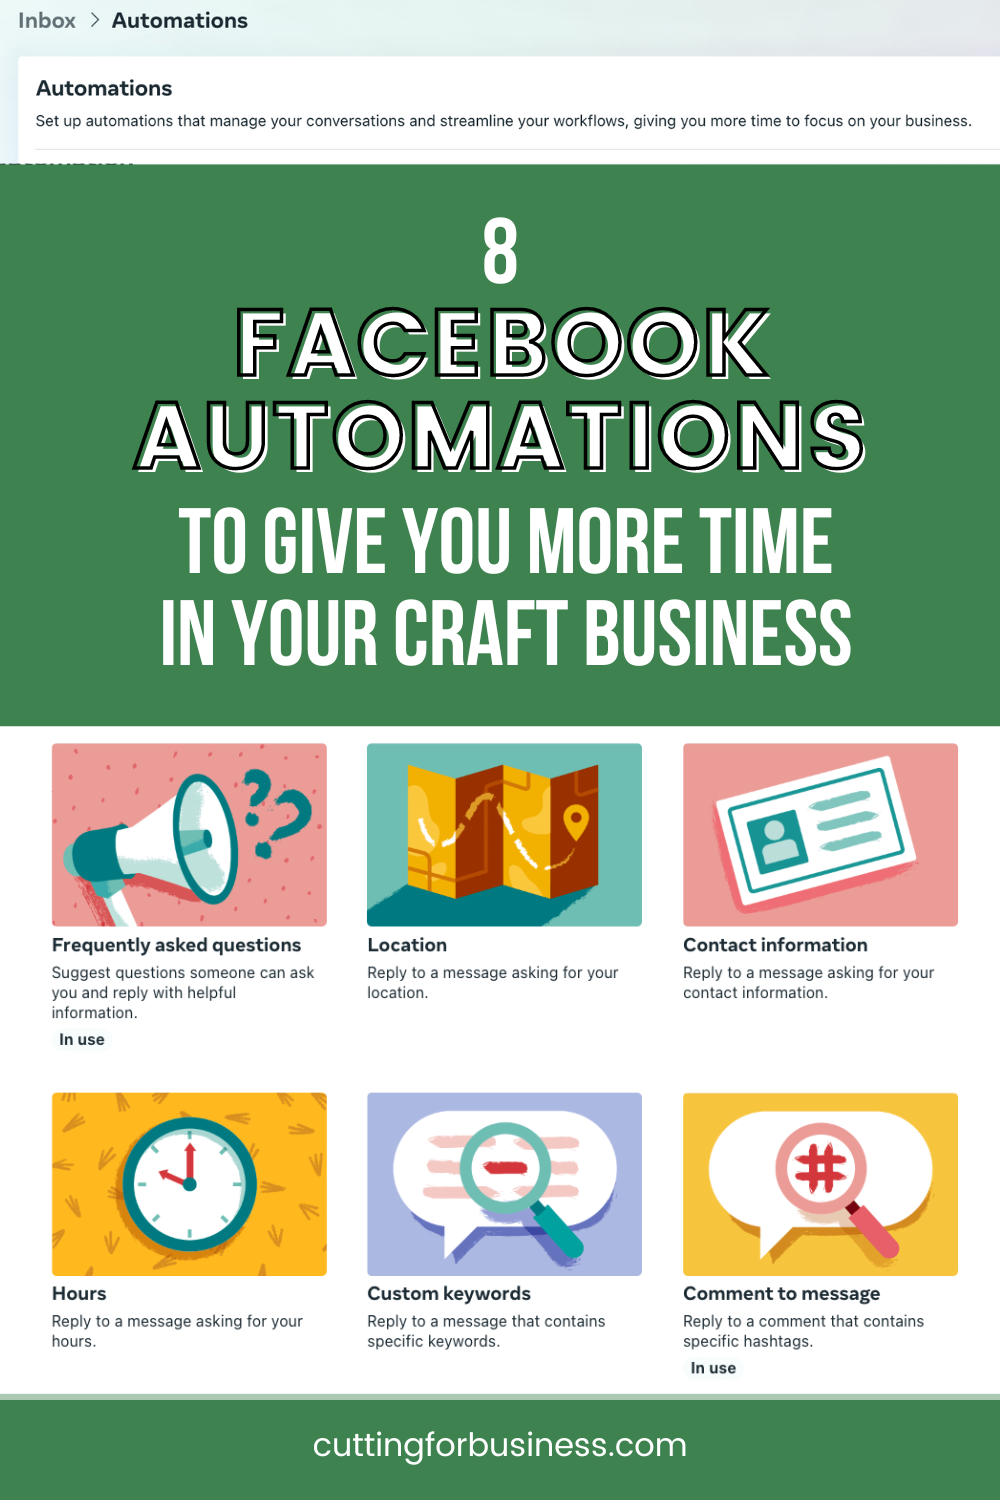
    1. You can automatically reply to customers when they message your Facebook Page for the first time. (This automation works on both Facebook and Instagram.)
      • Why this is helpful: Everyone wants new customers. You can make a great impression on your first time customer by greeting them quickly – or sharing an exclusive offer.
    2. You can automatically reply with an Away message letting customers know you are unavailable right now. (This automation works on both Facebook and Instagram.)
      • Why this is helpful: If you are away and not able to respond promptly, this automation can let customers know when you will respond.
    3. You can automatically reply with a message with your contact information.
      • Why this is helpful: This is an easy way to give customers additional information like your phone number, additional social media links, and more.
    4. You can automatically share answers to Frequently Asked Questions. (This automation works on both Facebook and Instagram.)
      • Why this is helpful: No one likes to answer the same questions over and over. With an automated frequently asked question series, your customer can get the answers they need.
    5. You can share your location when a customer or clients asks.
      • Why this is helpful: If you have a brick and mortar location or are participating in a market or show, you can tell customers exactly where you are located.
    6. You can automatically share your business hours when a customer or client asks.
      • Why this is helpful: If you have specific business hours, an automated Facebook message can share your hours.
    7. You can automatically respond based on a keyword a customer uses.
      • Why this is helpful: This is a great way to give customers direct information, like a link to a specific product.
    8. You can automatically reply to a comment with a Messenger message.
      • Why this is helpful: This is a good way to get into customer’s inboxes and send them a direct message – automatically. Among the automations, it’s my favorite one to use.

    Tutorial: How to Set Up Facebook Automations

    Log into Facebook’s Meta Business Suite as your Facebook Page.

    On the left hand toolbar, click ‘Inbox’.

    On the top of the page, click on the atomic looking icon.

    Meta Business Suite Screenshot - cuttingforbusiness.com

    Then, click the ‘Create Automation’ button.

    Meta Business Suite Screenshot - cuttingforbusiness.com

    You’ll be presented with all the Facebook Automation options. Choose the one you want. I’ve found they are straight forward and easy to set up.
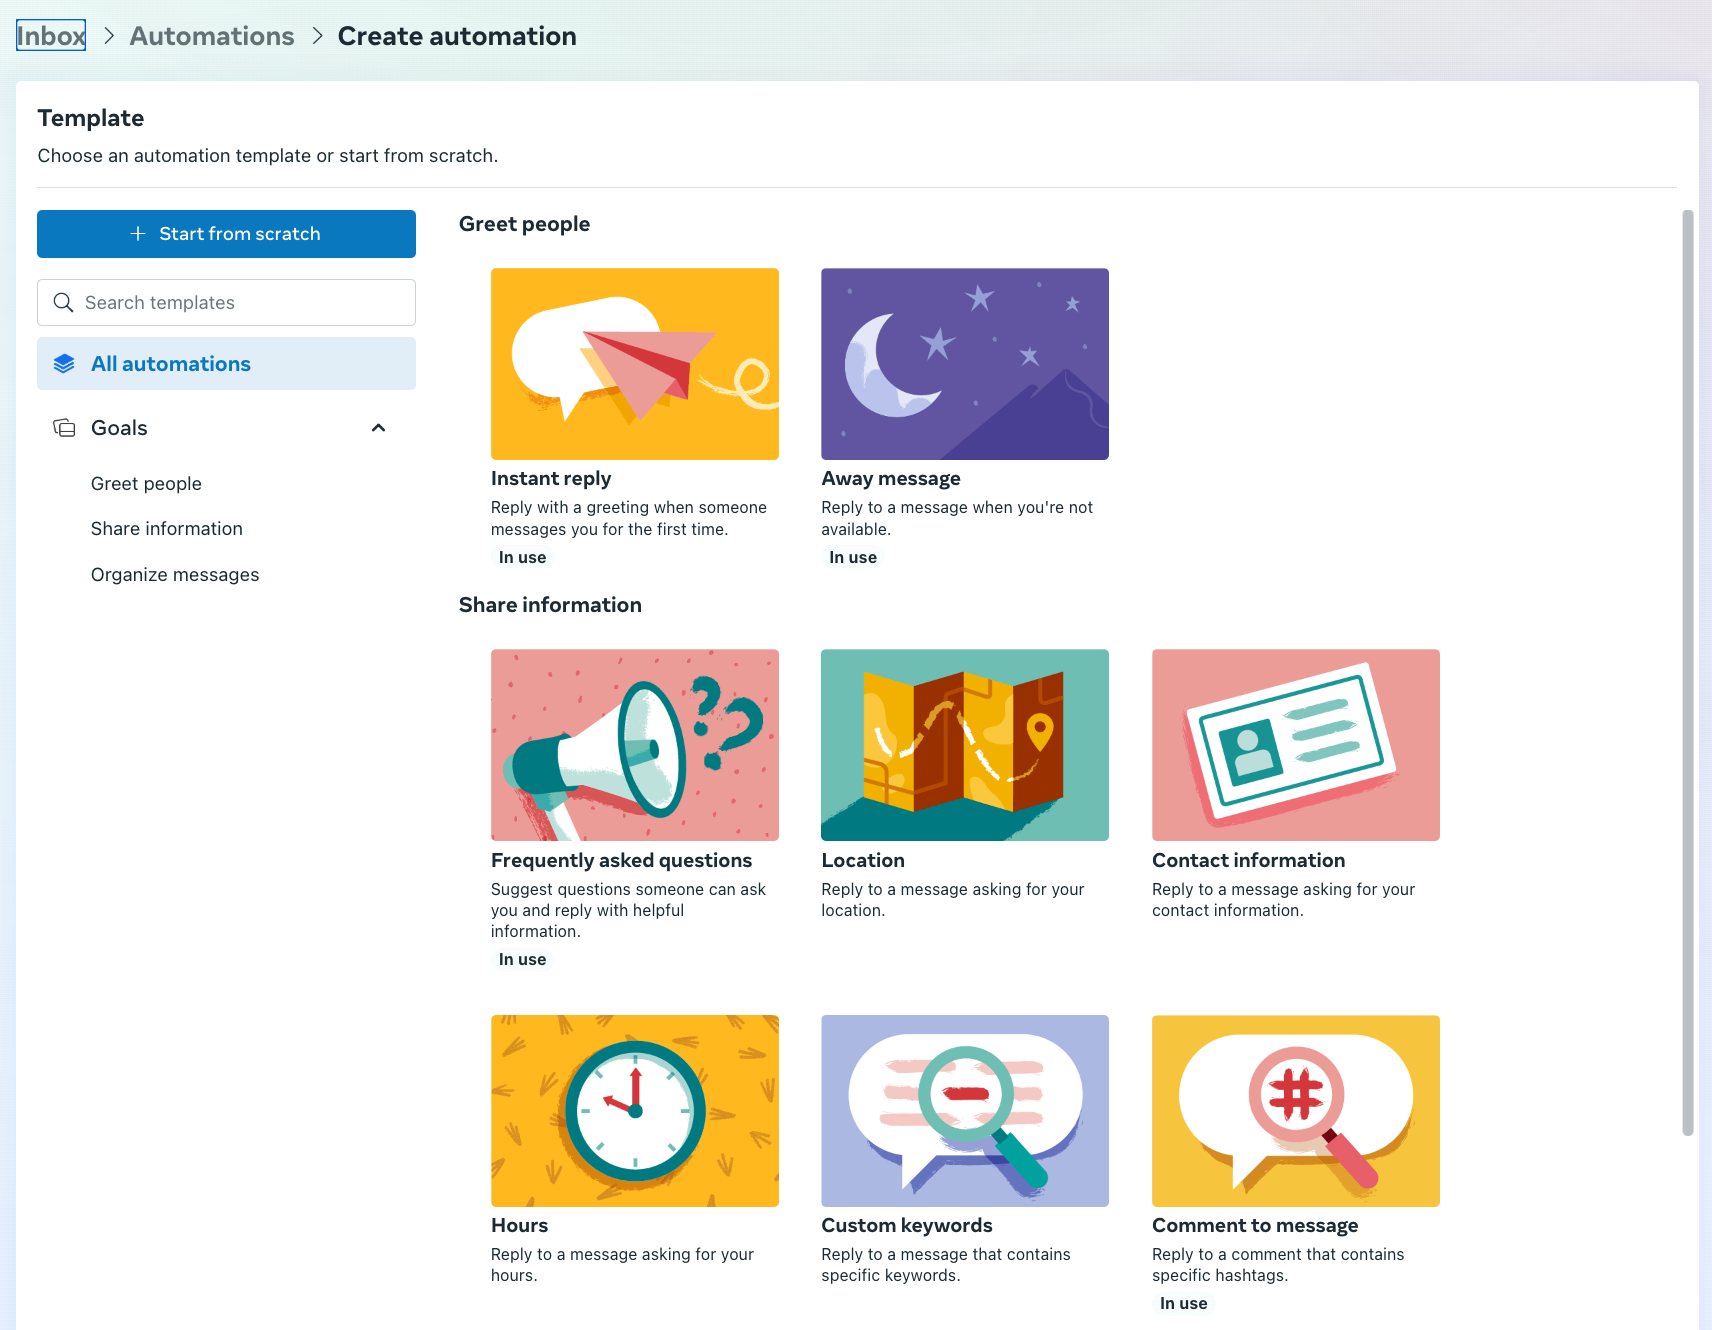
    Meta Business Suite Screenshot - cuttingforbusiness.com

    Simply follow the steps in Facebook’s Meta Business Suite to set up the automation. In this tutorial, I’ll show you how to set up ‘Comment to Message’. With this Facebook Automation, you can send a message when Facebook followers comment with a specific hashtag you’ve set up. You can see this in action or try it out in this Facebook Post on Cutting for Business.

    Click the ‘Comment to Message’ image.
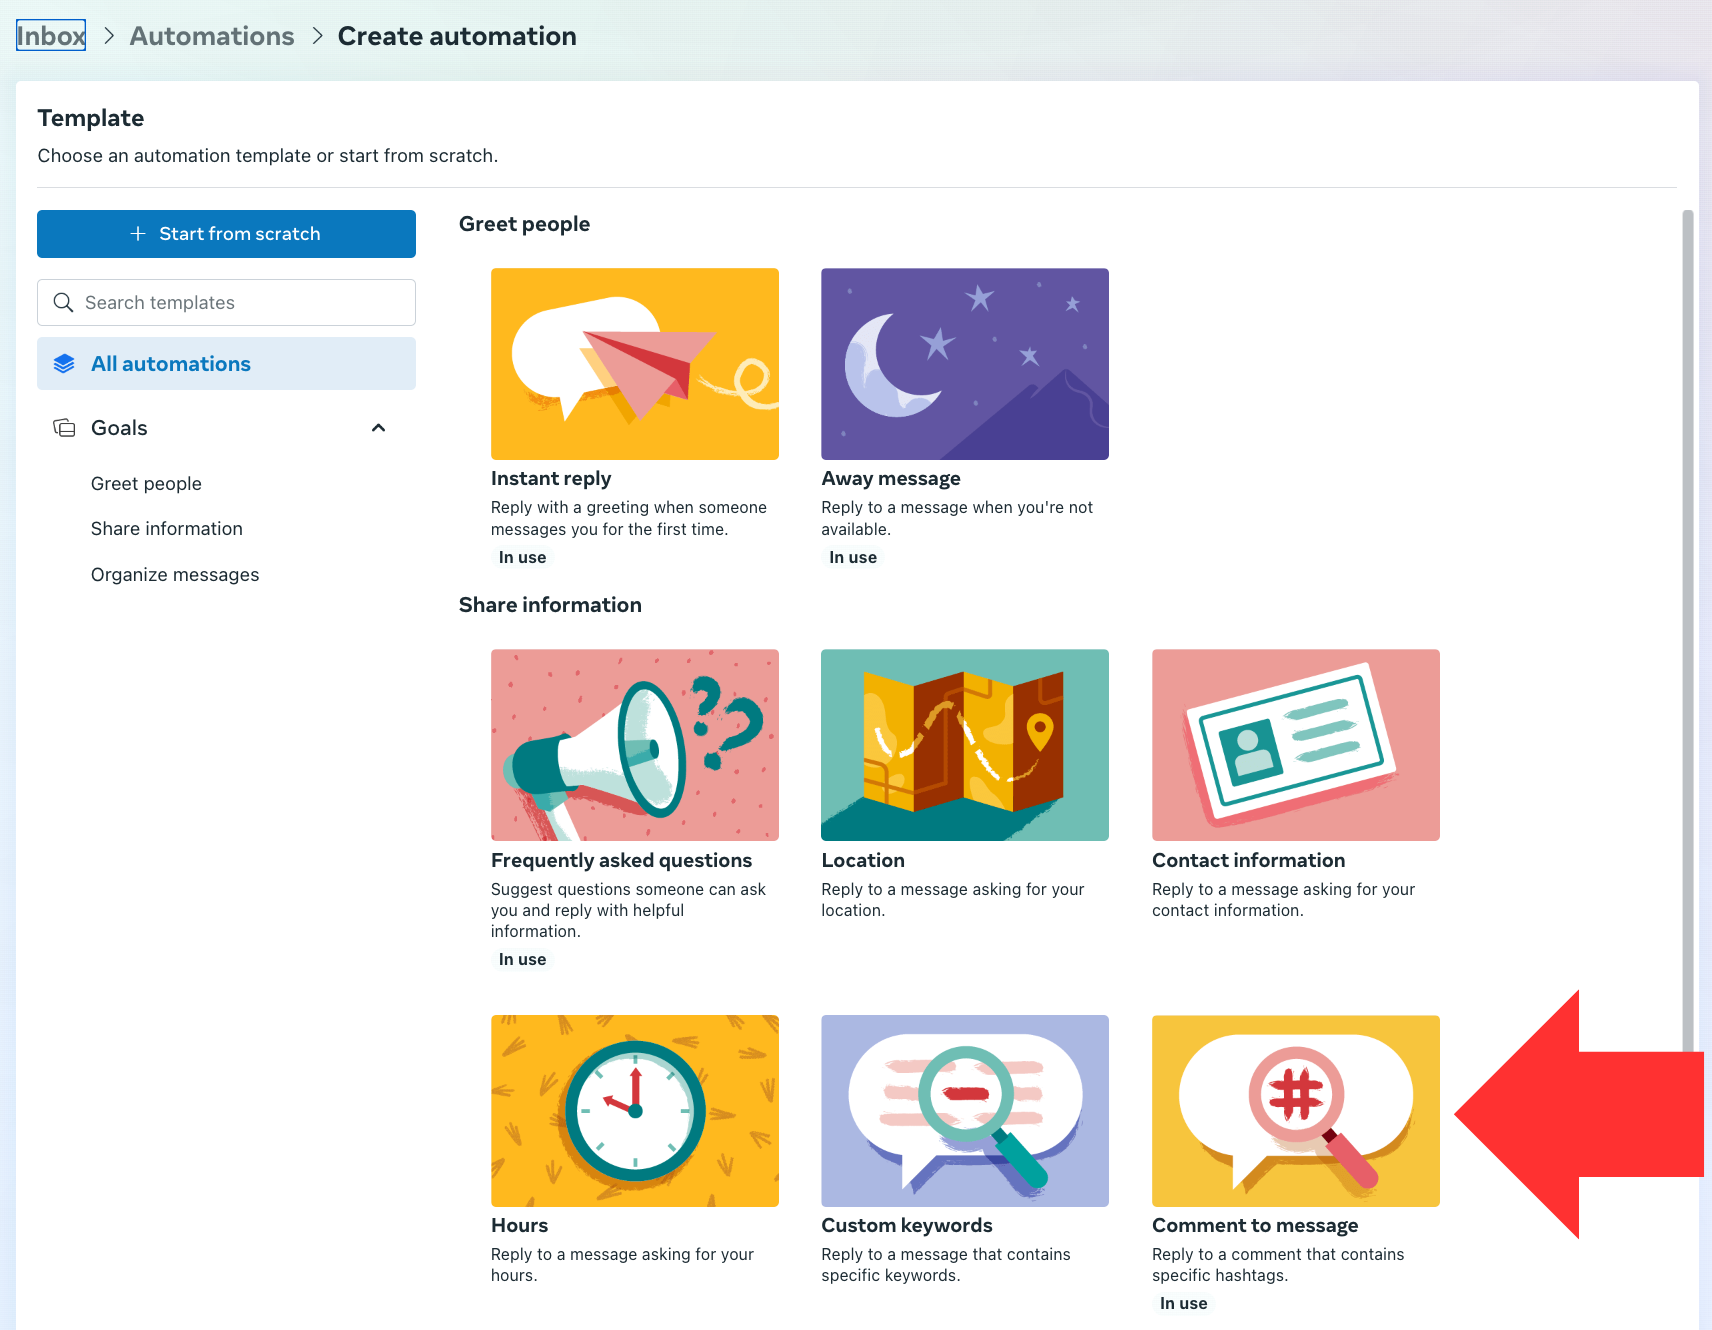
    Meta Business Suite Screenshot - cuttingforbusiness.com

    Now, you’ll add your hashtag, set up the message, and click the ‘Save’ button.
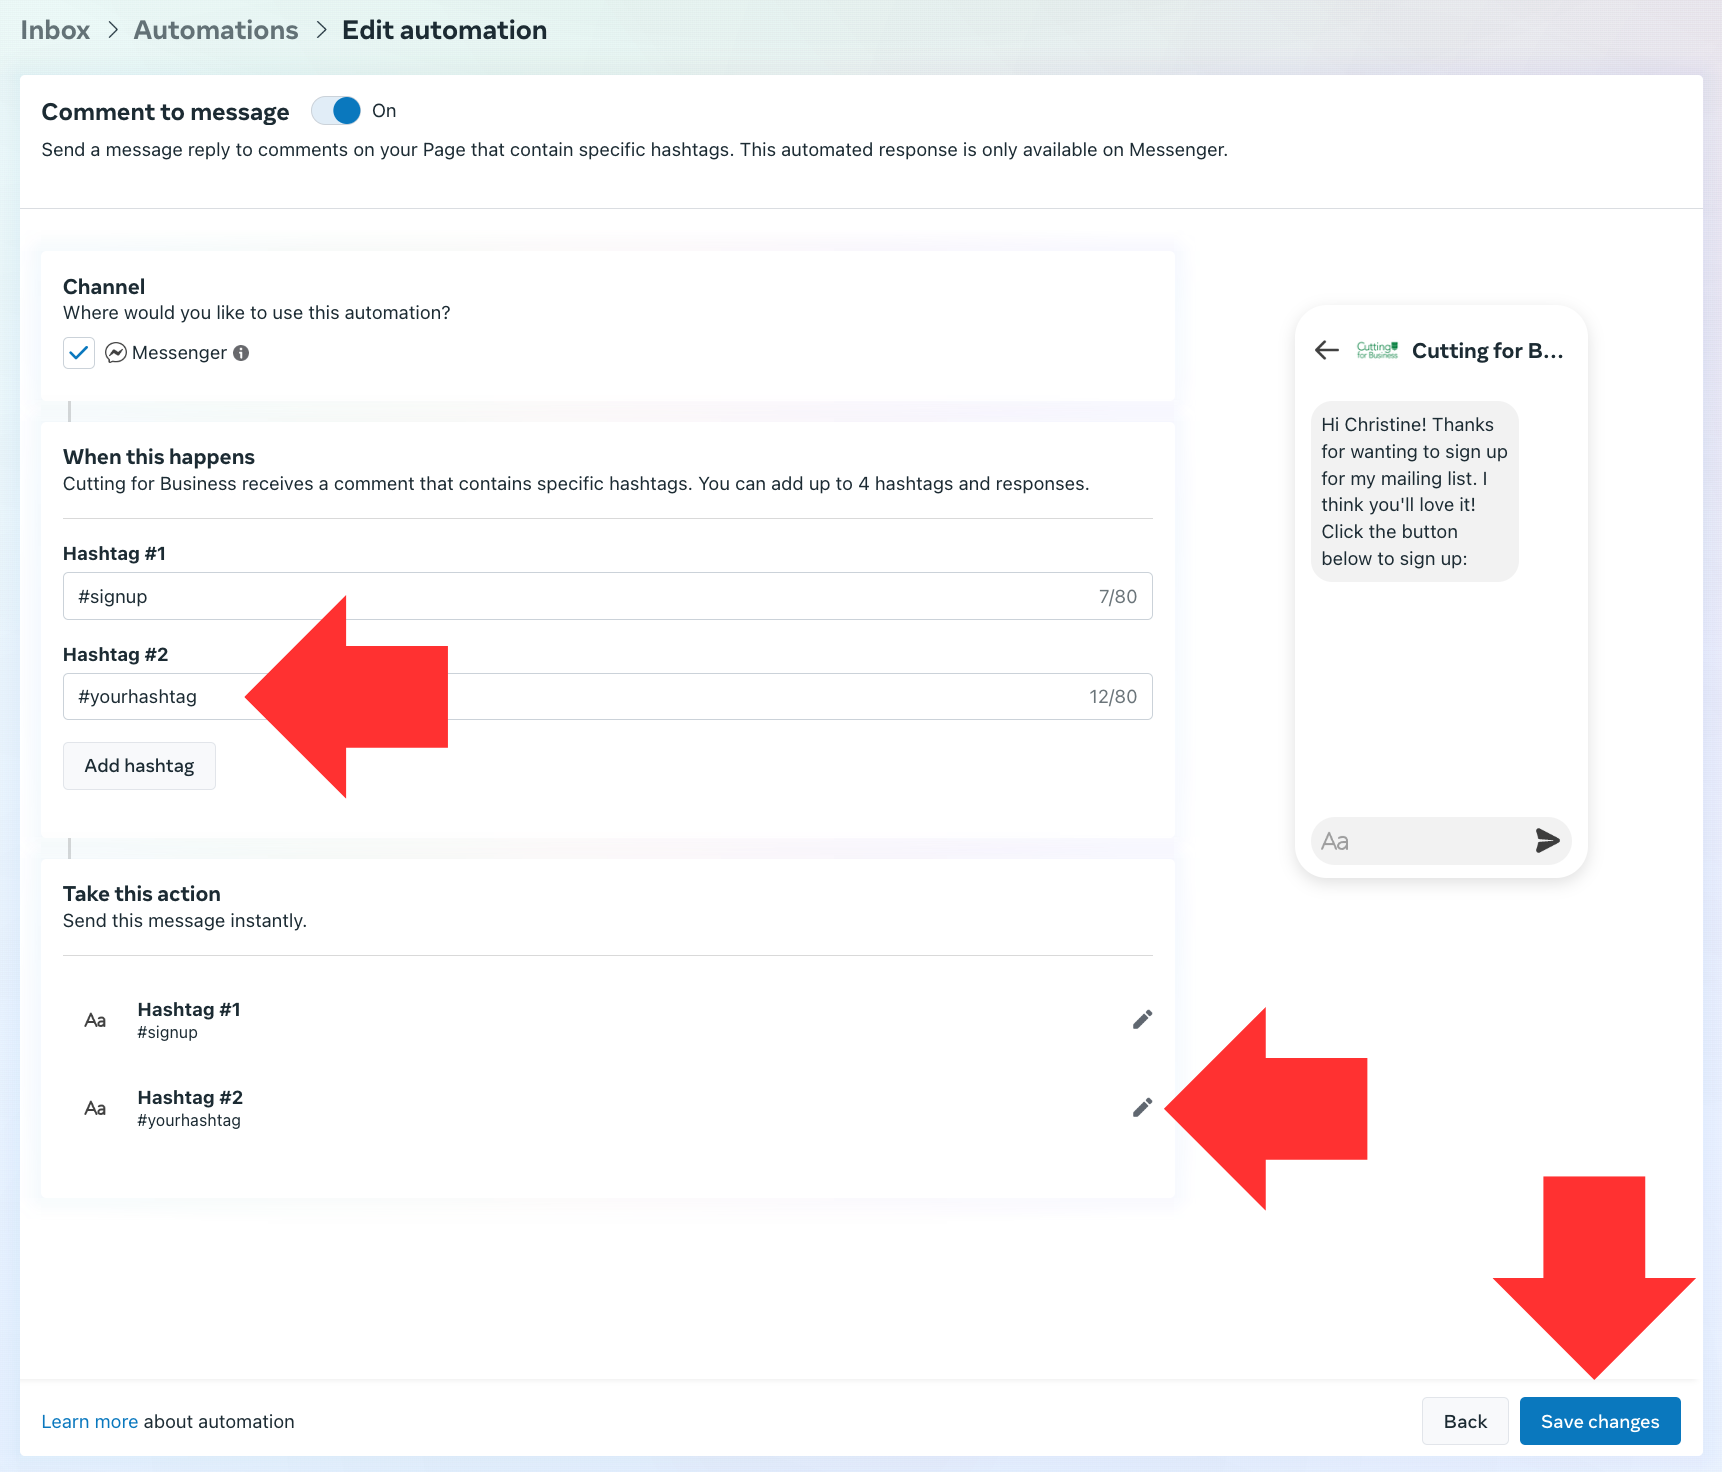
    Meta Business Suite Screenshot - cuttingforbusiness.com

    Next, make sure that your automation is turned on.

    Meta Business Suite Screenshot - cuttingforbusiness.com

    Finally, create a post on Facebook that tells followers to leave a comment with the hashtag you set up. When followers comment with a hashtag, they will receive your message through Messenger.

    Here are a few screenshots of what the process looks like:

    A Facebook post with the hashtag I created:
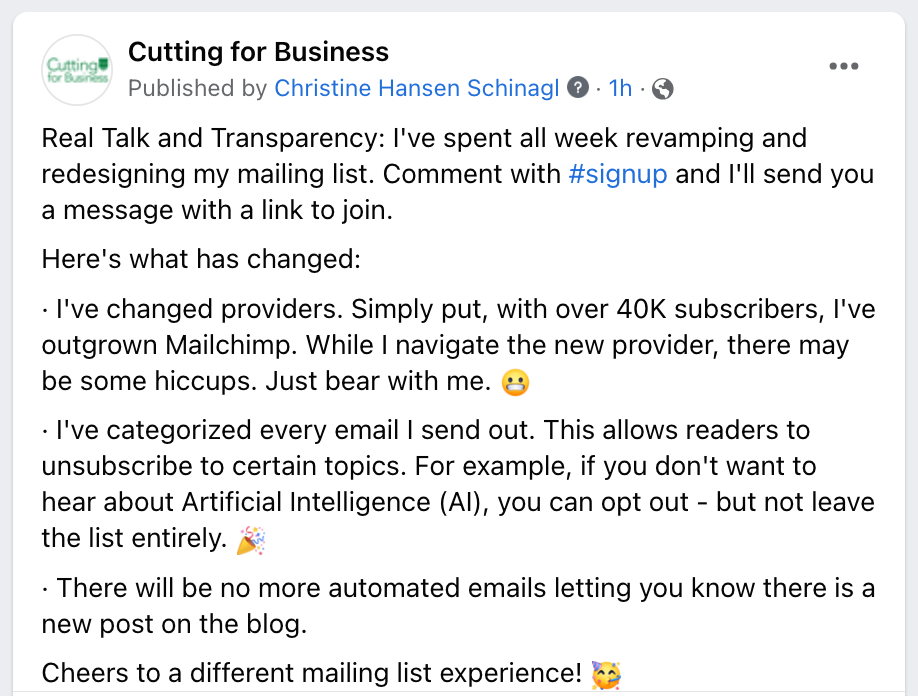
    Facebook Post Screenshot - cuttingforbusiness.com

    The message that is sent when followers comment with the hashtag:
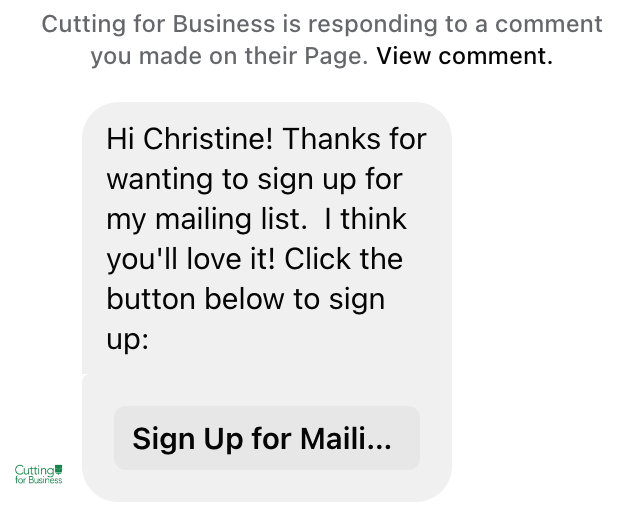
    Messenger Screenshot - cuttingforbusiness.com

    What will you automate in your craft business? P.S. Click here if you’d like to join my mailing list.
  • What is Threads?

    Have you heard about Threads? Maybe you are already on the Threads app? Let’s take a look at it today.

    What is Threads? Why You Should Join - cuttingforbusiness.com.

    What is Threads?

    Several months ago, the Threads app was released by Meta – the parent company of Instagram, Facebook, and WhatsApp. Threads is a newer social media platform, and is in direct competition to Twitter.

    Like Twitter, Threads has a focus on text conversations. Threads users can post text updates as long as 500 characters, photos, and videos up to 5 minutes long. And, there is an estimated user base of 141 million as of December 2023 (source).

    I’ve been on Threads since it first launched, but I’ve been seeing more crafters and makers joining.

    Why Am I Posting About Threads Right Now?

    My Threads feed is often pretty quiet. I assume that of those 141 million users – most are not actively using the platform.

    So, why am I posting about it now? In the last week, there has been a huge push in women supporting women. I’m seeing women led businesses reaching out to each other to join together and grow their accounts.

    Much of this is due to some changes to the Instagram algorithm. Many creators and business owners are struggling to be seen on Instagram – and taking their efforts over to Threads.

    I see now as the perfect time to jump in the conversation over on Threads.

    Should You Join Threads?

    In a nutshell, Threads is just another social media network. Whether you want to spend the time on another social media network is up to you.

    However, I do recommend you go over and create an account so that you can reserve your business username. For example, I wouldn’t be happy if someone was using cuttingforbusiness on Threads. So, I made sure I owned it. You should do the same.

    How Do You Sign Up for Threads?

    Signing up for Threads is easy, visit threads.net or download the Threads app.

    Want to follow me? Cutting for Business on Threads. Better yet: After you join, tag me and I’ll come reply and follow you. ❤️

    What’s Different About Threads?

    1. No ads. Threads currently doesn’t have any ads – yet. Mark Zuckerberg has been open about eventually monetizing Threads.
    2. No hashtags. Unlike other social media networks, hashtags don’t work on Threads. You can add them to your post, but they aren’t clickable links. Hashtag functionality (called tags) has now been added.
    3. Limited editing. Read what you post before you post it. You can only edit your post within the first few minutes of posting it. After that, you’ll have to delete and repost it.
    4. Choose commenters. When you post on Threads, you can choose who can comment on your post: Everyone, only those tagged, profiles you follow. Why do I love this? If you set the replies to only “profiles you follow”, you can eliminate potential spam.
    5. No trending page/section. Threads doesn’t have a section that tells you what is popular on the network at the moment.

    Tell me in the comments: What do you think of Threads?

  • Tutorial: How to Add a Diverse Business Category on Facebook

    Diversity and inclusion continue to be hot topics in the world right now. If you’ve had your Facebook Page for a long time, you probably haven’t included this information on it.

    Let’s take 5 minutes today to add your Diverse Business category.

    Tutorial: How to Add a Diverse Business Category on Facebook - Marketing - cuttingforbusiness.com.

    What Are Diverse Business Categories on Facebook?

    Diverse Business categories are a self selected, categorization system that lets users know if a certain group owns the business.

    Why Add a Diverse Business Category on Facebook?

    It is another way that Facebook users can connect with your business. Many shoppers seek out diverse businesses to support.

    Additionally, Facebook may feature businesses of certain Diverse Business categories.

    What Diverse Business Categories are Available on Facebook?

    Facebook offers 10 different Diverse Business categories:

    • Asian-owned
    • Black-owned
    • Disabled-owned
    • Latin-owned
    • Indigenous-owned
    • LGBTQ+ owned
    • Middle Eastern-owned
    • Pacific Islander-owned
    • Women-owned
    • Veteran-owned

    Tutorial: How to Add Your Diversity Information on Facebook.

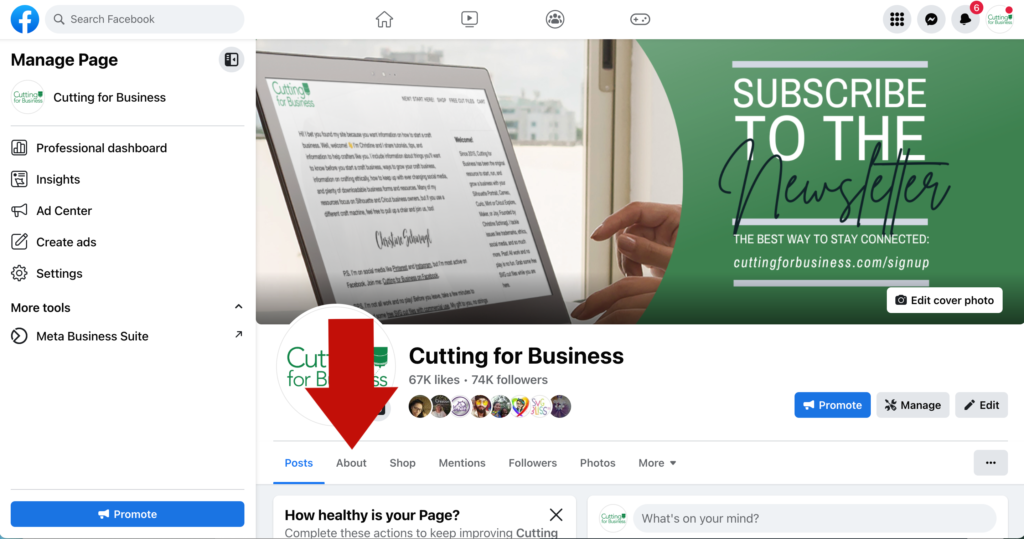
    1. Navigate to your Facebook Page. Then, click ‘About’.
    Tutorial: How to Add a Diverse Business Category on Facebook - Screenshot 1 - cuttingforbusiness.com.

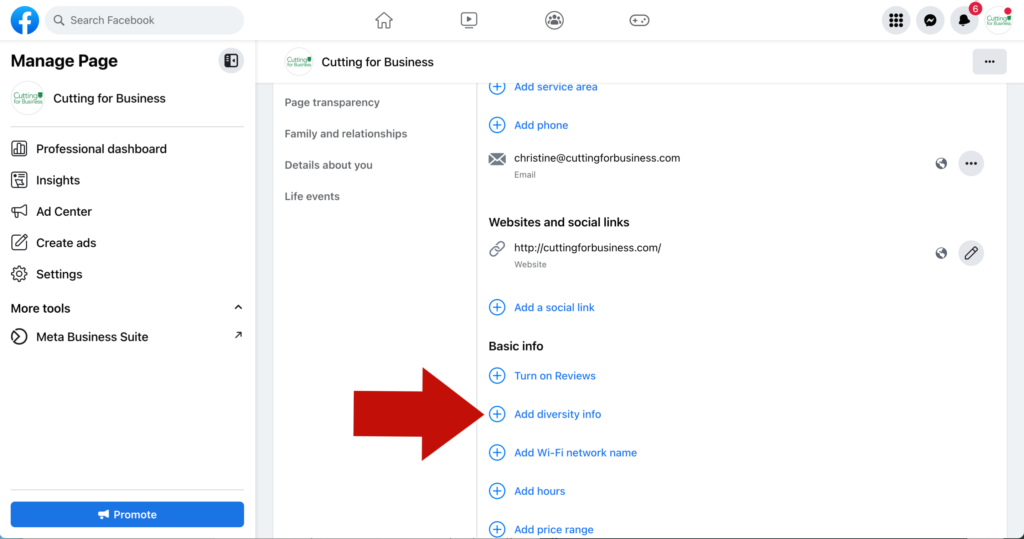
    2. Scroll down to ‘Basic info’. Then, click ‘Add diversity info’.

    Tutorial: How to Add a Diverse Business Category on Facebook - Screenshot 2 - cuttingforbusiness.com.

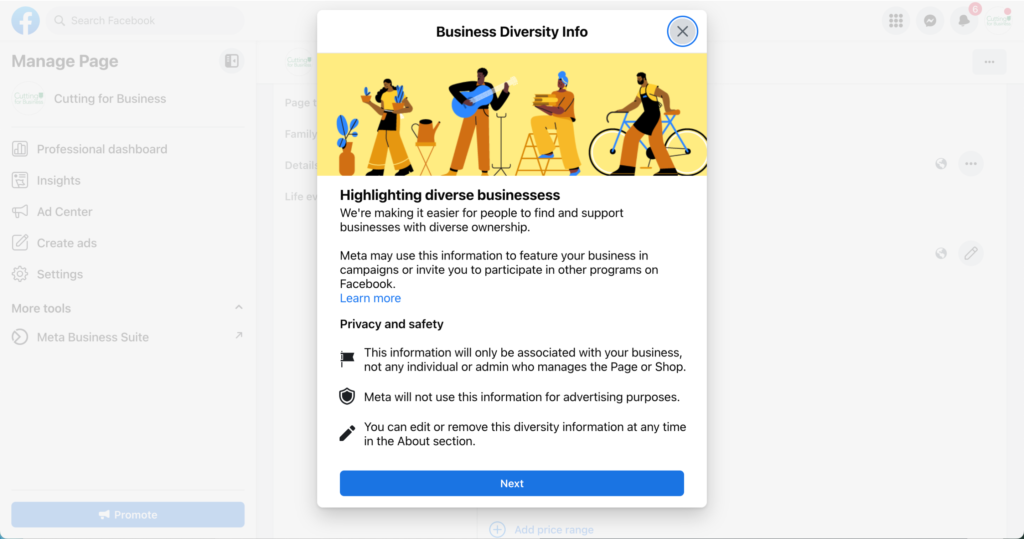
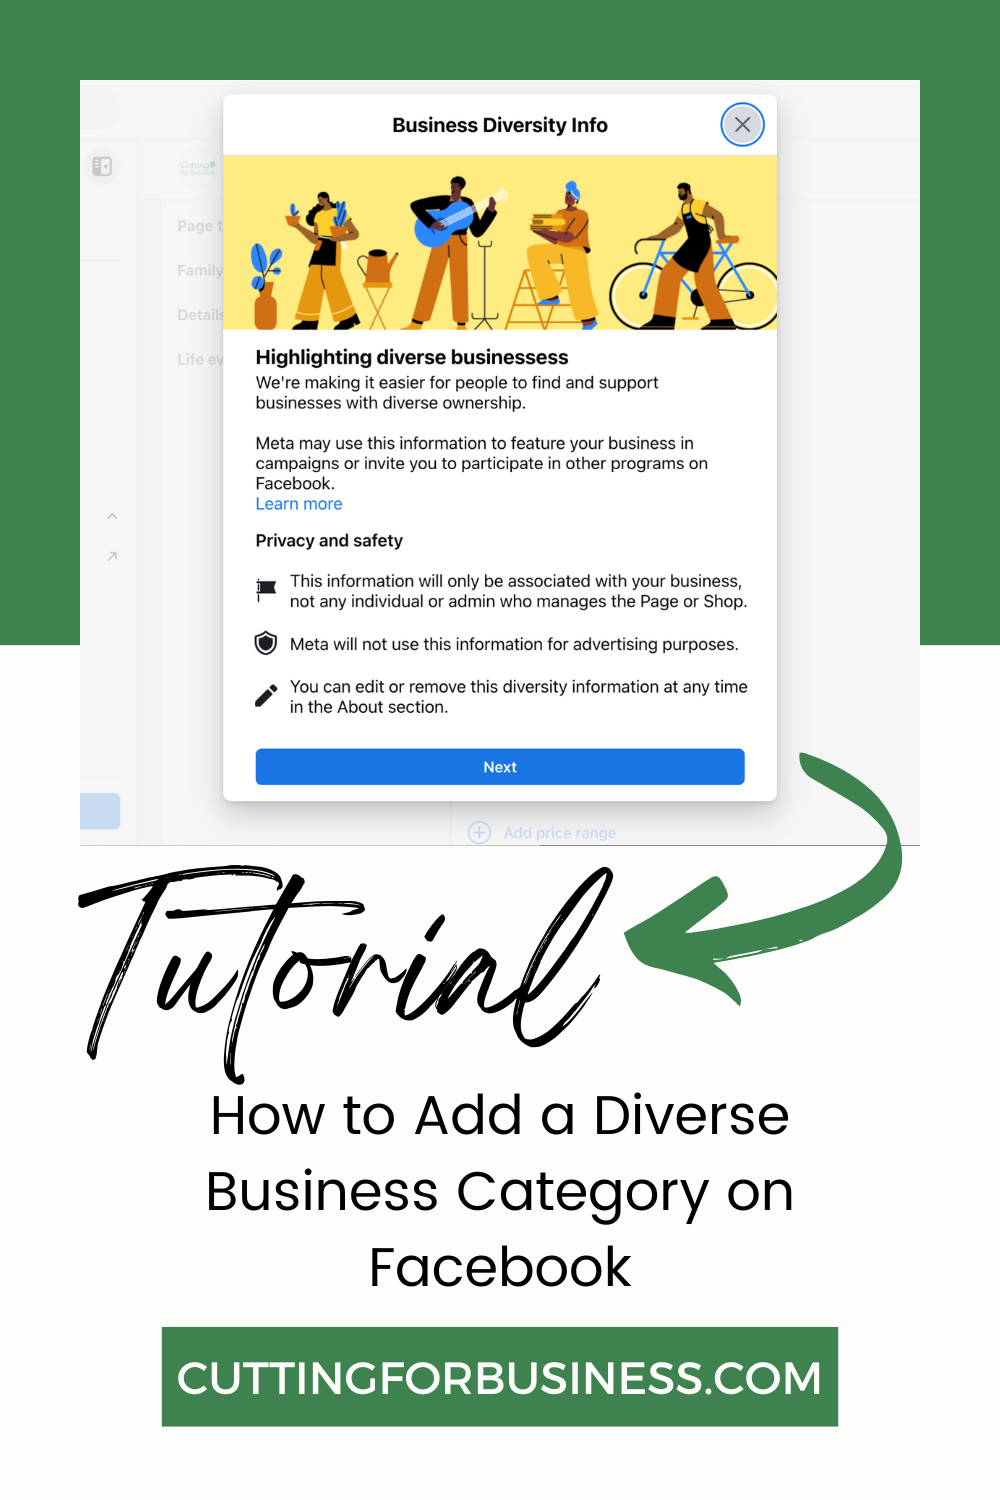
    3. This pop up appears. Read the information, then click the ‘Next’ button.

    Tutorial: How to Add a Diverse Business Category on Facebook - Screenshot 3 - cuttingforbusiness.com.

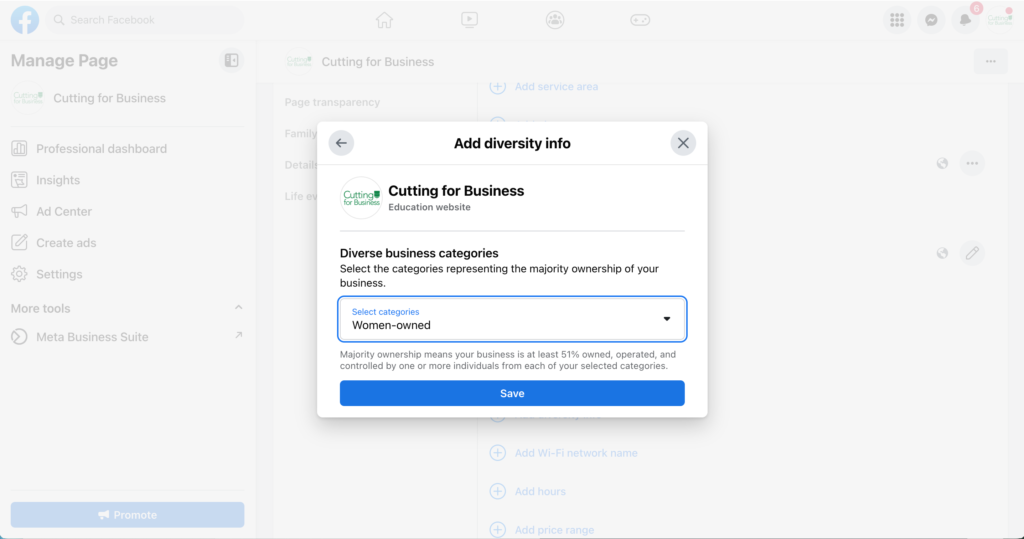
    4. Select your diversity category. You can select more than one category if you qualify. (Qualifying means majority ownership of 51% of the diverse business category.) Click the ‘Save’ button.

    Tutorial: How to Add a Diverse Business Category on Facebook - Screenshot 4 - cuttingforbusiness.com.

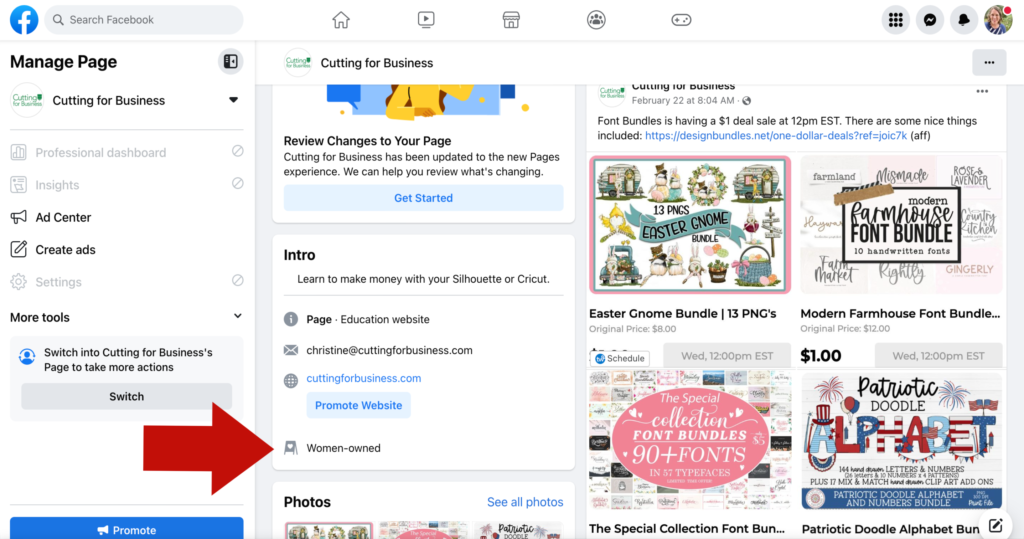
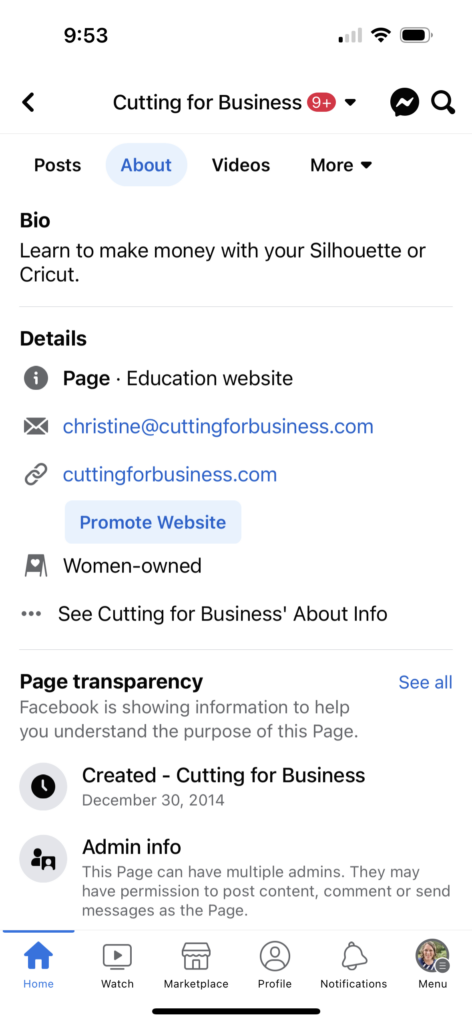
    That’s it! The diversity information you added will appear in the Intro section of your Facebook page.

    Here is what it looks like on a desktop page:

    Tutorial: How to Add a Diverse Business Category on Facebook - Screenshot 5 - cuttingforbusiness.com.

    Here is what it looks like from the Facebook App:

    Tutorial: How to Add a Diverse Business Category on Facebook - Screenshot 6 (Mobile) - cuttingforbusiness.com.

    Note: Diverse Business categories are only available to users located in the US at this time. If you don’t see the option to add a Diverse Business category to your Facebook Page, your page may be registered outside of the US.

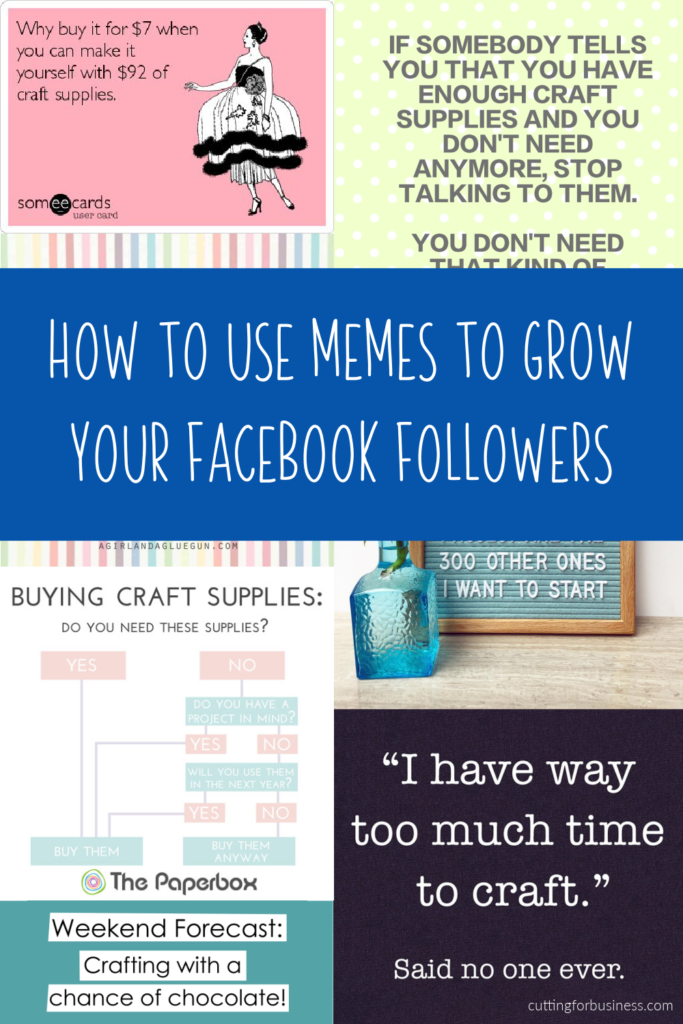
  • How to Use Memes to Grow Your Facebook Page Followers

    Everyone loves a good meme, right? Of course you do! Now, what if I told you using memes to grow my Facebook followers is one of the most effective strategies I use… and it’s free!

    Today, I’ll share how I use memes to grow my Facebook followers on my Facebook Business Page.

    Before we get started, you’ll want to make sure you have the Meta Business Suite app on your phone.

    How to Use Memes to Grow Your Facebook Page Followers - cuttingforbusiness.com.

    How to Use Memes to Grow Your Facebook Followers

    1. Post a meme on your Facebook Business Page. If you need some guidelines on how to choose the perfect meme, I put them later in this post.
    2. As people interact with your meme, interact with them. Show them you are interested in their comments.
    3. Open the Meta Business Suite app. You can find it in the Apple App Store or Google Play if you don’t already have it.
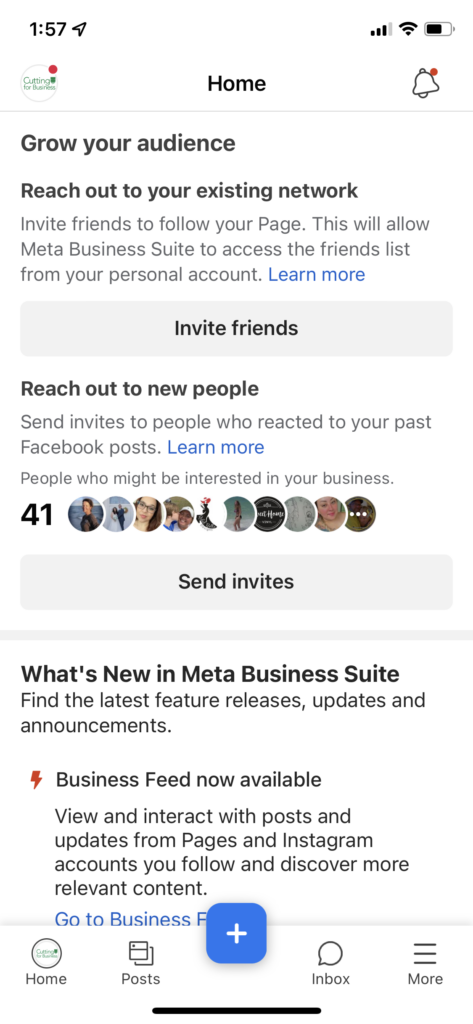
    4. From the Home tab, you’ll see your most recent 3 posts, recent stories, recent ads, insights, and an Audience growth section, among others.
    How to Use Memes to Grow Your Facebook Page Followers - Meta Business Suite screenshot - cuttingforbusiness.com.

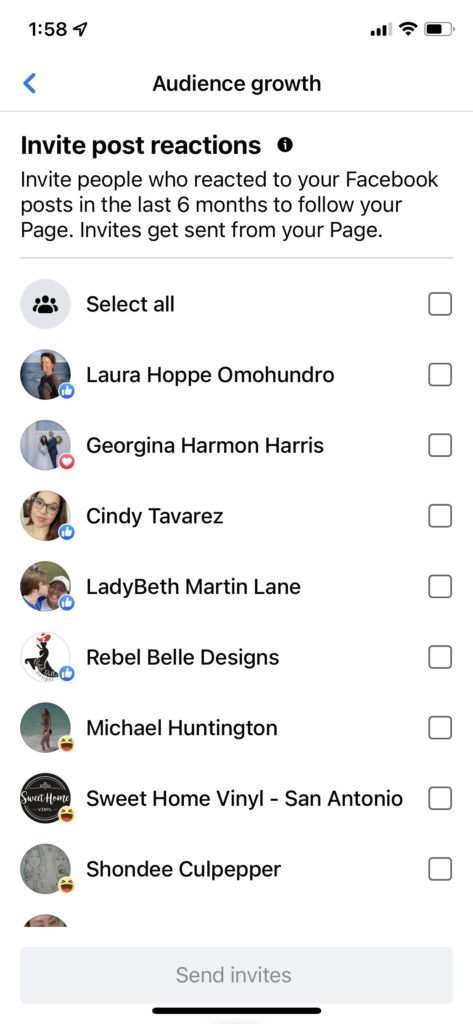
    5. In the Audience growth section, you’ll see a section called ‘Post reactions’. These are people that have reacted to something on your page, but don’t currently follow you. Tap the ‘Send invites’ button.

    How to Use Memes to Grow Your Facebook Page Followers - Meta Business Suite screenshot - cuttingforbusiness.com.

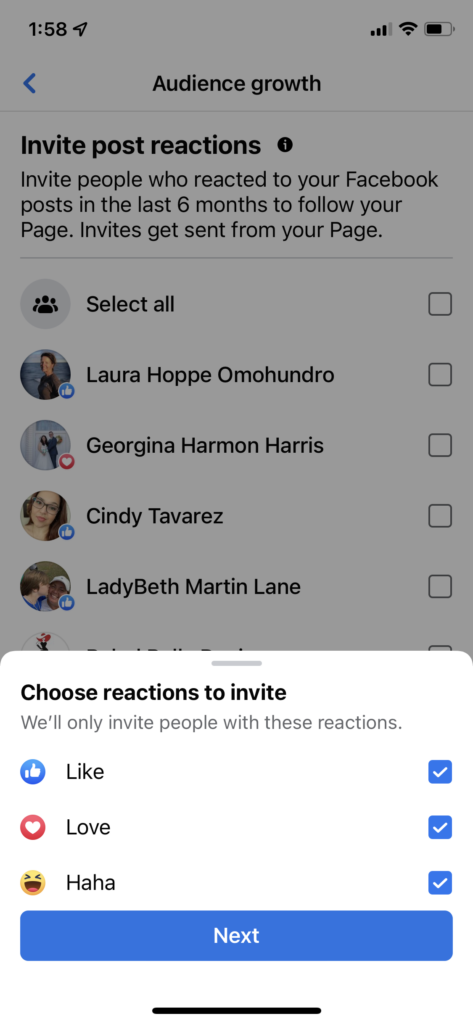
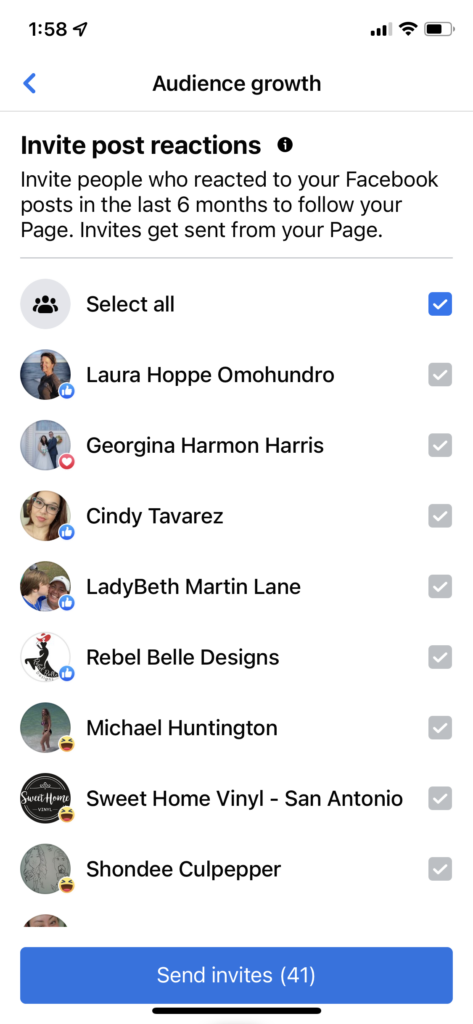
    6. Work your way through all the screens checking which people you want to invite. I usually invite everyone.

    How to Use Memes to Grow Your Facebook Page Followers - Meta Business Suite screenshot - cuttingforbusiness.com.
    How to Use Memes to Grow Your Facebook Page Followers - Meta Business Suite screenshot - cuttingforbusiness.com.

    Click the ‘Send invites’ button and invites will be sent from your page – not your personal account.

    That’s it! I usually check for new people to invite daily. And, I’ve gotten thousands of new followers using this method.

    3 Reasons Why Memes Work

    Wonder why memes work to build your audience?

    1. They build community. Memes are relatable and make people feel like they belong.
    2. They are shareable. In their essence, memes beg to be shared. When people share a meme from your page – you reach more and more people.
    3. Memes entertain. People like to be entertained – and memes do just that!

    5 Tips for Choosing & Using Great Memes

    1. Try to find memes that haven’t already made their way through the craft groups and pages. This is easier said than done.
    2. Make your own memes.
    3. Make sure they are safe for work.
    4. Don’t belittle customers. Sure, there are a few really funny (and truthful!) memes about blog readers and customers out there. But, the goal is grow your page – not to offend people along the way.
    5. Give credit where credit is due. Didn’t create the meme but know the author? Give them credit, too.

    Tell me: Are you currently using memes to grow your Facebook Page audience? Will you start after reading this post?

  • Tutorial: How to Block Spam Comments on Instagram

    Let’s face it: No one likes spammers or bot commenters.

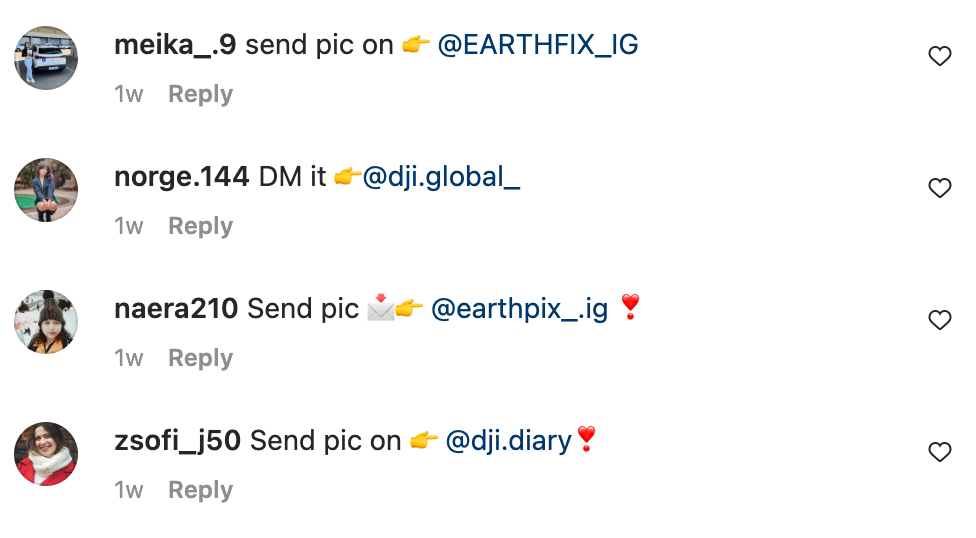
    I have a few different Instagram accounts – and I help manage my husband’s accounts, too. Lately, there are so many spam comments on every single post. It’s pretty clear that most of them are bots, because they appear within minutes of posting.

    Screenshot of spam comments on Instagram - cuttingforbusiness.com.
    Spam comments on Instagram.
    Screenshot of spam comments on Instagram - cuttingforbusiness.com.
    More spam comments on Instagram.

    I did some research and got to the bottom of how to block spam comments. And, it only takes a few minutes.

    Before you read the tutorial, know this method isn’t perfect and you’ll never entirely escape from all the spam comments. Also, some good comments will probably get blocked, too.

    How to Block Spam Comments on Instagram

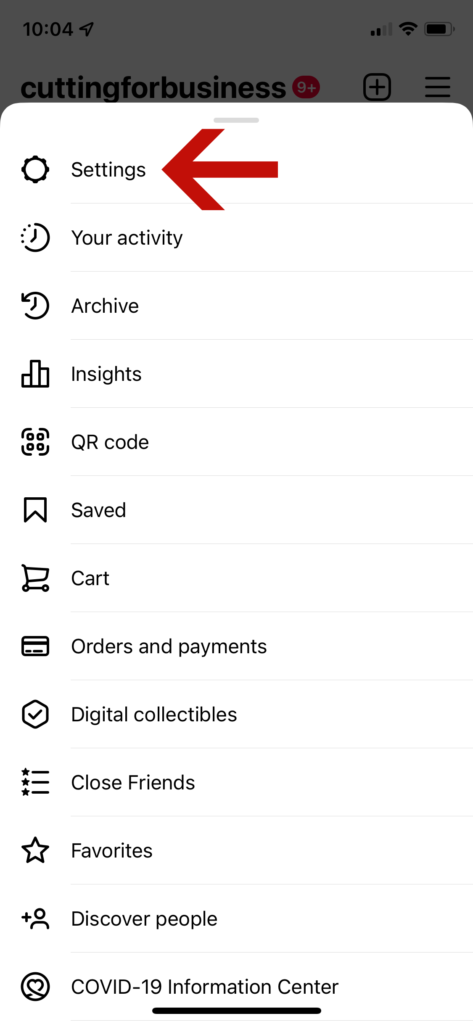
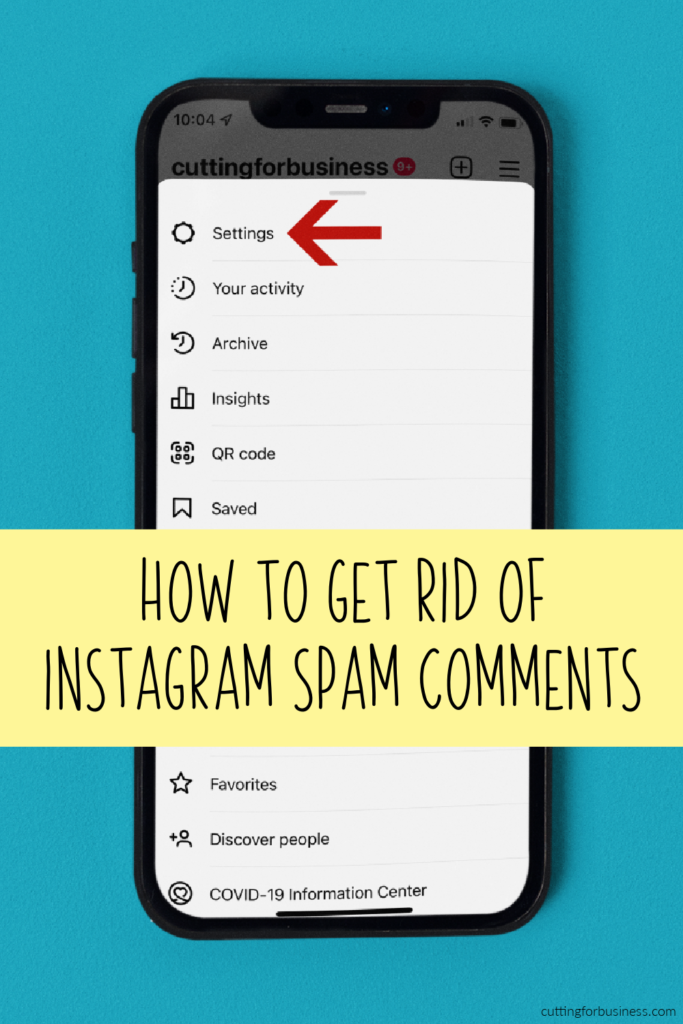
    • Open the Instagram app, and tap the hamburger menu in the top right corner. (It’s the three horizontal lines.)
    • Tap ‘Settings’.
    Screenshot - Instagram from the article 'Tutorial: How to Get Rid of Instagram Spam Comments' - cuttingforbusiness.com.
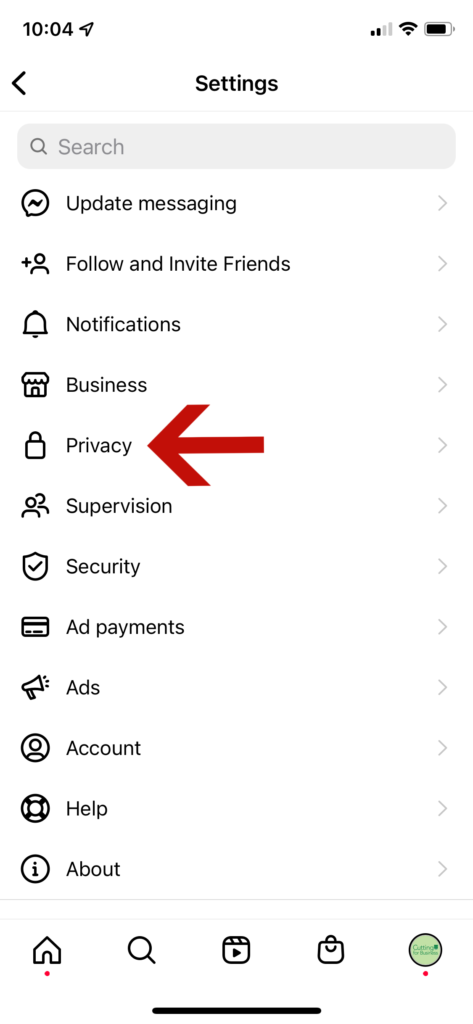
    • Tap ‘Privacy’.
    Screenshot - Instagram from the article 'Tutorial: How to Get Rid of Instagram Spam Comments' - cuttingforbusiness.com.
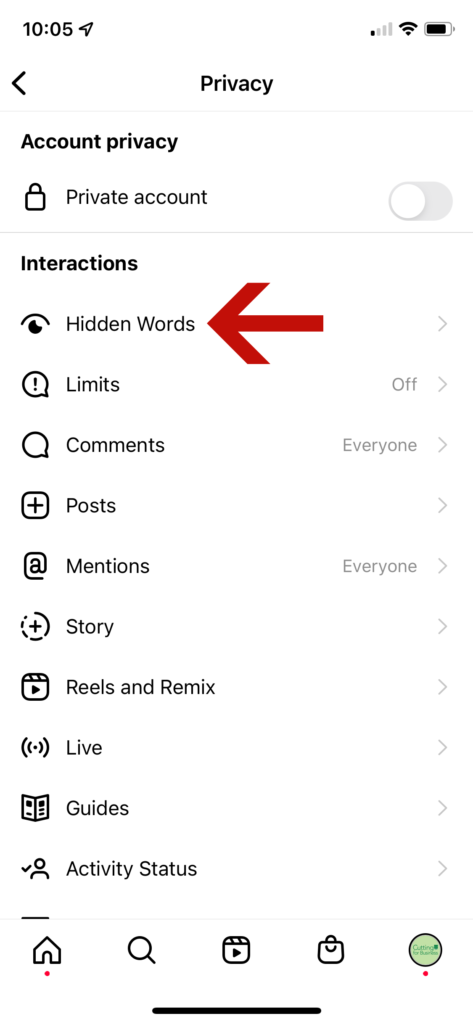
    • Tap ‘Hidden Words’.
    Screenshot - Instagram from the article 'Tutorial: How to Get Rid of Instagram Spam Comments' - cuttingforbusiness.com.
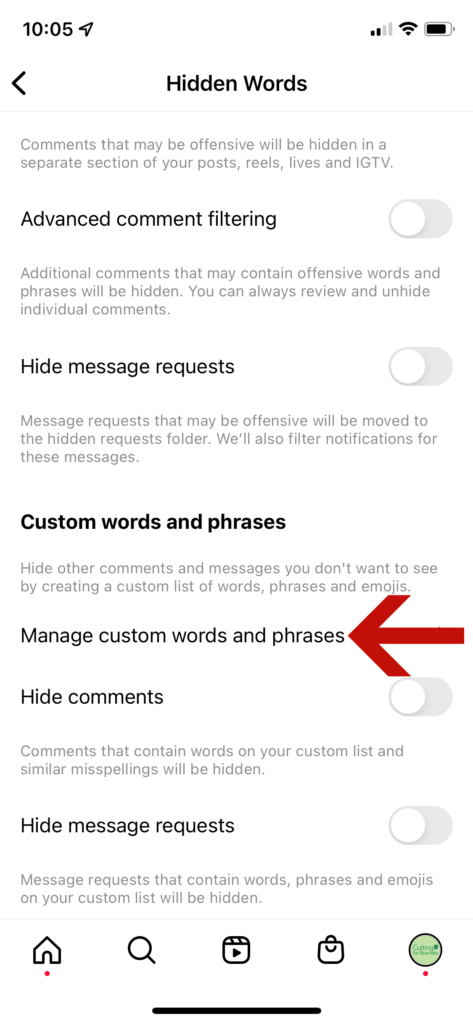
    • Under ‘Custom words and phrases’, tap ‘Manage custom words and phrases’.
    Screenshot - Instagram from the article 'Tutorial: How to Get Rid of Instagram Spam Comments' - cuttingforbusiness.com.
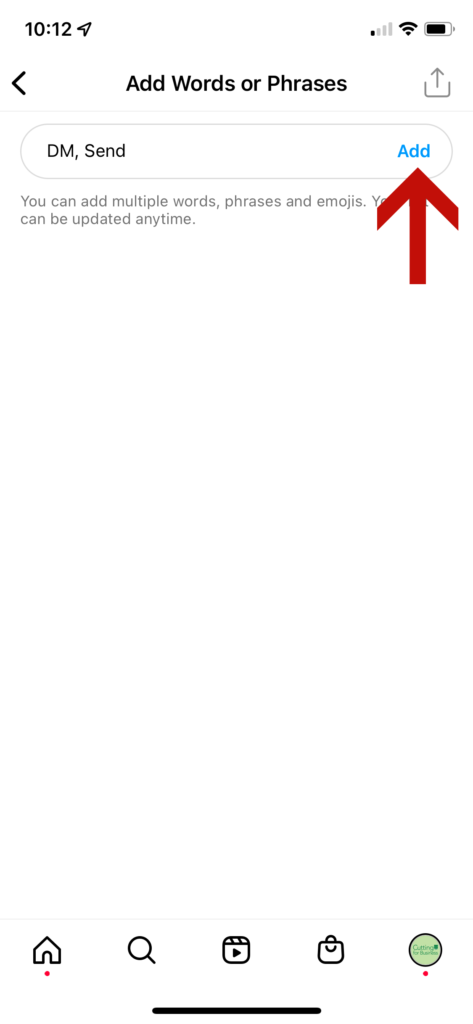
    • Add each word you want to block separated by a comma. (Hint: Not sure what words to add? Look through the spam comments on your posts for common words. In my case, I added the words ‘DM’ and ‘Send’ to my list.)
    Screenshot - Instagram from the article 'Tutorial: How to Get Rid of Instagram Spam Comments' - cuttingforbusiness.com.

    That’s it! You can return to your list at any time to add or remove words.

    I implemented hidden words on all of my Instagram profiles a few weeks ago. I’ve definitely seen a huge drop off in spam bot comments. I haven’t noticed any negative effects from creating a hidden words list on Instagram.

    Tutorial: How to Get Rid of Instagram Spam Comments - cuttingforbusiness.com.
  • Tutorial: How to Set Up Linktree for Instagram

    It has always been difficult to convert Instagram posts to actual traffic to your website or shop. This is because you can only post a single link in your profile bio to direct shoppers. I’ve been using Linktree for a bit now without any problems, so I’m confident enough in the service to offer you the recommendation to use it. Today, I’ll share a quick tutorial on how to set it up.

    What is Linktree?

    Linktree is a third party service that adds a page to your Instagram profile that directs social media users to links and pages that you set up.

    Tutorial: How to Set Up Linktree

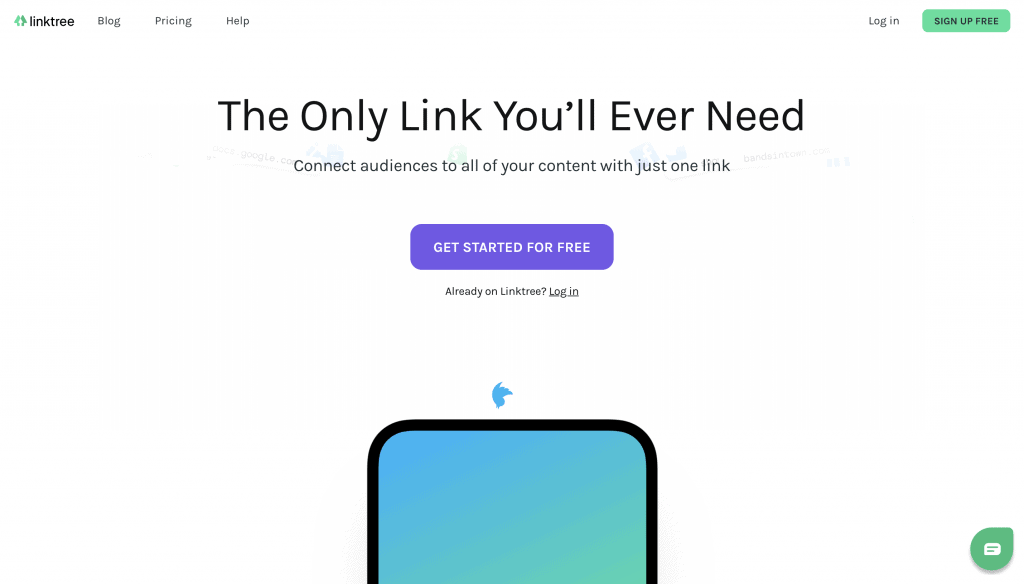
    1. Visit linktree.com and click the ‘Get Started for Free’ button, then complete the quick form. I’d recommend that your username be your business name (example: cuttingforbusiness).
    Screenshot of Linktree sign up page - by cuttingforbusiness.com.

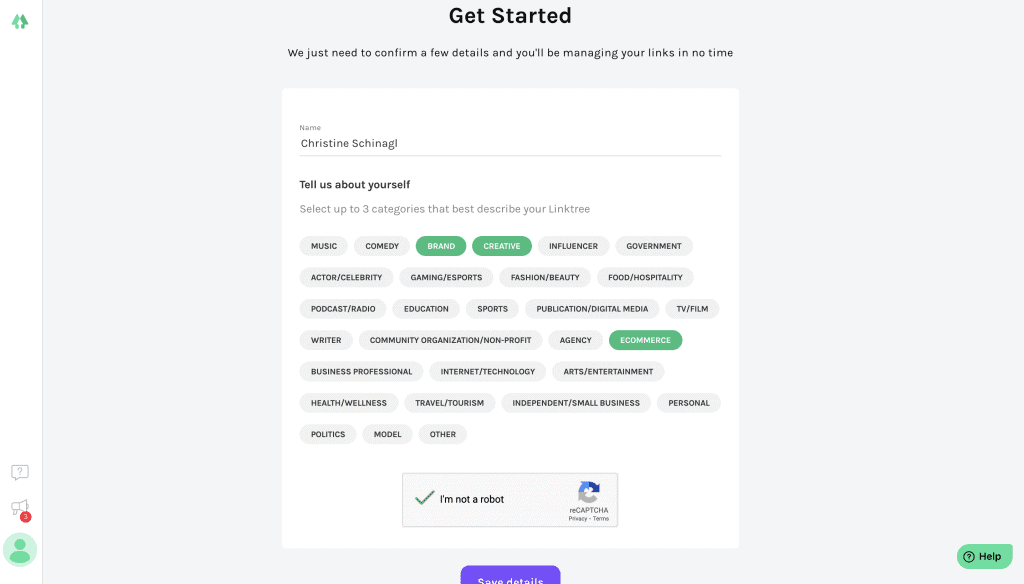
    2. On the next page, choose your categories. For most Silhouette and Cameo businesses, ‘Brand’, ‘Creative’, and ‘Ecommerce’ should work fine. Click the ‘Save Details’ button when you are finished.

    Screenshot of creating a Linktree account - by cuttingforbusiness.com.

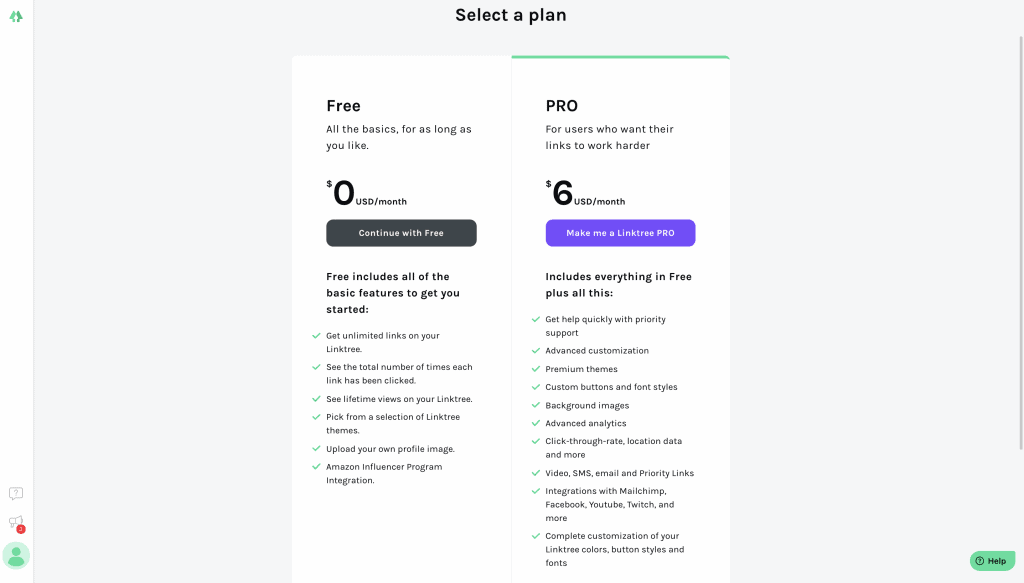
    3. Choose a plan. The Pro plans gives you additional features. It’s well worth the $6, but the Free plan may work for you as well.

    Plans available for Linktree accounts - by cuttingforbusiness.com.

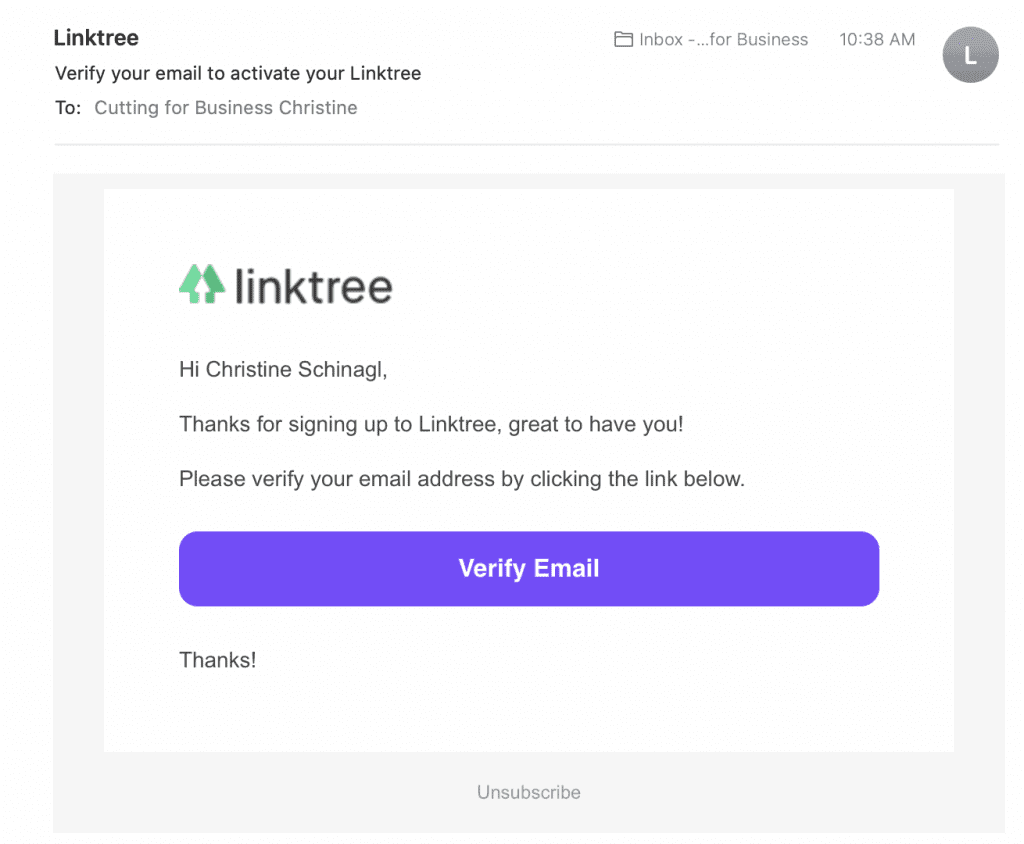
    4. If you are new to Linktree, you’ll need to verify your email address. Quick and easy, click the link on the email they send to you.

    Email verification of Linktree accounts - by cuttingforbusiness.com.

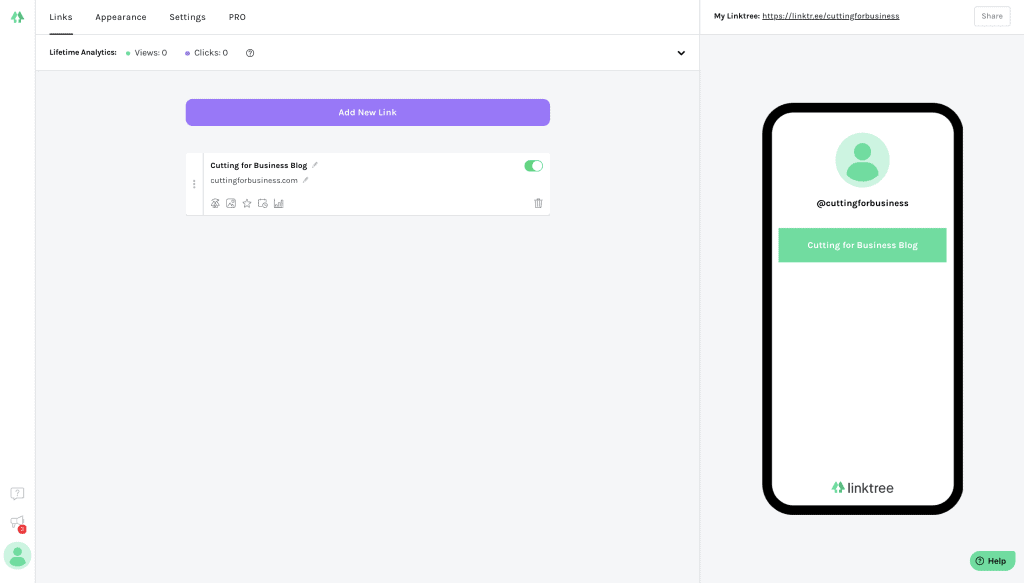
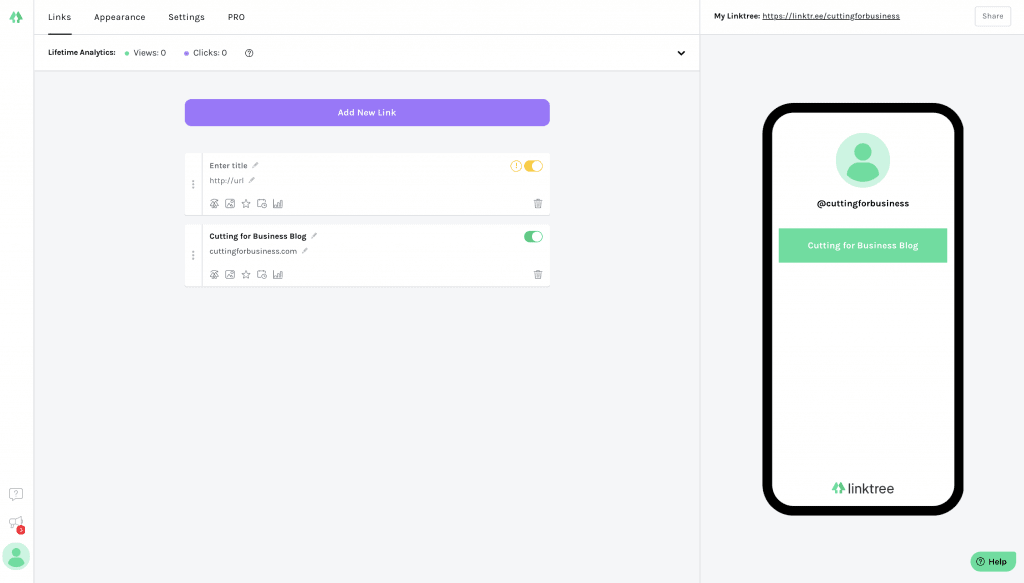
    5. Now is the fun part! You’ll add links to places you want to direct Instagram users to. I think that the first link you enter should be your website or shop’s home page. For the other links, consider adding to a sale you are promoting on Instagram, a popular product in your shop, your About Me page, or anything else.

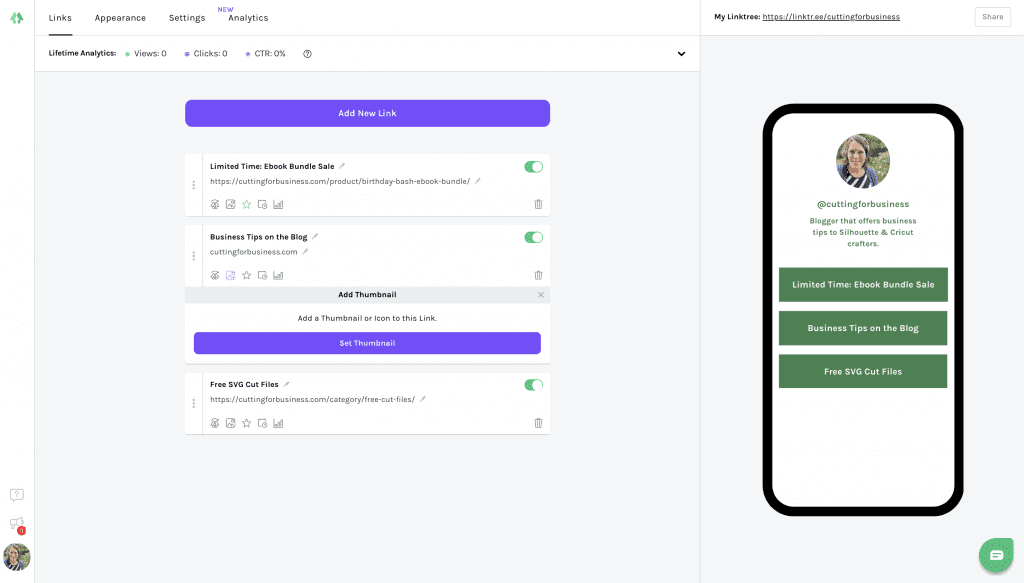
    To add links, click the ‘Add New Link’ button, then fill in the details. Be sure to click the button to switch the link on to be viewable on your Linktree (this is the yellow switch on the right side).

    Creating links in Linktree - by cuttingforbusiness.com.
    Creating more links in Linktree - by cuttingforbusiness.com.

    6. Click the ‘Appearance’ link at the top of the page and take a minute to style your Linktree landing page. First, enter a short biography and upload a profile picture. Then, choose a background. On the Free plan, many of the background options are busy. I’d recommend a simple page that doesn’t distract from your links AND that matches your branding.

    Advanced: On the Pro plan, you can add button effects, a thumbnail, scheduling, and more.

    Customizing your profile page in Linktree - by cuttingforbusiness.com.

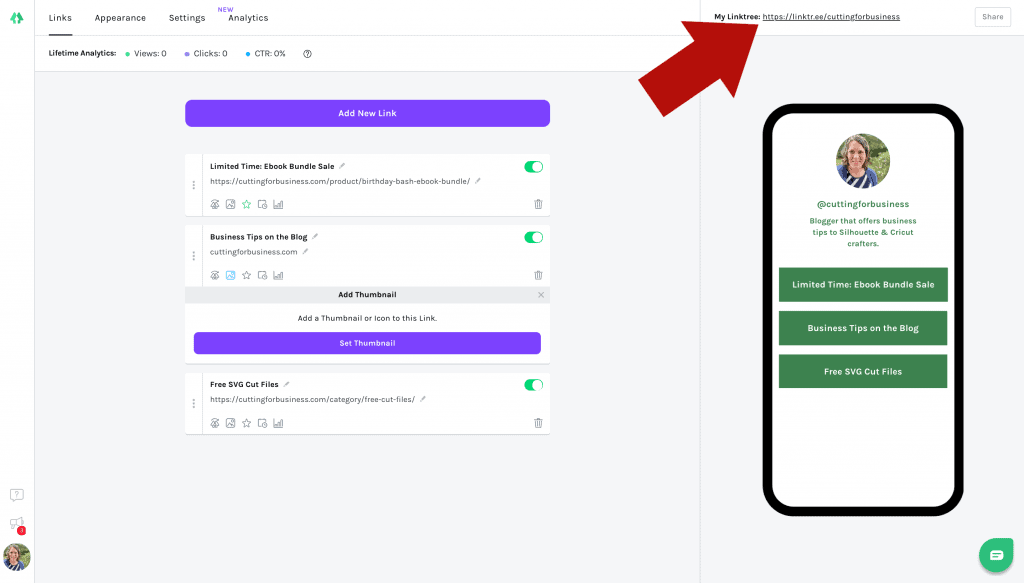
    7. Finally, take your Linktree link and add it to your Instagram profile page. (Tip: You don’t have to include the ‘https://’ part. Example in your Instagram bio: linktr.ee/cuttingforbusiness.)

    Where to find your Linktree link - by cuttingforbusiness.com.

    That’s it! You can get your Linktree up and running on Instagram in about 15 minutes. If you want to see mine: Click here.

    Don’t Forget to Update It

    If you are going to use Linktree, don’t forget to regularly update that links. I mean, no one wants to see links to your Halloween products in April!

    You Can Create Your Own Link Page on Your Website

    Oh! If you are pretty tech savvy, you can create the same kind of landing page from your website. Simply create a new page (make sure it is mobile friendly!) and add your links. Then, add your page to your Instagram bio.

    Use it in Other Places

    You can also use your Linktree on TikTok (or anywhere else)!

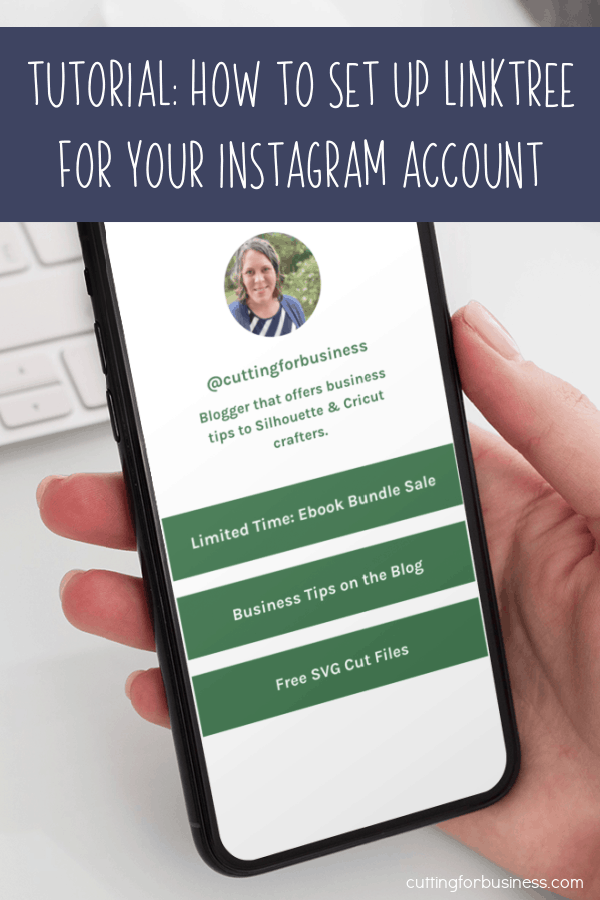
    Tutorial: How to Set Up Linktree for your Instagram account in your Craft Business - by cuttingforbusiness.com.
  • How to (Easily!) Make Animated Graphics for Social Media

    A few weeks ago, I was creating advertising graphics for my new course, How to Design SVGs. I wanted to make a few animated graphics, since they tend to perform well across my most popular social media platforms – Facebook and Instagram.

    Honestly, I dread tasks that I consider ‘time sucking’ – like making animated graphics. However, I was pleasantly surprised that it didn’t take too long when I used a few of Canva’s newer templates. I made a mental note to come back to the blog and share a tutorial so you could make some animated graphics as well. Let’s take a look at it today.

    How to (Easily!) Make Animated Graphics for Social Media

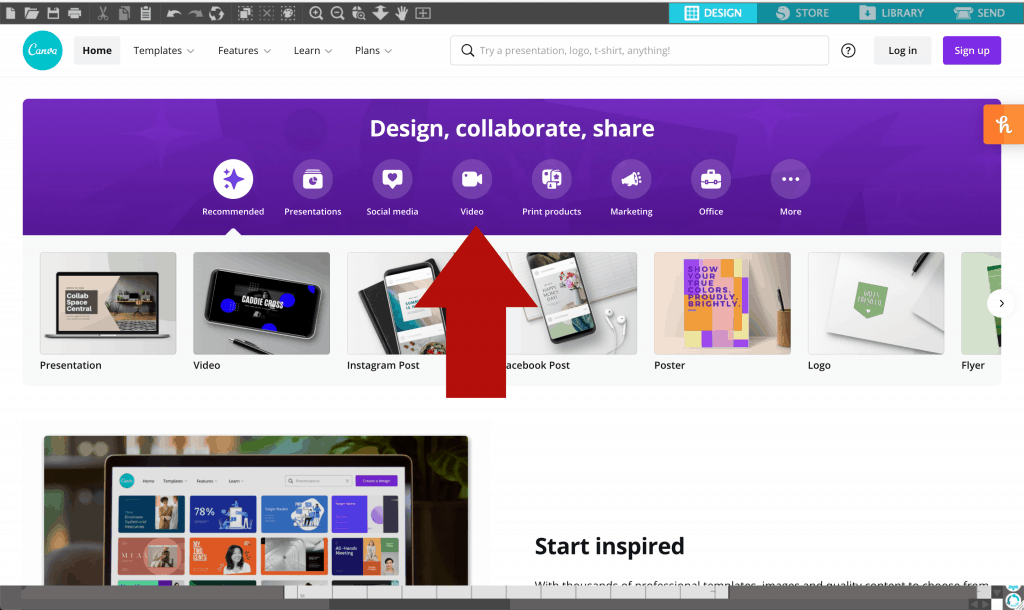
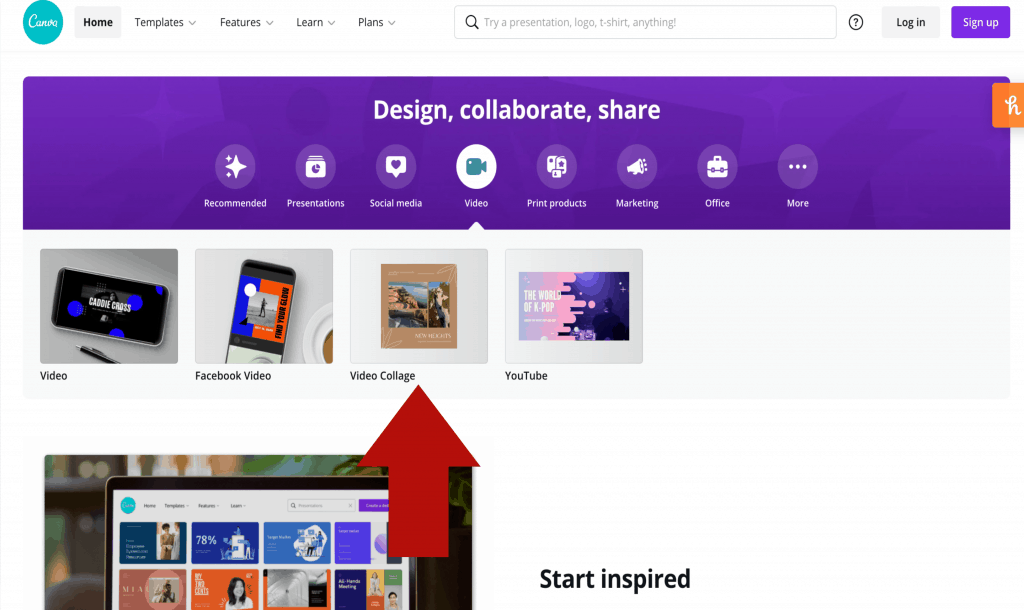
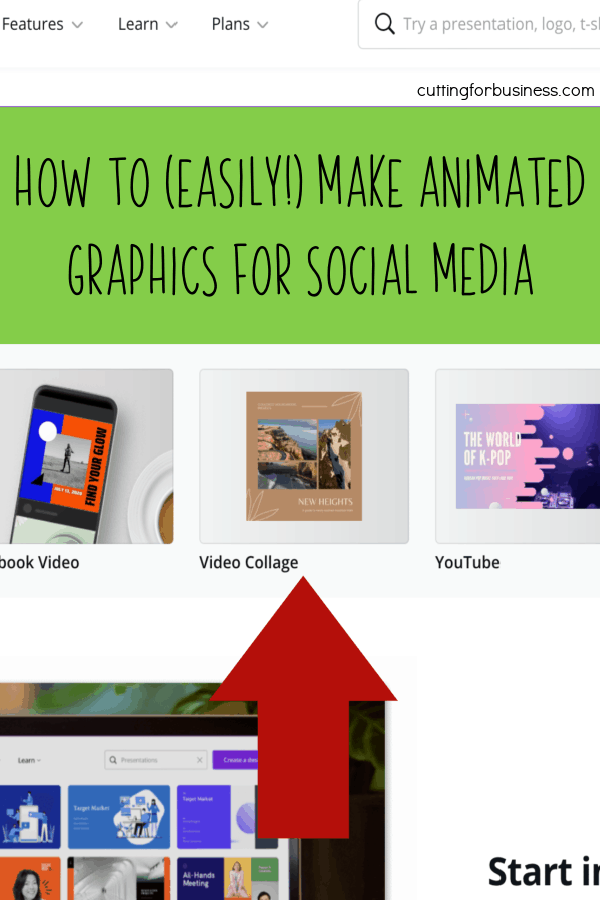
    1. Head over to canva.com. Then, click the ‘Video’ icon on the home page.
    Tutorial: How to Make Animated Social Media Graphics for Small Business Use - by cuttingforbusiness.com.

    2. Once on the Video Tab, select a template size. In this case, I’m choosing ‘Video Collage’.

    Tutorial: How to Make Animated Social Media Graphics for Small Business Use - by cuttingforbusiness.com.

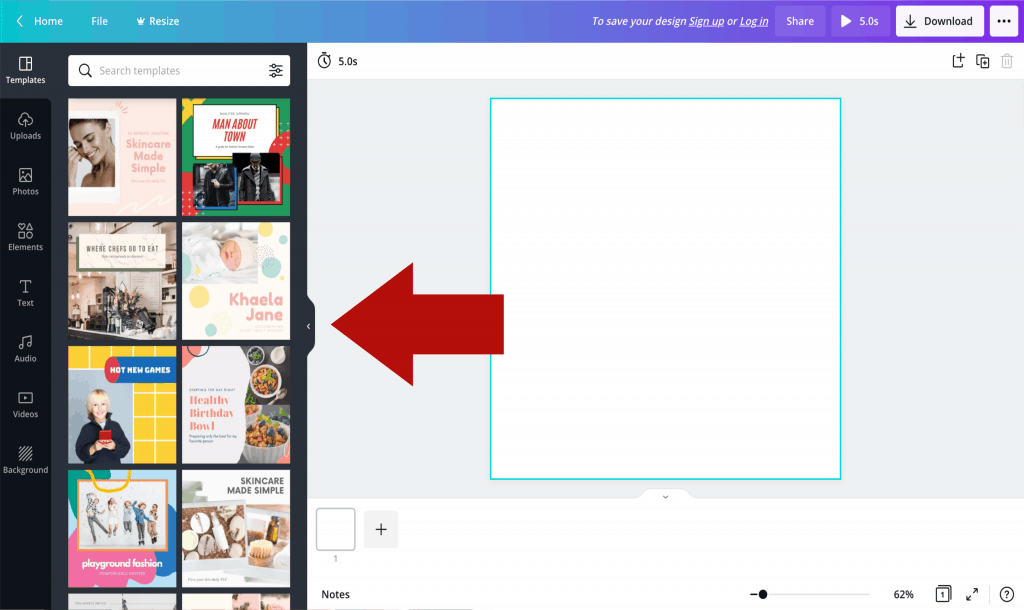
    3. Now, you’ve got video templates on the left hand side of the screen.

    Tutorial: How to Make Animated Social Media Graphics for Small Business Use - by cuttingforbusiness.com.

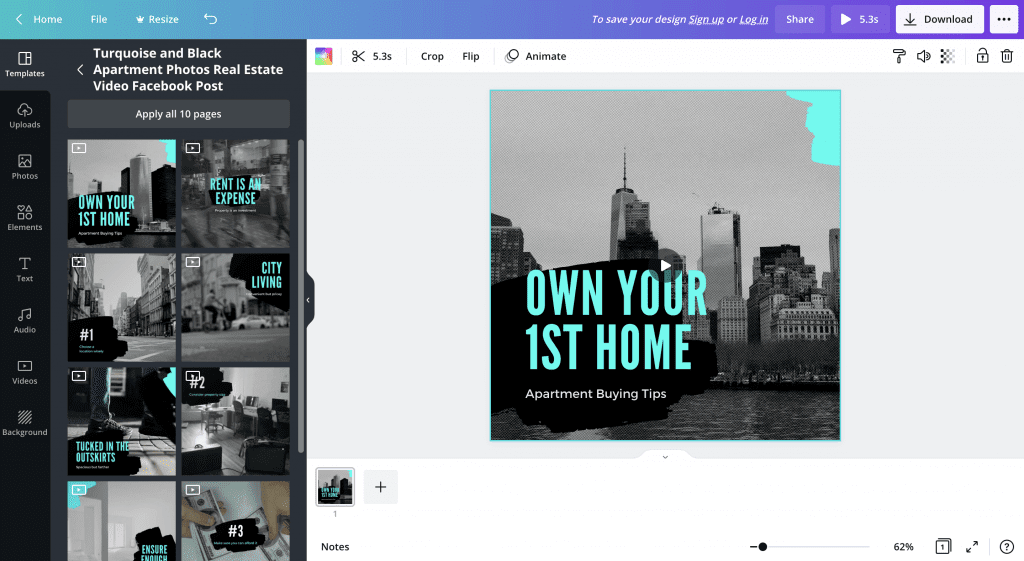
    4. Choose a template and click on it. When selecting a template, look more at the layout of the template than anything else. The words, fonts, and colors can be changed. Also, you’ll notice that some of the templates are slideshows; while others are animated graphics. You can also use one of the animated graphics in a slideshow template. For this tutorial, I chose a real estate themed animated graphic that is part of the slideshow, but I am only using one slide.

    Tutorial: How to Make Animated Social Media Graphics for Small Business Use - by cuttingforbusiness.com.

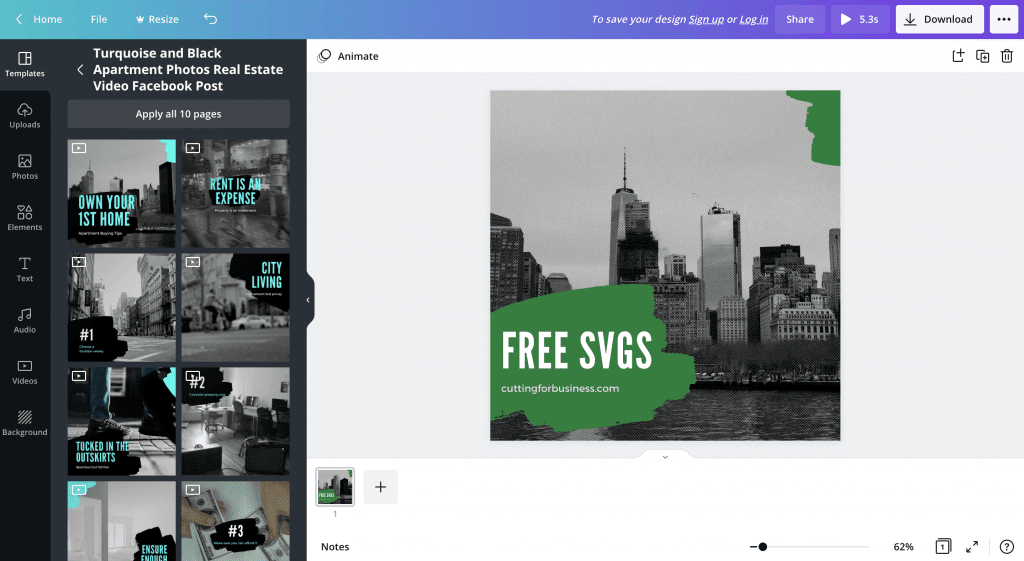
    5. Click the text to edit it. Change any colors as desired. Remember, you’ll want to make it match your brand colors.

    Tutorial: How to Make Animated Social Media Graphics for Small Business Use - by cuttingforbusiness.com.

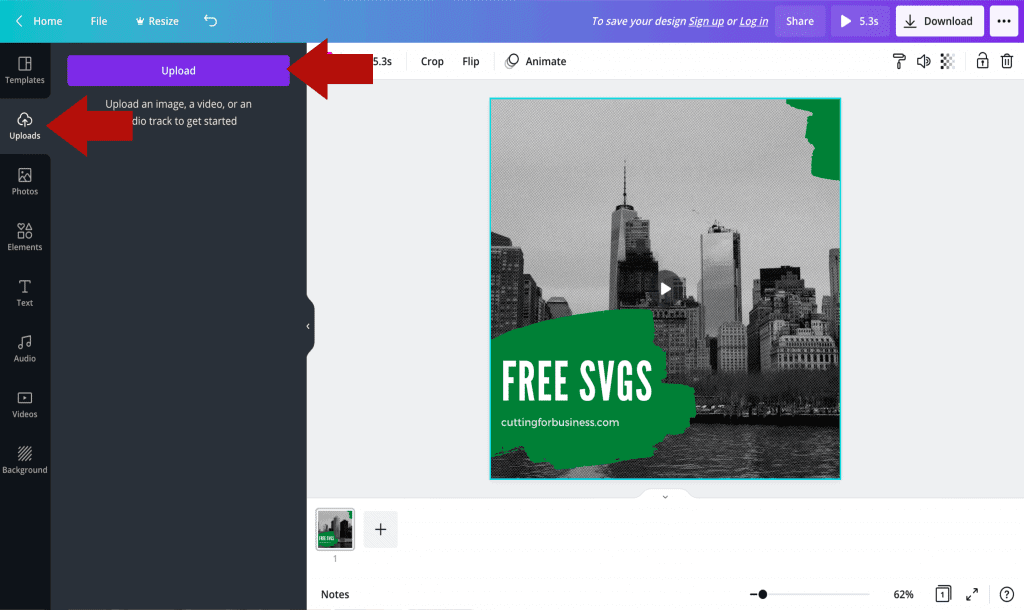
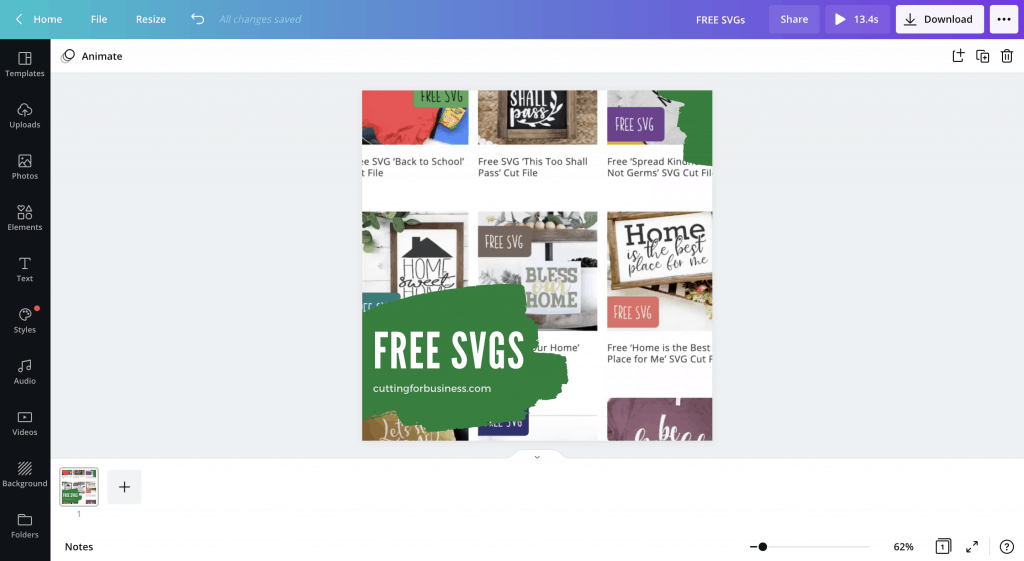
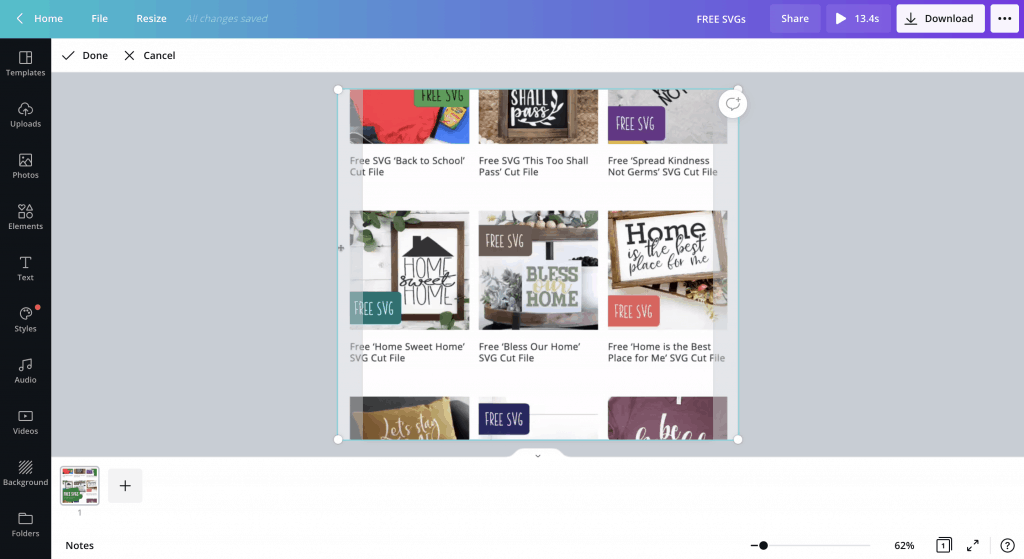
    6. Next, we need to add a video. Navigate to ‘Uploads’ on the left hand side and upload your video. I used my favorite screen recording program (Loom) to record a section of my website while I scrolled through some of the free SVGs on Cutting for Business. A short video of one of your products, a video of your workspace, or a video of your packaging all work well.

    Tutorial: How to Make Animated Social Media Graphics for Small Business Use - by cuttingforbusiness.com.

    7. After your video is uploaded, click the video in the template and add your video.

    Tutorial: How to Make Animated Social Media Graphics for Small Business Use - by cuttingforbusiness.com.

    8. Last, double click the video to resize it if needed.

    Tutorial: How to Make Animated Social Media Graphics for Small Business Use - by cuttingforbusiness.com.

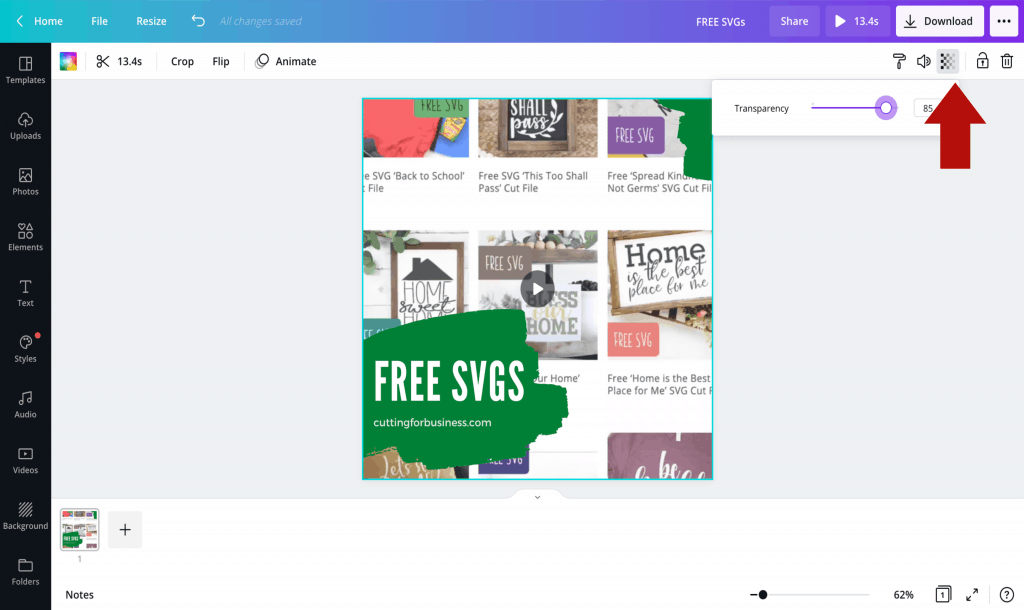
    9. As an optional step, you can adjust the video transparency if you’d like. I prefer to make it slightly transparent so that the text overlay jumps out a bit more. Click the checkerboard icon near the top, then use the slider to adjust the transparency.

    Tutorial: How to Make Animated Social Media Graphics for Small Business Use - by cuttingforbusiness.com.

    That’s it! Save and download your video (Canva account required). The final video is ready to post to social media and looks like this:

    The goal with animated graphics is to use a short background video to catch the eye of someone scrolling through their social media feed. Give it a try and spice up your customer’s feed!

    How to Easily Make Animated Social Media Graphics for Your Small Business - by cuttingforbusiness.com.
  • What are Pinterest Story Pins?

    Pinterest has been testing Story Pins for several months, but they’ve only just officially been released as a beta test about a week ago. Story Pins are available to those with Pinterest Business Accounts, but you may or may not have access to them at this time.

    What are Pinterest Story Pins?

    Pinterest Story Pins are collections of up to 20 related pins. Unlike regular pins, Pinterest Story Pins do not allow a spot to include a link (for US based accounts). (Note: Pinterest Story Pins in other countries do allow you to add links, so this feature may be coming to the US.) Some social media commentators are stating that Pinterest is using Story Pins to promote users staying on Pinterest and not clicking to outside websites.

    If you are thinking about Story Pins being similar to Stories on say Instagram or Facebook, they aren’t. They are permanent pins that do not disappear after a period of time.

    How Do I Create a Pinterest Story Pin?

    Pinterest Story Pins are created in Pinterest, either using the Pinterest App or the website. Here is a quick walkthrough using the Pinterest website:

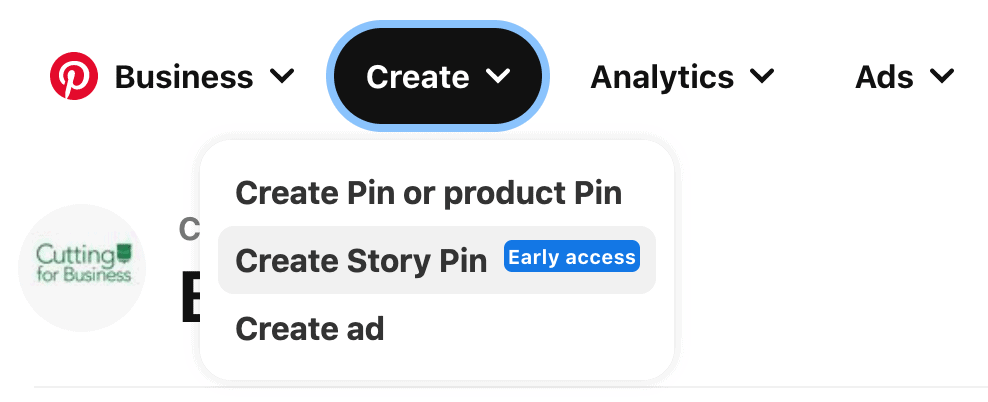
    1. From your profile page, click ‘Create’ along the top. Then, select ‘Create Story Pin’.
    What are Pinterest Story Pins? Are They Worth It For Craft Businesses? - by cuttingforbusiness.com.

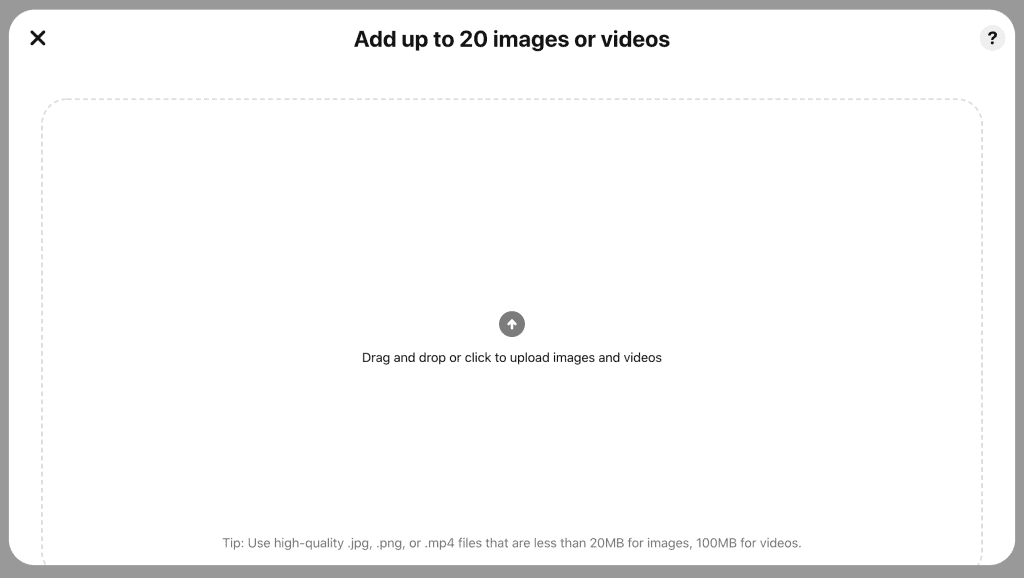
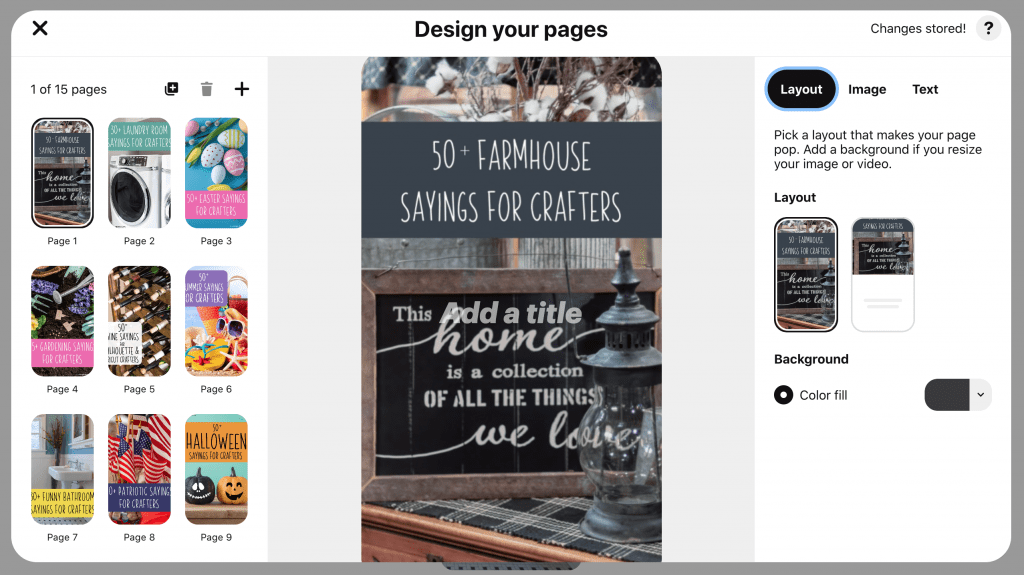
    2. The pin builder will launch and you can drag and drop or upload your images or videos into it. The recommended image size is 1080×1920.

    What are Pinterest Story Pins? Are They Worth It For Craft Businesses? - by cuttingforbusiness.com.

    3. After uploading, the pin builder will switch views and you’ll see all the images you just uploaded.

    What are Pinterest Story Pins? Are They Worth It For Craft Businesses? - by cuttingforbusiness.com.

    4. A few things to know about the pin builder:

    • You can change the order of the pins by dragging them around. You can add up to 20 images.
    • In the ‘Layout’ tab, there are two layouts to choose from. One allows you to add text under it.
    • The ‘Image’ tab allows you to edit the image.
    • From the ‘Text’ tab, you can overlay text onto your image.

    Click ‘Next’ when you are happy with your arragement.

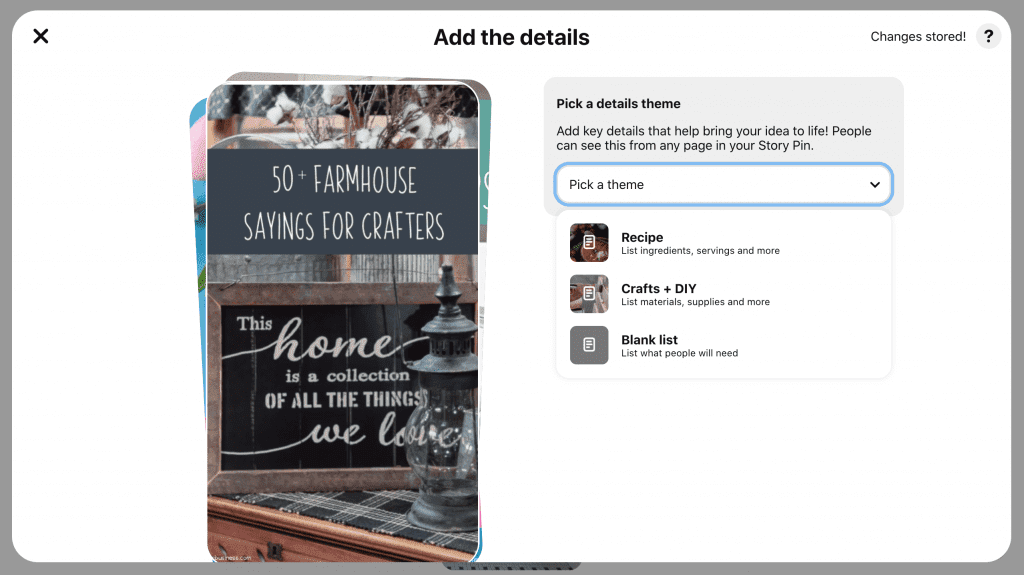
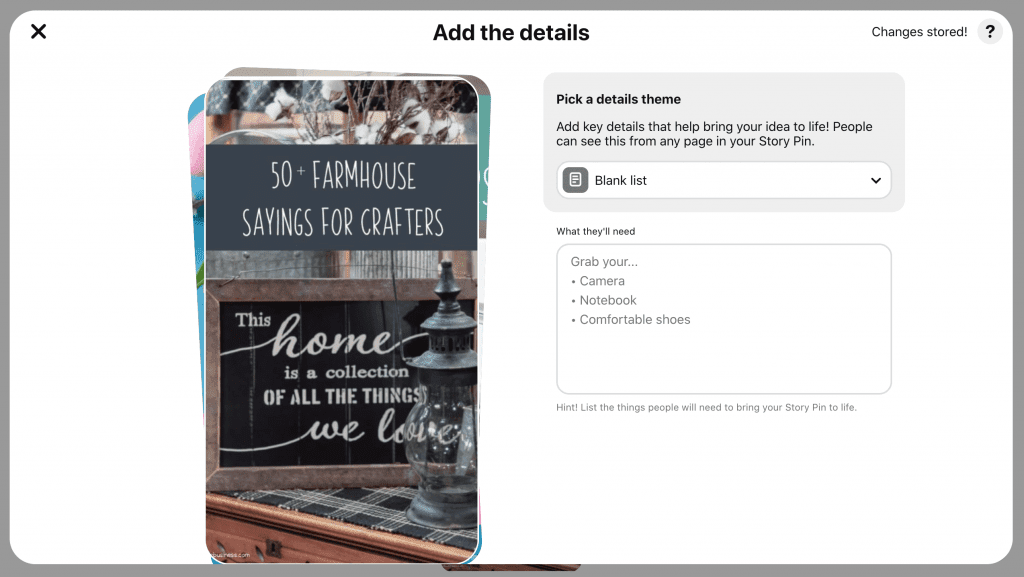
    5. Choose a theme for your Story Pin. You can choose from: Recipe, Crafts, or Blank. Then, add details about your pin. For my pins, I’m choosing ‘Blank’, and then adding details. It is important to put a link to where the buyer can buy your products in the details section. (Alternatively, you can also put your shop link on the images… or both!)

    What are Pinterest Story Pins? Are They Worth It For Craft Businesses? - by cuttingforbusiness.com.
    What are Pinterest Story Pins? Are They Worth It For Craft Businesses? - by cuttingforbusiness.com.

    Click ‘Next’ after you’ve added the details.

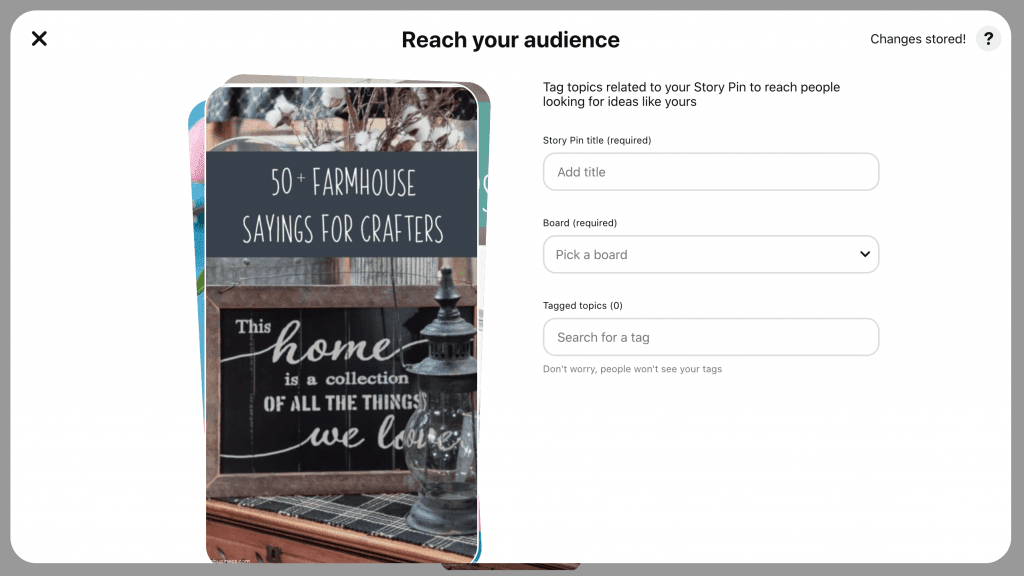
    6. Finally, add the audience details. Give your Story Pin a keyword rich title, choose a board, and add related tags. (Note: Tags are populated in Pinterest and there aren’t a lot to choose from.)

    What are Pinterest Story Pins? Are They Worth It For Craft Businesses? - by cuttingforbusiness.com.

    Last, click the ‘Publish’ button to put your Story Pin on Pinterest.

    Are Story Pins Worth It on Pinterest?

    So, are they worth it? In my opinion, it depends on your goal.

    • If you are looking to drive traffic to your website directly from your Story Pin – then no, Pinterest Story Pins are not worth your time right now. They may be worth your time if links are allowed at a future date.
    • If you are looking to drive traffic to your Pinterest account – then yes, Pinterest Story Pins are worth it. See, Pinterest has recently rolled out Story Pins and they are putting a lot of effort into promoting Story Pins throughout the network. Accounts using Story Pins see a lot of views on their Story Pins – and quickly. This may lead to new followers on Pinterest. Additionally, what I’ve personally seen is that it also leads to increased views on the pins I upload immediately before and after the Story Pins.

    Example Story Pins

    Interested in seeing some Story Pins live on Pinterest?

    Next time, I’ll share ideas for using Story Pins in your craft business.

    Need help using Pinterest in your Silhouette or Cricut business? Check out my book.

    What are Pinterest Story Pins? How Can You Use them in Your Craft Business? By cuttingforbusiness.com.
  • 10 Ideas for Using Pinterest Story Pins

    I recently talked about Pinterest Story Pins. Today, I’m sharing some ideas I’ve come up with to utilize the new format for your craft business.

    10 Ideas for Using Pinterest Story Pins

    • Share a step-by-step tutorial related to what you sell. This is particularly useful if you sell supplies like vinyl or blanks.
    • Show your Pinterest followers how to use your product. For example, if you sell digital cut files, show your followers how to edit or personalize your cut file.
    • Take your followers through a journey of creating one particular product. For example, if you sell greeting cards, show yourself designing the card, cutting out the pieces, gluing them down, packaging them, then shipping them.
    • Use Pinterest Story Pins to share collections of products. For example, if you sell shirts, put together all the holiday shirts you sell into one Story Pin. You could do the same if you sell ornaments, wood signs, or anything else that can be grouped around a theme, season, or holiday.
    • Show the flexibility of your products. If you sell cut files or digital papers, show a single product being used in various different ways or on several different products.
    • Use Pinterest Story Pins to tell the story behind your business. This is a great opportunity to show off your workspace, you working, or other behind the scenes clips.
    • Offer several different views of a particular product using short videos and still images tied together in a Pinterest Story pin. I think this is a great idea for products that are difficult to photograph, like an epoxied tumbler.
    • Highlight happy customers in a Pinterest Story Pin. You can include customer submitted pictures along with screenshots of positive feedback.
    • Collaborate with another maker and you can both post the same Pinterest Story Pin around the same time. You can show your products, the other maker’s products, and both of your products together.
    • Use Story Pins to create a modified time lapse of anything. Establish the time of day in the first few pins, then work through the day in the rest. Or, start with hour 1, hour 2, hour 3, and so on. This would work well to show your day, or the creation of a product that takes a long time.

    Remember, work smarter – not harder. The easiest way to get started with Pinterest Story Pins is to reuse the pins you’ve already made.

    10 Ideas for Using Pinterest Story Pins in Your Silhouette or Cricut Small Craft Business - by cuttingforbusiness.com.
  • 15 Social Media Don’ts for Craft Businesses

    It’s no secret that social media is a necessity in modern times to running a craft business. Today, I wanted to share a quick list I’ve put together about 

    15 Social Media Don’ts for Craft Businesses

    1. Don’t constantly sell, sell, sell. Yes, the purpose of your social media profiles is to promote your business. However, you will lose followers if you solely post things for sale everyday. Vary your content. Need some ideas for varied content? Read this post.
    2. Don’t beg your followers. I see this a lot, ‘Share this’, ‘Follow me over here’, and so on. Once in a while it’s perfectly acceptable, but not on every post.
    3. Don’t post before you proofread. I’m guilty of this every once in a while, but please, proofread before you post to your social media.
    4. Don’t share the same thing over and over again. It’s okay to post the same message more than once – but make sure it’s spaced out over time.
    5. Don’t write in ALL CAPITAL LETTERS. I get it, you’re excited! I’m excited, too! But, writing in all capital letters is known as SCREAMING on the internet. 
    6. Don’t get involved in politics. Honestly, political conversations often go downhill on social media. The best plan for your craft business? Stay out of it. Want to share your opinions? Your personal profile is a better outlet.
    7. Don’t fight with trolls. Have someone intentionally posting on your page to get a rise out of you? Don’t even engage with them. Delete their comments, remove them, and move on.
    8. Don’t go to other related small businesses and promote yourself on their page. I’ll come straight up and say it: If you sell tumblers and you go to another tumbler maker’s social media to promote yourself – you look bad, your business looks bad, and it’s tacky. Don’t do it.
    9. Don’t feel like to have to be on every social media network. Not all networks will bring you the customers you are seeking. Find the ones that work for you – and stick with them.
    10. Don’t schedule a post and never return to it. It’s completely fine to use automation tools to schedule posts to social media. It’s not okay to schedule messages and never look back at them. Followers leave comments and questions – be sure to answer or acknowledge them.
    11. Don’t complain. Everyone has complaints, but they don’t need to be aired on your business page. And, don’t complain or vent about customers either.
    12. Don’t feel pressured to follow everyone that follows you. While follow trains are nice, they don’t give you an engaged audience. Instead, follow accounts that you are actually interested in.
    13. Don’t obsess about social media numbers. It’s better to have a small engaged audience than a large social media following with no engagement. Need to improve your engagement? Head to this post.
    14. Don’t use personal accounts as a business. Always follow the terms of service for whatever network you are on. If you are using the network as a business, be sure to create a business account.
    15. Don’t spam. Constantly posting links to your page all over a network is considered spam. For example, if you join 10 Facebook Groups and post your website link in every one – it’s considered spam. Don’t do it or you’ll risk being removed from the network altogether.

    Was this information helpful? Save the image below to Pinterest.

    15 Social Media Don'ts for Craft Business Owners - Silhouette Portrait or Cameo and Cricut Explore or Maker - by cuttingforbusiness.com