Category: Social Media

  • New on Instagram: How to Follow Hashtags

    Love using Instagram in your Silhouette or Cricut business? Me, too! There’s a new feature that I am excited to share with you today: Following hashtags! If you are like me, in addition to following other Instagramers, you love to browse relevant hashtags related to crafting, your business, and Silhouette or Cricut. (If you don’t, get to it – it’s how I find new Instagramers to follow!) Let’s take a look at how this hashtag following works.

    How to Follow Hashtags on Instagram

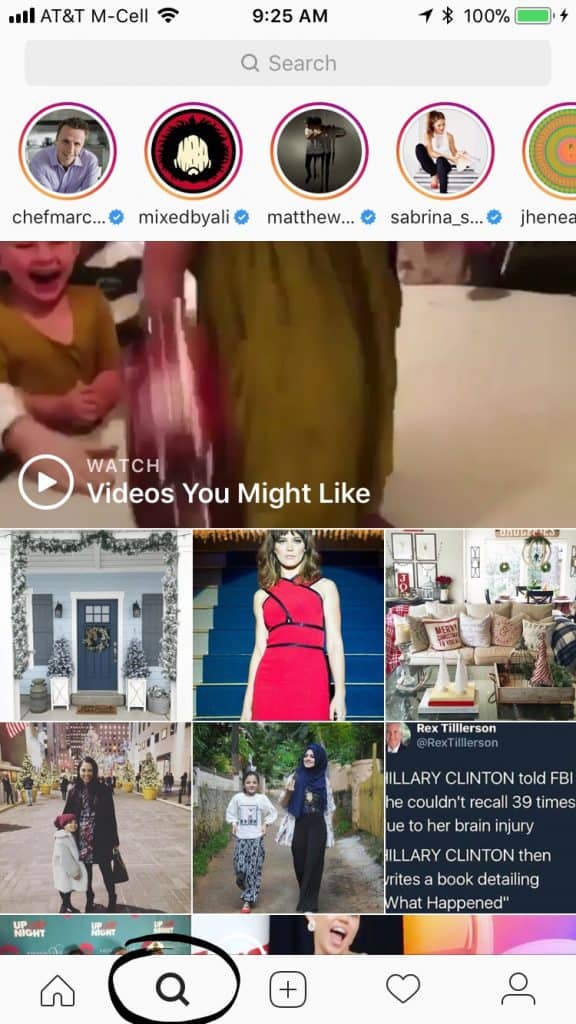
    1. Once logged into your account, click the ‘Search’ function at the bottom of the screen (it’s the magnifying glass). New on Instagram: How to Follow Hashtags - A great tool for Silhouette Cameo or Cricut Explore or Maker Small Business Owners - by cuttingforbusiness.com
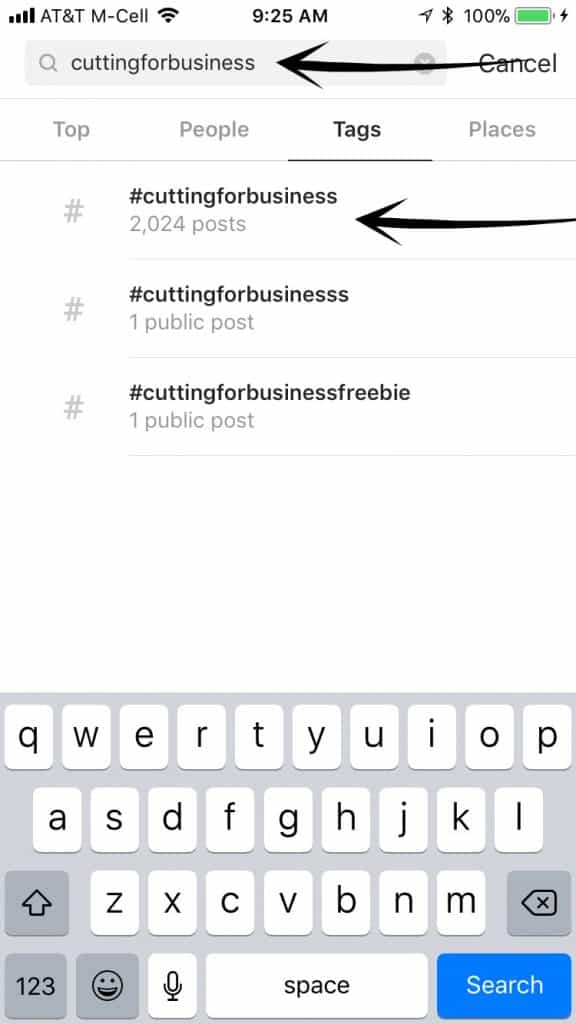
    2. Type the hashtag you’d like to follow into the search box. In this case, I’m following my own hashtag, #cuttingforbusiness, which is a mix of my content and content from Cutting for Business followers. Click on the desired hashtag in the search results.New on Instagram: How to Follow Hashtags - A great tool for Silhouette Cameo or Cricut Explore or Maker Small Business Owners - by cuttingforbusiness.com
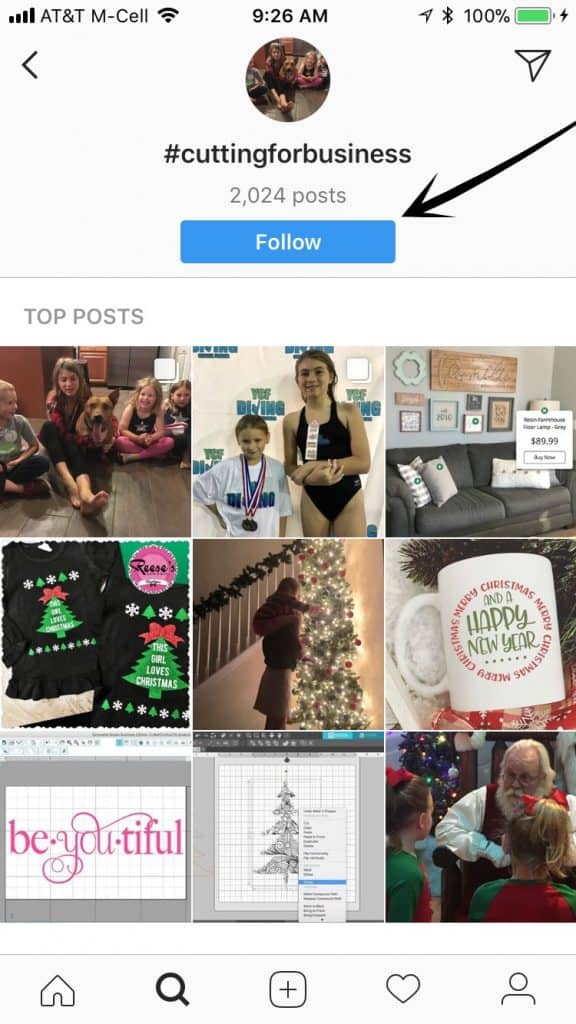
    3. Click the “Follow” button. New on Instagram: How to Follow Hashtags - A great tool for Silhouette Cameo or Cricut Explore or Maker Small Business Owners - by cuttingforbusiness.com
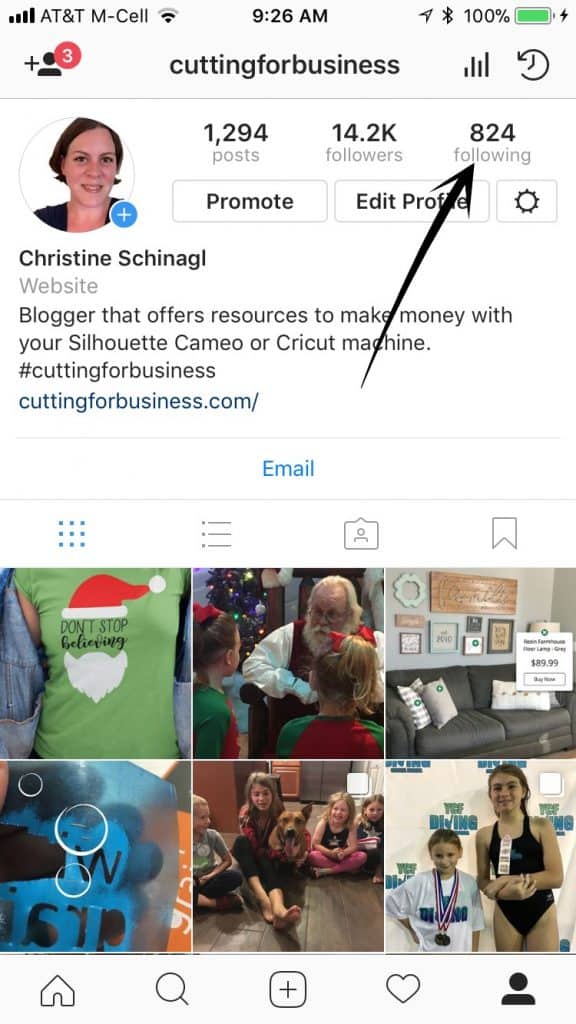
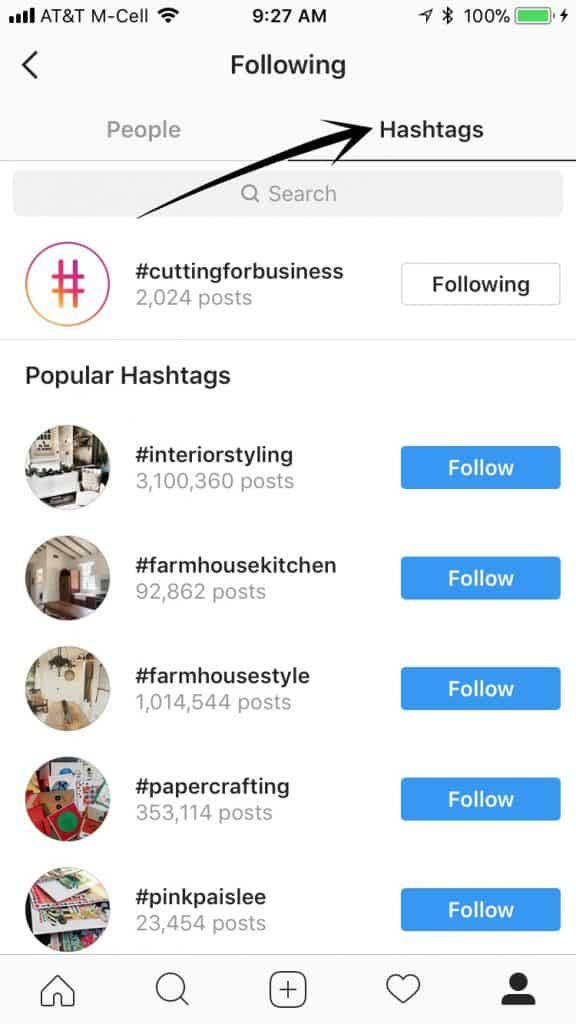
    4. Now, you (and other Instagramers) can see what hashtags you follow by first going to your profile, then clicking the “Following” tag. New on Instagram: How to Follow Hashtags - A great tool for Silhouette Cameo or Cricut Explore or Maker Small Business Owners - by cuttingforbusiness.com
      New on Instagram: How to Follow Hashtags - A great tool for Silhouette Cameo or Cricut Explore or Maker Small Business Owners - by cuttingforbusiness.com

    That’s it – it’s just that simple! It’s no secret that Instagram has undergone quite a transformation in the last few years. Of the changes made, this one is one of my favorites. It makes it so much easier (and time saving!) to discover new accounts.

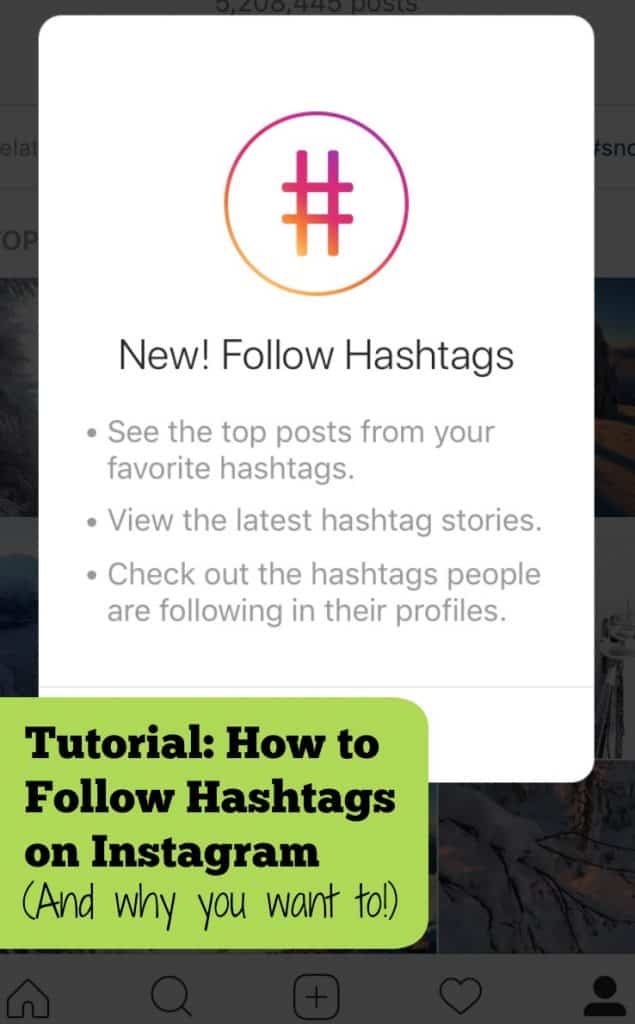
    If you found this tutorial easy to follow, save it to Pinterest:

    New on Instagram: How to Follow Hashtags - A great tool for Silhouette Cameo or Cricut Explore or Maker Small Business Owners - by cuttingforbusiness.com

  • Decluttering Your Pinterest Account: A Checklist

    Ok, I have given you some time to declutter your digital life after I wrote about it – Digital Clutter: 9 Things to Get Rid of Now – last week. Now, it’s time to tackle another New Year decluttering project: Your business Pinterest account.

    You should treat your business Pinterest account like prime real estate; I mean, Pinterest is a top referrer on the internet. Let’s look at it this way: Imagine you own a shopping mall and one of your store tenants moves out. You’d get busy trying to find a replacement tenant instead of letting an empty storefront sit there. The same principle applies to your Pinterest boards: Don’t take up valuable real estate with outdated pins or pins that don’t link where they should.

    To help you get started, I’m giving you some tips:

    What to Delete from Your Pinterest Account

    1. Pins with broken links. The internet is constantly changing. You are more than likely to have pins that link to pages that no longer exist. Delete them.
    2. Pins with spam links. Pins get highjacked by spammers all the time. Delete any pins that don’t link to where they should.
    3. Outdated pins. If you pinned something due to a sale, limited time offer, or giveaway and it is now expired, get rid of it.
    4. Pins that aren’t complementary to your brand or product. If you have pins that don’t complement your products, delete them. For example: Let’s say you make wood signs and are in the rustic/farmhouse niche. If you’ve got pins that feature modern, sleek designs – get rid of them. These pins would attract customers that aren’t in your demographic and won’t buy your products. There is no need to keep them.
    5. Pins that your followers haven’t interacted with. You may have thought is was the best ever ‘thing’ but if your followers haven’t repinned it, delete it.

    Plan of Attack

    If you’ve got thousands of pins, decluttering your Pinterest account can be a daunting task! Here’s some tips for getting the job done:

    1. Start with your most popular boards. After you finish these, work your way down to your least popular boards.
    2. Choose one board per day and work through it until it is finished.
    3. Slowly replace deleted pins with high quality content.

    Your Business Isn’t on Pinterest?

    If you’re business isn’t on Pinterest, you are missing loads of potential customers! Pick up my Pinterest Boot Camp and in 7 days – your business will be on Pinterest.

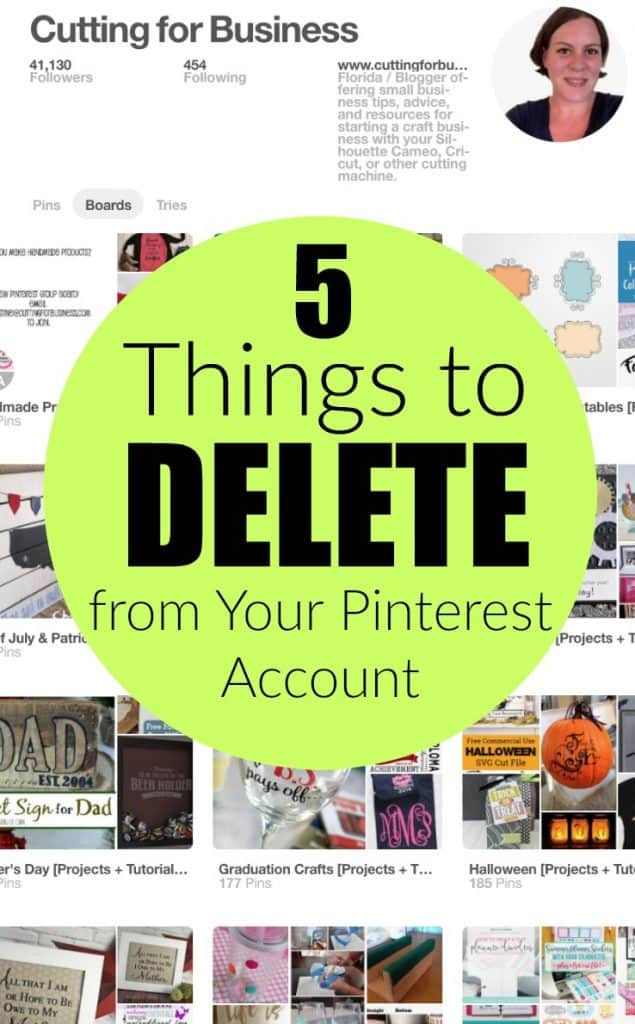
    Before you start decluttering, be sure to save the image below to Pinterest:

    Decluttering Your Pinterest Account: A Checklist - 5 Things to Delete from Your Pinterest Account - by cuttingforbusiness.com

  • How to Host a Facebook Live Sale Event in Your Craft Business

    Maybe you’ve seen them before: direct sales consultants selling their products through Facebook Live. While the idea is newer to Facebook, the idea isn’t new. Shows on QVC and HSN have been selling through live shows for decades. Today, let’s look how you can implement this in your Silhouette or Cricut craft business.

    Weeks Before the Event

    • Create all the products you will have for sale. In live shows, you can’t use mockups and you’ll need to have a number of products made before the event. You can make one of each product or several – it’s your choice.
    • Decide on a date and time. When looking at your calendar, take into account what your customers might be doing on an average day: Do they work during the day? Are they free in the evenings or weekends? Does the time you chose work well for people across several time zones?
    • Advertise, advertise, advertise! I’d suggest you make up graphics to advertise the time and date of your live event. You can make your advertising fun by saying that shoppers can bring their own snacks and drinks – or even shop in their pajamas.
    • Plan giveaway products. If you give away products throughout your event, you are likely to keep people tuned in through the whole thing.

    Event Prep

    • Set up your space. In the days before the event, you’ll want to set up your space. You can use anywhere in your home, but be sure that it has good lighting (near a window is perfect), is quiet, and is free from distractions (like significant others, children, and televisions or phones).
    • Setup idea. An easy setup is to use a long table with your products on display on both the table and the wall behind you. Then, stand behind the table as you show off your products.
    • Prepare notes to help guide you during the event. This could be the order of products to show off, the size of the products, the prices, and the numbers.
    • Know your technology. Be sure you know how to work any technology component you use during the broadcast. There is nothing worse than tuning into a Facebook event and the host is fiddling around with the camera!

    At the Event

    • Sell! Once your live shopping event starts, introduce yourself and start selling! You should hold up each product in front of the camera and give basic details about it (size, colors, ideas on how to use it, what makes it awesome).
    • Remind shoppers how to buy. As you see new shoppers join your event, welcome them and remind them how to order. There are two easy ways to collect orders during a live event: 1) Have customers comment the item, size or color, and email address. After the event, you’d send invoices to each customer to pay. 2) Use a program like CommentSold or Soldsie.
    • Answer shopper questions. Don’t ignore shoppers while using Facebook Live. Respond to their questions and ask them to be involved.
    • Give stuff away. The absolute easiest way to keep shoppers through the entire event is to give away stuff at the beginning, middle, and end of the event. Require participation to be able to win giveaways.

    After the Event

    • Send invoices. Send invoices to shoppers as quickly after the event as you can if needed.
    • Follow up. Be sure to follow up with shoppers who had questions or requested custom orders during the event.
    • Ship items. Don’t forget to ship items to your shoppers in a timely manner.
    • Start planning your next event! Remember, after each event take a few minutes to write down what worked and what didn’t so you’ll remember for next time.

    Need tips for Facebook Live? Head to this post.

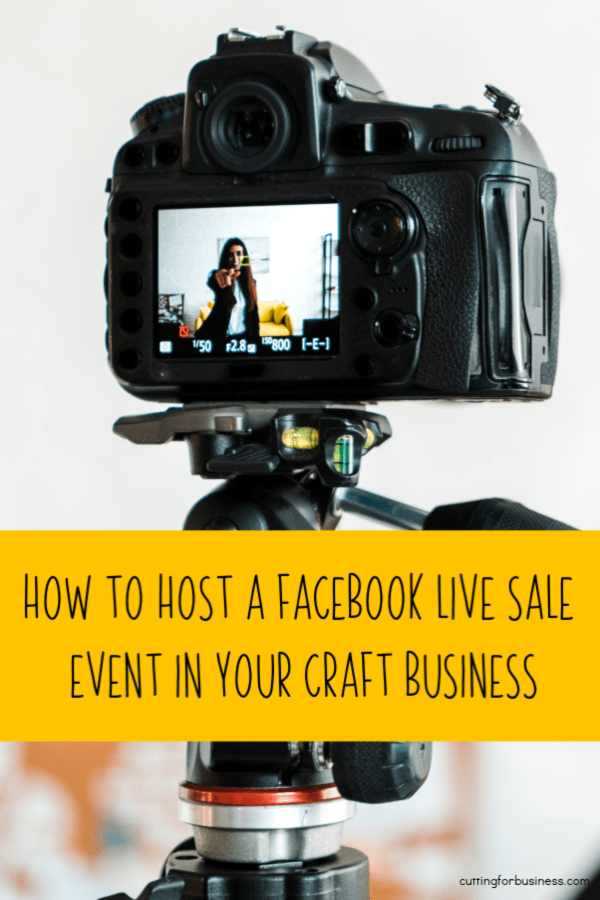
    Love this post? Share it on Pinterest:

    How to Host a Facebook Live Sale Event in Your Craft Business - Silhouette Cameo - Cricut Explore Maker - cuttingforbusiness.com
  • Tutorial: Facebook Cover Videos

    I’ve said it a million times before and it bears repeating: Facebook is pushing to get themselves into the video aspect of the online world. With engagement being the key to success on Facebook, it’s no surprise that they recently introduced cover videos for pages. Let’s take a look today.

    What are Cover Videos?

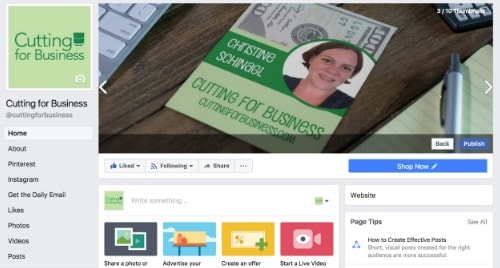
    Just like your cover photo on your Facebook page, you can now add a video instead.

    Video Specifics of Facebook Cover Videos

    • Facebook suggests a ratio of 820 pixels by 312 pixels. Now, this is a really odd ratio that I was concerned about, but Facebook allows you to move the video around once uploaded, so it turned out to not be a big deal. Make sure your video is larger than these dimensions.
    • Videos can be between 20 and 90 seconds long.
    • You can loop a short video.
    • The cover video automatically plays when a visitor visits your page.
    • The bottom corner features a mute/unmute button.
    • Videos are muted to start. To hear the audio, a user must turn the sound on. This is important, because it implies that you shouldn’t have important audio with the video. Users are likely to miss it. (Example: a video of you talking wouldn’t be ideal.)
    • Videos are shown on both desktop and mobile sites, but a still shot from the video is shown if a visitor is using the Facebook app.
    • Facebook cover videos are still being rolled out to all pages, but most people are reporting the option. If you don’t see the option, watch for it to roll out to your page soon.

    Tutorial to Create a Facebook Cover Video

    1. Record a video related to your brand. If you aren’t much of a videographer (raising my hand!), you can create a brand related video mockup through Placeit like I did. (Save 15% on purchases through this link.) Learn more about Placeit video mockups in this previous post.
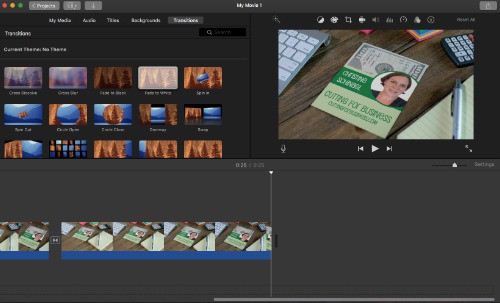
    2. Edit your video as needed. I used iMovie to simply loop the video to make it at least 20 seconds. Feel free to use the video editor of your choice.Tutorial: Facebook Cover Videos - New Facebook Feature! - by cuttingforbusiness.com
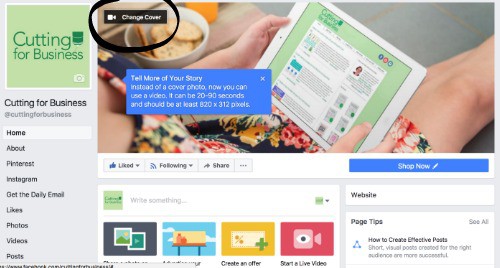
    3. Head to your Facebook page. In the top left corner of your Facebook page cover photo, click “Change Cover”.Tutorial: Facebook Cover Videos - New Facebook Feature! - by cuttingforbusiness.com
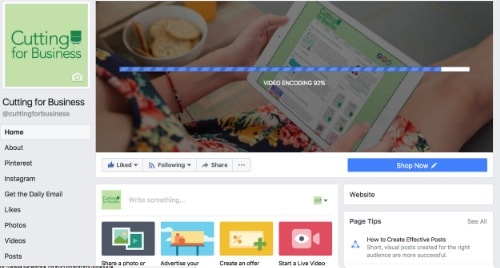
    4. Your video will take a few minutes to upload. Tutorial: Facebook Cover Videos - New Facebook Feature! - by cuttingforbusiness.com
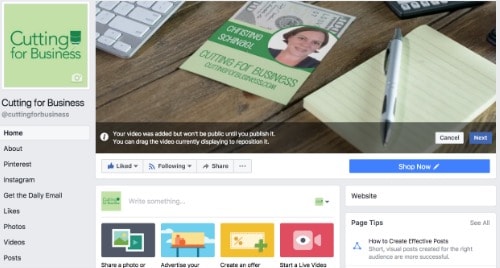
    5. After uploading, you can drag the video around. Then, you’ll choose a thumbnail to be shown from the video if the video is unavailable and within the Facebook app. After selecting, click “Next”. Tutorial: Facebook Cover Videos - New Facebook Feature! - by cuttingforbusiness.com
    6. Finally, click “Publish” to put your video live on your Facebook cover. Tutorial: Facebook Cover Videos - New Facebook Feature! - by cuttingforbusiness.com

    Ready to see my Placeit video live on my page? Click here to visit the Cutting for Business Facebook page.

    Tell me in the comments, will you use this new Facebook feature in your Silhouette or Cricut small business?

    Save this post to Pinterest so you can find it later!

    Tutorial: Facebook Cover Videos - New Facebook Feature! - by cuttingforbusiness.com

  • Facebook Likes versus Followers: What’s the Difference?

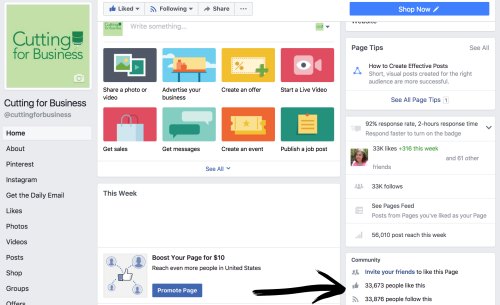
    Today’s blog post comes from a question I’ve keep getting in my email box from Silhouette Cameo and Cricut Explore small business owners with Facebook Pages: “Why does my Facebook page have likes and follows?”

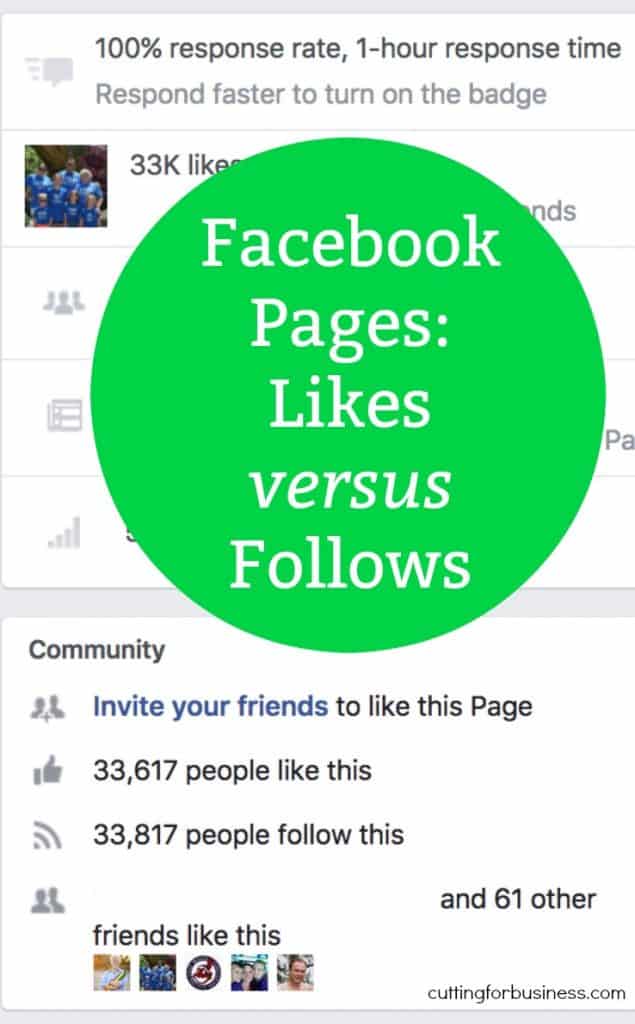
    If you head to your Facebook business page and scroll down a bit, you’ll see a count for both likes and follows: Facebook Likes versus Followers: What's the Difference? - by cuttingforbusiness.com

    So, what’s the difference?

    • The like counter is the number of people that have liked your Facebook business page.
    • When a new customer likes your page, the default setting is that they also follow your page.
    • When someone follows your page, it means that your Facebook page posts will appear on their personal Facebook feed.
    • Followers have the option to “Unfollow” your page, but still like your page. (This is similar to personal Facebook accounts. You can “Unfollow” someone you are friends with and no longer see their posts in your feed – but still stay friends with them.)

    Now what? It’s time to play detective a bit. If your numbers are drastically different (way more likes than followers) – you might rethink your Facebook strategy. This means that people are liking your page, then unfollowing you. Could your page be boring? Is your page offensive? Whatever the cause, you can likely figure it out and fix it.

    Remember, there are no (and I mean – NONE!) stupid questions. Feel free to shoot me an email or message if you have a question, likely someone else has the same question.

    Save this post to Pinterest:

    Facebook Likes versus Followers: What's the Difference? - by cuttingforbusiness.com

  • Tutorial: How to Set Up a Facebook Shop

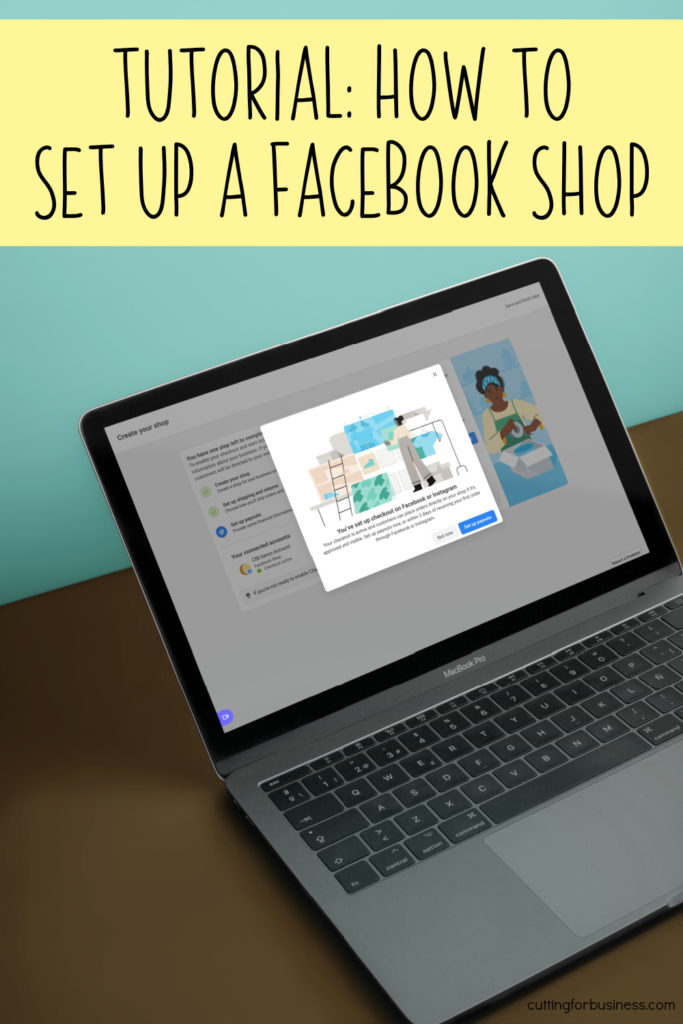
    Ready to start selling crafts on Facebook? This page will show you how to set up a Facebook Shop.

    Tutorial: How to Set Up a Facebook Shop - Great for Silhouette and Cricut Crafters - by cuttingforbusiness.com.

    Tutorial: How to Set Up a Facebook Shop

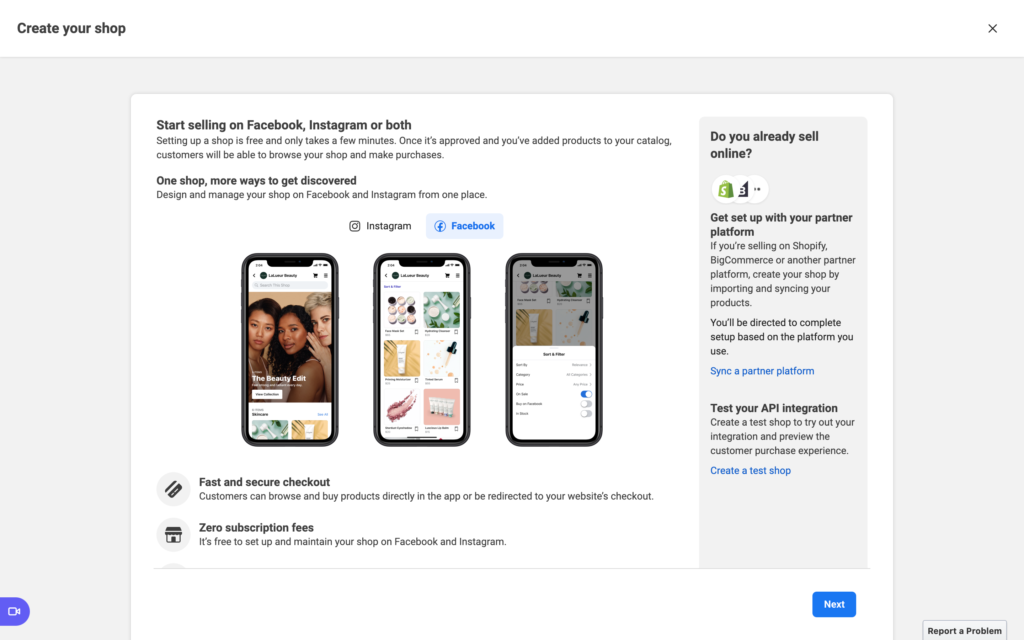
    1. Visit the Create Your Shop page on Facebook. Read the information and click the ‘Next’ button near the bottom of the page.
    Facebook Screenshot - Tutorial: How to Set Up a Facebook Shop - Great for Silhouette and Cricut Crafters - by cuttingforbusiness.com.

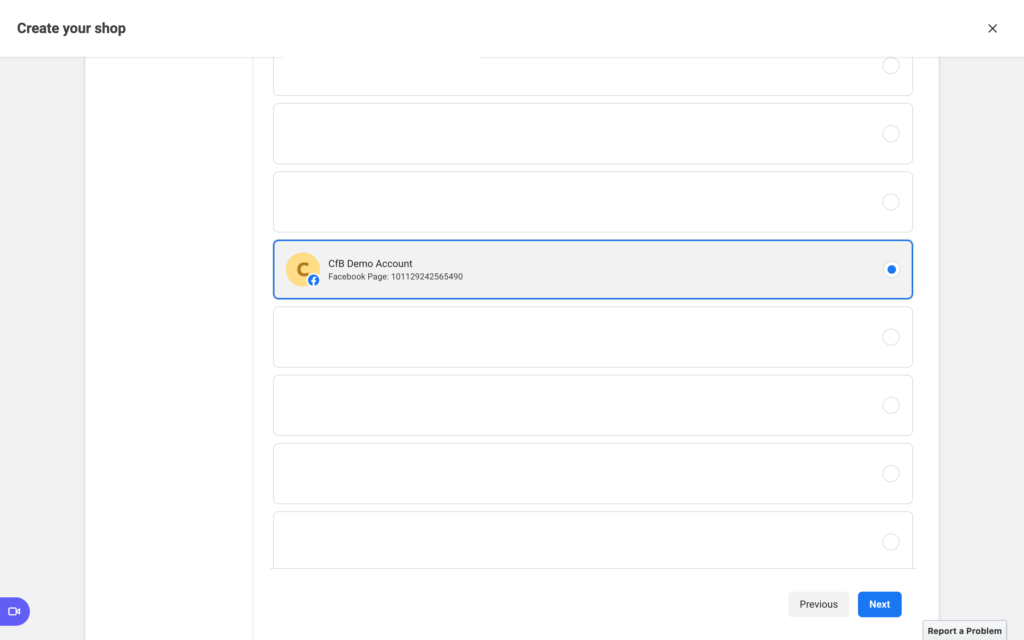
    2. Choose your Facebook Page. If you have multiple pages, you may see several pages listed. If you do not have a Facebook Page, choose ‘Create a new Page’. Click the ‘Next’ button.

    Facebook Screenshot - Tutorial: How to Set Up a Facebook Shop - Great for Silhouette and Cricut Crafters - by cuttingforbusiness.com.

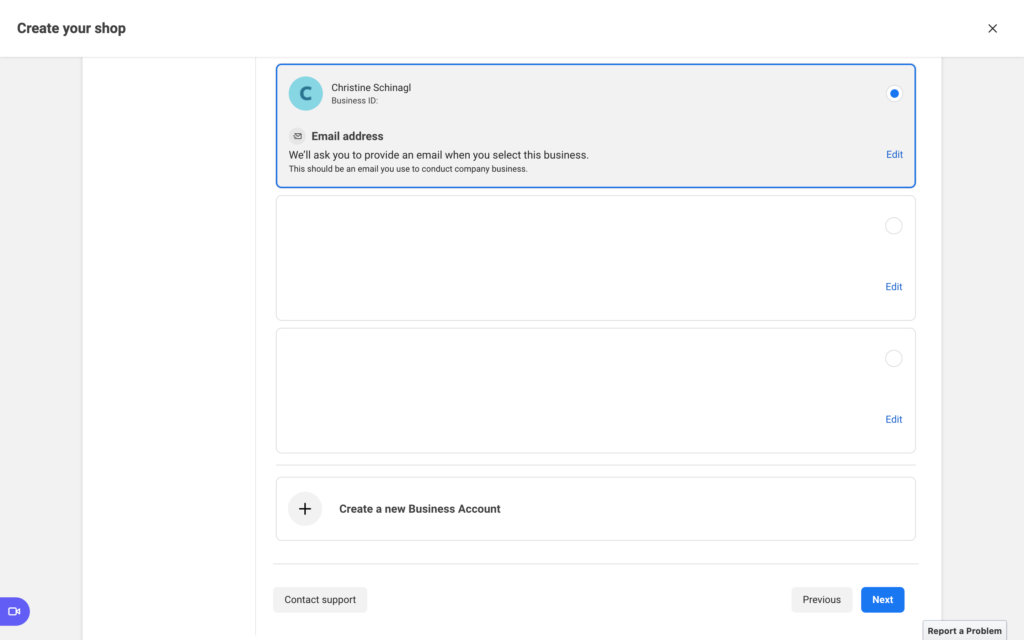
    3. Choose your business account. If you do not have one, choose ‘Create a new Business Account’. Click the ‘Next’ button.

    Facebook Screenshot - Tutorial: How to Set Up a Facebook Shop - Great for Silhouette and Cricut Crafters - by cuttingforbusiness.com.

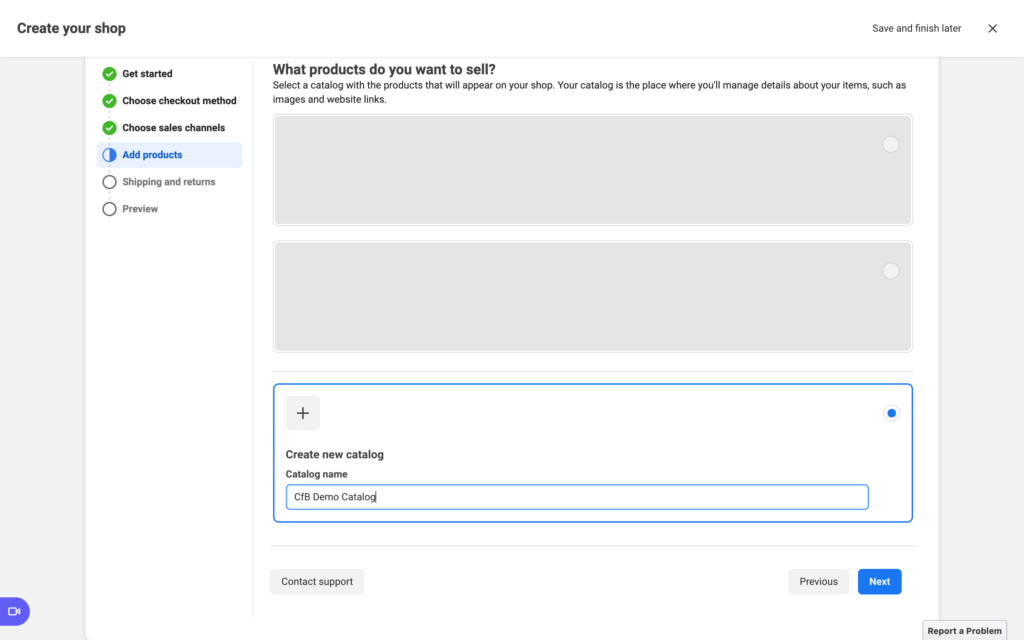
    4. If you’ve previously uploaded products, select your catalog. If not, select ‘Create new catalog’ and give it a name. Then, click the ‘Next’ button.

    Facebook Screenshot - Tutorial: How to Set Up a Facebook Shop - Great for Silhouette and Cricut Crafters - by cuttingforbusiness.com.

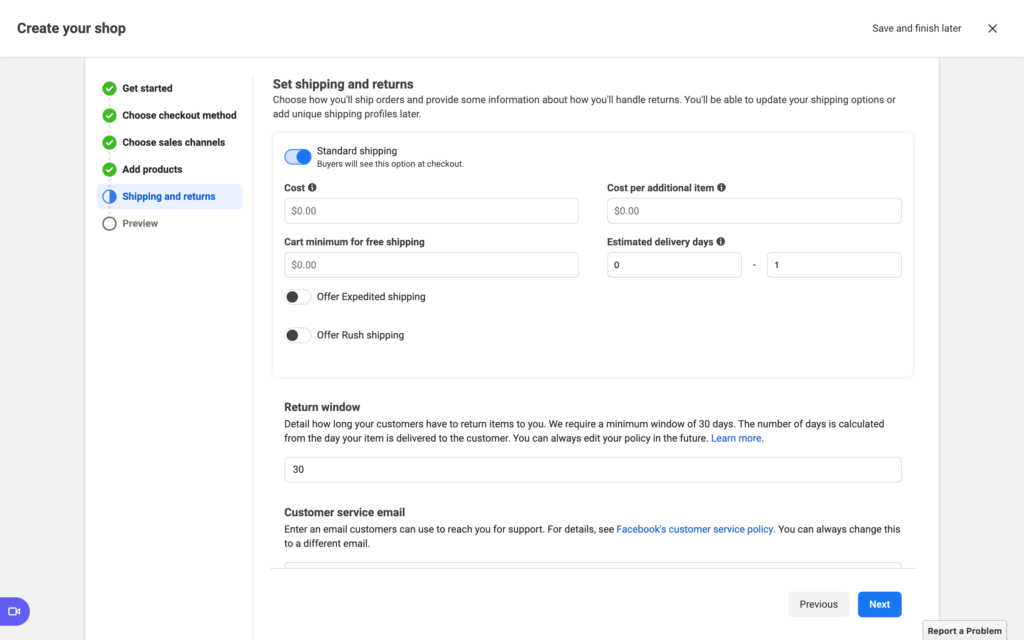
    5. Set your shipping preferences, return window, and customer service email address. Click the ‘Next’ button.

    Facebook Screenshot - Tutorial: How to Set Up a Facebook Shop - Great for Silhouette and Cricut Crafters - by cuttingforbusiness.com.

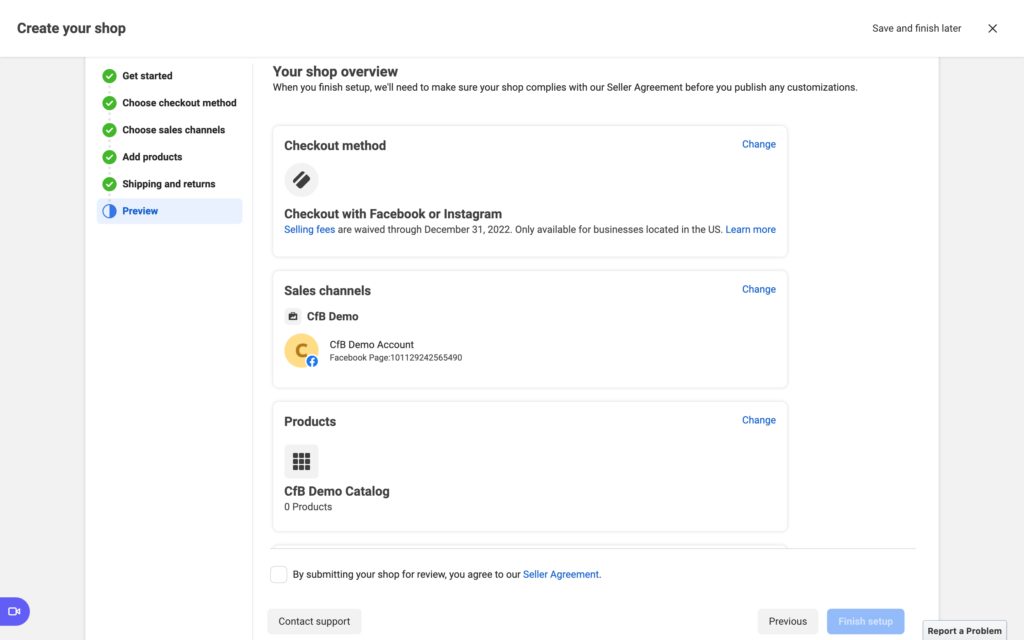
    6. Verify the ‘Your shop overview’ page for accuracy. Correct anything that needs correcting. Read the Seller Agreement, then agree to it. Click the ‘Finish setup’ button.

    Facebook Screenshot - Tutorial: How to Set Up a Facebook Shop - Great for Silhouette and Cricut Crafters - by cuttingforbusiness.com.

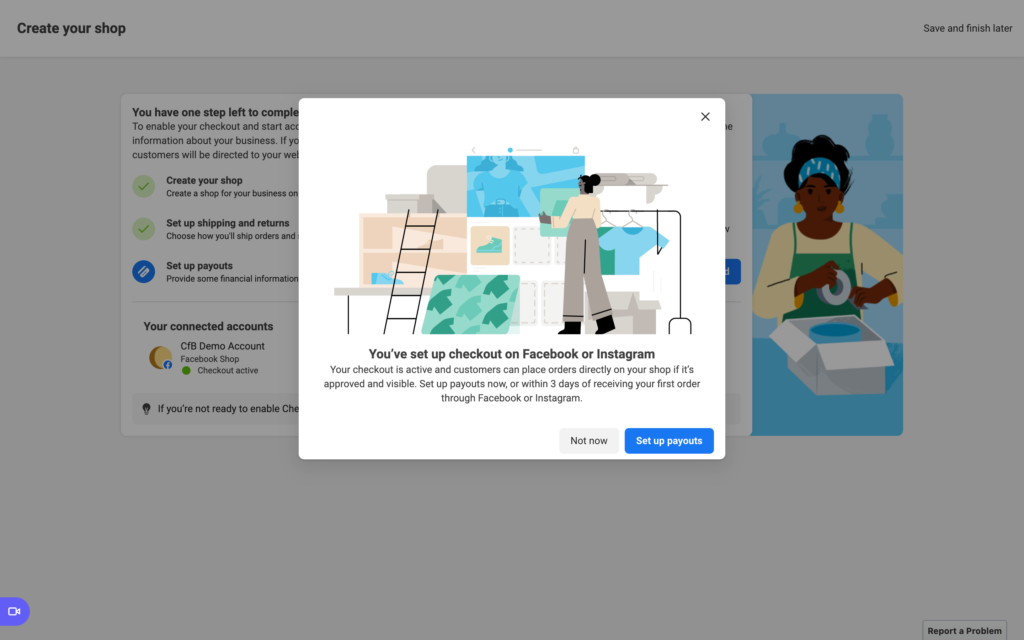
    7. Click the ‘Set up payouts’ button to tell Facebook where to send the money you make. If you do not want to set up payouts now, you can do it within 3 days of receiving your first order.

    Facebook Screenshot - Tutorial: How to Set Up a Facebook Shop - Great for Silhouette and Cricut Crafters - by cuttingforbusiness.com.

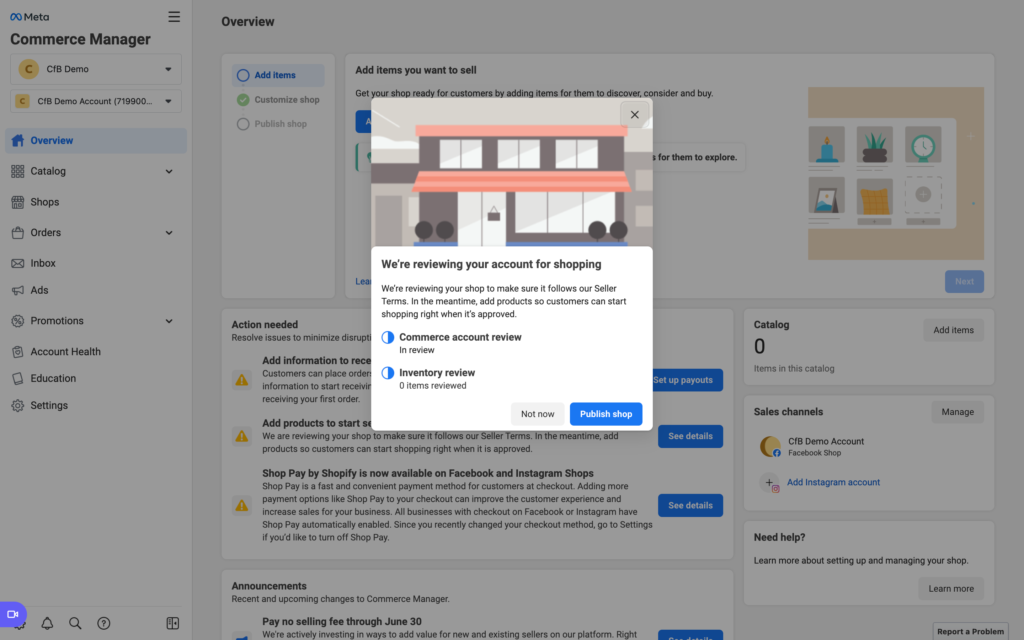
    8. Your shop is under review. You can choose to publish your shop now, or wait until after it has been reviewed. If you choose to publish now, it won’t be shown until after it’s been reviewed. Choose either the ‘Not now’ or ‘Publish shop’ button.

    Facebook Screenshot - Tutorial: How to Set Up a Facebook Shop - Great for Silhouette and Cricut Crafters - by cuttingforbusiness.com.

    9. Now that you are set up and being reviewed, it is time to add products. Click the ‘Add items’ button.

    Facebook Screenshot - Tutorial: How to Set Up a Facebook Shop - Great for Silhouette and Cricut Crafters - by cuttingforbusiness.com.

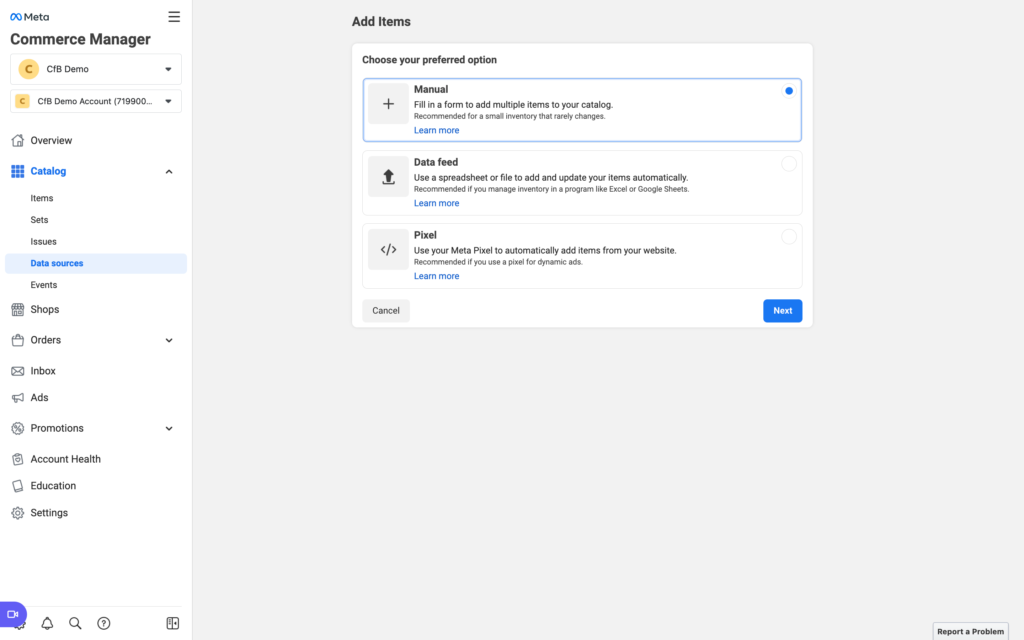
    10. You can choose to add products manually, through a spreadsheet, or automatically off your website. I’ll show you how to manually add them. Select ‘Manual’ then click the ‘Next’ button.

    Facebook Screenshot - Tutorial: How to Set Up a Facebook Shop - Great for Silhouette and Cricut Crafters - by cuttingforbusiness.com.

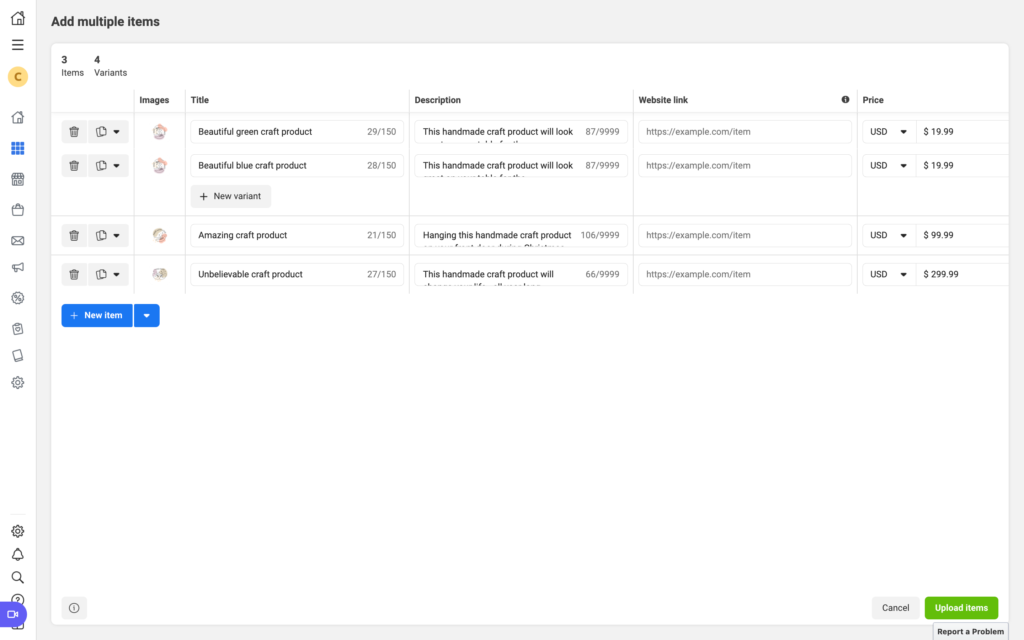
    11. Enter the details of your product. You’ll need to add:

    • Images: You can add multiple images. All images should be at least 500px by 500px.
    • Variants: You can add variants. For example: sizes or colors.
    • Description: Write a good description for your product. I have tips for writing good product descriptions.
    • Website link: This space allows you to add a link to the product on your website.
    • Price: Enter your price.

    Click the ‘Upload items’ button when you are finished.

    Facebook Screenshot - Tutorial: How to Set Up a Facebook Shop - Great for Silhouette and Cricut Crafters - by cuttingforbusiness.com.

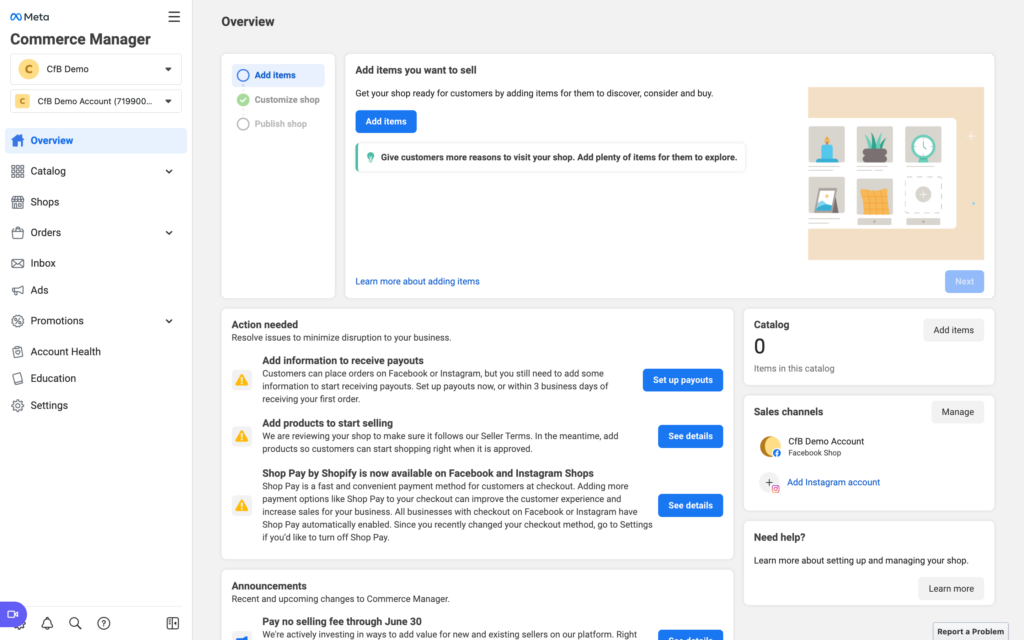
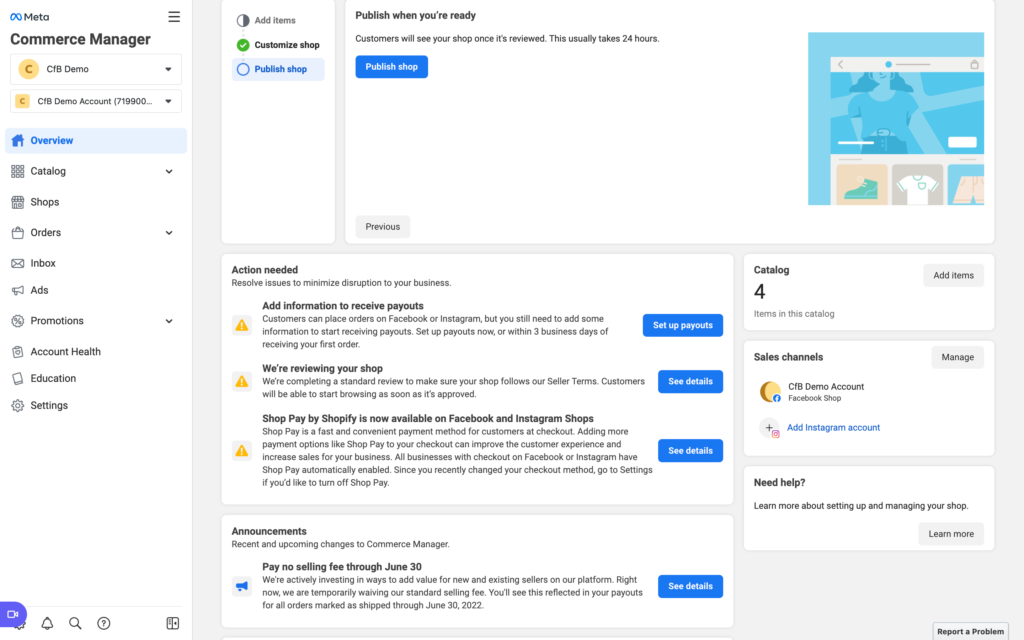
    12. Facebook Commerce Manager gives you a nice overview of your shop. The ‘Action needed’ section provides a to do list of things for you to do.

    Facebook Screenshot - Tutorial: How to Set Up a Facebook Shop - Great for Silhouette and Cricut Crafters - by cuttingforbusiness.com.

    A Few Other Things

    Before you head to create your own Facebook Shop, here are a few odds and ends:

    • From the ‘Overview’ screen, under ‘Sales Channels’ you can put your shop on Instagram and Facebook Marketplace.
    • Under ‘Promotions’, the marketing list gives you an option to allow customers to subscribe to your list. You can download subscribers from this section as well.
    • Under ‘Education’, you can get help and reach out to the Support team for account related issues.

    When you have a few minutes, I recommend clicking around and exploring.

  • How to Manage Your Facebook Shop

    Yesterday we looked at setting up a shop on Facebook. Today, I’m going to show you how to manage your shop and give you answers to a few questions you may have.

    How do You Access Your Shop?

    Customers will access your shop at facebook.com/yourpagename/shop.

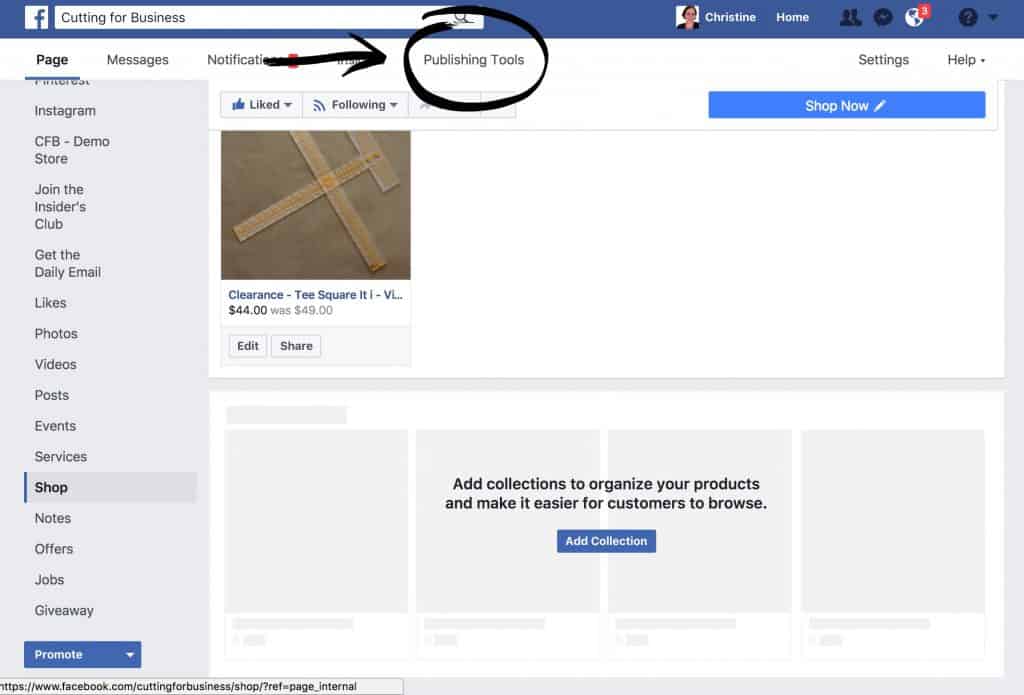
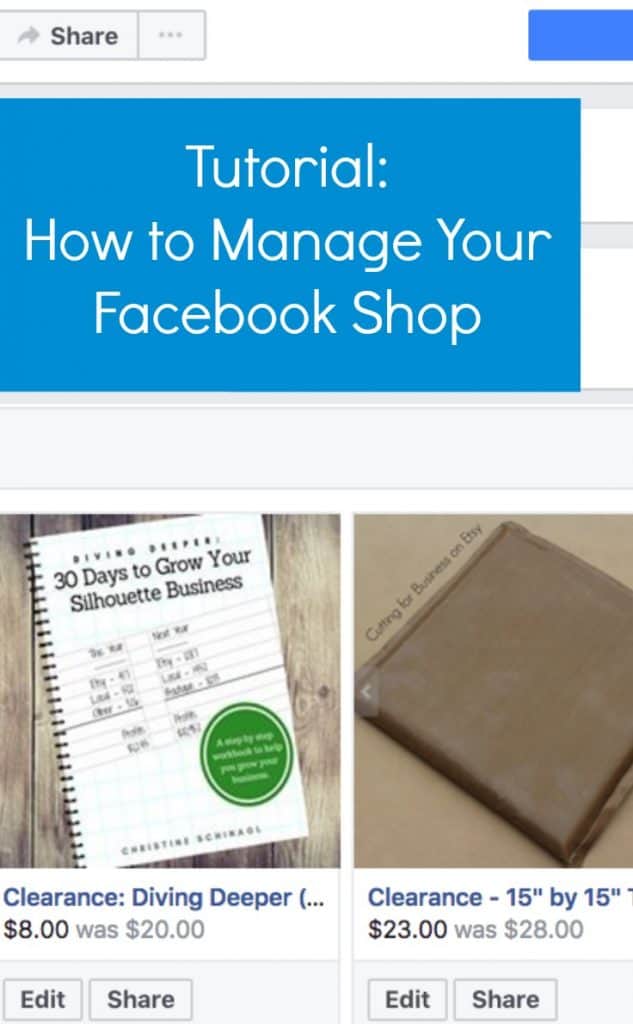
    Here’s how you will access your shop: Log into your Facebook page. From the top navigation bar, you’ll see the “Publishing Tools” link. How to Manage Your Facebook Shop - Great for Silhouette Cameo or Cricut Explore Small Business Owners - by cuttingforbusiness.com

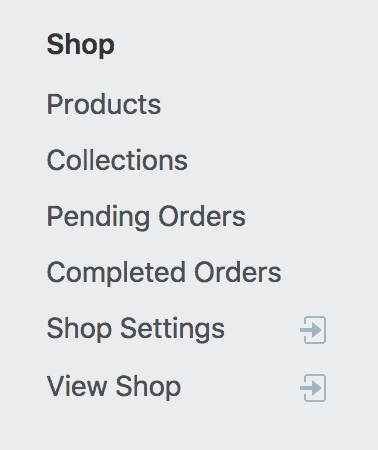
    After clicking it, you’ll see a section for your shop. The options are pretty self explanatory:

    How to Manage Your Facebook Shop - Great for Silhouette Cameo or Cricut Explore Small Business Owners - by cuttingforbusiness.com

    What Guidelines Do I Need to Know?

    It’s a good idea to look over the guidelines for images (no mockups allowed!), descriptions, and variations. Here’s a link to them.

    What Happens When You Get an Order in Your Facebook Shop?

    1. You’ll receive a notification through Facebook about the pending order.
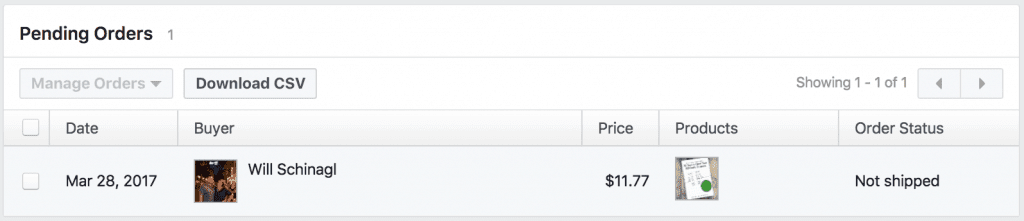
    2. The order will appear under “Pending Orders”. How to Manage Your Facebook Shop - Great for Silhouette Cameo or Cricut Explore Small Business Owners - by cuttingforbusiness.com
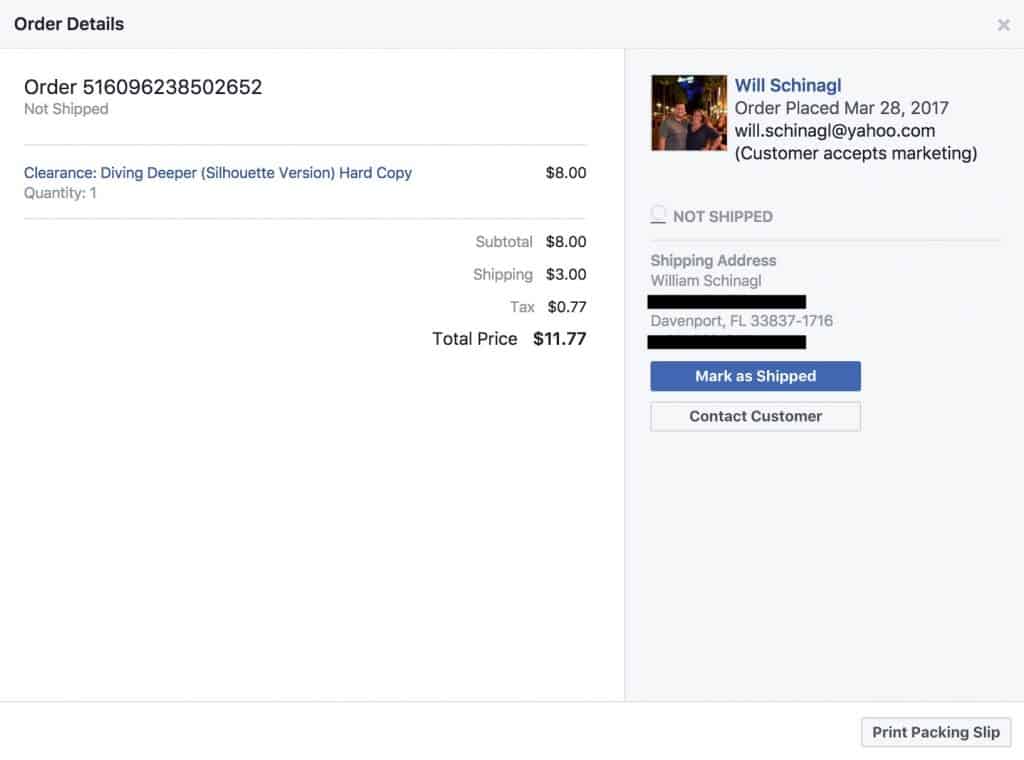
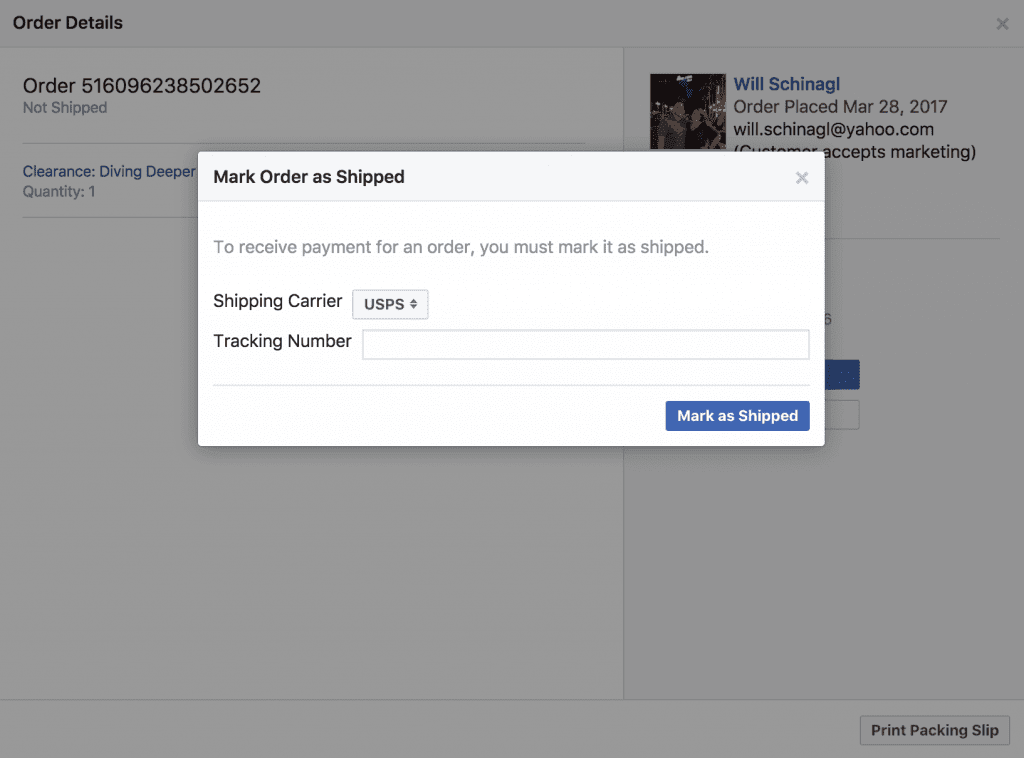
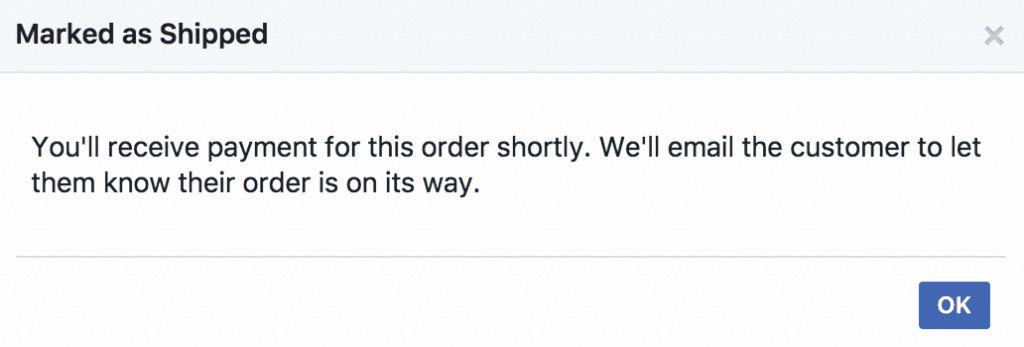
    3. Once you click on it, you’ll get details about the order and you’ll be able to print a packing slip and mark the item as shipped. It is extremely important that you mark the order as shipped, or you will not get paid. (In other words, Facebook does not process the payment until it is marked shipped.) How to Manage Your Facebook Shop - Great for Silhouette Cameo or Cricut Explore Small Business Owners - by cuttingforbusiness.com To mark the item as shipped, you’ll enter the tracking number. How to Manage Your Facebook Shop - Great for Silhouette Cameo or Cricut Explore Small Business Owners - by cuttingforbusiness.com How to Manage Your Facebook Shop - Great for Silhouette Cameo or Cricut Explore Small Business Owners - by cuttingforbusiness.com

    Can You Print Shipping Labels through Facebook?

    No, if you receive payments through Paypal, you’ll print the shipping labels through Paypal.

    How Much Does it Cost to Sell on Facebook?

    It’s free, however, you’ll pay processing fees through Paypal or Stripe.

    Is Selling on Facebook Better than Etsy/Amazon/a website?

    This is strictly my opinion, but having a Facebook shop is great for:

    • New sellers just starting out.
    • Those that are currently selling only on Facebook buy/sell/trade groups or social media. (No more trying to juggle orders through comments or messages!)
    • Sellers currently selling elsewhere and looking to add another venue for buyers to purchase products.

    Facebook shops are quite limited in what you can do with them, so they aren’t ideal to fully scale your business. Here’s a few things to think about:

    • Facebook shops are not well known, buyers may not trust shopping from them.
    • There are no customization options available in terms of color or layouts. What you see is what you get. In terms of what you see is what you get – at this time, you cannot set shop policies. Facebook assigns an automatic 45 day return period for customers and a 5 business day turnaround period. Neither of these options can be changed.
    • Facebook is known for making changes and could eliminate the store option at any time.
    • While shops are currently free, I doubt they will remain free forever.

    Don’t forget: If you have a website domain name that you aren’t using, you could always forward your domain directly to your Facebook shop – see this post.

    Tomorrow, I’ve got one more Facebook shop related tutorial – so check back then!

    Now that you’ve got more information about creating and managing a Facebook shop, tell me: Will you start one?

    Save this tutorial to Pinterest:


    How to Manage Your Facebook Shop - Great for Silhouette Cameo or Cricut Explore Small Business Owners - by cuttingforbusiness.com

  • Tutorial: How to Tag Your Products in Facebook Posts

    Now that you’ve had time to set up your Facebook shop – there’s one more awesome feature I have to tell you about: the ability to tag products from your Facebook shop in Facebook posts! (I know, how cool is that?!)

    Tutorial: How to Tag Your Products in Facebook Posts

    1. Set up products in your Facebook shop. See this post to get setup, and this post to help you manage it once set up.
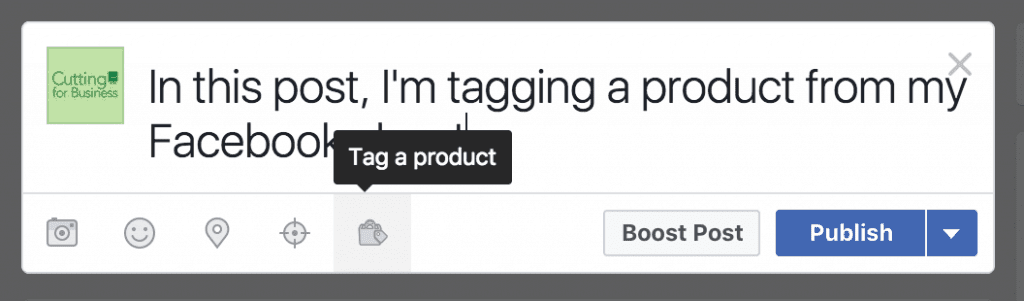
    2. Go to your Facebook business page and write a post. Click the “Tag a Product” icon. Tutorial: How to Tag Your Products in Facebook Posts - Great for Silhouette Cameo or Cricut Explore small business owners with a shop - by cuttingforbusiness.com
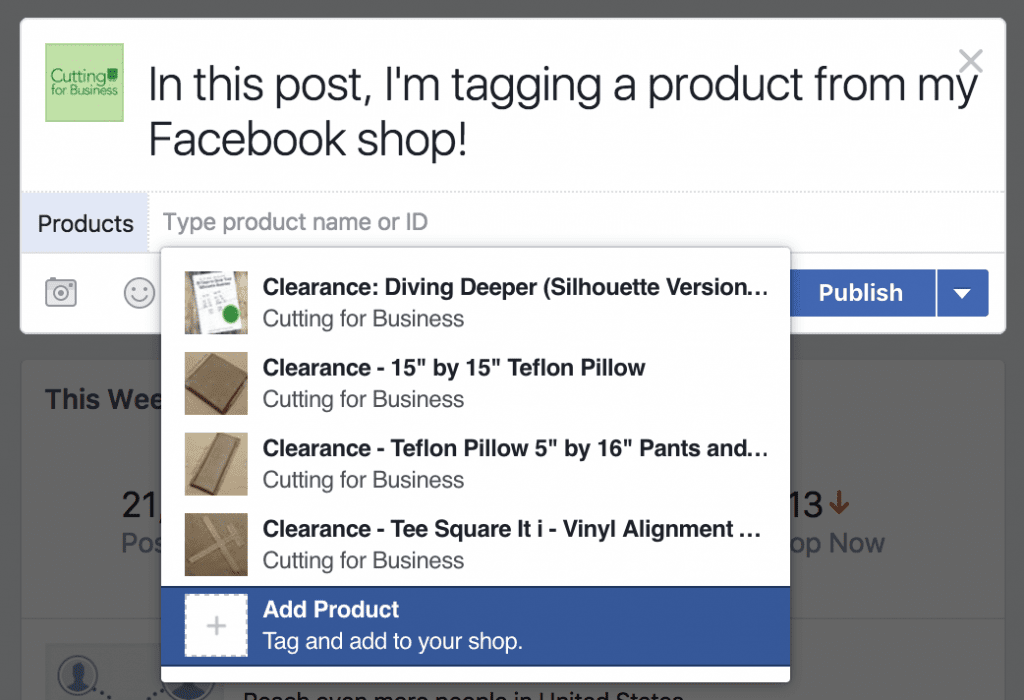
    3. When you click the icon, you’ll see the products currently listed in your Facebook shop. Tutorial: How to Tag Your Products in Facebook Posts - Great for Silhouette Cameo or Cricut Explore small business owners with a shop - by cuttingforbusiness.com
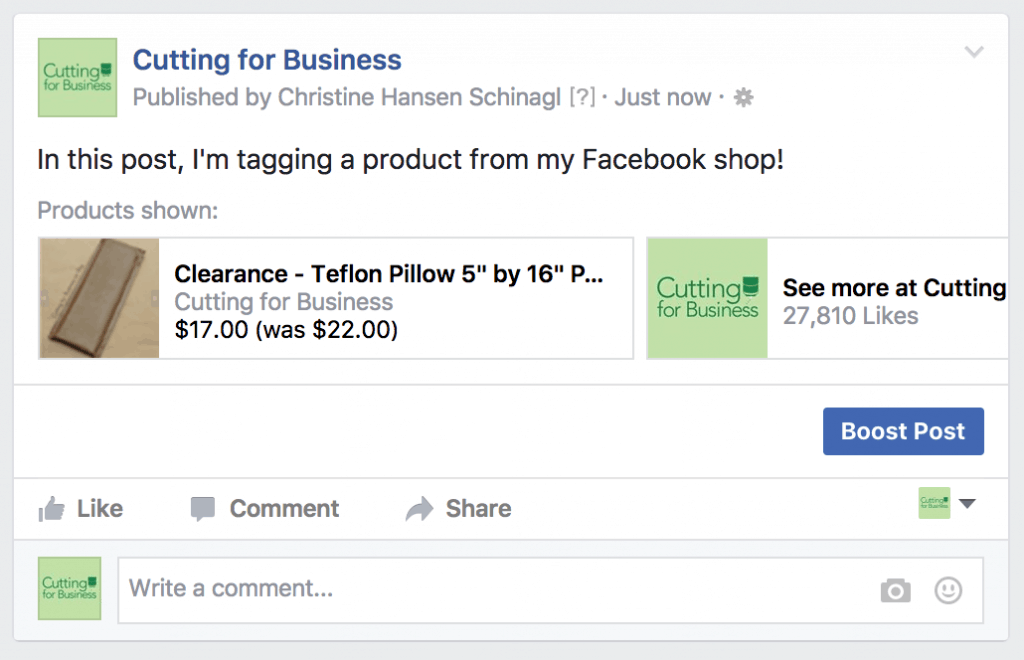
    4. Choose a product and publish the post. When someone clicks on the product, they will be able to purchase it. Here’s what the post will look like once it is live on your Facebook page: Tutorial: How to Tag Your Products in Facebook Posts - Great for Silhouette Cameo or Cricut Explore small business owners with a shop - by cuttingforbusiness.com

    Isn’t that great? I see a million different uses for it. For example, when a customer sends you a picture of your product in action – you can post it to Facebook and tag the product in your Facebook shop so others can buy it!

    Note: The product tagging doesn’t seem available yet in the Facebook pages app. Best to do this from a browser.

    Save this tutorial to Pinterest:

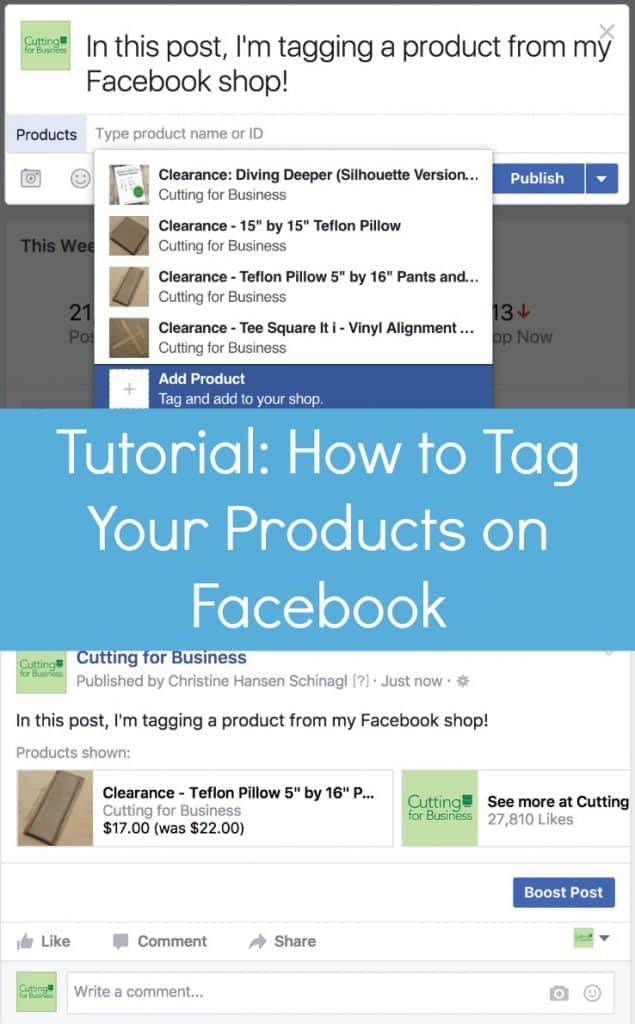
    Tutorial: How to Tag Your Products in Facebook Posts - Great for Silhouette Cameo or Cricut Explore small business owners with a shop - by cuttingforbusiness.com

  • How to Set a Preferred Page Audience for Your Facebook Page

    Today, I’m showing you a little known feature in Facebook to try on your Silhouette Cameo or Cricut small business page. The feature is called a Preferred Page Audience. It allows you to tell Facebook what kind of audience is best for your page. When Facebook knows what kind of audience they should show your page to, they will suggest it to people that fit your demographic.

    Tutorial to Choose a Preferred Page Audience on Facebook

    1. Log into your Facebook business page. Click “Settings”.
    2. Click “Preferred Page Audience” from the left hand side.
    3. Click “Set Preferred Page Audience”.
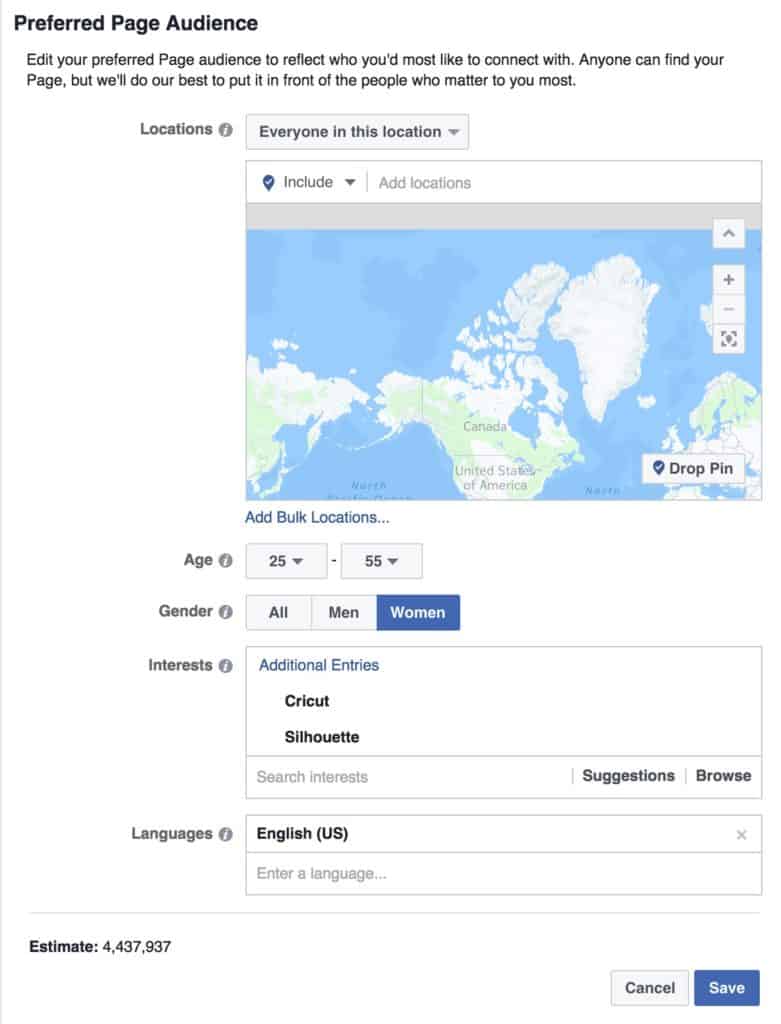
    4. Now, you’ll fill in the details of your ideal page audience. If you don’t know what to put, think of the ideal buyer of the products you sell. As an example, here is what the Cutting for Business Preferred Page Audience looks like:

    How to Set a Preferred Page Audience for Your Facebook Page - Great for Silhouette Cameo or Cricut Small Business Owners - by cuttingforbusiness.com

    That’s it! Remember to tweak your preferred page audience on Facebook as your products change. Need more help with marketing your business on Facebook? My Facebook class advertising course officially launches on Monday, but the Cutting for Business Insider’s Club members get access today. Click here to join the group!

    Save this post to Pinterest:

    How to Set a Preferred Page Audience for Your Facebook Page - Great for Silhouette Cameo or Cricut Small Business Owners - by cuttingforbusiness.com

  • An Easy to Implement Hashtag Strategy for Instagram

    I know that Instagram remains a bit of a mystery for some Silhouette and Cricut small business owners. So, I’m sharing an easy to implement hashtag strategy with you today.

    Before I tell you the strategy, let’s make sure that you understand what hashtags are. Hashtags are keywords that help people find your post. Instagram users can search hashtags. All hashtags should have the “#” sign before them. Currently, you can add up to 30 hashtags on your post.

    How to Make the Most of Instagram Hashtags

    Step 1) Grab a piece of paper and write down as many hashtags as you can that are related to your business or the products you sell. If I sold tumblers, my list might start like this: #tumbler #tumblers #cup #handmade #custom and so on.

    Step 2) Pull out the Instagram app and start a new post. You aren’t actually going to publish the post, so it doesn’t matter what picture you use. When you to get to the caption, start typing in each hashtag on your list and write down the number of occurrences of that hashtag. Repeat this process for all the hashtags on your list. The image below shows which number you should write down.
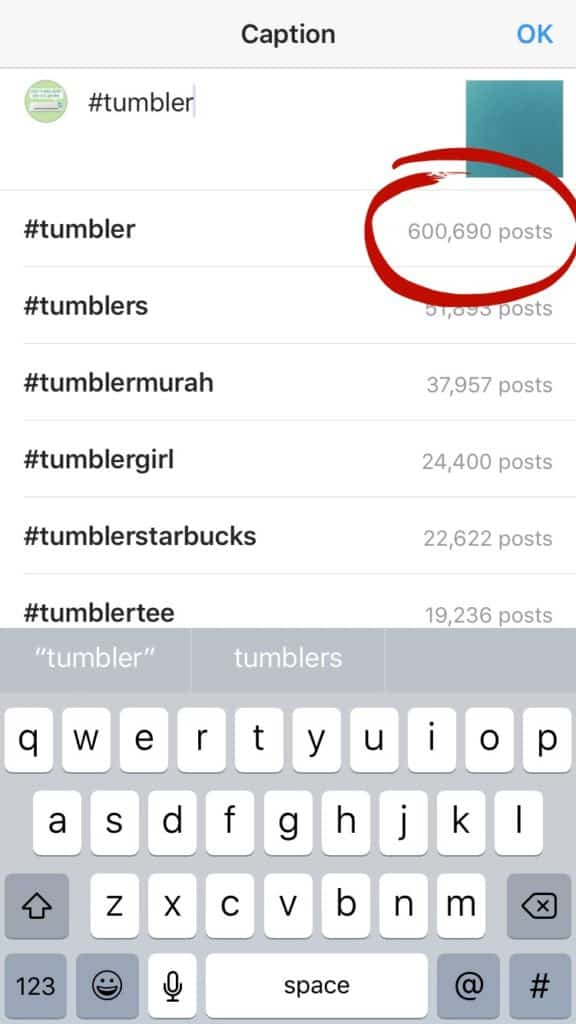
    An Easy to Implement Hashtag Strategy for Instagram - Great for Silhouette Cameo and Cricut Small Business Owners - by cuttingforbusiness.com

    Step 3) Pull out another piece of paper and divide it into three columns: High, Medium, and Low. Now, sort your hashtag list into the three columns. In the first column, put the hashtags that have a lot of occurrences on Instagram. Next, put the ones that have a medium amount of occurrences. Last, in the low column, put the hashtags that have low occurrences in that column.

    Depending on the hashtags you choose, you will have different definitions of High, Medium, and Low. Here is what mine looks like: High (500,000+), Medium (50,000 to 499,999), and Low (Under 49,999). However, yours could also look like this: High (10,000+), Medium (1,000 to 9,999), and Low (Under 999).

    Step 4) After you’ve got all the hashtags sorted, keep your list handy when scheduling your Instagram posts or when posting on Instagram. Try to post an assortment of hashtags from each category. Why?

    • When you post hashtags from your High column, these posts will likely be seen by lots of people quickly. Since this hashtag moves fast, after a short time (maybe a few hours) your post will be buried.
    • When you post hashtags from your Medium column, these posts will be seen by less people but will stick around longer near the top of the hashtag search list. This could keep your post seen for a few days.
    • When you post hashtags from your low column, these posts will be seen by less people but will stick around longer than the medium column hashtags. This could keep your post seen for weeks or months when the hashtag is searched.

    Be sure to keep your hashtag lists current by updating them regularly.

    Oh, before you leave – keep the hashtags on Instagram. Hashtags don’t do well on Facebook and you’ll even get punished in the search results for using them on Pinterest!

    Save this post to Pinterest so you can find it when you get ready to implement it:
    An Easy to Implement Hashtag Strategy for Instagram - Great for Silhouette Cameo and Cricut Small Business Owners - by cuttingforbusiness.com