Category: Social Media

  • FAQ About Facebook Page Messaging

    Love it or hate it – your Facebook business page is a great tool to keep in touch with your customers. Facebook’s Messenger feature is a popular way for customers to ask questions. Today, we are going to look at some of the features hidden away in Facebook’s messenger. Did you know that it is incredibly easy to change your displayed response time, turn off messaging all together, or set up autoresponders? Let me show you how with these 10 second tutorials:

    How to Turn Off Messaging for Your Facebook Business Page

    1. Log into your Facebook Business Page.
    2. Click “Settings” at the top of the page (near the right hand side).
    3. From the “General” section, click on “Messages”.
    4. Check or uncheck the box next to “Allow people to contact my Page privately by showing the message button”. (If unchecked, people can’t message you – if checked, your page will be abe to receive messages.)

    How to Change Your Facebook Message Response Time

    On the left hand side of your Page profile, under the About Section, your typical message response time is noted. It looks like this:
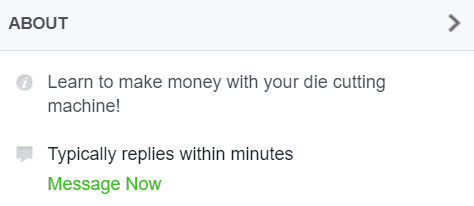
    FAQ About Facebook Page Messaging (Great for Silhouette Cameo or Cricut small business owners) by cuttingforbusiness.com

    You can change what is displayed in here by following these steps:

    1. Log into Facebook.
    2. Click “Settings” at the top of the page (near the right hand side).
    3. Click on “Messaging” on the left hand side.
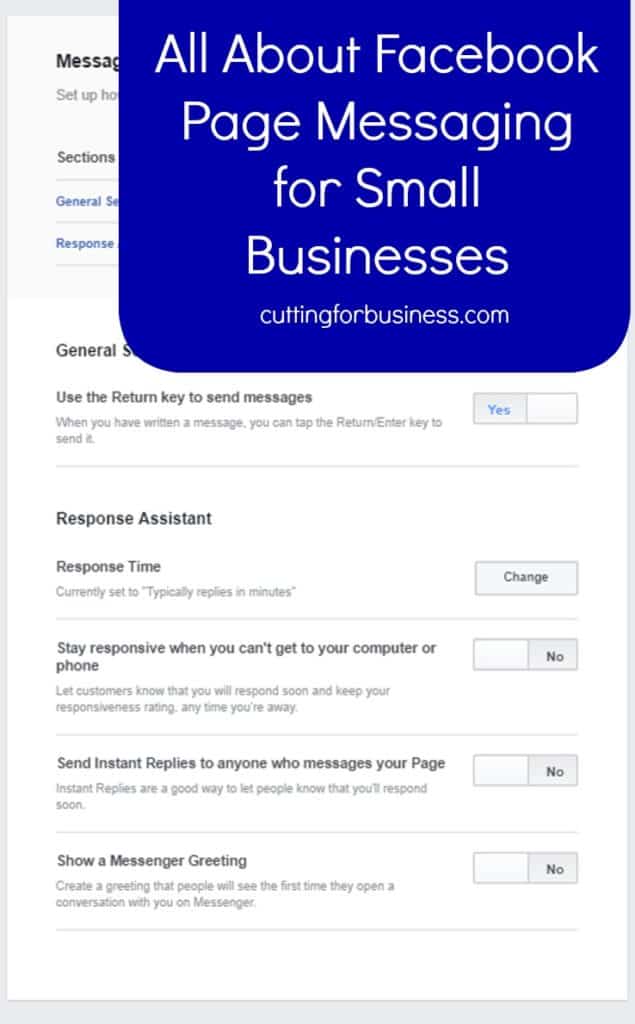
    4. Under “Response Assistant”, change the “Response Time” setting. Your choices include:

    I recommend choosing the setting that most accurately describes how often you reply to messages.

    How to Set up Autoresponders to Facebook Messages

    1. Log into Facebook.
    2. Click “Settings” at the top of the page (near the right hand side).
    3. Click on “Messaging” on the left hand side.
    4. Under “Response Assistant”, you can set up automatic messages to be sent as soon as someone messages your page.
      1. The “Send Instant Replies to anyone who messages your Page” setting will send a message to anyone who messages your page. You can customize the message by clicking the “Change” button after turning it on.
      2. The “Show a Messenger Greeting” setting will send a message to anyone who messages your page for the first time. Again, you can customize the message by clicking the “Change” button after turning it on.
      3. The “Stay responsive when you can’t get to your computer or phone” setting will send a message to anyone who messages your page while it is set to away. You can think of this as a mini vacation responder – lasting for 12 hours. Of course, you will be able to customize this message after you change the setting to “Yes”.
        1. If you would like to set your Facebook page to away, follow these steps:
          1. Click “Messages”.
          2. In the bottom left hand side of the screen, flip the button to “Away”. This will set your page as away for up to 12 hours. (Look closely, it is grayed out and kind of hard to see!)

    Facebook’s Responsiveness Badge

    Facebook displays a badge to pages who respond to at least 90% of the messages they receive within an average of 15 minutes. The badge looks like this:

    FAQ About Facebook Page Messaging (Great for Silhouette Cameo or Cricut small business owners) by cuttingforbusiness.com

    A few things about the Facebook badge:

    1. It is only displayed to page visitors when you meet the 90%/average 15 minute response time.
    2. When you are outside of those times, the response percentage and times are only visible to page admins.
    3. The averages that count are for the last 7 days.
    4. The response time is only calculated on the first reply in the series of messages.
    5. If your page is set to “Away”, the calculations will start from the time that you page comes back from the away status.

    Whew, who knew there were so many settings within Facebook’s messaging? There’s actually one more that I will talk about in depth tomorrow to help you get (and keep) your messages organized – labels.

    Save this post to Pinterest so you can find it when you need it:
    FAQ About Facebook Page Messaging (Great for Silhouette Cameo or Cricut small business owners) by cuttingforbusiness.com

  • Advertising with Feature Accounts on Instagram

    Do the sales in your Silhouette Cameo or Cricut small business need a boost? Are you looking for more exposure? If so, a feature through a dedicated feature account on Instagram might be a good option for you.

    What is a Feature Account on Instagram?

    Within the handmade community on Instagram, there are accounts that exist only to promote handmade products. These accounts often have large followings, and affordable prices from free upwards to $20 or $30 for a one time feature. I know that most Cutting for Business readers have small advertising budgets, and feature accounts often provide a good return on investment.

    How do Feature Accounts Work?

    First, you’ll need a locate a feature account on Instagram that you like. Do a little digging and look at the types of products the account has previously featured, how many followers they have, and the amount of interaction the account has. After you have located an account that is in line with your products, you will generally fill out a form with your basic information, a link to where you sell, a description, and a photo of your product for sale. In most cases, you will choose one product to feature – so make sure your photo is AH-MAZING! (Note: The form to apply for features is usually located in the bio line of the Instagram account. If you don’t see one, send a direct message for information.)

    Links to Feature Accounts

    Ready to get featured? Here’s link to some of my favorite feature accounts on Instagram:

    @etsyUSA
    @EtsyFavorites
    @EtsyFavorites_baby
    @EtsyFavorites_wedding
    @ExclusivelyEtsy
    @UniquelyEtsy
    @EtsyTown
    @FaveHandmade
    @HelloImHandmade
    @HandmadeCurator
    @MakersVillage

    Have a favorite that I didn’t include in the list? Leave it in the comments and I will add it.

    Share with a small business crafting friend, just hover over the image and post to social media:

    Advertising with Feature Accounts on Instagram for Your Silhouette Cameo or Cricut Small Business - by cuttingforbusiness.com

  • Tutorial: How to Use Pinterest in Your Silhouette or Cricut Business

    Today we are going to look at creating pins on Pinterest. I’ve blogged about the benefits of using Pinterest in your Silhouette Cameo or Cricut business before. In case you missed those:

    • Pinterest is a top referrer of traffic to websites and stores.
    • The primary demographic of Pinterest users is women.
    • Pinterest users have deep pockets: 28% of Pinterest users have an annual income of over $100,000.

    Now that you know that your business should be on Pinterest, you might be wondering how you should use Pinterest. There are three steps that you need to complete:

    1. Make sure that you are using a Pinterest Business Account. It’s free and you can sign up at this link.
    2. Create boards and pin things that will attract your customers. For example, if you sell infant products, repin pins that contain tips for new moms or reviews of baby products.
    3. Pin your products for sale and links to your shop. I feel the need to shout this out: If you are not pinning links to your products for sale and links to your shop, your shop will not benefit from using Pinterest. Put another way: If you only repin pins from other shops, you are driving your customers to other shops.
    How to Create Pins for Your Products

    Now, let’s look at two easy ways to pin your products:

    1. If you have an Etsy shop, you can pin directly from your listing, by clicking the gray and red “Pin it” button from the right side of the screen. Unfortunately, there are a million of these pins on Pinterest, and they are not optimized for Pinterest.
    2. Create pins using your favorite photo editor. In this post, I will show you how to use Canva.com.
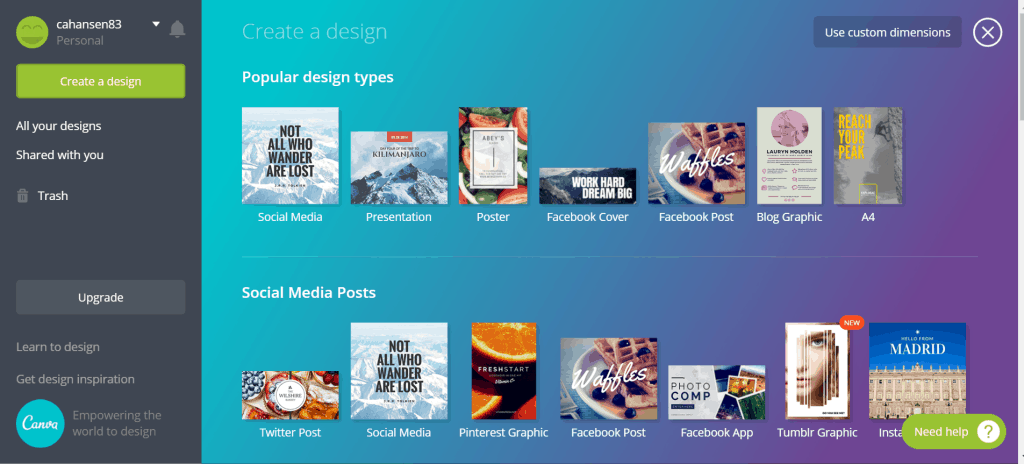
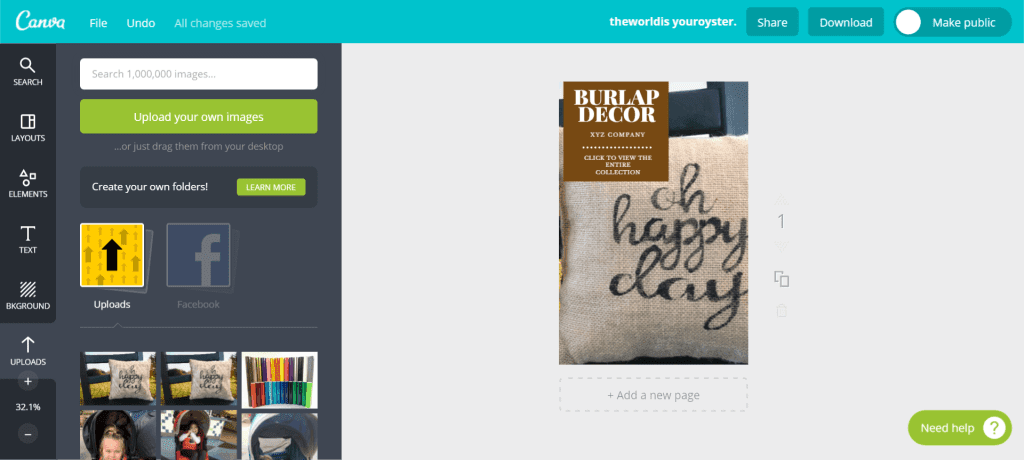
      1. Visit canva.com, and click the green “Create a design” button, then choose “Pinterest Graphic” from under “Social Media Posts”.Tutorial: How to Use Pinterest in Your Silhouette or Cricut Business - by cuttingforbusiness.com
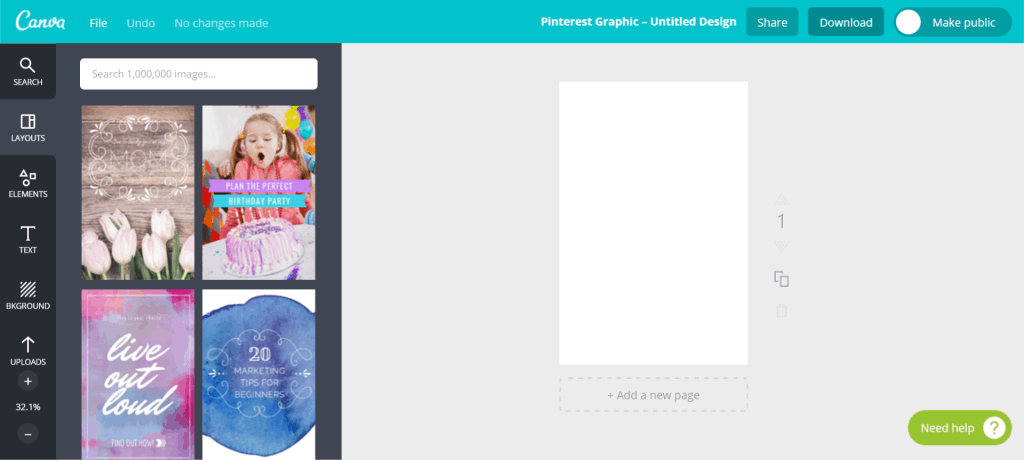
      2. Now, you will see a blank canvas to work with as shown below:Tutorial: How to Use Pinterest in Your Silhouette or Cricut Business - by cuttingforbusiness.com
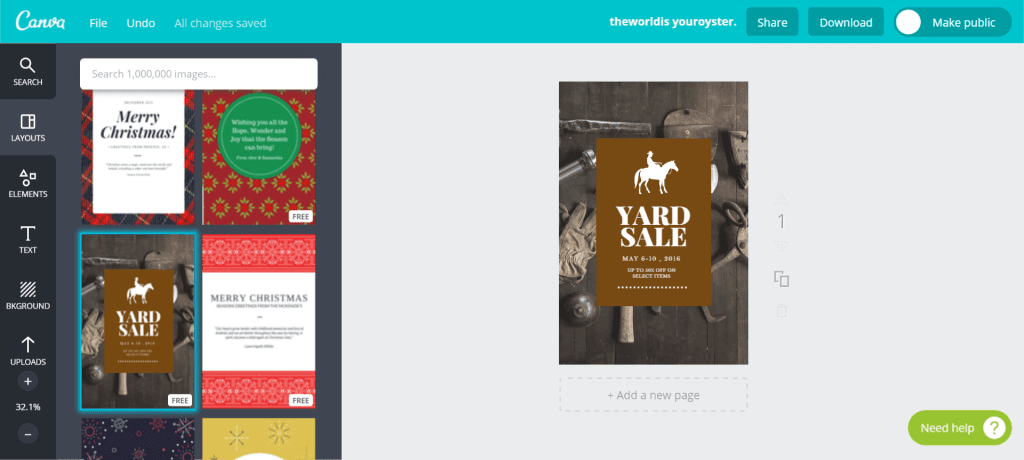
      3. From the left hand side, choose a template to work with. Focus on choosing a template layout that you like, you will change out the photo. For this tutorial, I chose a rustic looking template. (Good to know: some templates are free; while others cost $1.)
        Tutorial: How to Use Pinterest in Your Silhouette or Cricut Business - by cuttingforbusiness.com
      4. From the left hand side of the screen, upload your product photo. Adjust the size as necessary. Then, add a title and your business name in text. Be sure to include a call to action – such as “Click here to buy today”, “See the entire collection by clicking here”, or “Click to contact me and start your custom order now”.Tutorial: How to Use Pinterest in Your Silhouette or Cricut Business - by cuttingforbusiness.com
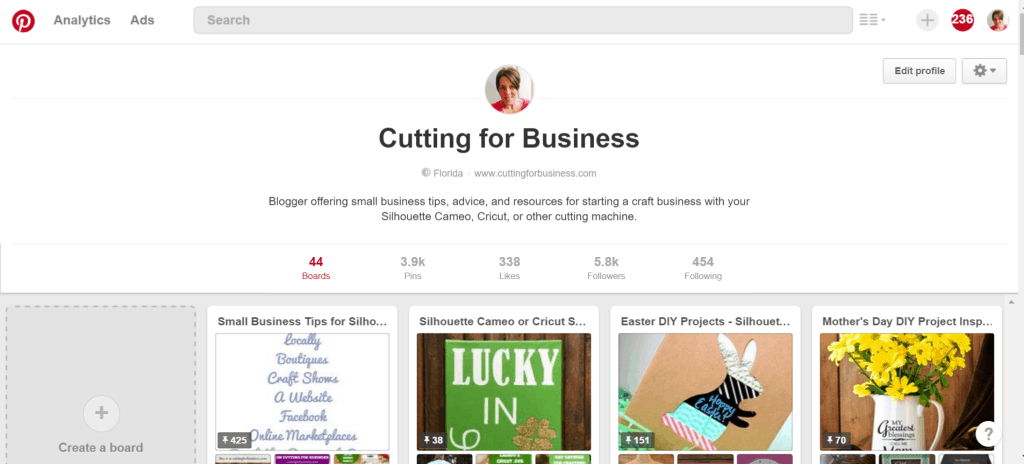
      5. Now that your pin is ready to go, visit your Pinterest account. Click the grey “+” sign in the top right corner, then choose “Upload from computer”.Tutorial: How to Use Pinterest in Your Silhouette or Cricut Business - by cuttingforbusiness.com
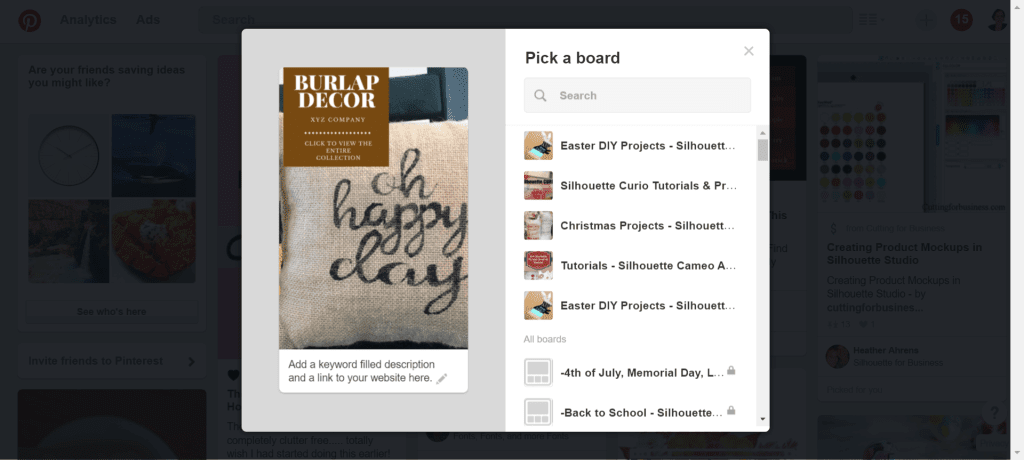
      6. Upload your newly created pin, and write a short, keyword filled description. Include a link to your website or shop in the text. Then choose a board and pin it.Tutorial: How to Use Pinterest in Your Silhouette or Cricut Business - by cuttingforbusiness.com
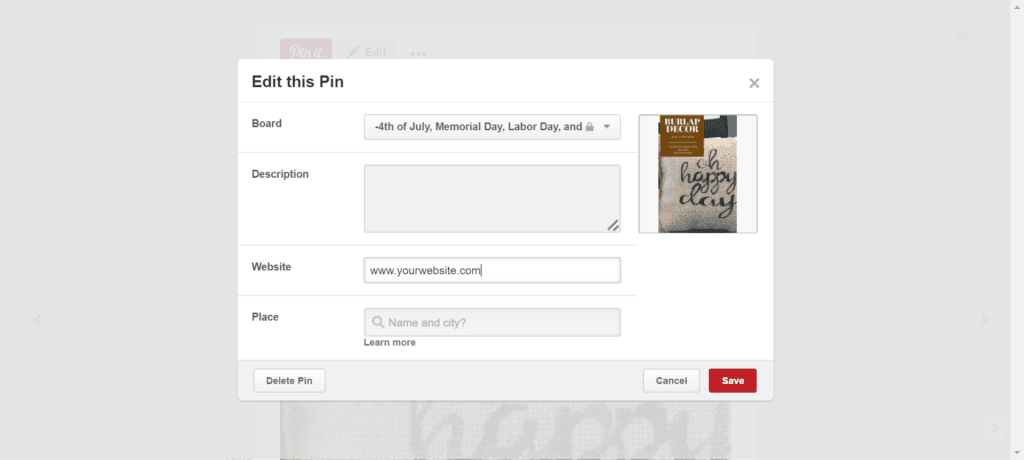
      7. One more (very important) step: Click “See your pin” on the screen that pops up. If the screen goes too fast to click, just go to your board and click on your pin. Then, click the “Edit” button. Enter the link you want customers to go to when they click your pin. Click “Save” and you are finished. Tutorial: How to Use Pinterest in Your Silhouette or Cricut Business - by cuttingforbusiness.com

    The more pins of your own products that you can create, the more success that you will have on Pinterest. Don’t forget to view this post on scheduling pins on Pinterest and join my group pinning board at this link.

    Before you go, pin this post on Pinterest by hovering over the image below:

    Tutorial: How to Use Pinterest in Your Silhouette or Cricut Business - by cuttingforbusiness.com

  • Silhouette and Cricut Small Business Do’s and Don’ts on Pinterest

    Yesterday I showed you how to create original pins on Pinterest and highlighted the importance of creating pins with your products or links to your store. Today, I’m giving you some additional tips – as well as some things to avoid.

    Do’s for Using Pinterest in Your Silhouette or Cricut Business

    • DO be consistent – posting regularly helps your pins be seen by more users.
    • DO include boards and pins that aren’t directly related to your business, but may be of interest to your customers. This is a great way to bring new customers to your profile.
    • DO feel free to use a scheduling program. I personally use BoardBooster to continuously “loop” my pins and add new pins to my boards. This cuts down my Pinterest marketing efforts and you can learn more about Boardbooster in this post.
    • DO delete pins. If you pinned things that users are not repinning, just delete it – no need to take up valuable space!
    • DO use keyword rich descriptions and include a link to your website on your original pins.
    • DO remember the demographics of Pinterest. Pinterest is mainly a female audience, so if your pin doesn’t appeal to women – it likely won’t perform well.
    • DO join group boards and pin to them. If you are interested, Cutting for Business has a recently launched Pinterest group board. Email me at christine@cuttingforbusiness.com with your Pinterest email address and I will add you.

    Don’ts for Using Pinterest in Your Silhouette or Cricut Business

    • DON’T use a personal account for your business. A business account is free to sign up for and provides great analytics for your account.
    • DON’T pin “anything and everything”. Keep your boards focused on your customer base.
    • DON’T forget to change your board covers regularly.
    • DON’T forget to change the order of your boards regularly. Keep your seasonal boards in order of the next upcoming season or holiday.
    • DON’T be afraid to pin the same pin to more than one board. Followers may not subscribe to all of your boards, so if it fits on more than one board, put it on both.
    • DON’T repin a pin without clicking it and checking the source. There is a lot of spam on Pinterest (these are links that don’t link to what the image suggests). Don’t help the spammers!

    What do’s and don’ts would you add to this list? Leave them in the comments.

    Silhouette Cameo and Cricut Small Business Do's and Don'ts on Pinterest - by cuttingforbusiness.com

  • 4 Step Checklist When Posting About Customers on Social Media

    Cutting for Business readers: I try to keep this blog full of helpful tips for Silhouette and Cricut small business owners, and I attempt to do so in a light, fun manner. But, there is something serious I have been seeing online lately that I need to address here: Venting or trashing your customers on social media.

    Unfortunately, I see this all the time on Facebook crafting groups, on Instagram, and most recently when I was browsing my personal Twitter account. At no time is it okay to vent about your customers, complain about them, or otherwise berate them online. Small business owners must realize that without paying customers, there is no business!

    The Golden Rule of Social Media: Always assume that anything you post online (either on your personal accounts or business accounts) will be shared somewhere and could potentially be seen by anyone in the world – including by your customer.

    4 Questions to Ask Yourself Before Posting on Social Media

    1. Would my customer give me permission to post this information?
    2. Would my customer push the “like” button on my post?
    3. If your this post goes viral – will I be proud as the business owner?
    4. How does this post make my business look?

    Together, let’s let other small business owners know that it is not okay to speak poorly of customers online. If you see it online, I urge you to simply comment “This post is not professional and will not help your business grow.” If you belong to moderated online groups, reach out to the administrators of the group and ask if they will ban venting or trashing customers in their group.

    Need help dealing with difficult customers? See this post.

    4 Step Checklist When Posting About Customers on Social Media - A must read for Silhouette and Cricut Etsy Shop Owners - by cuttingforbusiness.com.
  • What are Instagram Brand Reps or Enthusiasts?

    Brand reps (representatives) or brand enthusiasts are people that you send free products or discounted products to in exchange for them taking pictures and posting them on their Instagram account. Brand reps or enthusiasts can be highly effective in growing small businesses on Instagram because they can help the shop’s following grow organically. This post will tell you everything you need to know about using brand reps or enthusiasts on Instagram.

    Getting Ready to Use Brand Reps or Enthusiasts on Instagram

    • Decide if you would like brand reps or brand enthusiasts. Brand reps are usually given products free of charge, while brand enthusiasts are generally offered a discount on products and must order regularly. You could use one type or a combination of both.
    • Write a basic contract that outlines what products they will receive, how long you will use their services, how many posts you expect the rep or enthusiast to post during that time period, and when they will post the images.
      • I’d suggest using brand reps in 3 or 6 month increments and starting over with your brand search as the term expires.
      • I suggest having a signed contract with any brand rep or enthusiast.
    • Write out requirements for brand reps or enthusiasts. Are you searching for moms or dads with babies, those with fabulous home decor, or someone trendy that loves the latest accessories? Feel free to ask for specific age or size ranges. The more specific you are when advertising the search, the better applicants you will receive.
    • Create an image that states you are looking for brand reps or brand enthusiasts.
    • Create a hashtag that incorporates your business name and “brandrep” or “brandenthusiast”. Be sure to search the hashtag on Instagram to make sure that it isn’t already in use.

    How to Find Brand Reps or Enthusiasts on Instagram

    • Post your image on Instagram along with dates for your brand rep or enthusiast search. From here, you have a few different options:
      • Direct potential brand reps or enthusiasts to email you with information about them and why they want to be a brand rep or enthusiast.
      • Direct potential brand reps or enthusiasts to an application on your website.
      • (This method is generally most effective) Have potential reps or enthusiasts repost your brand search image and hashtag on their Instagram feed. Then, have them tag 2-5 pictures on their feed with your hashtag. Their tagged photos become their entries into the search. Last, have them tag friends that may be interested in your brand rep or enthusiast search.

    What to Look for When Selecting Brand Reps or Enthusiasts

    • Since Instagram is highly visual, look for someone who posts great photos.
    • Look for someone who is active on Instagram (posting at least every other day) and has a large following.
    • Brand reps and enthusiasts should have public accounts rather than private accounts.

    Sample Brand Rep and Enthusiast Search Post

    Brand Rep Search: (Name of business) is holding a Brand Rep and Enthusiast Search! We are looking for (number of reps) and (number of enthusiasts). We are specifically looking for (criteria you are looking for). Brand Reps will receive (number of items each month), while Enthusiasts will receive a discount of (choose discount, usually between 30 and 50%) each month and are required to purchase 1 item per month. In exchange you will post clear photos that show off (name of business) products at least once per week to help promote the brand. This term will last from (dates of term). How to enter: 1) Follow us (Instagram username). 2) Repost this image with hashtag (#yourhashtag) and tell us about (you, your child, your home, your decor, etc). 3) Tag 3 photos from your feed with (#yourhashtag). 4) Tag 2 friends that may be interested in (Name of business) Brand Rep and Enthusiast Search. Search ends on (date).

    Will you use brand reps or enthusiasts to help grow your business? Let me know in the comments!

    What are Instagram Brand Reps or Enthusiasts? by cuttingforbusiness.com - Make money with your Silhouette Cameo!

  • How to Schedule Facebook Posts in Your Craft Business

    Cutting for Business readers, have you ever sat down at your computer, tablet, or phone – logged into your Facebook, Pinterest, or Instagram account and gotten sidetracked? Did you get sucked down the social media black hole and look up “a few minutes later” only to realize that you just spent 30 minutes, an hour, or more liking a friend’s baby photos, checking out the latest trends on Instagram, or pinning future craft projects on Pinterest?

    If so, these next three posts are for you! Today, tomorrow, and Wednesday I will show you how to automate three popular social media networks that you may use to promote your Silhouette or Cricut made products. For each network I will share what works for me, and a tutorial on how to schedule your content. To start, let’s look at Facebook.

    My Facebook Social Media Strategy

    • Post to my Facebook Business Page at least once a day.
    • Share a mix of content including my blog posts (or your products), related content from around the internet, and deals or sales of related products. The key is to share a mix of content and not simply your products for sale – as you may bore your audience. For ideas on what to post to keep your Facebook Business Page interesting, see this post.
    • Have at least one day of regular content where Facebook followers know what to expect. On Cutting for Business, I have Sold It Sunday on Sundays, Supplier Spotlights on Thursdays, and Freebie Fridays on Friday. Since most Cutting for Business readers are building their businesses, you could have “Behind the Scenes at XYZ Business” on a certain day, “Customer Photo Sharing Day”, “New Product Day”, “Inspiration of the Week”, or “Get to Know the Owner/Designer/Creator”. You readers are a creative bunch, so get creative!
    • Like or reply to each and every comment posted on my Facebook Business Page. Since Facebook followers access Facebook at different times throughout the day, I do not like or reply to each comment as they come in. Sadly, if I did, I would never get anything else done. Instead, I check in about 3 times per day and handle everything in groups.
    • Schedule most of my weekly content on Sunday evenings.

    Scheduling Facebook Content

    • There are a number of third party apps and websites that will allow you to schedule content on Facebook. Some are available for free, while others are monthly subscriptions. I have tried several of them – and they work. However, I have noticed that I get many, many more Facebook views, comments, and likes when I schedule directly in Facebook. If you are interested in trying out a third party service, my favorite was Hootsuite.
    • Why would you want to schedule Facebook content for your business page? It frees up more time to spend on other aspects of your business, and helps you stay more consistent with your social media efforts. While you can schedule content, you cannot schedule it and forget about it. You must remember to log in regularly and acknowledge Facebook followers who like or comment on your content.

    Tutorial for Scheduling Facebook Page Content on a Computer:

    1. Log into your Facebook Business Page account.

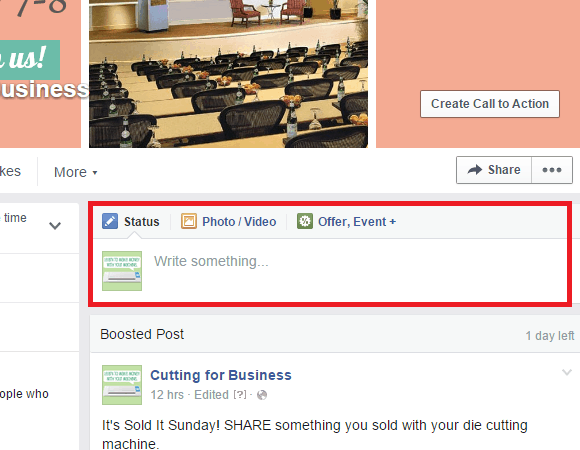
    2. Create a status update, image post, video, or offer like you normally would.

    Social Media Automation in Your Silhouette Business - Facebook - by cuttingforbusiness.com

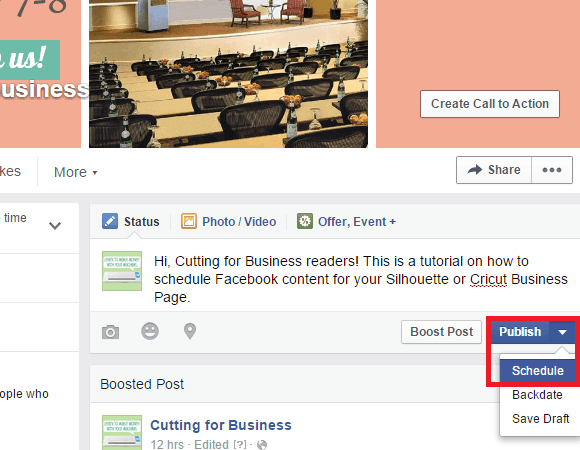
    3. Click the small arrow to the right of “Publish”, then click “Schedule”.

    Social Media Automation in Your Silhouette Business - Facebook - by cuttingforbusiness.com

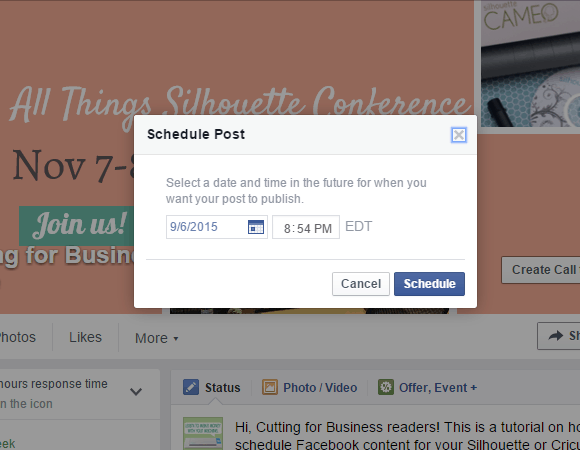
    4. Choose a date and time for your content to be posted and click “Schedule”.

    Social Media Automation in Your Silhouette Business - Facebook - by cuttingforbusiness.com

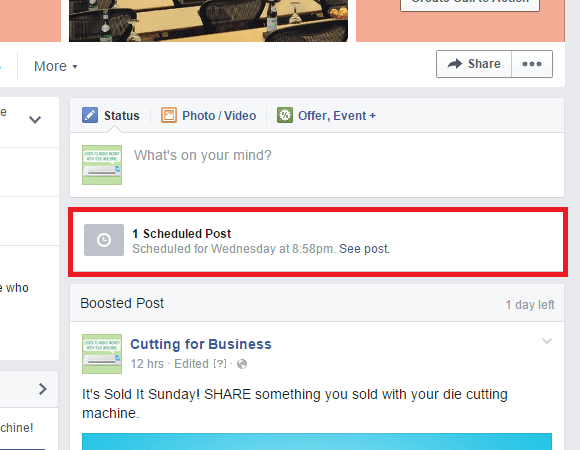
    5. That’s it! You can view or edit your scheduled messages from the link that appears on your Facebook Business Page. If you’d prefer to schedule content from the Facebook Pages App, continue below.

    Social Media Automation in Your Silhouette Business - Facebook - by cuttingforbusiness.com

    Tutorial for Scheduling Facebook Content from the Facebook Pages App:

    1. Log into your Facebook Page on the App.

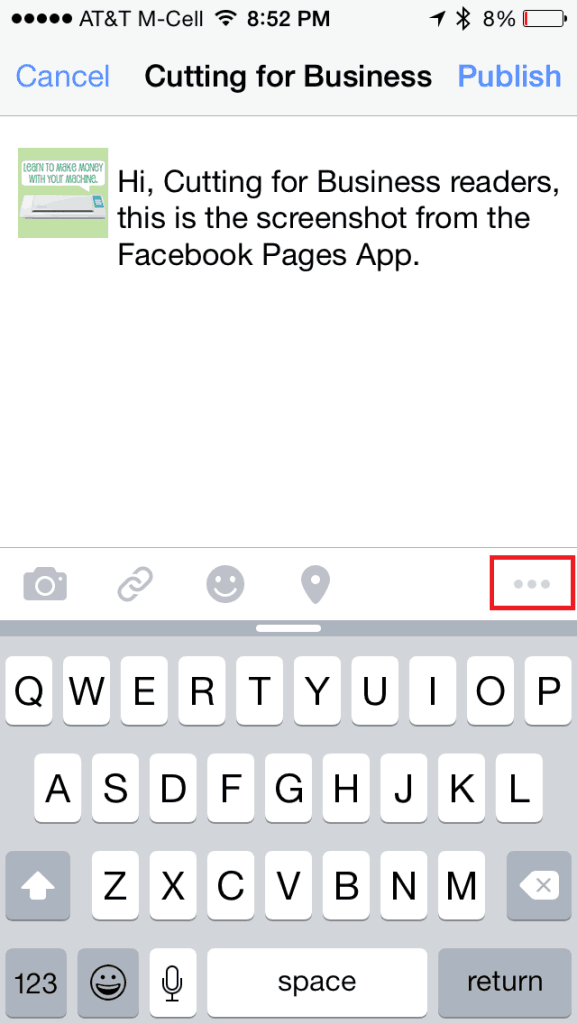
    2. Write your content. Select the More Options Menu (that’s the three horizontal dots on the right hand side):

    Social Media Automation in Your Silhouette Business - Facebook - by cuttingforbusiness.com

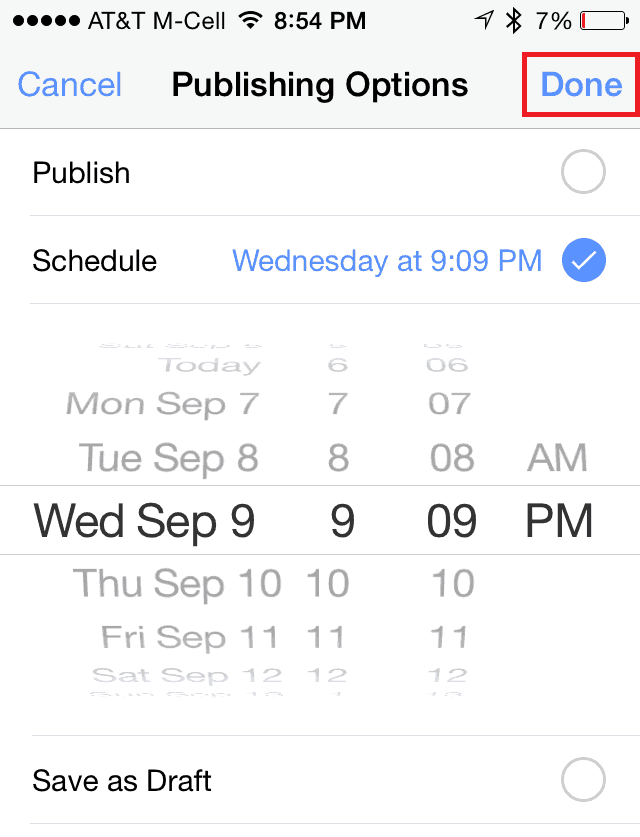
    3. Choose a date and time for your content to be published, and click “Done”.

    Social Media Automation in Your Silhouette Business - Facebook - by cuttingforbusiness.com

    That’s it! If you haven’t started your Silhouette or Cricut Facebook Business Page yet, see this post for instructions on how to start one.

    Continue on to How to Schedule an Instagram post.

    Save this post to Pinterest:

    How to Schedule Facebook Posts in Your Craft Business - Save time in your Silhouette Portrait or Cameo and Cricut Explore or Maker business - by cuttingforbusiness.com

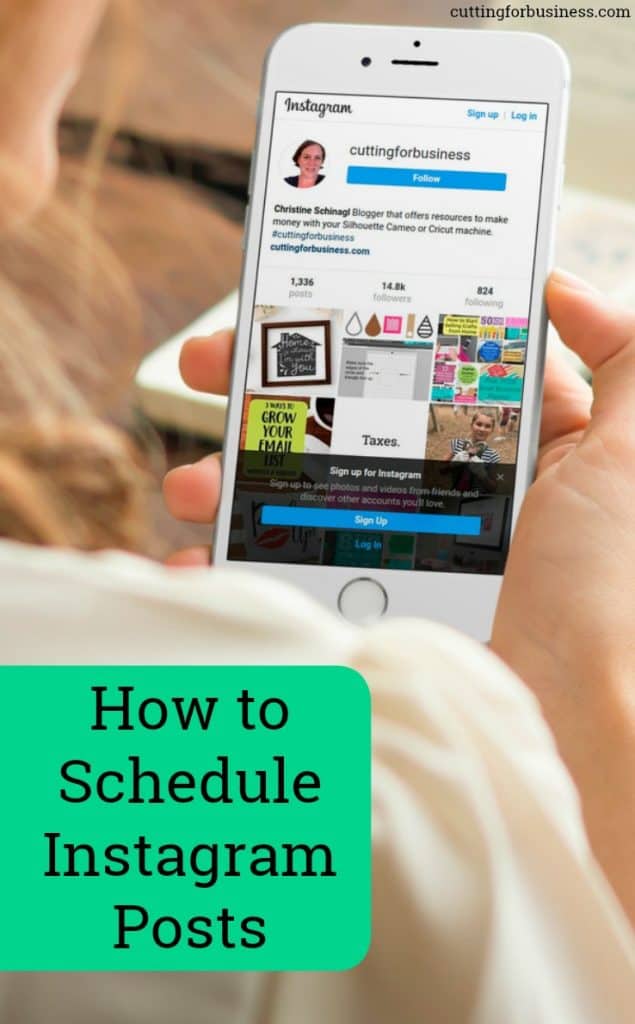
  • How to Schedule Instagram Posts for Your Craft Business

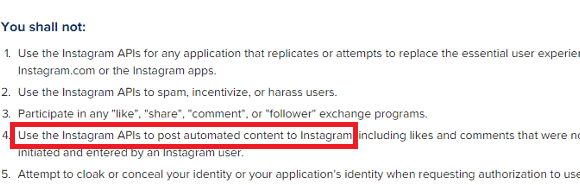
    Yesterday we looked at scheduling social media content for your Silhouette or Cricut business on Facebook. Today, we are continuing the series as we head to Instagram. You won’t find as many scheduling websites or apps for Instagram, because it is against the Instagram terms of service for developers to use the API (that’s technical talk for the computer programming that runs the site) to post automated content. Here’s the statement from the API documentation:

    Scheduling Instagram Posts for Your Silhouette or Cricut Business - by cuttingforbusiness

    My Instagram Social Media Strategy

    • Post to my Instagram at least once a day.
    • Share different content on Instagram than I share on other social media outlets. I tend to share more personal details of my life on Instagram, including family photos and my personal DIY and crafting projects. It allows people that are interested in getting to know me learn about me through pictures. For small business owners, you can do the same. Many people buy handmade products because they like the people that sell them. Instagram is a great way to get to “know” the crafter behind the products.
    • Like and comment on other users photos at least once per day.
    • Follow new Instagram accounts regularly.
    • Reply to each comment on my Instagram posts.
    • Schedule most of my weekly content on Sunday evenings.

    Scheduling Instagram Content

    • Like I mentioned in the previous post about Facebook, scheduling content helps you be more consistent across social media, and it cuts down on the amount of daily time you have to spend with social media.
    • (Update: Latergramme has changed their name to Later. Everything remains the same except for the name change.) I have tried several Instagram scheduling tools, and have settled on Later as my favorite. Since Later can’t actually post the content for me without violating Instagram’s Terms of Use, here is how it works: You schedule the content either on the website or through the smartphone app. When the scheduled message is ready to go live, Later sends you a notification on your phone. You are then able to open the post in Instagram, paste the text, and push publish. This process is within the limits of the Instagram Terms of Use.

    Tutorial for Scheduling Instagram Content:

    1. Create an account at Later, and log in.

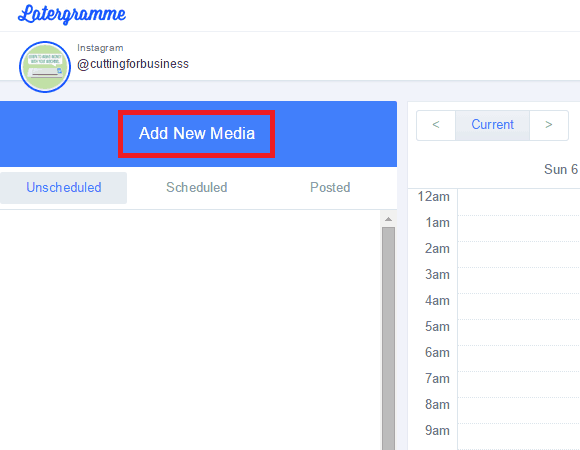
    2. Click “Add New Media” from the left hand side of the screen.

    Scheduling Instagram Posts for Your Silhouette or Cricut Business - by cuttingforbusiness

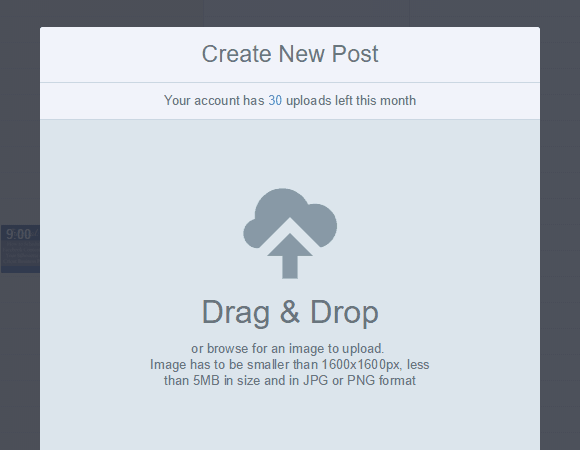
    3. Upload your image by dragging it into the popup box or by browsing to it on your computer. Size must be smaller than 1600px by 1600px and bigger than 640px by 640px.

    Scheduling Instagram Posts for Your Silhouette or Cricut Business - by cuttingforbusiness

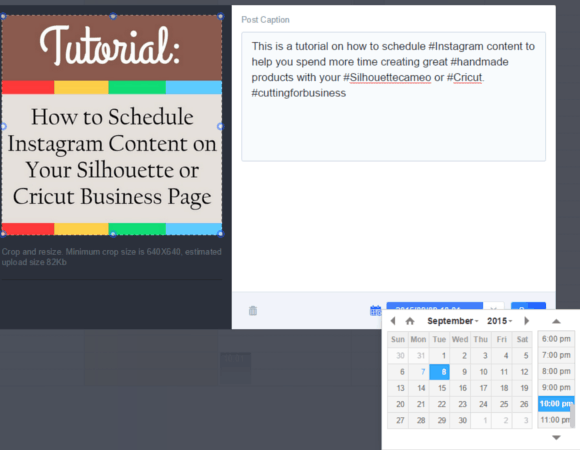
    4. Crop your image if needed and write your content. Using the calendar at the bottom, select a date and time and click “Save”.

    Scheduling Instagram Posts for Your Silhouette or Cricut Business - by cuttingforbusiness

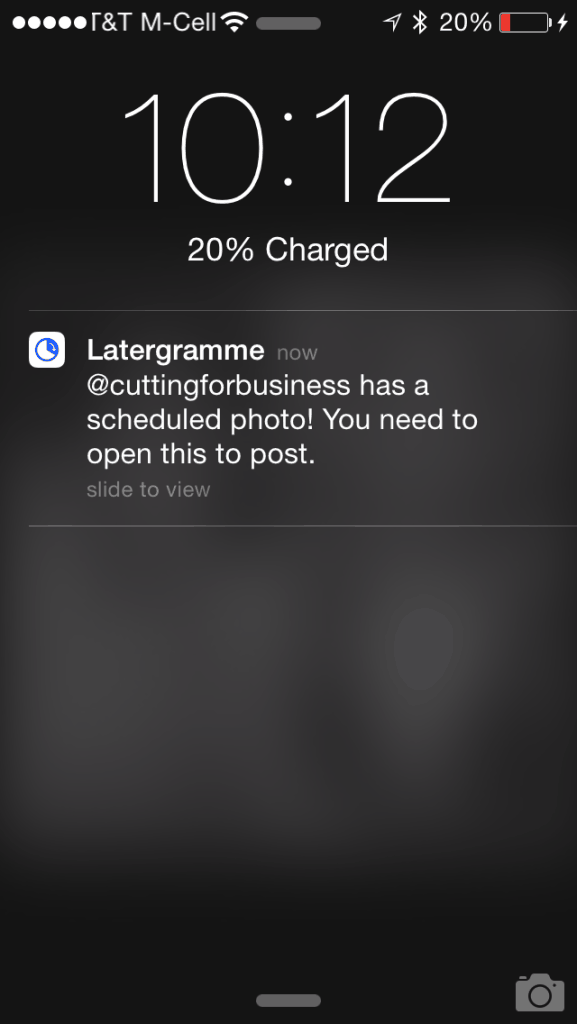
    5. When the time comes for your post to go live, Later will send you a notification on your phone that looks like this:

    Scheduling Instagram Posts for Your Silhouette or Cricut Business - by cuttingforbusiness

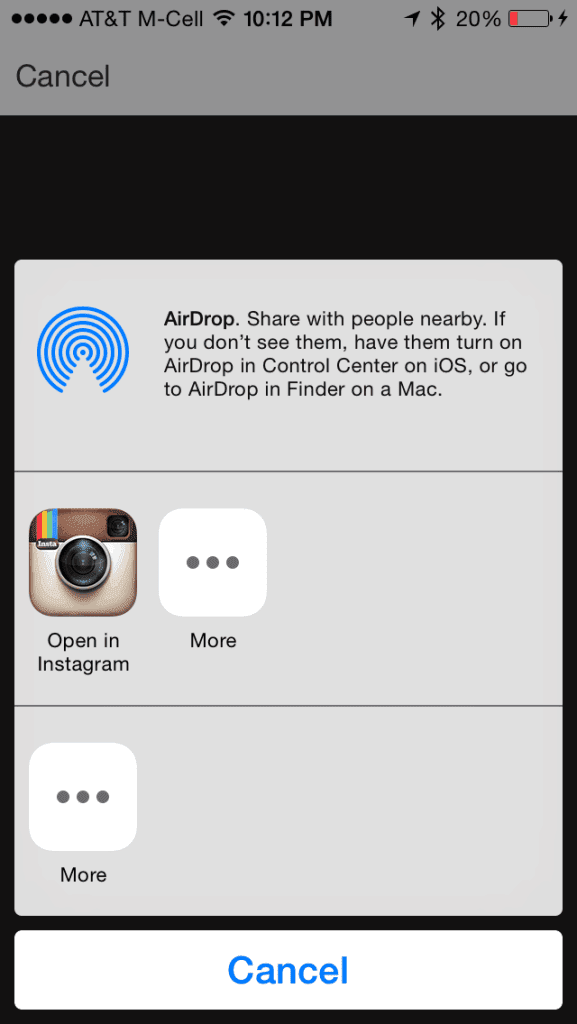
    6. When you open the notification, you’ll be able to select “Open in Instagram”:

    Scheduling Instagram Posts for Your Silhouette or Cricut Business - by cuttingforbusiness

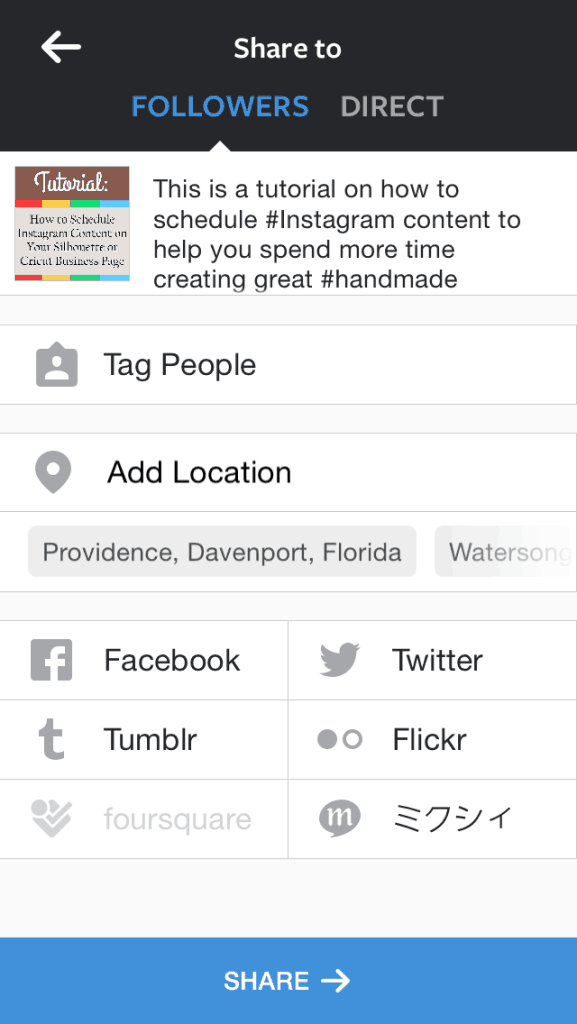
    7. You should now be in Instagram. Paste the description you wrote into the caption space, and hit “Share”.

    Scheduling Instagram Posts for Your Silhouette or Cricut Business - by cuttingforbusiness

    It’s just that simple! My disclaimer: I gave you screenshots for every step of the way and this looks like a long process, but it takes less than a minute once you get the hang of it.

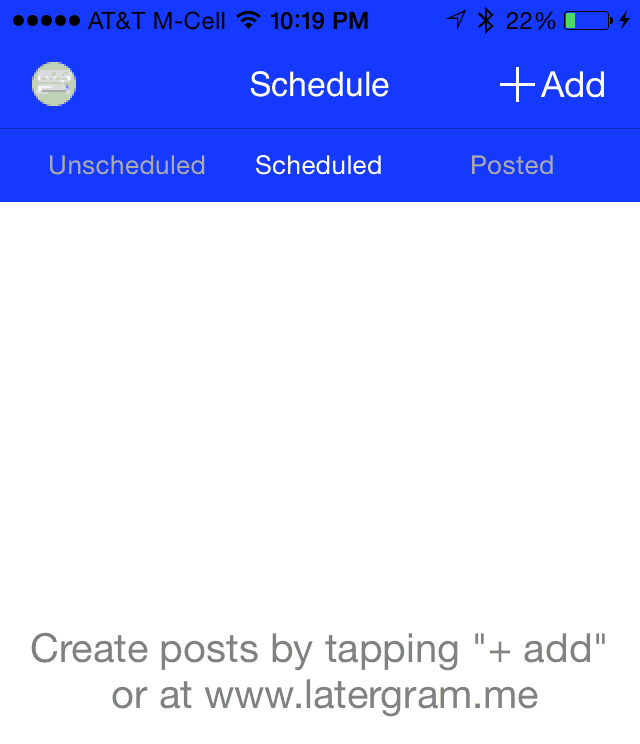
    If you’d prefer to only use the app to schedule your messages and not use a computer, you should skip steps 1-4. Instead, you would open the app on your smartphone, and use the “+Add” link in the top right hand corner. The app will prompt you to upload your photo, add a caption, then schedule a date and time:

    Scheduling Instagram Posts for Your Silhouette or Cricut Business - by cuttingforbusiness

    Tomorrow, we will wrap up this quick series on social media automation when we head to Pinterest to schedule pins.

    Was this article helpful? Share the love and pin the image below on Pinterest.

    How to Schedule Instagram Posts in Your Craft Business - Silhouette Cameo or Portrait and Cricut Explore or Maker - by cuttingforbusiness.com

  • How to Schedule Pins on Pinterest in Your Craft Business

    We are wrapping up our discussion of automating social media to make more time to run your Silhouette or Cricut based business today. We’ve covered Facebook and Instagram, so let’s head to Pinterest. I think automating Pinterest is a huge timesaver, because I get sidetracked (I’m sure I’m not the only one!) on Pinterest and could literally spend hours looking at tutorials, craft projects, recipes, and more.

    My Pinterest Social Media Strategy

    • Pin between 20 to 40 pins per day, across all my boards. Pinterest experts recommend anywhere between 20 to 40 pins, so that is what I follow. They also note that you should pin across all your boards, and that you should post a mix of content including your own products, repins of pins already on Pinterest, and new pins that you’ve added from around the internet.
    • Follow new accounts about once a week. I usually try to follow about 10 new accounts each week.
    • Click each pin I post to make sure that the image goes to where it should. This is important, because Pinterest has a lot of dead pins (those that don’t go to a website, because the website is no longer online) and spam pins (those that go to somewhere other than the image shown, including not safe for work sites).
    • Rather than flood my boards with new content daily, I use a “drip” method, where pins are posted one at a time throughout the day. This is important, because Pinterest users access Pinterest throughout the day. For the most part, Pinterest feeds are organized in chronological order. If you pin a bunch of Pinterest pins at the same time at 8am, a user that logs in at 5pm likely won’t see your pins because they will be too far down their feed. By “dripping” pins in throughout the day, your pins have a better chance of being seen by more users.
    • Schedule most of my weekly content on Sunday evenings.

    Scheduling Pinterest Content

    • Just as a reminder, scheduling your Pinterest pins can help you cut down on the time you spend on Pinterest, plus it helps you be more consistent.
    • I have tried a few different Pinterest scheduling services and prefer BoardBooster. BoardBooster offers a free trial, and a variety of services. If the service works for you, there are several plans to choose from. There is also a referral program that you can earn credits for referring new users. Links found in this tutorial are my referral link, but I’d recommend this service even if I didn’t get a subscription credit. For this tutorial, we are only looking at two features of BoardBooster, the scheduling tool and the looping tool.
    • BoardBooster works by creating secret boards within Pinterest. You pin the content to your secret boards and BoardBooster “drips” the content into your selected board throughout the day. It is a newer service, but I have experienced zero issues with it throughout my first 6 months using BoardBooster.

    Tutorial for Scheduling Pinterest Content:

    1. Create an account at BoardBooster and log in.

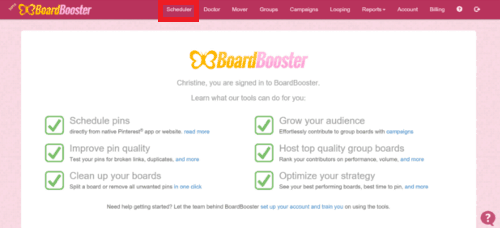
    2. From the menu across the top, select “Scheduler”.

    Scheduling Pinterest Pins for Your Silhouette or Cricut Business by cuttingforbusiness.com

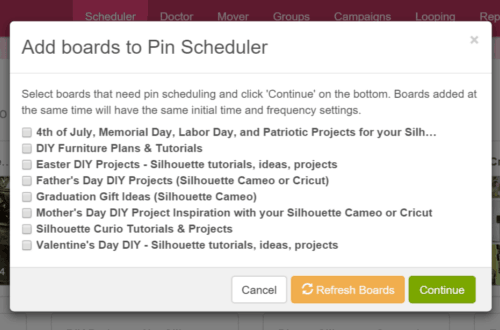
    3. Next, BoardBooster is going to ask you to connect your boards to the service. Select your boards and click continue. (Note: You can add as many boards as you want, but you can only add them in groups of 10.)

    Scheduling Pinterest Pins for Your Silhouette or Cricut Business by cuttingforbusiness.com

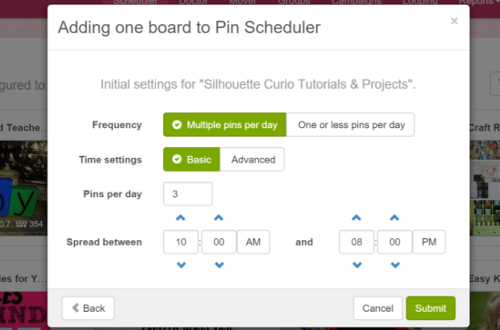
    4. Choose settings for your secret board to push your pins to Pinterest. Experiment with the settings to see what works well for your Pinterest profile. You can change these settings at a later time. Click “Submit” and let BoardBooster create your boards. It’ll take a few minutes for the boards to be added to BoardBooster and your secret boards to be created.

    Scheduling Pinterest Pins for Your Silhouette or Cricut Business by cuttingforbusiness.com

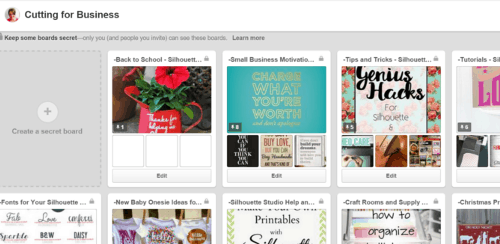
    4. Once your secret boards are created, you can head to your Pinterest profile. You’ll be able to see the secret boards that BoardBooster created. If your board name is “Silhouette Curio Tutorials & Projects”, your secret board name is “-Silhouette Curio Tutorials & Projects” (Notice the dash at the beginning of the secret board). Here is a screenshot of some of my secret boards.

    Scheduling Pinterest Pins for Your Silhouette or Cricut Business by cuttingforbusiness.com

    5. Now, you’ll just need to fill up your secret boards and keep them full. You add pins to your secret board the same way you pin now, and BoardBooster does all the magic behind the scenes. That’s it! Isn’t that cool?

    Looping on BoardBooster

    The other feature of BoardBooster that we are going to look at today is looping. This BoardBooster feature takes the oldest pin on a specified board and repins it to the top. This can help you if you’ve recently had many new followers, or if you have a lot of pins, because it helps refresh older content to a brand new audience. Boardbooster can delete the original pin, or if it has a lot of repins or comments, leave it there. Setting up looping in BoardBooster only takes a minute.

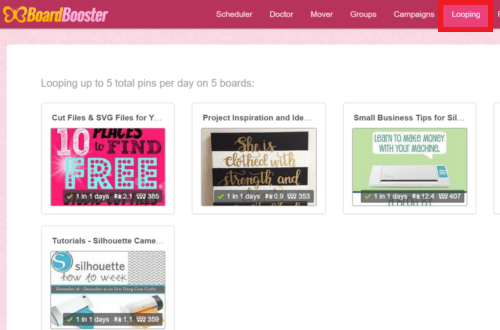
    1. Log into BooardBooster and select “Looping” from the top menu.

    Scheduling Pinterest Pins for Your Silhouette or Cricut Business by cuttingforbusiness.com

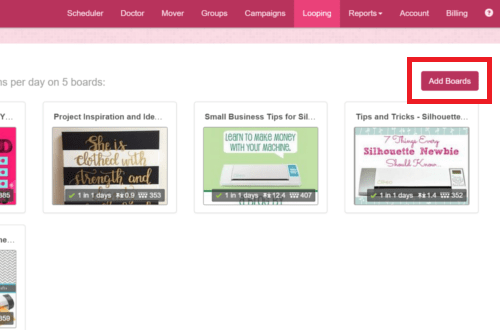
    2. I only “loop” on a handful of boards, which are my most popular boards. To add a board to start looping, select “Add Boards”.

    Scheduling Pinterest Pins for Your Silhouette or Cricut Business by cuttingforbusiness.com

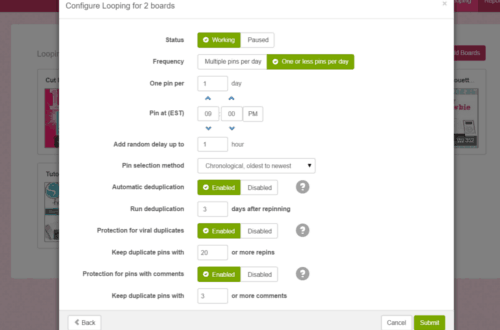
    3. Next, you’ll need to select your settings. I usually choose to only loop one pin per day, in the evening. I turn deduplication on, which means that Boardbooster will remove duplicate pins every few days. I protect any pin that has more than 20 repins by not having BoardBooster delete the original pin after it is repinned. You’ll want to experiment with the settings to find out what works for your business. Here is a screenshot of my settings. When you are ready, click “Submit” and looping is set up. It’s just that easy!

    Scheduling Pinterest Pins for Your Silhouette or Cricut Business by cuttingforbusiness.com

    That’s as far into BoardBooster as we are going to go today. You should browse it if you have time, as there are several other helpful features. Oh! If your business is not on Pinterest yet – head to this post.

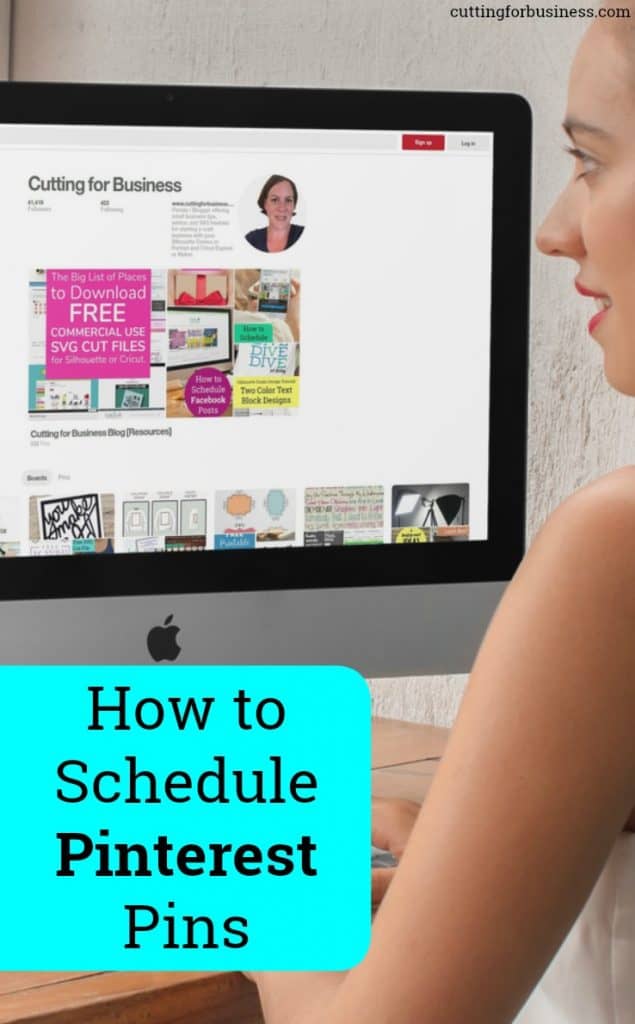
    Before you go, take a second to follow Cutting for Business on Pinterest. Then, save the image below to Pinterest.

    How to Schedule Pinterest Pins in Your Craft Business - Silhouette Cameo or Portrait and Cricut Explore or Maker - by cuttingforbusiness.com

  • How to Host a Giveaway in Your Craft Business

    Whether your business has hit a lull in sales or you are brand new, a great way to get new customers is to have a giveaway on social media. Different social media sites have different rules that you must follow in order to host a giveaway on their site. Unfortunately, it seems that the guidelines on social media sites for giveaways, raffles, and contests are constantly changing. The easiest way to host a giveaway is through a third party application. Over the years, I’ve tried several of them and the easiest to use for a multi-site giveaway is Rafflecopter.

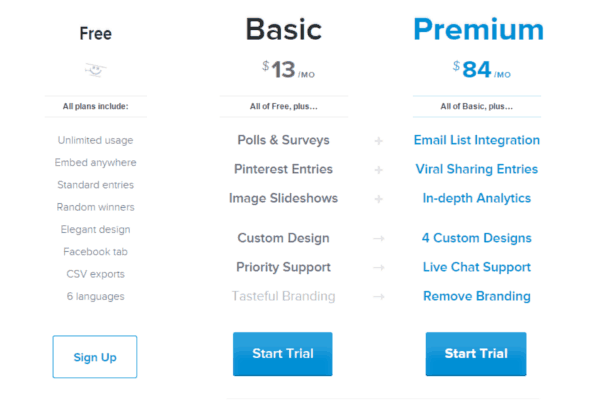
    With Rafflecopter, you can collect entries for your giveaway through Facebook, Twitter, Pinterest, blog comments, and more. Rafflecopter offers a free 7 day trial to see if you like the program, no credit card required. Pricing after the 7 day trial is shown below, but there is a free plan available:

    Getting New Customers Through Social Media Giveaways by cuttingforbusiness.com

    Here’s a walkthrough of the process of setting up your giveaway:

    1) Visit rafflecopter.com and create an account.

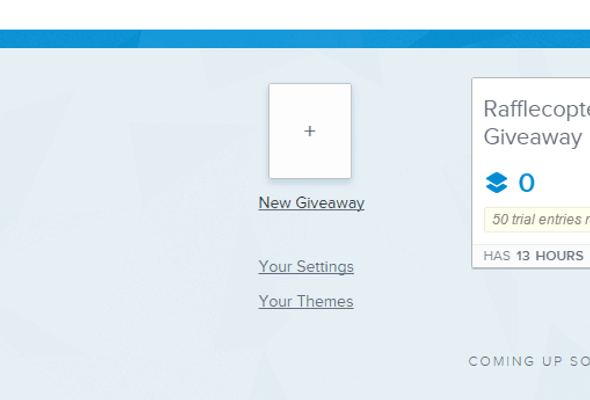
    2) Click “New Giveaway”.

    Getting New Customers Through Social Media Giveaways by cuttingforbusiness.com

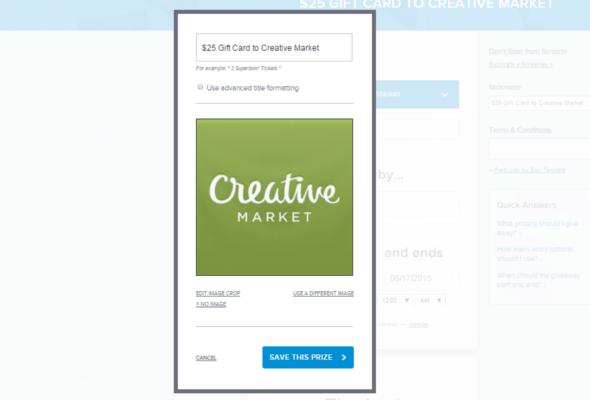
    3) Click “Add Prize” and fill in the details about the prize(s) that someone can win in your giveaway. You’ll need to add a title for your giveaway, and a photo of the prize. Click “Save this Prize”.

    Getting New Customers Through Social Media Giveaways by cuttingforbusiness.com

    4) Optional: Repeat step 3 and add additional prizes to your giveaway.

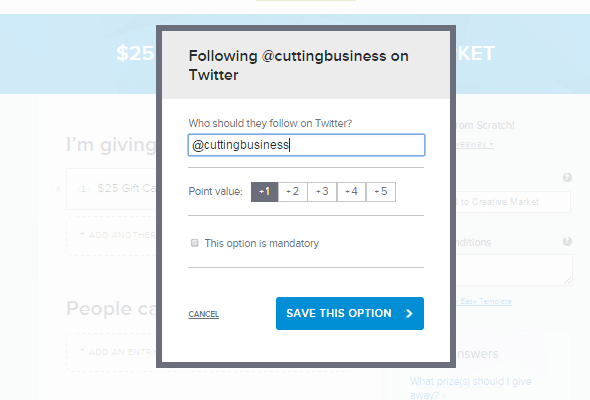
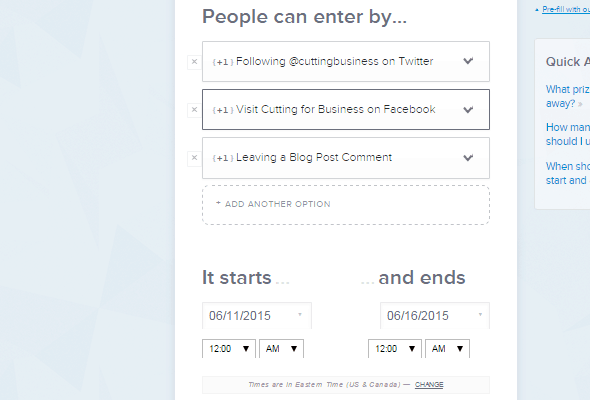
    5) Now, you’ll add how people can earn entries. On Rafflecopter, people can earn entries by doing things such as following you on social media platforms, tweeting messages, or pinning images (Pinterest functionality is limited to paid plans). You’ll assign each task a point value and the user receives that number of entries into the giveaway for completing the task. You can set options to be mandatory or optional.

    Getting New Customers Through Social Media Giveaways by cuttingforbusiness.com

    6) Repeat step 5 for each social media outlet you want to include in your giveaway.

    7) Choose starting and ending dates and times.

    Getting New Customers Through Social Media Giveaways by cuttingforbusiness.com

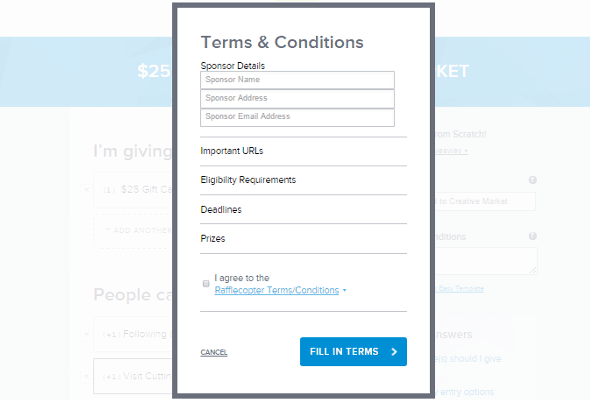
    8) On the right hand side, click “Terms and Conditions” and fill out the fine print details, including residency, age, your company name, and other legal details.

    Getting New Customers Through Social Media Giveaways by cuttingforbusiness.com

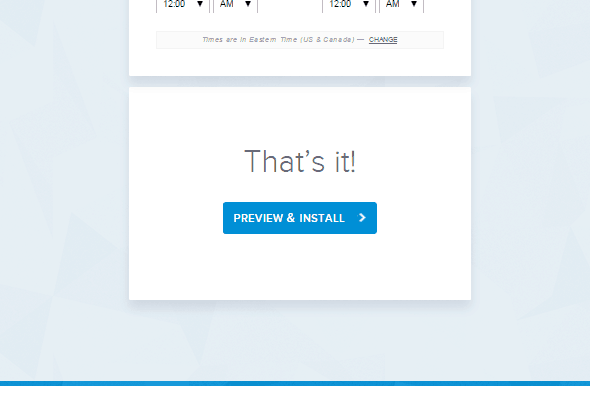
    9) Now you’ll click “Preview and Install”.

    Getting New Customers Through Social Media Giveaways by cuttingforbusiness.com

    10) From the install screen you’ll either need to copy and paste the provided HTML code onto your website or click “Choose a Page” to post it on your Facebook Business Page. You are ready to share your giveaway with everyone you can!

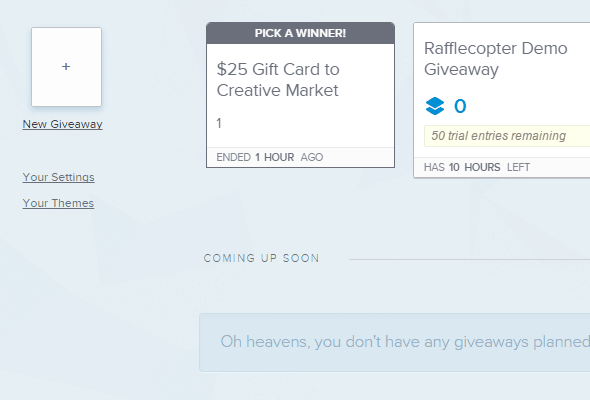
    11) At the end of your giveaway, Rafflecopter will send you an email letting you know that your giveaway has ended. Log in at Rafflecopter.com and click “Pick a Winner”.

    Getting New Customers Through Social Media Giveaways by cuttingforbusiness.com

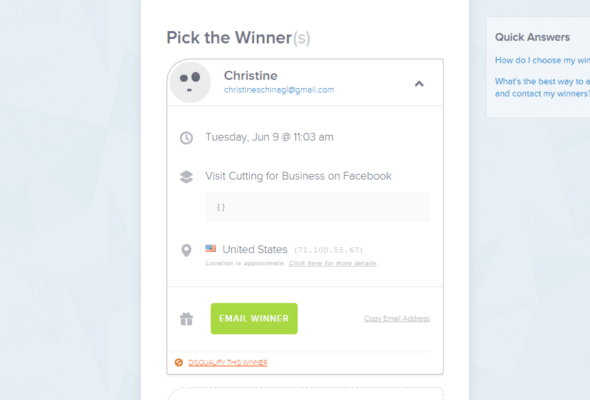
    12) Next, click “Add a Random Winner” and Rafflecopter will choose a winner. You can then contact the winner.

    Getting New Customers Through Social Media Giveaways by cuttingforbusiness.com

    If you are stumped for what prizes to offer, a gift certificate to your company, a gift basket with products from your company, or an item themed to the current upcoming holiday or season all make great giveaways!

    Share this post on Pinterest:

    How to Host a Giveaway in Your Silhouette Cameo or Cricut Handmade Craft Business - by cuttingforbusiness.com