Blog

  • Silhouette Studio Tutorial: How to a Create Sketched Shape SVG

    Design with Me is a new regular feature on Cutting for Business! Each Friday, I’ll bring you a new Silhouette Studio tutorial featuring how to design an SVG.

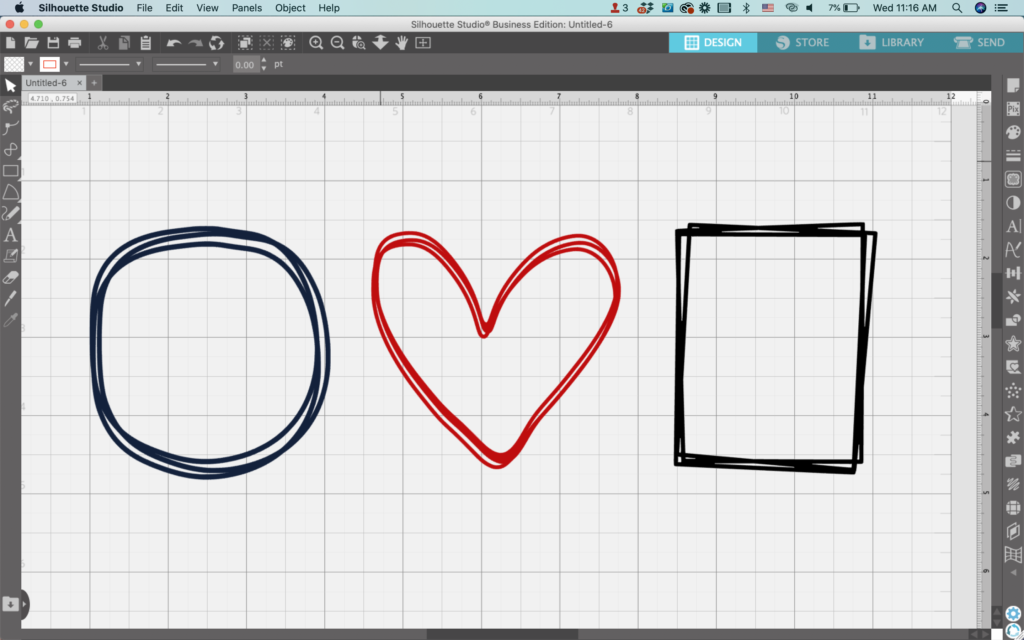
    Let’s design some a sketched shape SVG today in Silhouette Studio.
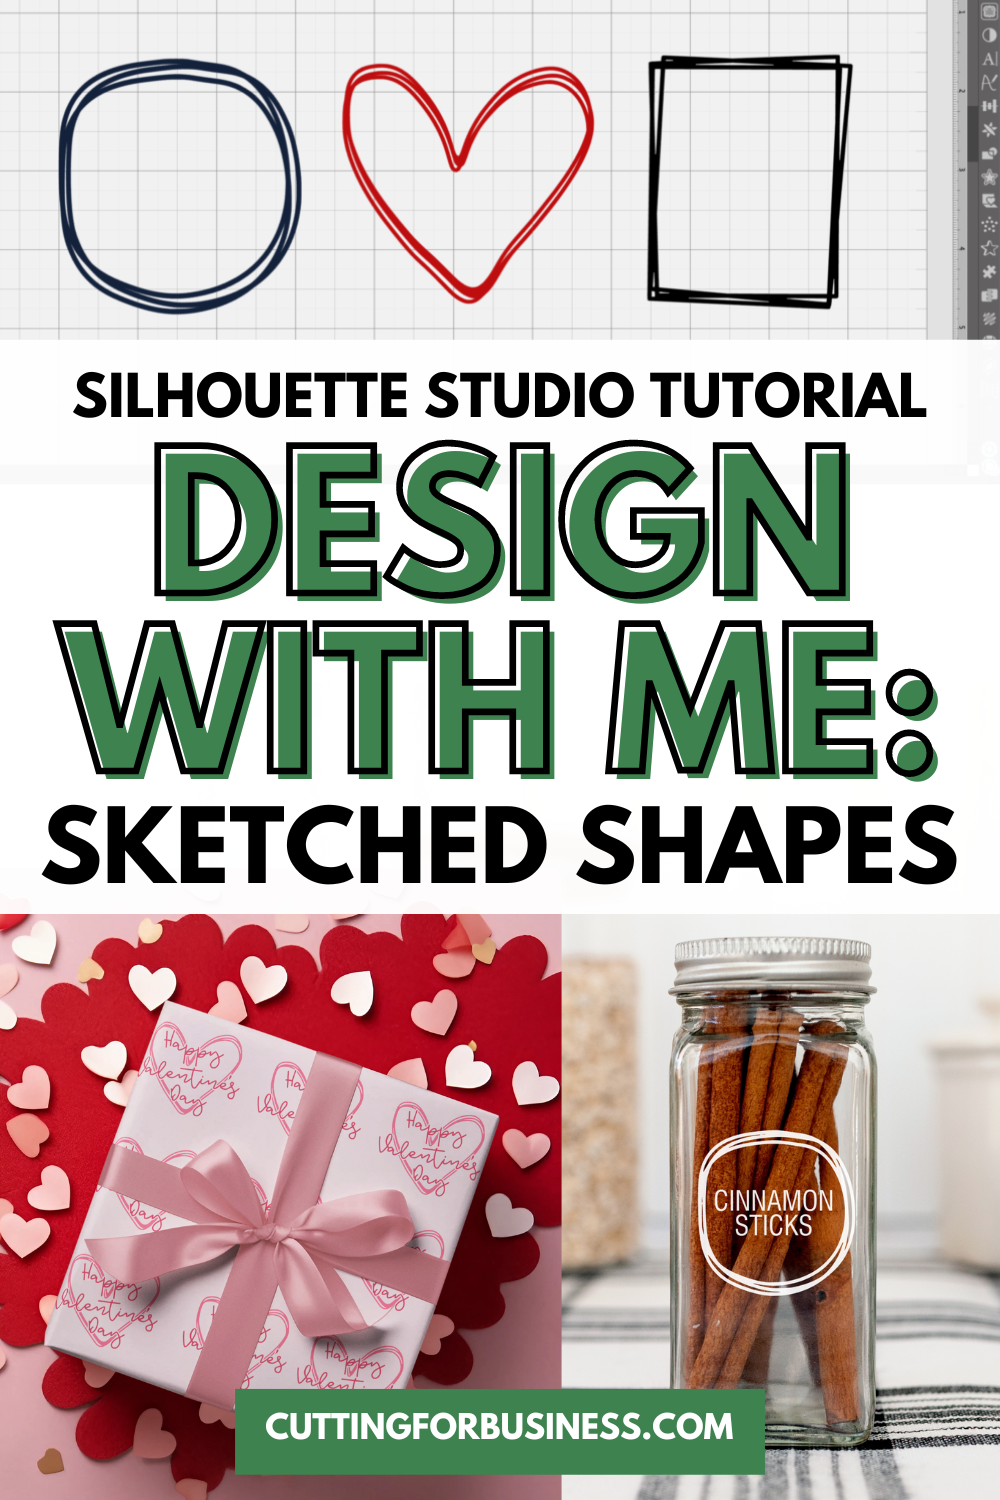
    Silhouette Studio Tutorial: How to a Create Sketched Shape SVG - cuttingforbusiness.com

    Silhouette Studio Tutorial: Sketched Shape SVG

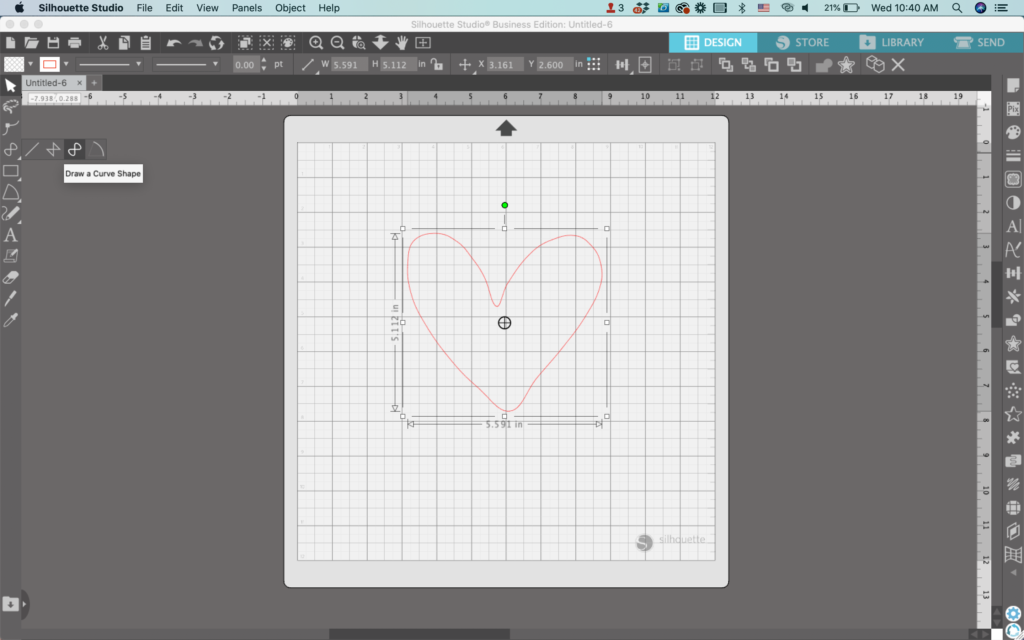
    1. In Silhouette Studio, use the ‘Draw a Curve Shape’ tool (it’s located in the ‘Line Tools’, which is the fourth icon on the left hand side) to draw a heart. Don’t stress if it isn’t perfect.
    Silhouette Studio Screenshot - cuttingforbusiness.com

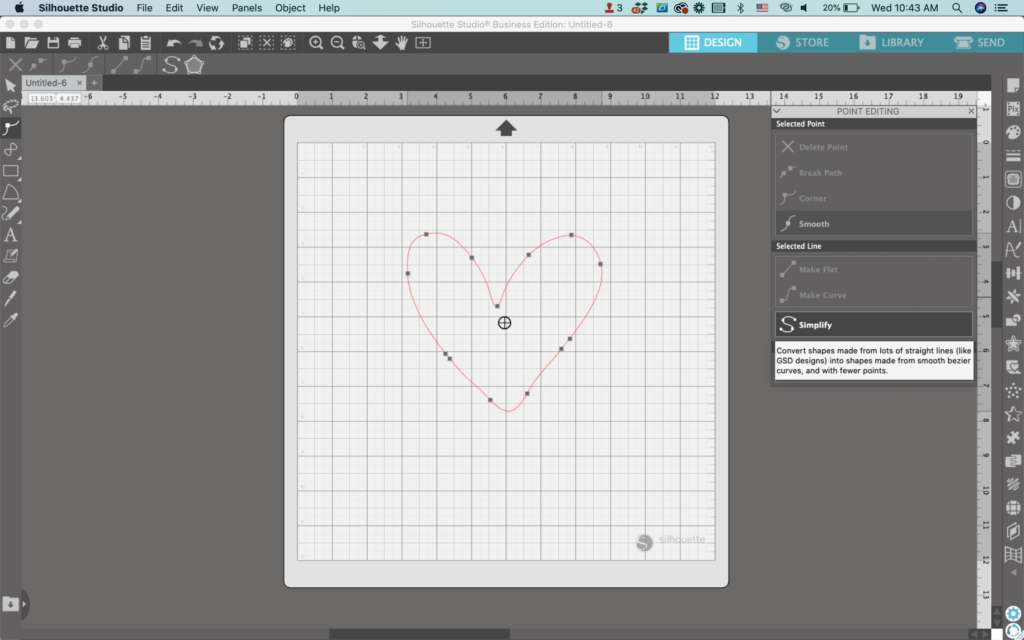
    2. Double click the heart to open the ‘Point Editing’ Panel. Fine tune your heart. Personally, I find ‘Smooth’ and ‘Simplify’ to work great for this.
    Silhouette Studio Screenshot - cuttingforbusiness.com

    3. Navigate to ‘Panels’, then ‘Line Style’. Increase the thickness of the line. In this tutorial, I’m using a line thickness of 6.
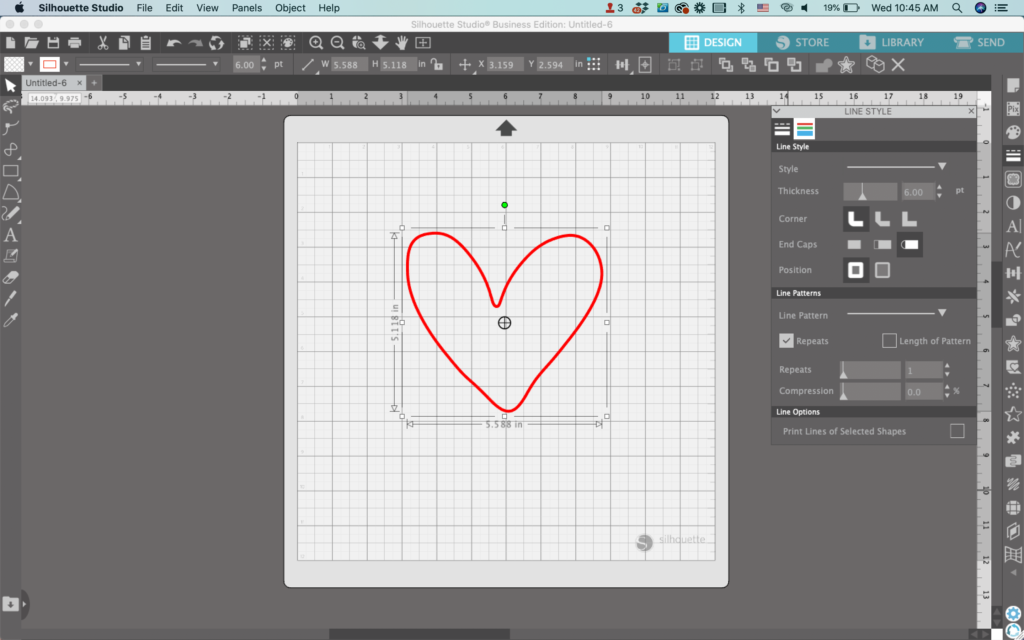
    Silhouette Studio Screenshot - cuttingforbusiness.com

    4. Right click the heart, then select ‘Duplicate’ to make a copy.
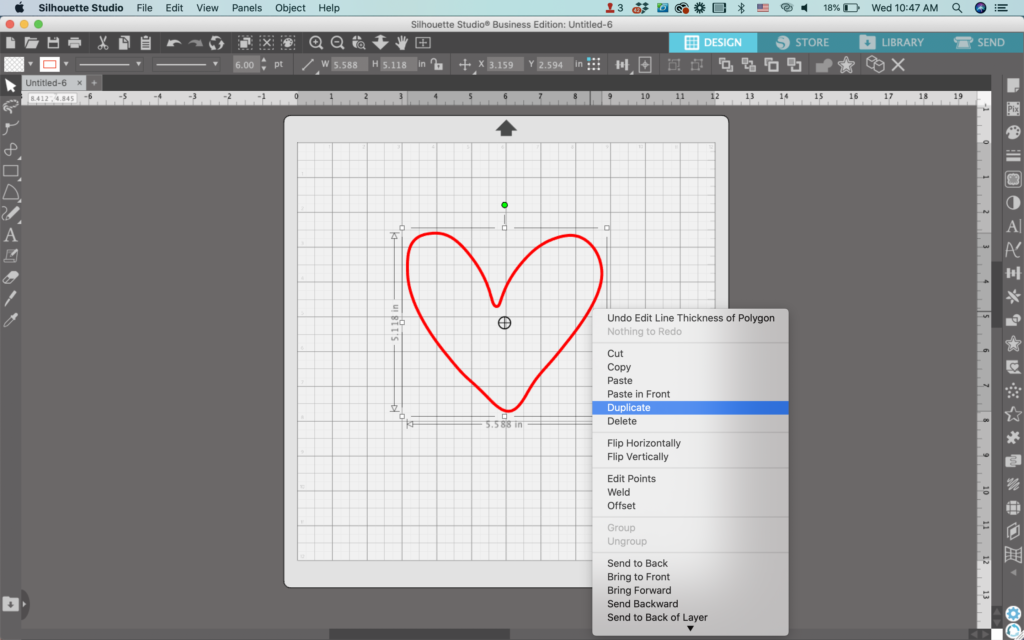
    Silhouette Studio Screenshot - cuttingforbusiness.com

    5. Drag the duplicate on top of the original, but offset it slightly. You can also resize it a bit or stretch it slightly.
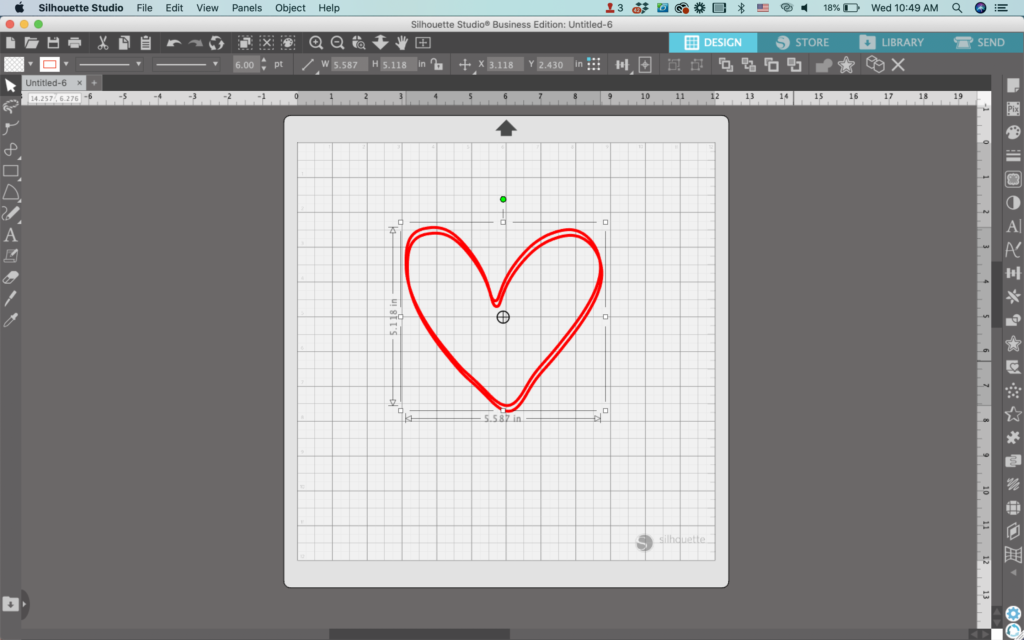
    Silhouette Studio Screenshot - cuttingforbusiness.com

    6. Repeat steps 4 and 5 once (maybe two or three times – you’re the designer so it’s your choice!).
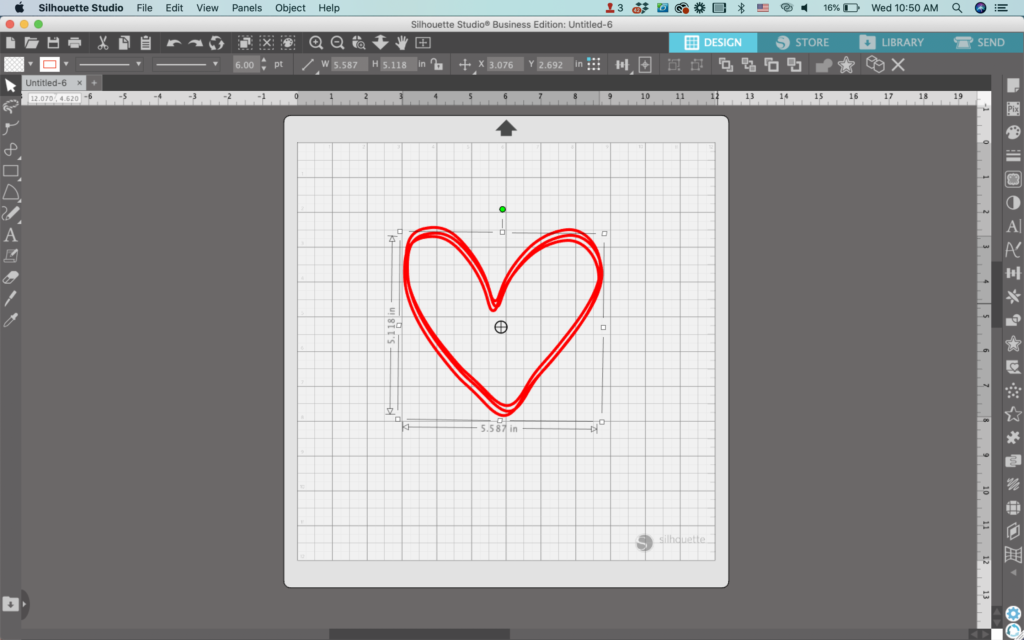
    Silhouette Studio Screenshot - cuttingforbusiness.com

    7. Navigate to ‘Panels’, then ‘Trace’, and trace your stack of hearts. Why? Right now, if you attempted to cut this, it will cut three hearts because these are simply lines. By tracing, you make it into a shape.
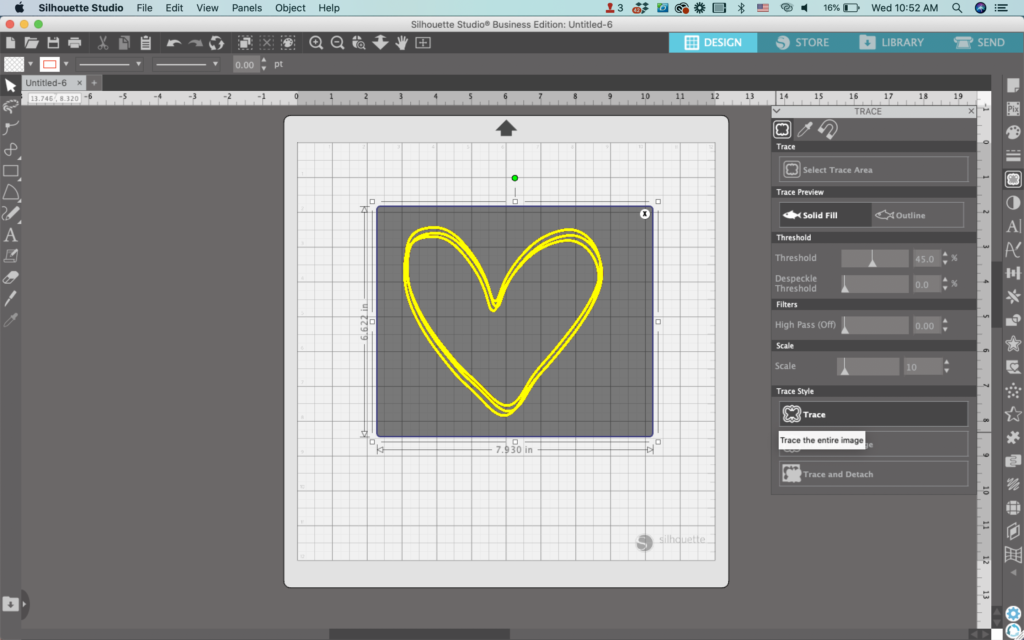
    Silhouette Studio Screenshot - cuttingforbusiness.com

    8. Delete the original line shapes. You’ll be left with a sketched shape.
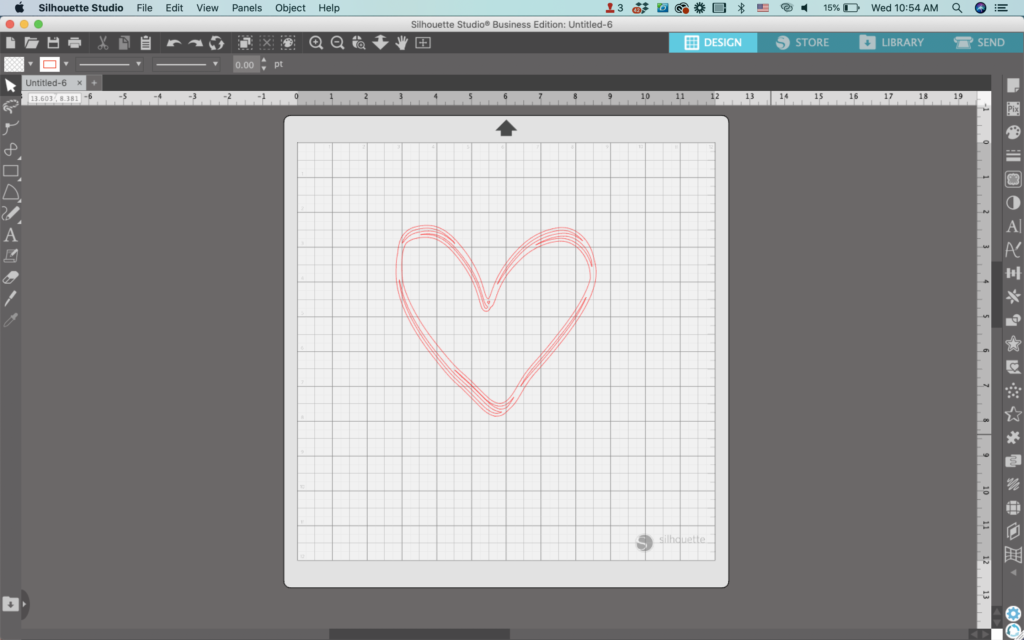
    Silhouette Studio Screenshot - cuttingforbusiness.com

    9. (Optional) Zoom in on your design and double click to open the ‘Point Editing’ Panel. Delete any pieces that might be hard to weed. This is especially helpful if you plan to cut the sketched shape in vinyl.
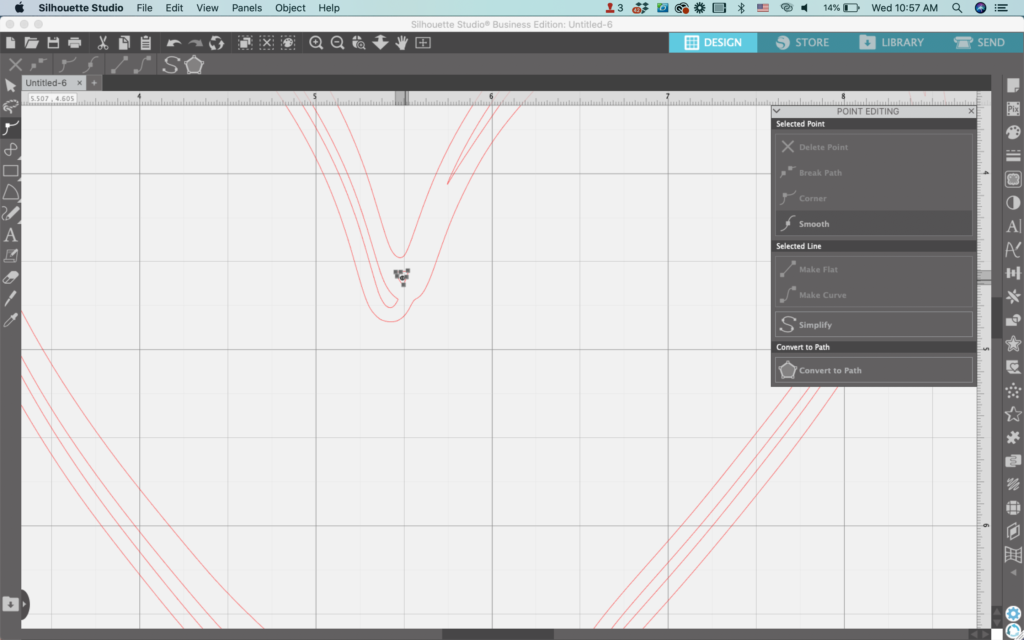
    Silhouette Studio Screenshot - cuttingforbusiness.com

    10. Fill your design with color.

    Silhouette Studio Screenshot - cuttingforbusiness.com

    While I demonstrated this technique with a heart, you can use any shape: star, rectangle, square, circle, oval, polygon, and so on.

    My finished designs looks like this:

    Sketched circle spice jar label:

    Sketched circle spice jar labels - cuttingforbusiness.com.

    Sketched heart Valentine’s Day wrapping paper:

    Sketched heart Valentine's Day wrapping paper - cuttingforbusiness.com.

    Don’t Forget to Save!

    To save your new SVG creation, head to ‘File’, ‘Save As’, ‘Save to Hard Drive’, name the file, then select ‘SVG’ from the dropdown menu.

    Want More SVG Tutorials?

    View more Design with Me SVG tutorials.
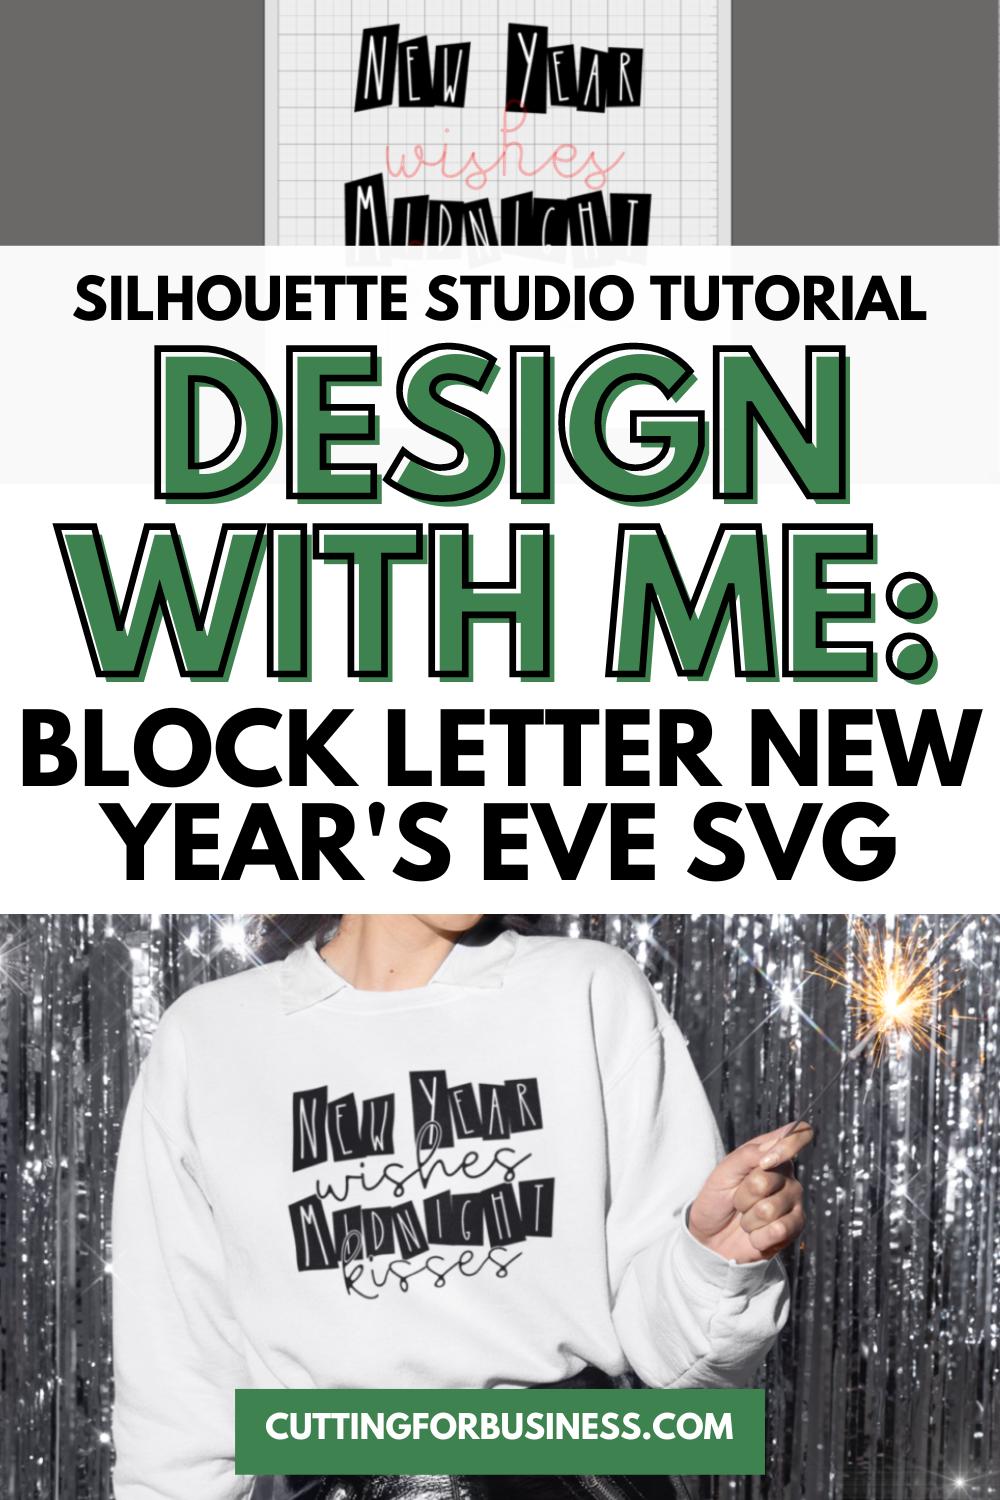
  • Silhouette Studio Tutorial: Block Letter New Year’s Eve SVG

    Design with Me is a new regular feature on Cutting for Business! Each Friday, I’ll bring you a new Silhouette Studio tutorial featuring how to design an SVG.

    It seems fitting to end this great year on Cutting for Business with a New Year’s Eve SVG.

    Wondering what I’ll be doing on New Year’s Eve when the calendar flips? Probably sleeping! LOL! What about you?

    Silhouette Studio Tutorial: Block Letter New Year's Eve SVG - cuttingforbusiness.com

    Silhouette Studio Tutorial: Block Letter New Year’s Eve SVG

    Before you get started, decide what words you will put into your design. Then, count the letters.

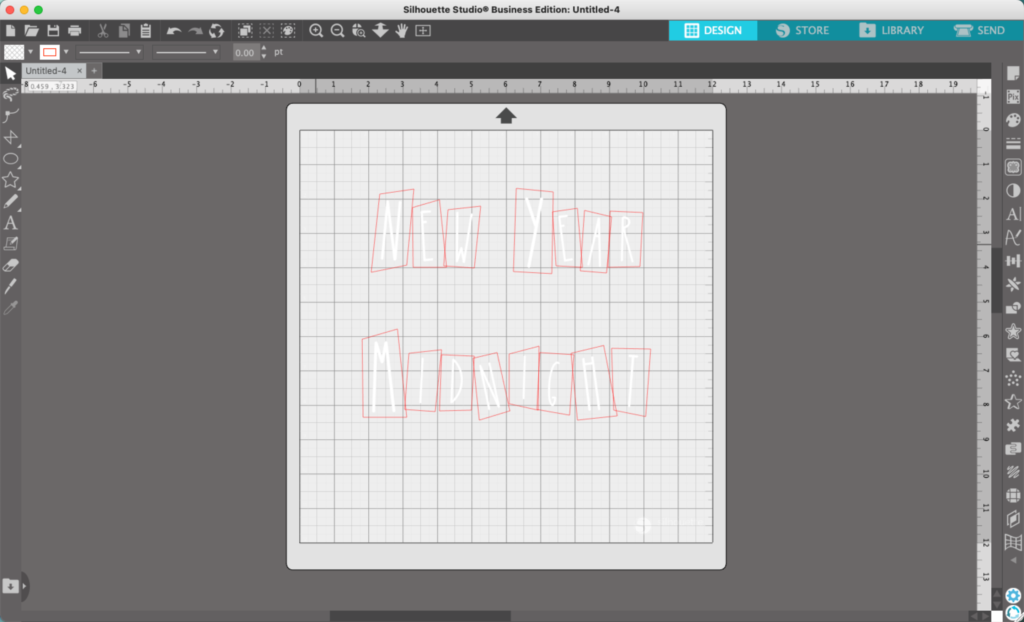
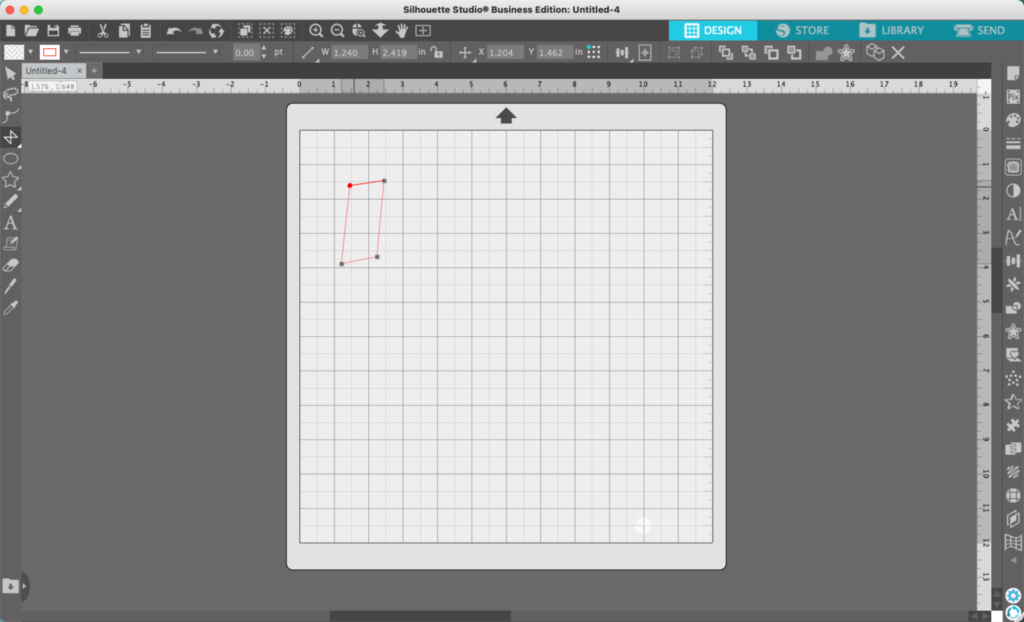
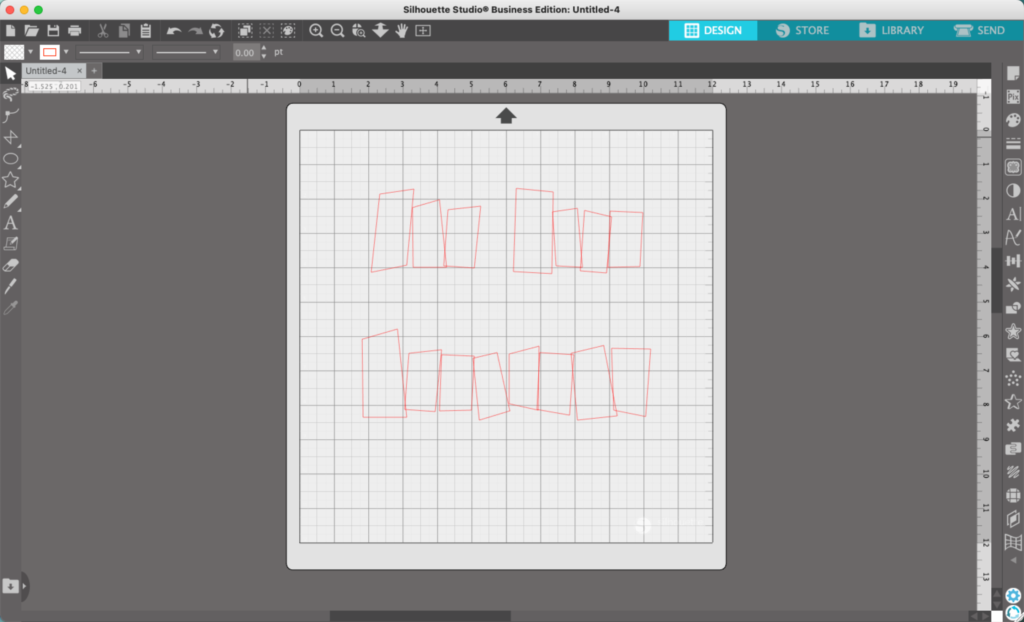
    1. In Silhouette Studio, use the ‘Draw a Polygon’ tool to draw a box for each letter in your design. In this example, my design will say: New Year Wishes Midnight Kisses. I’ll draw enough boxes for NEW YEAR and MIDNIGHT. The boxes can be sloppy and not even, just make sure they each overlap slightly.
    Silhouette Studio Screenshot - cuttingforbusiness.com.
    Silhouette Studio Screenshot - cuttingforbusiness.com.

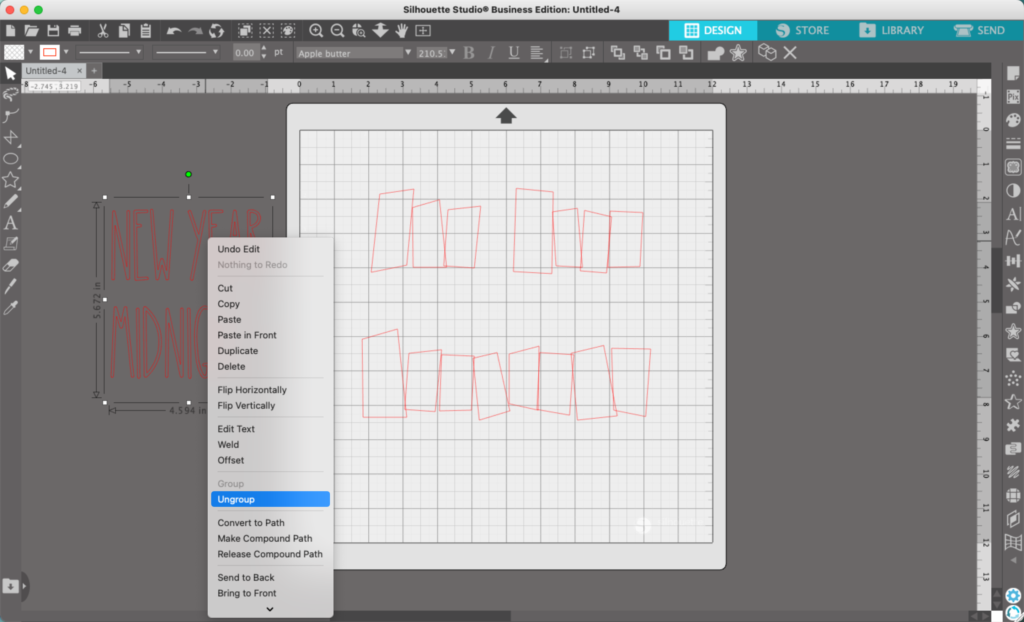
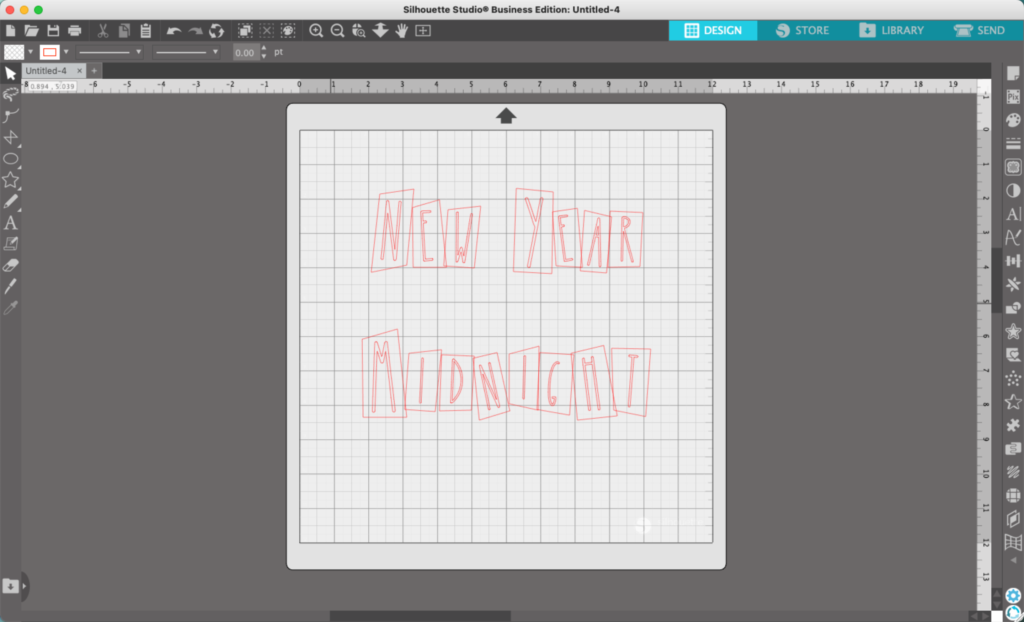
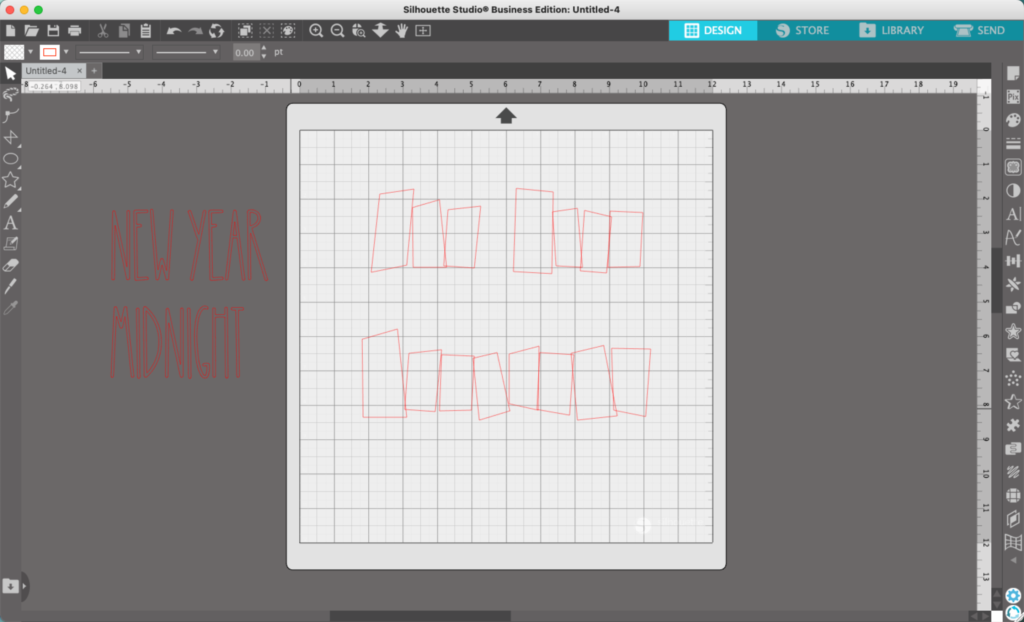
    2. Add text to your blocks. You’ll want to type the text, right click to ungroup it, and move each letter into place.

    Silhouette Studio Screenshot - cuttingforbusiness.com.
    Silhouette Studio Screenshot - cuttingforbusiness.com.
    Silhouette Studio Screenshot - cuttingforbusiness.com.

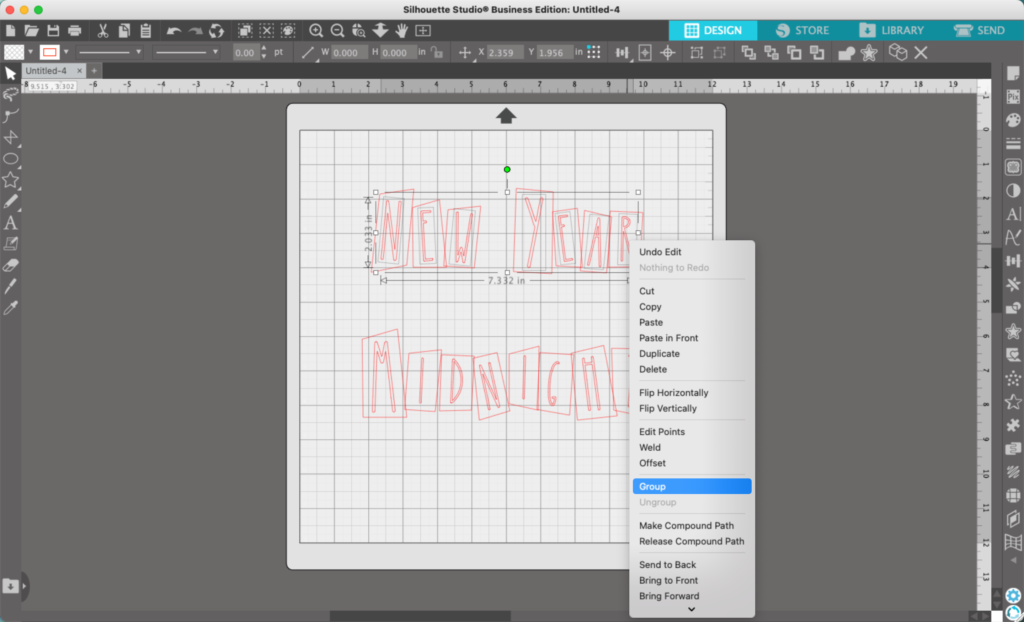
    3. Select all the letters, right click, and ‘Group’ them back together.

    Silhouette Studio Screenshot - cuttingforbusiness.com.

    4. Add color to the letters. In this tutorial, I’m using white.

    Silhouette Studio Screenshot - cuttingforbusiness.com.

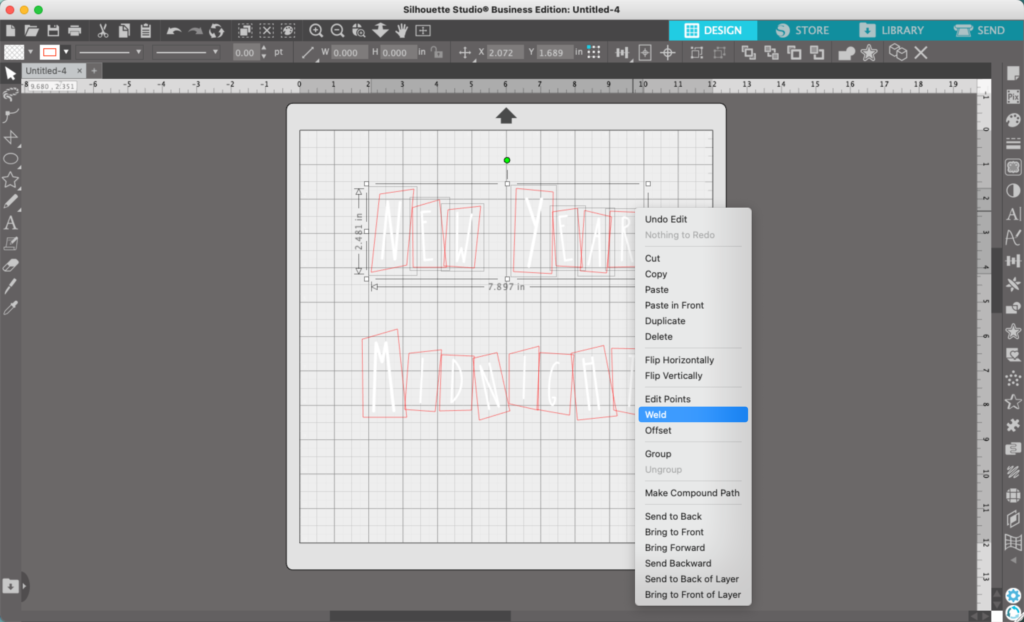
    5. Select all the boxes, right click, and ‘Weld’ them together.

    Silhouette Studio Screenshot - cuttingforbusiness.com.

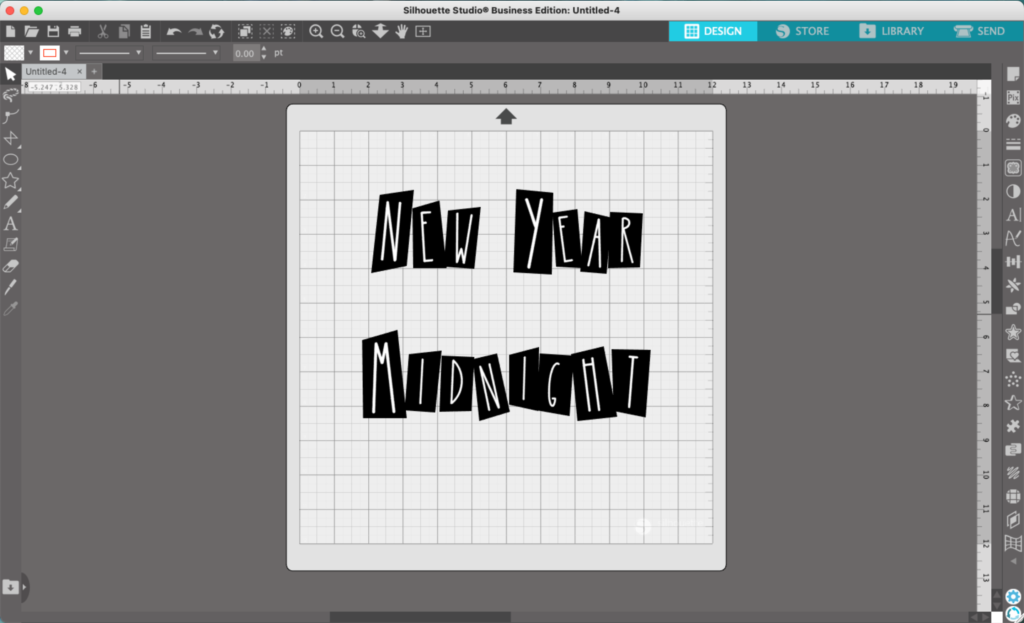
    6. Add color to the boxes. I used black.

    Silhouette Studio Screenshot - cuttingforbusiness.com.

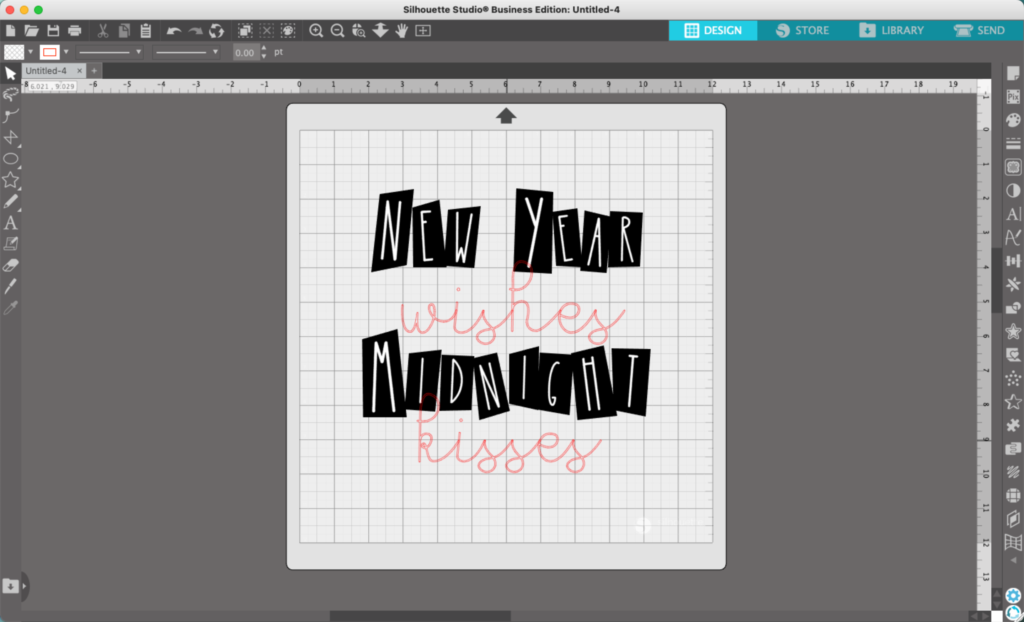
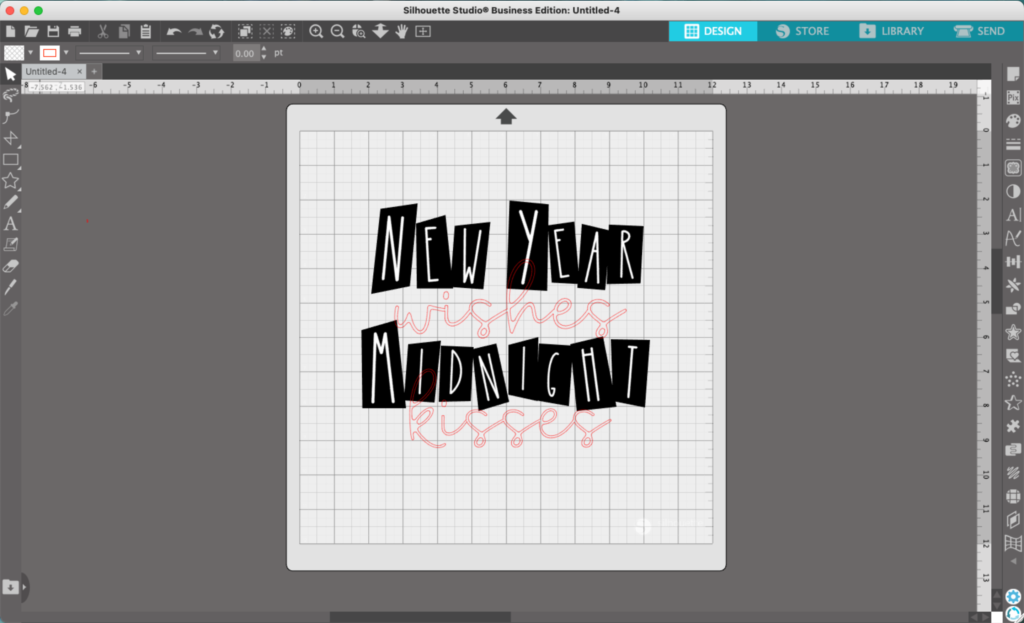
    7. Add the remaining text in a script font.

    Silhouette Studio Screenshot - cuttingforbusiness.com.

    8. Resize and align everything as desired.

    Silhouette Studio Screenshot - cuttingforbusiness.com.

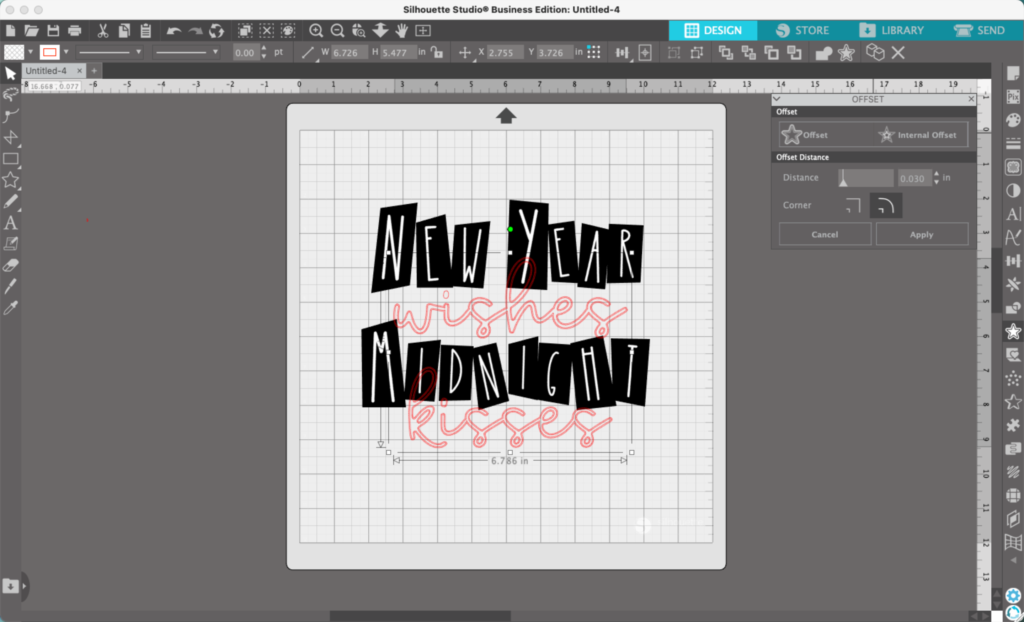
    9. Navigate to ‘Panels’, ‘Offset’, and perform an offset on the script text.

    Silhouette Studio Screenshot - cuttingforbusiness.com.

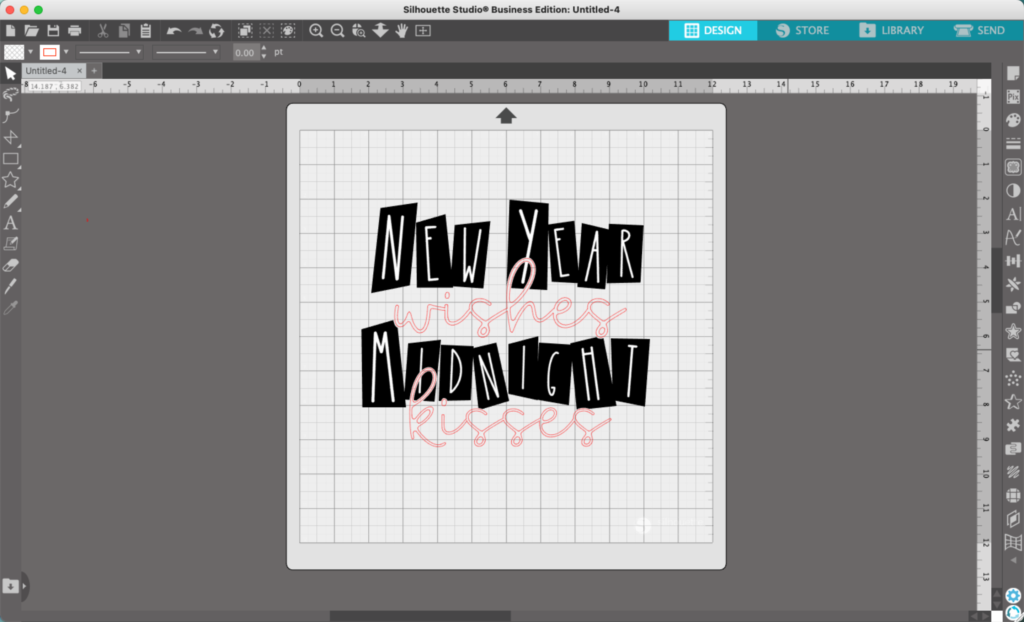
    10. Subtract the offset letters from the blocks. As a reminder: Select the blocks, then the text, then ‘Modify’, ‘Subtract’.

    Silhouette Studio Screenshot - cuttingforbusiness.com.

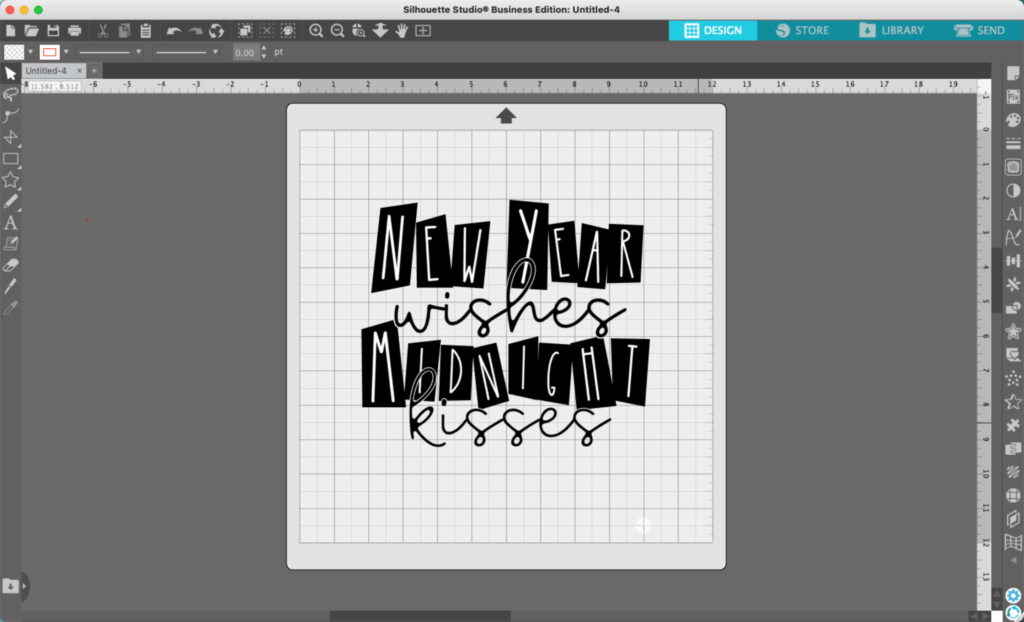
    11. Add color to the remaining text and group everything together.

    Silhouette Studio Screenshot - cuttingforbusiness.com.

    It’s ready to print on a design. If you are cutting in vinyl, you’ll want to be sure to subtract each letter from the block it sits in.

    Curious about the fonts? They are Apple Butter and Glypher.

    My finished design looks like this:

    Silhouette Studio Tutorial: Block Letter New Year's Eve Design - cuttingforbusiness.com

    That’s it! Your design is ready to go!

    Don’t Forget to Save!

    To save your new SVG creation, head to ‘File’, ‘Save As’, ‘Save to Hard Drive’, name the file, then select ‘SVG’ from the dropdown menu.

    Want More SVG Tutorials?

    View more Design with Me SVG tutorials.
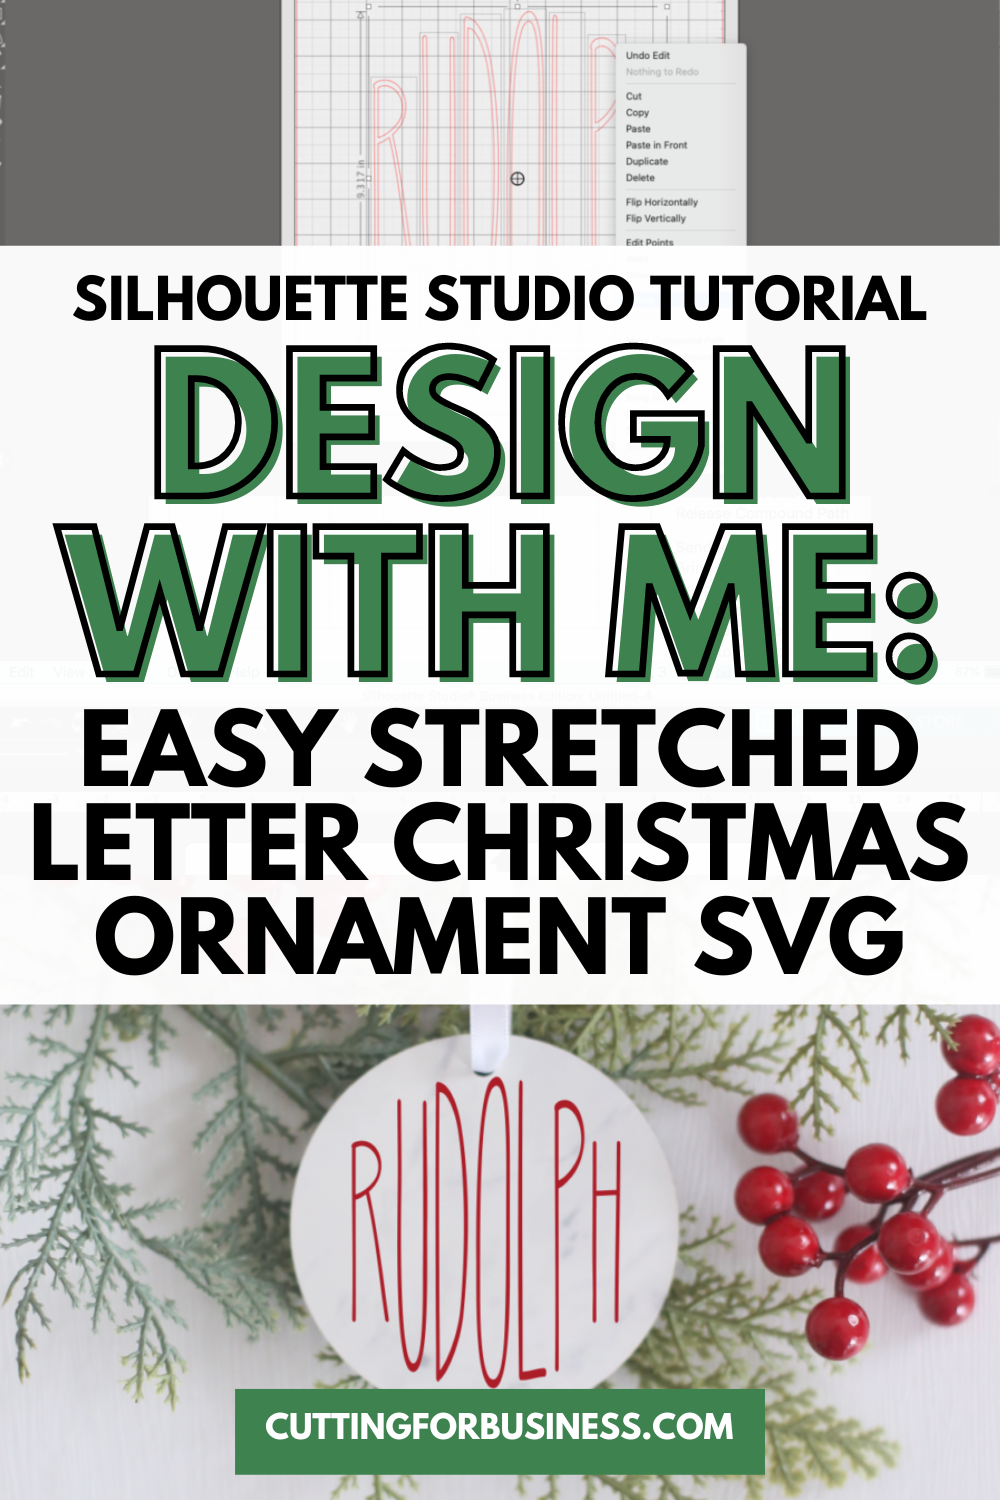
  • Silhouette Studio Tutorial: Easy Stretched Letter Christmas Ornament SVG

    Design with Me is a new regular feature on Cutting for Business! Each Friday, I’ll bring you a new Silhouette Studio tutorial featuring how to design an SVG.

    Today, let’s make a stretched letter Christmas ornament SVG. In general, it’s not a good idea to stretch fonts. However, if you use the right font, you can bend the rules a little bit.

    So what font should you use? I find that fonts advertised as “hand lettered”, “hand drawn”, and “skinny” can be usually be stretched and not look weird. Let’s take a look.

    Silhouette Studio Tutorial: Easy Stretched Letter Christmas Ornament SVG - cuttingforbusiness.com

    Silhouette Studio Tutorial: Easy Stretched Letter Christmas Ornament SVG

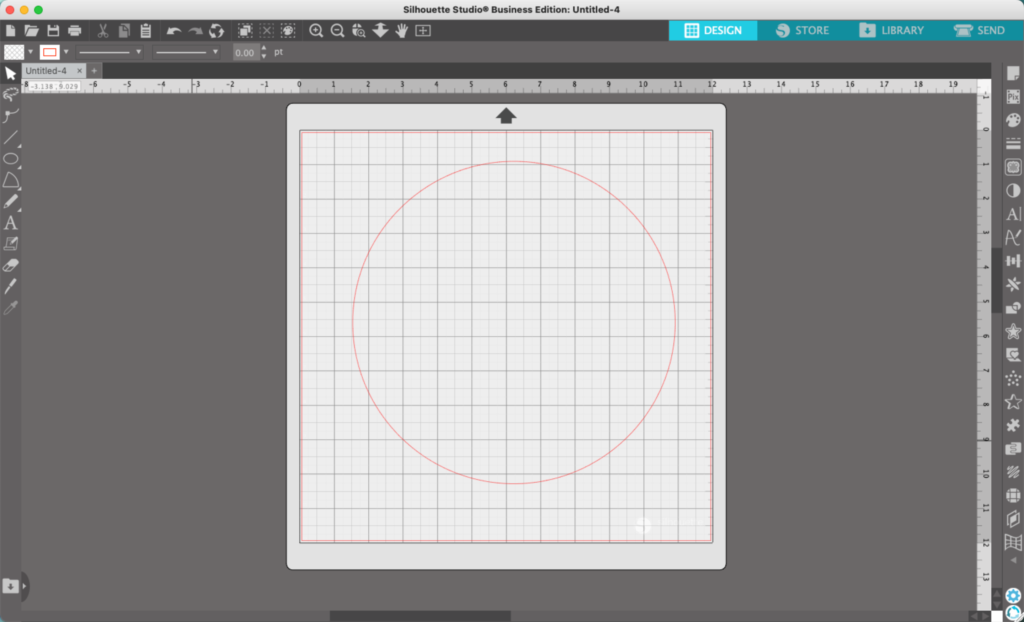
    1. Draw a large circle in Silhouette Studio. We will end up deleting this at the end, it is just going to be a guideline.
    Silhouette Studio Screenshot - cuttingforbusiness.com

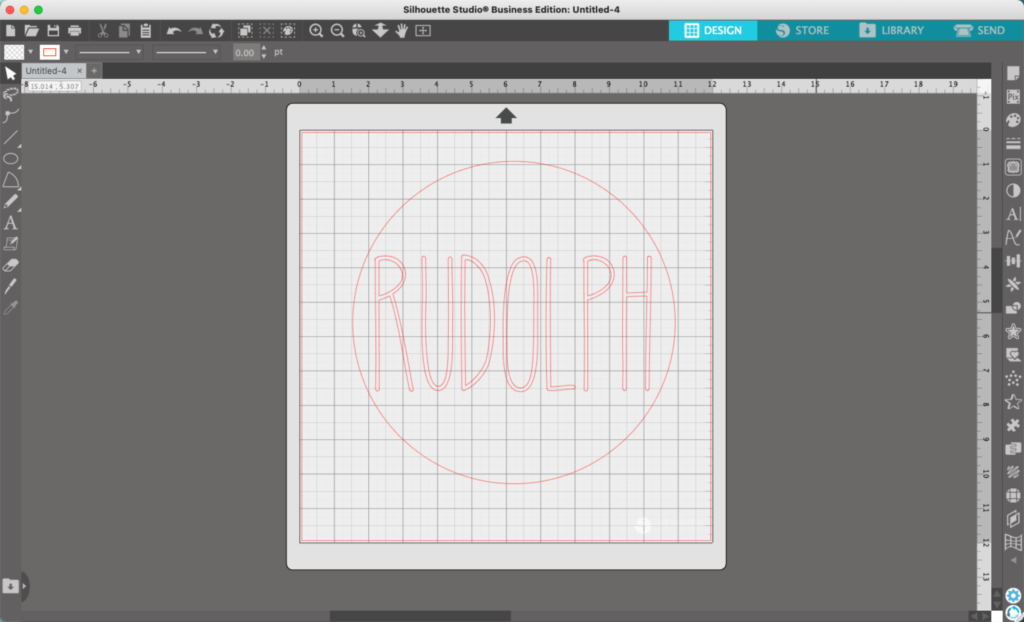
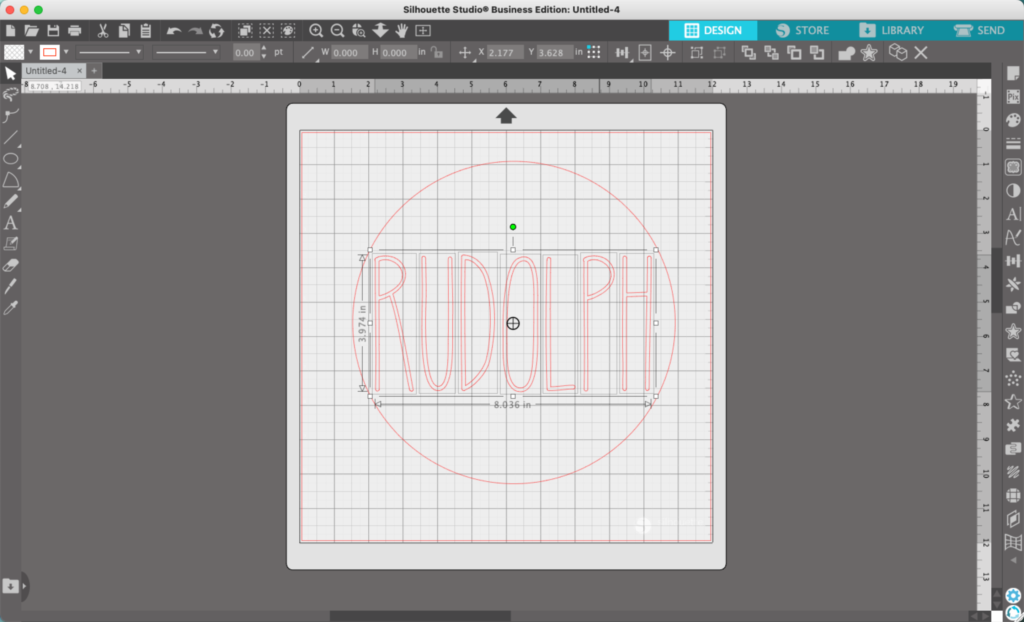
    2. Write a single Christmas-y word in the circle. Use a font style that I talked about at the beginning. In this tutorial, I’ll use Rudolph – my favorite reindeer.

    Silhouette Studio Screenshot - cuttingforbusiness.com

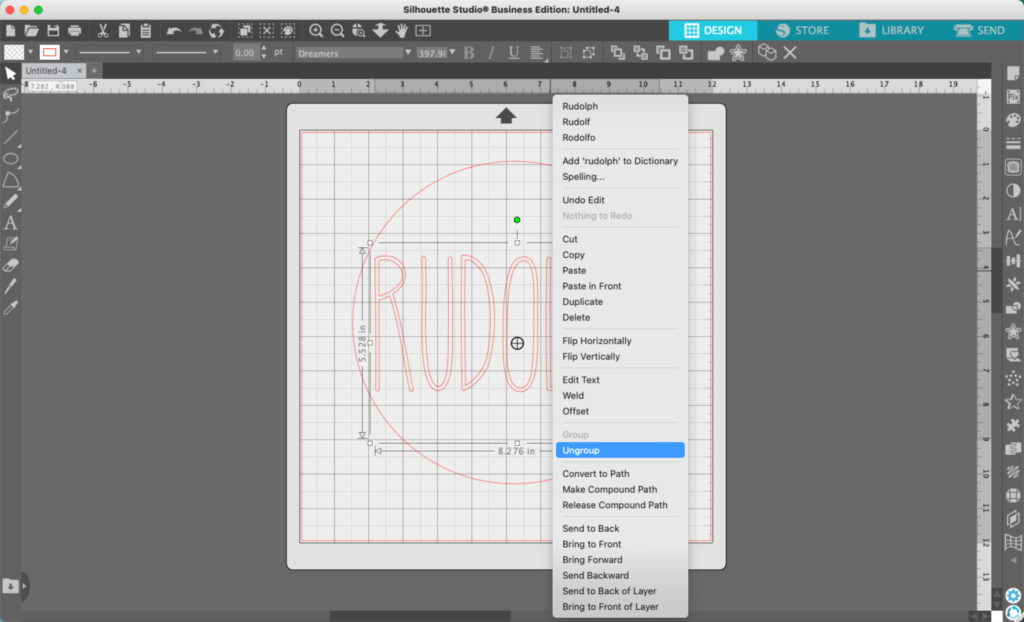
    3. Right click on your text and select ‘Ungroup’.

    Silhouette Studio Screenshot - cuttingforbusiness.com
    Silhouette Studio Screenshot - cuttingforbusiness.com

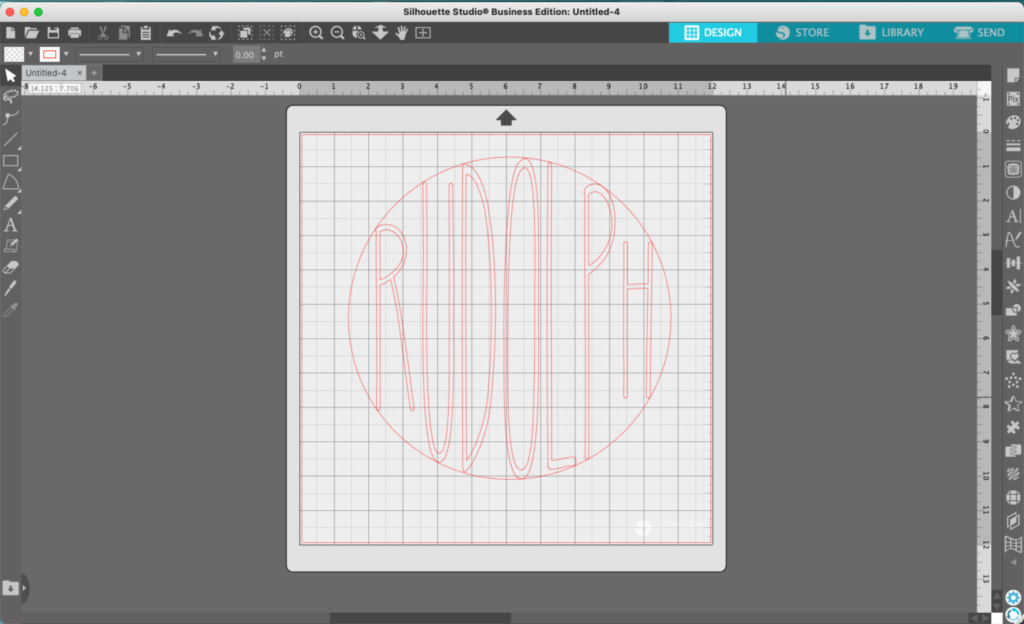
    4. Drag each letter so that it is touching both the top and bottom of the circle.

    Silhouette Studio Screenshot - cuttingforbusiness.com

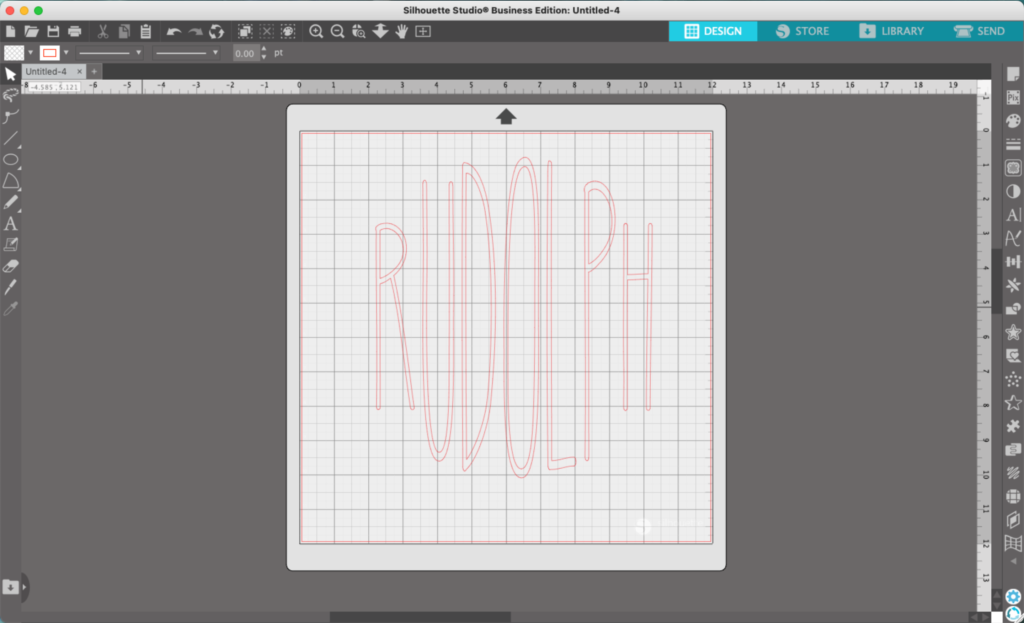
    5. Delete the circle.

    Silhouette Studio Screenshot - cuttingforbusiness.com

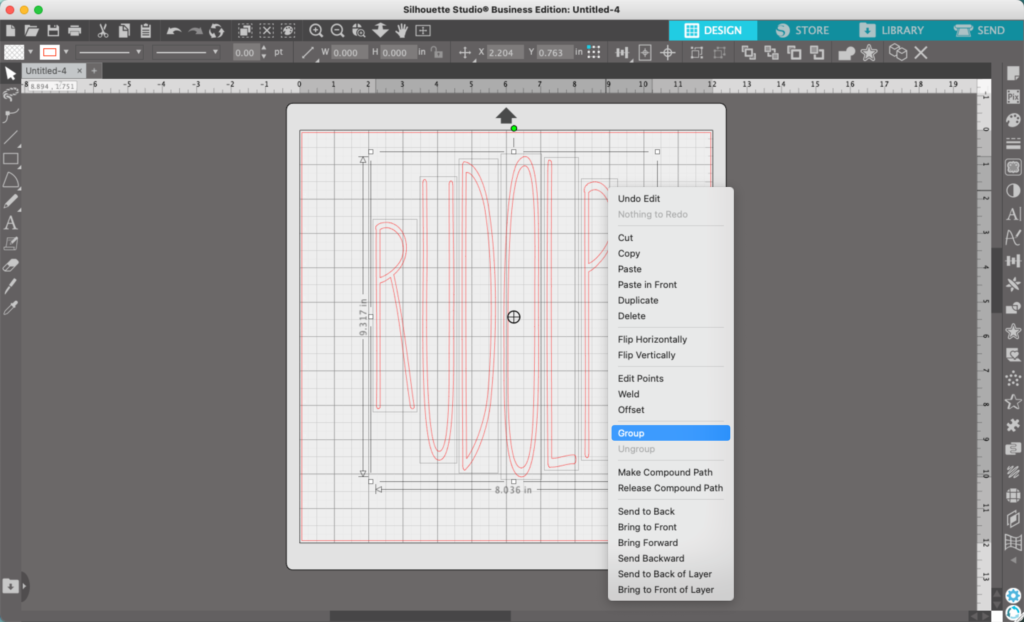
    6. Select all the letters and group them back together.

    Silhouette Studio Screenshot - cuttingforbusiness.com

    7. Add color to finish the design. My finished project looks like this:

    Silhouette Studio Tutorial: Stretched Letter Christmas Ornament SVG - cuttingforbusiness.com

    Font used: Dreamers.

    Don’t Forget to Save!

    To save your new SVG creation, head to ‘File’, ‘Save As’, ‘Save to Hard Drive’, name the file, then select ‘SVG’ from the dropdown menu.

    Want More SVG Tutorials?

    View more Design with Me SVG tutorials.
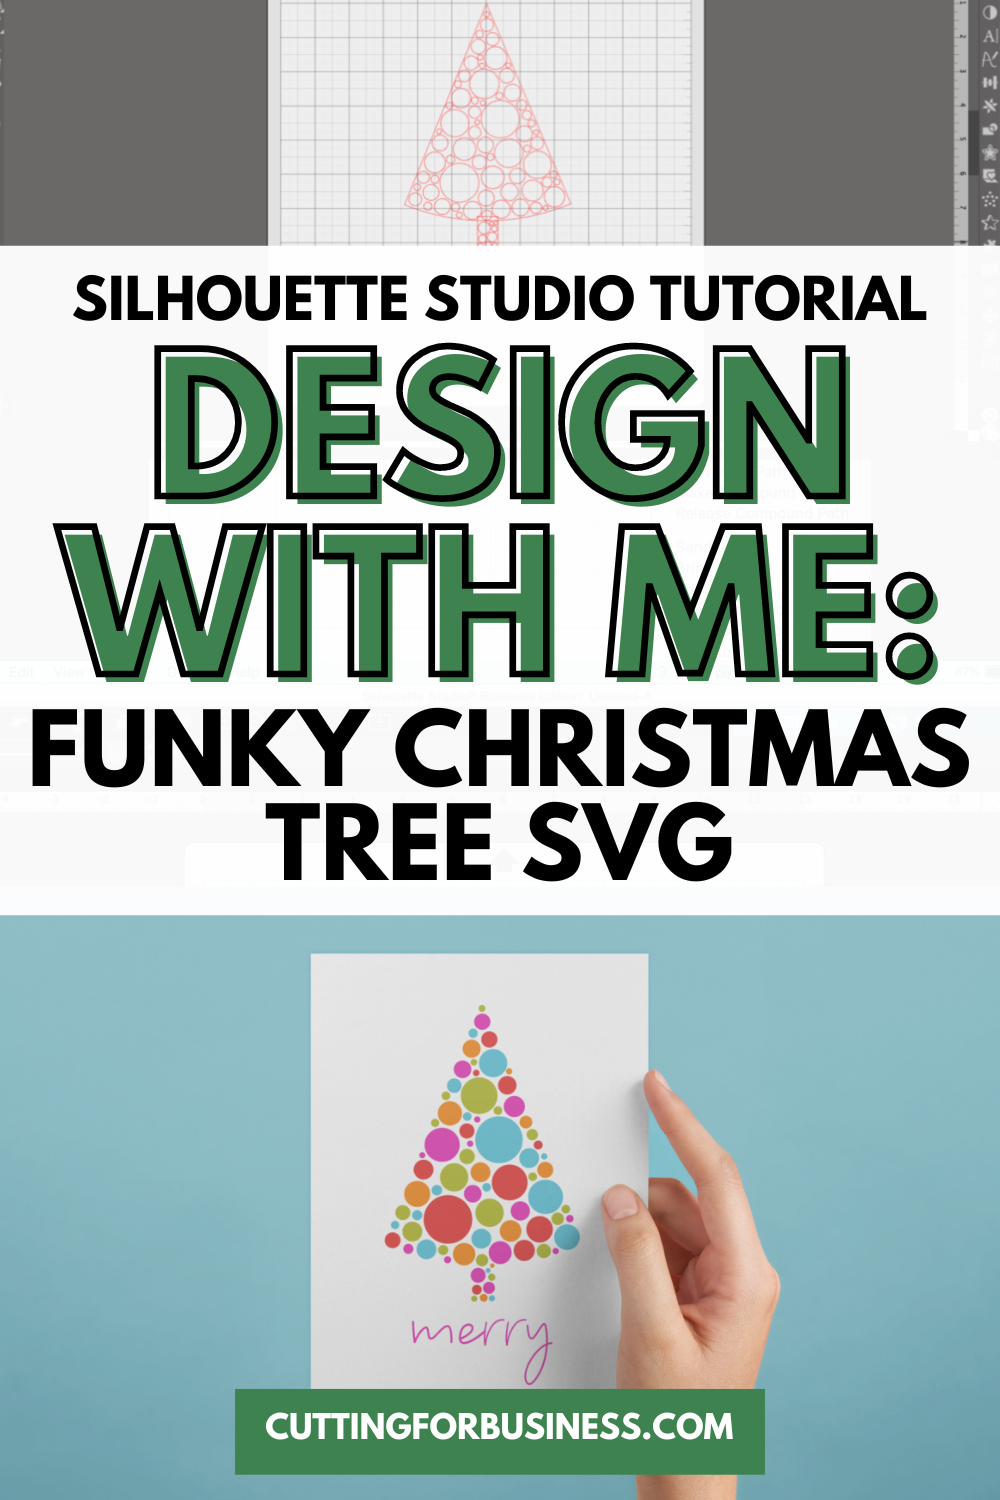
  • Silhouette Studio Tutorial: Funky Christmas Tree SVG

    Design with Me is a new regular feature on Cutting for Business! Each Friday, I’ll bring you a new Silhouette Studio tutorial featuring how to design an SVG.

    It’s almost Christmas! I can’t wait! Today, let’s create a funky Christmas tree.

    Silhouette Studio Tutorial: Funky Christmas Tree SVG - cuttingforbusiness.com

    Silhouette Studio Tutorial: Funky Christmas Tree SVG

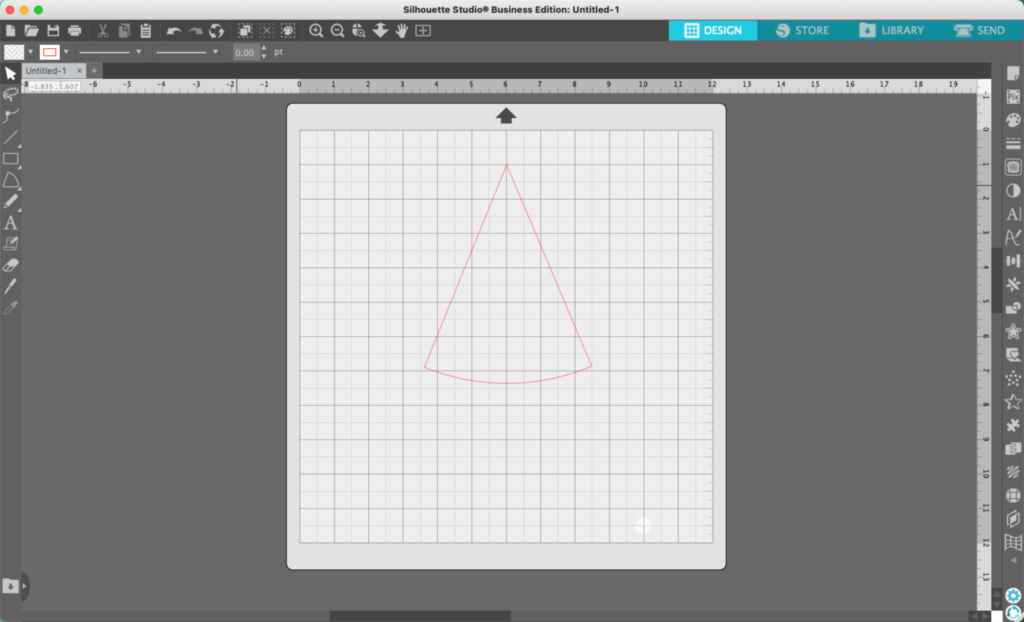
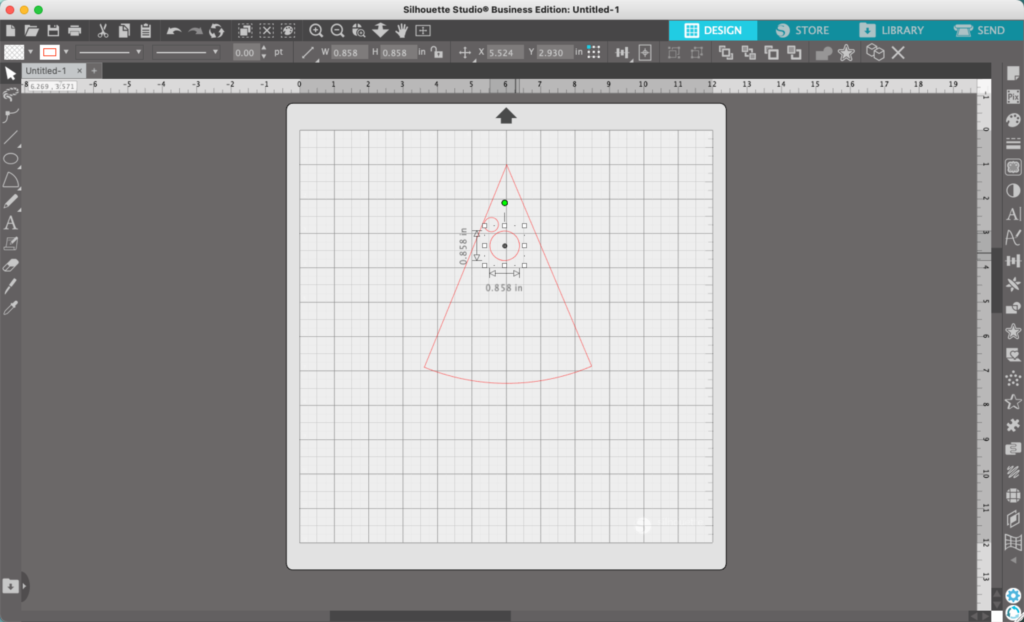
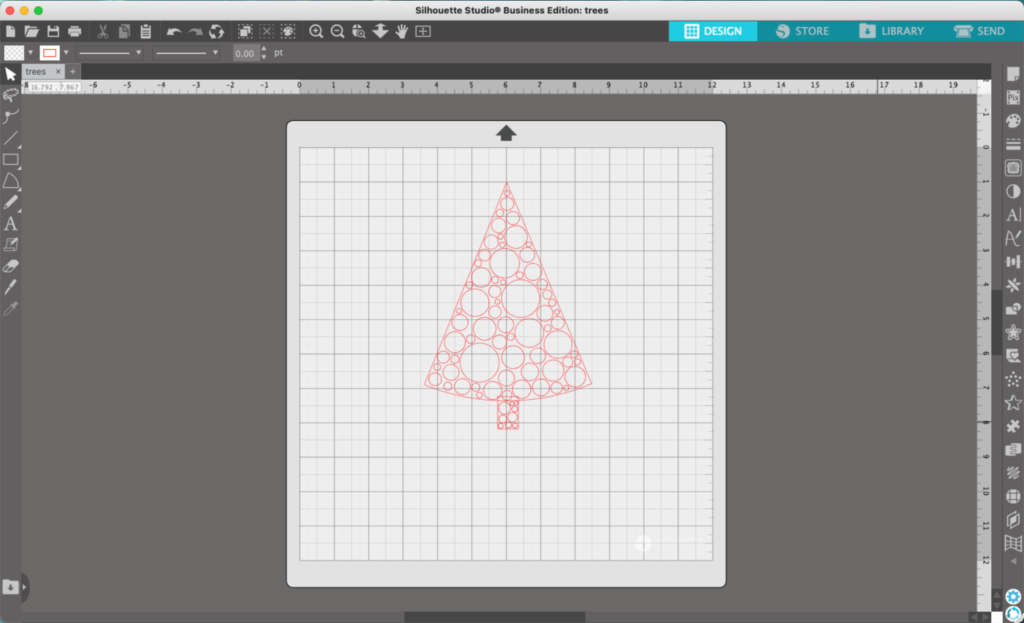
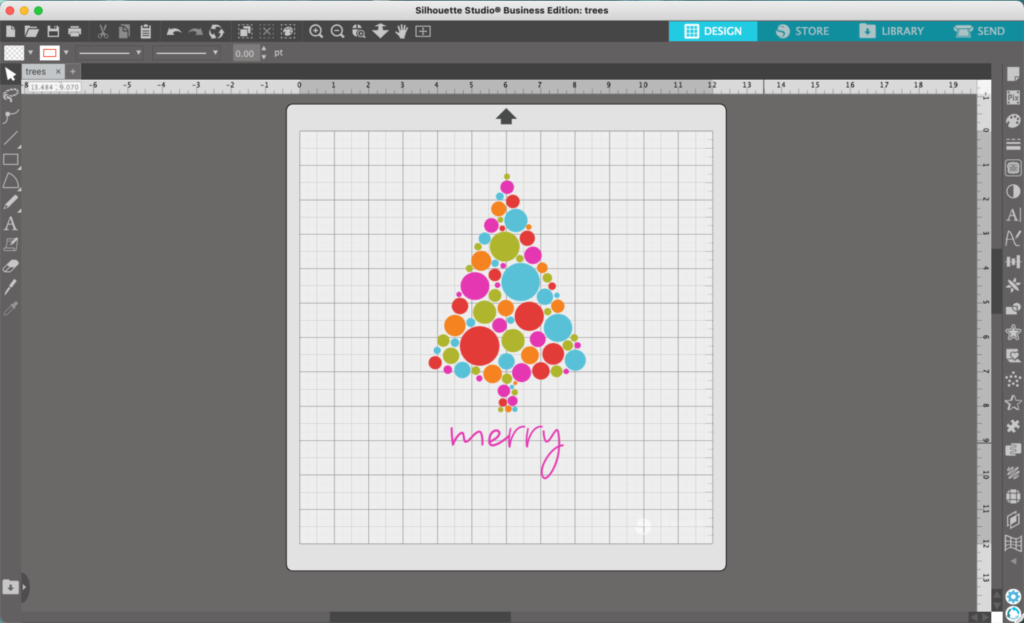
    1. In Silhouette Studio, use Flexishapes (6th tool on the left sidebar) to draw a triangle/tree shape. I used a basic triangle, but you could choose a more detailed tree.
    Silhouette Studio Screenshot - Tutorial: Funky Christmas Tree SVG - cuttingforbusiness.com

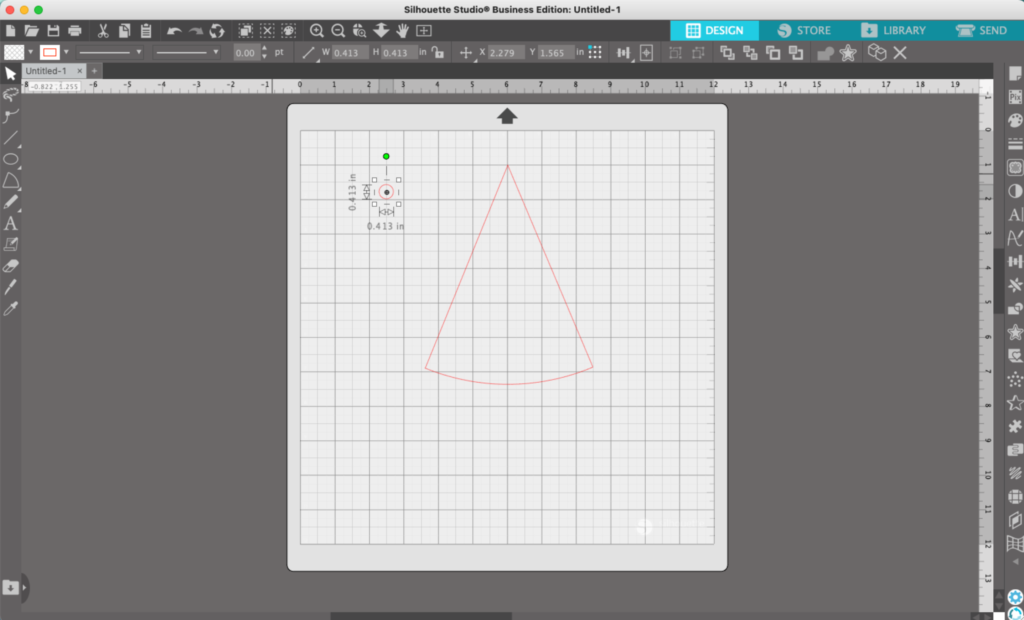
    2. Draw a small circle using the Draw an Ellipse tool (5th tool on the left sidebar). Hold down the SHIFT key to make a perfect circle.

    Silhouette Studio Screenshot - Tutorial: Funky Christmas Tree SVG - cuttingforbusiness.com

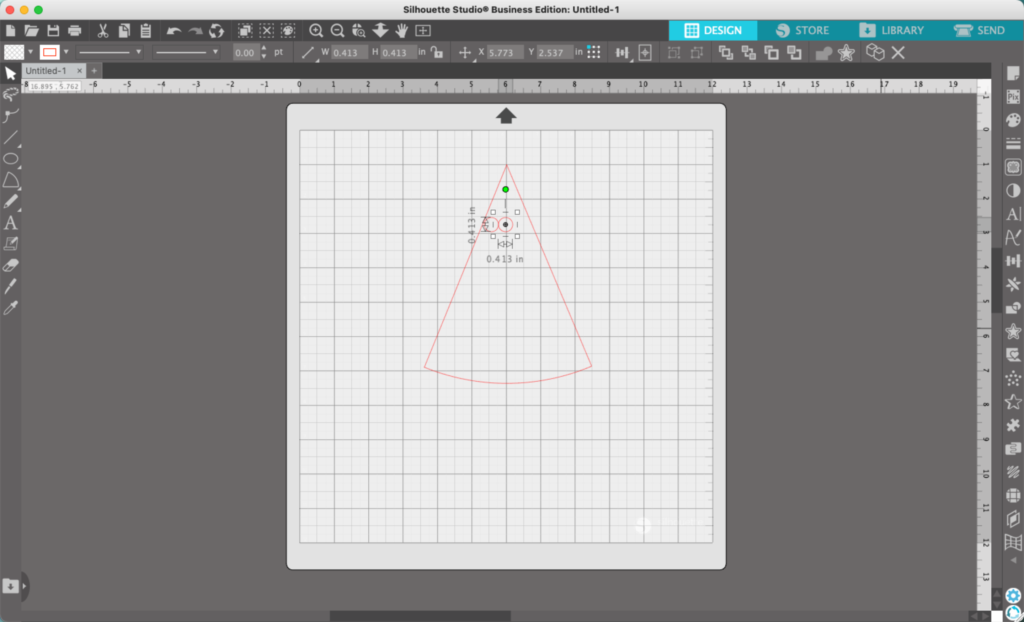
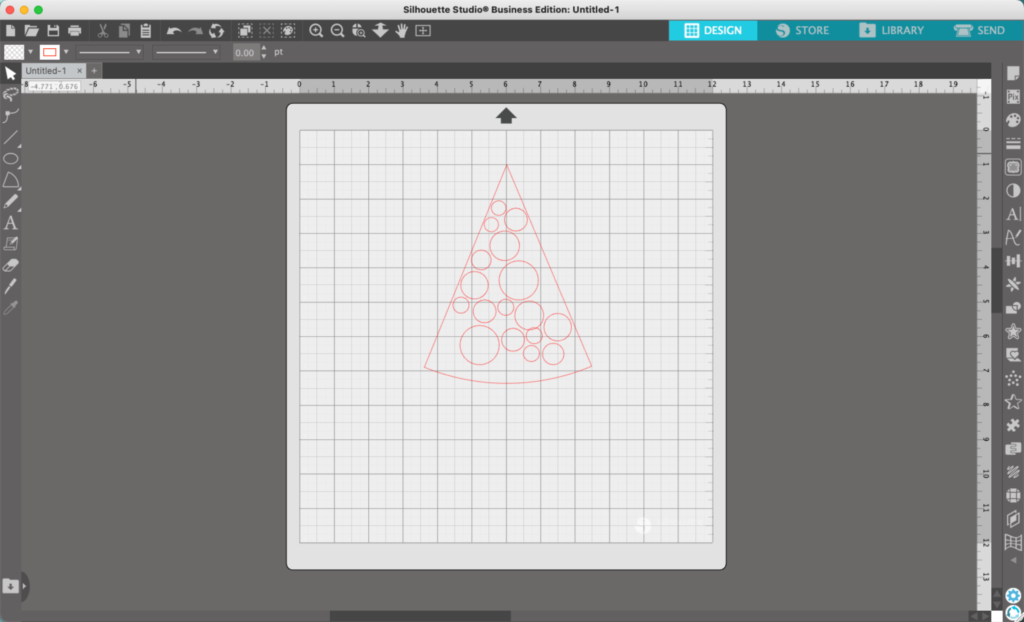
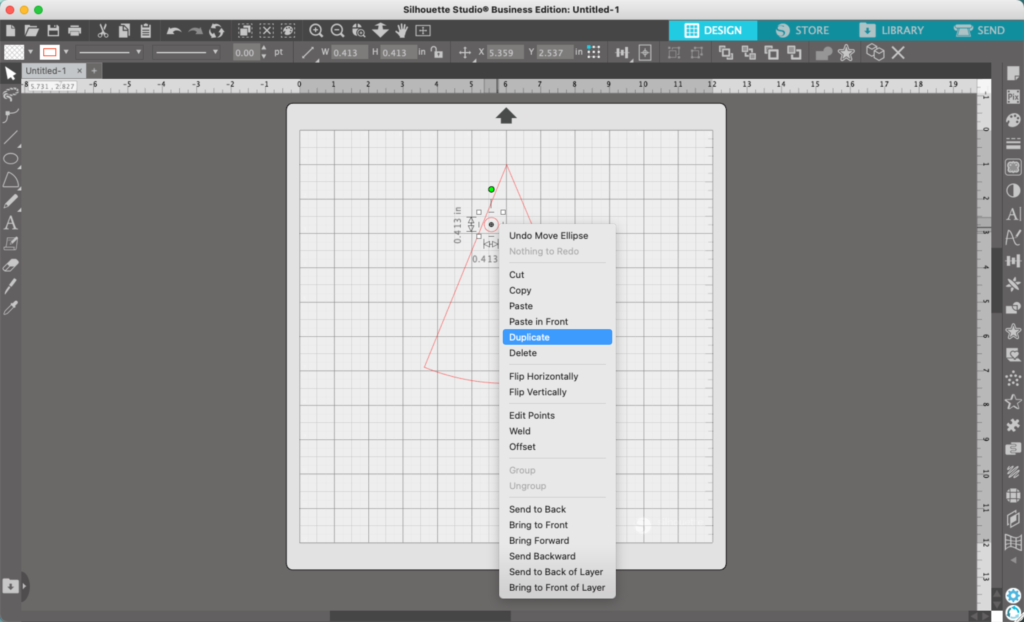
    3. Move the circle into your triangle/tree. Then, right click the circle and choose ‘Duplicate’.

    Silhouette Studio Screenshot - Tutorial: Funky Christmas Tree SVG - cuttingforbusiness.com
    Silhouette Studio Screenshot - Tutorial: Funky Christmas Tree SVG - cuttingforbusiness.com

    4. Resize the circle and move it.

    Silhouette Studio Screenshot - Tutorial: Funky Christmas Tree SVG - cuttingforbusiness.com

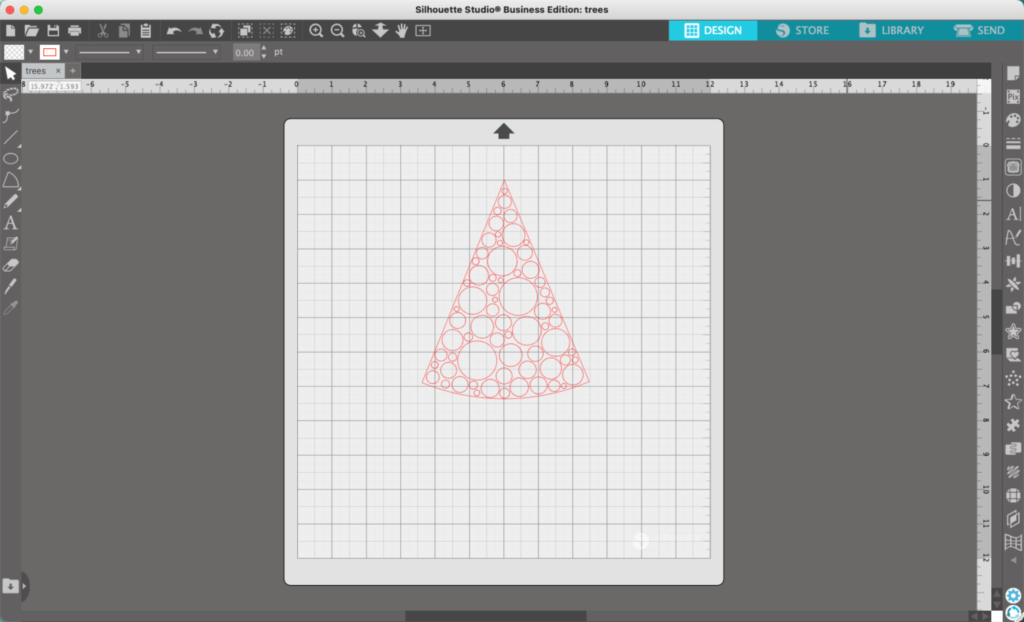
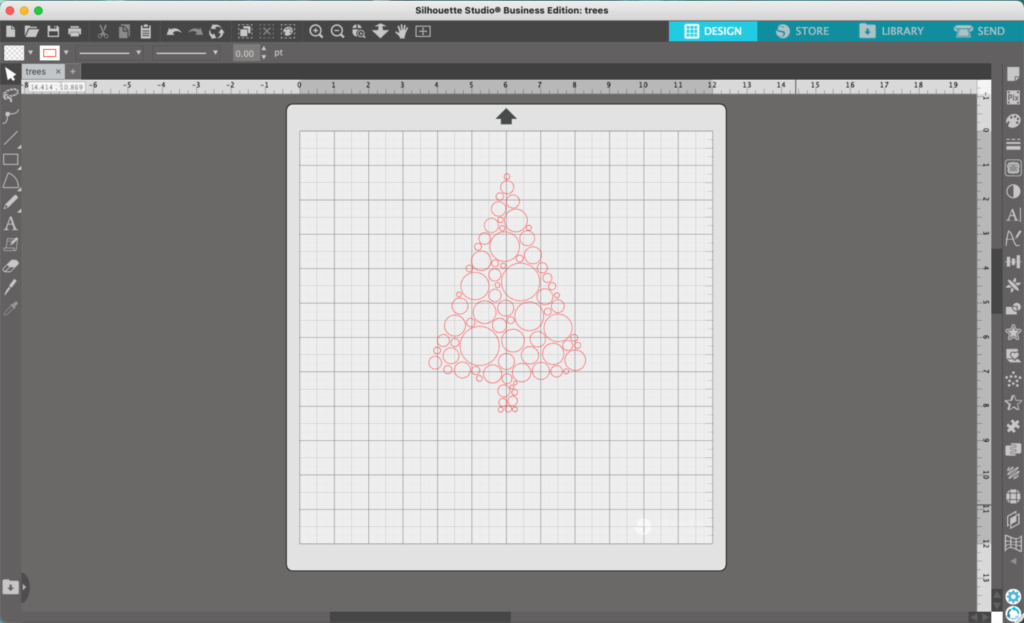
    5. Repeat steps 3 and 4 until your triangle shape is full of circles. Be sure to keep the circles near the triangle shape line – at the end you’ll be deleting the triangle shape.

    Silhouette Studio Screenshot - Tutorial: Funky Christmas Tree SVG - cuttingforbusiness.com
    Silhouette Studio Screenshot - Tutorial: Funky Christmas Tree SVG - cuttingforbusiness.com

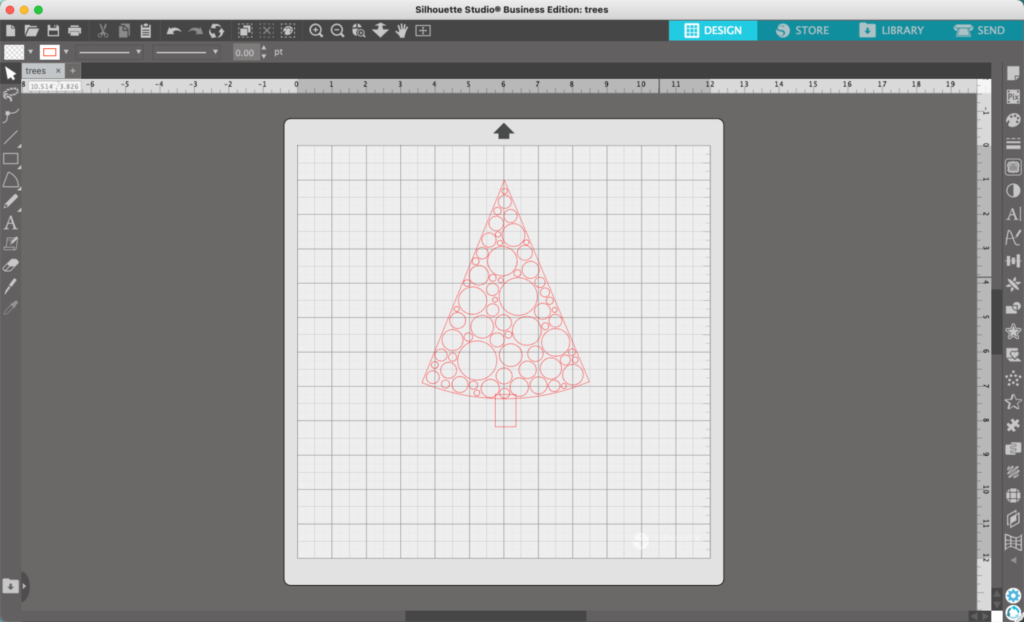
    6. Add a rectangle for a trunk and fill it with circles.

    Silhouette Studio Screenshot - Tutorial: Funky Christmas Tree SVG - cuttingforbusiness.com
    Silhouette Studio Screenshot - Tutorial: Funky Christmas Tree SVG - cuttingforbusiness.com

    7. Delete the triangle and the rectangle.

    Silhouette Studio Screenshot - Tutorial: Funky Christmas Tree SVG - cuttingforbusiness.com

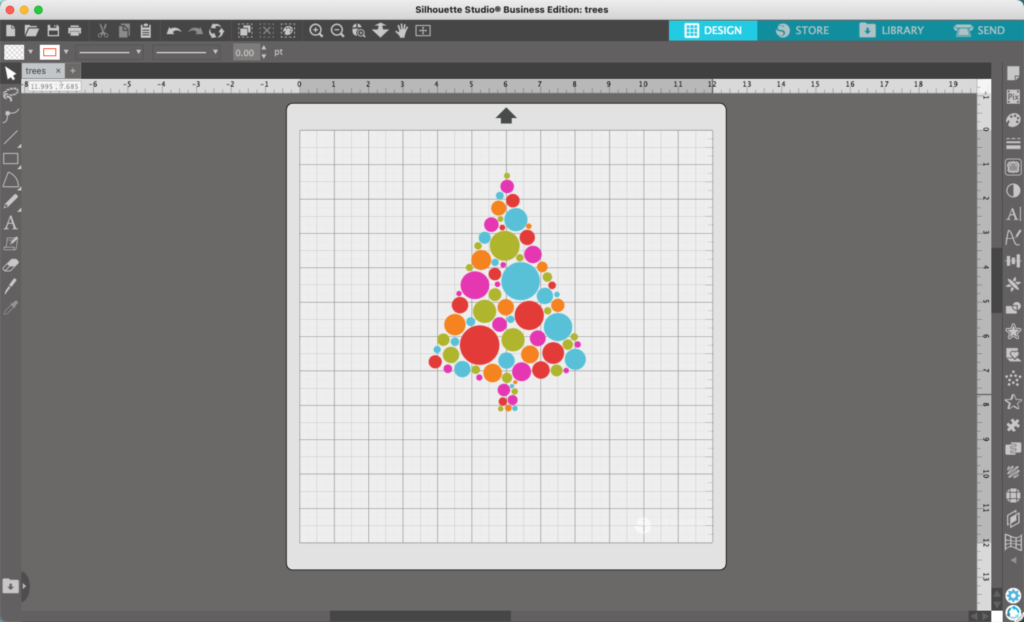
    8. Add color to the design.

    Silhouette Studio Screenshot - Tutorial: Funky Christmas Tree SVG - cuttingforbusiness.com

    9. Add additional details or text. (Font used: Kate Johnson.)

    Silhouette Studio Screenshot - Tutorial: Funky Christmas Tree SVG - cuttingforbusiness.com

    This tutorial was fun with circles, but you could use anything: How about an alphabet themed Christmas tree for a bulletin board in a classroom? What about a dinosaur filled tree for a toddler boy’s shirt? What if you forgot the tree and used an entirely different shape? It’s your choice… you are the designer!

    That’s it! Your funky Christmas tree is ready to go!

    Don’t Forget to Save!

    To save your new SVG creation, head to ‘File’, ‘Save As’, ‘Save to Hard Drive’, name the file, then select ‘SVG’ from the dropdown menu.

    Want More SVG Tutorials?

    View more Design with Me SVG tutorials.
  • XTool Coupon Code & Recap

    Thanks for following along with my articles and discussions on the xTool P2 for the last week.

    I think it’s a pretty awesome machine that outperforms many of the other lasers on the market right now.

    I feel that xTool has spent time innovating their product to include unique features like the Riser Base and the Rotary Attachment; while other companies are focused more on software and subscriptions.

    An xTool P2 is a great addition to any craft room, workshop, or studio.

    xTool Coupon Code

    Want to save money on your xTool purchase? Use this link to get a discounted price, or click the button below.

    xTool P2 Posts

    Let’s recap everything I’ve talked about the last week or so.

    [mv_create key=”34″ type=”list” title=”xTool P2 Articles” thumbnail=”” layout=”hero”]
    xTool Coupon Code & Recap - cuttingforbusiness.com.
  • xTool P2 Automatic Conveyor Feeder: How to Create Extra Large Projects

    I spent all of last week talking about the xTool P2 and the available accessories. Let’s wrap up our talks on the xTool P2 today and tomorrow.

    Today, let’s look at how to create extra large projects with xTool’s P2 Automatic Conveyor Feeder.

    What is the xTool P2 Automatic Conveyor Feeder?

    The xTool P2 Automatic Conveyor Feeder allows you to cut or engrave materials and projects up to 118 inches long (that’s almost 10 feet! ), 19.6 inches wide, and 14 mm thick (a little over a half an inch).

    And, as the name suggests, the feeder automatically pushes the material forward and backward.

    How Does the xTool P2 Automatic Conveyor Feeder Work?

    Before you get started with the Automatic Conveyor Feeder, you’ll need xTool’s Riser Base. The Riser Base is required to use the Automatic Conveyor Feeder.

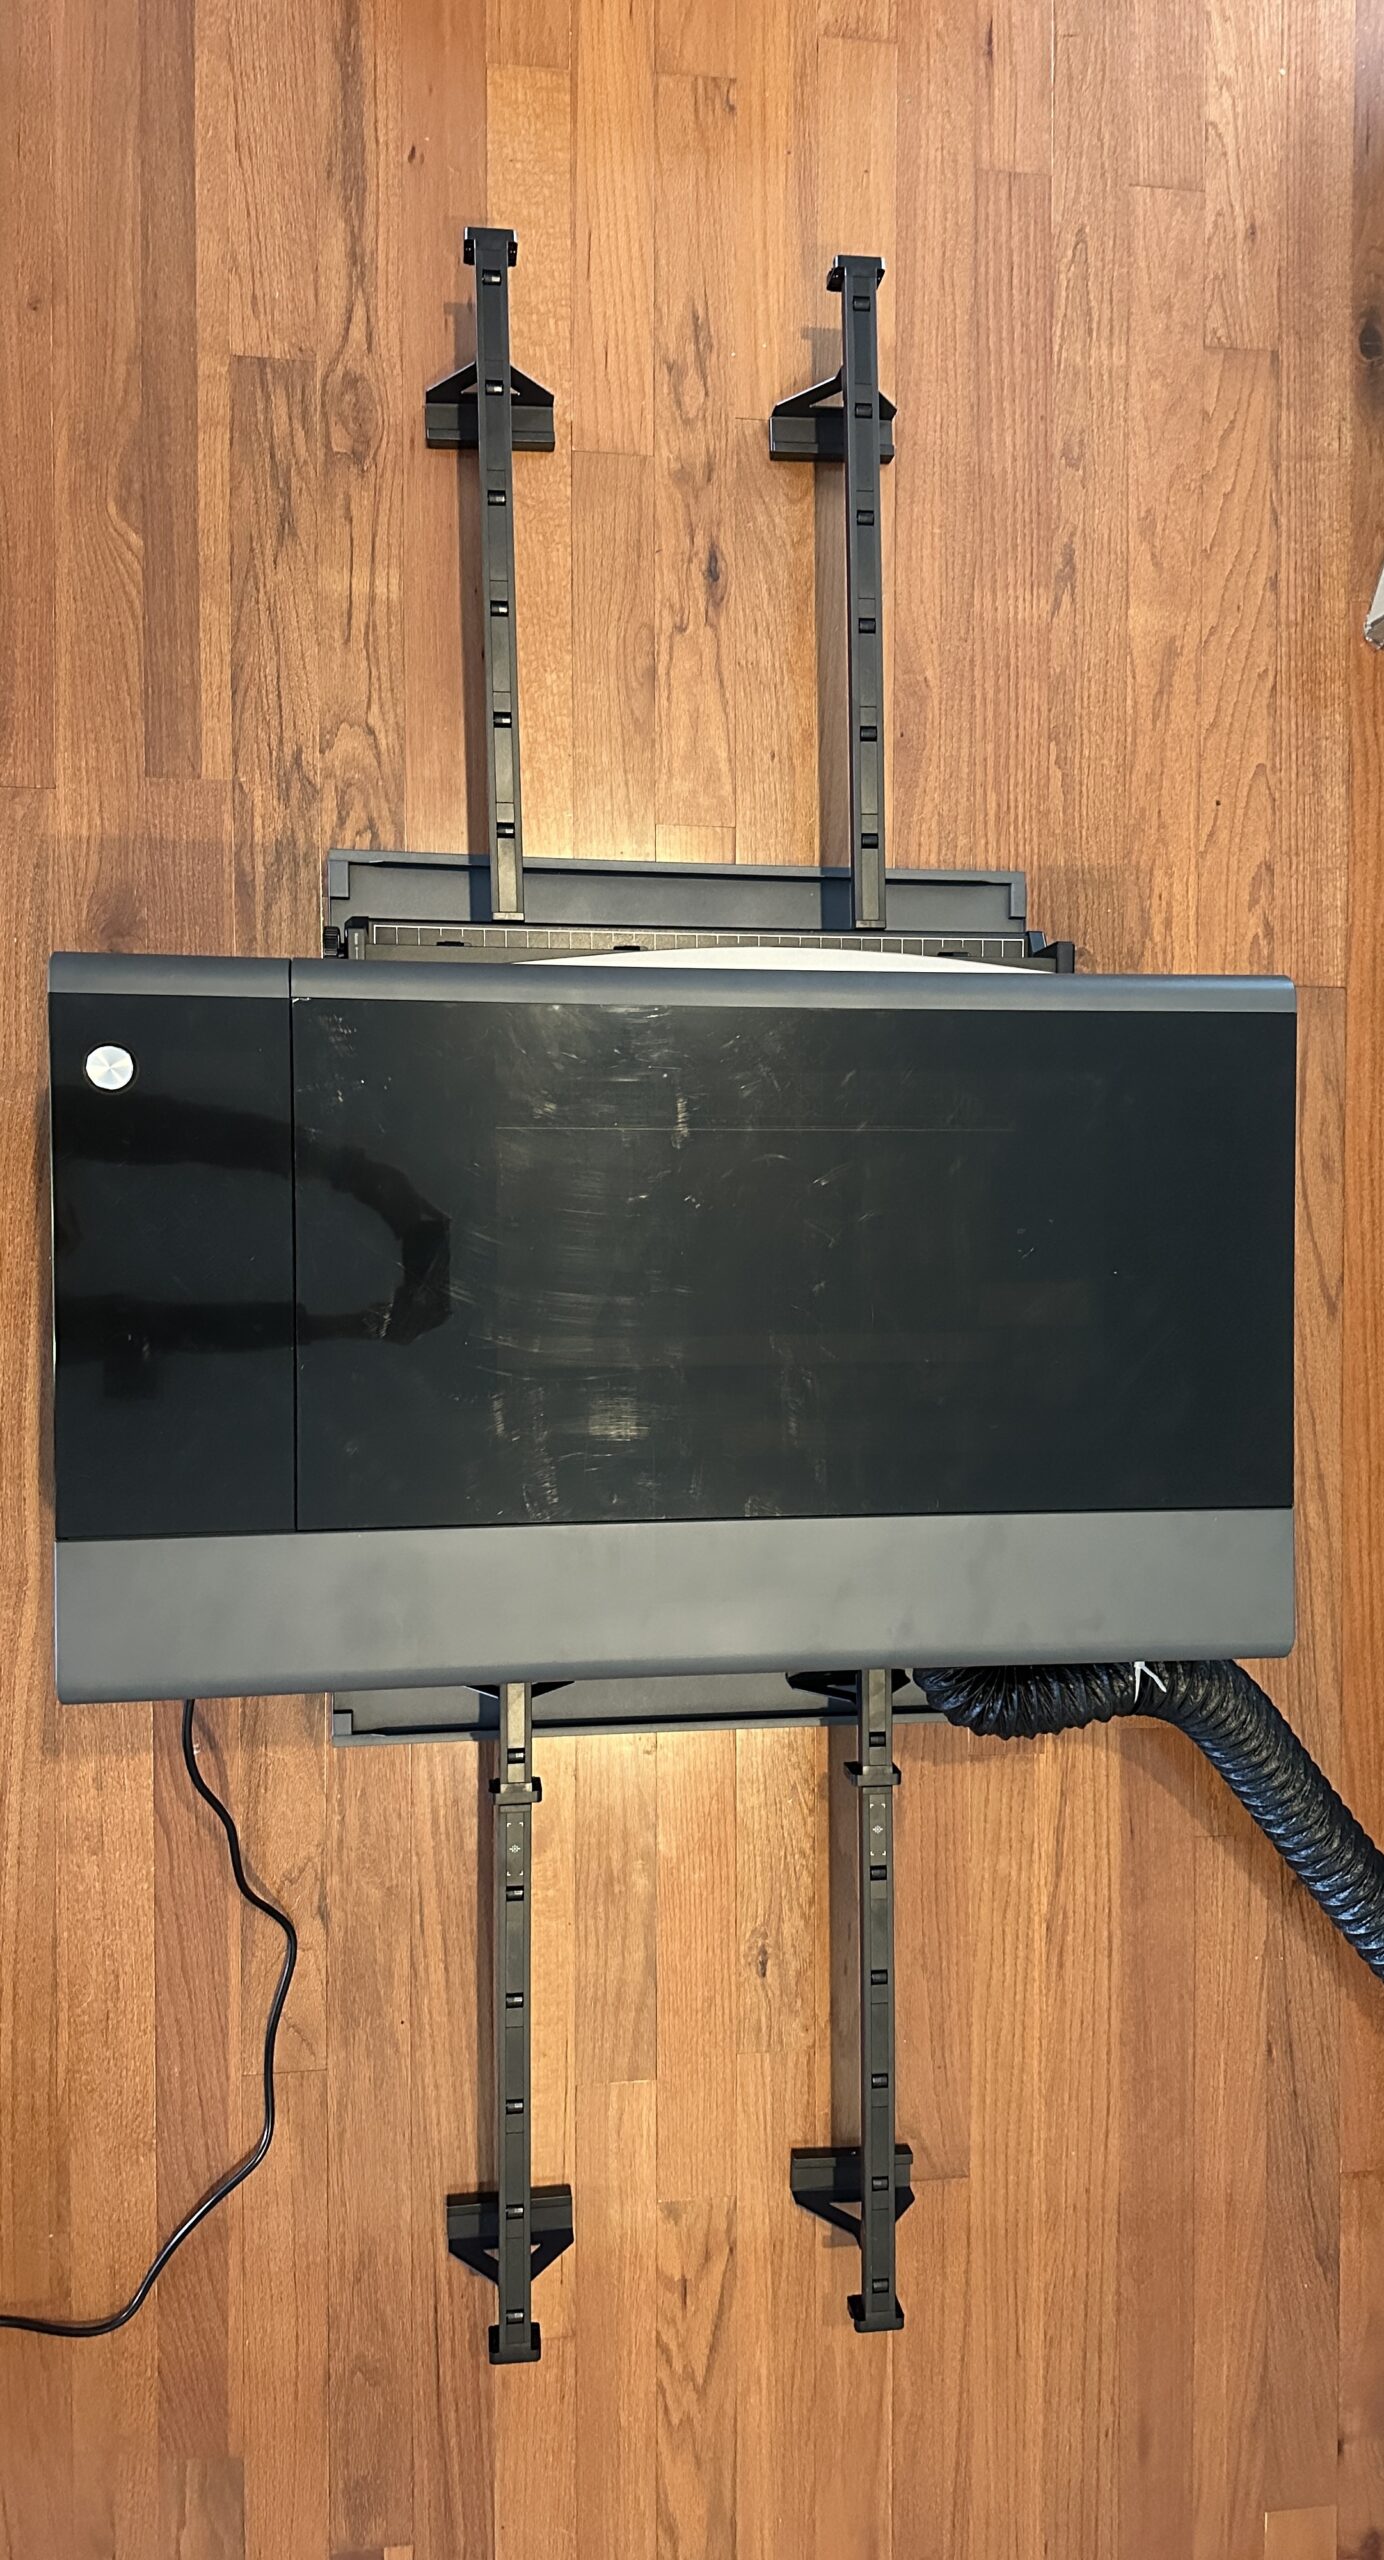
    Notice that the conveyor goes through the front and back of the riser base, as shown in the photo:

    xTool P2 Automatic Conveyor Feeder - cuttingforbusiness.com

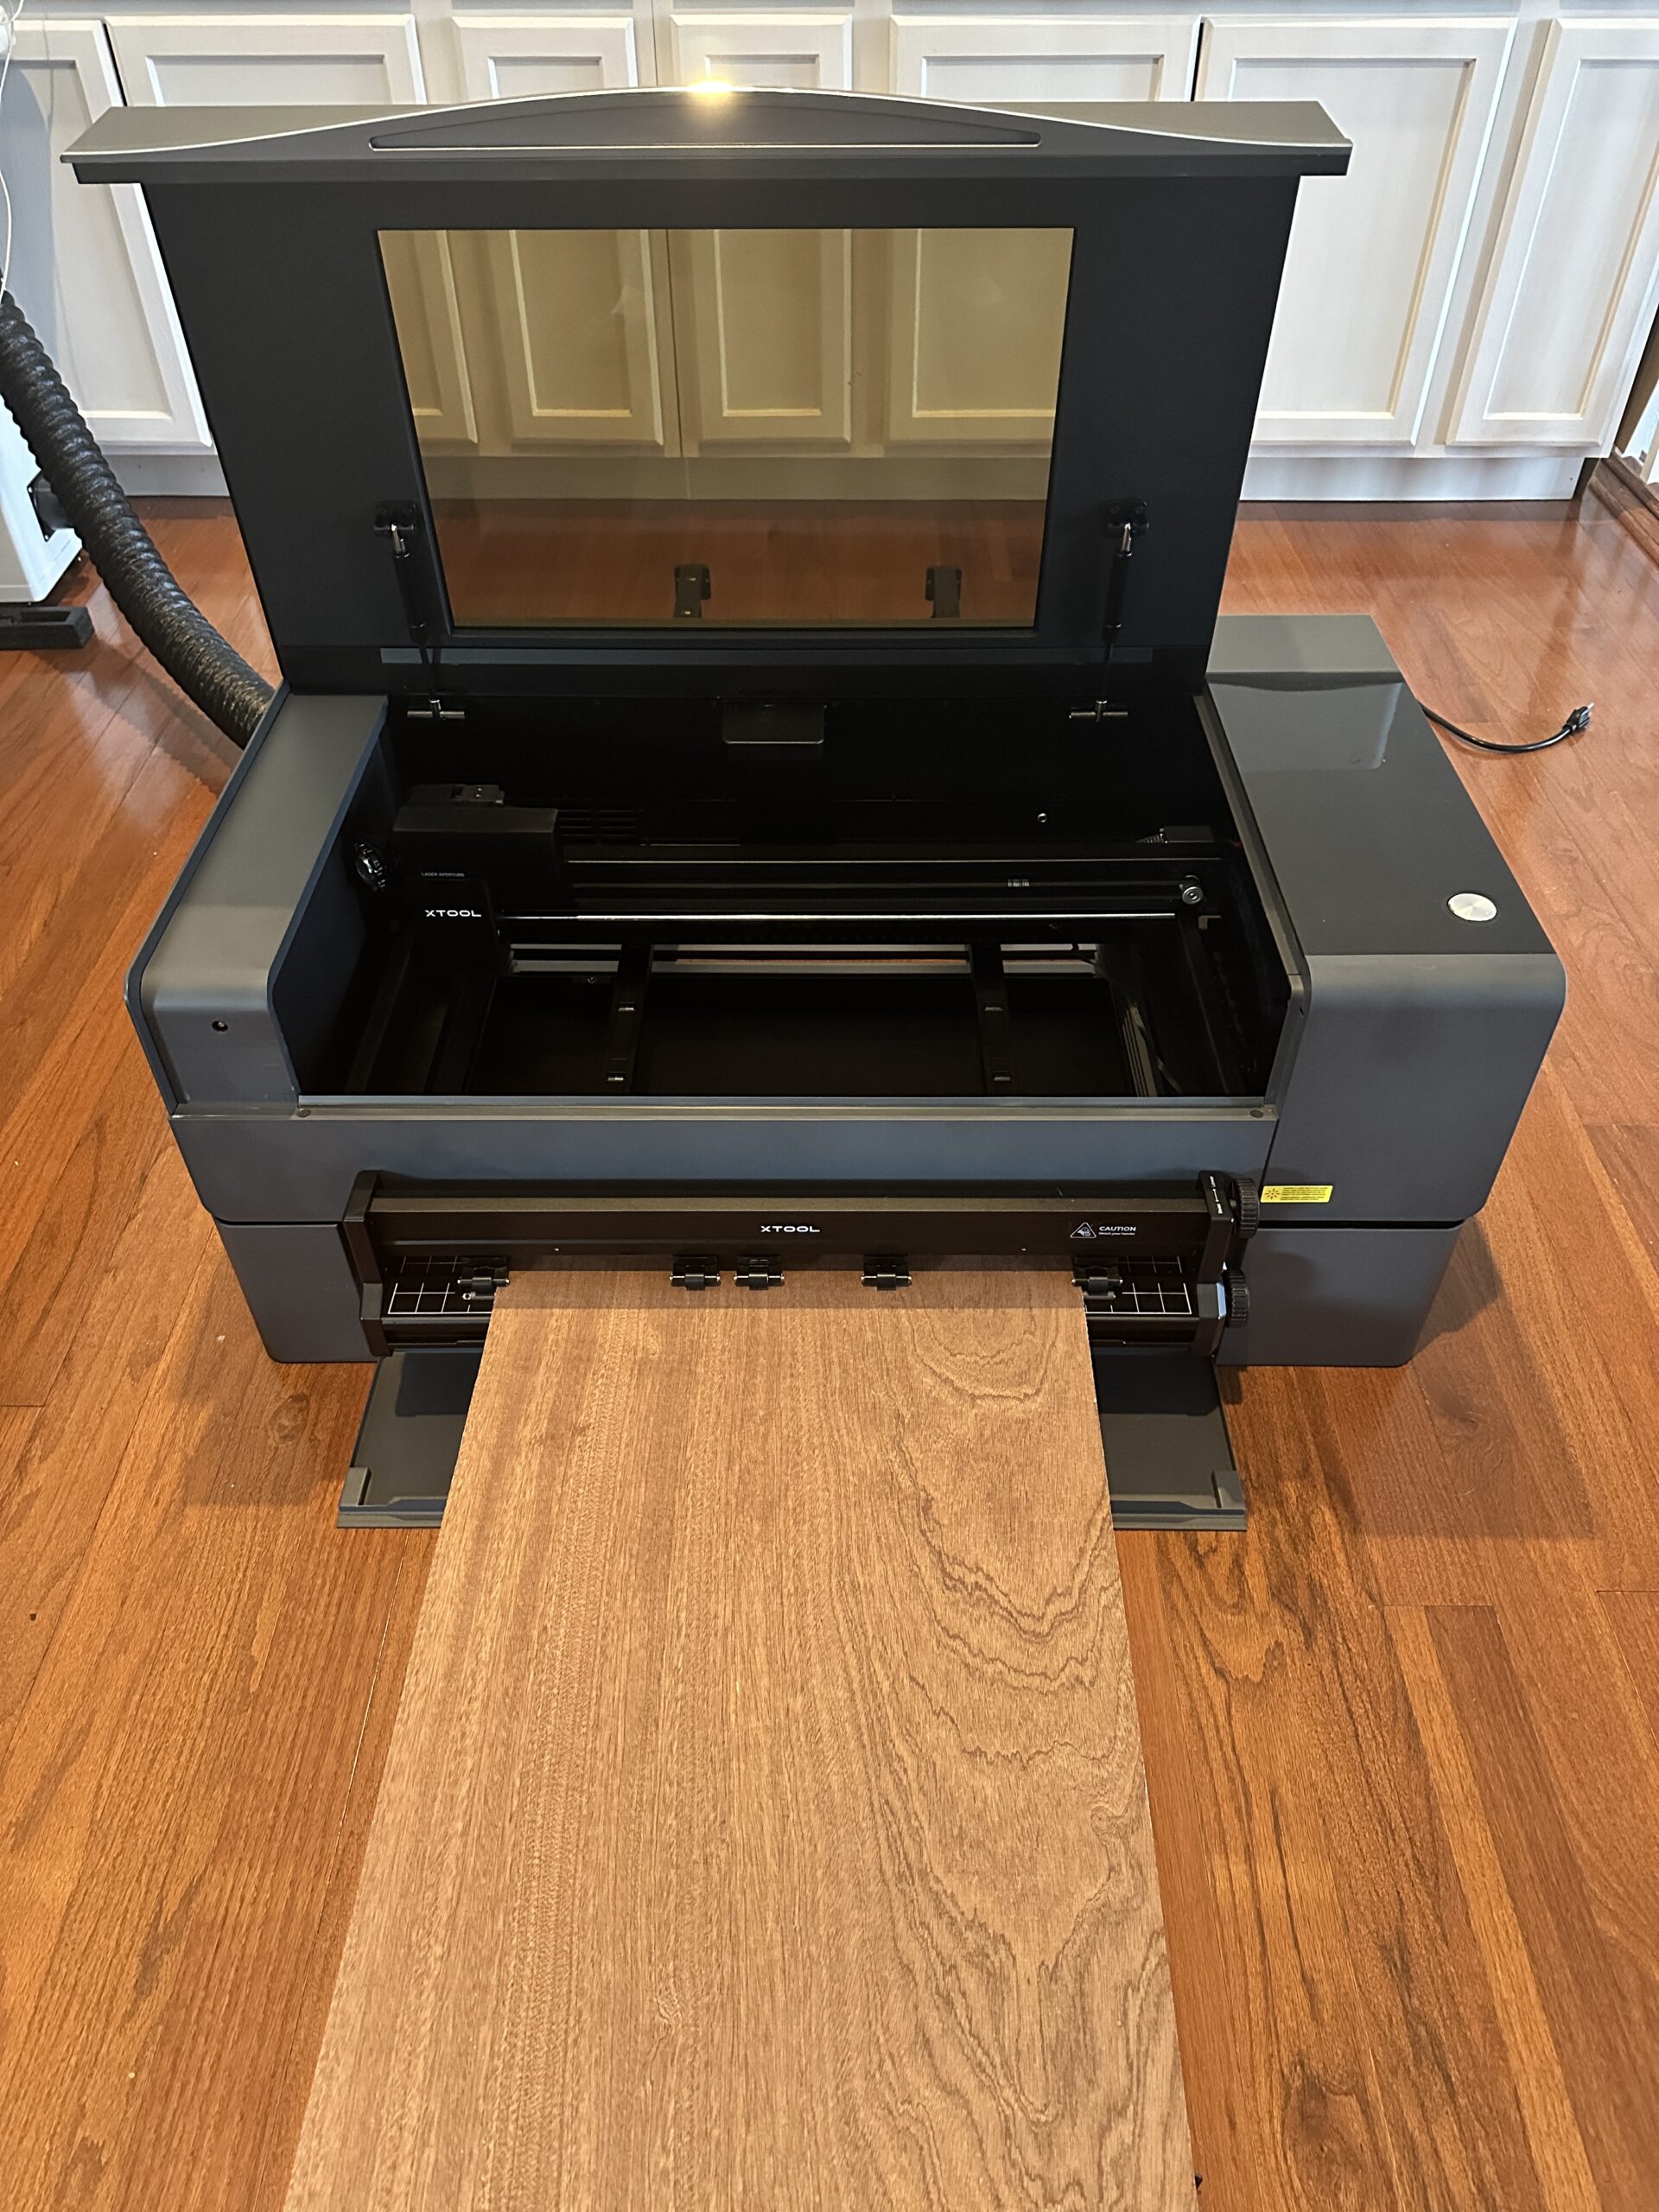
    Once installed, the Automatic Conveyor Feeder is easy to use:

    1. Load the material to be cut or engraved.
    xTool P2 with Automatic Conveyor Feeder - cuttingforbusiness.com

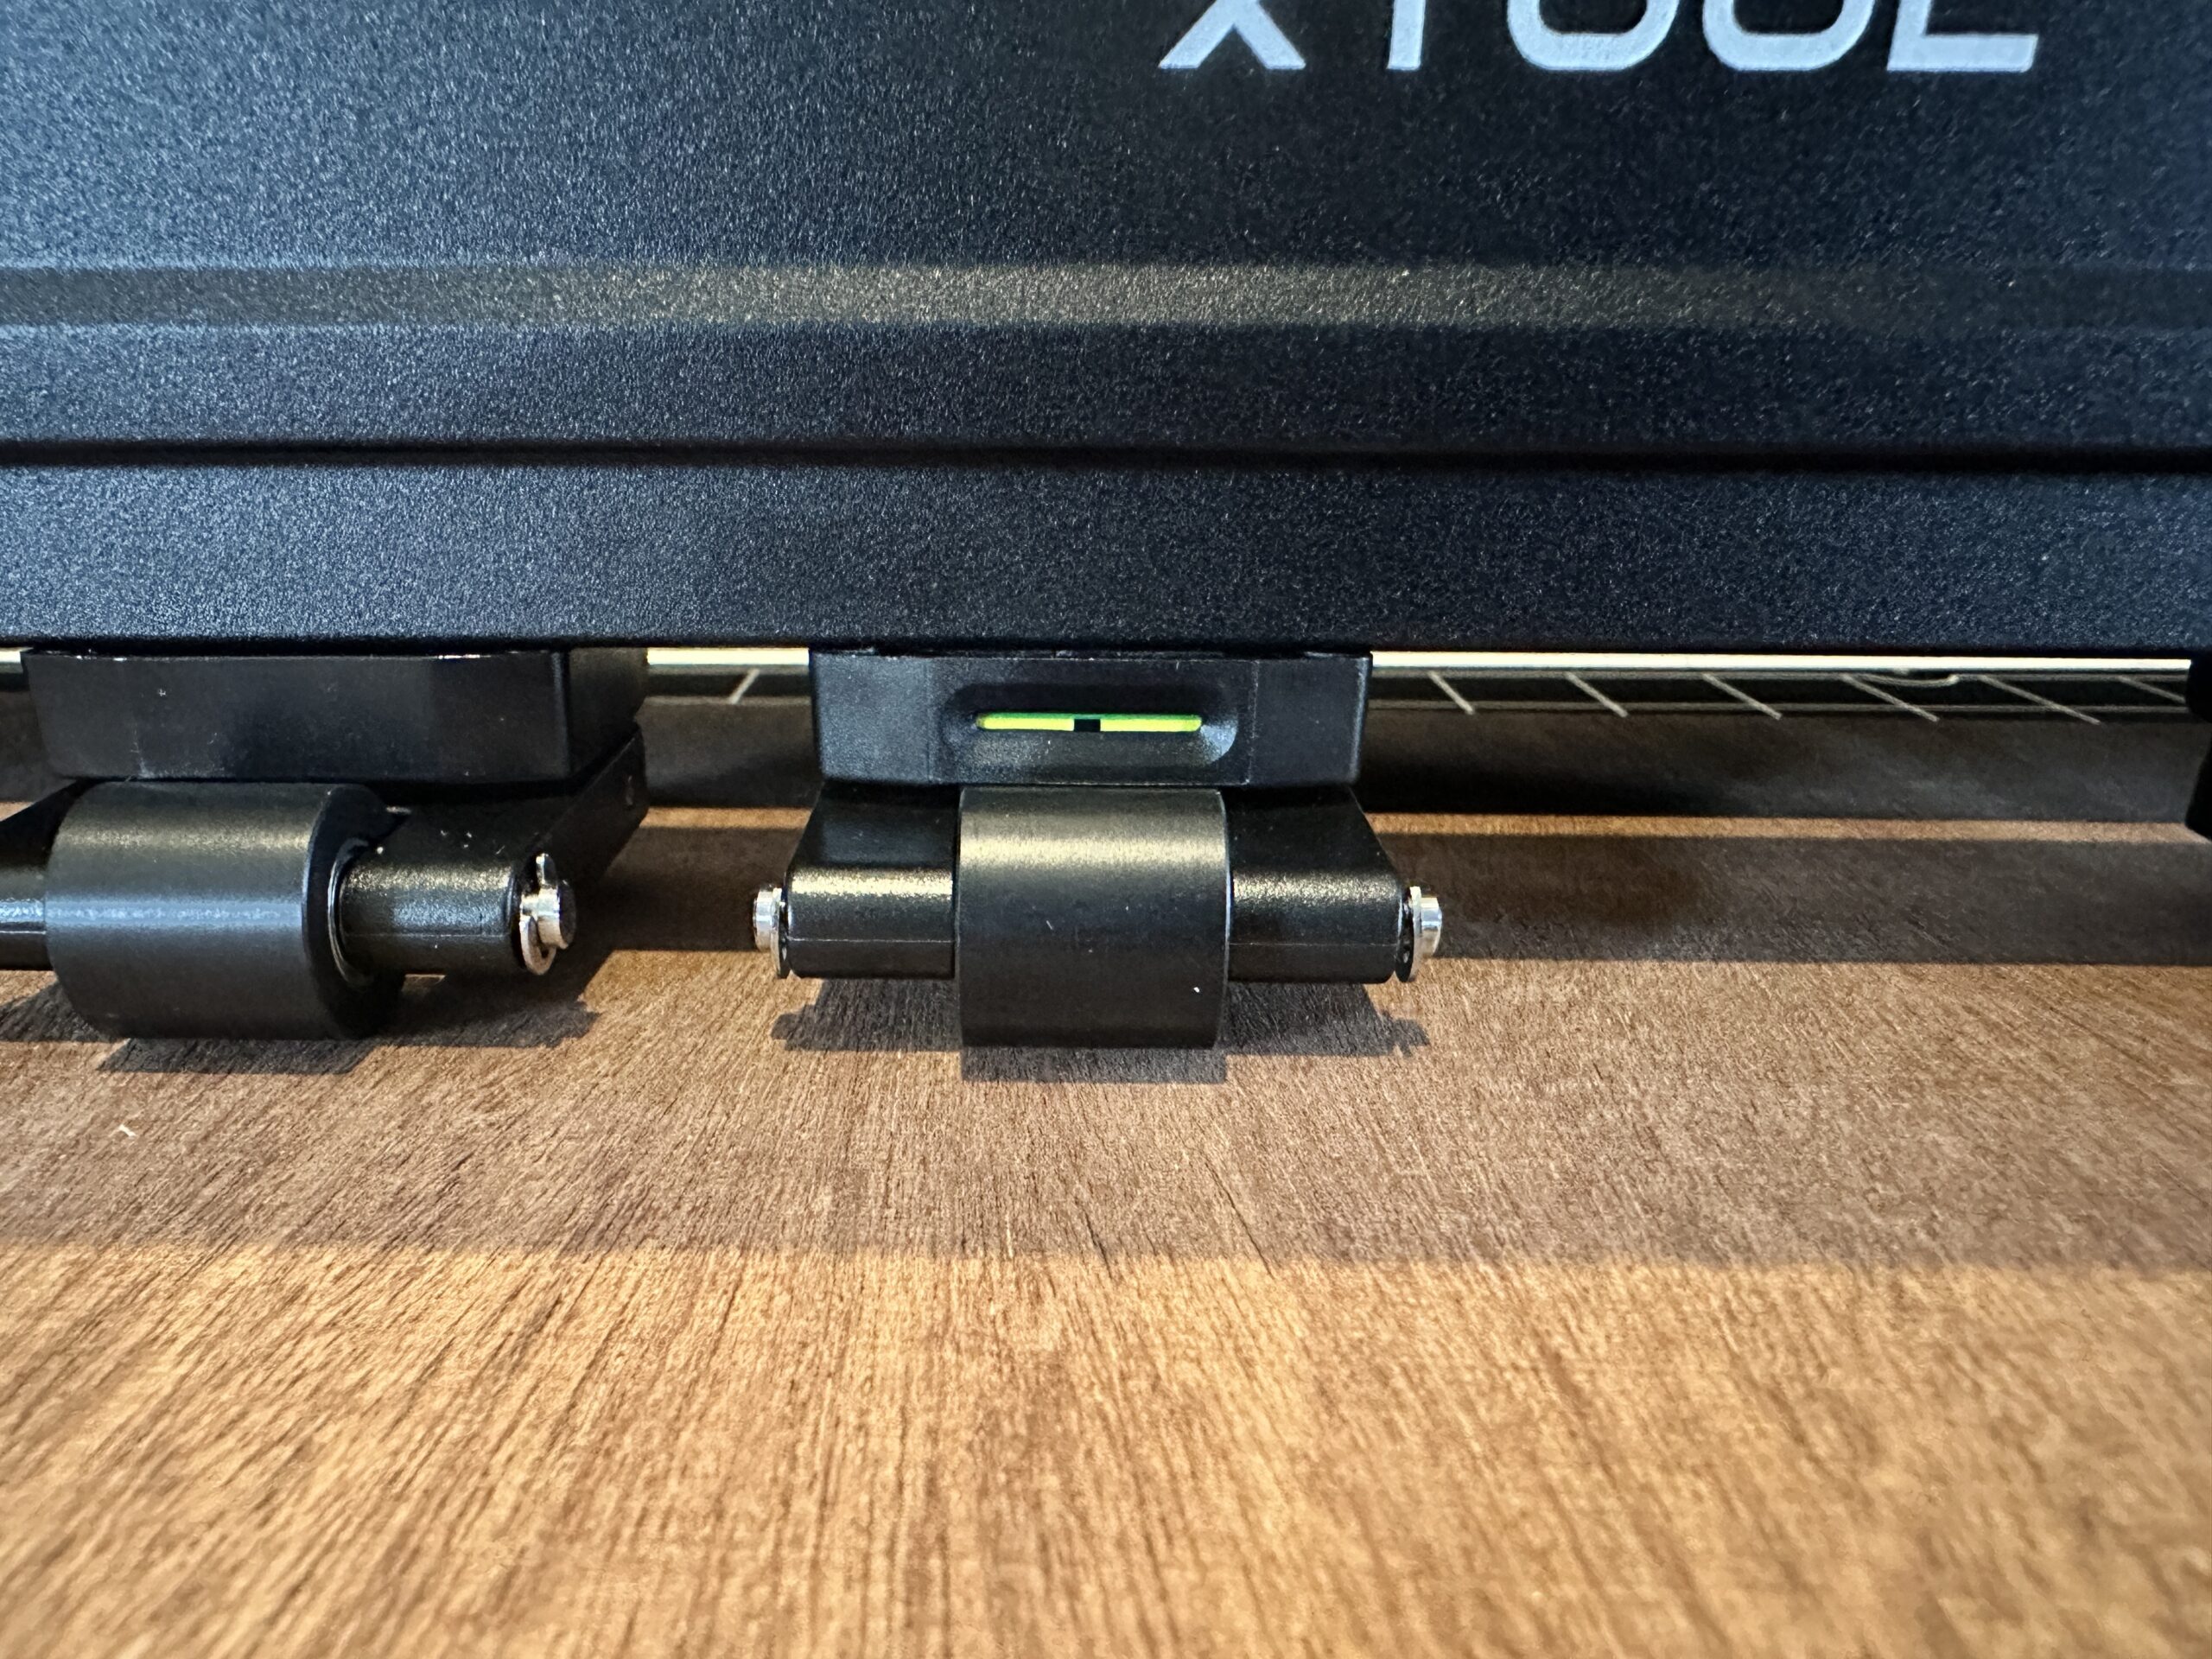
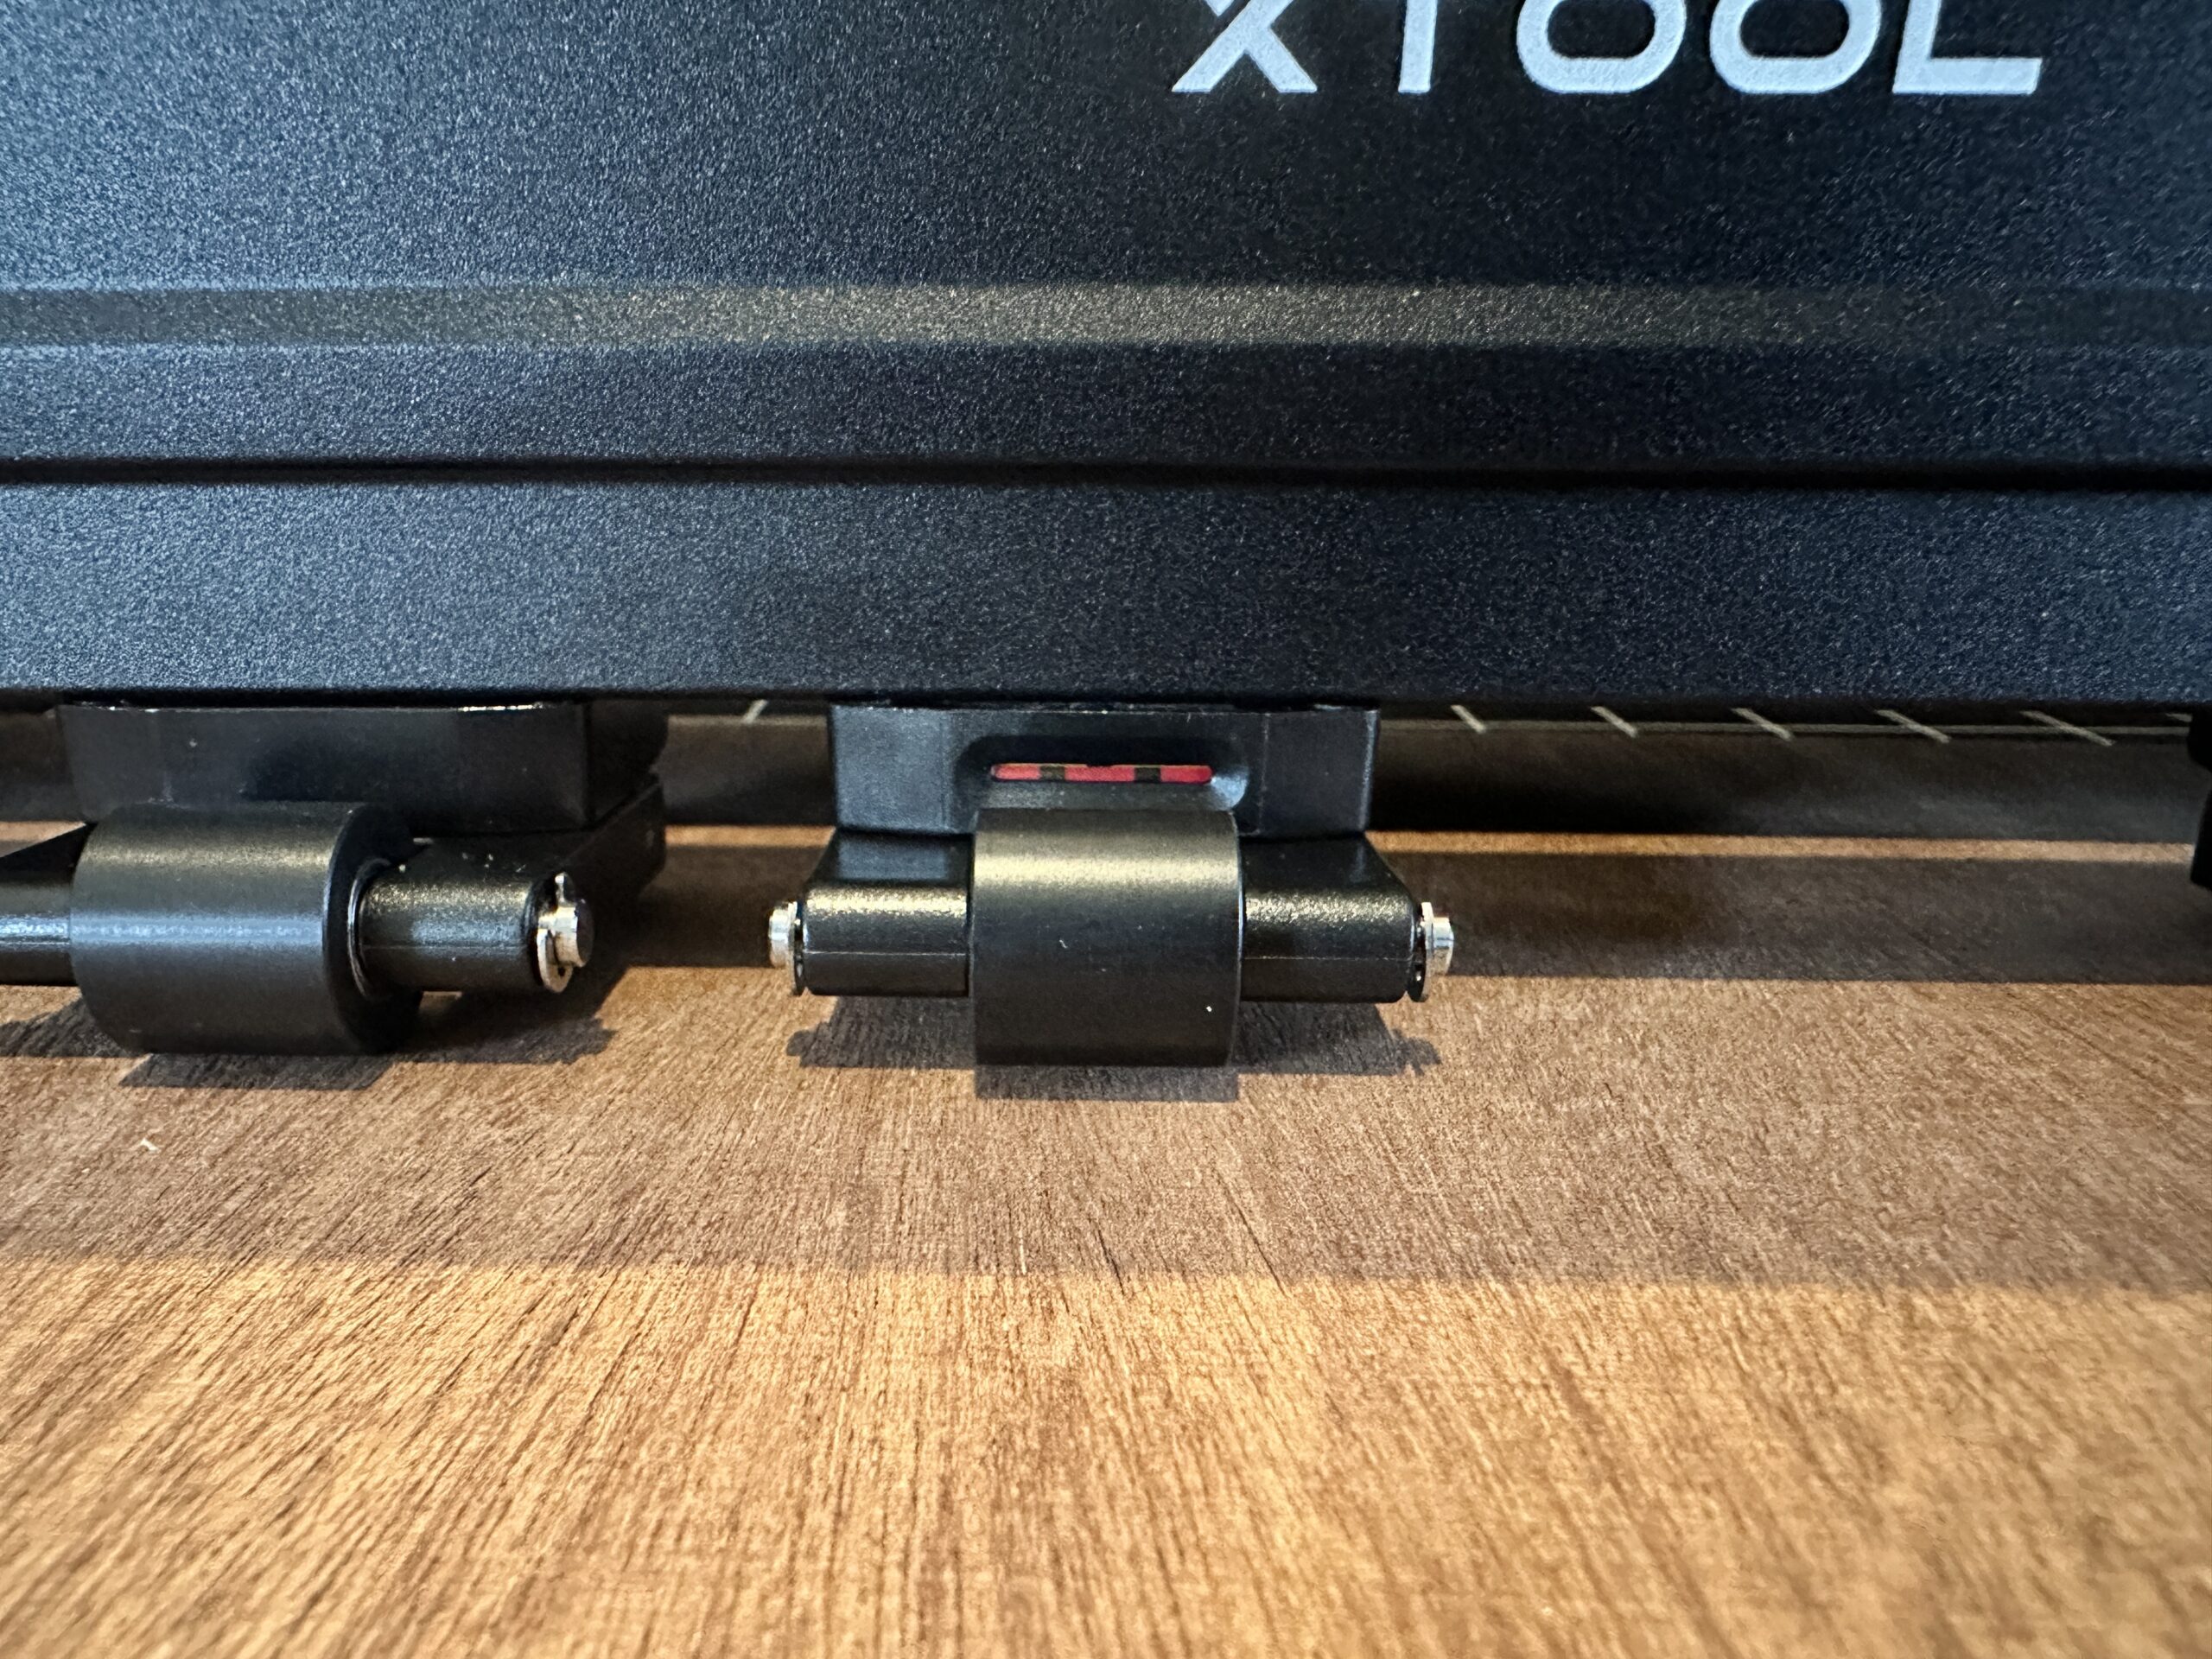
    2. Adjust the pressure on the rollers according to xTool’s guidelines (listed in the instructions and online). Basically, you turn a knob to adjust the tension on the material. In this case, I took the tension from green, past yellow, to red.

    xTool P2 with Automatic Conveyor Feeder roller pressure level - Green - cuttingforbusiness.com
    xTool P2 with Automatic Conveyor Feeder roller pressure level - Red - cuttingforbusiness.com

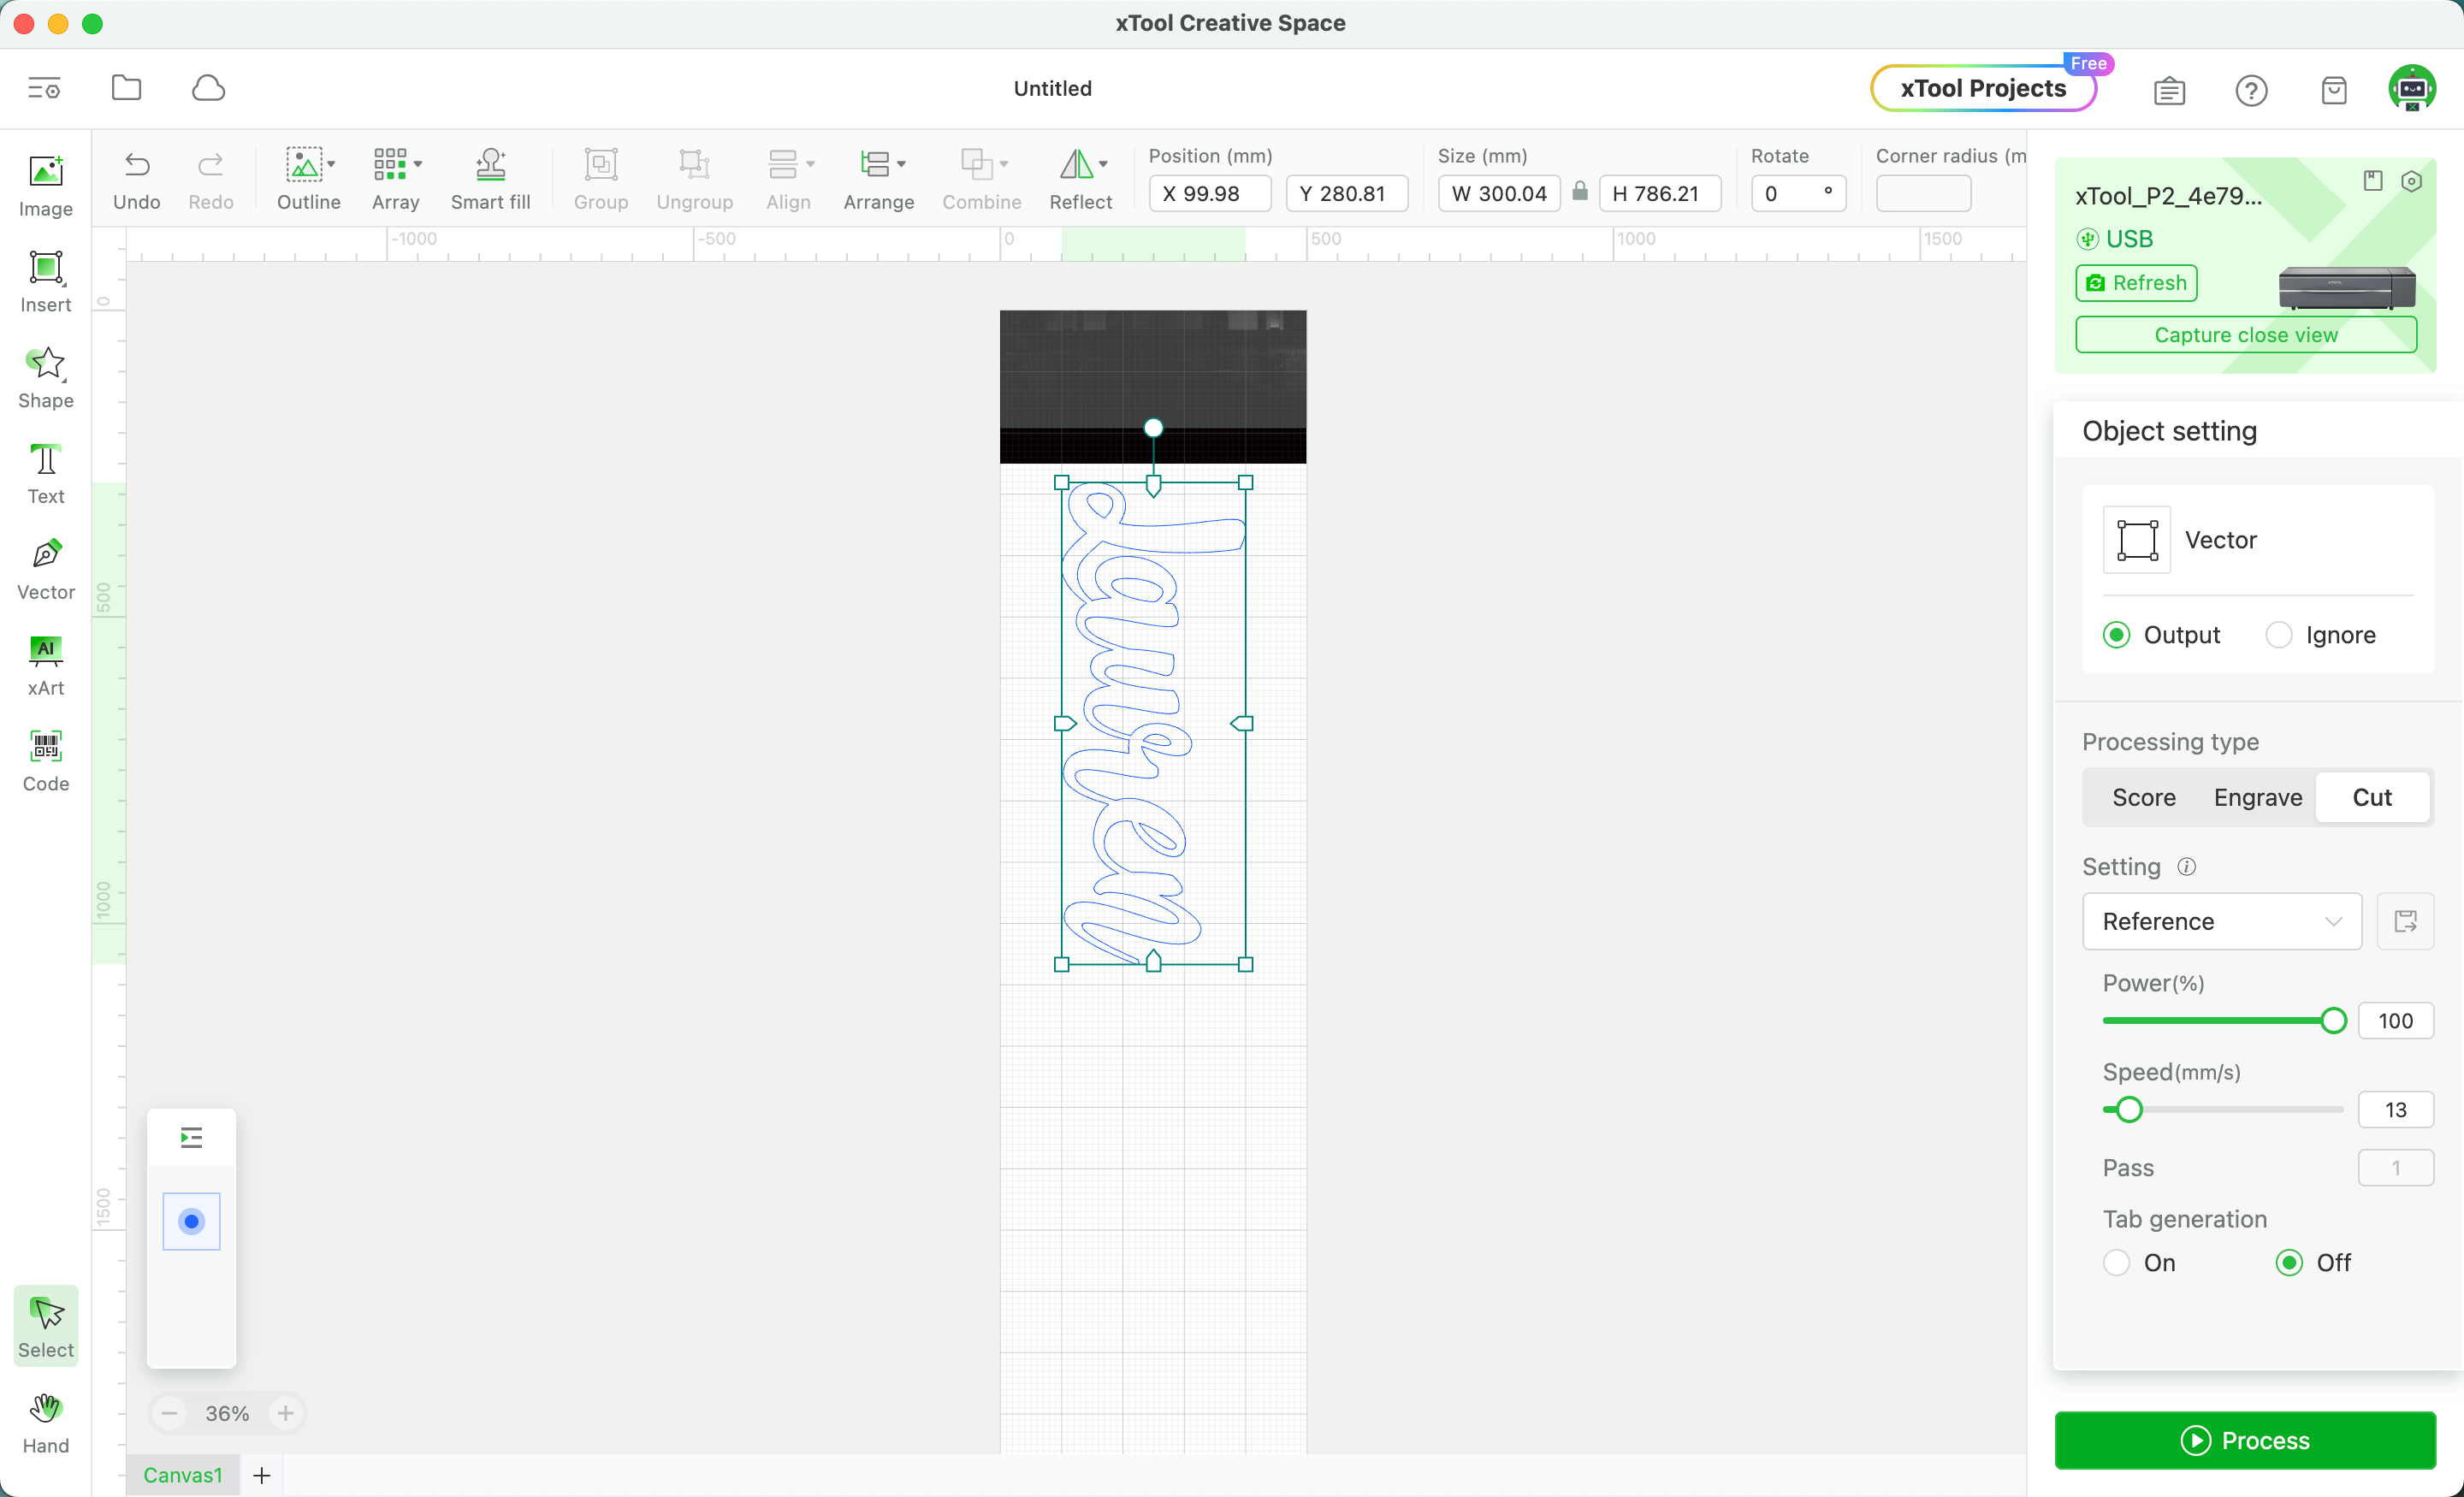
    3. Adjust settings in the Creative Space software.

    xTool Creative Space Screenshot - cuttingforbusiness.com

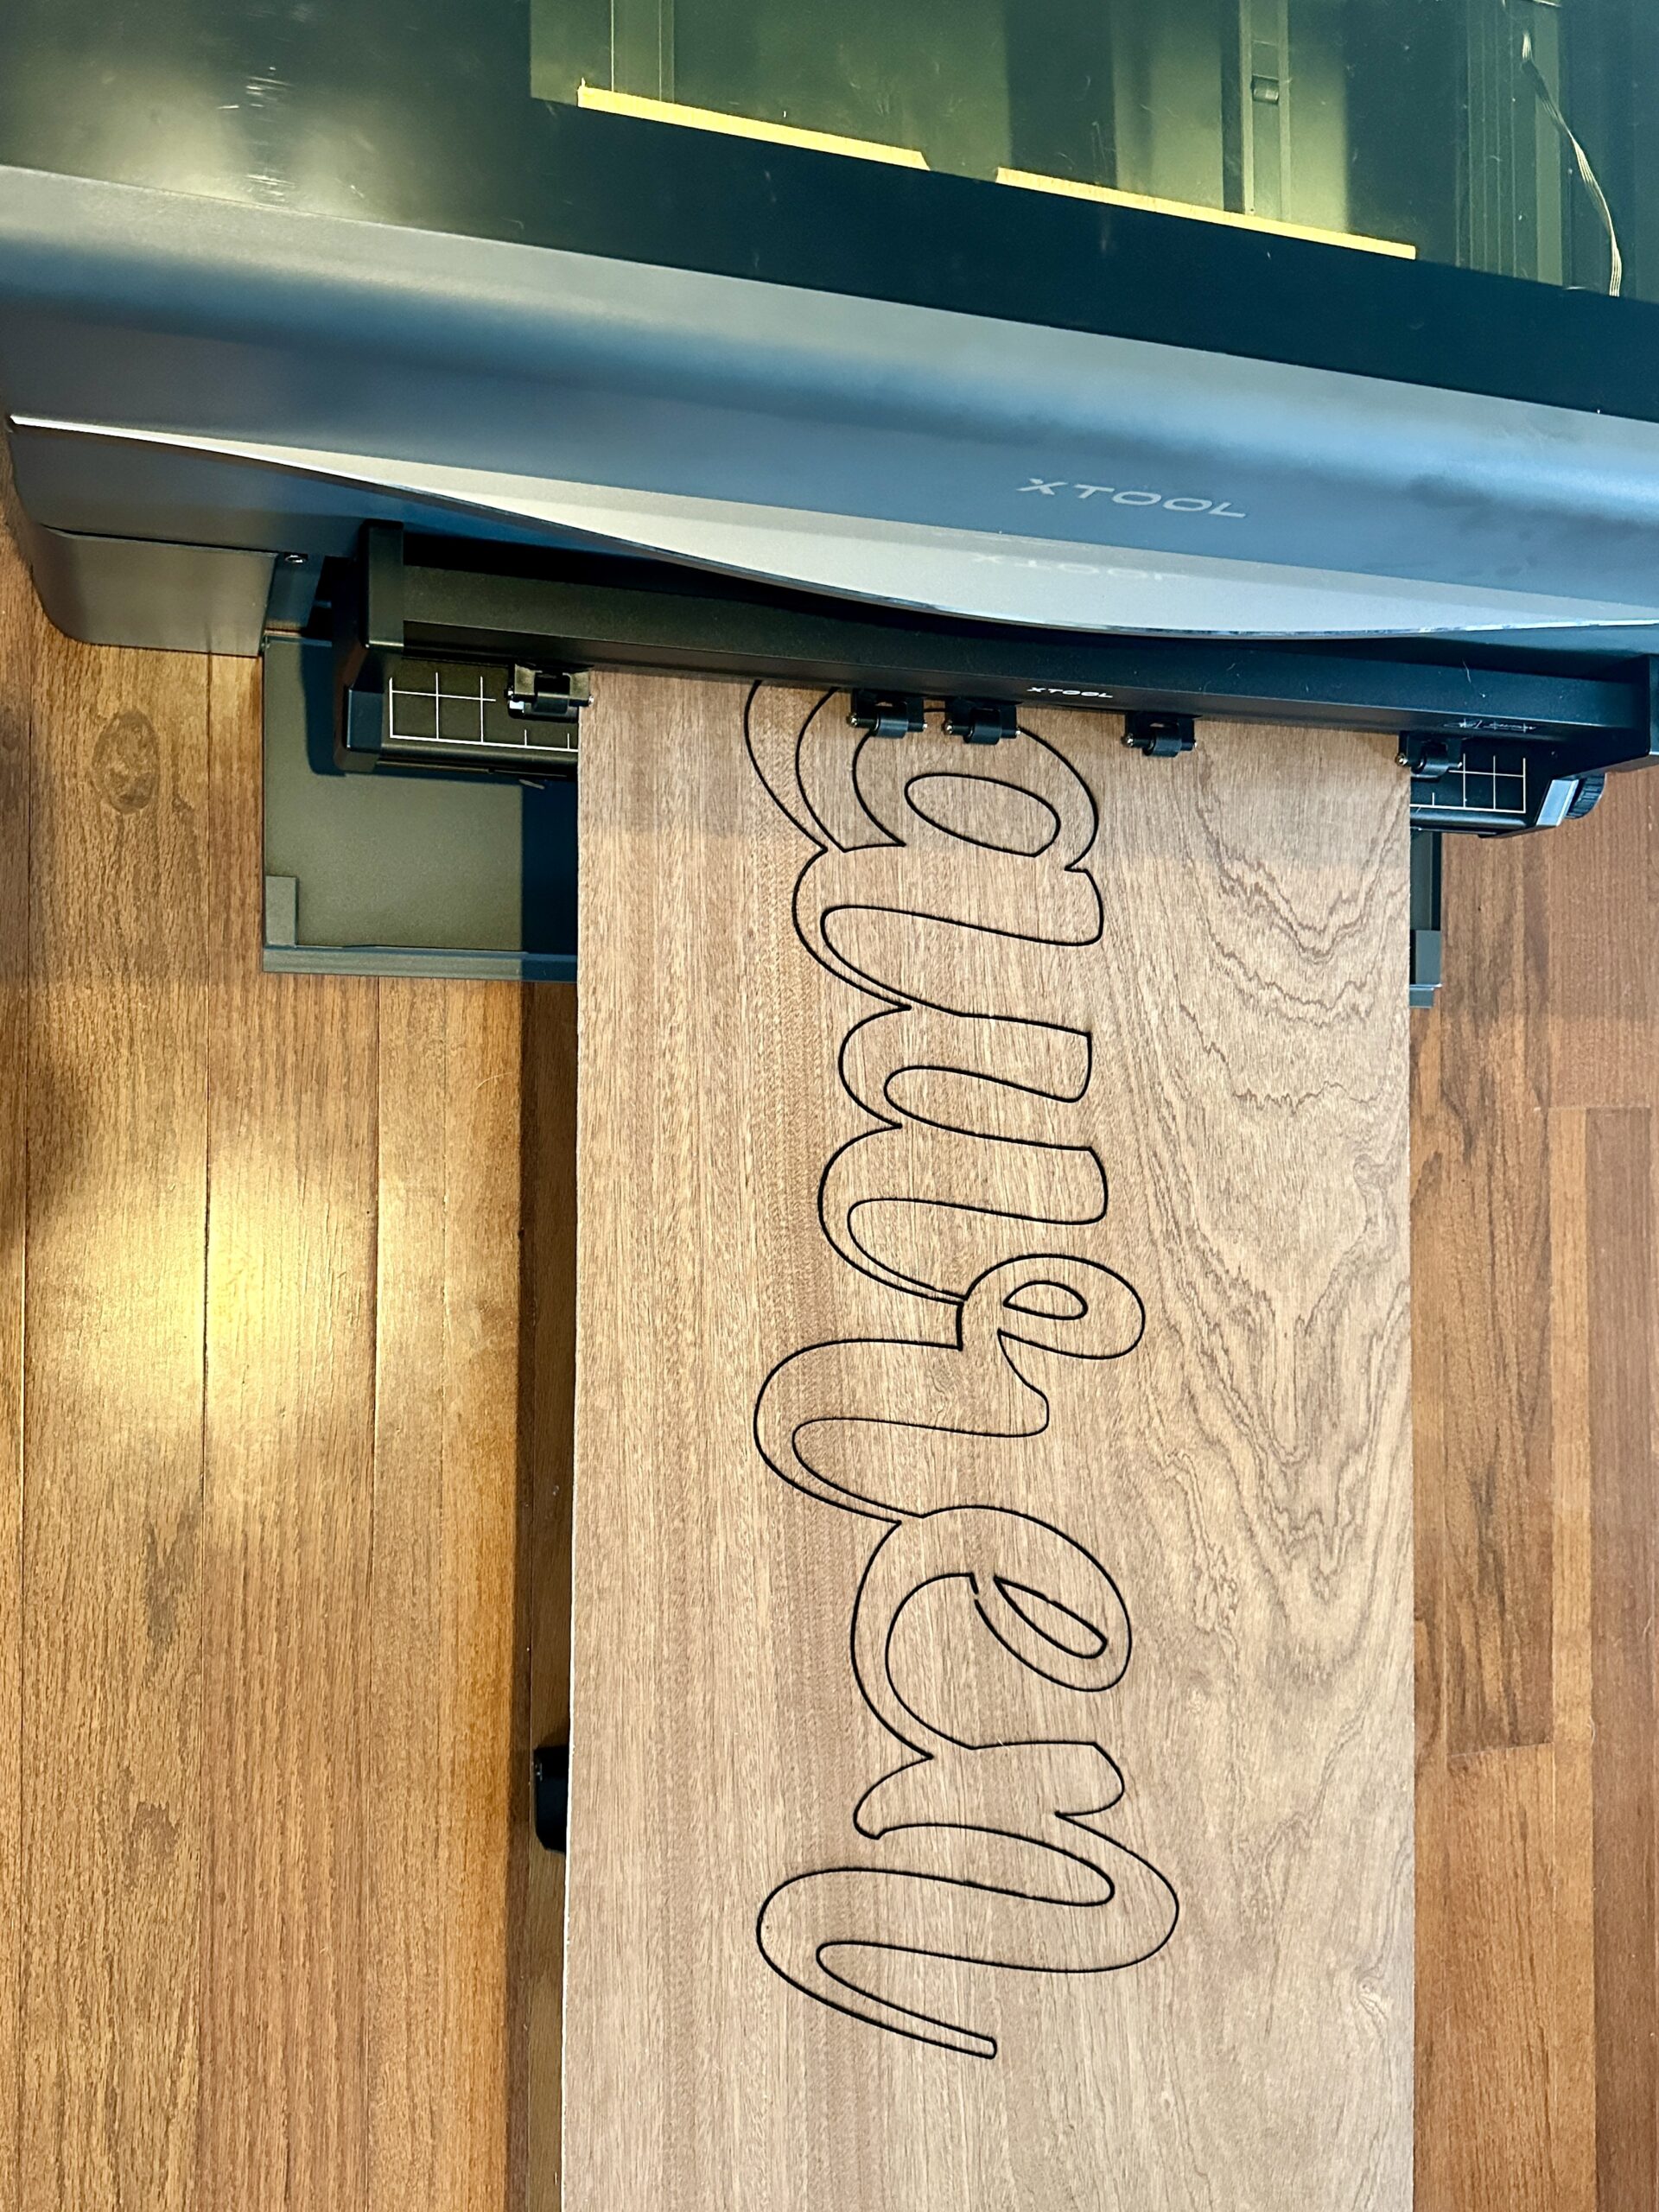
    4. Process the job.

    xTool P2 with Automatic Conveyor Feeder for Extra Large Projects - cuttingforbusiness.com

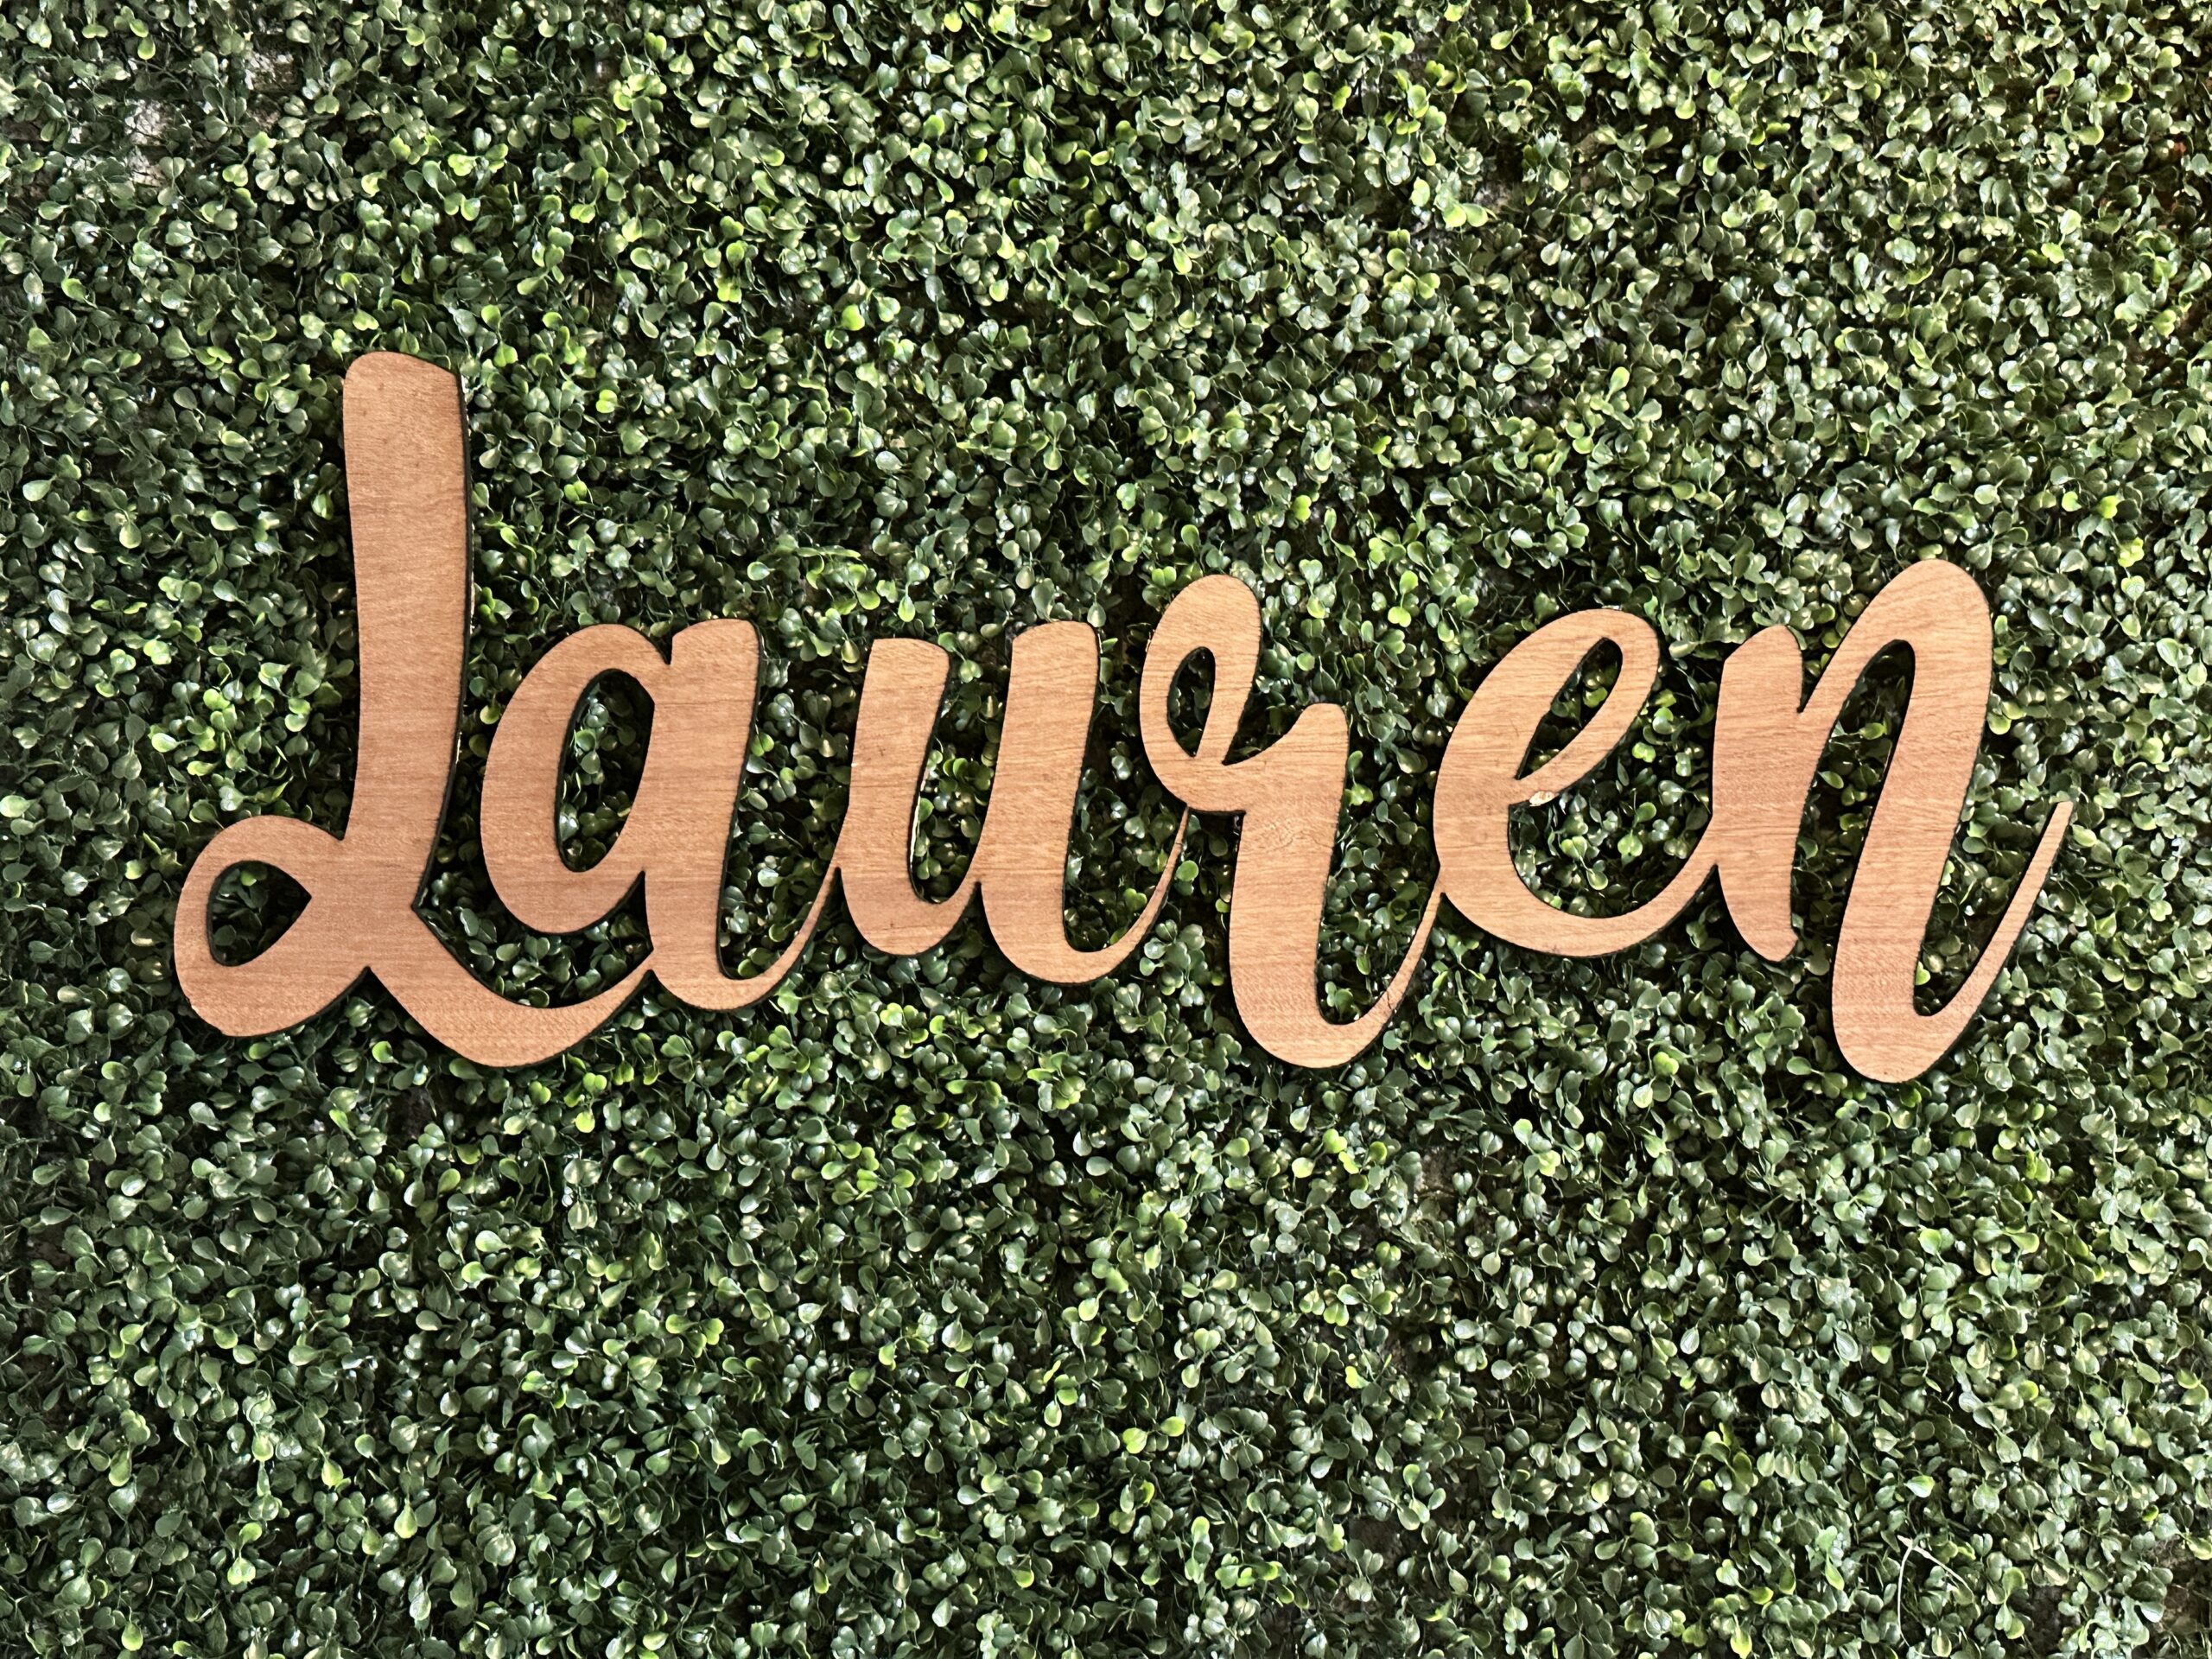
    5. Admire your finished product.

    Oversized wooden name - xTool P2 - cuttingforbusiness.com
    Oversized wooden name detail - xTool P2 - cuttingforbusiness.com

    What Else Do You Need to Know About the Automatic Conveyor Feeder?

    • The maximum thickness and length varies by material:
      • Plywood: 14mm, 118″
        • Acrylic and Fiberboard: 12mm, 96″
    • You can cut soft materials like EVA board, felt board, cork board, and kraft paper.
    • Additional conveyor rails can be added/subtracted based on your project.

    Who Will Want to Buy the Automatic Conveyor Feeder?

    Crafters who want to make extra large projects will love the Automatic Conveyor Feeder.

    View more xTool P2 posts on Cutting for Business.

  • xTool P2: How to Engrave with the RA Pro 2 Rotary Attachment

    I went engraving crazy for today’s blog post. The xTool P2’s rotary attachment (RA Pro 2) is… AH-MAZING! Let’s take a look at it.

    xTool P2: How to Engrave with the RA Pro 2 Rotary Attachment - cuttingforbusiness.com

    What is the Rotary Attachment (RA Pro 2)?

    One accessory that xTool offers is the rotary attachment shortened to the RA Pro 2. This tool configures and set up in multiple ways to allow you to engrave coffee cups, balls, Christmas ornaments, tumblers, wine glasses, champagne glasses, and so much more.

    How Does the RA Pro 2 Work?

    I’ve previously shared a tutorial on how to use xTool’s M1 to engrave a tumbler. This tutorial features the basic rotary attachment which relies on rollers to move the product to be engraved back and forth. The roller has some limitations.

    In addition to the rollers, the xTool Rotary Attachment Pro 2 offers a chuck which holds materials in adjustable jaws. This opens so many new possibilities like round objects and even rings!

    How to Use the RA Pro 2 to Engrave a Stanley Cup

    I’m almost scared for my Stanley tumbler obsessed girls to see this tutorial for fear that I will have a pile of their friend’s tumblers to engrave! But, let’s look at how to engrave a Stanley cup tumbler. I’m using the 40oz tumbler with a handle.

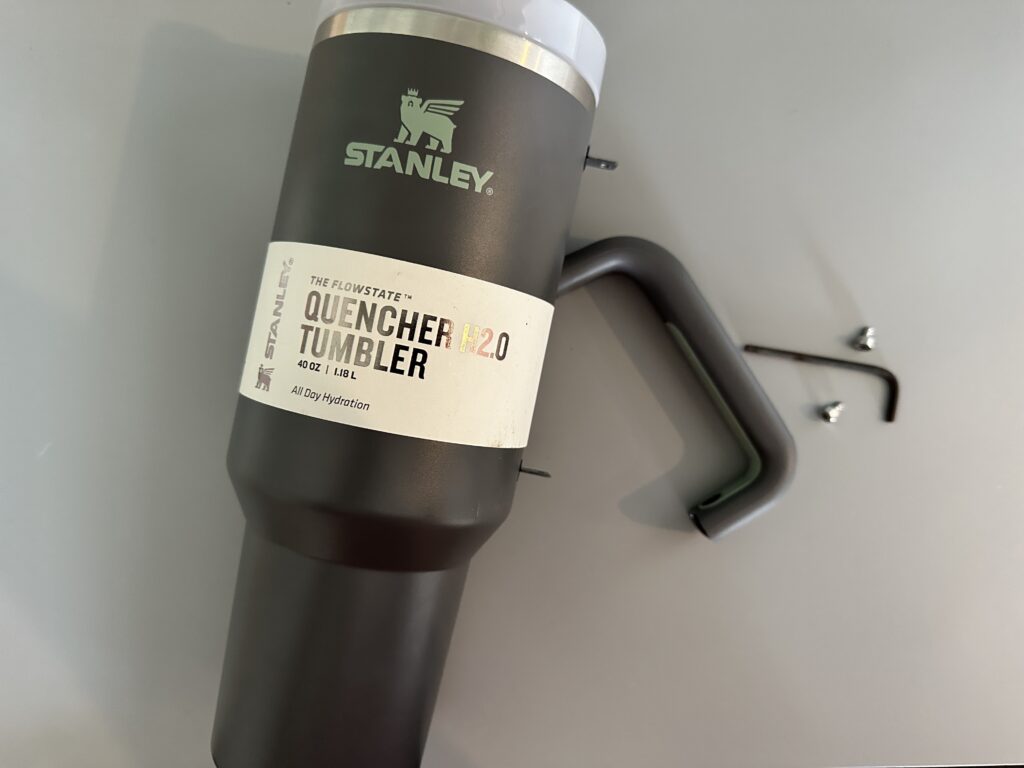
    1. Remove the handle. The handle comes off with two screws. Depending where you want to engrave the tumbler, you might want to remove it, you might not. I figured it was easier to remove the handle because I engraved volleyballs randomly all over the cup.
    Removing the Stanley cup handle for engraving - cuttingforbusiness.com

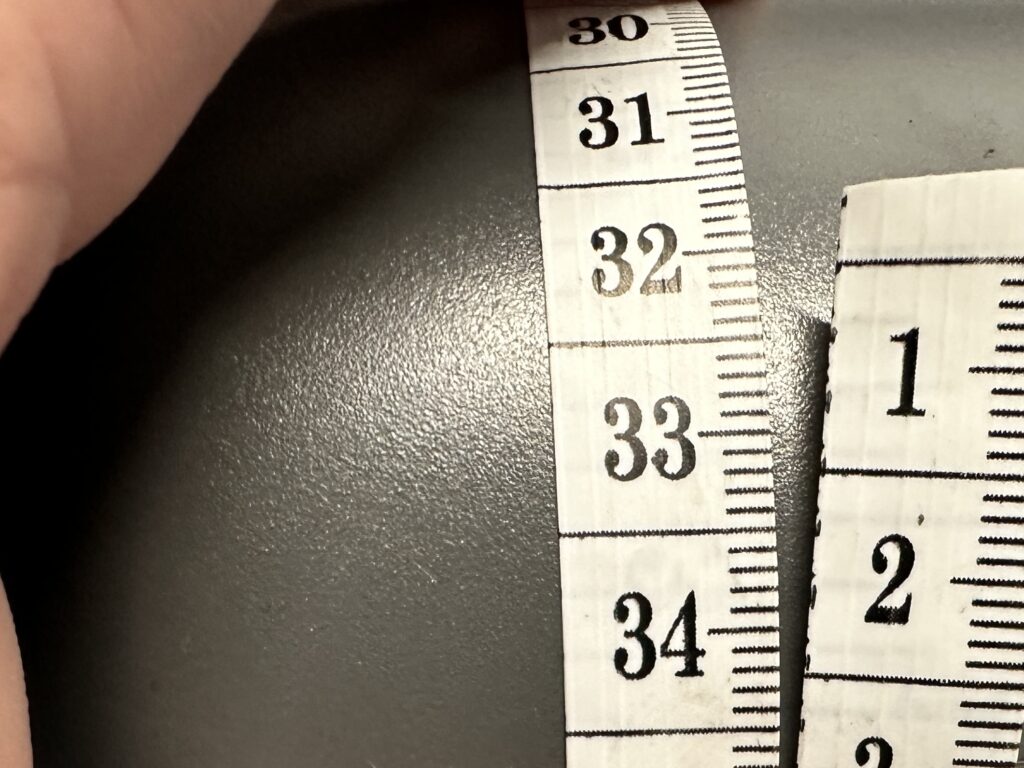
    2. Measure around the tumbler in millimeters.

    Measuring the Stanley tumbler - cuttingforbusiness.com

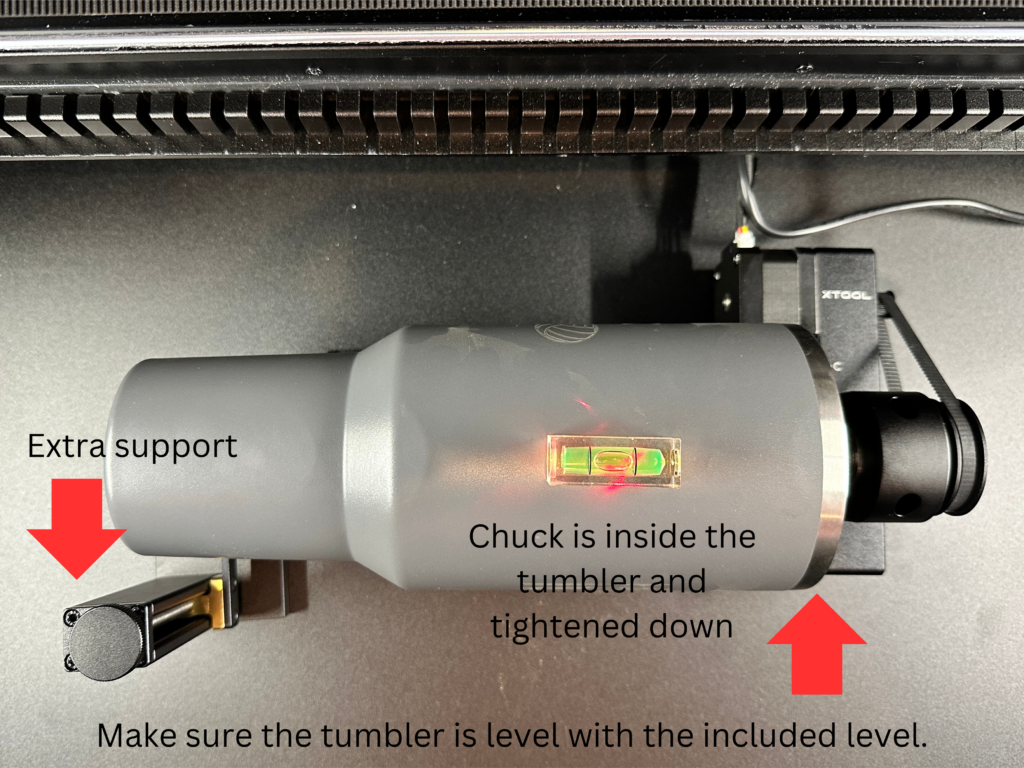
    3. Place the tumbler onto the RA Pro 2, with the chuck inside and tighten it. Use the support on the bottom of the tumbler, then make sure it is level.

    Setup of the Stanley tumbler on the RA Pro 2 inside the xTool P2 - cuttingforbusiness.com

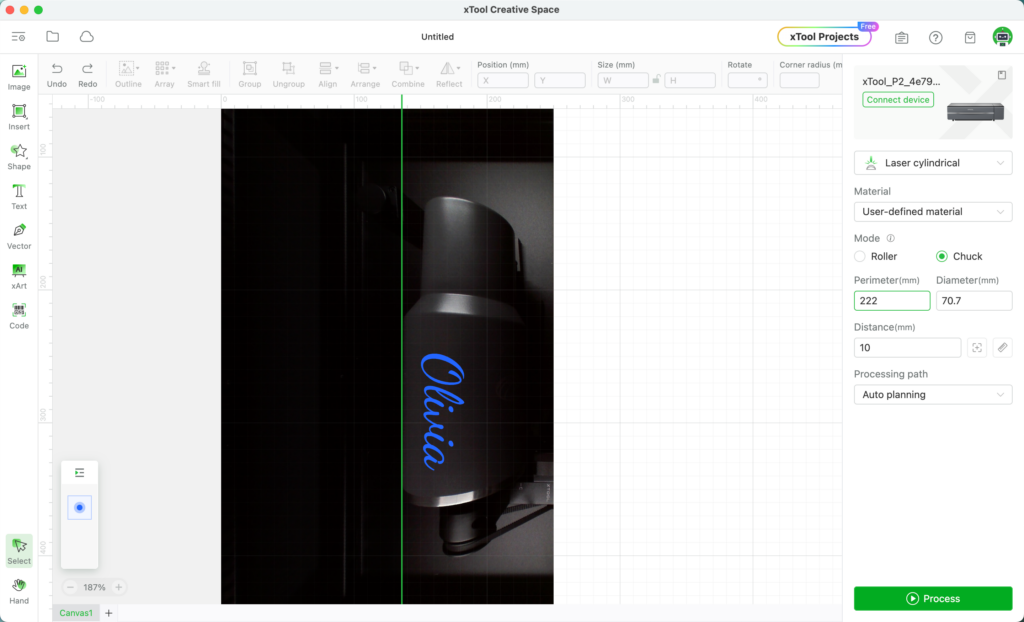
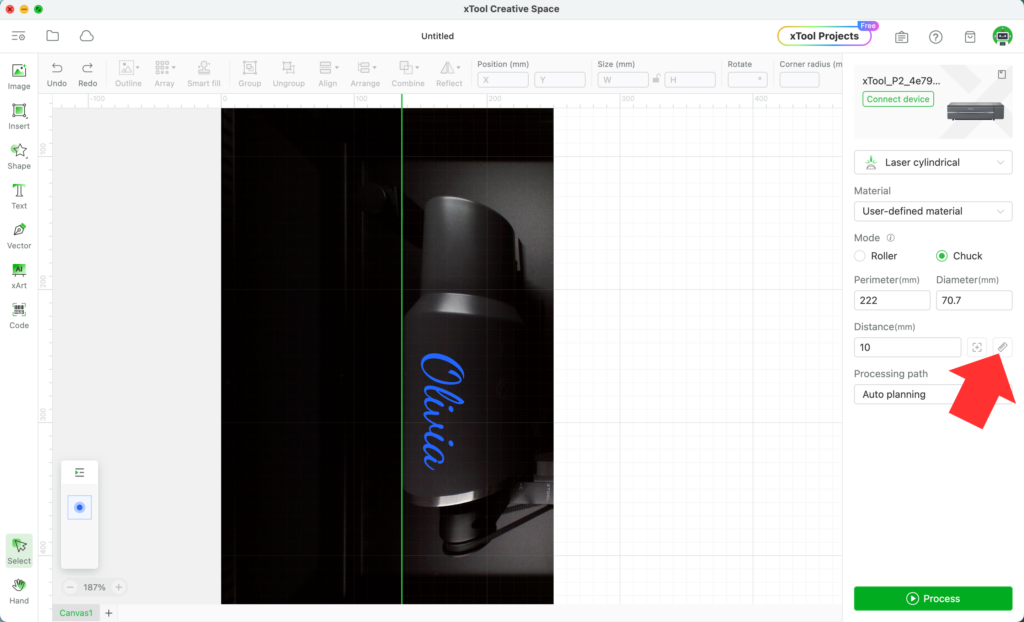
    4. Set up Creative Space by making sure that the green line is to the left of the engrave and entering the perimeter measurement. The software will automatically calculate the diameter.

    XTool's Creative Studio setup for engraving Stanley tumblers - cuttingforbusiness.com

    5. Allow the xTool P2 to automatically measure the distance.

    xTool's Creative Studio auto measure - cuttingforbusiness.com

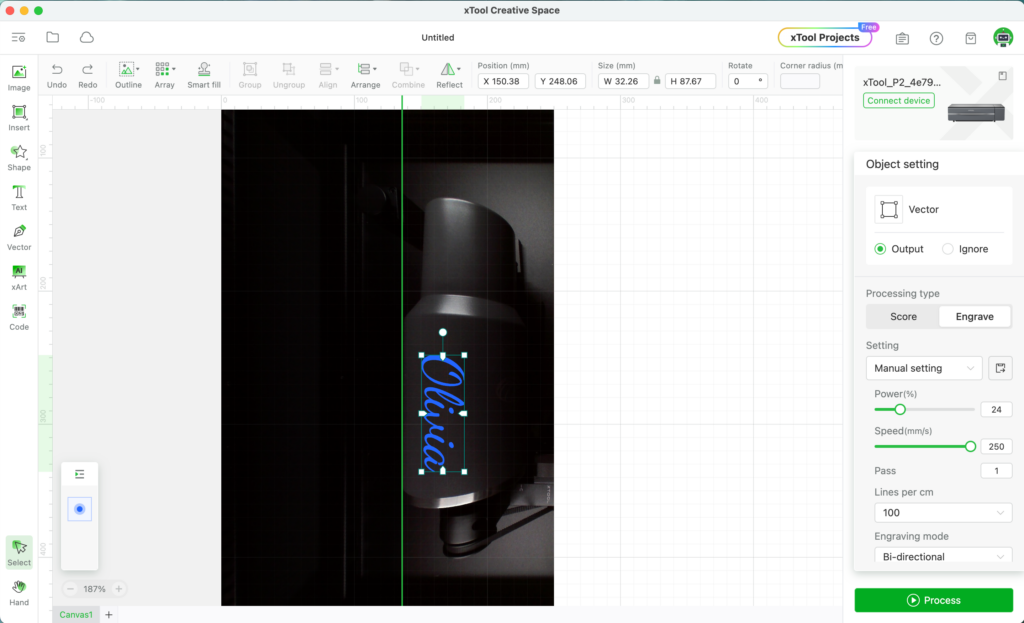
    6. Enter your settings. (I used 24, 250, 1, 100.)

    Settings for engraving a Stanley tumbler with the xTool P2 - cuttingforbusiness.com

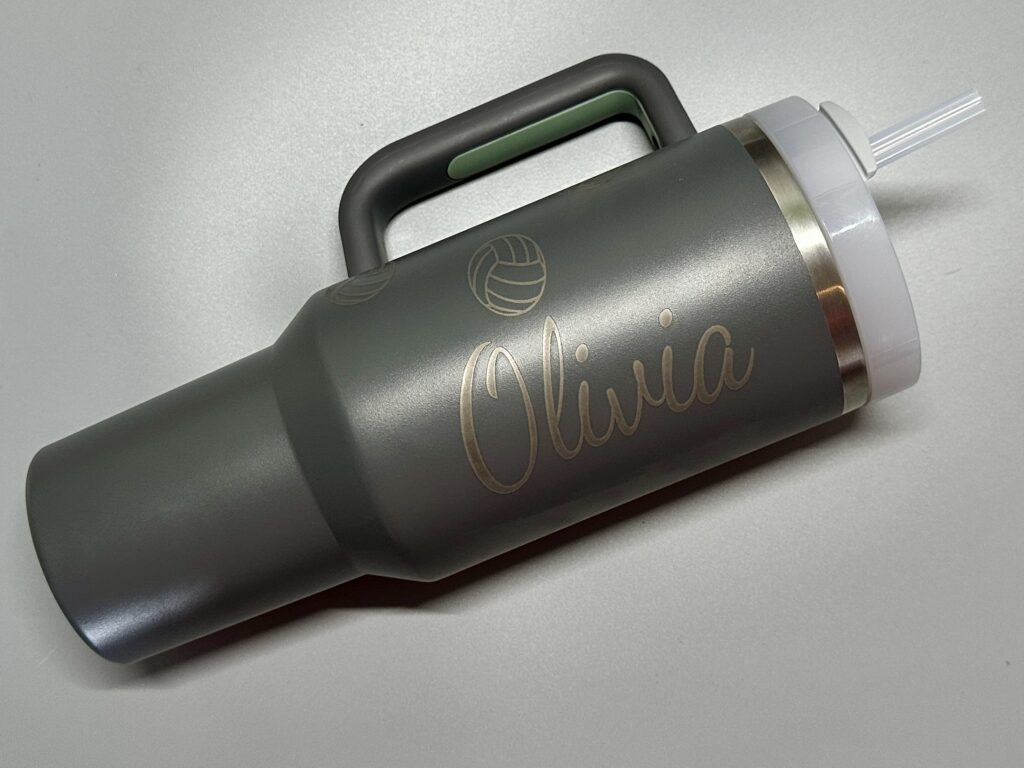
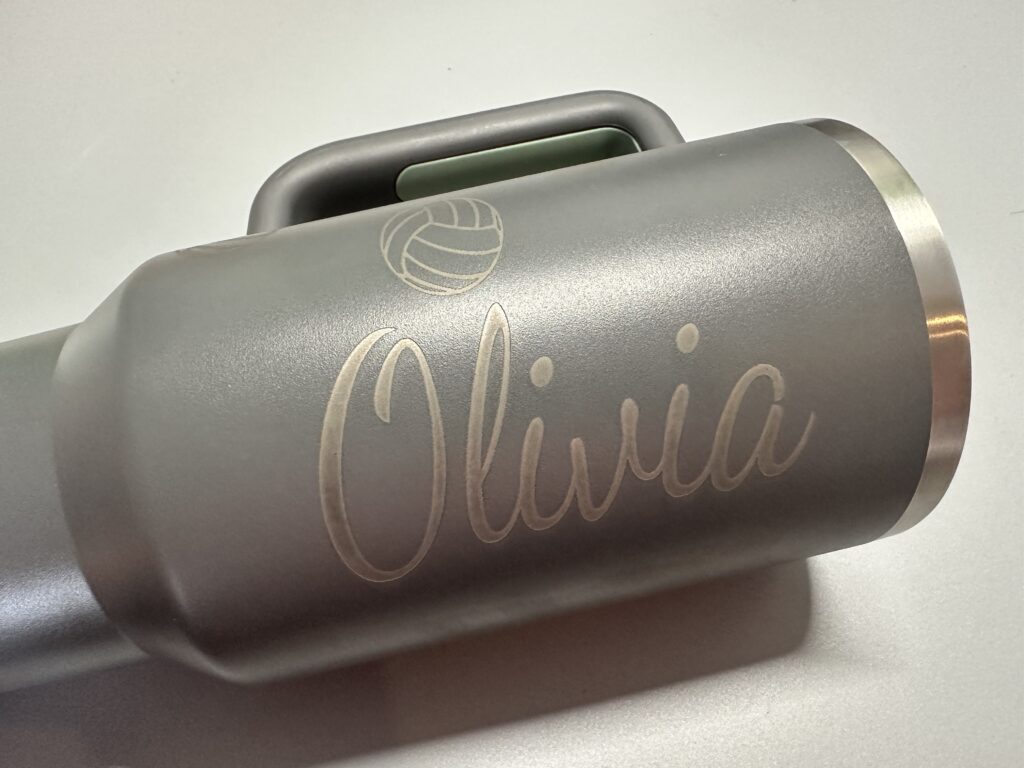
    7. Turn on your air purifier, and fire up the laser! My completed engrave looks great, and I also added volleyballs all over the tumbler. The handle is easy to put back on.

    Engraved Stanley tumbler with xTool P2 - cuttingforbusiness.com
    Close up view of an engraved Stanley tumbler with xTool P2 - cuttingforbusiness.com

    How to Engrave a Baseball with the RA Pro 2

    For Christmas this year, I bought tickets for someone to go to two Tampa Bay Rays games. The tickets are digital, so I wanted to find a creative way to give the tickets to the recipient. The xTool RA Pro 2 made it possible to easily engrave a baseball.

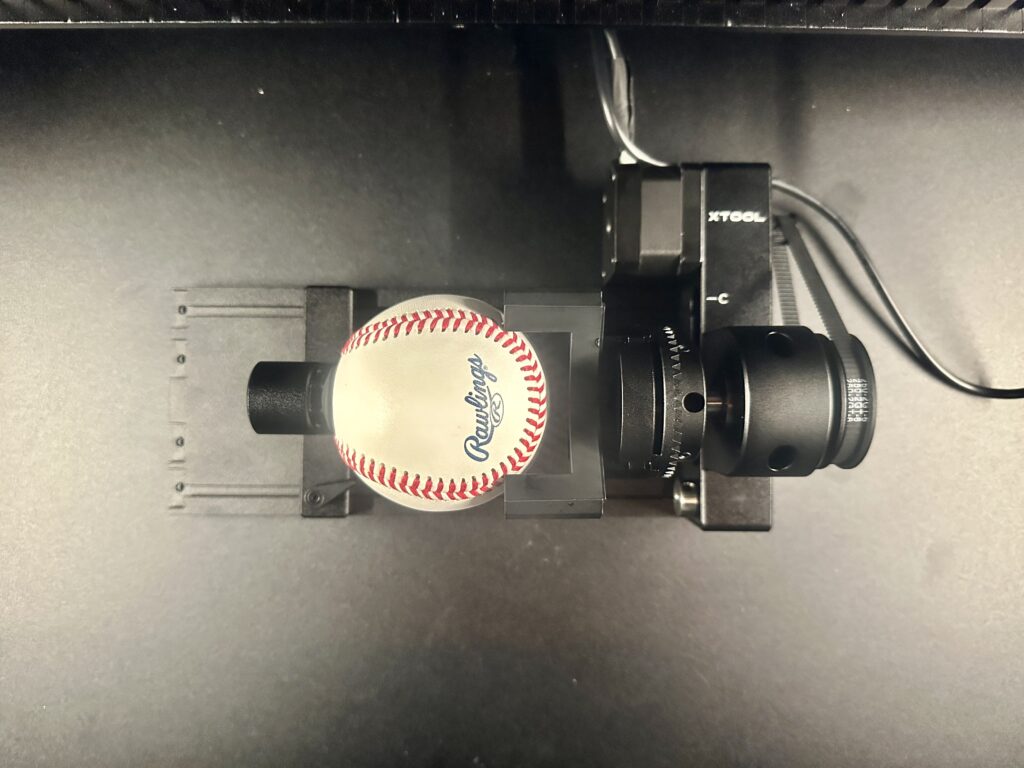
    I used an old a brand new ball from Coach Will’s stock (please don’t tell him!). Using the jaws, I clamped the baseball into place and added the support bracket. In minutes, I had an engraved baseball – and a cute way to tell someone they are going to the games!

    Settings: 11, 250, 1, 100.

    How the baseball looks in the RA Pro 2 and xTool P2:

    Engraving a baseball with the xTool P2 - cuttingforbusiness.com

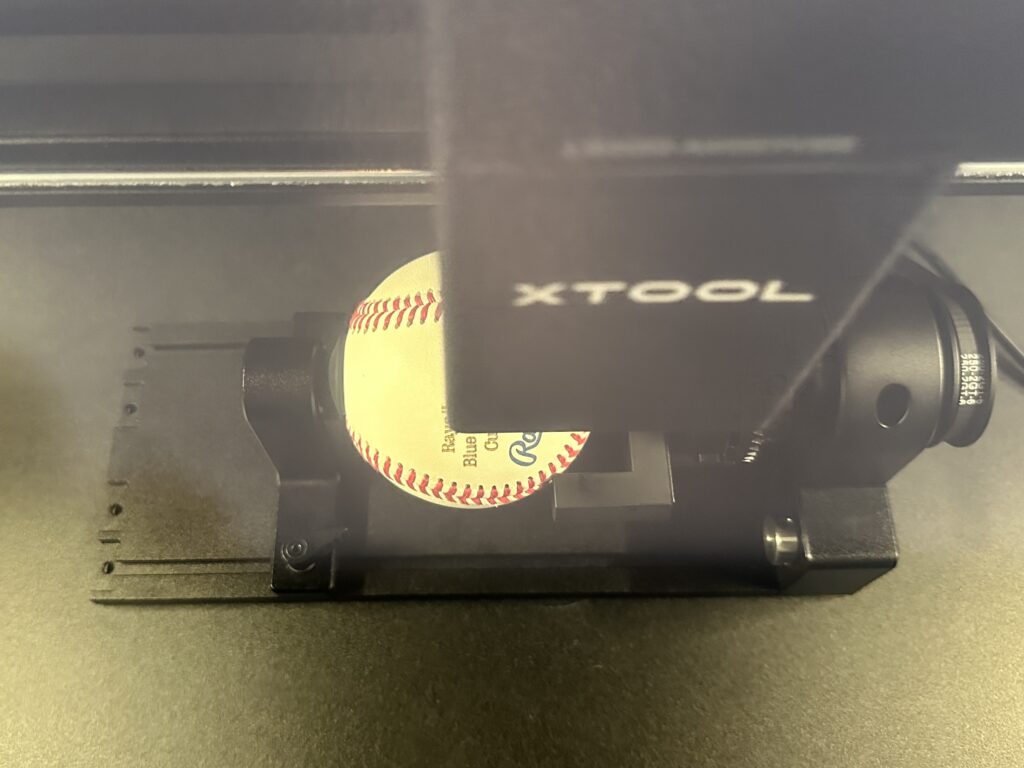
    During the Engrave:

    In process shot of engraving a baseball with the xTool P2 - cuttingforbusiness.com

    Final product:

    Engraved baseball with the xTool P2 - cuttingforbusiness.com

    How to Engrave a Christmas Ornament with the RA Pro 2

    The baseball engrave went so well that I decided to try a Christmas ornament. I used a plastic, glitter covered ornament that came from Dollar Tree.

    The set up was the same as the baseball: RA Pro 2 with the rollers removed, chuck setting, with the additional support.

    Settings: 8, 250, 2, 100.

    It turned out perfect!

    Engraved Christmas ornament with the xTool P2 - cuttingforbusiness.com

    Final Thoughts on the RA Pro 2

    I am pretty excited to have xTool’s RA Pro 2. With the chuck attachment, I can’t wait to see what else I can engrave.

    If you are in the market for xTool’s P2, the RA Pro 2 is a must buy – along with the riser base.

    Have you read my other xTool posts?

  • xTool Creative Space: xArt AI Feature – How Does It Work?

    Whether you are a fan of Artificial Intelligence (AI) or not, it is here to stay. As a early adopter, and big AI fan, I was delighted (and honestly, surprised!) to see AI built right into xTool’s Creative Space called xArt.

    As I mentioned in previous xTool posts, Creative Space is free for everyone. Today, let’s take a look at Creative Space’s AI feature.

    Review: xTool xArt (AI) - cuttingforbusiness.com.

    How Does xTool’s Creative Space AI Work?

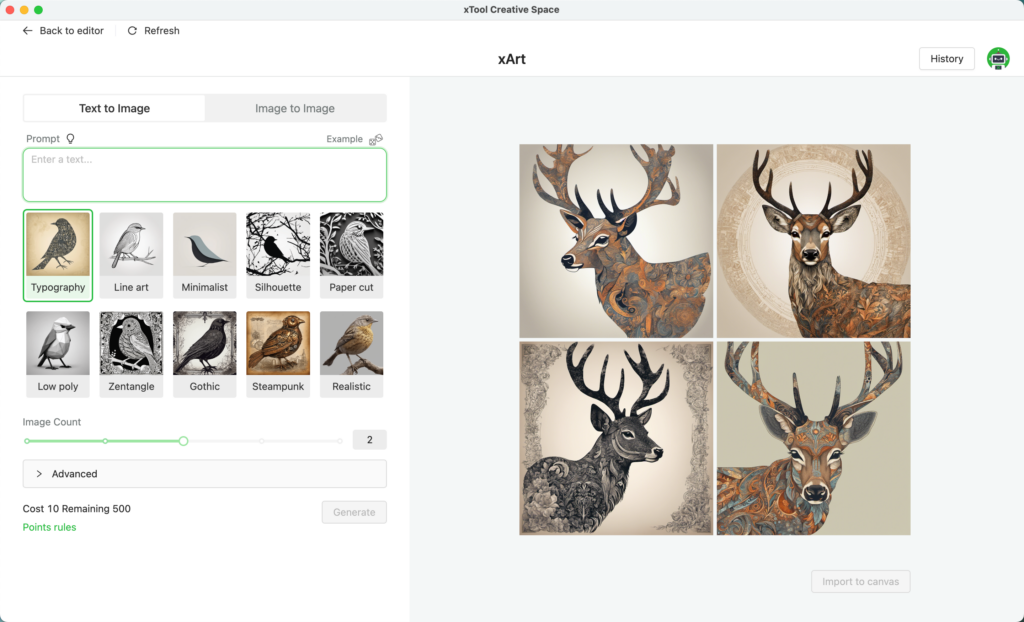
    On the left hand side tool bar of Creative Space, there’s a button for xArt. Click it, log in, and you’ll be taken to xArt.

    Here’s a screenshot:

    Screenshot of Xtool's xArt - cuttingforbusiness.com

    Using xArt is as easy as typing in a prompt.

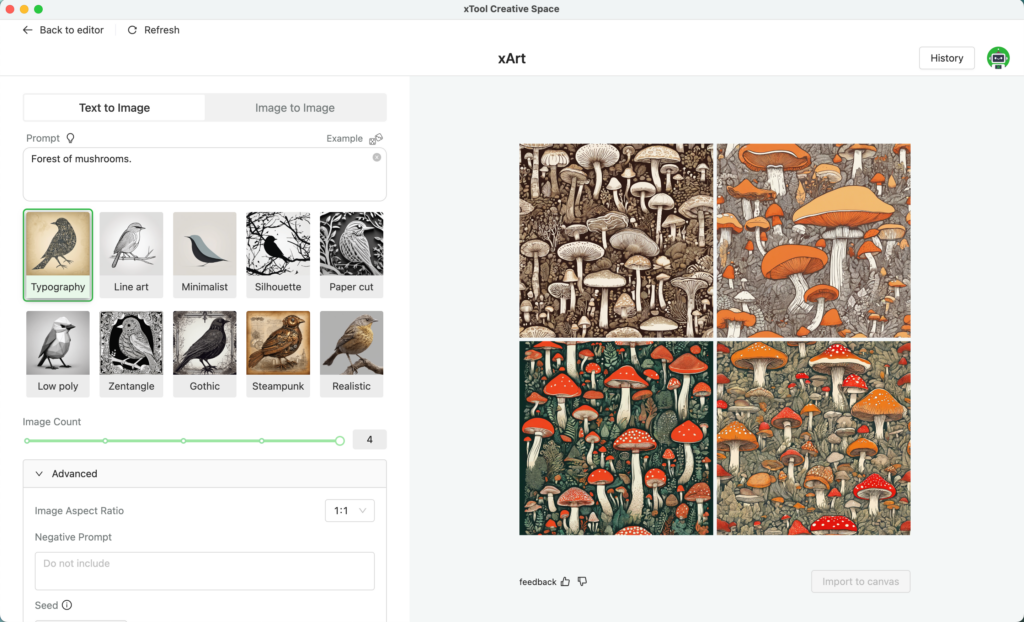
    One of my girls is obsessed with mushrooms and forests, so I figured I’d create a piece of mushroom wall art for her room.

    Prompt used: Forest of mushrooms.

    Here are the results of my first attempt:

    Screenshot of Xtool's xArt - cuttingforbusiness.com

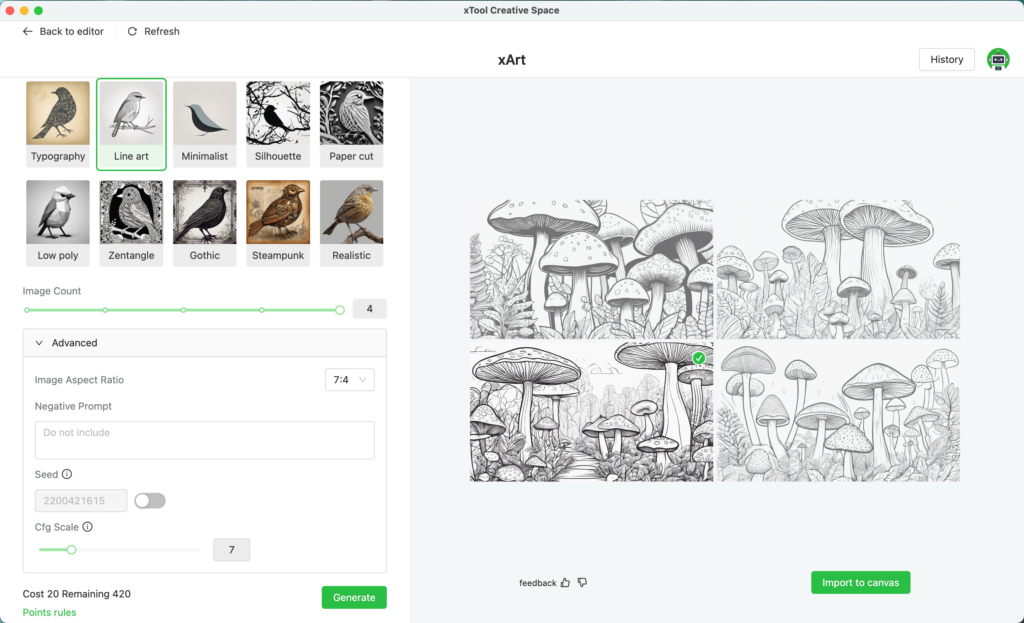
    Let’s try another style.

    I’ll use the same prompt, but change the output to ‘Line Art’ with an aspect ratio of 7:4 (horizontal).

    Here’s the result:

    Screenshot of Xtool's xArt - cuttingforbusiness.com

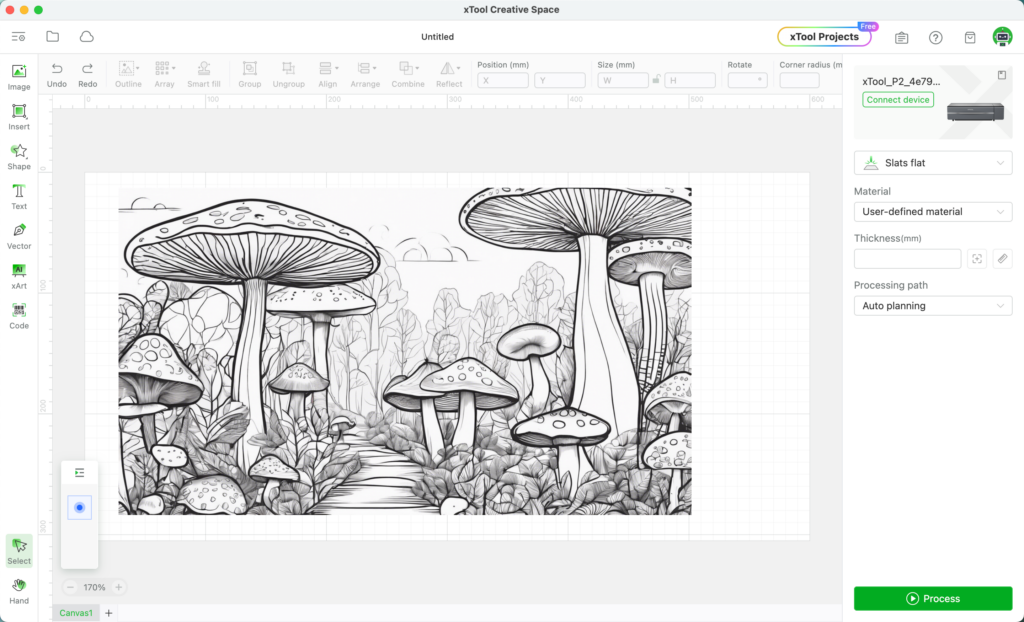
    I’m going to use the third image with a basswood engrave on the xTool P2.

    To select an image, click on it and click the ‘Import to Canvas’ button.

    Scale the image as needed to bring it into xTool’s Creative Space.

    Screenshot of Xtool's Creative Space - cuttingforbusiness.com

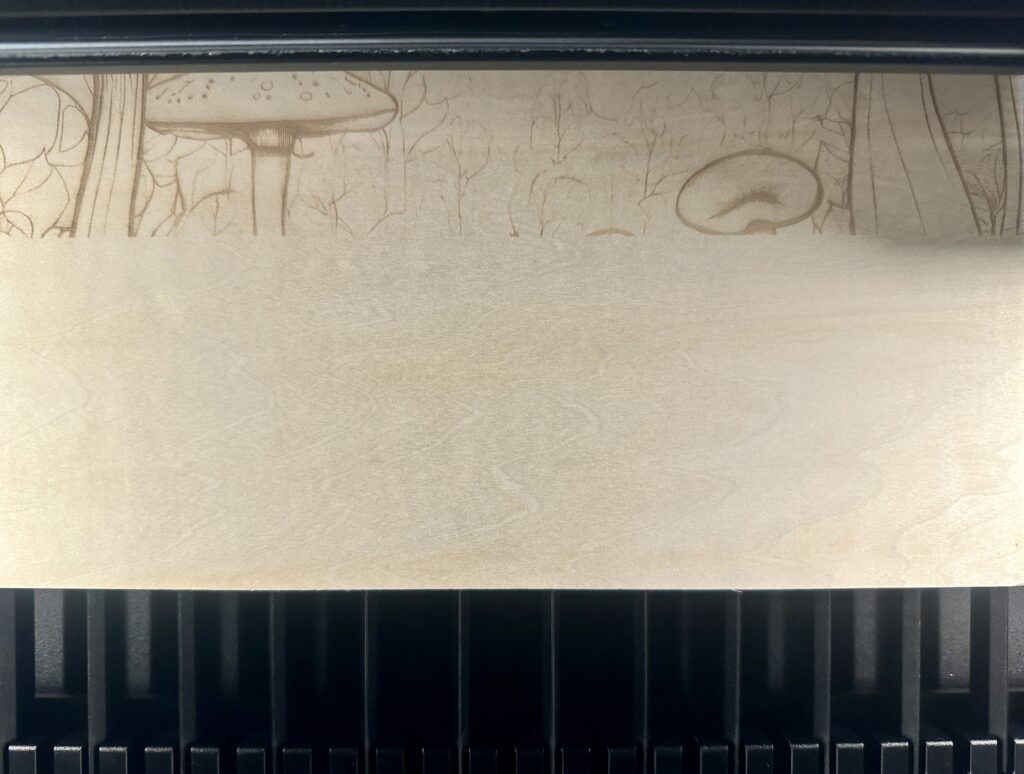
    Resize your image, choose your settings, load material into the xTool P2, turn on your smoke purifier, and fire up the laser.

    Photo while engraving:

    xTool P2 engraving on basswood - cuttingforbusiness.com

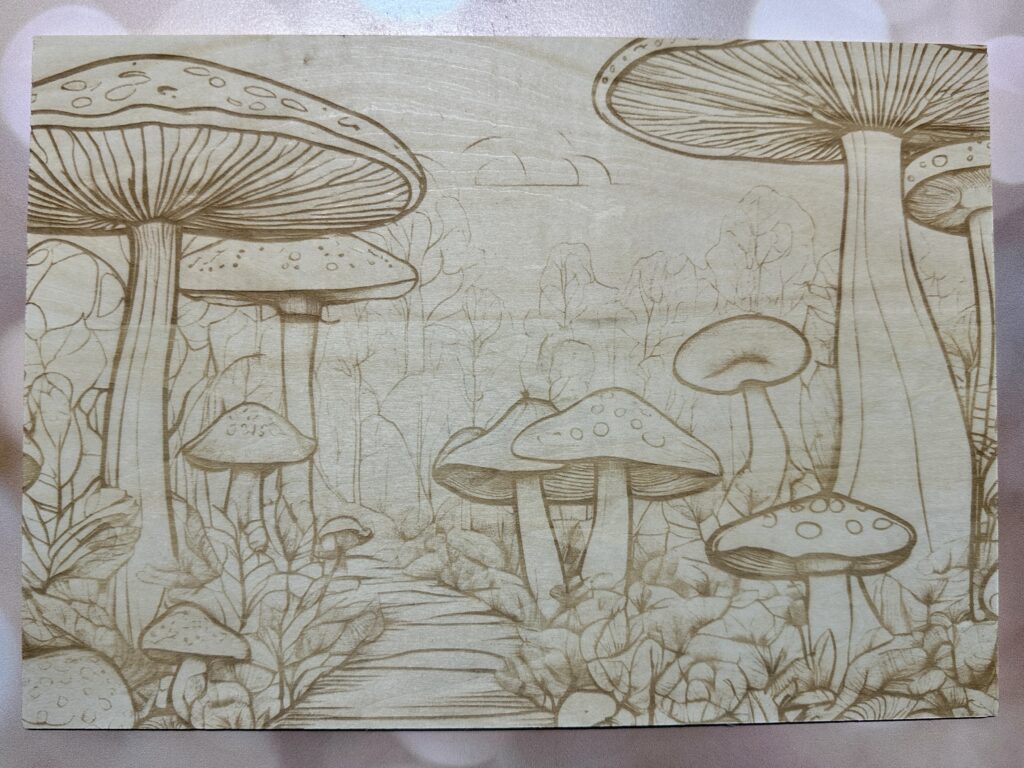
    Finished engrave:

    xTool P2 finished mushroom engrave on basswood - cuttingforbusiness.com

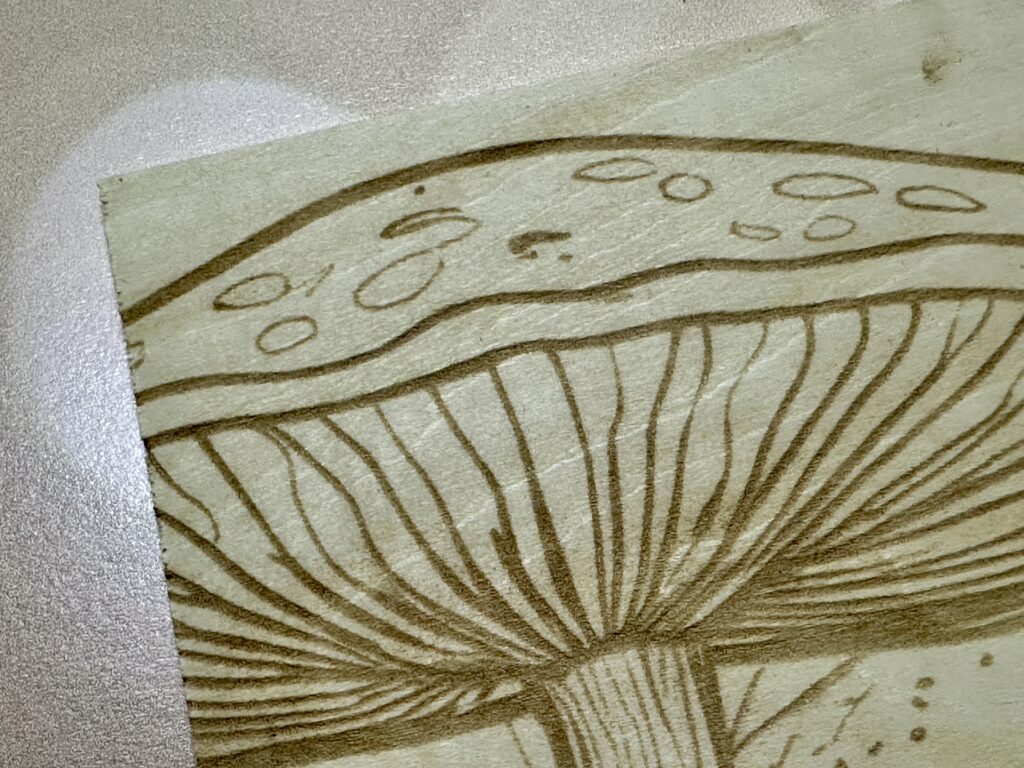
    Close up view:

    Close up view of xTool P2 finished mushroom engrave on basswood - cuttingforbusiness.com

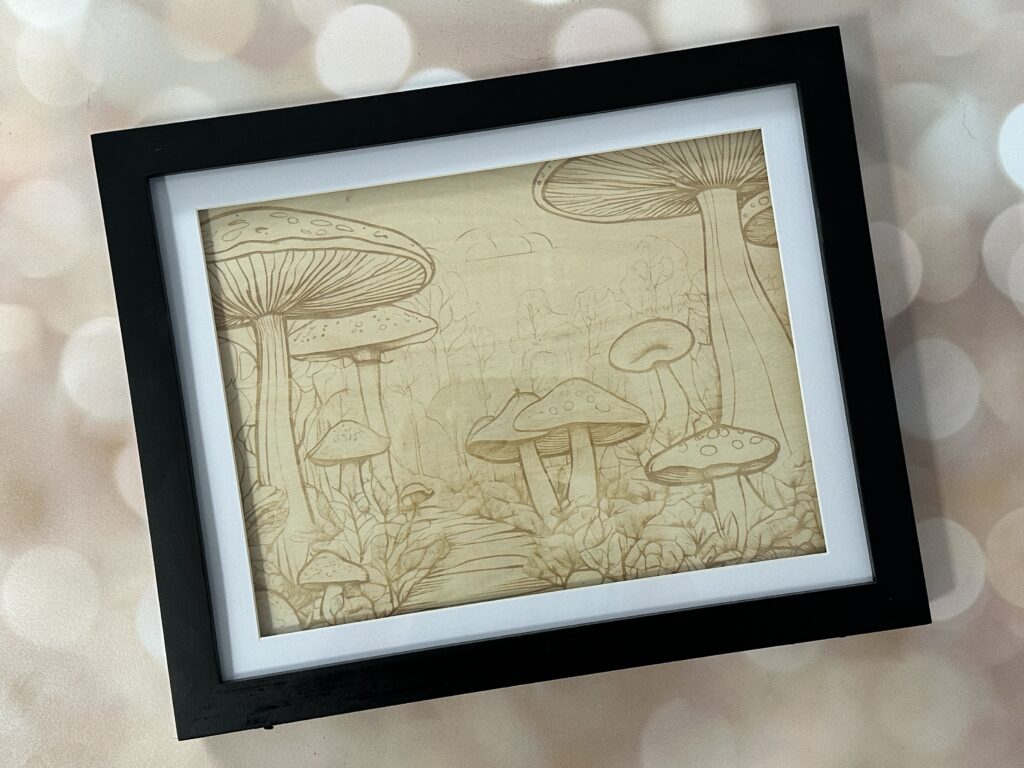
    Framed and ready to gift:

    Final product of xTool P2 finished mushroom engrave on basswood - cuttingforbusiness.com

    xArt AI Modifiers

    There are several options inside xArt:

    • You can use a text prompt or a text and image prompt.
    • There are 10 different styles ranging from line art to gothic and realistic to silhouette.
    • You can generate up to 4 images at the same time.
    • There are three aspect ratios: 1:1 (square), 4:7 (vertical), and 7:4 (horizontal).
    • You can add negative prompts, which are elements you don’t want included.
    • You can add a seed number, which is helpful when creating a series of images.
    • You can adjust the CFG scale. The higher the setting, the more artistic freedoms the AI will produce.

    How Much Does xArt Cost?

    • All users receive 500 free credits the first time they use xArt.
    • Images cost 5 credits per image. If you choose to generate 4 images at a time, that’s 20 credits.
    • You can earn more points by posting in the xTool community. Full details are available on xTool’s website.

    Would I Recommend xTool’s AI?

    Absolutely! I went from not having a design to having an engraved and framed, giftable project in less than an hour.

    Don’t forget to check out my other xTool posts.

  • FAQ: xTool P2 Riser Base – Do You Need It?

    I’ve already given you an overview of the xTool P2 vs the Glowforge, and I shared a simple tutorial to create wood Christmas tags.

    Today, let’s talk about the xTool P2 riser base. It’s one of the unique features of the machine (and one I really love).

    FAQ: xTool P2 Riser Base - Do You Need It? - cuttingforbusiness.com

    What is the xTool P2 Riser Base?

    The xTool P2 riser base is an optional accessory stand that your xTool P2 sits on top of. It allows you to increase the height of the materials inside the machine.

    It work similarly to the xTool M1 riser, that I detailed in my post on the xTool M1.

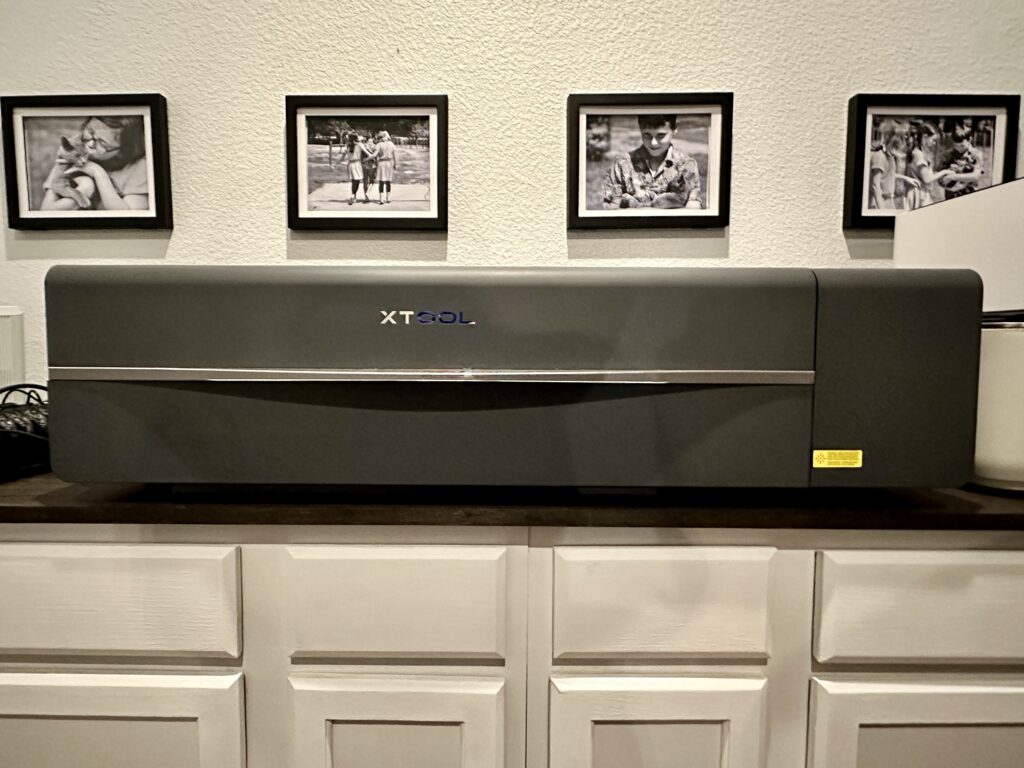
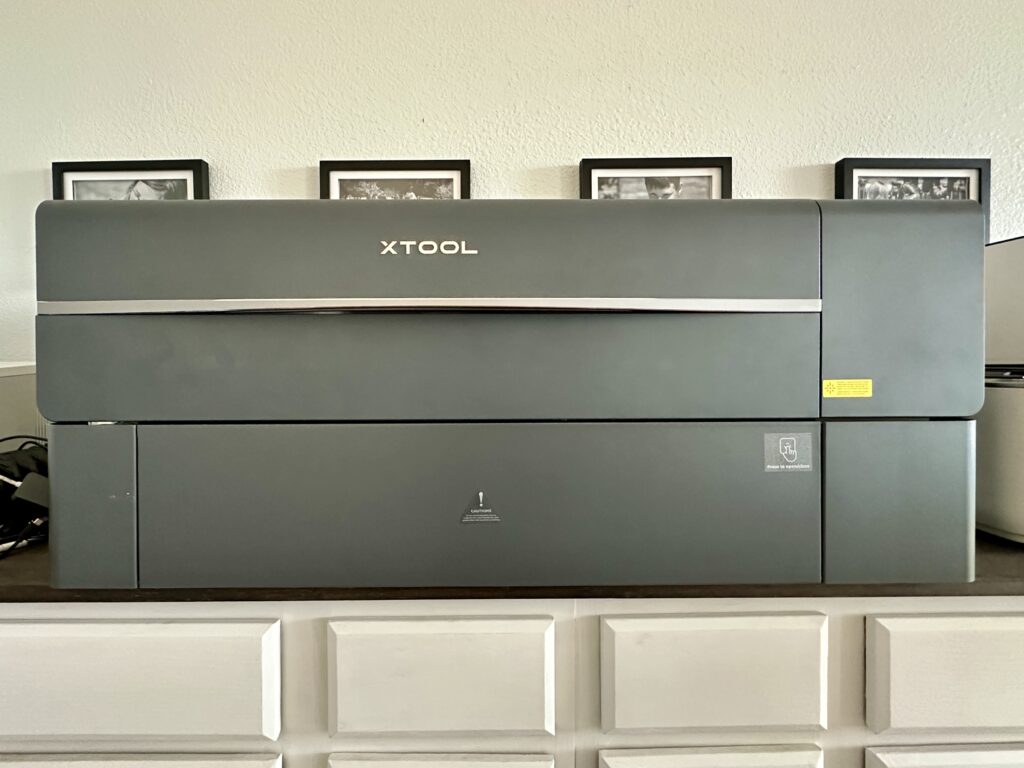
    This photo shows the xTool P2 without the riser:

    xTool P2 without the riser base - cuttingforbusiness.com

    This photo shows the xTool P2 with the riser:

    xTool P2 with the riser base - cuttingforbusiness.com

    What Height Can the xTool P2 Engrave?

    Without the riser base, the xTool P2 can engrave materials up to 2.7″ thick. With the riser base, the xTool P2 can engrave materials up to 8.5″ thick.

    How Does the xTool P2 Riser Work?

    Once installed, the xTool P2 riser allows you to have a moveable floor (called the base plate). This accommodates taller materials, and is perfect for engraving.

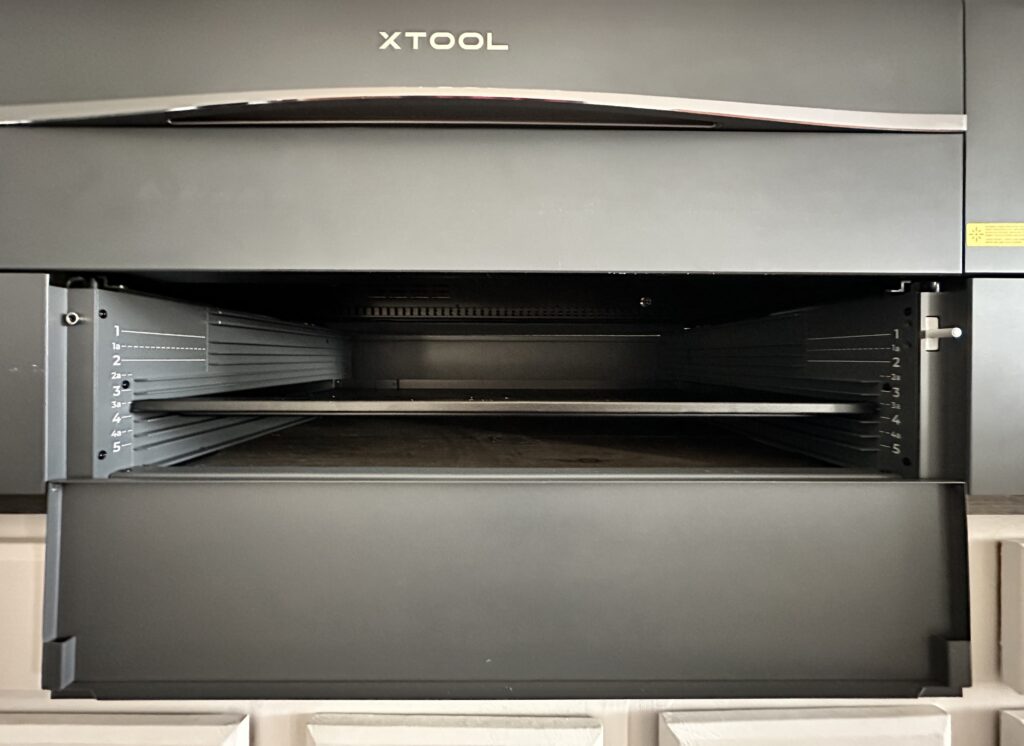
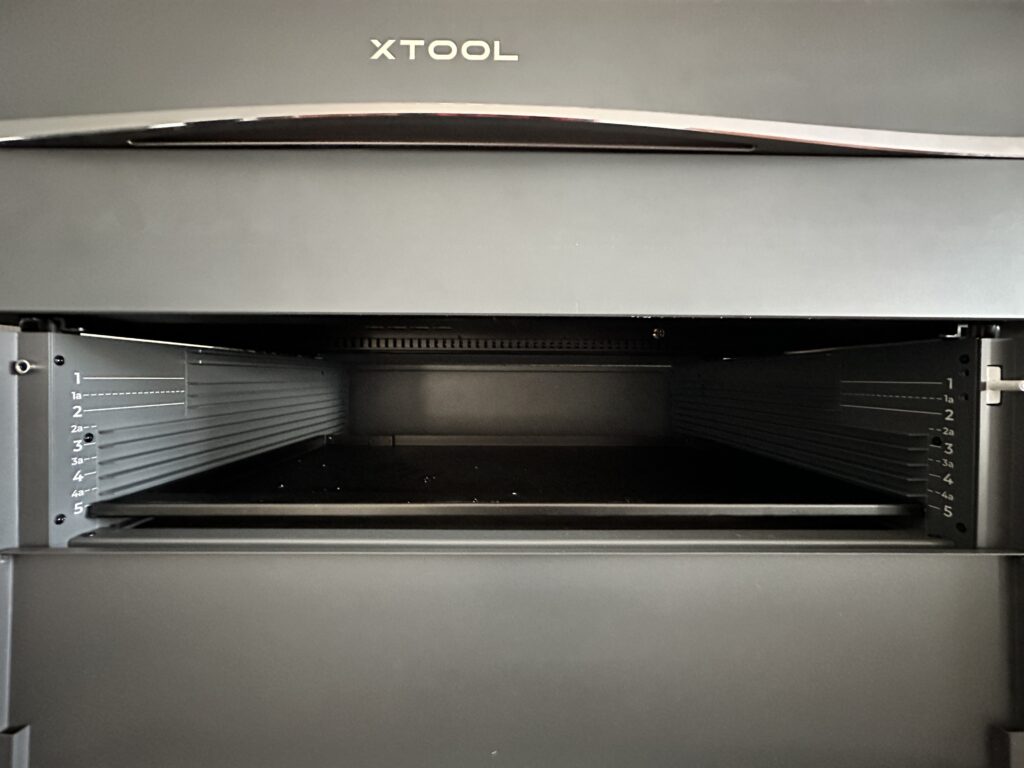
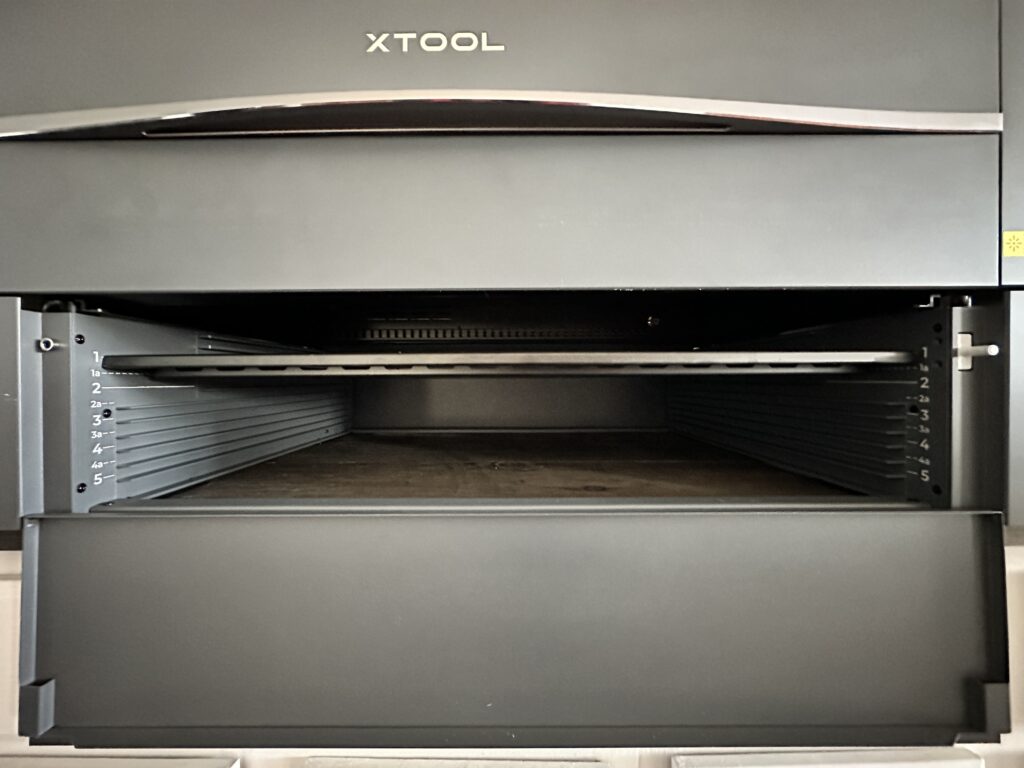
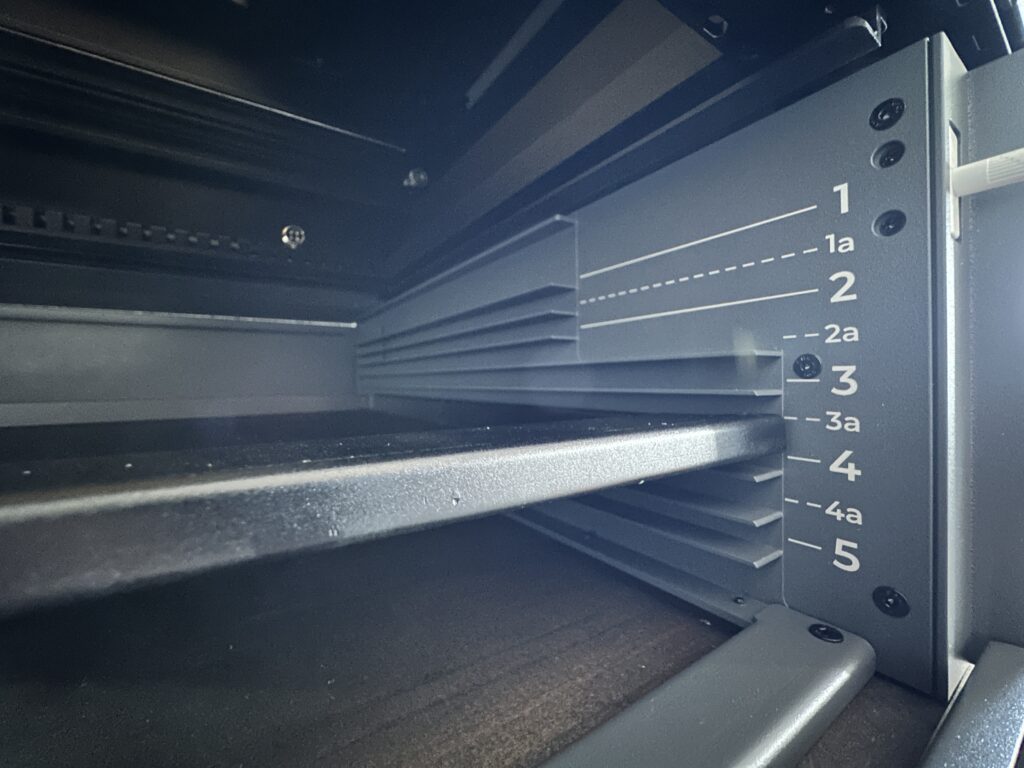
    The front door of the riser base opens (flips down), and moving the bottom is as easy as sliding it into one of the nine positions.

    Here are some pictures:

    xTool P2 Riser Base Interior - cuttingforbusiness.com
    xTool P2 Riser Base Interior - cuttingforbusiness.com
    xTool P2 Riser Base Interior - cuttingforbusiness.com
    xTool P2 Riser Base Interior - cuttingforbusiness.com

    How Do You Know Which xTool P2 Riser Setting to Use?

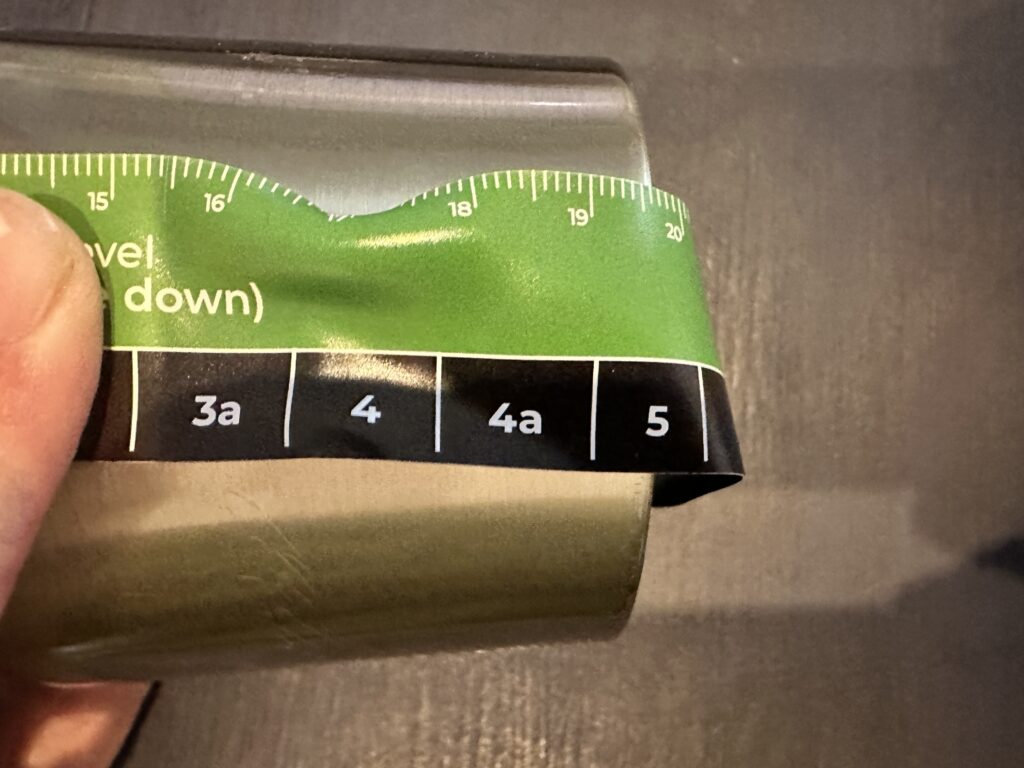
    Included with the xTool P2 riser base is a measuring tape. You simply measure the item to be engraved, note which riser base setting, and move the base plate.

    In the photo below, I’d move the base plate into level 5.

    Measuring a tumbler for engraving with an xTool P2 - cuttingforbusiness.com.

    Fun fact: You can insert the base plate right side up or upside down. Both are noted on the tape measure.

    What Else Do You Need to Know About the xTool P2 Riser Base?

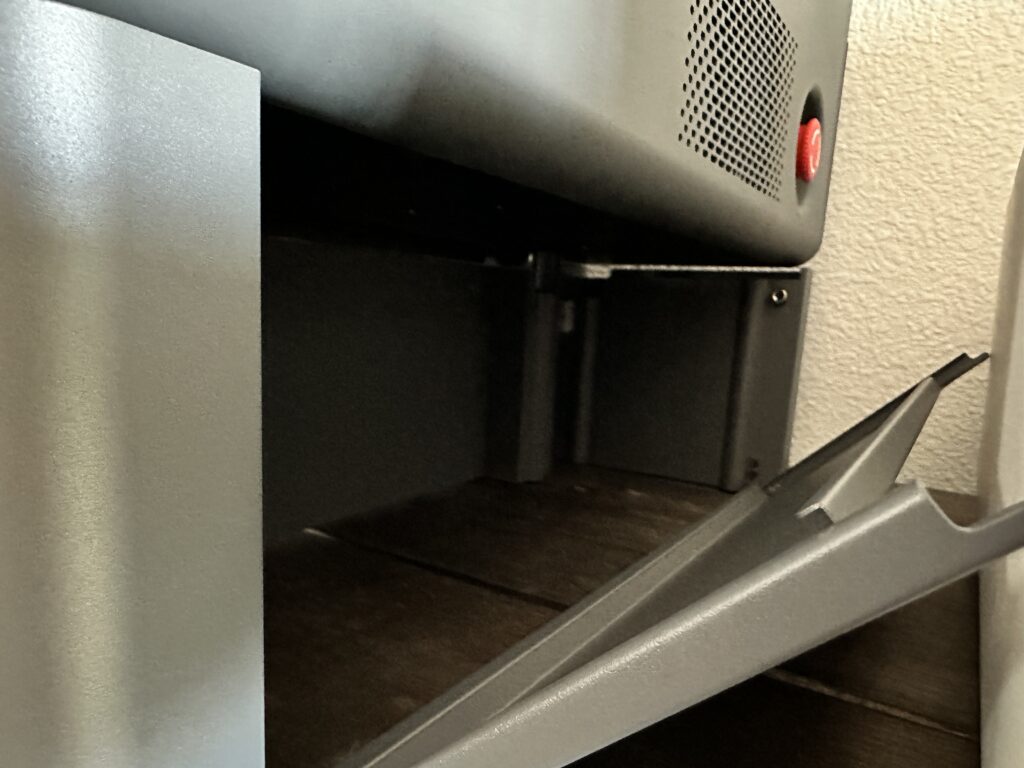
    The right side of the riser features a door that opens to an open space. It’s a great place to store accessories like xTool’s rotary attachment!

    Storage in the xTool P2 Riser Base - cuttingforbusiness.com

    My Recent Engrave

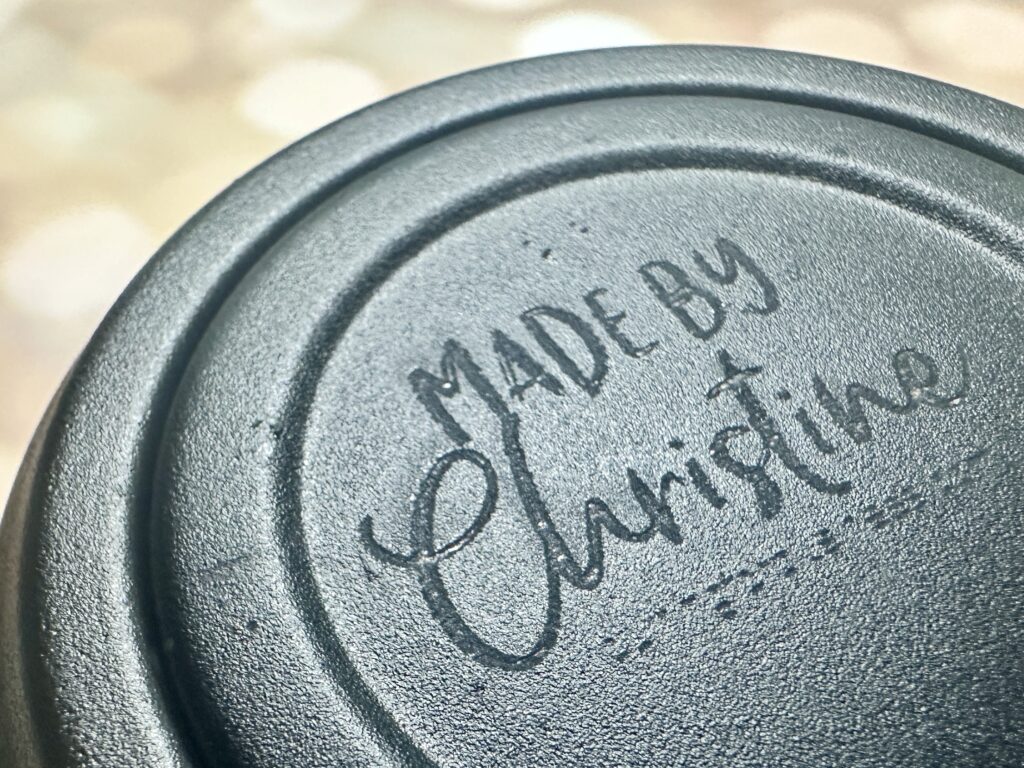
    I engraved the bottom of a tumbler that measured 7.75″ tall. How cool is that? What a perfect way to add branding custom made tumblers.

    Engraved tumbler bottom - cuttingforbusiness.com

    Do I Think You Need the xTool P2 Riser Base?

    Yes! I think that the xTool P2 riser base is a must buy. It opens so many possibilities of projects.

    Keep going! Read more xTool articles and tutorials.
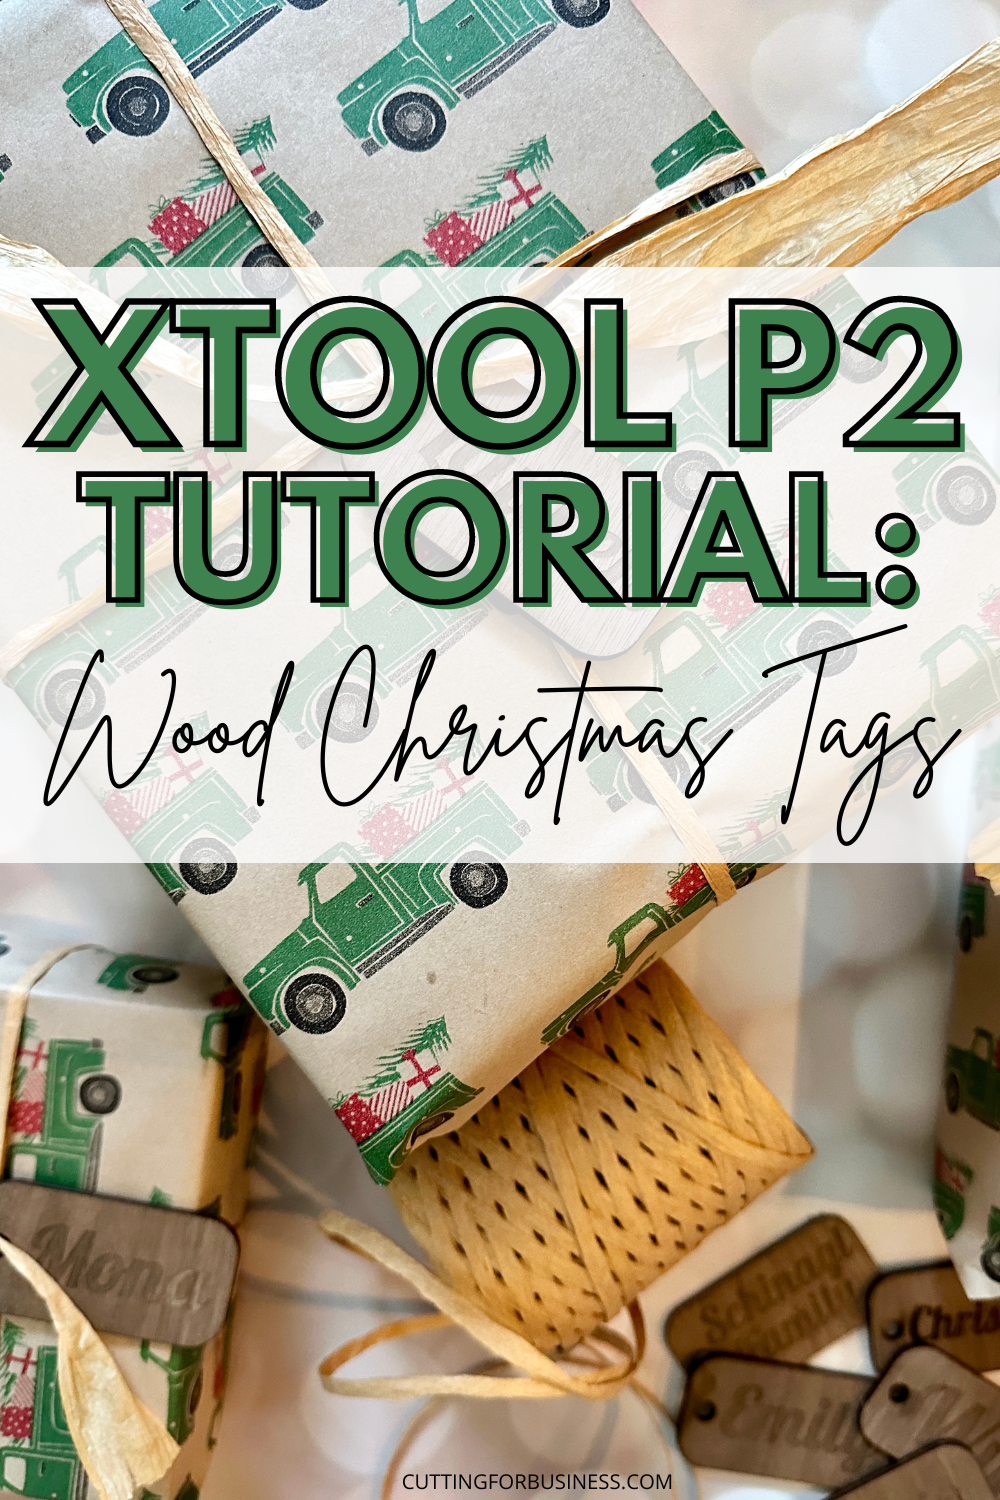
  • xTool P2 Tutorial: Wooden Christmas Tags

    I recently detailed the differences between the xTool P2 and the Glowforge. Today, let’s look at a quick xTool P2 tutorial to create wooden Christmas tags.
    Setup of the machine is incredibly easy. I am not going to go over it – because the instructions included are pretty awesome. The one quirky thing is that you have to fill the internal tank with water before your first use. If you follow the instructions, it’s a 10 minute, one time thing. Then, you will be off and cutting!

    Tutorial: xTool P2 Wooden Christmas Tags - cuttingforbusiness.com

    xTool P2 Tutorial: Wooden Christmas Tags

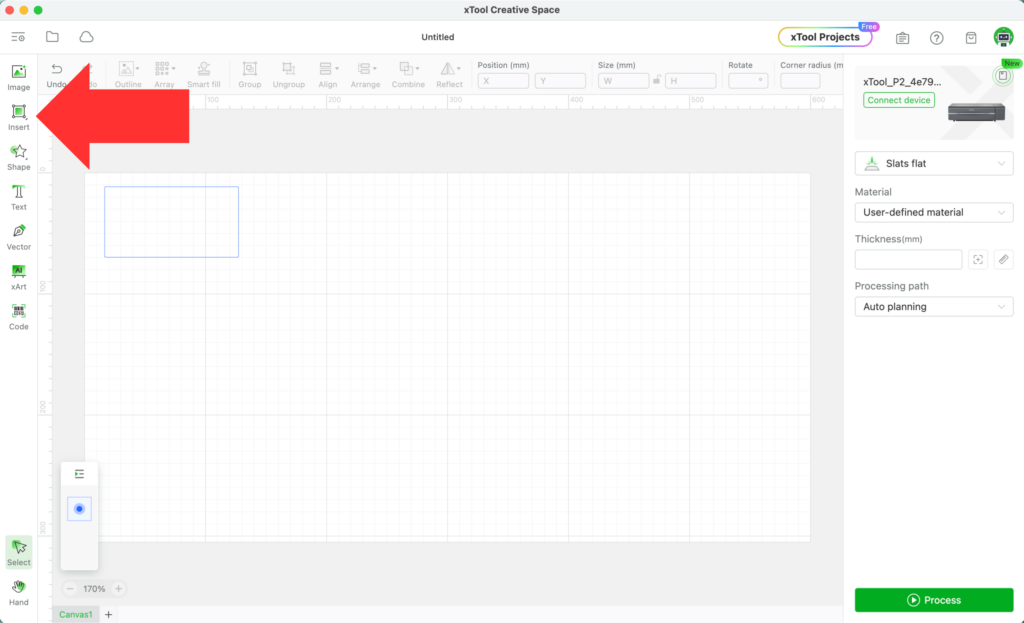
    1. From xTool’s Creative Space, draw a rectangle using the tools on the left hand side.
    Screenshot - xTool Creative Space - cuttingforbusiness.com.

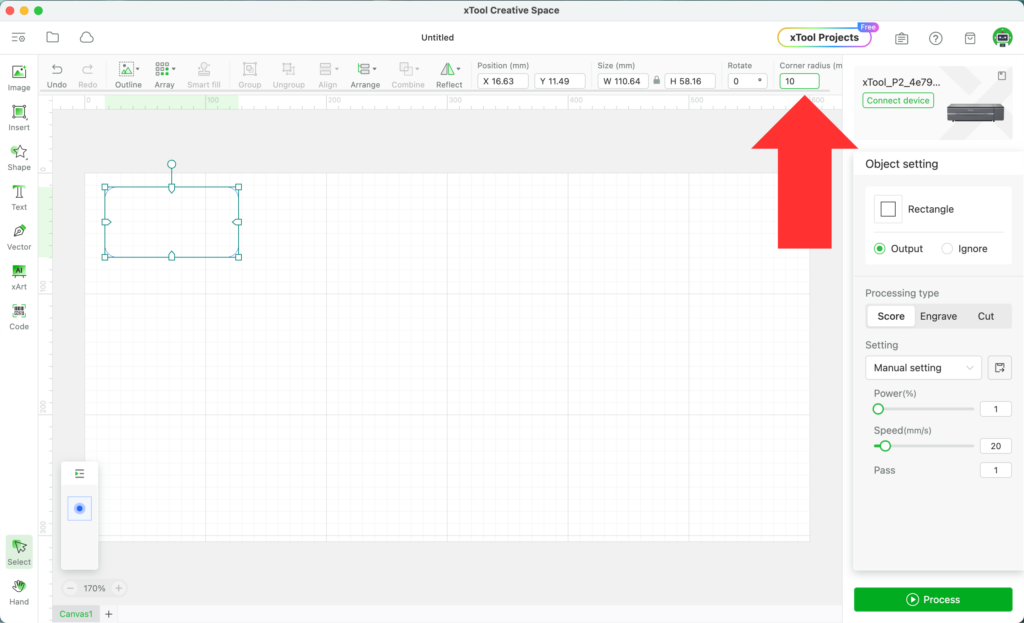
    2. I’d prefer rounded corners on the tags. Select the rectangle you made, then adjust the ‘Corner Radius’. This adjustment is in millimeters. I used 10mm.

    Screenshot - xTool Creative Space - cuttingforbusiness.com.

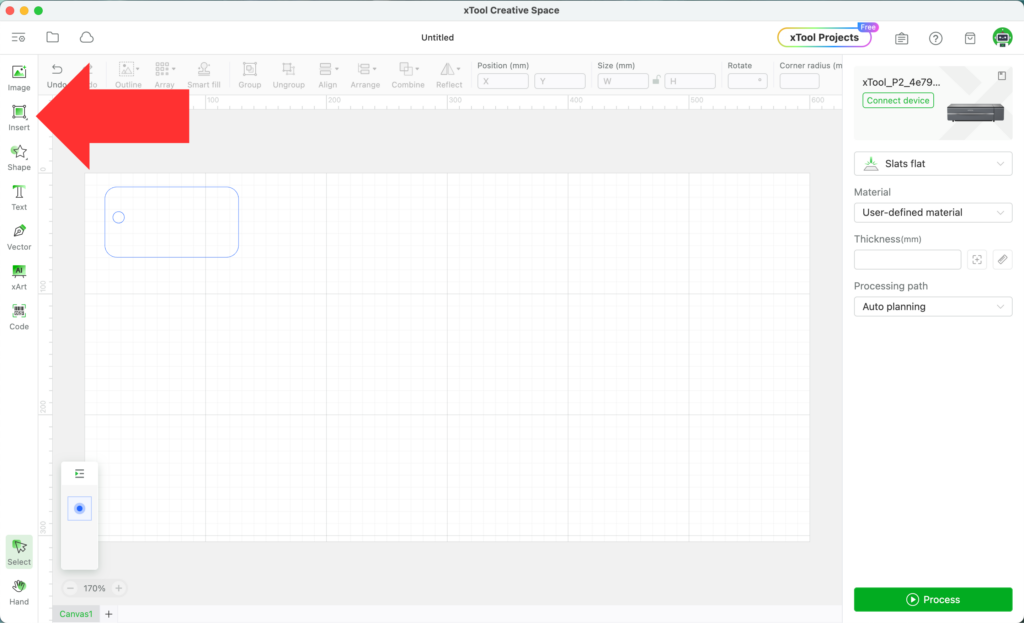
    3. Add a circle for the hole to attach the Christmas tag through. Again, I used the ‘Insert Shape’. Remember to hold down the SHIFT key to make a perfect circle.

    Screenshot - xTool Creative Space - cuttingforbusiness.com.

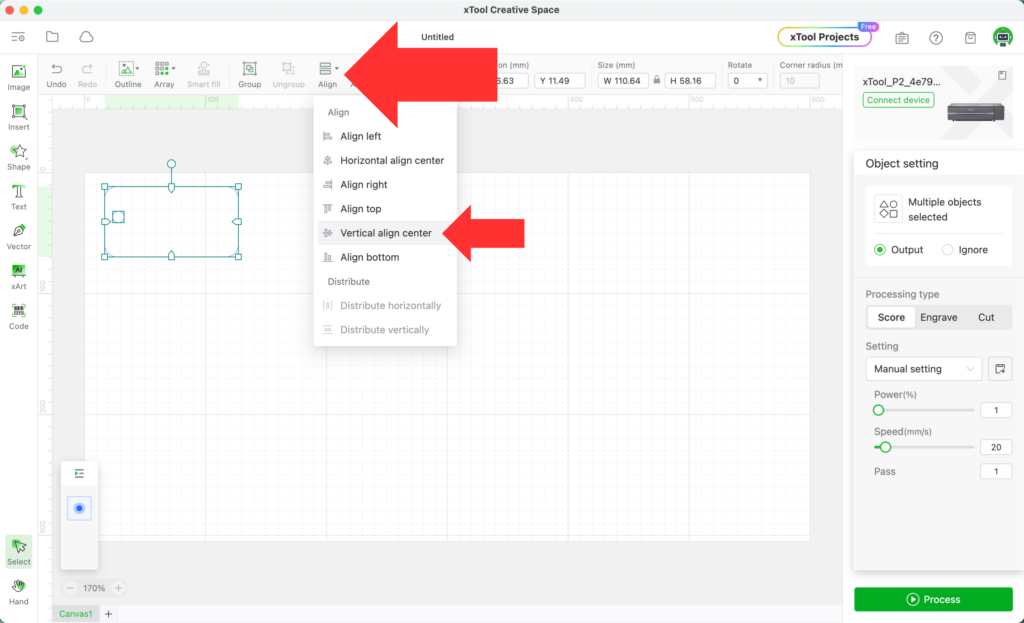
    4. I want the hole lined up in the middle of the tag, so select both the tag and the circle. Then, navigate to ‘Align’, then ‘Vertical align center’.

    Screenshot - xTool Creative Space - cuttingforbusiness.com.

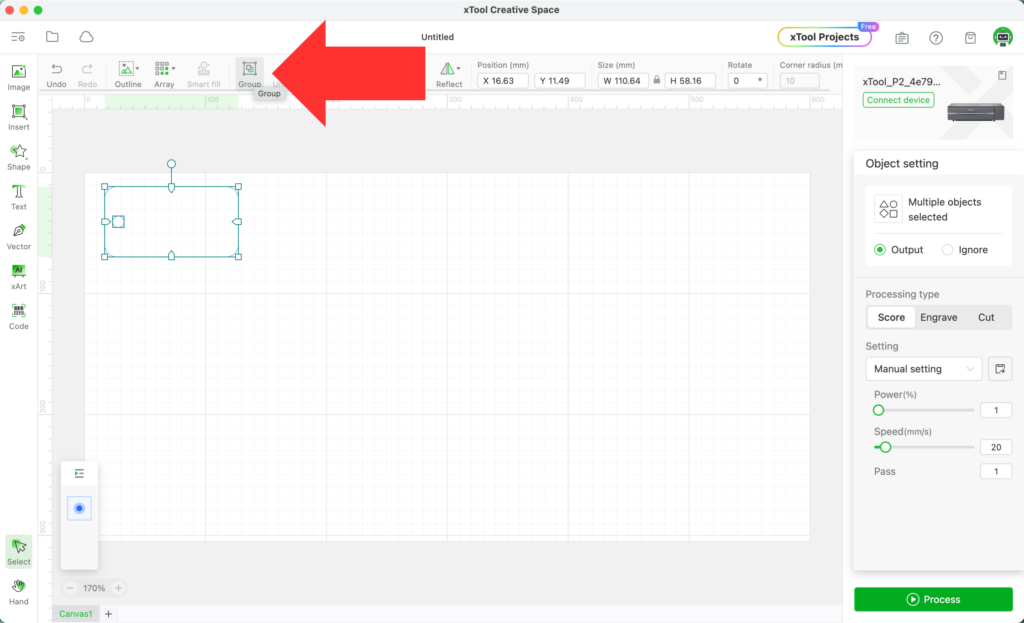
    5. Select both the tag and the circle, then select ‘Group’. This will lock them together.

    Screenshot - xTool Creative Space - cuttingforbusiness.com.

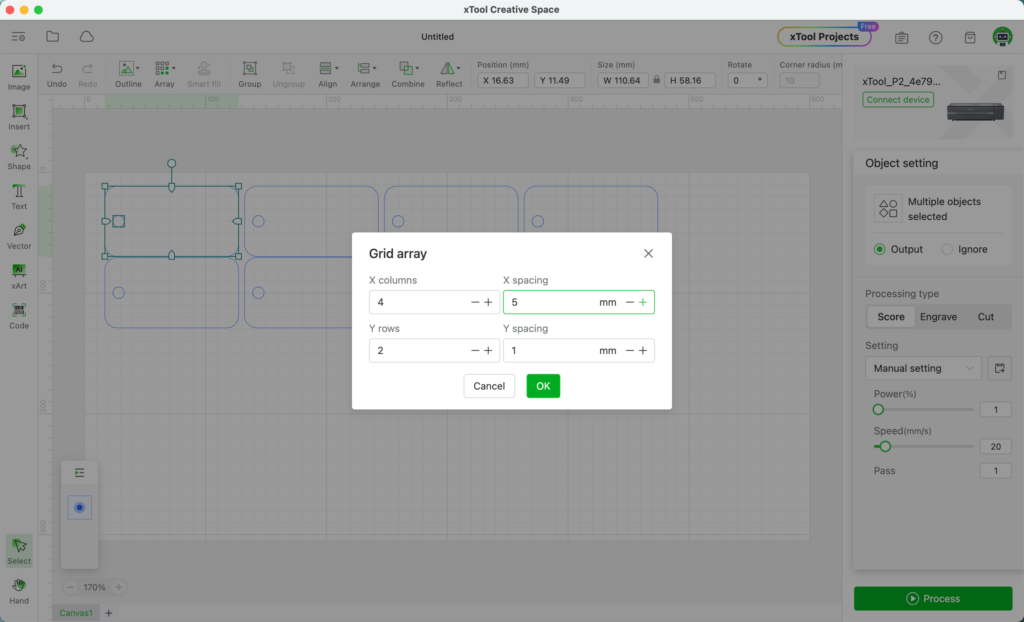
    6. Duplicate the tag and circle by selecting ‘Array’, then set the parameters. You can choose how many duplicates to make and the spacing.

    Screenshot - xTool Creative Space - cuttingforbusiness.com.

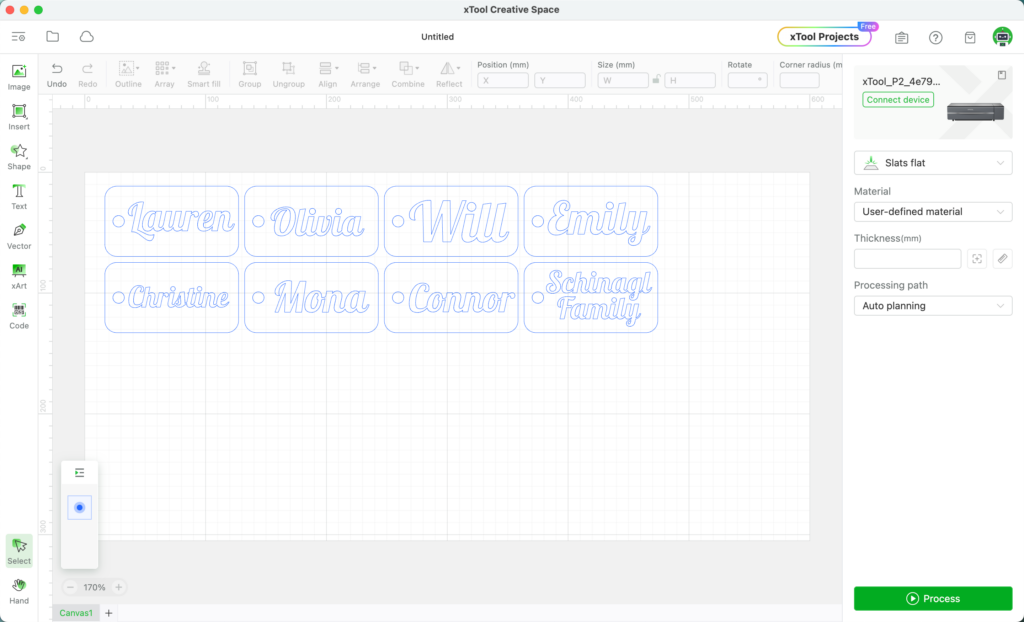
    7. Now, add the names for the tags using the text tool. After adding the names, you can weld them right in the same window!

    Screenshot - xTool Creative Space - cuttingforbusiness.com.

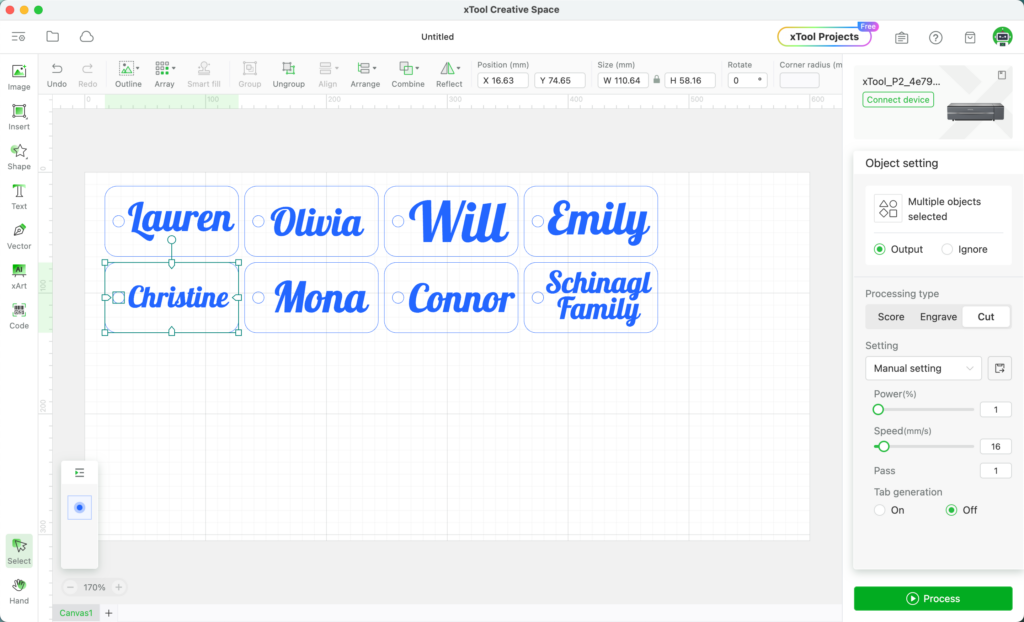
    8. Set up the tags for cutting and engraving by clicking each element and selecting whether to score, cut, or engrave it.

    Screenshot - xTool Creative Space - cuttingforbusiness.com.

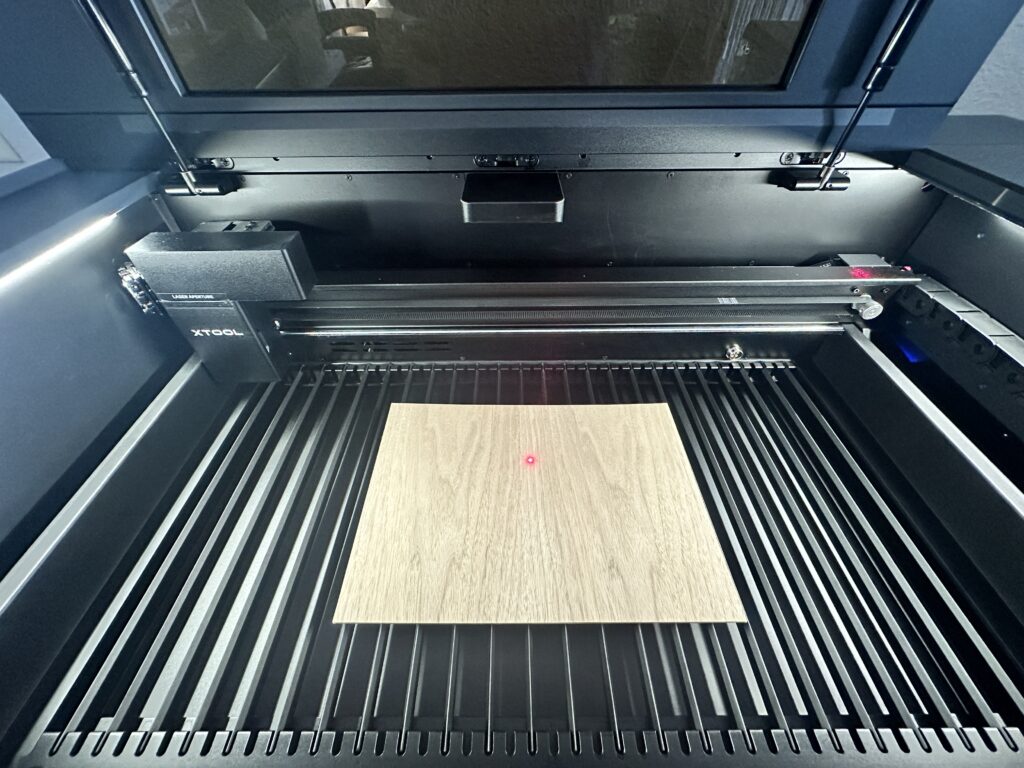
    9. Load the material (I’m using a sample of xTool’s plywood), turn on the (optional) smoke purifier, and fire up the laser!

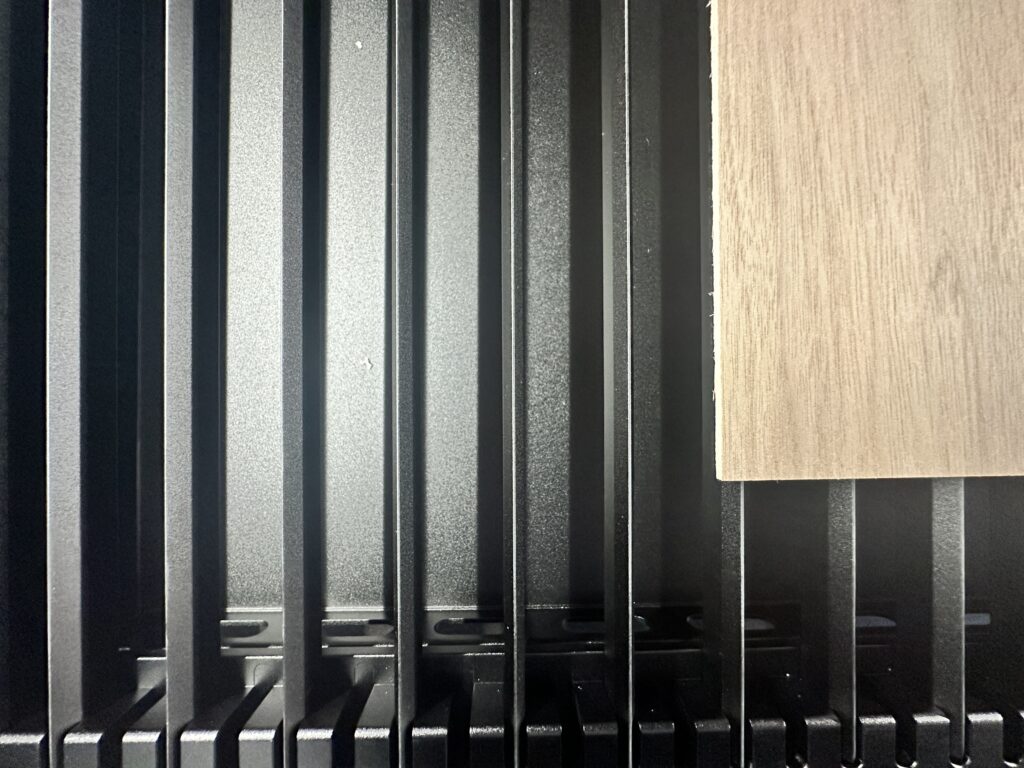
    You’ll notice that the xTool P2 has a slatted tray rather than a honeycomb. The slats are moveable and repositionable. I have a feeling this will come in handy.

    Interior of xTool P2 - cuttingforbusiness.com
    Slatted tray in the xTool P2 - cuttingforbusiness.com
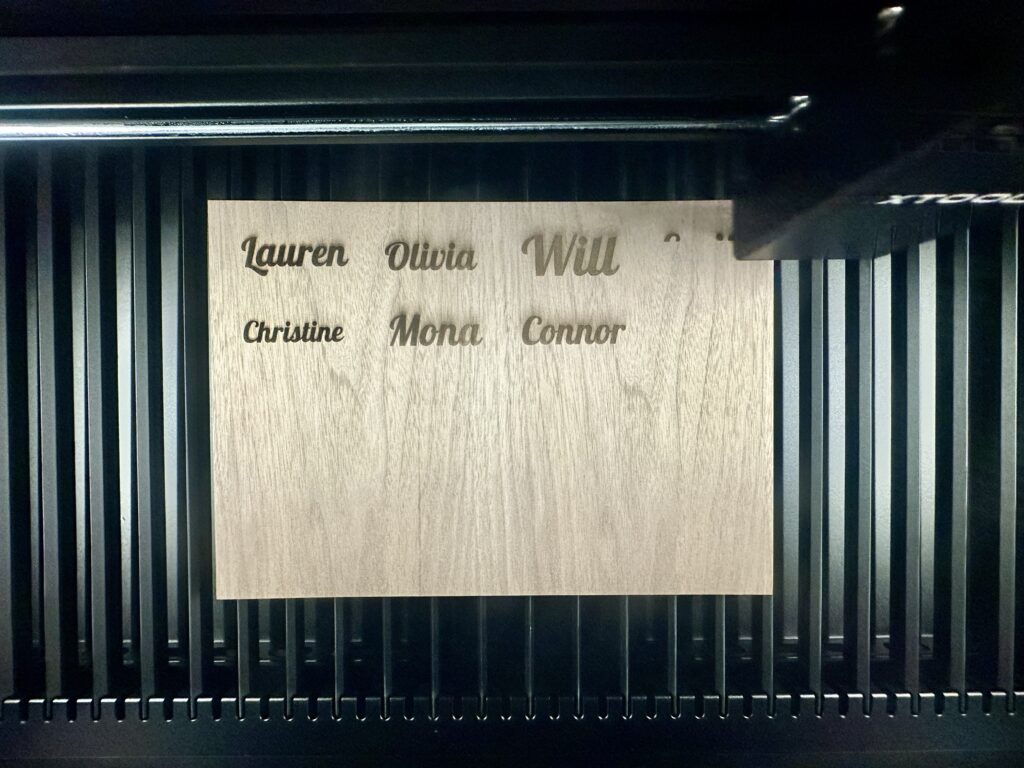
    Engraving in the xTool P2 laser - cuttingforbusiness.com

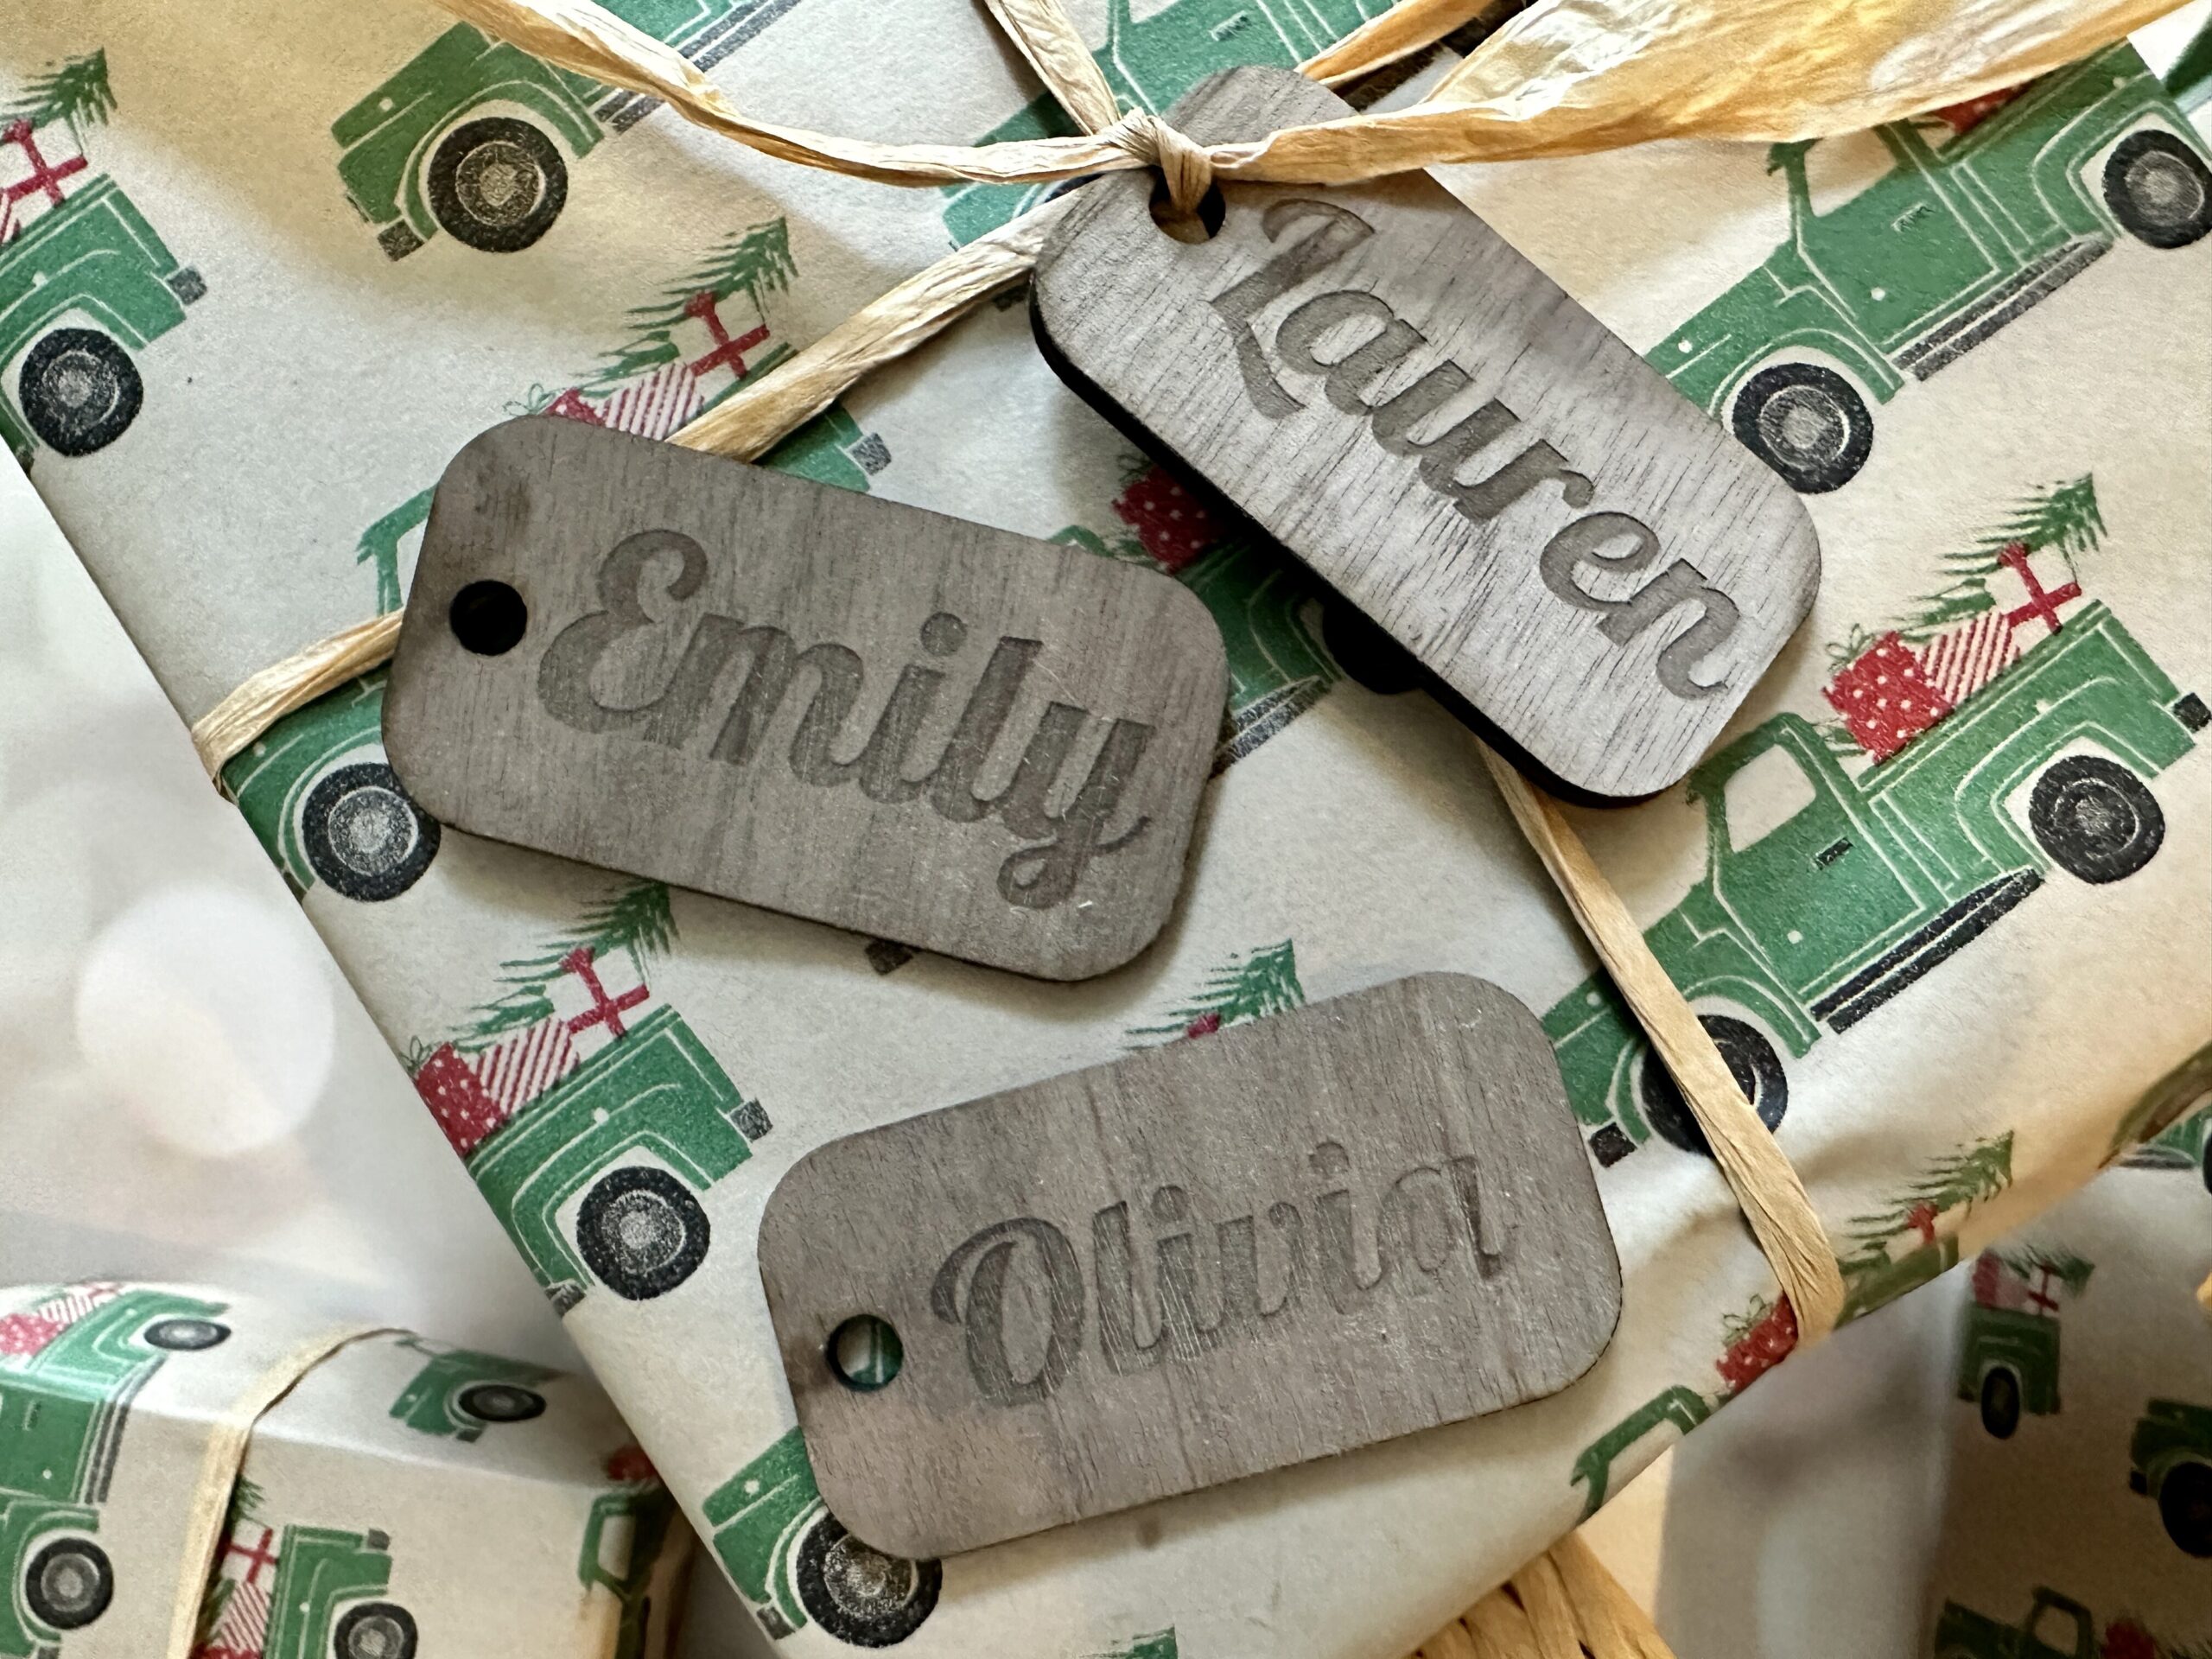
    10. To cut and engrave 8 tags took a little over 9 minutes. After a quick wipe down with paper towel and water, they are already on presents from “Santa”. Since my kids are old enough to know what my handwriting looks like, these are perfect!

    My Thoughts on xTool’s Creative Space

    I consider myself a competent designer in both Adobe Illustrator and Silhouette Studio. While you can import designs from other programs, I decided to design directly in xTool’s Creative Space.

    I found Creative Space easy to use – and quite intuitive! I was able to easily draw shapes, resize, weld, align, and more.

    XTool’s Creative Space program is free. Before you order your xTool P2, download it and see for yourself how easy it is to use: Download Creative Space.

    Read more on Cutting for Business about the xTool P2.