Category: Growing Your Business

  • 5 Ways to Sell Handmade Products on Amazon

    Let’s talk about Amazon today. Amazon is the largest online retailer, and it seems that they are growing by the day. Amazon has changed many things about online shopping and aims to be “Earth’s Most Customer-Centric Company.”

    I’m sure you’ve heard a number of Amazon success stories floating around the internet of sellers making millions through the platform. Personally, I am an experienced Amazon seller with hundreds of thousands of dollars in sales in the last few years. Today, I wanted to take some time to tell you different ways you can sell handmade goods through Amazon.

    5 Ways to Sell Handmade Products on Amazon

    1. Amazon Marketplace – Selling through Amazon’s catalog is the first way to sell handmade goods. This option is best for ready to ship products that aren’t customized. You simply create a new product, add pictures, a description, and a UPC number. (Tip: You can buy UPC numbers through Ebay.)
      1. Costs to sell on Amazon Marketplace: There are two plans available: Individual or Professional. The Individual plan is best for those selling less than 40 items per month and costs $0.99 per item sold plus a referral fee and a closing fee. These fees vary per category and are listed at this link. On the Professional Plan, you pay $39.99 per month (instead of $0.99 per item) plus a referral fee and a closing fee.
    2. Fulfillment by Amazon – Fulfillment by Amazon is a selling program where you list your products in the Amazon Marketplace and then ship your inventory to Amazon. Amazon handles packing and shipping to your customer. This program works best for sellers of handmade items who make and sell only a small number of designs. For example, a tee shirt with a specific design that sells well.
      1. Costs to sell through FBA: Fees vary greatly and are listed at this link.
    3. Amazon Handmade – Amazon Handmade is Amazon’s answer to Etsy. This program is only open to sellers of handmade products. This is a juried program. Much like a juried craft show; you first request access to the program then submit photos of your work and details about your existing business. This program is best for sellers with moderately and higher priced handmade products due to higher selling fees.
      1. Costs to sell through Amazon Handmade: $39.99 per month plus 15% of item sold cost. (To attract new sellers, Amazon frequently waives the $39.99 fee. Currently, the fee is being waived for new sellers for a period of time.)
    4. Merch by Amazon – Merch by Amazon is a print on demand service for shirts. In this program, you create the design for a shirt and list it on Amazon. After Amazon receives an order, they print the shirt for the customer and ship it. This program is invite only and the turnaround time is six to eight weeks to get a response. Request an invitation at this link.
      1. Costs to sell through Merch by Amazon: Free. You set the price for your shirts and receive a royalty for each shirt you sell. Here is an example: If you price your short sleeve shirt at $15.99, you’d receive $2.36. For a shirt that sells at $25.99, you’d receive $9.92. While the royalties may seem low, you have no inventory to stock, no shirts to create, and no shipping or customers to deal with. If you have popular designs, it can add up fast.
    5. Amazon Custom – Amazon Custom is a program for sellers who sell things that can be customized with a name or image. These things aren’t necessarily handmade – but can be. For example, if you sell cutting boards, wine glasses, or customized mouse pads this program might be for you. This is another program that you apply to join, but applications are approved or denied within an hour.
      1. Costs to sell through Amazon Custom: You are required to be on the Professional selling plan for $39.99 per month, plus standard referral and closing fees.

    Okay, so you’ve read about the programs and are ready to start selling on Amazon? The first step is to get a seller account and start listing! I’d recommend starting out in the Marketplace and fulfilling your own orders to get a good feel for the platform. Tomorrow, I will walk you step by step through how to create your first catalog listing in Amazon’s Marketplace.

    Was this post informational? Great! Save it to Pinterest.
    5 Ways to Sell Handmade Products on Amazon - Great for Silhouette Portrait or Cameo and Cricut Explore or Maker - by cuttingforbusiness.com

  • Tutorial: How to Create a Product Listing on Amazon

    Yesterday, I shared different ways to sell handmade products through Amazon and gave you some information about the fees to expect. Today, I wanted to share with you exactly how to create a product listing in Amazon’s catalog – officially called Amazon Marketplace.

    How to Create a Product Listing on Amazon

    1. Decide which selling account is best for you: Individual or Professional. To recap: the Individual plan is best for sellers that sell less than 40 products per month; while the Professional plan is best if you sell more than 40 products per month. This walkthrough assumes you have an Individual account. (By the way, if you are new to selling on Amazon, I’d recommend you start with an Individual account.)
    2. Go to Amazon.com and log into your account. If you already have an Amazon account that you use to buy products, you are ready to start selling. If you want to create a new account solely for your small business, create one. Once you are logged into Amazon, head to Seller Central at this link.
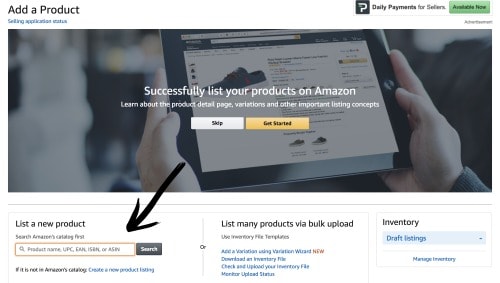
    3. From the navigation menu at the top, go to ‘Catalog’, then ‘Add Products’. On the next screen, you will either be able to search for an existing product or create a new product. If the product you are selling is already on Amazon, you simply need to locate it. For example, if you are selling blanks or vinyl, it’s likely already on Amazon. However, to add a new product to Amazon (like a tee shirt or tumbler you’ve made) click ‘Create a new product listing’. Tutorial: How to Create a Product Listing on Amazon - by cuttingforbusiness.com
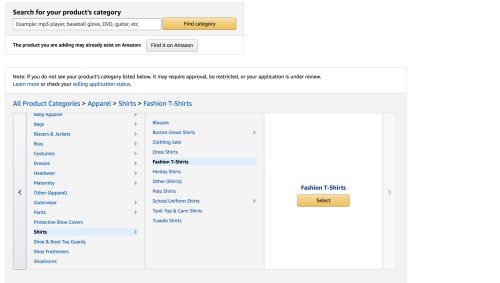
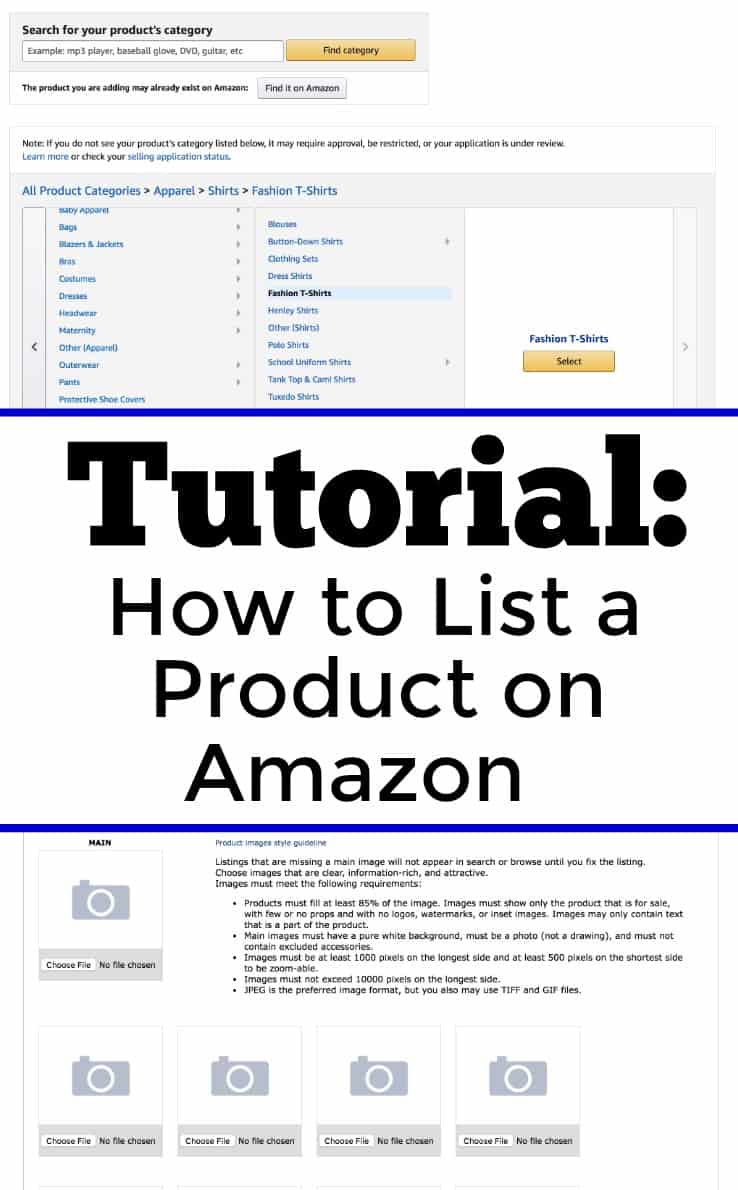
    4. Choose a category by working your way through the hierarchy. Click the ‘Select’ button once you narrow the category down. In this example, I’m listing a tee shirt that I made. Tutorial: How to Create a Product Listing on Amazon - by cuttingforbusiness.com
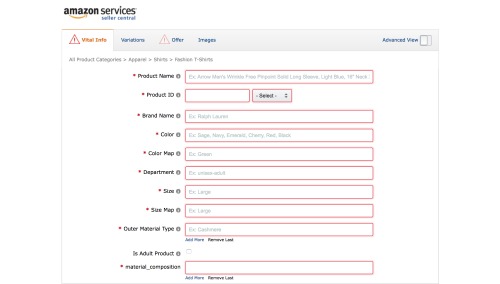
    5. Next, you’ll fill in all of the information about your product on the ‘Vital Info’ tab. Depending on your product, the options will be different. Any box in red will need to be completed before moving on. The one thing that often trips up new sellers is the requirement to have a barcode number. If your product is handmade, you will not have one. Instead, go to Ebay and search UPC numbers. You can buy a bulk lot of them and use them to list products on Amazon. Tutorial: How to Create a Product Listing on Amazon - by cuttingforbusiness.com
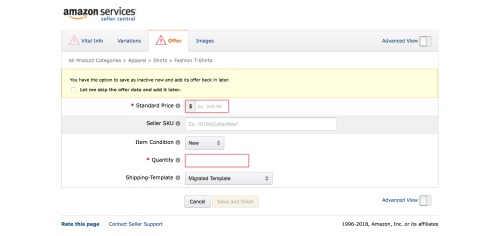
    6. After completing the ‘Vital Info’ tab, move to the remaining tabs and work your way through inputting the information. The ‘Variations’ tab is where you would enter size or color choice information and the ‘Offer’ tab is where you set the pricing. Tutorial: How to Create a Product Listing on Amazon - by cuttingforbusiness.com
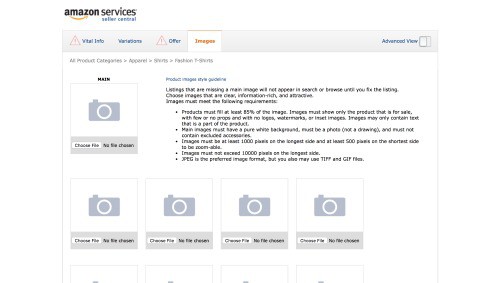
    7. Last, add images to your product listing. Amazon does not allow images with watermarks, borders, or additional text. Amazon prefers photos to be taken on a solid white background when available. Additional photos requirements are listed on the image upload page. Tutorial: How to Create a Product Listing on Amazon - by cuttingforbusiness.com
    8. Once your pictures are uploaded, click the ‘Save and finish’ button at the bottom of the page. You’ve now added your first product to the Amazon catalog!

    You Don’t Own the Listing

    Quickly, now that you’ve created a product in Amazon’s catalog, any other seller can list the same item for sale using your product page. Unlike other marketplaces, the listing you created is not owned by you.

    Shipping on Amazon

    You may have noticed when listing your product that you couldn’t specify shipping prices. Unlike other marketplaces, Amazon has a standard cap for every category. This means they have a maximum price your customer can be charged for shipping. In many, many cases, this price is not enough to ship your item to your customer. To compensate for this, remember to price your product accordingly.

    How You Get Paid Through Amazon

    Sellers on Individual selling plans get paid once a week and the payment is initiated through ACH directly to your bank account. New sellers will often have a hold on their payments for a period of time (21 days is standard, but I’ve also seen longer).

    Sellers on Professional selling plans are paid every 14 days or twice a month. Again, new sellers may be subject to a hold period.

    You cannot request payment sooner through wither the Individual or Professional selling plan.

    Save the information below to Pinterest so you can find it when you need it!

    Tutorial: How to Create a Product Listing on Amazon - by cuttingforbusiness.com

  • 6 Ways to Prevent Burnout in Your Craft Business

    I see so many craft business owners that work their businesses hard for a year or so, then lose interest. I think that much of this has to do with burnout.

    It’s not surprising that burnout would be common since craft business owners wear so many hats: Designer, Creator, Researcher, Accountant, Tax Filer, Customer Service Representative, Shipper, Web Designer, Social Media Manager, and so many more.

    Today, let’s look at ways that you can prevent burnout in your small business.

    6 Ways to Prevent Burnout in Your Craft Business - cuttingforbusiness.com.

    6 Ways to Prevent Burnout in Your Craft Business

    Create and Abide by Office Hours

    Nearly every entrepreneur I’ve ever talked to works more hours in their business than they would if they worked for someone else. (Myself included!) Since we are driven people, we need to remember there is more to life than our business.

    One good way to tackle this is by setting clear work hours. I’ve written about the importance of office hours.

    Change Up Your Schedule/Scenery Once in a While

    Schedules are great – I honestly live and die by mine – but monotony can set in from doing the same thing over and over again day in and day out.

    I have found that I can refresh my mind by just working from a different room – or even sitting outside.

    Change Up Your Products

    This goes hand in hand with changing up your schedule. While it might sound like more work, change up the products you offer once in a while. Creating the same thing over and over can lead to serious burnout.

    This can be as simple as running a weekend sale on something you don’t normally create – like tumblers or tshirts.

    Don’t Procrastinate

    I’m sure there are tasks in your business that you don’t enjoy doing (hello, accounting!). However, stop the urge to procrastinate and keep up with unenjoyable tasks. If you don’t they can snowball into huge projects that will leave you with a feelings of burnout.

    Seek Help When You Are Overwhelmed

    If you are buried in things to do, call in an older child, family member, or friend to help conquer your to do list. Remember to pay them accordingly, even if it is just in free product. Similarly, if a task is too hard (like designing a logo or building a website) hire someone to take care of it for you. Fiverr is a great place to find help for one off tasks.

    Treat Yourself

    I’m not talking about a full out spa day every other day, but treat yourself once in a while. From grabbing a fancy coffee at the local shop or bingeing on your favorite Netflix show for an entire day – find something that you enjoy doing and regularly do it as a reward for your hard work.

    Tell me in the comments, how do you prevent burnout in your craft business?

  • How to Create an Email Template Library to Save Time in Your Craft Business

    If there’s one thing that almost all Silhouette and Cricut small business owners have told me, it’s that they need more time in their days to get things done! In my opinion, I manage my time well and wanted to share a time saving secret I use to respond to emails quickly: My custom made email template library. Today I’m sharing how to create your own email template library.

    How to Create an Email Template Library for Your Craft Business

    1. Identify the questions that you get asked the most in your small business and write out a list. I do this by looking through old emails.
    2. Write a generic response email for each commonly asked question.
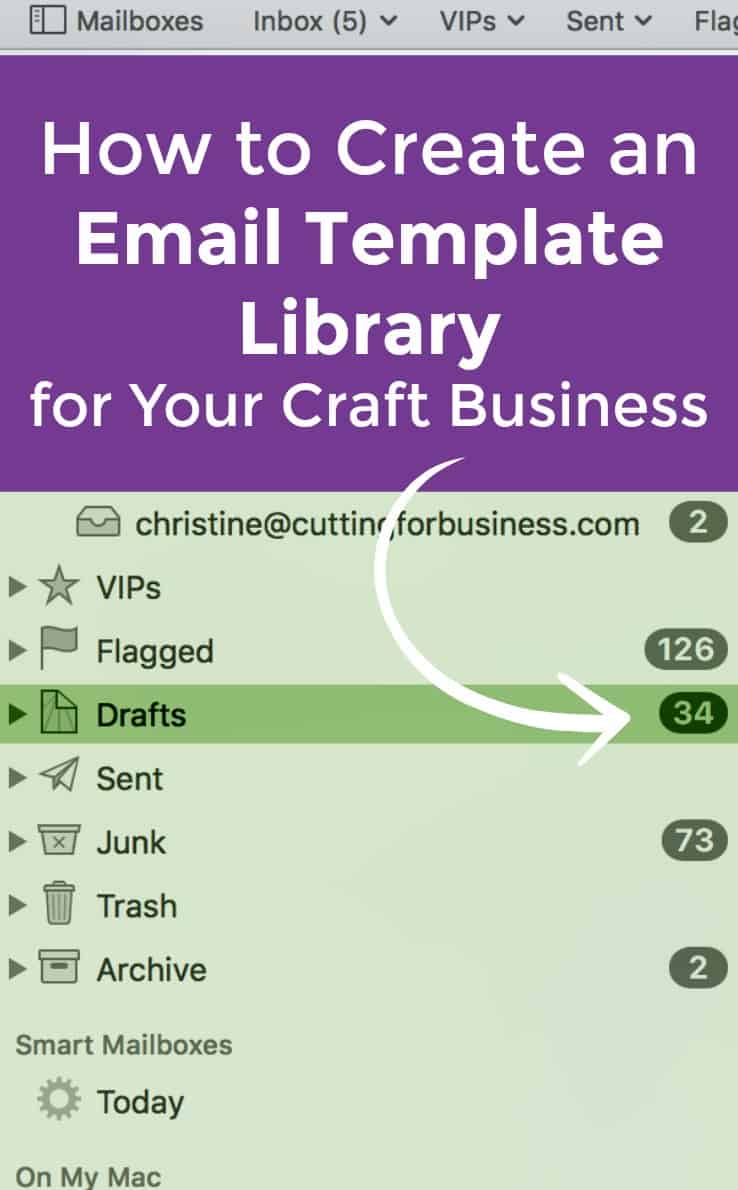
    3. Save each response email you’ve written to a folder on your computer. Depending on what mail program you use to manage your emails, you may also be able to save them to your ‘Drafts’ folder or a custom folder like ‘Saved Emails’.
    4. When a customer asks one of your commonly asked questions, copy and paste your prewritten email into your response. Be sure to take a minute to personalize the email with their name. No one likes to get an automatic response style email.

    Creating an email template library can drastically cut down on the time you spend answering emails. Remember, to cut down on the actual amount of emails that you receive, be sure you have a FAQ page. See what other pages I recommend your have on your website at this link.

    Love this idea? Save it to Pinterest!

    How to Create an Email Template Library to Save Time in Your Silhouette or Cricut Craft Business - by cuttingforbusiness.com

  • 7 Tips to Get Your Handmade Products into Local Stores and Boutiques

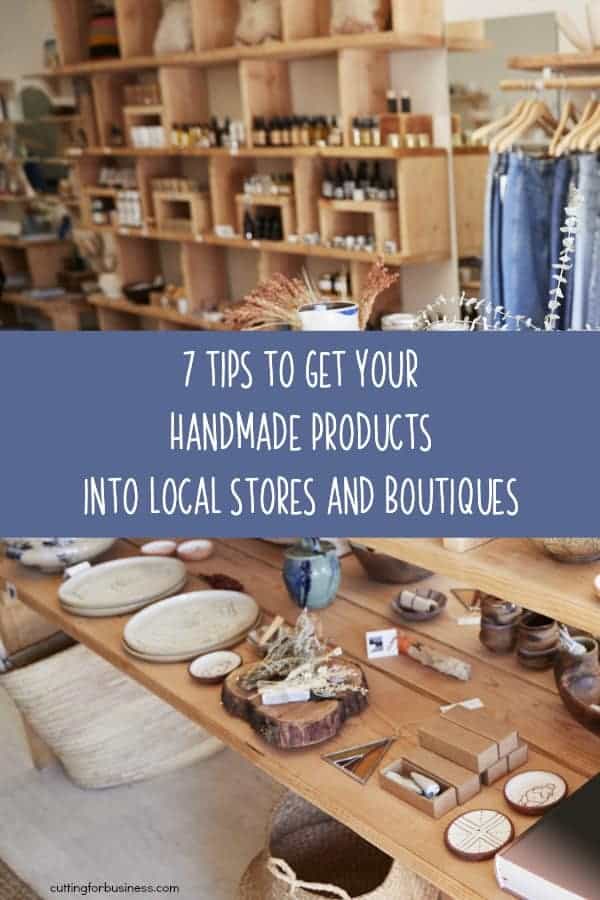
    Ready to expand your Silhouette or Cricut small business? Why not put your handmade products into local shops and boutiques in your area? While it may sound like a daunting task, it isn’t that difficult. Today, I’m sharing seven tips to help you get your products into locally owned shops.

    7 Tips to Get Your Handmade Products into Local Stores & Boutiques

    1. Do research before you contact any shops or stores. Take an afternoon and drive around your local area. Make a list of shops in the area. Go inside the shops as a shopper. Take notes on the condition of the store, the products they offer, the pricing, and how the employees respond to you. Ask yourself: “Would my products be a good fit in this store?” When you return home, dig around on the internet for more information about the shops you liked. Do they have an online presence? Do they have good buyer reviews?
    2. Do an audit of your business. Make sure your business is in tip top shape by asking yourself these questions: Is my branding consistent? Are my logo and tagline effective? Is my social media and website up to date? Are recent customer reviews great? Are my company licenses for my city, county, and state up to date? If anything needs attention, fix it before you start trying to get your products into stores.
    3. Make sample products. Make several different products that you plan to try to get into the store. Be sure to package them as you would if the store were selling them today.
    4. Prepare a presentation and know your numbers. I’m not talking about a power point presentation where you will stand in the front of a room and talk at an owner. Instead, lay out points that you’d want to discuss during a conversation with the store owner. Prepare wholesale pricing sheets to present to the owner. Remember these two things: 1) A store owner can’t pay retail price for your products. 2) Not every product you make will be good to sell in a local store.
    5. Reach out to the store owner. Social media is a great way to make contact with the store owner or buyer. Simply introduce yourself and ask for some time to sit down and talk to the owner about carrying your handmade products in their shop or boutique. Never, and I mean never, walk into a store with the intention of getting your products into the store without a previous scheduled appointment. I mean, as a company owner, you are busy. Assume that the store owner is just as busy as you are.
    6. Be confident on the day of the meeting. Show up on time and prepared. Talk about your products, but also ask questions about the store and the store owner. Show the store owner that you’ve done research about their store before you walked in the door. Leave the owner with information relating to your shop and schedule a follow up appointment. One trick that I’ve used in the past is to leave the store owner with a sample book of my products or more information about me. I then schedule a time the following week to pick it up and hopefully ‘seal the deal’.
    7. Stick with it. Don’t expect to get your products into every store you speak with. And, don’t take it personally. Just move to the next store on your list and start over. Building a business takes time – don’t expect it to grow overnight.

    Having trouble with pricing for stores or wholesale? First, head to this post – then this one.

    Was this post helpful? Save the image below to Pinterest.

    7 Tips to Get Your Handmade Products into Local Stores and Boutiques for Silhouette Portrait or Cameo and Cricut Explore or Maker Crafters - by cuttingforbusiness.com


  • Why Your Craft Business Needs Multiple Streams of Income & How to Do It

    I’m sure you’ve heard the phrase, multiple streams of income before. Lots of business people throw it around on blogs, articles, and podcasts. If you haven’t, picture an octopus in your head with eight different tentacles. At the end of each tentacle, imagine one way that your small business earns money. This is what is meant by multiple streams of income.

    Why Your Craft Business Needs Multiple Streams of Income & How to Do It - cuttingforbusiness.com

    Why Do You Want Multiple Streams of Income?

    The concept behind multiple streams of income is awesome – create as many streams of income in your small business as you can. If one stream has a slow day, week, or month; the other revenue streams will continue making money. The term multiple streams of income goes hand in hand with the old saying, “Don’t put all your eggs in one basket”.

    How Do You Set Up Multiple Streams of Income in Your Craft Business?

    This is great and all – but what the business experts don’t tell you is HOW. How can you create multiple streams of income in your craft business? Let’s take a look at three different craft businesses and how they are arranged to have multiple streams of income.

    Example 1: Handmade Seller – Physical Products

    • Business Information: This seller does handmade vinyl work including cups, tumblers, tee shirts, and decals.
    • Number of Streams of Income: 5
      • Sells through stand alone website.
      • Sells products through an Etsy shop.
      • Sells products through a Facebook page and group.
      • Sells wholesale shirts through a local boutique in her home town.
      • Sells at craft shows and events throughout the year; attending at least one show a month.

    Example 2: Handmade Seller – Digital Products

    • Business Information: This seller sells digital cut files.
    • Number of Streams of Income: 6
      • Sells digital cut files through a stand alone website.
      • Sells (the same) digital cut files through Etsy.
      • Sells (the same) digital cut files through Creative Market.
      • Sells digital bundles through font and design bundling websites like Design Bundles.
      • Writes a weekly tutorial on her website using her designs with supplies that can be purchased on Amazon. Earns money through the affiliate program every time someone purchases supplies. (Learn more about affiliate programs.)
      • Earns money passively through ads on her website. (Learn more about passive income passive income.)

    Example 3: Silhouette or Cricut Instructor

    • Business Information: This seller teaches new Silhouette or Cricut owners how to use their machine.
    • Number of Streams of Income: 6
      • Earns money from one-on-one classes in her area.
      • Earns money from group classes in her area.
      • Offers videos on a YouTube channel, which makes passive income.
      • Sells project kits at the end of each group class she teaches.
      • Sell project kits online through a stand alone website.
      • Attends craft shows to sell seasonal items, but talks to customers about classes during the show.

    Before you get out there and starting selling everywhere, know that you’ll need to be able to keep up with each income stream as you add it. First, create a plan. Then, put your plan into action.

  • 3 Ways to Build an Email List without a Website

    You’ve heard me say it before, but email lists are a great way to stay in contact with your customers. Why? I’ve gone on and on about it in this post. Basically, email lists are the most direct way to reach your customers – without worrying about barriers on social media. If you don’t have a website for your Silhouette or Cricut small business – you can still build your email list. Let’s look at how:

    How to Build an Email List without a Website

    1. Use your business cards. After you’ve started your email list, include a link to it on your business cards or care instructions. Since mailing list signup links can be long and ugly, use a service such as tinyurl.com to make it shorter and easier to type.
    2. Use your email signature. I’m sure you have a memorable signature that you end all of your business emails with. (If not, hop over to this post to learn more.) Consider putting an email list signup form link right in your signature.
    3. Use social media.
      1. On Instagram: Use the link on your bio page to link to your email list signup page.
      2. On Facebook: There are a number of ways you can promote your email list signup page. First, you can create a pinned post that contains the link. Or, you can regularly promote it on your Facebook Page wall by saying things like, “XYZ Business just sent out coupon codes to email subscribers. If you aren’t one, join now at (insert link)”. Additionally, some mailing list providers have integrations in place to connect a tab on your Facebook Page with their service.
      3. On Pinterest: Create a few pins that link to your email list signup forms.
    4. (Bonus!) Use Etsy. If you are an Etsy shop owner, include a link to your email list signup form at the end of the descriptions of your most popular listings. It’s a great call to action!

    That’s it! For something that only takes a few minutes, it can be a huge impact on your Silhouette or Cricut small business. Don’t forget that once you get email list members – regularly send them emails!

    Love this post? Save the image below to Pinterest.

    3 Ways to Build an Email List without a Website - A great read for Silhouette Portrait or Cameo and Cricut Explore or Maker small business owners - by cuttingforbusiness.com

  • Spring Marketing Ideas for Craft Businesses

    The Spring season is almost here. Spring is a great time for new products, new customers, or a Spring sale. And, that means plenty of opportunities for Silhouette and Cricut craft businesses to make money.

    Let’s look at a some Spring marketing ideas for your craft business.

    Spring Marketing Ideas for Craft Businesses - cuttingforbusiness.com

    Spring Marketing Ideas for Craft Businesses

    Use these marketing themes throughout the Spring months in your products, social media platforms, and promotions.

    Renewal

    Nature shows us that Spring is a time for renewal. Focus your marketing efforts on fresh starts and color palettes that feature bright colors like greens, yellows, pinks, purples, and light blues.

    Milder Weather

    As the snow melts and temperatures rise, Spring is the time for many to head to their gardens. Products focused on gardening and spending time outdoors will sell well. With Earth Day in April, small businesses can focus on green living and creating.

    Spring Cleaning

    For many, Spring is a time to deep clean and purge with a good cleaning. Use this concept in your craft business to get rid of old inventory that you haven’t been able to move. An ‘in with the new and out with the old’ social media campaign could work well.

    Spring Fling

    Many companies will hold ‘Spring Fling’ sales. Market this idea with your favorite product. You might describe it as ‘easy to fall in love with fast and on sale until (date)’.

    Spring Break

    Across the country, schools will be out for Spring Break. Spring is an excellent time to start marketing your summer products early – for those customers that may be traveling to vacation at the beach. You can market everything from personalized sun hats or visors, custom beach towels, and shirts with fun sayings.

    Outdoor Events

    With warmer weather, craft fairs and shows can be held outdoors. Consider signing up for an outdoor event, or a space at your local farmer’s market.

    Taxes/Tax Refunds

    With taxes in the United States due in April, many think of Spring as ‘tax time’. Theme promotions on your social media around a ‘Tax Relief Sale’ or a ‘Tax Refund Sale’. Since many customers receive refunds, focus on reminding them they can spend their tax refund on a product in your shop.

    Graduation

    In late Spring, graduations start. You could theme products to kindergarten graduation, middle school graduation, high school graduation, or college graduation. Remember to aim products towards both gifts for graduates and gifts to help them in their next step in life.

    Major Holidays in Spring

    St. Patrick’s Day

    Think all things luck, lucky, and green. While consumers don’t spend a lot of money on St. Patrick’s Day, lower priced items usually sell well. Consider theming your St. Patrick’s Day products to specific groups or professions.

    Product Ideas to Sell: Shirts, Irish blessing signs and decor, leprechaun treat bags or traps, and drinkware or drinkware decals.

    Easter

    Last year, the National Retail Federation estimated that Americans spent an average of $192.01 on Easter. This is divided into these main categories: Candy, food, gifts, clothing, and decorations. (Source.)

    In 2024, Easter falls early: March 31. Be sure to get your Easter products ready to sell early. You can choose either a religious path or an Easter bunny path in your craft business.

    Product Ideas to Sell: Small products like keychains, plush, and personalized goods that can be put into Easter baskets, custom Easter basket tags, matching family shirts, home decor, Easter themed garland, Easter table decor, or DIY Easter egg decorating kits with vinyl stencils.

    Cinco de Mayo

    While Cinco de Mayo isn’t a huge celebration in much of Mexico, in the US, we use it to celebrate Mexican-American heritage.

    If you recognize Cinco de Mayo in your business, be sure to be culturally aware and respectful. There is a great article on this from Better Homes and Gardens.

    Possible Collaborations for Cinco de Mayo: Partner with a local Mexican restaurant or a Mexican owned local business.

    Mother’s Day

    At some time, everyone has had or has a mother. Include customers in your social media promotions. Increase customer engagement by asking your customers to share a photo of their mother or them with their mother across your social channels.

    Also, when marketing for Mother’s Day, be sure your target audience is dads. Dads are often primary shoppers for Mother’s Day.

    Product Ideas to Sell: Mother’s Day cards, photo frames, tote bags, custom jewelry, mom-themed decals, or monogrammed kitchen accessories.

    Companies to Partner with This Spring

    Spring is the perfect time to partner with local businesses. Collaborating with other businesses can help your business reach a wider audience and and bring you new potential customers.

    Here are some ideas:

    • Florists
    • Landscapers & lawn care providers
    • Realtors
    • Pressure washing companies
    • Home organizers
    • Plant nurseries
    • Cleaning services
    • Wedding and event planners

    No matter what you plan for Spring in your craft business, I hope this article on Spring marketing ideas has helped you. Look for some crafting inspiration? I’ve got a list of Spring sayings to get you started.

  • 30 Things to Do When Your Craft Business is Slow

    Is your business slower than usual right now?

    There’s no need to panic, because all businesses experience ups and downs. In fact, slow times can be beneficial because you can get a few extra tasks done.

    Today, I’m sharing some ideas of things you can do to keep yourself busy during slower business periods.

    30 Things to Do When Your Craft Business is Slow - cuttingforbusiness.com

    30 Things to Do When Your Craft Business is Slow

    1. Take a Break

    Everyone needs a break sometime. If your business is usually busy and it gets slow – roll with it and take some time off. And, don’t feel guilty about it – not even for a single second.

    2. Clean Your Craft Room/Space

    There, I said it. You know it needs to be done – so go do it. Maybe even invite a friend or two over to help.

    3. Declutter Your Online Existence

    After you tackle the craft room, dive into a digital declutter. I’ve got tips for you in this post and this post.

    4. Make Something for Yourself

    So many times when I talk to Silhouette and Cricut small business owners, they can’t remember the last thing that they made for themselves. In many cases, you bought the machine to create stuff for yourself. Go back to your roots and make a few things for yourself!

    5. Make Gifts for the Year

    If you aren’t into making things for yourself, make a list of all the gifts you’ll need for the rest of the year and make them. You’ll thank yourself when birthdays, anniversaries, and Christmas roll around!

    6. Stock Your Inventory Full of Ready to Ship Products

    When you get busy again you’ll be ahead of the game. Or, use the products you make at an upcoming craft show or fair.

    7. Schedule Social Media

    Save time later by scheduling engaging content on social media ahead of time. At the same time, if there is a network that you aren’t familiar with, get to studying and using it. A content calendar can greatly help you.

    8. Catch Up on Accounting

    If you are one to let your accounting slip through the cracks from time to time, a slow period is the perfect time to catch up. While you are working on accounting, a quick audit can tell you what you can cut out to save money.

    9. Narrow in on Your Niche

    Your niche is your thing. Spend some time focusing in on yours. Not convinced a niche is the way to go? Read my thoughts here.

    10. Audit Your Business for Trademark Violations

    While is isn’t fun, trademarks are a big deal. Remove any products that are trademarked to another company that you are using without permission. Need help? Head to this section of the blog.

    11. Work on Your Pricing

    Prices shouldn’t be static. Instead, they should be ever changing. In slow periods, lower your prices. Read more about dynamic pricing in this post.

    12. Rebrand Your Business

    If you aren’t happy with your branding, change it. This designer has gotten great feedback for logos by other Cutting for Business readers. Don’t forget to read about colors and small businesses in this post.

    13. Retake Your Product Photos

    In many craft businesses, there’s always room for improved photos. Hey, improved photos might even end your slow period. Need photography tips? I’ve got them here.

    14. Freshen Up Your Paperwork

    If you include paperwork like instructions with your products, freshen them up to fit with your branding. I’ve got some you can use at this link.

    15. Research and Work on SEO

    Time spent working on search engine optimization is never time wasted. Those titles, tags, and descriptions are powerful – so use them correctly.

    16. Experiment with New Products

    If you currently work with vinyl, try working with paper. If you only work with jewelry making, pick up some vinyl. Maybe sublimation is right for you?

    17. Create New Designs and Products

    Expanding your current line of products is a great way to spend your down time.

    18. Network with Other Makers

    There’s thousands of other makers and small business owners that you can connect with on social media. Find a couple that have products who complement yours and reach out to them.

    19. Volunteer or Network with a Charity

    In addition to helping the charity, it’s a good way to get your business name out there.

    20. Start a Website or Update Your Website

    If you don’t already have one, a slow time is a great time to start one. Here’s some resources on Cutting for Business.

    21. Work on Building Your Email List

    I’ve said it several times on the blog before, but email lists are often your best bet for reaching customers. Read more in this post and this one.

    22. Create a Library of Email Templates

    If you regularly email similar information to customers, build a small library of emails to use. Then, when you need one it is just a quick copy and paste and you are done.

    23. Film Some Videos

    Video marketing is here to stay. Put together a video or two to use in your craft business. I’ve got some resources for video marketing here.

    24. Enroll in a Class, Register for a Conference, or Attend a Tradeshow

    Your class could be business related or it can be for pleasure. A few of my favorite online class providers are Udemy, Skillshare, and CreativeLive. For conferences and shows, here is a list of reasons why I recommend them.

    25. Create a Passive Income Stream

    Head to this series on the blog and learn more.

    26. Get to Know Your Customers Better

    Take a look at your analytics and see what patterns you can learn about your customers and the demographic you attract. Create a loyalty program or survey your customers. I’ve got an easy to implement loyalty program here and information about surveying in this post and this one.

    27. Start Selling on a New Platform

    If you don’t use Etsy; try it. Haven’t checked out TpT; head here.

    28. Start Shipping Internationally

    If you only ship to the USA, you’ve got the world waiting for your products. Get some tips in this post.

    29. Find New Wholesale Suppliers

    Searching for new suppliers can be tedious, but if your business is slow – it’s a great time. Here are some of my favorites.

    30. Make Your Business Official

    Let’s face it, paperwork is time consuming. Government paperwork is even worse. Use your down time to get it all sorted out. Confused about whether you have a business or a hobby? Here’s what the IRS says.

    While your business is slow, you definitely won’t be! What do you do when your business is slow?

  • How to Make More Money Selling Personalized Christmas Elves

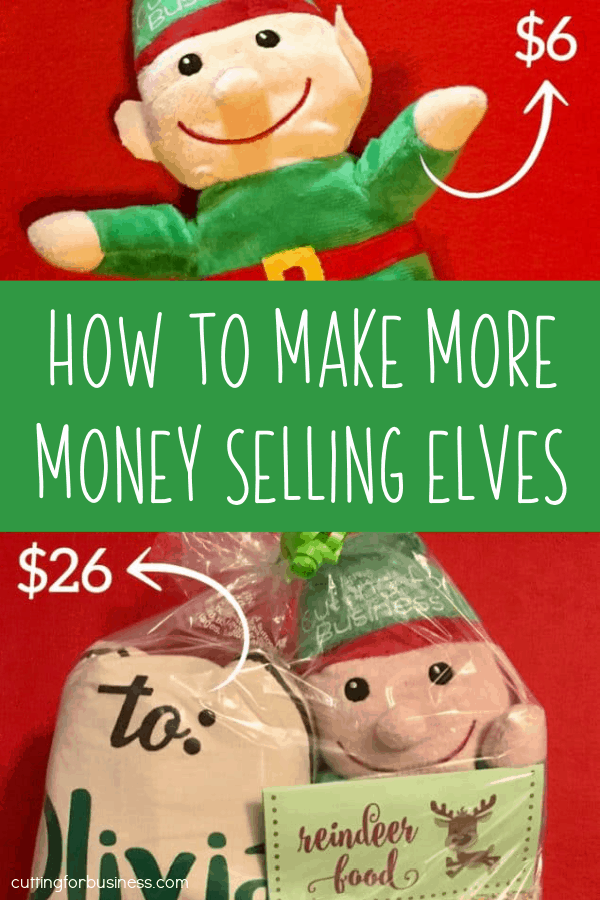
    Christmas season is here and for many Silhouette and Cricut crafters, this means it’s time to trek down to the local Dollar Tree to (hopefully) score some plush elves that you can add a name to and sell for $5 or $6. Unless you are selling a ton – which some crafters are – it’s not too exciting to make $4 or $5 per elf.

    However, you can easily make more money with the elves by simply bundling them with other small products.

    Ideas to Bundle Plush Elves with Other Handmade Products

    • Two matching masks: One for the elf and one for the child
    • Personalized adoption certificate
    • Elf facts card (I’m thinking a baseball style card with facts about elves.)
    • Reindeer food (this is usually oatmeal mixed with bird seed and sprinkles and finished off with a nice tag.)
    • Personalized glitter ornament
    • Personalized letter from Santa
    • Personalized Santa bags
    • Fake Santa camera

    Depending on what you put into your bundle, give it a snappy name like “Santa’s Surveillance Kit” or “North Pole Elf Care Kit” or “Santa’s Coming Soon Kit”.

    By bundling 2 to 3 products together, you are increasing the value of your product and this will demand a higher price.

    Bundling Examples

    Example 1: Personalized elf ($1.00) + reindeer food ($.50) + glitter ornament ($2.00) + packaging ($1.00). Your cost is about $4.50 and this bundle could sell for up to $20. Instead of making $4 or $5 for a single elf, you’ll make $15.50.* (Assumes selling price of $6.00 for elf, $2.00 for reindeer food, and $12 for glitter ornament.)

    Example 2: Personalized elf ($1.00) + fake Santa camera ($5.00) + Santa bag ($4.00) + packaging ($1.00). Your cost to create this bundle is around $11 and this bundle could sell for $36. In this case, you are profiting $25.00.* (Assumes selling price of $6.00 for elf, $12.00 for fake Santa camera, and $18.00 for Santa bag.)

    Example 3: Personalized elf ($1.00) + personalized glitter ornament ($2.00) + packaging ($1.00). Your cost to create this bundle is $4.00 and this bundle could sell for $18.00. In this example, you are profiting $14.00.* (Assumes selling price of $6.00 for elf and $12.00 for glitter ornament.)

    *These are simplified examples that do not take into account taxes or selling fees.

    Psst, bundling isn’t just great around Christmas time. You can regularly bundle products together to create a higher price point.

    How to Make More Money Selling Personalized Christmas Elves with your Silhouette Cameo or Cricut Explore or Maker - by cuttingforbusiness.com.