Blog

  • 10 Product Photography Tips for Silhouette & Cricut Businesses

    Good product photos sell your products. Everyone knows that, but getting those great shots can be tough. Here are some of my favorite tips.

    10 Product Photography Tips for Silhouette & Cricut Business Owners

    1. Know your camera. I can’t stress enough, to take better pictures – you have to know how your camera works. Whether you are shooting with your cell phone, a DSLR, or a mirrorless camera; you have to know how it works. Some of my favorite resources are: Apple’s iPhone photography websiteCreativeLive’s photography classes, and your camera’s instruction manual.
    2. Don’t shoot down on your product. If you product is sitting on a table, squat down to the same level as your product to take the picture. If your product is on the floor, lay on your belly to take the photo. Basically, get down to the same level as the product to photograph it.
    3. Take photos from several angles. This is especially important if you are selling online. Since buyers cannot touch and feel the product, it is your job as the seller to show all aspects of the product for sale.
    4. Use good lighting. Usually, natural light is best to shoot your product photos. In fact, I usually head out mid day to my driveway to shoot product photos. (After you do this a few times – the neighbors will stop staring – I promise!) If you can’t make it outside – invest in studio lighting like these inexpensive lights with umbrellas.
    5. Invest in appropriate backgrounds. While we will tackle inexpensive backgrounds later in the week, it bears saying that you should not take photos with overly busy or reflective backgrounds, wrinkled comforters or blankets, or carpet. This list might sound basic and like common sense, but a quick search of Etsy will provide lots of examples of poor photography. Better options are scrapbook papers for small items or printed photography backgrounds.
    6. Show your product in use. If possible, show your product being used. If you are selling a tee shirt – photograph it being worn. If you are selling a cup – show someone holding it. If you can’t get people to model your goods, consider using Placeit for mockups.
    7. Think about scale. Some products can look much larger or smaller than they are in photographs. One culprit is wooden signs. When photographing them, place something in the photo that buyers are likely to know the size of. For example, if you are selling an 8 inch by 8 inch wood sign, hold it in your hands to show it’s small size. In contrast, a 40 inch by 40 inch wood sign is quite large. Set it in front of a person to show how large it is.
    8. Use props minimally in your product photos. A few well placed props can add interest to your product photo, but too many become a distraction. For example, a coffee mug could be filled with coffee with a spoon next to it. Or, a Christmas ornament could be photographed hanging on a tree.
    9. Crop out the excess. Your product photo should star your product. Crop out excessive space around your photo to make the eyes of the buyer go straight to your product.
    10. Back up your photos. Personally, I prefer to backup my photos to a cloud of some kind (examples include Dropbox, iCloud, and so on). I do not like using external backups because they can fail, get lost, or damaged. For example, if I back up all my product photos to an external drive and store it in my laptop bag and my house burns down – I’ve lost my laptop with the originals and my external drive with my backups. Since I use a cloud, this cannot happen.

    Love this article? Save it to Pinterest:
    10 Product Photography Tips for Silhouette Cameo & Cricut Explore Businesses - by cuttingforbusiness.com

  • 100+ Free Commercial Use Cut Files for Crafters

    Welcome! You probably landed on this page while looking for free commercial use cut files for your Silhouette or Cricut. Great! I’m glad you found me, Christine, and this blog, Cutting for Business.

    In addition to sharing tips for running your craft business, I also have a large collection of free commercial use cut files.

    100+ free commercial use cut files for Silhouette, Cricut, Brother, Juliet, Romeo, and xTool - cuttingforbusiness.com.

    FAQ About the Free Commercial Use Cut Files

    • Please follow the guidelines of my SVG license. It states that commercial use is extended to crafters with less than 5 employees. It also states that the digital files cannot be be resold – or disassembled and resold. It further notes that you can not use print on demand services with my files – or include my files in your app or behind any other paywall. Read the full details of the license.
    • To download the files, visit each freebie’s page on the blog. You’ll find the download link in a green box near the bottom of each page.
    • If you’d like to save time, you can purchase a zip file that contains all of the files.
    • If you’d like to support me, please buy me a coffee. Also, there are a few other freebies over on my Buy Me a Coffee page
    • If you are interested in learning to design your own SVG files, read more about my course – How to Design SVGs.
    • After you’ve downloaded all my files, head to this list of fellow bloggers and companies that also share free commercial use cut files on their websites.

    Free Commercial Use SVG Cut Files

    New Year

    Valentine’s Day

    Love & Wedding

    St. Patrick’s Day

    Easter

    Spring & Gardening

    Patriotic

    Summer & Vacation

    Outdoors

    Pets

    Home

    Family

    Birthday

    Coffee

    Wine

    Crafting

    Small Business

    Motivational

    School & Graduation

    Sports

    Cancer Awareness

    Halloween

    Fall

    Thanksgiving

    Winter

    Christmas

    Miscellaneous

  • Are QR Codes Dead in Your Craft Business?

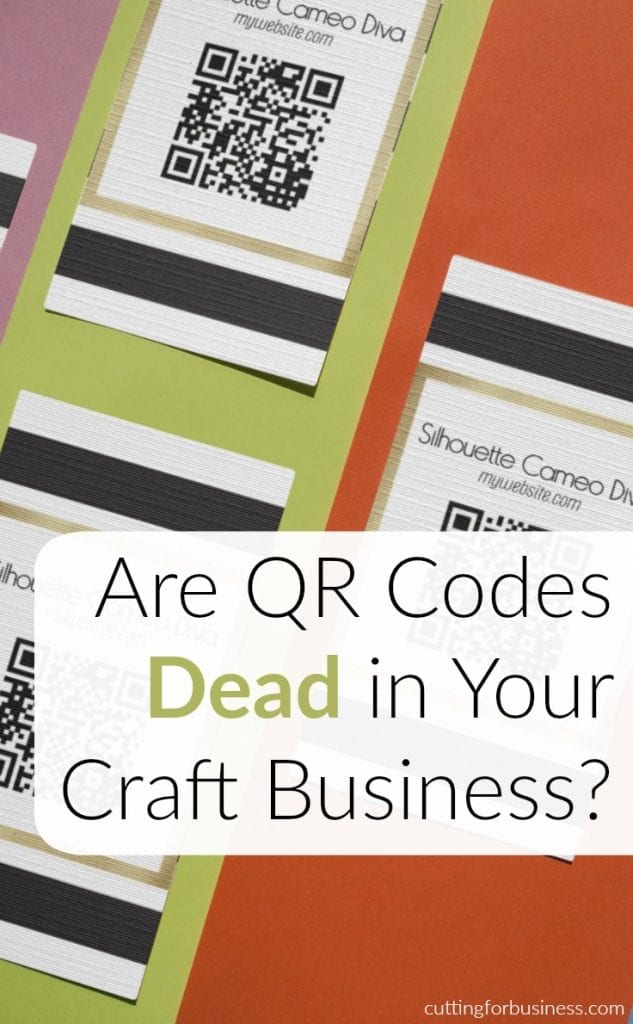
    Recently, I’ve seen a surge of small business crafters both designing products with QR codes and including QR codes on their business cards. So today, I’m answering the question: Are QR codes dead?

    What are QR Codes?

    If you aren’t familiar with QR codes, they are small square codes that you can scan with your phone or tablet and they take you to a link. They debuted in 1994 in the automotive industry to track car parts during the manufacturing process. In 2010, the first smartphone app was released that could scan a QR code was released. QR codes can be put on anything you’d like – including products, business cards, advertising displays, and more. Here’s an example QR code (it’ll take you to the Cutting for Business Facebook page if you are interested):

    What’s Wrong with QR codes?

    They were a great idea that never really took off. Now, onto the problems:

    • The public doesn’t know what they are. QR codes just haven’t caught on – a lot of the general public doesn’t know what they are – let alone how to use them.
    • Most people don’t have an app. In most cases, smartphone users have to download an app to be able to scan a QR code. Experts estimate that most smartphone users do not have QR code scanning apps. (To further prove the point, pull out your smartphone – do you have a QR code scanning app?)
    • It takes too long. In a fast paced social media world, pulling out your phone, opening the app, scanning something, and waiting for a link to load takes too long. It’s much faster to share your social media name and customers can go straight to your social media page(s).

    Are QR Codes Dead?

    So, are QR codes dead? In my opinion, in the small business world – YES. Don’t believe me? Read on:

    So, tell me in the comments: Do you think QR codes are dead? Why or why not?

    Save this post to Pinterest:

    Are QR Codes Dead in Your Silhouette Cameo or Cricut Explore Craft Business? by cuttingforbusiness.com

  • Facebook Likes versus Followers: What’s the Difference?

    Today’s blog post comes from a question I’ve keep getting in my email box from Silhouette Cameo and Cricut Explore small business owners with Facebook Pages: “Why does my Facebook page have likes and follows?”

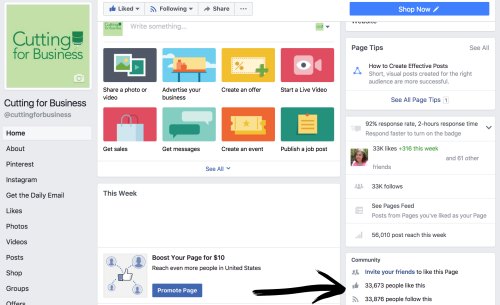
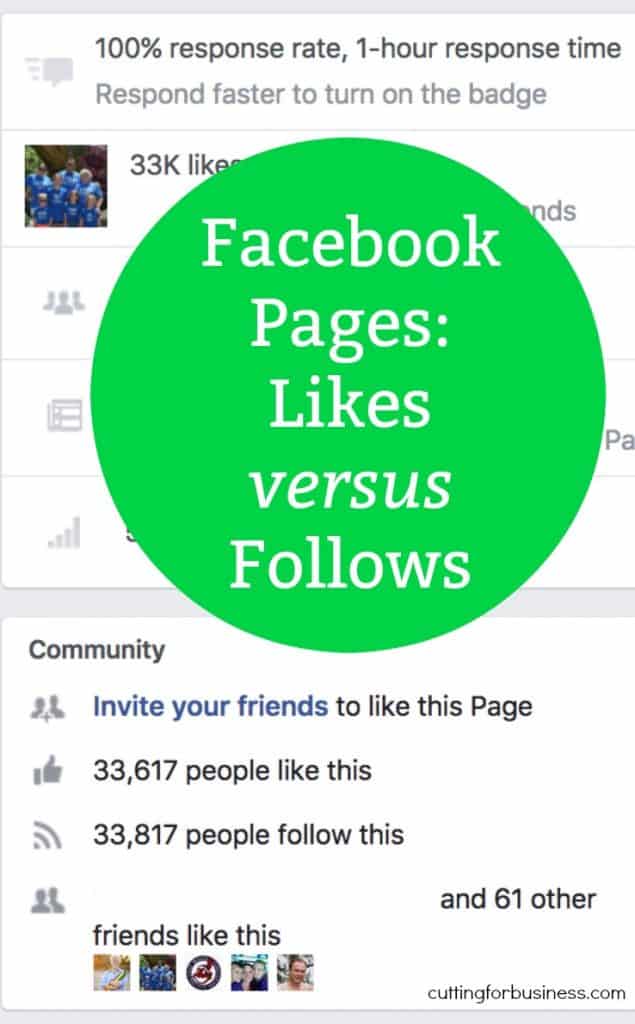
    If you head to your Facebook business page and scroll down a bit, you’ll see a count for both likes and follows: Facebook Likes versus Followers: What's the Difference? - by cuttingforbusiness.com

    So, what’s the difference?

    • The like counter is the number of people that have liked your Facebook business page.
    • When a new customer likes your page, the default setting is that they also follow your page.
    • When someone follows your page, it means that your Facebook page posts will appear on their personal Facebook feed.
    • Followers have the option to “Unfollow” your page, but still like your page. (This is similar to personal Facebook accounts. You can “Unfollow” someone you are friends with and no longer see their posts in your feed – but still stay friends with them.)

    Now what? It’s time to play detective a bit. If your numbers are drastically different (way more likes than followers) – you might rethink your Facebook strategy. This means that people are liking your page, then unfollowing you. Could your page be boring? Is your page offensive? Whatever the cause, you can likely figure it out and fix it.

    Remember, there are no (and I mean – NONE!) stupid questions. Feel free to shoot me an email or message if you have a question, likely someone else has the same question.

    Save this post to Pinterest:

    Facebook Likes versus Followers: What's the Difference? - by cuttingforbusiness.com

  • List of Legal Resources for Creatives Businesses

    I get asked a lot of questions that are best suited to a lawyer, which I am not. However, I put a list of legal teams and practices that specialize in helping creative folks with legal questions and problems.

    Legal Resources for Creative Businesses

    • Volunteer Lawyers and Accountants for the Arts – View the list broken down by state at this link.


  • 7 Christmas in July Sale Ideas for Craft Businesses

    In 1940, a movie called Christmas in July was released. The retail world embraced the idea of celebrating and hosting Christmas sales during the summer – because this was a slow time for many.

    If you need a good pick me up in your Silhouette or Cricut craft business, consider holding a Christmas in July sale. Today, I’m giving you some Christmas in July sale ideas.

    7 Christmas in July Sale Ideas for Craft Businesses - cuttingforbusiness.com

    When Should I Hold My Christmas in July Sale?

    You can hold a Christmas in July Sale anytime in the month of July. You’ll notice that most retailers host their sales after the July 4th holiday.

    Do I Have to Have Christmas Products on Sale or Available?

    No, you can host a sale on any products you would like. However, being able to sell Christmas products in July is great, too!

    7 Christmas in July Sale Ideas for Crafters

    Offer a Discount

    Offer a substantial discount in your store or offer substantial discounts on certain items in your store.

    Offer Free Products

    Advertise a free product with a minimum purchase of $XX. Examples of inexpensive products include decals (personalized or generic), keychains, earrings, headbands, cupcake toppers, or greeting cards.

    Give a Gift Certificate with a Minimum Purchase

    Give a gift certificate or coupon code with a minimum purchase. This is a great way to encourage shoppers to return at a later time – like the actual Christmas holiday. For example, spend $100 and get a $15 gift certificate good in the months of November or December. I love this tactic because it encourages customers to return at a later time.

    Offer a Bounce Back Coupon

    Similarly, offer a bounce back coupon in the order to return again at a later time. I’ve written about bounce back offers in another article.

    Offer Free Shipping

    Consider extending free shipping to customers. With Amazon’s Prime membership leading the marketplace, many customers now balk at having to pay shipping costs.

    Host a Giveaway

    Host a giveaway for your sale. The easiest way to accomplish this is everyone who buys from you on a certain day will be automatically entered into your giveaway.

    Offer Christmas Products

    If you’ve already got your holiday products designed and ready to sell, you can offer an early preview sale for everything Christmas related.

  • Design Tutorial: Text Cut Out Designs in Silhouette Studio

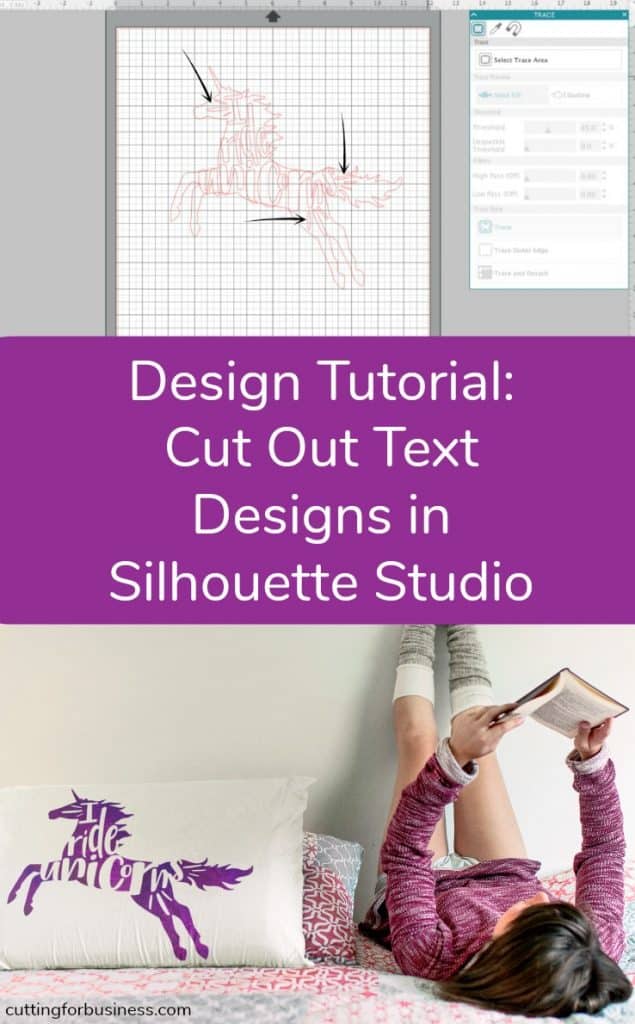
    It’s about time for another design tutorial, don’t you think? Today, we are going to look at creating cut out text designs in Silhouette Studio. Cut out designs are easy enough for a beginning Silhouette user to create and look great on a number of products, so let’s go!

    Here’s a few examples of cut out designs that I’ve shared on the blog before – and they’ve all been popular:

    Cut Out Designs in Silhouette Studio Tutorial

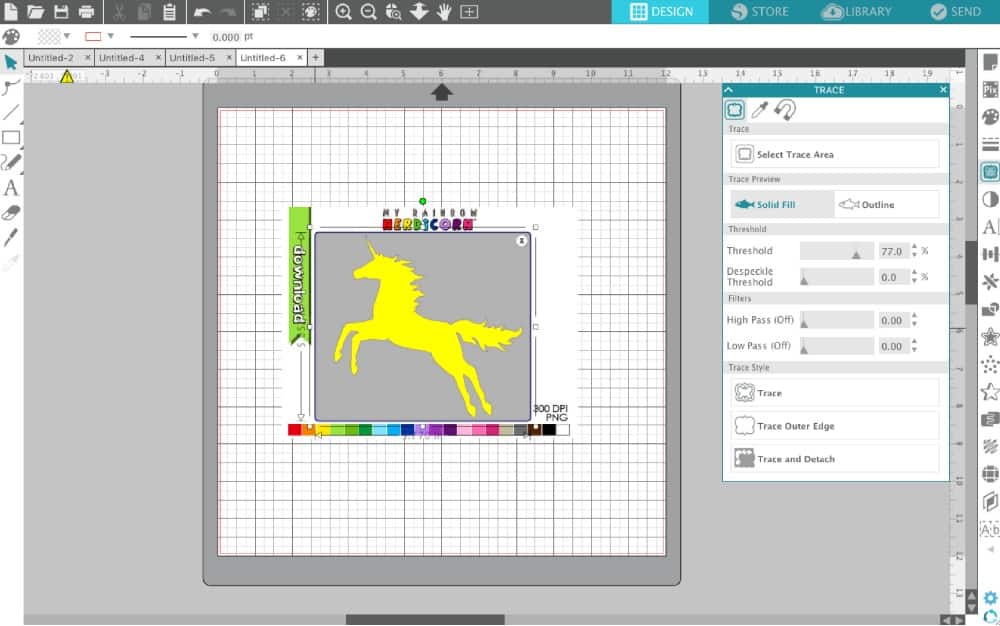
    1. Start by finding a commercial use clipart design that you can trace. For this tutorial, I chose a free, commercial use unicorn image. When looking for images, find ones that have enough space for text and that are easily recognizable when cut in one color.
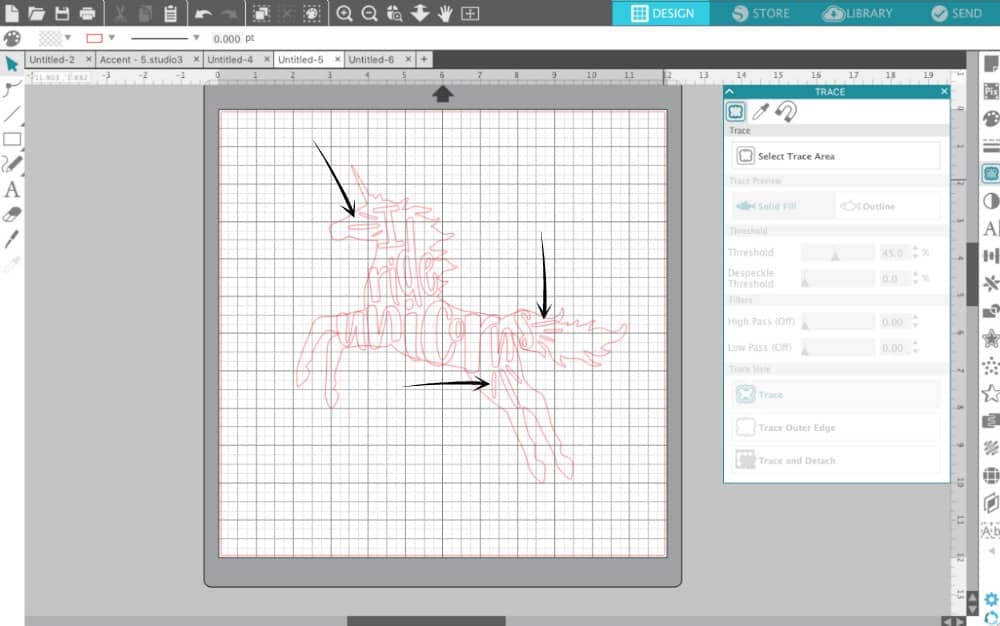
    2. Trace the unicorn design. In Silhouette Studio version 4, you’d use the “Trace” panel. Delete the original image once you’ve got the trace. Design Tutorial: Text Cut Out Designs in Silhouette Studio - by cuttingforbusiness.com
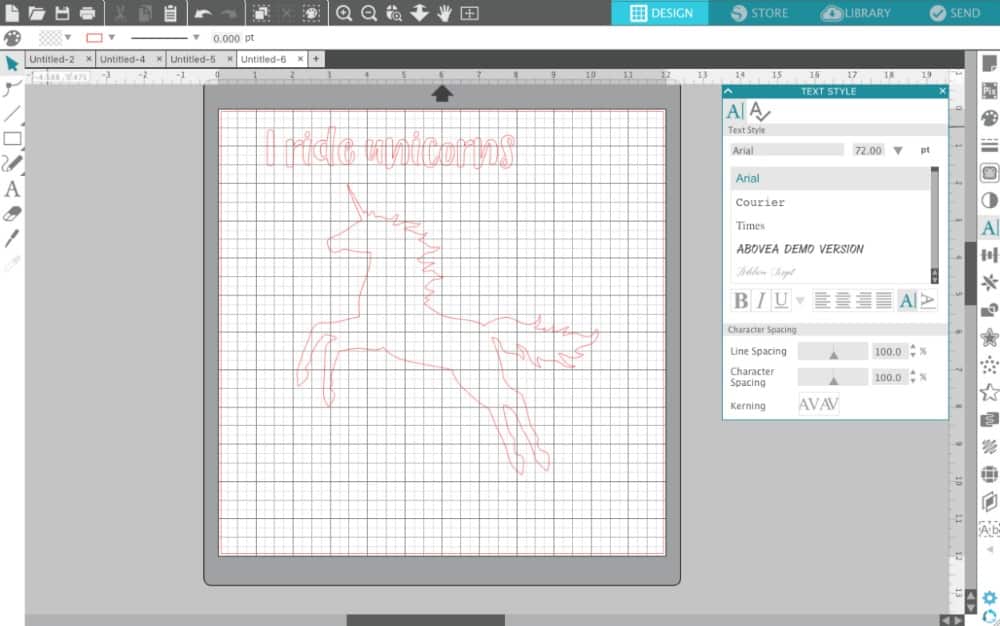
    3. Choose a font and type out the text to put in your design. For this tutorial, I chose Camica font and the words “I ride unicorns”. Design Tutorial: Text Cut Out Designs in Silhouette Studio - by cuttingforbusiness.com
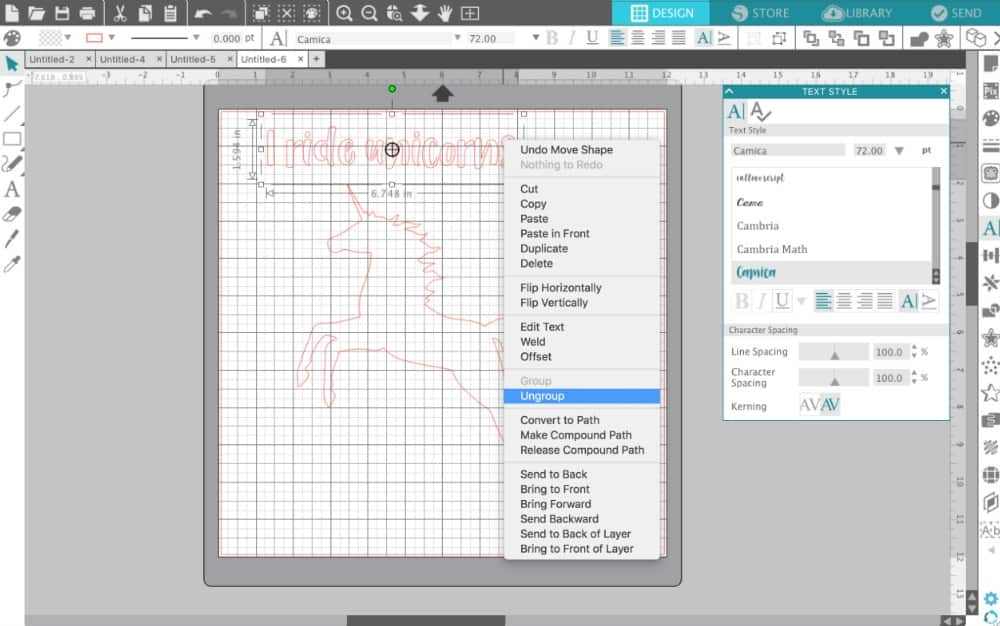
    4. Right click the text and select “Ungroup”. This will leave you with each letter separated from the rest. Design Tutorial: Text Cut Out Designs in Silhouette Studio - by cuttingforbusiness.com
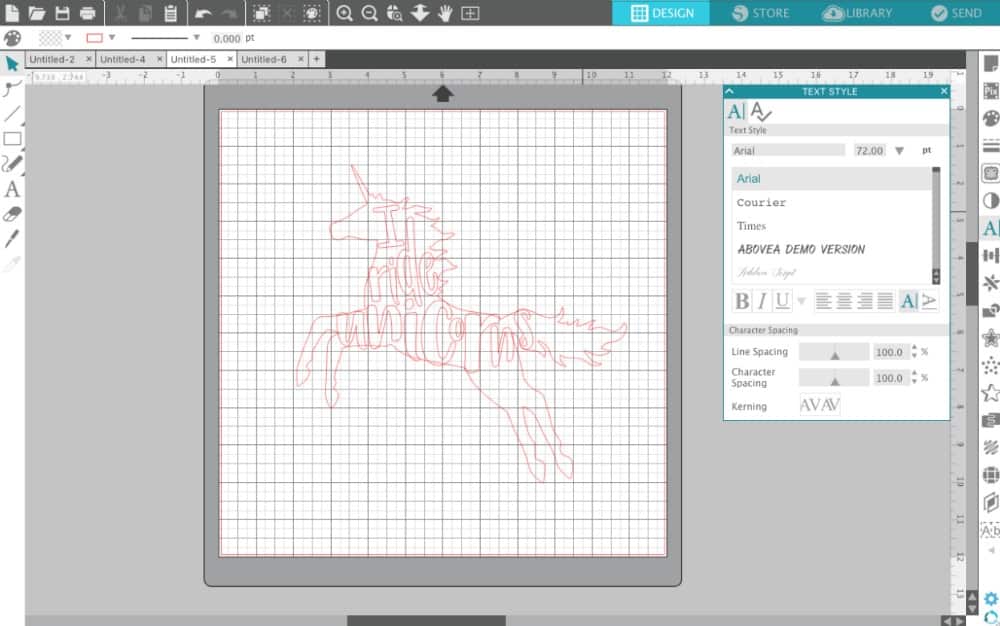
    5. Now, drag each letter to where you want it. The goal will be to cover most of the shape with the text. I like to let my letters overlap the shape a bit, but that is your choice. Design Tutorial: Text Cut Out Designs in Silhouette Studio - by cuttingforbusiness.com
    6. After your letters are arranged, select all the letters and group them together. In Silhouette Studio version 4, you’d right click and select “Group”.
    7. Now, we have to deal with the empty space in the design. To fill it in a little more, I just add some flourishes, dashes, and so on. I first drew one shape using the Smooth Drawing Tool (pencil icon, left side), then copy and pasted it and resized it to make more. Design Tutorial: Text Cut Out Designs in Silhouette Studio - by cuttingforbusiness.com
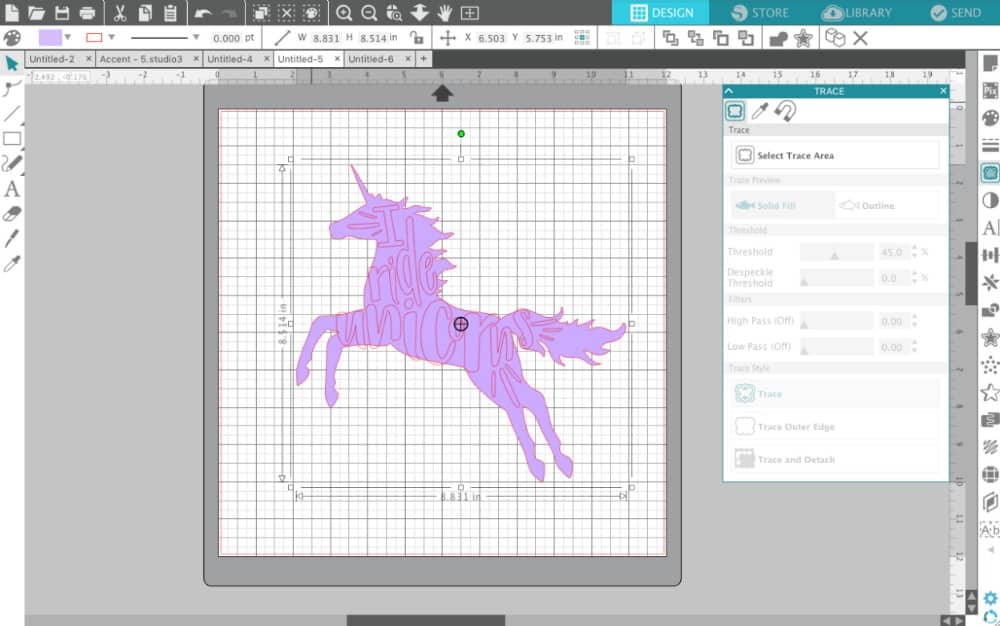
    8. Now, I like to turn my picture a solid color. Choose any color and fill in your traced image. Design Tutorial: Text Cut Out Designs in Silhouette Studio - by cuttingforbusiness.com
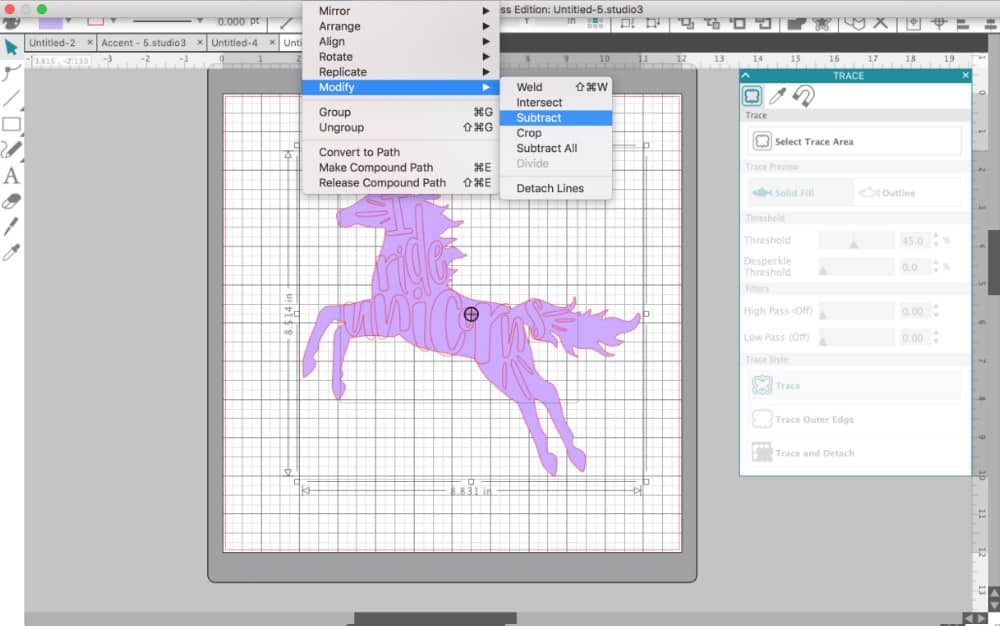
    9. Last, select the text and subtract it from the image. In Silhouette Studio 4, you’d select, “Object”, “Modify”, “Subtract”. Design Tutorial: Text Cut Out Designs in Silhouette Studio - by cuttingforbusiness.com
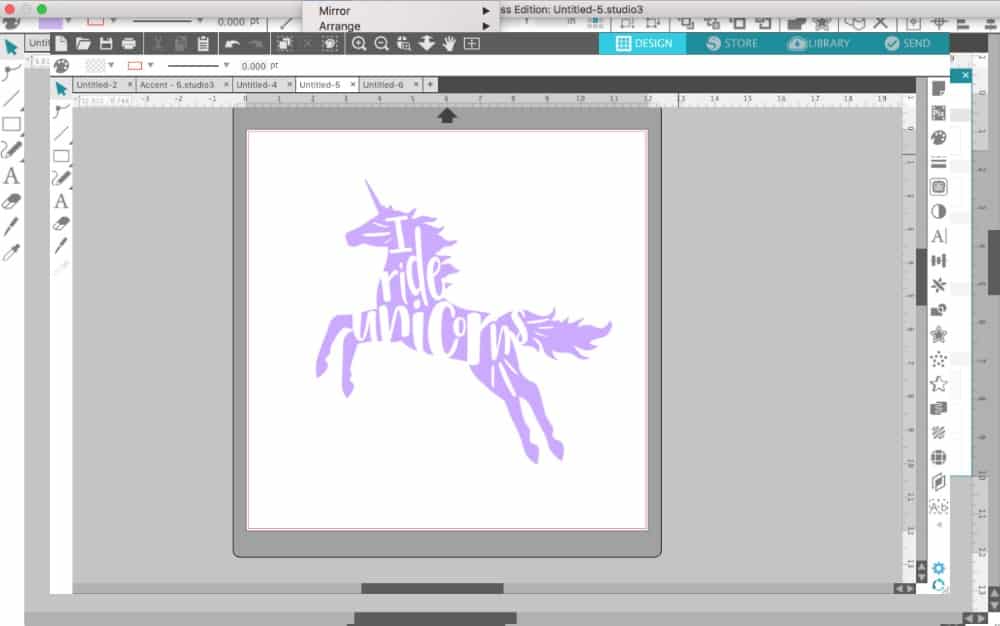
    10. That’s it! Here’s what the finished design looks like: Design Tutorial: Text Cut Out Designs in Silhouette Studio - by cuttingforbusiness.com
      Or, here’s the design in holographic heat transfer material:Design Tutorial: Text Cut Out Designs in Silhouette Studio - by cuttingforbusiness.com

    Now, get out there and try it yourself! Remember, unique designs pay off!

    Download the file I created in this tutorial – free with commercial use license included at this link in .studio3 format.

    No time to design right now? Save this post to Pinterest and come back to it later:

    Design Tutorial: Text Cut Out Designs in Silhouette Studio - by cuttingforbusiness.com

  • Tutorial: Facebook Cover Videos

    I’ve said it a million times before and it bears repeating: Facebook is pushing to get themselves into the video aspect of the online world. With engagement being the key to success on Facebook, it’s no surprise that they recently introduced cover videos for pages. Let’s take a look today.

    What are Cover Videos?

    Just like your cover photo on your Facebook page, you can now add a video instead.

    Video Specifics of Facebook Cover Videos

    • Facebook suggests a ratio of 820 pixels by 312 pixels. Now, this is a really odd ratio that I was concerned about, but Facebook allows you to move the video around once uploaded, so it turned out to not be a big deal. Make sure your video is larger than these dimensions.
    • Videos can be between 20 and 90 seconds long.
    • You can loop a short video.
    • The cover video automatically plays when a visitor visits your page.
    • The bottom corner features a mute/unmute button.
    • Videos are muted to start. To hear the audio, a user must turn the sound on. This is important, because it implies that you shouldn’t have important audio with the video. Users are likely to miss it. (Example: a video of you talking wouldn’t be ideal.)
    • Videos are shown on both desktop and mobile sites, but a still shot from the video is shown if a visitor is using the Facebook app.
    • Facebook cover videos are still being rolled out to all pages, but most people are reporting the option. If you don’t see the option, watch for it to roll out to your page soon.

    Tutorial to Create a Facebook Cover Video

    1. Record a video related to your brand. If you aren’t much of a videographer (raising my hand!), you can create a brand related video mockup through Placeit like I did. (Save 15% on purchases through this link.) Learn more about Placeit video mockups in this previous post.
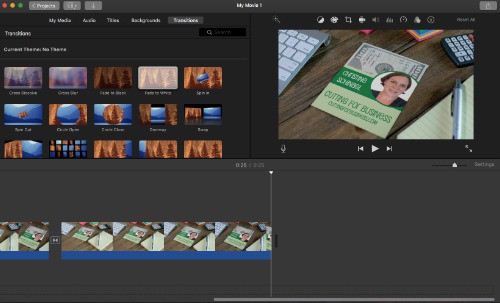
    2. Edit your video as needed. I used iMovie to simply loop the video to make it at least 20 seconds. Feel free to use the video editor of your choice.Tutorial: Facebook Cover Videos - New Facebook Feature! - by cuttingforbusiness.com
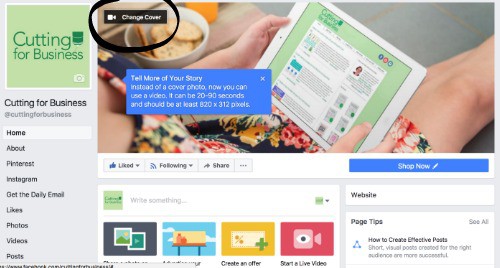
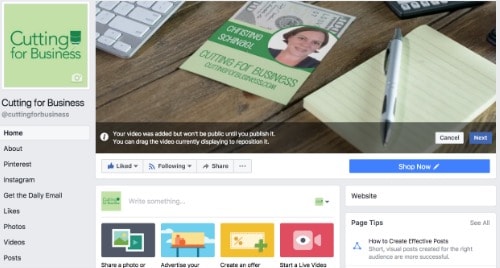
    3. Head to your Facebook page. In the top left corner of your Facebook page cover photo, click “Change Cover”.Tutorial: Facebook Cover Videos - New Facebook Feature! - by cuttingforbusiness.com
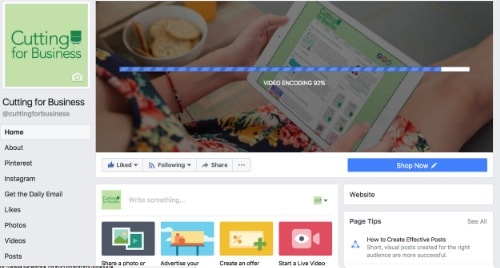
    4. Your video will take a few minutes to upload. Tutorial: Facebook Cover Videos - New Facebook Feature! - by cuttingforbusiness.com
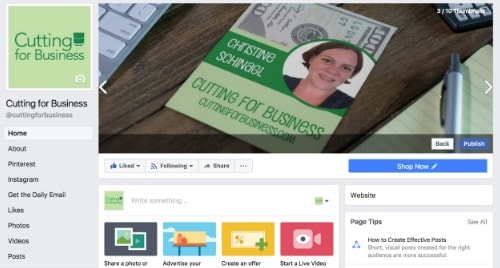
    5. After uploading, you can drag the video around. Then, you’ll choose a thumbnail to be shown from the video if the video is unavailable and within the Facebook app. After selecting, click “Next”. Tutorial: Facebook Cover Videos - New Facebook Feature! - by cuttingforbusiness.com
    6. Finally, click “Publish” to put your video live on your Facebook cover. Tutorial: Facebook Cover Videos - New Facebook Feature! - by cuttingforbusiness.com

    Ready to see my Placeit video live on my page? Click here to visit the Cutting for Business Facebook page.

    Tell me in the comments, will you use this new Facebook feature in your Silhouette or Cricut small business?

    Save this post to Pinterest so you can find it later!

    Tutorial: Facebook Cover Videos - New Facebook Feature! - by cuttingforbusiness.com

  • How to Organize a Drive Through Decals Fundraiser

    With Back to School on the horizon, one thing is certain: Schools will be in need of fundraisers.

    If you’re close to your PTO or PTA, you could suggest a Drive Through Decals fundraiser event to raise money for your school.

    How to Organize a Drive Through Decals Fundraiser - cuttingforbusiness.com

    What is a Drive Through Decals Fundraiser?

    The premise behind a Drive Through Decals event is simple: Customers line up in their cars and make their way through an assembly line to get a decal applied to their car. The school buys the decals (from a small business owner like you!) and upcharges to make a profit.

    Organizing the Drive Through Decal Event for a School

    1. Plan to hold the event in the school parking lot. Immediately before or after school or an event is ideal.
    2. Make up flyers with the time and date of the event, location of the event, a picture of the decal to be applied, and the cost. I’d charge between $5 and $8 and accept cash only. A design with the school or sports logo is perfect!
    3. Stop 1: Customer pays for the decal. Be sure to have an extra jar for additional donations available, as well as extra decals that the customer can purchase and apply themselves.
    4. Stop 2: A spot on the back window is cleaned with a paper towel and alcohol for the decal to be applied.
    5. Stop 3: The decal is applied and the transfer tape is removed. The customer drives away.

    Decal Crafting Tips

    • Decals that are around 4 inches by 4 inches work great for Drive Through Decals Events. All cars will have the same decal applied to them during the event.
    • Consider using white for the decals. This will ensure that they can be seen even on car windows with darker tints.
    • Decals should be precut in adhesive vinyl (Oracal 651 or similar), weeded, and have transfer tape applied before the event.
    • A few helpers during the event will make it run faster and smoother. Use common sense if having children help, since cars will be moving around.

    It’s that simple to host a Drive Through Decals event and you can plan them quite quickly. As the small business owner, you can be present and run the event yourself, or simply provide the decals and let the PTO/PTA handle the actual event.

    Don’t Limit Drive Through Decal Fundraisers to Schools!

    Of course, a Drive Through Decals fundraiser isn’t limited to schools! Try it for your child’s sports team, theater group, or any other group seeking funding.

  • Color Theory in Your Craft Business

    The subconscious mind is a powerful thing. Did you know that the colors that you use in your Silhouette or Cricut craft business can send a message to buyers without saying anything? This is known as color theory – and there has been enough information written about color theory to fill entire volumes of encyclopedias!

    If you want to start your own research on color theory, I highly recommend Color Matters as your first resource.

    What Colors Convey What Messages?

    Color experts have agreed that certain colors invoke thoughts and emotions in customers – subconsciously. Using expert research, here’s a list of common colors and the thoughts and feelings that they bring.

    • Red: Excitement, Youthful, Bold, Active
    • Orange: Friendly, Cheerful, Confident
    • Yellow: Optimism, Warmth,
    • Green: Growth, Peaceful, Health, Prosperity, Stable
    • Blue: Trust, Dependability, Strength, Content
    • Purple: Creative, Imaginitive, Wise, Original
    • Greys: Balance, Peacefulness, Calmness

    There are several fantastic color theory graphics around the internet that I compiled in a Pinterest board. Click here to visit it.

    A Real Life Example: This Blog

    The colors used on the Cutting for Business blog are not accidental. When I first began blogging, I sat down and wrote a list of what traits my blog would need to have in order to gain trust with the readers. I knew right off the bat that I needed to be relatable to small business owners – and I needed to gain trust to talk to them about something important – money. I headed to other websites that dealt with money like banks and online budgeting websites and found that many of them used green color schemes. After some research into color theory, green invokes colors such as growth, peace, prosperity, stability, and more (and it is the color of money!) So I went with it for this blog. After deciding I’d use green, I used color swatch websites to find the right shades.

    You can do the same thing I did with your logo and branding by asking yourself: “What do I want customers to feel when they see my company?” Write down emotions you want to invoke – and those that you don’t. Look at sites that sell similar goods in your niche, or large companies with similar products. Then, decide on the best colors for your website, products, and branding. Once you narrow in the color scheme, you can pick up great color combinations and swatches at sites like Coolors.com.

    Now, go take a look at your current color scheme and product colors and see if they are invoking the emotions that you intend.

    Color Theory in Your Craft Business - Silhouette Portrait or Cameo and Cricut Explore, Maker, or Joy - by cuttingforbusiness.com.