Whether you are heading out of town, have family or friends coming into town, or just need a break from your Etsy shop – there are a variety of reasons why you might want to put your Etsy shop into vacation mode.
Let’s face it: No one likes spammers or bot commenters.
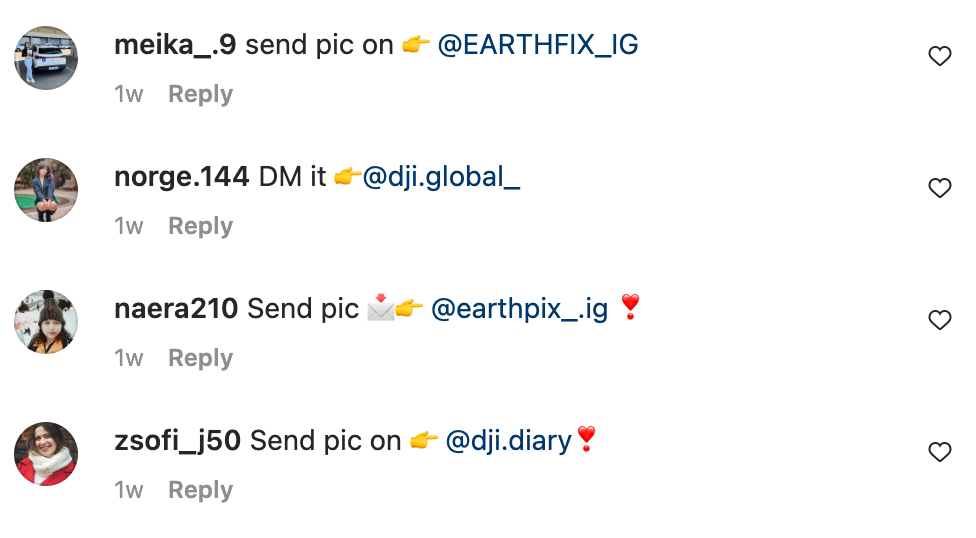
I have a few different Instagram accounts – and I help manage my husband’s accounts, too. Lately, there are so many spam comments on every single post. It’s pretty clear that most of them are bots, because they appear within minutes of posting.
Spam comments on Instagram.More spam comments on Instagram.
I did some research and got to the bottom of how to block spam comments. And, it only takes a few minutes.
Before you read the tutorial, know this method isn’t perfect and you’ll never entirely escape from all the spam comments. Also, some good comments will probably get blocked, too.
How to Block Spam Comments on Instagram
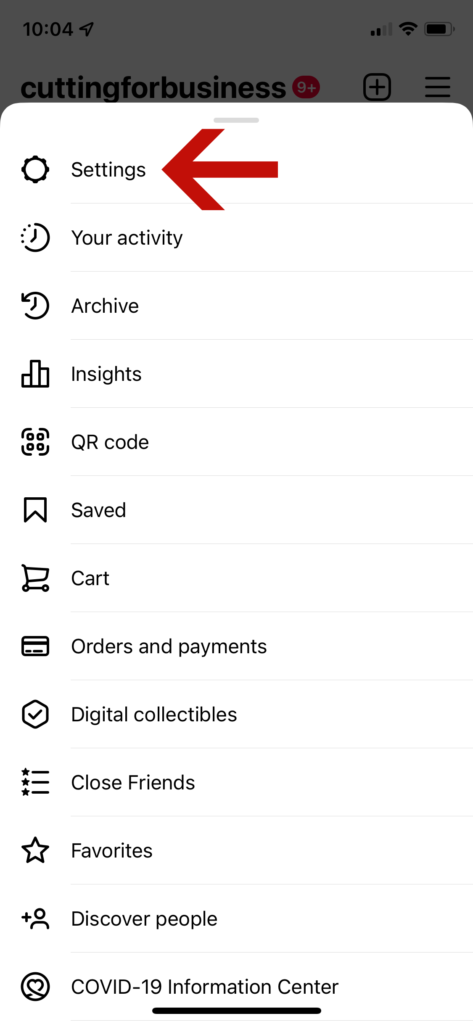
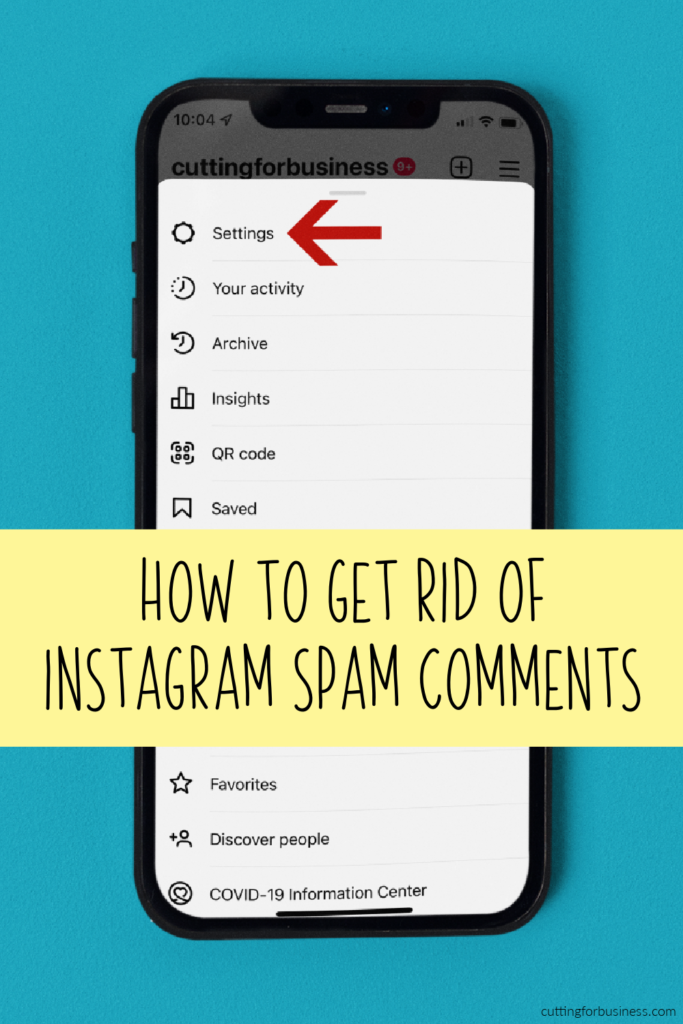
Open the Instagram app, and tap the hamburger menu in the top right corner. (It’s the three horizontal lines.)
Tap ‘Settings’.
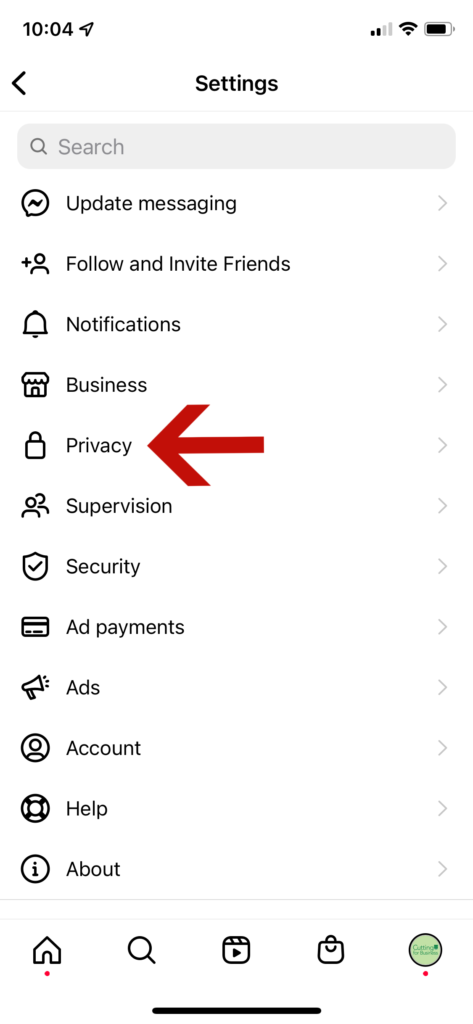
Tap ‘Privacy’.
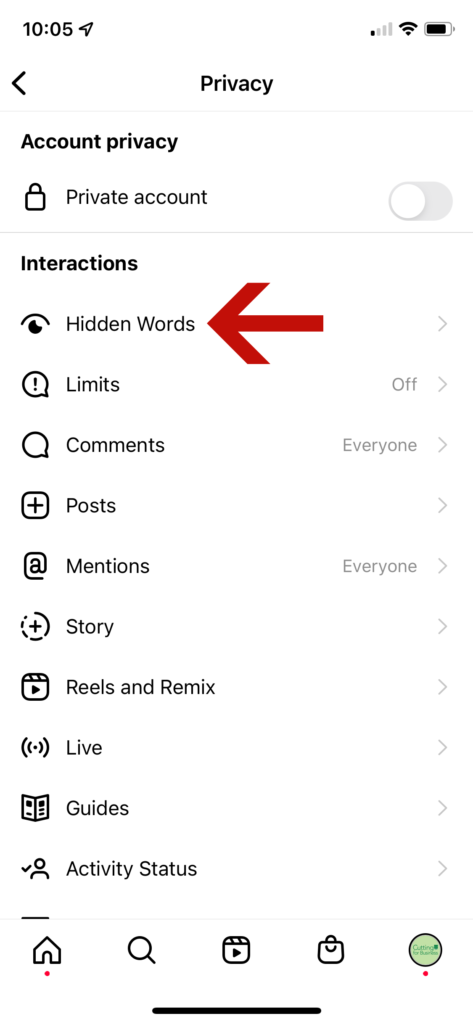
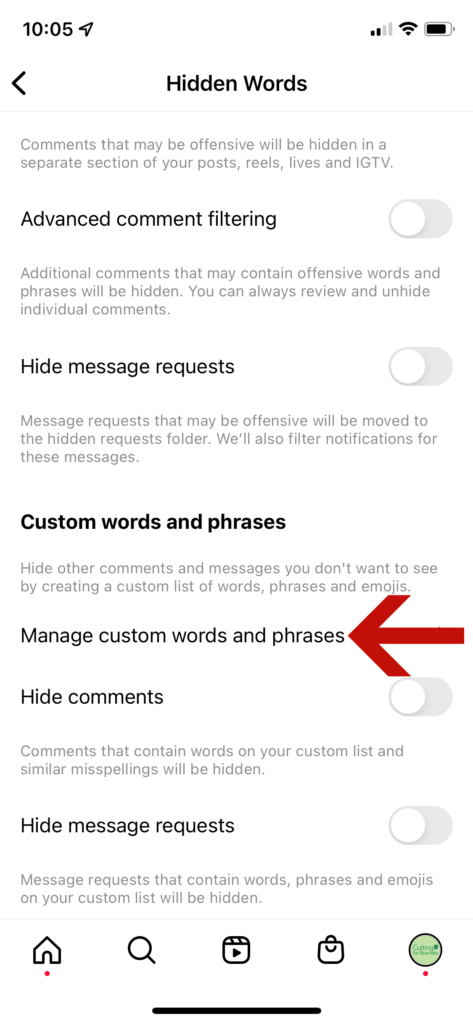
Tap ‘Hidden Words’.
Under ‘Custom words and phrases’, tap ‘Manage custom words and phrases’.
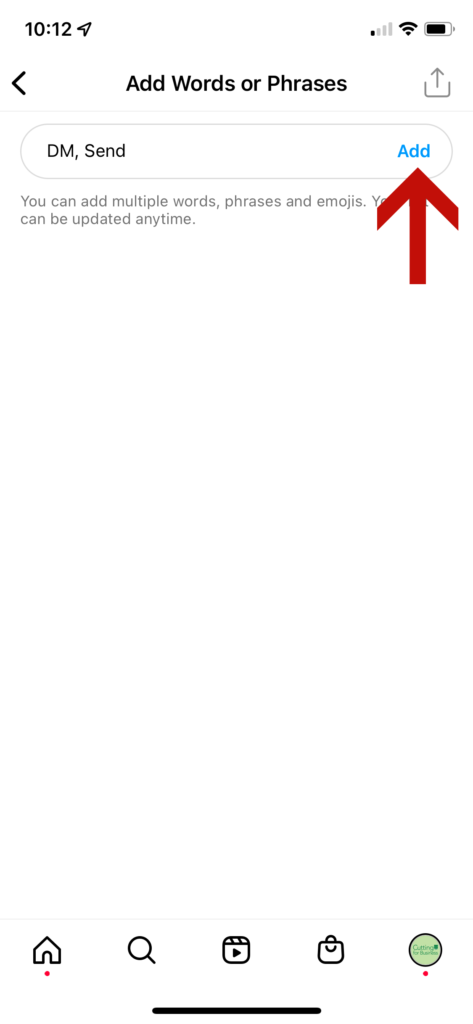
Add each word you want to block separated by a comma. (Hint: Not sure what words to add? Look through the spam comments on your posts for common words. In my case, I added the words ‘DM’ and ‘Send’ to my list.)
That’s it! You can return to your list at any time to add or remove words.
I implemented hidden words on all of my Instagram profiles a few weeks ago. I’ve definitely seen a huge drop off in spam bot comments. I haven’t noticed any negative effects from creating a hidden words list on Instagram.
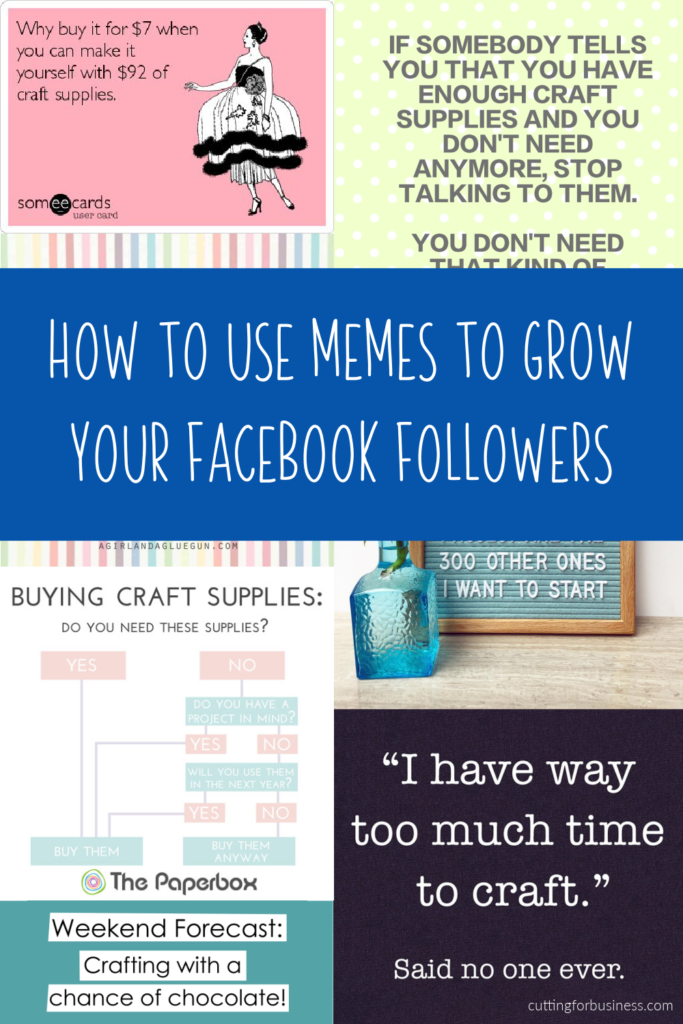
Everyone loves a good meme, right? Of course you do! Now, what if I told you using memes to grow my Facebook followers is one of the most effective strategies I use… and it’s free!
Today, I’ll share how I use memes to grow my Facebook followers on my Facebook Business Page.
Before we get started, you’ll want to make sure you have the Meta Business Suite app on your phone.
How to Use Memes to Grow Your Facebook Followers
Post a meme on your Facebook Business Page. If you need some guidelines on how to choose the perfect meme, I put them later in this post.
As people interact with your meme, interact with them. Show them you are interested in their comments.
Open the Meta Business Suite app. You can find it in the Apple App Store or Google Play if you don’t already have it.
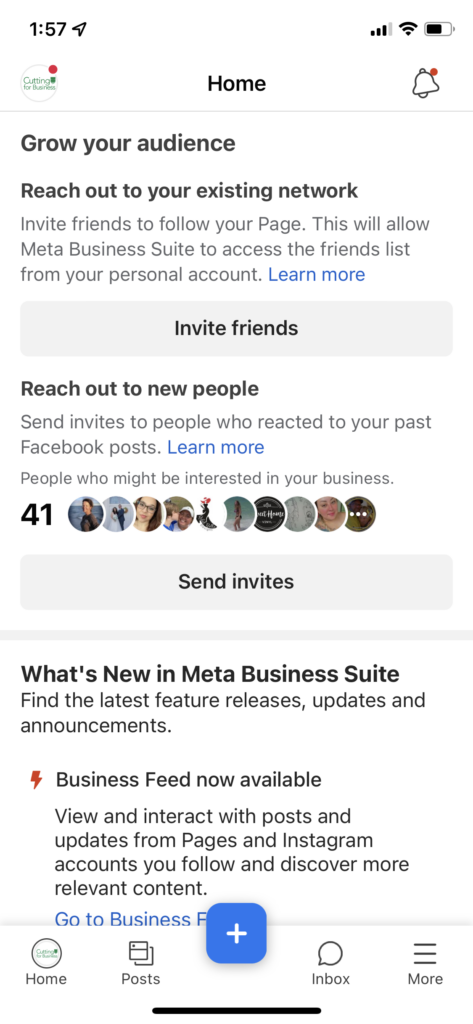
From the Home tab, you’ll see your most recent 3 posts, recent stories, recent ads, insights, and an Audience growth section, among others.
5. In the Audience growth section, you’ll see a section called ‘Post reactions’. These are people that have reacted to something on your page, but don’t currently follow you. Tap the ‘Send invites’ button.
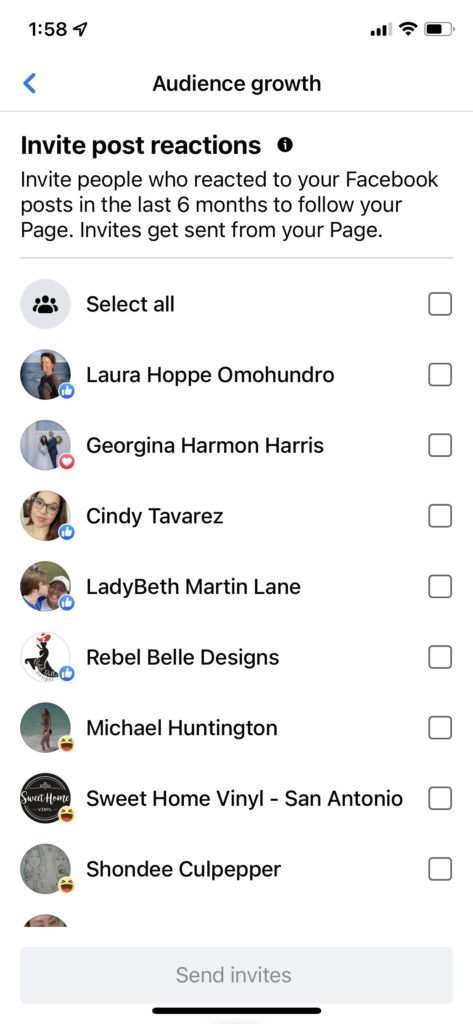
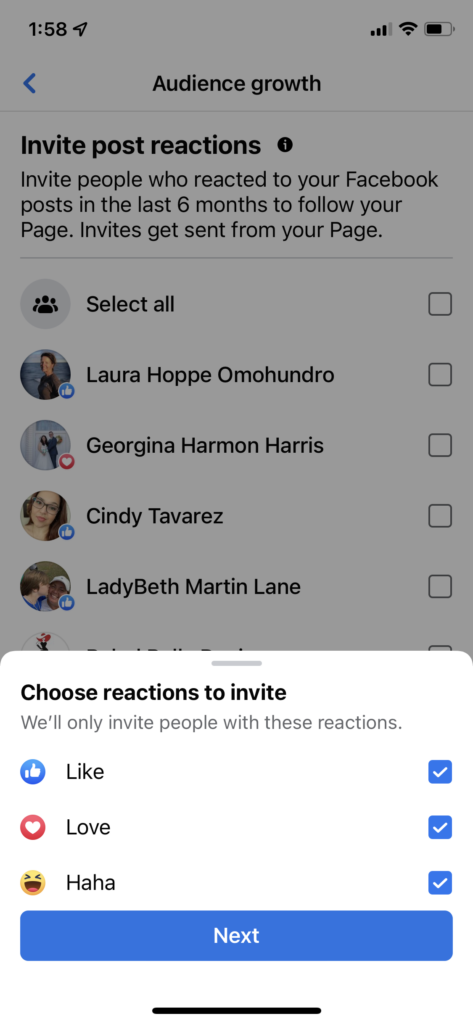
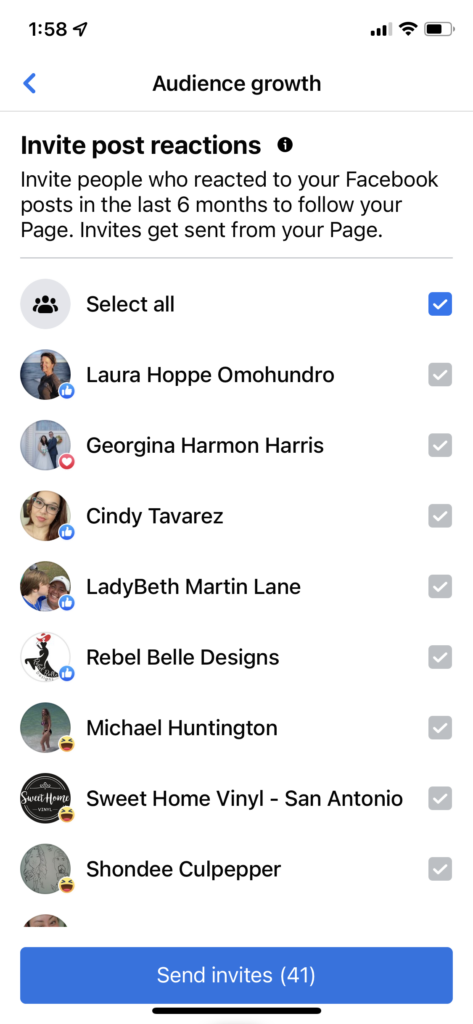
6. Work your way through all the screens checking which people you want to invite. I usually invite everyone.
Click the ‘Send invites’ button and invites will be sent from your page – not your personal account.
That’s it! I usually check for new people to invite daily. And, I’ve gotten thousands of new followers using this method.
3 Reasons Why Memes Work
Wonder why memes work to build your audience?
They build community. Memes are relatable and make people feel like they belong.
They are shareable. In their essence, memes beg to be shared. When people share a meme from your page – you reach more and more people.
Memes entertain. People like to be entertained – and memes do just that!
5 Tips for Choosing & Using Great Memes
Try to find memes that haven’t already made their way through the craft groups and pages. This is easier said than done.
Make your own memes.
Make sure they are safe for work.
Don’t belittle customers. Sure, there are a few really funny (and truthful!) memes about blog readers and customers out there. But, the goal is grow your page – not to offend people along the way.
Give credit where credit is due. Didn’t create the meme but know the author? Give them credit, too.
Tell me: Are you currently using memes to grow your Facebook Page audience? Will you start after reading this post?
With the start of a new school year, it’s the time to get organized. And, with 2 adults and 4 kids with different schedules – our days tend to get a little crazy.
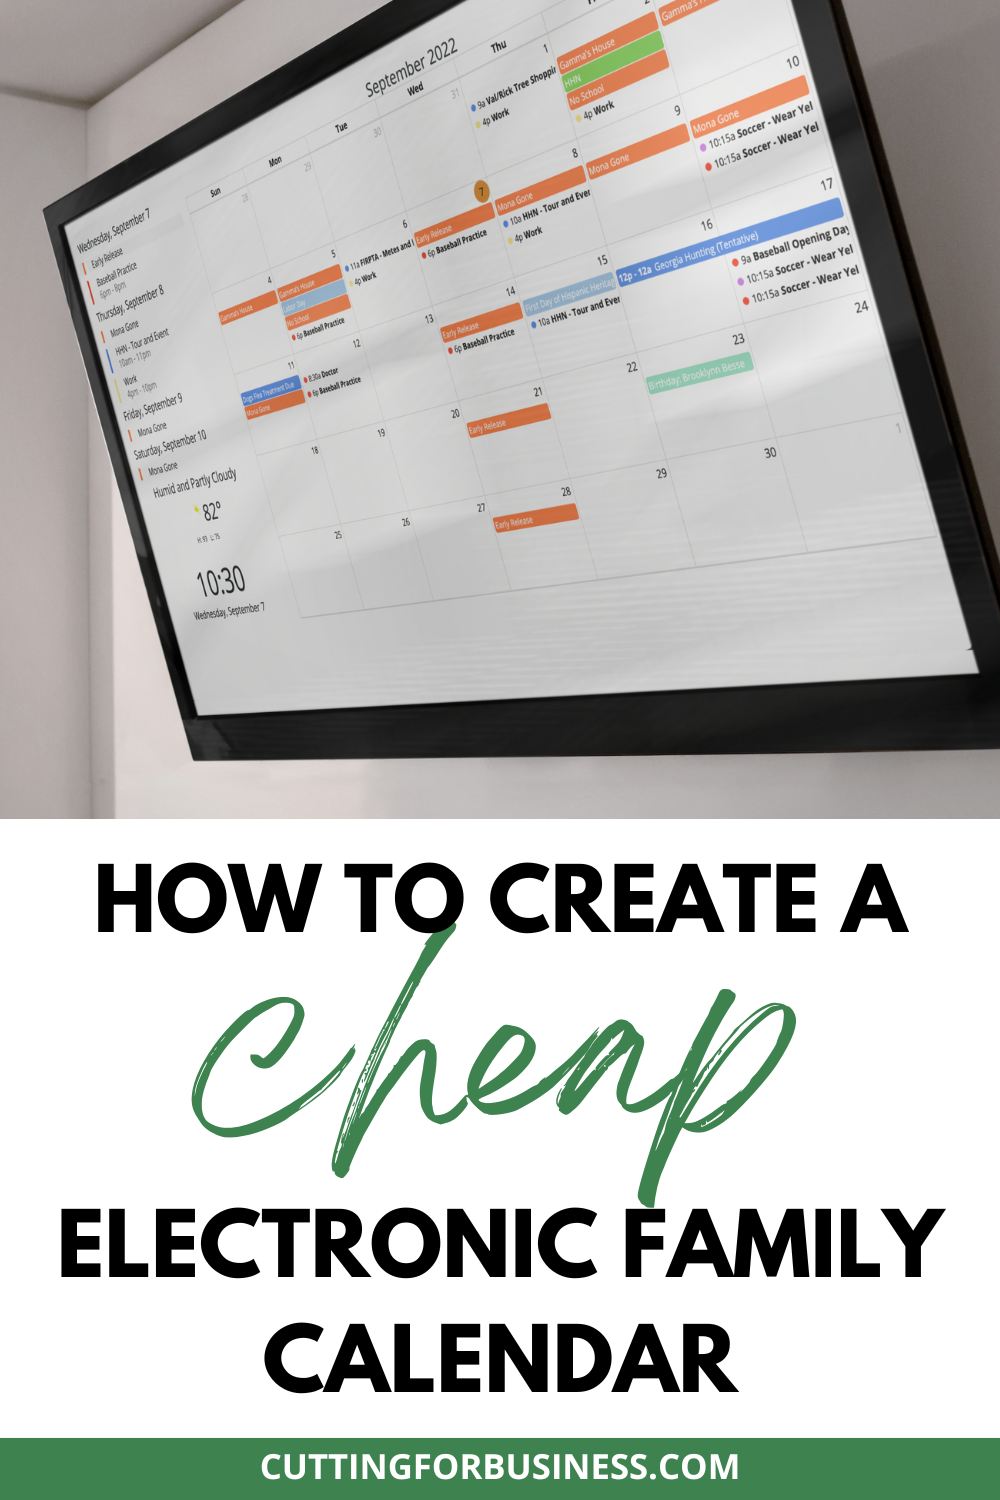
Today, I’m going to share how I (cheaply!) created an electronic calendar. The more organized my family life is, the more successful my small business is. Of course, you could use the calendar for your business, too.
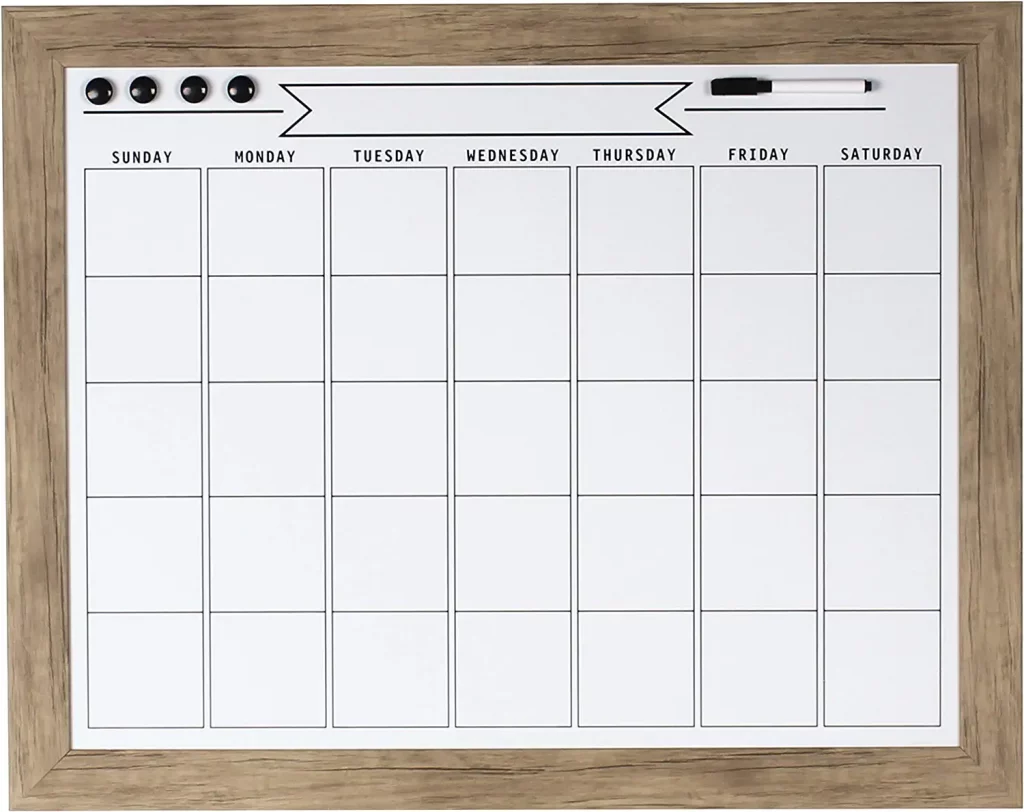
My previous solution was a framed dry erase calendar similar to the one below. (Amazon link: https://amzn.to/3ex8kaE.)
This calendar worked well – when I could get the family members to use it. And, when there were no last minute changes and the calendar didn’t get updated. The biggest problem though? I was constantly chasing down family members to write their events on the calendar. Quite often, the events never made it to our dry erase calendar.
So, I was in the market for a better solution. I kept seeing Facebook ads for the Skylight Calendar. If you aren’t familiar with it, Skylight is an electronic calendar that you can access through their screen and a phone app. I loved the calendar, but it doesn’t hang on the wall – and it is expensive at $300 and an optional monthly plan.
Like many families right now, we’ve tightened down our household budgets with the rising prices of life. But, I still needed a calendar.
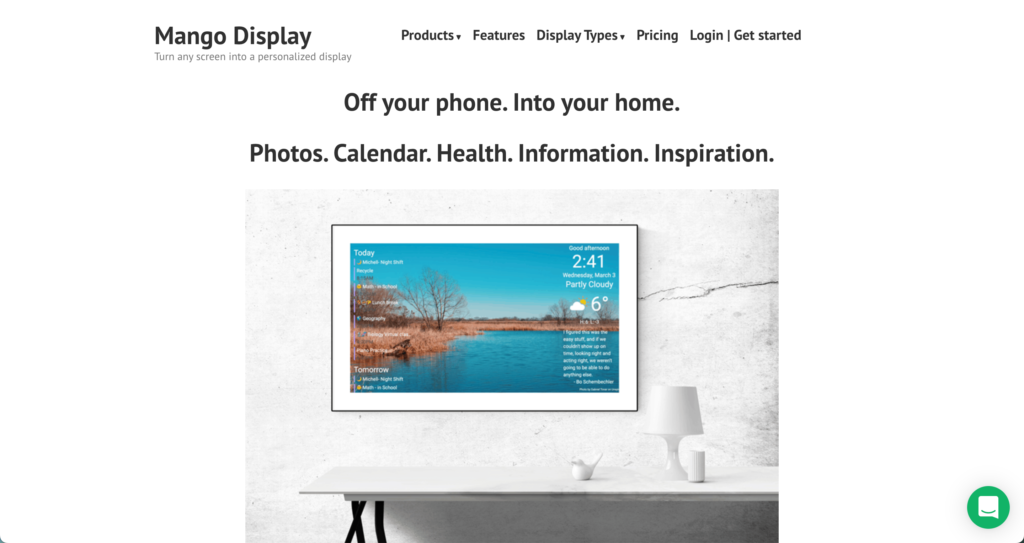
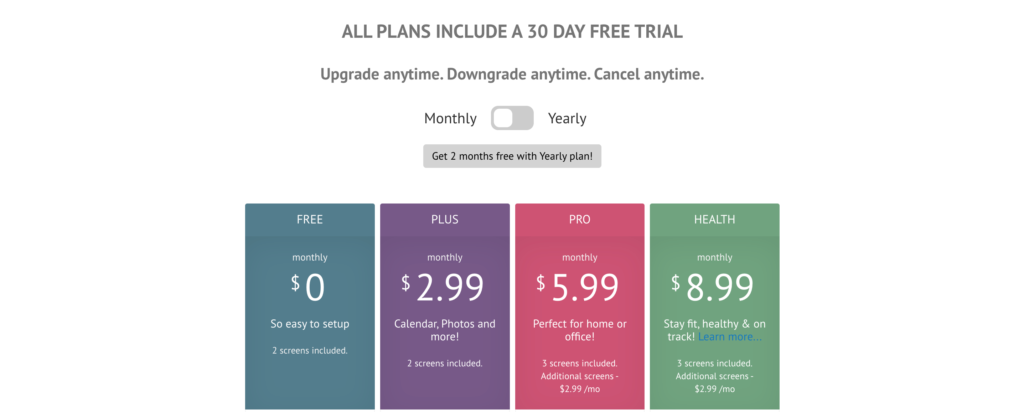
What I did have was an old tv sitting around not being used. After some research, I found some software called Mango Display. It allows you to build a custom calendar and integrate it with your Apple Calendar, Google Calendar, or Microsoft Calendar.
Step-by-Step Tutorial to Create an Electronic Calendar
Find a screen to use. You could use an iPad, an Android tablet, or a tv, depending on how large of a screen you want to use. I used an old flat panel tv that didn’t have a browser. This means that I needed to buy an Amazon Fire Stick – or something else to connect to the internet.
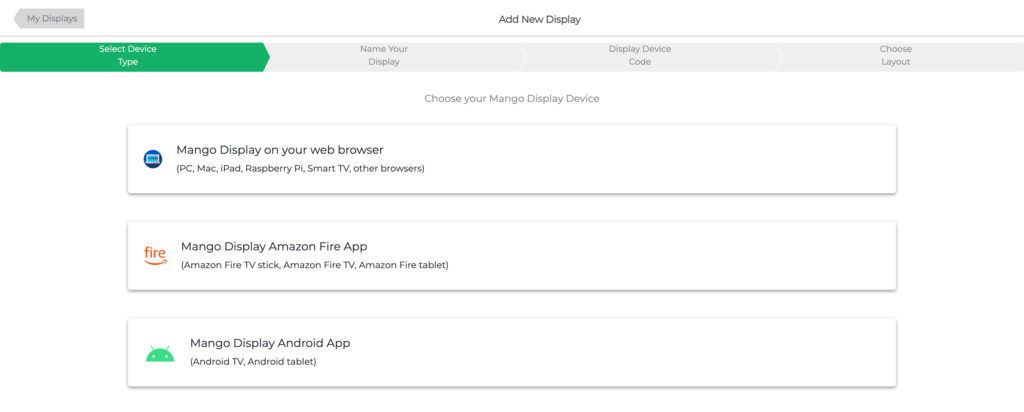
3. Click the ‘Get Started’ button in the top right corner. After setting up your account, click ‘Add New Display’.
4. Choose the screen type you will be using. For my calendar, I used ‘Mango Display Amazon Fire App’.
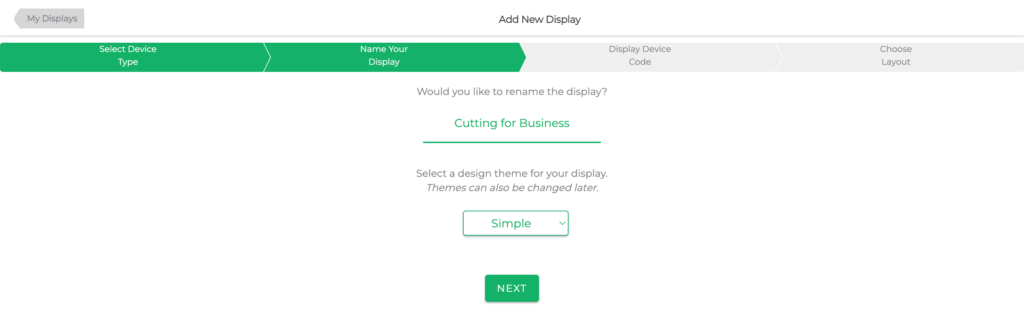
4. Name your calendar, choose a theme, and click the ‘Next’ button.
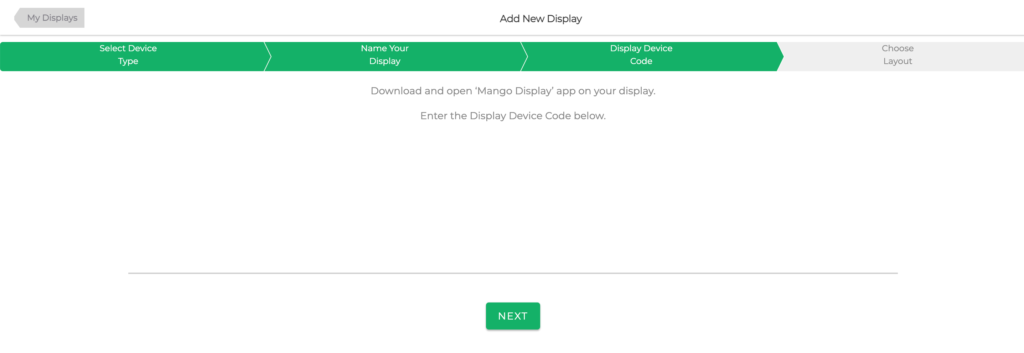
5. Download the Mango Display App on your device, open it, and get your code. Enter the code and click the ‘Next’ button.
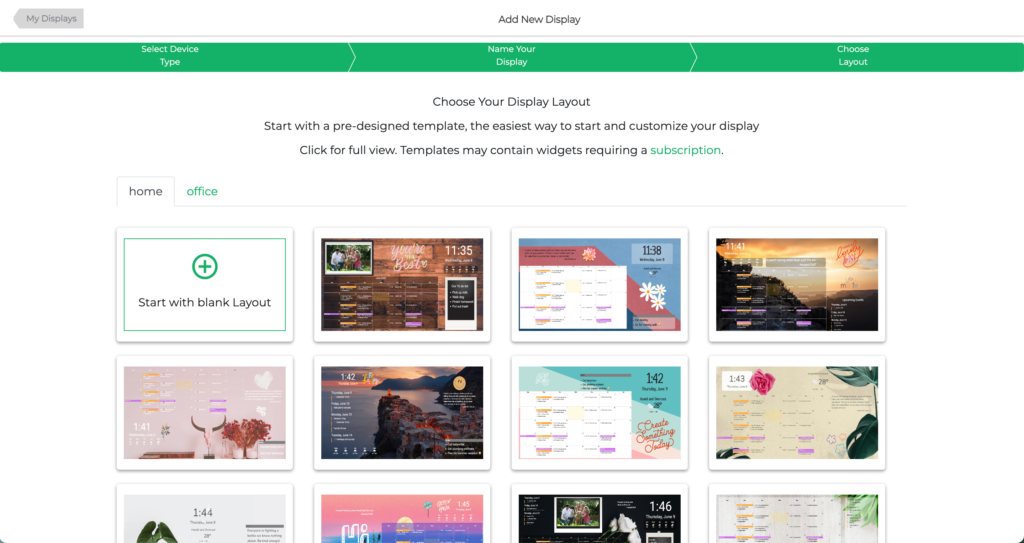
6. Choose your layout. To set up my calendar, I chose a blank layout.
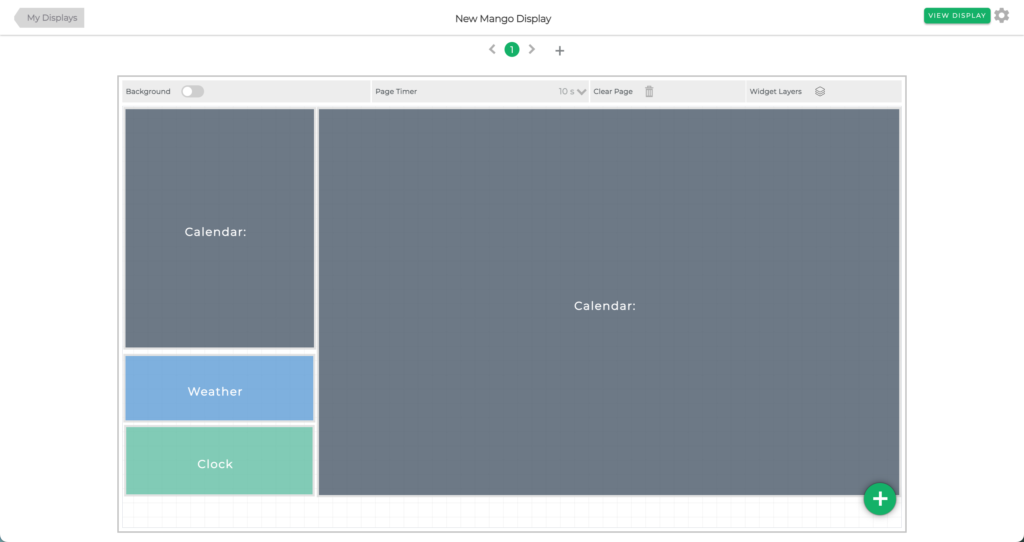
7. Click the green ‘+’ symbol in bottom corner to add widgets. Drag the widgets around to rearrange them. Click each widget, then click the pencil icon to control how the information in the widget displays or click the trash can to delete the widget. My calendar looks like this:
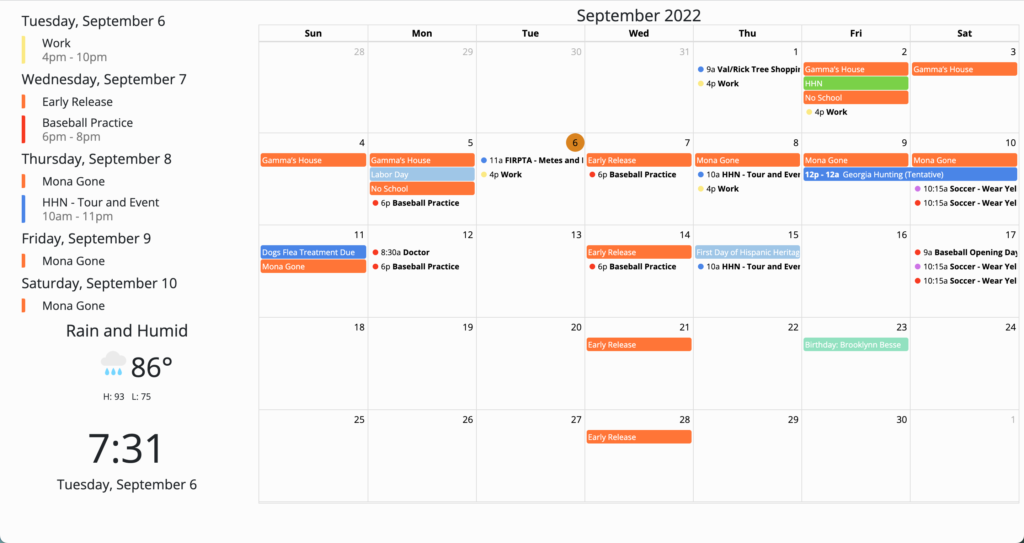
My calendar when displayed looks like this:
The top left widget is a calendar that is displayed as a list. It displays the next handful of events. The widget below this is the weather. The widget below the weather is the clock. The large calendar is connected to my Google Calendar.
9. To add events to my Google Calendar, I can either access calendar.google.com on a browser or through the phone app. I also added the Google Calendar app to my kid’s devices and they can add events as well. For our family of 6, it was easiest to use a family calendar on Google since we have a mix of Apple and Android phones.
So, will you be creating an electronic calendar? Or maybe you will just buy one? Or are you sticking with a more traditional calendar? Let me know in the comments.
One more thing. This post is not sponsored by Skylight or Mango Display. I created an electronic wall calendar for my family and everyone that comes to our home asks about it. So, I’m sharing it with you.
Earlier in the summer, I purchased a Remarkable tablet to better organize my life. After using it for the entire summer, I’m ready to share my thoughts on the Remarkable 2.
What is a Remarkable 2?
Never heard of the Remarkable2? Remarkable is an e-ink tablet. If you are familiar with a Kindle, a Remarkable 2 looks like a larger Kindle that you can write on. Put simply, it can replace your paper notebooks.
How Am I Using the Remarkable 2?
To understand how I’m using my Remarkable, you have to understand how I (used) to manage everything in my life. I used to use spiral notebooks. I had a spiral notebook for Cutting for Business. I had a notebook for family stuff – like meal planning, grocery lists, and kid’s stuff. I had a notebook for each aspect of my life.
This system worked well and served me well for years. But, there were a few problems: 1) Sometimes I would find myself without the notebook I needed. For example, I’d be at the store and I would have a great idea for a blog post. But, I wouldn’t have the Cutting for Business notebook with me. 2) Carrying around different notebooks
Features of the Remarkable 2
Screen writing surface feels like pencil and paper
10.3 inch screen
Weighs 14.1 ounces
8 GB storage capacity
Can open PDF files
Syncs to a cloud
How Long is the Battery Life on the Remarkable 2?
Remarkable notes that the battery lasts for around 3 weeks when used for 3 hours daily. I’ve found this battery life estimate to be correct. I’ve been charging my Remarkable2 about once a month.
How is it Different from an iPad and Apple Pencil?
A Remarkable2
FAQ About Remarkable2
Q: Does the Remarkable 2 have a camera? A: No, the Remarkable 2 does not have a camera.
Q: Can you browse the internet on the Remarkable 2? A: No, the Remarkable 2 does not have a web browser.
Q: Can you watch movies on the Remarkable 2? A: No, the Remarkable 2 does not play movies.
Q: How long does the battery last? A: Remarkable claims that the Remarkable 2 lasts for approximately 3 weeks with daily usage of
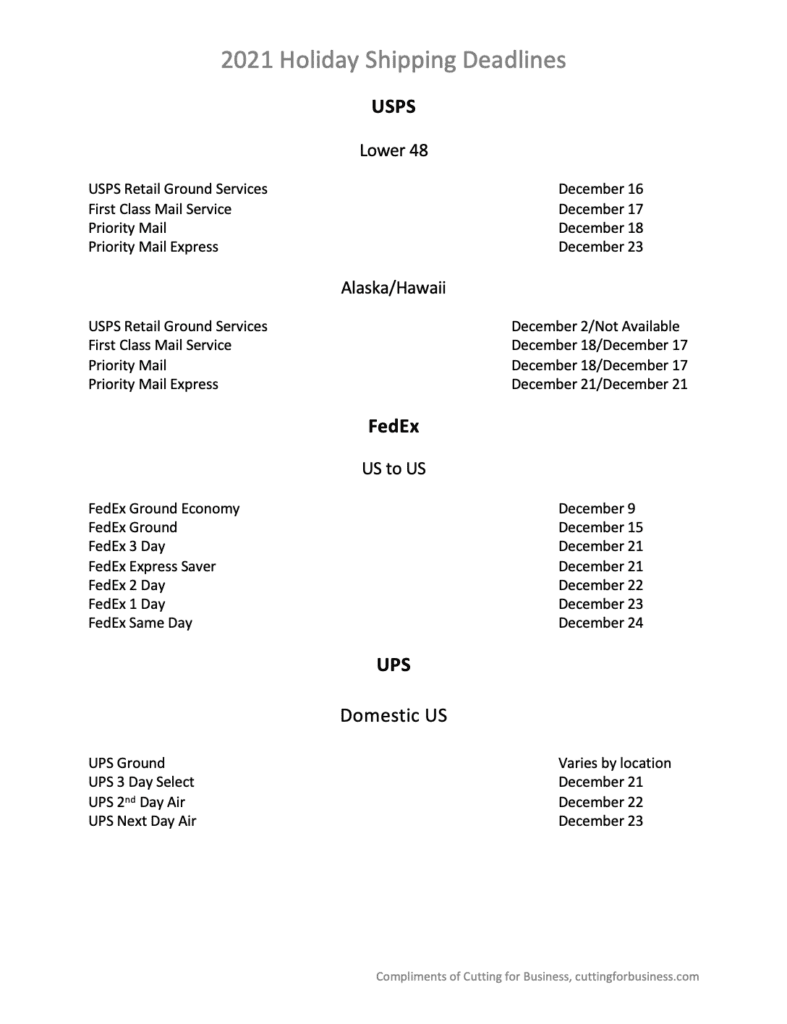
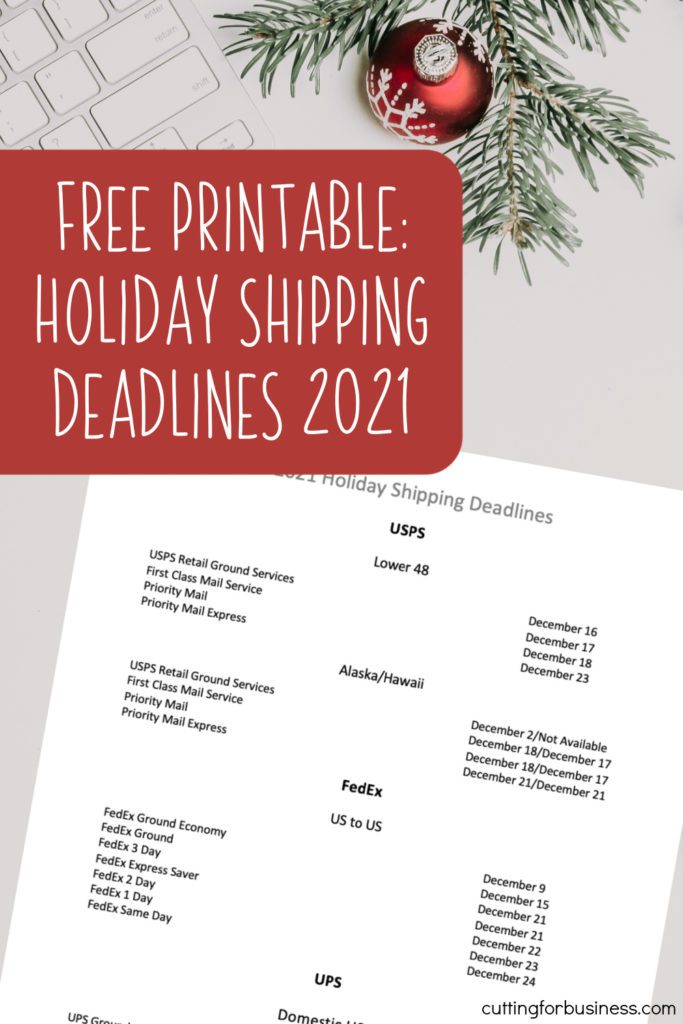
The major package carriers recently released their holiday shipping deadlines for this year, 2021. Now, I’ve got them all in a quick printable that you can print and hang in your workspace – or screenshot it on your phone.
If I can offer any advice this year, it is ship early! Throughout this year, we’ve seen delays of all types for mail and packages. I’d hate for you to have to deal with angry customers due to late packages.
Free Printable: USPS, FedEx, and UPS Holiday Shipping Deadlines 2021
The Pay What You Want model is a promotional pricing strategy that advertises to customers that they can set their own price for your product. You may have also been seen it called ‘Pay What You Can’ or the ‘Value for Value’ model.
While this ‘new’ concept has been gaining traction lately, it’s not new at all. If you have ever gone to a dealership and purchased a new car, you’ll know that many dealerships put a price on a car. However, the customer doesn’t usually pay the ‘sticker price’ – that’s the just the price listed. Instead, you haggle with the salesman to get a lower price… or the price you want to pay.
Similarly, if you’ve ever bought online through Ebay or Mercari, you’ll know that both marketplaces, along with many others, allow sellers to accept offers on their listings. As a buyer, when you submit an offer, you are essentially paying what you want if your offer is accepted.
Why Does the Pay What You Want Model Work?
Put simply, the Pay What You Want model works because it makes people feel good. When you make customers feel good about the deal, customers will buy from you.
Will I Lose Money with the Pay What You Want Model?
No. You will set a minimum price for your product. Customers will be able to pay the minimum price or higher. Obviously, your minimum price should be a price you don’t mind selling the product for.
How Do I Implement the Pay What You Want Model in My Craft Business?
How you implement a Pay What You Want model in your business will depend on what platform you use to sell your products.
I’ve gathered some links for you below to begin implementing a Pay What You Want Model in your craft business.
Etsy: Etsy does not have a way to implement Pay What You Want for customers.
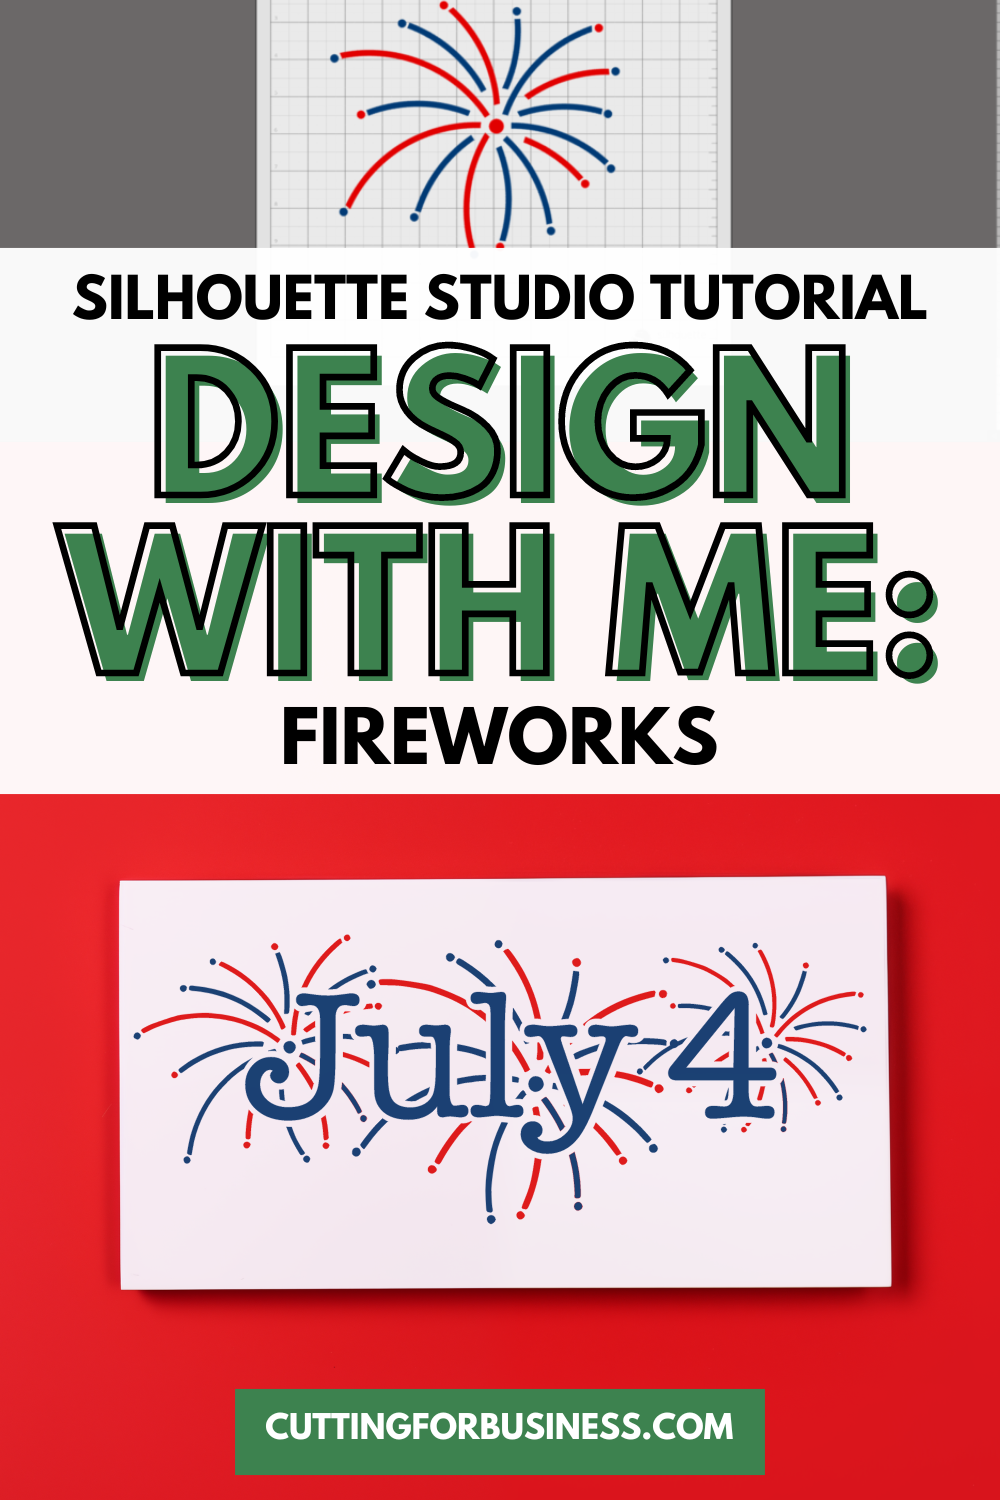
It seems that fireworks and summer go hand in hand. With July 4th coming up soon, I figured today would be perfect to take a few minutes to share a Silhouette Studio tutorial to draw fireworks.
Tutorial: How to Draw Fireworks
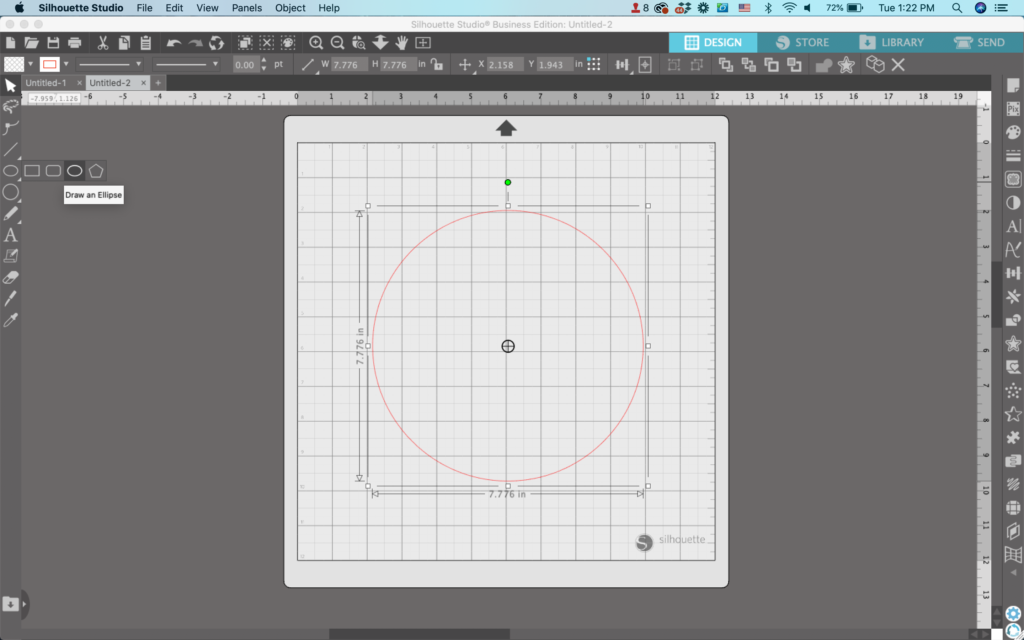
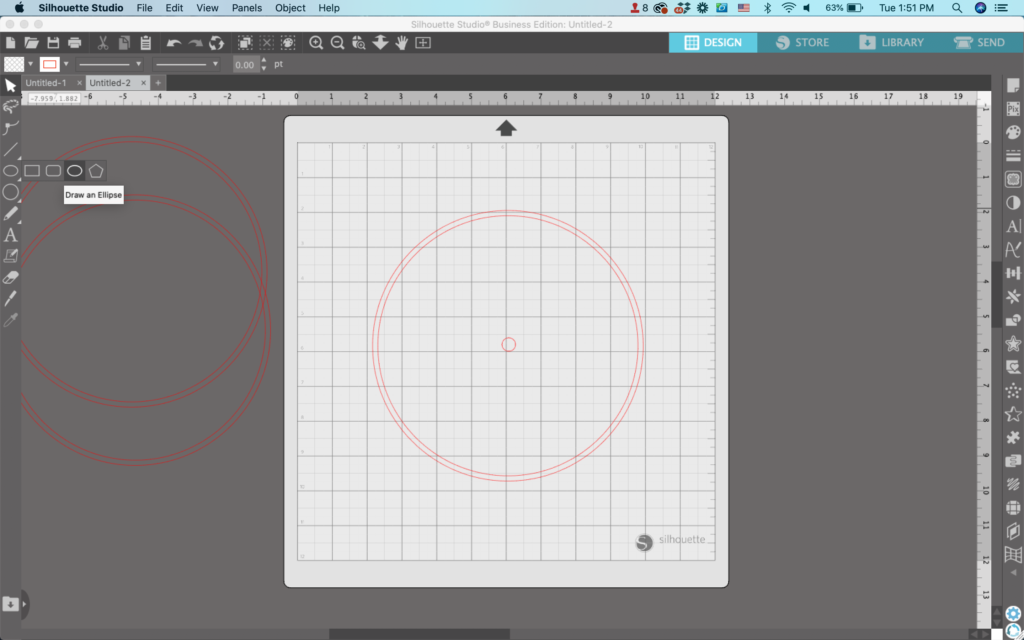
Draw a circle in Silhouette Studio using the ‘Draw Ellipse’ tool. Be sure to hold down the SHIFT key to make it a perfect circle.
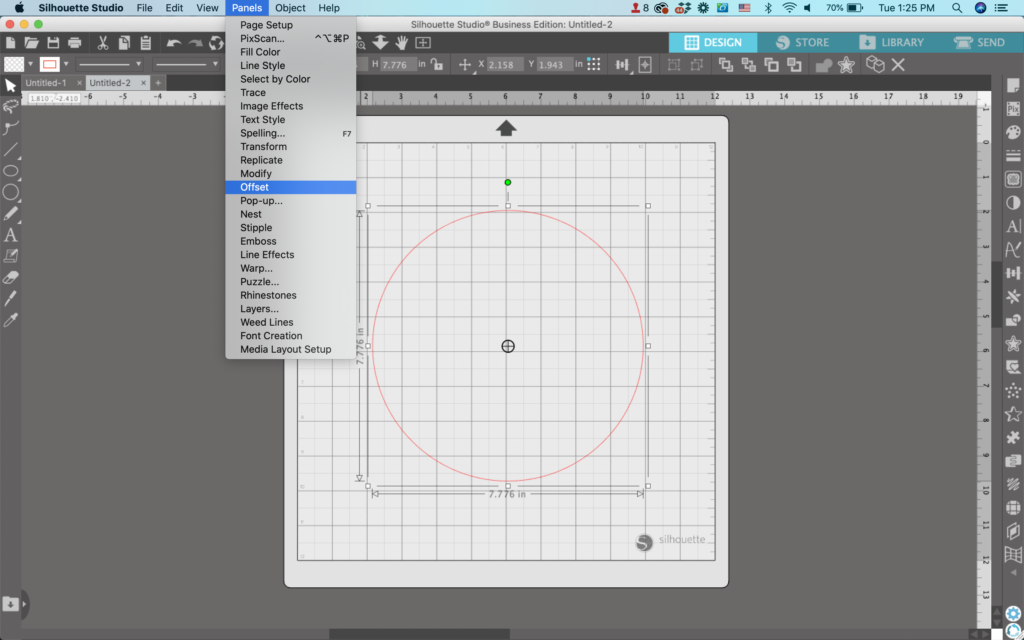
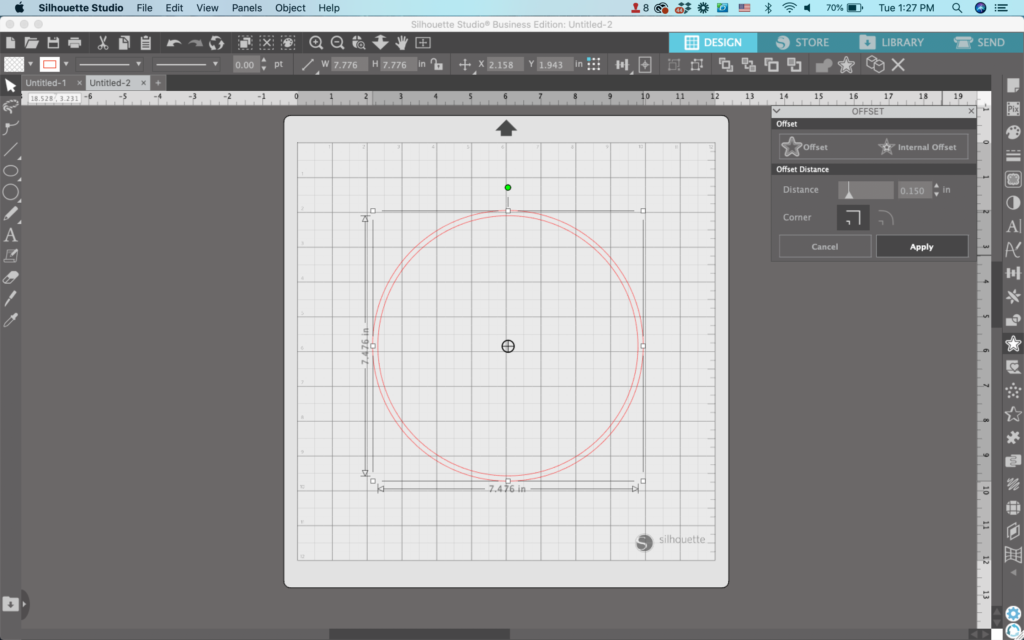
2. Navigate to ‘Panels’, ‘Offset’. Then, create an offset of your circle. The thickness is your choice, but I stick towards a thinner offset.
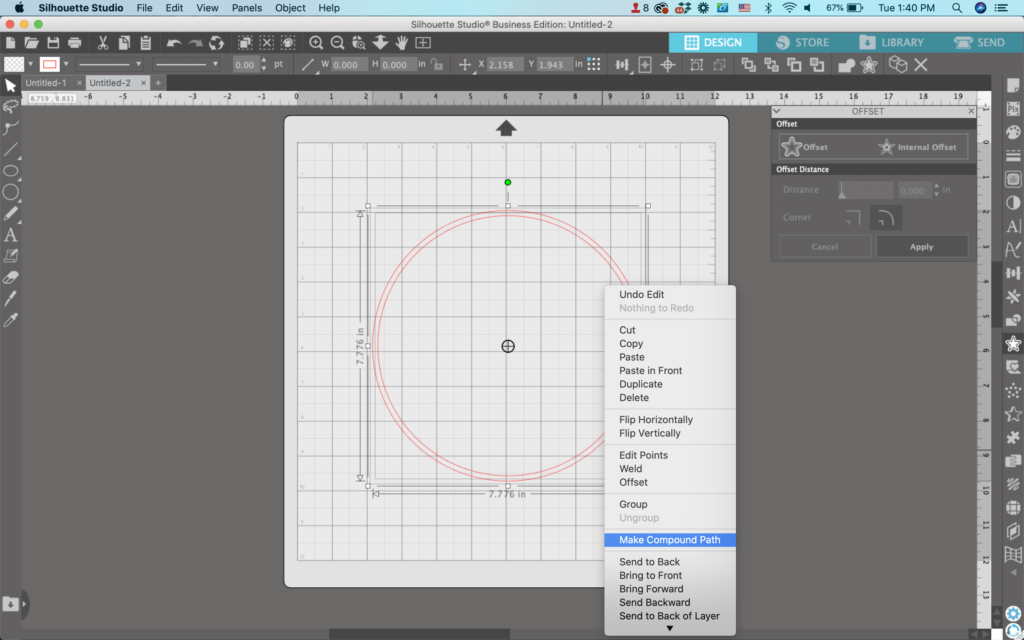
3. Select both circles and right click, then choose ‘Make Compound Path’.
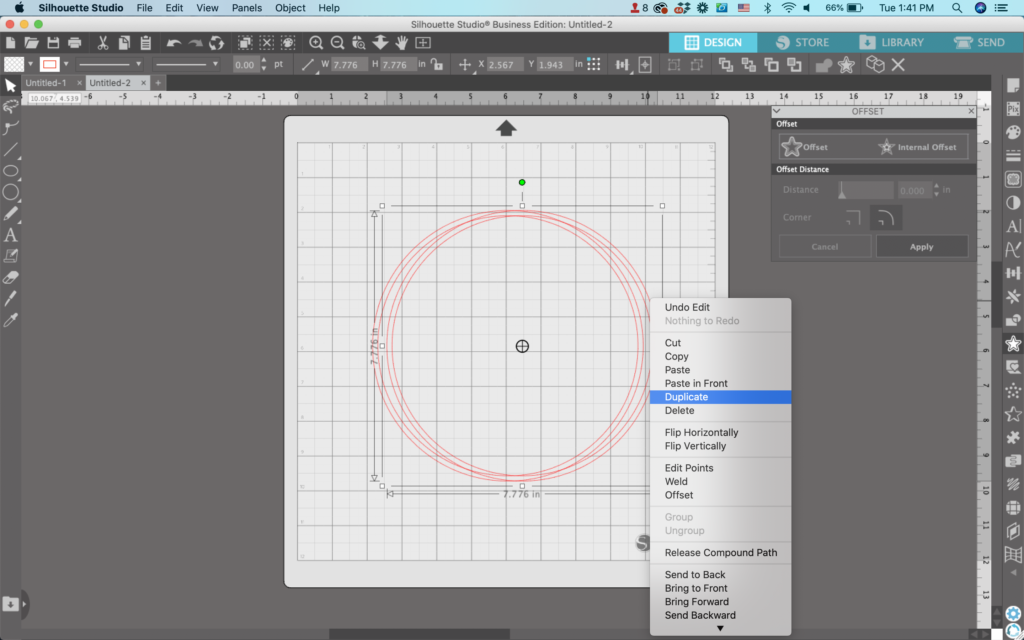
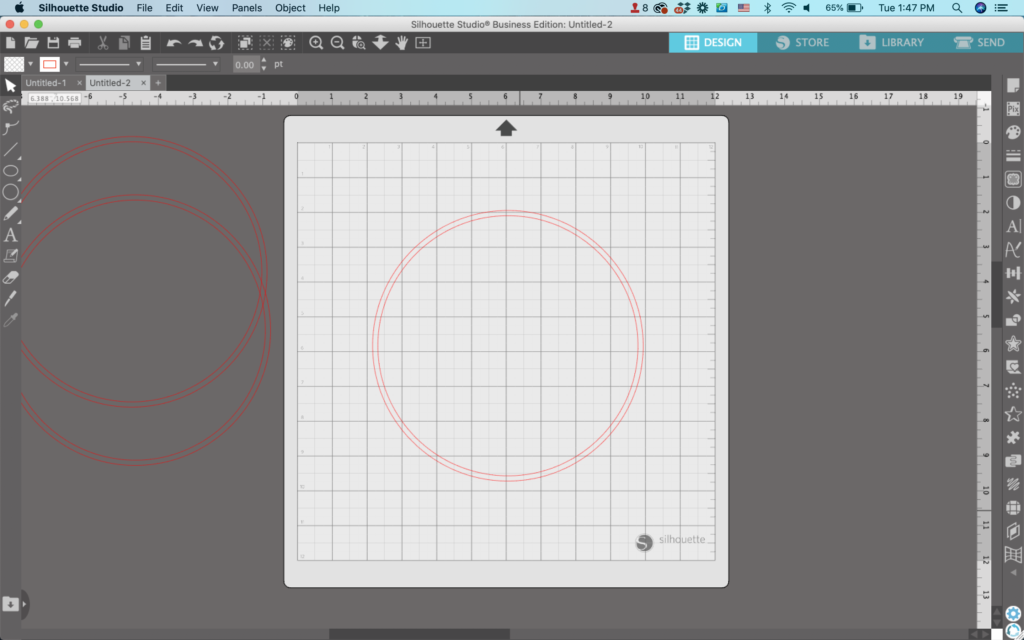
4. Right click again and duplicate your circle a few times. Then, move the duplicates off to the side.
5. Draw a tiny circle towards the middle of the mat. Again, hold down the SHIFT key to make a perfect circle.
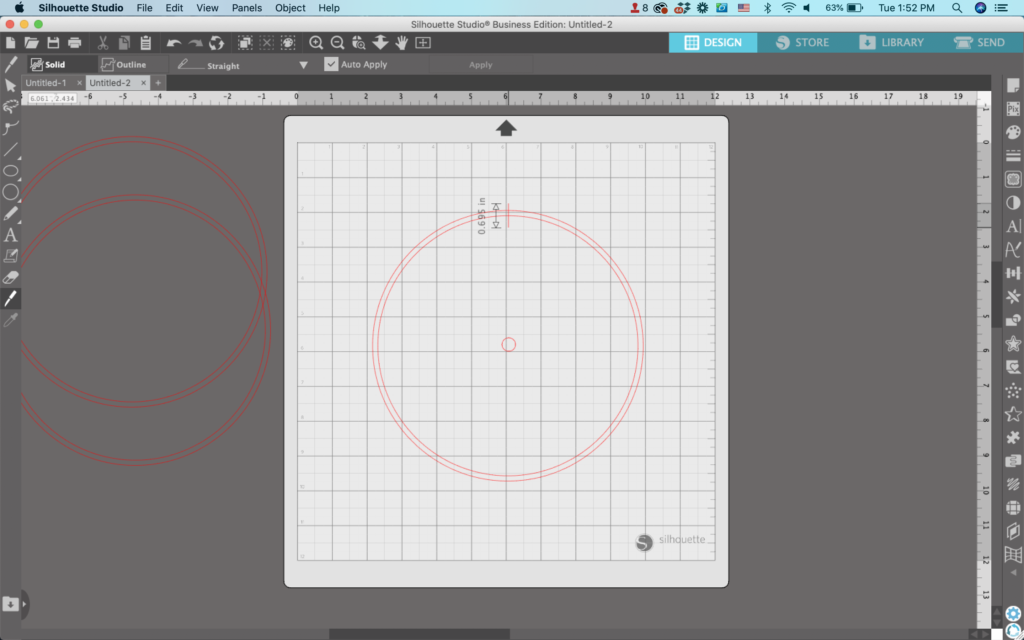
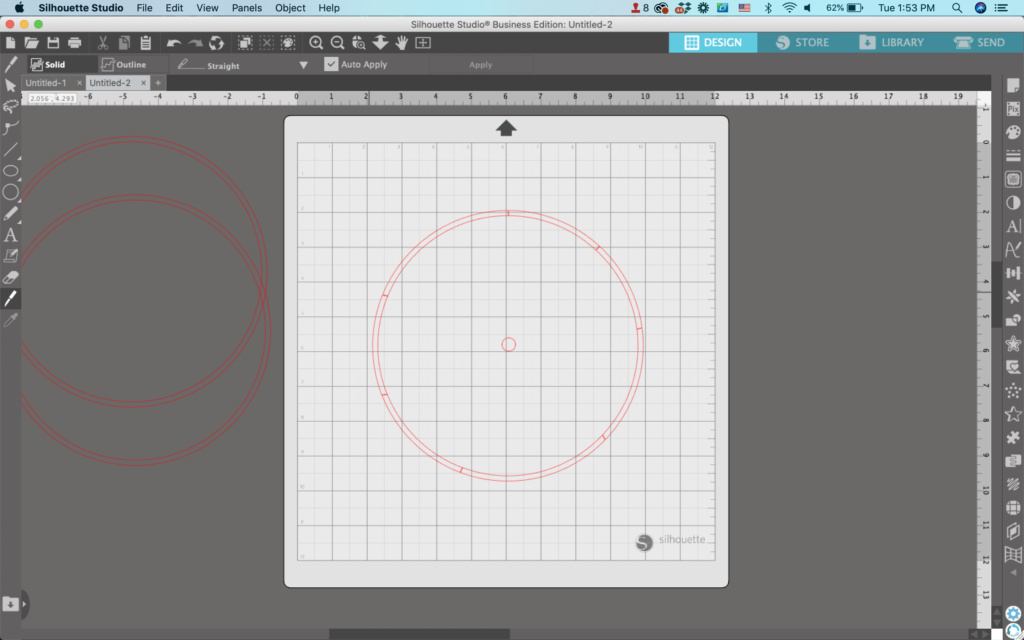
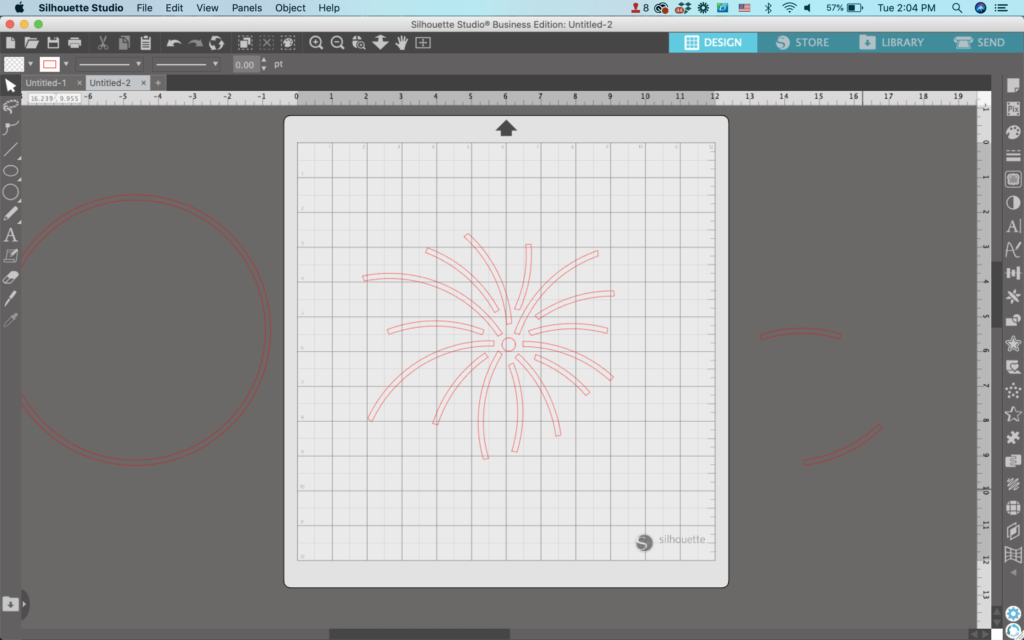
6. Using the knife tool, cut the circle into pieces. No need for precision.
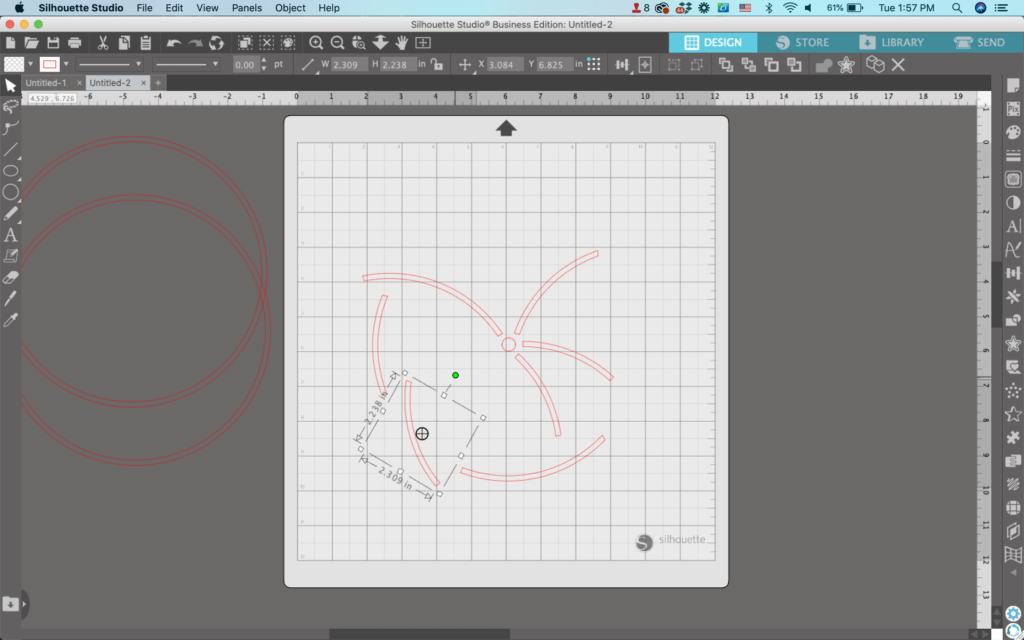
7. Drag the pieces of the circle around the tiny circle to start constructing your firework. Use the green circle to rotate the pieces.
8. When you’ve placed all the pieces from the first circle, use a knife to cut the next circle and place those pieces. The placement and number of pieces you use in your firework are up to you.
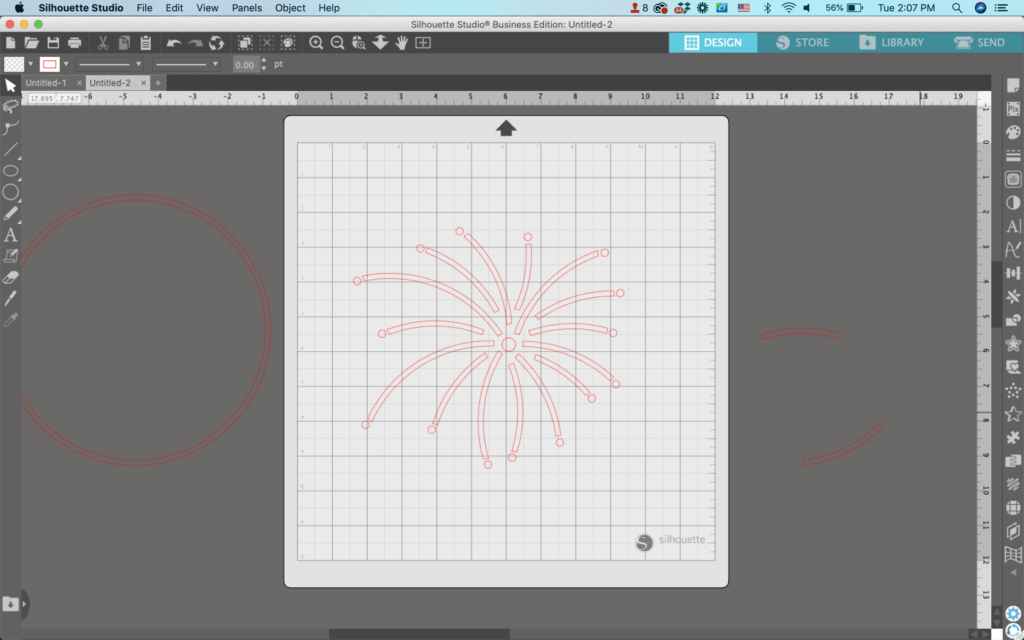
9. Add circles to the tips of each firework.
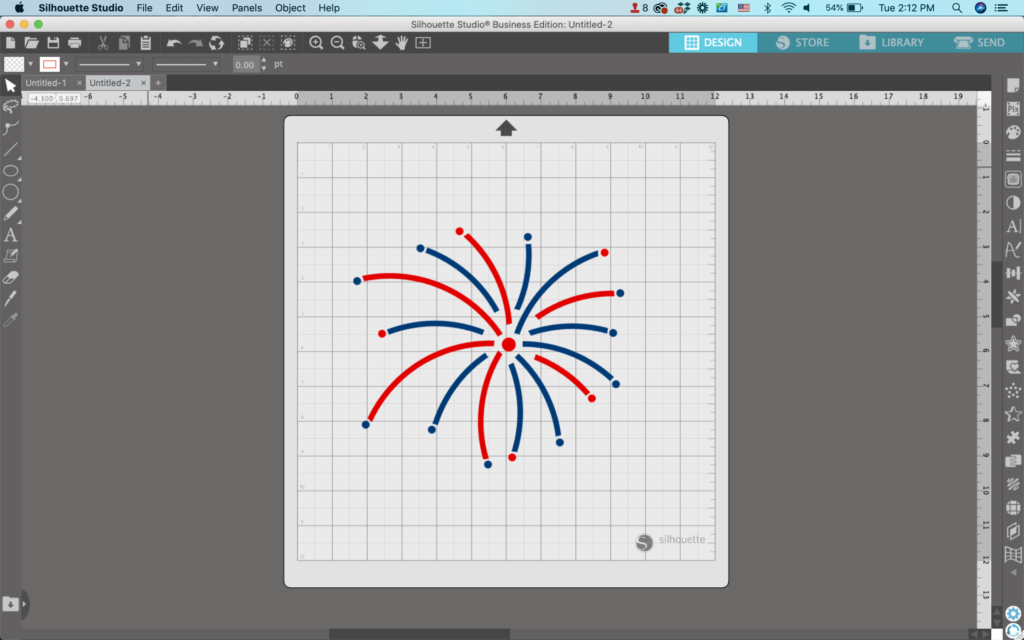
10. Delete any remaining circles/circle pieces. Then, add color or additional details.
That’s it! Your design is ready to go!
Don’t Forget to Save!
To save your new SVG creation, head to ‘File’, ‘Save As’, ‘Save to Hard Drive’, name the file, then select ‘SVG’ from the dropdown menu.